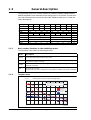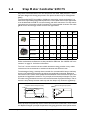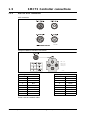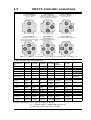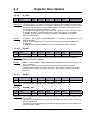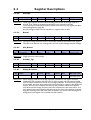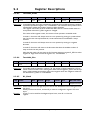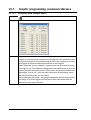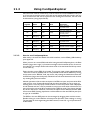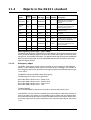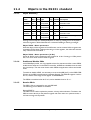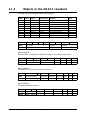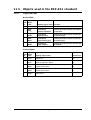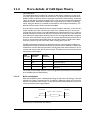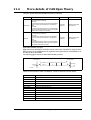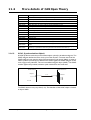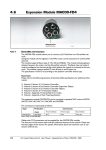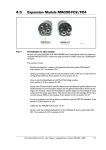
1
MIS231, MIS232 and MIS234
Integrated Step Motors,
QuickStep,
and Step Motor Controller
SMC75
User Manual
JVL Industri Elektronik A/S
LB0053-12GB
Revised 5-8-2009
Important
User Information
!
Warning
!
The MIS and SMC series of products are used to control electrical
and mechanical components of motion control systems.
You should test your motion system for safety under all potential
conditions. Failure to do so can result in damage to equipment
and/or serious injury to personnel.
Please contact your nearest JVL representative in case of technical assistance. Your nearest contact can be found on our web site www.jvl.dk
Copyright 1998-2008, JVL Industri Elektronik A/S. All rights reserved.
This user manual must not be reproduced in any form without prior written
permission of JVL Industri Elektronik A/S.
JVL Industri Elektronik A/S reserves the right to make changes to information contained in this manual without prior notice.
Similarly JVL Industri Elektronik A/S assumes no liability for printing errors
or other omissions or discrepancies in this user manual.
MacTalk and MotoWare are registered trademarks
JVL Industri Elektronik A/S
Blokken 42
DK-3460 Birkerød
Denmark
Tlf. +45 45 82 44 40
Fax. +45 45 82 55 50
e-mail: [email protected]
Internet: http://www.jvl.dk
Contents
1
Introduction .................................................................................................................... 5
1.1
1.2
1.3
1.4
1.5
Features pulse/direction (SMD73) ...................................................................................................................... 6
Features positioning - speed control (SMC75) ................................................................................................... 8
General description ......................................................................................................................................... 10
Step Motor Controller SMC75 ......................................................................................................................... 12
SMC75 Controller connections ........................................................................................................................ 13
2
Connections SMC75 ..................................................................................................... 17
2.1
2.2
2.3
2.4
2.5
2.6
2.7
2.8
2.9
2.10
2.11
2.12
2.13
Power Supply SMC75 ....................................................................................................................................... 18
SMC75 Inputs ................................................................................................................................................... 21
SMC75 User Inputs ........................................................................................................................................... 22
SMC75 Analogue Inputs .................................................................................................................................... 25
SMC75 User Outputs ....................................................................................................................................... 29
SMC75 Special Outputs .................................................................................................................................... 31
Special connections ........................................................................................................................................... 33
Auto Correction ............................................................................................................................................... 34
Absolute position back-up system .................................................................................................................... 35
SSI encoder/sensor interface ............................................................................................................................. 38
SMC75 Connection of motor ........................................................................................................................... 40
Handling noise in cables .................................................................................................................................... 43
Quick Start (SMC75A1MxAA) .......................................................................................................................... 45
3
Serial Interface .............................................................................................................. 47
4
RS485 Interface ............................................................................................................ 49
5
Using MacTalk ............................................................................................................... 51
5.1
Using the MacTalk software ............................................................................................................................. 52
6
Adjustment of motor phase current ............................................................................ 61
7
Modes ............................................................................................................................ 63
7.1
7.2
7.3
7.4
7.5
Passive Mode .................................................................................................................................................... 64
Velocity Mode ................................................................................................................................................... 65
Positioning Mode .............................................................................................................................................. 66
Gear Mode ........................................................................................................................................................ 67
Zero search modes ........................................................................................................................................... 68
8
Error Handling .............................................................................................................. 73
9
Registers ........................................................................................................................ 75
9.1
9.2
Introduction and register overview .................................................................................................................. 77
Register Descriptions ........................................................................................................................................ 81
10
Programming .............................................................................................................. 107
10.1
10.2
10.3
10.4
10.5
10.6
10.7
Getting started with programming ................................................................................................................. 108
Programming Main window ............................................................................................................................ 109
Programming menu ........................................................................................................................................ 110
How to build a program ................................................................................................................................. 111
General programming hints ............................................................................................................................ 114
Command toolbox description ....................................................................................................................... 115
Graphic programming command reference ................................................................................................... 116
JVL Industri Elektronik A/S - User Manual - Integrated Stepper Motors MIS231, 232, 234
3
11
CANopen Introduction ............................................................................................... 135
11.1
11.2
11.3
11.4
11.5
11.6
General information about CANopen .............................................................................................................136
Connection and setup of the CAN bus ...........................................................................................................140
Using CanOpenExplorer .................................................................................................................................144
Objects in the DS301 standard ........................................................................................................................149
Objects used in the DSP-402 standard ............................................................................................................157
More details of CANOpen Theory .................................................................................................................164
12
Appendix ..................................................................................................................... 175
12.1
12.2
12.3
12.4
12.5
12.6
12.7
12.8
Velocity accuracy .............................................................................................................................................176
Command timing .............................................................................................................................................177
More about program timing ............................................................................................................................178
Motor Connections .........................................................................................................................................179
.........................................................................................................................................................................180
Serial communication ......................................................................................................................................181
MIS Ordering Information ...............................................................................................................................186
SMC75 Ordering Information .........................................................................................................................187
13
MIS Motor Technical Data ......................................................................................... 189
13.1
13.2
13.3
13.4
SMC75 Technical Data ....................................................................................................................................190
Torque Curves ................................................................................................................................................191
Physical Dimensions ........................................................................................................................................192
Trouble-shooting guide ...................................................................................................................................193
14
Connection to other Equipment ................................................................................ 195
14.1
14.2
14.3
14.4
14.5
Connecting SMI30/SMC35 to MIS/SMC75 ......................................................................................................196
Connecting MISxx/SMC75 to SMD73 .............................................................................................................197
Connecting MISxx/SMC75 to SMD41 .............................................................................................................198
Connecting MISxx/SMC75 to MAC00-Bx .......................................................................................................199
Connection to PLC/PC Boards .......................................................................................................................200
15
Accessories .................................................................................................................. 201
15.1
15.2
15.3
Cables ..............................................................................................................................................................202
Power Supplies ................................................................................................................................................203
Brakes and shaft reinforcement .......................................................................................................................204
16
CE Declaration of Conformity .................................................................................... 205
4
JVL Industri Elektronik A/S - User Manual - Integrated Servo Motors MAC050 - 800
1
Introduction
This user manual describes the set-up and use of the Integrated step motors, QuickStep types MIS231, MIS232 and MIS234 and the SMC75 Step Motor Controller.
The QuickStep motors types MIS231, 232 and 234 can be delivered either for pulse /direction control or for positioning and speed control.
For pulse/direction control, the QuickStep motors are delivered with the Step Motor
Driver SMD73 built in. For further information on this driver, reference should be
made to the data-sheet for these drivers (LD0057) and the Technical Note (LS0003).
For positioning and speed control, the Quick Step motors are delivered with Step Motor Controller SMC75 built in.
Both the driver SMD73 and the controller SMC75 can also be delivered separately as
PCB boards for own use by the customer, and can be delivered in a metal housing with
M12 connectors corresponding to the housing built together with the complete integrated motor.
Complete QuickStep motor with SMC75 built-in
SMD73 PCB
QuickStep motor with SMD73
SMC75 PCB
SMC75 in housing
JVL Industri Elektronik A/S - User Manual - Integrated Step Motors MIS 231, 232, 234
5
1.1
Features pulse/direction (SMD73)
SMD73
The QuickStep series of Stepper motors with integrated electronics represents a major step forward.
All the necessary electronics in a stepper system are integrated in the motor itself.
In the past, a traditional motor system has typically been
based on a central controller unit located remote from
the motor. This configuration however has the disadvantage that installation costs are a major part of the total expense of building machinery.
The basic idea of the QuickStep motors is to minimize
these costs but also to make a component that is much
better protected against electrical noise, which can be a
typical problem when using long cables between the
controller and motor.
The stepper motor, encoder and electronics are specially developed by JVL so that together they form a
closed unit, in which the power driver and controller
are mounted inside the motor.
The advantages of this solution are:
• De-central intelligence.
• Simple installation. No cables between motor and
driver.
• EMC safe. Switching noise remains within
motor. (Noise can however be introduced in the
DI/DO).
• Compact. Does not take space in cabinet.
• Low-cost alternative to separate step or
servo motor and driver.
In the past decade, pulse/direction interfaces have become increasingly popular for the control of step and
servo motors. This is due to the fact that pulse/direction
signals provide a simple and reliable interface which is
100% digital, precise, and offers immediate response.
When a pulse is sent, the motor instantaneously moves
1 step forward.
For example, if the motor has a resolution of
MIS231 with pulse/direction
200 steps/revolution, it will move 1.8 degrees. By
changing the frequency of the applied pulse signal,
it is possible to accelerate the motor.
By counting the number of pulses, the motor’s position can be determined without any error whatsoever. The direction input is used to determine
the motor’s direction of rotation. JVL’s QuickStep
motors with pulse/direction interface offer the following advantages:
• Very simple technology that is easy to understand and apply.
• High stability and low cost because the technology is simple with few components.
• Only one cable with 4 wires is required, so
cabling costs are a minimum.
• No controller in the control cabinet.
• All positioning and control is performed by the
PLC, so there is no duplication of software or
cabling.
• Robust IP67 connector and IP55 motor housing
for applications in demanding environments.
• Thermally protected against current overload
and short-circuit.
• Reacts instantaneously. The motor starts within
microseconds.
• 5V or 24V PNP/NPN inputs ensure compatibility with any controller.
• Step resolution of 200, 400, 800, 1000 or 1600
pulses/revolution.
• Supply voltage 12-28 VDC.
• Possibility for encoder feedback.
All the required electronics are integrated in the
motor itself in a single compact unit. The motor can
be supplied with the connector either on the back
or side of the housing. M12 connector is standard,
but cable glands or DSUB connector can be delivered on request.
For further information on the pulse/direction
driver see SMD73 Data-sheet and Technical
Note.
6
JVL Industri Elektronik A/S - User Manual - Integrated Step Motors MIS 231, 232, 234
1.1
Block diagram, Pulse/Direction Version (SMD73)
Power supply connector
1.1.1
Features pulse/direction (SMD73)
Motor
SMD73 Driver
200, 400, 800,
1000, 1600 step Phase A
Driver
Bus Supply
12-28V
Ground
Phase B
2-phase
stepper
motor
High speed
digital logic
array
5V to 24V
PNP/NPN
Selector
Stepclock
Direction
Encoder Output
Encoder
A
B
Incremental
encoder
Optional
TT2178GB
1.1.2
Driver Connections
Versions with pulse and direction control:
Connections for versions with 1 M12 connector. (See also SMD73 data-sheet)
M12 5 pin male
Description
JVL cable WI1000M12 F5TxxN
1
P+ (12-28VDC)
Brown
2
Pulse
White
3
P-
Blue
4
Direction
Black
5
Signal Ground
Grey
xx: 05 for 5 metre and 20 for 20 metre cable.
Versions with cable glands and 5 m cable
Colour Code
Description
Red
P+ (12-28VDC)
Black
P-
Blue
Direction
White
Pulse
Shield
Signal ground
JVL Industri Elektronik A/S - User Manual - Integrated Step Motors MIS 231, 232, 234
7
1.2Features positioning - speed control (SMC75)
SMC75
SMC75 mounted in a housing
The compact step motor controller SMC75 is
designed for positioning and speed control of
stepper motors. SMC75 is a PCB with di-
mensions 57x57mm and mounted with
SMD electronics on both sides.
It is mounted directly in the housing of the JVL
QuickStep motors MIS 231, 232 and 234,
forming a complete integrated step motor.
It may also be used with other types of step
motors according to customers requirements.
The basic features of the controller are:
• Serial RS485 or 5V serial position controller
• Position controller with graphic programming.
• Option for CANbus, CANopen DS-301/
DSP-402 or DeviceNet (under development).
• A dual supply facility is available so that
position and parameters are maintained at
emergency stop
• Gear mode
• MACmotor protocol so MACmotor and
Quickstep motors can be connected on
the same RS485 bus
• Command for easy PLC/PC setup and
communication
• Power supply 12-48VDC
• Fixed 1600 pulses/rev.
• Built-in µprocessor with 8 In/Out that can
be configured as inputs, PNP outputs or
analogue inputs. 5V serial and RS485 interface for set up and programming.
• MODBUS interface.
• 9.6 to 1Mb communication
8
MIS232 with controller
• Driver technology is improved as compared to SMD73 and supply voltage is
12-48VDC.
When used with the QuickStep motor or
mounted on any other step motor the advantages of the controller are:
• De-central intelligence.
• Simple installation. No cables between
motor and driver.
• EMC safe. Switching noise remains
within motor.
• Compact. Does not take space in cabinet.
• Low-cost alternative to separate step
or servo motor and driver.
• Stall detect by means of magnetic
encoder with resolution of up to 1024
pulses/rev.
• Interface possibilities to the SMC75
controller:
• From PC/PLC with serial commands via
5V serial or RS485.
• Pulse/direction input. Encoder output.
• CANopen, DeviceNet
• 8 I/O, 5-28VDC that can be configured
as Inputs, Outputs or analogue inputs
• Future option for Profibus DP, Ethernet,
Bluetooth and Zigbee wireless
JVL Industri Elektronik A/S - User Manual - Integrated Step Motors MIS 231, 232, 234
1.2Features positioning - speed control (SMC75)
1.2.1
Block diagram, Positioning/Speed Control (SMC75)
Serial interface
connector
User I/O connector
Power supply
connector
Bus supply
CVI
12-28V logic
1/8 step
Phase A
Driver
1600 step/rev.
Switchmode
Power
Supply
P- Ground
Phase B
2-phase
stepper
motor
Fuse
750mA
CVO
IO1
Output
source
driver
16 Bit
Microprocessor
with
Integrated Flash
IO8
IN1 Analog 1
Digital 1
Tx
High speed
digital logic
array
IN8 Analog 8
Digital 8
Rx
A-
RS485
driver
B+
Field Bus
connector
Motor
SMC75 Controller
P+ 12-48V
1024 ppr
magnetic
incremental
encoder
CAN R
CAN
Tranciever
Optional
CAN L
Encoder
Optional
A+
AB+
B-
RS422
Optional
TT2140GB
JVL Industri Elektronik A/S - User Manual - Integrated Step Motors MIS 231, 232, 234
9
1.3
General description
The QuickStep motors are currently available in 4 different models: MIS230, MIS231,
MIS232 and MIS234, with continuous torque ratings from 0.5 to 2.9 Nm. The basic functions and I/O features are the same for all models. MIS34x models up to 12.0 Nm are
under development.
Motor Type
MIS230
MIS231
MIS232
MIS234
MIS340
MIS341
MIS342
MIS343
Unit
Torque
0.5
1.1
1.6
2.9
3.2
4.6
8.0
12.0
Nm
Inertia
0.12
0.3
0.48
0.96
1.0
1.4
2.7
4.0
kgcm2
Flange
NEMA23 (57x57 mm)
82
96
118.5
154
105
120
158
196
mm
Shaft Ø
6.35
6.35
6.35
10.0
9.53
9.53
14.0
14.0
mm
Shaft radial play
Max. 0.02 (450g load)
Max. 0.02 (450g load)
mm
Shaft axial play
Max. 0.08 (450g load)
Max. 0.08 (450g load)
mm
Max radial force
7.5 (20mm from flange)
22 (20mm from flange)
kg
Max axial force
1.5
6
kg
Weight
1.3.1
1.3.2
NEMA34 (87x87mm)
Length
0.7
0.9
1.2
1.8
2.1
2.7
4.2
5.8
Basic modes/functions in the QuickStep motor
The QuickStep motor offers the following functions:
Mode
Description
Passive
The motor will be in a completely passive state but communication is active and internal registers
can be setup. Motor shaft can be turned by hand.
Velocity
The motor velocity can be controlled using MacTalk software or by setting register 5(V_SOLL)
using serial or program commands.
Position
The motor position can be controlled using MacTalk or by setting register 3 (P_SOLL) using serial
or program commands.
Gear
The motor position and velocity can be controlled by pulse and direction or encoder signals at
the inputs “IN1” and “IN2”.
The gear ratio can be set to a large ratio by using register14 (GEAR1) and register 15 (GEAR2).
Torque curves
Quickstep motor torque versus speed and supply voltage
Torque (Nm)
3,5
TT2223GB
Power supply = PSU24-240 (24V/240W regulated PSU)
Power supply = PSU48-240 (48V/240W regulated PSU)
Room temperature = 20°C
3
2,5
MIS234 @48V
MIS234 @24V
MIS232 @48V
MIS232 @24V
MIS231 @48V
MIS231 @24V
2
1,5
1
0,5
0
0
100
200
300
400
500
600
700
800
900
1000
Speed (RPM)
10
kg
JVL Industri Elektronik A/S - User Manual - Integrated Step Motors MIS 231, 232, 234
JVL Industri Elektronik A/S - User Manual - Integrated Step Motors MIS 231, 232, 234
11
1.4
Step Motor Controller SMC75
Step Motor Controller SMC75 is a mini-step driver with fixed 1600 pulses/rev., which
has been designed for driving step motors with phase currents of up to 3 Amp/phase
(RMS).
The Controller SMC75 is available in 2 different versions for various applications. It is
built into the QuickStep Integrated Step Motors, but for OEM and low-cost applications
it can be delivered as a PCB or in its own housing with M12 connectors. For easy mounting and service, the version with M12 connectors is recommended. A version with cable
glands can be used for high volume and low cost applications.
Order no.
PCB
SMC75A1
X
SMC75A1AC
X
BOX
CANopen
IO
X
SMC75A1M3
X
SMC75A1W0
1
8
1
8
X
SMC75A1M6
8
4
X
SMC75A1M5
RS485
X
X
8
8
2
1
1
M12
Cable
Glands
X
X
X
1
X
Other combinations and features are also possible for OEM use. See “MIS23x: M12 connections” on page 14. for further information.
The “box” version which is built into a black aluminium casing provides a very robust
construction that is insensitive to mechanical vibration and electrical noise.
The advantage of using a ministep driver instead of a conventional full-step or half-step
driver is that mechanical resonance problems are significantly minimised. Resonance
most often occurs at slow motor speeds and results either in loss of motor torque or the
appearance of significant harmonics. The principle of the ministep technique is to drive
the motor using a sinusoidal current in the interval between 2 physical full steps. This reduces the step velocity between each step and thus damps any resonance significantly.
Comparison between ministep and full step
Current (%)
150
Ministep
Full step
100
Resonance during full step operation
Position
(Full steps)
6
Overshoot
5
50
4
0
3
-50
2
-100
-150
1
1
2
3
Position
4 (Full steps)
0
TT2158GB
Time
Both 2-phase and 4-phase step motors can be connected to the Controller, which utilises
the "Bipolar Chopper" principle of operation, thus giving optimum motor performance.
12
JVL Industri Elektronik A/S - User Manual - Integrated Step Motors MIS 231, 232, 234
1.5
1.5.1
SMC75 Controller connections
SMC75 Connector overview
The connections to the various connectors of the SMC75 PCB board is shown below.
Note that GND and P- are connected together internally.
User IO
RS422
IO6
IO5
IO7
IO8
CVO
GND
B1+
B1-
1
2
3
4
5
6
7
8
9
10
IO1
User IO IO2
IO3
IO4
CVO
ARS485
B+
GND
A1+
RS422
A1-
Recommended connectors
Molex (or equivalent from CViLux)
Crimp contact 50079-8000 x 10
Housing 10 pin 51021-1000 x 1
or
CViLux
Crimp contact CI44T011PEO x 10
Housing 10 pin CI4410 S000 x 1
1
2
3
4
5
6
7
8
9
10
J5
CAN
CAN_H
CAN_L
V+
1
2
3
4
5
6
GND
TT2152GB
Recommended connectors
Molex (or equivalent from CViLux) CViLux
Crimp contact CI44T011PEO x 6
Crimp contact 50079-8000 x 6
Housing 6 pin CI4406 S000 x 1
Housing 6 pin 51021-0600 x 1
1
P+
2
CVI
3
P-
Recommended connector
Crimp terminals:
Housing:
Molex 09-91-0300 Molex 08-50-106
(Nylon UL94V-0) Pitch = 3.96mm
The figure below shows the generation 2 connector for future or special purposes.
Please contact JVL for further information.
JVL Industri Elektronik A/S - User Manual - Integrated Step Motors MIS 231, 232, 234
13
1.5
1.5.2
SMC75 Controller connections
MIS23x: M12 connections
M12 connectors
1
2
2
1
5
5
4
3
3
1
2
8
7
6
5
4
2
3
1
7
3
4
4
6
5
TT2143GB
Example of SMC75 controller connections.
2
5
1
3
4
PWR
I/O5-8
PWR:
RS485
5 pin male
RS485: 5 pin female
I/O1-4: 8 pin female
I/O1-4
RS485
I/O5-8: 8pin female
TT2205GB
5- pole connector
8-pole connector
Pin no.
Colour
Pin no.
Colour
1
Brown
1
White
2
White
2
Brown
3
Blue
3
Green
4
Black
4
Yellow
5
Grey
5
Grey
6
Pink
7
Blue
8
Red
Colour code for standard cables
14
JVL Industri Elektronik A/S - User Manual - Integrated Step Motors MIS 231, 232, 234
1.5
SMC75 Controller connections
# MIS23xAzM2yy75
MIS23xAzM3yy75
# MIS23xAzM4yy75
RS485 serial communication
and few local I/O.
RS485 serial communication in
network. Up to 32 MAC and QuickStep
on the same network. Few local I/O.
RS485 serial communication
and many local I/O.
PWR
PWR
PWR
I/O5-8
RS485
I/O1-4
RS485
I/O1-4
RS485
RS485 and SSI encoder Few local I/O.
RS485 and CANopen/Devicenet
operation. Many local IO.
PWR
PWR
PWR
I/O5-8
MIS23xAzM9yy75
MIS23xAzM6yy75
MIS23xAzM7yy75
MIS23xAzM5yy75
RS485 serial communication in
network. Up to 32 MAC and QuickStep
on the same network. Many local I/O.
I/O1-4
RS485
RS485
I/O1-4
RS485
I/O1-4
RS485
I/O1-4
RS485
RS485
SSI
I/O5-8
CAN
TT2259GB
PWR: 5 pin male RS485: 5 pin female CAN: 5 pin male I/O1-4: 8 pin female I/O5-8: 8pin female SSI: 8 pin male
Versions with positioning and speed control
Quick Step M12
Power
Connector overMale 5pin
view
#MIS23xAzM2yy75
X
MIS23xAzM3yy75
X
#MIS23xAzM4yy75
X
MIS23xAzM5yy75
X
IO1-4 RS485
Female 8pin
IO5-8
Female 8pin
X
X
X
X
X
X
MIS23xAzM6yy75
X
X
X
MIS23xAzM7yy75
MIS23xAzM9yy75
X
X
P+ (1248VDC)
P+ (1248VDC
P- (GND)
CVI+ (1228VDC)
P- (GND)
WI1008M12F5SS1
WI1000M12F5T05N
X
X
X
M12 Pin 1
M12 Pin 2
M12 Pin 3
M12 Pin 4
M12 Pin 5
M12 Pin 6
M12 Pin 7
M12 Pin 8
M12 connector solder terminals
M12 cables 5m.
RS485
CANopen/DeFemale 5pin viceNet
Male 8pin
SSI Encoder
Male 8pin
X
X
X
X
X
X
IO1
IO5
B+ (RS485)
CAN_SHLD
IO2
IO3
IO6
IO7
A- (RS485)
B+ (RS485)
CAN_V+
CAN_GND
IO5 Zero setting
IO6 Counting
Direction
A+ (Clock+)
GND IOB+ (RS485)
A- (RS485)
IO4
CVO+ (Out)
WI1008M12M8SS1
WI1000M12M8T05N
GND IONot used
Not used
IO8
CVO+ (Out)
WI1008M12M8SS1
WI1000M12M8T05N
A- (RS485)
GND
WI1008M12M5SS1
WI1000M12M5T05N
CAN_H
CAN_L
WI1008M12F5SS1
WI1006M12F5S05R
GND
B- (Data in-)
B+ (Data in+)
A- (Clock-)
CVO+ (Out)
WI1008M12M8SSI
WI1000M12M8T05N
Function
RS485, 4IO
2xRS485, 4IO
RS485, 8IO
2xRS485, 8IO
CANopen, RS485,
8IO
DeviceNet,
RS485, 8IO
SSI, 6IO
#: Only >50pcs order. x=: 1~1Nm, 2~1.6Nm, 3~2.5Nm.
z=: 1~6.35mm shaft, 3~10.0mm shaft (only if x=3)
yy=NO~No encoder. H2~built-in encoder
JVL Industri Elektronik A/S - User Manual - Integrated Step Motors MIS 231, 232, 234
15
16
JVL Industri Elektronik A/S - User Manual - Integrated Step Motors MIS 231, 232, 234
2
Connections SMC75
JVL Industri Elektronik A/S - User Manual - Integrated Step Motors MIS 231, 232, 234
17
2.1
2.1.1
Power Supply SMC75
General Aspects of Power Supply
Powering of the Controller is relatively simple.
To ensure that powering of the Controller is as simple as possible, only a driver and control voltage are connected to the Controller. Internal supply circuitry ensures the correct
supply voltages for the driver, control circuits, etc.
The motor can be operated with the same power supply if using 12 – 28VDC for both
Driver and control voltage
SMC75 Power Supply
Power Supply In
Power Supply
12-48VDC
( Nominal)
+
ControlVoltage
12-28VDC
TT2159GB
NB: for actual connections, see drawing SMC75 Controller connections, page 13
2.1.2
Power Supply (P+)
The Driver section requires a supply voltage in the range 12-48VDC nominal. It is strongly recommended to use a voltage as high as possible since it will give the best torque performance of the motor at high speeds.
For optimum performance, it is recommended that a capacitance of minimum 1000µF is
connected to the power supply. It should be mounted as close as possible to the motor.
Similarly, it is recommended that 0.75mm cable is used to connect the power supply to
the Controller. If the Controller supply voltage falls below10V, the internal reset circuitry
will reset the driver. Provision should therefore be made to ensure that the supply voltage is always maintained at a minimum of 12V, even in the event of a mains voltage drop.
The Controller is protected against incorrect polarity connection but not over-voltage.
Warning: Power supply voltage higher than 50VDC will damage the controller.
18
JVL Industri Elektronik A/S - User Manual - Integrated Step Motors MIS 231, 232, 234
2.1
Power Supply SMC75
2.1.3
Control Voltage (CVI)
The control voltage should be in the range12-28VDC and is used to supply the microprocessor circuit and the user output driver.
This input is used as supply to the microprocessor, encoder and output driver. To ensure
that position and parameters are maintained after an emergency stop, the control voltage
should be maintained under the emergency stop.
Warning: Control voltage higher than 30VDC will damage the controller.
2.1.4
Power Supply Grounding
It is recommended that the housing is connected to ground or common 0 VDC. The
overall earthing of the system must be done at a central point close to the power supply.
2.1.5
Dimensioning power supply and fuse
The power supply must be dimensioned according to the actual motor size.
The size of the pre-fuse also depends on the actual model of the MIS motor.
Use the following table to select the power supply and fuse ratings.
Desired
voltage
MIS231
MIS232
MIS234
-
Supply
rating
Fuse size
Supply
rating
Fuse size
Supply
rating
Fuse size
12VDC
20W
T4A
40W
T6.3A
60W
T10A
24VDC
40W
T4A
80W
T6.3A
160W
T10A
48VDC
80W
T4A
160W
T6.3A
320W
T10A
Recommended
power supply
PSU24-075
PSU48-240
PSU40-4
PSU24-240
PSU48-240
PSU40-4
PSU24-240
PSU48-240
PSU40-4
See also the appendix which shows the standard power supplies that JVL offers.
2.1.6
General power supply description
The supply voltage can be chosen in the range 12VDC to 48VDC. However the maximum torque is based on 48VDC. A lower voltage will decrease the speed/torque performance, and in general it is not recommended to run the motor at more than 300RPM
if for example 24VDC is used as supply.
JVL Industri Elektronik A/S - User Manual - Integrated Step Motors MIS 231, 232, 234
19
2.1
Power Supply SMC75
Power supply connections to a MAC140 or a QuickStep motor
+12-28VDC
(control voltage)
(Bus voltage)
GND
Power supply
+12-48VDC
Make sure that all
involved units are
connected to the same
potential
MAC140 Motor
with MAC00-B1,
B2 or B4
Power
Supply
P+
P-
Control voltage O+
Only MAC50-141 with
B2 or B4 (Optional)
Allways use shielded cables.
The screen must be connected
to common ground at
the power supply
QuickStep motor or
SMC75 Controller
Power
Supply
P+
P-
Control
Voltage CVI
TT2220GB
2.1.7
Select Your Power Supply
We recommend the use of 48VDC or the highest possible voltage to supply the motor.
As seen in the chart below, it is clear that the torque below 100 RPM is independent of
supply voltage. But above 300-500 RPM, the torque at 24VDC is half compared to the
torque at 48VDC.
Additionally, higher voltage gives better current and filter regulation and thereby better
performance. If there is a tendency for motor resonance, a lower supply voltage can be
a solution to the problem.
20
JVL Industri Elektronik A/S - User Manual - Integrated Step Motors MIS 231, 232, 234
2.2
SMC75 Inputs
The SMC75 has 8 inputs/outputs that each can be set individually to input, output or analog input 0-5VDC via MacTalk or software commands. See Using MacTalk, page 51, for
setup.
This means for example that it is possible to have 4 inputs, 3 outputs and one analog input.
Input/output functional diagram:
CVI
<1 Ohm
µ-Processor
Overcurrent protection
+5V
4k7
Digital input
Analog input
IO 1-8
1nF
10kOhm
TT2160GB
2.2.1
Inputs
•
•
•
•
•
•
•
•
•
Inputs are TTL to 28VDC compliant.
Over-current protection and thermal shut-down.
10 kOhm input resistance.
No galvanic isolation.
High speed Pulse/direction on Input 1 and Input 2 for gear mode.
High speed incremental counter on Input 1 and Input 2.
Positive and negative limit can be selected to any input 1 to 8.
Zero search input can be selected to any input 1 to 8.
Digital filter can be enabled for each input selectable from 0 to 100ms. If disabled, the
response time is 100µs.
• Analog filter can be selected for all Analog inputs.
JVL Industri Elektronik A/S - User Manual - Integrated Step Motors MIS 231, 232, 234
21
2.3
SMC75 User Inputs
Select external
or internal power
supply to sensors
or similar
Note that End-of-travel inputs,
I1-8 and HM share a
common ground ( GND).
All three ground terminals ( GND and P-)
are connected together.
PNP Output
CVO
+
Power Supply
+5-30VDC
Inductive
sensor
or similar
User Inputs
For actual connections
see drawing page 11
This diagram is used if an NPN output is connected
+
Power Supply
+5-30VDC
Inductive
sensor
or similar
R
NPN Output
TT2161GB
NB: For actual connections, see SMC75 Controller connections, page 13.
2.3.1
General
The Controller is equipped with a total of 8 digital inputs. Each input can be used for a
variety of purposes depending on the actual application. Each of the inputs can be detected from the actual program that has been downloaded to the Controller or via serial
commands.
The Inputs are not optically isolated from other Controller circuitry. All of the Inputs
have a common ground terminal, denoted GND. Each Input can operate with voltages
in the range 5 to 30VDC. Note that the Inputs should normally be connected to a PNP
output since a positive current must be applied for an input to be activated.
Note that CVO is available as CVI on the I/O connectors. This provides the facility that
local sensors can be supplied directly from the controller.
2.3.2
Connection of NPN Output
If an Input is connected to an NPN output, a Pull-Up resistor must be connected between the Input and the + supply. See the illustration above.
The value of the resistance used depends on the supply voltage. The following resistances
are recommended:
22
Supply Voltage
Recommended Resistance R
5-12VDC
1kOhm / 0.25W
12-18VDC
2.2kOhm / 0.25W
18-24VDC
3.3kOhm / 0.25W
24-30VDC
4.7kOhm / 0.25W
JVL Industri Elektronik A/S - User Manual - Integrated Step Motors MIS 231, 232, 234
2.3
2.3.3
SMC75 User Inputs
End-of Travel Limit Inputs: General
Any of the 8 inputs can be used as limit inputs. The input can be set from MacTalk or via
register NL_Mask, page 97 or PL_Mask, page 98.
Positive limit (PL)
Activation of the Positive limit (PL) Input will halt motor operation if the motor is moving
in a positive direction. The motor can however operate in a negative direction even if the
PL Input is activated.
Negative limit (NL)
Activation of the Negative limit (NL) Input will halt motor operation if the motor is moving in a negative direction. The motor can however operate in a positive direction even
if the NL Input is activated.
A bit will be set in the Controller’s warning register if either the NL or PL Inputs has been
activated or are active. See Section 9.2.26, page 88.
2.3.4
Step Pulse and Direction Inputs
If gear mode is selected, then IO1 and IO2 can be used as Step Pulse and Direction Inputs.
Thereby speed or position can be controlled proportional to the signal properties.
The Step Pulse Input (IO1) is used for applying pulse signals which make the motor move.
One signal pulse corresponds to a single ministep. The Direction Input (IO2) determines the
direction of the motor movement. If logic "1" is applied to the Direction Input, the motor
moves forward. If logic "0" is applied to the Input, the motor moves backwards.
The Step Pulse and Direction Inputs are not optically isolated from other Driver circuitry
and must be driven either by a push-pull driver or a PNP (source) driver. The Inputs can
handle voltages in the range 0 to 30 V, which makes the controller well suited for industrial applications, for example in PLC systems.
SMC75
Pulse
Indexer Direction
In 1
In 2
A
Encoder
B
TT2231GB
Electronic gearing is possible in the range 1/32767 to 32767.
It is recommended that shielded cable is always used for connection to the Step Pulse
and Direction Inputs.
Both inputs must be controlled from a "Source-driver". This means that they share a
common ground — see above illustration.
The Driver executes the step on the leading flank of the Step Input pulse — see above
illustration. If gear mode is selected, then IO1 and IO2 can be used as step pulse and
Direction Inputs or encoder inputs
.
JVL Industri Elektronik A/S - User Manual - Integrated Step Motors MIS 231, 232, 234
23
2.3
SMC75 User Inputs
Step occurs on the
leading flank
Step clock (IO1)
Min. 5µS
1
0
Min. 2.5µS
Direction (IO2)
Min. 5µS
Min. 2.5µS
1
0
The Direction signal must be
well defined in this interval
PLC or Pulse
Generator
Direction Output
Pulse Output
Ground
PNP Outputs
IO2
IO1
GND
Screen
Note ! : screen only
connected on signal source.
TT2172GB
2.3.5
Home Input
Any of the 8 inputs can be used as Home input for the zero search function. A zerosearch occurs when the Controller receives the seek zero search command by changing
Mode_Reg (Section 9.2.2, page 81)
The Home Input can be set from MacTalk or via register Home_Mask (Section 9.2.67,
page 98)
It is possible to see when a zero-search is finished by reading a bit in Status bits (Section
9.2.20, page 87
2.3.6
Digital inputs
All of the eight I/O signals can be used as digital inputs. The sampled and possibly filtered
value of each input is stored in the Input’s register (register 18). Unlike the analog inputs,
there is only one value for each digital input, so it must be configured to be either unfiltered or filtered.
Unfiltered (high-speed) digital inputs are sampled every 100 µS (micro-seconds).
Filtered digital inputs are sampled every milli-second, and the filter value can be set in the
range 1 to100 mS, so the filtered input must be sampled to have the same logical value
for that number of samples in a row. Once an input has changed state after passing the
filtering, it will again take the same number of samples of the opposite logical level to
change it back. For example, if the filter is set to 5 mS and the start value is 0 (zero), the
input will remain at zero until three samples in succession have been read as 1 (one). If
the signal immediately drops down to 0 again, it will take three samples of zero in succession before the register bit gets set to zero.
Note that filtering of the digital inputs does load the micro-controller, so if filtering of the
digital inputs is not needed, ALL the inputs can be selected as high-speed to reduce the
load.
24
JVL Industri Elektronik A/S - User Manual - Integrated Step Motors MIS 231, 232, 234
2.4
SMC75 Analogue Inputs
PC-card or
Potentiometer
Note ! : screen only
connected to signal source.
Analogue inputs
0-5VDC Input
Ground
0-5V Out
Screen
TT2164GB
NB: For actual connections, see SMC75 Controller connections, page 13.
2.4.1
General
The 0-5V Analogue Inputs are used for example when the Controller is operated as a
stand-alone unit. In this kind of application it can be an advantage to use a potentiometer,
joystick or other device for adjusting speed, position, acceleration, etc.
In these modes of operation, the motor is controlled to produce a velocity or position,
etc., which is determined by, and proportional to, the voltage applied to the Analogue
Input.
The Analogue Inputs share a common internal supply with the GND and P- terminal and
are not optically isolated from all other inputs and outputs. The Analogue Inputs are protected against voltage overload up to 30V peak and have a built-in filter which removes
input signal noise. See Analog input filters, page 26.
Always use shielded cable to connect the source used to control an Analogue Input since
the motor, etc., can easily interfere with the analogue signal and cause instability.
The Controller is equipped with 8 analog-to-digital converters (ADC) which convert the
detected analogue signal level. The ADCs have a resolution of 10bit.
In order to use the Analogue Inputs as 0-20 mA inputs, a 250 Ω, 1% resistor must be
connected between IO 1-8 and GND.
IO 1-8
0-20mA
250 Ohm
1%
0.25W
TT2186GB
P-
JVL Industri Elektronik A/S - User Manual - Integrated Step Motors MIS 231, 232, 234
25
2.4
2.4.2
SMC75 Analogue Inputs
Analog input filters
The SMC75-based products, like the MIS motors have 8 general-purpose I/Os, that can
be used as both digital inputs, digital outputs and analog inputs. When an I/O is configured
to be an input, it simultaneously has both a digital value (high or low) and an analog value
in the range 0.00 to 5.00 Volts. Input voltages higher than 5.0 Volts will be internally limited and read as 5.00 Volts.
The inputs use a resolution of 10 bits, which means that in the raw motor units a value
of 5.00 Volts reads out as the value 1023. This gives a resolution of 5.00/1023 = 4.8876
mV per count.
The eight values from the analog inputs are maintained by the SMC75 firmware in the
registers 89...96 as raw, unfiltered values with the fastest possible update frequency, and
additionally in the registers 81...88 as filtered values. The firmware does not use any of
the values for dedicated functions. It is always up to the program in the motor to read
and use the values.
The analog filtered values are typically used to suppress general noise or to define how
quickly the input value is allowed to change, or in some cases to limit the input voltage
range. A typical example is an analog input that is connected to a manually controlled potentiometer, so an operator can regulate the speed of the machine by turning a knob. In
many environments, this setup is subject to noise, which could make the motor run unevenly, and cause too sharp accelerations or decelerations when the knob is turned.
The filter functions supported in the SMC75 firmware always use three different steps.
Confidence check
First the raw input value is compared to two Confidence limits: Confidence Min and
Confidence Max. If the new value is either smaller than the Confidence Min limit or larger
then the Confidence Max limit, it is simply discarded (not used at all), and the value in its
associated register is unchanged. This is done to eliminate noise spikes. Confidence limits
can only be used if not all of the measurement range is used. Values of 0 for Confidence
Min and 1023 for Confidence Max will effectively disable the confidence limits.
Slope limitation
After a new sample has passed the Confidence limit checks, its value is compared with
the last filtered value in its associated register. If the difference between the old and the
new value is larger than the Max Slope Limit, the new value is modified to be exactly the
old value plus or minus the Max Slope Limit. This limits the speed of change on the signal.
Since the samples come at fixed intervals of 10 mS, it is easy to determine the number of
Volts per millisecond. A value of 1023 will effectively disable slope limitation.
Filtering
After a new sample has both passed the confidence limits checks and has been validated
with respect to the slope limitation, it is combined with the last filtered value by taking a
part of the new sample and a part of the old filtered value, adding them together and
writing the result back to the final destination register – one of the registers 81...88. For
instance a filter value of 14 would take 14/64 of the new sample plus 50/64 of the old
value. A filter of 64 would simply copy the new sample to the rule, thus disabling the filtering. This completes the filtering of the analog inputs.
26
JVL Industri Elektronik A/S - User Manual - Integrated Step Motors MIS 231, 232, 234
2.4
SMC75 Analogue Inputs
Confidence alarms
If either of the Confidence Min or Confidence Max limits is used, it may be possible that
no new samples are accepted, which means that the filtered value will never change even
though there is a change in the input voltage. For instance, if the Confidence Min limit is
set to 2.0 V, and the actual input voltage is 1.50 V, the filtered value may continue to read
out 0.00 V (or the last value it had before exceeding the confidence limits).
To help troubleshooting in cases like this, each input has a status bit that is set if at least
half of the new samples during the last second lie outside either confidence limit. It is not
possible to see which of the confidence limits is violated. The status bits are updated once
per second.
Slope alarms
If the Max Slope limit is used (by setting its value lower than 1023), it may be possible
that many samples have their value limited. This is not necessarily an error in itself, but
can be a sign of a fault causing a noisy signal, or it can be a sign that the Max Slope limit is
set too low, which can have implications if the analogue voltage is used to control the motor speed, torque, etc.
To help troubleshooting in cases like this, each input has a status bit that is set if at least
half of the new samples during the last second were limited by the Max Slope setting. The
status bits are updated once per second.
Example of analog input filter operation:
Note that even though the examples use units rather than Volts, decimal values are used,
since the motor uses a much higher resolution internally to store the units.
Also note that as long as the slope limitation is in effect, the result will keep a constant
slope even when using a filter. When the slope limitation is no longer in effect, the filter
will cause the value to approach the final result more slowly as it approaches the result.
Confidence Min = 0, Confidence Max = 500, Max Slope = 10, Filter = 8, Old filtered
value = 0.
Sample 1 = 100
Confidence OK, slope limit to 0 + 10 = 10,
result = 10*(8/64)+0*(56/64) = 1.25 units.
Sample 2 = 100
Confidence OK, slope limit to 1.25 + 10 = 11.25,
result = 11.25*(8/64)+1.25*(56/64) = 2.5 units.
Sample 3 = 100
Confidence OK, slope limit to 2.5 + 10 = 12.5,
result = 12.5*(8/64)+2.5*(56/64) = 3.75 units.
Sample 4 = 800
Confidence error, keep old value, result = 3.75 units.
…and so on until the result gets ~= 95.0 units…
Sample 78 = 100
Confidence OK, no slope limitation needed,
result = 100*(8/64)+95*(56/64) = 95.625 units.
Sample 79 = 100
Confidence OK, no slope limitation needed,
result = 100*(8/64)+95.625*(56/64) ~= 96.171875 units.
Sample 80 = 100
Confidence OK, no slope limitation needed,
result = 100*(8/64)+96.171875*(56/64) ~= 96.65 units.
Sample 81 = 100
Confidence OK, no slope limitation needed,
result = 100*(8/64)+96.65*(56/64) ~= 97.07 units.
JVL Industri Elektronik A/S - User Manual - Integrated Step Motors MIS 231, 232, 234
27
2.4
SMC75 Analogue Inputs
Sample 82 = 100
Confidence OK, no slope limitation needed,
result = 100*(8/64)+97.07*(56/64) ~= 97.44 units.
Sample 83 = 100
Confidence OK, no slope limitation needed,
result = 100*(8/64)+97.44*(56/64) ~= 97.76 units.
..98.04, 98.28, 98.49, 98.68, 98.85, 99.00, 99.12, 99.23, 99.33, 99.41, 99.48, 99.55,
99.60, 99.65, 99.70, 99.74, 99.77, 99.80, 99.82, 99.84, 99.86, 99.88, 99.90, 99.91, 99.92,
99.93, 99.94, 99.95, 99.95, 99.96, 99.96, 99.97, 99.97, 99.98, 99.98, 99.98, 99.98, 99.99,
99.99, 99.99, …….100.0
28
JVL Industri Elektronik A/S - User Manual - Integrated Step Motors MIS 231, 232, 234
SMC75 User Outputs
The SMC75 has 8 inputs/outputs that each can be set individually to input, output or analog input 0-5V via MacTalk or software commands.
This means that it for example is possible to have 4 inputs, 3 outputs and one analog input.
Input/output functional diagram:
CVI
<1 Ohm
Overcurrent protection
µ-Processor
+5V
4k7
Digital input
IO 1-8
Analog input
1nF
10kOhm
TT2160GB
• Outputs are Source (PNP) outputs and 5-28VDC compliant
• No galvanic isolation
• Short-circuit to ground protected that shuts down all outputs and sets Error bit in
software
• In Position and Error signal can be selected to be on any outputs 1 to 8
• Optional Encoder outputs
• 75 to 350 mA output current that depends on number of outputs activated and on
duty cycle. (See diagram)
• Internal ground clamp diodes
Allowable output current as a function of duty cycle
312
Number of outputs conducting simultaneously
8
273
7
5
6
4
3
2
234
Collector Current (mA)
2.5
195
156
117
78
39
0
0
10
20
30
40
50
60
Duty Cycle (%)
70
80
90
100
TT2180GB
JVL Industri Elektronik A/S - User Manual - Integrated Step Motors MIS 231, 232, 234
29
2.5
SMC75 User Outputs
Output circuit (PNP output)
CVI
O8
O7
O6
O5
O4
O3
O2
O1
O-
User Outputs
CVI
Max. 350mA
+
Load
8-28VDC
TT2165GB
NB: For actual connections, see SMC75 Controller connections, page 13.
2.5.1
General
The Controller is equipped with a total of 8 digital outputs. Each output can be used for
a variety of purposes depending on the Controller’s basic mode of operation. The Outputs are not optically isolated from other Controller circuitry. The output circuitry is
powered from the internal power supply CVI. The output circuitry operates with voltages in the range 5-28VDC. Each output can supply a continuous current up to 350mA.
The Outputs are all source drivers, i.e. if a given Output is activated, contact is made between the control voltage (CVI) and the respective output terminal. See above illustration.
2.5.2
Overload of User Outputs
All of the Outputs are short-circuit protected, which means that the program and the
motor is stopped and the output is automatically disconnected in the event of a short
circuit. The Output will first function normally again when the short-circuit has been removed.
Note: Do not connect a voltage greater than 30VDC to the CVI terminal as the output
circuitry may be seriously damaged and the unit will require factory repair.
If one or more outputs are short circuited, MacTalk will show Error “Output Driver” and
Bit2 will be set in Err_Bits Section 9.2.25, page 88.
30
JVL Industri Elektronik A/S - User Manual - Integrated Step Motors MIS 231, 232, 234
2.6
SMC75 Special Outputs
2.6.1
Error Output
Error output can be selected as one of the 8 outputs. This selection is done in MacTalk
or by setting a bit in register Error_Mask, Section 9.2.73, page 99
The Driver’s Error Output enables a PLC or other equipment in a motion control system
to verify that the Driver is functioning correctly.
Under normal operation, the Error Output has a status of logic "1", but if the Driver is
short-circuited or the temperature exceeds 85 degrees Centigrade, the Output is
switched to logic "0".
2.6.2
In Position Output
In Position Output can be selected as one of the 8 outputs.
This selection is done in MacTalk or by setting a bit in register 137 (bit 0-7) InPos_Mask,
Section 9.2.72, page 99.
When the motor is running, the output will be inactive. When the motor is at stand-still,
the output will be active.
2.6.3
In Physical Position Output”
In physical position can be selected as one of the 8 outputs.
This selection is done in MacTalk or by setting a bit in register 137 ( bit 8 – 15)
InPos_Mask, Section 9.2.72, page 99.
This signal is used together with MIS motors with an internal or external encoder for positioning.
This signal can be selected to be continuously updated and will then indicate if the motor
is inside the “In Position Window” all the time.
If continuous update of the “In Physical Position” is not selected and the autocorrection
is used, this signal is changed after a move and when a check has been made of the position after the “settling time between retries” if the motor is inside the “In Position Window”.
In Physical Position Example
Requested
Position
Actual
Position
In Position
In Phys.Position:
w. o. update
w. Update
IPW=1
IPW=50
IPW=5
Settling time
TT2206GB
See also Auto Correction, page 34.
JVL Industri Elektronik A/S - User Manual - Integrated Step Motors MIS 231, 232, 234
31
2.6
2.6.4
SMC75 Special Outputs
Pulse/Direction Outputs
Any number of the outputs can be configured to follow the pulse and direction signals
used internally in the motor. This can be used for accurate synchronization of two or
more motors.
Driver
SMC75
Motor
O1-O2
O3-O4
O5-O6
O7-O8
TT2230GB
See the register description for registers 108 and 109 in PulseDirMask, page 94 and PulseDirMod, page 94
2.6.5
Encoder Outputs (only from version 2.0)
If the motor is equipped with a built-in encoder, it is possible to obtain the incremental
signal and the index pulse out on the user outputs. Please note that the voltage typically
is 24VDC PNP. Therefore a resistor to ground should be connected.
A 2 channel encoder with 256 pulses/revolution will give a total of1024 pulses/revolution.
SMC75
PLC
06
A
07
B
08
Index
N
S
TT2232GB
If a magnet is mounted on the rear end of the motorshaft and this is placed in close distance to the SMC75 PCB, a 1023 pulses/rev. incremental A, B, index signal will be available on 3 of the output pins. Encoder position will also be available at an internal register
and can be used in a PLC program.
Output
06
07
08
32
Encoder designation
A
B
Index
JVL Industri Elektronik A/S - User Manual - Integrated Step Motors MIS 231, 232, 234
2.7
Special connections
QuickStep motor MIS231A1C1N075.
Motor with 2 cable glands PG12 out of the side for low cost applications where a short
total length is required.
Can also be delivered with 5m cables as MIS231A1C2N075. Option for IP65.
Cable WG0905 for MIS231A1C2N075 and mounted cable on MIS231A1C1HN075
Connector J3
Pin no.
1
2
3
4
5
6
7
8
9-10
Connector J4
Pin no.
1
2
3
4
5-10
Connector J5
Pin no.
1-2
3
4
5
6
Connector J8
Screen
Function
IO1
IO2
IO3
IO4
CVO
AB+
GND
Not used
Color
White
Brown
Green
Yellow
Red
Grey
Pink
Black
Function
IO5
IO6
IO7
IO8
Not used
Color
Blue
Violet
Grey/Pink
Red/Blue
Function
Not used
CAN_H
CAN_L
V+
GND
Color
White/Green
Brown/Green
White/Yellow
Yellow/Brown
Cable WG1005 for MIS231A1C2N075 and mounted cable on MIS231a1C1N075 (Power
Cable)
Connector J2
Pin no.
1
2
3
Function
P+
CVI
P-/GND
Color
Red
Blue
Black/Screen
JVL Industri Elektronik A/S - User Manual - Integrated Step Motors MIS 231, 232, 234
33
2.8
Auto Correction
AutoCorrection is used in motors with a built-in encoder only. It is only used in position
mode to re-try a movement if the decoder position is too far from the target after the
pulse generator has stopped moving the motor – this will happen for instance if the
movement was physically blocked, the torque of the motor was insufficient, or a bad value for start velocity or acceleration were used. It might also be used to handle occasional
mechanical oscillations.
The AutoCorrection system will first wait (unconditionally) for a certain time to allow the
initial movement to settle mechanically before testing for the target position. It will then
attempt a normal movement, using the same values for velocities and acceleration as the
movement that failed. It will continue until the encoder position is within the target window, or the selected number of retries has expired.
Note that AutoCorrection will only start after the value of the P_SOLL register is
changed. In other words, changing P_SOLL (not just writing the same value again) will
reload the maximum number of retries and set the Auto Correction Active status bit.
The Auto Correction Active status bit will remain set until either the position is within
the target window or the max number of retries has been exhausted.
Also note that if the motor is used to control other motors by sending out the pulse and
direction signals on digital outputs, any extra movements caused by AutoCorrection will
send out additional steps to the other motors.
Registers affected:
-Register 33, IN_POSITION_WINDOW, specifies how many steps from the target
position the encoder must report before AutoCorrection is attempted.
-
Register 34, IN_POSITION_COUNT, specifies the maximum number of retries. A
value of 0 (zero) effectively disables AutoCorrection.
-Register 110, SETTLING_TIME, specifies the number of milli-seconds to wait after a
movement before testing the encoder position against IN_POSITION_WINDOW.
In the present firmware versions, SETTLING_TIME will be used in AutoCorrection
mode only.
-Register 25, STATUSBITS, will still set bit 4 after the pulse generator has output all
the pulses to reach the target position (a theoretical In-Position). In AutoCorrection
mode, bit 2 will be set to reflect if the internal encoder position is within +/IN_POSITION_WINDOW steps from the target position P_SOLL (a physical In-Poition). Also bit 1 will be set when AutoCorrection is active. Higher layer software can
use this bit to detect when AutoCorrection has either completed or given up.
-Register 124, SetupBits, bit 1 can be set to have the firmware maintain the InPhysical Position bit 1 in register 25 all the time, also during a movement. If this bit is not
set, the InPhysicalPosition bit will only be maintained after the motor has stopped
moving.
-Register 137, INPOS_Mask, is used to select the outputs to reflect the status of the
two bits InPosition (bit 4 in the STATUSBITS register) and InPhysical Position (bit 2
in the STATUSBITS register). The 8 lowest bits will select the mask for InPosition and
the 8 highest bits will select the mask for InPhysicalPosition. Any combination of bits
can be set to have zero, one or more outputs reflect each of the two InPosition bits.
The MacTalk program only supports setting a single output for each bit, however,
since this is the normal case.
34
JVL Industri Elektronik A/S - User Manual - Integrated Step Motors MIS 231, 232, 234
2.9
Absolute position back-up system
The absolute position backup system is activated when a voltage goes under a preset value. Then all absolute multiturn information is saved to flash at once.
All data are then recalled from flash memory at startup and the motor has the absolute
position information saved at power down.
The input on which the voltage drop is monitored, is selected between all standard I/O’s,
the P+ (12-48V power supply) and a special input (see the “registers involved –section”
later in this chapter).
When the operation is triggered, the motor will not be able to work at all until the power
has been cycled off and on again.
It is required that the supply control voltage drops relatively slowly to allow time to save
the values to flash memory. This can be secured by adding, if necessary, a large capacitor
on the CV supply voltage and powering on/off the external power supply on the AC side.
Beside the position information also error tracking information is saved. This is very helpful for later troubleshooting.
2.9.1
Registers involved
Register 142, Analog Input Selection, selects which analogue input to use for measuring
the power supply. It can be:
1 to 8 for analogue inputs IO1 to IO8, using the unfiltered values for fast response.
81 to 88 for analogue inputs IO1 to IO8, using the filtered values for noise immunity.
12 for the 12-48V power supply P+ and finally 13 for a special input developed for this
feature alone (from HW rev. 1.7 and up).
Any other value will disable the flash backup system.
When running the motor from 30 Volts or less, it can be convenient to connect the bus
voltage with the control voltage (CV) supply, and use the value 12 in register 142 to monitor the control voltage.
When running the motor from 48 Volts, this is not allowed and can damage the controller
board if voltage exceeds 30V.
Register 141, Save Threshold Voltage, selects the voltage threshold, that will trigger the
flash backup save operation (and stop all other motor operation).
When register 142 has the value 12, the scaling/unit of register 141 is the same as register
97, BusVoltage (1023 = 111.4V).
The register 142 has the values of 1-8 or 81-88, the scaling/unit of register 141 is the
same as registers 81-96 (1023 = 5.0V)
Register 139, Acceptance Voltage, selects the voltage threshold that defines when the
power supply is ready to use for erasing flash memory after power up. The scaling/unit
is the same as register 141.
Register 140, Acceptance Count, selects the number of times the Acceptance Voltage
must be measured after power up before the flash erase operation is started.
When using values 1-8 or 12 for register 142, the count is in units of ~245 microseconds.
When using values 81-88, the count is in units of 10 milliseconds.
Register 124, SetupBits, selects to use Flash-based Absolute Multiturn Encoder functionality when bit 11 is set.
JVL Industri Elektronik A/S - User Manual - Integrated Step Motors MIS 231, 232, 234
35
2.9
2.9.2
Absolute position back-up system
Reading the Flash Backup data
The Error tracking and diagnostics counters can be copied to the general purpose register P1-8 and V1-8 by writing to the Command register 24. This can also be done by writing the value into MacTalk Command field on the Advanced tab and pressing Enter.
Saved positions, RunSeconds and counters
A command value of 260 will result in:
P1 = Last saved values of the Actual Position, P_IST
P2 = Total number of times motor has been powered down
P3 = Total number of seconds the PCB has been running (with a valid CV supply voltage)
P4 = Total number of times a PLC program has been uploaded.
P5 = Total number of times the motor parameters have been saved to flash (button in
MacTalk).
P6 = Last saved external encoder value
P7 = Last saved SSI encoder value
V3 = Last saved Encoder position (internal magnetic encoder)
A command of 265 will result in:
P1 = Last timestamp (in RunSeconds) the Follow Error was set.
P2 = Last timestamp (in RunSeconds) the Output Driver Error was set.
P3 = Last timestamp (in RunSeconds) the Position Limits Exceeded Error was set.
P4 = Last timestamp (in RunSeconds) the Low Bus Voltage Error was set.
P5 = Last timestamp (in RunSeconds) the Over Voltage Error was set.
P6 = Last timestamp (in RunSeconds) the Temperature Too High Error was set.
P7 = Last timestamp (in RunSeconds) the Internal Error (memory test error) was set.
V1 = Number of times the Follow Error was set since the last Error Reset command.
V2 = Number of times the Output Driver Error was set since the last Error Reset command.
V3 = Number of times the Position Limits Exceeded Error was set since the last Error
Reset command.
V4 = Number of times the Low Bus Voltage Error was set since the last Error Log Reset
command.
V5 = Number of times the Over Voltage Error was set since the last Error Log Reset
command.
V6 = Number of times the Temperature Error was set since the last Error Log Reset
command.
V7 = Number of times the Internal Error was set since the last Error Log Reset command.
The command 266 will set all error timestamps and all error counters to zero.
All commands are entered in register 24 or in the Command field in Mactalk
36
JVL Industri Elektronik A/S - User Manual - Integrated Step Motors MIS 231, 232, 234
2.9
Absolute position back-up system
Additional information saved when position backup is activated.
Error tracking where the number of times each type of error has occurred since the last
reset error operation is remembered together with a timestamp for the last time the error occurred. The timestamp is in Runseconds.
Monitoring of total run time in seconds, called RunSeconds
Counting of the number of times:
-A new PLC program has been saved.
-The motor parameters have been saved.
2.9.3
The Flash backup feature support in MacTalk
All setup-values are accessible from MacTalk.
Acceptance count Register 140
Acceptance voltage Register 139
Save threshold voltage reg. 141
Input selection Register 142
SetupRegister Register 124
TT2265GB
The QuickStep series offers many ways of position control using encoders. From
firmware V.2.6 SSI standard encoder is supported, and linear absolute positioning is possible using a SSI-encoder.
JVL Industri Elektronik A/S - User Manual - Integrated Step Motors MIS 231, 232, 234
37
2.10
2.10.1
SSI encoder/sensor interface
General information concerning the differential lines
The SMC75 provides a double differential RS422 interface that can be used for reading
values from sensors, including absolute multiturn encoders.
One of the interfaces, the A1+ and A1- 5V differential signals, is always used for output,
while the other interface, the B1+ and B1- signals, can be used for either input or output.
On PCB hardware versions earlier than version 1.5, the B1+/- signals were always input.
To interface to an SSI sensor, the B1 +/- signals are used as inputs.
Note that one of the other uses of the differential lines is to output pulses from the internal singleturn absolute encoder on A1+/- and B1+/-, but this requires that B1+/- is
set in output mode.
In firmware version 2.4 and later, running on HW 1.5 or later, the B1+/- interface is set
up as input per default, and the user must change parameter values to enable internal encoder outputs.
2.10.2
The SSI interface
When the differential lines are used for SSI, the A1+/- lines work as a Clock signal from
the SMC75 to the encoder, while the B1+/- signals work as a Data signal from the encoder to the SMC75.
The figure above shows the SSI protocol principle. The Clock line is normally high. When
a reading is requested, the Clock goes low for t1 micro seconds to allow the encoder to
sample and prepare a value. On the first rising edge of the Clock (1), no sampling is done,
but on the second rising edge of the Clock (2) the first data bit is read from the Data line.
Shortly after reading the bit value, the SMC75 will set the Clock high and execute another
cycle, where the data bit is sampled just before each rising Clock. After the last data bit
has been sampled, the Clock stays high.
The following parameters can be set up in the SMC75 registers:
Register 107, SSI_Setup1, 16 bits: The low byte selects the number of data bits in each
SSI transfer. The valid range is 0 to 31, corresponding to 1 to 32 data bits. The high byte
selects the maximum clock speed in units of 10 kHz. The valid range is 0 to 59, corresponding to 10 kHz to 600 kHz.
Register 111, SSI_Setup2, 16 bits: The low byte selects the prepare time in micro seconds at the start of an SSI transfer, corresponding to t1 in the figure. The valid range is
0..255 corresponding to 1..256 micro seconds. The High byte is not currently used, but
is reserved for the minimum waiting time between reads.
38
JVL Industri Elektronik A/S - User Manual - Integrated Step Motors MIS 231, 232, 234
2.10
SSI encoder/sensor interface
Register 47, SSI_Data, 32 bits: The data from the last SSI transfer are placed at the low
bits in this register. The high bits are always set to zero.
Register 24, Command, 16 bits: Write a value of 321 (decimal) to this register to perform a single SSI read operation. This register will automatically be set to zero after the
command has completed.
The default values select 25 data bits, 100 kHz and a t1value of 100 us.
SSI and Mactalk
From Mactalk all configurations and settings are accessible.
Choosing the "Advanced" -Tab gives access to the "SSI encoder value" and the "SSI encoder setup".
The SSI encoder value is sampled by typing in the 321 into the command field.
Because of the special timing requirements of the SSI standard it is sometimes required
to disable all interrupts in the quickstep-processor in order to prevent false encoder data
when reading. To Disable all interrupts in the processor while reading the encoder value,
simply check the
"Disable intr when reading SSI".
The SSI encoder reading is supported in QuickStep firmware from V2.7.
JVL Industri Elektronik A/S - User Manual - Integrated Step Motors MIS 231, 232, 234
39
2.11
SMC75 Connection of motor
BB+
Screen
Step Motor
AA+
Ground
Terminate screen only at SMC75
TT2168GB
2.11.1
Cabling
For SMC75 controllers that supply a phase current in the range 0 to 3 A, it is recommended that 0.5mm² cable (minimum) is used to connect the motor to the controller.
(0.75mm² is recommended.)
Motor cable lengths should not exceed 10 metres because of impedance loss. It is possible to use longer cables but motor performance will decrease.
Cables should be securely connected since a poor connection can cause heating and destruction of the connector. Similarly, tinned conductors should be avoided.
Important!
To minimise spurious noise emission from the motor cables and to fulfil CE requirements, shielded cable must be used.
If shielded cable is not used, other electronic equipment in the vicinity may be adversely
affected.
The removable connector must never be removed while a voltage is connected as this
will significantly reduce the lifetime of the connector. Note also that the connector’s lifetime is reduced by repeated connecting/disconnecting since the contact resistance of the
pins is increased.
Note that P- is connected to the chassis and functions as the main ground on the Controller.
See also Motor Connections Section 12.4, page 179, which describes how various models
of motor should be connected to the Controller.
40
JVL Industri Elektronik A/S - User Manual - Integrated Step Motors MIS 231, 232, 234
2.11 SMC75 Connection of motor
Serial connection of phases:
Motor
Torque
A+
SMC75
Parallel
A-
Serial
B+
Velocity
Current for Serial or
Parallel connection
B-
Maximum
current
settting
Example
motor 4.2A
Motor
4-phase
parallel
I x 1.41
4.2 x 1.41 =5.9
Motor
4-phase
serial
I
1.41
4.2
= 3A
1.41
Motor
2-phase
I
4.2A
SMC75
Parallel connection of phases:
I = Nominal current per phase in accordance
with manufacturer's specifications
2.11.2
TT2207GB
Connection of Step Motor
Various types of step motor are available:
1. 2-phase Bipolar (4 connectors)
2. 4-phase Bipolar/Unipolar (8 connectors)
3. 4-phase Unipolar (6 connectors).
Note that Type 3 motors indicated above (Unipolar motors) produce 40% less torque.
This motor type can be used with success but is not recommended if a 4 or 8 wire motor
is available instead. This section will not describe the unipolar type further.
2-phase or 4-phase motors can be connected to the Controllers as follows:
2-phase Motors (4 wires).
This type of motor can be directly connected to the Controller’s motor terminals.
The Controller current adjustment must not exceed the manufacturer’s specified rated
current for the motor.
4-phase Motors (8 wires).
This type of motor can be connected to the Driver in one of the following two ways:
1. Serial connection of phases.
2. Parallel connection of phases.
Selection of serial or parallel connection of the motor phases is typically determined by
the speed requirements of the actual system.
If slow speeds are required (typically less than 1 kHz), the motor phases can be connected in serial. For operation at higher speeds (greater than 1 kHz), the motor phases can
be connected in parallel.
JVL Industri Elektronik A/S - User Manual - Integrated Step Motors MIS 231, 232, 234
41
2.11
SMC75 Connection of motor
2.11.3
Serial Connection
Using serial connection of the phases, a motor provides the same performance (up to
1kHz) as parallel connection, but using only approximately half the current. This can influence the selection of Controller model and enables a Controller rated for a lower motor current to be used. See illustration on previous page.
If the phases of a 4-phase step motor are connected in series, the motor’s rated phase
current should be divided by 1.41. For example, if the rated current is 4.2A, the maximum setting of the Controller phase current must not exceed 3 A when the motor phases are connected in series.
2.11.4
Parallel Connection
With parallel connection of motor phases, a motor will provide better performance at
frequencies greater than 1kHz compared to serially connected phases, but requires approximately twice the current. This can influence the choice of Controller since it is necessary to select a Controller that can supply twice the current used for serial phase
connection. See illustration on previous page.
When the phases of a 4-phase motor are connected in parallel, the specified rated current of the motor must be multiplied by a factor of 1.41. For example, if the rated current
is 2.0A, the maximum setting of the Controller phase current must not exceed 2.83A
when the phases are connected in parallel.
It should be noted that the lower the self-induction of the motor the better, since this
influences the torque at high speeds. The torque is proportional to the current supplied
to the motor.
The applied voltage is regulated by the Controller so that the phase current is adjusted
to the selected value. In practice this means that if a motor with a large self-inductance
(e.g. 100mH) is used, the Controller cannot supply the required phase current at high
speeds (high rotational frequencies) since the output voltage is limited.
42
JVL Industri Elektronik A/S - User Manual - Integrated Step Motors MIS 231, 232, 234
2.12
Handling noise in cables
2.12.1
About noise problems
The MIS family of motors eliminates the traditional problems with noise from long motor
cables that emit noise and feedback cables that are sensitive to noise from external
sources.
However, it is still necessary to be aware of noise problems with communications cables
and the 8 general-purpose inputs and outputs.
Whenever a digital signal changes level quickly, a noise spike is generated, and is transferred to the other wires in the same cable, and to a lesser degree to wires in other cables located close to the cable with the switching signal. A typical example is when a
digital output from the MIS motor changes from low to high to drive a relay. If this digital
output signal is transmitted in a multi-wire cable together with the RS-485 signals, there
is a high risk that the RS-485 signal will be affected to the extent that the communication
will fail, and require software retries.
If communication is used during operation, and operation includes either digital input signals or digital output signals, some precautions must be taken to avoid noise problems.
The following sections describe a number of measures which can be taken to solve noise
problems. In most installations, no special measures will be required, but if noise problems are experienced – and/or must be avoided – it is highly recommended the instructions below are followed.
2.12.2
Use short cables
The shorter a cable is, the less noise problems it will induce. Be sure to keep the cables
as short as possible. Instead of curling up the cables, cut them off at the minimum required length.
2.12.3
Use separate cables
Avoid running digital signals in the same multi-wire cables as RS-485 communication signals.
On some models of the MIS motors, the same connector contains both RS-485 signals
and I/O signals – typically the I/Os 1-4.
In many applications, far from all inputs and outputs are used. If only up to four I/Os are
required, consider using only I/Os 5-8 which are typically available via another connector
on the motor.
2.12.4
Use filters
If more than 4 I/Os are needed, consider using I/Os 1-4 for inputs and I/Os 5-8 for outputs. It is normally possible to install a hardware filter on the digital input signals before
they enter the cable. With such a (good) filter, noise on the RS-485 signals will not be a
problem.
It is also possible to use filters on the outputs, but it is more difficult. It can be done by
using short cables from the motor to the filters, and then using longer cables from the
filters to the output targets. It may be easier to use a short cable from the motor to a
splitter box, and then split the I/Os in one cable and the RS-485 signals in another cable.
2.12.5
Use termination (resistors) on the RS-485 signals
RS-485 is typically used to connect a single master PC or PLC to one or more motors in
a chain. Both ends of the chain must have a 120 Ohms termination resistor connected
between the A- and B+ signals. There is typically a terminating resistor in the master PC
or PLC, but there is no termination inside the motors. Therefore an external resistor
must be connected at the end of the cable out of the last motor in the chain. If the last
motor has no connection cable, a connector with a resistor soldered between the A- and
B+ pins should be used.
JVL Industri Elektronik A/S - User Manual - Integrated Step Motors MIS 231, 232, 234
43
2.12
Handling noise in cables
As an alternative, a connector with a short cable can be used with the resistor soldered
between the two wires carrying A- and B+.
Use individually shielded cables.
In some installations, it will be necessary to have RS-485 signals in the same multi-wire
cables as fast-switching digital signals. In addition to keeping cable lengths to a minimum
and using termination resistors, high-quality cables, where each wire is shielded from the
other wires in the cable, should be used. This is typically done using a metal foil wrapped
around each wire. These types of cables are more expensive, but the overall cost and
noise immunity requirements may justify the solution instead of splitting cables.
2.12.6
44
Use simple shielding
Using cables with only a single shield shared by all the signal wires will also improve noise
problems to some degree, but will not guarantee completely stable operation for mixed
signal cables. If a cable carries only RS-485 or only digital I/O, this simple and inexpensive
form of shielding is recommended.
JVL Industri Elektronik A/S - User Manual - Integrated Step Motors MIS 231, 232, 234
2.13
Quick Start (SMC75A1MxAA)
1 - A+
2 - A3 - B+
4 - B5 - NC
24-48VDC
24VDC
brown
white
blue
black
grey
1
1
2
3
3
4
5
2
4
5
5
2
white
blue
yellow
2.13.1
4
RS485-USB-ATC-820
5
3
red
Step motor
1
8 (CVO)
Cable RS485-M12-1-5-5
PC with USB input
2
3
1 (IO1)
7 (IO4)
5
4 (GND)
1
8
7
4
5
6
TT2169GB
Getting started with the SMC75A1MxAA and MacTalk
1. Connect the cables and Power supply as shown above. Use RS485-M12-1-5-5 cable
if the PC has an RS485 interface, or use the converter RS485-USB-ATC-820 if the
PC has a USB interface. Please note that other models use an 8-pin female connector
and therefore use RS485-M12-1-5-8 cable.
2. Switch on the SMC75.
3. Start MacTalk and wait 5 seconds until it automatically is connected to the motor. If
“no connection” occurs, check the serial cables and the Mactalk set-up. The Baud
rate should be 19200 and the correct com port selected.
4. When a connection has been established, key in values of “running current” and
“standby current” under “Driver Parameters”. Remember to press “Enter” after
each parameter is keyed in. Actual motor values can be seen to the left of the input
field.
5. Set “Startup mode” to select “Position” to enable the motor driver. There should
now be current in the motor phases. Depending on the standby current, the motor
shaft will be fixed. Some current regulation noise should be heard from the motor.
6. The motor and I/O status can be seen to the left under “Status”.
7. At “Motion Parameter”, key in 1600 counts at “Position”. The motor will now turn
one revolution at the speed specified by “Max Velocity”.
JVL Industri Elektronik A/S - User Manual - Integrated Step Motors MIS 231, 232, 234
45
46
JVL Industri Elektronik A/S - User Manual - Integrated Step Motors MIS 231, 232, 234
3
3.1.1
Serial Interface
Serial Interfaces
The Controller has 2 serial interfaces:
• RS485 (A and B) balanced for up to 32 units in multi-axis applications and MODBUS
communication. (Standard)
• CANbus -CANopen DS-301/DSP-402,
• DeviceNet under development
CANbus and RS485 can be used at the same time.
JVL Industri Elektronik A/S - User Manual - Integrated Step Motors MIS 231, 232, 234
47
48
JVL Industri Elektronik A/S - User Manual - Integrated Step Motors MIS 231, 232, 234
(Bus voltage)
QuickStep motor or
SMC75 Controller
A
B
GND
2 Use shielded cable.
*** Address=1
RS485
Interface
Power
Supply
3 Make sure that the GND is
also connected.
Control voltage
P+
PCVI
MAC50-141
Motor
A
B
GND
5 The last unit in each end of
the network must be terminated with a 120 Ohm resistor between A and B.
6 Ensure that the supply lines
are made individually in order to reduce the voltage
drop between the motors.
+12-48VDC
A
B
GND
Screen
Screen connected
to GND in each end
1 Use twisted pair cable.
4 Ensure that all units have a
proper connection to safety
ground (earth) in order to
refer to the same potential.
GND
**
+12-32VDC
Opto isolation *
When connecting the RS485
interface to a central controller, the following rules must
be followed:
(control voltage)
RS485 - General description when using a QuickStep motor
The RS485 interface offers
more noise immune commu- RS485 network with 1 x QuickStep, 1 x MAC140 and 1 x MAC800
nication compared to the
mounted with MAC00-B1, B2 or B4 modules.
RS232 interface. Up to 32
Central
Make sure that all
Power supply
involved units are
motors can be connected to
Controller
connected to the same
(for example a PC)
the same interface bus.
potential
Screen
4.1.1
RS485 Interface
*** Address=2
RS485
Interface
Power
Supply
Screen
4
P+
P-
Control voltage
O+
Only MAC50-141 with
B2 or B4 (Optional)
MAC800
Motor
7 Central Controller RS485
interface:
If available, it is strongly recommended a type with optical isolation is used.
*** Address=3
A **
RS485
B
Interface
GND
Power
Supply
Up to 32
Motors
P+
P-
Main supply
Max. 32VDC !
Mains 230VAC
TT2181GB
* Opto isolation is recommended.
** The last unit in each end of the line must be terminated. The MAC00-B1, B2
and B4 contain this feature. See the individual module descriptions.
The QuickStep motor does not have a resistor built-in, the resistor
has to be mounted externally, for instance in the M12 connector.
*** Each unit connected must be setup with an address via The MacTalk program.
If only one unit is connected no address is needed.
JVL Industri Elektronik A/S - User Manual - Integrated Step Motors MIS 231, 232, 234
49
50
JVL Industri Elektronik A/S - User Manual - Integrated Step Motors MIS 231, 232, 234
5
Using MacTalk
Setup save/open
The complete setup
can be either saved
or reloaded from a
file using these
buttons
System control
Error Handling
Use these buttons to save data
Use these fields to define error
permanently, reset the motor etc. limits for the position range etc.
Motor status
This field shows the
actual motor load,
position and speed etc.
Run status
Shows what the status of
the motor is. The Bus voltage
for the motor and the temperature of the driver is also shown
Inputs
The status of the digital inputs
are shown her and the analogue value
Outputs
The status of the outputs
are shown here and can
be activated by the cursor
Errors
If a fatal error occurs,
information will be
displayed here.
Startup mode
The basic functionality
of the unit is
setup in this field.
Profile Data
All the main parameters for controling the motor behaviour
are setup in this field.
Driver Parameters
These fields are used
to define standby and
running current.
Warnings
Here different warnings are shown
Gear Factor
The gear ratio can
be entered here
Motion Parameters
The distance the motor
has to run is entered here
Zero Search
All the parameters
regarding the position
zero search can
be specified here.
Autocorrection
The parameters used
to get the correct position,
if it is a motor with encoder
Communication
The actual address of the
motor can be entered here
TT2145GB
Help Line
Left area: If parameters entered
are outside their normal
values, errors are shown here.
Right area: Here it is possible to
see if a motor is connected,
the type, version and serial no.
JVL Industri Elektronik A/S - User Manual - Integrated Step Motors MIS 231, 232, 234
51
5.1
5.1.1
Using the MacTalk software
MacTalk introduction
The MacTalk software is the main interface for setting up the MIS motor for a specific
application.
The program offers the following features:
-
Selection of operating mode of the MIS motor.
Changing main parameters such as speed, motor current, zero search type, etc.
Monitoring in real time the actual motor parameters, such as supply voltage, input
status, etc.
Changing protection limits such as position limits.
Saving all current parameters to disc.
Restoring all parameters from disc.
Saving all parameters permanently in the motor.
Updating the motor firmware or MacTalk software from the internet or a file.
The main window of the program changes according to the selected mode, thus only
showing the relevant parameters for operation in the selected mode.
The following pages describe the actual window for each mode and how the parameters
affect MIS motor operation.
52
JVL Industri Elektronik A/S - User Manual - Integrated Step Motors MIS 231, 232, 234
5.1
5.1.2
Using the MacTalk software
Toolbar description
The toolbar at the top of MacTalk contains the most commonly used features.
Open
Opens a setup file from disc and downloads the setup to the motor. If no motor is connected, the setup is shown in MacTalk and can be edited and saved to disc again.
Save
Saves the actual setup from the motor to a file. If no motor is connected, the actual offline settings (including module setups and program) are saved.
Save in flash
The complete actual setup in the basic motor will be saved permanently in the flash
memory. If the motor is powered down or reset, the saved setup will be used.
Reset position
Resets the position counter to 0. The content of the position counter can be monitored
in the right side of the main screen as “Actual position”.
Clear errors
Clears all the errors (if any). Please note that if an error is still present, the motor will
remain in the actual error state.
Reset motor
Reset the motor. Same as performing a power off / on operation.
Filter Setup
For specifying the filter setup of the analogue inputs.
STOP motor
Stops the motor immediately using a controlled deceleration ramp and puts the motor
into passive mode. If a program is present this is stopped as well.
This button shall be considered a functional stop button and is available using the
keyboard shortcut CTRL+F8.
Pressing the “Stop” button will immediately stop the motor by changing the currently
running mode to “passive” using a fast controlled deceleration curve.
Using a quickstep motor or a module that enables the user to execute RxP programs this
execution is also halted to prevent the motor from starting up if a startup-mode is setup
from a program.
Warning! Do not consider this button as an appropriate Emergency stop. Always fit an Emergency stop circuitry to your motor setup.
MacTalk Address
Only if more than one motor is connected to the same interface. The address specified
in this field will determine which motor is communicated with.
JVL Industri Elektronik A/S - User Manual - Integrated Step Motors MIS 231, 232, 234
53
5.1
5.1.3
Using the MacTalk software
Saving or opening a setup file to/from disc
The complete motor setup can be saved to disc or opened from disc
and transferred to the motor. The setup files can be saved anywhere
on the hard disc or a floppy disc. Saving and opening a file over a network is also possible.
The setup files use the extension .MAC. By default, the setup files are
saved in the same directory in which MacTalk itself is also installed.
Other directories can be selected.
TT1020GB
In case a motor is present and a disc file is opened the user is prompted for keeping the
connection or going offline and displaying the file-content.
The following message box appears.
TT2264GB
Transfers Data to the motor
and displays the data in
MacTalk afterwards
Going off-line and displays
the data in MacTalk
If the user decides to go offline the following textbox is presented.
Pressing “OK” disconnects the motor from the PC-application and all data can be edited
without any interruption in the motor.
54
JVL Industri Elektronik A/S - User Manual - Integrated Step Motors MIS 231, 232, 234
5.1
Using the MacTalk software
The following MacTalk view is presented.
As seen in the bottom info line, the motor is disconnected and the filedata is currently
present in Mactalk. To re-establish communication with the motor, simply press the ”Go
Online” -button and if any data has been changed a warning box appears enabling the
user to save current data before re-establishing communication with the motor as this
will overwrite existing data in MacTalk.
If data is changed in MacTalk the user is warned that current data in MacTalk may be
overwritten and needs to be saved. The following warningbox is presented.
Choosing “No“ will immediately upload all motor data, pressing “yes” will save all data
in the open file.
JVL Industri Elektronik A/S - User Manual - Integrated Step Motors MIS 231, 232, 234
55
5.1
5.1.4
Using the MacTalk software
Main Screen
a) This field shows
the register values
in the controller
b) Here it is possible to
key in new values. After
pressing enter the value
will be transferred to the
motor and thereafter be
read again from the controller
and be shown at point a.
Because of digitalizing of
the keyed in value, the
returned value in a) can be
different from the value in b).
5.1.5
c) By pressing the unit field it is possible to change between internal unit in the control
ler and the unit shown to the user.
E.g. If user unit for current is ARMS and the internal unit is 5.87mA (300ARMS correspond to 511 units.) Not all registers have different internal and user unit. Speed
for example is alway specified in RPM.
TT2182GB
IO Screen
Active level can be
chosen to high or
low on inputs
Selection of Inputs for
HM, NL and PL
Dedicated Inputs
Selection for Inputs
HM, NKL and PL
An external encoder can
also be selected here and
defined as either quadrature
or pulse/direction type.
Selection of output for
In-Position and Errors
Status of the inputs *)
Selection if it shall
be Inputs or Outputs
Status of the outputs
Dedicated Outputs
Selection for outputs ”In position”,
”In Physical Position”, ”Error”
output. It can also be selected
if the pulses generated shall be
used internally, externally or both
and which output should be used
for pulse and direction signals
Input filters
Here the filter for the
digital inputs can be selected.
Selection if IO´s
shall use filters
Filter time constant can be adjusted here.
The same value is used for all inputs if filter
inputs are enabled.
TT2183GB
*) The analogue value of certain inputs can be read. Click at the input lamp and the analogue value will be shown. The upper value is the actual value and the lower value the
filtered value.
56
JVL Industri Elektronik A/S - User Manual - Integrated Step Motors MIS 231, 232, 234
5.1
5.1.6
Using the MacTalk software
Register Screen
These registers can be used with FastMac commands. For example, the motor can run
to position P2 using velocity V2, acceleration/deceleration A2, running current T2, using
only a one byte command.
These values are not updated automatically. To update, place the cursor at the specific
register value to the left of the box for new values, and click. Otherwise they only update
at motor reset or power up.
JVL Industri Elektronik A/S - User Manual - Integrated Step Motors MIS 231, 232, 234
57
5.1
5.1.7
Using the MacTalk software
Advanced Screen
If it is desired to run the motor in the
opposite direction it can be done by
marking “Invert motor direction”
When this field is marked the motor
runs to the AP (Actual position) from
the encoder position when the motor
goes from passive to position mode
Remove the mark in this field and the
motor will start the program at start-up
Here it is possible to select different ways
of running a turntable and define
number of steps
It is possible to have a certain number
of motors doing the same by giving
them the same group id.
TT2184GB
5.1.8
Test Screen
This screen is used for adjusting the Zero search sensor to the correct position when using the index pulse of an encoder. The index pulse should be in the green area. If not, the
sensor has to be adjusted.
58
JVL Industri Elektronik A/S - User Manual - Integrated Step Motors MIS 231, 232, 234
5.1
5.1.9
Using the MacTalk software
Scope Function
The Scope function is an excellent and necessary function for testing a new application
or finding errors in an existing system.
The Setup has to be selected to set up the Scope function correctly before use. Most registers in SMC75 can be selected for viewing, different trigger functions can be selected,
saving and loading scope pictures is possible, etc.
JVL Industri Elektronik A/S - User Manual - Integrated Step Motors MIS 231, 232, 234
59
60
JVL Industri Elektronik A/S - User Manual - Integrated Step Motors MIS 231, 232, 234
6
Adjustment of motor phase current
The current supplied to each of the step motor’s phases can be adjusted for standby and
running currents by changing the values of standby and running currents under “Driver
parameters”.
The Driver automatically switches between the two currents by detecting the presence
of step-pulses. If a rising edge is detected at the step-clock, the "Move current" is selected. If no rising edge is detected during the period specified by “Standby time” at the stepclock input, the current is automatically switched back to "Standby current".
Values for the two currents are typically adjusted so that the Operating Current is significantly higher than the Standby Current, since the motor must be supplied with more
power to drive its load during acceleration and constant operation than when it is stationary.
Note that the maximum Standby Current normally will be set to 50% or lower of the
maximum current for the actual driver type. The only overriding consideration that must
be made in the adjustment of motor phase currents is that the thermal output of the motor must not exceed the maximum operating temperature of the step motor.
Clk
Running
Standby
0
Standby time
TT2208GB
MIS231
MIS232
MIS234
Unit
Standby Current
0-3000
0-3000
0-3000
mA
Running Current
0-3000
0-3000
0-3000
mA
Torque
0-1.1
0-1.6
0-2.9
Nm
If a MIS232 motor is used and the current is set to 3000 mA, the motor will be able to
deliver a torque of 1.6 Nm at low speed. If the current is set to 1000 mA, the motor will
be able to deliver 0.53Nm.
See Run_Current, page 83 for information about Running Current and Standby_Current,
page 84 for information about Standby Current.
JVL Industri Elektronik A/S - User Manual - Integrated Step Motors MIS 231, 232, 234
61
62
JVL Industri Elektronik A/S - User Manual - Integrated Step Motors MIS 231, 232, 234
7
Modes
The QuickStep motor offers the following modes of operation:
Passive :
The motor will be in a completely passive state but
communication is active and internal registers can be set up.
Velocity :
The motor velocity can be controlled using MacTalk software
or by setting register 5 ( V_SOLL ) using serial or program
commands.
Position :
The motor position can be controlled using MacTalk software
or by setting register 3 ( P_SOLL ) using serial or program
commands.
Gear :
The motor position and velocity can be controlled by pulse
and direction or encoder signals at IN1 and IN2.
The gear ratio can be set to a large ratio using register 14
( GEAR1 ) and register 15 ( GEAR2 ).
Zero search type 1 and type2:
Searches for sensor to define a zero position
( Reference point ).
JVL Industri Elektronik A/S - User Manual - Integrated Step Motors MIS 231, 232, 234
63
7.1
7.1.1
64
Passive Mode
Passive Mode
After power up, the controller will start up in passive mode. This means that it is possible
to communicate and read/write to/from registers, but no current is supplied to the motor. It should thus be possible to turn the motor shaft as no voltage is connected to the
motor. If there is encoder feed-back, the encoder counter will always register the correct position.
JVL Industri Elektronik A/S - User Manual - Integrated Step Motors MIS 231, 232, 234
7.2
7.2.1
Velocity Mode
Velocity Mode
In this mode, the QuickStep motor controls the motor velocity via the Max Velocity setting. This mode is typically used for simple tasks or for applications in which an overall
unit, such as a PC-board or PLC, controls velocity and positioning.
JVL Industri Elektronik A/S - User Manual - Integrated Step Motors MIS 231, 232, 234
65
7.3
7.3.1
66
Positioning Mode
Positioning Mode
In this mode, the QuickStep motor positions the motor via commands sent over the serial interface. Various operating parameters can be changed continuously while the motor is running. This mode of operation is used primarily in systems where the Controller
is permanently connected to a PC/PLC via the interface. This mode is also well suited for
setting up and testing systems. The mode is also used when programming is done.
JVL Industri Elektronik A/S - User Manual - Integrated Step Motors MIS 231, 232, 234
7.4
7.4.1
Gear Mode
Gear Mode
In this mode, the QuickStep motor functions as in a step motor driver. The motor moves
one step each time a voltage pulse is applied to the step-pulse input. Velocity, acceleration and deceleration are determined by the external frequency, but can be limited and
controlled by the QuickStep motor. In addition, the QuickStep motor also provides a facility for electronic gearing at a keyed-in ratio in the interval 1/32767 to 32767.
Start velocity is not used in this mode.
The digital input filter is not used in this mode at input 1 and 2.
Example:
The motor has a resolution of1600 pulses/rev. and the encoder 500 pulses/rev.
If one revolution of the encoder should result in one motor revolution, the Input must be
set to 500 and the Output to1600.
If the motor must run 5 revolutions because there is a gear with a reduction of 5:1, the
output must be set to 5x1600 = 8000 instead.
JVL Industri Elektronik A/S - User Manual - Integrated Step Motors MIS 231, 232, 234
67
7.5
7.5.1
Zero search modes
Mechanical zero search modes
In all positioning systems, there is a requirement to be able to find a mechanical zero position after the system is powered up or at specific times during operation. For this purpose the MIS motor offers 2 different Zero search modes which can be selected from
the MacTalk main window or by sending a command via one of the serial interfaces.
Select the Zero search mode
using this field. The selected format will
be used as follows :
- Immediately after ther motor is powered up
(only the “Power up ....” Formats)
- If a search is initiated via the serial
interface.
TT2170GB
The menu offers 3 options:
Disabled (default)
The Zero search is disabled.
Power up: Sensor type 1 Similar to “Sensor type 1” but the Zero search will automatically be started after power up.
Power up: Sensor type 2 Similar to “Sensor type 2” but the Zero search will automatically be started after power up.
The following sections explain in detail the functionality of the 2 fundamental Zero search
modes.
7.5.2
Starting a Zero search
If the Zero search mode is set to Disabled, no Zero search is done at any time unless written in a program.
If one of the 2 modes Power up: Sensor type 1 or Sensor type 2 is selected, the respective
Zero search mode will be executed every time the MIS motor is powered up if no program is started up. If a program has been made and is running, the Zero search command
must be executed within the program to execute a Zero search.
The MIS motor´s zero search facility is very flexible. The inputs for reference and limit
switches must be set up correctly before use.
The active levels must also be set up correctly.
68
JVL Industri Elektronik A/S - User Manual - Integrated Step Motors MIS 231, 232, 234
7.5
7.5.3
Zero search modes
I/O Set Up
Important information: Each of the 8 pins can be defined as inputs or outputs. The active digital input level for each input is also defined in the above screen. Furthermore, it
is possible to set up a filter for each input to avoid noise interfering with the program.
The inputs for Home, Negative Limit and Positive Limit and outputs for In Position and
Error are also selected here.
If an external encoder is used, it must be enabled here
7.5.4
Advanced
There are several ways to perform a Zero search:
- Start from both sides of the reference sensor in a system with limit switches without
having position limit problems.
- to go to the opposite side of the sensor and use this position as zero position.
- use a position limit as reference position. In this case the zero search position must be
be different from 0 or the motor enters passive mode.
- ignore the reference switch input and use the actual position or index pulse as zero
position before using the zero search position.
JVL Industri Elektronik A/S - User Manual - Integrated Step Motors MIS 231, 232, 234
69
7.5
7.5.5
Zero search modes
“Sensor type 1” Zero search
Sensor type 1 zero search is carried out according to the following illustration.
Select the mechanical zero
search mode using this field.
The position is sampled in the exact
position where the sensor was
activated. The motor the decelerates
and moves the reverse distance back
to the position where the sensor was
activated.
Zero search position is an optional
offset. See description in
other chapter.
Zero search velocity defines the
velocity used during Zero search.
The sign of the specified velocity Sensor status
defines the zero search direction.
Zero search
started
TT2175GB
The Zero sensor must be connected to a user input
For connection information, see SMC75 User Inputs, page 22
7.5.6
“Sensor type 2” Zero search
Sensor type 2 zero search is carried out according to the following illustration.
Velocity
Zero search position is an optional
offset. See description in
other chapter.
Zero search velocity defines the
velocity used during Zero search.
The sign of the specified velocity
defines the zero search direction.
Select the mechanical Zero
search format in this menu.
When the zero search sensor is activated, the
motor decelerates and starts to move in
the reverse direction with 1/64 of Zero search
Velocity. When the edge of the Zero search
sensor is passed the motor stops and the
zero position is found.
Acceleration specified by
the general acceleration
parameter under the “Profile
data” in MAC-Talk
Time
Sensor
status
Zero search
started
In this example the
active sensor level
is set to high
(Home Torque=1)
Time
TT2187GB
The Zero sensor must be connected to a user input. For connection information, see
SMC75 User Inputs, page 22.
70
JVL Industri Elektronik A/S - User Manual - Integrated Step Motors MIS 231, 232, 234
7.5
7.5.7
Zero search modes
Making a Zero point offset
Common for all the zero search modes, it is possible to optionally define the zero-point
as a value other than zero (position 0).
When is it useful to use the zero point offset?
- If it is required that the position interval under normal operation is always “nice” positive values from 0 to x instead of a mixture of negative and positive values. This can
happen if the zero point sensor is placed a long distance away from the normal positioning interval or inside the normal positioning interval.
- If an automatic move to an initial position is desired after a power-up zero search.
The offset value must be specified in the “Zero search position” field.
The complete zero search will be performed in the following order.
1. The zero search is started either automatically (power up) or initiated by a command
from the serial interface.
2. The basic zero search is completed and the position counter is set to the value specified in the “Zero search position” field.
3. If the zero search position value is different from position, the motor will now move
to position 0.
4. The zero search is now complete and the motor will switch to normal operation, i.e.
the mode selected in the “Startup mode” field in the main window.
The illustration below shows the complete zero-search cycle.
The motor will always go to position 0
after a complete zero search is done this
causes the motor to move the difference
between 0 and the value specified in the
“Zero search position” field.
Velocity
The speed and acceleration
is set to the general setting
in MacTalk under “Profile data”
Zero search in progress
velocity etc. depends on
the actual zero search mode.
Zero search
started
After the basic zero search has
been done, the actual position counter
is set to the value specified in the
“Zero search position” register
Time
Actual position counter
is now zero (position 0).
Zero search complete.
TT2171GB
Ensure several tests are made to ensure the white dot is located in the acceptable interval
each time.
JVL Industri Elektronik A/S - User Manual - Integrated Step Motors MIS 231, 232, 234
71
7.5
Zero search modes
Example: Zero search velocity = -128 rpm
Zero search position = - 10000 counts
Position before
zero search
“Sensor Type 2” X
Zero search sensor
128 rpm
X Actual position = zero search position
2 rpm
Max Velocity
Actual position = 0
X
TT2192GB
7.5.8
Zero search with index pulse
Sensor
Zero
search
velocity
Index pulse
Index pulse
Index pulse range
1 rev. of motor
TT2209GB
If the MIS motor is equipped with an encoder, it is also possible to use the index pulse of
the encoder. This gives a much more precise zero position than just running for a sensor.
The accuracy of the sensor signal depends on how far the sensor is located away from
the measuring item and on the velocity.
The index pulse can be used with or without the sensor. This must be defined on the
advanced tab. If the MIS motor is set to use the index pulse, the MIS motor always runs
to the sensor first and then index pulse.
The sensor must be placed at the right position. This can be done using MacTalk. Select
the type of sensor movement to be used in the main tab screen. In the advanced tab,
choose not to start the program automatically after reset. Then select Save in Flash. Go
to the Test tab and press “Start Zero Search”. The motor now rotates at the zero search
velocity towards the sensor, and when this has been found the motor continues to the
index pulse. The circle at the Test tab indicates the location of the index pulse according
to the sensor. The index pulse must be in the green area. If the index pulse is in the red
area, the sensor must be moved slightly and the procedure repeated.
72
JVL Industri Elektronik A/S - User Manual - Integrated Step Motors MIS 231, 232, 234
8
Error Handling
Error Handling
Use these fields to define error
limits for the maximum follow error etc.
TT2174GB
The MIS motor contains 5 fundamental parameters which are used for protection related
purposes. They all have effect regardless of which mode of operation the motor is set to
use.
Follow error
(Only for MIS with internal encoder)
Follow error is the difference between the target position and the encoder position. The
target position is the position generated. Default is 0. (Function disabled).
Position limit min. and max.
Same as physical limit switches but implemented in software. Default is 0 meaning that
the feature is disabled. If one parameter is different from 0, both values are activated.
Error acceleration
If a fatal error occurs, it can be convenient to use a controlled deceleration instead of a
sudden stop. If the inertia in the system is high and the mechanical parts are weak, a sudden stop can cause damage and unintended behaviour. Use this parameter to define the
deceleration used during a fatal error. Default is 0, meaning that the feature is disabled.
Min. bus voltage
This is the level of P+ at which the motor goes into error state “low bus voltage”.
JVL Industri Elektronik A/S - User Manual - Integrated Step Motors MIS 231, 232, 234
73
74
JVL Industri Elektronik A/S - User Manual - Integrated Step Motors MIS 231, 232, 234
9
Registers
JVL Industri Elektronik A/S - User Manual - Integrated Step Motors MIS 231, 232, 234
75
76
JVL Industri Elektronik A/S - User Manual - Integrated Step Motors MIS 231, 232, 234
9.1
Introduction and register overview
All of the motor registers can be accessed either through the RS485 interface or over
CANopen.
When accessing registers over CANopen, they are mapped to object indexes 2012 and
2014 (hex) with the sub-index equal to the register number 1...255. Use index 2012 for
the 32-bit registers and index 2014 for the 16-bit registers.
For example to access register 3, P_SOLL, use index 2012, subindex 3. To access register 5, V_SOLL, use index 2014, subindex 5. This is described in more detail in CANopen Introduction, page 135.
All of the registers can be accessed over CANopen with the same Read/Write access restrictions as when using the RS485 interface.
Some registers are tagged as R for Read-only. There are different reasons for this, such
as protecting the serial number from being changed or indicating that the value in registers, such as Analog Inputs, will never be read by the motor but always overwritten using
the latest sampled values.
In the following sections and examples, positions, velocity and acceleration are based on
a 200 step motor running with 1/8 steps.
9.1.1
Reg
Register Overview.
Name
Size
Access
Range
Default
Unit
MacTalk name
“Status bar”
Current Mode
1
PROG_VERSION
16bit
R
-
*
Major*16+
Minor+16384
2
Mode_Reg
16bit
R/W
0,1,2,3,
13,14,15
0
-
3
P_SOLL
32bit
R/W
(-231)-(231-1)
0
steps
Position
5
V_SOLL
16bit
R/W
-1023-1023
250
RPM
Max velocity
6
A_SOLL
16bit
R/W
1-65535
131
9.54 RPM/s2
Acceleration
7
RUN_CURRENT
16bit
0-511
511
5.87mA
Running Current
8
STANDBY_TIME
16bit
R/W
1-65535
500
ms
Standby Time
9
STANDBY_
CURRENT
16bit
R/W
0-511
128
5.87 mA
Standby Current
10
P_IST
32bit
R/W
(-231)-(231-1)
-
Steps
Actual Position
12
V_IST
16bit
R
0-1023
-
RPM
Actual Velocity
13
V_START
16bit
R/W
1-1023
100
RPM
Start Velocity
14
GEAR1
16bit
R/W
(-2
15)-(215-1)
1600
Steps
Output
15
Counts
Input
15
15
GEAR2
16bit
R/W
(-2 )-(2 -1)
2000
16
ENCODER_POS
32bit
R/W
(-231)-(231-1)
-
Steps
Encoder position
18
INPUTS
16bit
R
-
-
Special
Inputs
19
OUTPUTS
16bit
R/W
-
0
Special
Outputs
31
31
-
Steps
Follow Error
31
31
Steps
Follow Error Max
20
FLWERR
32bit
R
22
FLWERRMAX
32bit
R/W
(-2 )-(2 -1)
0
24
COMMAND
16bit
R/W
0-127, 256,
257
0
-
N/A
25
STATUSBITS
16bit
R
-
-
Special
Run Status
26
TEMP
16bit
R
27
Reserved
-
-
28
MIN_P_IST
32bit
R/W
(-2 )-(2 -1)
-2.27
uses
offset
31
31
31
31
(-2 )-(2 -1)
Temperature
-
-
0
Steps
Steps
30
MAX_P_IST
32bit
R/W
(-2 )-(2 -1)
0
32
ACC_EMERG
16bit
R/W
1-65535
10000
9.54
RPM/s2
Position Limit Min
Position Limit Max
Error Acceleration
JVL Industri Elektronik A/S - User Manual - Integrated Step Motors MIS 231, 232, 234
77
Reg
Name
Size
Access
Range
Default
Unit
33
IN_POSITION
_WINDOW
16bit-
R/W
0-65535
5
Steps
34
IN_POSITION
_COUNT
16bit-
R/W
0-65535
0
Counts
MacTalk name
35
ERR_BITS
16bit
R/W
0
Special
Errors
36
WARN_BITS
16bit
R/W
0
Special
Warnings
37
STARTMODE
16bit
R/W
-
0
-
Startup Mode
38
P_HOME
32bit
R/W
(-231)-(231-1)
0
Steps
Zero Search Position
40
V_HOME
16bit
R/W
-1023-1023
-50
RPM
Zero Search Velocity
41
Reserved
-
-
-
-
-
42
HOMEMODE
16bit
R/W
0,13,14
0
-
43-48
Reserved
-
-
-
-
-
49-64
Pn
32bit
R/W
(-231)-(231-1)
0
Steps
RPM
Zero Search Mode
Position n (Pn)
65-72
Vn
16bit
R/W
0-1023
250
73-76
An
16bit
R/W
1-65535
131
Velocity n (Vn)
9.54
77-80
Tn
16bit
R/W
0-511
511
5.87 mA
Current n (Tn)
81-88
AnalogFiltered
16bit
R
0-1023
0
4.888mV
N/A
89-96
AnalogInput
16bit
R
0-1023
-
4.888 mV
N/A
97
BUSVOL
16bit
R
0-1023
-
109 mV
Bus Voltage
98
MIN_BUSVOL
16bit
R/W
0-1023
15
109 mV
Min Bus Voltage
99
ENCODER_TYPE
16bit
R
0-10
-
-
“Tooltip on motor”
100
AFZUP_WriteBits
16bit
R/W
-
0
Special
N/A handled on the
Filter Setup screen
101
AFZUP_Read Index
16bit
R/W
0, 1-8,
3276832775
0
Special
102
AFZUP Conf Min
16bit
R/W
0-1022
0
4.888 mV
Confidence Min
103
AFZUP_Conf Max
16bit
R/W
1-1023
1023
4.888 mV
Confidence Max
104
AFZUP_ Max Slope
16bit
R/W
2-1023
1023
4.888 mV
Max Slope
RPM/s2
th
64 of new
sample
Acceleration n (An)
N/A handled on the
Filter Setup screen
Filter (on the Filter
setup screen)
105
AFZUP_Filter
16bit
R/W
1-64
64
106
FilterStatus
16bit
R
0-65535
0
107
Reserved
-
-
-
-
-
108
PulseDirMask
16bit
R/W
0-65535
0
Bitmask
Pulse signal
Direction signal
109
PulseDirMode
16bit
R/W
0-2
0
-
Pulse/Direction
mode
110
SettlingTime
16bit
R/W
0-32676
0
ms
Settling time
between retries
111
Reserved
-
-
-
-
-
112115
SAMPLE1-4
16bit
R/W
-
0
-
N/A
116
REC_CNT
16bit
R/W
-
0
-
N/A
N/A (shown grafically)
117
S_TIME
16bit
R/W
-
1
ms
N/A
118
S_CONTROL
16bit
R/W
-
0
-
NA
119
BUF_SIZE
16bit
R
-
-
-
N/A
120
INDEX_OFFSET
16bit
R
0-1599
-
Steps
Tests-
122
HOME_BITS
16bit
R/W
-
0
Special
Advanced-Zero
Search
123
Reserved
16bit
R/W
-
-
-
N/A
78
JVL Industri Elektronik A/S - User Manual - Integrated Step Motors MIS 231, 232, 234
Reg
Name
Size
Access
Range
Default
Unit
MacTalk name
SETUP_BITS
16bit
R/W
-
0
Special
Don´t start program after power
up.
Invert motor direction.
External Encoder
Enable DSP 402
Support
Auto encoder
synchronize
125
IOSETUP
16bit
R/W
-
0
Special
Inputs/Outputs
126
TURNTABLE_
MODE
16bit
R/W
-
0
Special
Turn Table -Mode
127
TURNTABLE_
SIZE
32bit
R/W
-
0
Steps
Turn Table - Size
129
NL_MASK
16bit
R/W
-
0
IO Mask
Dedicated Inputs
Negative Limit Input
130
PL_MASK
16bit
R/W
-
0
IO Mask
Dedicated Inputs Positive Limit Input
131
Reserved
16bit
R/W
-
0
132
HOME_MASK
16bit
R/W
-
0
IO Mask
Dedicated inputs.
Home Input
133
-134
Reserved
-
-
-
-
-
135
INPUT_FILTER_
MASK
16bit
R/W
-
0
IO Mask
IOx digital input filter enabled
136
INPUT_FILTER_
CNT
16bit
R/W
-
5
ms
Input filter time
137
INPOS_MASK
16bit
R/W
-
0
IO MASK
Dedicated Outputs
- In Position
138
ERROR_MASK
16bit
R/W
-
0
IO Mask
Dedicated Outputs
- Error
139143
Reserved
-
-
-
-
-
144
P_NEW
32bit
R/W
(-231)-(231-1)
0
Counts
N/A
146
BAUD_RATE
16bit
R/W
0-5
1
-
Baud Rate
147
TX_DELAY
16bit
R/W
0-255
15
Bits
Transmit Delay
148
GROUP_ID
16bit
R/W
0-255
-
Group ID
149
GROUP_SEQ
16bit
R
0-255
150
MY_ADDR
16bit
R/W
151
MOTORTYPE
16bit
152
SERIALNUMBER
154
124
-
-
N/A
0-254
-
Motor Address
R
64-xx
-
“Status Bar”
32bit
R
-
-
-
“Status Bar”
CHECKSUM
32bit
R
0-65535
-
156
HARDWARE_
REV
16bit
R
0-65535
-
Major*16+
Minor+16384
“Tooltip on
Motor”
157
MAX_VOLTAGE
16bit
R
0-100
*
Volt
“Tooltip on
Motor”
158
AVAILABLE_IO
16bit
R
-
-
IO MASK
N/A
159
BOOTLOADER_
VER
16bit
R
0-65535
-
Major*16+
Minor+16384
“Tooltip on
Motor”
160
NOTSAVED
16bit
R/W
0-65535
0
-
N/A
161164
Reserved
165
OPTION_BITS
16bit
R
0-65535
-
-
“Tooltip on motor”
166
FBUS_NODE ID
16bit
R/W
0-255
5
-
Fieldbus - Node ID
167
FBUS_BAUD
16bit
R/W
0-8
2
-
Fieldbus - Baud
Rate
168
Reserved
16bit
-
-
-
-
JVL Industri Elektronik A/S - User Manual - Integrated Step Motors MIS 231, 232, 234
79
Reg
Name
Size
Access
Range
Default
Unit
MacTalk name
169
Reserved
16bit
-
-
-
-
170
EXT_ENCODER
32bit
R/W
(-231)-(231-1)
-
Counts
External Encoder
172
EXT_ENCODER_
VEL
16bit
R
(-215)-(215-1)
-
Counts 16ms
External Encoder
Velocity
The following parameters are only available when the CanOpen option is installed and only used for DSP-402
Reg Name
Size Access Range
Default Unit Description
180
ControlWord
16bit R/W
0-65535
0
-
Object 6040 subindex 0
181
StatusWord
16bit R
0-65535
0
-
Object 6041 subindex 0
182
ModeOfOperation
16bit R/W
0-255
0
-
Object 6060 subindex 0
183
ModeOfOperationDisplay
16bit R
0-255
0
-
Object 6061 subindex 0
184
TargetPosition
32bit R/W
(-231)-(231-1) 0
-
Object 607A subindex 0
186
ActualPosition
32bit R
(-231)-(231-1) 0
-
Object 6064 subindex 0
188
TargetVelocity
32bit R/W
(-231)-(231-1) 0
-
Object 60FF subindex 0
190
ActualVelocity
32bit R
(-231)-(231-1) 0
-
Object 606C subindex 0
192
DigitalOutputs
16bit R/W
0-65535
0
-
Object 60FE subindex 1 (Low 16bit)
194
DigitalInput
16bit R
0-65535
0
-
Object 60FD subindex 1 (Low 16bit)
80
JVL Industri Elektronik A/S - User Manual - Integrated Step Motors MIS 231, 232, 234
9.2
Register Descriptions
9.2.1
Prog_Vers
MacTalk
name
Reg
Name
Size
Access
Range
Default
Unit
1
PROG_VERSION
16bit
R
-
*
Major*16+
Minor+16384
“Status bar”
Description: The firmware version. The Bit 14 is set to indicate that the type is SMC75. Bit 0-3 is the
minor version and bit 4-7 is the major version.
Example:
The firmware version 1.7 will have the value 0x4017 (16407)
9.2.2
Mode_Reg
Reg
Name
Size
Access
Range
Default
Unit
MacTalk name
2
Mode_Reg
16bit
R/W
0,1,2,3,11,
13,14,15
0
-
Current Mode
Description:
Controls the operating mode of the motor. The following modes can be selected:
0: Passive
1: Velocity mode
2: Position mode
3: Gear mode
13: Zero search type 1
14: Zero search type 2
15: Safe mode
Passive mode (0)
In this mode, the motor current is turned off and the motor will not react to any position/
velocity commands.
Velocity mode (1)
When the motor is in velocity mode, the controller accelerates the motor to the velocity
in V_SOLL. V_SOLL can be changed at any time and the move will decelerate/accelerate
accordingly.
It is permissible to change A_SOLL and V_START during a movement, but the changes
will first take effect after the motor has stopped. Please note that if the motor needs to
change direction, it will decelerate and stop, and the new A_SOLL and V_START will be
activated.
Position mode (2)
When the motor is in position mode, the controller will always try to move until P_IST
= P_SOLL.
The movement will follow the profile specified by V_SOLL, A_SOLL and V_START.
P_SOLL can be changed at any time and the motor will move accordingly.
V_SOLL can also be changed during a movement.
It is permissible to change A_SOLL and V_START during a movement, but the changes
will first take effect after the motor has stopped. Please note that if the motor needs to
change direction, it will decelerate and stop, and the new A_SOLL and V_START will be
active.
JVL Industri Elektronik A/S - User Manual - Integrated Step Motors MIS 231, 232, 234
81
9.2
Register Descriptions
Gear mode (3)
The GEAR mode works as position mode, but has an additional feature. The input on the
external encoder is multiplied with GEAR1/GEAR2 and added to P_SOLL. Any remainder of the result is saved and used next time the external encoder changes.
The result is that this mode can be used as an electronic gear.
When using gear mode, it is not recommend to set V_START below 10 rpm. This can
gives problems at low speeds, because the motor will lag behind when doing the first
step. It will then accelerate in order to catch up.
NOTE: Time from the first input pulse to the first step is typically 30-60µs if not on
standby. 72-102µs if on standby.
Zero search type 1 (13)
When the operation mode is set to 13, the controller will start the search for the zero
point. See “Sensor type 1” Zero search, page 70 for details.
Zero search type 2 (14)
When the operation mode is set to 15, the controller will start the search for the zero
point. See “Sensor type 2” Zero search, page 70 for details.
Safe mode (15)
This mode is similar to passive mode, but also allows the “save in flash” and “reset” commands. Safe mode cannot be entered/exited directly; this must be done using the serial
commands ENTER/EXIT SAFEMODE.
Example:
Writing MODE_REG=2 will set the motor in position mode. When P_SOLL is changed,
the motor will move to this position with the specified max velocity (V_SOLL) and acceleration (A_SOLL).
Writing MODE_REG=13 will start a zero search for a sensor. When the search is completed, the MODE_REG will automatically be changed to the mode specified in
START_MODE.
9.2.3
Reg
3
P_Soll
Name
P_SOLL
Size
32bit
Access
Range
Default
Unit
MacTalk name
R/W
(-231)-(231-1)
0
Steps
Position
Description: The desired position. When in position mode, the motor will move to this position. This
value can be changed at any time. The maximum possible position difference is 231-1. If
relative movement is used, the P_SOLL will just wrap at 231-1 and the motor will move
correctly. Please note that the turntable function changes the behaviour of P_SOLL. See
Turntable_Mode, page 97.
Example:
82
If P_SOLL = -800 and then P_SOLL is set to 800, the motor moves one revolution
forward.
If P_IST = 231-100 (2147483548) and P_SOLL is set to -231+100 (2147483548), the
motor will move 200 steps in the positive direction.
JVL Industri Elektronik A/S - User Manual - Integrated Step Motors MIS 231, 232, 234
9.2
Register Descriptions
9.2.4
V_Soll
Reg
Name
Size
Access
Range
Default
Unit
MacTalk name
5
V_SOLL
16bit
R/W
-1023-1023
250
RPM
Max velocity
Description: The maximum velocity allowed. When in velocity mode, the motor will run constantly at
this velocity. Specify a negative velocity to invert the direction. This value can be changed
at any time.
Example:
V_SOLL = 250, will limit the velocity to 250 RPM.
9.2.5
A_SOLL
Reg
Name
Size
Access
Range
Default
6
A_SOLL
16bit
R/W
1-65535
131
Unit
9.54
RPM/s2
MacTalk name
Acceleration
Description: The acceleration/deceleration ramp to use. If this value is changed during at movement,
it will first be active when the motor stops or changes direction.
Example:
A_SOLL = 105, will set the acceleration to 1000 RPM/s.
9.2.6
Run_Current
Reg
Name
Size
Access
Range
Default
Unit
MacTalk name
7
RUN_CURRENT
16bit
R/W
0-511
511
5.87mA
Running Current
Description: This register sets the running current for the motor. 511 is the maximum possible current, corresponding to 3A RMS. The running current is active when the motor is running
and after it stops until the specified standby time has elapsed.
See Standby_Time, page 83.
When the RUN_CURRENT is changed, the new motor current will be set instantly.
Example:
RUN_CURRENT = 100, will set the running current to 0.59A RMS.
9.2.7
Standby_Time
Reg
Name
Size
Access
Range
Default
Unit
MacTalk name
8
STANDBY_TIME
16bit
R/W
1-65535
500
ms
Standby Time
Description: This register sets the standby time. This time is the time from the last step has been
performed until the current changes from running to standby. When a new request for
a move is received the current changes from standby to running with no delay.
Example:
STANDBY_TIME = 200, will result in the controller switching to the standby current
after 200ms.
JVL Industri Elektronik A/S - User Manual - Integrated Step Motors MIS 231, 232, 234
83
9.2
Register Descriptions
9.2.8
Standby_Current
Reg
Name
Size
Access
Range
Default
Unit
MacTalk name
9
STANDBY_
CURRENT
16bit
R/W
0-511
128
5.87 mA
Standby Current
Description: This register set the standby current for the motor. 511 is the maximum possible value,
corresponding to 3A RMS. The standby current is active when the motor has stopped
and the specified Standby time has elapsed. See Standby_Time, page 83. When the
STANDBY_CURRENT is changed, the new motor current will be set instantly.
Example:
STANDBY_CURRENT = 50, will set the running current to 0.29A RMS.
9.2.9
P_Ist
Reg
Name
Size
Access
Range
Default
Unit
MacTalk name
10
P_IST
32bit
R/W
(-231)-(231-1)
-
Steps
Actual Position
Description: This register shows the actual position of the motor. This is updated each time the motor
makes a step. If P_IST is changed when in position mode or gear mode, the motor
will move until P_IST = P_SOLL. When P_IST reaches 231-1, it will wrap around to -231.
Please note that the turntable function changes the behaviour of P_IST.
See Turntable_Mode, page 97.
Example:
P_IST = 1000, P_SOLL = 1000. P_IST is set to 500. The motor will move 500 steps forward and P_IST will again be 1000.
9.2.10
V_Ist
Reg
Name
Size
Access
Range
Default
Unit
MacTalk name
12
V_IST
16bit
R
0-1023
-
RPM
Actual Velocity
Description: This register shows the actual velocity of the motor. The velocity is positive when running in a positive direction and negative when running in a negative direction.
Example:
84
If V_SOLL = 400 and a movement of -10000 steps is done, V_IST will be -400 during
the move and when the move is complete V_IST will be 0.
JVL Industri Elektronik A/S - User Manual - Integrated Step Motors MIS 231, 232, 234
9.2
Register Descriptions
9.2.11
V_Start
Reg
Name
Size
Access
Range
Default
Unit
MacTalk name
13
V_START
16bit
R/W
±1-1023
100
RPM
Start Velocity
Description: The start velocity. The motor will start the acceleration at this velocity. It will also stop
the deceleration at this velocity. If |V_SOLL| is lower that V_START the motor will not
accelerate at all, but start to run at V_SOLL instantly. The motor will actually start the
movement with an internal V_START = V_SOLL.
If V_START is changed during a movement, it will first be active when the motor stops
or changes direction. This also means that if V_SOLL is changed to a value below
V_START, while the motor is in motion, the motor will decelerate to V_START
and run at that velocity.
Example:
V_START = 100, V_SOLL = 200, MODE_REG = 1. The motor will accelerate from 100
RPM to 200 RPM.
V_SOLL is now changed to 50. The motor will decelerate to 100 RPM and continue
at 100 RPM.
V_SOLL is now changed to -50 RPM. The motor will stop and start at -50 RPM.
9.2.12
GEAR1
Reg
14
Name
GEAR1
Size
16bit
Access
R/W
Range
15
15
(-2 )-(2 -1)
Default
Unit
MacTalk name
1600
Steps
Output
Description: When the gear mode is active, the input from the external encoder is multiplied by
GEAR1 and divided by GEAR2.
Example:
GEAR1 = 1600, GEAR2 = 2000. If 2000 steps are applied to the input, the motor will
turn 1 revolution.
If one step is applied, the motor will not move (but the remainder will be 0.8)
If another step is applied, the motor will move 1 step (and the remainder will be 0.6).
If another step is applied, the motor will move 1 step (and the remainder will be 0.4)
And so on.
9.2.13
GEAR2
Reg
15
Name
GEAR2
Size
16bit
Access
Range
Default
Unit
MacTalk name
R/W
(-215)-(215-1)
2000
Counts
Input
Description: The denominator of the gear factor. See GEAR1 for details.
9.2.14
Reg
16
Encoder_Pos
Name
ENCODER_POS
Size
32bit
Access
R/W
Range
31
31
(-2 )-(2 -1)
Default
Unit
MacTalk name
-
Steps
Encoder position
Description: If the internal encoder option is installed, this register shows the position feedback from
the encoder.
This value is initialized to zero at power-up and modified by the firmware when a zero
search is performed.
The value can be used internally by the AutoCorrection system to retry a movement in
position and gear modes.
JVL Industri Elektronik A/S - User Manual - Integrated Step Motors MIS 231, 232, 234
85
9.2
Register Descriptions
9.2.15
Inputs
Reg
Name
Size
Access
Range
Default
Unit
MacTalk name
18
INPUTS
16bit
R
-
-
Special
Inputs
Description: This register shows the status of the digital inputs. Bit 0-7 shows whether IO 1-8 is
active or inactive. The active level can be set using IOSETUP. See Iosetup, page 96.
Bits 8-15 are not used and will always be 0. The inputs can be filtered or unfiltered. See
Input_Filter_Mask, page 99.
Note that all of the inputs have a digital state and an analog value at the same time. This
register shows their digital state only. Note that the digital inputs can be filtered by setting bits in register 135 (Input_Filter_Mask, page 99).
Bit
Function
7
IO8
9.2.16
6
IO7
5
IO6
4
IO5
3
IO4
2
IO3
1
IO2
0
IO1
Outputs
Reg
Name
Size
Access
Range
Default
Unit
MacTalk name
19
OUTPUTS
16bit
R/W
-
0
Special
Outputs
Description: This register shows the status of the outputs. Bit 0-7 shows whether IO 1-8 is active or
inactive. The active level can be set using IOSETUP. See Iosetup, page 96. Please note
that the output driver for each output also has to be enabled. This is also done using
IOSETUP. The register can be changed in order to change the status of the outputs.
9.2.17
Reg
20
Flwerr
Name
FLWERR
Size
32bit
Access
R
Range
31
31
(-2 )-(2 -1)
Default
Unit
MacTalk name
-
Steps
Follow Error
Description: When the encoder option is installed, this register shows the encoder deviation from the
calculated position (P_IST).
9.2.18
Reg
22
Flwerrmax
Name
FLWERRMAX
Size
32bit
Access
R/W
Range
31
31
(-2 )-(2 -1)
Default
Unit
MacTalk name
0
Steps
Follow Error Max
Description: The maximum allowed value in FLWERR before an error is triggered. If FLWERRMAX
= 0, the error is disabled. See register 35 (Err_Bits, page 88) for a description of the
error bit.
9.2.19
Command
Reg
Name
Size
Access
Range
Default
Unit
MacTalk name
24
COMMAND
16bit
R/W
0-127, 256,
257
0
-
N/A
Description: Used to issue commands to the motor. 0-128 are the normal FastMac commands.
The values 128-255 are reserved.
Command 256 will activate a new baud rate on the serial ports, and command 257
will synchronize the internal encoder position to the actual motor position.
86
JVL Industri Elektronik A/S - User Manual - Integrated Step Motors MIS 231, 232, 234
9.2
Register Descriptions
9.2.20
Statusbits
Reg
Name
Size
Access
Range
Default
Unit
MacTalk name
25
STATUSBITS
16bit
R
-
-
Special
Run Status
Default
Unit
MacTalk name
-
-2.27 - uses
offset
Temperature
Description: Status bits:
Bit 0: Reserved
Bit 1: AutoCorrection Active
Bit 2: In Physical Position
Bit 3: At velocity
Bit 4: In position
Bit 5: Accelerating
Bit 6: Decelerating
Bit 7: Zero search done
Bit 8-15: Reserved
Actual run status bits for the motor.
9.2.21
Reg
26
Temp
Name
TEMP
Size
16bit
Access
R
Range
0...127
Description: Temperature measured inside the motor electronics.
The approximate temperature in degrees Celsius is calculated from the value in this register using the formula: Tc = 2.27 * Value.
9.2.22
Reg
28
Min_P_Ist
Name
MIN_P_IST
Size
32bit
Access
Range
Default
Unit
MacTalk name
R/W
(-231)-(231-1)
0
Steps
Position Limit Min
Description: Position limit for movement in the negative direction. The motor can be configured to
stop automatically when it reaches this position.
9.2.23
Reg
30
Max_P_Ist
Name
MAX_P_IST
Size
32bit
Access
Range
Default
Unit
MacTalk name
R/W
(-231)-(231-1)
0
Steps
Position Limit Max
Description: Position limit for movement in the positive direction. The motor can be configured
to stop automatically when it reaches this position.
9.2.24
Acc_Emerg
Reg
Name
Size
Access
Range
Default
32
ACC_EMERG
16bit
R/W
1-65535
10000
Unit
9.54
RPM/s2
MacTalk name
Error Acceleration
Description: The motor will use this acceleration during an emergency stop.
JVL Industri Elektronik A/S - User Manual - Integrated Step Motors MIS 231, 232, 234
87
9.2
Register Descriptions
9.2.25
Err_Bits
Reg
Name
Size
Access
35
ERR_BITS
16bit
R/W
Range
Default
Unit
MacTalk name
0
Special
Errors
Description: Error bits:
Bit 0: General error. Will always be set together with one of the other bits.
Bit 1: Follow error
Bit 2: Output driver error. Bit is set if one of the outputs is short circuited.
Bit 3: position Limit error
Bit 4: Low bus voltage error
Bit 5: Over voltage error
Bit 6: Temperature too high (90°C)
Bit 7: Internal error (Self diagnostics failed)
If any of these bits are set, the motor is in a state of error, and will not move until all the
errors have been cleared. Some of the errors can be cleared by writing zero to this register. Other errors will require hardware fixes or intervention, such as allowing the
motor cool down or adjusting the power supply voltage.
9.2.26
Warn_Bits
Reg
Name
Size
Access
36
WARN_BITS
16bit
R/W
Range
Default
Unit
MacTalk name
0
Special
Warnings
Description: Warning bits:
Bit 0: Positive limit active. This bit will be set as long as the positive limit is active.
Bit 1: Negative limit active. This bit will be set as long as the negative limit is active.
Bit 2: Positive limit has been active
Bit 3: Negative limit has been active
Bit 4: Low bus voltage
Bit 5: reserved
Bit 6: Temperature has been above 80°C
These bits provide information on both the actual state and remembered state of the end
position limits, the supply voltage and the temperature. These are used for diagnostic
purposes as well as handling position limit stops, also after the motor may have left
the end position mechanically.
9.2.27
Startmode
Reg
Name
Size
Access
Range
Default
Unit
MacTalk name
37
STARTMODE
16bit
R/W
-
0
-
Startup Mode
Description: The motor will switch to this mode after power up. This is also the mode that is used
when a zero search has been completed. See Mode_Reg, page 81 for a list of
possible modes.
9.2.28
Reg
38
P_Home
Name
P_HOME
Size
32bit
Access
R/W
Range
31
31
(-2 )-(2 -1)
Default
Unit
MacTalk name
0
Steps
Zero Search Position
Description: The zero point found is offset with this value.
88
JVL Industri Elektronik A/S - User Manual - Integrated Step Motors MIS 231, 232, 234
9.2
Register Descriptions
9.2.29
V_Home
Reg
Name
Size
Access
Range
Default
Unit
MacTalk name
40
V_HOME
16bit
R/W
-1023-1023
-50
RPM
Zero Search Velocity
Description: The velocity used during zero search. Set a negative velocity to search in the negative
direction.
9.2.30
Homemode
Reg
Name
Size
Access
Range
Default
Unit
MacTalk name
42
HOMEMODE
16bit
R/W
0,13,14
0
-
Zero Search Mode
Description: Selects the zero search that should start on power up.
A value of 13 will use sensor type 1, while a value of 14 will use sensor type 2.
9.2.31
Reg
46
Absolute encoder position
Name
ABSWNCODER
Size
16bit
Access
R
Range
(0-1023)
Default
0
Unit
MacTalk name
-
Abs. Encoder Position
Description: This is the absolute magnetic encoder position, this is only a singleturn value and the
resolution is 10bit. That is 360 deg./1023 = 1 count = appx. 0.35 deg
9.2.32
SSI encoder value
Reg
Name
Size
Access
Range
Default
Unit
MacTalk name
47
ABSWNCODER
16bit
R
(0-1023)
0
-
Abs. Encoder Position
Description: This is the actual encoder position data received from the external SSI encoder. This
value is typically gray-coded.
The firmware offers the possibility to do the Gray conversion but requires that some RxP
programming is done as this feature is only available as a RxP program command.
Example:
An SSI encoder is chosed using 25 bit data.
We want to sample and convert the SSI data value from register 47 and put the converted value into Register 61 (P2).
To get the actual value from the SSI encoder we use a special command 321. The new
data is placed in register 47. Now we want to convert the data from Gray-code to conventional binary format.
To do this we use a Binary command instruction.
The command is 0x0C (12d)
From register 0x2F (47d)
To register 0x3D (61d)
25bits 0x19 (25d)
Get the actual value from
the SSI encoder
Convert from binary
TT2268GB
JVL Industri Elektronik A/S - User Manual - Integrated Step Motors MIS 231, 232, 234
89
9.2
Register Descriptions
9.2.33
Reg
49-64
Pn
Name
Pn
Size
32bit
Access
R/W
Range
31
31
(-2 )-(2 -1)
Default
Unit
MacTalk name
0
Steps
Position n (Pn)
Description: These eight general-purpose position registers are referred to as P1 ... P8 and can be
used to make absolute or relative movements in several different ways, either from the
user program or via the serial interfaces. See also the sections on FastMac commands,
and the P_NEW register description (P_New, page 101).
9.2.34
Vn
Reg
Name
Size
Access
Range
Default
Unit
MacTalk name
65-72
Vn
16bit
R/W
0-1023
250
RPM
Velocity n (Vn)
Description: These eight general-purpose Velocity registers are referred to as V1...V8 and can be
used to change the velocity in several different ways, either from the user program or
via the serial interfaces. See also the sections on FastMac commands.
9.2.35
An
Reg
Name
Size
Access
Range
Default
Unit
MacTalk name
73-76
An
16bit
R/W
1-65535
131
9.54 RPM/s2
Acceleration n (An)
Description: These four general-purpose Acceleration registers are referred to as A1... A4 and can be
used to change the acceleration in several different ways, either from the user program
or via the serial interfaces. See also the sections on FastMac commands.
9.2.36
Tn
Reg
Name
Size
Access
Range
Default
Unit
MacTalk name
77-80
Tn
16bit
R/W
0-511
511
5.87 mA
Current n (Tn)
Description: These four general-purpose Torque registers are referred to as T1...T4 and can be used
to change the velocity in several different ways, either from the user program or via the
serial interfaces. See also the sections on FastMac commands. They select the current in
the motor windings used during movement.
9.2.37
AnalogFiltered
Reg
Name
Size
Access
Range
Default
Unit
MacTalk name
81-88
AnalogFiltered
16bit
R
0-1023
0
4.888mV
N/A
Description: These eight registers hold the software-filtered analog value of each of the eight I/Os:
IO-1 to IO-8. Their values are updated every ten milliseconds. See the AFZUP_xx registers 100-106 for the filter parameters. Important: Also read the section on Analog
filters in this manual.
To use the unfiltered values of the inputs for faster updates, but with no noise immunity,
use registers 89-96 instead (AnalogIn, page 91).
An input voltage of 5.00 Volts corresponds to a register value of 1023.
90
JVL Industri Elektronik A/S - User Manual - Integrated Step Motors MIS 231, 232, 234
9.2
Register Descriptions
9.2.38
AnalogIn
Reg
Name
Size
Access
Range
Default
Unit
MacTalk name
89-96
AnalogInput
16bit
R
0-1023
-
4.888 mV
N/A
Description: These eight registers hold the unfiltered analog value of each of the eight I/Os: IO-1
to IO-8. Their values are updated approximately every 182 micro-seconds.
To use the filtered values of the inputs for better noise immunity, use registers 81-88 instead (AnalogFiltered, page 90).
An input voltage of 5.00 Volts corresponds to a register value of 1023.
9.2.39
Busvol
Reg
Name
Size
Access
Range
Default
Unit
MacTalk name
97
BUSVOL
16bit
R
0-1023
-
109 mV
Bus Voltage
Description: The supply voltage inside the motor is continually measured and stored in this register.
This value is the basis for the warnings and errors of Low Bus Voltage and Over Voltage.
9.2.40
Min_Busvol
Reg
Name
Size
Access
Range
Default
Unit
MacTalk name
98
MIN_BUSVOL
16bit
R/W
0-1023
15
109 mV
Min Bus Voltage
Description: Trigger point for under-voltage
9.2.41
Encoder_Typ
Reg
Name
Size
Access
Range
Default
Unit
MacTalk name
99
ENCODER_TYPE
16bit
R
0-10
-
-
“Tooltip on motor”
9.2.42
Afzup_WriteBits
Reg
Name
Size
Access
Range
Default
Unit
MacTalk name
100
AFZUP_WriteBits
16bit
R/W
-
0
Special
N/A handled on the
Filter Setup screen
Description: When changing values for the analog input filter parameters, this register is used in
combination with registers 102-106. First, all of the registers 102-106 must be loaded
with the values to be used for one or more analog input filters. Then the lower eight bits
in this register are set to select which inputs the parameters in registers 102-106 should
control. The firmware will detect this and copy the parameter values from registers
102-106 to internal storage. Once this has been completed, the firmware sets bit 15 in
this register to show that registers 102-106 are free to receive new values for programming the remaining inputs with other filter parameters. To use the same filtering for all
analog inputs, this register can be loaded with 255 (hex FF).
JVL Industri Elektronik A/S - User Manual - Integrated Step Motors MIS 231, 232, 234
91
9.2
Register Descriptions
9.2.43
Reg
101
Afzup_ReadIndex
Name
AFZUP_Read Index
Size
16bit
Access
Range
R/W
0, 1-8,
3276832775
Default
0
Unit
MacTalk name
Special
N/A handled on the
Filter Setup screen
Description: This register makes it possible to read back the analog input filter parameters for one analog input at a time. To select a new input, write a value of 1 to 8 to this register and wait
for bit 15 to be set high. When bit 15 has been set by the firmware, the registers 102106 have been loaded with the filter parameters currently used by that analog input.
9.2.44
Afzup_ConfMin
Reg
Name
Size
Access
Range
Default
Unit
MacTalk name
102
AFZUP Conf Min
16bit
R/W
0-1022
0
4.888 mV
Confidence Min
Description: The minimum confidence limits for analog inputs are set and read back using this register
in combination with the read and write ‘command’ registers 100 and 101.
If a new raw sample value is less than the value in this register, it is simply discarded and
the filtered input value in registers 81-88 will not change. A value of zero in this register
will effectively disable the minimum confidence check.
9.2.45
Afzup_ConfMax
Reg
Name
Size
Access
Range
Default
Unit
MacTalk name
103
AFZUP_Conf Max
16bit
R/W
1-1023
1023
4.888 mV
Confidence Max
Description: The maximum confidence limits for analog inputs are set and read back using this register
in combination with the read and write ‘command’ registers 100 and 101.
If a new raw sample value is larger than the value in this register, it is simply discarded and
the filtered input value in registers 81-88 will not change. A value of 1023 in this register
will effectively disable the maximum confidence check.
9.2.46
Afzup_MaxSlope
Reg
Name
Size
Access
Range
Default
Unit
MacTalk name
104
AFZUP_ Max Slope
16bit
R/W
2-1023
1023
4.888 mV
Max Slope
Description: The maximum slopes per sample for analog inputs are set and read back using this
register in combination with the read and write ‘command’ registers 100 and 101.
If a new raw sample value on an analog input lies farther from the previous filtered value
in registers 81-88, the new sample will be modified to lie at most MaxSlope units
from the filtered value. This is used to suppress noise and limit acceleration. Note that
the value is optionally filtered after being slope limited, in which case the effective slope
limitation will be divided by the filter ratio. A value of 1023 will effectively disable slope
limitation.
92
JVL Industri Elektronik A/S - User Manual - Integrated Step Motors MIS 231, 232, 234
9.2
Register Descriptions
9.2.47
Reg
105
Afzup_Filter
Name
AFZUP_Filter
Size
16bit
Access
R/W
Range
1-64
Default
Unit
MacTalk name
64
64th
Filter (on the Filter
setup screen)
of new
sample
Description: The final filtering of new samples on the analog inputs can be selected using this register
in combination with the read and write ‘command’ registers 100 and 101. The final
filtered value results from taking Filter/64 of the new sample plus (64-Filter)/64 of the old
value and storing the result in registers 81-88. A value of 64 effectively disables this
filtering, so the new sample simply replaces the old value.
9.2.48
FilterStatus
Reg
Name
Size
Access
Range
Default
106
FilterStatus
16bit
R
0-65535
0
Unit
MacTalk name
N/A (shown grafically)
Description: This register contains status bits for the analog input filters. The lowest eight bits hold
confidence errors for each of the eight inputs, while the highest eight bits hold the status
of their slope errors.
The filter status is updated each second. The confidence error bit will be set if more than
half of the samples within the last second fell outside either of the confidence limits.
The slope errors will be set if more than half of the samples within the last second were
slope limited.
9.2.49
Reg
107
SSI_SETUP1
Name
SSI_Setup1
Size
16bit
Access
R/W
Range
Default
Unit
16Bit
25bit, 100kHz
frequency prepare
time=100µs
*
MacTalk name
* Number of data bits. Clock frequency, Disable interrupts when Reading SSI
Description: This register contains status bits for the analog input filters. The lowest eight bits hold
Register 107, SSI_Setup1, 16 bits: The low byte selects the number of data bits in each
SSI transfer. The valid range is 0 to 31, corresponding to 1 to 32 data bits. The high byte
selects the maximum clock speed in units of 10 kHz. The valid range is 0 to 59, corresponding to 10 kHz to 600 kHz.
Due to the nature of the firmware timing some timing jitter can occur while reading SSI
data. Some encoders doesn't allow this or run with a very tight bit timing so that the
firmware timing jitter causes trouble. To prevent this, interrupts during SSI reading can
be disabled by setting the MSB of the high byte. In this way the timing is strictly control
led. If the timing isn't critical and the motor velocity is high we recommend that the interrupts isn't disabled.
JVL Industri Elektronik A/S - User Manual - Integrated Step Motors MIS 231, 232, 234
93
9.2
Register Descriptions
9.2.50
PulseDirMask
Reg
Name
Size
Access
Range
Default
Unit
MacTalk name
108
PulseDirMask
16bit
R/W
0-65535
0
Bitmask
Pulse signal
Direction signal
Description: When enabled by register 108, this register defines which of the eight digital outputs are
used to transmit the pulse and direction signals. The lowest eight bits select which
outputs will carry the pulse signal, while the highest eight bits select the outputs that
carry the direction signal. More than one output can be selected for each type of signal,
but the MacTalk program supports only one output for each signal. The outputs selected
here must be manually configured to operate as outputs using register 125
(Iosetup, page 96).
9.2.51
PulseDirMod
Reg
Name
Size
Access
Range
Default
Unit
MacTalk name
109
PulseDirMode
16bit
R/W
0-2
0
-
Pulse/Direction
mode
Description: The pulse and direction signals used to control the motor directly attached to the SMC75
board can also be optionally output to digital outputs and used to control other stepper motors. The value in this register selects one of three operating modes: Mode 0
in which the pulse/direction signals are used only internally to control the motor attached
directly to the SMC75 board. Mode 1 in which the signals are not used internally but
output to the digital outputs selected in register 109. Mode 2 where the signals are used
both internally and sent out on the digital outputs.
See register 109 (PulseDirMod, page 94) for more information.
9.2.52
SettlingTime
Reg
Name
Size
Access
Range
Default
Unit
MacTalk name
110
SettlingTime
16bit
R/W
0-32676
0
ms
Settling time
between retries
Description: When the internal encoder option is installed and register 34, InPositionCount, is nonzero so AutoCorrection is enabled, the value in this register defines how many milliseconds to wait after each movement attempt before testing whether the encoder position is within the target window as defined in register 33. This waiting time is often
necessary to allow mechanical oscillations to die out.
9.2.53
SSI_SETUP2
Reg
Name
Size
Access
Range
Default
Unit
111
SSI_Setup2
16bit
R/W
16 bit
25bit, 100kHz
frequency prepare time=100µs
-
MacTalk
name
Prepare time
(Clk to Data)
Description: Register 111, SSI_Setup2, 16 bits: The low byte selects the prepare time in micro sec
onds at the start of an SSI transfer, corresponding to t1 in the figure. The valid range is
0..255 corresponding to 1..256 microseconds.
94
JVL Industri Elektronik A/S - User Manual - Integrated Step Motors MIS 231, 232, 234
9.2
Register Descriptions
9.2.54
Sample 1-4
Reg
Name
Size
Access
Range
Default
Unit
MacTalk name
112115
SAMPLE1-4
16bit
R/W
-
0
-
N/A
Description: Up to four registers can be set up to be sampled into buffers for diagnostic purposes.
These registers define which registers are sampled. All of the registers 1-255 can be
sampled. A value of zero in any of these four registers will cause the corresponding sample buffer to contain zeroes.
See registers 116-119 for more information on the sampling system.
Most users will use MacTalk to handle sampling.
9.2.55
Rec_Cnt
Reg
Name
Size
Access
Range
Default
Unit
MacTalk name
116
REC_CNT
16bit
R/W
-
0
-
N/A
Description: This value specifies the number of samples to take for each of the sampled registers
selected in registers 112-115. This value must never be set larger than the value in the
read-only register 119. Sampling will stop automatically after the specified number of
samples has been taken.
9.2.56
S_Time
Reg
Name
Size
Access
Range
Default
Unit
MacTalk name
117
S_TIME
16bit
R/W
-
1
-
N/A
Description: This value selects the time in milliseconds between samples of the registers selected in
registers 112-115.
9.2.57
S_Control
Reg
Name
Size
Access
Range
Default
Unit
MacTalk name
118
S_CONTROL
16bit
R/W
-
0
-
NA
Description: This value controls the sample system. It can assume three different values:
A value of zero is set by the firmware after all sampling has completed.
A value of one will initialize the sample system.
A value of two will start a new sample sequence and set this register to zero at completion.
The sampled values are read back using the command hex 53 SMC75_READSAMPLE.
9.2.58
Buf_Size
Reg
Name
Size
Access
Range
Default
Unit
MacTalk name
119
BUF_SIZE
16bit
R
-
-
-
N/A
Description: This read-only register contains the maximum length of the sample buffers used to sample the registers selected in registers 112-115. Register 116 should never be set to a value
higher than the value in this register.
JVL Industri Elektronik A/S - User Manual - Integrated Step Motors MIS 231, 232, 234
95
9.2
Register Descriptions
9.2.59
Index_Offset
Reg
Name
Size
Access
Range
Default
Unit
MacTalk name
120
INDEX_OFFSET
16bit
R
0-1599
-
Steps
Tests-
Description: This register can be selected to receive the absolute value of the internal encoder where
the Zero search/home position was found during homing. This is selected by bit 0, Use
Index, in register 122. It requires that the internal encoder option is installed.
9.2.60
Home_Bits
Reg
Name
Size
Access
Range
Default
Unit
MacTalk name
122
HOME_BITS
16bit
R/W
-
0
Special
Advanced-Zero
Search
Description: Bit 0: Search for index
Bit 1: Change direction on limit.
Bit 2: Search for opposite side of sensor
Bit 3: Use Limit switch as sensor
Bit 4: Ignore switch (Used for searching only for index)
Contains configuration bits, that define how Zero search/homing should be carried out.
9.2.61
Reg
124
Setup_Bits
Name
SETUP_BITS
Size
16bit
Access
R/W
Range
-
Default
0
Unit
MacTalk name
Special
Don´t start program
after power up.
Invert motor direction.
External Encoder
Enable DSP 402
Support
Auto encoder synchronize
Description: Bit 0: Invert direction.
Bit 1: Don’t start program after power up.
Bit 3,2: Select encoder input type. 0 = Disabled, 1 = Quadrature, 2 = Pulse/direction
Bit 4: Enable DSP 402 support
Bit 5: Synchronize to encoder after passive
These individual bits are used to control various functions in the firmware.
9.2.62
Iosetup
Reg
Name
Size
Access
Range
Default
Unit
MacTalk name
125
IOSETUP
16bit
R/W
-
0
Special
Inputs/Outputs
Description: This register controls the eight IOs: IO-1 to OI-8. These pins can be used either in
input mode as combined digital and analog inputs or used in output mode as digital outputs. The lowest eight bits in this register can be used to individually invert the active level of the digital inputs. The highest eight bits are used to select the corresponding
pin as an output.
96
JVL Industri Elektronik A/S - User Manual - Integrated Step Motors MIS 231, 232, 234
9.2
Register Descriptions
9.2.63
Turntable_Mode
Reg
Name
Size
Access
Range
Default
Unit
MacTalk name
126
TURNTABLE_
MODE
16bit
R/W
-
0
Special
Turn Table -Mode
Description: In turntable mode, the motor controls the revolution of a turntable that has the number
of positions specified in register 127, TurntableSize. This means the same position will be
reached after rotating this number of steps in either direction.
This register selects one of three modes that define how the motor should move to a
new position when the P_SOLL register is changed.
If the value of this register is zero, the motor will not operate in turntable mode.
In mode 1, the motor will always move to a new position by turning in a positive direction. So to move one step backwards, it must instead move TurntableSize-1 steps
forward.
In mode 2, the motor will always move to a new position by turning in a negative
direction.
In mode 3, the motor will move in the direction that takes the smallest number of
steps to reach the new position.
Note that the motor will not move at all if the new position in register P_SOLL is either
negative or larger than the value of register 127, TurntableSize.
9.2.64
Turntable_Size
Reg
Name
Size
Access
Range
Default
Unit
MacTalk name
127
TURNTABLE_
SIZE
32bit
R/W
-
0
Steps
Turn Table - Size
Description: If turntable mode is selected in register 126, the number of steps needed for a full revolution of the turntable is set in this register. Note that the register P_SOLL must always
have a value between zero and the value in this register minus one. Negative values are
not allowed for P_SOLL or TurntableSize.
9.2.65
Reg
129
NL_Mask
Name
NL_MASK
Size
16bit
Access
R/W
Range
-
Default
0
Unit
MacTalk name
IO Mask
Dedicated Inputs
Negative Limit Input
Description: Selects which one of the eight IO pins to use for the dedicated function of Negative Position Limit.
Exactly one bit must be set, and the IO pin must be configured in register 125 as an
input.
If input 7 is to be used for the Negative Input Limit, write 26 = 64 to this
Example:
register.
JVL Industri Elektronik A/S - User Manual - Integrated Step Motors MIS 231, 232, 234
97
9.2
Register Descriptions
9.2.66
PL_Mask
Reg
Name
Size
Access
Range
Default
Unit
MacTalk name
130
PL_MASK
16bit
R/W
-
0
IO Mask
Dedicated Inputs Positive Limit Input
Description: Selects which one of the eight IO pins to use for the dedicated function of Positive Position
Limit.
Exactly one bit must be set, and the IO pin must be configured in register 125 as an
input.
Example: If input 8 is to be used for the Positive Input Limit, write 27 = 128 to this
register.
9.2.67
Home_Mask
Reg
Name
Size
Access
Range
Default
Unit
MacTalk name
132
HOME_MASK
16bit
R/W
-
0
IO Mask
Dedicated inputs.
Home Input
Description: Selects which one of the eight IO pins to use for the dedicated function of Home Input.
Exactly one bit must be set, and the IO pin must be configured in register 125 as an
input.
If input 2 is to be used for the Home Input, write 21 = 2 to this register.
Example:
9.2.68
CAN_Setup1
Reg
Name
Size
Access
Range
Default
Unit
MacTalk name
133
CAN_Setup1
16bit
R/W
16bit
35
-
32-bit Register
Description: Register 133 holds the user selectable 32-bit register number that is transferred in
PDO22 or PDO4 (Beckhoff). Please observe that this is not working with DSP402.
Example: Register133=10 will transfer register 10 (P_IST actual position, 32bit value) in
PDO22 or PDO4.
9.2.69
CAN_Setup2
Reg
Name
Size
Access
Range
Default
Unit
MacTalk name
134
CAN_Setup2
16bit
R/W
16bit
170
-
16-bit Register
Description: Register 134 holds the user selectable 16-bit register number that is transferred in
PDO22 or PDO4 (Beckhoff). Please observe that this is not working with DSP402.
Example: Register133=5 will transfer register 5 (V_IST actual velocity, 16bit value) in
PDO22 or PDO4.
98
JVL Industri Elektronik A/S - User Manual - Integrated Step Motors MIS 231, 232, 234
9.2
Register Descriptions
9.2.70
Input_Filter_Mask
Reg
Name
Size
Access
Range
Default
Unit
MacTalk name
135
INPUT_FILTER_
MASK
16bit
R/W
-
0
IO Mask
IOx digital input filter enabled
Description: This register controls filtering of each of the eight IO pins that are used as digital
inputs. If the bit corresponding to the input number is set in this register, the input value
will be filtered to a new logical level is only accepted after that level has been measured
on the hardware pin for the number of milliseconds specified in register 136. If the bit is
not set, the input will be updated directly from the hardware value every 100
microseconds. Please read the section on Digital Input filters in this manual.
9.2.71
Input_Filter_Cnt
Reg
Name
Size
Access
Range
Default
Unit
MacTalk name
136
INPUT_FILTER_
CNT
16bit
R/W
-
5
ms
Input filter time
Description: The filtering of all of the eight digital inputs is controlled by the value in this register
together with register 135. The input must be sampled at the same value for the specified
number of milliseconds in this register to be accepted as the new filtered value. See also
the section on Digital Input Filters in this manual.
9.2.72
Reg
137
Inpos_Mask
Name
INPOS_MASK
Size
16bit
Access
R/W
Range
-
Default
0
Unit
MacTalk name
IO MASK
Dedicated Outputs
- In Position
Description: Selects which one of the eight IO pins to use for the dedicated function of In Position
Output.
Exactly one bit must be set, and the IO pin must be configured in register 125 as an
output.
The In Position output will then be set after a movement has completed.
If output 1 is to be used for the In Position Output, write 20 = 1 to this register.
Example:
9.2.73
Error_Mask
Reg
Name
Size
Access
Range
Default
Unit
MacTalk name
138
ERROR_MASK
16bit
R/W
-
0
IO Mask
Dedicated Outputs
- Error
Description: Selects which one of the eight IO pins to use for the dedicated function of Error Output.
Exactly one bit must be set, and the IO pin must be configured in register 125 as an
output.
The Error Output will set be set when any error is set.
See register 35 (Err_Bits, page 88) for more information on errors.
If output 3 is to be used for the Error Output, write 22 = 4 to this register.
Example:
JVL Industri Elektronik A/S - User Manual - Integrated Step Motors MIS 231, 232, 234
99
9.2
Register Descriptions
9.2.74
Acceptance voltage
Reg
Name
Size
Access
Range
Default
Unit
MacTalk name
139
AcceptanceVoltage
16bit
R/W
16bit
18
Counts
Acceptance
Voltage
Description: Acceptance Voltage, selects the voltage threshold that defines when the power supply is
ready to use for erasing the used flash memory sector after power up.
The scaling/unit is as follows (1023 = 111.4V) this is ofcause a theoretical value and will
greatly depends on which input that is used (setup using register 142).
Due to the HW variation on inputs, different threshold values must be used. The following table will indicate which values to be used in combination with which input that is
used.
For IO1-IO8 (Filtered or Nonfiltered) an analog voltage of 0-5V is sampled. Anything
above this will result in a 5V reading.
IO1-IO8 5V = 1023 Counts
For Bus voltage and the CVI -selection the scaling is as follows:
1023 = 111.2V (in theory) so 48V = 441.6 (appx. due to component tolerances etc.)
Please observe that CVI measurements are only available from HW. Rev. 1.7 and up. The
HW rev. can be observed in the tooltip over the motor displayed in MacTalk.
9.2.75
Acceptance count
Reg
Name
Size
Access
Range
Default
Unit
MacTalk name
140
AcceptanceCount
16bit
R/W
16bit
10000
-
Acceptance Count
Description: Acceptance Count, selects the number of times the Acceptance Voltage must be measured after power up before the flash erase operation is started.
When using values 1-8 or 12 for register 142, the count is in units of ~245 microseconds.
When using values 81-88, the count is in units of 10 milliseconds.
The flash memory sector holding the absolute position information is erased at startup
to save critical time when the absolute information is about to be saved to flash memory
again.
This register selects when to consider the startup as completed and supply voltage as stable.
100
JVL Industri Elektronik A/S - User Manual - Integrated Step Motors MIS 231, 232, 234
9.2
Register Descriptions
9.2.76
Save threshold voltage
Reg
Name
141
SaveThresholdVoltage
Size
16bit
Access
R/W
Range
16bit
Default
-
Unit
MacTalk name
-
Save Threshold
Voltage
Description: When voltage drops below the selected value the absolute position information (and other information) is instantly saved to flash memory .
Save Threshold Voltage, selects the voltage threshold, that will trigger the flash save operation (and stop all other motor operation).
When register 142 has the value 12, the scaling/unit of register 141 is the same as register
97, BusVoltage (1023 = 111.4V).
The register 142 has the values of 1-8 or 81-88, the scaling/unit of register 141 is the
same as registers 81-96 (1023 = 5.0V)
The scaling of this value follows the one of the Acceptance Voltage, register 139.
9.2.77
Analog input selection
Reg
Name
Size
Access
Range
Default
Unit
MacTalk name
142
AnalogInputSelection
16bit
R/W
16bit
0
-
Analog Input Selection
Description: Analog input selection, selects which analogue input to use for measuring the power supply.
It can be:
1 to 8 for analogue inputs IO1 to IO8, using the unfiltered values for fast response.
81 to 88 for analogue inputs IO1 to IO8, using the filtered values for noise immunity.
12 for the bus voltage used for motor supply
and finally 13 for CVI measurement(from HW rev. 1.7 and up).
Any other value will disable the flash backup system.
When running the motor from 30 Volts or less, it can be convenient to connect the bus
voltage with the control voltage (CV) supply, and use the value 12 in register 142 to monitor the control voltage.
When running the motor from 48 Volts, this is not allowed and can damage the controller
board if voltage exceeds 30V
9.2.78
P_New
Reg
Name
Size
Access
Range
Default
Unit
MacTalk name
144
P_NEW
32bit
R/W
(-231)-(231-1)
0
Counts
N/A
Description: This register can be used to change both of the registers P_SOLL and P_IST in one operation. This can be used to correct or offset the current position without performing a
movement. The register value can be copied to P_IST and P_SOLL using FastMac command 23, or it can be added with sign to both of these registers using FastMac command
24.
JVL Industri Elektronik A/S - User Manual - Integrated Step Motors MIS 231, 232, 234
101
9.2
Register Descriptions
9.2.79
Baud_Rate
Reg
Name
Size
Access
Range
Default
Unit
MacTalk name
146
BAUD_RATE
16bit
R/W
0-5
1
-
Baud Rate
Description: The baud rate on the serial port.
0 : 9600 baud
1 : 19200 baud (default)
2 : 38400 baud
3 : 57600 baud
4 : 115200 baud
5 : 230400 baud
6 : 460800 baud
7 : 921600 baud
The firmware will automatically update the baud rate after this value is changed over the
serial interface (RS485) once the motor has finished transmitting all data bytes that
are queued.
9.2.80
Tx_Delay
Reg
Name
Size
Access
Range
Default
Unit
MacTalk name
147
TX_DELAY
16bit
R/W
1-255
15
Bits
Transmit Delay
Description: The time to wait before the response is transmitted. The unit corresponds to the time
of one bit at the current baud rate.
Many PLCs and communications processors require a minimum delay after they have
sent a command to the motor before they are able to receive the response.
9.2.81
Group_Id
Reg
Name
Size
Access
Range
Default
Unit
MacTalk name
148
GROUP_ID
16bit
R/W
0-255
-
-
Group Id
Description: The group ID of the motor. The motor will accept data from a group write command
only if the group ID number in the command matches this number. The idea is that
several motors can have the same group ID so they can be updated with new register
values in parallel to save transmission time.
9.2.82
Group_Seq
Reg
Name
Size
Access
Range
Default
Unit
MacTalk name
149
GROUP_SEQ
16bit
R
0-255
-
-
N/A
Default
Unit
MacTalk name
-
Motor Address
Description: The last received group write sequence.
9.2.83
My_Addr
Reg
Name
Size
Access
Range
150
MY_ADDR
16bit
R/W
0-254
Description: The motor address. Data communicated over the serial interface will only be accepted
if the address byte in the command is either equal to this value or has the value 255,
which means broadcast to all motors.
102
JVL Industri Elektronik A/S - User Manual - Integrated Step Motors MIS 231, 232, 234
9.2
Register Descriptions
9.2.84
Motortype
Reg
Name
Size
Access
Range
151
MOTORTYPE
16bit
R
64-xx
Default
Unit
MacTalk name
-
“Status Bar”
Description: The motor type.
64: SMC75
65: MIS231
66: MIS232
67: MIS234
This value is read-only and is programmed into the motor during manufacturing.
9.2.85
Serial_Number
Reg
Name
Size
Access
Range
Default
Unit
MacTalk name
152
SERIALNUMBER
32bit
R
-
-
-
“Status Bar”
Description: The serial number of the motor.
This value is read-only and is programmed into the motor during manufacturing.
9.2.86
Checksum
Reg
Name
Size
Access
Range
Default
154
CHECKSUM
32bit
R
0-65535
-
Unit
MacTalk name
Description: Firmware checksum.
This value is read-only and is programmed into the motor during firmware update.
9.2.87
Reg
156
Hardware_Rev
Name
HARDWARE_REV
Size
16bit
Access
R
Range
0-65535
Default
Unit
MacTalk name
-
Major*16+
Minor
+16384
“Tooltip on
Motor”
Description: The revision of the hardware. This value is read-only and is programmed into the motor
during manufacturing.
9.2.88
Reg
157
Max_Voltage
Name
MAX_VOLTAGE
Size
16bit
Access
R
Range
0-100
Default
*
Unit
MacTalk name
Volt
“Tooltip on
Motor”
Description: The maximum allowed voltage on the bus. If the bus voltage exceeds this value, the motor will enter an error state.
This value is read-only and is programmed into the motor during manufacturing. It reflects the rating of the hardware components. Supplying a higher voltage can damage the
electronics components permanently. If in doubt, it is strongly recommended to first
supply 24 Volts and connect the motor to MacTalk. In MacTalk this value can be read by
holding the mouse cursor over the image of the motor in the lower right of the main window.
JVL Industri Elektronik A/S - User Manual - Integrated Step Motors MIS 231, 232, 234
103
9.2
Register Descriptions
9.2.89
Available_IO
Reg
Name
Size
Access
Range
Default
Unit
MacTalk name
158
AVAILABLE_IO
16bit
R
-
-
IO MASK
N/A
Description: Defines what IO that are available on the connector.
This value is read-only and is programmed into the motor during manufacturing. Service
personnel may ask for this value to identify the type of connector board mounted on
the motor. The values are not documented here.
9.2.90
Bootloader_Ver
Reg
Name
Size
Access
Range
Default
Unit
MacTalk name
159
BOOTLOADER_
VER
16bit
R
0-65535
-
Major*16+
Minor
+16384
“Tooltip on
Motor”
Description: The version of the boot-loader.
This value is read-only and is programmed into the motor during manufacturing
9.2.91
Notsaved
Reg
Name
Size
Access
Range
Default
Unit
MacTalk name
160
NOTSAVED
16bit
R/W
0-65535
0
-
N/A
Description: This register is not used internally, but will always be 0 after power on. Please note that
MacTalk uses this register
9.2.92
Option_Bits
Reg
Name
Size
Access
Range
Default
Unit
MacTalk name
165
OPTION_BITS
16bit
R
0-65535
-
-
“Tooltip on motor”
Description: This register contains information about what options are available. Bit 0-7 defines the
options available in the hardware (or licensed). Bit 8-15 defines the options available in
the firmware.
Bit 0,8 : CanOpen fieldbus
Bit 1,9 : DeviceNet fieldbus
9.2.93
Fbus_Node Id
Reg
Name
Size
Access
Range
Default
Unit
MacTalk name
166
FBUS_NODE ID
16bit
R/W
0-255
5
-
Fieldbus - Node ID
Description: The node id on the fieldbus interface.
104
JVL Industri Elektronik A/S - User Manual - Integrated Step Motors MIS 231, 232, 234
9.2
Register Descriptions
9.2.94
Fbus_Baud
Reg
Name
Size
Access
Range
Default
Unit
MacTalk name
167
FBUS_BAUD
16bit
R/W
0-8
2
-
Fildbus - Baud Rate
Description: The baudrate used on the fieldbus interface.
0 : 1000 kbit/s
1 : 800 kbit/s (unsupported)
2 : 500 kbit/s
3 : 250 kbit/s
4 : 125 kbit/s
5 : 100 kbit/s
6 : 50 kbit/s
7 : 20 kbit/s
8 : 10 kbit/s
9.2.95
Ext_Encoder
Reg
Name
Size
Access
Range
Default
Unit
MacTalk name
170
EXT_ENCODER
32bit
R/W
(-231)-(231-1)
-
Counts
External Encoder
Description: This register counts the encoder input on IN1+IN2. The type of input is selected using
SETUP_BITS bit 2+3.
9.2.96
Ext_Encoder_Vel
Reg
Name
Size
Access
Range
Default
Unit
MacTalk name
172
EXT_ENCODER
_VEL
16bit
R
(-215)-(215-1)
-
Counts
16ms
External Encoder
Velocity
Description: This register is updated with the velocity of the external encoder input. The velocity is
measured every 16ms.
JVL Industri Elektronik A/S - User Manual - Integrated Step Motors MIS 231, 232, 234
105
106
JVL Industri Elektronik A/S - User Manual - Integrated Step Motors MIS 231, 232, 234
10
Programming
JVL Industri Elektronik A/S - User Manual - Integrated Step Motors MIS 231, 232, 234
107
10.1
Getting started with programming
When using the SMC75, almost any kind of program can be created using a set of user
friendly icons.
Make the required choice on the Programming tab.
Choose here to make a new program
Optionally uploads the actual program
previously stored in the module.
TT2188GB
After making one of these 2 choices, the program window will be opened.
108
JVL Industri Elektronik A/S - User Manual - Integrated Step Motors MIS 231, 232, 234
10.2
Programming Main window
The main window for creating a new program or editing a program is shown below:
SMC75 Status texts
The message Program not transferred means
that there is a difference between the program
seen on the screen and the actual program in
the module. This can happen if the program
have been edited but not transferred.
Status: Running (or Stopped) refers to the
program in the module.
Programming menu
Main menu for creating a new program,
Verifying program size and other basic
details for the SMC75 Controller..
Transfer & Start
Will transfer the complete
program and start it.
Use Stop or Pause to stop it.
Stop
Use this botton if the program
must be stopped.
Program lines
Each Botton represent a program
line. By pushing the botton a command can be entered at the program
line.
Pause
Use this botton if the program must
be paused. By paused means that actual
program line executed is temporary paused.
When paused the single step feature can be
used to debug the program.
TT2189GB
JVL Industri Elektronik A/S - User Manual - Integrated Step Motors MIS 231, 232, 234
109
10.3
Programming menu
The menu found at the top of the main window gives access to the following options:
g
g
Described elsewhere in this chapter
Upload the program from the module to MacTalk
Program + Source
Shows the memory usage if the program
(compiled)+source program and remarks
is downloaded into the module.
Program + Source - REM
Same as above but without remarks.
Program only
Same as above but without source
program and remarks.
Checksum
Shows the checksum of the complete
program downloaded into the module.
The checksum is unique and can be used
to verify whether the program in the
module matches the original program or
not.
Lines
The number of program lines used in the
source program (MacTalk)
Mode
Specify the program type actually used.
Skip initialization (advanced)
Bypasses internal initialization routines after powerup.
(Only for very special use).
Program + Source + Remarks
Default. Choosing this will transfer everything down into the
module memory. This can be an advantage if remarks
and source program must be uploaded to MacTalk later.
Program + Source
Same as above but without remarks.
Program only
Only the compiled program is transfered.
110
TT2173GB
JVL Industri Elektronik A/S - User Manual - Integrated Step Motors MIS 231, 232, 234
10.4
How to build a program
When choosing New program in the Programming menu or entering MacTalk for the
first time, programming can be started.
Press the button at line 1 and a tool box will pop up.
1
Press the first button to create
the first program line.
The “Select command” box will
pop up.
2
Choose the desired command.
In this example it is desired to
wait for an input to be activated
before further program execution.
3
Choose to wait until input 5
is high and press OK
4
The command is inserted at the
previous selected program line
TT0983GB
Continued
JVL Industri Elektronik A/S - User Manual - Integrated Step Motors MIS 231, 232, 234
111
10.4
How to build a program
5
Press the second button to create
the second program line
6
Choose the movement type needed.
Relative: Move x counts forward with
reference to the actual position.
Absolute: Move to the x position with
reference to the zero search position.
7
The relative move command just
entered is converted into a program
line.
8
Multiple program lines are
entered by the user forming
the last part of the program.
9
Now the program is finished.
Press the “Transfer & Start”
button.
Now the program will be transfered
and stored permanently in the module.
The program will be executed
immidiately
TT0984GB
112
Continued
JVL Industri Elektronik A/S - User Manual - Integrated Step Motors MIS 231, 232, 234
10.4
How to build a program
10
Now the program is running
continuously. The actual program
line which is executed is shown
by the small red arrow.
11
By choosing the “Pause” button, the
program is paused. After it is paused,
it is possible to single step through
each program line which can be a
useful feature to debug the program
since the action in each line can be
closely observed.
12
When the program is finished, it can
be saved on the harddisc or floppy
disc. Please be aware that when
saving the program it is the complete
program including the overall setup
of the motor such as servofilter, I/O
setup etc. Everything is stored in a file
with the extension .MAC. Later it can
be opened and restored in the motor.
TT0985GB
JVL Industri Elektronik A/S - User Manual - Integrated Step Motors MIS 231, 232, 234
113
10.5
General programming hints
When programming and saving programs the following hints may be useful to ensure that
the program behaves as expected.
1. When transferring the program to the module, it is saved permanently in memory
and the program will be executed each time the motor is switched on.
2. Before beginning to program, ensure that the basic parameters for controlling acceleration, torque, safety limits, etc. are set to proper values. When saving the program
on the hard-disk or to floppy disc, all of these basic parameter settings will be saved
together with the program as a complete motor setup package.
3. A program line can be edited by double-clicking on the command text.
4. When the cursor is placed on top of the command icon, an edit menu will be shown
by right-clicking.
114
JVL Industri Elektronik A/S - User Manual - Integrated Step Motors MIS 231, 232, 234
10.6
Command toolbox description
The toolbox used for programming covers 14 different command types.
The basic idea of the commands is to provide easy access to the most common functions
of the motor. Some functions may seem to be missing at first glance, but the buttons “Set
register in the QuickStep motor” or “Wait for a register value before continuing” give
direct access to 50 registers in the basic QuickStep motor, such as the gear ratio or the
actual torque register.
In total, this gives a very powerful programming tool since >95% of a typical program
can be built using the simple command icons, while the remaining 5% is typically
achieved by accessing the basic motor registers directly.
The following gives a short description of all 14 command icons.
Use: Initiates any
motor movement
relative or absolute.
Use: When a remark/
Comment must be inserted
in the program.
Use: Set the motor in the
desired mode such as
position- or velocity mode.
Use: Set a certain
state at one or multiple
digital outputs.
Use: Unconditional
jump from one program
line to another.
Use: Conditional jump
from one program line
to another. Input dependent
Use: Inserts a delay in
the program specified
in milliseconds.
Use: Wait for a certain
state at one or multiple
digital inputs.
Use: Conditional jump
from one program line to
another. Register dependent
Use: Write a value
to almost any register in
the basic MAC/MIS motor.
Use: Save the actual motor
position to an intermediate
register.
Use: Wait until a certain
register in the basic
MAC/MISmotor reaches
a certain value.
Use: Preset the position
counter to a certain value.
Use: Initiates a zero
search to a sensor
Use: Send a FastMac
commandto the motor.
FastMac commands can
be used to send complex
instructions very quickly.
TT2222GB
Use: Performs a calculation
using constants and register
values, and stores the result
in a motor register
Use: Conditional Jump
according to a comparison
between the values of
two registers
Use: Sends a command in
binary format, that enables
various non-standard
operations
JVL Industri Elektronik A/S - User Manual - Integrated Step Motors MIS 231, 232, 234
115
10.7 Graphic programming command reference
10.7.1
Enter your own remarks
Icon:
Dialog:
Function:
10.7.2
Inserts a remark/comment in the source code. The program line will not do
anything, but can make the source code easier to read. This can be very
important if other programmers have to review or work on the code, or if the
program is only worked on infrequently.
Set operation mode
Icon:
Dialog:
Function:
10.7.3
Sets the operating mode of the motor. When the program encounters a
program line with this command, the motor’s operating mode will be set to
the specified mode. This allows you to use different operating modes in
different parts of the program.
For a detailed description of the individual operating modes, refer to section
1.3.1., Basic modes/functions in the QuickStep motor, page 10.
Move operations
Icon:
Function:
116
The Move command is very flexible, with five different operating modes. Each
mode is described in its own section below.
JVL Industri Elektronik A/S - User Manual - Integrated Step Motors MIS 231, 232, 234
10.7
Graphic programming command reference
10.7.4
Move (Relative)
Icon:
Dialog:
Function:
Performs a movement relative to the current position. The distance moved is
measured in encoder counts, and can either be entered directly or taken from
three registers in the user memory area. For further information on using
these memory registers, refer to the sections on the ‘Save position’ and ‘Set
position’ commands.
Note that if you specify a velocity, motor register no. 5 (V_SOLL) will be
overwritten with this velocity value. Also, if you specify an acceleration, motor
register no. 6 (A_SOLL) will be overwritten with the acceleration value
specified. Register no. 49 (P1) is always overwritten by this command.
If the ‘Wait for in position’ option is checked, the program will wait until the
motor has finished the movement, before proceeding to the next program
line. If this option is not checked, the program will start the movement, then
immediately start executing the next command. The motor will finish the
movement on its own, unless given other instructions by the program.
JVL Industri Elektronik A/S - User Manual - Integrated Step Motors MIS 231, 232, 234
117
10.7
10.7.5
Graphic programming command reference
Move (Relative + velocity change at a distance)
Icon:
Dialog:
Function:
118
Performs a relative movement, and changes velocity at a specified distance
before reaching the new position. The distances are measured in encoder
counts and can either be entered directly, or taken from three memory
registers in the RxP module. For further information on using these memory
registers, refer to the sections on the ‘Save position’ and ‘Set position’
commands.
Note that motor register no. 5 (V_SOLL) will always be overwritten with the
value specified in the ‘New velocity’ field. Also, if you specify an acceleration,
motor register no. 6 (A_SOLL) will be overwritten with the acceleration value
specified. Register no. 49 (P1) is always overwritten by this command.
This command always waits until the movement is finished, before proceeding
to the next line in the program.
JVL Industri Elektronik A/S - User Manual - Integrated Step Motors MIS 231, 232, 234
10.7
10.7.6
Graphic programming command reference
Move (Relative + set outputs)
Icon:
Dialog:
Function: Performs a movement relative to the current position, and sets one or more
outputs when the operation is completed. The distance moved is given in
encoder counts and can either be entered directly, or can be taken from one
of three memory registers in the user memory area. For further information
on using these memory registers, refer to the sections on the ‘Save position’
and ‘Set position’ commands.
Note that if you specify a velocity, motor register no. 5 (V_SOLL) will be
overwritten with this velocity value. Also, if you specify an acceleration, motor
register no. 6 (A_SOLL) will be overwritten with the acceleration value
specified. Register no. 49 (P1) is always overwritten by this command.
This command always waits until the movement is finished, before proceeding
to the next line in the program.
JVL Industri Elektronik A/S - User Manual - Integrated Step Motors MIS 231, 232, 234
119
10.7
10.7.7
Graphic programming command reference
Move (Absolute)
Icon:
Dialog:
Function:
120
Moves to an absolute, non-relative position. The position is given in encoder
counts and can either be entered directly, or can be taken from one of three
memory registers in the user memory area. For further information on using
these memory registers, refer to the sections on the ‘Save position’ and ‘Set
position’ commands.
Note that if you specify a velocity, motor register no. 5 (V_SOLL) will be
overwritten with this velocity value. Also, if you specify an acceleration, motor
register no. 6 (A_SOLL) will be overwritten with the acceleration value
specified.
If the ‘Wait for in position’ option is checked, the program will wait until the
motor has finished the movement before proceeding to the next program line.
If this option is not checked, the program will start the movement, then
immediately start executing the next command. The motor will finish the
movement on its own, unless given other instructions by the program.
JVL Industri Elektronik A/S - User Manual - Integrated Step Motors MIS 231, 232, 234
10.7
Graphic programming command reference
10.7.8
Move (Sensor)
Icon:
Dialog:
Function:
Performs a movement in the direction specified until an input condition is
satisfied. The motor then moves the distance specified before stopping. The
motor will not move farther than the Safety distance specified, regardless of
whether the input condition is satisfied. The distances are measured in
encoder counts and can either be entered directly, or taken from three
memory registers in the user memory area. For further information on using
these memory registers, refer to the sections on the ‘Save position’ and ‘Set
position’ commands.
Note that if you specify a velocity, motor register no. 5 (V_SOLL) will be
overwritten with this velocity value. Also, if you specify an acceleration, motor
register no. 6 (A_SOLL) will be overwritten with the acceleration value
specified. Register no. 49 (P1) is always overwritten by this command.
This command always waits until the movement is finished before proceeding
to the next line in the program.
JVL Industri Elektronik A/S - User Manual - Integrated Step Motors MIS 231, 232, 234
121
10.7
10.7.9
Graphic programming command reference
Set outputs
Icon:
Dialog:
Function:
122
Sets one or more outputs. When setting a single output, you can set it to high,
low, or you can specify the length (in milliseconds) of a pulse to send out on
that output. When setting multiple outputs, you can specify whether to set
each output high, low, or leave it in its current state.
JVL Industri Elektronik A/S - User Manual - Integrated Step Motors MIS 231, 232, 234
10.7
Graphic programming command reference
10.7.10
Unconditional jump
Icon:
Dialog:
Function:
10.7.11
None. After selecting this command, the mouse cursor changes. The next
program line that you click on will become the destination for the jump.
Jumps to another line in the program.
Conditional jump (single input)
Icon:
Dialog:
Function:
Tests for an input condition before either jumping to another line in the
program or moving on to the next line in the program. If the condition is met,
the command jumps to the specified program line. If the condition is not met,
the program proceeds to execute the next line in the program.
When ‘Input type’ is set to ‘Single’, the command can test a single input for one
of four possible conditions: the input is low, the input is high, the input has
transitioned to low (Falling Edge), or the input has transitioned to high (Rising
Edge). If transitions are tested for, the transition must have taken place during
the last 30 microseconds.
After pressing the OK button, the dialog will disappear, and the mouse cursor
will change. The next program line that you click on will then become the
destination of the jump command.
JVL Industri Elektronik A/S - User Manual - Integrated Step Motors MIS 231, 232, 234
123
10.7
10.7.12
Graphic programming command reference
Conditional jump (multiple inputs)
Icon:
Dialog:
Function:
124
Tests for an input condition before either jumping to another line in the
program or moving on to the next line in the program. If the condition is met,
the command jumps to the specified program line. If the condition is not met,
the program proceeds to execute the next line in the program.
When ‘Input type’ is set to ‘Multiple’, multiple inputs can be tested for being
either high or low. The ‘Operand’ setting determines whether one or all of the
inputs must meet their test criterion. If set to ‘And’, all inputs must match their
test settings. If set to ‘Or’, only one input need match its test setting. Inputs
that are set to ‘Don’t care’ are not tested.
After pressing the OK button, the dialog will disappear, and the mouse cursor
will change. The next program line that you click on will then become the
destination of the jump command.
JVL Industri Elektronik A/S - User Manual - Integrated Step Motors MIS 231, 232, 234
10.7
Graphic programming command reference
10.7.13
Wait for (x) ms before continuing
Icon:
Dialog:
Function:
10.7.14
Causes the program to pause for a number of milliseconds before continuing.
The maximum pause that can be specified is 65535 milliseconds. The
minimum pause that can be specified is 0 milliseconds.
Note that this command overwrites Timer 1 in the RxP module’s memory.
Wait for an input combination before continuing (single input)
Icon:
Dialog:
Function:
Waits for a specified input condition to occur. The next line in the program will
not be executed until the input condition has been met.
If ‘Input type’ is set to ‘Single’, the command will wait for one of four things to
happen on the specified input: that the input tests as high, that the input tests
as low, that the input transitions from high to low (Falling Edge), or that the
input transitions from low to high (Rising Edge). The input is tested with 30
microsecond intervals.
JVL Industri Elektronik A/S - User Manual - Integrated Step Motors MIS 231, 232, 234
125
10.7
10.7.15
Graphic programming command reference
Wait for an input combination before continuing (multiple inputs)
Icon:
Dialog:
Function:
126
Waits for a specified input condition to occur. The next line in the program will
not be executed until the input condition has been met.
If ‘Input type’ is set to ‘Multiple’, multiple inputs can be tested for being either
high or low. The ‘Operand’ setting determines whether one or all of the inputs
must meet their test criterion. If set to ‘And’, all inputs must match their test
settings. If set to ‘Or’, only one input need match its test setting. Inputs that
are set to ‘Don’t care’ are not tested. The inputs are tested with 30
microsecond intervals.
JVL Industri Elektronik A/S - User Manual - Integrated Step Motors MIS 231, 232, 234
10.7
Graphic programming command reference
10.7.16
Set a register in the MIS motor
Icon:
Dialog:
Function:
10.7.17
Sets a register in the motor to a specified value. The register is selected from a
list of known, user-accessible registers. The value can either be entered as
native motor units or it can be entered as generic engineering units.
The dialog above provides an example: register no. 3 (P_SOLL, or Requested
position, depending on your preference) can either be set to an integer
number of encoder counts, or it can be set to a non-integer number of
revolutions.
Jump according to a register in the MAC motor
Icon:
Dialog:
Function:
Tests a register in the motor against a specified value before either jumping to
another line in the program or moving on to the next line in the program. If
the condition is met, the command jumps to the specified program line. If the
condition is not met, the program proceeds to execute the next line in the
program. The value can either be entered as native motor units, or it can be
entered as generic engineering units.
The dialog above provides an example: register no. 10 (P_IST, or Actual
position, depending on your preference) must be equal to 0 revolutions if the
jump is to be executed. The position that the register is tested against can be
specified as an integer number of encoder counts or can be specified as a noninteger number of revolutions.
After pressing the OK button, the dialog will disappear and the mouse cursor
will change. The next program line that you click on will then become the
destination of the jump command.
JVL Industri Elektronik A/S - User Manual - Integrated Step Motors MIS 231, 232, 234
127
10.7
10.7.18
Graphic programming command reference
Wait for a register value before continuing
Icon:
Dialog:
Function:
10.7.19
Tests a register in the motor against a specified value and waits until the
specified condition is met. The value can either be entered as native motor
units or can be entered as generic engineering units.
The dialog above provides an example: register no. 10 (P_IST, or Actual
position, depending on your preference) must be less than 0 revolutions,
before the program will continue. The position that the register is tested
against can be specified as an integer number of encoder counts, or can be
specified as a non-integer number of revolutions.
Save position
Icon:
Dialog:
Function:
128
Saves the current position from register no. 10 (P_IST) to one of three
locations in the user memory area. The saved position(s) can then be used
whenever a position or distance is needed in a move command.
JVL Industri Elektronik A/S - User Manual - Integrated Step Motors MIS 231, 232, 234
10.7
Graphic programming command reference
10.7.20
Set position
Icon:
Dialog:
Function:
10.7.21
Sets the current position stored in register no. 10 (P_IST) to one of three
position values stored in the user memory area. This is the reverse of the ‘Save
position’ command.
Zero search
Icon:
Dialog:
Function:
Initiates a zero search. The program waits until the zero search has completed
before proceeding to the next command. For a detailed description of how to
set up a zero search, refer to Zero search modes, page 68
JVL Industri Elektronik A/S - User Manual - Integrated Step Motors MIS 231, 232, 234
129
10.7
10.7.22
Graphic programming command reference
Send FastMAC command (change mode and activate register)
Icon:
Dialog:
Function:
130
FastMAC commands are also sometimes referred to as FlexMAC commands.
The advantage of these commands is a very low communication overhead.
FastMAC/FlexMAC commands are described in detail in section 4.5.7 of the
MAC user manual, JVL publication no. LB0047-20GB. However, a brief
summary is in order.
If ‘Mode’ is set to ‘Passive’, ‘Velocity’, or ‘Position’, the motor will switch to
that mode. Also, one of the passive motor registers will be activated, in the
sense that its value will be written to the corresponding active motor register,
which actually controls motor behaviour. In the example above, the value in
register no. 65 (V1) will be written to register no. 5 (V_SOLL). Move
operations will then take place at that velocity.
JVL Industri Elektronik A/S - User Manual - Integrated Step Motors MIS 231, 232, 234
10.7
Graphic programming command reference
10.7.23
Send FastMAC command (macro command)
Icon:
Dialog:
Function:
10.7.24
If ‘Mode’ is set to ‘Command’, the motor does not necessarily change mode
but it can be commanded to carry out a series of predetermined operations.
Describing all of the FastMAC commands is beyond the scope of this section
but for example, using a single command it is possible to activate four different
sets of registers, each controlling position, velocity, acceleration, torque, load
factor, and in-position window. For further details, refer to section 4.5.7 of the
MAC user manual.
Binary command
Icon:
Dialog:
Function:
MacTalk SMC75 programs are sent to the motor in a compact, binary format,
which is then interpreted by the SMC75’s firmware. The existing set of graphic
commands covers most situations, but when special needs arise, anything that
can be done with SMC75 programs can be done with a binary command. If
special needs arise that are not covered by the other commands, contact JVL
for assistance.
JVL Industri Elektronik A/S - User Manual - Integrated Step Motors MIS 231, 232, 234
131
10.7
10.7.25
Graphic programming command reference
Calculator (basic)
Icon:
Dialog:
Function:
132
Performs a calculation using register values, constants, and the four basic
arithmetic operations: +, -, * and /. The result is stored in a register.
Arithmetic operations take place in the order that they are specified.
Operands/arguments can be either integer constants or registers. The caption
of the dialog box shows the resulting expression in traditional infix format. It is
continuously updated as you type in the expression.
Note that if you write a value to a register using this command, that value is
always measured in native motor units. Conversion from generic engineering
units is only supported for the commands ‘Set a register in the MAC motor’,
‘Jump according to a register in the MAC motor’, and ‘Wait for a register value
before continuing’.
JVL Industri Elektronik A/S - User Manual - Integrated Step Motors MIS 231, 232, 234
10.7
Graphic programming command reference
10.7.26
Calculator (options)
Icon:
Dialog:
Function:
The options tab contains various settings that affect the operation of the
Calculator command. ‘Calculation precision’ is currently preset to 32-bit
precision and cannot be changed. This is not an error, and should not be
reported.
‘Register listing and naming’ provides an alternative method of entering data
into the dialog by selecting ‘Simple list with short firmware names’. Instead of
selecting, for example, ‘3 – Requested position’ to access register no. 3, you
can simply type ‘P_SOLL’. If you wish to enter a constant, you simply enter the
digits – the dialog will not mistake the constant for a register number.
If you are in doubt about a register name, look at the expression in the caption
of the dialog box. A recognized register name will appear in the expression. An
unrecognized register name will appear as a zero. You can switch between the
two methods of data entry at any time.
JVL Industri Elektronik A/S - User Manual - Integrated Step Motors MIS 231, 232, 234
133
10.7
10.7.27
Graphic programming command reference
Jump according to a comparison
Icon:
Dialog:
Function:
134
Compares two registers with each other before either jumping to another line
in the program or moving on to the next line in the program. If the condition is
met, the command jumps to the specified program line. If the condition is not
met, the program proceeds to execute the next line in the program.
Any two registers can be compared with each other but the command does
not do anything beyond comparing the registers numerical values measured in
native motor units. To ensure that comparisons are meaningful, it is preferable
to compare registers that hold the same type of information in the same binary
format.
In the example above, two position registers are compared. Both hold position
information, both are 32-bit wide, and both measure position in encoder
counts. Such a comparison will always yield meaningful, predictable results.
For other types of registers, see the relevant register sections.
JVL Industri Elektronik A/S - User Manual - Integrated Step Motors MIS 231, 232, 234
11
CANopen Introduction
This chapter deals with JVL’s Step motor controller SMC75, which is used with the
MIS231, MIS232 and MIS234 motors on a CANopen network.
The chapter covers the following main topics:
-
General introduction: a section with general information about CANopen. See
section 11.1.1 to section 11.1.5.
-
Setting up the Baud-rate, node-id and termination of the CAN bus. Covers also the
wiring of the CAN bus. See section 11.2.1 to section 11.2.6.
-
Using CanOpenExplorer.
See section 11.3.1 to section 11.3.3.
-
Survey of Communication specific objects and manufacturer specific objects in the
DS301standard. Communication objects consist of the general information about
the settings in the module, while the Manufacturer specific objects consist of the
settings of input/output and the motor parameters. This section also covers the
settings of the transmit and receive PDOs in the module. See section 11.4.1 to
section 11.4.6.
-
Survey of objects which are used in the DSP-402 standard. See section 11.5.1 to
section 11.5.7.
-
Section with more detailed explanations of the CANopen theory, particularly
DS-301.
See section 11.6.1 to section 11.6.7.
JVL Industri Elektronik A/S - User Manual - Integrated Step Motors MIS 231, 232, 234
135
11.1
11.1.1
General information about CANopen
Introduction
A CanOpen option is available for the SMC75. When this option is installed, the SMC75
includes a CANopen slave. Through the CANopen slave, all the registers of the SMC75
can be accessed. The SMC75 implements an object dictionary that follows the CiA DS301 standard.
The SMC75 contains a number of statically mapped PDOs that can be used to access the
most common registers.
It also supports the DSP-402 (motion profile) standard, and the motor can be controlled
using this as well.
The SMC75 Controller is designed to be used on a CANbus, CANopen DS-301 and
CANopen DSP-402. Do not use the module together with CANKingdom or DeviceNet.
11.1.2
CiA membership
CiA (CAN in Automation) is a non-profit society. The object of the society is to promote
CAN (Controller-Area-Network) and to provide a path for future developments of the
CAN protocol. CiA specifications cover physical layer definitions as well as application
layer and device profile descriptions.
In order to receive the CAN standard, is it necessary to obtain CiA membership. The
membership fee depends on a company’s number of employees. Membership runs from
January 1st until December 31st and is renewed automatically unless cancelled in writing
by the end of a calendar year. Companies applying for membership after July 1st pay 50%
of annual membership.
A PDF application form can be downloaded from http://www.can-cia.org/cia/application.html.
Note: Once you have received a license from CIA, standards will be sent on a CD and
are downloadable via member login. All of the CiA specifications can be ordered from
the following URL:
www.can-cia.org/downloads/ciaspecifications/
11.1.3
136
CANopen network
The CAN bus is a serial bus with multi-master capabilities where different products from
different manufacturers can communicate with each other. These include, for example,
devices such as PLCs, motors, sensors and actuators. Some message types have higher
priority and are sent first, for time-critical applications. New devices can easily be integrated on an existing bus, without the need to reconfigure the entire network. The devices are connected through a 2-wire bus cable with ground, and data is transmitted
serially.
JVL Industri Elektronik A/S - User Manual - Integrated Step Motors MIS 231, 232, 234
11.1
General information about CANopen
Terminator
Terminator
CAN_H
CAN Node
master
CAN network
11.1.4
CAN Node
slave
CAN Node
slave
CAN_L
TT1092GB
CANopen, general information
CANopen is a CAN-based, higher-level protocol. The purpose of CANopen is to give an
understandable and unique behaviour on the CAN network. The CAN network is the
hardware level of the system, and CANopen is the software level. CANopen is based on
the communication profile described in CiA DS-301, and specifies all of the basic communication mechanisms.
CiA DS-301contains message types on the lowest software level. The DSP-402 CANopen standard defines the device profile and the functional behaviour for servo drive
controllers, frequency inverters and stepper motors. The DSP-402 constitutes a higher
software level, and it uses the DS-301 communication, but makes the device independent of the manufacturer. Not all JVL functionality is available.
The CANbus with real-time capabilities works in accordance with the ISO11898 standard. The major performance features and characteristic of the CAN protocol are described below:
Message-oriented protocol:
The CAN protocol does not exchange data by addressing the recipient of the message,
but rather marks each transmitted message with a message identifier. All nodes in the
network check the identifier when they receive a message to see whether it is relevant
for them. Messages can therefore, be accepted by none, one, several or all participants.
Prioritisation of messages:
As the identifier in a message also determines its priority for accessing the bus, it is possible to specify a correspondingly rapid bus access for messages according to their importance. Especially important messages can thus gain access to the bus without a
prolonged wait-time, regardless of the loading on the bus at any instant.
This characteristic means that important messages are transmitted with high priority
even in exceptional situations, thereby ensuring proper functioning of a system even during phases of restricted transmission capacity.
JVL Industri Elektronik A/S - User Manual - Integrated Step Motors MIS 231, 232, 234
137
11.1
General information about CANopen
Multi-Master capability:
Bus access rights are not issued by a mean-level control unit (bus master) per network.
Instead, each network node can start to send a message with equal rights as soon as the
bus has become free. If several participants access the bus at the same time, an arbitration process allocates each participant the bus access right in line with the priority of the
message they want to send at that particular moment. Each participant can therefore
communicate directly with every other participant. As the transmission of a message can
be initiated by the message source itself, then in the case of event-controlled transmission of messages, the bus is only occupied when a new message is on-hand.
No-loss bus arbitration:
As the bus is accessed at random under the CAN protocol, it is possible that several participants try to occupy the bus at the same time. In other random bus access routines,
this causes the destruction of suppressed messages. In order to solve such a bus access
conflict, a repeated occupation of the bus is required using an appropriate triggering
strategy. The CAN protocol therefore deploys a routine to ensure that the message with
the highest priority at any given time is sent without any destruction of message contents.
Short block length:
The maximum data length of a CAN message is limited to 8 bytes. This data length is usually sufficient to transmit the information occurring in the lowest field area in a CAN message.
11.1.5
Header
A CAN message transmits the communications object and a variety of management and
control information. The management and control information bits are used to ensure
error-free data transmission, and are automatically removed from the received message
and inserted before a message is sent. A simplified CANopen message could be as in the
figure below:
0....8 Byte
11 bit
Header
0
1
2
3
4
5
6
7
Data frame
TT1093GB
The two bit fields “Header” and “Data” form the simplified CANopen message. The 11bit Header is also designated as the identifier or as the COB-ID (Communication Object
identifier).
138
JVL Industri Elektronik A/S - User Manual - Integrated Step Motors MIS 231, 232, 234
11.1
General information about CANopen
JVL uses the 11-bit format type CAN A, but not the 29-bit format type CAN B.
The COB-ID carries out two tasks for the controller communications object.
- Bus arbitration: Specification of transmission priorities.
- Identification of communications objects.
The COB-ID comprises two sections:
- Function code, 4 bits in size (0....15)
- Node address (Node ID), 7 bits in size (0....127).
The function code classifies the communications objects, and controls the transmission
priorities. Objects with a small function code are transmitted with high priority. For example, in the case of simultaneous bus access an object with the function code “1” is sent
before an object with the function code “3”.
Node address:
Every device is configured before network operation with a unique 7-bit long node address between 1 and 127. The device address “0” is reserved for broadcast transmissions, in which messages are sent simultaneously to all devices.
PDO, SDO, EMCY, NMT and heartbeat use the header frame for communication on the
CANopen bus.
JVL Industri Elektronik A/S - User Manual - Integrated Step Motors MIS 231, 232, 234
139
11.2 Connection and setup of the CAN bus
11.2.1
Connecting the SMC75 Controller to the CAN bus
Before you connect the Controller SMC75 to the CAN-bus, the Baud-rate, the NodeID and the termination must be selected.
On the serial bus it is possible to set a transmission speed (Baud-rate) of max.1000 Kbit/
s and a min. of 10 Kbit/s. The Baud-rate depends on the cable length, and the wire crosssection. The table below gives some recommendations for networks with less than 64
nodes. Recommended bus cable cross-sections are according to CIA.
:
Bus Distance
(m)
Cross-section (mm2)
Terminator
(Ohms)
Baud-rate
(Kbit/s)
25
0.25-0.34
120
1000
100
0.34-0.6
150-300
500
250
0.34-0.6
150-300
250
500
0.5-0.6
150-300
125
500
0.5-0.6
150-300
100
1000
0.75-0.8
150-300
50
The bus wires may be routed in parallel, twisted and/or shielded, depending on EMC requirements. The layout of the wiring should be as close as possible to a single line structure in order to minimize reflections. The cable stubs for connection of the bus node
must be as short as possible, especially at high bit rates. The cable shielding in the housing
must have a large contact area. For a drop cable, a wire cross-section of 0.25 to 0.34
mm² would be an appropriate choice in many cases.
For bus lengths greater than 1 km, a bridge or repeater device is recommended. Galvanic
isolation between the bus nodes is optional.
11.2.2
Necessary accessories for SMC75 Controller:
The EDS file for the SMC75 is available for download at JVL’s web-site, http://
www.jvl.dk, under the downloads menu, Field bus Interface Specifications Files. EDS
means Electronic Data Sheet. This file contains the information about SMC75 settings
that are required to configure the setup and program in the master. The SMC75 is a slave
module on the CAN-bus. The master can, for example, be a PLC or a PC.
If you are using a PLC as master, then make sure it is provided with a CANopen communications module, and that the correct programming tools are available. For support of
the PLC master, the PLC vendor is recommended.
If you are using a PC as master, JVL provides some tools that can help when installing and
using the SMC75 Controller.
140
JVL Industri Elektronik A/S - User Manual - Integrated Step Motors MIS 231, 232, 234
11.2
Connection and setup of the CAN bus
The latest firmware for the SMC75 is available at JVL’s web-site under the menu downloads/firmware. In the site’s programs menu, the software CanOpen Explorer is also
available, but note that this is not a free-ware program. Please contact your JVL representative for further information.
CanOpen Explorer can be used to load the EDS file and operate with the motor. The
CanOpenExplorer software must use a special dongle for communication with the PC.
For further information about the dongle, see An overall method for communication
test, page 144. The PC must be provided with a CANopen communications module.
11.2.3
EDS (Electronic data Sheet)
In order to give the user of CANopen more support, the device description is available
in a standardised way, and gives the opportunity to create standardised tools for configuration of CANopen devices, designing networks with CANopen devices, and managing
project information on different platforms. The EDS file are ASCII-coded.
11.2.4
Setting the node id and baud rate
The node id is set using MacTalk. It is located in register 162. The baud rate is also set
using MacTalk and is located in register 163.
JVL Industri Elektronik A/S - User Manual - Integrated Step Motors MIS 231, 232, 234
141
11.2
11.2.5
Connection and setup of the CAN bus
Bus termination
In order to guarantee correct operation of the CAN bus, bus terminating resistors must
be provided at both ends of the bus cable.
CAN bus connectors:
The SMC75 does not use 9-pin D-sub connectors and none of the cables JVL supplies are
provided with a 9-pin D-sub connector, but the PIN configuration is also shown in the
table below.
Signal
Description
SMC75
D-sub
-
Reserved
CAN_L
CAN_L bus line (Low)
Pin 5
Pin 2
CAN_GND
CAN Ground
Pin 3
Pin 3
Pin 1
Pin 5
Pin 1
-
Reserved
(CAN_SHLD)
Optional CAN Shield
Pin 4
(GND)
Optional CAN Ground
CAN_H
CAN_H bus line (High)
-
Reserved (error line)
CAN_V+
Optional CAN ext. + supply
Pin 6
Pin 4
Pin 7
Pin 2
Pin 9
Pin 8
The figure below shows the 9-pin D-sub and 5-pin style connectors.
5-pin style connector
9-pin D-sub connector
5
5
4
3
3
4
1
2
2
1
Male - front view
Female - front view
1 2 3 4 5
5 4 3 2 1
6 7 8 9
Male - front view
9 8 7 6
Female - front view
TT1096GB
142
JVL Industri Elektronik A/S - User Manual - Integrated Step Motors MIS 231, 232, 234
11.2
11.2.6
Connection and setup of the CAN bus
SMC75 connectors, rear plate layout
The MIS motors offer IP67 protection and M12 connectors which make them ideal for
automation applications where no additional protection is desired. The M12 connectors
offer solid mechanical protection and are easy to unplug.
The connector layout:
“PWR” - Power input. M12 - 5-pin male connector
Signal name
Description
Pin no.
JVL Cable
WI1000M12
F5A05N
Isolation
group
P+
Main supply +12-48VDC. Connect with pin 2 *
1
Brown
1
P+
Main supply +12-48VDC. Connect with pin 1 *
2
White
1
P-
Main supply ground. Connect with pin 5 *
3
Blue
1
CV
Control voltage +12-28VDC.
4
Black
1
P-
Main supply ground. Connect with pin 3 *
5
Grey
1
* Note: P+ and P- are each available at 2 terminals. Ensure that both terminals are connected in order to
split the supply current in 2 terminals and thereby avoid an overload of the connector.
“BUS1” - CAN-open interface. M12 - 5-pin male connector
Signal name
Description
Pin no.
Cable: user
supplied
Isolation
group
CAN_SHLD
Shield for the CAN interface - internally connected to the motor housing
1
-
2
CAN_V+
Reserved for future purpose - do not connect
2
-
2
CAN_GND
CAN interface ground
3
-
2
CAN_H
CAN interface. Positive signal line
4
-
2
CAN_L
CAN interface. Negative signal line
5
-
2
“BUS2” - CANopen interface. M12 - 5-pin female connector
Signal name
Description
Pin no.
Cable: user
supplied
Isolation
group
CAN_SHLD
Shield for the CAN interface - internally connected to the
motor housing
1
-
2
CAN_V+
Reserved for future purpose - do not connect
2
-
2
CAN_GND
CAN interface ground
3
-
2
CAN_H
CAN interface. Positive signal line
4
-
2
CAN_L
CAN interface. Negative signal line
5
-
2
“IO” - I/Os and R485 interface. M12 - 8-pin female connector.
Signal name
Description
Pin no.
JVL Cable
WI1000-M12
M8A05N
Isolation
group
3
IO1
IO5
I/O terminal 1
1
White
IO2
IO6
I/O terminal 2
2
Brown
3
IO3
IO7
IO terminal 3
3
Green
3
GNDIO
GNDIO
Ground for I/O
4
Yellow
3
B+
Tx
RS485 (5V serial)
5
Grey
3
3
A-
Rx
RS485 (5V serial)
6
Pink
IO4
IO8
I/O terminal
7
Blue
3
CVO
CVO
Out
8
Red
3
Cable Screen
Some standard cables with M12 connector offer a screen around the cable. This screen on some cables is
fitted to the outer metal at the M12 connector. When fitted to the SMC75 controller, this means that the
screen will have contact with the complete motor housing and thereby also the power ground (main ground).
JVL Industri Elektronik A/S - User Manual - Integrated Step Motors MIS 231, 232, 234
143
11.3
11.3.1
Using CanOpenExplorer
The CanOpenExplorer program
The CanOpenExplorer is a program that was developed for internal use only, especially
in production, but the program offers features that are very convenient and which make
it very easy to start up the MIS motor when this is supplied with an SMC75 CANopen
Controller module.
The program can write and send SDOs, PDOs, SYNC and heartbeat messages, and also
can read EDS files.
11.3.2
An overall method for communication test
Depending on the type of master and software solution available, the following components must be available:
PLC:
PLC with a CANopen module and software that can communicate with this
module.
The CANopen module must be connected to a CAN bus, as shown in section
11.2.6. To set up the master, download the EDS file from the JVL web site (see
section 11.2.2). This file contains all register set-up data for the SMC75 Controller. For details of the node-ID and the Baud-rate, see section 11.2.4. The power
supply must be connected to the motor as shown in section 11.2.6.
PC:
PC with a CAN adaptor and software that can communicate with this module,
or if the CanOpen Explorer software is used, the PCAN-USB Dongle from Peaksystem that is connected to a USB port on the PC. The Peak systems web site
address is http://www.peak-system.com. This includes a list of distributors. To
set up the master, download the EDS file from the JVL web-page, see section
11.2.2. This file contains all register set-up data for the SMC75. For details of the
node-ID and the Baud-rate, see section 11.2.4. The power supply must be connected to the motor as shown in section 11.2.6.
If CanOpenExplorer is used, see the following method for testing the motor
communication:
-Install CanOpenExplorer
-Connect the motor to the USB port via the Dongle.
-Connect power supply, see section section 11.2.6 or section 2.
-Run the CanOpenExplorer program on the PC.
1: Select the correct node ID in the slave using MacTalk. See section 11.2.4.
2: Select the EDS file. For all the MIS motors this file is SMC75.eds.
3: Load the EDS file by pressing load.
144
JVL Industri Elektronik A/S - User Manual - Integrated Step Motors MIS 231, 232, 234
11.3
Using CanOpenExplorer
TT1100GB
2
1
3
4: Select here on the +the manufacturer specific register.
5: Select thereafter the object 0x2012. Object 0x2012 contains the motor parameters.
4
5
TT1101GB
JVL Industri Elektronik A/S - User Manual - Integrated Step Motors MIS 231, 232, 234
145
11.3
Using CanOpenExplorer
6: Point to the sub register 0x02, which is the register that determines in which mode
the motor will operate.
TT1102GB
6
Press W on the keyboard. The following screen appears:
TT1076GB
7: Type 02 in the window, and press OK.
8: Click on the sub register 0x05, which is the register to choose the velocity the motor
will use. Press W on the keyboard, type 100 in the window, and press OK. The value
100 is in RPM.
9: Click on the sub register 0x03, which is the register to choose the distance the motor
will run. Press W on the keyboard, type 20000 in the window, and type OK. The value 20000 is in Steps
146
JVL Industri Elektronik A/S - User Manual - Integrated Step Motors MIS 231, 232, 234
11.3
Using CanOpenExplorer
Now the motor shaft will rotate slowly, until the motor has counted 20000 Encoder pulses. If you want to stop the motor, then click on sub register 0x02 and write 0 in the window, and the motor will switch to passive mode. If using other software, the test could
be described as, (using object 2012h):
Subregister
Name
Width
02h
Mode_Reg
16 bit
05h
V_SOLL
16 bit
03h
P_SOLL
32 bit
02h
Mode_Reg
16 bit
Unit
Operation
Value
Set up the motor
in position mode
02h
RPM
Sets up the desired velocity
100h
Steps
The motor rotates the
desired numbers of
encoder pulses
20000
Sets the motor
to passive mode
00h
Returning the motor with higher velocity
11.3.3
02h
Mode_Reg
16 bit
05h
V_SOLL
16 bit
03h
P_SOLL
32 bit
02h
Mode_Reg
16 bit
Set up the motor
in position mode
02h
RPM
Sets up the desired velocity
200h
Steps
The motor rotates the
desired numbers of Steps
-20000
Sets the motor
in passive mode
00h
How to use CanOpenexplorer
After startup, the name and details of the HW-interface, such as PCAN_USB should appear upper left.
When you turn on a motor/CAN node after having started CanOpenexplorer, the Data
Window (large centre right), will contain a message with the number 0x7xx, where xx is
the node ID. For example: 0x704 will indicate node 4. Set the Node ID field top centre
to that value (4).
Ensure that the correct EDS_file is loaded. The program loads a hard-coded default file
- either smc75.eds or mac00-fc.eds. It is also possible to load another EDS file by writing
the file name in the “EDS file” field, top centre, and pressing the load button. Note that
the EDS view (large centre left panel) will add the new file at the bottom but will not clear
any existing file(s) that are loaded.
Normal operation will be to select an object in the EDS view pane, and press either R for
read or W for write. Pressing R should read the value (successful if no error pops up).
Pressing W for write will pop up a small window in which the present value is displayed
in both decimal and hex. It is then possible to write a new value either in decimal or hex
using a 0x prefix, such as 0x185 to enable the first TPDO on node 5 (by clearing the high
bit). If the “Add to list” checkbox is checked, the object will be added to the user SDO
list as a write SDO. Pressing A performs a read and adds it to the user SDO list pane (lower right) as a read SDO.
The SDOs in the user SDO pane can be rearranged by dragging them with the mouse.
Double-clicking on a user SDO list will execute the operation, either reading or writing.
The bus state can be changed using the NMT buttons, lower left, e.g. to Operational to
enable PDOs.
JVL Industri Elektronik A/S - User Manual - Integrated Step Motors MIS 231, 232, 234
147
11.3
Using CanOpenExplorer
The button Read User SDOs will read all of the “R” type objects in the user SDO list.
This is useful for updating a large number of values in the EDS view.
The button Write User SDOs will write all of the “W” type objects in the user SDO list.
This is useful for automated testing.
Entries can be deleted from the user SDO list by selecting them with the mouse and
pressing the delete key.
The sync Time field (top right) sets the time in milliseconds for the SYNC messages to
be sent out. SYNCs can be started and stopped using the buttons Enable Sync and the
Stop button to the right.
The Guard Time field below the Sync Time field works like SYNC - just for the Guarding
message.
The close button exits the program after saving the list of user SDOs, which will be automatically reloaded at the next program start.
148
JVL Industri Elektronik A/S - User Manual - Integrated Step Motors MIS 231, 232, 234
11.4
11.4.1
Objects in the DS301 standard
DS301 specified Communications objects
The DS301 specified Communications objects are shown in the table below. To obtain
the default value in CanOpenExplorer, press R on the keyboard, and the actual value will
be shown.
Name
Index Sub
Index Data Type
(hex)
Device type
1000
Error
Register
UNSIGNED32
1001
UNSIGNED8
Read
only Default Description
X
0x40192
This is the mapping error register,
and it is part of the emergency object. If any of the sub indices are
high, an error has occured. See
also section 11.4.2. Mandatory
X
0
Reservation
register
Contains information about the
device type. See note at top of next
page. Mandatory.
Generic error. Mandatory
1
Current
2
Voltage
3
Temperature
4
Communication (Overrun)
5
Device profile specific
6
Reserved
7
Manufactor specific
1004
Reservation of PDOs
0
X
1
X
Reserved numbers of syncPDOs
2
X
Reserved numbers of asyncPDOs
Manufacturer device
name
1008
VISIBLE
STRING
X
Manufacturer hardware
version
1009
VISIBLE
STRING
X
Manufacturer software
version
100A
VISIBLE
STRING
X
Reserved numbers of PDOs
JVL A/S
Example: Version x.x
JVL Industri Elektronik A/S - User Manual - Integrated Step Motors MIS 231, 232, 234
149
11.4
Objects in the DS301 standard
Name
Index Sub
Index Data Type
(hex)
Read
only Default Description
Guard time
100C
UNSIGNED16
Informs about the Guard time in
milliseconds. Is only mandatory if
the module does not support
heartbeat
Life time
factor
100D
UNSIGNED8
Is the factor that guard time is multiplied with to give the life time for
the node quarding protocol
Heartbeat
time
1017
UNSIGNED8
If the Heartbeat timer is not 0,
Heartbeat is used.
Identity
object
1018
IDENTITY
X
0
1..4
X
4h
Number of entries. Mandatory
1
UNSIGNED32
X
0x0117
Vendor ID, contains a unique value
allocated to each manufactor. 117h
is JVLs vendor ID. Mandatory.
2
UNSIGNED32
X
0x0200
Product Code, identifies a specific
device version. SMC75 has the
product code 200H
3
UNSIGNED32
X
Revision number.
4
UNSIGNED32
X
Serial number
Contain general information about
the module
Note regarding “device type” (index 1000):
The device type register is composed of 2 16-bit registers. One register describes which
device profile the module supports, and the other states which type of motors the module supports, and possible I/O module. The default value 0192h denotes that the DSP402
Device profile is supported, and the value 0004h denotes that the SMC75 Controller
supports stepper motors.
11.4.2
Emergency object
The EMCY (emergency) object is used to transfer an error message to the CANopen
master, or also to another node which can process the error message. The reaction on
the emergency object is not specified. An emergency object is transmitted only once per
“error event”.
The SMC75 supports the EMC object (Emergency).
The following error codes can be generated:
Errorcode 1001h: Generic error - Motor error
Errorcode 1002h: Generic error - Position error
Errorcode 1003h: Generic error - Follow error
Errorcode 1004h: Generic error - Low
Transmit PDO25:
Use Transmit PDO25 in asynchronous mode to read the status of the error.
In the SMC75, no error control is enabled when the modules are started up because if
there is any fault in the system, it is impossible to get in contact with the module. After
the module has started up and there is communication between the master and the slave,
turn on the required error control mechanism in the communication objects, see section
11.4.1.
150
JVL Industri Elektronik A/S - User Manual - Integrated Step Motors MIS 231, 232, 234
11.4
11.4.3
Objects in the DS301 standard
Object dictionary
Name
Index Sub
(hex) Index Type
Motor parameters 2012
Motor parameters 2014
Read
only Default Description
0
Unsigned8 x
n
Unsigned32
0
Unsigned8 x
n
Unsigned16
254
Subindex count
Access to the 32 bit motor register, n
254
Subindex count
Access to the motor register n,
but as 16bit
Writing to these objects in CANopenExplorer is done by pressing W on the keyboard
when the register in folder Manufacturer is selected. Reading is done by pressing R.
Object 2012h – Motor parameters
With this object, all the registers of the MIS motor can be accessed. All the registers are
accessed as 32 bit. When reading and writing to 16-bit registers, the values are automatically converted in the module.
Object 2014h – Motor parameters (16 bit)
Works as 2012h, but the parameters are accessed as 16-bit. If writing to a 32bit parameter, the 16-bit value will be treated as signed.
11.4.4
Enable and Disable PDOs
In the CANOpen profile, it is only possible to have four transmit and four receive PDOs
enabled at the same time. In the SMC75 controller, all PDOs are disabled when the module is booted up. The user must choose which PDOs the application will use and enable
these.
To enable or disable a PDO, it is necessary to write to the MSB (bit 31) in the PDO COBID entry in the PDO communication parameter Record. The COB-ID register is sub-index 1h, and the value range of this register is UNSIGNED32.
The PDOs are enabled when bit 31 is 0, and is disabled when bit 31 is 1.
11.4.5
Receive PDOs
The PDO 1-20 are reserved for use with DSP-402.
The following receive PDOs are available:
Receive PDO 21:
This PDO can be used to update the position, velocity and acceleration. The data in the
PDO is written directly to the position register and if the motor is in position mode, it
will start moving to that position.
JVL Industri Elektronik A/S - User Manual - Integrated Step Motors MIS 231, 232, 234
151
11.4
Objects in the DS301 standard
The table below shows default values of the COB-ID:
PDO
Subindex
Type
Description
Default
21
1
Receive
COB-ID
Nodeid+0x80000200
r/w
1
Transmit
COB-ID
Nodeid+0x80000180
r/w
1
Receive
COB-ID
Nodeid+0x80000300
r/w
1
Transmit
COB-ID
Nodeid+0x80000280
r/w
1
Receive
COB-ID
Nodeid+0x80000400
r/w
1
Transmit
COB-ID
Nodeid+0x80000380
r/w
24
1
Receive
COB-ID
Nodeid+0x80000500
r/w
1
Transmit
COB-ID
Nodeid+0x80000480
r/w
25
1
Transmit
COB-ID
Nodeid+0x80000480
r/w
22
23
1
2
3
4
Access
type
Byte
0
5
6
7
Data
P_SOLL
V_SOLL
A_SOLL
Object
2012h, sub 3
2014h, sub 5
2014h, sub 6
Receive PDO 22:
With this PDO it is possible to update the running current and operating mode.
Byte
0
1
2
3
Data
RUN_CURRENT
MODE_REG
Object
2014h, sub 7
2014h, sub 2
4
5
6
7
Receive PDO 23:
This PDO can be used to issue a Motor command.
Byte
0
1
Data
Motor Command
Object
2014h, sub 24
2
3
4
5
6
7
Reserved Reserved Reserved Res. Res. Res.
Receive PDO 24:
This PDO updates the outputs.
152
Byte
0
1
Data
Output data
Object
2014h, sub 19
2
3
4
5
6
7
Reserved
Reserved
Reserved
Res.
Res.
Res.
JVL Industri Elektronik A/S - User Manual - Integrated Step Motors MIS 231, 232, 234
11.4
11.4.6
Objects in the DS301 standard
Transmit PDOs
The PDOs 1-20 are reserved for use with DSP-402.
All of the transmit PDOs support synchronous transmission. PDO 25 also supports asynchronous transmission.
From firmware V2.8 some new features has been developed in the CanOpen support.
From MacTalk both a 16-bit and 32-bit user selectable register can be setup to be transmitted in PDO22 when using DSP-301.
Register 10 is selected as 32-bit,
that is P_IST actual position
Register 5 is selected as 16-bit,
that is V_IST actual velocity
TT2266GB
Transmit PDO 21:
With this PDO the actual position can be read.
Byte
0
1
2
3
4
5
6
7
Data
P_IST
V_IST
Motor error
Object
2012h, sub 10
2014h, sub 12
2014h, sub 35
4
6
Transmit PDO 22:
With this PDO the actual velocity can be read.
Byte
0
Data
V_IST
Object
1
2
3
5
Reserved Reserved Reserved Res.
7
Res. Res.
User selectable 16-bit User selectable 32-bit register exc.
ENCODER_POS
2014h, sub 12 register exc.
(register16)
STATUSBITS
(register 25)
Transmit PDO 23:
With this PDO the value of the analog inputs 1-4 can be read.
Byte
0
1
2
3
4
5
6
Data
ANALOG1
ANALOG2
ANALOG3
ANALOG4
Object
2014h, sub 89
2014h, sub 90
2014h, sub 91
2014h, sub 92
JVL Industri Elektronik A/S - User Manual - Integrated Step Motors MIS 231, 232, 234
7
153
11.4
Objects in the DS301 standard
Transmit PDO 24:
With this PDO the value of the analog inputs 4-8 can be read.
Byte
0
1
2
3
Data
ANALOG5
Object
2014h, sub 93 2014h, sub 94
ANALOG6
4
5
6
7
ANALOG7
ANALOG8
2014h, sub 95
2014h, sub 96
Transmit PDO 25:
With this PDO the motor status, inputs and last error can be read.
This PDO also supports asynchronous transmission. If this PDO is in asynchronous
mode, it will be transmitted every time the run status or inputs are changed.
11.4.7
Byte
0
1
2
3
Data
Inputs
Object
2014h, sub 18 2014h, sub 35
Motor error
4
5
6
7
Res.
Res.
Res.
Res.
Beckhoff support
The SMC75 supports running CAN with Beckhoff PLC.
In this mode, 4 receive and transmit PDO's are enabled from startup and are configured
as PDO 1-4.
COB_ID = 0x800000xxx : NOT ENABLED
COB_ID = 0x000000xxx : ENABLED
11.4.8
PDO setup in Beckhoff mode
Normally each selected PDO needs to be enabled after powerup and initialization but in
Beckhoff mode PDO 1-4 is automatically enabled at powerup.
The 2 dynamical registers are put into PDO4.
Default the 16-bit register is set to 35 (motor error) and
the 32-bit register is set to (170 ext. encoder).
To setup and use the Beckhoff mode, enable the Beckhoff support from MacTalk and
press the Save in flash -button.
TT2267GB
154
JVL Industri Elektronik A/S - User Manual - Integrated Step Motors MIS 231, 232, 234
11.4
11.4.9
Objects in the DS301 standard
Beckhoff receive PDO setup
The table below shows default values of the COB-ID:
PDO
Subindex
Type
Description
Default
Access
type
1
1
Receive
COB-ID
Nodeid+0x00000200
r/w
1
Transmit
COB-ID
Nodeid+0x00000180
r/w
2
1
Receive
COB-ID
Nodeid+0x00000300
r/w
1
Transmit
COB-ID
Nodeid+0x00000280
r/w
3
1
Receive
COB-ID
Nodeid+0x00000400
r/w
1
Transmit
COB-ID
Nodeid+0x00000380
r/w
4
1
Receive
COB-ID
Nodeid+0x00000500
r/w
1
Transmit
COB-ID
Nodeid+0x00000480
r/w
Receive PDO1
Byte
0
1
2
3
4
5
6
7
Data
P_SOLL
V_SOLL
A_SOLL
Object
2012h, sub 3
2014h, sub 5
2014h, sub 6
Receive PDO 2:
With this PDO it is possible to update the running current and operating mode.
Byte
0
1
2
3
Data
RUN_CURRENT
MODE_REG
Object
2014h, sub 7
2014h, sub 2
4
5
6
7
Receive PDO 3:
This PDO can be used to issue a Motor command.
Byte
0
1
Data
Motor Command
Object
2014h, sub 24
2
3
4
5
6
7
Reserved Reserved Reserved Res. Res. Res.
Receive PDO 4:
This PDO updates the outputs.
Byte
0
1
Data
Output data
Object
2014h, sub 19
2
3
4
5
6
7
Reserved
Reserved
Reserved
Res.
Res.
Res.
JVL Industri Elektronik A/S - User Manual - Integrated Step Motors MIS 231, 232, 234
155
11.4
11.4.10
Objects in the DS301 standard
Beckhoff transmit PDO setup
Transmit PDO 1:
With this PDO the actual position can be read.
Byte
0
1
2
3
4
5
6
7
Data
P_IST
V_IST
Motor error
Object
2012h, sub 10
2014h, sub 12
2014h, sub 35
Transmit PDO 2:
With this PDO the value of the analog inputs 1-4 can be read.
Byte
0
1
2
3
4
5
6
7
Data
ANALOG1
ANALOG2
ANALOG3
ANALOG4
Object
2014h, sub 89
2014h, sub 90
2014h, sub 91
2014h, sub 92
Transmit PDO 3:
With this PDO the value of the analog inputs 4-8 can be read.
Byte
0
1
2
3
4
Data
ANALOG5
Object
2014h, sub 93 2014h, sub 94
ANALOG6
5
6
7
ANALOG7
ANALOG8
2014h, sub 95
2014h, sub 96
Transmit PDO 4:
With this PDO the actual velocity can be read.
Byte
0
Data
V_IST
Object
156
1
2
3
4
5
Reserved Reserved Reserved Res.
6
7
Res. Res.
User selectable 16-bit User selectable 32-bit register exc.
ENCODER_POS
2014h, sub 18 register exc.
(register16)
STATUSBITS
(register 25)
JVL Industri Elektronik A/S - User Manual - Integrated Step Motors MIS 231, 232, 234
11.5 Objects used in the DSP-402 standard
11.5.1
DSP-402 Support
Introduction
The SMC75 supports the DSP-402 standard from CiA (http://www.can-cia.com/).
Please refer to this standard for details of the functions.
The DSP-402 is only a standard proposal and might be changed in the future. JVL therefore reserves the right to change future firmware versions to conform to new versions
of the standard.
Not all of the functionality described in DSP-402 is supported, but all mandatory functions are supported.
The following operation modes are supported:
•Profile position mode
•Velocity mode
•Homing mode
Preconditions
The start mode of the motor must be set to passive.
No power up zero searches must be selected.
When using the DSP-402 mode, manipulating parameters with object 2012h or 2014h
can corrupt the behaviour of the DSP-402 functions. Also be aware that manipulating parameters in MacTalk should be avoided when using DSP-402.
JVL Industri Elektronik A/S - User Manual - Integrated Step Motors MIS 231, 232, 234
157
11.5
Objects used in the DSP-402 standard
Supported objects
The following table gives the additional object dictionary defined for DSP-402 support.
Index Sub In(hex) dex
Type
Read
only Default
Motor_type
6402 0
UNSIGNED16
X
Motor_catalog_number
6403 0
VISIBLE_STRING X
SMC75
Motor_manufacturer
6404 0
VISIBLE_STRING X
JVL A/S
http_motor_catalog_address 6405 0
VISIBLE_STRING X
www.jvl.dk
Supported_drive_modes
6502 0
UNSIGNED32
37
Drive_catalog_number
6503 0
VISIBLE_STRING X
SMC75
Drive_manufacturer
6504 0
VISIBLE_STRING X
JVL A/S
http_drive_catalog_address 6505 0
VISIBLE_STRING X
www.jvl.dk
Name
Device data
X
9
Digital I/O
Digital_inputs
60FD 0
UNSIGNED32
X
Digital_outputs
60FE 0
UNSIGNED8
X
Digital_outputs_Physical_ou
tputs
60FE 1
UNSIGNED32
Digital_outputs_Bit_mask
UNSIGNED32
60FE 2
Device Control
Abort_connection_option_co
de
6007 0
INTEGER16
Error_code
603F 0
UNSIGNED16
Controlword
6040 0
UNSIGNED16
Statusword
6041 0
UNSIGNED16
Quick_stop_option_code
605A 0
INTEGER16
Modes_of_operation
6060 0
INTEGER8
Modes_of_operation_display 6061 0
INTEGER8
X
X
X
Profile Position parameters
158
Position_actual_value
6064 0
INTEGER32
Target_position
607A 0
INTEGER32
Software_position_limit
607D 0
UNSIGNED8
Software_position_limit_Min
_position_limit
607D 1
INTEGER32
Software_position_limit_Max
_position_limit
607D 2
INTEGER32
Max_motor_speed
6080 0
UNSIGNED32
Profile_velocity
6081 0
UNSIGNED32
Profile_acceleration
6083 0
UNSIGNED32
X
2
JVL Industri Elektronik A/S - User Manual - Integrated Step Motors MIS 231, 232, 234
11.5
Objects used in the DSP-402 standard
Name
Index Sub In(hex) dex
Type
Read
only Default
Quick_stop_deceleration
6085 0
UNSIGNED32
Motion_profile_type
6086 0
INTEGER16
Velocity_sensor_actual_valu
e
6069 0
INTEGER32
X
Velocity_demand_value
606B 0
INTEGER32
X
Velocity_actual_value
606C 0
INTEGER32
X
Velocity_window
606D 0
UNSIGNED16
Velocity_window_time
606E 0
UNSIGNED16
Target_velocity
60FF 0
INTEGER32
Max_torque
6072 0
UNSIGNED16
Home_offset
607C 0
INTEGER32
Homing_method
6098 0
INTEGER8
Homing_speeds
6099 0
UNSIGNED8
Profile velocity mode
Homing mode
Homing_speeds_Speed_duri
ng_search_for_switch
6099 1
UNSIGNED32
Homing_speeds_Speed_duri
ng_search_for_zero
6099 2
UNSIGNED32
Homing_acceleration
609A 0
UNSIGNED32
Position_notation_index
6089 0
INTEGER8
Position_dimension_index
608A 0
UNSIGNED8
Velocity_notation_index
608B 0
INTEGER8
Velocity_dimension_index
608C 0
UNSIGNED8
X
2
X
2
X
2
X
2
X
2
Factors
Acceleration_notation_index 608D 0
INTEGER8
Acceleration_dimension_ind
ex
608E 0
UNSIGNED8
Position_encoder_resolution 608F 0
UNSIGNED8
Position_encoder_resolution
_Encoder_increments
608F 1
UNSIGNED32
Position_encoder_resolution
_Motor_revolutions
608F 2
UNSIGNED32
Velocity_encoder_resolution 6090 0
UNSIGNED8
Velocity_encoder_resolution
_Encoder_increments_per_s
econd
6090 1
UNSIGNED32
Velocity_encoder_resolution
_Motor_revolutions_per_sec
ond
6090 2
UNSIGNED32
Gear_ratio
UNSIGNED8
6091 0
Gear_ratio_Motor_revolution
s
6091 1
UNSIGNED32
Gear_ratio_Shaft_revolutions 6091 2
UNSIGNED32
Feed_constant
UNSIGNED8
6092 0
JVL Industri Elektronik A/S - User Manual - Integrated Step Motors MIS 231, 232, 234
159
11.5
11.5.2
Objects used in the DSP-402 standard
Name
Index Sub In(hex) dex
Type
Feed_constant_Feed
6092 1
UNSIGNED32
Feed_constant_Shaft_revolu
tions
6092 2
UNSIGNED32
Position_factor
6093 0
UNSIGNED8
Position_factor_Numerator
6093 1
UNSIGNED32
Position_factor_Feed_const
ant
6093 2
UNSIGNED32
Velocity_encoder_factor
UNSIGNED8
6094 0
Velocity_encoder_factor_Nu
merator
6094 1
UNSIGNED32
Velocity_encoder_factor_Div
isor
6094 2
UNSIGNED32
Acceleration_factor
UNSIGNED8
6097 0
Acceleration_factor_Numera
tor
6097 1
UNSIGNED32
Acceleration_factor_Divisor 6097 2
UNSIGNED32
Polarity
UNSIGNED8
607E 0
Read
only Default
X
2
X
2
X
2
Factors
Position factor
The position factor is the relation between the user unit and the internal position unit
(steps).
The position factor is automatically calculated when the feed constant (Obj. 6092h) and
gear ratio (Obj. 6091h) are set.
Example:
A MIS232 Motor with a 3.5:1 gear box is connected to a belt drive. The diameter of the
drive wheel is 12.4 cm.
The unit of position is required to be in millimetres.
The perimeter of the drive wheel is 389.56mm (124mm*pi)
The parameters should be set as follows:
160
Object
Name
Value
6091h subindex 1
Gear ratio - Motor revolutions
35
6091h subindex 2
Gear ratio - Shaft revolutions
10
6092h subindex 1
Feed constant - Feed
38956
6092h subindex 2
Feed constant - Shaft revolutions
100
JVL Industri Elektronik A/S - User Manual - Integrated Step Motors MIS 231, 232, 234
11.5
Objects used in the DSP-402 standard
Velocity encoder factor
This factor is used to convert the user unit into the internal unit (RPM).
The factor is adjusted with the object 6094h.
Example 1:
An MIS232 has1600 counts/revolution.
We want the user unit of velocity to be in RPM. This is the same as the internal unit.
The parameters should be set as follows:
Object
Name
Value
6094h subindex 1
Velocity encoder factor - Numerator
1600
6094h subindex 2
Velocity encoder factor – Divisor
1600
Example 2:
We have an MIS232 that uses RPM as the internal velocity and the same belt drive as in
the above Position factor example.
We want the user unit of velocity to be in mm/s.
The parameters should be set as follows:
Object
Name
Calculated value Value
Velocity encoder factor - Numera- (60*3.5)/389,56 =
6094h subindex 1 tor
0.53907
53907
6094h subindex 2 Velocity encoder factor – Divisor 1
100000
Acceleration factor
This factor is used to convert the user unit into the internal unit (9.54 RPM/s).
The factor is adjusted with the object 6097h.
Example 1:
We have an MIS232 with 1600 counts/revolution.
We want the user unit of acceleration to be in RPM/s.
The parameters should be set as follows:
Object
Name
Value
6097h subindex 1
Acceleration encoder factor - Numerator
100
6097h subindex 2
Acceleration encoder factor – Divisor
954
JVL Industri Elektronik A/S - User Manual - Integrated Step Motors MIS 231, 232, 234
161
11.5
Objects used in the DSP-402 standard
Example 2:
We have an MIS232 with 1600 counts/revolution and the same belt drive as in the above
Position factor example.
We want the user unit of acceleration to be in mm/s2.
The parameters should be set as follows:
Object
Name
Calculated value Value
6097h subindex 1
Acceleration factor- Numera- (3,5*60)/389,56 =
tor
0.53907
53907
6097h subindex 2
Acceleration factor - Divisor
9.54
954000
11.5.3
Changing operation mode
Change of operation mode is only possible when the operation mode is not enabled.
There is one exception and that is when changing from homing mode to profile position
mode. This is possible when the homing sequence is completed and can be done even
though the operation mode is enabled.
11.5.4
Profile position mode
This mode can be used for positioning in which a move profile can be set up. The acceleration and maximum velocity can be programmed.
In this mode both absolute and relative movement is supported. This is selected using bit
6 (abs/rel) in the status word. It is also possible to select different movement modes. This
is done with bit 5 (change set immediately) in the status word. When this bit is 0 and a
move is in progress, the new set-point is accepted, but the new set-point and profile are
not activated until the previous movement is finished. When this bit is 1, the new setpoint is activated instantly and the motor will move to the new position with the new
profile parameters.
11.5.5
Velocity mode
In this mode the motor runs at a selected velocity. A new velocity can be selected and
the motor will then accelerate/decelerate to this velocity.
The maximum slippage error is not supported in this mode.
11.5.6
Homing mode
Using this mode, different homing sequences can be initiated. The standard homing
modes from 1-34 are supported. Before starting the homing, the inputs must be configured properly using MacTalk or parameters 125,129,130,132.
162
JVL Industri Elektronik A/S - User Manual - Integrated Step Motors MIS 231, 232, 234
11.5
Objects used in the DSP-402 standard
11.5.7
Supported PDOs
Receive PDOs
Mapping
PDO object
no. index
Mapping object name Comment
1
6040h
Controlword
controls the state machine
2
6040h
6060h
Controlword
Modes of operation
controls the state machine and modes
of operation
3
6040h
607Ah
Controlword
Target position
controls the state machine and the target position (pp)
4
6040h
60FFh
Controlword
Target velocity (pv)
controls the state machine and the target velocity (pv)
7
6040h
60FEh
Controlword
Digital outputs
controls the state machine and the digital outputs
Transmit PDOs
Mapping
PDO object
no. index
Mapping object name
Event driven
1
6041h
Statusword
Yes
2
6041h
6061h
Statusword
Modes of operation display
Yes
3
6041h
6064h
Statusword
Position actual value
No
4
6041h
606Ch
Statusword
Velocity actual value
No
7
6041h
60FDh
Statusword
Digital inputs
Yes
JVL Industri Elektronik A/S - User Manual - Integrated Step Motors MIS 231, 232, 234
163
11.6
11.6.1
More details of CANOpen Theory
CANopen DS-301 device profiles
Standardized devices in CANopen have their characteristics described in a device profile.
For each device profile, particular data and parameters are strictly defined. Data and parameters are known as objects in CANopen. Objects perform all processes in CANopen; they can perform various tasks, either as communications objects or as device-specific objects where they are directly related to the device. A communication object can
transport data to the bus control and establish connection, or supervise the network devices.
The application layer makes it possible to exchange meaningful real-time-data across the
CAN network. The format of this data and its meaning must be known by the producer
and the consumer(s). There are encoding rules that define the representation of values
of data types and the CAN network transfer syntax for the representations. Values are
represented as bit sequences. Bit sequences are transferred in sequences of octets
(byte). For numerical data types, the encoding is with the lowest byte first.
Every object is described and classified in the object dictionary (or index) and is accessible
via the network. Objects are addressed using a 16-bit index so that the object dictionary
may contain a maximum of 65536 entries.
Index (Hex)
Object
0000-
Not used
0001-001F
Static data types
Supported by
MAC00-FC2/FC4
0020-003F
Complex data types
0040-005F
Manufacturer specific Data Types
0060-0FFF
Reserved for further use
1000-1FFF
Communication Profile area DS301
Yes
2000-5FFF
Manufacturer specific profile area
Yes
6000-9FFF
Standardised Device Profile area (DSP-402)
Yes
A000-FFFF
Reserved for further use
Index 0001-001F:
Static data types contain type definitions for standard data types like boolean, integer,
floating point, etc. These entries are included for reference only, they cannot be read or
written.
Index 0020-003F:
Complex data types are predefined structures that are composed out of standard data
types and are common to all devices.
Index 0040-005F:
Manufacturer-specific data types are also structures composed of standard data types
but are specific to a particular device.
Index 1000-1FFF:
The communication Profile area contains the parameters for the communication profile
on the CAN network. These entries are common to all devices.
Index 2000-5FFF:
The manufacturer-specific profile area, for truly manufacturer-specific functionality.
164
JVL Industri Elektronik A/S - User Manual - Integrated Step Motors MIS 231, 232, 234
11.6
More details of CANOpen Theory
Index 6000-9FFF:
The standardised device profile area contains all data objects common to a class of devices that can be read or written via the network. The drives profile uses entries from
6000h to 9FFFh to describe the drive parameters and the drive functionality. Within this
range, up to 8 devices can be described. In such a case, the devices are denominated Multi Device Modules. Multi Device Modules are composed of up to 8 device profile segments. Using this feature it is possible to build devices with multiple functionality. The
different device profile entries are shifted with 800h.
A 16-bit index is used to address all entries within the object dictionary. In the case of a
simple variable, this index references the value of the variable directly. In the case of
records and arrays however, the index addresses the whole data structure. To allow individual elements of structures of data to be accessed via the network, a sub-index has
been defined. For single object dictionary entries such as Unsigned8, Boolean, Integer32,
the value of the sub-index is always zero. For complex object dictionary entries such as
arrays or records with multiple data fields, the sub-index refers to fields within a datastructure pointed to by the main index. Index counting starts with one.
The DS-301standard constitutes the application and the communications profile for a
CANopen bus, and is the interface between the devices and the CAN bus. It defines the
standard for common data and parameter exchange between other bus devices, and it
controls and monitors the devices in the network. The table below lists some of the communications profile objects:
Data
Transfer
Parameter
Transfer
Special
functions
PDO
Process Data Objects
SDO
Service Data Objects
SYNC
Synchronisation
EMCY
Emergency
The access from the CAN network is done through data objects PDO (Process Data Object) and SDO (Service Data Object).
11.6.2
Boot up telegram
After the initialization phase, a CANopen slave logs on with a boot up message. The node
address of the slave is contained in this. This allows a CANopen master to know which
slaves are connected to the network. The protocol uses the same identifier as the error
control protocols. See the figure below:
NMT Slave
NMT Master
COB-ID = 700h + Node-ID
Indication
0
Request
TT1085GB
One data byte is transmitted with value 0.
JVL Industri Elektronik A/S - User Manual - Integrated Step Motors MIS 231, 232, 234
165
11.6
11.6.3
More details of CANOpen Theory
PDO (Process Data Object)
PDO: Performs real-time transfers, and the transfer of PDOs is performed without a
protocol. PDOs are used in two ways: for data transmission and for data reception.
PDOs can bundle all objects from the object data directory, and a PDO can handle max
8 bytes of data in the same PDO. The PDO can consist of multiple objects.
Another PDO characteristic is that it does not reply when it is receiving data, in order to
make data transfer fast. It has a high priority identifier.
PDO connections follow the Producer/Consumer model, whereby a normal PDO connection follows the Push model and an RTR connection the Pull model.
Objects are mapped in a PDO. This mapping is an agreement between the sender and
receiver regarding which object is located at which position in the PDO. This means that
the sender knows at which position in the PDO it should write data and the receiver
knows where it should transfer the data to that is received.
The PDOs correspond to entries in the Device Object Dictionary and provide the interface to the application objects. Data type and mapping of application objects into a PDO
are determined by a corresponding PDO mapping structure within the Device object
Dictionary. The number and length of PDOs of a device are application specific and must
be specified within the device profile
Write PDO service:
The Write PDO service is unacknowledged. A PDO producer sends its PDO to the PDO
consumer. There can be 0 or more consumers in the network. For receive PDOs the
SMC75 Controller is the consumer and for Transmit PDOs, the producer.
The following figure shows a Write PDO service:
PDO Producer
Request
PDO Consumers
0
L = 0....8
Proces data
Indication
TT1086GB
166
JVL Industri Elektronik A/S - User Manual - Integrated Step Motors MIS 231, 232, 234
11.6
More details of CANOpen Theory
Read PDO service:
The read PDO service is an acknowledged service. One of the several PDO consumers
send an RTR message to the network. After it has received the RTR message, the PDO
producer sends the requested PDO. This service is used for RTR queries. Using this service, an actual value can be interrogated independently of the selected cycle time. The following figure shows a read PDO service:
PDO Producer
PDO Consumers
Request
Indication
Response
0
L = 0....8
Proces data
Confirmation
TT1087GB
PDO identifier:
In the CAN-Open profile, it is only possible to have four transmit and four receive PDOs
enabled at the same time. In the SMC75 controller, all PDOs are disabled when the module is booted up. The user must choose which PDOs the application will use and enable
these.
The PDO configuration can be seen either in the EDS-file or in the CanOpen Explorer
program, where the communication and the mapping parameters are shown.
There are two standard methods to map the PDOs in CANopen: static mapping and dynamic mapping. In static PDO mapping all PDOs are mapped in accordance with some
fixed, non-modifiable setting in the relevant PDO. In dynamic PDO mapping, the setting
of a PDO can be modified. It is also allowable to have a flexible combination of different
process data during operation. The SMC75 controller uses only static mapping.
11.6.4
SDO (Service Data Objects)
SDO: can access all entries in the object directory but they are normally used in the initialization during the boot up procedure. Some SDOs characteristics are:
-
Confirmed transfer of objects
Data transfer/exchange is always non-synchronous
Values greater than 4 bytes are transferred (Normal transfer)
Values not more than 4 bytes are transferred (Expedited transfer)
Basically an SDO is transferred as a sequence of segments. Prior to transferring the segment, there is an initialization phase where client and server prepare themselves for
transferring the segment. For SDOs, it is also possible to transfer a dataset of up to four
bytes during the initialisation phase. This mechanism is called an expedited transfer.
Download SDO protocol:
The download SDO protocol is used to write the values of the object directory into the
drive.
JVL Industri Elektronik A/S - User Manual - Integrated Step Motors MIS 231, 232, 234
167
11.6
More details of CANOpen Theory
Server
Client
7...5
CCS=1
Request
4
1
0
4
X
3...2
n
1
e
0
7...5
SCS=3
Confirm
TT1088GB
4...0
X
1
4
m
8
d
m
0
s
Indication
reserved
8
Response
Upload SDO protocol:
The upload SDO protocol is used to read the values in the object directory of the drive.
Client
Server
1
0
7...5
CCS=2
Request
0
7...5
SCS=2
Confirm
TT1088GB
m
4...0
X
4
X
3...2
n
1
e
0
s
1
m
4
reserved
4
d
8
Indication
8
Response
Table for upload and download SDO protocol.
CCS:
Download
Upload
1: Initiate
download
request
2: Initiate
upload
request
SCS:
n:
e:
s:
m:
3: Initiate
download
response
Only valid if e=1 and s=1
otherwise 0. If valid it
indicates the number of
bytes in d that do not
contain data. Bytes
[8-n,7] do not contain
data
Transfer
type: 0=
normal
transfer
1=
expedited
transfer
Size indicator: 0=data
set size is
not indicated 1=data
set size is
indicated
Multiplexer.
It reprensents the
index/subindex of the
data to be
transfer by
the SDO
2: Initiate
upload
response
CCS:Client command specified.
SCS: Server commander specified.
168
JVL Industri Elektronik A/S - User Manual - Integrated Step Motors MIS 231, 232, 234
11.6
More details of CANOpen Theory
Table for upload and download SDO protocol (continued)
d:
X:
Reserved:
Download
e=0, s=0:
d is reserved for further use
e=0, s=1:
d contains the number of bytes to be downloaded.
Byte 4 contains the lsb and byte 7 contains the
msb
e=1, s=1:
d contains the data of length 4-n to be downloaded, the encoding depends on the type of the data
referenced by index and sub-index.
not used,
always 0
Reserved for further
use, always 0
Upload
e=0, s=0:
d is reserved for further use
e=0, s=1:
d contains the number of bytes to be uploaded.
Byte 4 contains the lsb and byte 7 contains the
msb
e=1, s=1:
d contains the data of length 4-n to be uploaded,
the encoding depends on the type of the data referenced by index and sub-index.
not used,
always 0
Reserved for further
use, always 0
Abort SDO transfer protocol:
SDO tasks which the SMC75 controller cannot process are responded to using an abort
SDO protocol. If the module does not respond in the expected time, the CANopen master also sends an abort SDO.
The following figure shows an abort SDO transfer protocol:
Client/Server
Server/Client
0
Request
1
7...5
CS=4
4...0
X
m
4
d
8
Indication
TT1090GB
There are various abort codes in CANopen. These are listed in the table below:
Abort code
Description
0503 0000h
Toggle bit not alternated
0504 0000h
SDO Protocol timed out
0504 0001h
Client/server command specified not valid or unknown
0504 0002h
Invalid block size (block mode only)
0504 0003h
Invalid sequence number (block mode only)
0504 0004h
CRC error (block mode only)
0504 0005h
Out of memory
0601 0000h
Unsupported access to an object
0601 0001h
Attempt to read a write-only object
0601 0002h
Attempt to write a read-only object
0602 0000h
Object does not exist in the object dictionary
0604 0041h
Object cannot be mapped to the PDO
JVL Industri Elektronik A/S - User Manual - Integrated Step Motors MIS 231, 232, 234
169
11.6
11.6.5
More details of CANOpen Theory
Abort code
Description
0604 0042h
The number and length of the objects to be mapped would exceed PDO length
0604 0043h
General parameter incompatibility reason
0606 0000h
Access failed due to a hardware error
0607 0010h
Data type does not match, length of service parameter does not match
0607 0012h
Data type does not match, length of service parameter too high
0607 0013h
Data type does not match, length of service parameter too low
0609 0011h
Sub-index does not exist
0609 0030h
Value range of parameter exceeded (only for write access)
0609 0031h
Value of parameter written too high
0609 0032h
Value of parameter written too low
0609 0036h
Maximum value is less than minimum value
0800 0000h
General error
0800 0020h
Data cannot be transferred or stored to the application
0800 0021h
Data cannot be transferred or stored to the application because of local control
0800 0022h
Data cannot be transferred or stored to the application because of the present device
state
0800 0023h
Object dictionary dynamic generation fails or no object dictionary is present (e.g. object
dictionary is generated from file and generation fails because of a file error).
SYNC (Synchronisation Object)
A SYNC producer sends the synchronization object cyclically a broadcast telegram. The
SYNC telegram defines the basic clock cycle of the network. The time interval of the
SYNC telegram is set using the object Communication Cycle period (1006h). In order to
obtain a precise (accurate) cycle between the SYNC signals, the SYNC telegram is sent
with a high-priority identifier. This can be modified using the object (1005h). The SYNC
transfer applies the producer/consumer push model and is non-confirmed.
SYNC Producer
Request
SYNC Consumers
L=0
Indication
TT1091GB
The SYNC does not carry any data (L=0). The identifier of the SYNC object is located
at object 1005h.
170
JVL Industri Elektronik A/S - User Manual - Integrated Step Motors MIS 231, 232, 234
11.6
11.6.6
More details of CANOpen Theory
NMT (Network Management services)
The Network Management is structured according to nodes and follows a master-slave
structure. NMT objects are used for executing NMT services. Through NMT services,
nodes are initialised, started, monitored, reset or stopped. All nodes are regarded as
NMT slaves. An NMT slave is uniquely identified in the network by its Node-ID. NMT
requires that one device in the network fulfils the function of the NMT master. The NMT
master controls the state of the NMT slaves. The state attribute is one of the values
(Stopped, Pre-operational, Operational, Initialising). The module control services can be
performed with a certain node or with all nodes simultaneously. The NMT master controls its own NMT state machine via local services which are implementation dependent.
The Module Control Service, except Start Remote Node, can be initiated by the local application.
A general NMT protocol:
NMT master
Request
NMT Slave (s)
0
CS
1
Node-ID
COB-ID = 0
2
Indication
Indication
Indication
TT1081GB
TT1082GB
Where CS is the NMT command specified. The Node-ID of the NMT slave is assigned
by the NMT master in the Node Connect protocol, or 0. If 0, the protocol addresses all
NMT slaves.
CS =
Operation
1
Start Remote Node
2
Stop Remote Node
128
Enter Pre Operational
129
Reset Node
130
Reset Communication
Start Remote Node:
This is an instruction for transition from the Pre-Operational to Operational communications state. The drive can only send and receive process data when it is in the Operational state.
Stop Remote Node:
This is an instruction for transition from either Pre-Operational to stopped or from Operational to Stopped. In the stopped state, the nodes can only process NMT instructions.
Enter Pre Operational:
This is an instruction for transition from either Operational or Stopped state to Pre-Operational. In the Pre-Operational state, the node cannot process any PDOs. However, it
can be parameterized or operated via SDO. This means set point can also be entered.
JVL Industri Elektronik A/S - User Manual - Integrated Step Motors MIS 231, 232, 234
171
11.6
More details of CANOpen Theory
Reset Node:
This is an instruction for transition from the Operational, Pre-Operational or Stopped
states to Initialization. After the Reset Node instruction, all objects (1000h-9FFFh) are reset to the Voltage On stage.
Reset Communication:
This is an instruction for transition from Operational or Stopped to Initialization. After
the Reset Communication instruction, all communication objects (1000h-1FFFh) are reset to the initial state.
In the various communication states, nodes can only be accessed via CAN-Open using
specific communication services. Further, the nodes in the various states only send specific telegrams. This is clearly shown in the following table:
Initializing
Pre-Operational
Operational
PDO
SDO
X
Synchronization Object
X
X
Emergency Object
X
X
X
X
Boot-Up Object
Network Management object
11.6.7
Stopped
X
X
X
X
Error Control Services
Two possibilities exist for performing Error Control:
- Node Guarding/Life Guarding
- Heartbeat
Node Guarding/Life Guarding
With Node Guarding, the CANopen master sends each slave an RTR telegram (Remote
Transmit request) with the COB-ID 1792 (700h) + node-ID.
Using the same COB-ID, the slave responds with its communications state, i.e. either
Pre-Operational, Operational or stopped.
The CANopen slave also monitors the incoming RTR telegram from the master.
The cycle of the incoming RTR telegrams is set using the Guard Time Object.
The number of RTR telegrams which can fail (at a maximum) before the slave initiates a
Life Guarding event is defined using the Life time factor object.
The Node Life Time is calculated from the product of the Guard Time and Life Time Factor. This is the maximum time that the slave waits for an RTR telegram.
The figure below shows a Node Guarding/Life Guarding protocol.
172
JVL Industri Elektronik A/S - User Manual - Integrated Step Motors MIS 231, 232, 234
11.6
More details of CANOpen Theory
COB-ID = 700h + Node-ID
Request
Confirmation
Node
Life
time
Node
Guard
time
Remote transmit request
7
t
6....0
s
Indication
Response
COB-ID = 700h + Node-ID
Request
Confirmation
Node Guarding event
Indication
Remote transmit request
7
t
6....0
s
Indication
Response
Life Guarding event
Indication
TT1083GB
Where s is the state of the NMT slave:
s
NMT state
4
Stopped
5
Operational
7
Pre-operational
t: is the toggle bit. It alternates between 2 consecutive responses from the NMT Slave.
The value of the toggle-bit of the first response after the guarding protocol becomes active is 0. The Toggle Bit in the guarding protocol is only reset to 0 when the NMT message Reset Communication is passed (no other change of state resets the toggle bit). If a
response is received with the same value of the toggle-bit as in the preceding response,
then the new response is handled as if it was not received.
Heartbeat:
With the Heartbeat protocol, a Heartbeat Producer cyclically sends its communications
state to the CAN bus. One or more Heartbeat Consumers receive the indication. The
relationship between producer and consumer is configurable via the object dictionary.
The Heartbeat Consumer guards the reception of the Heartbeat within the Heartbeat
Consumer time. If the Heartbeat is not received within the Heartbeat Consumer Time,
a Heartbeat Event will be generated.
JVL Industri Elektronik A/S - User Manual - Integrated Step Motors MIS 231, 232, 234
173
11.6
More details of CANOpen Theory
Heartbeat producer
Heartbeat consumer
COB-ID = 700h + Node-ID
Request
7
r
6....0
s
Heartbeat
producer time
Request
7
r
TT1084GB
6....0
s
Indication
Heartbeat
consumer time
Indication
Heartbeat
consumer time
Heartbeat Event
Where r is reserved (always 0).
s: is the state of the Heartbeat producer:
s
NMT state
0
Boot up
4
Stopped
5
Operational
7
Pre-operational
Only one communication monitoring service may be activated. This is either Node
Guarding/Life Guarding or Heartbeat. If the Heartbeat Producer Time is configured on
a device, the Heartbeat Protocol begins immediately. If a device starts with a value of the
Heartbeat Producer Time different from 0, the Heartbeat Protocol starts with the state
transition from Initialising to Pre-operational. In this case the Bootup Message is regarded
as the first heartbeat message. If the Heartbeat producer time is not 0, the heartbeat protocol is used.
In the SMC75, none of the error control mechanisms is enabled when the modules are
started up, because if there is any fault in the system it is impossible to contact the module. After the module has started up and there is communication between the master and
the slave, activate the required error control mechanism in the object Dictionary. See
section 11.4.1.
174
JVL Industri Elektronik A/S - User Manual - Integrated Step Motors MIS 231, 232, 234
12
Appendix
JVL Industri Elektronik A/S - User Manual - Integrated Step Motors MIS 231, 232, 234
175
12.1
Velocity accuracy
When setting a velocity in V_SOLL, the motor will not run at that exact velocity.
The exact velocity can be calculated with the following formula:
Note: The “Round” function rounds the number to the nearest integer.
Also note that the lowest possible velocity is 1.43 RPM and the highest is 1023
RPM.
176
JVL Industri Elektronik A/S - User Manual - Integrated Step Motors MIS 231, 232, 234
12.2
Command timing
Each command has a certain execution time. The specified execution time in the
following table is the maximum execution time if not using CANopen, serial communication and the motor is disabled. The actual execution may be faster.
Icon
Name
Execution time [µs]
Remarks
0
Set operation mode
60
Move relative (no velocity, no acceleration)1
90
Move relative+set velocity (no acceleration)1
150
Move relative+set velocity+set acceleration1
210
Move absolute (no velocity, no acceleration)1
60
Move absolute+set velocity (no acceleration)1
120
Move absolute+set velocity+set acceleration1
180
Set single output (high/low)
30
Set multiple outputs
30*number of outputs
Unconditional jump
30
Conditional jump (inputs)
60
Set a register
60
Conditional jump (register)
120
Save position
60
Set position
90
Send fastMAC command
30
Binary command
30
1) The time for all move commands is shown without waiting for in position
JVL Industri Elektronik A/S - User Manual - Integrated Step Motors MIS 231, 232, 234
177
12.3
More about program timing
The firmware is structured so that one program instruction is executed for each pass of
the main loop, which takes approximately 30 microseconds (µs) without CANopen,
without serial communications and when the motor is not running. The Main Loop Time
is termed MLT in the following text.
A single program line in MacTalk can generate more than one instruction. For example,
assigning a constant value to a register uses two instructions: First load the value to the
internal stack and then Store from the stack to the target register. The above table in section 12.2 reflects this operation.
The main loop time will vary depending on a number of factors: The motor velocity, the
serial communications speed and load, whether CANopen is installed, and the CANopen
communications speed and load.
Simply running the motor will load the motor up to 17% so the MLT becomes ~= 37
µs at full speed (1023 RPM).
Serial communications on the RS-485 line can load the motor up to 1% at 19.200 baud,
which is insignificant, but at the maximum baud rate of 921.600 the communications can
load the motor up to 45%, which would result in an MLT of ~60 µs.
When CANopen firmware is installed, the basic MLT will change from 30 to 90 µs with
no communications.
When loading the CANbus with communications, the MLT can rise significantly. For example, when using seven transmit PDOs with an event timer value of 1 ms and a CANbus
link speed of 500 kbits/s, the MLT can rise to 150-200 µs. Also using RS-485 communications at high baud rates can result in even longer MLT values. However, this scenario
is very unlikely.
Note: In applications where program timing is critical, tests must be performed
to ensure that timing is satisfactory when communication is running according
to conditions used in production!
178
JVL Industri Elektronik A/S - User Manual - Integrated Step Motors MIS 231, 232, 234
12.4
Motor Connections
Connection of JVL and MAE
4 wire motors. Type MST17x
and HY200-xxxx-xxx-x4
Connection of JVL and MAE
motors (parallel). Type MST23x/
MST34x and HY200-xxxx-xxx-x8
Black
AB+
B-
Orange
A+
A
Red
B
A
Driver
Driver
A+
Black / White
Orange / White
B
Red / White
AB+
B-
Yellow / White
Yellow
Connection of JVL and MAE
motors (serial). Type MST23x/
MST34x and HY200-xxxx-xxx-x8
Black
Orange
(Yellow 17xx)
Yellow
Driver
AB+
Orange
Red
BYellow
Black/White
A+
A
A
B
B
B
(Blue 17xx)
Connection of Zebotronics motor
Type : SMxxx.x.xx.x (8 terminals)
Driver
Orange/White
A
(Red 17xx)
Red
Black
A+
(White 17xx)
Red/White
Yellow/White
AB+
B-
1
Brown
3
2
Black
White
4
Red
5
Blue
7
Yellow
6
Gray
8
Green
SM87/SM107/168.x.xx
Connection of MAE motor (unipol.)
Type HY200-1xxx-xxxxx6
A
A
B
B
SM56.x.xx
Connection of Zebotronics motor
Type : SMxxx.x.xx.x (4 terminals)
( Motor in unipolar model - 6 wires )
AB+
B-
White
Green
Black
Red
A+
A
B
A
B
White/
Green
White/
Red
Driver
Driver
A+
AB+
B-
Black
1
Green 2
Red
3
A
B
White 4
TT0005
JVL Industri Elektronik A/S - User Manual - Integrated Step Motors MIS 231, 232, 234
179
12.5
Connection of Vexta motor
Type PH2xx.xxx
Connection of Phytron motor
Type ZSx.xxx.x,x
Red
( Motor in unipolar model - 6 cables )
AB+
B-
Yellow
Red
A+
A
A
B
B
White
Driver
Driver
A+
Black
AB+
B-
Brown
Black
Yellow
Blue
A
A
B
B
Violet
White
Green
Connection of Vexta stepmotor
Type : PH2xx-xxx
Driver
A+
AB+
B-
Black
Black / White
Orange / White
Orange
Red
A
A
B
B
Red / White
Yellow / White
Yellow
TT0006
180
JVL Industri Elektronik A/S - User Manual - Integrated Step Motors MIS 231, 232, 234
12.6
Serial communication
This section describes control of the SMC75 motor via the serial interface (RS232/
RS485).
The communication is not made in ASCII values and it is thus not possible to use programs like Hyperterminal to control the motor.
The interface is RS232 compatible and uses 8 data bits and no parity.
The SMC75 motor is completely controlled by reading and writing to registers.
The registers are numbered 1-255. The width of the registers is 16 bits or 32 bits.
To protect communication from errors, the data is transmitted twice.
First the data byte is transmitted and then an inverted version (255-x) is transmitted.
The easiest way to become familiar with the registers and MacTalk communication is to
use the MacRegIO program. This program lists all of the registers, and the serial commands sent and received can be monitored.
12.6.1
Supported commands
Sync
Response Sync
Description
0x50
0x51
0x52
0x54
0x55
0x56
0x57
0x59
0x61
0x62
0x63
0x52
0x52
0x11 (Ack)
0x11 (Ack)
0x11 (Ack)
0x11 (Ack)
None
None
0x61
0x11 (Ack)
0x63
Read register
Read register block
Write register
Enter safe mode
Exit safe mode
Write to flash
Reset controller
Group write register
Program status and command
Write program flash
Read program flash
12.6.2
Read register
This command can read a register. All registers are read as 32-bit. If the register is only
16-bit, the high part must be discarded.
Master sends
SMC75 Response
<Read><Address><RegNum><End>
<Write><MAddress><RegNum><Len><Data><End>
Block description
Block name
Protected
Example
Description
<Read>
<Address>
<RegNum>
<End>
<Write>
No
Yes
Yes
No
No
50h,50h,50h
07h,F8h (Address 7)
05h,FAh (RegNum 5)
AAh, AAh
52h,52h,52h
<MAddress>
Yes
00h,FFh (Address 0)
<RegNum>
Yes
05h,FAh (RegNum 5)
<Len>
Yes
<Data>
Yes
<End>
No
04h,FBh (Len = 4)
E8h,17h, 03h,FCh,
00h, FFh, 00h,FFh
(Data = 1000)
AAh, AAh
Read command
The address of the SMC75
The register number to read
Command termination
Write command
This will always be 0, because this is the
address of the master
This will always be the same as
requested
The length will always be 4
The data read from the register
Command termination
JVL Industri Elektronik A/S - User Manual - Integrated Step Motors MIS 231, 232, 234
181
12.6
Serial communication
12.6.3
Read register block
Using this command it is possible to read 64 consecutive registers at once.
Master sends
SMC75 Response
<ReadB><Address><RegNum><End>
<Write><MAddress><RegNum><Len><Data><End>
Block description
Block name
Protected
Example
Description
<ReadB>
<Address>
<RegNum>
<End>
<Write>
No
Yes
Yes
No
No
51h,51h,51h
07h,F8h (Address 7)
05h,FAh (RegNum 5)
AAh, AAh
52h,52h,52h
<MAddress>
Yes
00h,FFh (Address 0)
<RegNum>
Yes
05h,FAh (RegNum 5)
<Len>
Yes
80h,7Fh (Len = 128)
<Data>
Yes
E8h,17h, …, 03h,FCh
Read block command
The address of the SMC75
The first register to read
Command termination
Write command
This will always be 0, because this is the Address
of the master
This will always be the same as
requested
The length will always be 128, so 64
registers is read in each block.
The data read from the registers
12.6.4
Write Register
Using this command, a register can be written.
Controller sends
SMC75 Response
<Write><Address><RegNum><Len><Data><End>
<Accept>
Block description
Block Name
Protected
Example
Description
<Write>
<Address>
<RegNum>
<Len>
No
Yes
Yes
Yes
Write command
The address of the SMC75
The register number to write to
The number of data bytes
<Data>
Yes
<End>
<Accept>
No
No
52h,52h,52h
07h,F8h (Address 7)
05h,FAh (RegNum 5)
02h,FDh (Len = 2)
E8h,17h, 03h,FCh
(Data = 1000)
AAh, AAh
11h, 11h,11h
12.6.5
The data to write to the register
Command termination
Accept from SMC75
Enter safe mode
When this command is sent, the SMC75 switches to safe mode. In safe mode, no program or commands can enable the motor. The mode can only be exited using either an
“Exit safe mode” or “Reset” command.
Controller sends
SMC75 response
<EntSafe><Address><End>
<Accept>
Block description
Block Name
Protected
Example
Description
<EntSafe>
<Address>
<End>
<Accept>
No
Yes
No
No
54h,54h,54h
07h,F8h (Address 7)
AAh, AAh
11h, 11h,11h
Enter safe mode command
The address of the SMC75
Command termination
Accept from SMC75
182
JVL Industri Elektronik A/S - User Manual - Integrated Step Motors MIS 231, 232, 234
12.6
Serial communication
12.6.6
Exit safe mode
When this command is sent, the SMC75 switches back to normal mode.
Controller sends
SMC75 response
<ExitSafe><Address><End>
<Accept>
Block description
Block Name
Protected
Example
Description
<ExitSafe>
<Address>
<End>
<Accept>
No
Yes
No
No
55h,55h,55h
07h,F8h (Address 7)
AAh, AAh
11h, 11h,11h
Exit safe mode command
The address of the SMC75
Command termination
Accept from SMC75
12.6.7
Write to flash
This command writes the register values to flash memory. The values will then be retained after a power down. The command will only work if the motor is in “Safe mode”
After the command is executed, the motor will reset. The response will only be transmitted if the command failed, e.g. if the motor is not in safe mode.
Controller sends
SMC75 response
<WriteFlash><Address><End>
<Accept>
Block description
Block Name
Protected
Example
Description
<WriteFlash>
<Address>
<End>
<Accept>
No
Yes
No
No
56h,56h,56h
07h,F8h (Address 7)
AAh, AAh
11h, 11h,11h
Write to flash command
The address of the SMC75
Command termination
Accept from SMC75
12.6.8
Reset controller
This command resets the SMC75. No response will be transmitted from the SMC75.
Controller sends
SMC75 response
<Reset><Address><End>
None
Block description
Block Name
Protected
Example
Description
<Reset>
<Address>
<End>
No
Yes
No
57h,57h,57h
07h,F8h (Address 7)
AAh, AAh
Reset command
The address of the SMC75
Command termination
JVL Industri Elektronik A/S - User Manual - Integrated Step Motors MIS 231, 232, 234
183
12.6
Serial communication
12.6.9
Group write register
Using this command it is possible to write a register in several SMC75s with one command.
The command includes a sequence number which must be changed for each write. This
is used so that the same command can be written several times, to ensure that all controllers received it. The last received sequence id can be read in register 148.
Controller sends
SMC75 Response
<GWrite><Group><Sequence><RegNum><Len><Data><End>
None
Block description
Block Name
Protected
Example
Description
<GWrite>
<Group>
<Sequence>
<RegNum>
<Len>
No
Yes
Yes
Yes
Yes
Group write command
The group id of the SMC75s to write to.
The sequence number of the write.
The register number to write to
The number of data bytes
<Data>
Yes
<End>
No
59h,59h,59h
07h,F8h (Address 7)
04h,FBh (Sequence 4)
05h,FAh (RegNum 5)
02h,FDh (Len = 2)
E8h,17h, 03h,FCh
(Data = 1000)
AAh, AAh
12.6.10
Data 1
Data 2
0
1
2
3
-
-
5
6
7
Command termination
Program status and command
Using this command, different actions can be executed. The command also returns some
information about the program state.
The table below shows the possible commands:
Command
4
The data to write to the register
Description
No operation
Start program execution
Stop program execution
Pause program execution
Run the program until the program pointer is outside the area
Start Address End Address
[Start Address,End Address]
(16bit)
(16bit)
Then the program is paused
Modifies the outputs. The bits set in the “Set outputs” data will be set and cleared
Set outputs
Clear outputs for “Clear outputs”.
(8bit)
(8bit)
Example:
The data 0x06,0x01 sets output 2+3 and clears output 1
Reserved
Size (16 bit)
Prepare the flash for a new program. Data 1 specifies the size of the program in bytes.
The command number is placed in the first command data byte. Data 1 + Data 2 are
placed in the following command data bytes.
Controller sends
SMC75 Response
<PStat><Address><Len1><Data1><End>
<PStat><MAddress><Len2><Data2><End>
184
JVL Industri Elektronik A/S - User Manual - Integrated Step Motors MIS 231, 232, 234
12.6
Serial communication
Block description
Block Name
Protected
Example
Description
<PStat>
<Address>
<Len1>
<Data1>
No
Yes
Yes
Yes
61h,61h,61h
07h,F8h (Address 7)
01h,FEh (Len = 1)
01h,FEh (Start)
<MAddress>
Yes
00h,FFh (Address 0)
<Len2>
Yes
Program status command
The address of the SMC75’s to write to.
Length of the command data
Command data
This will always be 0, because this is the
address of the master
The length of the return data
<Data2>
Yes
<End>
No
08h,F7h (Len = 8)
09h,F6h, (Program state)
00h,FFh, 00h,FFh, (Program
pointer)
00h,FFh, (Stack pointer)
Data returned from SMC75
00h,FFh,
00h,FFh, (Program checksum)
80h,7Fh, (Inputs)
00h,FFh (Outputs)
AAh, AAh
Command termination
The returned data has the following format:
Data offset
Size
Description
0
1
3
8 bit
16 bit
8 bit
4
16 bit
6
7
8 bit
8 bit
Program state. See table below for states.
Program pointer. The current location of the program pointer.
Stack pointer
Program checksum. This checksum is calculated when the program is
started.
Input status.
Output status
Program states:
Program
state
Name
Description
0
1
Passive
Running
2
Single Step
3
4
5
6
7
8
Paused
Stack Ovf.
Program Ovf.
Invalid Ins.
Stopped
Com. Error
9
Starting Prg.
10
11
Flash Error
Flash Checksum Error
The program execution is stopped. This state is only entered shortly at power-up.
The program execution is running
A single step is in progress. The program will run until the selected program
position is reached.
The program execution is paused, but can be resumed again.
The stack pointer has overflowed
The program pointer has overflowed.
An invalid instruction is encountered in the program.
The program execution is stopped.
Internal communication error has occurred. This cannot happen on SMC75.
Program execution is being prepared. After this is completed the state will change
to running.
The program data is corrupted.
The program data checksum is incorrect.
JVL Industri Elektronik A/S - User Manual - Integrated Step Motors MIS 231, 232, 234
185
N0 73 8 10 E
Standby current ratio
mA in driver
Input format
M2
Driver Technology
Step Resolution
3
Revision September26, 2007
01
to
31
Standby current ratio (03 = 1/3 standby current) #
D 24V NPN inputs
E 24V PNP inputs
F 5V inputs
xx xx specifies mA*100/phase. See SMD73 data-sheet
0 No driver #
1 1/1 step (with 200step/rev motor 200 pulses/rev.)
2 1/2 step (with 200step/rev motor 400 pulses/rev.)
4 1/4 step (with 200step/rev motor 800 pulses/rev.)
5 1/5 step (with 200step/rev motor 1000 pulses/rev.)
8 1/8 step (with 200step/rev motor 1600 pulses/rev.)
73 SM73 driver 15-28VDC. Pulse and direction driver. (Only orders more than 10 pcs.)*
74 Driver 12-48VDC based on SMC75 technology (Future option)
75 SMC75 controller with MAC protocol. 12-48VDC and optional encoder/hall sensor feedback #
76 Controller based on SMD41 driver and SMC75 controller functionality. #
41 SMD41 driver technology 20-80VDC. Pulse and direction driver. Only MIS34x. (Future option)
42 SMD42 driver technology 30-160VDC. Pulse and direction driver. Only MIS34x. (Future option)
N0 No feedback
H1 Magnetic encoder feedback. 32 pulses/rev. Only if controller supports this feature (Future option)
H2 Magnetic encoder feedback. 256x4 pulses/rec. Only if controller supports this feature
E1 Encoder feedback. 1024 lines = 4096 pulses/rev. Only if controller supports this feature. (Future option)
M1 M12 1pcs. 5pin male . SMD73 pulse/direction driver.
M2 M12 2 pcs. 5 pin male (power). 8 pin female (RS485, 4IOA)
M3 M12 3 pcs. 5 pin male (power), 8 pin female (RS485, IOA 1-4), 5 pin female (RS485). SMC75
M4 M12 3 pcs. 5 pin male (power), 8 pin female (RS485, IOA 1-4), 8 pin female (5V serial, IOA5-8). SMC75
M5 M12 4 pcs. 5 pin male (power), 8 pin female (RS485, IOA 1-4 ), 5 pin female (RS485), 8 pin female (5V serial, IOA 5-8).SMC75
M6 M12 4 pcs. CANopen 5 pin male (power), 8 pin female (RS485, IOA 1-4), 8 pin female (5V serial, IOA 5-8), 5 pin male (CAN) SMC75
M7 M12 4 pcs.DeviceNet 5 pin male (power), 8 pin female (RS485, IOA 1-4), 8 pin female (5V serial, IOA 5-8), 5 pin male (Device) SMC75
W0 PG16 and no cable
W1 PG16 and 2m cable. Flying leads with shield.
EX Long hosing ready for MAC00-xx expansion board (Future option)
1 6,35mm shaft and IP42
2 6,35mm shaft and IP55 (motor shaft and body). IP65 (Rear end and connector)
3 10,0 mm shaft and IP42
4 10,0mm shaft and IP55 (motor shaft and body). IP65 (Rear end and connector)
5 14mm shaft and IP42
6 14mm shaft and IP55 (motor shaft and body). IP65 (Rear end and connector)
7 8mm shaft 52mm long for HFOS worm gear
A Motor driver for 3,0A/phase
B Motor driver for 5,2A/phase (Future option)
230 NEMA23 stepper motor
231 NEMA23 stepper motor
232 NEMA23 stepper motor
234 NEMA23 stepper motor
340 NEMA34 stepper motor (Future option)
341NEMA34 step motor (Future option)
342NEMA34 step motor (Future option)
MIS MISxxx Motor Integrated Stepper Motor.
Examples
MIS 231 A
1 W1
N0 73 8 25 D Motor 6,35 shaft, flying leads, SMD73 driver
MIS 233 A
3 M1
N0 73 2 30 D Motor 10mm shaft, M12 , SMD73
MIS 232 A
1 M3
N0 75
Motor 6,35mm shaft. SMC75. 3 pcs M12 connectors
MIS 234 A
3 M6
N0 75
Motor 10mm shaft. SMC75. 4 pcs M12 connectors, CANopen
MIS 232 A
1 M7
H2 75
Motor 6,35mm shaft. SMC75. 4 pcs M12 connectors. DeviceNet. Encoder H2 option
MIS 340 B
5 M1
N0 41
Motor 14,0 mm shaft. 1 pcs M12 connector. 80V driver
MIS 342 B
5 M7
N0 76
Motor 14,0 mm shaft. 4 pcs M12 connectors. 80V controller. DeviceNet. Encoder H2 option
# : End of number. No more letters or numbers should be added.
*: For orders less than 10 pcs., use Controller SMC75 instead, allowing current and gear ratio to be freely programmed.
186
1
MIS Ordering Information
Feedback
MIS 232 A
Connection
Generation
IP and shaft
Size
Motor Type
12.7
JVL Industri Elektronik A/S - User Manual - Integrated Step Motors MIS 231, 232, 234
12.8
SMC75 Ordering Information
SMC75 selection chart
SMC Step motor controller
75 Version 3ARMS 12-48VDC with 8IOA and optional CANopen/DeviceNet and encoder
85 Version 12-160VDC with 8IOA and optional CANopen/Devicenet and encoder
A PCB 3ARMS (default)
B PCB 6ARMS
C PCB 9ARMS
1 Hardware version1. (default)
2 Hardware version 2.
M1 M12 2pcs. 5pin male (power). 8 pin female (RS485, 4IOA). SMC75
M2 M12 2 pcs. 5 pin male (power). 8 pin female (RS485, 4IOA). SMC75
M3 M12 3 pcs. 5 pin male (power), 8 pin female (RS485, IOA 1-4), 5 pin female (RS485). SMC75
M4 M12 3 pcs. 5 pin male (power), 8 pin female (RS485, IOA 1-4), 8 pin female (5V serial, IOA5-8). SMC75
M5 M12 4 pcs. 5 pin male (power), 8 pin female (RS485, IOA 1-4 ), 5 pin female (RS485), 8 pin female (5V serial, IOA
M6 M12 4 pcs. CANopen 5 pin male (power), 8 pin female (RS485, IOA 1-4), 8 pin female (5V serial, IOA 5-8), 5 pin
M7 M12 4 pcs. DeviceNet 5 pin male (power), 8 pin female (RS485, IOA 1-4), 8 pin female (5V serial, IOA 5-8), 5 pin
male (Device) SMC75
W1 PG16 and 2m cable. Flying leads with shield.
AA No fieldbus (default). Only PCB
AC Fieldbus CANopen. Only PCB
AD Fieldbus DeviceNet. Only PCB
H1 Magnetic encoder chip 1.
H2 Magnetic encoder chip2 mounted 256x4=1024 counts (AS5040)
SMC 75
A
1
M4
H1
Examples
SMC 75
SMC 75
SMC 75
A
A
A
1
1
1
AC
AA
SMC 75
SMC 75
A
A
1
1
AC
M7
H2
Steppermotor controller only PCB. No housing and encoder chip
Steppermotor controller only PCB, CANopen. No housing and encoder chip
Stepper motor controller only PCB with magnetic encoder chip type H2 mounted. No housing
Stepper motor controller only PCB with Fieldbus CANopen and magnetic encoder chip type H2
SMC 75
A
1
M6
H1
Stepper motor controller in a box with connector M7 and CANopen and DeviceNet
Stepper motor controller in a box with connector M7 and CANopen and H1 magnetic
sensor
H2
JVL Industri Elektronik A/S - User Manual - Integrated Step Motors MIS 231, 232, 234
187
12.8
SMC75 Ordering Information
QuickStep MST motor selection chart
MST Stepper motor with housing but without electronics. IP55
230 NEMA23 Stepper motor
231 NEMA23 Stepper motor
232 NEMA23 Stepper motor
234 NEMA23 Stepper motor
340 NEMA23 Stepper motor. (Future option)
341 NEMA23 Stepper motor .(Future option)
342 NEMA23 Stepper motor .(Future option)
A For 3Amp. driver/controller
B For 6 Amp. driver/controller
C For 9 or 12 Amp. driver/controller
1 6.35mm shaft and IP42
2 6.35mm shaft and IP55 (motor shaft and body) IP65 /Rear end and connector)
3 10.0mm shaft and IP42
4 10.0mm shaft and IP55 (motor shaft and body) IP65 /Rear end and connector)
5 14mm shaft and IP42
6 14mm shaft and IP55 (motor shaft and body) IP65 Rear end and connector)
3 Motor type
M1 m12 connector
W0 PG16 and no cable
W1 PG16 and 2m cable
MST 232 A 1 3
M1
Examples
MST 232 A 1 3
MST 234 A 3 3
MST 340 B 5 3
188
M1 Stepper motor NEMA23 with housing
M1 Stepper motor NEMA23 with housing
W1 Stepper motor NEMA34 with housing
JVL Industri Elektronik A/S - User Manual - Integrated Step Motors MIS 231, 232, 234
13
MIS Motor Technical Data
Supply Voltage (P+)
Control Voltage (CV)
Analog Input
Voltage Range
Range
10 Bit
Voltage Range
0 to +5VDC
Number/Type
8 Sources of output or input
Logic Range
Inputs and Outputs tolerant to +24VDC. Inputs TTL level compatible
0.1 or 1 to 100 ms
Type (Standard)
RS485
Type (Optional)
RS422
Baud Rate
9.6 to 921.6 kbps
Type (Optional)
CANopen DSP402 (V2.0), DS301 (VS3.0), 2,0B Active
Isolation
None
Open Loop Configuration
Internal
Encoder
(optional)
Counters
Velocity
Thermal
Node Guarding, heartbeat, SDOs, PDOs (Static mapping)
Number of settings
2
Steps per revolution
1600
Type
Internal, magnetic, absolute 1 rev.
Steps per Revolution
1024
Resolution
256 Lines
Type
Position, Encoder/32 Bit
Edge Rate (Max.)
27.280 kHz
Range
1.43 to 1023 RPM
Resolution
1 RPM
Range
3x10⁵ RPM/s
Resolution
9.54 RPM/s
Electronic Gearing
Range/Resolution/Threshold (External Clock In)
0.00003 to 32768/32 Bit
Program Storage
Type/Size
Flash 3072 Bytes
User Registers
2248 Bytes/32 bits
User program variables
Up to 224
Accel./Decel.
Software
Up to 350 mA per Channel. See Chart section 2.5
Over Temp. Short Circuit. Transient. Over Voltage. Inductive Clamp.
Input Filter
Features
Motion
+12 to + 28VDC
maintains power to control output driver and feed-back circuits (only) when input
voltage is removed. If no motor connected or passive mode: 100mA.
Resolution
General Purpose I/O Output Source Current
Protection
Communication
+12 to 48VDC
Ampere (no motor) 5mA Power supply current requirements = 2A (max.). Refer to illustration.
Actual power supply currents will depend on voltage and load
Math Functions
+, -, x, /, >, <, =, <=, >=, AND, OR, XOR, NOT, I, &, ^.
Branch Functions
Branch & Call
General Purpose I/O
Functions
Inputs
Home, Limit Plus, Limit Minus, Analog In,
General Purpose
Outputs
Moving, Fault, general Purpose
Party Mode Addresses
254
Encoder Functions
Stall Detection, Position maintenance, Find Index
Operating Temperature
0-45°C ambient
JVL Industri Elektronik A/S - User Manual - Integrated Step Motors MIS 231, 232, 234
189
13.1
SMC75 Technical Data
Power supply
P+ - PPP supply current
(No load)
CV
CV supply current
(Unconnected I/O)
V+ for CAN
V+ supply current for CAN
User outputs O1-O8
Output source current pr. channel
Output sink current
Output voltage
User inputs I1-I8
Input impedance
Voltage applied to any input
Analog input nominal
Logic ”0”
Logic ”1”
RS232 (5V)
Tx output low level
Tx output high level
Tx output source current
Tx output sink current
Rx input low level
Rx input high level
RS422
Input (VB1+-VB1-)
Input leakage current
Output (VA1+-VA1-)
Output source current
RS485
Input (VA--VB-)
Input leakage current
Output (VA--VB-)
Output source current
CAN (ISO 11898-24V)
Voltage at any input
Input (VCAN_H - VCAN_L)
Input (VCAN_H - VCAN_L)
Output (VCAN_H - VCAN_L)
Output (VCAN_H - VCAN_L)
190
Condition
Min.
12
@ 24V
@ 48 V
Norm.
125
100
7
@12V
@24V
4.5
35
160
90
5
CV = 35V
@ 8 sourcing
@ 4 sourcing
@ 1 sourcing
@ 100mA
Max.
48
5.5
1
75
100
350
0
CV – 2,4
CV- 2.2
10
-0.5
0
0
1.9
4
22
5.0
0.9
22
0.45
4.55
± 1.1
0.7
± 2.2
±6
1
± 5,0
60
V
mA
V
mA
0.7
± 2.5
± 12
1
± 5.0
60
V
mA
V
mA
36
5
0.5
3.0
50
V
V
V
V
mV
± 0.2
@ 50 ohm
± 1.5
Dominant
Recessive
Dominant
Recessive
-36
0.9
-1.0
1.5
-500
kOhm
V
V
V
V
1
1
0.9
48
± 0.2
@ 50 ohm
mA
mA
mA
mA
V
V
V
mA
mA
V
V
-0.5
1.9
1
Unit
V
mA
(RMS)
V
mA
mA
V
mA
JVL Industri Elektronik A/S - User Manual - Integrated Step Motors MIS 231, 232, 234
13.2
Torque Curves
Quickstep motor torque versus speed and supply voltage
Torque (Nm)
3,5
TT2223GB
Power supply = PSU24-240 (24V/240W regulated PSU)
Power supply = PSU48-240 (48V/240W regulated PSU)
Room temperature = 20°C
3
2,5
MIS234 @48V
MIS234 @24V
MIS232 @48V
MIS232 @24V
MIS231 @48V
MIS231 @24V
2
1,5
1
0,5
0
0
100
200
300
400
500
600
700
800
900
1000
Speed (RPM)
JVL Industri Elektronik A/S - User Manual - Integrated Step Motors MIS 231, 232, 234
191
13.3
13.3.1
Physical Dimensions
Physical dimensions MIS231, MIS232 and MIS234
Motor Type
MIS231
MIS232
MIS234
Motor Type Length ±2mm
D (dia.)
+0/-0.013
6.35
6.35
10.0
MIS231
MIS232
MIS234
96.0
118.5
154.0
Length including
connector and plug
140
162.5
198
(All dimensions in mm).
4 x Ø5.0
Ø66.67
47 ± 0.2
60.0
66.0
Shaft dia. D
∅ 38.1 ± 0.025
Fa
Fr
1.6
5.0
54.5
47 ± 0.2
56.4
192
JVL Industri Elektronik A/S - User Manual - Integrated Step Motors MIS 231, 232, 234
56.4
44
20,6 ±0.5
13.4
13.4.1
Trouble-shooting guide
Problems related to communication with the motor
Problem : “RS232 - MacTalk is not communicating with the motor”
The status at the bottom of the screen shows “*** No Connection ***” but the power
LED on the motor is lit and the serial cable is connected.
Action :
- Check that the correct COM port is selected in the MacTalk “Setup” menu.
- Check using Control Panel/System/Hardware/Device Manager/Ports (COM&LPT).
- Check that the connection to the motor is made according to specifications. If only
one motor is used on the RS232 bus, TX-PD must be shorted to TX, otherwise communication can be very unstable.
- Ensure that a firmware update has not been interrupted before the communication
problem was observed. If such an update is aborted/interrupted, it must be restarted
and completed before the internal processor is back to normal and can handle communication.
JVL Industri Elektronik A/S - User Manual - Integrated Step Motors MIS 231, 232, 234
193
194
JVL Industri Elektronik A/S - User Manual - Integrated Step Motors MIS 231, 232, 234
14
Connection to other Equipment
The SMC75 can be connected to other JVL products. These connections are described
in the following chapter.
JVL Industri Elektronik A/S - User Manual - Integrated Step Motors MIS 231, 232, 234
195
14.1Connecting SMI30/SMC35 to MIS/SMC75
The SMI3x or the SMC35B can control the MIS/SMC75 in gear mode. Pulse and directio
are send from SMi3x to control position and speed.
To do this, some parameters in both the SMI3x and SMC35B must be set up correctly.
In the SMI3x, the definition of the number of pulses pr. revolution, PR, can be selected
freely. So normally it is recommended to set PR=1600. The SMI3x has inputs from external drivers for alarm and in Position signals. If these are not connected, set CB15=0
and CB16=0.
The SMC75 must also be configured correctly. The mode must be set to Gear Mode
(Reg. 2 = 3 ). If gear factor input=1 and gear factor output=1, then the motor will run
at 100 rpm if velocity=100 in the SMI3x/SMC35B.
The connection between the SMI3x Indexer or SMC35B Controller should be made according to the following diagram:
SMI3x/SMC35B
MIS (IO1-4) /SMC75
Clk (2)
IO1
Dir (4)
IO2
Gnd (5)
Gnd
TT2218GB
The Controller SMC75 must be set to gear mode and the input and output for gear factor
must be adjusted according to the actual application.
196
JVL Industri Elektronik A/S - User Manual - Integrated Step Motors MIS 231, 232, 234
14.2 Connecting MISxx/SMC75 to SMD73
The MISxx/SMC75 can control an external driver with pulse and direction signals for precise positioning and speed control.
Driver
SMC75
Motor
O1-O2
O3-O4
O5-O6
O7-O8
TT2230GB
The 8 outputs can be used to generate pulse/direction for up to 4 drivers. This can be
used for accurate syncronization of two or more motors, based on the same source signal. Use MacTalk “I/O Setup” to set up the outputs to pulse/direction signals.
SMC75
SMD73 with PNP inputs
O1 (pulse)
IN1
O2 (direction)
IN2
O3 (pulse)
IN1
O4 (direction)
IN2
O5 (pulse)
IN1
O6 (direction)
IN2
O7 (pulse)
IN1
O8 (direction)
IN2
Motor 1
Motor 2
Motor 3
Motor 4
JVL Industri Elektronik A/S - User Manual - Integrated Step Motors MIS 231, 232, 234
197
14.3
Connecting MISxx/SMC75 to SMD41
The MISxx/SMC75 can control an external driver with pulse and direction signals for precise positioning and speed control.
198
MISxx or SMC75
SMD41xx or SMD42xx
O1 (Pulse)
I8 (Direction)
O2 (Direction)
I9 (Stepclock)
GND
I10 (GND)
JVL Industri Elektronik A/S - User Manual - Integrated Step Motors MIS 231, 232, 234
14.4 Connecting MISxx/SMC75 to MAC00-Bx
The stepper motor MIS23x and Controller SMC75 can also be connected with the
MAC00-B1, MAC00-B2 and MAC00B4 Expansion Modules. See the MAC motor manual
chapter 4.2.10 for further information.
O1
MIS23x or SMC75 O2
2.7kOhm
MAC00-Bx
A+
2.7kOhm
NC
B+
NC
GND
A-
B-
Dipswitch
1
2
3
4
off
on
off
on
GND
TT2243GB
JVL Industri Elektronik A/S - User Manual - Integrated Step Motors MIS 231, 232, 234
199
14.5
200
Connection to PLC/PC Boards
JVL Industri Elektronik A/S - User Manual - Integrated Step Motors MIS 231, 232, 234
15
Accessories
The following accessories are available for the MIS motor series.
JVL Industri Elektronik A/S - User Manual - Integrated Step Motors MIS 231, 232, 234
201
15.1
202
Cables
JVL Industri Elektronik A/S - User Manual - Integrated Step Motors MIS 231, 232, 234
15.2
15.2.1
Power Supplies
PSU00-PD1
Combined power dump, resistor, and capacitor unit. For a complete power supply system, only a transformer with a secondary winding supplying 32VAC is required.
For systems with up to 5-8 QuickStep motors, this unit can serve as a central power
dump unit.
The capacitor offers an efficient and economical way of storing the energy returned from
the motors during deceleration of high inertias. See also www.jvl.dk
15.2.2
PSU48-240
A compact switch-mode power supply with 240W output power at 48VDC.
The power supply is UL and CSA approved. It is protected against overvoltage, overtemperature and short-circuit or overload of the output. The power supply can either be
mounted on a DIN rail or “wall” mounted. See also the data-sheet LD0047 which can be
downloaded from www.jvl.dk
15.2.3
Other power supplies
JVL offers a wide range of power supplies in the power range 45W to 1.5kW with output
voltages 24 and 48VDC. They all uses switch-mode technology in order to minimize
physical dimensions and for easy adaptation to mains voltages in the range 90 to 240VAC.
The product range covers the following types: PSU05-045, PSU24-075, PSU24-240,
PSU48-240, PSU48-800, PSU48-1000, PSU48-1500.
See also the data-sheet LD0058 (overview) or LD0053 (detailed) which can be downloaded from www.jvl.dk.
JVL Industri Elektronik A/S - User Manual - Integrated Step Motors MIS 231, 232, 234
203
15.3
Brakes and shaft reinforcement
2 brake units are available for the MIS231 and MIS232 motors. MIS234 has a 10 mm output shaft and the MAB23 can therefore not be mounted. The MAB23x-01 offers a 10mm
output shaft and MAB23x-02 offers a 6.35mm output shaft. Both types can be mounted
directly on all the MIS231 and MIS232 motors and require 24VDC applied to release the
motor
See also the data-sheet LD0055-xx which can be downloaded from www.jvl.dk.
204
JVL Industri Elektronik A/S - User Manual - Integrated Step Motors MIS 231, 232, 234
16
CE Declaration of Conformity
EU - Declaration of Conformity
Manufacturer
Company Name:
Address:
Telephone:
E-mail:
Web:
JVL Industri Elektronik A/S
Blokken 42
DK-3460 Birkerød
Denmark
+45 45 82 44 40
[email protected]
www.jvl.dk
Hereby declare that
Product
No.:
Name:
Type:
MIS231, 232 and 234
Integrated Hybrid stepper motor
Series from A1 to A6 incl. subversions
- is in conformity with:
- COUNCIL DIRECTIVE of 3 May 1989 on the approximation of the laws of the
Member States relating to electromagnetic compatibility (89/336/EEC)
was manufactured in conformity with the following national standards that
implements a harmonised standard:
EN 61800-3 Adjustable speed electrical power drives systems - part 3:
EMC product standard including specific test methods..
Januar 2008
Bo V. Jessen
Technical Director
JVL Industri Elektronik A/S
LX0020-01GB
JVL Industri Elektronik A/S - User Manual - Integrated Step Motors MIS 231, 232, 234
205
206
JVL Industri Elektronik A/S - User Manual - Integrated Step Motors MIS 231, 232, 234
Index
A
A_SOLL 83, 117–121, 152, 155
Abort SDO 169
Acc_Emerg 87
Acceleration factor 161
Address, CANopen 139
Address, MacTalk 53
Afzup_ConfMax 92
Afzup_ConfMin 92
Afzup_Filter 93
Afzup_MaxSlope 92
Afzup_ReadIndex 92
Afzup_WriteBits 91
An 90
Analog input filters 26
AnalogFiltered 90
AnalogIn 91
Analogue inputs 25
Auto correction 34
Available_IO 104
B
Baud rate 45, 86, 102, 141, 178, 189
Binary command 131
Bipolar motors 41
Boot up telegram 165
Bootloader_Ver 104
Brakes and shaft reinforcement 204
Busvol 91
C
Cables 202
Cabling 40, 140
Calculator (basic) 132
Calculator (options) 133
CAN A 139
CAN B 139
CAN bus connectors 142
CANbus 47
CANopen 12, 15, 47, 77, 104, 135–
154, 156–174, 178
CAN bus connectors 142
CanOpen Explorer 141, 144–148
Communication test 144
Connecting the SMC75 Controller to the
CAN bus 140
DS-301 136
DS-301 device profiles 164
DSP-402 136
Node id and baud rate 141
PDOs 136
slave 136
CanOpen 80
CANopen network 136
Capacitor 18
CE requirements 40, 205
Checksum 103
CiA DS-301 standard 136
CiA membership 136
Clear errors 53
COB-ID 139, 152, 155
Command 86
Command timing 177
Conditional jump (multiple inputs) 124
Conditional jump (single input) 123
Confidence alarms 27
Confidence check 26
Connecting the SMC75 Controller to the CAN
bus 140
Connection of motor 41–42
Connection of motor phases 42
Connections
Driver 7
M12 7
MIS23x 14
Motor 41
SMC75 13
Connectors 143
M12 143
Control voltage 19
Current, motor phase current 61
CVI control voltage 19
D
Declaration of Conformity 205
Digital inputs 24
Dimensions 192
Direction inputs 23
Download SDO 167
Driver connections 7
DS-301 136, 149
DS301 specified Communications
objects 149
DSP 402 80
DSP-402 136
DSP-402 Support 157
E
EDS file 140
EMCY 150
Emergency object 150
Enable and Disable PDOs 151
Encoder outputs 32
Encoder_Pos 85
JVL Industri Elektronik A/S - User Manual - Integrated Stepper Motors MIS231, 232, 234
207
Index
Encoder_Type 91
End-of-travel inputs 23
Enter safe mode 182
Err_Bits 30, 88
Error acceleration 73
Error Control Services 172
Error handling 73
Error output 31
Error_Mask 99
Errors, clearing 53
Exit safe mode 183
Ext_Encoder 105
Ext_Encoder_Vel 105
F
Factors 160
Fbus_Baud 105
Fbus_Node Id 104
Filtering 26
Filters 43, 53
Filters, analog input 26
FilterStatus 93
Flash 53
Flwerr 86
Flwerrmax 86
Follow error 73
Fuse dimensioning 19
G
Galvanic isolation 22, 25, 30
Gear mode 67
GEAR1 10, 63, 82, 85
GEAR2 10, 63, 82, 85
GND 143
Ground 22
Grounding 143
Grounding, power supply 19
Group write register 184
Group_Id 102
Group_Seq 102
H
Hardware_Rev 103
Heartbeat 172–173
Home input 24
Home sensor 70
Home_Bits 96
Homemode 89
Homing mode 162
I
In physical position output 31
In position output 31
Index_Offset 96
Indexer SMI30 199
Inpos_Mask 99
Input_Filter_Cnt 99
Input_Filter_Mask 99
Inputs 86
Analogue 25
Digital 24
End-of-travel 23
Home 24
SMC75 21
Step pulse and direction 23
User inputs 22
Interface
RS485 49
Serial 47
Iosetup 86, 96
IP67 143
J
Jump 123
Jump according to a comparison 134
Jump according to a register in the MAC
motor 127
Jumps 123–124, 127, 134
L
Life Guarding 172
M
M12 143
M12 connector 7
MAB23x-01 204
MAB23x-02 204
MAC00-B1/B4 198
MacTalk 51–52, 56–59
Main Loop Time 178
Max_P_Ist 87
Max_Voltage 103
Min bus voltage 73
Min_Busvol 91
Min_P_Ist 87
Ministeps 12
MIS23x connections 14
MLT 178
MODE_REG 152, 155
Mode_Reg 24, 81, 147, 152, 155
Modes of operation 10, 63, 116, 162
Gear mode 67
Passive mode 64
Positioning mode 66
Velocity mode 65
Zero search mode 68–72
Motor Connection 41–42
Motor Connections 179
JVL Industri Elektronik A/S - User Manual - Integrated Servo Motors MAC050 - 800
208
Index
Motor phase current 61
Motor Phases 41
Motortype 103
Move (Absolute) 120
Move (Relative + set outputs) 119
Move (Relative + velocity change at a
distance) 118
Move (Relative) 117
Move (Sensor) 121
Move current 61
Move operations 116
Multi-Master capability 138
My_Addr 102
N
Negative limit 23
NL, negative limit 23
NL_Mask 97
NMT (Network Management services) 171
Node address 139
Node Guarding/Life Guarding 172
Node id 141
Noise 40
Noise emission 40
No-loss bus arbitration 138
Notsaved 104
NPN output 22
O
Object dictionary 151
Object dictionary defined for DSP-402
support 158
Opening a file 54
Operating modes 10, 63–72, 116, 162
Optical isolation 22, 25, 30
Option_Bits 104
Ordering Information 186
Outputs 86
Encoder 32
Error output 31
In position 31
In pyhsical position 31
Pulse/Direction 32
SMC75 special outputs 31
SMC75 user outputs 29
P
P- terminal 18
P+ terminal 18
P_Home 88
P_Ist 84, 86, 101, 153, 156
P_New 90, 101
P_Soll 10, 34, 63, 133, 152, 155
Parallel connection of motor phases 41–42
Parallel connection of motors 42
Passive mode 64
PDOs 136, 151, 153, 163, 166–167
Phase current 61
Phases 41
PL, positive limit 23
PLC systems 31
PLC/PC 200
Pn 90
PNP 23
PNP output 22
Position factor 160
Position limit min and max 73
Position mode 10
Positioning mode 66
Positioning-Speed Control 8–9
Positive limit 23
Power Supplies 203
Power Supply
Capacitor
18
Power supply
Grounding 19
Power supply,
SMC75 18
Profile position mode 162
Prog_Vers 81
Program comments 116
Program jumps 123–124, 127, 134
Program status and command 184
Programming 107–134
PSU05-045 203
PSU24-075 203
PSU24-240 203
PSU48-1000 203
PSU48-1500 203
PSU48-240 203
PSU48-800 203
Pull-up resistor 22
Pulse/Direction driver 6
Pulse/direction outputs 32
PulseDirMask 94
PulseDirMod 94
Q
Quick start 45
QuickStep motors 10
R
Read register 181
Read register block 182
Receive PDOs 151, 163
Register overview 77
JVL Industri Elektronik A/S - User Manual - Integrated Stepper Motors MIS231, 232, 234
209
Index
75–89, 91, 95, 100
A_Soll 83, 117–121, 152, 155
Acc_Emerg 87
Afzup_ConfMax 92
Afzup_ConfMin 92
Afzup_MaxSlope 92–93
Afzup_ReadIndex 92
Afzup_WriteBits 91
An 90
AnalogFiltered 90
AnalogIn 91
Available_IO 104
Bootloader_Ver 104
Busvol 91
Checksum 103
Command 86
Encoder_Pos 85
Encoder_Type 91
Err_Bits 30, 88
Error_Mask 99
Ext_Encoder 105
Ext_Encoder_Vel 105
Fbus_Baud 105
Fbus_Node Id 104
FilterStatus 93
Flwerr 86
Flwerrmax 86
GEAR1 10, 63, 82, 85
GEAR2 10, 63, 82, 85
Group_Id 102
Group_Seq 102
Hardware_Rev 103
Home_Bits 96
Homemode 89
Index_Offset 96
Inpos_Mask 99
Input_Filter_Cnt 99
Input_Filter_Mask 99
Inputs 86
Iosetup 86, 96
Max_P_Ist 87
Max_Voltage 103
Min_Busvol 91
Min_P_Ist 87
Mode_Reg 24, 81, 147, 152, 155
Motortype 103
My_Addr 102
Registers
NL_Mask 97
Notsaved 104
Option_Bits 104
Outputs 86
P_Home 88
P_Ist 84, 86, 101, 153, 156
P_New 90, 101
P_Soll 10, 34, 63, 133, 152, 155
Pn 90
Prog_vers 81
PulseDirMask 94
PulseDirMod 94
Register descriptions 81–
89, 91, 95, 100
Register overview 77–80
Run_Current 83, 152, 155
Serial_Number 103
Setup_Bits 96, 105
Standby_Current 84
Standby_Time 83
Startmode 88
Statusbits 34, 87
Temp 87
Tn 90
Turntable_Mode 97
V_Home 89
V_Ist 84, 153, 156
V_Soll 10, 63, 83, 117–
121, 130, 147, 152, 155, 176
V_Start 81–82, 85
Vn 90
Remarks 116
Reset controller 183
Reset motor 53
Reset position 53
Resistors, termination 43
Resonances 12
RS232/RS485 181
RS485 interface 47, 49
Run_Current 83, 152, 155
S
Save in flash 53
Save position 128
Saving a file 54
Scope function 59
Screened cable 40
SDO (Service Data Objects) 167
Send FastMAC command 130–131
Serial communication 181
JVL Industri Elektronik A/S - User Manual - Integrated Servo Motors MAC050 - 800
210
Index
Serial connection of motor phases 41–42
Serial connection of motors 42
Serial interface 47
Serial_Number 103
Set a register in the MIS motor 127
Set operation mode 116
Set outputs 122
Set position 129
Setup_Bits 96, 105
Short block length 138
Slope alarms 27
Slope limitation 26
SMC35 196
SMC35B 196
SMC75 8–9, 12, 196–198
CANopen slave 136
Inputs 21
User inputs 22
SMC75 analogue inputs 25
SMC75 connector 13
SMC75 Power Supply 18
SMC75 special outputs 31
SMC75 user outputs 29
SMD41 198
SMD73 197–198
Pulse/Direction driver 7
SMI30 196, 199
Special outputs, SMC75 31
Specifications 189–190, 192
Standby current 61
Standby time 61
Standby_Current 84
Standby_Time 83
Startmode 88
Statusbits 34, 87
Unipolar Motors 41
Upload SDO protocol 168
User inputs, SMC75 22
User outputs 29
V
V 130
V_Home 89
V_Ist 84, 153, 156
V_Soll 10, 63, 83, 117–
121, 130, 147, 152, 155, 176
V_Start 81–82, 85
Velocity accuracy 176
Velocity encoder factor 161
Velocity mode 10, 65, 162
Vn 90
Voltage Overload 25
W
Wait for (x) ms before continuing 125
Wait for a register value before
continuing 128
Wait for an input combination before continuing
(multiple inputs) 126
Wait for an input combination before continuing
(single input) 125
Write Register 182
Write to flash 183
Z
Zero search 129
Zero search mode 68–72
Step pulse and direction inputs 23
Step pulse inputs 23
SYNC (Synchronisation Object) 170
T
Technical Data 189–190, 192
Temp 87
Temperature protection 31
Termination 140, 142
Termination resistors 43
Tn 90
Torque 42, 61
Transmit PDOs 153, 163
Trouble-shooting 193
Turntable_Mode 97
U
Unconditional jump 123
JVL Industri Elektronik A/S - User Manual - Integrated Stepper Motors MIS231, 232, 234
211