1
BreezeMAX™ Service
Manager
User Manual
SW Version 1.0
February 2007
P/N 214488
Legal Rights
Legal Rights
© Copyright 2007 Alvarion Ltd. All rights reserved.
The material contained herein is proprietary, privileged, and confidential and
owned by Alvarion or its third party licensors. No disclosure thereof shall be made
to third parties without the express written permission of Alvarion Ltd.
Alvarion Ltd. reserves the right to alter the equipment specifications and
descriptions in this publication without prior notice. No part of this publication
shall be deemed to be part of any contract or warranty unless specifically
incorporated by reference into such contract or warranty.
Trade Names
Alvarion®, BreezeCOM®, WALKair®, WALKnet®, BreezeNET®, BreezeACCESS®,
BreezeMANAGE™, BreezeLINK®, BreezeCONFIG™, BreezeMAX™, AlvariSTAR™,
BreezeLITE™, AlvariCRAFT™, MGW™, eMGW™, and/or other products and/or
services referenced here in are either registered trademarks, trademarks or
service marks of Alvarion Ltd.
All other names are or may be the trademarks of their respective owners.
Statement of Conditions
The information contained in this manual is subject to change without notice.
Alvarion Ltd. shall not be liable for errors contained herein or for incidental or
consequential damages in connection with the furnishing, performance, or use of
this manual or equipment supplied with it.
Warranties and Disclaimers
All Alvarion Ltd. ("Alvarion") products purchased from Alvarion or through any of
Alvarion's authorized resellers are subject to the following warranty and product
liability terms and conditions.
Exclusive Warranty
With respect to the Software, Alvarion warrants the correct functionality
according to the attached documentation, for a period of fourteen (14) month from
invoice date (the "Warranty Period")". During the Warranty Period, Alvarion may
release to its Customers software updates, which include additional performance
improvements and/or bug fixes, upon availability (the "Warranty"). Bug fixes,
temporary patches and/or workarounds may be supplied as Software updates.
Additional hardware, if required, to install or use Software updates must be
purchased by the Customer. Alvarion will be obligated to support solely the two (2)
most recent Software major releases.
BreezeMAX Service Manager User Manual
iii
Legal Rights
ALVARION SHALL NOT BE LIABLE UNDER THIS WARRANTY IF ITS TESTING
AND EXAMINATION DISCLOSE THAT THE ALLEGED DEFECT IN THE PRODUCT
DOES NOT EXIST OR WAS CAUSED BY PURCHASER'S OR ANY THIRD
PERSON'S MISUSE, NEGLIGENCE, IMPROPER INSTALLATION OR IMPROPER
TESTING, UNAUTHORIZED ATTEMPTS TO REPAIR, OR ANY OTHER CAUSE
BEYOND THE RANGE OF THE INTENDED USE, OR BY ACCIDENT, FIRE,
LIGHTNING OR OTHER HAZARD.
Disclaimer
(a) THE SOFTWARE IS SOLD ON AN "AS IS" BASIS. ALVARION, ITS AFFILIATES
OR ITS LICENSORS MAKE NO WARRANTIES, WHATSOEVER, WHETHER
EXPRESS OR IMPLIED, WITH RESPECT TO THE SOFTWARE AND THE
ACCOMPANYING DOCUMENTATION. ALVARION SPECIFICALLY DISCLAIMS ALL
IMPLIED WARRANTIES OF MERCHANTABILITY AND FITNESS FOR A
PARTICULAR PURPOSE AND NON-INFRINGEMENT WITH RESPECT TO THE
SOFTWARE. UNITS OF PRODUCT (INCLUDING ALL THE SOFTWARE)
DELIVERED TO PURCHASER HEREUNDER ARE NOT FAULT-TOLERANT AND
ARE NOT DESIGNED, MANUFACTURED OR INTENDED FOR USE OR RESALE IN
APPLICATIONS WHERE THE FAILURE, MALFUNCTION OR INACCURACY OF
PRODUCTS CARRIES A RISK OF DEATH OR BODILY INJURY OR SEVERE
PHYSICAL OR ENVIRONMENTAL DAMAGE ("HIGH RISK ACTIVITIES"). HIGH
RISK ACTIVITIES MAY INCLUDE, BUT ARE NOT LIMITED TO, USE AS PART OF
ON-LINE CONTROL SYSTEMS IN HAZARDOUS ENVIRONMENTS REQUIRING
FAIL-SAFE PERFORMANCE, SUCH AS IN THE OPERATION OF NUCLEAR
FACILITIES, AIRCRAFT NAVIGATION OR COMMUNICATION SYSTEMS, AIR
TRAFFIC CONTROL, LIFE SUPPORT MACHINES, WEAPONS SYSTEMS OR
OTHER APPLICATIONS REPRESENTING A SIMILAR DEGREE OF POTENTIAL
HAZARD. ALVARION SPECIFICALLY DISCLAIMS ANY EXPRESS OR IMPLIED
WARRANTY OF FITNESS FOR HIGH RISK ACTIVITIES.
(b) PURCHASER'S SOLE REMEDY FOR BREACH OF THE EXPRESS
WARRANTIES ABOVE SHALL BE REPLACEMENT OR REFUND OF THE
PURCHASE PRICE AS SPECIFIED ABOVE, AT ALVARION'S OPTION. TO THE
FULLEST EXTENT ALLOWED BY LAW, THE WARRANTIES AND REMEDIES SET
FORTH IN THIS AGREEMENT ARE EXCLUSIVE AND IN LIEU OF ALL OTHER
WARRANTIES OR CONDITIONS, EXPRESS OR IMPLIED, EITHER IN FACT OR BY
OPERATION OF LAW, STATUTORY OR OTHERWISE, INCLUDING BUT NOT
LIMITED TO WARRANTIES, TERMS OR CONDITIONS OF MERCHANTABILITY,
FITNESS FOR A PARTICULAR PURPOSE, SATISFACTORY QUALITY,
CORRESPONDENCE WITH DESCRIPTION, NON-INFRINGEMENT, AND
ACCURACY OF INFORMATION GENERATED. ALL OF WHICH ARE EXPRESSLY
DISCLAIMED. ALVARION' WARRANTIES HEREIN RUN ONLY TO PURCHASER,
AND ARE NOT EXTENDED TO ANY THIRD PARTIES. ALVARION NEITHER
iv
BreezeMAX Service Manager User Manual
Legal Rights
ASSUMES NOR AUTHORIZES ANY OTHER PERSON TO ASSUME FOR IT ANY
OTHER LIABILITY IN CONNECTION WITH THE SALE, INSTALLATION,
MAINTENANCE OR USE OF ITS PRODUCTS.
Limitation of Liability
(a) ALVARION SHALL NOT BE LIABLE TO THE PURCHASER OR TO ANY THIRD
PARTY, FOR ANY LOSS OF PROFITS, LOSS OF USE, INTERRUPTION OF
BUSINESS OR FOR ANY INDIRECT, SPECIAL, INCIDENTAL, PUNITIVE OR
CONSEQUENTIAL DAMAGES OF ANY KIND, WHETHER ARISING UNDER
BREACH OF CONTRACT, TORT (INCLUDING NEGLIGENCE), STRICT LIABILITY
OR OTHERWISE AND WHETHER BASED ON THIS AGREEMENT OR
OTHERWISE, EVEN IF ADVISED OF THE POSSIBILITY OF SUCH DAMAGES.
(b) TO THE EXTENT PERMITTED BY APPLICABLE LAW, IN NO EVENT SHALL
THE LIABILITY FOR DAMAGES HEREUNDER OF ALVARION OR ITS EMPLOYEES
OR AGENTS EXCEED THE PURCHASE PRICE PAID FOR THE PRODUCT BY
PURCHASER, NOR SHALL THE AGGREGATE LIABILITY FOR DAMAGES TO ALL
PARTIES REGARDING ANY PRODUCT EXCEED THE PURCHASE PRICE PAID
FOR THAT PRODUCT BY THAT PARTY (EXCEPT IN THE CASE OF A BREACH OF
A PARTY'S CONFIDENTIALITY OBLIGATIONS).
BreezeMAX Service Manager User Manual
v
Legal Rights
Important Notice
This user manual is delivered subject to the following conditions and restrictions:
This manual contains proprietary information belonging to Alvarion Ltd. Such
information is supplied solely for the purpose of assisting properly authorized
users of the respective Alvarion products.
No part of its contents may be used for any other purpose, disclosed to any
person or firm or reproduced by any means, electronic and mechanical,
without the express prior written permission of Alvarion Ltd.
The text and graphics are for the purpose of illustration and reference only.
The specifications on which they are based are subject to change without
notice.
The software described in this document is furnished under a license. The
software may be used or copied only in accordance with the terms of that
license.
Information in this document is subject to change without notice.
Corporate and individual names and data used in examples herein are
fictitious unless otherwise noted.
Alvarion Ltd. reserves the right to alter the equipment specifications and
descriptions in this publication without prior notice. No part of this
publication shall be deemed to be part of any contract or warranty unless
specifically incorporated by reference into such contract or warranty.
The information contained herein is merely descriptive in nature, and does not
constitute an offer for the sale of the product described herein.
vi
BreezeMAX Service Manager User Manual
Contents
1
Introducing the BreezeMAX Service Manager Window
1.1
Specifications ............................................................................................................1
2
Installing the BreezeMAX Service Manager Utility
3
Starting the Application
4
5
3.1
Closing the Application ............................................................................................4
3.2
Working with Tables .................................................................................................5
RADIUS Clients
4.1
Adding a Client ..........................................................................................................7
4.2
Editing a Client ..........................................................................................................7
4.3
Removing a Client .....................................................................................................8
Users
5.1
6
7
Adding a User ............................................................................................................9
5.1.1
User Parameters ..........................................................................................9
5.1.2
User Attributes ............................................................................................10
5.2
Editing a User ..........................................................................................................12
5.3
Removing a User .....................................................................................................13
Log
6.1
Deleting Log Entries ...............................................................................................14
6.2
Clearing The Log .....................................................................................................15
6.3
Locking The Log ......................................................................................................15
6.4
Filtering The Log Display .......................................................................................15
Administration
Introducing the BreezeMAX Service Manager Window
1
Introducing the BreezeMAX Service Manager
Window
The BreezeMAX Service Manager provides operators and service providers with
Remote Authentication Dial-In User Service (RADIUS) authentication capabilities
of BreezeMAX CPEs. The information of every CPE that registers to a Base Station
that is connected to the server is authenticated by the Service Manager. Following
authentication, the Service Manager authorizes or rejects access to the system
and records all authentication attempts in its log file.
1.1
Specifications
Item
Description
Operating System
One of the following:
Windows TM 2000 Professional SP4
Windows TM 2000 Server SP4
Windows TM 2003 Server SP2
Windows TM XP SP2
Hardware
Workstation Pentium II-266 and above
Hard Disk 100MB free disk space
Floppy and CD ROM CD drive, 3.5" floppy drive (1.44 Mbytes)
Memory 128MB RAM
10BaseT Ethernet port
Mouse, Keyboard Microsoft TM or compatible
Max number of CPEs
10,000
Max number of Base Stations
10
BreezeMAX Service Manager User Manual
1
Installing the BreezeMAX Service Manager Utility
2
Installing the BreezeMAX Service Manager
Utility
The executable file (Setup.exe) is available in the CD package.
Run the executable file and follow the instructions to install the Service Manager
on your PC.
To uninstall the Service Manager:
Run the Setup.exe file and select Remove. The database and configuration files
are not deleted, however, it is recommended to back up these files prior to
removing the application.
To back up your database and configuration files:
Copy the database file (ServiceManager.mdb) and configuration file (saved.cfg) to a
safe location. The files’ default location is: c:\Program Files\ServiceManager. To
restore the files, simply copy them back into the folder (after reinstalling the
utility).
3
Starting the Application
To start the Service Manager:
From the Windows Start menu, select Programs > Service Manager > Service
Manager, or click on the Service Manager Icon on the Desktop. The Service
Manager is activated and runs in the background.
To access the Service Manager window:
1
Double-click on the Service Manager icon in the Taskbar Notification Area.
Figure 1: Service Manager Icon on Taskbar
2
BreezeMAX Service Manager User Manual
Starting the Application
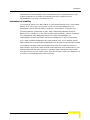
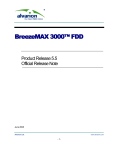
You will be prompted to enter a password.
Figure 2: Enter Administrator Password Window
2
Enter the Administrator Password and click on Unlock (or the Enter on the
keyboard). The default password is serveradmin.
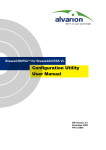
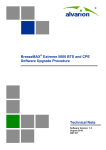
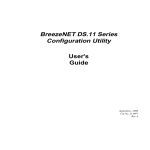
The Service Manager window is displayed, as shown below.
Figure 3: Service Manager Typical Window
The Service Manager Main window comprises the following components:
Title Bar: Identifies the application's name and the service status (see
Section 7). It also includes the following icons for minimizing or closing the
application:
Minimizes the application to the task bar.
BreezeMAX Service Manager User Manual
3
Starting the Application
Closes the application window. The Service Manager will continue running in the
background and the application’s icon will be active in the Taskbar Notification Area.
Tab Selection Area: The Tab Selection Area comprises the following tabs, each
corresponding to a work area displaying a specific group of parameters:
“RADIUS Clients,” Section 4
“Users,” Section 5
“Log,” Section 6
“Administration,” Section 7
About - displays the version of the application.
Work Area: The display of this area varies depending on the selected tab.
3.1
Closing the Application
To close the Service Manager window:
Click on the Close button. The application window closes and the Service
Manager continues running in the background. To access the application again,
double-click on the icon in the Taskbar and enter the administrator password.
To stop the Service Manager and exit:
1
Right-click on the Service Manager icon on the taskbar and select Exit from
the menu.
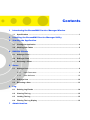
2
Enter the Administrator Password (see Figure 2) and click on Unlock (or the
Enter on the keyboard). A confirmation message appears.
4
BreezeMAX Service Manager User Manual
Starting the Application
Figure 4: Stopping the Service Manager - Confirmation Message
3.2
Working with Tables
In each table, the columns can be rearranged by dragging them from their current
location and dropping them in the desired location.
By default, tables are sorted by name in ascending order and can be sorted
according in either ascending or descending order. To sort the table, right-click
anywhere in the table and select the sorting order.
All table display changes are applicable to the current session only. After exiting
the application, the settings will revert to default on the next entry.
BreezeMAX Service Manager User Manual
5
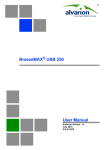
RADIUS Clients
4
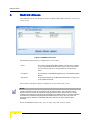
RADIUS Clients
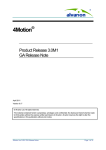
The RADIUS Clients tab displays the list of NPUs/Micro Base Stations connected
to the server.
Figure 5: RADIUS Clients Tab
The following information is displayed for each client:
Name
The name of the NPU/Micro Base Station. The client name is astring
of up to 255 printable characters and must be unique in the system.
You can enter any name. It is recommended to enter the device
name.
IP Address
The IP address of the Data/Management port of the NPU/Micro Base
Station.
Description
An optional description of the NPU/Micro Base Station. A string of up
to 50 printable characters.
The number of defined clients is displayed at the bottom left corner.
NOTE
The NPU maintains a keep alive mechanism with all defined servers. The Keep Alive Timeout
defines the time in seconds to wait before reaching a decision that a certain server is no longer
available. When the NPU sends a keep alive message to the RADIUS server, it uses its own default
User Name and Password (KeepAliveUserNameAndPassword for both). This user name and
password must be defined in the RADIUS Clients list, otherwise the server will send reject
messages.
From the RADIUS Clients tab, you can add, edit, and remove clients.
6
BreezeMAX Service Manager User Manual
RADIUS Clients
4.1
Adding a Client
To add a new client:
1
In the RADIUS Clients tab, click on the Add Client button. The Add RADIUS
Client window is displayed.
Figure 6: Add Client Window
2
In the appropriate fields, enter the NPU’s/Micro Base Station’s name, IP
address, shared secret and optionally a short description.
IMPORTANT
The shared secret is a string of up to 16 printable characters (case sensitive) that serve as the
password for ciphering traffic. The shared secret must match the one defined in the NPU. If they do
not match, the request will be rejected.
In the Confirmation field, re-enter the shared secret to confirm it.
3
4.2
Click OK to apply or Cancel to close the Add Client window without saving.
Editing a Client
To edit an existing client:
1
In the RADIUS Clients tab, select a client from the list and click on the Edit
Client button.
OR
BreezeMAX Service Manager User Manual
7
Users
Double-click on a row in the RADIUS Clients tab.
The Edit Client window is displayed for the selected client.
2
Edit the fields as required and click OK to apply the changes.
NOTE
You can also click twice in any of the cells to edit that cell.
4.3
Removing a Client
To remove a client:
1
In the RADIUS Clients tab, select a client from the list and click on the Delete
button. You will be asked to confirm your request to delete the record.
2
5
Click Yes to confirm the deletion, or No to cancel the request.
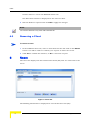
Users
The Users tab displays the list of Subscriber Units (SU) that are connected to the
server.
Figure 7: Users Tab
The following information is displayed for each Subscriber Unit (SU):
8
BreezeMAX Service Manager User Manual
Users
User Name
The name of the SU as defined in the SU. The User name is a string
of up to 32 printable characters and must be unique in the system.
You can select either case sensitive or case insensitive (see
Section 7). If the User Name does not match the one defined in the
SU, the request will be rejected.
Description
An optional description of the SU. A string of up to 50 printable
characters.
The number of SUs defined is displayed at the bottom left corner.
From the Users tab, you can add, edit, and remove SUs.
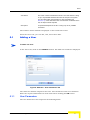
5.1
Adding a User
To add a new user:
In the Users tab, click on the Add User button. The Add User window is displayed.
Figure 8: Add User - User Parameters Tab
The Add User window comprises two tabs: User Parameters and User Attributes.
Enter the required information in both tabs before clicking the OK button.
5.1.1
User Parameters
The User Parameters tab comprises the following fields:
BreezeMAX Service Manager User Manual
9
Users
5.1.2
Name
The name of the SU. See Section 5.
Password
The SU’s password. The password must be identical to the one
defined in the SU. A string of up to 32 printable characters (case
sensitive).
Description
An optional description of the SU. See Section 5.
User Attributes
The User Attributes tab enables to define the services to be provided to the SU and
the timeframe for renewing them. The configured attributes are displayed in the
attributes table in the upper pane.
Figure 9: Add User - User Attributes Tab
The available attribute types are:
Filter Id
The Service Profiles defined for the SU (see Section 5.1.2.1).
Session Timeout
The defined interval (in seconds) for the SU authentication. Upon
expiration, the session is terminated. To renew the services, the NPU
must send an authorization request on behalf of the SU to the Service
Manager at the defined intervals (see Section 5.1.2.2).
Session Timeout and Termination Action must both be configured.
Otherwise, the request is ignored.
10
BreezeMAX Service Manager User Manual
Users
Termination Action
The reason for termination: Default, RADIUS-request.
Session Timeout and Termination Action must both be configured.
Otherwise, the request is ignored.
NOTE
When attributes are defined, you can edit or delete them by selecting the attribute in the attributes
table, modifying the fields as required, and clicking the Edit or Delete buttons.
5.1.2.1
Defining Services (Filter Ids)
To define a service for the SU:
1
Select Filter ID from the Attributes List.
2
Enter the Service Profiles for the SU. Service Profiles can be conjoined to a
single Filter Id. Up to 16 VLANs can be defined.
The Filter ID between the Radius Server and the NPU is as follows:
n=Service Profile Name 1:v=<VLAN list up to 16 VLANs>
:h=ON/Off
:a=<Off or On, VLAN ID>
:c=ON/OFF;
n=Service Profile Name 2:........................up to 5 Service profiles per user.
Where: n = Service Profile Name v = VLAN list h = hybrid a = access VLAN, c =
classification.
Remark: v=<> is empty VLAN list and deletes the previous provisioned VLANs.
“;” separates between service profiles.
For example:
n=be_96:v=<8,4,100,22>:h=ON:a=<ON,433>:c=ON;
n=be_128:v=<22>:h=OFF:a=<OFF>:c=OFF;
NOTE
The Service Manager does not check the validity or the format of the entered service profiles. In
case of an invalid entry, the NPU will ignore the request.
3
Click on Add to add the service to the list of attributes.
BreezeMAX Service Manager User Manual
11
Users
5.1.2.2
Defining Session Timeout
To renew the services, the SU must send an authorization request to the Service
Manager at the defined intervals.
Session Timeout and Termination Action must both be configured. Otherwise, the
request is ignored.
To define the session timeout:
1
Select Session Timeout from the Attributes List field.
2
Enter the session timeout (in seconds).
NOTE
The minimum timeout limit is 600 seconds. The Service Manager applies any value below 600 as
600.
3
Click on the Add button to the right. The newly defined attribute is displayed
in the table in the upper pane.
5.1.2.3
Defining the Termination Action
The termination action attribute defines the action to be performed upon session
timeout. The possible actions are:
Default - default termination - disconnects the services when Session Timeout
is reached. When selected, the value displayed in the attributes table will be 0.
RADIUS-request - At every Session Termination interval, the new Filter Id
request is sent to the Service Manager. If there is any change in the requested
services, the current services are disconnected and re-connected with the new
services. If there is no change in the request, the SU can continue without
being disconnected. When selected, the value displayed in the attributes table
will be 1.
5.2
Editing a User
To edit an existing user:
1
12
In the Users tab, select a user from the list and click on the Edit User button.
BreezeMAX Service Manager User Manual
Log
OR
Double-click inside a cell in the Users tab.
The Edit User window is displayed for the selected SU.
2
Edit the fields in the User Parameters and User Attributes tabs as required and
click OK to apply the changes.
NOTE
You can also click twice in any of the cells to edit that cell (User Name and Description only).
5.3
Removing a User
To remove a user:
1
In the Users tab, click on the Delete button. You will be asked to confirm your
request to delete the record.
2
6
Click Yes to confirm the deletion, or No to cancel the request.
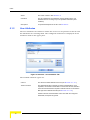
Log
The Log tab displays a list of all authentication attempts by SUs defined in the
Service Manager. The display is updated whenever an SU attempts
authentication.
NOTE
The NPU maintains a keep alive mechanism with all defined servers. The Keep Alive Timeout
defines the time in seconds to wait before reaching a decision that a certain server is no longer
available. When the NPU sends a keep alive message to the RADIUS server, it uses its own default
User Name and Password (KeepAliveUserNameAndPassword for both). This user name and
password must be defined in the RADIUS Clients list, otherwise the server will send reject
messages.
BreezeMAX Service Manager User Manual
13
Log
Figure 10: Log Tab
The following information is displayed for each entry:
Status
The status type of the authentication request:
Accept/Reject/Unknown. The status types logged depend on the
types set in the Administration tab. See Section 7.
User Name
The name of the SU as defined in the SU.
RADIUS Client Name
The name of the NPU/Micro Base Station
RADIUS Client IP
The IP address of the Data/Management port of the NPU/Micro Base
Station.
Date and Time
The date and time of the authentication attempt.
Additional Info
For records with Reject or Unknown status, displays the reason for
authentication failure.
The number of log records is displayed below the log table on the left. This reflects
the total number of logged records, even when filtering the display.
From the Log tab you can delete entries, clear the log, lock the log refresh, and
filter the display.
6.1
Deleting Log Entries
To delete an entry:
1
14
Select the entry to be removed from the list.
BreezeMAX Service Manager User Manual
Administration
6.2
2
Click on Delete. A confirmation message appears.
3
Click on OK to confirm the deletion.
Clearing The Log
You can clear the log from all entries by clicking on the Clear Log button.
6.3
Locking The Log
You can lock the log clicking on the Lock Log check box. New entries will not be
displayed in real time as long as the Lock Log box is checked. To refresh the
display and revert to real time updates display, uncheck the Lock Log box.
6.4
Filtering The Log Display
You can search for a specific entry, or filter the display according to any of the
predefined filters. The available filters are: Status, User Name, RADIUS Client
Name, RADIUS Client IP, and Date and Time.
To filter the displayed entries:
1
Check any of the Filter boxes (one filter at a time).
2
Enter the string to search in the selected field of all of the entries.
NOTE
Repeating this procedure applies the filter on the entire list and does not filter further the already
filtered list.
7
Administration
The Administration tab enables to configure the log file, define the Server port to
be used for authentication, defragment the database and change the password.
BreezeMAX Service Manager User Manual
15
Administration
Figure 11: Administration Tab
The Administration tab comprises the following parameters:
Status
Service Status
The service status. Active/Not Active. Click on the Start/Stop Service
to toggle between the two options. The status is displayed in the Title
Bar, as well. To change any of the fields in the Administration page,
set the status to Not Active.
Defragmentation
Last Defragmented at:
A display of the date and time of the last database defragmentation.
Defragment Now
Enables to defragment the database. It is recommended to
defragment the database once a month. Click on the Defragment
Now button to begin defragmentation.
Administrator Password
Password/Confirmation
Enables to change the password. Enter a new password in the
Password field. Reenter the password in the Confirmation field and
click on Set Password.
Server Settings
Click on Save Changes to apply the changes in server settings.
Port Number
Defines the UDP port to be used for authentication. The port must
match the one defined in the NPU for the Data/Management port
used.
The range of available ports is: 1-65535
The default port is: 1812
After setting the port number, click on the Save Changes button.
16
BreezeMAX Service Manager User Manual
Administration
Case Sensitive User
Name
Defines whether or not the user name is case sensitive. When
enabled the user name must match in case the defined user name.
Log Settings
Max records to log
Defines the maximum records to log. When the maximum number of
records is reached, the Service Manager deletes the oldest records to
make room for the newer records.
The maximum number of records is 10,000.
The default is: 10,000.
Log records type
Defines the type of records to log. The available types are: Accepted,
Rejected, Unknown (i.e., packets from non-listed clients). If none of
the types is selected, nothing will be logged.
After setting the log parameters, click on the Save Changes button.
BreezeMAX Service Manager User Manual
17