1
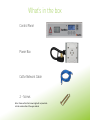
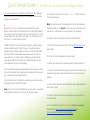
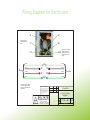
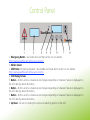
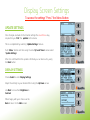
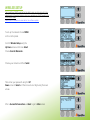
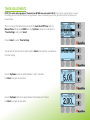
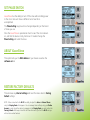
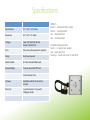
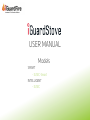
USER MANUAL Models SMART - IGSEC-Smart INTELLIGENT - IGSEC TABLE OF CONTENTS SAFETY • • • GETTING STARTED – – What’s in the Box Quick Install Guide Page 3 Page 4 – – – – Control Panel Default Factory Settings Display Screen Settings Specifications Page 5 Page 6 Page 7 Page 10 OPERATION • • • • Page 2 WARRANTY REFUND & RETURN POLICY Page 11 Page 12 Safety Read this manual first before installing. When properly cared for, your new iGuardStove has been designed to be safe and reliable. Hire a professional if you are uncomfortable performing the installation yourself. In most situations the installation of iGuardStove does not require the use of a licensed electrician. However, a licensed electrician must install iGuardStove if the stove is: Presently hard-wired (not plugged into an existing 4 prong range wall outlet) or Uses an outdated range wall outlet (other than a 3 or 4 prong). iGuardStove must only be connected to a 125-250 VAC grounded NOTE: The ISGEC ungrounded (US only) power box has a ground stud that is used to connect the power box to the home’s grounding system. UL requires that this ground connection be completed during installation of the iGuardStove Do not disassemble any of the components. There are no user serviceable parts inside. Refer servicing to a qualified person only with iGuardFire’s permission to open up the power box. Note: Do Not Install Control Panel if: Directly above a heat source or where hot air or steam will blow onto it On or above a microwave or toaster oven Directly on or above the stove What’s in the box Control Panel Power Box Cat5e Network Cable 2 - Screws Note: Please confirm that screw length will not penetrate into the inside surface of the upper cabinet Quick Install Guide – For Both the Smart and the Intelligent Models This model needs to be installed by an electrician. The following instructions are not for installation by a consumer and should be shown to your electrician. You need to connect the iGuardStove Intelligent to Wi-Fi to access all the many features. 1. Mount the iGuardStove control panel underneath the upper kitchen cabinet near the stove and close to the front edge where it has a good view of the cooking area and is easy to reach. If using screws remove the clear plastic hole plugs. Do not mount above the stove or in other hazardous spots. Note: Cut out the end of the shipping box that has the label with the MAC address on it. Save it for the next step in the set up and then put it in a safe place in case you need it for reference. The BEST location to mount the Control Panel is under the upper kitchen cabinets close to the front edge. This will most likely require a longer network cable to connect or Control Panel under the cabinet and the Power Box which will be under or near the stove cook top. If a longer cable is needed any network Cat5e cable will do and they can be found in different lengths at your local electronics store such as BestBuy. 11. Using the Up Down arrows scroll down to Wireless Setup and press Select. 10. Refer to the control panel and touch the Menu button. 12. Scroll to Scan for Networks and press Select. 13. When your home’s Wi-Fi network appears scroll and Select it. If the Control Panel needs to be mounted on the counter top close to the stove cooktop holes may need to be drilled into the counter top. The electrician can help with that. Once the electrician is finished the installation you can move on to the following steps to finish the setup. 14. Enter the password for the network using the Up Down arrows to select the characters and the Next button to move to the next position. 15. Press Select after the final character has been entered and the device will connect. Note: If you have the Smart Model then you are done. If you have the Intelligent Model then continue on to the next column. 16. After a Successful Connection press Back until you return to the Main Screen. 17. Your installation of your iGuardStove Intelligent is complete! Please refer to How To Setup Your Online Account at http://iguardfire.com/set-up-online-account/ Wiring Diagram for Electricians #10 Ring Terminals should be used on all studs. W XP YP XR YR GND Neutral Mains The star washer should go against the enclosure followed by the two ring terminals and then the lock nut. Neutral W Y Phase YP YR Y Phase X Phase XP XR X Phase Ground 6 AWG Wire must be used for the X and Y phases. 8 AWG wire may be used for Neutral and Ground. Ground GND PROPRIETARY AND CONFIDENTIAL THE INFORMATION CONTAINED IN THIS DRAWING IS THE SOLE PROPERTY OF DELTATEE ENTERPRISES LTD. ANY REPRODUCTION IN PART OR AS A WHOLE WITHOUT THE WRITTEN PERMISSION OF DELTATEE ENTERPRISES LTD. IS PROHIBITED. Cooktop DRAWN BY CHECKED BY NAME DATE LG July 2015 12/23/2014 TITLE: iGuardFire Cook Top Wiring Diagram COMMENTS: SIZE A DWG. NO. STOVE-M-042 SHEET 1 OF 2 REV 1.0 Control Panel 1. Emergency Button. See Online Account Help section on our website http://www.iguardfire.com/online-account-info/ 2. Motion Sensor 3. LED Strobe for hearing impaired. See Audible and Visual Alerts section on our website. http://www.iguardfire.com/online-account-info/ 4. LCD Display Screen 5. Button – Button action is situational and changes depending on whatever feature is displayed on the LCD directly above the button. 6. Button – Button action is situational and changes depending on whatever feature is displayed on the LCD directly above the button. 7. Button – Button action is situational and changes depending on whatever feature is displayed on the LCD directly above the button. 8. Up Down - Arrows for moving the cursor and selecting options on the LCD Operations & Default Factory Settings These instructions should be used if the device is NOT connected to the Wi-Fi. Once connected some options will not appear. The factory default settings that can be used out of the box without having Wi-Fi are an Auto Shut Off Timer set at 5 minutes and the Manual Timer set at 2 hours. These settings can be changed if you activate your Online Account. 1. POWER When the iGuardStove is installed it is powered on all the time. It is in one of two modes. Either in Standby/Sleep or is in normal operational. It draws almost no power while in the Standby/Sleep mode so you will not need to shut it off. NOTE: If the device has automatically had to shut off the stove, after 20 minutes the iGuardStove will go into Standby/Sleep mode and the “Reset” button will need to be pushed to start cooking again. 2. AUTO SHUT OFF OPERATION This mode is totally automatic and once the stove knob is turned on it requires no interaction from the user to initiate cooking or to resume cooking after an Auto Shut off. After you turn off the stove the back light might stay on and the Timer may appear to be still counting down and resetting as you move about. This is normal operation and the screen will go black after about a minute. 3. INITIATE COOKING Once you turn on the stove knob, the iGuardStove senses the current draw and wakes up and switches from Standby into the Auto Shut Off mode. If you are moving around the kitchen inside the sensor zone the timer will keep constantly resetting to the maximum countdown time. Example: If it’s set at say 5 minutes then it will keep resetting to 5 minutes. Once you move out of sensor range, approximately 10-12 feet (3-4m) line of sight from the sensor is when the clock will start to count down from that maximum time. The beep and strobe will warn the user 10 seconds before of the impending shut off of the stove. Upon hearing the 1second beeps and/or seeing the strobe the user can walk back into the sensor field of view thereby resetting the countdown timer back to its maximum setting. This will allow the cooking to continue uninterrupted. 4. RESUME COOKING AFTER the iGuardStove has shut down, the stove beeps and strobes will continue at 2 per second for 10 seconds. Upon returning to the kitchen the sensor will see the user and automatically turn the stove back on with no interaction required by the user. 2 sets of 3 quick beeps will act as a reminder to the user that the device has turned the stove back on. NOTE: AFTER THE IGUARDSTOVE AUTO SHUTS OFF THE STOVE AND IS WAITING FOR SOMEONE TO RETURN IT WILL ONLY HOLD THIS WAITING STATE FOR 20 MINUTES. AFTER THAT IT WILL ASSUME THAT IN FACT THE USER WILL NOT BE COMING BACK ANYTIME SOON AND IT WILL GO TO SLEEP AND THE ONLY WAY TO RESUME COOKING IS TO USE THE “RESET” BUTTON ON THE FRONT PANEL. 5. MANUAL TIMER Push the button labeled Manual Timer in order to set the oven and stovetop into Manual mode. This mode is required if oven and/or stovetop are needed to operate for times that are longer than the Auto Shut Off times (1-15 mins.). If you set the Manual Timer to, as an example; 1 hour and 15 minutes the stove top will ALSO run for the 1 hour and 15 minutes. This has the same effect as disabling the Auto Shut Off feature so be careful with its use. When in Manual Timer mode use the “Up Down” arrows to set the hours and minutes that you want to have the stove or oven operate. In Manual Timer mode the maximum time is 6 hours. The oven or stove will automatically start cooking and the Manual Timer will count down. NOTE: This mode is mostly for the oven so the user can cook a roast or a chicken but it also affects the stovetop for lengthy simmering when needed, so be careful while allowing someone access to this feature. The Manual Timer can be disabled in the online settings if only the Auto Shut Off feature is required Display Screen Settings To access the se:ngs “Press” the Menu Bu?on UPDATE SETTINGS Once changes are made to the Internet settings the iGuardStove may require that you “Pull” the updates to the device. This is accomplished by selecting “Update Settings” feature. Push “Menu” button and then using the side “Up” and “Down” arrows select “Update Settings”. After it is confirmed that the update is finished you can back out by using the Back button. DISPLAY SETTINGS Choose Select to enter Display Settings Adjust the settings to your desired effect using the Up Down arrows. Use Next to move from Brightness to Contrast When happy with your choice use the Back to return to the Main screen WIRELESS SETUP The iGuardStove SMART model will not be able to open an online account to take advantage of all the online features unless you upgrade your SMART model to the INTELLIGENT model. Please contact iGuardFire to subscribe for the software update. To set up the network choose MENU on the control panel. Scroll to Wireless Setup using the Up Down arrows and choose Select Choose Scan for Networks... Choose your network and then Select. Then enter your password using the UP Down arrows to Select and then move to next digit using the lower arrows. After a Successful Connection use Back to get to Main screen TIMER ADJUSTMENTS NOTE: This option will only appear if the device has NEVER been connected to Wi-Fi. If you do not see the option, but want this ability you must reset the device’s Factory Defaults. Keep in mind when you do this you lose the Wi-Fi connection and those features. This is to change the default times for both the Auto Shut Off Timer and the Manual Timer. While inside MENU use the “Up Down” arrows to scroll down to “Timer Settings” and press “Select”. Choose Select to enter Timer Settings You will see the two choices for either setting. Select one and then you will move into that setting. Use the Up Down arrows to select between 1 and 15 minutes. Use Back to accept the new time. Use the Up Down buttons to select between 30 minutes and 5 hours. Use Back to accept the new time. SET PHASE SWITCH iGuardStove has the ability to turn off the stove without killing power to the clock. But each stove is different as to how this is accomplished. The Phase Setting may have to be changed depending on the brand of stove you use. Once the iGuardStove is operational check to see if the clock remains on, and that the device is fully functional. If needed change the Phase Setting and retest the stove. ABOUT iGuardStove This option tells you the MAC address of your device as well as the software version RESTORE FACTORY DEFAULTS This will erase any Internet settings and reset the device back to Factory Default settings. NOTE: When connected to the Wi-Fi the ability to adjust the Auto and Manual Timers using the Display Panel will disappear. You can manage these settings using your Online Account. In order to get the option to reappear on the Display Panel you must restore the Factory Defaults. But keep in mind this will then disconnect you from the Wi-Fi and you will lose those online features. Specifications Control Panel 9.7” x 2.3” x 2.2” inches Power Box 6.5” x 5.5” x 2” inches Voltages Input: 125/250 VAC 40 amp Output: 125/250 VAC Wi-‐Fi YES but an online account is required Wiring Electrician required Network Cable 6’ Cat5e cable with RJ45 ends Default Se:ngs 5 minute Auto Shut Off Timer 3 hour Manual Timer Firmware Updatable with Wi-‐Fi and online account Warranty 1 year for Smart or 5 year with Intelligent model MODELS Electric – Standard IGSE3, ISGE4 Electric – Cooktop IGSEC Gas – Standard IGSG Gas – Cooktop IGSGC Installation Requirements: Electric - no electrician needed Gas - needs gas fitter Cooktops - needs Electrician or Gas fitter Warranty 1. iGuardFire warrants, to the original purchaser, this product against defects in materials workmanship for a period of one (1) year from the date of original purchase. During this period iGuardFire Ltd. will repair or replace a defective product or part, at their discretion, with a new or refurbished product without charge. No warranty shall apply when damage is caused, or repair is required, due to any of the following; • Use of the product for other than the intended purpose, • Accident alteration abuse or miss use of the appliance • Inaccurate mounting location or poor workmanship during installation 2. These warranties and remedies are exclusive and all other warranties, expressed or implied, written or oral, including the implied warranties of merchantability or fitness for any particular purpose are excluded 3. To receive warranty consideration a return goods authorization number (RGA) must be obtained by either phoning 844-859-3838 or email at [email protected]. If a warranty registration has not been received by iGuardFire Ltd. via, the online setup of the account, a proof of purchase must accompany the returned product once an RGA number is received. 4. The defective product must be returned to the address included with the RGA. All transportation and insurance costs to buy guard fire are the responsibility of the owner iGuardFire Ltd. will pay for the return costs please include a brief description of the problem contact name and phone number RGA number and a complete return address. Product Liability 5. iGuardFire Ltd. shall not be liable for any loss damage (including without limitation direct or indirect damages for personal injury property damage loss of business profits business interruption or any other pecuniary loss) or expense arising directly or indirectly out of the purchase installation or operation of the products. 6. In no event shall iGuardFire Ltd. be liable for special, indirect, incidental or consequential damage of any kind or nature due any cause. 7. iGuardFire Ltd. neither assumes or authorizes any representative or other person to assume for it any obligation or liability other then is expressly set forth herein. 8. The laws of the province of British Columbia Canada govern this agreement the products and accompanying instructions and manuals the purchaser and any other related parties further agree that any litigation shall be commenced in the courts in the city of Kelowna in the province of British Columbia, Canada. 9. This warranty does not cover any incidental or consequential damages and is in lieu of all other warranties expressed or implied and no representative or person is authorized to assume for us, any other liability in connection with the sale of our products. Refund & Return Policy Option 1 – No Refunds/Exchanges: We do not accept returns or exchanges unless the item you purchased is defective. If you receive a defective item, please contact us at [email protected] with details of the product and the defect. You can send the item you consider defective to: Upon receipt of the returned product, we will fully examine it and notify you via e-mail, within a reasonable period of time, whether you are entitled to a refund or a replacement as a result of the defect. If you are entitled to a replacement or refund, we will replace the product or refund the purchase price, using the original method of payment. Option 2 – Refunds Permitted: We accept returns. You can return unopened items in the original packaging within 30 days of your purchase with receipt or proof of purchase. If 30 days or more have passed since your purchase, we cannot offer you a refund or an exchange. Upon receipt of the returned item, we will fully examine it and notify you via email, within a reasonable period of time, whether you are entitled to a return. If you are entitled to a return, we will refund your purchase price and a credit will automatically be applied to your original method of payment. We only exchange goods if they are defective or damaged. In circumstances where you consider that a product is defective, you should promptly contact us at [email protected] with details of the product and the defect. You can send the item you consider defective to the address provided by email. Upon receipt of the returned product, we will fully examine it and notify you via e-mail, within a reasonable period of time, whether you are entitled to a replacement as a result of the defect. If you are eligible, we will send you a replacement product. Shipping To return the item you purchased, please mail it to: Call for RMA first. No items shall be returned without an RMA being issued by iGuardFire. Refunds do not include any shipping and handling charges shown on the packaging slip or invoice. Shipping charges for all returns must be prepaid and insured by you. You are responsible for any loss or damage to hardware during shipment. We do not guarantee that we will receive your returned item. Shipping and handling charges are not refundable. Any amounts refunded will not include the cost of shipping. DELIVERY POLICY General Information All orders are subject to product availability. If an item is not in stock at the time you place your order, we will notify you and refund you the total amount of your order, using the original method of payment. Delivery Time An estimated delivery time will be provided to you once your order is placed. Delivery times are estimates and commence from the date of shipping, rather than the date of order. Delivery times are to be used as a guide only and are subject to the acceptance and approval of your order. Unless there are exceptional circumstances, we make every effort to fulfill your order within [15] business days of the date of your order. Business day means Monday to Friday, except holidays. Date of delivery may vary due to carrier shipping practices, delivery location, method of delivery, and the items ordered. Delivery Instructions You can provide special delivery instructions on the checkout page of our website. Shipping Costs Shipping costs are based on the weight of your order and the delivery method. To find out how much your order will cost, simple add the items you would like to purchase to your cart, and proceed to the checkout page. Once at the checkout screen, shipping charges will be displayed. Additional shipping charges may apply to remote areas or for large or heavy items. You will be advised of any charges on the checkout page. Sales tax is charged according to the province or territory to which the item is shipped. Damaged Items in Transport If there is any damage to the packaging on delivery, contact us immediately at [email protected] Questions If you have any questions about the delivery and shipment or your order, please contact us at 844-859-3838