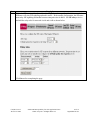
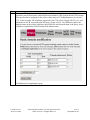
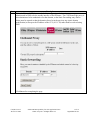
1
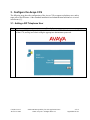
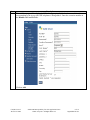
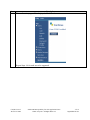
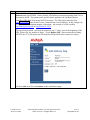
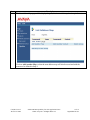
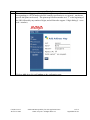
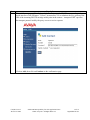
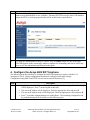
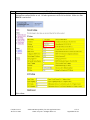
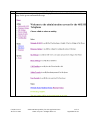
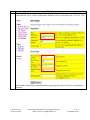
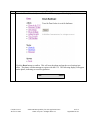
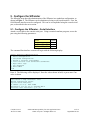
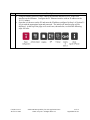
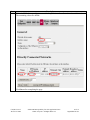
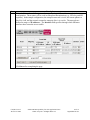
Avaya Solution & Interoperability Test Lab
Application Notes for the Ingate SIParator with Avaya
Converged Communication Server (CCS) - Issue 1.0
Abstract
These Application Notes describe the configuration steps required for interoperability of the
Ingate SIParator with the Avaya CCS in an enterprise SIP telephony configuration. The
SIParator performs SIP-aware Network Address Translation (NAT) as well as firewall
functions. Basic and supplementary telephony services were tested. Emphasis was placed on
NAT as opposed to firewall functionality. All tests were successful.
Information in these Application Notes has been obtained through compliance testing and
additional technical discussions. Testing was conducted via the DeveloperConnection
Program at the Avaya Solution and Interoperability Test Lab.
FAS; Reviewed:
WCH 6/17/2004
Solution & Interoperability Test Lab Application Notes
©2004 Avaya Inc. All Rights Reserved.
1 of 35
IngateSIPNAT.doc
1. Introduction
Customers implementing multi-location communication networks often use Network Address
Translation (NAT) to conserve public IP addresses as well as hide the internals of the enterprise
network configuration. SIP communication networks additionally require NAT to be performed
on IP addresses embedded in protocol layers above the IP layer (e.g., Session Description
Protocol (SDP)). The Ingate SIParator permits customers to add this capability without
impacting existing router/firewall configurations. The SIParator can perform all SIP proxy and
registrar functions. In the configuration tested in these Application Notes, the registrar function
was not used - the SIParator was configured to relay SIP signaling and media. The SIParator is
offered in several product sizes to support small, medium, and large enterprises.
The configuration tested consisted of an Avaya CCS within an enterprise SIP network, as shown
in Figure 1. Several SIP telephones are registered to the CCS. The enterprise edge router
performs IP-level Port NAT (PNAT) for non-SIP network devices within the enterprise. The
SIParator performs IP- and SIP-level PNAT on behalf of the CCS and SIP phones, and has a
direct connection to the public network.1 For simplicity, NAT was not performed for devices
within or beyond the simulated SIP Service Provider (SSP) network.
The Avaya CCS proxy is configured to route all off-enterprise calls to the SIParator, which is
configured to route them to the simulated SSP network that supports SIP-to-SIP and SIP-toPSTN service. The SIParator is configured to route inbound calls to the CCS. DNS support
allows dialing using Fully Qualified Domain Names (FQDNs). The domains administered in the
test configuration were “avaya.com” for the enterprise site, and “pop.ssp.com” for the service
provider network.
1
The SIParator can also be configured within a DMZ, so that a separate public IP address is not required.
FAS; Reviewed:
WCH 6/17/2004
Solution & Interoperability Test Lab Application Notes
©2004 Avaya Inc. All Rights Reserved.
2 of 35
IngateSIPNAT.doc
SimulatedSIP
Service
IP level
PNAT
Provider
DNS .200
Cisco
Catalyst Network
Enterprise
Site B
IDC
Enterprise
Site A
Cisco 3640
Router
10.1.1.x
Private
.1
IP + SIP
PNAT
Avaya P333T-PWR
Modlar Stackable
Swtich
.200
.5
Ingate
SIParator
.50
Avaya CCS
Home/Edge
Proxy
22000
Pingtel
SIP
Phone
.150
22001
.2
.100
30.1.1.x
Public
Cisco
SIP
Phone
IP
SIP
Cisco 2621
Router
Cisco
Catalyst
4006
Cisco
SIP
Proxy
Server
.50
ID C
22003
Avaya
4602 SIP
Phone
.153
.154
2924
.1
10.2.2.x
Public
Cisco .40
AS5300
Voice
Gateway
Avaya
4602 SIP
Phone
.103
Cisco
SIP
Phone
10.2.2.x
Public
PSTN
T1
PRI
.155
avaya.com
Avaya
Server R
pop.ssp.com
Figure 1: Ingate SIParator/Avaya CCS Test Configuration
2. Equipment and Software Validated
The following equipment and software were used for the configuration in Figure 1:
Equipment
Avaya Converged Communication Server (CCS)
Avaya P333T-PWR Modular Stackable Switch
Avaya 4602 SIP Telephone
Ingate SIParator 20 & 40
Cisco 7940 SIP Telephone
Cisco SIP Proxy Server
Cisco 3640 Router/ NAT
Cisco 2621 Router
Cisco AS5300 Voice Gateway
Pingtel SIP Telephone
FAS; Reviewed:
WCH 6/17/2004
Software
15.2
3.12.1
0.79
3.3.1
POS3-04-1-00
2.0
IOS 12.2(4)T
IOS 12.2(4)T1
12.3(1)
2.1.7.5
Solution & Interoperability Test Lab Application Notes
©2004 Avaya Inc. All Rights Reserved.
3 of 35
IngateSIPNAT.doc
3. Configure the Avaya CCS
The following steps describe configuration of the Avaya CCS to support a telephony user, and to
route calls to the SIParator. Other standard installation and administration functions are covered
in Reference [1].
3.1. Adding a SIP Telephone User
Steps
Description
1.
The Avaya CCS is configured using a web browser. Set the URL of the browser to the IP address
of the CCS, and log in as admin using the appropriate administrator password.
FAS; Reviewed:
WCH 6/17/2004
Solution & Interoperability Test Lab Application Notes
©2004 Avaya Inc. All Rights Reserved.
4 of 35
IngateSIPNAT.doc
Steps
Description
2.
The CCS administration web interface will be displayed. Expand the Users link on the left side
of the page and click on Add.
FAS; Reviewed:
WCH 6/17/2004
Solution & Interoperability Test Lab Application Notes
©2004 Avaya Inc. All Rights Reserved.
5 of 35
IngateSIPNAT.doc
Steps
Description
3.
The Add User page will be displayed. Fill in the appropriate fields. In the screen below, the user
corresponding to the Avaya 4602 SIP telephone is being added. Enter the extension number in
the Handle and User ID fields.
Click on Add.
FAS; Reviewed:
WCH 6/17/2004
Solution & Interoperability Test Lab Application Notes
©2004 Avaya Inc. All Rights Reserved.
6 of 35
IngateSIPNAT.doc
Steps
Description
4.
The confirmation page will be displayed. Click Continue.
Repeat Steps 1-4 for each user to be supported.
FAS; Reviewed:
WCH 6/17/2004
Solution & Interoperability Test Lab Application Notes
©2004 Avaya Inc. All Rights Reserved.
7 of 35
IngateSIPNAT.doc
3.2. Adding an Address Map
Address maps are used in the CCS to specify how incoming SIP calls are to be routed, based on
the dialed number. They are grouped by the SIP contact to which they will be routed. In this
configuration, calls to phones at Site B and the PSTN need to be routed to the simulated SSP.
The following steps describe how to administer this. See Reference [1] for more information on
the syntax used to specify address maps.
Steps
Description
1.
Click on the Hosts link on the left side of the main CCS web page. The List Hosts page is
displayed.
Click on Map.
FAS; Reviewed:
WCH 6/17/2004
Solution & Interoperability Test Lab Application Notes
©2004 Avaya Inc. All Rights Reserved.
8 of 35
IngateSIPNAT.doc
Steps
Description
2.
The List Address Map page is displayed.
Select Add Map in New Group.
FAS; Reviewed:
WCH 6/17/2004
Solution & Interoperability Test Lab Application Notes
©2004 Avaya Inc. All Rights Reserved.
9 of 35
IngateSIPNAT.doc
Steps
Description
3.
The Add Address Map page will be displayed. Specify a Name for the first address map, and the
Pattern match specification. In this example, all telephone extensions beginning with 5 are to
be routed to Site B. The pattern match specification is applied to the Uniform Resource
Identifier (URI) field of incoming INVITE messages. The URI usually takes the form
sip:user@domain, where domain can be a domain name or an IP address. In this example, the
user is actually the telephone number of the phone. An example of a URI would be
sip:[email protected] or sip:[email protected].
The specification means “match on the characters ‘sip:5’ if they occur at the beginning of the
URI, followed by any number of digits.” Check Replace URI. When routing the incoming
INVITE, the CCS will replace the URI with the URI specified in the contact (see Step 6).
Click on Add; then click on Continue on the confirmation page.
FAS; Reviewed:
WCH 6/17/2004
Solution & Interoperability Test Lab Application Notes
©2004 Avaya Inc. All Rights Reserved.
10 of 35
IngateSIPNAT.doc
Steps
Description
4.
The List Address Map page will be displayed again, this time with the updated map information.
Click on Add Another Map, so that the next address map will also be associated with the
contact to be defined in Step 6.
FAS; Reviewed:
WCH 6/17/2004
Solution & Interoperability Test Lab Application Notes
©2004 Avaya Inc. All Rights Reserved.
11 of 35
IngateSIPNAT.doc
Steps
Description
5.
The Add Address Map page will be displayed. Again, enter a Name and a Pattern
corresponding to a PSTN number plan (the example specification is very general – much more
specific dial plans can be used). This pattern specification matches on a “1” at the beginning of
the URI, followed by any number of digits, and will therefore support 11 digit dialing (1 + area
code + number).
Click on Add; then click on Continue on the confirmation page.
FAS; Reviewed:
WCH 6/17/2004
Solution & Interoperability Test Lab Application Notes
©2004 Avaya Inc. All Rights Reserved.
12 of 35
IngateSIPNAT.doc
Steps
Description
6.
The List Address Map page will be displayed again, this time with the updated map information.
Click on Add Another Contact.
FAS; Reviewed:
WCH 6/17/2004
Solution & Interoperability Test Lab Application Notes
©2004 Avaya Inc. All Rights Reserved.
13 of 35
IngateSIPNAT.doc
Steps
Description
7.
The Add Contact page will be displayed. In Contact, enter the SIP URI corresponding to the
inside interface of the SIParator. “$(user)” instructs the CCS to substitute the user portion of the
URI of the incoming INVITE message at this point in the contact. “transport=UDP” specifies
the transport protocol used by the proxy server to receive requests.
Click on Add; then click on Continue on the confirmation page.
FAS; Reviewed:
WCH 6/17/2004
Solution & Interoperability Test Lab Application Notes
©2004 Avaya Inc. All Rights Reserved.
14 of 35
IngateSIPNAT.doc
Steps
Description
8.
The List Address Map page will be displayed again with the updated map information. The
address map administration is now complete. Incoming INVITE messages whose URI matches
either the PSTN or SiteB map specification will be routed to the contact shown.
9.
To apply the administration in Steps 1-8 above, click on Update on the left side of the page.
This link appears on the current page whenever updates are outstanding, and can be used at any
time to save the administration performed to that point.
4. Configure the Avaya 4602 SIP Telephone
The following steps describe how to configure the 4602 SIP telephone to register with the CCS
in enterprise Site A. In this configuration, the phone is configured with static settings.
Configuration using DHCP and HTTP servers can be found in Reference [2].
Steps
1.
•
•
•
•
FAS; Reviewed:
WCH 6/17/2004
Description
Apply power to the telephone. During the boot sequence, the message “Press * to Setup”
will be displayed. Press * on the keypad at this time.
The current IP address will be displayed. Enter the appropriate value and press #.
The current IP address mask will be displayed. Enter the appropriate value and press #.
Press * to end the configuration process at the phone. The remaining configuration can
be performed using the web interface in the following steps.
Solution & Interoperability Test Lab Application Notes
©2004 Avaya Inc. All Rights Reserved.
15 of 35
IngateSIPNAT.doc
Steps
Description
2.
Set the URL of a browser to the IP address entered in Step 1, and log in as admin using the
appropriate administrator password.
The 4602 SIP Phone administration web interface will be displayed.
FAS; Reviewed:
WCH 6/17/2004
Solution & Interoperability Test Lab Application Notes
©2004 Avaya Inc. All Rights Reserved.
16 of 35
IngateSIPNAT.doc
Steps
Description
3.
To assign static network parameters, select the Network & QOS link under Admin and enter the
information outlined below in red. All other parameters can be left as default. Make sure Use
DHCP is unchecked.
Select Save.
FAS; Reviewed:
WCH 6/17/2004
Solution & Interoperability Test Lab Application Notes
©2004 Avaya Inc. All Rights Reserved.
17 of 35
IngateSIPNAT.doc
Steps
Description
4.
The main administration web page will be displayed as shown below. Check the bottom of the
page for the green confirmation message.
FAS; Reviewed:
WCH 6/17/2004
Solution & Interoperability Test Lab Application Notes
©2004 Avaya Inc. All Rights Reserved.
18 of 35
IngateSIPNAT.doc
Steps
Description
5.
To set the SIP parameters, select the SIP Settings link under Admin and enter the information
outlined below in red. In this configuration, the phone will be registering to the CCS (10.1.1.50).
Select Save, and check the main administration page displayed next for the green confirmation
message.
FAS; Reviewed:
WCH 6/17/2004
Solution & Interoperability Test Lab Application Notes
©2004 Avaya Inc. All Rights Reserved.
19 of 35
IngateSIPNAT.doc
Steps
Description
6.
Select the Reset link under System. The Reset Hardware page will be displayed.
Click the Reset button to confirm. This will reset the phone and put the saved settings into
effect. The phone will then attempt to register with the CCS. The following display will appear
on the phone, indicating successful registration.
SIP
FAS; Reviewed:
WCH 6/17/2004
22001
Solution & Interoperability Test Lab Application Notes
©2004 Avaya Inc. All Rights Reserved.
20 of 35
IngateSIPNAT.doc
5. Configure the SIParator
The following steps describe administration of the SIParator in a standalone configuration, as
shown in Figure 1. The SIParator can be administered using a web-based interface. First, the
Eth0 Ethernet interface must be configured. This can be accomplished using the console serial
port, as described in the next section.
5.1. Configure the SIParator – Serial Interface
Attach a serial cable to the console serial port. Using a terminal emulator program, access the
port using the following parameters:
Speed
Parity
Number of Data Bits
Number of Stop Bits
19200
None
8
1
The command line interface session will begin with the following display:
Ingate SIParator Administration
1. Basic configuration
2. Save/Load configuration
3. Become a failover team member
4. Leave failover team and become standalone
5. Wipe email logs
6. Set password
q. Exit admin
==>1
Enter 1. The following will be displayed. Enter the values shown in bold, or press enter if no
value is shown.
Basic unit installation program version 3.3
Press return to keep the default value
Network configuration inside:
Physical device name[eth0]:
IP address [0.0.0.0]: 10.1.1.200
Netmask/bits [255.255.255.0]: 255.255.255.0
Deactivate other interfaces? (y/n) [n]
FAS; Reviewed:
WCH 6/17/2004
Solution & Interoperability Test Lab Application Notes
©2004 Avaya Inc. All Rights Reserved.
21 of 35
IngateSIPNAT.doc
The following prompt is displayed for specification of computers that can configure the
SIParator. In this case, any computer on the 10.1.1.0 subnet will be permitted. Enter a password
for the admin login.
Computers from which configuration is allowed:
You can select either a single computer or a network.
Configure from a single computer? (y/n) [y]n
Network number [0.0.0.0]: 10.1.1.0
Netmask/bits [255.255.255.0]: 255.255.255.0
Password []:xxx
Now save the configuration, using the default update mode:
Other configuration
Do you want to reset the rest of the configuration? (y/n) [n]y
Update mode (1-3) [1]:
You have now entered the following configuration
Network configuration inside:
Physical device name: eth0
IP address: 10.1.1.200
Netmask: 255.255.255.0
Deactivate other interfaces: no
Computer allowed to configure from:
Network Number: 10.1.1.0
Password: xxx
The rest of the configuration is kept.
Is this configuration correct (yes/no/abort)? yes
5.2. Configure the SIParator – Web Interface
The following steps illustrate the remaining administration for the SIParator for the sample
configuration in Figure 1, using the web interface. In some cases, the web page display has been
abbreviated for clarity.
FAS; Reviewed:
WCH 6/17/2004
Solution & Interoperability Test Lab Application Notes
©2004 Avaya Inc. All Rights Reserved.
22 of 35
IngateSIPNAT.doc
Steps
1.
•
•
Description
Using an Ethernet crossover cable, connect the Ethernet interface of a PC to the Eth0
interface on the SIParator. Configure the PC Ethernet interface with an IP address on the
10.1.1.0 subnet.
Open the web browser on the PC and enter the IP address configured in Step 1 of Section 5.1.
Log in with the appropriate login and password. The initial web interface page will be
displayed. At the top of the page are several icons, shown below, to which the following
steps will refer.
FAS; Reviewed:
WCH 6/17/2004
Solution & Interoperability Test Lab Application Notes
©2004 Avaya Inc. All Rights Reserved.
23 of 35
IngateSIPNAT.doc
Steps
Description
2.
Click on the Basic Configuration icon. Select the SIParator Type tab to specify the type of
connectivity the SIParator will have to the network. If the Current SIParator type is not set to
Standalone, use the Change SIParator type pull-down menu to select Standalone and click on
the Prepare to change type button. The factory default type is Standalone, as shown below.
Refer to the description on the web page for information on the various types.
FAS; Reviewed:
WCH 6/17/2004
Solution & Interoperability Test Lab Application Notes
©2004 Avaya Inc. All Rights Reserved.
24 of 35
IngateSIPNAT.doc
Steps
Description
3.
Select the Eth0 tab. This is the inside (private) interface. Verify that the values have already
been populated based on the values entered during the serial port session.
Click Save after completing the page.
FAS; Reviewed:
WCH 6/17/2004
Solution & Interoperability Test Lab Application Notes
©2004 Avaya Inc. All Rights Reserved.
25 of 35
IngateSIPNAT.doc
Steps
Description
4.
Select the Eth1 tab to specify parameters for the public interface. Enter the values indicated.
The remaining values are default.
Click Save after completing the page.
FAS; Reviewed:
WCH 6/17/2004
Solution & Interoperability Test Lab Application Notes
©2004 Avaya Inc. All Rights Reserved.
26 of 35
IngateSIPNAT.doc
Steps
Description
5.
Select the Basic Configuration tab and the following screen will be displayed. Set the fields as
indicated. The other fields contain default values. In this example, the Default gateway is the
edge router in the simulated SSP. The Name server is the DNS server. The values in the
Configuration section are already set according to the values input in the serial port session of
the previous section.
Click Save after completing the page.
FAS; Reviewed:
WCH 6/17/2004
Solution & Interoperability Test Lab Application Notes
©2004 Avaya Inc. All Rights Reserved.
27 of 35
IngateSIPNAT.doc
Steps
Description
6.
Select the Networks and Computers tab to specify a logical Name for networks in the
configuration. These names will be used in subsequent administration (e.g., SIP relay and SIP
registrar). In the sample configuration, the enterprise network is inside, the remote phones at
Site B is siteB, and the network external to enterprise Site A is outside. The networks are
defined as ranges of IP addresses. The Interface field specifies through which SIParator
interface these networks are accessible.
Click Save after completing the page.
FAS; Reviewed:
WCH 6/17/2004
Solution & Interoperability Test Lab Application Notes
©2004 Avaya Inc. All Rights Reserved.
28 of 35
IngateSIPNAT.doc
Steps
Description
7.
Select the SIP icon (see Step 1) and then the SIP Relay tab to specify with which networks the
SIParator will relay SIP signaling and media traffic. In the sample configuration, the SIParator
must relay SIP signaling and media between enterprise sites A and B. Set SIP relay to Active
and add the relay rules for networks inside and siteB as shown below.
Click Save after completing the page.
FAS; Reviewed:
WCH 6/17/2004
Solution & Interoperability Test Lab Application Notes
©2004 Avaya Inc. All Rights Reserved.
29 of 35
IngateSIPNAT.doc
Steps
Description
8.
Select the SIP Registrar tab. Use this page to specify to which domain a given SIP request
should be routed, based on the Uniform Resource Identifier (URI) field in the INVITE message.
This specification is analogous to the Address Map entry in CCS administration (See Section
3.2). In this example, SIP telephones registered to the CCS at Site A begin with 22 or 21, and
telephones at Site B, registered to the SSP proxy, begin with 50. The SIParator replaces the
domain names in the request with those specified below and forwards them to the proxy server
IP address returned from a DNS lookup of the domain name.
Click Save after completing the page.
FAS; Reviewed:
WCH 6/17/2004
Solution & Interoperability Test Lab Application Notes
©2004 Avaya Inc. All Rights Reserved.
30 of 35
IngateSIPNAT.doc
Steps
Description
9.
Select the External SIP Servers tab. In this configuration, the domain avaya.com was
administered in DNS to be the outside interface of the SIParator. The CCS Home/Edge proxy is
also administered to be authoritative for that domain, so the Static Forwarding entry shown
below must be entered so that the domain referred to in the previous step (static domain
modification) will map to the IP address of the CCS (10.1.1.50) rather than be resolved using
DNS.
Click Save after completing the page.
FAS; Reviewed:
WCH 6/17/2004
Solution & Interoperability Test Lab Application Notes
©2004 Avaya Inc. All Rights Reserved.
31 of 35
IngateSIPNAT.doc
Steps
Description
10.
The configuration changes that have been saved thus far are designated as preliminary. They
must now be applied and copied to the permanent configuration. Click the Administration icon
and then the Save/Load Configuration tab. Click on Apply Configuration.
At this point, the applied configuration will be in effect on the SIParator for the test period
shown to the right of “Time limit for limited test mode (seconds):”. Three buttons will be
displayed as shown below. When satisfied with the operation of the SIParator, click on Save
Configuration before the test period specified above expires. See the above page for
explanations of the remaining buttons.
6. Interoperability Compliance Testing
The test plan used for compliance testing was Reference [5]. The test configuration was
identical to that of Figure 1, and focused on SIP telephony interoperability, as opposed to instant
messaging and presence features. The results from an existing test plan executed against the test
bed without the SIParator were compared to those with the SIParator installed.
FAS; Reviewed:
WCH 6/17/2004
Solution & Interoperability Test Lab Application Notes
©2004 Avaya Inc. All Rights Reserved.
32 of 35
IngateSIPNAT.doc
6.1. General Test Approach
Feature and functional testing was performed manually. Testing verified the ability of the
SIParator to:
• Route SIP call requests inbound to and outbound from the enterprise.
• Perform NAT at both the IP and SIP/SDP layers on SIP signaling and media traffic.
6.2. Test Results
All test cases passed. In all cases, the SIParator performed the tested features as expected. No
SIParator-specific issues were observed.
7. Verification Steps
The following verification steps can be used when troubleshooting configurations in the field:
•
Verify that the Avaya 4602 SIP telephone has registered to the CCS by looking at the display
(see Section 4, Step 6). If the following display appears, registration has failed:
No Service
Verify that the 4602 was administered with the correct IP address for the CCS in the Proxy
Server IP Address and Registrar Server IP Address fields.
•
•
•
Ping the FQDN for the enterprise site and remote site (SIParator and SSP proxy, respectively,
in this example) to verify correct DNS IP address resolution. If this test fails, but the IP
address can be pinged, check DNS administration.
Make a call from a 4602 in Site A to a SIP phone in Site B. Verify good quality audio in
both directions. If the call fails, use a SIP-capable network analyzer to verify that the
INVITE message is being routed from the CCS to the SIParator. If it is not, check the
address map(s) administered in the CCS (Section 3.2). Also, check that the transport
protocol supported by the remote SIP proxy server is correctly specified. If these are correct,
use the analyzer to verify that the SIParator routes the INVITE to the remote site. If it is not,
check the Static Domain Modification administration in the SIParator (Section 5.2, Step 8).
Make a call from a SIP phone at the remote site to the 4602 at Site A. Verify good quality
audio in both directions. If the call fails, use the techniques described in the previous step to
verify proper routing of the INVITE message from the SSP to the SIParator, and then on to
the CCS.
8. Support
Sales and technical support is available from the vendors that distribute Ingate products. They
can be located by emailing [email protected]. Technical support is also available by emailing to
[email protected] or calling 1-973-678-0464. The U.S. main office can be reached at 1-603883-6569.
FAS; Reviewed:
WCH 6/17/2004
Solution & Interoperability Test Lab Application Notes
©2004 Avaya Inc. All Rights Reserved.
33 of 35
IngateSIPNAT.doc
9. Conclusion
The Ingate SIParator has been successfully compliance tested in the configuration outlined in
these Application Notes. The administration steps provided here can be used to implement SIPaware NAT in the enterprise without changing the existing router and firewall configurations.
10. Additional References
[1]
[2]
[3]
[4]
[5]
Converged Communications Server Installation and Administration, Doc # 555-245-705,
February, 2004.
4602 SIP Telephone – Release 1.0 Administrator’s Guide, Doc # 16-300037, Issue 1.0,
May 2004.
Ingate SIParator 3.3 Getting Started Guide.
Ingate SIParator 3.3 User Manual.
Interoperability Test Plan and Results for the Avaya R2.0 CM and CCS SIP Offer with
Ingate SIP-Aware NAT Products, April 1, 2003, Issue 1.0, Fred Schmidt and James
Feeney.
FAS; Reviewed:
WCH 6/17/2004
Solution & Interoperability Test Lab Application Notes
©2004 Avaya Inc. All Rights Reserved.
34 of 35
IngateSIPNAT.doc
©2004 Avaya Inc. All Rights Reserved.
Avaya and the Avaya Logo are trademarks of Avaya Inc. All trademarks identified by ® and ™
are registered trademarks or trademarks, respectively, of Avaya Inc. All other trademarks are the
property of their respective owners. The information provided in these Application Notes is
subject to change without notice. The configurations, technical data, and recommendations
provided in these Application Notes are believed to be accurate and dependable, but are
presented without express or implied warranty. Users are responsible for their application of any
products specified in these Application Notes.
Please e-mail any questions or comments pertaining to these Application Notes along with the
full title name and filename, located in the lower right corner, directly to the Avaya
DeveloperConnection Program at [email protected].
FAS; Reviewed:
WCH 6/17/2004
Solution & Interoperability Test Lab Application Notes
©2004 Avaya Inc. All Rights Reserved.
35 of 35
IngateSIPNAT.doc