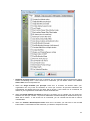
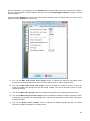
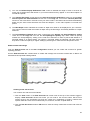
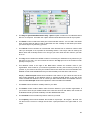
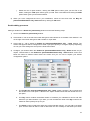
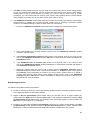
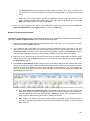
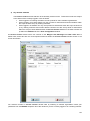
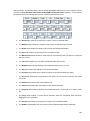
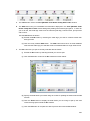
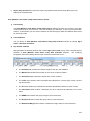
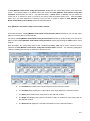
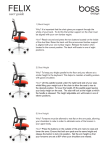
1
Nutron Front End Manual for the APD, EDM and Global Markets 1 Table of Contents Disclaimer & Copyright ........................................................................................................................................ 4 Introduction .......................................................................................................................................................... 4 Nutron front end overview ................................................................................................................................... 5 Launching and updating Nutron .......................................................................................................................... 6 System Menus and what they do ........................................................................................................................ 7 The Config system menu ................................................................................................................................. 8 The Print/Transfer System Menu ................................................................................................................... 33 The About system menu ................................................................................................................................ 35 System buttons and what they do .................................................................................................................. 40 Online trading from default menus and tabs ..................................................................................................... 43 Online Financial market trading ..................................................................................................................... 43 Financials market trading in a primary online trading window ................................................................... 47 Financials market trading in a secondary online trading window ............................................................... 59 Online Commodities market trading ............................................................................................................... 81 Commodities market trading in a primary online trading window ............................................................... 82 Commodities market trading in a secondary online trading window .......................................................... 93 Online Global market trading ....................................................................................................................... 109 Online Global market trading in a primary online trading window ............................................................ 110 Online Global market trading in a secondary online trading window ....................................................... 122 Using operations and views windows .............................................................................................................. 137 Fin Views operations .................................................................................................................................... 137 Enter Report Only Trade Window ............................................................................................................ 137 Access Control Window ........................................................................................................................... 141 Enter a Client window ............................................................................................................................... 145 [Member Code Dealer Code] EDM window ............................................................................................. 150 Roll Over Window ..................................................................................................................................... 150 View [Member Code Dealer Code] EDM Trades window ........................................................................ 152 View [Member Code Dealer Code] EDM Active Order window ............................................................... 159 View [Member Code Dealer Code] EDM Completed Orders window ...................................................... 161 View [Member Code Dealer Code] EDM Suspended Orders window ..................................................... 163 View [Member Code Dealer Code] EDM Unmatched trades window ...................................................... 164 View [Member Code Dealer Code] EDM Contracts window .................................................................... 167 View [Member Code Dealer Code] EDM Closing Prices window ............................................................ 171 View [Member Code Dealer Code] EDM Trace Deals window ................................................................ 172 View [Member Code Dealer Code] EDM Positions window ..................................................................... 175 View [Member Code] EDM Consolidated Positions window .................................................................... 176 View [Member Code] EDM Consolidated Member Positions window...................................................... 178 2 View [Member Code Dealer Code] EDM Clients window ........................................................................ 180 DAILY ACCOUNT SUMMARY FOR: [Clearing Member Code (Date)] window....................................... 182 View [Member Code Dealer Code] EDM Rates windows ........................................................................ 184 View [Member Code Dealer Code] EDM Exchange Announcements File windows ............................... 186 View [Member code Dealer code] EDM Option Stats .............................................................................. 187 Agris Views operations ................................................................................................................................ 188 Enter Report Only Trade window ............................................................................................................. 188 Access Control window ............................................................................................................................ 192 Enter a Client window ............................................................................................................................... 196 [Member Code Dealer Code] APD window .............................................................................................. 201 View [Member Code Dealer Code] APD Trades window ......................................................................... 202 View [Member Code Dealer Code] APD Active Orders window .............................................................. 208 View [Member Code Dealer Code] APD Completed Orders window ...................................................... 210 View [Member Code Dealer Code] APD Suspended Orders window...................................................... 212 View [Member Code Dealer Code] APD Unmatched trades window ...................................................... 213 View [Member Code Dealer Code] APD Contracts window .................................................................... 216 View [Member Code Dealer Code] APD Closing Prices window ............................................................. 219 View [Member Code Dealer Code] APD Trace Deals window ................................................................ 221 View [Member Code Dealer Code] APD Positions window ..................................................................... 224 View [Member Code] APD Consolidated Positions window .................................................................... 226 [Member Code] APD Consolidated Member Positions window ............................................................... 227 View [Member Code Dealer Code] APD Clients window ......................................................................... 229 DAILY ACCOUNT SUMMARY FOR: [Clearing Member Code (Date)] window....................................... 230 View [Member Code Dealer Code] APD Physical Deliveries window...................................................... 233 View [Member Code Dealer Code] APD Silo Certificate File window ...................................................... 234 View [Member Code Dealer Code] APD Allocation Notice File ............................................................... 237 View [Member Code Dealer Code] APD Delivery Notice File window ..................................................... 239 View [Member Code Dealer Code] APD Rates window .......................................................................... 241 View [Member Code Dealer Code] APD Exchange Announcements File windows ................................ 244 3 Disclaimer & Copyright DISCLAIMER These online help files have been produced as a guide at a given point of time and in an abbreviated form, to the key provision of the JSE Limited Rules and Directives, Stock Exchanges Act and Related Legislation. Given the compressed and dated nature of the contents of a document such as this, it should not be construed as the full and official interpretation of the Act, Rules and Directives; and the JSE Limited does not accept any responsibility or liability for any errors or omission in the formulation of these online help files, nor for any consequential claims arising there from. Accordingly, the JSE Limited accepts no responsibility for any transaction entered into as a result of the contents herein. COPYRIGHT © JSE Limited, 2011 All intellectual property rights in this documentation, the trademark and the logo are vested in the JSE Limited and are protected by legislation DISCLAIMER These online help files have been produced as a guide at a given point of time and in an abbreviated form, to the key provision of the JSE Limited Rules and Directives, Stock Exchanges Act and Related Legislation. Given the compressed and dated nature of the contents of a document such as this, it should not be construed as the full and official interpretation of the Act, Rules and Directives; and the JSE Limited does not accept any responsibility or liability for any errors or omission in the formulation of these online help files, nor for any consequential claims arising there from. Accordingly, the JSE Limited accepts no responsibility for any transaction entered into as a result of the contents herein. COPYRIGHT © JSE Limited, 2011 All intellectual property rights in this documentation, the trademark and the logo are vested in the JSE Limited and are protected by legislation Introduction The Nutron ATS Front End (Nutron from now on) is a multiple instrument online trading system supplied to the JSE. These help files describe how to trade online in each of the Financials, Commodities and Global markets that Nutron supports. These help files begin at the point at which Nutron has been installed, but not necessarily configured, on your workstation. Nutron features include: A highly customizable online trading workspace that lets you configure: Default Nutron user settings for Nutron as a whole. Default Nutron user settings for specific markets that Nutron supports. Default user settings for a specific trading session for a specific market. Support for an extensive range of trading operations including bids, doubles, offers, options, deltas, spreads and splits. Windows from which you can carry out general non trading operations or obtain comprehensive feedback in real time on your trading activities for the current day. DDE functionality that lets you use your familiarity with Excel spreadsheets to set up trading information you can use to participate in the Nutron online trading environment without working within a Nutron trading window. 4 Nutron front end overview The Nutron front end consists of a front end window to which you can add default elements and your own main menus, sub-menus and tabs that link to view windows, trading windows and operations windows. These online help files refer to this window as the Workspace window from now on. Most of what follows will discuss processes launched from the Workspace window The window section in the screen shot below shows part of a Workspace window that has been configured to include default menus and tabs for the Financials market. A. The Config menu The Config system menu is independent of the market/s configured within the Workspace window. The Config system menu contains menu items and sub menu items that mainly configure and customize the Workspace window and the online trading experience it offers B. The Fin Trading menu The Fin Trading menu only appears within the Workspace window once you have configured it for the Financials market. The Fin Trading menu contains menu items that mainly link to trading windows that let you trade in real time on selected contracts. C. The Fin Views menu The Fin Views menu only appears within the Workspace window once you have configured it for the Financials market. The Fin Views menu contains menu items that link to windows from which you can carry out non-trading operations and menu items that link to windows that display trading data for the current day in real time. D. The Agris Trading Menu The Agris Trading menu only appears within the Workspace window after it has been configured for the APD market. The Agris Trading menu contains menu items that mainly link to trading windows that let you trade in real time on selected contracts. E. The Agris Views Menu The Agris Views menu only appears within the Workspace window after it has been configured for the APD market. The Agris Views menu contains menu items that link to windows that you use for operations and menu items that link to windows that display trading data for the current or previous trading day in real time. F. The Global Market Menu The Global Market menu only appears within the Workspace window after it has been configured for the Global market. The Global Market menu contains menu items that mainly link to trading windows that let you trade in real time on selected contracts. G. The Print/Transfer menu The Print/Transfer system menu is independent of the market/s configured within the Workspace window. The Print/Transfer system menu contains a menu item that lets Nutron users save to their local hard drive and print trading record files in XML and HTML format for the current day, the 5 previous day and a prior date of their own choice. You can, however, only access trading record files for the current day unless the market is in a download only period. H. The About menu The About system menu is independent of the market/s configured within the Workspace window. The About system menu contains three menu items that respectively display Nutron front end online help files, a window consisting of a reference list of shortcut keys for order processes and a Nutron front end About window that displays product version details. I. Eight system buttons The Workspace window contains eight system buttons. These buttons are independent of the market/s configured within the Workspace window. These buttons let Nutron users log in, log off, change the password for a market, start and stop the real time display of market data within the Workspace window, cancel all active orders, change default user configuration settings and display/hide a message screen. J. The Fin tab The Fin tab and its tab buttons duplicates the functionality of the Fin Trading menu and its menu items discussed in the Fin Trading menu section toggle. K. The Fin Views tab The Fin Views tab and its tab buttons duplicates the functionality of the Fin Views menu and its menu items discussed in the Fin Views menu section toggle. Launching and updating Nutron Launching and updating Nutron involves the following steps: 1. Click Windows Start Menu > Programs > JSE Securities Exchange > Nutron Front-End to display a Launching Application window like the one shown below. Once the back end process tracked in the Launching Application window has established that your workstation meets the requirements to run Nutron, this window will close. 2. If a later Nutron version is available, an Update Available window, like the one in the screen shot below, will appear. 6 Learn what happens if you follow the recommended course of action and update Nutron at this point by going to step 3. Learn what happens if you choose not to update Nutron at this point by going to step 4. 3. Start updating Nutron, close the Update Available window and display the ([x]%]) Updating Nutron Front-End window shown in the screen shot below by clicking on the Update Available window OK button. Information on the progress of the Nutron update will appear within the ([x]%]) Updating Nutron Front-End window until the update is complete. The ([x]%]) Updating Nutron Front-End window will then close. 4. If you choose to skip or cancel an automated Nutron update, an Update Available window will not reappear for that update when you next launch Nutron. The only way you can implement this update is to click About > Upgrade FE within the Nutron Workspace window and manually launch the update. System Menus and what they do A Workspace window contains three default system menus. In order from left to right within a Workspace window, these consist of the Config system menu, the Print/Transfer system menu and the About system menu. Notes in separate help topics below discuss each system menu and the menu items and sub menu items included within it. 7 The Config system menu The Config system menu contains menu items and sub menu items that mainly configure and customize the Workspace window. Numbers linked to the numbered labels in the screen shot below discuss each Config system menu in turn. 1) Menu Config The Menu Config menu item and its sub menu items lets you customize menus and tabs that hold menu item links, sub menu item links and tab button links to windows that you have chosen. These windows will consist of view windows, trading windows and operations windows. The Menu Config menu item displays the sub menu items shown in the screen shot below. 8 Letters keyed to the Menu Config sub menu items screen shot above discuss each sub menu item in turn below. a) Add Main Menu Item This Add Main Menu Item sub menu item lets you create custom menus that appear next to system menus and menus linked to one or another of the Financials, Commodities or Global markets that Nutron supports. You would create these custom menus to provide a convenient location for menu item links to view windows. You create custom menus from the Add Main Menu Item sub menu item as follows: i) Click Config > Menu Config > Add Main Menu Item to display an Add Main Menu Item window like the one below. 9 ii) Type a meaningful caption for the new main menu item into the Menu Item Prompt text box. iii) Use the Menu Position control to specify the position from the left of the Workspace window menu bar where you would like the new main menu item to appear. iv) Optionally, check the Add Tab as well check box to create a new tab with the caption you supplied in step 2. All links you set up on the new main menu item will also appear on the tab as tab buttons. v) Click the Add Main Menu Item window's OK button to close this window and display the new menu where you specified it should appear within the Workspace window menu bar. vi) If you choose to have links to windows that you have chosen appear as sub menu items, you can optionally add menu items to your new main menu item. as described in section b. b) Add Sub Menu Item This Add Submenu Item sub menu item lets you add menu items to your own custom menus as well as menus linked to one or another of the Financials, Commodities or Global markets that Nutron supports. Once these menu items are in place, you can add sub menu items to them that respectively link to view windows, trading windows and operations windows that you have chosen. You create custom menu items from the Add Submenu Item sub menu item as follows: i) Click Config > Menu Config > Add Submenu Item to display an Add Sub Menu Item window like the one below. ii) Type a meaningful caption for the new custom menu item into the Menu Item Prompt text box. iii) Use the Menu Position control to select the menu within which you want the new sub menu item to appear by specifying the position of this menu from the left of the Workspace window menu bar. iv) Use the Submenu Position control to specify the position within the selected menu where you want the new sub menu item to appear. If the selected menu contains no menu items, the Submenu Position control will hold a value of „0‟ and the menu item will automatically appear in the first position within the selected menu v) Click the Add Sub Menu Item window's OK button to close this window and save the menu item where you specified it should appear within the selected menu. 10 vi) Confirm that the new menu item has been created where you wanted it to be created. If the menu to which you added the menu item was linked to a tab, a tab button will only appear on the tab once you have linked the new menu item to a window as. c) Add Tab This Add Tab sub menu item lets you define up to 100 tabs that will appear in the tab area on the right of the Workspace window. These tabs will be completely independent of menus and can be customized to contain shortcuts to view windows, trading windows and operations windows. You may use the Add Tab sub menu item to create your own custom tab as follows: i) Click Config > Menu Config > Add Tab to display an Add a New Tab window like the one below. ii) Type a meaningful caption for the new tab into the Caption text box. iii) Use the Position control to specify the position from the left of the Workspace window tabs where you would like the new tab to appear. iv) Click the Add a New Tab window's OK button to close this window and display the new tab in its designated position amongst the Workspace window tabs. d) Del Main Menu Item This Del Main Menu Item sub menu item lets you delete your own customized menus, as well as Financials, Commodities or Global market menus, as follows: i) Click Config > Menu Config > Del Main Menu Item to display a window prompting you to click the main menu item you want to delete. ii) Click OK button of the window that displayed the prompt to close the window. iii) Click the main menu item you want to delete. iv) If the main menu item you want to delete contains sub menus, an Information window, like the one shown in the screen shot below, will appear. 11 v) Assuming you want to continue deleting the main menu item, click on the Information window OK button e) Del Sub Menu Item This Del Submenu Item sub menu item lets you delete your own customized menu items, as well as Financials, Commodities or Global market menu items, as follows: i) Click Config > Menu Config > Del Submenu Item to display a window prompting you to click the menu item you want to delete. ii) Click the OK button of the window that displayed the prompt. iii) Click the menu item you want to delete iv) When a Confirm window, like the one shown in the screen shot below, appears, click its Yes button to delete the menu item and close the Confirm window. f) Del Tab This Del Tab sub-menu item lets you delete your own custom tabs as well as Financials, Commodities or Global market tabs as follows: i) Click the tab you want to delete. ii) Click Config > Menu Config > Del Tab to display a Confirm window like the one shown in the screen shot below that prompts you to confirm the delete. 12 iii) Click the Confirm window Yes button to confirm the delete and close the Confirm window. 2) Select User By clicking on either the Primary Logon or the Secondary Logon sub menu item of the Select User menu item, shown in the screen shot below, you can change default user configuration settings for either the primary or the secondary log on to Nutron respectively. Set up default user credentials that provide access to Nutron as a whole and then to its currently active market/s as follows: a) Click Config > Select User > Primary Logon/Secondary Logon to change default user configuration settings for either the primary or the secondary log on to Nutron. b) The Default User window that appears is represented by the screen shot below. The lettered circles in the screen shot are keyed to default user record fields for Nutron as a whole that lettered notes beneath the screen shot discuss. 13 i) This Member Code control holds a unique code that your system support provider will supply to you. This code is 4 characters long for member organizations and 5 characters long for clearing members. ii) This Dealer Code control holds a unique three-character code that your system support provider will supply to you. This code is allocated to each dealer within each member organization for identification purposes. iii) This Exchange Domain control holds your parent domain at the Exchange as specified by your system support provider. c) When you are satisfied with the changes you have made to field values held within the Default User window, click on its OK button to save these values and close the Default User window. d) If the Workspace window has been configured for the Financials and/or Commodities and/or Global markets, one or two additional windows will appear within which you can set up default user credentials for the currently active Nutron markets. For illustrative purposes, we will assume that the current Nutron instance has been configured for the Financials, Commodities and Global markets. The first additional window to appear will be the Connect data for Financial Derivatives window represented by the screen shot below. 14 i) Field values held in this Exchange User Code control are the same as those held in the Default User window Member Code control. ii) Field values held in this Exchange Dealer Code control are the same as those held in the Default User window Dealer Code control. iii) This AD Username control holds the Active Directory user name allocated to you by the Exchange for the Financials market. Your system support provider will be able to provide you with this user name. iv) This Network Address control holds the network or IP address of the server where the back end trading system for the Financials market runs v) This Port Number control holds the port number value used for connectivity to the Financials market. Specifying port numbers for distributed applications like Nutron lets you connect to them through security firewalls on local workstations. vi) This All dealers data control holds values that only apply to master dealers. If you assign a "True" value to this control, by adding a check mark to it, master dealers will be able to see all Financials market trades for all member dealers in your organization. vii) If you assign a "True" value to this Delete active orders on lost connection control, by adding a check mark to it, as soon as the Exchange discovers that you have lost your connection to it, it will delete all your active orders. If you assign a "False” value to this control, by leaving it without a check mark, the Exchange will let your active Financial market orders persist after you have lost your connection to it. viii) This Use as Global Market control holds values that only apply if your current Nutron instance has been configured for the Global market. If you want to connect to the Global market from the Financials market, so that your Global market trades appear within Financial market view windows, assign a "True" value to this Use as Global Market control by adding a check mark to it. Once you have specified that you want to connect to the Global market from the Financials market, the Use as Global Market control will be disabled within the Connect data for Agric Derivatives window if it appears. e) When you are satisfied with the changes you have made to field values held within the Connect data for Financial Derivatives window, click on its OK button to save these values and close the Connect data for Financial Derivatives window. f) The Connect data for Agric Derivatives window, represented by the screen shot below, will appear. As the Connect data for Agric Derivatives window contains equivalent controls to the Connect data for Financial Derivatives window controls, the purposes served by Connect data for Agric Derivatives window controls should now also be clear to you. 15 g) When you are satisfied with the changes you have made to field values held within the Connect data for Agric Derivatives window, click on its OK button to save these values and close the Connect data for Agric Derivatives window. 3) User Config Sub menu items linked to the User Config menu item let you configure additional settings for yourself for the market represented by the applicable sub menu item for the current trading session. These settings you configure encompass trading attributes, default attributes, sub accounts and reference numbers. The User Config menu item in the screen shot below has both Financials and Commodities sub menu items. This indicates that the corresponding Nutron instance has been configured for at least the Financials and the Commodities markets 16 You configure additional settings for yourself for a specific market as follows: a) Log in to the market for which you want to configure additional settings. For illustrative purposes, we will assume you want to configure additional settings for the Financials market. b) Click Config > User Config > Financials to display a User Configuration window. Section toggles below discuss the settings available for configuration from each User Configuration window tab. Flags tab settings Flags tab settings are all managed from check boxes on the tab and all have either a “True” value or a “False” value. You assign a “True” value to a Flags tab setting by checking its check box. You assign a “False” value to a Flags tab setting by leaving its check box unchecked or by unchecking its check box. Use the lettered Flags tab screen shot below and the lettered notes that follow after it to find out what each Flags tab setting does. 17 i. Suspend not delete orders check box is checked, you can suspend orders and edit these orders before re-submitting them. If this check box is unchecked, you can delete orders in the Active Orders View, but not suspend them. ii. When the Single bid/offer per principal check box is checked, all dealers within your organization can only insert one bid/offer at a time per contract. All previous bids/offers will automatically be deleted and only the latest will be shown. If this check box is unchecked, all dealers in your organization will be able to submit unlimited bids. iii. When the Single bid/offer per dealer check box is checked, you as a dealer can only insert one bid/offer at a time per contract. All previous bids/offers will automatically be deleted and only the latest will be shown. If this check box is unchecked, you as a dealer will be able to submit unlimited bids. iv. When the Confirm delete/suspend order check box is checked, you will have to click an OK button within a confirmation window whenever you delete or suspend an order. 18 v. When the Lock Dealer check box is checked, your initials as a dealer will default to those of the logged in dealer when submitting orders. You will not be able to change these initials. You should also refer to notes on defaulting orders you put up to a specific sub account/dealer combination. The Lock Dealer check box is checked by default, but can be changed. vi. When the Must confirm Report Only Member trades check box is checked, you will be required to confirm by accepting the receiving trade leg in the View [Member Code Dealer Code] EDM Unmatched trades window for trades that have been captured by a member organization to match these trades. vii. When the OK button print on trade entry check box is checked, a deal confirmation sheet can be printed if required for report only trades. viii. When the Clear input screen after entry check box is checked, if you have booked more than one reported trade, the relevant input fields will be cleared once you have submitted that trade. This lets you enter details for another report only trade without manually clearing all the input screen fields. ix. This tab setting links to a timeout setting set on the Defaults tab. When the Auto timeout future bids/offers check box is checked, active future orders will only remain active for the time period specified by the timeout setting. If no trades result from these bids/offers within the timeout period, the back end will delete them from the system. If this check box is unchecked, active future orders will remain active for the duration of the trading day or until removed whether any trades result from them or not. x. This tab setting links to a timeout setting set on the Defaults tab. When the Auto timeout option and delta bids/offers check box is checked, active option and delta orders will only remain active for the time period specified by the timeout setting. If no trades result from these bids/offers within the timeout period, the back end will delete them from the system. If this check box is unchecked, active option and delta orders will remain active for the duration of the trading day or until removed (whether traded, cancelled or suspended). xi. When the Deal Notification Message check box is checked, a window containing a notification message will appear whenever one of your orders results in a trade. This window will contain an OK button you will need to click to close the window. xii. This tab setting links to a timeout setting set on the Defaults tab. When the Deal Notification Message (with timeout) check box is checked, a window containing a notification message will appear whenever one of your orders results in a trade. This window will automatically close after the specified number of seconds has passed. xiii. When the Cumulate Bid/Offer on depth window check box is checked, when you open a Depth window and select a specific row, all the orders up to that row in the depth quantity will be cumulated with the selected row's price in the bid/offer window. xiv. When the Confirm Bid/Offer check box is checked, you will be prompted to confirm every bid and offer made. This is to ensure that no orders (which might result in trades) are made in error. xv. By default, you can determine whether you make a bid, double or offer in a principal capacity or an agent capacity by the trading window column you click or the keyboard shortcut you press. When the Always use Principal/Agency setting check box is checked, the principal/agent setting that is configured, will always be used regardless of which trading window column you click or which keyboard shortcut you press. xvi. When the Default orders to NOR checks box is checked, bids default to the Normal setting instead of the Fill or Kill setting. 19 xvii. When the Deal Notification Beep check box is checked, your computer will beep whenever any order has resulted in a deal. xviii. When the Must not show pop ups check box is checked, messages that you only have to acknowledge - by clicking on the OK button of the window within which the message is contained will only appear in the third section of the status bar at the bottom of the Workspace window. xix. When the Use Market Tele Ticker check box is checked, market data will scroll across the Nutron front end Workspace window from right to left when a logged in user clicks the Market Ticker system button as described elsewhere. xx. When the Use Market Ticker check box is checked, market data will appear in a list format within a Market Ticker window when a logged in user clicks the Market Ticker system button as described elsewhere. xxi. If the Bid Window Position Design check box is left unchecked, windows used for adding bids, doubles and offers will always appear in the centre of your screen. If you check the Bid Window Position Design check box, however, each of these windows will appear in front of their respective trading window relative to the position of the instrument record involved in the current bid, double or offer adding process. xxii. If you check this Collate Depth check box, if you make successive normal futures bids of the same type, the depth window will only update the quantity of orders that you have bided within an existing bid record row. xxiii. If you check this Use Selected Members check box, a Selected Members tab will be added to the right hand side of the User Configuration window. c) Once you have made the Select Members tab active, by clicking on its caption, you can select members with which you want to trade as follows: i) Click on the member code of a member you would like to select from the Available Members: column as shown in the screen shot below. Notice that the member name of the currently highlighted member record appears directly beneath the Available Members: column. 20 ii) Click on the Right Arrow button to select the currently highlighted member record by transferring it into the Selected Member column. iii) Repeat steps i. and ii. as often as required. Default tab settings You can use the Defaults tab to set up data range limits for yourself. The main purpose of these limits is to help traders avoid entering incorrect data. 21 With one exception, you set settings on the Defaults tab by typing number values into controls on the right of the tab. This exception involves making a selection from the Principal/Agent Capacity dropdown control discussed below. Use the lettered Defaults tab screen shot below and the lettered notes that follow after it to find out what parameters each Defaults tab control sets. a) You use the Max order points price change control to indicate the maximum permitted points movement from the last traded price. You will not be able to place an order outside this limit. b) You use the Max order points volat change control to indicate the maximum number of points by which the volatility may change from the last traded volatility. You will not be able to place an order outside of this limit. c) You use the Max order quantity control to indicate the maximum order quantity allowed per order. d) You use the Max order points rate change control to indicate the maximum number of points by which order points may change from the last traded rate. This text box is greyed out when it does not apply to a particular market. e) You use the Default order quantity control to indicate the default quantity that will be entered whenever you place a bid/offer on a trading screen. 22 f) You use the Default Popup Notification Time control to indicate the length of time in seconds for which pop-up dialog boxes will remain on your screen whenever they appear. A zero value implies a 5 second time period. g) The Timeout (Seconds) control links to the Auto timeout future bids/offers check box and the Auto timeout option and delta bids/offers check box on the Flags tab. You use the Timeout (Seconds) text box to set a time limit in seconds on all your active orders. The Nutron back end will automatically delete all your active orders whenever this time limit elapses. A zero value implies a 5 second time period. h) The Max Depth control indicates the number of depth that needs to be displayed for your contracts. This number cannot exceed the number of depth set by the Exchange, and usually defaults to 9 depth elements. i) The Principal/Agent Capacity drop down control links to the Always use Principal/Agency setting check box on the Flags tab. You use the Principal/Agent Capacity drop down control to specify whether the Principal/Agency setting on the order box whenever an order is placed will default to a Principal setting or an Agent setting. You specify a „Principal‟ setting by selecting a P value from the drop down control and specify an „Agent‟ setting by selecting an A value from the drop down control. Sub Accounts tab settings From the Sub Accounts tab of the User Configuration window you can create sub accounts for greater reporting precision. Use the Sub Accounts tab controls below to create and manage sub accounts to trade with on Nutron as described under separate headings below Creating a new sub account You create a new sub account as follows: 1. Click the Plus button in the Sub Accounts tab screen shot at the top of this section toggle to display a Sub Accounts window into which you can enter a sub account name. Sub account names must be five characters long and can contain any combination of letters, numbers and special characters. Sub account names may not, however, end with a capital letter C. 2. Click the Sub Accounts window's OK button to save the newly created sub account and close the window. 23 Defaulting your orders to a specific sub account/dealer combination You default orders you put up to a specific sub account/dealer combination as follows: 1. Choose the sub account you want all your orders to default to from the drop down control indicated by a mouse cursor in the Sub Accounts tab screen shot at the top of this section toggle. 2. Click the Lock to sub account and dealer check box in the Sub Accounts tab screen shot at the top of this section toggle to check it and ensure all your future orders default to the sub account you selected in step 1. The dealer box on your order screens will also be locked to you as the logged in dealer. Clicking the Lock to sub account and dealer check box also checks and greys out the Lock Dealer check box on the Flags tab. Deleting a sub account You delete a sub account as follows: 1. Choose the sub account you want to delete from the drop down control indicated by a mouse cursor in the Sub Accounts tab screen shot at the top of this section toggle. 2. Click the Minus button to display a window asking you to confirm that you wish to delete the sub account. Click the Yes button of this window to delete the sub account and close the window Ref Number tab settings From the Ref Number tab of the User Configuration window you can create a reference number seed value specifically for orders as follows: 1. Type a number value of up to nine numerals like the number value in the screen shot below into the Reference Number text box. 2. Save the reference number seed value and close the User Configuration window by clicking its OK button. 3. Once you are satisfied with values you have specified on one or all User Configuration tabs, save these values and close the User Configuration window by clicking its OK button. 4) Add Views This Add Views menu item lets you add a pre-existing menu item that links a previously inaccessible view window to a custom or default menu, a custom or default tab or a custom menu item. 24 You use the Add Views menu item to provide access to a previously inaccessible view window as follows: a) Click Config > Add Views to display a Menu Configuration window like the one shown in the screen shot below. b) Scroll through the contents of the Menu Configuration window data grid until you locate the data grid row record of the view window to which you want to provide access. c) Click on your chosen data grid row record to highlight it, and then click the Add Menu button to display a Set Menu data window. d) Input values within the applicable Set Menu data window Tab Number, Menu number, Menu Position and/or Sub Menu controls to determine the exact location of each link through which you want to provide access to your chosen view window. e) Optionally, check the Use Short Cut Key check box to display the Short Cut frame and its contents as shown in the Set Menu data window section screen shot below. 25 f) Use the Short Cut frame controls to specify the control key and alpha key combinations you intend using as keyboard shortcuts for displaying your chosen view window. g) Optionally, specify an image to appear on the tab button (if applicable) that links to your chosen view window as described in the paragraph directly below. h) Click images within the Select Icon panel until the image displayed in the BitMap Preview image container corresponds to the image you want to appear on the tab button that links to your chosen view window. i) Save your selections and close the Set Menu data window by clicking its OK button. j) Click the Menu Configuration window‟s Close button to close this window. 5) Add Trading Windows This Add Trading Windows menu item lets you link a custom sub-menu item or tab to a previously inaccessible trading window as follows: a) Click Config > Add Trading Windows to display a Select Market and View window like the one below. 26 b) Use the Select Market and View window Market, For What and Menu item controls to respectively choose the applicable market, the applicable window and whether the new window is to be a trading window or a global options window. c) Click the Select Market and View window OK button to close this window and display a Configure [Menu item name] window. d) Optionally, edit the value in the Configure [Menu item name] window Menu item name control. e) Input values within the applicable Configure [Menu item name] window Tab Number, Position on tab, Menu Number, Menu Position and/or Sub Menu Pos controls to determine the exact location of each link through which you want to provide access to your chosen window. f) Optionally, check the Use Short Cut Key check box to display the Short Cut frame and its contents in the bottom left Configure [Menu item name] window section as shown in the screen shot below. 27 g) Use the Short Cut frame controls to specify the control key and alpha key combinations you intend using as keyboard shortcuts for displaying your chosen view window. h) Optionally, specify an image to appear on the tab button (if applicable) that links to your chosen window as described in the paragraph directly below. i) Click images within the Select Icon panel until the image displayed in the BitMap Preview image container corresponds to the image you want to appear on the tab button that links to your chosen window. j) Select the contract/s on which you want to be able to trade from within the Configure [Menu item name] window Select Contracts panel by adding check marks to their check boxes. Optionally, select all the available contracts by clicking on the Select All button at the bottom and on the right of the Configure [Menu item name] window. k) Click the OK button to save your user defined shortcut/s to your chosen window and close the Configure [Menu item name] window. 6) Add Operations This Add Operations menu item lets you link a custom sub-menu item or tab to a previously inaccessible operations window as follows: a) Click Config > Add Operations to display the Menu Configuration window shown below. b) Scroll through the contents of the Menu Configuration window data grid until you find the data grid row for the operations window to which you want to create a link. Highlight this data grid row record and then click the Add Menu button to display a Set Menu data window. c) Scroll through the contents of the Menu Configuration window data grid until you find the data grid row for the operations window to which you want to create a link. Highlight this data grid row record and then click the Add Menu button to display a Set Menu data window. d) Optionally, check the Use Short Cut Key check box to display the Short Cut frame and its contents as shown in the Set Menu data window section screen shot below. 28 e) Use the Short Cut frame controls to specify the control key and alpha key combinations you intend using to display your chosen window. f) Optionally, specify an image to appear on the tab button that links to your chosen trading window (if applicable) as described in the paragraph directly below. g) Click images within the Select Icon panel until the image displayed in the BitMap Preview image container corresponds to the image you want to appear on the tab button that links to your chosen window. h) Click the OK button to save your user defined shortcut/s to the selected window and close the Set Menu data window i) Click the Menu Configuration window‟s Close button to close this window. 7) Clear Configuration This Clear Configuration menu item displays the sub menu items shown in the screen shot below. 29 a) This Clear Menus and Tabs sub menu item irreversibly removes all your customized menus and customized tabs as well as menus and tabs linked to markets that your Nutron instance currently supports. b) This Clear Trading Defaults sub-menu item irreversibly removes all trading defaults from the user configuration of the currently logged in dealer to the market. c) This Clear All Configurations sub menu item irreversibly removes all your customized menus and customized tabs as well as menus and tabs linked to markets that your Nutron instance currently supports. The Clear All Configurations sub menu item also clears every trace of user customization. 8) Run as Intranet This Run as Intranet menu item lets Nutron users who are master dealers designate their workstations as Intranet servers that connect to the Exchange on their own behalf and on behalf of multiple users who connect to them instead of to the Exchange for the available markets. Nutron users use the Run as Intranet menu item to designate their workstation as an Intranet server as follows: a) Click the Login button to log into one or more of the markets. b) Click Config > Run as Intranet to display the Intranet window shown below. 30 c) Add a check mark to the Intranet window EDM Derivatives and/or the APD Derivatives check box/es. d) Click the Intranet window OK button to close this window and display one or two windows that respectively confirm that your workstation is functioning as an Intranet server for either the Financials market or the Commodities market or both of these markets. A window like the one shown in the screen shot below confirms that your workstation is functioning as an Intranet server for the Financials market. e) Windows that confirm that your workstation is functioning as an Intranet server for a market will continually update themselves with messages that relate to the new role of your workstation in relation to that market. 9) Add Default Windows A Nutron Workspace window, like the Nutron Workspace window section shown below, may have no menus and tabs with menu items and tab buttons that link to trading, view and operational windows for markets that you specify. 31 Instead of clicking on the Config menu items for creating custom menus and custom tabs with links to trading, view and operational windows, as described in previous section toggles within this help topic, you can create corresponding default menus and tabs as follows: a) Click Config >> Add Default Windows to display a Default User window like the one shown below. b) Add a check mark to one or more Default User window check boxes to select the market/s in which you want to trade. c) Click the Load Defaults button to finalize your selection and close the Default User window. d) Within a few moments, menus and tabs for the market/s you specified will appear within the Nutron Workspace window. 10) Stay on Top This Stay on Top menu item lets you keep the Workspace window on top of other windows, even when these windows are active, by clicking Config > Stay on Top when no check mark is displayed on the left of the Stay on Top menu item. You can click Config > Stay on Top when a check mark is displayed on the left of the Stay on Top menu item to make the Workspace window stay behind active windows. 11) Use HD Files This Use HD Files menu item lets you save bandwidth and enhances how Nutron performs as described below. 32 The Print/Transfer System Menu Sections keyed to the Print/Transfer system menu screen shot below discuss each Print/Transfer menu item in turn. 1) Print Menu Item Section toggles keyed to the Print/Transfer system menu screen shot below discuss each Print/Transfer menu item in turn. i. Ensure Nutron is configured for a market that it supports and that you are logged in to this market. ii. If you want to save trading data files in XML and HTML format to a specific folder or set of folders, create the folder/set of folders using Windows Explorer. iii. Click Print/Transfer > Print > Financials or Print/Transfer > Print > Commodities to respectively display a Financials File Printing window like the one below or a Commodities File Printing window like the one that follows directly after the Financials File Printing window 33 iv. Use either of the screen shots above and the lettered notes keyed to it below to learn how to use the Financials File Printing / Commodities File Printing window. a. Click each trading data file category check box for which you would like to download a data file within this panel. b. Use the controls in this frame to specify the folder to which you would like to save your data file selection. c. Leave the Auto Save Off check box unchecked to make a Save As dialog box appear for each downloaded data file in your data file selection. You can use each Save As dialog box to specify alternative data file names to the default file names. d. Click the appropriate option button inside this frame to process your data file selection for the current business day, the previous business day or a prior business day on a date of your own choice. You can, however, only access trading record files for the current day unless the market is in a download only period. e. The Select All button is a toggle that lets you alternately select or deselect all the trading data file categories in the panel above it. f. The Close button lets you close either [Market Name] File Printing window. g. The Print button lets you print a hard copy of your data file selection. h. The Save button lets you save your data file selection to a folder that you have already specified. This button will save each data file as an HTML file and an XML file. i. As a rule, Download buttons let you retrieve data that is not immediately displayed. When you click these buttons, data files are downloaded so that you can save them to file or print them out. This Download button lets you download your data file selection so it can be printed out or saved to a folder. 34 2) Transfer menu item This Transfer menu item targets Nutron users who have benefited from a specific API development process. This API development process results in a custom Nutron data handling utility that writes Nutron data file dumps to a database or other storage format. From such a storage location, this data can be used, for instance, in customized risk management applications. You use the Transfer menu item to update data files in real time and dump them from memory into storage as follows: a) Click Print/Transfer > Transfer > Financials or Print/Transfer > Transfer > Commodities to display a message window like the one below. b) Click the Yes button of this window to close it and to display the window shown below. c) Click the Yes button of this window to export all Nutron data files for your custom Nutron data management utility to process. The About system menu Sections keyed to the About system menu screen shot below discuss each About menu item in turn. a) Help This Help menu item displays these Nutron online help files. 35 b) Default Shortcuts This Default Shortcuts menu item displays a Nutron Default Shortcut Keys window like the one below. As you can see from the screen shot, the Nutron Default Shortcut Keys window provides a reference list of shortcut keys for order processes described elsewhere. c) Upgrade FE This Upgrade FE menu item lets Nutron users who skipped the automatic Nutron update when Nutron launched manually update Nutron as follows: 1) Click About > Upgrade FE to display a SAFEX Upgrade Front End window like the one below. 36 2) Click a hyperlink like the one indicated by a mouse cursor inside the Nutron Upgrade Front End window to display a web page in your web browser. 3) Follow the instructions provided in the web page to manually update Nutron. d) Market To Close This Market To Close menu item displays a Nutron Market Count Down window like the one below. e) Downloads This Downloads menu item displays a window that contains a hyperlink that links to an Exchange web page with hyperlinks from which you can select mark-to-market data files to download as follows: 1) Click About > Downloads to display a Nutron FE Downloads window like the one shown below. 37 2) Click a hyperlink like the one indicated by a mouse cursor inside the Nutron FE Downloads window to display an Exchange web page represented by the web page section shown below in your web browser 3) Click on hyperlinks linked to data files you want to download within the Exchange web page to download these files. f) About Click on hyperlinks linked to data files you want to download within the Exchange web page to download these files. 38 39 System buttons and what they do Every Nutron Workspace window contains eight system buttons arranged as shown in the screen shot below. You can display a button‟s name by resting your mouse cursor on that button. Numbered sections below describe what each system button does. 1) The Login system button Click the Login button to log into one or more of the markets made available through nutron. 2) The Log Off system button Click the Log Off button to log off from one or more of the markets made available through Nutron. Logging off from a market closes all open trading windows, views and operations screens. After logging off, the Workspace window will remain open. The option to suspend/cancel all active orders that you loaded will still be available to the master dealer of your member organization from his/her front end. 3) The Change Password system button Click the Change Password button to change your market password for one of the markets Nutron supports. You change this password as follows: a) Click the Change Password button to display a window where you are expected to type in your current password once and your new password twice. Your new password needs to consist of at least eight characters and should be unique. At least one of the characters in your password must come from at least three of the four following categories: upper case letters, lower case letters, numerals and special characters. Your system support provider will advise you of additional password requirements. b) Click the OK button of the active window once you have typed in your new password for the second time to display a window confirming that you have updated your password successfully. c) Click the OK button of the active window to close it. 4) The Start Ticker system button The Start Ticker button displays all trades, bids and offers done on the market as they occur. You display this market data as follows: Ensure you are logged in to a market made available through Nutron as described in section toggle 1. above. This is necessary so that you can change the way in which market data is presented to you. a) You can choose to have market data scroll across an expanded portion of the Nutron Workspace window from right to left as shown in the screen shot below. The ticker will only 40 display information while you are subscribed to the trading window. I will refer to this market data display option from now on as Market Data Display Option A. When market data is displayed using Market Data Display Option A, you can right click inside the expanded Nutron Workspace window portion to display the context menu shown below. The first three context menu items in the screen shot let you choose to display each individual market data item on one, two or three lines respectively. The Deal Ticker context menu item displays one or more sub menu items that identify the currently active market/s. Click on such a sub menu item to display a Deal Ticker window that will display all your matched trades from when you open it until you close it again. You usually open a Deal Ticker window when you expect to be away from your workstation for a few minutes and want to know which of your trades were matched during that period. When you close and reopen a Deal Ticker window, all the matched trades data displayed in that window before you closed it will have disappeared. Alternatively, you may want to have market data appear in a list format inside a Market Ticker window as shown in the screen shot below. The Market Ticker window will only display information while you are subscribed to the trading window. I will refer to this market data display option from now on as Market Data Display Option B. When market data is displayed using Market Data Display Option B, you can right click within its market data display area to display the context menu shown in the screen shot below. 41 The Deal Ticker context menu item in the screen shot displays one or more sub menu items that identify the currently active market/s. Click on such a sub menu item to display a Deal Ticker window that will display all your matched trades from when you open it until you close it again. As noted above, you usually open a Deal Ticker window when you expect to be away from your workstation for a few minutes and want to know which of your trades were matched during that period. When you close and reopen a Deal Ticker window, all the matched trades data displayed in that window before you closed it will have disappeared. The Stay on Top context menu item lets you keep the Market Ticker window on top of or behind active windows. Clicking the Stay on Top context menu item when it has no check mark on its left makes the Market Ticker window stay on top of active windows. Clicking the Stay on Top pop-up menu item when it has a check mark on its left makes the Market Ticker window stay behind active windows. Click the Clear List context menu item to clear current market data from the Market Ticker window. b) Click the Market Ticker button to display market data. The data that appears will be displayed using Market Data Display Option A or Market Data Display Option B. c) If necessary, follow the steps provided below to switch to another market data display option. You get market data to display using Market Data Display Option A as follows: i. Click Config > User Config > Financials to display the User Configuration window. ii. Check the Use Market Tele Ticker check box inside the User Configuration window. iii. Click the User Configuration window's OK button to save your preference for Market Display Option A and close the User Configuration window. d) You get market data to display using Market Data Display Option B as follows: i. Click Config > User Config > Financials/Commodities to display the applicable User Configuration window. ii. Check the Use Market Ticker check box inside the User Configuration window. iii. Click the User Configuration window's OK button to save your preference for Market Display Option B and close the User Configuration window. iv. Click the Stop Ticker button to close the currently active market data display. Click the Market Ticker button to display market data using the display option that you chose. 5) The Cancel All Order system button Click the Cancel All Orders button to cancel all active orders (i.e. orders from which deals have not yet resulted) for your dealer code. 42 6) The Set User system button Click the Set User button to duplicate functionality available from the Select User menu item of the Config menu that lets you change default user configuration settings. 7) The Show Messages system button Displays/hides message windows once you have logged in to a market made available through Nutron. 8) The Stop Ticker system button Click the Stop Ticker button to close the Market Ticker window. Online trading from default menus and tabs As previously mentioned, you can carry out online trading using Nutron from customized menus and tabs and/or default menus and tabs. Default menus and tabs will appear in the same locations and use the same menu captions and tab button images within every Nutron instance. As customized menus and tabs can contain only elements derived from default menus and tabs, what follows will describe Nutron online trading from default menus and tabs exclusively. Online trading involving the Financials, Commodities and Global markets that Nutron supports take place from the default Fin Trading, Agris Trading and Global Market menus and their corresponding tabs within the Nutron Workspace window. Some online trading activities, such as real time bids, doubles and offers, take place within windows launched from default Fin Trading, Agris Trading and Global Market menu items and buttons on their corresponding tabs. I refer to all such windows as "primary online trading windows". Other trading activities, such as trading in options, deltas and spreads, take place within windows launched by right clicking and making menu item selections from context menus within primary online trading windows. I refer to all such windows as "secondary online trading windows". Separate help topics below describe online trading for each market that Nutron supports in turn. Online Financial market trading The table below contains online Financials market trading functionality delivered from each primary online trading window (as well as a window listing all the options and deltas that have been traded in the course of the current trading day) and the launch methods for each of these windows Functionality Launch Method An EDM Splits ([Member Code Dealer Code]) trading window facilitates online trading on split contracts (subject to availability) for Nutron trader users. In this window each instrument represents two different contracts with the same expiry date. You can launch an EDM Splits ([Member Code Dealer Code]) trading window by clicking Fin Trading > Split_Contracts, pressing Ctrl + A on your keyboard or clicking the tab button of the Fin tab. An Index_Futures ([Member Code Dealer Code]) You can launch an Index_Futures ([Member Code 43 Functionality Launch Method trading window facilitates online trading for Nutron Dealer Code]) trading window by clicking Fin Trading trader users. In this window each instrument > Index_Futures, pressing Ctrl + B on your keyboard represents a current tradable contract. or clicking the tab button of the Fin tab. An EDM Global Options ([Member Code Dealer Code]) window facilitates online trading for Nutron trader users. In this window the contracts provide a consolidated view of all current orders on screen. You can launch an EDM Global Options ([Member Code Dealer Code]) trading window by clicking Fin Trading > Global_Options, pressing Ctrl + Alt + C on your keyboard or clicking the tab button of the Fin tab. With two exceptions, primary online trading windows for the Financials market only let you trade in a single contract category type. The first of the windows that lets you trade in contract types you have chosen across your choice of contract categories is the EDM Central Options ([Member Code Dealer Code]) window. You can launch an EDM Central Options ([Member Code Dealer Code]) trading window by clicking Fin Trading > Central_Options, pressing Ctrl + D on your keyboard or clicking the tab button of the Fin tab. A Single_Stock_Futures A To M ([Member Code Dealer Code]) trading window facilitates online trading for Nutron trader users across single stock futures contract types with names that fall within the specified alphabetical range. You can launch a Single_Stock_Futures A TO M ([Member Code Dealer Code]) trading window by clicking Fin Trading > Single_Stock_Futures A To M, pressing Ctrl + E on your keyboard. A Single_Stock_Futures N To Z ([Member Code Dealer Code]) trading window facilitates online trading for Nutron trader users across single stock futures contract types with names that fall within the specified alphabetical range. You can launch a Single_Stock_Futures N TO Z ([Member Code Dealer Code]) trading window by clicking Fin Trading > Single_Stock_Futures N To Z, pressing Ctrl + F on your. A Top_40_Single_Stock_Futures A To M ([Member Code Dealer Code]) trading window facilitates online trading for Nutron trader users across 40 single stock futures contract types that the Exchange considers to be the most tradable with names that fall within the specified alphabetical range. Contract types within this window will not be duplicated within standard single stock futures contract type windows, but may also appear in top 100 single stock futures contract type windows. You can launch a Top_40_Single_Stock_ Futures A TO M ([Member Code Dealer Code]) trading window by clicking Fin Trading > Top_40_Single_Stock_Futures A To M, pressing Ctrl + G on your keyboard. A Top_40_Single_Stock_Futures N To Z ([Member Code Dealer Code]) trading window facilitates online trading for Nutron trader users across 40 single stock futures contract types that the Exchange considers to be the most tradable with names that fall within the specified alphabetical range. Contract types within this window will not be duplicated within standard single stock futures contract type windows, but may also appear in top 100 single stock futures contract type windows. You can launch a Top_40_Single_Stock_ Futures N TO Z ([Member Code Dealer Code]) trading window by clicking Fin Trading > Top_40_Single_Stock_Futures N To Z, pressing Ctrl + H on your keyboard. A Top_100_Single_Stock_Futures A To H ([Member Code Dealer Code]) trading window facilitates online trading for Nutron trader users across 100 single stock futures contract types that the Exchange considers to be the most tradable with names that fall within the specified alphabetical range. Contract types within this window will not be duplicated within standard single stock futures You can launch a Top_100_Single_ Stock_Futures A TO H ([Member Code Dealer Code]) trading window by clicking Fin Trading >Top_100_Single_Stock_Futures A To H, pressing Ctrl + I on your keyboard. You will also have to manually specify contract categories and contract types for the EDM Central Options ([Member Code Dealer Code]) trading window. 44 Functionality Launch Method contract type windows, but may also appear in top 40 single stock futures contract type windows. A Top_100_Single_Stock_Futures I To Q ([Member Code Dealer Code]) trading window facilitates online trading for Nutron trader users across 100 single stock futures contract types that the Exchange considers to be the most tradable with names that fall within the specified alphabetical range. Contract types within this window will not be duplicated within standard single stock futures contract type windows, but may also appear in top 40 single stock futures contract type windows. You can launch a Top_100_Single_ Stock_Futures I TO Q ([Member Code Dealer Code]) trading window by clicking Fin Trading > Top_100_Single_Stock_Futures I To Q, pressing Ctrl + J on your. A Top_100_Single_Stock_Futures R To Z ([Member Code Dealer Code]) trading window facilitates online trading for Nutron trader users across 100 single stock futures contract types that the Exchange considers to be the most tradable with names that fall within the specified alphabetical range. Contract types within this window will not be duplicated within standard single stock futures contract type windows, but may also appear in top 40 single stock futures contract type windows. You can launch a Top_100_Single_ Stock_Futures R TO Z ([Member Code Dealer Code]) trading window by clicking Fin Trading > Top_100_Single_Stock_Futures R To Z, pressing Ctrl + K on your keyboard. A Dividend_Futures_A To M ([Member Code Dealer Code]) trading window facilitates online trading for Nutron trader users across dividend futures contract types with names that fall within the specified alphabetical range. You can launch a Dividend_Futures A TO M ([Member Code Dealer Code]) trading window by clicking Fin Trading > Dividend_Futures A To M, pressing Ctrl + L on your keyboard. A Dividend_Futures_N To Z ([Member Code Dealer Code]) trading window facilitates online trading for Nutron trader users across dividend futures contract types with names that fall within the specified alphabetical range. You can launch a Dividend_Futures N TO Z ([Member Code Dealer Code]) trading window by clicking Fin Trading > Dividend_Futures N To Z, pressing Ctrl + M on your keyboard. A Cando ([Member Code Dealer Code]) trading You can launch a Cando ([Member Code Dealer window facilitates online trading for Nutron trader Code]) trading window by clicking Fin Trading > Cando, pressing Ctrl + N on your keyboard. users. A Hard_Commodities ([Member Code Dealer You can launch a Hard_Commodities ([Member Code]) trading window facilitates online trading in Code Dealer Code]) trading window by clicking Fin Trading > Hard_Commodities, pressing Ctrl + O on hard commodities for Nutron trader users. your keyboard. A Dividend_Neutral_Futures_A To M ([Member Code Dealer Code]) trading window facilitates online trading for Nutron trader users across dividend neutral futures contract types with names that fall within the specified alphabetical range. You can launch a Dividend_Neutrals_ Futures_A To M ([Member Code Dealer Code]) trading window by clicking Fin Trading > Dividend_Neutrals_Futures A To M, pressing Ctrl + P on your keyboard. A Dividend_Neutral_Futures_N To Z([Member Code Dealer Code]) trading window facilitates online trading for Nutron trader users across dividend neutral futures contract types with names that fall within the specified alphabetical range. You can launch a Dividend_Neutrals_ Futures N To Z ([Member Code Dealer Code]) trading window by clicking Fin Trading > Dividend_Neutrals_Futures N To Z, pressing Ctrl + Q on your keyboard. A Top_40_Dividend_Neutral_Futures A To M ([Member Code Dealer Code]) trading window facilitates online trading for Nutron trader users across 40 dividend neutral futures contracts that the Exchange considers to be the most tradable with names that fall within the specified alphabetical You can launch a Top_40_Dividend_ Neutral_Futures A To M ([Member Code Dealer Code]) trading window by clicking Fin Trading > Top_40_Dividend_ Neutral_Futures A To M, pressing Ctrl + R on your keyboard. 45 Functionality Launch Method range. Contract types within this window will not be duplicated within standard dividend neutral futures contract type windows, but may also appear in top 100 dividend neutral futures contract type windows. A Top_40_Dividend_Neutral_Futures N To Z ([Member Code Dealer Code]) trading window facilitates online trading for Nutron trader users across 40 dividend neutral futures contracts that the Exchange considers to be the most tradable with names that fall within the specified alphabetical range. Contract types within this window will not be duplicated within standard dividend neutral futures contract type windows, but may also appear in top 100 dividend neutral futures contract type windows. You can launch a Top_40_Dividend_Neutral_ Futures N To Z ([Member Code Dealer Code]) trading window by clicking Fin Trading > Top_40_Dividend_Neutral_Futures N To Z, pressing Ctrl + S on your keyboard. A Top_100_Dividend_Neutral_Futures A To H ([Member Code Dealer Code]) trading window facilitates online trading for Nutron trader users across 100 dividend neutral futures contracts that the Exchange considers to be the most tradable with names that fall within the specified alphabetical range. Contract types within this window will not be duplicated within standard dividend neutral futures contract type windows, but may also appear in top 40 dividend neutral futures contract type windows. You can launch a Top_100_Dividend_ Neutral_Futures A To H ([Member Code Dealer Code]) trading window by clicking Fin Trading > Top_100_Dividend_Neutral_Futures A To H, pressing Ctrl + T on your keyboard. A Top_100_Dividend_Neutral_Futures I To Q ([Member Code Dealer Code]) trading window facilitates online trading for Nutron trader users across 100 dividend neutral futures contracts that the Exchange considers to be the most tradable with names that fall within the specified alphabetical range. Contract types within this window will not be duplicated within standard dividend neutral futures contract type windows, but may also appear in top 40 dividend neutral futures contract type windows. You can launch a Top_100_Dividend_ Neutral_Futures I To Q ([Member Code Dealer Code]) trading window by clicking Fin Trading > Top_100_Dividend_Neutral_Futures I To Q, pressing Ctrl + U on your keyboard. A Top_100_Dividend_Neutral_Futures R To Z ([Member Code Dealer Code]) trading window facilitates online trading for Nutron trader users across 100 dividend neutral futures contracts that the Exchange considers to be the most tradable with names that fall within the specified alphabetical range. Contract types within this window will not be duplicated within standard dividend neutral futures contract type windows, but may also appear in top 40 dividend neutral futures contract type windows. You can launch a Top_100_Dividend_ Neutral_Futures R To Z ([Member Code Dealer Code]) trading window by clicking Fin Trading > Top_100_Dividend_Neutral_Futures R To Z, pressing Ctrl + Alt + V on your keyboard. An SAVI_Contracts ([Member Code Dealer You can launch an SAVI_Contracts ([Member Code Code]) window can potentially facilitate online Dealer Code]) trading window by clicking Fin Trading > SAVI_Contracts, pressing Ctrl + W on your trading for Nutron trader users. keyboard. A Variance_Futures ([Member Code Dealer You can launch a Variance_Futures ([Member Code Code]) trading window facilitates online trading for Dealer Code]) trading window by clicking Fin Trading > Variance_Futures, pressing Ctrl + Alt + X on your Nutron trader users. keyboard An African_Derivatives ([Member Code Dealer You can launch an African_Derivatives ([Member Code]) trading window facilitates online trading for Code Dealer Code]) trading window by clicking Fin Trading > African_Derivatives, pressing Ctrl + Y on Nutron trader users. your keyboard. 46 Functionality Launch Method An African_Derivatives_Dividends ([Member You can launch an African_Derivatives_Dividends Code Dealer Code]) trading window facilitates ([Member Code Dealer Code]) trading window by clicking Fin Trading > African_Derivatives_ online trading for Nutron trader users. Dividends, pressing Ctrl + Z on your keyboard. An IDX_Futures ([Member Code Dealer Code]) You can launch an IDX_Futures ([Member Code trading window facilitates online trading for Nutron Dealer Code]) trading window by clicking Fin Trading > IDX_Futures, pressing Ctrl + [ on your keyboard. trader users. With two exceptions, primary online trading windows for the Financials market only let you trade in a single contract category type. The second of the windows that lets you trade in contract types you have chosen across your choice of contract categories is the Asset_Class_ Futures ([Member Code Dealer Code]) trading window. You can launch an Asset_Class_Futures ([Member Code Dealer Code]) trading window by clicking Fin Trading > Asset_Class_Futures, pressing Ctrl + ] on your keyboard. An EDM Options Stats ([Member Code Dealer Code]) window lists all the options and deltas that have been traded in the course of the current trading day. You can launch an EDM Options Stats ([Member Code Dealer Code]) trading window by clicking Fin Trading > Option_Stats or clicking the tab button of the Fin tab. You will also have to manually specify contract categories and contract types for the Asset_Class_Future ([Member Code Dealer Code]) trading window. The next help topic provides all the information required to carry out Financials market trading in a primary online trading window. Financials market trading in a primary online trading window When carrying out Financials market trading from the EDM Central Options ([Member Code Dealer Code]) or the Asset_Class_Futures ([Member Code Dealer Code]) primary online trading window, you first need to specify contract categories and contract types within these categories that you want to trade. The first section toggle below, therefore, describes how to do this. You should be familiar with the data grid cells found in typical primary online trading windows and the full range of context menu items available for all such windows before trading in them. The second and third section toggles below, therefore, respectively discuss these key primary online trading window elements. Primary online trading window processes entail adding bids, doubles and offers as respectively described in the fourth, fifth and sixth section toggles below. Specifying contract categories and contract types to trade in Specifying contract categories and contract types to trade in involves the following steps: 1) Click Fin Trading > Central_Options, press Ctrl + D on your keyboard or click the display a Select Contracts To Trade window. tab button to 2) Click on the Select Contracts To Trade window Asset Class dropdown control to display the contract categories available for selection as shown in the Select Contracts To Trade window section below. 47 3) Select a contract category within the Asset Class dropdown control by clicking on it. For illustrative purposes, let us assume that you have clicked on the CanDo contract category. 4) The instrument name of each contract type within the CanDo contract category will appear within the Available column on the left of the Select Contracts To Trade window. 5) Select a contract type in which you want to trade by clicking on it. Transfer the selected contract type to the To Trade column by clicking on the Add button between the Available and the To Trade columns. In the Select Contracts To Trade screen shot below, the Nutron user has selected nine contract types from the CanDo contract category in which to trade. 6) Optionally, select other contract categories and contact types within these categories by repeating steps 3. to 5. above with appropriate changes. 48 7) Save your choice of contract categories and contract types, close the Select Contracts to Trade window and display an EDM Central Options ([Member Code Dealer Code]) primary online trading window by clicking on the Select Contracts to Trade window's OK button. Data grid cells in a typical Financials market primary online trading window The EDM Central Options ([Member Code Dealer Code]) primary online trading window is a typical online trading window in which data grid cells predominate. You can see this in the EDM Central Options ([Member Code Dealer Code]) window sections screen shots below. EDM Central Options ([Member Code Dealer Code]) window sections that would be next to each other in Nutron itself, however, have been placed one above the other to use the available on-screen space optimally. Circled letters in the screen shots are linked to lettered notes below the screen shots that describe the contents of each data grid field. a. This Instrument field contains a descriptive instrument code supplied by the Exchange. We can break down the instrument codes on view in the first screen shot as follows: i. The first part of the code consists of the first three letters of a month name followed by the last two digits of a year. The month and year in the first part of the code represent an expiry date for trading on the corresponding contract. ii. The second part of the code consists of a space followed by four letters of the alphabet that uniquely identify each contract type. iii. As EDM Central Options ([Member Code Dealer Code]) windows contain instruments that are options or delta options, the instrument codes of these instruments contain additional elements discussed here and in points iv. and v. below. The third part of the code holds the strike value of its respective option or delta option. iv. The fourth part of the code consists of a space followed by a capital letter C for a Call or a capital letter P for a Put. v. The fifth part of the code serves to identify delta options and consists of a space followed by the word Delta. b. This QtyB field displays the current quantity of each corresponding contract available for the best quoted bid price. Click within this field to display the window described in the Bid adding processes section toggle below from which you can add a bid as an agent. c. This Bid field displays the current best price on the buying side for each corresponding contract. Click within this field to display the window described in the Bid adding processes section toggle below from which you can add a bid as a principal. d. Click within this / field to display the window described in the Double adding processes section toggle below from which you can add a double. e. This Offer field displays the current best price on the offering side for each corresponding contract. Click within this field to display the window described in the Offer adding processes section toggle below from which you can add an offer as a principal. 49 f. This QtyO field displays the current quantity of each corresponding contract available for the best quoted offer price. Click within this field to display the window described in the Offer adding processes section toggle below from which you can add an offer as an agent. g. This Change field displays the change between the last traded price and the opening price for the current trading day. The text displayed in this field will be blue (if the change is positive), black (if the change is zero), or red (if the change is negative). h. This Last field displays the last traded price for each corresponding contract for the current trading day. If the contract has not traded, the previous trading day's closing price will be displayed in this field. The text displayed in this field will turn red as soon as a trade has been made. i. This Time field displays the most recent time at which each corresponding contract was traded on the current trading day. If no trade has taken place, this field will display zero values. j. This High field indicates the highest trading price for each corresponding contract for the current trading day. If there was no trade on the contract, this field will display zero values. k. This Low field indicates the lowest trading price for each corresponding contract for the current trading day. If there was no trade on the contract, this field will display zero values. l. This Volume field displays the number of contracts of each corresponding contract traded during the current trading day. m. This MidPrice field displays the mid price of each corresponding contract. n. The OpenInt field displays the current open interest on each corresponding contract. Context menus within typical Financials market primary online trading windows Context menus within Financials market primary online trading windows, which you display by right clicking within their parent windows, offer different functional features depending on the contract types these windows hold. The context menu in the screen shot below, however, includes all the functional features available from Financials market primary online trading window context menus. This means you can learn all you need about Financials market primary online trading window context menu functional features from the sample context menu below. Circled letters in the context menu screen shot are linked to lettered notes below the screen shot that describe each functional feature in turn. 50 a) This Depth context menu item opens a depth window for the currently selected contract. The depth window displays all active orders on the market for the contract. b) This Options context menu opens a secondary online options trading window for the currently selected contract provided the instrument for that contract was set up on the back end to allow options. In the secondary online options trading window, you can place bids, doubles or offers on the option for the contract at various strike prices. c) This Deltas context menu item opens a secondary online deltas trading window for the currently selected contract provided the instrument for that contract was set up on the back end to allow deltas. In the secondary online deltas trading window, you can place bids, doubles or offers on the option and its underlying future for the selected contract at various strike prices. d) This Spreads context menu item opens a spreads trading window for the currently selected contract if instrument records of the same type as the currently selected contract with different expiry dates exist. e) This Days History context menu item displays an [Instrument] window like the one shown below. [Instrument] windows, like the one shown in the screen shot immediately above, represent the times, prices and volumes at which the currently selected contract has traded during the current trading day. f) This Contract data context menu item lets you see data set up by the Exchange for the currently selected contract inside a Contract Data window like the one shown below. Use the circled numbers in the Contract Data window screen shot below and the numbered notes that follow after it to learn about the contract data such windows display. 51 g) This Set DDE-Copy On context menu item activates an aspect of DDE (Dynamic Data Exchange) functionality within Nutron that lets users copy their choice of fields from the currently open primary online trading window into an alternative interface like a Microsoft Excel worksheet. Values within fields copied in this way will update in real time within the new interface. Another DDE aspect within Nutron lets you use a DDE Trader window and your familiarity with Excel spreadsheets to set up trading information you can use to participate in the Nutron online trading environment without working within a primary online trading window. h) This Freshen data context menu item forces a refresh of data contained within the primary online open trading window. i) This Configure context menu item displays the window shown below. This window lets you hide/show data grid lines and change the font type and size used within the currently open primary online trading window. Once you have made the changes you require, confirm them and close the Configure Grid window by clicking on its OK button. j) This Sort context menu item displays various sub menu items. The precise sub menu items displayed varies from one primary online trading window to the next. Click on one of these sub menu 52 items to sort contract record rows within the currently open online trading window a By Contract Name and Date sub-menu item, a By Contract Date sub-menu item and a By Contract Name submenu item. These sub-menu items let you sort record rows within the Index_Futures ([Member Code Dealer Code]) trading window data grid according to the criteria that give each sub-menu item its name. This Low field indicates the lowest trading price for each corresponding contract for the current trading day. If there was no trade on the contract, this field will display zero values. k) This Stay on Top context menu item lets you keep the currently open primary online trading window on top of or behind active windows. You can ensure that the currently open primary online trading window stays on top of active windows by clicking on it when it has no check mark on its left. Conversely, you can ensure that the currently open primary online trading window remains behind active windows by clicking on it when it does have a check mark on its left. l) This Add/Delete Contracts context menu item lets you alter the currently open primary online trading window display by deleting the currently selected contract from it, restoring a previously deleted contract to it or adding/deleting an entire contract class from it as follows: i. Click on the Add/Delete Contracts context menu item to display the window shown below. ii. Learn what deleting the currently selected contract from the Add/Delete Contracts window involves in point iii. below. Learn what restoring previously deleted dated contract from the Add/Delete Contracts window involves in point iv. below. Learn what adding/deleting an entire contract class from the Add/Delete Contracts window involves in point v. below. iii. If the Delete specific dated contract option button is not checked, click on it to check it. Next click on the Add/Delete Contracts window's OK button to close its parent window and display an Information window like the one below. Confirm the deletion of the currently selected contract and close the Information window by clicking on its OK button. iv. If the Restore deleted dated contracts option button is not checked, click on it to check it. Next click on the Add/Delete Contracts window's OK button to close its parent window and display an Information window like the one below. 53 Confirm the restoration of the previously deleted dated contracts and close the Information window by clicking on its OK button. v. If the Add/Delete Class of contract option button is not checked, click on it to check it. Next click on the Add/Delete Contracts window's OK button to close its parent window and display a new Add/Delete Contracts window like the one below. Select the contract class you want to add or delete from the Add/Delete Contracts window Contracts dropdown control. Next, click on either the Plus or the Minus button on the right of the Contracts control depending on whether you want to add a contract class to or delete a contract class from its parent primary online trading window. Finally, click on the Add/Delete Contracts window's OK button to confirm the addition or deletion of the contract class that you specified and to close the window. Bid adding processes You add a Financials market bid as follows: 1) Choose a contract for which you want to add a bid by clicking inside its cell within the leftmost column of the applicable primary online trading window. 2) Display a Buy for [Instrument] window within which you will add a bid in an agent capacity by clicking within the QtyB column or pressing Shift + F5 on your keyboard. Alternatively, display a Buy for [Instrument] window within which you will add a bid in a principal capacity by clicking within the Bid column or pressing F2 on your keyboard. 3) Configure your bid within the Buy for [Instrument] window as you require. Circled letters in the Buy for [Instrument] window below are keyed to Buy for [Instrument] window controls. Lettered notes beneath the screen shot describe the bid configuration options available from each control. 54 a. This Qty control shows the default number of contracts you undertake to buy whenever you add a Financials market bid. If you wish, you can increase the value in the Qty control to the maximum order quantity set up for you. b. This Ref No control contains an incremented value derived from a reference number seed value you accepted or set up earlier in the trading session. This unique value is used by the Nutron back end to identify the bid. You can type your own value into this control if you wish to do so. c) This Price control contains the price per contract for the instrument for which you are adding a bid. You can change this price if you want to bid at a different per contract price. If you launched the bid from an EDM Splits ([Member Code Dealer Code]) trading window, this control will have a Split Diff caption and hold the difference in value between the two contracts in the split instead of a price value. You can also change this value d) This labelled control to the right of the Prin button contains the member code of your organization, client codes for your member organization and any sub accounts you set up for yourself. If you chose to have all your trades locked to the same sub account and dealer, this labelled control will be disabled and all your offers will always use the same sub account. Display a Pick Principal window that includes the full names of your clients as well as the client codes displayed in the labelled control by clicking the Prin button on the left of the control. Double click within the row of a client you want selected within the labelled control to close the Pick Principal window and update the value held within the labelled control e) This Capacity control shows whether the bid will be a principal – P or agent – A trade. You can also use the control to change the bid from a principal trade to an agent trade or vice versa. f) This Dealer control contains dealer codes for all the dealers in your member organization. If you chose to have all your trades locked to the same sub account and dealer, this control will be disabled and all your bids will always use the default dealer code. g) Within this set of option buttons, clicking the FOK option button gives your bid Fill or Kill status, clicking the TOK option button gives your bid Take or Kill status and clicking the NOR option button gives your bid Normal status. 55 h) This tick box indicates the order is of type Iceberg, an Iceberg is an order to buy or sell a large amount of a security in smaller quantities. i) This field indicates the number of contracts in total if the order is of type Iceberg j) The Hold Over Order tick box is used to hold over the bid to the selected date. k) The Hold Over Date field is used to specify till when the buy order needs to be held over. 4) When you have configured the bid to your satisfaction, save your configurations, launch the bid and close the Buy for [Instrument] window by clicking its OK button. Double adding processes You add a Financials market double as follows: 1) Choose a contract for which you want to add a double by clicking inside its cell within the leftmost column of the applicable primary online trading window. 2) If you click within a cell of the / column of the applicable primary online trading window, a Double for [Instrument] window configured for either adding a double in a principal capacity or adding a double in an agent capacity will appear. The capacity for which the window is configured will depend on user settings specified as described elsewhere. If neither an agent capacity nor a principal capacity has been specified through user settings, you can do the following: a. Display a Double for [Instrument] window within which you will add a double in an agent capacity by pressing Ctrl + F3 on your keyboard. b. Display a Buy for [Instrument] window within which you will add a double in a principal capacity by pressing Ctrl + F2 on your keyboard. 3) Configure your double within the Double for [Instrument] window as you require. Circled letters in the Double for [Instrument] window below are keyed to Double for [Instrument] window controls. Lettered notes beneath the screen shot describe the double configuration options available from each control. 56 a. This Qty control shows the default number of contracts you undertake to bid for and offer whenever you add a Financials market double. If you wish, you can increase the value in the Qty control to the maximum order quantity set up for you. b. A Price control appears both within the Bid frame and the Offer frame. Within the Bid frame, it contains the price per contract on the bid side of the double you are adding. Within the Offer frame, it contains the price per contract on the offer side of the double you are adding. You can change the price per contract value contained within each Price control. If you launched the double from an EDM Splits ([Member Code Dealer Code]) trading window, each control would have a Split Diff caption and hold the difference in value between the two contracts in the split instead of a price value. You could still change the values held in each control. c. A Capacity control appears both within the Bid frame and the Offer frame. Within the Bid frame, it indicates whether the bid side of the double will be a principal – P or agent – A trade. Within the Offer frame, it indicates whether the offer side of the double will be a principal – P or agent – A trade. You can use the two Capacity controls to change the bid side of the double, the offer side of the double, or both sides of the double from a principal trade to an agent trade or vice versa. d. An Order/Ref control appears both within the Bid frame and the Offer frame. Both controls will initially contain identical incremented values derived from a reference number seed value you accepted or set up earlier in the trading session. This unique value is used by the Nutron back end to identify the bid and offer sides of the double. You can type your own values into these controls if you want to do so. e. The control immediately to the right of the Prin button contains the member code of your organization, client codes for your member organization and any sub accounts you set up for yourself. If you chose to have all your trades locked to the same sub account and dealer, this control will be disabled and all your bids will always use the same sub account. Click the Prin button to display a Pick Principal window that includes the full names of your clients as well as the client codes displayed in the control. Double click within the row of a client you want selected within the control to close the Pick Principal window and update the value held within the control. 57 f. This Dealer control contains dealer codes for all the dealers in your member organization. If you chose to have all your trades locked to the same sub account and dealer, this control will be disabled and all your doubles will always use the default dealer code. 4) When you have configured the double to your satisfaction, save your configurations, launch the double and close the Buy for [Instrument] window by clicking its OK button. Offer adding processes You add a Financials market offer as follows 1) Choose a contract for which you want to add an offer by clicking inside its cell within the leftmost column of the applicable primary online trading window. 2) Display an Offer for [Instrument] window within which you will add an offer in an agent capacity by clicking within the QtyO column or pressing Ctrl + F5 on your keyboard. Alternatively, display an Offer for [Instrument] window within which you will add an offer in a principal capacity by clicking within the Offer column or pressing F3 on your keyboard. 3) Configure your offer within the Offer for [Instrument] window as you require. Circled letters in the Offer for [Instrument] window below are keyed to Offer for [Instrument] window controls. Lettered notes beneath the screen shot describe the offer configuration options available from each control. a. This Qty control shows the default number of contracts you undertake to offer whenever you add a Financials market offer. If you wish, you can increase the value in the Qty control to the maximum order quantity set up for you. b. This Ref No control contains an incremented value derived from a reference number seed value you accepted or set up earlier in the trading session. This unique value is used by the Nutron back end to identify the bid. You can type your own value into this control if you wish to do so. c. This Price control contains the price per contract for the instrument for which you are adding an offer. You can change this price if you want to offer at a different per contract price. 58 If you launched the offer from an EDM Splits ([Member Code Dealer Code]) trading window, this control will have a Split Diff caption and hold the difference in value between the two contracts in the split instead of a price value. You can also change this value. d. This labelled control to the right of the Prin button contains the member code of your organization, client codes for your member organization and any sub accounts you set up for yourself. If you chose to have all your trades locked to the same sub account and dealer, this labelled control will be disabled and all your offers will always use the same sub account. Display a Pick Principal window that includes the full names of your clients as well as the client codes displayed in the labelled control by clicking the Prin button on the left of the control. Double click within the row of a client you want selected within the labelled control to close the Pick Principal window and update the value held within the labelled control. e. This Capacity control shows whether the offer will be a principal – P or agent – A trade. You can also use the control to change the offer from a principal trade to an agent trade or vice versa. f. This Dealer control contains dealer codes for all the dealers in your member organization. If you chose to have all your trades locked to the same sub account and dealer, this control will be disabled and all your offers will always use the default dealer code. g. Within this set of option buttons, clicking the FOK option button gives your offer Fill or Kill status, clicking the TOK option button gives your offer Take or Kill status and clicking the NOR option button gives your offer Normal status. h. The Hold Over Order tick box is used to hold over the bid to the selected date. i. The Hold Over Date field is used to specify till when the buy order needs to be held over. 4) When you have configured the offer to your satisfaction, save your configurations, launch the offer and close the Offer for [Instrument] window by clicking its OK button. Financials market trading in a secondary online trading window A Financials market secondary online trading window is a window that is launched by clicking on a menu item within a context menu launched within a primary online trading window. Section toggles below describe each secondary online trading window type and the trading processes associated with it. Options for [Instrument] windows An Options for [Instrument] secondary online trading window lets you set up bids, doubles and offers on options. Launching Options for [Instrument] window involves the following steps: 1) Select a Financials market primary online trading window from which you can generate a context menu that includes an Options menu item. 59 2) If you expect to add a new strike in the course of ensuing trading processes, right click on the data grid cell of the contract with which you want to trade within the primary online trading window and click the Contract Data menu item of the context menu that appears to display a Contract Data window. You can obtain valid strike intervals for the currently selected contract from within this window. 3) Right click on the data grid cell of the contract with which you want to trade within the primary online trading window and click the Options menu item of the context menu that appears to display Options for [Instrument] window. The Options for [Instrument] window sections screen shots below depict window sections that would be next to each other in Nutron itself. These window sections have, however, been placed one above the other to use the available on-screen space optimally. Circled letters in the screen shots are linked to lettered notes below the screen shots that describe key elements within each Option for [Instrument] window section. a. This upper Options for [Instrument] data grid duplicates the record row of the contract you selected to trade as an option from within a primary online trading window with the difference that the Last column has been replaced with a MidPrice column. This is because the mid price is used to determine the price used in volatility calculations. b. Bids, doubles and offers in this window section apply to call options for the selected contract. The upper data grid can still be used to submit bids, doubles and offers on the underlying future contract. c. Bids, doubles and offers in this window section apply to put options for the selected contract. The upper data grid can still be used to submit bids, doubles and offers on the underlying future contract. d. This call option Volume field and put option Volume. field respectively display the number of call options and put options traded during the current trading day for the selected contract. e. This call option Last field and put option Last. field respectively display the last traded price of a call option and a put option during the current trading day for the selected contract. f. This call option QtyB field and put option QtyB. field respectively display the current quantity of a call option and a put option for the selected contract available for the best quoted bid price. Click on one of these fields to display a window from which you can add a bid as an agent. g. This call option Bid field and put option Bid. field respectively display the current best price for a call option and a put option on the buying side. Click on one of these fields to display a window from which you can add a bid as a principal. h. This call option / field and put option \ field display a window from which you can respectively add a double of a call option and a double of a put option for the selected contract. 60 i. This call option Offer field and put option Offer. field respectively display the current best price for a call option and a put option on the offering side. Click on one of these fields to display a window from which you can add an offer as a principal. j. This call option QtyO field and put option QtyO. field respectively display the current quantity of a call option and a put option for the selected contract available for the best quoted offer price. Click on one of these fields to display a window from which you can add an offer as an agent. k. This call option OpenInt field and put option OpenInt. field respectively display the current open interest for their respective options for the selected contract. l. This Strike field displays the strike price of the selected contract. m. This MidPrice field mirrors the mid price value of the corresponding upper data grid field. Right clicking within the upper data grid inside an Options for [Instrument] window displays the context menu shown in the screen shot below. Display a depth window for the selected contract by clicking on the Depth menu item in the context menu screen shot shown directly above. The depth window will display all active orders on the market for the contract. Force data displayed within the upper data grid to be refreshed by clicking on the Refresh menu item in the context menu screen shot above. The context menu shown in the screen shot below appears when you right click in the lower data grid inside an Options for [Instrument] window. Lettered letters in the context menu screen shot directly above are linked to lettered notes below that describe what each context menu item does. a) Click on this Depth context menu item to display a depth window for the currently selected contract. The depth window will display all active orders on the market for the contract. b) Click on this Set DDE-Copy On context menu item to activate an aspect of DDE functionality within the Nutron front end that lets users copy their choice of fields from the currently open window into an alternative interface like a Microsoft Excel worksheet. Values within fields copied in this way will update in real time within the new interface. 61 Another aspect of DDE presented within the Nutron front end lets you use a DDE Trader window and your familiarity with Excel spread sheets to set up trading information you can use to participate in the Nutron online trading environment without working within a Nutron trading window. c) Click on this Freshen data context menu item to force data displayed within the lower data grid to refresh itself. d) Click on this Configure context menu item to display the window shown below. This window lets you hide/show data grid lines and change the font type and size used within the Options for [Instrument] window. e) This Stay on Top context menu item lets you keep the currently open secondary online trading window on top of or behind active windows. You can ensure that the currently open secondary online trading window stays on top of active windows by clicking on it when it has no check mark on its left. Conversely, you can ensure that the currently open secondary online trading window remains behind active windows by clicking on it when it does have a check mark on its left. Options for [Instrument] window trading processes entail adding bids, doubles and offers as described in separate sections below. Bid adding processes Adding a bid from an Options for [Instrument] window involves the following steps: 1) Launch the Options for [Instrument] window. 2) Click inside a QtyB cell or a Bid cell on the left of the lower data grid to place a bid on a call option. Choose a QtyB cell or a Bid cell on the right of the lower data grid to place a bid on a put option. 3) Click inside a QtyB cell to display a Buy for [InstrumentStrikeValue C/P] - Option window with an agent capacity. Click inside a Bid cell to display a Buy for [InstrumentStrikeValue C/P] - Option window with a principal capacity. 4) Configure your bid within the Buy for [InstrumentStrikeValue C/P] - Option window as you require. Circled letters in the Buy for [InstrumentStrikeValue C/P] - Option window screen shot below are linked to lettered notes below the screen shot you can use to explore your bid configuration options. 62 a. This Buy for [InstrumentStrikeValue C/P] - Option caption contains a C to indicate that this bid is for a call option. A P within the caption would indicate that the bid was for a put option. b. This Strike control contains the strike price of the selected contract. You can add a new strike price and the skew file will be used to determine the new volatility for that strike price when you save that price by launching your bid. c. This Ref No control contains an incremented value derived from a reference number seed value you accepted or set up earlier in the trading session. This unique value is used by the Nutron back end to identify the bid. You can type your own value into this control if you wish to do so. d. This Qty control contains the default number of contracts you undertake to buy whenever you add a bid. If you wish, you can increase the value in the Qty spin box to the maximum order quantity set up for you. e. This labelled control to the right of the Prin button contains the member code of your organization, client codes for your member organization and any sub accounts you set up for yourself. If you chose to have all your trades locked to the same sub account and dealer, this labelled control will be disabled and all your bids will always use the same sub account. Display a Pick Principal window that includes the full names of your clients as well as the client codes displayed in the labelled control by clicking the Prin button on the left of the control. Double click within the row of a client you want selected within the labelled control to close the Pick Principal window and update the value held within the labelled. f. This Volat control contains a volatility value for your bids. g. This Dealer control contains dealer codes for all the dealers in your member organization. If you chose to have all your trades locked to the same sub account and dealer, this control will be disabled and all your bids will always use the default dealer code. h. This Premium control contains a premium value for your bids. i. This Capacity control shows whether the bid will be a principal – P or agent – A trade. You can also use the control to change the bid from a principal trade to an agent trade or vice versa. 63 j. Within this set of option buttons, clicking the FOK option button gives your bid Fill or Kill status, clicking the TOK option button gives your bid Take or Kill status and clicking the NOR option button gives your bid Normal status. 5) When you have configured the bid to your satisfaction, launch the bid and close the Buy for [Instrument] window by clicking its OK button. Double adding processes Adding a double from an Options for [Instrument] window involves the following steps: 1) Launch the Options for [Instrument] window. 2) Click inside a / cell on the left of the lower data grid to add a double on a call option. Click inside a \ cell on the right of the lower data grid to add a double on a put option. 3) Click inside a / cell to display a Double for [InstrumentStrikeValue C/P] - Option window. The window that appears will be configured for either a principal capacity or an agent capacity depending on how your user settings are set up for the Financials market. 4) Configure your double within the Double for [InstrumentStrikeValue C/P] - Option window as you require. Circled letters in the Double for [InstrumentStrikeValue C/P] - Option window screen shot below are linked to lettered notes below the screen shot you can use to explore your double configuration options. a. This Double for [InstrumentStrikeValue C/P] - Option caption contains a C to indicate that this double is for a call option. A P within the caption would indicate that the double was for a put option. b. This Qty control contains the default number of contracts you undertake to bid for and offer whenever you add a double. If you wish, you can increase the value in the Qty control to the maximum order quantity set up for you. 64 c. This Strike control contains the strike price of the selected contract. You can add a new strike price and the skew file will be used to determine the new volatility for that strike price when you save that price by launching your bid. d. A Volat control appears both within the Bid frame and the Offer frame. Within the Bid frame, it contains a volatility value for the bid element of the double. Within the Offer frame it contains a volatility value for the offer element of the double. e. A Premium control appears both within the Bid frame and the Offer frame. Within the Bid frame, it contains a premium value for the bid element of the double. Within the Offer frame, it contains a premium value for the offer element of the double. f. A Capacity control appears both within the Bid frame and the Offer frame. Within the Bid frame, it indicates whether the bid side of the double will be a principal – P or agent – A trade. Within the Offer frame, it indicates whether the offer side of the double will be a principal – P or agent – A trade. You can use the two Capacity controls to change the bid side of the double, the offer side of the double, or both sides of the double from a principal trade to an agent trade or vice versa. g. This Order/Ref control appears both within the Bid frame and the Offer frame. Both controls will initially contain identical incremented values derived from a reference number seed value you accepted or set up earlier in the trading session. This unique value is used by the Nutron back end to identify the bid and offer sides of the double. You can type your own value into this control if you wish to do so. h. The labelled control immediately to the right of the Prin button contains the member code of your organization, client codes for your member organization and any sub accounts you set up for yourself. If you chose to have all your trades locked to the same sub account and dealer, this control will be disabled and all your bids will always use the same sub account. Click the Prin button to display a Pick Principal window that includes the full names of your clients as well as the client codes displayed in the control itself. Double click on the row of a client you want to select within the labelled control to update the labelled control and close the Pick Principal window. i. This Dealer control contains dealer codes for all the dealers in your member organization. If you chose to have all your trades locked to the same sub account and dealer, this control will be disabled and all your bids will always use the default dealer code. 5) Launch the double and close the Double for [InstrumentStrikeValue C/P] - Option window by clicking its OK button. Offer adding processes Adding an offer from an Options for [Instrument] window involves the following steps: 1) Launch the Options for [Instrument] window. 65 2) Click inside an Offer cell or a QtyO cell on the left of the lower data grid to add an offer on a call option. Click inside an Offer. cell or a QtyO. cell on the right of the lower data grid to add an offer on a put option. 3) Click inside an Offer cell to display an Offer for [InstrumentStrikeValue C/P] - Option window with a principal capacity. Click inside a QtyO cell to display an Offer for [InstrumentStrikeValue C/P] Option window with an agent capacity. 4) Configure your offer within the Offer for [InstrumentStrikeValue C/P] - Option window as you require. Circled letters in the Offer for [InstrumentStrikeValue C/P] - Option window screen shot below are linked to lettered notes below the screen shot you can use to explore your offer configuration options. a. This Offer for [InstrumentStrikeValue C/P] - Option caption contains a C to indicate that this offer is for a call option. A P within the caption would indicate that the offer was for a put option, b. This Strike control contains the strike price of the selected contract. You can add a new strike price and the skew file will be used to determine the new volatility for that strike price when you save that price by launching your bid. c. This Ref No control contains an incremented value derived from a reference number seed value you accepted or set up earlier in the trading session. This unique value is used by the Nutron back end to identify the offer. You can type your own value into this control if you wish to do so. d. This Qty control contains the default number of contracts you undertake to sell whenever you add a bid. If you wish, you can increase the value in the Qty control to the maximum order quantity set up for you. e. This labelled control to the right of the Prin button contains the member code of your organization, client codes for your member organization and any sub accounts you set up for yourself. If you chose to have all your trades locked to the same sub account and dealer, this labelled control will be disabled and all your offers will always use the same sub account. Display a Pick Principal window that includes the full names of your clients as well as the client codes displayed in the labelled control by clicking the Prin button on the left of the control. Double click within the row of a client you want selected within the labelled control to close the Pick Principal window and update the value held within the labelled control. 66 f. This Volat control contains a volatility value for your offers. g. This Dealer control contains dealer codes for all the dealers in your member organization. If you chose to have all your trades locked to the same sub account and dealer, this control will be disabled and all your offers will always use the default dealer code. h. This Premium control contains a premium value for your offers. i. This Capacity control shows whether the offer will be a principal – P or agent – A trade. You can also use the control to change the offer from a principal trade to an agent trade or vice versa. j. Within this set of option buttons, clicking the FOK option button gives your offer Fill or Kill status, clicking the TOK option button gives your offer Take or Kill status and clicking the NOR option button gives your offer Normal status. 5) When you have configured the offer to your satisfaction, launch the offer and close the Offer for [InstrumentStrikeValue C/P] - Option window by clicking its OK button. Deltas for [Instrument] windows A Deltas for [Instrument] secondary online trading window lets you set up bids, doubles and offers on deltas. Launching a Delta for [Instrument] window involves the following steps: 1) Select a Financials market primary online trading window from which you can generate a context menu that includes a Deltas menu item. 2) If you expect to add a new strike in the course of ensuing trading processes, right click on the data grid cell of the contract with which you want to trade within the primary online trading window and click the Contract Data menu item of the context menu that appears to display a Contract Data window. You can obtain valid strike intervals for the currently selected contract from within this window. 3) Right click on the data grid cell of the contract with which you want to trade within the primary online trading window and click the Deltas menu item of the context menu that appears to display a Deltas for [Instrument] window. The Deltas for [Instrument] window sections screen shots below depict window sections that would be next to each other in Nutron itself. These window sections have, however, been placed one above the other to use the available on-screen space optimally. Circled letters in the screen shots are linked to lettered notes below the screen shots that describe key elements within each Deltas for [Instrument] window section. 67 a. This upper Deltas for [Instrument] data grid duplicates the record row of the contract you selected to trade as an option from within a primary online trading window with the difference that the Last column has been replaced with a MidPrice column. This is because the mid price is used to determine the price used in volatility calculations. b. Bids, doubles and offers in this window section apply to call deltas for the selected contract. The upper data grid can still be used to submit bids, doubles and offers on the underlying future contract. c. Bids, doubles and offers in this window section apply to put deltas for the selected contract. The upper data grid can still be used to submit bids, doubles and offers on the underlying future contract. d. This call delta Volume field and put delta Volume. field respectively display the number of call deltas and put deltas traded during the current trading day for the selected contract. e. This call delta Last field and put delta Last. field respectively display the last traded price of a call delta and a put delta during the current trading day for the selected contract. f. This call delta QtyB field and put delta QtyB. field respectively display the current quantity of a call delta and a put delta for the selected contract available for the best quoted bid price. Click on one of these fields to display a window from which you can add a bid as an agent. g. This call delta Bid field and put delta Bid. field respectively display the current best price for a call delta and a put delta on the buying side. Click on one of these fields to display a window from which you can add a bid as a principal. h. This call delta / field and put delta \ field display a window from which you can respectively add a double of a call delta and a double of a put delta for the selected contract. i. This call delta Offer field and put delta Offer. field respectively display the current best price for a call delta and a put delta on the offering side. Click on one of these fields to display a window from which you can add an offer as a principal. j. This call delta QtyO field and put delta QtyO. field respectively display the current quantity of a call delta and a put delta for the selected contract available for the best quoted offer price. Click on one of these fields to display a window from which you can add an offer as an agent. k. This Strike field displays the strike price of the selected contract. l. This MidPrice field mirrors the mid price value of the corresponding upper data grid field. 68 Right clicking within the upper data grid inside an Deltas for [Instrument] window displays the context menu shown in the screen shot below. Display a depth window for the selected contract by clicking on the Depth menu item in the context menu screen shot shown directly above. The depth window will display all active orders on the market for the contract. Force data displayed within the upper data grid to be refreshed by clicking on the Refresh menu item in the context menu screen shot above. The context menu shown in the screen shot below appears when you right click in the lower data grid inside an Options for [Instrument] window. Lettered letters in the context menu screen shot directly above are linked to lettered notes below that describe what each context menu item does. a) Click on this Depth context menu item to display a depth window for the currently selected contract. The depth window will display all active orders on the market for the contract. b) Click on this Set DDE-Copy On context menu item to activate an aspect of DDE functionality within the Nutron front end that lets users copy their choice of fields from the currently open window into an alternative interface like a Microsoft Excel worksheet. Values within fields copied in this way will update in real time within the new interface. Another aspect of DDE presented within the Nutron front end lets you use a DDE Trader window and your familiarity with Excel spreadsheets to set up trading information you can use to participate in the Nutron online trading environment without working within a Nutron trading window. c) Click on this Freshen data context menu item to force data displayed within the lower data grid to refresh itself. d) Click on this Configure context menu item to display the window shown below. This window lets you hide/show data grid lines and change the font type and size used within the Deltas for [Instrument] window. 69 e) This Stay on Top context menu item lets you keep the currently open secondary online trading window on top of or behind active windows. You can ensure that the currently open secondary online trading window stays on top of active windows by clicking on it when it has no check mark on its left. Conversely, you can ensure that the currently open secondary online trading window remains behind active windows by clicking on it when it does have a check mark on its left. Deltas for [Instrument] window trading processes entail adding bids, doubles and offers as described in separate section toggles below Bid adding processes Adding a bid from a Deltas for [Instrument] window involves the following steps: 1) Launch the Deltas for [Instrument] window. 2) Click inside a QtyB cell or a Bid cell on the left of the lower data grid to place a bid on a call delta. Choose a QtyB cell or a Bid cell on the right of the lower data grid to place a bid on a put delta. 3) Click inside a QtyB cell to display a Buy for [InstrumentStrikeValue C/P] - Delta window with an agent capacity. Click inside a Bid cell to display a Buy for [InstrumentStrikeValue C/P] - Delta window with a principal capacity. 4) Configure your bid within the Buy for [InstrumentStrikeValue C/P] - Delta window as you require. Circled letters in the Buy for [InstrumentStrikeValue C/P] - Delta window screen shot below are linked to lettered notes below the screen shot you can use to explore your bid configuration options. 70 a. This Buy for [InstrumentStrikeValue C/P] - Delta caption contains a C to indicate that this bid is for a call delta. A P within the caption would indicate that the bid was for a delta option. b. This Strike control contains the strike price of the selected contract. You can add a new strike price and the skew file will be used to determine the new volatility for that strike price when you save that price by launching your bid. c. This Ref No control contains an incremented value derived from a reference number seed value you accepted or set up earlier in the trading session. This unique value is used by the Nutron back end to identify the bid. You can type your own value into this control if you wish to do so. d. This Qty control contains the default number of contracts you undertake to buy whenever you add a bid. If you wish, you can increase the value in the Qty spin box to the maximum order quantity set up for you. e. This labelled control to the right of the Prin button contains the member code of your organization, client codes for your member organization and any sub accounts you set up for yourself. If you chose to have all your trades locked to the same sub account and dealer, this labelled control will be disabled and all your bids will always use the same sub account. Display a Pick Principal window that includes the full names of your clients as well as the client codes displayed in the labelled control by clicking the Prin button on the left of the control. Double click within the row of a client you want selected within the labelled control to close the Pick Principal window and update the value held within the labelled control. f. This Volat control contains a volatility value for your bids. g. This Dealer control contains dealer codes for all the dealers in your member organization. If you chose to have all your trades locked to the same sub account and dealer, this control will be disabled and all your bids will always use the default dealer code. h. This Premium control contains a premium value for your bids. i. This Capacity control shows whether the bid will be a principal – P or agent – A trade. You can also use the control to change the bid from a principal trade to an agent trade or vice versa. 71 j. Within this set of option buttons, clicking the FOK option button gives your bid Fill or Kill status, clicking the TOK option button gives your bid Take or Kill status and clicking the NOR option button gives your bid Normal status. 5) When you have configured the bid to your satisfaction, launch the bid and close the Buy for [InstrumentStrikeValue C/P] - Delta window by clicking its OK button. Double adding processes Adding a double from a Deltas for [Instrument] window involves the following steps: 1) Launch the Deltas for [Instrument] window. 2) Click inside a / cell on the left of the lower data grid to add a double on a call delta. Click inside a \ cell on the right of the lower data grid to add a double on a put delta. 3) Click inside a / cell to display a Double for [InstrumentStrikeValue C/P] - Delta window. The window that appears will be configured for either a principal capacity or an agent capacity depending on how your user settings are set up for the Financials market. 4) Configure your double within the Double for [InstrumentStrikeValue C/P] - Delta window as you require. Circled letters in the Double for [InstrumentStrikeValue C/P] - Delta window screen shot below are linked to lettered notes below the screen shot you can use to explore your double configuration options. a. This Double for [InstrumentStrikeValue C/P] - Delta caption contains a C to indicate that this double is for a call option. A P within the caption would indicate that the double was for a put option. b. This Qty control contains the default number of contracts you undertake to bid for and offer whenever you add a double. If you wish, you can increase the value in the Qty control to the maximum order quantity set up for you. c. This Strike control contains the strike price of the selected contract. You can add a new strike price and the skew file will be used to determine the new volatility for that strike price when 72 you save that price by launching your bid. If the new premium is out of the allowable range set up for you when the strike is created, the error message, "too far from market" will appear. d. A Volat control appears both within the Bid frame and the Offer frame. Within the Bid frame, it contains a volatility value for the bid element of the double. Within the Offer frame it contains a volatility value for the offer element of the double. e. A Premium control appears both within the Bid frame and the Offer frame. Within the Bid frame, it contains a premium value for the bid element of the double. Within the Offer frame, it contains a premium value for the offer element of the double. f. A Capacity control appears both within the Bid frame and the Offer frame. Within the Bid frame, it indicates whether the bid side of the double will be a principal – P or agent – A trade. Within the Offer frame, it indicates whether the offer side of the double will be a principal – P or agent – A trade. You can use the two Capacity controls to change the bid side of the double, the offer side of the double, or both sides of the double from a principal trade to an agent trade or vice versa. g. This Order/Ref control appears both within the Bid frame and the Offer frame. Both controls will initially contain identical incremented values derived from a reference number seed value you accepted or set up earlier in the trading session. This unique value is used by the Nutron back end to identify the bid and offer sides of the double. You can type your own value into this control if you wish to do so. h. The labelled control immediately to the right of the Prin button contains the member code of your organization, client codes for your member organization and any sub accounts you set up for yourself. If you chose to have all your trades locked to the same sub account and dealer, this control will be disabled and all your bids will always use the same sub account. Click the Prin button to display a Pick Principal window that includes the full names of your clients as well as the client codes displayed within the labelled control itself. Double click on the row of a client you want to select within the labelled control to update the labelled control and close the Pick Principal window. i. This Dealer control contains dealer codes for all the dealers in your member organization. If you chose to have all your trades locked to the same sub account and dealer, this control will be disabled and all your bids will always use the default dealer code. 5) Launch the double and close the Double for [InstrumentStrikeValue C/P] - Option window by clicking its OK button. Offer adding processes Adding an offer from a Deltas for [Instrument] window involves the following steps: 1) Launch the Deltas for [Instrument] window. 2) Click inside an Offer cell or a QtyO cell on the left of the lower data grid to add an offer on a call delta. Click inside an Offer. cell or a QtyO. cell on the right of the lower data grid to add an offer on a put delta. 73 3) Click inside an Offer cell to display an Offer for [InstrumentStrikeValue C/P] - Delta window with a principal capacity. Click inside a QtyO cell to display an Offer for [InstrumentStrikeValue C/P] Delta window with an agent capacity. 4) Configure your offer within the Offer for [InstrumentStrikeValue C/P] - Delta window as you require. Circled letters in the Offer for [InstrumentStrikeValue C/P] - Delta window screen shot below are linked to lettered notes below the screen shot you can use to explore your offer configuration options. a. This Offer for [InstrumentStrikeValue C/P] - Delta caption contains a C to indicate that this offer is for a call delta. A P within the caption would indicate that the offer was for a put option. b. This Strike control contains the strike price of the selected contract. You can add a new strike price and the skew file will be used to determine the new volatility for that strike price when you save that price by launching your bid. c. This Ref No control contains an incremented value derived from a reference number seed value you accepted or set up earlier in the trading session. This unique value is used by the Nutron back end to identify the offer. You can type your own value into this control if you wish to do so. d. This Qty control contains the default number of contracts you undertake to sell whenever you add a bid. If you wish, you can increase the value in the Qty control to the maximum order quantity set up for you. e. This labelled control to the right of the Prin button contains the member code of your organization, client codes for your member organization and any sub accounts you set up for yourself. If you chose to have all your trades locked to the same sub account and dealer, this labelled control will be disabled and all your offers will always use the same sub account. Display a Pick Principal window that includes the full names of your clients as well as the client codes displayed in the labelled control by clicking the Prin button on the left of the control. Double click within the row of a client you want selected within the labelled control to close the Pick Principal window and update the value held within the labelled control. f. This Volat control contains a volatility value for your offers. g. This Dealer control contains dealer codes for all the dealers in your member organization. If you chose to have all your trades locked to the same sub account and dealer, this control will be disabled and all your offers will always use the default dealer code. 74 h. This Premium control contains a premium value for your offers. i. This Capacity control shows whether the offer will be a principal – P or agent – A trade. You can also use the control to change the offer from a principal trade to an agent trade or vice versa. j. Within this set of option buttons, clicking the FOK option button gives your offer Fill or Kill status, clicking the TOK option button gives your offer Take or Kill status and clicking the NOR option button gives your offer Normal status. 5) When you have configured the offer to your satisfaction, launch the offer and close the Offer for [InstrumentStrikeValue C/P] - Option window by clicking its OK button. Spreads for [Instrument] windows Spreads for [Instrument] windows let you trade in spreads. From a Spreads for [Instrument] window you can set up bids, doubles and offers on spreads. Spreads for [Instrument] windows only appear if the configuration of the currently selected instrument was set to TRUE at the Exchange. When a display file is created at the start of the business day, an underlying process will recognize that spreads need to be created for a specific instrument set. The system will then create a spread instrument between contracts derived from instruments of the same type with different expiry dates. A buy on a spread indicates that the user wishes to sell the early contract and buy the late contract. When another user then puts a bid on the early contract, a phantom will be created on the late contract on the buy side. This phantom provides the market with a guideline of what would be a good price. A phantom will only be created if the phantom price is the best price on the stack. If the late contract is dealt with, a chain reaction of trades would happen. The spread would be hit as well as the early contract. This would result in two deals. The user's deals file would, therefore, contain a trade leg for the buy of the late leg and a sell for the early leg. In the completed orders file, the original deals would be shown as a spread buy. This would also work the other way round. Launching a Spreads for [Instrument] window involves the following steps: 1) Select a Financials market primary online trading window from which you can generate a context menu that includes a Spreads menu item. 2) Right click on the data grid cell of the contract with which you want to trade within the primary online trading window and click the Spreads menu item of the context menu that appears to display a Spreads for [Instrument] window Use the lettered labels in the Spreads for [Instrument] window screen shot below and the lettered notes that follow after it to learn about each data grid field within this window. 75 a. This Instrument field within the window represents two contracts of the same type with different expiry dates known as a spread. The first part of each Instrument field value consists of the first three letters of a month name followed by the last two digits of a year. This part of each Instrument field value represents the first expiry date within its spread. The next part of each Instrument field value consists of a forward slash / followed by the first three letters of a month name and the last two digits of a year. This part of each Instrument field value represents the second expiry date within its spread. The final part of each Instrument field value consists of a space followed by four letters of the alphabet that represent the contract type being traded b. This QtyB field displays the current quantity of the corresponding contract available for the best quoted bid price. Click on this field to display a window from which you can add a bid as an agent. c. This Bid field displays the current best price on the buying side. Click on this field to display a window from which you can add a bid as a principal. d. Click on this / field to display a window from which you can add a double. e. This Offer field displays the current best price on the offering side. Click on this field to display a window from which you can add an offer as a principal. f. This QtyO field displays the current quantity of the corresponding contract available for the best quoted offer price. Click on this field to display a window from which you can add an offer as an agent. The context menu shown in the screen shot below appears when you right click within a Spreads for [Instrument] window. Lettered labels in the context menu screen shot directly above are linked to lettered notes below that describe what each context menu item does. a. Click on this Depth context menu item to display a depth window for the currently selected contract. The depth window will display all active orders on the market for the contract. b. Click on this Set DDE-Copy On context menu item to activate an aspect of DDE functionality within the Nutron front end that lets users copy their choice of fields from the currently open 76 window into an alternative interface like a Microsoft Excel worksheet. Values within fields copied in this way will update in real time within the new interface. c. Click on this Freshen data context menu item to force data displayed within the Spreads for [Instrument] window data grid to refresh itself. d. Click on this Configure context menu item to display the window shown below. This window lets you hide/show data grid lines and change the font type and size used within the Spreads for [Instrument] window e. This Stay on Top context menu item lets you keep the currently open secondary online trading window on top of or behind active windows. You can ensure that the currently open secondary online trading window stays on top of active windows by clicking on it when it has no check mark on its left. Conversely, you can ensure that the currently open secondary online trading window remains behind active windows by clicking on it when it does have a check mark on its left. f. You may wish to simplify the Spreads for [Instrument] trading window data grid display by eliminating specific contracts and classes of contract from it. The Add/Delete Contracts context menu item provides this functionality by displaying the window shown in the screen shot below. You use this window to dismiss various contracts and various classes of contract from the data grid and to restore them as and when the need arises. Spreads for [Instrument] window trading processes entail adding bids, doubles and offers as described in separate sections below. Bid adding processes Adding a bid from a Spreads for [Instrument] window involves the following steps: 1) Launch the Spreads for [Instrument] window and select the contract for which you want to trade a spread. 2) Click inside a QtyB cell or click the Shift + F5 keys on your keyboard to display a Buy for [Instrument] window with an agent capacity. Click inside a Bid cell or click the F2 key on your keyboard to display a Buy for [Instrument] window with a principal capacity. 3) Configure your bid within the Buy for [Instrument] window as you require. Circled letters in the Buy for [Instrument] window screen shot below are linked to lettered notes below the screen shot you can use to explore your bid configuration options. 77 a. This Qty control contains the default number of spreads you undertake to buy whenever you add a bid. If you wish, you can increase the value in the Qty control to the maximum order quantity set up for you. b. This Ref No control contains an incremented value derived from a reference number seed value you accepted or set up earlier in the trading session. This unique value is used by the Nutron back end to identify the bid. You can type your own value into this control if you want to do so. c. The value in this Differential control represents the difference between the early and the late contract expiry dates. You can supply your own value for this control if you want to do so. d. This labelled control to the right of the Prin button contains the member code of your organization, client codes for your member organization and any sub accounts you set up for yourself. If you chose to have all your trades locked to the same sub account and dealer, this labelled control will be disabled and all your bids will always use the same sub account. Display a Pick Principal window that includes the full names of your clients as well as the client codes displayed in the labelled control by clicking the Prin button on the left of the control. Double click within the row of a client you want selected within the labelled control to close the Pick Principal window and update the value held within the labelled control. e. This Capacity control shows whether the bid will be a principal – P or agent – A trade. You can also use the control to change the bid from a principal trade to an agent trade or vice versa. f. This Dealer control contains dealer codes for all the dealers in your member organization. If you chose to have all your trades locked to the same sub account and dealer, this control will be disabled and all your bids will always use the default dealer code. g. Within this set of option buttons, clicking the FOK option button gives your bid Fill or Kill status, clicking the TOK option button gives your bid Take or Kill status and clicking the NOR option button gives your bid Normal status. h. The Hold Over Order tick box is used to hold over the bid to the selected date. i. The Date field is used to specify till when the buy order needs to be held over. 4) When you have configured the bid to your satisfaction, save your configurations, launch the bid and close the Buy for [Instrument] window by clicking its OK button. 78 Double adding processes Adding a double from a Spreads for [Instrument] window involves the following steps: 1) Launch the Spreads for [Instrument] window. 2) Click in the / cell of the row of the spread to which you want to add a double to display a Double for [Instrument] window. The window that appears will be configured for either a principal capacity or an agent capacity depending on how your user settings are set up for the EDM market. Your user settings may not be configured for either a principal capacity or an agent capacity. Under these circumstances, you can select the spread to which you want to add a double by clicking on the cell for that spread inside the Instrument column of the Spreads for [Instrument] window. You would then press your Ctrl + F2 keyboard keys for a Double for [Instrument] window with a principal capacity, or press your Ctrl + F3 keyboard keys for a Double for [Instrument] window with an agent capacity 3) Configure your double within the Double for [Instrument] window as you require. Circled letters in the Double for [Instrument] window screen shot below are linked to lettered notes below the screen shot you can use to explore your double configuration options. a. This Qty control contains the default number of contracts you undertake to bid for and offer whenever you add a double. If you wish, you can increase the value in the Qty control to the maximum order quantity set up for you. b. A Differential control appears both within the Bid frame and the Offer frame. The value in each Differential control represents the difference between the early and the late contract expiry dates. You can supply your own value within each control if you want to do so. c. A Capacity control appears both within the Bid frame and the Offer frame. Within the Bid frame, it indicates whether the bid side of the double will be a principal – P or agent – A trade. Within the Offer frame, it indicates whether the offer side of the double will be a principal – P or agent – A trade. You can use the two Capacity controls to change the bid side of the double, the offer side of the double, or both sides of the double from a principal trade to an agent trade or vice versa. 79 d. This Order/Ref control appears both within the Bid frame and the Offer frame. Both controls will initially contain identical incremented values derived from a reference number seed value you accepted or set up earlier in the trading session. This unique value is used by the Nutron back end to identify the bid and offer sides of the double. You can type your own value into this control if you wish to do so. e. The labelled control immediately to the right of the Prin button contains the member code of your organization, client codes for your member organization and any sub accounts you set up for yourself. If you chose to have all your trades locked to the same sub account and dealer, this control will be disabled and all your bids will always use the same sub account. Click the Prin button to display a Pick Principal window that includes the full names of your clients as well as the client codes displayed in the control itself. Double click on the row of a client you want to select within the labelled control to update the labelled control and close the Pick Principal window. f. This Dealer control contains dealer codes for all the dealers in your member organization. If you chose to have all your trades locked to the same sub account and dealer, this control will be disabled and all your bids will always use the default dealer code. 4) Launch the double and close the Double for [Instrument] window by clicking its OK button. Offer adding processes Adding an offer from a Spreads for [Instrument] window involves the following steps: 1) Launch the Spreads for [Instrument] window and select the contract for which you want to trade a spread. 2) Click in the QtyO trading window column or press the Ctrl + F5 combination on your keyboard to display an Offer for [Instrument] window with an agent capacity. Click in the Offer trading window column or press F3 on your keyboard to display an Offer for [Instrument] window with a principal capacity. 3) Configure your offer within the Offer for [Instrument] window as you require. Lettered labels in the Offer for [Instrument] window screen shot below are linked to lettered notes below the screen shot you can use to explore your offer configuration options. 80 a. This Qty control contains the default number of spreads you undertake to sell whenever you add an offer. If you wish, you can increase the value in the Qty control to the maximum offer quantity set up for you. b. This Ref No control contains an incremented value derived from a reference number seed value you accepted or set up earlier in the trading session. This unique value is used by the Nutron back end to identify the offer. You can type your own value into this control if you wish to do so. c. The value in this Differential control represents the difference between the early and the late contract expiry dates. You can supply your own value for this control if you wish to do so. d. This labelled control to the right of the Prin button contains the member code of your organization, client codes for your member organization and any sub accounts you set up for yourself. If you chose to have all your trades locked to the same sub account and dealer, this labelled control will be disabled and all your offers will always use the same sub account. Display a Pick Principal window that includes the full names of your clients as well as the client codes displayed in the labelled control by clicking the Prin button on the left of the control. Double click within the row of a client you want selected within the labelled control to close the Pick Principal window and update the value held within the labelled control. e. This Capacity control shows whether the offer will be a principal – P or agent – A trade. You f. can also use the control to change the offer from a principal trade to an agent trade or vice versa. This Dealer control contains dealer codes for all the dealers in your member organization. If you chose to have all your trades locked to the same sub account and dealer, this control will be disabled and all your offers will always use the default dealer code. g. Within this set of option buttons, clicking the FOK option button gives your offer Fill or Kill status, clicking the TOK option button gives your offer Take or Kill status and clicking the NOR option button gives your offer Normal status. h. The Hold Over Order tick box is used to hold over the bid to the selected date. i. The Date field is used to specify till when the buy order needs to be held over. 4) When you have configured the offer to your satisfaction, launch the offer and close the Offer for [InstrumentStrikeValue C/P] - Option window by clicking its OK button. Online Commodities market trading The table below contains online Commodities market trading functionality delivered from each primary online trading window (as well as a window listing all the options and deltas that have been traded in the course of the current trading day) and the launch methods for each of these windows. Functionality Launch Method An APD Splits ([Member Code Dealer Code]) You can launch an APD Splits ([Member Code trading window facilitates online trading on split Dealer Code]) trading window by clicking Agris contracts (subject to availability) for Nutron Trading > Split_Contracts. trader users. In this window each instrument represents two different contracts with the same expiry date. 81 Functionality Launch Method An Agri_Futures ([Member Code Dealer Code]) trading window facilitates online trading for Nutron trader users. In this window each instrument represents a current tradable contract. You can launch an Agri_Futures ([Member Code Dealer Code]) trading window by clicking Agris Trading > Agri_Futures, pressing Ctrl + ' on your keyboard. An APD Global Options ([Member Code Dealer Code]) window facilitates online trading for Nutron trader users. In this window the contracts provide a consolidated view of all current orders on screen. You can launch an APD Global Options ([Member Code Dealer Code]) trading window by clicking Agris Trading > Global_Options, pressing Ctrl + A on your keyboard. With two exceptions, primary online trading windows for the Commodities market only let you trade in a single contract category type. The first of the windows that lets you trade in contract types you have chosen across your choice of contract categories is the APD Central Options ([Member Code Dealer Code]) window. You can launch an APD Central Options ([Member Code Dealer Code]) trading window by clicking Agris Trading > Central_Options, pressing Ctrl + B on your keyboard. A Cando ([Member Code Dealer Code]) You can launch a Cando ([Member Code trading window facilitates online trading for Dealer Code]) trading window by clicking Agris Trading > Cando, pressing Ctrl + C on your Nutron trader users. keyboard. A Commodities ([Member Code Dealer Code]) You can launch a Single_Stock_Futures N TO trading window facilitates online trading for Z ([Member Code Dealer Code]) trading window by clicking Agris Trading > Nutron trader users. Commodities, pressing Ctrl + D on your keyboard. With two exceptions, primary online trading windows for the Commodities market only let you trade in a single contract category type. The second of the windows that lets you trade in contract types you have chosen across your choice of contract categories is the Asset_Class_Futures ([Member Code Dealer Code]) trading window. You can launch an Asset_Class_Futures ([Member Code Dealer Code]) trading window by clicking Agris Trading > Asset_Class_Futures. An APD Options Stats ([Member Code Dealer Code]) window lists all the options and deltas that have been traded in the course of the current trading day. You can launch an APD Options Stats ([Member Code Dealer Code]) trading window by clicking Agris Trading > Options_Stats, pressing Ctrl + F. An SAVI_Contracts ([Member Code Dealer You can launch an SAVI_Contracts ([Member Code]) window can potentially facilitate online Code Dealer Code]) trading window by clicking Agris Trading > SAVI_Contracts, pressing Ctrl trading for Nutron trader users. + G on your keyboard. The next help topic provides all the information required to carry out Commodities market trading in a primary online trading window. Commodities market trading in a primary online trading window When carrying out Commodities market trading from the APD Central Options ([Member Code Dealer Code]) or the Asset_Class_Futures ([Member Code Dealer Code]) primary online trading window, you first 82 need to specify contract categories and contract types within these categories that you want to trade. The first section toggle below, therefore, describes how to do this. You should be familiar with the data grid cells found in typical primary online trading windows and the full range of context menu items available for all such windows before trading in them. The second and third section toggles below, therefore, respectively discuss these key primary online trading window elements. Primary online trading window processes entail adding bids, doubles and offers as respectively described in the fourth, fifth and sixth sections below. Specifying contract categories and contract types to trade in Specifying contract categories and contract types to trade in involves the following steps: 1) Click Agris Trading > Central_Options, press Ctrl + B on your keyboard to display a Select Contracts To Trade window. 2) Click on the Select Contracts To Trade window Asset Class dropdown control to display the contract categories available for selection as shown in the Select Contracts To Trade window section below. 3) Select a contract category within the Asset Class dropdown control by clicking on it. For illustrative purposes, let us assume that you have clicked on the AgriFut contract category. 4) The instrument name of each contract type within the AgriFut contract category will appear within the Available column on the left of the Select Contracts To Trade window. 5) Select a contract type in which you want to trade by clicking on it. Transfer the selected contract type to the To Trade column by clicking on the Add button between the Available and the To Trade columns. In the Select Contracts To Trade screen shot below, the Nutron user has selected seven contract types from the AgriFut contract category in which to trade. 83 6) Optionally, select other contract categories and contact types within these categories by repeating steps 3. to 5. above with appropriate changes 7) Save your choice of contract categories and contract types, close the Select Contracts to Trade window and display an APD Central Options ([Member Code Dealer Code]) primary online trading window by clicking on the Select Contracts to Trade window's OK button. Data grid cells in a typical Commodities market primary online trading window The APD Central Options ([Member Code Dealer Code]) primary online trading window is a typical online trading window in which data grid cells predominate. You can see this in the APD Central Options ([Member Code Dealer Code]) window sections screen shots below. APD Central Options ([Member Code Dealer Code]) window sections that would be next to each other in Nutron itself, however, have been placed one above the other to use the available on-screen space optimally. Lettered labels in the screen shots are linked to lettered notes below the screen shots that describe the contents of each data grid field 84 a. This Instrument field contains a descriptive instrument code supplied by the Exchange. b. This QtyB field displays the current quantity of each corresponding contract available for the best quoted bid price. Click within this field to display the window described in the Bid adding processes section toggle below from which you can add a bid as an agent. c. This Bid field displays the current best price on the buying side for each corresponding contract. Click within this field to display the window described in the Bid adding processes section toggle below from which you can add a bid as a principal. d. Click within this / field to display the window described in the Double adding processes section toggle below from which you can add a double. e. This Offer field displays the current best price on the offering side for each corresponding contract. Click within this field to display the window described in the Offer adding processes section toggle below from which you can add an offer as a principal. f. This QtyO field displays the current quantity of each corresponding contract available for the best quoted offer price. Click within this field to display the window described in the Offer adding processes section toggle below from which you can add an offer as an agent. g. This Change field displays the change between the last traded price and the opening price for the current trading day. The text displayed in this field will be blue (if the change is positive), black (if the change is zero), or red (if the change is negative). h. This Last field displays the last traded price for each corresponding contract for the current trading day. If the contract has not traded, the previous trading day's closing price will be displayed in this field. The text displayed in this field will turn red as soon as a trade has been made. i. This Time field displays the most recent time at which each corresponding contract was traded on the current trading day. If no trade has taken place, this field will display zero values. j. This High field indicates the highest trading price for each corresponding contract for the current trading day. If there was no trade on the contract, this field will display zero values. 85 k. This Low field indicates the lowest trading price for each corresponding contract for the current trading day. If there was no trade on the contract, this field will display zero values. l. This Volume field displays the number of contracts of each corresponding contract traded during the current trading day. m. This MidPrice field displays the mid price of each corresponding contract. n. The OpenInt field displays the current open interest on each corresponding contract. Context menus within typical Commodities market primary online trading windows Context menus within Commodities market primary online trading windows, which you display by right clicking within their parent windows, offer different functional features depending on the contract types these windows hold. The context menu in the screen shot below, however, includes all the functional features available from Commodities market primary online trading window context menus. This means you can learn all you need about Commodities market primary online trading window context menu functional features from the sample context menu below. Lettered labels in the context menu screen shot are linked to lettered notes below the screen shot that describe each functional feature in turn. a. This Depth context menu item opens a depth window for the currently selected contract. The depth window displays all active orders on the market for the contract. b. This Options context menu opens a secondary online options trading window for the currently selected contract provided the instrument for that contract was set up on the back end to allow options. In the secondary online options trading window, you can place bids, doubles or offers on the option for the contract at various strike prices. c. This Deltas context menu item opens a secondary online deltas trading window for the currently selected contract provided the instrument for that contract was set up on the back end to allow deltas. In the secondary online deltas trading window, you can place bids, doubles or offers on the option and its underlying future for the selected contract at various strike prices. 86 d. This Spreads context menu item opens a spreads trading window for the currently selected contract if instrument records of the same type as the currently selected contract with different expiry dates exist. e. This Silo Certificate Auction context menu item displays the Silo certificates which are available for auctioning. f. This Days History context menu item displays an [Instrument] window like the one shown below. [Instrument] windows, like the one shown in the screen shot immediately above, represent the times, prices and volumes at which the currently selected contract has traded during the current trading day. g. This Contract data context menu item lets you see data set up by the Exchange for the currently selected contract inside a Contract Data window like the one shown below. 87 h. This Set DDE-Copy On context menu item activates an aspect of DDE (Dynamic Data Exchange) functionality within Nutron that lets users copy their choice of fields from the currently open primary online trading window into an alternative interface like a Microsoft Excel worksheet. Values within fields copied in this way will update in real time within the new interface. i. This Freshen data context menu item forces a refresh of data contained within the primary online open trading window. j. This Configure context menu item displays the window shown below. This window lets you hide/show data grid lines and change the font type and size used within the currently open primary online trading window. Once you have made the changes you require, confirm them and close the Configure Grid window by clicking on its OK button. k. This Sort context menu item displays various sub menu items. The precise sub menu items displayed varies from one primary online trading window to the next. Click on one of these sub menu items to sort contract record rows within the currently open online trading window a By Contract Name and Date sub-menu item, a By Contract Date sub-menu item and a By Contract Name submenu item. These sub-menu items let you sort record rows within the Index_Futures ([Member Code Dealer Code]) trading window data grid according to the criteria that give each sub-menu item its name. This Low field indicates the lowest trading price for each corresponding contract for the current trading day. If there was no trade on the contract, this field will display zero values. 88 l. This Stay on Top context menu item lets you keep the currently open primary online trading window on top of or behind active windows. You can ensure that the currently open primary online trading window stays on top of active windows by clicking on it when it has no check mark on its left. Conversely, you can ensure that the currently open primary online trading window remains behind active windows by clicking on it when it does have a check mark on its left. m. This Add/Delete Contracts context menu item lets you alter the currently open primary online trading window display by deleting the currently selected contract from it, restoring a previously deleted contract to it or adding/deleting an entire contract class from it as follows: i. Click on the Add/Delete Contracts context menu item to display the window shown below. ii. Learn what deleting the currently selected contract from the Add/Delete Contracts window involves in point iii. below. iii. If the Restore deleted dated contracts option button is not checked, click on it to check it. Next click on the Add/Delete Contracts window's OK button to close its parent window and display an Information window. iv. If the Add/Delete Class of contract option button is not checked, click on it to check it. Next click on the Add/Delete Contracts window's OK button to close its parent window and display a new Add/Delete Contracts window. v. Select the contract class you want to add or delete from the Add/Delete Contracts window Contracts dropdown control. Next, click on either the Plus or the Minus button on the right of the Contracts control depending on whether you want to add a contract class to or delete a contract class from its parent primary online trading window. Finally, click on the Add/Delete Contracts window's OK button to confirm the addition or deletion of the contract class that you specified and to close the window. Bid adding processes You add a Commodities market bid as follows: 1) Choose a contract for which you want to add a bid by clicking inside its cell within the leftmost column of the applicable primary online trading window. 2) Display a Buy for [Instrument] window within which you will add a bid in an agent capacity by clicking within the QtyB column or pressing Shift + F5 on your keyboard. Alternatively, display a Buy for [Instrument] window within which you will add a bid in a principal capacity by clicking within the Bid column or pressing F2 on your keyboard. 3) Configure your bid within the Buy for [Instrument] window as you require. Circled letters in the Buy for [Instrument] window below are keyed to Buy for [Instrument] window controls. Lettered notes beneath the screen shot describe the bid configuration options available from each control. 89 a. This Qty control shows the default number of contracts you undertake to buy whenever you add a Financials market bid. If you wish, you can increase the value in the Qty control to the maximum order quantity set up for you. b. This Ref No control contains an incremented value derived from a reference number seed value you accepted or set up earlier in the trading session. This unique value is used by the Nutron back end to identify the bid. You can type your own value into this control if you wish to do so. c. This Price control contains the price per contract for the instrument for which you are adding a bid. You can change this price if you want to bid at a different per contract price. If you launched the bid from an APD Splits ([Member Code Dealer Code]) trading window, this control will have a Split Diff caption and hold the difference in value between the two contracts in the split instead of a price value. You can also change this value d. This labelled control to the right of the Prin button contains the member code of your organization, client codes for your member organization and any sub accounts you set up for yourself. If you chose to have all your trades locked to the same sub account and dealer, this labelled control will be disabled and all your offers will always use the same sub account. Display a Pick Principal window that includes the full names of your clients as well as the client codes displayed in the labelled control by clicking the Prin button on the left of the control. Double click within the row of a client you want selected within the labelled control to close the Pick Principal window and update the value held within the labelled control e. This Capacity control shows whether the bid will be a principal – P or agent – A trade. You can also use the control to change the bid from a principal trade to an agent trade or vice versa. f. This Dealer control contains dealer codes for all the dealers in your member organization. If you chose to have all your trades locked to the same sub account and dealer, this control will be disabled and all your bids will always use the default dealer code. g. Within this set of option buttons, clicking the FOK option button gives your bid Fill or Kill status, clicking the TOK option button gives your bid Take or Kill status and clicking the NOR option button gives your bid Normal status. 4) When you have configured the bid to your satisfaction, save your configurations, launch the bid and close the Buy for [Instrument] window by clicking its OK button. 90 Double adding processes You add a Commodities market double as follows: 1) Choose a contract for which you want to add a double by clicking inside its cell within the leftmost column of the applicable primary online trading window. 2) If you click within a cell of the / column of the applicable primary online trading window, a Double for [Instrument] window configured for either adding a double in a principal capacity or adding a double in an agent capacity will appear. The capacity for which the window is configured will depend on user settings specified as described elsewhere. 3) Configure your double within the Double for [Instrument] window as you require. Lettered labels in the Double for [Instrument] window below are keyed to Double for [Instrument] window controls. Lettered notes beneath the screen shot describe the double configuration options available from each control. a. This Qty control shows the default number of contracts you undertake to bid for and offer whenever you add a Financials market double. If you wish, you can increase the value in the Qty control to the maximum order quantity set up for you. b. A Price control appears both within the Bid frame and the Offer frame. Within the Bid frame, it contains the price per contract on the bid side of the double you are adding. Within the Offer frame, it contains the price per contract on the offer side of the double you are adding. You can change the price per contract value contained within each Price control. c. A Capacity control appears both within the Bid frame and the Offer frame. Within the Bid frame, it indicates whether the bid side of the double will be a principal – P or agent – A trade. Within the Offer frame, it indicates whether the offer side of the double will be a principal – P or agent – A trade. You can use the two Capacity controls to change the bid side of the double, the offer side of the double, or both sides of the double from a principal trade to an agent trade or vice versa. d. An Order/Ref control appears both within the Bid frame and the Offer frame. Both controls will initially contain identical incremented values derived from a reference number seed value you accepted or set up earlier in the trading session. This unique value is used by the Nutron back end to identify the bid and offer sides of the double. You can type your own values into these controls if you want to do so. 91 e. The control immediately to the right of the Prin button contains the member code of your organization, client codes for your member organization and any sub accounts you set up for yourself. If you chose to have all your trades locked to the same sub account and dealer, this control will be disabled and all your bids will always use the same sub account. Click the Prin button to display a Pick Principal window that includes the full names of your clients as well as the client codes displayed in the control. Double click within the row of a client you want selected within the control to close the Pick Principal window and update the value held within the control. f. This Dealer control contains dealer codes for all the dealers in your member organization. If you chose to have all your trades locked to the same sub account and dealer, this control will be disabled and all your doubles will always use the default dealer code. 4) When you have configured the double to your satisfaction, launch the double and close the Buy for [Instrument] window by clicking its OK button. Offer adding processes You add a Commodities market offer as follows: 1) Choose a contract for which you want to add an offer by clicking inside its cell within the leftmost column of the applicable primary online trading window. 2) Display an Offer for [Instrument] window within which you will add an offer in an agent capacity by clicking within the QtyO column or pressing Ctrl + F5 on your keyboard. Alternatively, display an Offer for [Instrument] window within which you will add an offer in a principal capacity by clicking within the Offer column or pressing F3 on your keyboard. 3) Configure your offer within the Offer for [Instrument] window as you require. Lettered labels in the Offer for [Instrument] window below are keyed to Offer for [Instrument] window controls. Lettered notes beneath the screen shot describe the offer configuration options available from each control. a. This Qty control shows the default number of contracts you undertake to offer whenever you add a Financials market offer. If you wish, you can increase the value in the Qty control to the maximum order quantity set up for you. b. This Ref No control contains an incremented value derived from a reference number seed value you accepted or set up earlier in the trading session. This unique value is used by the 92 Nutron back end to identify the bid. You can type your own value into this control if you wish to do so. c. This Price control contains the price per contract for the instrument for which you are adding an offer. You can change this price if you want to offer at a different per contract price. d. This labelled control to the right of the Prin button contains the member code of your organization, client codes for your member organization and any sub accounts you set up for yourself. If you chose to have all your trades locked to the same sub account and dealer, this labelled control will be disabled and all your offers will always use the same sub account. Display a Pick Principal window that includes the full names of your clients as well as the client codes displayed in the labelled control by clicking the Prin button on the left of the control. Double click within the row of a client you want selected within the labelled control to close the Pick Principal window and update the value held within the labelled control. e. This Capacity control shows whether the offer will be a principal – P or agent – A trade. You can also use the control to change the offer from a principal trade to an agent trade or vice versa. f. This Dealer control contains dealer codes for all the dealers in your member organization. If you chose to have all your trades locked to the same sub account and dealer, this control will be disabled and all your offers will always use the default dealer code. g. Within this set of option buttons, clicking the FOK option button gives your offer Fill or Kill status, clicking the TOK option button gives your offer Take or Kill status and clicking the NOR option button gives your offer Normal status. 4) When you have configured the offer to your satisfaction, save launch the offer and close the Offer for [Instrument] window by clicking its OK button. Commodities market trading in a secondary online trading window A Commodities market secondary online trading window is a window that is launched by clicking on a menu item within a context menu launched within a primary online trading window. Section toggles below describe each secondary online trading window type and the trading processes associated with it. Options for [Instrument] windows An Options for [Instrument] secondary online trading window lets you set up bids, doubles and offers on options. Launching an Options for [Instrument] window involves the following steps: 1) Select a Commodities market primary online trading window from which you can generate a context menu that includes an Options menu item. 2) If you expect to add a new strike in the course of ensuing trading processes, right click on the data grid cell of the contract with which you want to trade within the primary online trading window and click the Contract Data menu item of the context menu that appears to display a Contract Data window. You can obtain valid strike intervals for the currently selected contract from within this window. 93 3) Right click on the data grid cell of the contract with which you want to trade within the primary online trading window and click the Options menu item of the context menu that appears to display an Options for [Instrument] window. The Options for [Instrument] window sections screen shots below depict window sections that would be next to each other in Nutron itself. These window sections have, however, been placed one above the other to use the available on-screen space optimally. Circled letters in the screen shots are linked to lettered notes below the screen shots that describe key elements within each Options for [Instrument] window section. a. This upper Options for [Instrument] data grid duplicates the record row of the contract you selected to trade as an option from within a primary online trading window with the difference that the Last column has been replaced with a MidPrice column. This is because the mid price is used to determine the price used in volatility calculations. b. Bids, doubles and offers in this window section apply to call options for the selected contract. The upper data grid can still be used to submit bids, doubles and offers on the underlying future contract. c. Bids, doubles and offers in this window section apply to put options for the selected contract. The upper data grid can still be used to submit bids, doubles and offers on the underlying future contract. d. This call option Volume field and put option Volume. field respectively display the number of call options and put options traded during the current trading day for the selected contract. e. This call option Last field and put option Last. field respectively display the last traded price of a call option and a put option during the current trading day for the selected contract. f. This call option QtyB field and put option QtyB. field respectively display the current quantity of a call option and a put option for the selected contract available for the best quoted bid price. Click on one of these fields to display a window from which you can add a bid as an agent. 94 g. This call option Bid field and put option Bid. field respectively display the current best price for a call option and a put option on the buying side. Click on one of these fields to display a window from which you can add a bid as a principal. h. This call option / field and put option \ field display a window from which you can respectively add a double of a call option and a double of a put option for the selected contract. i. This call option Offer field and put option Offer. field respectively display the current best price for a call option and a put option on the offering side. Click on one of these fields to display a window from which you can add an offer as a principal. j. This call option QtyB field and put option QtyB. field respectively display the current quantity of a call option and a put option for the selected contract available for the best quoted bid price. Click on one of these fields to display a window from which you can add a bid as an agent. k. This call option OpenInt field and put option OpenInt. field respectively display the current open interest for their respective options for the selected contract. l. This Strike field displays the strike price of the selected contract. m. This MidPrice field mirrors the mid price value of the corresponding upper data grid field. Right clicking within the upper data grid inside an Options for [Instrument] window displays the context menu shown in the screen shot below. Display a depth window for the selected contract by clicking on the Depth menu item in the context menu screen shot shown directly above. The depth window will display all active orders on the market for the contract. Force data displayed within the upper data grid to be refreshed by clicking on the Refresh menu item in the context menu screen shot above. The context menu shown in the screen shot below appears when you right click in the lower data grid inside an Options for [Instrument] window. Lettered labels in the context menu screen shot directly above are linked to lettered notes below that describe what each context menu item does. a. Click on this Depth context menu item to display a depth window for the currently selected contract. The depth window will display all active orders on the market for the contract. b. Click on this Set DDE-Copy On context menu item to activate an aspect of DDE functionality within the Nutron front end that lets users copy their choice of fields from the currently open window into an alternative interface like a Microsoft Excel worksheet. Values within fields copied in this way will update in real time within the new interface. 95 c. Click on this Freshen data context menu item to force data displayed within the lower data grid to refresh itself. d. Click on this Configure context menu item to display the window shown below. This window lets you hide/show data grid lines and change the font type and size used within the Options for [Instrument] window. e. This Stay on Top context menu item lets you keep the currently open secondary online trading window on top of or behind active windows. You can ensure that the currently open secondary online trading window stays on top of active windows by clicking on it when it has no check mark on its left. Conversely, you can ensure that the currently open secondary online trading window remains behind active windows by clicking on it when it does have a check mark on its left. Options for [Instrument] window trading processes entail adding bids, doubles and offers as described in separate section toggles below. Bid adding processes Adding a bid from an Options for [Instrument] window involves the following steps: 1) Launch the Options for [Instrument] window. 2) Click inside a QtyB cell or a Bid cell on the left of the lower data grid to place a bid on a call option. Choose a QtyB cell or a Bid cell on the right of the lower data grid to place a bid on a put option. 3) Click inside a QtyB cell to display a Buy for [InstrumentStrikeValue C/P] - Option window with an agent capacity. Click inside a Bid cell to display a Buy for [InstrumentStrikeValue C/P] - Option window with a principal capacity. 4) Configure your bid within the Buy for [InstrumentStrikeValue C/P] - Option window as you require. Circled letters in the Buy for [InstrumentStrikeValue C/P] - Option window screen shot below are linked to lettered notes below the screen shot you can use to explore your bid configuration options. 96 a. This Strike control contains the strike price of the selected contract. You can add a new strike price and the skew file will be used to determine the new volatility for that strike price when you save that price by launching your bid. b. This Ref No control contains an incremented value derived from a reference number seed value you accepted or set up earlier in the trading session. This unique value is used by the Nutron back end to identify the bid. You can type your own value into this control if you wish to do so. c. This Qty control contains the default number of contracts you undertake to buy whenever you add a bid. If you wish, you can increase the value in the Qty spin box to the maximum order quantity set up for you. d. This labelled control to the right of the Prin button contains the member code of your organization, client codes for your member organization and any sub accounts you set up for yourself. If you chose to have all your trades locked to the same sub account and dealer, this labelled control will be disabled and all your bids will always use the same sub account. Display a Pick Principal window that includes the full names of your clients as well as the client codes displayed in the labelled control by clicking the Prin button on the left of the control. Double click within the row of a client you want selected within the labelled control to close the Pick Principal window and update the value held within the labelled control e. This Volat control contains a volatility value for your bids. f. This Dealer control contains dealer codes for all the dealers in your member organization. If you chose to have all your trades locked to the same sub account and dealer, this control will be disabled and all your bids will always use the default dealer code. g. This Premium control contains a premium value for your bids. h. This Capacity control shows whether the bid will be a principal – P or agent – A trade. You can also use the control to change the bid from a principal trade to an agent trade or vice versa. i. Within this set of option buttons, clicking the FOK option button gives your bid Fill or Kill status, clicking the TOK option button gives your bid Take or Kill status and clicking the NOR option button gives your bid Normal status. 5) When you have configured the bid to your satisfaction, save your configurations, launch the bid and close the Buy for [Instrument] window by clicking its OK button. 97 Double adding processes Adding a double from an Options for [Instrument] window involves the following steps: 1) Launch the Options for [Instrument] window. 2) Click inside a / cell on the left of the lower data grid to add a double on a call option. Click inside a \ cell on the right of the lower data grid to add a double on a put option. 3) Click inside a / cell to display a Double for [InstrumentStrikeValue C/P] - Option window. The window that appears will be configured for either a principal capacity or an agent capacity depending on how your user settings are set up for the Financials market. 4) Configure your double within the Double for [InstrumentStrikeValue C/P] - Option window as you require. Circled letters in the Double for [InstrumentStrikeValue C/P] - Option window screen shot below are linked to lettered notes below the screen shot you can use to explore your double configuration options. a. This Double for [InstrumentStrikeValue C/P] - Option caption contains a C to indicate that this double is for a call option. A P within the caption would indicate that the double was for a put option. b. This Qty control contains the default number of contracts you undertake to bid for and offer whenever you add a double. If you wish, you can increase the value in the Qty control to the maximum order quantity set up for you. c. This Strike control contains the strike price of the selected contract. You can add a new strike price and the skew file will be used to determine the new volatility for that strike price when you save that price by launching your bid. d. A Volat control appears both within the Bid frame and the Offer frame. Within the Bid frame, it contains a volatility value for the bid element of the double. Within the Offer frame it contains a volatility value for the offer element of the double. 98 e. A Premium control appears both within the Bid frame and the Offer frame. Within the Bid frame, it contains a premium value for the bid element of the double. Within the Offer frame, it contains a premium value for the offer element of the double. f. A Capacity control appears both within the Bid frame and the Offer frame. Within the Bid frame, it indicates whether the bid side of the double will be a principal – P or agent – A trade. Within the Offer frame, it indicates whether the offer side of the double will be a principal – P or agent – A trade. You can use the two Capacity controls to change the bid side of the double, the offer side of the double, or both sides of the double from a principal trade to an agent trade or vice versa. g. This Order/Ref control appears both within the Bid frame and the Offer frame. Both controls will initially contain identical incremented values derived from a reference number seed value you accepted or set up earlier in the trading session. This unique value is used by the Nutron back end to identify the bid and offer sides of the double. You can type your own value into this control if you wish to do so. h. The labelled control immediately to the right of the Prin button contains the member code of your organization, client codes for your member organization and any sub accounts you set up for yourself. If you chose to have all your trades locked to the same sub account and dealer, this control will be disabled and all your bids will always use the same sub account. Click the Prin button to display a Pick Principal window that includes the full names of your clients as well as the client codes displayed in the control itself. Double click on the row of a client you want to select within the labelled control to update the labelled control and close the Pick Principal window. i. This Dealer control contains dealer codes for all the dealers in your member organization. If you chose to have all your trades locked to the same sub account and dealer, this control will be disabled and all your bids will always use the default dealer code. 5) Launch the double and close the Double for [InstrumentStrikeValue C/P] - Option window by clicking its OK button. Offer adding processes Adding an offer from an Options for [Instrument] window involves the following steps: 1) Launch the Options for [Instrument] window. 2) Click inside an Offer cell or a QtyO cell on the left of the lower data grid to add an offer on a call option. Click inside an Offer. cell or a QtyO. cell on the right of the lower data grid to add an offer on a put option. 3) Click inside an Offer cell to display an Offer for [InstrumentStrikeValue C/P] - Option window with a principal capacity. Click inside a QtyO cell to display an Offer for [InstrumentStrikeValue C/P] Option window with an agent capacity. 4) Configure your offer within the Offer for [InstrumentStrikeValue C/P] - Option window as you require. Circled letters in the Offer for [InstrumentStrikeValue C/P] - Option window screen shot 99 below are linked to lettered notes below the screen shot you can use to explore your offer configuration options. a. This Offer for [InstrumentStrikeValue C/P] - Option caption contains a C to indicate that this offer is for a call option. A P within the caption would indicate that the offer was for a put option. b. This Strike control contains the strike price of the selected contract. You can add a new strike price and the skew file will be used to determine the new volatility for that strike price when you save that price by launching your bid. c. This Ref No control contains an incremented value derived from a reference number seed value you accepted or set up earlier in the trading session. This unique value is used by the Nutron back end to identify the offer. You can type your own value into this control if you wish to do so. d. This Qty control contains the default number of contracts you undertake to sell whenever you add a bid. If you wish, you can increase the value in the Qty control to the maximum order quantity set up for you. e. This labelled control to the right of the Prin button contains the member code of your organization, client codes for your member organization and any sub accounts you set up for yourself. If you chose to have all your trades locked to the same sub account and dealer, this labelled control will be disabled and all your offers will always use the same sub account. Display a Pick Principal window that includes the full names of your clients as well as the client codes displayed in the labelled control by clicking the Prin button on the left of the control. Double click within the row of a client you want selected within the labelled control to close the Pick Principal window and update the value held within the labelled control f. This Volat control contains a volatility value for your offers. g. This Dealer control contains dealer codes for all the dealers in your member organization. If you chose to have all your trades locked to the same sub account and dealer, this control will be disabled and all your offers will always use the default dealer code. h. This Premium control contains a premium value for your offers. 100 i. This Capacity control shows whether the offer will be a principal – P or agent – A trade. You can also use the control to change the offer from a principal trade to an agent trade or vice versa. j. Within this set of option buttons, clicking the FOK option button gives your offer Fill or Kill status, clicking the TOK option button gives your offer Take or Kill status and clicking the NOR option button gives your offer Normal status. 5) When you have configured the offer to your satisfaction, launch the offer and close the Offer for [InstrumentStrikeValue C/P] - Option window by clicking its OK button. Deltas for [Instrument] windows A Deltas for [Instrument] secondary online trading window lets you set up bids, doubles and offers on deltas. Launching a Deltas for [Instrument] window involves the following steps: 1) Select a Commodities market primary online trading window from which you can generate a context menu that includes a Deltas menu item. 2) If you expect to add a new strike in the course of ensuing trading processes, right click on the data grid cell of the contract with which you want to trade within the primary online trading window and click the Contract Data menu item of the context menu that appears to display a Contract Data window. You can obtain valid strike intervals for the currently selected contract from within this window. 3) Right click on the data grid cell of the contract with which you want to trade within the primary online trading window and click the Deltas menu item of the context menu that appears to display a Deltas for [Instrument] window. 4) The Deltas for [Instrument] window sections screen shots below depict window sections that would be next to each other in Nutron itself. These window sections have, however, been placed one above the other to use the available on-screen space optimally. Lettered labels in the screen shots are linked to lettered notes below the screen shots that describe key elements within each Deltas for [Instrument] window section. a. This upper Deltas for [Instrument] data grid duplicates the record row of the contract you selected to trade as an option from within a primary online trading window with the difference that the Last column has been replaced with a MidPrice column. This is because the mid price is used to determine the price used in volatility calculations. b. Bids, doubles and offers in this window section apply to call deltas for the selected contract. The upper data grid can still be used to submit bids, doubles and offers on the underlying future contract. 101 c. Bids, doubles and offers in this window section apply to put deltas for the selected contract. The upper data grid can still be used to submit bids, doubles and offers on the underlying future contract. d. This call delta Volume field and put delta Volume. field respectively display the number of call deltas and put deltas traded during the current trading day for the selected contract. e. This call delta Last field and put delta Last. field respectively display the last traded price of a call delta and a put delta during the current trading day for the selected contract. f. This call delta QtyB field and put delta QtyB. field respectively display the current quantity of a call delta and a put delta for the selected contract available for the best quoted bid price. Click on one of these fields to display a window from which you can add a bid as an agent. g. This call delta Bid field and put delta Bid. field respectively display the current best price for a call delta and a put delta on the buying side. Click on one of these fields to display a window from which you can add a bid as a principal. h. This call delta / field and put delta \ field display a window from which you can respectively add a double of a call delta and a double of a put delta for the selected contract. i. This call delta Offer field and put delta Offer. field respectively display the current best price for a call delta and a put delta on the offering side. Click on one of these fields to display a window from which you can add an offer as a principal. j. This call delta QtyO field and put delta QtyO. field respectively display the current quantity of a call delta and a put delta for the selected contract available for the best quoted offer price. Click on one of these fields to display a window from which you can add an offer as an agent. k. This Strike field displays the strike price of the selected contract. l. This MidPrice field mirrors the mid price value of the corresponding upper data grid field. Right clicking within the upper data grid inside an Deltas for [Instrument] window displays the context menu shown in the screen shot below. Display a depth window for the selected contract by clicking on the Depth menu item in the context menu screen shot shown directly above. The depth window will display all active orders on the market for the contract. Force data displayed within the upper data grid to be refreshed by clicking on the Refresh menu item in the context menu screen shot above. The context menu shown in the screen shot below appears when you right click in the lower data grid inside an Options for [Instrument] window. 102 a. Click on this Depth context menu item to display a depth window for the currently selected contract. The depth window will display all active orders on the market for the contract. b. Click on this Set DDE-Copy On context menu item to activate an aspect of DDE functionality within the Nutron front end that lets users copy their choice of fields from the currently open window into an alternative interface like a Microsoft Excel worksheet. Values within fields copied in this way will update in real time within the new interface. c. Click on this Freshen data context menu item to force data displayed within the lower data grid to refresh itself. d. Click on this Configure context menu item to display the window shown below. This window lets you hide/show data grid lines and change the font type and size used within the Deltas for [Instrument] window. e. This Stay on Top context menu item lets you keep the currently open secondary online trading window on top of or behind active windows. You can ensure that the currently open secondary online trading window stays on top of active windows by clicking on it when it has no check mark on its left. Conversely, you can ensure that the currently open secondary online trading window remains behind active windows by clicking on it when it does have a check mark on its left. Deltas for [Instrument] window trading processes entail adding bids, doubles and offers as described in separate section toggles below. Bid adding processes Adding a bid from a Deltas for [Instrument] window involves the following steps: 1) Launch the Deltas for [Instrument] window. 103 2) Click inside a QtyB cell or a Bid cell on the left of the lower data grid to place a bid on a call delta. Choose a QtyB cell or a Bid cell on the right of the lower data grid to place a bid on a put delta. 3) Click inside a QtyB cell to display a Buy for [InstrumentStrikeValue C/P] - Delta window with an agent capacity. Click inside a Bid cell to display a Buy for [InstrumentStrikeValue C/P] - Delta window with a principal capacity. 4) Configure your bid within the Buy for [InstrumentStrikeValue C/P] - Delta window as you require. Circled letters in the Buy for [InstrumentStrikeValue C/P] - Delta window screen shot below are linked to lettered notes below the screen shot you can use to explore your bid configuration options. a. This Buy for [InstrumentStrikeValue C/P] - Delta caption contains a C to indicate that this bid is for a call delta. A P within the caption would indicate that the bid was for a put delta. b. This Strike control contains the strike price of the selected contract. You can add a new strike price and the skew file will be used to determine the new volatility for that strike price when you save that price by launching your bid. c. This Ref No control contains an incremented value derived from a reference number seed value you accepted or set up earlier in the trading session. This unique value is used by the Nutron back end to identify the bid. You can type your own value into this control if you wish to do so. d. This Qty control contains the default number of contracts you undertake to buy whenever you add a bid. If you wish, you can increase the value in the Qty spin box to the maximum order quantity set up for you. e. This labelled control to the right of the Prin button contains the member code of your organization, client codes for your member organization and any sub accounts you set up for yourself. If you chose to have all your trades locked to the same sub account and dealer, this labelled control will be disabled and all your bids will always use the same sub account. Display a Pick Principal window that includes the full names of your clients as well as the client codes displayed in the labelled control by clicking the Prin button on the left of the control. Double click within the row of a client you want selected within the labelled control to close the Pick Principal window and update the value held within the labelled control. f. This Volat control contains a volatility value for your bids. g. This Dealer control contains dealer codes for all the dealers in your member organization. If you chose to have all your trades locked to the same sub account and dealer, this control will be disabled and all your bids will always use the default dealer code. 104 h. This Premium control contains a premium value for your bids. i. This Capacity control shows whether the bid will be a principal – P or agent – A trade. You can also use the control to change the bid from a principal trade to an agent trade or vice versa. j. Within this set of option buttons, clicking the FOK option button gives your bid Fill or Kill status, clicking the TOK option button gives your bid Take or Kill status and clicking the NOR option button gives your bid Normal status. 5) When you have configured the bid to your satisfaction, [Instrument] window by clicking its OK button. launch the bid and close the Buy for Spreads for [Instrument] windows window trading processes entail adding bids, doubles and offers as described in separate sections below. 1) Select a Commodities market primary online trading window from which you can generate a context menu that includes a Spreads menu item. Labelled letters in the screen shots are linked to lettered notes below the screen shots that describe key elements within each Spread for [Instrument] window section. a. This Instrument field contains a descriptive instrument code supplied by the Exchange. b. This QtyB field displays the current quantity of each corresponding contract available for the best quoted bid price. Click within this field to display the window described in the Bid adding processes section toggle below from which you can add a bid as an agent. c. This Bid field displays the current best price on the buying side for each corresponding contract. Click within this field to display the window described in the Bid adding processes section toggle below from which you can add a bid as a principal. d. Click within this / field to display the window described in the Double adding processes section toggle below from which you can add a double. e. This Offer field displays the current best price on the offering side for each corresponding contract. Click within this field to display the window described in the Offer adding processes section toggle below from which you can add an offer as a principal. f. This QtyO field displays the current quantity of each corresponding contract available for the best quoted offer price. Click within this field to display the window described in the Offer adding processes section toggle below from which you can add an offer as an agent. 105 Bid adding processes Adding a bid from an Spreads for [Instrument] window involves the following steps: 1) Launch the Spreads for [Instrument] window. 2) Click inside a QtyB cell to place a bid on a call spread. 3) Display a Buy for [Instrument] window within which you will add a bid in an agent capacity by clicking within the QtyB column or pressing Shift + F5 on your keyboard. Alternatively, display a Buy for [Instrument] window within which you will add a bid in a principal capacity by clicking within the Bid column or pressing F2 on your keyboard]. 4) Configure your bid within the Buy for [Instrument] window as you require. Circled letters in the Buy for [Instrument] window below are keyed to Buy for [Instrument] window controls. Lettered notes beneath the screen shot describe the bid configuration options available from each control. a. This Qty control shows the default number of contracts you undertake to buy whenever you add a Financials market bid. If you wish, you can increase the value in the Qty control to the maximum order quantity set up for you. b. This Ref No control contains an incremented value derived from a reference number seed value you accepted or set up earlier in the trading session. This unique value is used by the Nutron back end to identify the bid. You can type your own value into this control if you wish to do so. c. The value in this Differential control represents the difference between the early and the late contract expiry dates. You can supply yo0ur own value for this control if you want to do so. d. This labelled control to the right of the Prin button contains the member code of your organization, client codes for your member organization and any sub accounts you set up for yourself. If you chose to have all your trades locked to the same sub account and dealer, this labelled control will be disabled and all your offers will always use the same sub account. Display a Pick Principal window that includes the full names of your clients as well as the client codes displayed in the labelled control by clicking the Prin button on the left of the control. Double click within the row of a client you want selected within the labelled control to close the Pick Principal window and update the value held within the labelled control. e. This Capacity control shows whether the bid will be a principal – P or agent – A trade. You can also use the control to change the bid from a principal trade to an agent trade or vice versa. 106 f. This Dealer control contains dealer codes for all the dealers in your member organization. If you chose to have all your trades locked to the same sub account and dealer, this control will be disabled and all your bids will always use the default dealer code. g. Within this set of option buttons, clicking the FOK option button gives your bid Fill or Kill status, clicking the TOK option button gives your bid Take or Kill status and clicking the NOR option button gives your bid Normal status. 5) When you have configured the bid to your satisfaction, launch the bid and close the Buy for [Instrument] window by clicking its OK button. Double adding processes You add a Commodities market double as follows: 1) Choose a contract for which you want to add a double by clicking inside its cell. 2) If you click within a cell of the / column of the applicable primary online trading window, a Double for [Instrument] window configured for either adding a double in a principal capacity or adding a double in an agent capacity will appear. The capacity for which the window is configured will depend on user settings specified as described elsewhere. 3) Configure your double within the Double for [Instrument] window as you require. Lettered notes in the Double for [Instrument] window below are keyed to Double for [Instrument] window controls. Lettered notes beneath the screen shot describe the double configuration options available from each control a. This Qty control shows the default number of contracts you undertake to bid for and offer whenever you add a Financials market double. If you wish, you can increase the value in the Qty control to the maximum order quantity set up for you. b. The value in this Differential control represents the difference between the early and the late contract expiry dates. You can supply yo0ur own value for this control if you want to do so. c. A Capacity control appears both within the Bid frame and the Offer frame. Within the Bid frame, it indicates whether the bid side of the double will be a principal – P or agent – A trade. Within the Offer frame, it indicates whether the offer side of the double will be a principal – P or agent – A trade. You can use the two Capacity controls to change the bid side of the 107 double, the offer side of the double, or both sides of the double from a principal trade to an agent trade or vice versa. d. An Order/Ref control appears both within the Bid frame and the Offer frame. Both controls will initially contain identical incremented values derived from a reference number seed value you accepted or set up earlier in the trading session. This unique value is used by the Nutron back end to identify the bid and offer sides of the double. You can type your own values into these controls if you want to do so. e. The control immediately to the right of the Prin button contains the member code of your organization, client codes for your member organization and any sub accounts you set up for yourself. If you chose to have all your trades locked to the same sub account and dealer, this control will be disabled and all your bids will always use the same sub account. f. This Dealer control contains dealer codes for all the dealers in your member organization. If you chose to have all your trades locked to the same sub account and dealer, this control will be disabled and all your doubles will always use the default dealer code. 4) When you have configured the double to your satisfaction, launch the double and close the Buy for [Instrument] window by clicking its OK button. Offer adding processes You add a Commodities market offer as follows: 1) Choose a contract for which you want to add an offer by clicking inside its cell within the leftmost column of the applicable primary online trading window. 2) Display an Offer for [Instrument] window within which you will add an offer in an agent capacity by clicking within the QtyO column or pressing Ctrl + F5 on your keyboard. Alternatively, display an Offer for [Instrument] window within which you will add an offer in a principal capacity by clicking within the Offer column or pressing F3 on your keyboard. 3) Configure your offer within the Offer for [Instrument] window as you require. Lettered Notes in the Offer for [Instrument] window below are keyed to Offer for [Instrument] window controls. Lettered notes beneath the screen shot describe the offer configuration options available from each control. a. This Qty control shows the default number of contracts you undertake to offer whenever you add a Financials market offer. If you wish, you can increase the value in the Qty control to the maximum order quantity set up for you. 108 b. This Ref No control contains an incremented value derived from a reference number seed value you accepted or set up earlier in the trading session. This unique value is used by the Nutron back end to identify the bid. You can type your own value into this control if you wish to do so. c. The value in this Differential control represents the difference between the early and the late contract expiry dates. You can supply yo0ur own value for this control if you want to do so d. This labelled control to the right of the Prin button contains the member code of your organization, client codes for your member organization and any sub accounts you set up for yourself. If you chose to have all your trades locked to the same sub account and dealer, this labelled control will be disabled and all your offers will always use the same sub account. Display a Pick Principal window that includes the full names of your clients as well as the client codes displayed in the labelled control by clicking the Prin button on the left of the control. Double click within the row of a client you want selected within the labelled control to close the Pick Principal window and update the value held within the labelled control. e. This Capacity control shows whether the offer will be a principal – P or agent – A trade. You can also use the control to change the offer from a principal trade to an agent trade or vice versa. f. This Dealer control contains dealer codes for all the dealers in your member organization. If you chose to have all your trades locked to the same sub account and dealer, this control will be disabled and all your offers will always use the default dealer code. g. Within this set of option buttons, clicking the FOK option button gives your offer Fill or Kill status, clicking the TOK option button gives your offer Take or Kill status and clicking the NOR option button gives your offer Normal status. 4) When you have configured the offer to your satisfaction, launch the offer and close the Offer for [Instrument] window by clicking its OK button. Online Global market trading The table below contains online Global market trading functionality delivered from each primary online trading window (as well as a window listing all the options and deltas that have been traded in the course of the current trading day) and the launch methods for each of these windows. Functionality Launch Method A GLOBAL Splits ([Member Code Dealer Code]) trading window facilitates online trading on split contracts (subject to availability) for Nutron trader users. In this window each instrument represents two different contracts with the same expiry date. You can launch a GLOBAL Splits ([Member Code Dealer Code]) trading window by clicking Global Market > Split_Contracts_Global, pressing Ctrl + I on your keyboard. A Commodities_Global ([Member Code Dealer Code]) trading window facilitates online trading for Nutron trader users. In this window each instrument represents a current tradable contract. You can launch a Commodities_Global ([Member Code Dealer Code]) trading window by clicking Global Market > Commodities Global, pressing Ctrl + J on your keyboard. An IDX_Futures_Global ([Member Code You can launch an IDX_Futures_Global Dealer Code]) window facilitates online trading ([Member Code Dealer Code]) trading window by clicking Global Market > for Nutron trader users. 109 Functionality Launch Method IDX_Futures_Global, pressing Ctrl + K on your keyboard. An IDX_Dividend_Futures_Global ([Member You can launch an Code Dealer Code]) window facilitates online IDX_Dividend_Futures_Global ([Member Code Dealer Code]) trading window by clicking trading for Nutron trader users. Global Market > IDX_Dividend_Futures_Global, pressing Ctrl + L on your keyboard or clicking the tab button of the Global Market tab. With two exceptions, primary online trading windows for the Global market only let you trade in a single contract category type. The first of the windows that lets you trade in contract types you have chosen across your choice of contract categories is the Central Options Global ([Member Code Dealer Code]) trading window. You can launch a Central Options Global ([Member Code Dealer Code]) trading window by clicking Global Market > Central_Options_Loaded, pressing Ctrl + M on your keyboard. With two exceptions, primary online trading windows for the Global market only let you trade in a single contract category type. The second of the windows that lets you trade in contract types you have chosen across your choice of contract categories is the Asset_Class_Futures_Global ([Member Code Dealer Code]) trading window. You can launch an Asset_Class_Futures_Global ([Member Code Dealer Code]) trading window by clicking Global Market > Asset_Class_Futures_Global, pressing Ctrl + N on your keyboard. The next help topic provides all the information required to carry out Global market trading in a primary online trading window. Online Global market trading in a primary online trading window When carrying out Global market trading from the GLOBAL Central Options ([Member Code Dealer Code]) or the Asset_Class_Futures ([Member Code Dealer Code]) primary online trading window, you first need to specify contract categories and contract types within these categories that you want to trade. The first section toggle below, therefore, describes how to do this. You should be familiar with the data grid cells found in typical primary online trading windows and the full range of context menu items available for all such windows before trading in them. The second and third section toggles below, therefore, respectively discuss these key primary online trading window elements. Primary online trading window processes entail adding bids, doubles and offers as respectively described in the sections below. Specifying contract categories and contract types to trade in Specifying contract categories and contract types to trade in involves the following steps: 1) Click Global Market > Central_Options_Global, press Ctrl + M on your keyboard to display a Select Contracts To Trade window. 110 2) Click on the Select Contracts To Trade window Asset Class dropdown control to display the contract categories available for selection as shown in the Select Contracts To Trade window section below. 3) Select a contract category within the Asset Class dropdown control by clicking on it. For illustrative purposes, let us assume that you have clicked on the Commodities contract category. 4) The instrument name of each contract type within the Commodities contract category will appear within the Available column on the left of the Select Contracts To Trade window. 5) Select a contract type in which you want to trade by clicking on it. Transfer the selected contract type to the To Trade column by clicking on the Add button between the Available and the To Trade columns. In the Select Contracts To Trade screen shot below, the Nutron user has selected all four available contract types from the Commodities contract category with which to trade. 6) Where feasible, select other contract categories and contact types within these categories by repeating steps 3. to 5. above with appropriate changes. 7) Save your choice of contract categories and contract types, close the Select Contracts to Trade window and display a GLOBAL Central Options ([Member Code Dealer Code]) primary online trading window by clicking on the Select Contracts to Trade window's OK button. 111 Data grid cells in a typical Commodities market primary online trading window The APD Central Options ([Member Code Dealer Code]) primary online trading window is a typical online trading window in which data grid cells predominate. You can see this in the APD Central Options ([Member Code Dealer Code]) window sections screen shots below. APD Central Options ([Member Code Dealer Code]) window sections that would be next to each other in Nutron itself, however, have been placed one above the other to use the available on-screen space optimally. Lettered notes in the screen shots are linked to lettered notes below the screen shots that describe the contents of each data grid field. a. This Instrument field contains a descriptive instrument code supplied by the Exchange. b. This QtyB field displays the current quantity of each corresponding contract available for the best quoted bid price. Click within this field to display the window described in the Bid adding processes section toggle below from which you can add a bid as an agent. c. This Bid field displays the current best price on the buying side for each corresponding contract. Click within this field to display the window described in the Bid adding processes section toggle below from which you can add a bid as a principal. d. Click within this / field to display the window described in the Double adding processes section toggle below from which you can add a double. e. This Offer field displays the current best price on the offering side for each corresponding contract. Click within this field to display the window described in the Offer adding processes section toggle below from which you can add an offer as a principal. f. This QtyO field displays the current quantity of each corresponding contract available for the best quoted offer price. Click within this field to display the window described in the Offer adding processes section toggle below from which you can add an offer as an agent. g. This Change field displays the change between the last traded price and the opening price for the current trading day. The text displayed in this field will be blue (if the change is positive), black (if the change is zero), or red (if the change is negative). 112 h. This Last field displays the last traded price for each corresponding contract for the current trading day. If the contract has not traded, the previous trading day's closing price will be displayed in this field. The text displayed in this field will turn red as soon as a trade has been made. i. This Time field displays the most recent time at which each corresponding contract was traded on the current trading day. If no trade has taken place, this field will display zero values. j. This High field indicates the highest trading price for each corresponding contract for the current trading day. If there was no trade on the contract, this field will display zero values. k. This Low field indicates the lowest trading price for each corresponding contract for the current trading day. If there was no trade on the contract, this field will display zero values. l. This Volume field displays the number of contracts of each corresponding contract traded during the current trading day. m. This MidPrice field displays the mid price of each corresponding contract. n. The OpenInt field displays the current open interest on each corresponding contract. Context menus within typical Global market primary online trading windows Context menus within Global market primary online trading windows, which you display by right clicking within their parent windows, offer different functional features depending on the contract types these windows hold. The context menu in the screen shot below, however, includes all the functional features available from Global market primary online trading window context menus. This means you can learn all you need about Global market primary online trading window context menu functional features from the sample context menu below. Lettered notes in the context menu screen shot are linked to lettered notes below the screen shot that describe each functional feature in turn. a. This Depth context menu item opens a depth window for the currently selected contract. The depth window displays all active orders on the market for the contract. 113 b. This Options context menu opens a secondary online options trading window for the currently selected contract provided the instrument for that contract was set up on the back end to allow options. In the secondary online options trading window, you can place bids, doubles or offers on the option for the contract at various strike prices. c. This Deltas context menu item opens a secondary online deltas trading window for the currently selected contract provided the instrument for that contract was set up on the back end to allow deltas. In the secondary online deltas trading window, you can place bids, doubles or offers on the option and its underlying future for the selected contract at various strike prices. d. This Spreads context menu item opens a spreads trading window for the currently selected contract if instrument records of the same type as the currently selected contract with different expiry dates exist. e. This Days History context menu item displays an [Instrument] window like the one shown below. e f. This Contract data context menu item lets you see data set up by the Exchange for the currently selected contract inside a Contract Data window like the one shown below. Use the circled numbers in the Contract Data window screen shot below and the numbered notes that follow after it to learn about the contract data such windows display. 114 g. This Set DDE-Copy On context menu item activates an aspect of DDE (Dynamic Data Exchange) functionality within Nutron that lets users copy their choice of fields from the currently open primary online trading window into an alternative interface like a Microsoft Excel worksheet. Values within fields copied in this way will update in real time within the new interface. Another DDE aspect within Nutron lets you use a DDE Trader window and your familiarity with Excel spreadsheets to set up trading information you can use to participate in the Nutron online trading environment without working within a primary online trading window h. This Freshen data context menu item forces a refresh of data contained within the primary online open trading window. i. This Configure context menu item displays the window shown below. This window lets you hide/show data grid lines and change the font type and size used within the currently open primary online trading window. Once you have made the changes you require, confirm them and close the Configure Grid window by clicking on its OK button. j. This Sort context menu item displays various sub menu items. The precise sub menu items displayed varies from one primary online trading window to the next. Click on one of these 115 sub menu items to sort contract record rows within the currently open online trading window a By Contract Name and Date sub-menu item, a By Contract Date sub-menu item and a By Contract Name sub-menu item. These sub-menu items let you sort record rows within the Index_Futures ([Member Code Dealer Code]) trading window data grid according to the criteria that give each sub-menu item its name. This Low field indicates the lowest trading price for each corresponding contract for the current trading day. If there was no trade on the contract, this field will display zero values. k. This Stay on Top context menu item lets you keep the currently open primary online trading window on top of or behind active windows. You can ensure that the currently open primary online trading window stays on top of active windows by clicking on it when it has no check mark on its left. Conversely, you can ensure that the currently open primary online trading window remains behind active windows by clicking on it when it does have a check mark on its left. l. This Add/Delete Contracts context menu item lets you alter the currently open primary online trading window display by deleting the currently selected contract from it, restoring a previously deleted contract to it or adding/deleting an entire contract class from it as follows: i. Click on the Add/Delete Contracts context menu item to display the window shown below. ii. Learn what deleting the currently selected contract from the Add/Delete Contracts window involves in point iii. below. Learn what restoring previously deleted dated contracts from the Add/Delete Contracts window involves in point iv. below. Learn what adding/deleting an entire contract class from the Add/Delete Contracts window involves in point v. below. iii. If the Delete specific dated contract option button is not checked, click on it to check it. Next click on the Add/Delete Contracts window's OK button to close its parent window and display an Information window like the one below. 116 iv. If the Restore deleted dated contracts option button is not checked, click on it to check it. Next click on the Add/Delete Contracts window's OK button to close its parent window and display an Information window like the one below. v. If the Add/Delete Class of contract option button is not checked, click on it to check it. Next click on the Add/Delete Contracts window's OK button to close its parent window and display a new Add/Delete Contracts window like the one below. vi. Select the contract class you want to add or delete from the Add/Delete Contracts window Contracts dropdown control. Next, click on either the Plus or the Minus button on the right of the Contracts control depending on whether you want to add a contract class to or delete a contract class from its parent primary online trading window. Finally, click on the Add/Delete Contracts window's OK button to confirm the addition or deletion of the contract class that you specified and to close the window. Bid adding processes You add a Financials market bid as follows: 1) Choose a contract for which you want to add a bid by clicking inside its cell within the leftmost column of the applicable primary online trading window. 2) Display a Buy for [Instrument] window within which you will add a bid in an agent capacity by clicking within the QtyB column or pressing Shift + F5 on your keyboard. Alternatively, display a Buy for [Instrument] window within which you will add a bid in a principal capacity by clicking within the Bid column or pressing F2 on your keyboard. 3) Configure your bid within the Buy for [Instrument] window as you require. Circled letters in the Buy for [Instrument] window below are keyed to Buy for [Instrument] window controls. Lettered notes beneath the screen shot describe the bid configuration options available from each control. 117 a. This Qty control shows the default number of contracts you undertake to buy whenever you add a Financials market bid. If you wish, you can increase the value in the Qty control to the maximum order quantity set up for you. b. This Ref No control contains an incremented value derived from a reference number seed value you accepted or set up earlier in the trading session. This unique value is used by the Nutron back end to identify the bid. You can type your own value into this control if you wish to do so. c. This Price control contains the price per contract for the instrument for which you are adding a bid. You can change this price if you want to bid at a different per contract price. If you launched the bid from an EDM Splits ([Member Code Dealer Code]) trading window, this control will have a Split Diff caption and hold the difference in value between the two contracts in the split instead of a price value. You can also change this value. d. This labelled control to the right of the Prin button contains the member code of your organization, client codes for your member organization and any sub accounts you set up for yourself. If you chose to have all your trades locked to the same sub account and dealer, this labelled control will be disabled and all your offers will always use the same sub account. Display a Pick Principal window that includes the full names of your clients as well as the client codes displayed in the labelled control by clicking the Prin button on the left of the control. Double click within the row of a client you want selected within the labelled control to close the Pick Principal window and update the value held within the labelled control. e. This Capacity control shows whether the bid will be a principal – P or agent – A trade. You can also use the control to change the bid from a principal trade to an agent trade or vice versa. f. This Dealer control contains dealer codes for all the dealers in your member organization. If you chose to have all your trades locked to the same sub account and dealer, this control will be disabled and all your bids will always use the default dealer code. g. Within this set of option buttons, clicking the FOK option button gives your bid Fill or Kill status, clicking the TOK option button gives your bid Take or Kill status and clicking the NOR option button gives your bid Normal status. 4) When you have configured the bid to your satisfaction, save your configurations, launch the bid and close the Buy for [Instrument] window by clicking its OK button. 118 Double adding processes You add a Financials market double as follows: 1) Choose a contract for which you want to add a double by clicking inside its cell within the leftmost column of the applicable primary online trading window. 2) If you click within a cell of the / column of the applicable primary online trading window, a Double for [Instrument] window configured for either adding a double in a principal capacity or adding a double in an agent capacity will appear. The capacity for which the window is configured will depend on user settings specified as described elsewhere. If neither an agent capacity nor a principal capacity has been specified through user settings, you can do the following. i. Display a Double for [Instrument] window within which you will add a double in an agent capacity by pressing Ctrl + F3 on your keyboard. ii. Display a Buy for [Instrument] window within which you will add a double in a principal capacity by pressing Ctrl + F2 on your keyboard. 3) Configure your double within the Double for [Instrument] window as you require. Circled letters in the Double for [Instrument] window below are keyed to Double for [Instrument] window controls. Lettered notes beneath the screen shot describe the double configuration options available from each control. a. This Qty control shows the default number of contracts you undertake to bid for and offer whenever you add a Financials market double. If you wish, you can increase the value in the Qty control to the maximum order quantity set up for you. b. A Price control appears both within the Bid frame and the Offer frame. Within the Bid frame, it contains the price per contract on the bid side of the double you are adding. Within the Offer frame, it contains the price per contract on the offer side of the double you are adding. You can change the price per contract value contained within each Price control If you launched the double from an EDM Splits ([Member Code Dealer Code]) trading window, each control would have a Split Diff caption and hold the difference in value between the two contracts in the split instead of a price value. You could still change the values held in each control. c. A Capacity control appears both within the Bid frame and the Offer frame. Within the Bid frame, it indicates whether the bid side of the double will be a principal – P or agent – A trade. Within the Offer frame, it indicates whether the offer side of the double will be a principal – P 119 or agent – A trade. You can use the two Capacity controls to change the bid side of the double, the offer side of the double, or both sides of the double from a principal trade to an agent trade or vice versa. d. An Order/Ref control appears both within the Bid frame and the Offer frame. Both controls will initially contain identical incremented values derived from a reference number seed value you accepted or set up earlier in the trading session. This unique value is used by the Nutron back end to identify the bid and offer sides of the double. You can type your own values into these controls if you want to do so. e. The control immediately to the right of the Prin button contains the member code of your organization, client codes for your member organization and any sub accounts you set up for yourself. If you chose to have all your trades locked to the same sub account and dealer, this control will be disabled and all your bids will always use the same sub account. Click the Prin button to display a Pick Principal window that includes the full names of your clients as well as the client codes displayed in the control. Double click within the row of a client you want selected within the control to close the Pick Principal window and update the value held within the control. f. This Dealer control contains dealer codes for all the dealers in your member organization. If you chose to have all your trades locked to the same sub account and dealer, this control will be disabled and all your doubles will always use the default dealer code. 4) When you have configured the double to your satisfaction, save your configurations, launch the double and close the Buy for [Instrument] window by clicking its OK button. Offer adding processes You add a Financials market offer as follows: 1) Choose a contract for which you want to add an offer by clicking inside its cell within the leftmost column of the applicable primary online trading window. 2) Display an Offer for [Instrument] window within which you will add an offer in an agent capacity by clicking within the QtyO column or pressing Ctrl + F5 on your keyboard. Alternatively, display an Offer for [Instrument] window within which you will add an offer in a principal capacity by clicking within the Offer column or pressing F3 on your keyboard. 3) Configure your offer within the Offer for [Instrument] window as you require. Circled letters in the Offer for [Instrument] window below are keyed to Offer for [Instrument] window controls. Lettered notes beneath the screen shot describe the offer configuration options available from each control. 120 a. This Qty control shows the default number of contracts you undertake to offer whenever you add a Financials market offer. If you wish, you can increase the value in the Qty control to the maximum order quantity set up for you. b. This Ref No control contains an incremented value derived from a reference number seed value you accepted or set up earlier in the trading session. This unique value is used by the Nutron back end to identify the bid. You can type your own value into this control if you wish to do so. c. This Price control contains the price per contract for the instrument for which you are adding an offer. You can change this price if you want to offer at a different per contract price. If you launched the offer from an EDM Splits ([Member Code Dealer Code]) trading window, this control will have a Split Diff caption and hold the difference in value between the two contracts in the split instead of a price value. You can also change this value d. This labelled control to the right of the Prin button contains the member code of your organization, client codes for your member organization and any sub accounts you set up for yourself. If you chose to have all your trades locked to the same sub account and dealer, this labelled control will be disabled and all your offers will always use the same sub account. Display a Pick Principal window that includes the full names of your clients as well as the client codes displayed in the labelled control by clicking the Prin button on the left of the control. Double click within the row of a client you want selected within the labelled control to close the Pick Principal window and update the value held within the labelled control. e. This Capacity control shows whether the offer will be a principal – P or agent – A trade. You can also use the control to change the offer from a principal trade to an agent trade or vice versa. f. This Dealer control contains dealer codes for all the dealers in your member organization. If you chose to have all your trades locked to the same sub account and dealer, this control will be disabled and all your offers will always use the default dealer code. g. Within this set of option buttons, clicking the FOK option button gives your offer Fill or Kill status, clicking the TOK option button gives your offer Take or Kill status and clicking the NOR option button gives your offer Normal status. 4) When you have configured the offer to your satisfaction, save your configurations, launch the offer and close the Offer for [Instrument] window by clicking its OK button. 121 Online Global market trading in a secondary online trading window A Global market secondary online trading window is a window that is launched by clicking on a menu item within a context menu launched within a primary online trading window. Options for [Instrument] windows An Options for [Instrument] secondary online trading window lets you set up bids, doubles and offers on options. Launching an Options for [Instrument] window involves the following steps: 1) Select a Global market primary online trading window from which you can generate a context menu that includes an Options menu item. 2) If you expect to add a new strike in the course of ensuing trading processes, right click on the data grid cell of the contract with which you want to trade within the primary online trading window and click the Contract Data menu item of the context menu that appears to display a Contract Data window. You can obtain valid strike intervals for the currently selected contract from within this window. 3) Right click on the data grid cell of the contract with which you want to trade within the primary online trading window and click the Options menu item of the context menu that appears to display an Options for [Instrument] window. The Options for [Instrument] window sections screen shots below depict window sections that would be next to each other in Nutron itself. These window sections have, however, been placed one above the other to use the available on-screen space optimally. Circled letters in the screen shots are linked to lettered notes below the screen shots that describe key elements within each Options for [Instrument] window section. a. This upper Options for [Instrument] data grid duplicates the record row of the contract you selected to trade as an option from within a primary online trading window with the difference that the Last column has been replaced with a MidPrice column. This is because the mid price is used to determine the price used in volatility calculations. b. Bids, doubles and offers in this window section apply to call options for the selected contract. The upper data grid can still be used to submit bids, doubles and offers on the underlying future contract. c. Bids, doubles and offers in this window section apply to put options for the selected contract. The upper data grid can still be used to submit bids, doubles and offers on the underlying future contract. 122 d. This call option Volume field and put option Volume. field respectively display the number of call options and put options traded during the current trading day for the selected contract. e. This call option Last field and put option Last. field respectively display the last traded price of a call option and a put option during the current trading day for the selected contract. f. This call option QtyB field and put option QtyB. field respectively display the current quantity of a call option and a put option for the selected contract available for the best quoted bid price. Click on one of these fields to display a window from which you can add a bid as an agent. g. This call option Bid field and put option Bid. field respectively display the current best price for a call option and a put option on the buying side. Click on one of these fields to display a window from which you can add a bid as a principal. h. This call option / field and put option \ field display a window from which you can respectively add a double of a call option and a double of a put option for the selected contract. i. This call option Offer field and put option Offer. field respectively display the current best price for a call option and a put option on the offering side. Click on one of these fields to display a window from which you can add an offer as a principal. j. This call option QtyB field and put option QtyB. field respectively display the current quantity of a call option and a put option for the selected contract available for the best quoted bid price. Click on one of these fields to display a window from which you can add a bid as an agent. k. This call option OpenInt field and put option OpenInt. field respectively display the current open interest for their respective options for the selected contract. l. This Strike field displays the strike price of the selected contract. m. This MidPrice field mirrors the mid price value of the corresponding upper data grid field. Right clicking within the upper data grid inside an Options for [Instrument] window displays the context menu shown in the screen shot below. Display a depth window for the selected contract by clicking on the Depth menu item in the context menu screen shot shown directly above. The depth window will display all active orders on the market for the contract. Force data displayed within the upper data grid to be refreshed by clicking on the Refresh menu item in the context menu screen shot above. The context menu shown in the screen shot below appears when you right click in the lower data grid inside an Options for [Instrument] window. 123 Lettered labels in the context menu screen shot directly above are linked to lettered notes below that describe what each context menu item does. a. Click on this Depth context menu item to display a depth window for the currently selected contract. The depth window will display all active orders on the market for the contract. b. Click on this Set DDE-Copy On context menu item to activate an aspect of DDE functionality within the Nutron front end that lets users copy their choice of fields from the currently open window into an alternative interface like a Microsoft Excel worksheet. Values within fields copied in this way will update in real time within the new interface. Another aspect of DDE presented within the Nutron front end lets you use a DDE Trader window and your familiarity with Excel spreadsheets to set up trading information you can use to participate in the Nutron online trading environment without working within a Nutron trading window c. Click on this Freshen data context menu item to force data displayed within the lower data grid to refresh itself. d. Click on this Configure context menu item to display the window shown below. This window lets you hide/show data grid lines and change the font type and size used within the Options for [Instrument] window. e. This Stay on Top context menu item lets you keep the currently open secondary online trading window on top of or behind active windows. You can ensure that the currently open secondary online trading window stays on top of active windows by clicking on it when it has no check mark on its left. Conversely, you can ensure that the currently open secondary online trading window remains behind active windows by clicking on it when it does have a check mark on its left. Options for [Instrument] window trading processes entail adding bids, doubles and offers as described in separate sections below: 124 Bid adding processes Adding a bid from an Options for [Instrument] window involves the following steps: 1) Launch the Options for [Instrument] window. 2) Click inside a QtyB cell or a Bid cell on the left of the lower data grid to place a bid on a call option. Choose a QtyB cell or a Bid cell on the right of the lower data grid to place a bid on a put option. 3) Click inside a QtyB cell to display a Buy for [InstrumentStrikeValue C/P] - Option window with an agent capacity. Click inside a Bid cell to display a Buy for [InstrumentStrikeValue C/P] - Option window with a principal capacity. 4) Configure your bid within the Buy for [InstrumentStrikeValue C/P] - Option window as you require. Circled letters in the Buy for [InstrumentStrikeValue C/P] - Option window screen shot below are linked to lettered notes below the screen shot you can use to explore your bid configuration options. a. This Buy for [InstrumentStrikeValue C/P] - Option caption contains a C to indicate that this bid is for a call option. A P within the caption would indicate that the bid was for a put option. b. This Strike control contains the strike price of the selected contract. You can add a new strike price and the skew file will be used to determine the new volatility for that strike price when you save that price by launching your bid. c. This Ref No control contains an incremented value derived from a reference number seed value you accepted or set up earlier in the trading session. This unique value is used by the Nutron back end to identify the bid. You can type your own value into this control if you wish to do so. d. This Qty control contains the default number of contracts you undertake to buy whenever you add a bid. If you wish, you can increase the value in the Qty spin box to the maximum order quantity set up for you. e. This labelled control to the right of the Prin button contains the member code of your organization, client codes for your member organization and any sub accounts you set up for yourself. If you chose to have all your trades locked to the same sub account and dealer, this labelled control will be disabled and all your bids will always use the same sub account. 125 Display a Pick Principal window that includes the full names of your clients as well as the client codes displayed in the labelled control by clicking the Prin button on the left of the control. Double click within the row of a client you want selected within the labelled control to close the Pick Principal window and update the value held within the labelled control. f. This Volat control contains a volatility value for your bids. g. This Dealer control contains dealer codes for all the dealers in your member organization. If you chose to have all your trades locked to the same sub account and dealer, this control will be disabled and all your bids will always use the default dealer code. h. This Premium control contains a premium value for your bids. i. This Capacity control shows whether the bid will be a principal – P or agent – A trade. You can also use the control to change the bid from a principal trade to an agent trade or vice versa. j. Within this set of option buttons, clicking the FOK option button gives your bid Fill or Kill status, clicking the TOK option button gives your bid Take or Kill status and clicking the NOR option button gives your bid Normal status. 5) When you have configured your bid to your satisfaction, launch the bid and close the Buy for [Instrument] window by clicking on the windows Ok button. Double adding processes Adding a double from an Options for [Instrument] window involves the following steps: 1) Launch the Options for [Instrument] window. 2) Click inside a / cell on the left of the lower data grid to add a double on a call option. Click inside a \ cell on the right of the lower data grid to add a double on a put option. 3) Click inside a / cell to display a Double for [InstrumentStrikeValue C/P] - Option window. The window that appears will be configured for either a principal capacity or an agent capacity depending on how your user settings are set up for the Financials market. 4) Configure your double within the Double for [InstrumentStrikeValue C/P] - Option window as you require. Circled letters in the Double for [InstrumentStrikeValue C/P] - Option window screen shot below are linked to lettered notes below the screen shot you can use to explore your double configuration options. 126 a. This Double for [InstrumentStrikeValue C/P] - Option caption contains a C to indicate that this double is for a call option. A P within the caption would indicate that the double was for a put option. b. This Qty control contains the default number of contracts you undertake to bid for and offer whenever you add a double. If you wish, you can increase the value in the Qty control to the maximum order quantity set up for you. c. This Strike control contains the strike price of the selected contract. You can add a new strike price and the skew file will be used to determine the new volatility for that strike price when you save that price by launching your bid. d. A Volat control appears both within the Bid frame and the Offer frame. Within the Bid frame, it contains a volatility value for the bid element of the double. Within the Offer frame it contains a volatility value for the offer element of the double. e. A Premium control appears both within the Bid frame and the Offer frame. Within the Bid frame, it contains a premium value for the bid element of the double. Within the Offer frame, it contains a premium value for the offer element of the double. f. A Capacity control appears both within the Bid frame and the Offer frame. Within the Bid frame, it indicates whether the bid side of the double will be a principal – P or agent – A trade. Within the Offer frame, it indicates whether the offer side of the double will be a principal – P or agent – A trade. You can use the two Capacity controls to change the bid side of the double, the offer side of the double, or both sides of the double from a principal trade to an agent trade or vice versa. g. This Order/Ref control appears both within the Bid frame and the Offer frame. Both controls will initially contain identical incremented values derived from a reference number seed value you accepted or set up earlier in the trading session. This unique value is used by the Nutron back end to identify the bid and offer sides of the double. You can type your own value into this control if you wish to do so. h. The labelled control immediately to the right of the Prin button contains the member code of your organization, client codes for your member organization and any sub accounts you set up for yourself. If you chose to have all your trades locked to the same sub account and dealer, this control will be disabled and all your bids will always use the same sub account. 127 Click the Prin button to display a Pick Principal window that includes the full names of your clients as well as the client codes displayed in the control itself. Double click on the row of a client you want to select within the labelled control to update the labelled control and close the Pick Principal window. i. This Dealer control contains dealer codes for all the dealers in your member organization. If you chose to have all your trades locked to the same sub account and dealer, this control will be disabled and all your bids will always use the default dealer code. 5) Launch the double and close the Double for [InstrumentStrikeValue C/P] – Option window by clicking on its OK button. Offer adding processes Adding an offer from an Options for [Instrument] window involves the following steps: 1) Launch the Options for [Instrument] window. 2) Click inside an Offer cell or a QtyO cell on the left of the lower data grid to add an offer on a call option. Click inside an Offer. cell or a QtyO. cell on the right of the lower data grid to add an offer on a put option. 3) Click inside an Offer cell to display an Offer for [InstrumentStrikeValue C/P] - Option window with a principal capacity. Click inside a QtyO cell to display an Offer for [InstrumentStrikeValue C/P] Option window with an agent capacity. 4) Configure your offer within the Offer for [InstrumentStrikeValue C/P] - Option window as you require. Circled letters in the Offer for [InstrumentStrikeValue C/P] - Option window screen shot below are linked to lettered notes below the screen shot you can use to explore your offer configuration options. a. This Offer for [InstrumentStrikeValue C/P] - Option caption contains a C to indicate that this offer is for a call option. A P within the caption would indicate that the offer was for a put option. 128 b. This Strike control contains the strike price of the selected contract. You can add a new strike price and the skew file will be used to determine the new volatility for that strike price when you save that price by launching your offer. c. This Ref No control contains an incremented value derived from a reference number seed value you accepted or set up earlier in the trading session. This unique value is used by the Nutron back end to identify the offer. You can type your own value into this control if you wish to do so. d. This Qty control contains the default number of contracts you undertake to sell whenever you add a bid. If you wish, you can increase the value in the Qty control to the maximum order quantity set up for you. e. This labelled control to the right of the Prin button contains the member code of your organization, client codes for your member organization and any sub accounts you set up for yourself. If you chose to have all your trades locked to the same sub account and dealer, this labelled control will be disabled and all your offers will always use the same sub account. Display a Pick Principal window that includes the full names of your clients as well as the client codes displayed in the labelled control by clicking the Prin button on the left of the control. Double click within the row of a client you want selected within the labelled control to close the Pick Principal window and update the value held within the labelled control. f. This Volat control contains a volatility value for your offers. g. This Dealer control contains dealer codes for all the dealers in your member organization. If you chose to have all your trades locked to the same sub account and dealer, this control will be disabled and all your offers will always use the default dealer code. h. This Premium control contains a premium value for your offers. i. This Capacity control shows whether the offer will be a principal – P or agent – A trade. You can also use the control to change the offer from a principal trade to an agent trade or vice versa. j. Within this set of option buttons, clicking the FOK option button gives your offer Fill or Kill status, clicking the TOK option button gives your offer Take or Kill status and clicking the NOR option button gives your offer Normal status. 5) When you have configured the offer to your satisfaction, launch the offer and close the Offer for [InstrumentStrikeValue C/P] – Option window by clicking on its OK button. Deltas for [Instrument] windows A Delta for [Instrument] secondary online trading window lets you set up bids doubles and offers on deltas. Launching a Delta for [Instrument] window involves the following steps: 1) Select a Global market primary online trading window from which you can generate a context menu that includes a Deltas menu item. 129 2) If you expect to add a new strike in the course of ensuing trading processes, right click on the data grid cell of the contract with which you want to trade within the primary online trading window and click the Contract Data menu item of the context menu that appears to display a Contract Data window. You can obtain valid strike intervals for the currently selected contract from within this window. 3) Right click on the data grid cell of the contract with which you want to trade within the primary online trading window and click the Deltas menu item of the context menu that appears to display a Deltas for [Instrument] window. The Deltas for [Instrument] window sections screen shots below depict window sections that would be next to each other in Nutron itself. These window sections have, however, been placed one above the other to use the available on-screen space optimally. Lettered labels in the screen shots are linked to lettered notes below the screen shots that describe key elements within each Deltas for [Instrument] window section. a. This upper Deltas for [Instrument] data grid duplicates the record row of the contract you selected to trade as an option from within a primary online trading window with the difference that the Last column has been replaced with a MidPrice column. This is because the mid price is used to determine the price used in volatility calculations. b. Bids, doubles and offers in this window section apply to call deltas for the selected contract. The upper data grid can still be used to submit bids, doubles and offers on the underlying future contract. c. Bids, doubles and offers in this window section apply to put deltas for the selected contract. The upper data grid can still be used to submit bids, doubles and offers on the underlying future contract. d. This call delta Volume field and put delta Volume. field respectively display the number of call deltas and put deltas traded during the current trading day for the selected contract. e. This call delta Last field and put delta Last. field respectively display the last traded price of a call delta and a put delta during the current trading day for the selected contract. f. This call delta QtyB field and put delta QtyB. field respectively display the current quantity of a call delta and a put delta for the selected contract available for the best quoted bid price. Click on one of these fields to display a window from which you can add a bid as an agent. g. This call delta Bid field and put delta Bid. field respectively display the current best price for a call delta and a put delta on the buying side. Click on one of these fields to display a window from which you can add a bid as a principal. h. This call delta / field and put delta \ field display a window from which you can respectively add a double of a call delta and a double of a put delta for the selected contract. 130 i. This call delta Offer field and put delta Offer. field respectively display the current best price for a call delta and a put delta on the offering side. Click on one of these fields to display a window from which you can add an offer as a principal. j. This call delta QtyO field and put delta QtyO. field respectively display the current quantity of a call delta and a put delta for the selected contract available for the best quoted offer price. Click on one of these fields to display a window from which you can add an offer as an agent. k. This Strike field displays the strike price of the selected contract. l. This MidPrice field mirrors the mid price value of the corresponding upper data grid field. Right clicking within the upper data grid inside an Deltas for [Instrument] window displays the context menu shown in the screen shot below. Display a depth window for the selected contract by clicking on the Depth menu item in the context menu screen shot shown directly above. The depth window will display all active orders on the market for the contract. Force data displayed within the upper data grid to be refreshed by clicking on the Refresh menu item in the context menu screen shot above. The context menu shown in the screen shot below appears when you right click in the lower data grid inside an Options for [Instrument] window. Lettered labels in the context menu screen shot directly above are linked to the lettered notes below that describe what each context menu item does. a. Click on this Depth context menu item to display a depth window for the currently selected contract. The depth window will display all active orders on the market for the contract. b. Click on this Set DDE-Copy On context menu item to activate an aspect of DDE functionality within the Nutron front end that lets users copy their choice of fields from the currently open window into an alternative interface like a Microsoft Excel worksheet. Values within fields copied in this way will update in real time within the new interface. Another aspect of DDE presented within the Nutron front end lets you use a DDE Trader window and your familiarity with Excel spreadsheets to set up trading information you can use to participate in the Nutron online trading environment without working within a Nutron trading window. 131 c. Click on this Freshen data context menu item to force data displayed within the lower data grid to refresh itself. d. Click on this Configure context menu item to display the window shown below. This window lets you hide/show data grid lines and change the font type and size used within the Deltas for [Instrument] window. e. This Stay on Top context menu item lets you keep the currently open secondary online trading window on top of or behind active windows. You can ensure that the currently open secondary online trading window stays on top of active windows by clicking on it when it has no check mark on its left. Conversely, you can ensure that the currently open secondary online trading window remains behind active windows by clicking on it when it does have a check mark on its left. Deltas for [Instrument] window trading processes entail adding bids, doubles and offers as described in separate sections below. Bid adding processes Adding a bid from a Deltas for [Instrument] window involves the following steps: 1) Launch the Deltas for [Instrument] window. 2) Click inside a QtyB cell or a Bid cell on the left of the lower data grid to place a bid on a call delta. Choose a QtyB cell or a Bid cell on the right of the lower data grid to place a bid on a put delta. 3) Click inside a QtyB cell to display a Buy for [InstrumentStrikeValue C/P] - Delta window with an agent capacity. Click inside a Bid cell to display a Buy for [InstrumentStrikeValue C/P] - Delta window with a principal capacity. 4) Configure your bid within the Buy for [InstrumentStrikeValue C/P] - Delta window as you require. Circled letters in the Buy for [InstrumentStrikeValue C/P] - Delta window screen shot below are linked to lettered notes below the screen shot you can use to explore your bid configuration options. 132 a. This Buy for [InstrumentStrikeValue C/P] - Delta caption contains a C to indicate that this bid is for a call delta. A P within the caption would indicate that the bid was for a put delta. b. This Strike control contains the strike price of the selected contract. You can add a new strike price and the skew file will be used to determine the new volatility for that strike price when you save that price by launching your bid. c. This Ref No control contains an incremented value derived from a reference number seed value you accepted or set up earlier in the trading session. This unique value is used by the Nutron back end to identify the bid. You can type your own value into this control if you wish to do so. d. This Qty control contains the default number of contracts you undertake to buy whenever you add a bid. If you wish, you can increase the value in the Qty spin box to the maximum order quantity set up for you. e. This labelled control to the right of the Prin button contains the member code of your organization, client codes for your member organization and any sub accounts you set up for yourself. If you chose to have all your trades locked to the same sub account and dealer, this labelled control will be disabled and all your bids will always use the same sub account. Display a Pick Principal window that includes the full names of your clients as well as the client codes displayed in the labelled control by clicking the Prin button on the left of the control. Double click within the row of a client you want selected within the labelled control to close the Pick Principal window and update the value held within the labelled control. f. This Volat control contains a volatility value for your bids. g. This Dealer control contains dealer codes for all the dealers in your member organization. If you chose to have all your trades locked to the same sub account and dealer, this control will be disabled and all your bids will always use the default dealer code. h. This Premium control contains a premium value for your bids. i. This Capacity control shows whether the bid will be a principal – P or agent – A trade. You can also use the control to change the bid from a principal trade to an agent trade or vice versa. 133 j. Within this set of option buttons, clicking the FOK option button gives your bid Fill or Kill status, clicking the TOK option button gives your bid Take or Kill status and clicking the NOR option button gives your bid Normal status. 5) When you have configured your bid to your satisfaction, launch your bid and close the Buy for [Instrument] window by clicking on its OK button. Double adding processes Adding a double from a Deltas for [Instrument] window involves the following steps: 1) Launch the Deltas for [Instrument] window. 2) Click inside a / cell on the left of the lower data grid to add a double on a call delta. Click inside a \ cell on the right of the lower data grid to add a double on a put delta. 3) Click inside a / cell to display a Double for [InstrumentStrikeValue C/P] - Delta window. The window that appears will be configured for either a principal capacity or an agent capacity depending on how your user settings are set up for the Financials market. 4) Configure your double within the Double for [InstrumentStrikeValue C/P] - Delta window as you require. Lettered labels in the Double for [InstrumentStrikeValue C/P] - Delta window screen shot below are linked to lettered notes below the screen shot you can use to explore your double configuration options. a. This Double for [InstrumentStrikeValue C/P] - Delta caption contains a C to indicate that this double is for a call option. A P within the caption would indicate that the double was for a put option. b. This Qty control contains the default number of contracts you undertake to bid for and offer whenever you add a double. If you wish, you can increase the value in the Qty control to the maximum order quantity set up for you. c. This Strike control contains the strike price of the selected contract. You can add a new strike price and the skew file will be used to determine the new volatility for that strike price when 134 you save that price by launching your bid. If the new premium is out of the allowable range set up for you when the strike is created, the error message, "too far from market" will appear. d. A Volat control appears both within the Bid frame and the Offer frame. Within the Bid frame, it contains a volatility value for the bid element of the double. Within the Offer frame it contains a volatility value for the offer element of the double. e. A Premium control appears both within the Bid frame and the Offer frame. Within the Bid frame, it contains a premium value for the bid element of the double. Within the Offer frame, it contains a premium value for the offer element of the double. f. A Capacity control appears both within the Bid frame and the Offer frame. Within the Bid frame, it indicates whether the bid side of the double will be a principal – P or agent – A trade. Within the Offer frame, it indicates whether the offer side of the double will be a principal – P or agent – A trade. You can use the two Capacity controls to change the bid side of the double, the offer side of the double, or both sides of the double from a principal trade to an agent trade or vice versa. g. This Order/Ref control appears both within the Bid frame and the Offer frame. Both controls will initially contain identical incremented values derived from a reference number seed value you accepted or set up earlier in the trading session. This unique value is used by the Nutron back end to identify the bid and offer sides of the double. You can type your own value into this control if you wish to do so. h. The labelled control immediately to the right of the Prin button contains the member code of your organization, client codes for your member organization and any sub accounts you set up for yourself. If you chose to have all your trades locked to the same sub account and dealer, this control will be disabled and all your bids will always use the same sub account. Click the Prin button to display a Pick Principal window that includes the full names of your clients as well as the client codes displayed within the labelled control itself. Double click on the row of a client you want to select within the labelled control to update the labelled control and close the Pick Principal window. i. This Dealer control contains dealer codes for all the dealers in your member organization. If you chose to have all your trades locked to the same sub account and dealer, this control will be disabled and all your bids will always use the default dealer code. 5) Launch the double and close the Double for [InstrumentStrikeValue C/P] - Option window by clicking its OK button. Offer adding processes Adding an offer from a Deltas for [Instrument] window involves the following steps: 1) Launch the Deltas for [Instrument] window. 2) Click inside an Offer cell or a QtyO cell on the left of the lower data grid to add an offer on a call delta. Click inside an Offer. cell or a QtyO. cell on the right of the lower data grid to add an offer on a put delta. 135 3) Click inside an Offer cell to display an Offer for [InstrumentStrikeValue C/P] - Delta window with a principal capacity. Click inside a QtyO cell to display an Offer for [InstrumentStrikeValue C/P] Delta window with an agent capacity. 4) Configure your offer within the Offer for [InstrumentStrikeValue C/P] - Delta window as you require. Circled letters in the Offer for [InstrumentStrikeValue C/P] - Delta window screen shot below are linked to lettered notes below the screen shot you can use to explore your offer configuration options. a. This Offer for [InstrumentStrikeValue C/P] - Delta caption contains a C to indicate that this offer is for a call delta. A P within the caption would indicate that the offer was for a put option. b. This Strike control contains the strike price of the selected contract. You can add a new strike price and the skew file will be used to determine the new volatility for that strike price when you save that price by launching your bid. c. This Ref No control contains an incremented value derived from a reference number seed value you accepted or set up earlier in the trading session. This unique value is used by the Nutron back end to identify the offer. You can type your own value into this control if you wish to do so. d. This Qty control contains the default number of contracts you undertake to sell whenever you add a bid. If you wish, you can increase the value in the Qty control to the maximum order quantity set up for you. e. This labelled control to the right of the Prin button contains the member code of your organization, client codes for your member organization and any sub accounts you set up for yourself. If you chose to have all your trades locked to the same sub account and dealer, this labelled control will be disabled and all your offers will always use the same sub account. Display a Pick Principal window that includes the full names of your clients as well as the client codes displayed in the labelled control by clicking the Prin button on the left of the control. Double click within the row of a client you want selected within the labelled control to close the Pick Principal window and update the value held within the labelled control. f. This Volat control contains a volatility value for your offers. g. This Dealer control contains dealer codes for all the dealers in your member organization. If you chose to have all your trades locked to the same sub account and dealer, this control will be disabled and all your offers will always use the default dealer code. 136 h. This Premium control contains a premium value for your offers. i. This Capacity control shows whether the offer will be a principal – P or agent – A trade. You can also use the control to change the offer from a principal trade to an agent trade or vice versa. j. Within this set of option buttons, clicking the FOK option button gives your offer Fill or Kill status, clicking the TOK option button gives your offer Take or Kill status and clicking the NOR option button gives your offer Normal status. When you have configured the offer to your satisfaction, launch the offer and close the Offer for [InstrumentStrikeValue C/P] - Option window by clicking its OK button. Using operations and views windows As well as making online trading windows available to the markets Nutron supports, Nutron also makes operations windows and views windows available to the Financials market and the Commodities market. Operations windows are windows that let you carry out one or another process that supports online trading processes without actually being a trading process in its own right. The ability to perform operations lets us class these windows as Financials Views or Commodities Views operational windows or simply Fin Views operations or Agris Views operations. Views windows are windows that display trading data for you and optionally other dealers in your organization for the current day in real time or the previous day for the Financials or Agris markets. This functionality lets us class these windows as Financials Views or Commodities Views viewing windows or simply Fin Views views or Agris Views views. Fin Views operations Notes in separate help topics below deliver the following information for each Fin Views operation: A description of the functionality that the window provides. A description of ways to launch the window. Key window element descriptions within separate paragraphs. These descriptions will usually consist of one or more numbered screen shots linked to descriptions of each of the items. Enter Report Only Trade Window 1) Functionality The Enter Report Only Trade window lets you enter the details of one trade leg of a deal that took place off screen. Such a deal might, for instance, have been carried out over the telephone. 137 Once the one trade leg is done, a record of that trade leg appears within a View [Member Code Dealer Code] Unmatched trades window until the other leg is entered into the system. The trade record will then appear within a View [Member Code Dealer Code] EDM Completed Orders window. For a trade leg record to become a completed order, the principal of one leg must equal the counter party of the other leg. There are three kinds of report only trades: Member to Client trades in which the counter party is a client of the dealer entering the report only trade. Such trades result in an automatic match for the unmatched trade. Member to Member trades in which a member enters one leg of the trade and selects the member that he/she wishes to do the trade with as the counter party. This counter party must enter the other leg of the trade within six minutes for the trade to be matched by the Nutron back end. Client to Client trades that result in an automatic match in which the second trade leg is automatically generated. If the “Must confirm report only trades” setting has been set up for you, your unmatched Member to Member trades will stay in the unmatched trade record file until you accept them from within a View [Member Code Dealer Code] Unmatched trades window. If the “Must confirm report only client trades” setting has been set up for you, unmatched Member to Client trades and Client to Client trades will stay in the unmatched trade record file until their counter parties accept them from within a View [Member Code Dealer Code] Unmatched trades window. 2) Launch Methods You can launch an Enter Report Only Trade window by clicking on Fin Views >EDM Enter Report Only Trade. 3) Key Window Elements You enter a report only trade within an Enter Report Only Trade window. This means you can use the lettered labels keyed to Enter Report Only Trade window controls in the screen shot below and the lettered sections beneath it to learn how to enter a report only trade. 138 a. This Reference Num control contains an incremented value derived from a reference number seed value you accepted or set up earlier in the trading session. You can type your own value into this control if you wish to do so. b. This Member control will display the member code of your organization if you are logged on as a dealer. The dropdown list will display all the member organizations for your clearing code if you are logged in as a clearing member. c. This Principal control contains the member code of your organization, client codes for your member organization and any sub accounts you set up for yourself. If you chose to have all your trades locked to the same sub account and dealer, this control will be disabled and all your trades will always use the same sub account. Click the Prin button to display a Pick Principal window that includes the full names of your clients as well as the client codes displayed in the Principal control. Double click on the row of a client you want to populate this control to update the control and close the Pick Principal window 139 d. This Dealer control contains dealer codes for all the dealers in your member organization. If you chose to have all your trades locked to the same sub account and dealer, this dropdown list will be disabled (as shown in the screen shot) and all your bids will always use the default dealer code. e. Use this Time control to enter the time of the unmatched trade. The time you enter cannot be later than the current time displayed in the spin box, but may be earlier than the current time. f. Use this Buy / Sell control to specify if the trade leg you are entering is a buy - B or a sell – S. g. Use this Capacity control to specify if the report only trade you are entering will be a principal - P or agent - A trade. h. This Quantity control holds the default number of contracts for your trades when the Enter Report Only Trade window first appears. You can increase the number that appears here up to the maximum order quantity set up for you. i. Use this Contract control to select the contract to which you want to add a report only trade. Selecting a standard contract or an option on a contract respectively disables and enables controls m. through to p. near the bottom of the Enter Report Only Trade window as described in section toggle m. This selection also determines if the control described in section toggle q. has a Price caption and holds the price value of the contract involved in the report only trade, or if it has a Premium caption and holds the premium value of the option on a contract involved in the report only trade. j. If you have created sub accounts for yourself, you can select an appropriate sub account from this Sub Account control to link to the report only trade you are entering. k. The Trade Type field only contains a value for completed orders that have resulted from report only trades. Trade types at the time of writing consist of a correction trade type - COR, a misdeal trade type -MID, a mismatch trade type - MIS and a reported trade type – REP. l. If you selected a standard contract from the Contract control, this Strike control will be disabled. If, however, you selected an option on a contract from the Contract control, this Strike control will be enabled. This Strike control displays the strike price of the contract you specified using the Contract control. m. This Call / Put control lets you make report only trades for an option on a contract involve a call option - C or a put option – P. n. This Future Price control lets you specify the future price of a report only trade for an option on a contract. o. This Volatility control lets you specify the volatility of a report only trade for an option on a contract. p. The caption of this Quote At control changes to one of two values depending on whether you specified a standard contract or an option on a contract using the Contract control. 140 If you used the Contract control to specify a standard contract, the Quote At control will have a Price caption when you input the agreed upon price for a report only trade involving a standard contract into it. If you are logged in as a clearing member, you will see a Zero Fee this Deal check box on the right of the text box. You can apply a zero fee to the entire report only deal by adding a check mark to this check box. If you used the Contract control to specify an option on a contract, the Quote At control will have a Premium caption when you input the premium for a report only trade involving an option on a contract into it. q. When the counter party to the report only trade bring up their Enter Report Only Trade window to complete the trade, this Price Ref control will hold a price value or a premium value that applies to the counter party. r. The Counter Party control contains the member codes and client codes from which you need to select the counter party for the current report only trade. Display a Pick Principal window that includes the full names as well as the codes of potential counter parties by clicking on the C/Party button. Double click within the row of the client you want selected within the Counter Party control to close the Pick Principal window and update the value held within the Counter Party control. Click the OK button to submit the report only trade and display the confirm window shown below. Click the Confirm window's Yes button to close it while keeping the Enter Report Only Trade window open to let you enter another report only trade. Alternatively, click the Confirm window's No button to close both it and the Enter Report Only Trade window. Access Control Window 1) Functionality The Access Control window delivers functionality which allows clearing members and master dealers to define the scope of the limits that can be set up by ordinary dealers. Ordinary dealers can also set up trading limits within this window as long as the limits they set up and the messages they subscribe to do not go beyond the bounds of limits set up by a clearing member and messages within the set up group subscription. 2) Launch Methods You can launch an Access Control window by clicking Fin Views > EDM Configure Access. 141 3) Key window elements The Access Control window delivers its functionality at three levels. These three levels are subject to the status of the currently logged in user as follows. Users logged in as clearing members can set up limits for entire member organizations. Users logged in as master dealers can set up limits for themselves and other dealers within the scope of limits set up by clearing members. Users logged in as dealers can only set up limits for themselves within the scope of limits set up by clearing members and master dealers. Dealers can also set up limits for themselves within the scope of limits defined within the Access Control window on the basis of limits set up within the Defaults tab of the User Configuration window. As Access Control window users use controls on the Margin Limit, Messages and Bid / Offer tabs to define limits, these tabs are the most important elements within the Access Control window shown in the screen shot below. You activate controls on Access Control window tabs by selecting a member organization under your jurisdiction from the Member dropdown list of this window if you are currently logged in as a clearing member. 142 If you are currently logged in as a master dealer or an ordinary dealer, you would activate these controls by selecting a dealer for whom you can set up limits from within the Dealer dropdown list. In the screen shot above, the currently logged in user is logged in as a clearing member. This user can now proceed to apply margin limits on a per trade basis within the currently active Margin Limit tab. The cells in the screen shot above hold margin limits for instrument types from top to bottom. From left to right, the cells in the screen shot respectively hold margin limits for Financials market trades launched from primary online trading windows, secondary online trading windows and off screen as report only trades. In the screen shot, no margin limits have been applied. The zero values in the screen shot actually represent infinite margin limits. You enter margin limits as money values without currency symbols. Click the Messages tab to make it active when you have finished updating the Margin Limit tab. The Access Control window appears as shown in the screen shot below when the Messages tab is the active tab. The Messages tab provides the means whereby clearing members, master dealers and ordinary dealers can respectively determine the messages to and from the Nutron back end they wish member organizations, other dealers and themselves to subscribe to or unsubscribe from. 143 You change values held in cells in the Subscribed and Can Change columns by double clicking within each cell. Clearing members determine which messages master dealers and dealers can subscribe to or unsubscribe from by changing values in the Can Change column. Master dealers and dealers respectively determine which messages they wish other dealers and themselves to subscribe to or unsubscribe from by changing values in the Subscribed column. Click the Bid / Offer tab to make it active when you have finished updating the Messages tab. The Access Control window appears as shown in the screen shot below when the Bid / Offer tab is the active tab. You can determine the trading actions allowed for an entire organization, for other dealers or simply for yourself (depending on your status) by clicking within the Only Buys, Only Sells or All Buys and Sells option button shown in the screen shot. Once you are satisfied with the values you have updated within the Access Control window for a member organization or a single dealer, click its Submit button. Close the Access Control window by clicking on its Cancel button. 144 Enter a Client window 1) Functionality The Enter a Client window lets you add new clients to your Nutron installation. Compliance officers can also add clients. When a new client is loaded onto the system, a message is sent to the Nutron back end. The back end waits for the Exchange to FICA and validate the new client record before messaging the Nutron front end to update the client file. 2) Launch Method You can launch an Enter a Client window by clicking Fin Views > EDM Enter Client. 3) Key window elements You add a new client record by selecting and entering client details on the Trading, Contact Details and Banking tabs of an Enter a Client window. This means you can use the numbered tab screen shots and numbered notes below to learn how to add a new client record. Use the numbered Trading tab screen shot below and the numbered notes linked to it to learn how to complete the first stage of creating a new client record. 145 a. Check this check box to indicate that the new client is an individual. Leave the check box unchecked to indicate that the client is a company. b. Use this dropdown list to indicate whether or not the client has a staff account by selecting either the YES or the NO list item within the dropdown list. c. Enter a code for the new client inside this text box. d. Enter a client name of up to 80 characters inside this text box. e. Optionally, enter an additional client name of up to 52 characters inside this text box. f. Enter the client's date of birth here. g. Use this text box to enter the client's ID number if you checked the Individual check box described in numbered note a. Enter the CC registration number for a company here if you left the Individual check box unchecked. 146 h. Optionally, enter the client's passport number inside this check box. i. This control holds the date the new client record was loaded. j. This control holds the date the new client record was validated. k. Use this dropdown list to select the member organization to which the client belongs. l. Enter the client's VAT Registration Number into this text box. m. Enter an income tax number of up to 52 characters into this text box. n. Select this check box to load the client as a foreign client when it is enabled. o. Use this dropdown list to indicate whether or not the client‟s account is discretionary managed by selecting either the YES or the NO list item within the dropdown list. Click the Contact Details tab to make it active so you can continue to provide details for the new client record. Use the lettered controls within the Contact Details tab screen shot below and the numbered notes that appear after it to learn how to complete the second stage of creating a new client record. 147 a. Enter your first choice of contact telephone number for the client into this text box. You can type in a telephone number of up to 24 characters. b. Optionally, enter an alternative contact telephone number for the client into this text box. You can type in a telephone number of up to 24 characters. c. Enter a contact fax number for the client of up to 24 characters inside this text box. d. Enter a contact email address for the client of up to 52 characters inside this text box. The Nutron back end will check this email address for validity. e. Enter client physical address details up to suburb level within these two text boxes. The first text box can accommodate up to 52 characters and the second text box can accommodate up to 30 characters. f. Optionally, enter a suburb name of up to 43 characters as part of the client‟s physical address details into this text box. 148 g. Enter a predetermined city code of 3 characters into this text box for the client‟s city. h. Enter a postal code of 4 characters into this text box for the client‟s suburb/city. i. Check this check box if the client has the same postal address as physical address. If this is not the case, leave the check box unchecked and enter client postal address details into the text boxes below the check box. Click the Banking tab to make it active so you can continue to provide details for the new client record. Use the lettered controls within the Banking Details tab screen shot below and the numbered notes that follow after them to learn how to complete the final stage of creating a new client record. a. Optionally, enter a bank account number for the client of up to 18 characters into this text box. b. Optionally, if the new client will pay more than 100% margin, enter any value up to 200 into this spin box. c. Optionally, enter a Swift code for the client of up to 52 characters into this text box. Swift (Society of Worldwide International Financial Transfers) provides a set of standards for electronically transferring financial data worldwide. d. Optionally, enter a company number of up to 52 characters for the client into this text box. e. Optionally, enter the name of the client‟s compliance officer into this text box. f. Optionally, check this check box if the client has provided you with proof of residence. g. Optionally, check this check box if the client has provided you with proof of registration. h. Optionally, check this check box to indicate Clearing Member is changing margin multiplication factor. 149 Click on the OK button to display a window asking you if you want to load another client. [Member Code Dealer Code] EDM window The [Member Code Dealer Code] EDM window lets you respectively retrieve deals files and positions files depending on which of two check boxes inside the window you check on a market closeout. You can launch a [Member Code Dealer Code] EDM window by clicking Fin Views > EDM Retrieve Post Closed Trades and Positions. Roll Over Window 1) Functionality Roll Over is the ability to move position from one expiry to another in future. One can move existing position or create new position. 2) Launch Method You can launch a Roll Over window by clicking Fin Views > EDM Roll Over Position Screen. 3) Key window elements You add a new Roll Over Deal by entering the deal details on the Roll Over window. This means you can use the numbered tab screen shots and numbered notes below to learn how to add a new Roll Over. 150 a. The Member drop down list will display the member code of your organization if you are logged in as a dealer. b. The Principal drop down list contains the member code of your organization, client codes for your member organization and any sub accounts you set up for yourself. If you chose to have all your trades locked to the same sub account and dealer, this drop down control will be disabled and all your trades will always use the same sub account. c. Dealer drop down list contains dealer codes for all the dealers in your member organization. If you chose to have all your trades locked to the same sub account and dealer, this drop down list will be disabled (as shown in the screen shot) and all your bids will always use the default dealer code. d. The Time spin box allows you to enter the time of the unmatched trade. The time you enter cannot be later than the current time displayed in the spin box, but may be earlier than the current time. e. The Buy Sell drop down list allows you to specify if the trade leg you are entering is a buy -B or a sell – S. f. The Quantity text box holds the default number of contracts for your trades when the Roll Over window first appears. You can increase the number that appears here up to the maximum order quantity set up for you. 151 g. If you have created sub accounts for yourself, you can select an appropriate sub account from the Sub Account drop down list to link to the report only trade you are entering. h. The Capacity drop down list allows you to specify if the report only trade you are entering will be a principal - P or agent - A trade. i. The Ref Num 1 text box contains an incremented value derived from a reference number seed value you accepted or set up earlier in the trading session. This unique value is used by the Nutron back end to identify the report only trade. You can type your own value into this text box if you wish to do so. j. The Contract drop down list allows you to select the contract to which you want to add a report only trade. This Contract drop down list can be filtered by selecting the Class and whether the contract is a Future/Option. k. The Future Price text box lets you specify the future price of a report only trade for an option on a contract. l. The Ref Num 2 text box contains an incremented value derived from a reference number seed value you accepted or set up earlier in the trading session. This unique value is used by the Nutron back end to identify the report only trade. You can type your own value into this text box if you wish to do so. m. The Contract drop down list allows you to select the contract to which you want to add a report only trade. This Contract drop down list can be filtered by selecting the Class and whether the contract is a Future/Option. n. The Future Price text box lets you specify the future price of a report only trade for an option on a contract. This would similarly imply that if the future was Yield traded, this would hold the yield for the futures contract. o. The Counter Party drop down list contains member codes and client codes from which you need to select a counter party for the current report only trade. Click the C/Party button to display a Pick Principal window that includes the full names of the clients and members featured in the drop down list. Double click on the row of a client you want to populate the drop down list to update the drop down list and close the Pick Principal window. View [Member Code Dealer Code] EDM Trades window 1) Functionality The View [Member Code Dealer Code] EDM Trades window displays your completed trades for the current day as well as those of all the other dealers in your member organization if you are a master dealer who opted for this setting. This window is also a platform for various deal management tasks 2) Launch Method You can launch a View [Member Code Dealer Code] EDM Trades window by clicking Fin Views > EDM View Trades. 3) Key window elements Data grid fields, functionality buttons and a default Fin Views view pop-up menu comprise the key elements of View [Member Code Dealer Code] EDM Trades windows. The remaining paragraphs 152 under this heading discuss each of these three elements in turn. The View [Member Code Dealer Code] EDM Trades window section shown below is displayed in three lettered screen shots that respectively represent the left, middle and right sections of this window. a. The Contract field contains each contract that was traded on. b. The Prin field contains the principal for each trade leg. c. The Master Client field contains a client code for each trade leg that you linked to a principal which is a client. d. The Buy/Sell field indicates whether each trade leg was a buy or a sell. e. The Qty field contains the quantity traded for each trade leg. f. The Price field contains the price that applies to each trade leg. g. The Dealt at field contains the price of the trade for each trade leg. h. The Ref No field contains the user reference number used when an order was placed for each trade leg. i. The Exchange Ref field contains a unique exchange reference number assigned to each trade leg. j. The Version field contains a version number that increments each time the contract changes its originality. k. The Dealer field identifies the dealer who carried out the trade leg. l. The Time field specifies the time at which each trade was done. m. The Enter Time field displays the time the trade was entered. 153 n. The Allocation Time filed shows the time the trade was allocated. o. The SeqNo field uniquely identifies each trade. p. The Origin field specifies the origin of each trade e.g. OnScreen. q. The SubAcc field specifies the sub account (where applicable) on which each trade was done. r. The Member field contains the code of the member organization responsible for each trade. s. The Capacity field specifies whether the dealer made each trade as a principal or as an agent. t. The Trade Type field is an indication of why an unmatched trade is booked. u. The Contract Expiry field displays the expiry date of the contract. v. The Contract Name field specifies the name of each traded contract. w. The Booking Fee Flag field indicates if the booking fee does not have to be paid on the deal. x. The Fee Delta field is used for option deals to indicate the delta to be used for the fee purpose. y. The Maker Qty field indicates the number of contracts which were traded as a maker. (NOTE: This could include decimals if a consolidated deal is allocated to a client). z. The Report Only Qty field indicates the number of contracts which were traded via a report only trade. (NOTE: This could include decimals if a consolidated deal is allocated to a client). A View [Member Code Dealer Code] EDM Trades window has thirteen functionality buttons. Each of these buttons is discussed as they appear from left to right across the bottom of the window in separate numbered notes below. A. The Close button closes the View [Member Code Dealer Code] EDM Trades window. B. The Add button lets you consolidate the information displayed in the View [Member Code Dealer Code] EDM Trades window data grid by adding some trade legs together. In order for you to do this, the trade legs must have the same buy/sell flag, contract name, principal and sub account. Use the Add button as follows: 154 (i) Enable the Add button by selecting the trade legs you want to combine within their data grid rows. (ii) Click the newly enabled Add button. The Add button will revert to its usual disabled state and the trade legs you selected will be consolidated within a single trade record C. The Div button lets you split a currently selected deal as follows: (i) Enable the Div button by selecting the deal you want to split. (ii) Click the Div button to launch the Div window as shown below. (iii) Specify the deal field/s you intend using as a basis for splitting the deal inside the Div window. (iv) Click the Enter button to display the deal field/s you are using to split up the deal inside the large panel inside the Div window. (v) Click the OK button to complete the above process and close the Div window. The deal splitting process needs to be validated according to the following criteria: If the Principal is a client, the system checks for sub accounts. If a client is selected as the principal, then they cannot change the price. The system will not add a div deal if the quantity is 0. The system also checks for negative commission. You can only div a deal once the system has checked that the deal is allowed to be split. D. The Div Bulk button functionality is only available once you have set up am portfolio as described in Point E below. After you have set up the portfolio and clicked the Div Bulk button, you then select the portfolio you want to use from the Bulk Div window shown below. 155 Once you have made your selection, the trade leg will be split according to the portfolio you selected. The Nutron back end validates your div bulk processes according to the following criteria: The system checks that client codes in the syndicate are valid. When the syndicate is set up, the system checks that all the principals together equal 100%. E. Click the Portfolio button to display a Portfolio Setup window that lets you set up different portfolios with different percentages for some of your clients. These portfolios facilitate the div bulk processes. A screen shot of a Portfolio Setup window with an active Portfolio tab and with an active Setup tab appear below on the left and right respectively. 156 F. Click a Net View button to display a view like the one shown in the screen shot below that gives an overall summation of the trades that were actually done by contract. G. The Assign button lets you assign a trade leg to another member. The other member will receive this trade leg in his/her unmatched file and have the option to accept the trade leg. A new reference number can be given, the member can be selected and a new price can be entered when assigning a trade. You assign the trade from within the window shown below. 157 Assigned trades are checked for negative commission as part of the validation process. H. The Tri-Partite button lets you assign a trade leg to a tripartite client provided that client has been set up by the Exchange as a tripartite client. A new reference number can be given, the member can be selected and a new price/rate can be entered when the trade is assigned. You carry out the actual tripartite allocation process from the window shown in the screen shot below. I. The Pause/Resume button is a toggle. If you click this button while it has n Pause caption, it will prevent updates from appearing within the View [Member Code Dealer Code] EDM Trades window data grid until you click it again. The „Resume‟ caption will also replace the „Pause‟ caption of this button. If you click this button while it has a „Resume‟ caption, updates will appear within the View [Member Code Dealer Code] EDM Trades window data grid once again. The 'Pause' caption will also reappear. J. The Trade Correct button lets you correct a client trade that has been allocated to the incorrect participant. Use the trade correct button as follows: i. Double click the client trade record within the View [Member Code Dealer Code] EDM Trades window data grid that you want to correct. ii. Click the button to display the Correction Trade. iii. Correct the details by selecting the new principal and clicking on the OK button. K. Click the Refresh button to force an update of the contents of the data grid. L. The Filter button opens a separate filter screen where you can filter the data that should be displayed in the view. 158 M. The Change Dealer button is used to change the dealer for the trade. View [Member Code Dealer Code] EDM Active Order window 1) Functionality The View [Member Code Dealer Code] EDM Active Orders window displays your active orders for the current day as well as those of all the other dealers in your member organization if you are currently logged in as a master dealer and opted for this setting 2) Launch Method You can launch a View [Member Code Dealer Code] EDM Active Orders window by clicking Fin Views > EDM View Active Orders 3) Key window elements Data grid fields, functionality buttons and a default Fin Views view pop-up menu comprise the key elements of View [Member Code Dealer Code] EDM Active Orders windows. The remaining paragraphs under this heading discuss each of these three elements in turn. The View [Member Code Dealer Code] EDM Active Orders window section screen shots below display column headers for each of the data grid fields this window contains. a. The Buy/Sell field indicates whether each active order is a buy or a sell. b. The Qty field contains the quantity of each active order. c. The Contract field contains the contract name of each active order. d. The Quote at field contains the price at which each active order is being quoted. e. The RefNo field contains the reference number of each active order. f. The Prin field identifies the principal for which the active order was done. g. The Master Client field contains a client code for each trade leg that you linked to a principal which is a client. h. The Dealer field identifies the dealer who launched each active order. i. The Member field contains a four letter code describing the member firm to which each order belongs. j. The Time field contains the time that each order was put into the system. 159 k. The Seq No field contains a sequence number that uniquely identifies each active order. l. The Capacity field specifies whether each active order involved a Principal or an Agent. A View [Member Code Dealer Code] EDM Active Orders window has eight functionality buttons. Separate numbered note headings below discuss each of these buttons as they appear from left to right across the bottom of the window A) The Close button closes the View [Member code Dealer Code] EDM Active Orders window. B) The second functionality button is either a Delete-sel button or a Susp button. The button will only be a Susp button if you checked the Suspend not delete orders check box on the Flags tab of the User Configuration window. The Delete-Sel / Susp button is disabled until you select one or more active order records by double clicking their rows. Click the Delete-Sel / Susp button to remove active record rows you have selected from the data grid. You deselect data grid rows by double clicking them again. If you clicked a Susp button, the row/s you selected will appear within the View [Member Code Dealer Code] EDM Suspended Orders window data grid. C) The third functionality button is either a Del-All button or a Susp-All button. The button will only be a Susp-all button if you checked the Suspend not delete orders check box on the Flags tab of the User Configuration window. Click the Del-All / Susp-All button to remove all active record rows from the data grid. If you clicked a Susp-All button, all formerly active order rows will appear within the View [Member Code Dealer Code] EDM Suspended Orders window data grid. D) The Reduce button is disabled until you select one or more data grid rows by double clicking on them. Click the Reduce button to display a window that lets you reduce the quantity for an active order without the order losing its position in the trading stack on the Nutron back end. E) Click the Refresh button to force an update of the contents of the View [Member Code Dealer Code] EDM Active Orders window data grid. F) The Pause/Resume button is a toggle. If you click this button while it has n Pause caption, it will prevent updates from appearing within the View [Member Code Dealer Code] EDM Active Orders window data grid until you click it again. The „Resume‟ caption will also replace the „Pause‟ caption of this button. If you click this button while it has a „Resume‟ caption, updates will appear within the View [Member Code Dealer Code] EDM Active Orders window data grid once again. The 'Pause' caption will also reappear. G) The Filter button opens a separate filter screen where you can filter the data that should be displayed in the view. H) The Edit button allows you to edit the details for the selected trade leg. 160 View [Member Code Dealer Code] EDM Completed Orders window 1) Functionality The View [Member Code Dealer Code] EDM Completed Orders window displays your completed orders for the current day as well as those of all the other dealers in your member organization if you opted for this setting 2) Launch Method You can launch a View [Member Code Dealer Code] EDM Completed Orders window by clicking Fin Views > EDM View Completed Orders. 3) Key window elements Data grid fields, a functionality button and a default Fin Views view pop-up menu comprise the key elements of View [Member Code Dealer Code] EDM Completed Orders windows. The remaining paragraphs under this heading discuss each of these three elements in turn. The View [Member Code Dealer Code] EDM Completed Orders window section shown below is displayed in three numbered screen shots that respectively represent the left, middle and right sections of this window. a. The Buy/Sell field indicates whether the completed order was a buy or a sell trade leg. b. The Dealt Qty field contains the quantity that was traded. c. The Order Qty field contains the original quantity of the active order before a trade was done. d. The Contract field contains the contract that was traded on. e. The Order Price field contains the original price of the active order, but its semantic significance varies depending on whether the completed order was a future or an option. f. The Trade Price field contains the price that resulted in the deal, but its semantic significance varies depending on whether the completed order was a future or an option. g. The Price field contains the price that the unmatched trade was done for, but its semantic significance varies depending on whether the completed order was a future or an option. 161 h. The Order Ref No field contains the order reference number for the trade. i. The Exchange Ref field contains the exchange reference number allocated to the deal. j. The Prin field contains the principal code for the trade. k. The Master Client field contains a client code for each trade leg that you linked to a principal which is a client. l. The Dealer field contains the code of the dealer responsible for the trade. m. The Member field contains the code of the member organization to which the position belongs. n. The Order Time field contains the time of the order. o. The Dealt Time field contains the time of the deal. p. The Trade Type field only contains a value for completed orders that have resulted from report only trades. Trade types at the time of writing consist of a correction trade type - COR, a misdeal trade type -MID, a mismatch trade type - MIS and a reported trade type – REP. q. The Seq No field contains a unique identifier for the deal. r. The Origin field specifies the origin of each trade e.g. Onscreen. s. The Capacity field indicates whether the trade was a principal or an agency trade. t. The Spot Price field contains the spot price when the trade was done. u. The Version field contains a version number that increments whenever the contract changes its originality. v. The Booking fee Indicates if a fee has been charged on this completed order. w. The Fee Indicates the fee applied to this completed order. x. The Fee Delta field is used for option deals to indicate the delta to be used for the fee purpose. A View [Member Code Dealer Code] EDM Completed Orders window has two functionality buttons in its bottom left hand corner. A) Click the Close button to close the View [Member Code Dealer Code] EDM Completed Orders window. 162 B) The Filter button opens a separate filter screen where you can filter the data that should be displayed in the view. View [Member Code Dealer Code] EDM Suspended Orders window 1) Functionality The View [Member Code Dealer Code] EDM Suspended Orders window displays your suspended orders for the current day as well as those of all the other dealers in your member organization if you opted for this setting. You can also reactivate orders from within this window. 2) Launch Method You can launch a View [Member Code Dealer Code] EDM Suspended Orders window by clicking Fin Views > EDM View Suspended Orders 3) Key window elements Data grid fields, functionality buttons and a default Fin Views view pop-up menu comprise the key elements of View [Member Code Dealer Code] EDM Suspended Orders windows. The remaining paragraphs under this heading discuss each of these three elements in turn. a. The Buy/Sell field indicates if each suspended order is a buy or a sell. b. The Qty field contains the quantity of each suspended order. c. The Contract field contains the contract name of each suspended order. d. The Quote at field contains the price at which each suspended order was quoted. e. The Ref No field contains the reference number of each suspended order. f. The Prin field identifies the principal for whom each suspended order was launched. g. The Master Client field contains a client code for each trade leg that you linked to a principal which is a client. h. The Dealer field identifies the dealer who launched each suspended order. i. The Member field contains a four letter code describing the member firm to which each suspended order belongs. j. The Time field contains the time at which each suspended order was suspended. k. The Seq No field contains a sequence number that uniquely identifies each suspended order. 163 l. The Capacity field specifies whether each suspended order involved a Principal or an Agent. A View [Member Code Dealer Code] EDM Suspended Orders window has seven functionality buttons. Numbered notes below discuss each of these buttons as they appear from left to right across the bottom of the window. A) The Close button closes the View [Member Code Dealer Code] EDM Suspended Orders window. B) The Resubmit button resubmits a suspended order or suspended orders that you have selected from within the data grid and makes them active again. C) The Delete button deletes a suspended order or suspended orders that you have selected from within the data grid. D) The Edit button displays a window like the one shown in the screen shot below for the currently selected suspended order E) The Edit button allows you to edit the details for the selected trade leg. F) The Resubmit All button resubmits all suspended orders displayed in the data grid and makes them active again. G) The Delete All button deletes all the suspended trades. H) The Filter button opens a separate filter screen where you can filter the data that should be displayed in the view. View [Member Code Dealer Code] EDM Unmatched trades window 1) Functionality The View [Member Code Dealer Code] EDM Unmatched Trades window displays all of your Report Only trades that have not been matched as well as Report Only trades from other Members that have been assigned to you. You can see the unmatched trades of other dealers in your member organization if you are a master dealer who opted for this setting 2) Launch Method You can launch a View [Member Code Dealer Code] EDM Unmatched Trades window by clicking Fin Views > EDM View Unmatched Trades 3) Key window elements 164 Data grid fields, functionality buttons and a default Fin Views view pop-up menu comprise the key elements of View [Member Code Dealer Code] EDM Unmatched Trades windows. The remaining paragraphs under this heading discuss each of these three elements in turn. a. The Ref No field contains the reference number of each unmatched trade. b. The Member field contains the member code of each unmatched trade member. c. The Dealer field contains the dealer code of each unmatched trade dealer. d. The Prin field contains the principal for the unmatched trade. e. The Master Client field contains a client code for each trade leg that you linked to a principal which is a client. f. The Time field contains the time each unmatched trade was entered. g. The Buy/Sell field indicates whether the unmatched trade is a buy or a sell. h. The Qty field contains the quantity of the unmatched trade. i. The Contract field contains the contract on which the unmatched trade took place. j. The Price field will display the premium for the option on the contract involved in the report only trade. k. The Dealt at field contains the actual traded price. l. The CtPty field identifies the counterparty of the unmatched trade. m. The Capacity field indicates whether the unmatched trade is a principal or an agency trade leg. n. The Flags field contains a column which describes what the unmatched trade has been flagged as where applicable. o. The Seq No field contains the sequence number of the unmatched trade. p. The SubAcc field displays the sub account of the unmatched trade where applicable. 165 q. The Origin field specifies whether the unmatched trade is a report only trade, an assigned trade or an allocated trade. r. The Trade Type field describes the reason for each unmatched trade (where applicable). The currently available trade types are a correction trade type - COR, a misdeal trade type MID, a mismatch trade type - MIS and a reported trade type – REP. s. This Instrument field contains a descriptive instrument code supplied by the Exchange. A View [Member Code Dealer Code] EDM Unmatched trades window has nine functionality buttons. Numbered notes below discuss each of these buttons as they appear from left to right from the bottom left corner of the window. A) The Close button closes the View [Member Code Dealer Code] EDM Unmatched trades window. B) The Insert button lets you create a report only trade using an Enter Report Only Trade window. C) The Delete button lets you delete unmatched trades you have selected within the View [Member Code Dealer Code] EDM Unmatched trades window data grid. D) The Edit button lets you change the properties of a report only trade that you have selected. You use the Edit button to change the properties of a selected report only trade. E) The Accept button is enabled when you select a report only trade that needs to be accepted. You can identify such report only trades by the “Buy-U” or “Sell-U” values that appear in their Buy/Sell fields. Report only trades where the counter party is a member will remain in the View [Member Code Dealer Code] EDM Unmatched trades window grid with updated values in their Buy/Sell fields when you click the Accept button. Report only trades where the counter party is a client will automatically match when you click the Accept button. Record rows for these trades will disappear entirely from the data grid. You will be able to view these trades as completed orders/trades within data grids in the View [Member Code Dealer Code] EDM Trades window and the View [Member Code Dealer Code] EDM Completed Orders window. F) The Pause / Resume button is a toggle. If you click this button while it has a „Pause‟ caption, it will prevent updates from appearing within the View [Member Code Dealer Code] EDM Unmatched Trades window data grid until you click it again. The 'Resume' caption will also replace the 'Pause' caption of this button. If you click this button while it has a „Resume‟ caption, updates will appear within the View [Member Code Dealer Code] EDM Unmatched Trades window data grid once again. The 'Pause' caption will also reappear. G) Click the Refresh button to force an update of the contents of the View [Member Code Dealer Code] EDM Unmatched trades window data grid. H) The Filter button opens a separate filter screen where you can filter the data that should be displayed in the view. 166 I) Report Only Upload button opens the report only upload function which reads data( report only trades) from a spread sheet. View [Member Code Dealer Code] EDM Contracts window 1) Functionality The View [Member Code Dealer Code] EDM Contracts window provides an overview of how each contract was set up on the back end. You cannot change any data here, as this is just an information window. In this window you can select contracts and view their expiry dates and different strike prices for each expiry date 2) Launch Method You can launch a View [Member Code Dealer Code] EDM Contracts window by clicking Fin Views > EDM View Contracts. 3) Key window elements Data grid fields, functionality buttons and a default Fin Views view pop-up menu comprise the key elements of View [Member Code Dealer Code] EDM Contracts windows. The remaining paragraphs under this heading discuss each of these three elements in turn. a. The Contseq field contains the contract sequence set up in the database. b. The Market field identifies the market on which each contract is loaded. c. The Instrument field contains the actual name of each contract. d. The Class field contains class information that indicates the contract type of each contract e.g. Bond Future. e. The Isin field contains the International Securities Identification Number of each contract. f. The Description field contains a description for each contract that elaborates on its actual name. g. The SSMR field contains the group margin for each instrument. h. The GroupCode field contains the group code for each instrument. 167 i. The Settlement Margin field contains a settlement margin value for each instrument. j. The Is Top 40 field specifies if the contract is a top 40 contract. k. The Is Top 100 field specifies if the contract is a top 100 contract. A View [Member Code Dealer Code] EDM Contracts window has two functionality buttons in its bottom left corner. The leftmost button is a Close button that closes the View [Member Code Dealer Code] EDM Contracts window when you click it. The rightmost button, a Dates button is disabled until you select the record row of a contract for which you want to see expiry dates by double clicking on it. Click the Dates button once you have selected the contract record you wish to target to display a View [Member Code Dealer Code] Contract Dates window as described below. View [Member Code Dealer Code] Contract Dates window As mentioned earlier, a View [Member Code Dealer Code] Contract Dates window lets you view the expiry dates of a contract that you have selected. You launch a View [Member Code Dealer Code] Contract Dates window by double clicking on a record row within its parent View [Member Code Dealer Code] Contracts window and clicking the Dates button of that window. Data grid fields, two functionality buttons and a default Fin Views view pop-up menu comprise the key elements of View [Member Code Dealer Code] EDM Contract Dates windows. The remaining paragraphs under this heading discuss each of these three elements in turn. a. The ContSeq field contains the contract sequence for the selected contract. b. The ContDate field contains the contract ID for each expiry date for the selected contract. c. The Expiry field contains each expiry date for the selected contract. d. The Expm field displays the number of months to expiry or maturity for each expiry date for the selected contract. 168 e. The Nominal field displays the nominal to be traded on for the selected contract. f. StrikeintervalOnScreen is the Naked and Delta options strike price incremental interval for on screen trading. g. StrikeintervalOffScreen is the Naked and Delta options strike price incremental interval for off screen trading h. The Spread field indicates the differential spread. i. The LotSize field indicates whether or not odd lots are available on the selected contract. j. The OptLotsize field indicates whether odd lots are available on the selected contract. Odd lots will be available provided the contract option is not defaulted to zero. k. The MaxDepth field displays the depth that the Nutron back end should send to its front end for the selected contract. l. he PriceRate field indicates whether the selected contract is a price or a traded contract. m. The MaxChange field indicates the maximum change allowed on the selected contract for the day based on the closing price of the previous day. n. The Maxdaysmove field indicates the maximum that the price/rate of the selected contract may move from the previous day‟s closing price/rate. o. The MaxGap field specifies the maximum gap between the current rate/price and the previous day‟s closing rate/price for the selected contract. p. The FixMarg field is used for clearing management purposes. q. The Quote Format field contains the quote format on which the selected contract is traded. r. The Price Format field contains the price format for the selected contract. s. The DivConts field contains the nominal multiplier for the selected contract. t. The DivSor field contains the dividend nominal for the selected contract. u. The ClearDate field contains the clearance date of the contract. This date is usually three days after the expiry date of the selected contract. v. If the Future Anonymous data item has a 'Yes' value, it means that your member code won't appear in depth windows for future versions of the currently selected contract as this is how the JSE sets up such contract versions. w. If the Option Anonymous data item has a 'Yes' value, it means that your member code won't appear in depth windows for option and delta versions of the currently selected contract as this is how the JSE sets up such contract versions. A View [Member Code Dealer Code] EDM Contract Dates window has two functionality buttons in its bottom left corner. The leftmost button is a Close button that closes the View [Member Code Dealer Code] 169 EDM Contract Dates window when you click it. The rightmost button, a Strikes button is disabled until you select the record row of a contract expiry date for which you want to see strike information by double clicking on it. Click the Strikes button once you have selected the contract expiry date record you wish to target to display a View Contract Strikes window as described below. View Contract Strikes window As mentioned earlier, a View Contract Strikes window lets you view strike information for a contract expiry date. You launch a View Contract Strikes window by double clicking on a record row within its parent View [Member Code Dealer Code] Contract Dates window and clicking the Strikes button of that window. Data grid fields, a functionality button and a default Fin Views view pop-up menu comprise the key elements of View Contract Strikes windows. The remaining paragraphs under this heading discuss each of these three elements in turn. The View Contract Strikes window section screen shot below displays column headers for each of the data grid fields this window contains. a. The Strike SeqNo field contains a unique identifier number for each strike. b. The Date Seq field contains the sequence number of the date record. c. The Strike field contains the strike price of each strike. d. The Expiry field contains the expiry date of each strike. e. The Deltas field contains a „Yes‟ value or a „No‟ value. These values indicate if each strike is a delta option or not. A View Contract Strikes window has a single Close functionality button in its bottom left hand corner. Click this button to close the View Contract Strikes window. 170 View [Member Code Dealer Code] EDM Closing Prices window 1) Functionality The View [Member Code Dealer Code] EDM Closing Prices window displays closing prices from the current or previous business day subject to choices that you make. You can also choose to make the View [Member Code Dealer Code] EDM Closing Prices window display closing prices for Future contracts only, Option contracts only or the complete file. 2) Launch Method You launch a View [Member Code Dealer Code] EDM Closing Prices window as follows: a. Launch a [Member Code Dealer Code] EDM window like the one shown below by clicking Fin Views > EDM View Closing Prices. b. Leave the Today MTM File option button inside the Retrieve MTM File frame checked to view closing prices for the current day. Alternatively, click on the Previous B/Day MTM File option button to view closing prices from the previous business day. c. Leave the View complete file option button inside the File view options: frame checked to view all closing prices. Alternatively, click on either the View Future Contracts only option button or the View Option contracts only option button depending on the contract category for which you wish to view closing prices. d. Use the dropdown control in the Class Select frame to limit the scope of displayed closing prices to the contract class of a single Fin Trading primary window. If you do not make a selection from this control, closing prices from all the Fin Trading primary windows could potentially appear. 171 e. Click the OK button indicated by a mouse cursor in the screen shot to close the [Member Code Dealer Code] EDM window and display a View [Member Code Dealer Code] EDM Closing Prices window. f. The View [Member Code Dealer Code] EDM Closing Prices window will be displayed. 3) Key window elements Data grid fields, a functionality button and a default Fin Views view pop-up menu comprise the key elements of View [Member Code Dealer Code] EDM Closing Prices windows. The remaining paragraphs under this heading discuss each of these three elements in turn. a. The Date field contains the MTM file date. b. The Contract field contains the name of each contract. c. The Closing Price field contains the closing price of each contract. d. The Open Interest field contains the open interest for each contract. e. The Spot Price field contains the spot price for each contract. f. The Volatility field contains the volatility for each contract. g. The Contract Name field contains the true instrument name. This is a unique string for each instrument traded on Nutron h. The Contract Date field contains the contract expiry date. A View [Member Code Dealer Code] EDM Closing Prices window has a single Close functionality button in its bottom left hand corner. Click this button to close the View [Member Code Dealer Code] EDM Closing Prices window. View [Member Code Dealer Code] EDM Trace Deals window 1) Functionality The View [Member Code Dealer Code] EDM Trace Deals window provides a hierarchy of deals in its upper panel. If this hierarchy is expanded, it displays details of the deals that make up each parent deal. The bottom part of the window displays all the deals in the upper panel within a grid format. 2) Launch Method You can launch a View [Member Code Dealer Code] EDM Trace Deals window by clicking Fin Views > EDM View Trace File. 172 3) Key window elements The immediately visible portion of View [Member Code Dealer Code] EDM Trace Deals windows consists of an upper panel that provides a hierarchy of deals in a tree view format, a data grid immediately beneath this panel and five functionality buttons extending across from the bottom left corner of this window. View [Member Code Dealer Code] EDM Trace Deals windows also include a pop-up menu with two pop-up menu items from the default Fin Views view pop-up menu. The remaining paragraphs under this heading discuss each of these three elements in turn. A View [Member Code Dealer Code] EDM Trace Deals window upper panel features in the screen shot below. The View [Member Code Dealer Code] EDM Trace Deals window section screen shot below displays column headers for each of the data grid fields this window contains. a. The Seqno field contains an incremented sequence number for each deal. b. The Time field contains the time at which each deal was concluded. c. The Member field identifies the member involved in each deal. d. The Dealer field identifies the dealer responsible for each deal. 173 e. The Prin field identifies the principal involved in each deal. f. The Buy/Sell field contains a B or an S that indicates whether the trade leg of the deal for which the member, dealer etc. identified in the grid were responsible was a buy or a sell. g. The Qty field contains the quantity of contracts bought or sold in the course of the deal. h. The Contract field identifies the contract of the deal. i. SubAcc field specifies the sub account (where applicable) on which each trade was done. j. The ExchangeRef field contains a unique reference from the Exchange for the deal. k. The Price field contains the price of the deal. A View [Member Code Dealer Code] EDM Trace Deals window has five functionality buttons. Separate numbered notes below discuss each of these buttons as they appear from left to right from the bottom left corner of the window. A) You click the Close button to close the View [Member Code Dealer Code] EDM Trace Deals window. B) You click the Save Sel button to save deals you have selected by double clicking on their rows within the View [Member Code Dealer Code] EDM Trace Deals window data grid to permanent storage in text file format. C) You click the Save All button to save all deals within the data grid to permanent storage in text file format. D) You click the Find button to find particular deals. E) You click the Refresh button and then close and re-open the View [Member Code Dealer Code] EDM Trace Deals window to view a breakdown of deals within this window. The pop-up menu View [Member Code Dealer Code] EDM Trace Deals windows display when you right click inside their data grids consists of two pop-up menu items from the default Fin Views view pop-up menu. The numbered note headings below describe each menu item as follows: 1. The Print pop-up menu item displays an HTML page containing a grid in which all View [Member Code Dealer Code] EDM Trace Deals data grid records appear. You can print a hard copy of this HTML page if you wish to do so. 2. The Copy pop-up menu item displays the To Copy window shown in the screen shot below. You use this window to transfer your choice of data grid fields to the Windows clipboard. From there you can copy and paste your information into another format, for example, an MS Word document. 174 View [Member Code Dealer Code] EDM Positions window 1) Functionality The View [Member Code Dealer Code] EDM Positions window displays all of your positions for the current trading day. If you are logged in as a master dealer, it will also display the positions of the other dealers in your member organization 2) Launch Method You can launch a View [Member Code] EDM Positions window by clicking Fin Views > EDM View Positions. 3) Key window elements Data grid fields, a functionality button and a default Fin Views view pop-up menu comprise the key elements of View [Member Code Dealer Code] EDM Positions windows. The remaining paragraphs under this heading discuss each of these three elements in turn. 175 a. The Seq No field contains a unique identifier for each position. b. The Member field contains a four letter code that identifies the member firm to which each position belongs. c. The Dealer field identifies the dealer that has each position. d. The Prin field identifies the principal that has each position. e. The Master Client field contains a client code for each position linked to a principal that is a client. f. The Contract field contains the contract name that each position was on. g. The Open field contains the numeric value for each position at the start of the current trading day. This value may be a negative value. h. The Buy field contains the numeric value for each position bought during the current trading day. i. The Sell field contains the numeric value for each position sold during the current trading day. j. The Curr field contains the numeric value for each currently held position. The Nutron back end determined this value by adding the numeric value in the Open field to the numeric value in the Buy field and then taking away the value in the Sell field from this combined value. A View [Member Code Dealer Code] EDM Positions window has two functionality buttons in its bottom left hand corner. A. Click the Close button to close the View [Member Code Dealer Code] EDM Positions window. B. The Filter button opens a separate filter screen where you can filter the data that should be displayed in the view. View [Member Code] EDM Consolidated Positions window 1) Functionality The View [Member Code] EDM Consolidated Positions window contains consolidated positions for your entire member organization. Sub account positions are consolidated into members' positions, while client sub account positions are consolidated into the main client's position. 176 2) Launch Method You can launch a View [Member Code] EDM Consolidated Positions window by clicking Fin Views > EDM View Con Positions. 3) Key window elements Data grid fields, four functionality buttons and a default Fin Views view pop-up menu comprise the key elements of View [Member Code] EDM Consolidated Positions windows. The remaining paragraphs under this heading discuss each of these three elements in turn. a. The Member field contains a four letter code that identifies the member firm to which each consolidated position belongs. b. The Prin field identifies the principal that has the consolidated position. c. The Master Client field contains a client code for each consolidated position linked to a principal that is a client. d. The Contract field contains the contract name that each consolidated position was on. e. The Open field contains the numeric value of each consolidated position at the start of the current trading day. This value may be a negative value. f. The Buy field contains the numeric value of each consolidated position bought during the current trading day. g. The Sell field contains the numeric value of each consolidated position sold during the current trading day. h. The Curr field contains the numeric value of each currently held consolidated position. The Nutron back end determined this value by adding the numeric value in the Open field to the numeric value in the Buy field and then taking away the numeric value in the Sell field from this combined value. A View [Member Code] EDM Consolidated Positions window has ten functionality buttons. Numbered notes below discuss each of these buttons as they appear from left to right from the bottom left corner of the window. A. The Close button closes the View [Member Code] EDM Consolidated Positions window. 177 B. The Sub Acc Mod button, is disabled until you select a data grid record row for a consolidated position other than a client position by double clicking it. Click the Sub Acc Mod button after selecting a qualifying consolidated position you would like to modify to display the Edit Position in [Contract] window. C. The Roll Forward button is disabled until you select a data grid record row. The Roll Forward button lets you roll forward a selected consolidated member position. The position will then automatically roll forward to the next expiry date of its contract. D. Roll Over is the ability to move position from one expiry to another in future on derivatives contracts. One can move existing position or create new position. If the user selects data grid and the selected position can be rolled over, on clicking Roll Over button the screen will default with selected position details. By default when clicking Roll Over button the screen will open without any details. E. Roll Over Upload button opens the roll over upload function which reads data( roll over entries) from a spread sheet. F. The Pause / Resume button is a toggle. If you click this button while it has a „Pause‟ caption, it will prevent updates from appearing within the View [Member Code] EDM Consolidated Positions window data grid until you click it again. The 'Resume' caption will also replace the 'Pause' caption of this button. G. Click the Refresh button to force an update of the contents of the View [Member Code] EDM Consolidated Positions window data grid. H. The Filter button opens a separate filter screen where you can filter the data that should be displayed in the view. I. The Exer-opt button displays a window from which you can exercise a long position. A long position has a positive value in its Curr field. The Exer-opt button is disabled until you select a data grid record row for a long position derived from an option. You select data grid record rows by double clicking each row you want to select. You also deselect record rows within the data grid by double clicking them. J. The Abandon button displays a window from which you can abandon a long position. A long position has a positive value in its Curr field. The Abandon button is disabled until you select a data grid record row for a long position derived from an option. View [Member Code] EDM Consolidated Member Positions window 1) Functionality The View [Member Code] EDM Consolidated Member Positions window summarizes the positions held by your member organization. From within this window you can exercise and abandon long options and roll forward positions that you have selected. Notes under heading c) below describe these processes 178 2) Launch Method You can launch a View [Member Code] EDM Consolidated Member Positions window by clicking Fin Views > EDM View Consolidated Member Positions. 3) Key window elements Data grid fields, six functionality buttons and a default Fin Views view pop-up menu comprise the key elements of View [Member Code] EDM Consolidated Member Positions windows. The remaining paragraphs under this heading discuss each of these three elements in turn. a. The Member field contains a four letter code identifying the member organization to which each consolidated member position belongs. b. The Prin field contains a four or six letter code identifying the member or client to which each consolidated member position belongs. c. The Contract field contains the contract name of each consolidated member position. d. The Open field contains the numeric value of each consolidated member position at the start of the trading day. This value may be a negative value. e. The Buy field contains the numeric value of each consolidated member position bought during the current trading day. f. The Sell field contains the numeric value of each consolidated member position sold during the current trading day. g. The Curr field contains the numeric value of each currently held consolidated member position. The Nutron back end determined this value by adding the numeric value in the Open field to the numeric value in the Buy field and then taking away the value in the Sell field from this combined value. A View [Member Code] EDM Consolidated Member Positions window has seven functionality buttons. Numbered notes below discuss each of these buttons as they appear from left to right from the bottom left corner of the window. A. The Close button closes the View [Member Code] EDM Consolidated Member Positions window. 179 B. The Roll Forward button is disabled until you select a data grid record row. The Roll Forward button lets you roll forward a selected consolidated member position. The position will then automatically roll forward to the next expiry date of its contract. C. Roll Over is the ability to move position from one expiry to another in future on derivatives contracts. One can move existing position or create new position. If the user selects data grid and the selected position can be rolled over, on clicking Roll Over button the screen will default with selected position details. By default when clicking Roll Over button the screen will open without any details. D. Roll Over Upload button opens the roll over upload function which reads data( roll over entries) from a spread sheet. E. The Pause / Resume button is a toggle. If you click this button while it has a „Pause‟ caption, it will prevent updates from appearing within the View [Member Code] EDM Consolidated Positions window data grid until you click it again. The 'Resume' caption will also replace the 'Pause' caption of this button. F. Click the Refresh button to force an update of the contents of the View [Member Code] EDM Consolidated Positions window data grid. G. The Filter button opens a separate filter screen where you can filter the data that should be displayed in the view. View [Member Code Dealer Code] EDM Clients window 1) Functionality The View [Member Code Dealer Code] EDM Clients window displays a list of all your clients and lets you create new client records. If you are logged in as a master dealer, you can also validate/restrict client records from within this window. 2) Launch Method You can launch a View [Member Code Dealer Code] EDM Clients window by clicking Fin Views > EDM View Clients. 3) Key window elements Data grid fields, functionality buttons and a default Fin Views view pop-up menu comprise the key elements of View [Member Code Dealer Code] EDM Clients windows. The remaining paragraphs under this heading discuss each of these three elements in turn. a. The Id Client field contains a unique numeric identifier for each client. This identifier is generated by the Nutron back end. 180 b. The Client Code field contains a unique alpha-numeric code for each client. This identifier is generated by the Nutron back end. c. The Master Client field contains a master client code where applicable. d. The Member field contains the code of the client‟s member organization. e. The Client Name field contains the client name that is displayed on screen. f. The Foreign Client field contains a „Yes‟ value or a „No‟ value. This value indicates whether or not the client is a foreign client. g. The Validated field contains a „Yes‟ value or a „No‟ value. This value indicates whether or not the client has been validated. h. The Client Details field contains a „Yes‟ value or a „No‟ value. This value indicates whether or not the client‟s details have been requested. i. The Multiply Factor field displays the margin multiplication factor. A View [Member Code Dealer Code] EDM Clients window has six functionality buttons. Notes below discuss each of these buttons as they appear from left to right from the bottom left corner of the window. A. The Close button closes the View [Member Code Dealer Code] EDM Clients window. B. Validate / Restrict button functionality is only available if you are logged in as a master dealer. A Validate / Restrict button is disabled until you select the row of a client record you want to validate or restrict inside the data grid. The button appears as a Validate button when you select the row of a client record that can be validated. The button appears as a Restrict button when you select the row of a client record that can be restricted. You select record rows within the data grid by double clicking each row you want to select. You also deselect record rows within the data grid by double clicking them. C. The View Details button is disabled until you select the row of a client record for which details are available within the data grid. You select record rows within the data grid by double clicking each row you want to select. You also deselect record rows within the data grid by double clicking them. D. Click the Insert button to display an Enter a Client window that lets you add new client records to the data grid. E. Click the Download button to refresh the client records displayed in the View [Member Code Dealer Code] EDM Clients window data grid. F. Insert SubAcc button Inserts a client sub account for a selected master client. 181 DAILY ACCOUNT SUMMARY FOR: [Clearing Member Code (Date)] window 1) Functionality The DAILY ACCOUNT SUMMARY FOR: [Clearing Member Code (DATE)] window displays a daily account summary file for clearing members. As well as letting clearing members view their daily account summary details for the current or the previous day, this window also lets clearing members launch windows that display daily account summary details for selected member organizations and their clients. 2) Launch Method You can launch a DAILY ACCOUNT SUMMARY FOR: [Clearing Member Code (DATE)] window by clicking Fin Views > EDM Daily Account Summary. 3) Key window elements As can be seen from the screen shot below, the initially visible portion of a DAILY ACCOUNT SUMMARY FOR: [Clearing Member Code (DATE)] window consists of a data grid, a panel that provides key statistics, a set of functionality buttons and a pair of option buttons. A DAILY ACCOUNT SUMMARY FOR: [Clearing Member Code (DATE)] window also includes a default Fin Views view pop-up menu. The remaining paragraphs under this heading after the screen shot below will discuss each of these key window elements in turn. The DAILY ACCOUNT SUMMARY FOR: [Clearing Member Code (DATE)] window section shown below is displayed in two numbered screen shots that respectively represent the left and right sections of this window. 182 a. The Deals Done By field contains the code of each member organization for which the clearing member is responsible. b. The Total Booking Fees field contains the total booking fees for each member organization. c. The Initial Member Margin field contains each member‟s latest margin minus the previous margin. d. The Initial Client Margin field contains the client margin for each member minus the previous client margin for that member. e. The Total Member Variation Margin field provides mark to market statistics for each member. f. The Total Client Variation Margin field provides client mark to market statistics for each member. g. The Total for Member field provides totals for each member. The DAILY ACCOUNT SUMMARY FOR: [Clearing Member Code (DATE)] key statistics panel shown below is displayed in two screen shots that respectively represent the left and right sections of this panel. No explanatory notes follow after these screen shots as the information categories on each panel are either self-explanatory or relate to clearing management concepts rather than online trading concepts. A DAILY ACCOUNT SUMMARY FOR: [Clearing Member Code (DATE)] window five four functionality buttons and a pair of option buttons in its bottom left corner. Notes below describe each of these elements in order from left to right. A. Click the Close button to close the DAILY ACCOUNT SUMMARY FOR: [Clearing Member Code (DATE)] window. B. The Member Trace button is disabled until you have selected a member organization statistics record inside the DAILY ACCOUNT SUMMARY FOR: [Clearing Member Code (DATE)] window by double clicking it. You can then display a DAILY ACCOUNT SUMMARY FOR : [MEMBER CODE] window derived from the DAILY ACCOUNT SUMMARY FOR: [Clearing Member Code (DATE)] window by clicking the DAILY ACCOUNT SUMMARY FOR: [Clearing Member Code (DATE)] window Member Trace button. C. You use the Download button together with the Today or the Prev Bus Day option buttons on its right to populate the DAILY ACCOUNT SUMMARY FOR: [Clearing Member Code (DATE)] window data grid and its key statistics panel with data. 183 D. Click the Print button to display an HTML page with a grid in which all DAILY ACCOUNT SUMMARY FOR: [Clearing Member Code (DATE)] window data appears. You can print a hard copy of this HTML page if you wish to do so. View [Member Code Dealer Code] EDM Rates windows 1) Functionality The View [Member Code Dealer Code] EDM Rates window displays a view that is updated at the end of each day with data supplied from an Excel spreadsheet file created by the Exchange on a daily basis for the Fin market. 2) Launch Method You can launch a View [Member Code Dealer Code] EDM Rates window by clicking Fin Views > EDM View Rates 3) Key window elements Data grid fields, two functionality buttons and pop-up menu items comprise the key elements of View [Member Code Dealer Code] EDM Rates windows. Notes in separate paragraphs below discuss each of these three elements in turn a) The IDSFXRates field contains a unique identification number for each rates record. b) The EffectDate field contains the current trading date. c) The Rate field contains updated information from the Excel spreadsheet file created by the Exchange that specifies the interest on the initial margin. This information is applicable to all markets. 184 d) The ROD Index field contains updated information from the Excel spreadsheet file created by the Exchange that specifies the Rand Overnight Deposit rate. This information is applicable to the Financial and Yield-X markets. e) The JROD Index field contains updated information from the Excel spreadsheet file created by the Exchange that specifies the Johannesburg Rand Overnight Deposit rate. This information is applicable to the Yield-X market. f) The JROD Index Factor field contains updated information from the Excel spreadsheet file created by the Exchange that specifies the current calculated value for the Johannesburg Rand Overnight Deposit rate. This information is applicable to the Yield-X market. g) The JBar Index field contains updated information from the Excel spreadsheet file created by the Exchange that specifies the current Johannesburg Interbank Agreed Rate over a one month period. This information is applicable to the Financial and Yield-X markets. h) The JBar Index 3Month field contains updated information from the Excel spreadsheet file created by the Exchange that specifies the current JBAR (Johannesburg Interbank Agreed Rate) over a three month period. This information is applicable to the Financial and Yield-X markets. i) The JBar Index 6Month field contains updated information from the Excel spreadsheet file created by the Exchange that specifies the current JBAR (Johannesburg Interbank Agreed Rate) over a six month period. This information is applicable to the Financial and Yield-X markets. j) The JBar Index 9Month field contains updated information from the Excel spreadsheet file created by the Exchange that specifies the current JBAR (Johannesburg Interbank Agreed Rate) over a nine month period. This information is applicable to the Financial and Yield-X markets. k) The JBar Index 12Month field contains updated information from the Excel spreadsheet file created by the Exchange that specifies the current JBAR (Johannesburg Interbank Agreed Rate) over a twelve month period. This information is applicable to the Financial and Yield-X markets. l) The Prime field contains updated information from the Excel spreadsheet file created by the Exchange that specifies the current Prime Rate. m) The DiscountRate 3Month field contains updated information from the Excel spreadsheet file created by the Exchange that specifies the current Discount Rate over a three month period. n) The SarbCallRate field contains updated information from the Excel spreadsheet file created by the Exchange that specifies the current SARB (South African Reserve Bank) Call Rate. o) The USDRate field contains updated information from the Excel spreadsheet file created by the Exchange that specifies the daily average R/US Dollar exchange rate. p) The EURRate field contains updated information from the Excel spreadsheet file created by the Exchange that specifies the daily average R/Euro exchange rate. 185 q) The GBPRate field contains updated information from the Excel spreadsheet file created by the Exchange that specifies the daily average R/British Pound exchange rate. r) The OCAD field contains updated information from the Excel spreadsheet file created by the Exchange that specifies the current Overnight Call Deposit rate for all markets. s) The NCD 3Month field contains updated information from the Excel spreadsheet created by the Exchange that specifies the Negotiable Certificate of Deposit rate over a three month period. t) The NCD 6Month field contains updated information from the Excel spreadsheet created by the Exchange that specifies the Negotiable Certificate of Deposit rate over a six month period. u) The NCD 12Month field contains updated information from the Excel spreadsheet created by the Exchange that specifies the Negotiable Certificate of Deposit rate over a twelve month period. v) The Stefi field contains updated information from the Excel spreadsheet created by the Exchange that specifies the current Short Term Fixed Interest rate. A View [Member Code Dealer Code] EDM Rates window has two functionality buttons in its bottom left corner. A. The leftmost button, the Close button, closes the View [Member Code Dealer Code] EDM Rates window. B. The rightmost button, the Delete button populates the View [Member Code Dealer Code] EDM Rates window with rates records. View [Member Code Dealer Code] EDM Exchange Announcements File windows 1) Functionality The View [Member Code Dealer Code] EDM Exchange Announcements File window displays all Exchange announcements sent by the Exchange during the current trading day 2) Launch Method You can launch a View [Member Code Dealer Code] EDM Exchange Announcements File window by clicking Fin Views > EDM View Exchange Announcement 3) Key window elements Data grid fields, three functionality buttons and pop-up menu items comprise the key elements of View [Member Code Dealer Code] EDM Exchange Announcements File windows. Notes in separate paragraphs below discuss each of these three elements in turn. 186 a. The Announcement ID field contains an incrementing number value that uniquely identifies each Exchange announcement. b. The Announcement Date field contains the date of each Exchange announcement. c. The Announcement Time field contains the time of each Exchange announcement. d. The Announcement Message field contains the text of each Exchange announcement. A View [Member Code Dealer Code] EDM Exchange Announcements window has three functionality buttons. A. The leftmost button, the Close button, closes the View [Member Code Dealer Code] EDM Exchange Announcements window. B. The rightmost button, the Download button, populates the View [Member Code Dealer Code] EDM Exchange Announcements window with Exchange announcement records. C. The Display button View [Member code Dealer code] EDM Option Stats 1) Functionality The View [Member code Dealer Code] EDM Option Stats window displays statistics of all traded naked and delta options on the day. 2) Launch Method You can launch a View [Member code Dealer code] EDM Option Stats window by clicking Fin Views > EDM View Option Stats. 3) Key window elements Data grid fields, three functionality buttons and pop-up menu items comprise the key elements of View [Member code Dealer code] EDM Option Stats windows. Notes in separate paragraphs below discuss each of these three elements in turn. a. The Contract field contains the contract name. b. The Trade Date field displays the date the trade took place. 187 c. The Trade Time field displays the most recent time at which its corresponding contract was traded on the current trading day. d. The Volatility field contains the volatility for each contract. e. This Premium control contains a premium value for your bids. f. The Qty field contains the quantity. g. The Status field displays if it was an on screen trade or an off screen trade. h. The Contract Name field specifies the name of each traded contract. i. The Contract Expiry Date field contains the date the contract expires. A View [Member code Dealer code] EDM Option Stats window has two functionality buttons. A. The Close button closes the View [Member Code Dealer Code] EDM Options Stats window. B. Click the Download button to refresh the client records displayed in the View [Member Code Dealer Code] EDM Options Stats window data grid. Agris Views operations First mention of Agris Views operations windows Notes under separate headings below deliver the following information for each Agris Views operation: A description of the functionality that the window provides. A description of ways to launch the window. Key window element descriptions under separate headings. These descriptions will usually consist of one or more numbered screen shots linked to one or more sets of numbered notes. Enter Report Only Trade window 1) Functionality The Enter Report Only Trade window lets you enter the details of one trade leg of a deal that took place off screen. Such a deal might, for instance, have been carried out over the telephone. Once the one trade leg is done, a record of that trade leg appears within a View [Member Code Dealer Code] Unmatched trades window until the other leg is entered into the system. The trade record will then appear within a View [Member Code Dealer Code] APD Completed Orders window. For a trade leg record to become a completed order, the principal of one leg must equal the counterparty of the other leg. 188 There are three kinds of report only trades: Member to Client trades in which the counterparty is a client of the dealer entering the report only trade. Such trades result in an automatic match for the unmatched trade. Member to Member trades in which a member enters one leg of the trade and selects the member that he/she wishes to do the trade with as the counterparty. This counterparty must enter the other leg of the trade within six minutes for the trade to be matched by the Nutron back end. Client to Client trades that result in an automatic match in which the second trade leg is automatically generated. If the “Must confirm report only trades” setting has been set up for you, your unmatched Member to Member trades will stay in the unmatched trade record file until you accept them from within a View [Member Code Dealer Code] Unmatched trades window. If the “Must confirm report only client trades” setting has been set up for you, unmatched Member to Client trades and Client to Client trades will stay in the unmatched trade record file until their counterparties accept them from within a View [Member Code Dealer Code] Unmatched trades window. 2) Launch Method You can launch an Enter Report Only Trade window by clicking Agris Views > APD Enter Report only Trade. 3) Key window elements You enter a report only trade within an Enter Report Only Trade window. This means you can use the numbered controls within the Enter Report Only Trade window screen shot below and the numbered notes that follow after it to learn how to enter a report only trade. 189 a. This text box contains an incremented value derived from a reference number seed value you accepted or set up earlier in the trading session. You can type your own value into this text box if you wish to do so. b. This dropdown list will display the member code of your organization if you are logged in as a dealer. The dropdown list will display all the member organizations for your clearing code if you are logged in as a clearing member. c. This dropdown list contains the member code of your organization, client codes for your member organization and any sub accounts you set up for yourself. If you chose to have all your trades locked to the same sub account and dealer, this dropdown control will be disabled and all your trades will always use the same sub account. Click the Prin button to display a Pick Principal window that includes the full names of your clients as well as the client codes displayed in the dropdown list. Double click on the row of a client you want to populate the dropdown list to update the dropdown list and close the Pick Principal window. 190 d. This dropdown list contains dealer codes for all the dealers in your member organization. If you chose to have all your trades locked to the same sub account and dealer, this dropdown list will be disabled (as shown in the screen shot) and all your bids will always use the default dealer code. e. Use this spin box to enter the time of the unmatched trade. The time you enter cannot be later than the current time displayed in the spin box, but may be earlier than the current time. f. Use this dropdown list to specify if the trade leg you are entering is a buy - B or a sell – S. g. Use this dropdown list to specify if the report only trade you are entering will be a principal - P or agent - A trade. h. This text box holds the default number of contracts for your trades when the Enter Report Only Trade window first appears. You can increase the number that appears here up to the maximum order quantity set up for you. i. Use this dropdown list to select the contract to which you want to add a report only trade. When you select a contract from this dropdown list, it enables/disables fields further down the window depending on the contract type you selected. j. If you have created sub accounts for yourself, you can select an appropriate sub account from this dropdown list to link to the report only trade you are entering. k. You need to specify the trade type of the report only trade you are entering using this dropdown list. You can choose from a correction trade type - COR, a misdeal trade type MID, a mismatch trade type - MIS and a reported trade type – REP. l. If you selected an option contract type from the Contract dropdown list, this text box will be enabled to let you specify the strike value of the current report only trade. m. If you selected an option contract type from the Contract dropdown list, this dropdown list will be enabled to let you make the current report only trade involve a call option - C or a put option – P. n. If you selected an option contract type from the Contract dropdown list, this text box will be enabled to let you specify the volatility of the current report only trade. o. You input the agreed upon price for the current report only trade into this text box. If you are logged in as a clearing member, you will see a Zero Fee this Deal check box on the right of the text box. You can apply a zero fee to the entire report only deal by checking the Zero Fee This Deal check box. p. This dropdown list contains member codes and client codes from which you need to select a counter party for the current report only trade. Click the C/Party button to display a Pick Principal window that includes the full names of the clients and members featured in the dropdown list. Double click on the row of a client you want to populate the dropdown list to update the dropdown list and close the Pick Principal window. 191 Access Control window 1) Functionality The Access Control window delivers functionality which lets allows clearing members and master dealers to define the scope of the limits that can be set up by ordinary dealers. Ordinary dealers can also set up trading limits within this window as long as the limits they set up and the messages they subscribe to do not go beyond the bounds of limits set up by a clearing member and messages within the set up group subscription. 2) Launch Method You can launch an Access Control window by clicking Agris Views > APD Configure Access. 3) Key window elements The Access Control window delivers its functionality at three levels. These three levels are subject to the status of the currently logged in user as follows. Users logged in as clearing members can set up limits for entire member organizations. Users logged in as master dealers can set up limits for themselves and other dealers within the scope of limits set up by clearing members. Users logged in as dealers can only set up limits for themselves within the scope of limits set up by clearing members and master dealers. Dealers can also set up limits for themselves within the scope of limits defined within the Access Control window on the Defaults tab of the User Configuration window. As Access Control window users use controls on the Margin Limit, Messages and Bid / Offer tabs to define limits, these tabs are the most important elements within the Access Control window shown in the screen shot below. 192 You activate controls on Access Control window tabs by selecting a member organization under your jurisdiction from the Member dropdown list of this window if you are currently logged in as a clearing member. If you are currently logged in as a master dealer or an ordinary dealer, you would activate these controls by selecting a dealer for whom you can set up limits from within the Dealer dropdown list. In the screen shot above, the Margin Limit tab is inactive even though the currently logged in user has selected a dealer list item from within the Dealer dropdown list. This is because the currently logged in user is an ordinary dealer who only has rights to set up limits for herself. When the dealer selects her own dealer list item from within the Dealer dropdown list, the Margin Limit tab is activated as shown in the screen shot below. 193 From the Margin Limit tab, clearing members apply margin limits on a per trade basis. The cells in the screen shot above hold margin limits for instrument types from top to bottom. From left to right, the cells in the screen shot respectively hold margin limits for trades launched from Agris Trading primary windows, for trades launched from Agris Trading secondary windows and for trades launched outside the Nutron trading environment. Click the Messages tab to make it active when you have finished updating the Margin Limit tab. The Access Control window appears as shown in the screen shot below when the Messages tab is the active tab. 194 The Messages tab provides the means whereby clearing members, master dealers and ordinary dealers can respectively determine the messages to and from the Nutron back end they wish member organizations, other dealers and themselves to subscribe to or unsubscribe from. You change values held in cells in the Subscribed and Can Change columns by double clicking within each cell. In the screen shot, a dealer has just unsubscribed from the „Split deal‟ message by double clicking in the cell indicated by a mouse cursor in the screen shot. Clearing members determine which messages master dealers and dealers can subscribe to or unsubscribe from by changing values in the Can Change column. Master dealers and dealers respectively determine which messages they wish other dealers and themselves to subscribe to or unsubscribe from by changing values in the Subscribed column. Click the Bid / Offer tab to make it active when you have finished updating the Messages tab. The Access Control window appears as shown in the screen shot below when the Bid / Offer tab is the active tab. 195 You can determine the trading actions allowed for an entire organization, for other dealers or simply for yourself (depending on your status) by clicking within the Only Buys, Only Sells or All Buys and Sells option button shown in the screen shot. Once you are satisfied with the values you have updated within the Access Control window for a member organization or a single dealer, click its Submit button and update values for another member organization or single dealer. Alternatively, close the Access Control window by clicking its Close button. Enter a Client window 1) Functionality The Enter a Client window lets you add new clients to your Nutron installation. Compliance officers can also add clients. When a new client is loaded onto the system, a message is sent to the Nutron back end. The backs ends waits for the Master dealer to FICA and validate to validate the new client record before messaging the Nutron front end to update the client file. 2) Launch Method You can launch an Enter a Client window by clicking Agris Views > APD Enter Client. 3) Key window elements You add a new client record by selecting and entering client details on the Trading, Contact Details and Banking tabs of an Enter a Client window. This means you can use the numbered tab screen shots and numbered notes under separate headings below to learn how to add a new client record. Use the Lettered Trading tab screen shot below and the lettered notes linked to it to learn how to complete the first stage of creating a new client record. 196 a. Check this check box to indicate that the new client is an individual. Leave the check box unchecked to indicate that the client is a company. b. Use this dropdown list to indicate whether or not the client has a staff account by selecting either the YES or the NO list item within the dropdown list. c. Enter a code for the new client inside this text box. d. Enter a client name of up to 80 characters inside this text box. e. Optionally, enter an additional client name of up to 52 characters inside this text box. f. Enter the client's date of birth here. g. Use this text box to enter the client's ID number if you checked the Individual check box described in numbered note a. Enter the CC registration number for a company here if you left the Individual check box unchecked. 197 h. Optionally, enter the client's passport number inside this check box. i. This control holds the date the new client record was loaded. j. This control holds the date the new client record was validated. k. Use this dropdown list to select the member organization to which the client belongs. l. Enter the client's VAT Registration Number into this text box. m. Enter an income tax number of up to 52 characters into this text box. n. Select this check box to load the client as a foreign client when it is enabled. o. Use this dropdown list to indicate whether or not the client‟s account is discretionary managed by selecting either the YES or the NO list item within the dropdown list. Click the Contact Details tab to make it active so you can continue to provide details for the new client record. Use the numbered controls within the Contact Details tab screen shot below to learn how to complete the second stage of creating a new client record. 198 a. Enter your first choice of contact telephone number for the client into this text box. You can type in a telephone number of up to 24 characters. b. Optionally, enter an alternative contact telephone number for the client into this text box. You can type in a telephone number of up to 24 characters. c. Enter a contact fax number for the client of up to 24 characters inside this text box. d. Enter a contact email address for the client of up to 52 characters inside this text box. The Nutron back end will check this email address for validity. e. Enter client physical address details up to suburb level within these two text boxes. The first text box can accommodate up to 52 characters and the second text box can accommodate up to 30 characters. 199 f. Optionally, enter a suburb name of up to 43 characters as part of the client‟s physical address details into this text box. g. Enter a predetermined city code of 3 characters into this text box for the client‟s city. h. Enter a postal code of 4 characters into this text box for the client‟s suburb/city. i. Check this check box if the client has the same postal address as physical address. If this is not the case, leave the check box unchecked and enter client postal address details into the text boxes below the check box. Click the Banking tab to make it active so you can continue to provide details for the new client record. Use the lettered controls within the Banking Details tab screen shot below to learn how to complete the final stage of creating a new client record. 200 p. Optionally, enter a bank account number for the client of up to 18 characters into this text box. q. Optionally, if the new client will pay more than 100% margin, enter values of 125, 150 or 175 into this spin box. r. Optionally, enter a Swift code for the client of up to 52 characters into this text box. Swift (Society of Worldwide International Financial Transfers) provides a set of standards for electronically transferring financial data worldwide. s. Optionally, enter a company number of up to 52 characters for the client into this text box. t. Optionally, enter the name of the client‟s compliance officer into this text box. u. Optionally, check this check box if the client has provided proof of residence. v. Optionally, check this check box if the client has provided you with proof of registration. w. Optionally, check this check box to indicate Clearing Member is changing margin multiplication factor. x. Check this check box if the new client has an electronic account number. y. Enter an electronic account number of up to 29 characters for the client here if you checked the check box mentioned in numbered note i. Click the Enter a Client window OK button to display a window asking you if you want to load another client. Click the OK button of this window to close it while keeping the Enter a Client window open. You can then proceed to create an additional client record as described above. Click the NO button of this window to close both it and the Enter a Client window. [Member Code Dealer Code] APD window The [Member Code Dealer Code] APD window lets you respectively retrieve deals files and positions files depending on which of two check boxes inside the window you check on a market closeout. You can launch a [Member Code Dealer Code] APD window by clicking Agris Views > APD Retrieve Post Closed Trades and Positions. 201 View [Member Code Dealer Code] APD Trades window 1) Functionality The View [Member Code Dealer Code] APD Trades window displays your completed trades for the current day as well as those of all the other dealers in your member organization if you opted for this setting. This window is also a platform for various deal management tasks. 2) Launch Method You can launch a View [Member Code Dealer Code] APD Trades window by clicking Agris Views > APD View Trades 3) Key window elements Data grid fields, functionality buttons and a default Agris Views view pop-up menu comprise the key elements of View [Member Code Dealer Code] APD Trades windows. The remaining paragraphs under this heading discuss each of these three elements in turn. a. The Contract field contains each contract that was traded on. b. The Prin field contains the principal for each trade leg. c. The Master Client field contains a client code for each trade leg that you linked to a principal which is a client. d. The Buy/Sell field indicates whether each trade leg was a buy or a sell. e. The Qty field contains the quantity traded for each trade leg. f. The Price field contains the price that applies to each trade leg g. The Dealt at field contains the price of the trade for each trade leg. h. The Ref No field contains the user reference number used when an order was placed for each trade leg. 202 i. The Exchange Ref field contains a unique exchange reference number assigned to each trade leg. j. The Version field contains a version number that increments each time the contract changes its originality. k. The Dealer field identifies the dealer who carried out the trade leg. l. The Time field specifies the time at which each trade was done. m. The Enter Time field displays the time the trade was entered. n. The Allocation Time filed shows the time the trade was allocated. o. The SeqNo field uniquely identifies each trade. p. The Origin field specifies the origin of each trade e.g. OnScreen. q. The SubAcc field specifies the sub account (where applicable) on which each trade was done. r. The Member field contains the code of the member organization responsible for each trade. s. The Capacity field specifies whether the dealer made each trade as a principal or as an agent. t. The Trade Type field describes the reason for each trade match (where applicable). The currently available trade types are a correction trade type - COR, a misdeal trade type - MID, a mismatch trade type - MIS and a reported trade type – REP. u. The Contract Expiry field specifies the expiry date of each traded contract. v. The Contract Name field specifies the name of each traded contract. w. The Booking Fee Flag field indicates if the booking fee does not have to be paid on the deal. x. The Fee Delta field is used for option deals to indicate the delta to be used for the fee purpose. y. The Maker Qty field indicates the number of contracts which were traded as a maker. (NOTE: This could include decimals if a consolidated deal is allocated to a client). z. The Report Only Qty field indicates the number of contracts which were traded via a report only trade. (NOTE: This could include decimals if a consolidated deal is allocated to a client). A View [Member Code Dealer Code] APD Trades window has thirteen functionality buttons. Each of these buttons is discussed as they appear from left to right across the bottom of the window in separate numbered notes below. 203 A. The Close button closes the View [Member Code Dealer Code] APD Trades window. B. The Add button lets you consolidate the information displayed in the View [Member Code Dealer Code] APD Trades window data grid by adding some trade legs together. In order for you to do this, the trade legs must have the same buy/sell flag, contract name, principal and sub account. Use the Add button as follows: (iii) Enable the Add button by selecting the trade legs you want to combine within their data grid rows. (iv) Click the newly enabled Add button. The Add button will revert to its usual disabled state and the trade legs you selected will be consolidated within a single trade record C. The Div button lets you split a currently selected deal as follows: (i) Enable the Div button by selecting the deal you want to split. (ii) Click the Div button to launch the Div window as shown below. (iii) Specify the deal field/s you intend using as a basis for splitting the deal inside the Div window. (iv) Click the Enter button to display the deal field/s you are using to split up the deal inside the large panel inside the Div window. (v) Click the OK button to complete the above process and close the Div window. 204 The deal splitting process needs to be validated according to the following criteria: If the Principal is a client, the system checks for sub accounts. If a client is selected as the principal, then they cannot change the price. The system will not add a div deal if the quantity is 0. The system also checks for negative commission. You can only div a deal once the system has checked that the deal is allowed to be split. D. The Div Bulk button functionality is only available once you have set up am portfolio as described in Point E below. After you have set up the portfolio and clicked the Div Bulk button, you then select the portfolio you want to use from the Bulk Div window shown below. Once you have made your selection, the trade leg will be split according to the portfolio you selected. The Nutron back end validates your div bulk processes according to the following criteria: The system checks that client codes in the syndicate are valid. When the syndicate is set up, the system checks that all the principals together equal 100%. E. Click the Portfolio button to display a Portfolio Setup window that lets you set up different portfolios with different percentages for some of your clients. These portfolios facilitate the div bulk processes. A screen shot of a Portfolio Setup window with an active Portfolio tab and with an active Setup tab appear below on the left and right respectively. 205 F. Click a Net View button to display a view like the one shown in the screen shot below that gives an overall summation of the trades that were actually done by contract. G. The Assign button lets you assign a trade leg to another member. The other member will receive this trade leg in his/her unmatched file and have the option to accept the trade leg. A new reference number can be given, the member can be selected and a new price can be entered when assigning a trade. You assign the trade from within the window shown below. 206 Assigned trades are checked for negative commission as part of the validation process. H. The Tri-Partite button lets you assign a trade leg to a tripartite client provided that client has been set up by the Exchange as a tripartite client. A new reference number can be given, the member can be selected and a new price/rate can be entered when the trade is assigned. You carry out the actual tripartite allocation process from the window shown in the screen shot below. I. The Pause/Resume button is a toggle. If you click this button while it has n Pause caption, it will prevent updates from appearing within the View [Member Code Dealer Code] APD Trades window data grid until you click it again. The „Resume‟ caption will also replace the „Pause‟ caption of this button. If you click this button while it has a „Resume‟ caption, updates will appear within the View [Member Code Dealer Code] APD Trades window data grid once again. The 'Pause' caption will also reappear. J. The Trade Correct button lets you correct a client trade that has been allocated to the incorrect participant. Use the trade correct button as follows: i. Double click the client trade record within the View [Member Code Dealer Code] APD Trades window data grid that you want to correct. ii. Click the button to display the Correction Trade. iii. Correct the details by selecting the new principal and clicking on the OK button. K. Click the Refresh button to force an update of the contents of the data grid. L. The Filter button opens a separate filter screen where you can filter the data that should be displayed in the view. M. The Change Dealer button is used to change the dealer for the trade. 207 View [Member Code Dealer Code] APD Active Orders window 1) Functionality The View [Member Code Dealer Code] APD Active Orders window displays your active orders for the current day as well as those of all the other dealers in your member organization if you opted for this setting. 2) Launch Method You can launch a View [Member Code Dealer Code] APD Active Orders window by clicking Agris Views > APD View Active Orders 3) Key window elements Data grid fields, functionality buttons and a default Agris Views view pop-up menu comprise the key elements of View [Member Code Dealer Code] APD Active Orders windows. The remaining paragraphs under this heading discuss each of these three elements in turn. a. The Buy/Sell field indicates whether each active order is a buy or a sell. b. The Qty field contains the quantity of each active order. c. The Contract field contains the contract name of each active order.. d. The Quote at field contains the price at which each active order is being quoted. e. The RefNo field contains the reference number of each active order. f. The Prin field identifies the principal for which the active order was done. g. The Master Client field contains a client code for each trade leg that you linked to a principal which is a client. h. The Dealer field identifies the dealer who launched each active order. i. The Member field contains a four letter code describing the member firm to which each order belongs. j. The Time field contains the time that each order was put into the system. k. The Seq No field contains a sequence number that uniquely identifies each active order. 208 l. The Capacity field specifies whether each active order involved a Principal or an Agent. A View [Member Code Dealer Code] APD Active Orders window has eight functionality buttons. Separate numbered notes below discuss each of these buttons as they appear from left to right across the bottom of the window. A) The Close button closes the View [Member code Dealer Code] APD Active Orders window. B) The second functionality button is either a Delete-sel button or a Susp button. The button will only be a Susp button if you checked the Suspend not delete orders check box on the Flags tab of the User Configuration window. The Delete-Sel / Susp button is disabled until you select one or more active order records by double clicking their rows. Click the Delete-Sel / Susp button to remove active record rows you have selected from the data grid. You deselect data grid rows by double clicking them again. If you clicked a Susp button, the row/s you selected will appear within the View [Member Code Dealer Code] APD Suspended Orders window data grid. C) The third functionality button is either a Del-All button or a Susp-All button. The button will only be a Susp-all button if you checked the Suspend not delete orders check box on the Flags tab of the User Configuration window. Click the Del-All / Susp-All button to remove all active record rows from the data grid. If you clicked a Susp-All button, all formerly active order rows will appear within the View [Member Code Dealer Code] APD Suspended Orders window data grid. D) The Reduce button is disabled until you select one or more data grid rows by double clicking on them. Click the Reduce button to display a window that lets you reduce the quantity for an active order without the order losing its position in the trading stack on the Nutron back end. E) Click the Refresh button to force an update of the contents of the View [Member Code Dealer Code] APD Active Orders window data grid. F) The Pause/Resume button is a toggle. If you click this button while it has n Pause caption, it will prevent updates from appearing within the View [Member Code Dealer Code] APD Active Orders window data grid until you click it again. The „Resume‟ caption will also replace the „Pause‟ caption of this button. If you click this button while it has a „Resume‟ caption, updates will appear within the View [Member Code Dealer Code] APD Active Orders window data grid once again. The 'Pause' caption will also reappear. G) The Filter button opens a separate filter screen where you can filter the data that should be displayed in the view. H) The Edit button allows you to edit the details for the selected trade leg. 209 View [Member Code Dealer Code] APD Completed Orders window 1) Functionality The View [Member Code Dealer Code] APD Completed Orders window displays your completed orders for the current day as well as those of all the other dealers in your member organization if you opted for this setting. 2) Launch Method You can launch a View [Member Code Dealer Code] APD Completed Orders window by clicking Agris Views > APD View Completed Orders 3) Key window elements Data grid fields, a functionality button and a default Agris Views view pop-up menu comprise the key elements of View [Member Code Dealer Code] APD Completed Orders windows. The remaining paragraphs under this heading discuss each of these three elements in turn. a. The Buy/Sell field indicates whether the completed order was a buy or a sell trade leg. b. The Dealt Qty field contains the quantity that was traded. c. The Order Qty field contains the original quantity of the active order before a trade was done. d. The Contract field contains the contract that was traded on. e. The Order Price field contains the original price of the active order, but its semantic significance varies depending on whether the completed order was a future or an option. f. The Trade Price field contains the price that resulted in the deal, but its semantic significance varies depending on whether the completed order was a future or an option. g. The Price field contains the price that the unmatched trade was done for, but its semantic significance varies depending on whether the completed order was a future or an option. h. The Order Ref No field contains the order reference number for the trade. 210 i. The Exchange Ref field contains the exchange reference number allocated to the deal. j. The Prin field contains the principal code for the trade. k. The Master Client field contains a client code for each trade leg that you linked to a principal which is a client. l. The Dealer field contains the code of the dealer responsible for the trade. m. The Member field contains the code of the member organization to which the position belongs. n. The Order Time field contains the time of the order. o. The Dealt Time field contains the time of the deal. p. The Trade Type field only contains a value for completed orders that have resulted from report only trades as described under heading 12.2.1.1. Trade types at the time of writing consist of a correction trade type - COR, a misdeal trade type - MID, a mismatch trade type - MIS and a reported trade type – REP. q. The Seq No field contains a unique identifier for the deal. r. The Origin field specifies the origin of each trade e.g. Onscreen. s. The Capacity field indicates whether the trade was a principal or an agency trade. t. The Spot Price field contains the spot price when the trade was done. u. The Version field contains a version number that increments whenever the contract changes its originality. v. The Booking fee Indicates if a fee has been charged on this completed order. w. The Fee Indicates the fee applied to this completed order. x. The Fee Delta field is used for option deals to indicate the delta to be used for the fee purpose. A View [Member Code Dealer Code] APD Completed Orders window has two functionality buttons in its bottom left hand corner. A) Click the Close button to close the View [Member Code Dealer Code] APD Completed Orders window. B) The Filter button opens a separate filter screen where you can filter the data that should be displayed in the view. 211 View [Member Code Dealer Code] APD Suspended Orders window 1) Functionality The View [Member Code Dealer Code] APD Suspended Orders window displays your suspended orders for the current day as well as those of all the other dealers in your member organization if you opted for this setting. You can also reactivate orders from within this window. 2) Launch Method You can launch a View [Member Code Dealer Code] APD Suspended Orders window by clicking Agris Views > APD View Suspended Orders 3) Key window elements Data grid fields, functionality buttons and a default Agris Views view pop-up menu comprise the key elements of View [Member Code Dealer Code] APD Suspended Orders windows. The remaining paragraphs under this heading discuss each of these three elements in turn. a. The Buy/Sell field indicates if each suspended order is a buy or a sell. b. The Qty field contains the quantity of each suspended order. c. The Contract field contains the contract name of each suspended order. d. The Quote at field contains the price at which each suspended order was quoted. e. The Ref No field contains the reference number of each suspended order. f. The Prin field identifies the principal for whom each suspended order was launched. g. The Master Client field contains a client code for each trade leg that you linked to a principal which is a client. h. The Dealer field identifies the dealer who launched each suspended order. i. The Member field contains a four letter code describing the member firm to which each suspended order belongs. j. The Time field contains the time at which each suspended order was suspended. k. The Seq No field contains a sequence number that uniquely identifies each suspended order. 212 l. The Capacity field specifies whether each suspended order involved a Principal or an Agent. A View [Member Code Dealer Code] APD Suspended Orders window has seven functionality buttons. Numbered notes below discuss each of these buttons as they appear from left to right across the bottom of the window. A) The Close button closes the View [Member Code Dealer Code] APD Suspended Orders window. B) The Resubmit button resubmits a suspended order or suspended orders that you have selected from within the data grid and makes them active again. C) The Delete button deletes a suspended order or suspended orders that you have selected from within the data grid. D) The Edit button displays a window like the one shown in the screen shot below for the currently selected suspended order E) The Edit button allows you to edit the details for the selected trade leg. F) The Resubmit All button resubmits all suspended orders displayed in the data grid and makes them active again. G) The Delete All button deletes all the suspended trades. H) The Filter button opens a separate filter screen where you can filter the data that should be displayed in the view. View [Member Code Dealer Code] APD Unmatched trades window 1) Functionality The View [Member Code Dealer Code] APD Unmatched Trades window displays all of your Report Only trades that have not been matched as well as Report Only trades from other Members that have been assigned to you. You can see the unmatched trades of other dealers in your member organization if you opted for this setting. 2) Launch Method You can launch a View [Member Code Dealer Code] APD Unmatched Trades window by clicking Agris Views > APD View Unmatched Trades. 213 3) Key window elements Data grid fields, functionality buttons and a default Agris Views view pop-up menu comprise the key elements of View [Member Code Dealer Code] APD Unmatched Trades windows. The remaining paragraphs under this heading discuss each of these three elements in turn. a. The Ref No field contains the reference number of each unmatched trade. b. The Member field contains the member code of each unmatched trade member. c. The Dealer field contains the dealer code of each unmatched trade dealer. d. The Prin field contains the principal for the unmatched trade. e. The Master Client field contains a client code for each trade leg that you linked to a principal which is a client. f. The Time field contains the time each unmatched trade was entered. g. The Buy/Sell field indicates whether the unmatched trade is a buy or a sell. h. The Qty field contains the quantity of the unmatched trade. i. The Contract field contains the contract on which the unmatched trade took place. j. The Price field will display the premium for the option on the contract involved in the report only trade. k. The Dealt at field contains the actual traded price. l. The CtPty field identifies the counterparty of the unmatched trade. m. The Capacity field indicates whether the unmatched trade is a principal or an agency trade leg. n. The Flags field contains a column which describes what the unmatched trade has been flagged as where applicable. o. The SubAcc field displays the sub account of the unmatched trade where applicable. p. The Origin field specifies whether the unmatched trade is a report only trade, an assigned trade or an allocated trade. 214 q. The Trade Type field describes the reason for each unmatched trade (where applicable). The currently available trade types are a correction trade type - COR, a misdeal trade type - MID, a mismatch trade type - MIS and a reported trade type – REP. r. This Instrument field contains a descriptive instrument code supplied by the Exchange. A View [Member Code Dealer Code] APD Unmatched trades window has nine functionality buttons. Numbered notes below discuss each of these buttons as they appear from left to right from the bottom left corner of the window. A) The Close button closes the View [Member Code Dealer Code] APD Unmatched trades window. B) The Insert button lets you create a report only trade using an Enter Report Only Trade window. C) The Delete button lets you delete unmatched trades you have selected within the View [Member Code Dealer Code] APD Unmatched trades window data grid. D) The Edit button lets you change the properties of a report only trade that you have selected. You use the Edit button to change the properties of a selected report only trade. E) The Accept button is enabled when you select a report only trade that needs to be accepted. You can identify such report only trades by the “Buy-U” or “Sell-U” values that appear in their Buy/Sell fields. Report only trades where the counter party is a member will remain in the View [Member Code Dealer Code] APD Unmatched trades window grid with updated values in their Buy/Sell fields when you click the Accept button. Report only trades where the counter party is a client will automatically match when you click the Accept button. Record rows for these trades will disappear entirely from the data grid. You will be able to view these trades as completed orders/trades within data grids in the View [Member Code Dealer Code] APD Trades window and the View [Member Code Dealer Code] APD Completed Orders window. F) The Pause / Resume button is a toggle. If you click this button while it has a „Pause‟ caption, it will prevent updates from appearing within the View [Member Code Dealer Code] APD Unmatched Trades window data grid until you click it again. The 'Resume' caption will also replace the 'Pause' caption of this button. If you click this button while it has a „Resume‟ caption, updates will appear within the View [Member Code Dealer Code] APD Unmatched Trades window data grid once again. The 'Pause' caption will also reappear. G) Click the Refresh button to force an update of the contents of the View [Member Code Dealer Code] APD Unmatched trades window data grid. H) The Filter button opens a separate filter screen where you can filter the data that should be displayed in the view. 215 I) Report Only Upload button opens the report only upload function which reads data( report only trades) from a spread sheet. View [Member Code Dealer Code] APD Contracts window 1) Functionality The View [Member Code Dealer Code] APD Contracts window provides an overview of how each contract was set up on the back end. You cannot change any data here, as this is just an information window. In this window you can select contracts and view their expiry dates and different strike prices for each expiry date 2) Launch Method You can launch a View [Member Code Dealer Code] APD Contracts window by clicking Agris Views > APD View Contracts. 3) Key window elements Data grid fields, functionality buttons and a default Agris Views view pop-up menu comprise the key elements of View [Member Code Dealer Code] APD Contracts windows. The remaining paragraphs under this heading discuss each of these three elements in turn. a. The Contseq field contains the contract sequence set up in the database. b. The Market field identifies the market on which each contract is loaded. c. The Instrument field contains the actual name of each contract. d. The Class field contains class information that indicates the contract type of each contract e.g. Bond Future. e. The Isin field contains the International Securities Identification Number of each contract. f. The Description field contains a description for each contract that elaborates on its actual name. g. The SSMR field contains the group margin for each instrument. h. The GroupCode field contains the group code for each instrument. i. The Settlement Margin field contains a settlement margin value for each instrument. 216 A View [Member Code Dealer Code] APD Contracts window has two functionality buttons in its bottom left corner. The leftmost button is a Close button that closes the View [Member Code Dealer Code] APD Contracts window when you click it. The rightmost button, a Dates button is disabled until you select the record row of a contract for which you want to see expiry dates by double clicking on it. Click the Dates button once you have selected the contract record you wish to target to display a View [Member Code Dealer Code] APD Contract Dates window as described below. View [Member Code Dealer Code] Contract Dates window As mentioned earlier, a View [Member Code Dealer Code] Contract Dates window lets you view the expiry dates of a contract that you have selected. You launch a View [Member Code Dealer Code] Contract Dates window by double clicking on a record row within its parent View [Member Code Dealer Code] Contracts window and clicking the Dates button of that window. Data grid fields, two functionality buttons and a default Fin Views view pop-up menu comprise the key elements of View [Member Code Dealer Code] APD Contract Dates windows. The remaining paragraphs under this heading discuss each of these three elements in turn. a. The ContSeq field contains the contract sequence for the selected contract. b. The ContDate field contains the contract ID for each expiry date for the selected contract. c. The Expiry field contains each expiry date for the selected contract. d. The Expm field displays the number of months to expiry or maturity for each expiry date for the selected contract. e. The Nominal field displays the nominal to be traded on for the selected contract. 217 f. StrikeintervalOnScreen is the Naked and Delta options strike price incremental interval for on screen trading. g. StrikeintervalOffScreen is the Naked and Delta options strike price incremental interval for off screen trading. h. The Spread field indicates the differential spread. i. The LotSize field indicates whether or not odd lots are available on the selected contract. j. The OptLotsize field indicates whether odd lots are available on the selected contract. Odd lots will be available provided the contract option is not defaulted to zero. k. The MaxDepth field displays the depth that the Nutron back end should send to its front end for the selected contract. l. The PriceRate field indicates whether the selected contract is a price or a traded contract. m. The MaxChange field indicates the maximum change allowed on the selected contract for the day based on the closing price of the previous day. n. The Maxdaysmove field indicates the maximum that the price/rate of the selected contract may move from the previous day‟s closing price/rate. o. The MaxGap field specifies the maximum gap between the current rate/price and the previous day‟s closing rate/price for the selected contract. p. The FixMarg field is used for clearing management purposes. q. The Quote Format field contains the quote format on which the selected contract is traded. r. The Price Format field contains the price format for the selected contract. s. The DivConts field contains the nominal multiplier for the selected contract. t. The DivSor field contains the dividend nominal for the selected contract. u. The ClearDate field contains the clearance date of the contract. This date is usually three days after the expiry date of the selected contract. v. The Is Future Anonymous field indicates if traded future is anonymous where orders booking member firm codes are displayed on depth window. w. The Is Option Anonymous field indicates if traded option is anonymous where orders booking member firm codes are displayed on depth window. A View [Member Code Dealer Code] APD Contract Dates window has two functionality buttons in its bottom left corner. The leftmost button is a Close button that closes the View [Member Code Dealer Code] APD Contract Dates window when you click it. The rightmost button, a Strikes button is disabled until you select the record row of a contract expiry date for which you want to see strike information by double clicking on it. Click the Strikes button once you have selected the contract expiry date record you wish to target to display a View Contract Strikes window as described below. 218 View Contract Strikes window As mentioned earlier, a View Contract Strikes window lets you view strike information for a contract expiry date. You launch a View Contract Strikes window by double clicking on a record row within its parent View [Member Code Dealer Code] Contract Dates window and clicking the Strikes button of that window. Data grid fields, a functionality button and a default Fin Views view pop-up menu comprise the key elements of View Contract Strikes windows. The remaining paragraphs under this heading discuss each of these three elements in turn. The View Contract Strikes window section screen shot below displays column headers for each of the data grid fields this window contains. a. The Strike SeqNo field contains a unique identifier number for each strike. b. The Date Seq field contains the sequence number of the date record. c. The Strike field contains the strike price of each strike. d. The Expiry field contains the expiry date of each strike. e. The Deltas field contains a „Yes‟ value or a „No‟ value. These values indicate if each strike is a delta option or not. A View Contract Strikes window has a single Close functionality button in its bottom left hand corner. Click this button to close the View Contract Strikes window. View [Member Code Dealer Code] APD Closing Prices window 1) Functionality The View [Member Code Dealer Code] APD Closing Prices window displays closing prices from the current or previous business day subject to choices that you make. You can also choose to make the View [Member Code Dealer Code] APD Closing Prices window display closing prices for Future contracts only, Option contracts only or the complete file. 2) Launch Method You launch a View [Member Code Dealer Code] APD Closing Prices window as follows: 219 1. Launch a [Member Code Dealer Code] APD window like the one shown below by clicking Agris Views > APD View Closing Prices. 4) Leave the Today MTM File option button inside the Retrieve MTM File frame checked to view closing prices for the current day. Alternatively, click on the Previous B/Day MTM File option button to view closing prices from the previous business day. 5) Leave the View complete file option button inside the File view options: frame checked to view all closing prices. Alternatively, click on either the View Future Contracts only option button or the View Option contracts only option button depending on the contract category for which you wish to view closing prices. 6) Click the OK button indicated by a mouse cursor in the screen shot to close the [Member Code Dealer Code] APD window and display a View [Member Code Dealer Code] APD Closing Prices window. 7) Wait for up to 30 seconds while the Nutron back end populates the View [Member Code Dealer Code] APD Closing Prices window with closing price data. 3) Key window elements Data grid fields, a functionality button and a default Agris Views view pop-up menu comprise the key elements of View [Member Code Dealer Code] APD Closing Prices windows. The remaining paragraphs under this heading discuss each of these three elements in turn. 1. The Date field contains the MTM file date. 220 2. The Contract field contains the name of each contract. 3. The Closing Price field contains the closing price of each contract. 4. The Open Interest field contains the open interest for each contract. 5. The Spot Price field contains the spot price for each contract. 6. The Volatility field contains the volatility for each contract. 7. The Contract Name field contains the true instrument name. This is a unique string for each instrument traded on Nutron. 8. The Contract Date field contains the contract expiry date. A View [Member Code Dealer Code] APD Closing Prices window has a single Close functionality button in its bottom left hand corner. Click this button to close the View [Member Code Dealer Code] APD Closing Prices window. Like all Agris Views views, View [Member Code Dealer Code] APD Closing Prices windows display a standard pop-up menu when you right click inside their data grids. View [Member Code Dealer Code] APD Trace Deals window 1) Functionality The View [Member Code Dealer Code] APD Trace Deals window provides a hierarchy of deals in its upper panel. If this hierarchy is expanded, it displays details of the deals that make up each parent deal. The bottom part of the window displays all the deals in the upper panel within a grid format. 2) Launch Method You can launch a View [Member Code Dealer Code] APD Trace Deals window by clicking Agris Views > APD View Trace File. 3) Key window elements The immediately visible portion of View [Member Code Dealer Code] APD Trace Deals windows consists of an upper panel that provides a hierarchy of deals in a tree view format, a data grid immediately beneath this panel and five functionality buttons extending across from the bottom left corner of this window. View [Member Code Dealer Code] APD Trace Deals windows also include a default Agris Views view pop-up menu. The remaining paragraphs under this heading discuss each of these three elements in turn. A View [Member Code Dealer Code] APD Trace Deals window upper panel features in the screen shot below. 221 The View [Member Code Dealer Code] APD Trace Deals window section screen shot below displays column headers for each of the data grid fields this window contains. a. The Seqno field contains an incremented sequence number for each deal. b. The Time field contains the time at which each deal was concluded. c. The Member field identifies the member involved in each deal. d. The Dealer field identifies the dealer responsible for each deal. e. The Prin field identifies the principal involved in each deal. f. The Buy/Sell field contains a B or an S that indicates whether the trade leg of the deal for which the member, dealer etc. identified in the grid were responsible was a buy or a sell. g. The Qty field contains the quantity of contracts bought or sold in the course of the deal. h. The Contract field identifies the contract of the deal. i. The SubAcc field specifies the sub account (where applicable) on which each trade was done j. The ExchangeRef field contains a unique reference from the Exchange for the deal. 222 k. The Price field contains the price of the deal. A View [Member Code Dealer Code] APD Trace Deals window has five functionality buttons. Separate numbered notes below discuss each of these buttons as they appear from left to right from the bottom left corner of the window. A) You click the Close button to close the View [Member Code Dealer Code] APD Trace Deals window. B) You click the Save Sel button to save deals you have selected by double clicking on their rows within the View [Member Code Dealer Code] APD Trace Deals window data grid to permanent storage in text file format. C) You click the Save All button to save all deals within the data grid to permanent storage in text file format. D) You click the Find button to find particular deals. E) You click the Refresh button and then close and re-open the View [Member Code Dealer Code] APD Trace Deals window to view a breakdown of deals within this window. The pop-up menu View [Member Code Dealer Code] APD Trace Deals windows display when you right click inside their data grids consists of two pop-up menu items from the default Fin Views view pop-up menu. The numbered note headings below describe each menu item as follows: 1. The Print pop-up menu item displays an HTML page containing a grid in which all View [Member Code Dealer Code] APD Trace Deals data grid records appear. You can print a hard copy of this HTML page if you wish to do so. 2. The Copy pop-up menu item displays the To Copy window shown in the screen shot below. You use this window to transfer your choice of data grid fields to the Windows clipboard. From there you can copy and paste your information into another format, for example, an MS Word document. 223 View [Member Code Dealer Code] APD Positions window 1. Functionality The View [Member Code Dealer Code] APD Positions window displays all of your positions for the current trading day. If you are logged in as a master dealer, it will also display the positions of the other dealers in your member organization. 2. Launch Method You can launch a View [Member Code] APD Positions window by clicking Agris Views > APD View Positions. 3. Key window elements Data grid fields, a functionality button and a default Agris Views view pop-up menu comprise the key elements of View [Member Code Dealer Code] APD Positions windows. The remaining paragraphs under this heading discuss each of these three elements in turn. 224 a. The Seq No field contains a unique identifier for each position. b. The Member field contains a four letter code that identifies the member firm to which each position belongs. c. The Dealer field identifies the dealer that has each position. d. The Prin field identifies the principal that has each position. e. The Master Client field contains a client code for each position linked to a principal that is a client. f. The Contract field contains the contract name that each position was on. g. The Open field contains the numeric value for each position at the start of the current trading day. This value may be a negative value. h. The Buy field contains the numeric value for each position bought during the current trading day. i. The Sell field contains the numeric value for each position sold during the current trading day. j. The Curr field contains the numeric value for each currently held position. The Nutron back end determined this value by adding the numeric value in the Open field to the numeric value in the Buy field and then taking away the value in the Sell field from this combined value. k. Physical Position is the number of physical positions the principal has on a specific commodity. l. Delivered Pos is the number of physical positions the principal has delivered. A View [Member Code Dealer Code] APD Positions window has two functionality buttons in its bottom left hand corner. A. Click the Close button to close the View [Member Code Dealer Code] APD Positions window. B. The Filter button opens a separate filter screen where you can filter the data that should be displayed in the view. 225 View [Member Code] APD Consolidated Positions window 1) Functionality The View [Member Code] APD Consolidated Positions window will contain consolidated positions for your entire member organization. Sub account positions will be consolidated into members' positions, while client sub account positions will be consolidated into the main client's position. 2) Launch Method You can launch a View [Member Code] APD Consolidated Positions window by clicking Agris Views > APD View Con Positions. 3) Key window elements Data grid fields, two functionality buttons and a default Agris Views view pop-up menu comprise the key elements of View [Member Code] APD Consolidated Positions windows. The remaining paragraphs under this heading discuss each of these three elements in turn. a. The Member field contains a four letter code that identifies the member firm to which each consolidated position belongs. b. The Prin field identifies the principal that has the consolidated position. c. The Master Client field contains a client code for each consolidated position linked to a principal that is a client. d. The Contract field contains the contract name that each consolidated position was on. e. The Open field contains the numeric value of each consolidated position at the start of the current trading day. This value may be a negative value. f. The Buy field contains the numeric value of each consolidated position bought during the current trading day. g. The Sell field contains the numeric value of each consolidated position sold during the current trading day. h. The Curr field contains the numeric value of each currently held consolidated position. The Nutron back end determined this value by adding the numeric value in the Open field to the numeric value in the Buy field and then taking away the numeric value in the Sell field from this combined value. 226 A View [Member Code] APD Consolidated Positions window has ten functionality buttons. Numbered notes below discuss each of these buttons as they appear from left to right from the bottom left corner of the window. A. The Close button closes the View [Member Code] APD Consolidated Positions window. B. The Sub Acc Mod button, is disabled until you select a data grid record row for a consolidated position other than a client position by double clicking it. Click the Sub Acc Mod button after selecting a qualifying consolidated position you would like to modify to display the Edit Position in [Contract] window. C. The Pause / Resume button is a toggle. If you click this button while it has a „Pause‟ caption, it will prevent updates from appearing within the View [Member Code] APD Consolidated Positions window data grid until you click it again. The 'Resume' caption will also replace the 'Pause' caption of this button. D. Click the Refresh button to force an update of the contents of the View [Member Code] APD Consolidated Positions window data grid. E. The Filter button opens a separate filter screen where you can filter the data that should be displayed in the view. F. The Exer-opt button displays a window from which you can exercise a long position. A long position has a positive value in its Curr field. The Exer-opt button is disabled until you select a data grid record row for a long position derived from an option. You select data grid record rows by double clicking each row you want to select. You also deselect record rows within the data grid by double clicking them. G. The Abandon button displays a window from which you can abandon a long position. A long position has a positive value in its Curr field. The Abandon button is disabled until you select a data grid record row for a long position derived from an option. [Member Code] APD Consolidated Member Positions window 1) Functionality The View [Member Code] APD Consolidated Member Positions window summarizes the positions held by your member organization. From within this window you can exercise and abandon long options, create physical delivery records and roll forward positions that you have selected. 2) Launch Method You can launch a View [Member Code] APD Consolidated Member Positions window by clicking Agris Views > APD View Consolidated Member Positions. 227 3) Key window elements Data grid fields, six functionality buttons and a default Agris Views view pop-up menu comprise the key elements of View [Member Code] APD Consolidated Member Positions windows. The remaining paragraphs under this heading discuss each of these three elements in turn. a. The Member field contains a four letter code identifying the member organization to which each consolidated member position belongs. b. The Prin field contains a four or six letter code identifying the member or client to which each consolidated member position belongs. c. The Contract field contains the contract name of each consolidated member position. d. The Open field contains the numeric value of each consolidated member position at the start of the trading day. This value may be a negative value. e. The Buy field contains the numeric value of each consolidated member position bought during the current trading day. f. The Sell field contains the numeric value of each consolidated member position sold during the current trading day. g. The Curr field contains the numeric value of each currently held consolidated member position. The Nutron back end determined this value by adding the numeric value in the Open field to the numeric value in the Buy field and then taking away the value in the Sell field from this combined value. h. The Physical Pos field contains the position that the member holds for the contract which is about to expire and can be delivered. i. The Delivered Pos field contains the actual quantities of wheat, soya etc. that have been delivered to the silo for each consolidated member record. A View [Member Code] APD Consolidated Member Positions window has six functionality buttons. Separate numbered notes below discuss each of these buttons as they appear from left to right from the bottom left corner of the window. A. The Close button closes the View [Member Code] APD Consolidated Member Positions window. B. The Physical Del button lets you create physical delivery records 228 C. Click the Download button to download your latest dealer position D. The Pause / Resume button is a toggle. If you click this button while it has a „Pause‟ caption, it will prevent updates from appearing within the View [Member Code] APD Consolidated Positions window data grid until you click it again. The 'Resume' caption will also replace the 'Pause' caption of this button. E. Click the Refresh button to force an update of the contents of the View [Member Code] APD Consolidated Positions window data grid. F. The Filter button opens a separate filter screen where you can filter the data that should be displayed in the view. View [Member Code Dealer Code] APD Clients window 1) Functionality The View [Member Code Dealer Code] APD Clients window displays a list of all your clients and lets you create new client records. If you are a master dealer, you can also validate/restrict client records from within this window. 2) Launch Method You can launch a View [Member Code Dealer Code] APD Clients window by clicking Agris Views > APD View Clients. 3) Key window elements Data grid fields, functionality buttons and a default Agris Views view pop-up menu comprise the key elements of View [Member Code Dealer Code] APD Clients windows. The remaining paragraphs under this heading discuss each of these three elements in turn. a. The Id Client field contains a unique numeric identifier for each client. This identifier is generated by the Nutron back end. b. The Client Code field contains a unique alpha-numeric code for each client. This identifier is generated by the Nutron back end. c. The Master Client field contains a master client code where applicable. d. The Member field contains the code of the client‟s member organization. e. The Client Name field contains the client name that is displayed on screen. 229 f. The Foreign Client field contains a „Yes‟ value or a „No‟ value. This value indicates whether or not the client is a foreign client. g. The Validated field contains a „Yes‟ value or a „No‟ value. This value indicates whether or not the client has been validated. h. The Client Details field contains a „Yes‟ value or a „No‟ value. This value indicates whether or not the client‟s details have been requested. i. Indicates the margin multiplication factor. A View [Member Code Dealer Code] APD Clients window has six functionality buttons. Notes below discuss each of these buttons as they appear from left to right from the bottom left corner of the window. A. The Close button closes the View [Member Code Dealer Code] APD Clients window. B. Validate / Restrict button functionality is only available if you are logged in as a master dealer. A Validate / Restrict button is disabled until you select the row of a client record you want to validate or restrict inside the data grid. The button appears as a Validate button when you select the row of a client record that can be validated. The button appears as a Restrict button when you select the row of a client record that can be restricted. You select record rows within the data grid by double clicking each row you want to select. You also deselect record rows within the data grid by double clicking them. C. The View Details button is disabled until you select the row of a client record for which details are available within the data grid. You select record rows within the data grid by double clicking each row you want to select. You also deselect record rows within the data grid by double clicking them. D. Click the Insert button to display an Enter a Client window that lets you add new client records to the data grid. E. Click the Download button to refresh the client records displayed in the View [Member Code Dealer Code] APD Clients window data grid. F. The Insert SubAcc button inserts a client sub account for a selected master client. DAILY ACCOUNT SUMMARY FOR: [Clearing Member Code (Date)] window 1) Functionality The DAILY ACCOUNT SUMMARY FOR: [Clearing Member Code (DATE)] window displays a daily account summary file for clearing members. As well as letting clearing members view their daily account summary details for the current or the previous day, this window also lets clearing members launch windows that display daily account summary details for selected member organizations and their clients. 230 2) Launch Method You can launch a DAILY ACCOUNT SUMMARY FOR: [Clearing Member Code (DATE)] window by clicking Agris Views > APD Daily Account Summary. 3) Key window elements As can be seen from the screen shot below, the initially visible portion of a DAILY ACCOUNT SUMMARY FOR: [Clearing Member Code (DATE)] window consists of a data grid, a panel that provides key statistics, a set of functionality buttons and a pair of option buttons. A DAILY ACCOUNT SUMMARY FOR: [Clearing Member Code (DATE)] window also includes a default Agris Views view pop-up menu. The remaining paragraphs under this heading after the screen shot below will discuss each of these key window elements in turn. The DAILY ACCOUNT SUMMARY FOR: [Clearing Member Code (DATE)] window section shown below is displayed in two numbered screen shots that respectively represent the left and right sections of this window. a. The Deals Done By field contains the code of each member organization for which the clearing member is responsible. b. The Total Booking Fees field contains the total booking fees for each member organization. c. The Initial Member Margin field contains each member‟s latest margin minus the previous margin. d. The Initial Client Margin field contains the client margin for each member minus the previous client margin for that member. 231 e. The Total Member Variation Margin field provides mark to market statistics for each member. f. The Total Client Variation Margin field provides client mark to market statistics for each member. g. The Total for Member field provides totals for each member. The DAILY ACCOUNT SUMMARY FOR: [Clearing Member Code (DATE)] key statistics panel shown below is displayed in two screen shots that respectively represent the left and right sections of this panel. No explanatory notes follow after these screen shots as the information categories on each panel are either self-explanatory or relate to clearing management concepts rather than online trading concepts. A DAILY ACCOUNT SUMMARY FOR: [Clearing Member Code (DATE)] window has four functionality buttons and a pair of option buttons in its bottom left corner. Separate numbered notes below describe each of these elements in order from left to right. A) Click the Close button to close the DAILY ACCOUNT SUMMARY FOR: [Clearing Member Code (DATE)] window. B) The Member Trace button is disabled until you have selected a member organization statistics record inside the DAILY ACCOUNT SUMMARY FOR: [Clearing Member Code (DATE)] window by double clicking it. You can then display a DAILY ACCOUNT SUMMARY FOR : [MEMBER CODE] window derived from the DAILY ACCOUNT SUMMARY FOR: [Clearing Member Code (DATE)] window by clicking the DAILY ACCOUNT SUMMARY FOR : [MEMBER CODE] window Member Trace button. Notes under heading i. below discuss DAILY ACCOUNT SUMMARY FOR : [MEMBER CODE] window features. C) You use the Download button in conjunction with the Today or the Prev Bus Day option buttons on its right to populate the DAILY ACCOUNT SUMMARY FOR: [Clearing Member Code (DATE)] window data grid and its key statistics panel with data. D) Click the Print button to display an HTML page with a grid in which all DAILY ACCOUNT SUMMARY FOR: [Clearing Member Code (DATE)] window data appears. You can print a hard copy of this HTML page if you wish to do so. 232 View [Member Code Dealer Code] APD Physical Deliveries window 1) Functionality The View [Member Code Dealer Code] APD Physical Deliveries window displays all the physical deliveries entered for the day from within the View [Member Code Dealer Code] APD Consolidated Member Positions window described under heading 12.2.2.11. You can also view the silo certificates that make up individual physical deliveries from within this window. 2) Launch Method You can launch a View [Member Code Dealer Code] APD Physical Deliveries window by clicking Agris Views > APD View Physical Deliveries. 3) Key window elements Data grid fields, functionality buttons and pop-up menu items comprise the key elements of View [Member Code Dealer Code] APD Physical Deliveries windows. Notes in separate paragraphs below discuss each of these three elements in turn. a. The Delivery ID field contains a unique physical delivery ID for each physical delivery. b. The Member field contains the code of the member organization linked to each physical delivery. c. The Client Code field contains the code of the client linked to each physical delivery. d. The Contract field identifies the contract linked to each physical delivery. e. The Delivery Date field contains each physical delivery‟s delivery date. f. The Notice Date field contains each physical delivery‟s notice date. g. The Nominal field contains the nominal of each physical delivery. h. The Qty field contains the quantity of each physical delivery. i. The Reference field contains a reference number for each physical delivery. j. The AllocateEFP field Indicates either a member or client code to which this delivery was allocated as EFP (Exchange For Physical). A View [Member Code Dealer Code] APD Physical Deliveries window has six functionality buttons. Separate numbered notes below discuss each of these buttons as they appear from left to right from the bottom left corner of the window in separate numbered notes below. 233 A) Click the Close button to close the View [Member Code Dealer Code] APD Physical Deliveries window. B) Click the Certificates button to view the silo certificates within a physical delivery record. The Certificates button is disabled until you select a delivery record row inside a View [Member Code Dealer Code] APD Physical Deliveries data grid. You select record rows within the data grid by double clicking each row you want to select. You also deselect record rows within the data grid by double clicking them. C) The Load button lets you select the position you want to deliver on for the various principals. D) The Get button lets you display delivered positions. E) The Allocate as EFP button indicates either a member or client code to which this delivery was allocated as EFP (Exchange For Physical). F) Click the Download button to populate the View [Member Code Dealer Code] APD Physical Deliveries window data grid with physical deliveries records. View [Member Code Dealer Code] APD Silo Certificate File window 1) Functionality The View [Member Code Dealer Code] APD Silo Certificate File window displays a view of all the silo certificates loaded in the silo certificate file. From this window you can also manually add and verify certificates. 2) Launch Method You can launch a View [Member Code Dealer Code] APD Silo Certificate File window by clicking Agris Views > APD View Silo Certificates. 3) Key window elements Data grid fields, functionality buttons and pop-up menu items comprise the key elements of View [Member Code Dealer Code] APD Silo Certificate File windows. Notes in separate paragraphs below discuss each of these three elements in turn. 234 a. The CertNumber field contains the certificate number of each silo certificate. b. The Silo Owner field identifies the silo owner for each silo certificate. c. The Silo Location field identifies the physical location of the silo for each silo certificate. d. The Contract field identifies the contract linked to each silo certificate. e. The Grade field identifies the crop grade for each silo certificate. f. The Origin field identifies the country of origin of the crop for each silo certificate. g. The Member field identifies the member linked to each silo certificate. h. The Status field identifies the status of the silo certificate. The Nutron back end initially assigns silo certificates a „Not Verified‟ status that you can later change. i. The Tonnage field contains the crop tonnage for each silo certificate. j. The Storage Paid field contains the date up to which storage has been paid for the crop represented by each silo certificate. k. The Electronic field contains a „True‟ or a „False‟ value that indicates whether the silo certificate only exists in an electronic format or whether it also exists in a paper-based format. l. The Issue Date field contains the date on which the silo certificate was issued. m. The Original Depositor field contains the original depositor of each silo certificate. A View [Member Code Dealer Code] APD Silo Certificate File window has six functionality buttons. Separate numbered notes below discuss each of these buttons as they appear from left to right from the bottom left corner of the window. A) Click the Close button to close the View [Member Code Dealer Code] APD Silo Certificate File window. B) The Add button lets you add a new silo certificate record to the View [Member Code Dealer Code] APD Silo Certificate File window data grid as follows: a. Click the Add button to display a Silo Certificate window like the one shown below. b. Enter and select information within the Silo Certificate window using the numbered notes above to guide you as to the kind of information that is required. Once you are satisfied with the information you have entered, click the Silo Certificate window OK button to close this window and create a new silo certificate record. The new record will have a status of „Not Verified‟ that you can change to „Verified‟ using the Verify Sel button. c. If you select the new silo certificate record by double clicking its data grid row, the Add button will appear as an Edit button. You can click the Edit button to display the Silo Certificate window for that record. You can then edit the contents of the Silo Certificate window and close the window and save your changes by clicking its OK button. The newly edited record 235 will have a status of „Not Verified‟ even if the previously saved version of that record had a status of „Verified‟. C) You can use the Delete button to delete silo certificate records by first selecting the record you want to delete within the data grid and then clicking the Delete button. D) You can use the Verify Sel button to verify newly created or newly edited silo certificate records by first selecting the record/s you want to verify within the data grid and then clicking the Verify Sel button. E) The Upload XLS button lets you import multiple silo certificate records at one time from an Excel spreadsheet instead of creating them one at a time from within a Silo Certificate window. You use the Upload XLS to import multiple silo certificate records as follows: a) Create or obtain a copy of an Excel spreadsheet with column fields like those shown in the Excel spreadsheet window section screen shots below. The upper screen shot shows Excel spreadsheet column fields from the left of the Excel spreadsheet window while the lower screen shot shows Excel spreadsheet column fields from the right of the Excel spreadsheet window. b) Fill in the details for each silo certificate record you want to create on a separate Excel spreadsheet row and save the updated spreadsheet to a folder on your Nutron workstation. c) Click the Upload XLS button to display a standard Open File Windows dialogue box you can use to locate the spreadsheet. d) Assuming you succeeded in locating and opening the Excel spreadsheet window, a Silo Upload window like the one shown below will appear. Thereafter, provided you do not change the name or folder location of the Excel spreadsheet window, a Silo Upload window populated with the silo certificate records you wish to create will appear as soon as you click the Upload XLS button. 236 e) From within the Silo Upload window you can add the new silo certificate records it contains to the View [Member Code Dealer Code] APD Silo Certificate File window and close the Silo Upload window by clicking its Submit button. Alternatively, you can select a different Excel spreadsheet from which to upload silo certificate records by clicking its Change XLS button. You can also close the Silo Upload window without uploading any new silo certificates by clicking its Close button. 6. Click the Download button to populate the View [Member Code Dealer Code] APD Silo Certificate File window with pre-existing silo certificate records. View [Member Code Dealer Code] APD Allocation Notice File 1) Functionality The View [Member Code Dealer Code] APD Allocation Notice File window displays a summary of the allocations done for a particular business day. This window is only populated with data once end of day processes have been concluded. Every allocation notice record in a View [Member Code Dealer Code] APD Allocation Notice File window has its counterpart in the View [Member Code Dealer Code] APD Delivery Notice File window. 2) Launch Method You can launch a View [Member Code Dealer Code] APD Allocation Notice File window by clicking Agris Views > APD View Allocation Notice. 3) Key window elements Data grid fields, two functionality buttons and pop-up menu items comprise the key elements of View [Member Code Dealer Code] APD Allocation Notice File windows. Notes in separate paragraphs below discuss each of these three elements in turn. 237 a. The Delivery Notice Reference Number field contains a unique reference number for each delivery notice. b. The ClientCode field contains the client code of each client that received an allocation. c. The MemberCode field contains either the code of each member that received an allocation or the code of each member to whom a client that has received an allocation belongs. d. The ClearingMemberCode field identifies the clearing member for each member involved in an allocation. e. The NoticeDate field contains the date when notice of each allocation was given. f. The DeliveryDate field contains the date when each set of allocated contracts will be delivered. g. The ShortName field identifies each instrument being delivered. h. The ExpiryDate field contains the expiry date of each futures contract being delivered on. i. The Nominal field specifies the numerical amount of each set of contracts being delivered. j. The DeliveryNoticeQuantity field specifies the physical tonnage of each set of contracts being delivered. k. The ReceiptNumber field specifies the receipt number of each delivery. l. The Electronic field contains a „True‟ or „False‟ value that specifies whether each delivery is accompanied only by an electronic certificate or by a paper-based certificate. m. The SiloCertificateQuantity field specifies the quantity of receipts for each delivery. n. The SiloOwnerCode field identifies each silo owner where a commodity instance is currently kept. o. The SiloLocationName field contains the location name of each silo where a commodity instance is currently kept. p. The StoragePaid field contains each date up to which storage for each delivery has been paid. q. The StorageDiscount field contains the storage discount for each delivery certificate. r. The LocationDiscount field contains the location discount for each delivery certificate. 238 s. The GradeDiscount field contains the grade discount for each delivery certificate. t. The OriginDiscount field contains the origin discount for each delivery certificate. u. The VAT field contains the Value Added Tax that applies to each delivery certificate. v. The TotalDiscount field contains the total discount for each delivery certificate. w. The ClosingPrice field contains the closing price of each futures contract on its notice date. x. Total Payment Is the Allocation Total discount, minus the sum of VAT and Silo certificate quantity multiplied by the allocation closing price. y. Premium AVG Indicates the premium at which Silo Auction closed at. A View [Member Code Dealer Code] APD Allocation Notice File window has two functionality buttons. Separate numbered notes below discuss each of these buttons as they appear from left to right from the bottom left corner of the window. A) The Close button closes the View [Member Code Dealer Code] APD Allocation Notice File window. B) The Download button populates the View [Member Code Dealer Code] APD Allocation Notice File window with records. View [Member Code Dealer Code] APD Delivery Notice File window View [Member Code Dealer Code] APD Delivery Notice File window functionality discussed. 1) Functionality The View [Member Code Dealer Code] APD Delivery Notice File window displays a summary of the deliveries done for a particular business day. This window is only populated with data once end of day processes have been concluded. Every delivery notice record in a View [Member Code Dealer Code] APD Delivery Notice File window has its counterpart in the View [Member Code Dealer Code] APD Allocation Notice File window. 2) Load Method You can launch a View [Member Code Dealer Code] APD Delivery Notice File window by clicking Agris Views > APD View Delivery Notice. 3) Key window elements Data grid fields, two functionality buttons and pop-up menu items comprise the key elements of View [Member Code Dealer Code] APD Delivery Notice File windows. Notes in separate paragraphs below discuss each of these three elements in turn. 239 a. The Delivery Notice Reference Number field contains a unique reference number for each notice given to deliver. b. The ClientCode field contains the client code of each client that gave notice. c. The MemberCode field contains either the code of each member that gave notice or the code of each member to whom a client that has gave notice belongs. d. The ClearingMemberCode field identifies the clearing member for each member involved in giving notice of a delivery. e. The NoticeDate field contains the date when each notice of each delivery was given. f. The DeliveryDate field contains the date when each delivery will take place. g. The ShortName field identifies each instrument being delivered. h. The ExpiryDate field contains the expiry date of each futures contract being delivered on. i. The Nominal field specifies the numerical amount of each set of contracts being delivered. j. The DeliveryNoticeQuantity field specifies the physical tonnage of each set of contracts being delivered. k. The ReceiptNumber field specifies the receipt number of each delivery. l. The Electronic field contains a „True‟ or „False‟ value that specifies whether each delivery is accompanied only by an electronic certificate or by a paper-based certificate. m. The SiloCertificateQuantity field specifies the quantity of receipts for each delivery. n. The SiloOwnerCode field identifies each silo owner where a commodity instance is currently kept. o. The SiloLocationName field contains the location name of each silo where a commodity instance is currently kept. 240 p. The StoragePaid field contains each date up to which storage for each delivery has been paid. q. The StorageDiscount field contains the storage discount for each certificate. r. The LocationDiscount field contains the location discount for each certificate. s. The GradeDiscount field contains the grade discount for each delivery certificate. t. The OriginDiscount field contains the origin discount for each delivery certificate. u. The VAT field contains the Value Added Tax that applies to each delivery certificate. v. The TotalDiscount field contains the total discount for each delivery certificate. w. The ClosingPrice field contains the closing price of each futures contract on its notice date. x. Total Payment Is the Allocation Total discount, minus the sum of VAT and Silo certificate quantity multiplied by the allocation closing price. y. Premium AVG Indicates the premium at which Silo Auction closed at. A View [Member Code Dealer Code] APD Delivery Notice File window has two functionality buttons. Separate numbered notes below discuss each of these buttons as they appear from left to right from the bottom left corner of the window. A) The Close button closes the View [Member Code Dealer Code] APD Allocation Notice File window. B) The Download button populates the View [Member Code Dealer Code] APD Allocation Notice File window with records. View [Member Code Dealer Code] APD Rates window 1) Functionality The View [Member Code Dealer Code] APD Rates window displays a view that is updated at the end of each day with data supplied from a NEW DAYAGR.xls Excel spreadsheet file created by the JSE on a daily basis for the Agris market. 2) Launch Method You can launch a View [Member Code Dealer Code] APD Rates window by clicking Agris Views > APD View Rates. 241 3) Key window elements Data grid fields, two functionality buttons and pop-up menu items comprise the key elements of View [Member Code Dealer Code] APD Rates windows. Notes in separate paragraphs below discuss each of these three elements in turn. a. The IDSFXRates field contains a unique identification number for each rates record. b. The EffectDate field contains the current trading date. c. The Rate field contains updated information from the Excel spreadsheet file created by the Exchange that specifies the interest on the initial margin. This information is applicable to all markets. d. The ROD Index field contains updated information from the Excel spreadsheet file created by the Exchange that specifies the Rand Overnight Deposit rate. This information is applicable to the Financial and Yield-X markets. e. The JROD Index field contains updated information from the Excel spreadsheet file created by the Exchange that specifies the Johannesburg Rand Overnight Deposit rate. This information is applicable to the Yield-X market. f. The JROD Index Factor field contains updated information from the Excel spreadsheet file created by the Exchange that specifies the current calculated value for the Johannesburg Rand Overnight Deposit rate. This information is applicable to the Yield-X market. g. The JBar Index field contains updated information from the Excel spreadsheet file created by the Exchange that specifies the current Johannesburg Interbank Agreed Rate over a one month period. This information is applicable to the Financial and Yield-X markets. h. The JBar Index 3Month field contains updated information from the Excel spreadsheet file created by the Exchange that specifies the current JBAR (Johannesburg Interbank Agreed Rate) over a three month period. This information is applicable to the Financial and Yield-X markets. i. The JBar Index 6Month field contains updated information from the Excel spreadsheet file created by the Exchange that specifies the current JBAR (Johannesburg Interbank Agreed 242 Rate) over a six month period. This information is applicable to the Financial and Yield-X markets. j. The JBar Index 9Month field contains updated information from the Excel spreadsheet file created by the Exchange that specifies the current JBAR (Johannesburg Interbank Agreed Rate) over nine month period. This information is applicable to the Financial and Yield-X markets. k. The JBar Index 12Month field contains updated information from the Excel spreadsheet file created by the Exchange that specifies the current JBAR (Johannesburg Interbank Agreed Rate) over a twelve month period. This information is applicable to the Financial and Yield-X markets. l. The Prime field contains updated information from the Excel spreadsheet file created by the Exchange that specifies the current Prime Rate. m. The DiscountRate 3Month field contains updated information from the Excel spreadsheet file created by the Exchange that specifies the current Discount Rate over a three month period n. The SarbCallRate field contains updated information from the Excel spreadsheet file created by the Exchange that specifies the current SARB (South African Reserve Bank) Call Rate. o. The USDRate field contains updated information from the Excel spreadsheet file created by the Exchange that specifies the daily average R/US Dollar exchange rate. p. The EURRate field contains updated information from the Excel spreadsheet file created by the Exchange that specifies the daily average R/Euro exchange rate. q. The GBPRate field contains updated information from the Excel spreadsheet file created by the Exchange that specifies the daily average R/British Pound exchange rate. r. The OCAD field contains updated information from the Excel spreadsheet file created by the Exchange that specifies the current Overnight Call Deposit rate for all markets. s. The NCD 3Month field contains updated information from the Excel spreadsheet created by the Exchange that specifies the Negotiable Certificate of Deposit rate over a three month period. t. The NCD 6Month field contains updated information from the Excel spreadsheet created by the Exchange that specifies the Negotiable Certificate of Deposit rate over a six month period. u. The NCD 12Month field contains updated information from the Excel spreadsheet created by the Exchange that specifies the Negotiable Certificate of Deposit rate over a twelve month period v. The Stefi field contains updated information from the Excel spreadsheet created by the Exchange that specifies the current Short Term Fixed Interest rate. A View [Member Code Dealer Code] APD Rates window has two functionality buttons. Separate numbered notes below discuss each of these buttons as they appear from left to right from the bottom left corner of the window. 243 A) The Close button closes the View [Member Code Dealer Code] APD Rates window. B) The Download button populates the View [Member Code Dealer Code] APD Rates window with rates records. View [Member Code Dealer Code] APD Exchange Announcements File windows 1) Functionality The View [Member Code Dealer Code] APD Exchange Announcements File window displays all Exchange announcements sent by the Exchange during the current trading day 2) Launch Method You can launch a View [Member Code Dealer Code] APD Exchange Announcements File window by clicking Fin Views > APD View Exchange Announcement 3) Key window elements Data grid fields, three functionality buttons and pop-up menu items comprise the key elements of View [Member Code Dealer Code] APD Exchange Announcements File windows. Notes in separate paragraphs below discuss each of these three elements in turn. a. The Announcement ID field contains an incrementing number value that uniquely identifies each Exchange announcement. b. The Announcement Date field contains the date of each Exchange announcement. c. The Announcement Time field contains the time of each Exchange announcement. d. The Announcement Message field contains the text of each Exchange announcement. A View [Member Code Dealer Code] APD Exchange Announcements window has three functionality buttons. A. The leftmost button, the Close button, closes the View [Member Code Dealer Code] APD Exchange Announcements window. B. The rightmost button, the Download button, populates the View [Member Code Dealer Code] APD Exchange Announcements window with Exchange announcement records. 244 C. The Display button opens a Window showing the full exchange announcement message if doesn‟t fit on the grid. 245