1
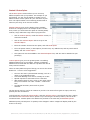
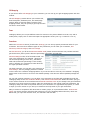
1
Tradingeye® Help Manual
Set up, configure and maintain your online shop
Contents
Understanding the Tradingeye interface ............................................................................................1
Managing Your Settings ..................................................................................................................2
Setting Up Users ......................................................................................................................... 2.1
Shop Settings ............................................................................................................................. 2.2
Company Information .................................................................................................................. 2.3
Text Areas ................................................................................................................................. 2.4
Feature Settings ......................................................................................................................... 2.5
Order Settings ............................................................................................................................ 2.6
Building Your Online Shop ...............................................................................................................3
Shop Builder............................................................................................................................... 3.1
The Department Structure............................................................................................................ 3.2
Creating Departments ................................................................................................................. 3.3
Creating and Arranging Sub-Departments ...................................................................................... 3.4
Standard & Custom options .......................................................................................................... 3.5
Product Packages Builder ............................................................................................................. 3.6
Menu Builder .............................................................................................................................. 3.7
Order Settings ...............................................................................................................................4
Order Manager ........................................................................................................................... 4.1
Customer Manager. ..................................................................................................................... 4.2
Postage & packing....................................................................................................................... 4.3
Gift Wrapping ............................................................................................................................. 4.4
Taxes ........................................................................................................................................ 4.5
Promotions................................................................................................................................. 4.6
Site Tools......................................................................................................................................5
Email Campaigns ........................................................................................................................ 5.1
Suppliers. .................................................................................................................................. 5.2
Product Importer ........................................................................................................................ 5.3
File Manager............................................................................................................................... 5.4
Reports...................................................................................................................................... 5.5
Glossary .......................................................................................................................................6
dpivision.com Ltd. | Studio 3, The Old Post Office, 5 Pink Lane, Newcastle upon Tyne NE1 5DW | tel: +44 (0)191 230 1048 | [email protected] | www.dpivision.com
2
Tradingeye Shop - User Handbook
Welcome to Tradingeye, the most versatile and user-friendly shop builder available. Tradingeye is
completely customisable, and can be modified to suit any purpose. Both advanced users and complete
beginners can use the system with the greatest of ease and minimum training.
To help you create the most efficient online shop possible, we've created this user manual that takes you
through the steps of building your shop. Since Tradingeye has many advanced capabilities, these steps
are just suggestions. If you have the knowledge, you can use the Tradingeye tools to create, or enhance a
more complex shop.
1 Understanding the Tradingeye interface:
After your website has been set up, you will receive your default login
details. To log in to your website, first enter your website’s URL into
your preferred web browser, followed by /admin/.
Example: http://www.mywebsite.com/admin/
This will take you to the Admin login page for your site. Enter your
default username and password in to the appropriate boxes, and click
on the Login button.
The Tradingeye interface is split into 2 main sections:
The left-hand menu houses the main options for customizing your shop. Selecting an item from this
menu will show its options in the main window. Items in this menu are arranged in the following main
sections:
Editor
Switch between the admin and shop front, and
logout of the admin section
Builder
Department, product and content options
Orders
Order, customer and accounts details
Marketing
Email campaigns, promotions and shop reports
Admin
Shop settings, security and product importer
Modules (optional)
Optional Quickbooks, ACT, Sage Line 50 links etc.
The main window will show your current selection, i.e. where you currently “are” in the console. For
example, select Menu Builder, and the Menu Builder page will load into the main window.
dpivision.com Ltd. | Studio 3, The Old Post Office, 5 Pink Lane, Newcastle upon Tyne NE1 5DW | tel: +44 (0)191 230 1048 | [email protected] | www.dpivision.com
3
2 Managing Your Settings
Tradingeye allows you to be in control of every aspect of your shop. The first thing you need to do to get
started is to set up the login details for the different users of your shop. Then we can look at the
parameters of your shop, which include everything from your shop name, to how you want your shopping
basket to function.
Setting Up Users
You now are logged into the Admin area of your website, where you can control the operation and
functionality of your online shop. Depending on how many people will be accessing this section, and what
they will be doing here, we need to set up the relevant user accounts. This will determine who will be
allowed to access certain parts of the admin section, and what they will be allowed to change. For
example, if one member of staff is solely responsible for Advertising & Promotion, then there is no need
for him / her to access the “VAT / Tax” area, so for safety and security reasons, this option should be
disabled for this user.
You will automatically receive one master login account with “Administrator” privileges. This user will have
access to every aspect of the shop, and can be responsible for setting new users up, and retrieving lost
password information for existing users. It is important to edit these login details to make them something
more personalised and memorable, for security reasons.
To set up a new user:
•
Once logged in to the admin section, click on
the Admin Login option, in the left-hand menu
under Admin.
•
Click on Add New User. Input the new user’s
login details in the appropriate boxes, and
check the boxes below according to what
areas of the admin section this user should
be granted access to.
•
Click the Set User Account button to enter this
user into the system.
Once all users have been set up, the administrator can
delete the default user from this list by clicking on the
corresponding Delete link.
Security Note: Passwords are best kept to something memorable, and should be a combination of both
words and numbers.
dpivision.com Ltd. | Studio 3, The Old Post Office, 5 Pink Lane, Newcastle upon Tyne NE1 5DW | tel: +44 (0)191 230 1048 | [email protected] | www.dpivision.com
4
Shop Settings
In the Shop Settings section, we can set our Company’s
contact information, any promotional offers, offer
optional a member points scheme, customer reviews
and / or wish list feature. We can also set how our shop
runs, i.e. how to accept payments, our payment
gateway, and how orders are processed. This section is
vital in setting up how we run our shop, and care must
be taken to ensure the details on here are entered
correctly.
Company Information
This is pretty straightforward - within this page, you simply enter the information for your company. If
there is information you don't want to appear on your shop, simply leave the appropriate areas blank.
To set the Company Information:
Enter your company information into this section, and all parts of
your site referring to your contact details (address, email etc.) will be
automatically updated.
•
Under Admin, click on Shop Settings, in the left-hand menu,
then click on the Company Information link.
•
Enter the name of your shop and your company details into
the appropriate boxes, and click the Update Company button
at the bottom of the page, to save the information.
Text Areas
This is where you set up the text throughout your site. Included in the Text Area section are headers,
index body, Member Points details, and the shopping basket header. To make your site more efficient, you
need to define each text area as clearly as possible. The Index Body is the content for your homepage,
and it can handle text, HTML, or cascading style sheets (CSS). These sections are where you create the
content for your shop.
To set the Text Areas:
Set all global text details in this section, such as a welcome note, information on member points,
accessibility etc.
•
Under the Admin section in the left-hand
menu, click on Shop Settings, then click on the
Text Areas link. Select the relevant link to edit
each specific text area in turn. Simply input
and edit the text with the built-in text editor,
and click the Update button to save.
dpivision.com Ltd. | Studio 3, The Old Post Office, 5 Pink Lane, Newcastle upon Tyne NE1 5DW | tel: +44 (0)191 230 1048 | [email protected] | www.dpivision.com
5
Feature Settings
There are special features you can set up within Tradingeye to offer your customers. Within Feature
Settings you can turn on Member Points and set up the parameters for them. You can also enable
Inventory Tracking, Customer Reviews, and a Wish List feature.
To set up the Shop Features:
Tradingeye offers an optional Member Points scheme, allowing users to accumulate points for items
purchased through the store. These points can be redeemed as a discount against products bought on the
customer’s next purchase. Also available in this section is an optional wish list feature, as well as a
customer review facility.
•
Under the Admin section in the left-hand menu, go to Shop Settings and click on the Feature
Settings link to access this area’s options.
•
Check the Enable Stock Control checkbox to apply the inventory tracking feature. By selecting
this, Tradingeye will track inventory for all products across
your website.
•
The Customer Review feature enables customers to post
reviews about products, shown alongside each product in the
online shop. Administrators have to ability to delete
inappropriate posts.
•
The Wish List feature allows users to log in and keep track of
their desired items within the website, with the ability to email
this list to friends and family. Use the checkbox to toggle this
feature on and off.
•
Use the Offer Member Points checkbox to toggle this feature
off and on. The more points a customer accumulates, the
higher their discount will be. To configure these settings, from
the main navigation menu under Marketing select Promotions
and then select Member points.
•
The Member Point Value relates to the value of each point awarded per £1.00 spent in the store.
For example, if this is set to 5, then for every £1.00 spent in the store, the customer will receive 5
points.
•
Set the Member Point Calculation to determine how the points will be converted into monetary
discount. For example, if a customer has 1,000 points and this point calculation is set to 0.05
(5%), then the customer has accrued £50.00 worth of discount (1000 x 0.05 = 50).
Once you are satisfied with your settings, click the Update Settings button to save your preferences.
dpivision.com Ltd. | Studio 3, The Old Post Office, 5 Pink Lane, Newcastle upon Tyne NE1 5DW | tel: +44 (0)191 230 1048 | [email protected] | www.dpivision.com
6
Order Settings
The shopping basket can be customised to set up the parameters for your customers’ orders.
To specify the Order settings:
This area determines how the ‘back end’ of your shop will function,
i.e. how payments will be dealt with, will gift wrapping be available,
and whether an email list signup be offered. Access this section via
the General Settings link.
•
Postage Method – Enter the description of the default
postage method if your customer selects none.
Example: ‘Royal mail First class’
•
Item Price/Kg – Enter the item weight per Kg from which
your postage will be calculated.
•
Order E-mail Address - When a customer places an order,
the notification will be sent to the e-mail address you supply
here.
•
Contact E-mail Address - If you want to set up a contact for
your customers to find information about your products or
company, this is where you input that e-mail address. It can
be separate from your order e-mail address, or the same.
The default site layout provides this e-mail address on the
footer of the page.
•
Wireless E-mail Address - If you have a mobile phone or PDA
with wireless e-mail capabilities, you can enter it to receive
order information while you're away from your computer.
The e-mail sent is formatted with minimal text and styling to
display specifically for handheld devices.
•
Enable Delivery Address - This option is automatically
checked as most companies allow their products to be
shipped to an address different than the billing address. If
your shop requires the billing address and the delivery
address to be the same, uncheck this box.
•
Enable Gift Wrapping - If you offer the gift-wrapping add-on
for your products, check this box. You will need to add various methods of gift-wrapping to your
system. To add gift-wrapping options, choose Gift Wrapping under the Basket Tools section. These
gift-wrapping options are available through the shopping basket as optional.
•
Offer Newsletter Signup - If you wish to offer your customers the ability to sign up to receive emails from you as they checkout, check this box.
•
Payment Types - Tradingeye offers many different options for you to set up for your customers.
Simply 'check' the types you can offer your customers. If you don't offer COD, simply leave 0.00
in the box.
•
Accept Credit Cards - If you have the 'credit card' option checked in the Payment Types, you
simply check the credit cards you wish to accept.
dpivision.com Ltd. | Studio 3, The Old Post Office, 5 Pink Lane, Newcastle upon Tyne NE1 5DW | tel: +44 (0)191 230 1048 | [email protected] | www.dpivision.com
7
•
Real-time Processing - If you are going to accept credit cards and want to bill their card with realtime processing, select the payment gateway that you are currently setup with. Tradingeye is
compatible with the following real-time processors:
Protx VSP Direct, Securetrading st, VeriSign PayFlow Pro, Authorize.Net, Shift4 On The Net and
PayPal. Other payment processors are available on demand.
Once you are happy with the settings in this section, click the Update Basket Settings button to save these
preferences.
dpivision.com Ltd. | Studio 3, The Old Post Office, 5 Pink Lane, Newcastle upon Tyne NE1 5DW | tel: +44 (0)191 230 1048 | [email protected] | www.dpivision.com
8
3 Building Your online Shop
The Shop Builder
In this next section we cover how to arrange and populate your shop using the Shop Builder.
The Shop Builder is essentially the front page of your online store. In this section we can set up
departments, sub-departments and create the actual content of our website. This is the centre of the
Tradingeye Shop admin, where you build and manage your shop. The Shop Builder can be found in the
left navigation bar under Builder.
Just like in ‘real’ high street shops, your shop should be comprised of departments and sub-departments.
Once this department structure has been set up, then we can start populating the shop with our products
and content pages. Tradingeye is built so you can easily add products to any page of your website. Once
products are entered, you can quickly move them throughout your shop.
The first step in building your online catalogue is to set up your hierarchy of departments. Tradingeye
allows you to set up as many departments (example: Apparel, Footwear) and sub-departments (Men's
Shirts, Women's Shirts) as you need. Your website can be as in depth as you want – the software is
capable of handling anything from the smallest of online shops to the most complex of e-commerce sites
with massive product bases.
By default, Tradingeye is set to focus on updating your home page first of all. The Shop Builder is split into
three sections:
Current Department: Home Page
This box is used to set up a hierarchy of additional
departments and sub-departments within your shop,
much like a department store.
Add Product to Home Page
This gives us the option to attach specific products to
our home page, to promote them further in a ‘Featured
Products’ spotlight.
Add Article to Home Page
Here we can add text / image content pages to our
home page, for example latest updates, news,
company information etc.
The Departments Structure
Just like high street shops have different departments, so will your website. If you sell only one type of
product, no problem - You can build one department, or one thousand - as many as you need.
Once you open your Shop Builder, it is automatically set up to build your homepage. Within this page are
three boxes that control all the information on your homepage. The first box is for setting up your
departments, the second box is for setting up special products that you'd like to feature on your shop
homepage as 'Featured Products', and the third is for content pages, such as articles, news items and
such like.
dpivision.com Ltd. | Studio 3, The Old Post Office, 5 Pink Lane, Newcastle upon Tyne NE1 5DW | tel: +44 (0)191 230 1048 | [email protected] | www.dpivision.com
9
Creating Departments
In the top box click on Add Department, to the right of the box header. This opens the page where you
will input department information.
•
Department Title - Simply the name of the type of
product within this department (for example:
Menswear).
•
Select a Site Layout - The general look and feel of your
site (customisations are available on demand). This tool
is used for example if you wanted a blue shop for Men's
Clothing and a pink shop for Women's Clothing. You
could also have different departments in your shop that
look different to each other.
•
Select a Template (layout for what you are creating)
The Tradingeye Shop offers many templates to use,
and you simply pick the one that best fits your shop's
needs. For example; if you want a content page, you
would pick content.cfm.
Content Page
content.cfm
Department
department.cfm
Department & product list
department_multi_productlist.cfm
Product
product.cfm
Product Kit (group of products sold as one)
product_kit.cfm
•
Images - There are three different types of pictures you
can use:
Image A - thumbnails seen throughout the site
Image B - 'regular-sized' pictures seen on the product page
Image C - detail, or close-up (large) pictures
To upload images, simply click on Browse and select the appropriate picture off your hard-drive
(please remember to compress your images and convert them to 72 dpi before uploading them)
•
Filename (URL) – By default, Tradingeye uses the product’s title as the filename. This can be
changed to whatever you like, and is very good for search engine optimization.
•
Meta Title - The Meta Title is used for search engines, so the text should be short and to the point.
•
Meta Description - The Meta Description is text similar to your Short Descriptions. The difference is
that your Meta Descriptions will be used for search engines, so the text should include a lot of
keywords.
•
Keywords - These are extremely important to achieve a dynamic website. Pick keywords that you
believe your customers would use for bringing up exactly what they want. These are also used for
search engines to drive traffic to your site.
dpivision.com Ltd. | Studio 3, The Old Post Office, 5 Pink Lane, Newcastle upon Tyne NE1 5DW | tel: +44 (0)191 230 1048 | [email protected] | www.dpivision.com
10
Note: If you intend on selling a large inventory of products, you don't want your keywords to be
generic. Be as specific as possible so your customers won't be lost when their keyword searches
bring up many options.
•
On / Off - This allows you to turn this department 'on' as soon as you create it.
•
Short Description - This is where you enter a short description of your department. For example: if
you have a Footwear department you might enter 'Shoes for all Walks of Life' as the short
description for your footwear department.
•
Long Description - You can use HTML, CFM, or style sheets to input content in the Long
Description section. You can also simply type in your content using the built-in text editor. The
content you place in this area should include information about the department you just created.
Note: For HTML users, the Tradingeye Shop provides HTML Quicktips. Click on the question mark
to the left of the Page Content box, and a small pop-up window will appear, providing a quick
reference guide to HTML code.
•
Click on Add Department, and you're ready to move on to the next steps.
dpivision.com Ltd. | Studio 3, The Old Post Office, 5 Pink Lane, Newcastle upon Tyne NE1 5DW | tel: +44 (0)191 230 1048 | [email protected] | www.dpivision.com
11
Creating and Arranging Sub-Departments
Adding sub-departments is very important if you have a variety of products to sell on your shop. If you
carry footwear, this is where you can add different sub-departments such as men's footwear, women's
footwear, etc. Arranging your shop in a logical and intuitive manner will aid your customers in finding
exactly what they are looking for, quickly and easily.
Once you've built a main department, go back to the Shop Builder, and click on the name of the
department you just built to bring up a page just like the one you just used to build your main
department. Simply fill in the information, and you've got a sub-department set up. The departments and
sub-departments will be arranged just like your finished shop will.
Once you have all your departments, sub-departments, and products inputted into the Tradingeye Shop,
you can quickly change them around if you decide to rearrange your shop.
Within the Shop Builder, and on your department page, towards
the bottom of the section you'll find a link that says Order List.
Click this to load in the Item Sorter. The Item Sorter lists the
departments and sub-departments within your shop. If you want
to move one, click on it, and use the up or down arrows to the
right to move them into the order you want within your list.
Associate Objects - The Associate Objects feature is a very
powerful tool that makes site building and maintenance quick and
easy. It allows you to attach objects (departments, products or
content) from other places in your site. This doesn't duplicate the
object, but rather creates an instance in the location that you
attach the object to.
Example: You have a t-shirt in the men's department and you
wish to have the same t-shirt in the women's department. To
attach the t-shirt product into the women's you would navigate
in the Shop Builder to the women's department, and click
Associate Item in the product area. This will bring up a module
to go and find the product; then associate that object with the
women's department. Once you save your changes, the t-shirt
will now be shown in both the men's and women's
departments. This is a simple method of cross-selling your
products.
dpivision.com Ltd. | Studio 3, The Old Post Office, 5 Pink Lane, Newcastle upon Tyne NE1 5DW | tel: +44 (0)191 230 1048 | [email protected] | www.dpivision.com
12
Standard & Custom Options
The Product Options section allows you to use many
different options with your products. For example: If you
sell clothing, you can use the builder to create a list of
different size or colour options for your customers to pick
from. The option builder is an extremely powerful tool to
enhance your shop, as its uses are endless.
Standard Options give you the ability to have multiple
choices for a single product. An example of this is T-shirt
sizes, where you would have the option of choosing Small,
medium, Large and Extra-Large when buying the item.
•
Click on Product Options, Under the Builder section, to
access this module.
•
Click on the Add New Option link to set up a new
Standard Option.
•
Enter the number of items for the option, and click Build Option
•
Fill in the option names (or descriptions) for each item, any added costs, and any stock control
details, and click Create Option.
•
This option will now be available in the Standard Options list, and can now be attached to your
product(s).
Custom Options give you even greater power over adding
additional features to your products. Choices are basically
additional form fields that are added to a product that can do
many various functions.
There are many different types of things you can use the Choice
Builder for – here are a few suggestions:
•
•
•
•
•
The user can enter a personalized message, such as a
name on an embroidered shirt
A Personal Message on a card or message on a cake
Special requests or instructions from a customer
Add quantity boxes for size, colour or any other choice.
Thus, the customer can order 2 smalls - 4 reds and 1
blue
List optional accessory items such as gloves
and hats
The list goes on and you can be as creative as you like. The various form types are input, text area,
quantity box and checkboxes.
To build a choice, go into the Choice Builder, and click Add New Choice. Then fill out the form, making
sure that the Form Field Name has no spaces. If you are using the inventory feature, this will be an
inventoried item. Custom options are attached to products in the same way as Standard Options.
Additional pricing will add price 'X' quantity to the shopper's orders. Images will display small by the
choice in the shop.
dpivision.com Ltd. | Studio 3, The Old Post Office, 5 Pink Lane, Newcastle upon Tyne NE1 5DW | tel: +44 (0)191 230 1048 | [email protected] | www.dpivision.com
13
Product Packages Builder
Tradingeye allows you to build product packages to
offer your customers. A kit is a group of like products
that you sell as a package, such as a hamper, or a
starter pack of some description.
Example: If you sell outdoor recreational gear, you might put a fishing rod, reel, and tackle box together
to create 'The Angler's Kit'. The options are endless, and all depend on the products you carry.
To build your kits, click on Product Packages, (under the Builder menu) and then click on Create New
Package.
The first screen you come to allows you to access your
departments and pick the products (which must be previously
created) that will form the basis of your kit. Once you find the
product you need, select it and click on Build Package. This will
then take you to a similar screen that lets you access
departments again to start adding products to your kit.
Basically, packages are virtual products that have a special
price, that then have other real products associated with them. Packages can be used in conjunction with
Standard Options only (not Custom Options).
Menu Builder
The Menu Builder allows you to create menu links in
your left-hand navigation (or where ever you end up
putting it). These are not department links, but specific
links that have been created manually through the
builder.
These links can consist of department, product, or content pages built inside of Tradingeye. They can also
be external links away from your site or outside of the Tradingeye framework.
Examples Menu Item uses:
Internal Link: Create a content page in the Shop Builder such as 'Pricing', then copy the website link for
that product page (preview the page just created, then copy & paste the URL) and use it for the link in the
menu builder .
External Link: One example would be banner ad code from an advertising affiliate. Another would be a
separate application such as an online forum, or guestbook. Take the link to the online forum and paste it
into the menu builder editor. (we can supply Online Forums - please ask for details). You can also add
images to your links instead of text.
Another option is to add extra HTML/JavaScript to your menu items. If you want to popup a new window
when the link is clicked, just add the attribute “target=_blank” to the html code for the link. The link will
then open up in a new window.
dpivision.com Ltd. | Studio 3, The Old Post Office, 5 Pink Lane, Newcastle upon Tyne NE1 5DW | tel: +44 (0)191 230 1048 | [email protected] | www.dpivision.com
14
4 Order Settings
Tradingeye offers one of the most efficient shopping
baskets available. The shopping basket is completely
customisable, and allows your customers to checkout
in three quick, easy steps. Tradingeye gives you
several options that you can offer your customers.
Order Manager
The Order Manager is a powerful management tool for your company. With this you can keep track of
every order placed through your shop. You can choose to list them by Invoice, Order Date, City, etc. and
you can also check back-ordered products, new orders etc. With the Order Manager, you can sort the
orders any way you want to fit your organisational needs. Once you have checked the orders you want to
view, you can check either DESC (descending order), or ASC (ascending order) to view them. You also
have the option of using the Search feature to find a specific order.
Customer Manager
Keeping a database of your customers is imperative to
good customer relations. The Customer Manager,
located under Orders, lets you input customer details
and sort them as you wish. Simply click on Add New
Customer and enter their information. You can find
specific customers by using the Search feature, or by
finding their last name in the database list.
Postage & Packing
The Postage & Packing section allows you to customise the postage options for your customers. Included
in the options are:
Flat Rate Postage - Allows you to set a flat rate for postage, no matter what product is being shipped.
Percentage Postage - This option allows you to set the postage cost as a percentage of the retail price,
and the base rate.
Per Item Postage - Allows you to set the rate depending
on how many items are bought from your site. You
could, for example set your first item charge is £5.00
and each additional item is set to £1.00.
Postage Codes - Allows you to input a separate postage
cost for each individual product.
Postage Ranges - Allows you to set postage ranges
dependant the on the prices of products bought.
Default Highest – Allows the postage to default to the
highest delivery charge if more than one item is
purchased.
Postage by weight – Allows you to set up postage by
weight calculation factor.
dpivision.com Ltd. | Studio 3, The Old Post Office, 5 Pink Lane, Newcastle upon Tyne NE1 5DW | tel: +44 (0)191 230 1048 | [email protected] | www.dpivision.com
15
Special Rates - This allows you to add special postage options not provided by UPS. These postage rates
are for speeding up postage. For example, First Class Royal Mail, Parcel Force and many others.
No Postage – Will not charge the customer extra for shipping.
dpivision.com Ltd. | Studio 3, The Old Post Office, 5 Pink Lane, Newcastle upon Tyne NE1 5DW | tel: +44 (0)191 230 1048 | [email protected] | www.dpivision.com
16
Gift Wrapping
If you want to offer Gift Wrapping to your customers, you can set up your gift-wrapping options with this
module.
The Gift Wrapping module allows you to add a title,
brief description, additional price, and small/large
images. When a customer adds a product to the
shopping basket, they can specify a gift-wrap for each
line item in their basket.
Taxes
Tradingeye allows you to input different taxes for countries. The present default is set at 0.00, and to
modify them, simply click on Taxes and input the appropriate country tax e.g. 0.17500 for 17.5 %).
Promotions
Within the Promotions section (found under Settings) you can set up special promotional sales for your
customers. There are three different types of site promotions you can offer your customers, Flat
Discounts, Discount Ranges, and Free Postage.
For Flat Discounts, you fill in the Minimum Basket Total (lowest amount someone can purchase and still
get the discount) then input the discount percentage, start date, and end date.
Discounts Ranges works off of the basket total. You
type in the description (for example, “spend over
one hundred pounds get 10% off!”), the basket
total and the discount percentage. These usually
work by offering your customers a better discount
for higher purchase amounts.
The third promotion you can offer your customers is
Free Postage. The free postage promotion is based
on the total of the customers shopping basket. If you set the value to £100.00, the customer's shopping
basket must exceed £100.00 to receive free default postage. This does not affect expedited postage site
tools.
For your gift-seeking customers, you can allow your customers to purchase gift certificates through the
Tradingeye Shop. In the Gift Certificate Builder, click Add New Gift Certificate. Within this editor you type
in the numeric amount of the certificate and a Manual Certificate Code. If you already have gift certificates
and wish to use their sequence numbers, place the certificate id in the manual code field. Otherwise, the
Tradingeye Shop will create a sequential code for you if left blank. For organisational purposes, it is best
to input your own number so you and your customers can keep track of your gift certificates.
Many e-commerce companies offer discounts to certain groups, or as promotional offers. In Discounts
Codes you input a discount code that that customers use in the shopping basket when they check out.
Below that, you input the discount value, the start date and end date.
dpivision.com Ltd. | Studio 3, The Old Post Office, 5 Pink Lane, Newcastle upon Tyne NE1 5DW | tel: +44 (0)191 230 1048 | [email protected] | www.dpivision.com
17
5 Site Tools
Email Campaigns
The Email Campaigns section is a very powerful way to
keep in touch with your customers and keep them
coming back into your shop to purchase more
products. Selecting the Create New Campaign option
lets you build an e-mail campaign. This e-mail campaign will consist of an E-mail Subject, Source ID,
HTML and Text e-mail content. The Source ID (SID) is a source id is an identifier that allows you to
track the success of your e-mail campaign. Each link in your email that is sent out must contain the
source id value.
Example:
http://www.domain.com/site/product.cfm?id=xxx&sid=SOURCEIDCODE (sid) is a URL parameter that is
passed through a URL string that the Tradingeye Shop parses and kicks into the shopping basket for
processing. (sourceIDcode) is the id value that you choose to identify your campaign. Once an order is
placed using a SID value, it is stored in the database for future reference and appears in the customers
invoice.
Lead Groups are a great way to target your customers. To create a lead group, you must select a number
of products that match the criteria of the customers you are interested in sending an e-mail to. Once it's
created, the system will find all of your customers who have purchased the selected products within the
date range you specified and create a listing of those customers. You can then specify that lead list in your
e-mail campaign to send a special e-mail to those customers.
Suppliers
This feature allows you to input and manage your manufacturers of the products you sell. To add new
manufacturers, simply click the Add New Supplier text and enter the information for your manufacturer.
You can also input manufacturer logos, which will then automatically show up on the product pages of
their products. The list automatically sorts by alphabetic order, but you can find a specific manufacturer by
using the Search feature.
Product Importer
The product importer allows you to import products from a text (.csv) file. This text file needs to be some
sort of delimited list one-row-per-product text file. There is a select list of available attributes that can be
tailored to match your import.
File Manager
The File Manager is for experienced HTML and Cold Fusion developers only. It allows you to edit/delete
certain files directly from within the admin without the use of FTP. It could also be used to upload images
etc. This tool should be used with great care as changing these files could affect the running of your shop.
Reports
This is an important tool for day-to-day management of your online shop. From here, you can access and
print off Daily Sales Reports, order Reports by Date, and an Inventory Report.
dpivision.com Ltd. | Studio 3, The Old Post Office, 5 Pink Lane, Newcastle upon Tyne NE1 5DW | tel: +44 (0)191 230 1048 | [email protected] | www.dpivision.com
18
6 Glossary
Add New Manufacturer
To keep your database of manufacturers organised, Tradingeye has a section that allows you the ability to
quickly add new manufacturers to your system.
Attach…
The Attach… feature is a very powerful tool in Tradingeye. It allows you to attach objects (departments,
products or content) to and from other places in your shop. This doesn't duplicate the object, but rather
creates a stub record in the location that it attaches the object to.
Builder
The Builder area gives you to access your Shop, Menu, Product Options and Product Package Builders,
which allow you to create your departments, sub-departments and products.
Shop Builder
The Shop builder creates the flow of your site. This is where you build and manage your online shop.
Within the Shop Builder you can set up your departments, sub-departments and products.
Admin Security
This section allows you to add other personnel to your website administration. Within this admin you can
set restrictions on the areas that they can edit and manipulate.
Customer Manager
Keeping a database of your customers is imperative to good customer relations. The Customer Manager
allows you to input customers and sort them how you wish. This feature allows you to keep a database of
your customers.
Default Postage
Description of the default postage method, if none are chosen by your customer.
Departments
Just like high street shops have different sections, so will your online shop. These departments consist of
the different types of products that you carry. For example: Footwear, Jackets, Trousers etc.
Discounts
Tradingeye allows you the ability to offer discounts at certain times that customers can access with the
discount code.
Feature Settings
There are special features that you can set up in Tradingeye up to offer your customers. Within Feature
Settings you can turn on Member Points and set up the parameters for them. You can also enable
Inventory Tracking, Customer Reviews, and a Wish List feature.
Flat Rate Postage
Within the Postage Builder section, you can set up many different postage options for your customers. Flat
Rate Postage allows you to set a flat rate for postage, no matter what product is being shipped.
Gift Wrapping
Tradingeye allows you the ability to set up gift-wrapping for your customer's purchases. Within the Gift
Wrap section you can modify different settings to customise your gift-wrapping options.
HMTL QuickTips
Within most areas of Tradingeye, there are HTML QuickTips. This is a small popup window you can open
that gives a quick reference to HTML code.
dpivision.com Ltd. | Studio 3, The Old Post Office, 5 Pink Lane, Newcastle upon Tyne NE1 5DW | tel: +44 (0)191 230 1048 | [email protected] | www.dpivision.com
19
Item Sorter
The Item Sorter lists the departments and sub-departments within your shop. If you want to move one,
click on it, and use the up or down arrows to the right to move them into the order you want within your
list.
Keywords
These are extremely important to achieve a dynamic website. Pick keywords that you believe your
customers would use for bringing up exactly what they want. These are also used to input into search
engines to drive traffic to your site.
Email Campaigns
The mailroom is a very powerful way to keep in touch with your customers and keep them coming back
into your store to purchase more products. Creating a new campaign lets you build an email campaign.
This email campaign will consist of an Email Subject, Source ID, HTML and Text email content.
Meta Description
The Meta Description is text similar to your Short Descriptions. The difference is that your Meta
Descriptions will be used for search engines, so you should use a lot of keywords in it.
Member Points
Member points are special points given to customers for buying certain amounts of product. For example:
If a customer bought £150 worth of product, you might give them 15 member points worth £1.50.
Customers can build up on Member Points that are redeemable in the future. The percentage and formula
for the points is completely customisable.
On / Off
This allows you to turn on departments as soon as you create them.
Option Builder
The choice builder gives you great power over adding additional features to your products. Standard and
Custom Choices are basically additional form fields that are added to a product that can do many various
functions.
Order E-Mail Address
This is the e-mail address you want your order e-mails to go to. When a customer places an order, the
notification goes to the e-mail address you supply in this section.
Order Manager
The Order Manager allows you to keep track of all your orders. With the Order Manager you can keep
track of every order placed through your shop. You can choose to list them by invoice, order date, city,
and much more.
Page Content
You can use HTML, CFML, or style sheets to input content in the Page Content section. You can also simply
type in your content.
Payment Types
Tradingeye gives you the ability to utilize a variety of different payment types. Within this section you
simply 'check' the payment types that are suited for your online business.
Per Item Postage
This allows you to set the rate depending on how many items are bought from your site. Example: Your
first item charge is £5.00 and each additional item is set to £1.00, and your customer purchases three
items. They are charged £7.00 (£5.00 + £1.00 + £1.00). If they purchase one item, they are charged
£5.00.
Percentage Postage
Allows you to set the postage rate by the price of the product. This option allows you to enter the cost
percentage, and the base cost for postage inexpensive items.
dpivision.com Ltd. | Studio 3, The Old Post Office, 5 Pink Lane, Newcastle upon Tyne NE1 5DW | tel: +44 (0)191 230 1048 | [email protected] | www.dpivision.com
20
Product Importer
The product importer allows you to import products from a text (csv) file. This text file needs to be some
sort of delimited list one-row-per-product text file.
Product Packages
Tradingeye allows you to combine multiple products into one product to create a product kit/package.
Quick Sort
This utilises the Item Sorter, which lists the departments and sub-departments within your shop. If you
want to move one, click on it, and use the up or down arrows to the right to move them into the order you
want within your list.
Real-time Processing
Real-time Processing refers to a certain type of credit card processing. Tradingeye allows you the option of
using different popular Real-time Processing types. Others are available on demand.
Report Generator
This is an important tool for day-to-day management of your online shop. In this section, you can access
and print off Daily Sales Reports, order Reports by Date, and an Inventory Report.
Postage Builder
This allows you to set up the postage options for your customers.
Postage Codes
Allows you to input a postage cost for individual products. For each product, you enter a different postage
code, and the shopping basket automatically reads the code and the product's postage cost.
Postage Ranges
Allows you to set postage ranges on prices of products bought. Example: If someone bought £50-£100
worth of product, they have £14 of postage.
Shop Settings
This section allows you to setup a lot of the base information needed to build your shop. Within this
section you can input Company Information, Feature Settings, and much more.
Shopping Basket
The shopping basket can be customised to suit any company's needs. Within the shopping basket settings
page you can set up the parameters to fit the needs of your customers.
Short Description
This is where you put in a short description of your department. For example: if you have a footwear
department you might enter 'Shoes for all Walks of Life' as the short description for your footwear
department.
Special Postage
This allows you to add special postage options not provided by UPS. These postage rates are for speeding
up postage. For example: Royal Mail and much more.
Stock Report
This feature within the Report Generator lets you know how much inventory you have of a specific
product.
Templates (layouts of information)
Templates are set forms that you can input information into. Tradingeye offers several templates - simply
pick the one that best fits your website's needs. For example; if you want your website to content-driven,
you would pick the content.cfm template. Other templates can be created for you by dpivision.com as
requested.
dpivision.com Ltd. | Studio 3, The Old Post Office, 5 Pink Lane, Newcastle upon Tyne NE1 5DW | tel: +44 (0)191 230 1048 | [email protected] | www.dpivision.com
21
Text Areas
This is where you set up the text throughout your shop. Included in the Text Area are headers, index
(homepage) body content, Member Points text and shopping basket header. To make your site more
efficient, you need to define each text area as well as you can.
Suppliers
Suppliers are the manufacturers of the products that you will sell on your shop. Within Tradingeye there is
a section where you can input manufacturer information.
Wireless E-mail
If you have a mobile phone with wireless e-mail capabilities, you can enter it to receive order information
while you're away from your computer. The e-mail sent is formatted for mobile phones with minimal text.
dpivision.com Ltd. | Studio 3, The Old Post Office, 5 Pink Lane, Newcastle upon Tyne NE1 5DW | tel: +44 (0)191 230 1048 | [email protected] | www.dpivision.com