1
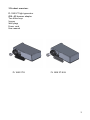
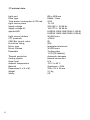
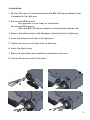
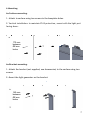
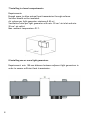
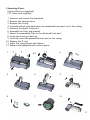
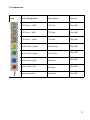
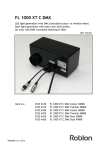
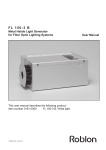
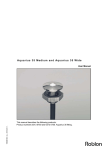
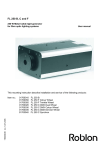
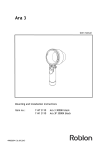
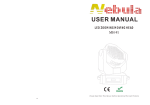
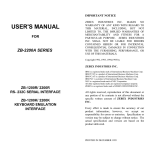
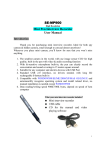
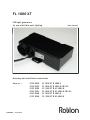
FL 1000 XT
LED light generators
for use with fibre optic lighting
User manual
Mounting and installation instructions
Item no.:
+99082088
30.09.2013
0123 0050
0123 0053
0123 2050
0123 2053
0123 0040
0123 2040
FL 1000 XT B 3000 K
FL 1000 XT B 3000 K CRI 90+
FL 1000 XT B US 3000 K
FL 1000 XT B US 3000 K CRI 90+
FL 1000 XT B 4000 K
FL 1000 XT B US 4000 K
Contents.
1. Introduction
2. Product overview
3. Technical data
4. Installation
5. Dimming US models only
6. Mounting
7. Installing in closed compartments
8. Installing adjacent light generators
9. Mounting filters
10. Spare parts
11. Accessories
12. Troubleshooting
1 Introduction.
Roblon FL 1000 XT light generators are designed for use
- outdoors
- with glass or PMMA fibre
- in all installation set-ups, including in closed compartments
Follow the installation instructions correctly in order to ensure
- safe operation
- enhanced functionality
- extended lifetime for components
- uninterrupted illumination
2
2 Product overview.
FL 1000 XT light generator
Ø28->Ø9 harness adaptor
Two Allen keys
Screws
Wall plugs
Power cord
User manual
FL 1000 XT B
FL 1000 XT B US
3
3 Technical data.
Light port
Fibre type
Total power consumption @ 700 mA
Light source power
Supply voltage
Supply voltage US
Applied LED
Light source lifetime
CCT (nominal)
CRI8 (Ra) typical value
Protection rating
Driver type
Driver lifetime
Dimmable
Thermal protection
Cooling system
Noise level
Ambient temperature
Material
Dimensions (L x H x W)
Weight
Safety
4
Ø9 or Ø28 mm
PMMA / Glass
24 W
19.3 W
220-240 V / 50-60 Hz
120-277 V / 50-60 Hz
LUXEON S1000 LXS8-PW30 (3,000 K)
LUXEON S1000 LXS8-PW40 (4,000 K)
50,000 hours
3,000 K
85
IP65
Integrated electronic
50,000 hours
Trailing edge
1-10V [US models]
Automatic decrease
Natural convection
N/a
-20°C to 45°C
Aluminium + POM
298 x 193 x 95 mm
2.3 kg
CE
4 Installation.
1. Use the Allen key to loosen and remove the Ø28->Ø9 harness adaptor that
is mounted in the light port.
2. For use with Ø28 harness:
The generator is now ready for installation.
For use with Ø9 harness:
Place the Ø28->Ø9 harness adaptor on the harness common end.
3. Remove the plastic plug on the baseplate, directly below the light port.
4. Insert the common end fully in the light port.
5. Tighten the screw on the base with an Allen key.
6. Insert the plastic plug.
7. Ensure all installation and ventilation requirements are met.
8. Connect the power cord to the mains.
5
5 Dimming of 01232050.
1. Ensure the dimmer is compliant with 1-10V US models.
[See ' Dimmer selection' guide for FL 1000 models on www. roblonlighting.com].
2. Remove the plastic plug.
3. Screw in the cable gland.
4. Guide the dimmer cable through the cable gland.
5. Use a cable tie to secure the cable's position.
2-3
4
5
6
6 Mounting.
6a Surface-mounting.
1. Attach to surface using two screws in the baseplate holes.
2. Vertical installation: to maintain IP 65 protection, mount with the light port
facing down.
170 mm
between
Ø6 mm
holes
6a Bracket-mounting.
1. Attach the bracket (not supplied; see Accessories) to the surface using two
screws.
2. Mount the light generator on the bracket.
140 mm
between
Ø6 mm
holes
7
7 Installing in closed compartments.
Requirements:
Enough space to allow natural heat transmission through surfaces.
Surfaces should not be insulated.
Air volume per light generator minimum 0.03 m³.
Ventilation holes per light generator with min. 20 cm² air inlet and min.
20 cm² air outlet.
Max. ambient temperature 45°C.
8 Installing one or more light generators.
Requirement: min. 100 mm distance between adjacent light generators in
order to ensure sufficient heat transmission.
8
9 Mounting filters.
Colour filters (not supplied)
CTC filters (not supplied)
1. Unscrew and remove the baseplate.
2. Remove the casing screws.
3. Remove the O-ring.
4. Carefully detach and manoeuvre the assembled inner part out of the casing.
5. Unscrew the plastic front part.
6. Assemble the filter and bracket.
7. Mount the assembled filter in the detached front part.
8. Screw the front part back on.
9. Carefully insert the assembled inner part in the casing.
10. Replace the O-ring.
11. Insert the casing screws and tighten.
12. Replace the baseplate and screw in place.
1
2-3
4
4
4
5
6
7
8
9
10 Spare parts.
Image
10
Model designation
Description
Item no.
LED, FL 1000 XT
LED module
0129 4004
LED, FL 1000 XT, US
LED module US models
0129 4005
Philips 25W CC 220-240 V
Driver
0129 3000
Philips 35W CC 120-277 V
Driver US models
0129 3001
11 Accessories.
Image
Model designation
Description
Item no.
CTC Filter A –500K
CTC filter
0126 1000
CTC Filter A –900K
CTC filter
0126 1002
CTC Filter A –1200K
CTC filter
0126 1001
Colour Filter A yellow
Yellow filter
0126 1004
Colour Filter A green
Green filter
0126 1005
Colour Filter A blue
Blue filter
0126 1006
Colour Filter A red
Red filter
0126 1007
Mounting bracket
Bracket that can be
padlocked
0126 7000
11
12 Troubleshooting.
Problem
Trace the problem
Solution
No light
Is the power on?
Is the power cord connected
properly?
Is the light generator too hot? *
Turn the power on.
Connect the power cord properly.
Light switches on and off
Light output has
diminished
Is the LED working?
Is the light generator too hot? *
Has the light been dimmed via a
dimmer switch?
Is the light generator too hot? *
Is the harness common end dirty?
Check it is installed according to
the instructions.
Switch generator off.
Let it cool for 15 minutes.
Try again.
Replace the LED.
Check it is installed according to
the instructions.
Switch generator off.
Let it cool for 15 minutes.
Try again.
Increase brightness using dimmer
switch.
Check it is installed according to
the instructions.
Switch generator off.
Let it cool for 15 minutes.
Try again.
Clean filter with damp cloth.
Dry with lint-free cloth.
* Ambient temperature: max. 45°. Measured 50 mm from light generator.
Surface temperature max. 73°. Measured beside the screw when it has been running for min. 1 hour.
Roblon accepts no responsibility for possible errors in printed and electronic material. Roblon reserves the right to alter or discontinue products
without notice. © 2012, Roblon A/S.