1
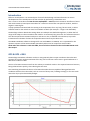
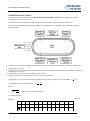
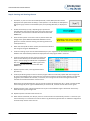
Coastdown Software Manual This page intentionally left blank COASTDOWN SOFTWARE MANUAL Contents Introduction ............................................................................................................................... 4 GPS & GPS + IMU ....................................................................................................................... 4 Coastdown test theory ............................................................................................................... 5 Getting Started .......................................................................................................................... 6 Step 1: Setting up the VBOX on a Vehicle ....................................................................................................................... 6 Step 2: Configuring the VBOX with VBOX Tools .............................................................................................................. 6 Step 4: Aligning the IMU ................................................................................................................................................. 7 Step 5: Selecting a test range ......................................................................................................................................... 7 Step 6: Starting and Running the test ............................................................................................................................. 8 Software functions ..................................................................................................................... 9 Layout ............................................................................................................................................................................. 9 Label Definitions ............................................................................................................................................................. 9 Software Configuration and Test Setup .................................................................................... 10 File Menu ...................................................................................................................................................................... 10 View Menu .................................................................................................................................................................... 10 Options Menu ............................................................................................................................................................... 11 Help menu ............................................................................................................................... 11 Page | 3 18 July 2014 COASTDOWN SOFTWARE MANUAL Introduction Effective aerodynamics is an essential part of overall vehicle design and manufacturers can assess developments to the aerodynamics of their vehicles by performing a Coastdown test. This is a test in accordance with EU directive 70/220/EEC – annex III, which measures the effects of wind and road resistance, based upon time taken for a vehicle to coast from one speed to another, with the engine in neutral gear. A major problem associated with this testing is the requirement for a very long, flat test track, to allow sufficient time for the vehicle to coast from 125kmh to 5kmh (for example – range is user definable). The Racelogic solution breaks the testing down into multiple user-definable segments, to allow the full range to be subject to the test without the need for an excessively long test track. The software takes the test data and performs statistical analysis in real time on this, as defined in the directive, to provide instantaneous indication of when the required statistical accuracy has been met. The VBOX Coastdown software is designed for use with VBOX III or VBOX3i, as it is optimised for the dynamic response of the VB III and VB3i, particularly when used in conjunction with an IMU. NOTE when this software is used with VB3i, the serial link to the PC must be via the VB3i RS232 serial data output. GPS & GPS + IMU The Racelogic Coastdown software can be run using GPS only data in open conditions where the GPS antenna has a good, unobstructed view of the sky, but for the best results even in good conditions it is advised to connect an IMU. The use of an IMU removes noise from the velocity trace which results in the required statistical accuracy being achieved more quickly, thus reducing the test time. The smoothing achieved with the use of an IMU also makes the test capable of being performed in conditions which are less than ideal, such as in areas of heavy tree / building coverage, or for test tracks where the sky may be obscured by bridges. Page | 4 18 July 2014 COASTDOWN SOFTWARE MANUAL Coastdown test theory The test is performed in accordance with European Directive 70/220/EEC – Annex III and is based upon statistical evaluation of a minimum of 4 test runs. The test results are considered to be valid when the statistical accuracy of the average test values is ≤ 2%. The test can be performed at any speed according to the manufacturer’s requirements, but must follow the general procedure below: 1 2 3 4 5 Accelerate the vehicle to a speed 10km/h greater than the test start speed (user definable – 125km/h in the diagram) Place gearbox in neutral Measure the time taken for the vehicle to decelerate from the start speed to the stop speed (user definable – 85km/h in the diagram). This is time t1. Repeat steps 1-3, but in the opposite direction. This is time t2 Take the average time of these two test runs (t1 + t2)/2. This is the time T Repeat steps 1 to 5 until such time that the statistical accuracy of the average is not more than 2% The statistical accuracy (p) is defined by: Where: t = Coefficient given by the table below, n = Number of tests s= deviation Page | 5 standard n 4 5 6 7 8 9 10 11 12 13 14 15 t 3.2 2.8 2.6 2.5 2.4 2.3 2.3 2.2 2.2 2.2 2.2 2.2 1.6 1.25 1.06 0.94 0.85 0.77 0.73 0.66 0.64 0.61 0.59 0.57 18 July 2014 COASTDOWN SOFTWARE MANUAL Getting Started Step 1: Setting up the VBOX on a Vehicle Set the up the VBOXIII/VB3i on your vehicle as instructed in the VBOXIII/VB3i user manual. If an IMU is being used, connect the IMU to the VBOXIII/VB3i. Example setups are shown below – please note the IMU04 can also be used with a RLCAB005/CS or RLCAB119. Step 2: Configuring the VBOX with VBOX Tools Prior to setting up and performing the Coastdown test, the VBOXIII/VB3I will need to be configured to ensure that it is in the correct operating mode for the test. This is particularly important if your VBOX is used for other types of testing as well. NOTE: Once this is done it will not need to be repeated providing that the VBOXIII/VB3i configuration does not get altered. The following instructions should be followed using your VBOX Tools software manual as a reference. Open VBOX Tools software. Next click on the VBOX Set-up Icon. A dialogue box will open to allow you to configure the VBOX. Select Channels ► Standard and then ensure that all channels from listed from Satellites to Trigger event time are ticked for sending over serial and log to compact flash. Click the Internal A-D and VCI modules tabs to ensure that every box is un-ticked. Select the 3-axis module window and ensure that the X Accel and Y Accel boxes ONLY are ticked for ‘log to Compact flash’ and ‘sending over serial’. Select the Logging Tab and ensure that: Serial o/p is set to 20Hz CF log rate is set to 100Hz Log conditions is set to Log only when moving Select the GPS Tab and ensure that: Kalman filter velocity option is set to zero. GPS Optimisation – if using an IMU, this should be set to high dynamics to ensure that the IMU data is integrated when the GPS data is noisy. If you’re not using an IMU, set GPS optimisation to low dynamics to compensate for any GPS noise. Step 3: Running the Coastdown software. Page | 6 Click on the Coastdown Software desktop shortcut, to run the software. Ensure VBOXTools software is closed so that it does not hold the Com port. Open the ‘Options’ drop down menu and select the correct Com port for the Coastdown software to use. 18 July 2014 COASTDOWN SOFTWARE MANUAL Step 4: Aligning the IMU If an IMU is to be used, the Coastdown software will require the use of the IMU to be enabled and its position aligned. Open the ‘Options’ menu and then ensure that the “Use IMU” option is ticked Drive the vehicle to the test track on which the Coastdown test will be performed and stop the vehicle. To perform the IMU alignment, click: Options ►IMU ► Alignment aid. This will bring up the screen opposite. The blue dot is the position of the IMU with respect to both the X and Y axis and the red circle is a target area for the blue dot. Physically adjust the mounting of the IMU so that the blue dot falls entirely within the boundary of the red circle – the closer this can be set to the 0 crossing of the axes the better, but to position the blue dot within the circle indicates that the IMU is within 1.8° of the horizontal and vertical axes. With the blue dot positioned correctly, click OK. The IMU alignment data is now stored within the software. Step 5: Selecting a test range Page | 7 Select the required test sub-range in the test range indicator. If the range options are not suitable then configure the ranges to what is required for your Coastdown test. For more details see the ‘Software Configuration and Test Setup’ section of this manual. 18 July 2014 COASTDOWN SOFTWARE MANUAL Step 6: Starting and Running the test 1. Click Start, or press F2. Your vehicle GPS speed and, if used, IMU speed will now be displayed in the speed trace window(s). In the Speed vs. Time window, the GPS speed is displayed in grey and the corrected GPS speed, incorporating IMU data, is displayed in red. 2. Accelerate to 5km/h (or mph, depending upon speed units selected) above the required sub-range start speed. During this acceleration, the test status indication will show the blue TEST ARMED box. 3. Once the Start speed + 5 has been reached, the test status will change to the yellow WAITING FOR START SPEED box. Place gearbox in neutral and start coasting, maintaining direction of travel (Direction 1). 4. When the start speed has been reached, the test status indicator will change to the green RUNNING box. 5. Continue coasting. If you have set intermediate steps in your range then the time taken to Coastdown between each intermediate speed will be displayed in the test progress table in real time. 6. Continue coasting until the sub-range end speed has been reached. At this point all of the intermediate steps in the test progress table will be completed for first run, in that direction only and the green TEST RUNNING box will revert back to the blue TEST ARMED box. 7. Repeat steps 6.3 to 6.6, in the opposite direction (Direction 2). 8. Continue performing steps 6.3 to 6.8. The test progress table will continually update with the average time for each intermediate section, based upon the time taken to perform the test in both directions. As the test progresses, the software will calculate, in real time, the running mean of the test averages and will also calculate the standard deviations of these means. Based upon the standard deviation, the accuracy % will either be greater than 2%, in which case the box will have an orange fill (for at a glance identification) or less than 2%, in which case the box will turn green. 9. Repeat steps 6.3 to 6.9, until the statistical accuracy for all intermediate ranges is below 2%. All Accuracy boxes will have a green background. 10. Repeat steps 6.3 to 6.10 for each test sub ran 11. When the test is finished, click Stop or press F2. The test results are automatically saved as a .TXT file to your chosen directory. For instructions on how to select a Log file directory please refer to ‘Software Configuration and Test Setup’ section of this manual. Page | 8 18 July 2014 COASTDOWN SOFTWARE MANUAL Software functions Layout Label Definitions 1. Menu / setup buttons Allows the user to define all test conditions. 2. Test Range Indicator This section gives the details of the defined test ranges and indicates which range is currently under test. 3. Start / Stop button This button starts and stops the current test. 4. Test Status Indicator 5. Reset Button This indicates the current status of the test in real time, in both English and in a colour coded system. This clears all results and returns the test to the start conditions. 6. Reset direction button This window shows the current speed of the vehicle, in either MPH or KMH 7. Test Progress Table 8. Live Speed Window This table shows the results for each test increment in both directions, along with the average of these two directions, the running average of all the test so far, the standard deviation of the running average and the statistical accuracy of the results, all in real time. This window shows the current speed of the vehicle, in either MPH or KMH 9. Live GPS UTC time window Live Accelerometer data This section displays the current Coordinated Universal Time in 24h format. This resets each day from 00:00h (midnight) This is the IMU data in the horizontal and vertical plane. (X&Y axis) 11. IMU data trace If used, this graph shows the trace for the data received from the IMU. 12. Speed vs. Time Trace This is a real time plot of the speed of the vehicle, whether accelerating to start conditions of decelerating due to a coast down. 13. Licensee details Name and logo of company to whom the software is licensed to. 10. Page | 9 18 July 2014 COASTDOWN SOFTWARE MANUAL Software Configuration and Test Setup Prior to performing the Coastdown test, you will need to configure the software and set-up the test parameters to your requirements. This is done by using the menu / set-up buttons in the top left corner of the screen. File - Contains options concerned with saving / replaying results files and allows you to load a .vbo file, set the log file location and choose the replay speed. View - Allows you to see the graph of the data from the optional IMU, plus change the time base of the IMU data trace and the speed vs. time trace. Options - Allows you to configure the PC COM port, the Custom test range(s), the IMU usage and the speed units Help - Provides a shortcut to this user manual and gives details of the software version, etc. The functions in these menus are described in more detail below File Menu In the file menu, you can recall a saved Coastdown test and replay this. This is explained in section ‘Replaying Saved Results’ Configuring a Log File Location To define the folder into which you wish the software to save the results. Select : File ►Log file location This will then bring up the directory structure, where you can choose the folder where you wish to save your results to. In the example opposite, the results are required to be saved in the folder “Coastdown”. Highlight the required folder and click OK View Menu There are two options in this menu – “show IMU graph” and “graph timescale” If an IMU is not to be used, ensure the “show IMU graph” is ticked. This will then include a graph of IMU data and a graph of the GPS speed data. If you are not using an IMU, you can un-tick this graph option and the software will only show the GPS speed graph. With IMU graph Without IMU graph You can also adjust the time base of the graph(s) by entering a different number into the Graph Timescale box. For example, if you enter 10 this will place the graph graticules 10s apart, but if you enter 100 into this box, this will place the graticules 100s apart, therefore allowing you to see more history on the screen. However, this will place a little more demand on your computer and could potentially cause a slight delay in the updating of this graph so, depending upon the specification of this, you may need to reduce this setting. The default software setting for the graph timescale is 24s. Page | 10 18 July 2014 COASTDOWN SOFTWARE MANUAL NOTE: The live data displayed on screen in the Coastdown software can suffers large delays, this is due to the processor power of the PC. If this delay is unacceptable firstly disable the IMU Graph window. If a large delay is still present then try to reduce the timescale of the main graph window. Options Menu The options menu contains four functions: COM Port – to enable communication between the PC and the VBOX, you will need to define the appropriate communications port to allow the devices to “talk” to one another. Select: Options ►COM Port ►then choose appropriate COM port – E.g. COM 4 Custom Test Range – Splitting the test into sub-ranges makes it easier to perform the test where you don’t have a very long test track – it takes some considerable time and distance to coast from 125km/h to 5km/h – and so the entire range can be split into sub-ranges, as follows: Options ►Custom Test Range The following dialogue box will appear: Simply define the start speed and end speed for each sub-range. For added resolution and for further data processing (if required), you can define the Coastdown time in each sub-range to be reported at intermediate speed steps as opposed to just the start and end speeds. These speed steps are user definable. In the example given above, the software is set-up to perform the entire test from 125km/h to 5km/h in 4 parts: 125km/h to 95km/h, 95km/h to 65km/h, 65km/h to 35km/h and 35km/h to 5km/h. In each sub-range, the coast down time will be reported at each 10km/h interval. For example, in the range 125 to 95. IMU – this allows you to enable the use of the optional Inertial Measurement Unit (IMU), for supplementing the GPS data with accelerometer data Here you can enable the IMU for use and then use the alignment aid function to ensure that the IMU is set correctly. This is described in more detail in section 8 GPS only and GPS + IMU Speed units – This function allows you to switch the basic speed units The chosen speed unit will be applied to both GPS and IMU (if used) data. To choose the required speed units, select: Options ►Speed Units ►then tick either km/h or mph Help menu The help menu contains two options, one to access the online version of this user manual and another to access the version details of the software, with contact details for Racelogic Page | 11 18 July 2014