1
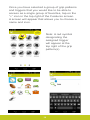
my i-limb™ App:
android
Quick Reference
Guide for i-limb™
ultra revolution
1
Contents
1 Welcome and important points
2 Getting started
5Activation
Connection
6
6 Searching for another device
7 Authorized user access
8 Connection failed
9 Quick grips™ and my grips™ screen
10 my grips configuration
16 Configuring my grips using QR codes
19 Sharing my grips with Touch Bionics
21 grip chip setup
33 Favorites screen
35 Creating a new favorite
40 Editing existing favorites
41 Modifying existing favorites
42Settings
43 Other features
2
44 Hand health check
45 Real time graph
46Languages
47About
48 Health and safety
48 Other important points
49 Firmware update
3
Welcome and important points
Welcome to the mobile world of Touch Bionics!
The my i-limb™ mobile application will enable you
to quickly and easily access and change features
on i-limb devices.
Important points to note:
• The my i-limb app must be downloaded from
the Google Play Store.
• A Wi-Fi or cellular connection is needed to
download the app, receive updates, or run hand
health check.
• Your Android device connects to an i-limb via a
Bluetooth® connection, which is automatically
established when you start the biosim app.
• The my i-limb mobile app is compatible with
the following devices: Samsung Galaxy S5,
Google Nexus 5, Motorola X.
• Minimum version of android required is 4.3 (jelly
bean).
• To exit the application at any time, simply press
the main “Home” button on your Android device.
1
Getting started
For general instructions on using your Android
device, read your device's user manual provided
by Android.
The first time you use your device, you will need
to be connected to the Internet via cellular or Wi-Fi
connection. You can connect to a Wi-Fi network by
tapping on the “Settings” icon on the first screen.
2
Next, go to the Google Play Store via the icon. To
search for the biosim app, type "Touch Bionics" or
“my i-limb” in the search tab and download the app
to your Android device. Note: a Google ID will be
required to download the app. If you do not have
one, please create an account by logging on to the
Google website.
3
Upon downloading the my i-limb mobile app, an
icon will appear on your mobile device's screen.
Tap on it to start the app.
4
Activation
The first time you connect to my i-limb, you will
see the “Sign in” screen. Here you will need to
enter the email address and password that you
use when you log-in on the Patient Care Pathway
on Touch Bionics’ web site. If you need to create
an account, you may also do so by selecting
“Register” on the screen below.
You will need to activate your account by
confirming the email sent to the email account
you provided prior to being able to connect.
Upon registering, please review the Terms and
Conditions. Tap “Accept” to continue.
5
Connection
After signing in, you will be brought to the connection screen where you will tap your device to
connect.
Searching for another device
If you need to connect to a different device, simply
tap the magnifying glass in the top left corner of the
app and it will search for any devices in the area.
6
Authorized user access In order for someone else to gain access to your
device you will need to tell them your 5 digit
security code. This unique code can be found in
the “About” section of the my i-limb app discussed
later. They will be prompted to enter this after
selecting your device.
In order for a clinician to access your device you
will need to tell them your 4 digit serial number
located on the wrist plate on the thumb side. If you
have a flexion wrist, the serial number is located
near the base of the thumb. They will be prompted
to enter this after selecting your device.
7
Connection failed
If the hand should fail to connect to the app due to
loss of power, proximity with the Android device, or
other reasons, the following screen will appear:
In this instance, turn the device off for 4 seconds,
then turn back on. Tap the “Search” button to
reconnect.
8
Quick grips and my grips screen
After connecting to my i-limb, you will see the
“Quick grips” and “my grips” screens. Here you
get instant access to 24 quick grip patterns and
12 my grips with a single tap. Tapping a grip icon
immediately puts the device into that mode.
Note: To exit that grip,
simply tap the same icon
to return to the full hand
mode or use one of your
programmed triggers.
9
my grips configuration
my grips allows you to configure up to 12
additional custom grips and can be used with any
trigger or grip chips.
To configure my grips, tap the settings icon after
connecting to the my i-limb app.
Once on the settings screen tap “Features – Grip
patterns” to access the full set of standard grips &
my grips available for selection.
10
All unassigned my grips will have no name
specified until one is assigned by the user.
Tap one of the blank
my grip options to
begin creating a
custom my grip.
11
Tapping on the desired my grip will bring up the
my grip configuration page that allows you to
configure a my grip and assign a desired trigger.
Tap “Configure my grip” to continue.
12
Next you will be able to assign a name to a my
grip. Tapping the “enter name” field will allow you
to customize the name of your my grip.
After creating a name, tap the start button to begin
the my grip configuration process. This will fully
open the hand.
Note: It is recommended that users configure my
grips when the prosthesis has a fully charged
battery.
13
Next, apply a close signal to rotate the thumb to
a desired position as noted. Tap “Continue” when
finished.
Now apply a close signal to flex the fingers into the
desired position as noted. Tap “Continue” when
finished.
14
Tap the “Test my grip” button to test the grip. To
change the configuration of your my grip, tap the
“Start Over” button.
You may also use the digit
sliders to fine-tune your my
grip. Please note that digit
sliders will not appear after
initial configuration. You
will have to exit your mygrip and access again to
fine-tune using digit sliders.
To save the my grip configuration, tap “Save.”
15
Configuring my grips using QR
codes
Users are able to instantly program a custom preconfigured my grip by scanning quick response
(QR) codes provided by Touch Bionics.
Further information and a free QR code library
can be accessed online at www.touchbionics.com/
qrcodes.
16
When ready to download and program a my grip,
tap an unassigned my grip to access the “Trigger”
menu.
Once on the “Trigger” menu, tap the “Scan QR to
import my grip” option.
17
After tapping “Scan QR to import my grip” the
camera function will be activated.
Note: if you have a cover on your mobile device
ensure it is not covering the camera lens.
Point your mobile device camera at the desired
QR code.
Once the QR code is scanned successfully, you
will be brought back to the “Trigger” menu. From
here you can further customize any my grip as
preferred.
18
Sharing my grips with Touch
Bionics
Users may share custom my grips to be
considered for inclusion in Touch Bionics‘ QR code
library.
To share your my grip with Touch Bionics, tap a
my grip to access the “Trigger” menu.
Next, tap “Share my grip”. The custom my grip
will be transmitted to Touch Bionics’ app cloud.
Note: Internet connection is needed to share my
grips.
19
Once complete a message will appear confirming
that the my grip was successfully shared with
Touch Bionics.
20
grip chip setup
For first time use, you will need to physically
tap the grip chip on a hard surface to activate
it. You will hear an audible alert when activated
successfully.
Upon connection to the my i-limb app, tap the
settings icon.
21
On the settings page, tap “grip chip setup” to
program a grip chip.
You will be prompted to contact Touch Bionics if
you do not currently have grip chip capability. For
grip chip compatible devices, you will be prompted
to awaken the grip chip by tapping sharply.
22
Active grip chips will be displayed on the grip chip
setup page along with their grip chip number and
battery level. Tap the desired grip chip to which
you want to connect.
Note: You will see “Not allocated on this device”
if you attempt to connect to a grip chip that has
been previously programed with a favorite using
a different Android device than the one you
are currently using. In this case, you can still
re-configure the chip, but will not see how it was
previously configured.
23
The grip chip will then connect.
24
Once connected successfully, the following screen
will appear.
To rename the grip chip, tap the “name of grip
chip” field.
Tapping “Find grip chip” will cause the selected grip
chip to illuminate and make a sound. This allows
easy confirmation of which grip chip is connected.
Tap on one of the options to assign quick grip,
favorite or my grip to a grip chip.
25
Selecting “Quick grip” will allow you to select a
quick grip option to assign to the grip chip.
After selecting a quick
grip to assign, tap
“Save” when arriving
back to the “grip chip
info“ screen. The grip
chip is now shown with
its name, assignment,
number and battery
level.
26
Selecting “Favorite” will allow you to select a saved
favorite option to the designated grip chip.
After selecting a favorite to assign, tap “Save”
when arriving back to the “grip chip info“ screen.
The grip chip is now shown with its name,
assignment, number and battery level.
27
Selecting “my grip” will allow you to select a my
grip option to assign to the grip chip.
After selecting a my grip to assign, tap “Save”
when arriving back to the “grip chip info“ screen.
The grip chip is now shown with its name,
assignment, number and battery level.
28
You can reassign a grip or favorite and rename the
grip chip if desired at any time by repeating this
same process.
You also have the ability to deactivate a single
grip chip or all grip chips. Upon accessing the grip
chip setup, a toggle switch will appear on the top
menu bar which allows you to enable/disable all
grip chips. A toggle switch will also appear next to
each individual grip chip allowing you to enable/
disable it. Disabling a grip chip will not erase any
pre-programmed settings.
Note: “Low battery warning” will appear any time
the app is running and a chip within range is at or
below 10% on battery. Please change the battery
according to instructions provided.
29
You must disconnect from the hand prior to using
grip chips. Upon successful programming of grip
chips you will be prompted to disconnect. Select
“yes” to disconnect and save changes. Select
“no” to configure additional grip chips. You will be
prompted to disconnect after configuring each chip.
30
Helpful Tips:
•
When powering on hand, please wait 5
seconds before connecting to my i-limb.
•
Programing must be completed within 10
seconds or grip chip will return to sleep
mode. If grip chip returns to sleep mode,
tap it once again to “wake up” and proceed
with programming. Once programed, sleep
mode is disabled.
•
Once programmed the grip chip will remain
on until the battery life runs out.
•
You must naturally approach the grip chip
and hold the i-limb ultra revolution within 6
inches (15cm) from the grip chip. The hand
must be in the full open position to detect
the grip chip. It is important to remember
that a natural movement is critical to quick
and proper grip chip detection. Running to
a chip or hastily placing your hand near it
may result in a connection delay.
•
Only hold open for grip chip detection when
you are within 6 inches (15cm) of grip chip.
31
Helpful Tips:
•
Each grip chip should remain at least 24
inches (61cm) apart from one another.
•
Do not press the home button while hand is
in process of connecting to the app. Doing
so will inhibit hands ability to detect grip
chips. If you press home button during this
process, cycle power to the hand or attempt
to full reconnect, and then disconnect, from
the app to reset connection.
32
Favorites screen
Here you can assign groups of grip patterns
and triggers a single name to make them easily
accessible with a single tap.
Note: The initial setup favorite will include all your
grip patterns that were set at the time you first
connected to the app.
Note: to access the “Favorites” screen at any time,
simply tap the “Heart” icon.
33
Tapping on the favorite will instantly activate
those settings on your device and display a quick
reminder of what grip patterns and triggers are
included.
Note: If you have questions about how a particular
grip pattern or trigger works, refer to your user
manual or contact your prosthetist.
34
Creating a new favorite
Here, you will be able to create your own set of
features and triggers that you prefer to use for
different tasks. To set up a group of features, tap
the “Settings” icon in the top right corner.
35
On the settings screen, tap “Features – Grip
patterns” to access the full set of grips available for
selection. From this screen you can choose the
features that you like to group together.
36
Tapping on a grip pattern will bring up a menu
that allows you to assign one of the four possible
triggers for activating it.
You may also customize certain grip patterns by
selecting “feature options“.
Note: If you have not had training on triggers or
need more information, contact your clinician or
consult the user manual.
37
Once you have selected a group of grip patterns
and triggers that you would like to be able to
access as a single group of favorites, tap on the
“+” icon in the top right of the Features screen.
A screen will appear that allows you to choose a
name and icon.
Note: A red symbol
designating the
assigned trigger
will appear at the
top right of the grip
pattern(s).
38
After you tap “Save” this favorite will now be added
to your list on the first screen of the my i-limb app
and can be activated in the future with a single tap.
39
Editing existing favorites
Tap the edit button at the top right and the screen
changes to look like the one seen below. Here,
you can tap the red button to delete the favorite,
grab the handles and drag to change the order of
the list, and tap the name of the entry to edit the
favorite.
40
Modifying existing favorites
To edit any of your favorites, simply go into the
favorite you would like to change. Here you can
modify the name, icon, or grip patterns associated
with the different triggers.
Note: You must hit the save button on this screen
for changes to take effect.
41
Settings
To access the “Settings“ page, tap the gear on the
top right of the “Favorites” page.
42
Other features
To access more features, back on the “Settings“
page, you can also select “Features-Other,” which
will provide a new screen showing the additional
options that can be turned “On or Off.”
43
Hand health check
Selecting “Hand health check” from the “Settings“
menu brings up the option to run a test on your
device to ensure that everything is running as
it should. Tapping “Run health check” will run
through a series of checks and will alert Touch
Bionics to contact your prosthetist if anything
requires attention.
Note: You must be
connected to the Internet
using Wi-Fi to run a
Hand health check.
44
Real time graph
Selecting the “Real-time graph of signals“ option
from the “Settings“ menu brings up a graph
showing your muscle signals on the screen. This
visual information can be helpful when trying to
activate certain triggers or work on controlling
activation and relaxation of signals.
Turn the Android device horizontally to view the
graph. To exit the graph, simply turn the Android
device back to a vertical position or tap the “Done“
button in the upper left hand corner.
45
Languages
The default language setting is English. Select
“Language” to change the settings to another
language.
46
About
The final option on the “Settings“ menu is the
“About” option. Tapping this brings up a screen
displaying information about your prosthesis and
the application. Your unique security code will also
be found here.
Tapping “Sign out“ will end the app and require you
to sign in again for your next session.
47
Health and safety
For health and safety information regarding
the i-limb ultra revolution, please refer to the
i-limb ultra revolution user manual that can be
found at www.touchbionics.com/downloads/
document-library/.
For health and safety information regarding
your Android device, please refer to the
product literature from the manufacturer.
Other important points
• Updates will be available through the
Google Play Store. Check back regularly to
ensure you are using the latest version of
the my i-limb mobile app.
48
Firmware Update
Touch Bionics always recommends that you
download the latest firmware for your device. If a
firmware update is available, you will be prompted
with the following screen upon connection to my
i-limb.
Tap “Apply“ to initiate the update. Tapping
“Cancel“ will dismiss this screen and return you to
the Quick grip landing screen.
49
Tapping “Apply“ will bring you to the app update
warning screen. Ensure that you read and comply
with all warnings. Tap “Continue with update” to
proceed.
Note: Ensure that you are able to perform the
update without interruption. Loss of power or hand
communication could result in your device locking,
which will require service by Touch Bionics. Total
update time may take up to 10 minutes.
50
After tapping “Continue with update” you will
arrive at a final confirmation screen. Tap “yes” to
continue.
51
After tapping “yes” the update will begin. You will
see a variety of screens as the update progresses.
52
At the conclusion of the update you will be
prompted to turn your device off and back on again
to complete the update.
After powering off and on, tap “Reconnect” to
continue working with the my i-limb app.
53
North American Customers
Tel: +1 855 MY iLIMB (694 5462)
International Customers
Tel: +44 1506 438 556
Email: [email protected]
For address details
and further information
please visit
www.touchbionics.com
© Copyright 2015 Touch Bionics Inc. and Touch Bionics Limited.
All rights reserved.
Part number: MA01313, Issue No. 1, March 2015
54