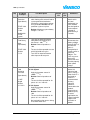
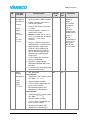
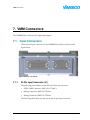
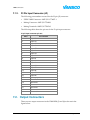
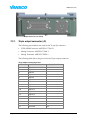
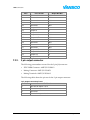
1
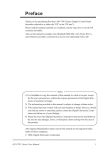
Vansco Multiplex
Module (VMM) 2820
Hardware Manual
UM–VMM2820–583000–XX–200712–01
Vansco Electronics
1305 Clarence Ave
Winnipeg MB R3T 1T4
Canada
Tel: 204.452.6776
Fax: 204.478.1749
http://www.vansco.ca
[email protected]
Copyright 2007 © Vansco Electronics LP. All rights reserved. No part of this work may be
reproduced, published, or distributed in any form or by any means (electronically,
mechanically, photocopying, recording, or otherwise), or stored in a database retrieval
system, without the prior written permission of Vansco Electronics LP in each instance.
Page 2 of 50
Vansco Multiplex Module (VMM) 2820
Table of Contents
1. Introduction ....................................................................................................... 5
1.1.
Conventions ...............................................................................................................5
1.2.
User Liability & Safety................................................................................................5
2. VMM Overview................................................................................................... 7
2.1.1.
Physical Dimensions.....................................................................................8
3. VMM Hardware .................................................................................................. 9
3.1.
VMM Inputs................................................................................................................9
3.2.
VMM Outputs ...........................................................................................................10
3.3.
VMM Communications.............................................................................................11
3.4.
VMM Addressing .....................................................................................................12
3.5.
VMM Diagnostic LEDs.............................................................................................13
4. VMM Operation................................................................................................ 15
4.1.
Reading Inputs.........................................................................................................15
4.2.
Switching Outputs ....................................................................................................15
4.3.
Output Fault Monitoring ...........................................................................................15
4.4.
CAN Communications .............................................................................................16
4.5.
LED Diagnostics ......................................................................................................16
4.6.
Vehicle Configuration Ladder Logic Programming..................................................17
4.7.
Plug and Play Automatic Module Programming ......................................................17
4.8.
CAN Diagnostics......................................................................................................18
5. VMM Setup and Use........................................................................................ 19
5.1.
Input Considerations................................................................................................19
5.2.
Address Considerations...........................................................................................20
5.3.
Output Considerations .............................................................................................21
5.4.
Power Considerations..............................................................................................22
5.5.
5.4.1. Cable Grounded System ............................................................................22
5.4.2. Chassis Grounded System .........................................................................23
Communication Considerations...............................................................................25
5.6.
General Considerations ...........................................................................................26
6. VMM Specifications ........................................................................................ 28
6.1.
Electrical/Environmental ..........................................................................................28
6.2.
Design Verification Standards .................................................................................30
7. VMM Connectors............................................................................................. 43
7.1.
Input Connectors .....................................................................................................43
7.1.1.
7.1.2.
Hardware Manual
35 Pin Input Connector (J1)........................................................................43
23 Pin Input Connector (J2)........................................................................45
Page 3 of 50
7.2.
Output Connectors .................................................................................................. 45
7.2.1.
7.2.2.
35 pin output connector (J3) ...................................................................... 46
3 pin output connector................................................................................ 47
8. Feedback ..........................................................................................................49
Page 4 of 50
Vansco Multiplex Module (VMM) 2820
Introduction
1. Introduction
Historically, vehicle controls are not intelligent. Outputs are connected directly to switch
inputs through wires. Relays may be used to boost current, but that is still essentially pointto-point wires. Building and installing the wire harness required to do this in a modern
vehicle is very time consuming. Performing diagnostics is extremely difficult.
An alternative is to distribute small intelligent controllers that act as networked relay
controllers throughout the vehicle. The modules communicate with each other over a
network and monitor each other’s status. In a multiplexed module system, when a switch is
activated at the front of a vehicle, a module near that switch detects the transition and
broadcasts the switch position over the network. The module connected to the load receives
this information and activates the load.
This user guide will introduce the Vansco Multiplex Module and describe its use in a typical
vehicular electrical system. The aim of the document is to provide a full specification for the
VMM and give the reader the tools to use it to its full potential.
1.1. Conventions
Warnings and cautions will appear throughout this user manual.
A warning or caution indicates that a situation exist that could cause injury to a
person or persons and/or damage to the vehicle or VMM product. A warning
may also indicate situations where certain VMM functions may not operate
properly if instructions are not followed. All instructions in the warnings
through out this manual must be read and completely understood by the
installer of the VMM system.
1.2. User Liability & Safety
The designer of a system or vehicle in which the VMM electronic control
modules are installed has the full responsibility for all consequences that might
occur. Vansco Electronics LP accepts no responsibility for any consequences,
direct or indirect, caused by system failures or malfunctions.
Hardware Manual
Page 5 of 50
Introduction
Page 6 of 50
•
Vansco Electronics LP does not assume any responsibility for accidents or
damage caused by incorrectly mounted or maintained equipment.
•
Vansco Electronics LP does not assume any responsibility for damage or
injury caused by VMM products being incorrectly applied or the system
being programmed in a manner that jeopardizes safety.
•
Vansco Electronics LP does not assume any responsibility for damage to
VMM products which have not been 100% electrically disconnected from the
system wire harness prior to welding on the vehicle or system in which it is
installed.
Vansco Multiplex Module (VMM) 2820
VMM Overview
2. VMM Overview
The VMM is a general-purpose multiplexed input/output controller designed to allow
several digital and analog inputs to control several solid state switch outputs according to a
logic table or vehicle configuration table. All VMM input and output information is
communicated on a Controller Area Network (CAN) communication bus which allows
inputs from one module to control outputs from another module, and vice versa. This
flexibility is the heart of vehicle multiplexing:
Multiplexing reduces complexity by transmitting multiple messages over a
single channel. This means taking a large number of inputs or wires, and
reducing them to a smaller number while retaining all the information originally
available. This technique allows simplification of complex systems without loss
of performance.
Thus, a VMM located close to several control inputs on a vehicle (for example, next to the
dashboard switches) could communicate the input states to a second VMM located close to
the loads or outputs they are intended to control (for example, lights or loads at the rear of
the vehicle). The communication cable that connects the VMMs is a shielded twisted pair
cable (two wires covered with a shield for electrical noise protection). In essence, this
example converts several dashboard switch wires running the length of the vehicle to two
wires. The example above is very simple, and in fact there would typically be several VMMs
in a vehicle electrical system, each located to help to reduce the complexity of the electrical
system.
The VMM is designed to conform to the Society for Automotive Engineers (SAE) and the
American Society of Agricultural Engineers (ASAE) standards. Specifically the VMM is
designed to meet SAE J1455 and ASAE EP455 environmental and electrical standards and to
SAE J1939 CAN communication standards. Each VMM is sealed and can withstand harsh
environments including temperature ranges from –40C to +85C, pressure wash, and EMC
susceptibility, to name a few.
The VMM arose from years of experience in the vehicular electronic control market. It has
been designed to facilitate vehicle integration, reduce vehicle wiring and complexity,
improve vehicle diagnostics, and enhance customers’ ability to upgrade vehicle electronic
systems.
Hardware Manual
Page 7 of 50
VMM Overview
2.1.1.
Physical Dimensions
The following diagrams show the physical dimensions of the VMM2820:
Top view of VMM2820
Side view of VMM2820
Page 8 of 50
Vansco Multiplex Module (VMM) 2820
VMM Hardware
3. VMM Hardware
This section will discuss the various features of the VMM hardware including a description
of inputs, outputs, communications, addressing, and diagnostic LEDs.
3.1. VMM Inputs
There are two types of inputs on each VMM: digital inputs and analog inputs.
Digital inputs read signals with either high or low value (that is, battery voltage
or ground). Digital inputs are typically connected to vehicle signals that have
two states. These include rocker switches, toggle switches, or ON/OFF signals
from other vehicle electronic control modules (ECMs). Analog inputs read
signals with voltage values between 0 volts and 32 volts. They are typically
connected to vehicle signals that could have a continuous range of values
between ground and 32 volts. These include signals like air pressure sensors, fuel
level sensors, and battery voltages.
The following table shows the inputs available on each VMM:
Input Number
Input Type
Power Save Control
Digital 1 to 5
Switch-to-ground
Yes
Digital 6 to 10
Programmable: switch-to-ground or
switch-to-battery
No
Digital 11 to 28
Switch-to-ground
No
Analog 1
0 V to 32 V
No
Analog 2
0 V to 32 V
No
Analog 3
0 V to 32 V
No
Vbat Analog
Internally connected to VMM power input
No
Digital inputs 1 to 5 and 11 to 28 can be connected to any signal that is
considered active when at ground potential. Digital inputs 6 to 10 can be
connected to any signals that are considered active when they are at ground
potential or at battery potential. The user programs these as either switch-tobattery or switch-to-ground depending on which type of signal they are
connected to.
Hardware Manual
Page 9 of 50
VMM Hardware
Digital inputs 1 to 5 also control VMM Power Save Mode. If any of these five
inputs are active (ground potential) then the VMM will power up and begin
normal operation. If all of these five inputs are inactive (floating or at battery
potential), then the VMM will power down to Power Save Mode. When the
VMM is in Power Save Mode, all power is disconnected from the microprocessor
and logic circuits inside the unit. This minimizes drain on the vehicle battery.
Warning: VMM inputs are not to be connected directly to inductive loads
such as solenoid or relay coils which can produce high voltage spikes. If
an input is connected to an inductive load, then a protective diode must
be used to prevent damage to the VMM input circuit.
3.2. VMM Outputs
There are two types of output on each VMM, high side outputs and bidirectional
outputs. High side outputs switch battery voltage to output pins. Bidirectional
outputs act like single pole single throw (SPST) relays; when they are active they
connect two points.
High side outputs are typically used to drive power to vehicle loads such as
bulbs, motors, solenoids, and switch-to-battery signal inputs on other ECMs.
They require a voltage or a ground on either of their pins in order to operate.
Bidirectional outputs are typically used to connect ground to vehicle loads such
as bulbs, motors, solenoids, and switch-to-ground signal inputs on other ECMs.
This typical bidirectional use is called a low side driver, but the bidirectional
switches are not limited to this function. They can be arranged as high side or
low side, or simply as a method of connecting two points. They do not require a
voltage or a ground on either of their pins in order to operate.
Several vehicles on the market today have electrical systems containing two
batteries connected in series. This arrangement provides two voltage potentials
in the vehicle, 12 V (regulated to 14 V) and 24 V (regulated to 28 V) for driving
several different types of loads. For this reason the high side outputs are
arranged so that they are connected to two different “bus bars” in the VMM. Half
the high side outputs are connected to bus bar 1 and the other half are connected
to bus bar 2. Each VMM has two external power pins, one connects to bus bar 1
and the other connects to bus bar 2. This allows a single VMM to switch either
12 V, 24 V, or both.
Page 10 of 50
Vansco Multiplex Module (VMM) 2820
VMM Hardware
The following table lists outputs available on each VMM:
Output
Number
Output
Type
Max Continuous
Current
Connected to
Bus Bar (1 or 2)
Allowable Load
Type
1 to 9
High Side
6A
Bus Bar 1
Resistive, Bulb,
Inductive, Motor
10 to 18
High Side
6A
Bus Bar 2
Resistive, Bulb,
Inductive, Motor
19 to 20
Bidirectional
4A
N/A
Resistive, Bulb,
1
Inductive , Motor
Outputs 1 to 18 have a maximum continuous current rating of 6 amps, which
means that a load of approximately 2.3 ohms can be connected to each output if
each is supplying 14 V (4.6 ohms if each output is supplying 28 V). Outputs 19
and 20 are the two bidirectional outputs supplied with the VMM. They have a
maximum continuous current rating of 4 amps which means that a load of
approximately 3.5 ohms can be connected to each output if each is supplying
14 V (7 ohms at 28 V).
Outputs 1 to 16 can be Pulse Width Modulated (PWM). This allows them to send
out a 100 Hz square wave with an On to Off duty cycle ratio of 0% to 100%.
All outputs are protected against short circuits, over currents, and reverse
battery. High side outputs can handle inrush currents of approximately 42 A for
a period of one second. Inrush currents of a higher value must drop below the
42 A point within approximately 0.5 ms.
3.3. VMM Communications
The VMM has one communication port for use in a multiplex system
environment. This communication port is a Controller Area Network (CAN)
type.
CAN is a high speed serial communication network which allows up to 32 nodes
or CAN based ECMs to be connected at any given time. The VMM CAN
conforms to SAE J1939 standards, which makes it a standard device that can be
used without conflict with other CAN J1939 based equipment. The VMM CAN
operates at a bit rate of 250 kbps (kilobits per second) which is more than 26
times faster than the industry standard SAE J1708 communication bus.
The VMM CAN is the multiplex system backbone. It is the communication cable
through which all system inputs and outputs are multiplexed. Each VMM has a
CAN port which, when connected in a two-or-more module system, creates a
CAN communication bus.
1
Inductive and motor loads on the bidirectional switches require the use of external back EMF diodes or
snubber circuits.
Hardware Manual
Page 11 of 50
VMM Hardware
The following information is currently communicated on the VMM CAN
communication bus:
CAN Message Type
CAN Data
VMM I/O
Input, Output, Flag, Timer and Fault states for all I/O on a
single VMM.
VMM Analog Inputs
Analog values for three analog inputs on a single VMM.
VMM Telltale Outputs
Output states for two telltale clusters.
Other J1939 messages
Any J1939 defined message
The CAN communication bus can be linked to other vehicle networks such as
SAE J1708 or SAE J1850 through “gateway” devices. The gateway would contain
filtering information allowing only user-defined messages to pass from one
network type to the other. Using a gateway device allows SAE J1708 based
engine, ABS and transmission controllers to communicate with the VMMs in a
multiplexed system. Critical information such as vehicle speed, gear position or
diagnostics can be communicated to VMMs and certain outputs can be activated
or deactivated accordingly (using the vehicle configuration ladder logic).
The VMM CAN is the link to VMM programming and VMM diagnostics. Each
VMM in a multiplex system can be programmed and/or queried for diagnostics
from a single CAN diagnostics port located on a vehicle. The CAN diagnostics
port is simply a connector, which taps into the CAN shielded twisted pair cable.
3.4. VMM Addressing
Each VMM is exactly the same as all other VMMs in a multiplex system. That is,
each VMM has exactly the same hardware configuration (28 digital inputs, 3
analog inputs, 1 CAN port, 18 high side outputs and 2 bidirectional outputs) and
each VMM is programmed with exactly the same firmware configuration. Since
each VMM is exactly the same, a method is required to tell them which tasks to
perform. This is accomplished through addressing.
VMM systems require a unique address to be hard wired into the vehicle wire
harness. The addresses are additional VMM switch to ground digital inputs
reserved for addressing purposes only. These address inputs are located on the
VMM input connector. There are five address inputs on each VMM, each one
representing an individual address binary digit (bit). With a five bit address the
system can contain a maximum of 32 distinct addresses (see table below).
Address Input Number
Page 12 of 50
VMM Address
1
2
3
4
5
0
0
0
0
0
VMM 1
1
0
0
0
0
VMM 2
Vansco Multiplex Module (VMM) 2820
VMM Hardware
Address Input Number
VMM Address
1
2
3
4
5
0
1
0
0
0
VMM 3
1
1
0
0
0
VMM 4
0
0
1
0
0
VMM 5
1
1
1
1
1
VMM 32
The address representing VMM 32 is reserved for diagnostic purposes, which
means that there are only 31 addresses available for a VMM system. Note that in
the table above, 0 represents inactive (no wire connected) and 1 represents active
(wire connected to the pin and to ground).
As stated above, the firmware in each module is exactly the same. This means
that each module contains the full vehicle configuration ladder logic. Each VMM
selects which section of the ladder logic to run depending on the physical wire
harness address. This feature allows VMMs to be interchanged without affecting
the vehicle operation. This can be done without reprogramming or setting dip
switches. Simply pop, swap, and go!
3.5. VMM Diagnostic LEDs
The VMM has two main diagnostic features. One is driven on the CAN
communication bus and requires Vansco VMM Software to operate. The second
is diagnostic LEDs located on the front of each VMM. The latter will be discussed
in this section.
Each VMM has 28 digital inputs, 20 outputs, and a CAN port. Each VMM also
has 28 LEDs representing active digital inputs: 20 LEDs represent active outputs,
one LED represents CAN activity and one represents overall module
power/health.
The 28 input LEDs have two states: ON and OFF.
•
If an input LED is ON, the corresponding input that the LED represents is
Active.
•
If an input LED is OFF, the corresponding input that the LED represents is
Inactive.
The 20 output LEDs have three states: ON, OFF, and FLASHING.
•
If an output LED is ON, the corresponding output that the LED represents is
Active.
•
If an output LED is OFF, the corresponding output that the LED represents is
Inactive.
Hardware Manual
Page 13 of 50
VMM Hardware
•
If an output LED is FLASHING, the corresponding output that the LED
represents is faulted. There are five types of faults that will cause output
LEDs 1 to 18 to flash. These are short circuit, over current, back drive, no
power detected at the output pin, and open circuit. There are two types of
faults that will cause output LEDs 19 and 20 to flash. These are short circuit
and over current.
o
A short circuit fault occurs when the circuit that a VMM output is driving
shorts to ground. An over current fault occurs when the circuit that a
VMM output is driving is drawing excessive current. A back drive fault
occurs when the circuit that a VMM output is driving is shorted to battery
voltage. A no-power-detected fault occurs if an output circuit is
physically damaged or if there is no power on the output bus bars. An
open circuit fault occurs if open load detection is turned on (via ladder
logic) and there is no load attached to the output.
Note: A back drive and open circuit fault is detected when an output is in
the off state and the short circuit/over current/no power faults are
detected when the output is in the on state.
The power LED has three states, ON, OFF, and FLASHING.
•
If the LED is ON, the module is powered up and is operating normally.
•
If the power LED is OFF, the module is either in Power Save Mode or the
vehicle power has been completely disconnected.
•
If the LED is FLASHING, the module is powered up but currently has no
vehicle configuration loaded into it or there is an internal VMM fault.
The diagnostic LEDs are designed to simplify vehicle debugging. Each LED
represents an input or output and as such, each LED is essentially a circuit
continuity tester. An indication of an electrical fault condition on a diagnostic
LED should be investigated and corrected immediately to prevent system
damage.
Page 14 of 50
Vansco Multiplex Module (VMM) 2820
VMM Operation
4. VMM Operation
The VMM performs many tasks at the same time. Each VMM must be able to read inputs,
switch outputs, monitor outputs for fault protection, communicate VMM information on the
CAN, and control VMM LED diagnostics, vehicle ladder logic programming, VMM “plug
and play” automatic vehicle configuration programming, and CAN diagnostics. This section
is a brief overview of VMM operation and how these tasks are performed.
4.1. Reading Inputs
The VMM reads all 28 digital inputs and the three analog inputs at a rate of 40
Hz (40 times per second). All readings are stored in memory as the most recent
state, which is then used for same module output control and for communicating
onto the CAN.
4.2. Switching Outputs
The VMM switches outputs according to the vehicle configuration ladder logic.
Outputs are refreshed at the same rate as the inputs are read (40 times per
second). Outputs 1 to 16 can be Pulse Width Modulated at a rate of 100 Hz, from
0% to 100% modulation. PWM is used to control the average power from the
VMM outputs. This is typically used to control light intensity or DC motor
speed.
4.3. Output Fault Monitoring
The VMM detects five types of output faults: short circuits, over currents, back
driven outputs, no power on the output pins and open loads. Electrical fault
conditions are detectable in ladder logic and system response to faults can be
programmed by the system/vehicle designer based on reported faults.
•
Hardware Manual
The short circuit protection is performed by hardware circuitry to ensure
high-speed operation. The hardware informs the VMM microprocessor that a
Page 15 of 50
VMM Operation
short circuit has occurred. When this fault is detected, the VMM reports the
fault via a fault flag for use in ladder logic.
•
Over current, back driven and no power on the output pins are detected
using the VMM microprocessor, which continuously monitors current flow
through the output switch and voltage level at the output pin.
Microprocessor fault monitoring occurs at a rate of 40 Hz (40 times per
second). When this fault is detected the VMM reports the fault via a fault flag
for use in ladder logic and starts the VMM fault response algorithm.
•
Open load detection is performed by applying a brief low current pulse to all
the output pins on a module. The resulting voltage read back from the output
pin is analyzed to determine if there is a load attached. When this fault is
detected the VMM reports the fault via a fault flag for use in ladder logic and
starts the VMM fault response algorithm.
•
Outputs 19 and 20 can detect short circuit and over current faults only. There
is no back driven, no power or open loads detected on these two outputs.
When this fault is detected the VMM reports the fault via a fault flag for use
in ladder logic.
The fault functions above may have additional programmable options associated
with them, for more information please see the VMM Software User Guide or the
VMM Software help file available with your copy of the VMM software.
Caution: It is the responsibility of the system/vehicle designer to ensure
that the electrical system faults are reported to system/vehicle operators
so the faults can be corrected by service personnel. Faults should not be
left uncorrected. Failure to follow this recommendation could lead to
damage of the VMM.
4.4. CAN Communications
Each VMM is designed to communicate input/output state information on the
CAN at a maximum rate of 40 Hz (40 times per second). CAN communication
occurs whenever there is a state change on an input (analog or digital), output,
flag, or timer. If none of these items changes state for a period longer than one
second, the VMMs automatically transmit their I/O status every second. This acts
as a “heart beat” to tell if any VMMs in the system are not operating.
4.5. LED Diagnostics
The VMM is designed to update the diagnostic input/output status LEDs at a
rate of 40 Hz (40 times per second).
Page 16 of 50
Vansco Multiplex Module (VMM) 2820
VMM Operation
4.6. Vehicle Configuration Ladder Logic
Programming
All VMMs in a system can be programmed with new vehicle configuration
ladder logic from a single CAN diagnostic port located in the vehicle. This is
accomplished with a Vansco Data Link Adapter (DLA) or a Vansco Pocket
Gateway Module (PGM) and a standard desktop or laptop PC loaded with VMM
Software. The DLA or PGM provides a link from the CAN to the PC RS-232 serial
port. VMM Software provides the tools to create, modify, and download the
ladder logic from the PC to the VMMs in a vehicle.
Note: The VMM Software and its uses are discussed in detail in the VMM
Software User Guide.
When downloading begins, all VMMs are taken offline (all outputs are turned
off, driving of diagnostic LEDs is discontinued, and power LEDs begin flashing
at a slow rate). To increase downloading speed, vehicle configuration is
downloaded to all VMMs in the system simultaneously. Once the new vehicle
configuration ladder logic has been downloaded, the modules will come back
online automatically.
Caution: When re-programming a VMM system, all VMM outputs turn
off, which could result in vehicle movement or vehicle implement
movement. Ensure that all safety equipment for your vehicle is used and
all persons are away from the vehicle prior to initiation of programming.
4.7. Plug and Play Automatic Module Programming
The VMM has a very powerful Plug and Play feature, which allows replacing a
single module in a vehicle system with a VMM that contains a different vehicle
configuration or no vehicle configuration at all. There is no need for
reprogramming. Upon every system power up each VMM communicates its
firmware and ladder logic revision on the CAN. If one module mismatches the
majority, that one module automatically downloads the firmware and ladder
logic from another VMM in the system. Once this process is complete, all
modules go online and continue to operate as though no module was changed.
This feature is particularly useful for module changes in the field in the unlikely
event that a module in a system fails to operate properly.
Caution: When plug and play is initiated on a VMM system, all VMM
outputs turn off, which could result in vehicle movement or vehicle
Hardware Manual
Page 17 of 50
VMM Operation
implement movement. Ensure that all safety equipment for your vehicle
is used and all persons are away from the vehicle prior to initiation of
plug and play.
4.8. CAN Diagnostics
The VMM is capable of logging errors in non-volatile memory, which can later be
retrieved for analysis by service personnel. Items that are logged include output
faults, CAN failures, user selectable event counters, timers, and generic number
logs.
VMMs automatically log output faults and CAN failures. The user cannot
customize this function. Output faults and CAN failures are logged once per
event, however only the time (in module running hours) is logged for the last
event. For example, if a short circuit occurs on output 1, the event is logged and
the hour (in module running hours) is recorded. If the short recurs on output 1
before service personnel have cleared the log, the time recorded for the first fault
will be over written by the second fault. The total number of occurrences of the
event since the logs were last cleared will be recorded for each event.
User selected event counters, timers and generic logs are custom features of
VMMs. They are set in the VMM Software when ladder logic is created. Event
counters allow the user to set up a log for a specific event (for example, door
solenoid activation) and count whenever this event occurs. Similarly, event
timers can count duration of an event in increments of hundredths of seconds
(0.1s intervals). The generic logs allow storage of generic numbers, accurate to
one decimal place. These log types are set up in the ladder logic for the vehicle in
the same way that outputs are defined. The VMM Software User Guide or the
VMM Software help file provides more information about this.
All logs can be retrieved and cleared using the VMM Software application. This
application also allows real time viewing of system logic operations, and it
allows inputs and outputs to be forced to active/inactive states regardless of what
the input/output is supposed to be doing. This is convenient for vehicle logic
debugging but should be used with caution. Duration, counter, and generic logs
can all be reset to zero (or any other value) dynamically within ladder logic.
Module fault logs cannot.
Page 18 of 50
Vansco Multiplex Module (VMM) 2820
VMM Setup and Use
5. VMM Setup and Use
This section reviews common practices that should be used when developing a vehicle
electrical system that uses VMMs.
5.1. Input Considerations
As discussed in Section 3, there are four different types of inputs available on the
VMM. To recap, these are
•
Digital switch-to-ground type
•
Digital switch-to-battery type (programmable)
•
Digital switch-to-ground type with power control
•
Analog type
When designing the wire harness for a vehicle the main input item that has to be
considered is the “Digital switch-to-ground type with power control” or simply
“Power Control Inputs”. These are inputs 1 to 5 and they behave like any other
switch-to-ground input on the unit except that they control the power to the
VMM. This means that at least one of these inputs must be active (or grounded)
in order to power up a VMM in the vehicle.
In addition, input 1 on all the VMMs in a vehicle is reserved to be “Master
Power”. This is a reference input that the VMM uses to perform additional tasks.
Input 1 on all VMMs in a system must be connected to the same source, which
means that when this source is active all VMMs in the vehicle will be powered
on. Typically this source would be a dashboard switch called “Master Power” or
the “auxiliary”/“run” position of a key switch. When this “Master Power” input
is active the following tasks are performed by the VMM:
•
Plug and Play system check
•
VMM Communication failure check
VMM Communication Failure and Plug and Play checks require that all VMMs
defined in the system are powered when the check occurs. The only way to
Hardware Manual
Page 19 of 50
VMM Setup and Use
ensure that all VMMs are active in a system is to dedicate a single input to
represent all VMMs “online”. Thus input 1 on all VMMs is dedicated to “Master
Power” for the system.
Note: You must ensure that input 1 on each module in a system is
dedicated as a “master power” input if you want plug and play and
network fault detection functionality.
Inputs 2 to 5 are general-purpose power control inputs in that the VMMs don’t
have to be connected to the same source. Power control inputs are designed to
allow power up of only those VMMs required to perform a function. For
example, hazard flashers may require one VMM at the front of the vehicle for
front and side turn lamps and one VMM at the rear for rear turn lamps. Only two
VMMs need to be powered up to perform the hazard function. In this example,
the hazard switch on the dashboard could be run to one of the general-purpose
power control inputs (2 to 5) on the two VMMs in use. When the hazard switch is
turned on only these two VMMs will be active (provided no other power control
inputs are currently active on other VMMs). This minimizes power consumption
for hazard operation, and extends the length of time that they will operate on the
vehicle battery.
Another consideration is whether any of the inputs being sent to VMMs are
considered active when connected to battery or to ground. In most applications,
there are very few switch-to-battery type inputs, which is why the VMM allows
only a maximum of 5 of this type of input. If the vehicle application has a switchto-battery input, it should be sent to one of inputs 6 to 10, which can be
programmed as switch-to-battery type using the VMM Software application.
There are no other specific considerations regarding vehicle digital inputs. VMM
inputs 11 to 28 are all switch-to-ground type and there are no special functions
associated with any of these inputs.
Analog inputs can handle a voltage-type or resistive-type input from various
sensors on the vehicle. The ground reference for these analog inputs is the
ground pins on the VMM input connector (see Section 6 for pin outs). The
maximum allowable voltage on any of the analog input pins is 32 V and the
minimum is 0 V. Any voltage above 32 V will be internally clamped to 32 V.
5.2. Address Considerations
There are five address inputs into each VMM in a system. These inputs are
similar to the switch-to-ground digital inputs but are dedicated to VMM
addressing. These inputs have to be grounded or left floating according to the
table shown in section 3.4. A reminder: the VMM Software application will show
Page 20 of 50
Vansco Multiplex Module (VMM) 2820
VMM Setup and Use
the user a pin out of each VMM in the system so the address lines to connect to
ground for each VMM are known. There are no special considerations for these
inputs.
5.3. Output Considerations
As discussed in section 3.2 there are two types of VMM outputs, these are:
•
High side outputs
•
Bidirectional outputs
To connect to the high side outputs two VMM connections have to be made.
First, the bus bar power pin for the output in question must be connected to the
battery voltage that is to be switched (see Section 6 for VMM pin outs). Second,
the output in question must be connected to one side of the load and the other
side of the load to vehicle ground. When the output turns on, it switches the
voltage on the bus bar power pin to the output pin, which is connected to the
vehicle load.
High side outputs must not draw more than 6 A per output, 30 A per bus bar (9
switches per bus bar) or 60 A per VMM (2 bus bars per VMM). These current
ratings are for continuous operation so loads which add up to more than 30 A
per bus bar or 60 A per VMM can be connected, provided all loads are not
operating at the same time.
Bi-directional outputs act like single-pole single-throw relays. Each bi-directional
output is associated with two pins (pin A and pin B). When the output is
activated, pin A makes contact with pin B. Pin A and pin B of each of these two
outputs can be connected in any manner. For example, to connect output 19 as a
low side driver, simply connect output 19A to ground and connect output 19B to
the load to be driven (the other side of the load should then be connected to the
battery voltage of choice). This connection could be reversed as well; output 19B
could be connected to ground while output 19A is connected to the load. In this
manner, these outputs can be used either to switch high side or low side loads, or
to switch battery- or ground-to-signal inputs on other electronic control modules
in the vehicle (engine or transmission controller for example).
For a complete list of voltage and current limitations on the VMM outputs, refer
to section 6.
Caution: When using bi-directional switches you must ensure that the
highest voltage being switched is less than or equal to the voltage being
supplied to the VMM’s logic power input (pins J1-24, J1-25 and J1-26).
Hardware Manual
Page 21 of 50
VMM Setup and Use
Caution: It is the responsibility of the system/vehicle designer to ensure
that the electrical system faults are reported to system/vehicle operators
so the faults can be corrected by service personnel. Faults should not be
left uncorrected. Failure to follow this recommendation could lead to
damage of the VMM.
5.4. Power Considerations
VMMs have internal short circuit and over current protection. In extreme short
circuit situations, voltage will dip on the power wire supplying the short circuit
current. This is due to the inductance inherent in all wiring. To ensure maximum
possible short circuit protection on the VMM product, low current power wiring
should be isolated as much as possible from high current wiring. The logic
power input (connector pins J1-24, 25 and 26) and the logic ground input
(connector pins J1-27, 28, 29 and 30) on the VMM2820 are considered low current
draw loads. The bus bar power input (connector pins J4-1 and 2) on the
VMM2820 are considered high current draw loads. The bus bar power pins are
subject to short circuit currents for brief periods of time and should therefore be
isolated from the logic power pins. This isolation prevents dips in voltage on the
bus bar wires from affecting the power supplied to the logic of the VMM2820.
This isolation scheme is shown in the following diagrams.
All power wires coming from battery or the alternator terminals require fusing to
protect the wiring in the event of a short circuit between the power source and
the VMM2820. A fuse value of 40 A or less is recommended on each VMM2820
bus bar wire.
Note: Proper fusing is required on any power wire coming off the
vehicle’s battery or alternator terminals. This fusing is not shown in the
diagrams below.
5.4.1.
Cable Grounded System
The cable grounded system is a system where by ground is supplied to the
various loads and modules in the vehicle by means of large gauge wires or
cables. The following diagram shows how the power and ground should be
connected in the vehicle.
Page 22 of 50
Vansco Multiplex Module (VMM) 2820
VMM Setup and Use
Cable grounded system
5.4.2.
Chassis Grounded System
The chassis grounded system is a system where by ground is supplied to the
various loads and modules in the vehicle by means of the vehicle’s metal chassis.
The following diagram shows how the power and ground should be connected
in the vehicle.
Hardware Manual
Page 23 of 50
VMM Setup and Use
Chassis grounded system
There are situations where both cable and chassis grounded systems occur on the
same vehicle. For example, low current ground wires could be run from the
modules to the battery stud in a chassis ground system. This would ensure that
ground rises due to current flow in the chassis under heavy load conditions do
not affect logic ground on the module.
Maintaining isolation between low current ground and high current ground is
also beneficial for ensuring proper input detection, particularly with analog
inputs. The VMM2820 uses the voltage value at the logic ground pins as the
reference for analog inputs. If an analog value is connected to one of the
VMM2820’s analog inputs, the voltage that the VMM2820 sees is with respect to
the logic ground pins. If there is a difference in voltage between the sensor
ground and the VMM2820 logic ground, that voltage difference will appear on
the analog input reading giving an erroneous value of the actual sensor voltage.
Voltage differences between sensors and the VMM2820 grounds can be
minimized by ensuring that these grounds are isolated from power grounds.
Note: Isolating low current ground and power from high current ground
and power in a system is essential for maintaining signal integrity.
Page 24 of 50
Vansco Multiplex Module (VMM) 2820
VMM Setup and Use
5.5. Communication Considerations
VMMs operate on SAE J1939 networks, which interconnect all VMMs (and other
optional equipment). The physical cable for the J1939 network has three wires
(J1939+, J1939- and J1939 Shield) and should be connected to the VMM input side
(see VMM pin outs in Section 6).
SAE J1939-11 calls for a main “back bone” cable, no longer than 40 metres, with
120-ohm terminators on each end. Nodes (such as VMMs) are connected to the
“back bone” using wire stubs no longer than 1 metre. Stubs in the J1939 network
should all be different lengths to reduce the possibility of standing wave
interference on the network. All J1939 connections should be done using SAE
J1939 specified connector types and cable types. At one location on the “back
bone”, the cable shield wire should be securely connected to vehicle chassis
ground to ensure adequate shielding on the network.
The connectors used on the J1939 network (that is, connecting stubs and
terminators to the back bone) consist of three pins of “T” or “Y” configuration
which allow branching off of the back bone. There are two manufacturers of
J1939 connectors recognized by SAE: ITT Cannon and Deutsch. Both
manufacturers offer terminator connectors with a 120-ohm resistor built in, but
the ITT Cannon connectors have the advantage of easier terminator connections
directly into the “Y” connector and fewer parts required (no secondary locks).
An example J1939 network arrangement with manufacturer part numbers is
shown below.
CAN connections
Hardware Manual
Page 25 of 50
VMM Setup and Use
For a complete list of J1939 connection considerations, please refer to the SAE
J1939 specifications available through the Society for Automotive Engineers. SAE
J1939-11 covers the physical aspects of the network including cable type,
connector type, cable lengths, etc.
5.6. General Considerations
VMMs were designed to reduce vehicle wiring, improve vehicle diagnostics and
simplify maintenance. The following suggestions can be used to take full
advantage of the power of the VMM system:
•
Place VMMs in locations close to inputs and outputs to minimize wire
lengths in the vehicle harness.
•
Send as many inputs and outputs as possible to VMMs (i.e., “multiplex” as
much as possible) to maximize diagnostic capability and simplify vehicle
configuration changes. Inputs and outputs going to VMMs can be diagnosed
electronically using the VMM Software package and the VMM LEDs. These
inputs and outputs can also be configured through ladder logic to perform
specific operations. If modifications are required in the future, a ladder logic
change is usually all that is needed to implement it on vehicles in the field.
•
Installing junction boxes at certain locations in the vehicle can minimize the
number of heavy gauge power cables routed throughout the vehicle. VMMs
can be located in the junction boxes and can then be connected to the main
vehicle harness through “bulkhead” connectors. This also separates the
junction box harnesses from the main harness and allows for easier
modifications to the vehicle harness if required.
•
The VMMs in a system must have all connectors disconnected prior to
initiating welding at any location in the system.
•
The vehicle design should provide a means of reporting electrical faults
(short circuit, over current, etc) to a vehicle operator to ensure electrical
system faults are found and repaired by vehicle service personnel. One
method of providing this indication is by using the VMM telltale output
messages to drive the vehicle dash board telltales.
Caution: Welding can cause potential damage to VMM products installed
in a vehicle or system. All electrical connections should be disconnected
from all VMMS in a vehicle or system prior to welding on the vehicle or
system.
Page 26 of 50
Vansco Multiplex Module (VMM) 2820
VMM Setup and Use
Multiplexing a vehicle helps not only to reduce harnessing costs and vehicle
weight, but it also reduces vehicle-troubleshooting time. This can reduce costs at
both the vehicle manufacturer and in the field.
Hardware Manual
Page 27 of 50
VMM Specifications
6. VMM Specifications
6.1. Electrical/Environmental
General
MIN
NOM
MAX
UNIT
Operating Voltage (Logic)
6
28
32
V
Operating Voltage (High Side Busbar 1 and 2)
6
28
32
V
Operating Over Voltage (Logic and outputs)
-
48
-
V
-
120
-
mA
-
8.5
-
mA
-
-
20
mA
Output Current per bus bar
-
-
30
A
Recommended Fuse per bus bar
-
-
40
A
Output Current per module
-
-
60
A
Operating Temperature
-40
-
+85
°C
Storage Temperature
-55
-
+125
°C
Operating Current Draw (Power Pin)
2
3
Operating Current per input cct
Operating Current Draw (Power Save)
4
Inputs (+25°°C unless otherwise stated)
MIN
NOM
MAX
UNIT
# Active Low Digital Inputs
-
18
-
-
# Programmable Active High/Low Digital Inputs
-
5
-
-
# Active Low Power Save Digital Inputs
-
5
-
-
# Analog Inputs
-
4
-
-
0
-
32
V
-
-
2.8
V
Voltage on Input pin
5
Active low activate voltage
2
Assumes 28 V power with only one input active (one power save input must be active to power device).
Assumes 28 V power, and input circuit active low, and input pin grounded.
4
Assumes 28 V power, no active high inputs in use. If active high inputs are in use, an additional x/1 kohm
(amps) must be added per output (where x is the voltage level of the active high input).
5
Inputs also protected against 48 V over voltage, ESD transients (SAE J1455) and reverse battery connection
(SAE J1455).
3
Page 28 of 50
Vansco Multiplex Module (VMM) 2820
VMM Specifications
MIN
NOM
MAX
UNIT
Active low deactivate voltage
5
-
-
V
Active low hysteresis
-
2.2
-
V
Active high activate voltage
5
-
-
V
Active high deactivate voltage
-
-
2.8
V
Active high hysteresis
-
2.2
-
V
Analog input type
-
Voltage
-
-
Analog input resolution
-
0.1
-
V
Analog input error with 14 V input voltage
0
-
0.13
V
Analog input error with 32 V input voltage
0
-
0.21
V
Outputs (+25°°C unless otherwise stated)
MIN
NOM
MAX
UNIT
# High Side Outputs Total
-
18
-
-
# High Side Outputs on Busbar 1
-
9
-
-
# High Side Outputs on Busbar 2
-
9
-
-
# Bidirectional Outputs
-
2
-
-
6
-
32
V
Bidirectional Voltage
6
-
32
V
High Side Current per output
0
-
6
A
Bidirectional Current per output
0
-
4
A
High Side short cct trip point
-
42
-
A
Bidirectional short cct trip point
-
20
-
A
Short cct trip time (high side outputs)
-
-
5
ms
Short cct trip time (bi-directional outputs)
-
-
0.5
ms
High Side over current trip
-
-
10
A
Bidirectional over current trip
-
-
6
A
Over current trip time
-
-
1
s
5
10
-
s
-
-
48
V
-
-
48
V
High Side Voltage
6
22,7
8
Fault reset time
High Side reverse battery protection
9
Bidirectional reverse battery protection
Memory
MIN
Ladder Logic Memory (flash)
10
-
NOM
128k
MAX
-
UNIT
byte
6
Outputs protected against 48 V over voltage (SAE J1455).
Bi-Directional Outputs must not switch voltages that are greater than the voltage applied to the logic power
input pin of the VMM2820 (voltage readings referenced to VMM logic ground).
8
Outputs protected against short circuits to ground and power (designed to meet ASAE EP455).
9
Reverse battery protection turns all high side outputs ON. In this state short circuit and over current protection
is not operational.
7
Hardware Manual
Page 29 of 50
VMM Specifications
MIN
NOM
MAX
UNIT
Number of Count/Time Logs
-
8
-
-
Count/Time Log Size
-
2
-
byte
Fault Log Size
-
4k
-
byte
6.2. Design Verification Standards
The test descriptions below are based on Environmental Specification SAE J1455
Aug 94 and ANSI/ASAE EP455 Jul 91. For full test descriptions, refer to these
specification documents available through the Society for Automotive Engineers
(SAE) and the American Society of Agricultural and Biological Engineers
(ASAE). Deviations from official specification are shown in the test description
column. The Grp column defines which group of test subjects were exposed to
the test. The design verification testing included 5 groups with 4 UUTs per
group. Thermal tests, also referred to as conditioning tests are always performed
before all other tests. The order shown in the table for all tests other than thermal
tests is not necessarily the order in which test tests were performed on the test
subjects.
Design Verification Test Descriptions
Grp
A
B
C
D
E
Test Name
Test Spec
Test Description
Storage
Temperature
1. Place the UUT in a chamber and
set the temperature from +25°C to
-55°C.
(NonOperational)
EP455 Jul91
Section 5.1.2
Level 1
Deviate
Pass
Y/N
/Fail
No
Comments
Pass
2. Allow the UUT to remain at -55°C
for 4 hours.
3. Set the chamber temperature to
+125°C.
4. Allow the UUT to remain at
+125°C for 4 hours.
5. Set the chamber temperature to
+25°C.
•
Test for impaired function at room
temperature.
•
Temperature transition must be at
an average rate of less than
0.5°C/minute.
•
See supporting record for further
test details.
10
As a reference, a typical vehicle application using 6 VMMs and 160 ladder logic rungs takes up 10% of
available ladder logic memory.
Page 30 of 50
Vansco Multiplex Module (VMM) 2820
VMM Specifications
Grp
A
B
C
D
E
Test Name
Test Spec
Temperature
Cycle
(Operational)
J-1455
Aug94
Section
4.1.3.1
Fig. 2A, Page
7.
Test Description
1. Attach test loads and apply 12
VDC power to the UUT in the
chamber.
Deviate
Pass
Y/N
/Fail
No
Pass
No
Pass
Comments
2. Set the chamber temperature from
+25°C to -40°C.
3. Maintain -40°C temperature for a
duration of 3.5 hours
4. Set the chamber temperature from
-40°C to +85°C.
5. Maintain +85°C temperature for a
duration of 11 hours
6. Set the chamber temperature from
+85°C to +25°C.
7. Maintain +25°C temperature for a
duration of 8 hours
8. Repeat steps 2 – 7 twice.
A
B
C
D
E
•
Temperature transition rate must
be 3°C/minute ±1.5°C.
•
Test for impaired function at hot
and cold extremes
•
Allow the temperature to stabilize
for 20 minutes before subjecting
the UUT to functional tests.
•
See supporting record for further
test details.
Thermal
Shock
1. Place the UUT in a chamber with
temperature set to -40°C.
(NonOperational)
2. Allow the UUT to remain at -40°C
for duration of 2 hours before
transferring it to another chamber
with temperature set at +85°C.
J-1455
Aug94
Section
4.1.3.2
Fig. C, Page
8.
Hardware Manual
3. Allow the UUT to remain at +85°C
for a duration of 2 hours before
transferring it back to the other
chamber with temperature set at 40°C.
4. Repeat steps 2 and 3 five times.
•
Transfer to occur in 1 min. or less.
•
Test for impaired function at room
temperature.
•
See supporting record for further
test details.
Page 31 of 50
VMM Specifications
Grp
A
Test Name
Test Spec
Salt Spray
Atmosphere
(Operational)
J-1455
Aug94
Section 4.3.3
Ref. ASTM B
117-73
Test Description
1. Subject UUT under nominal
conditions of voltage and load, to a
solution of 5 parts salt to 95 parts
water,
Deviate
Pass
Y/N
/Fail
No
Pass
Yes
Pass
Comments
2. Atomize at a temp. of 35°C,
3. UUT to be exposed to salt spray
for 48 hours,
4. When concluded, gently rinse in
clean running water, at 38°C to
remove salt deposits from surface,
5. Immediately dry with stream of
compressed dry air at 175.8 –
241.3 kPa,
A
•
Inspect for surface corrosion and
salt ingress.
•
Test for impaired function during
and after test.
Steam
Cleaning
1. Place non-operating UUT in
normal operating position.
(NonOperational)
2. If integral connector is used, it
shall be mated.
J-1455
Aug94
3. Deviate: to EP455 Section 5.6
Level 1. UUT mounted with
normally exposed surfaces
exposed to wash stream.
Section 4.5.3
Page 17, Fig.
5,
This test was
performed in the
test facility
parking lot using
an external
mobile pressure
wash system.
4. Use flat fan nozzles 20 – 30 cm
away.
5. Source pressure 1400kPa, flow
rate of 9.46 litre/min. (150 gal/hr.).
6. Use water at approximately 93°C.
7. Deviate exposure from J-1455 to
EP455 Section 5.6 Level 1.
Expose UUT to sweeping spray
over exposed surfaces for a period
of 2 minutes.
Page 32 of 50
•
Inspect for water ingress.
•
Test for impaired function at end of
test.
Vansco Multiplex Module (VMM) 2820
VMM Specifications
Grp
A
Test Name
Test Spec
Chemical
Exposure
(NonOperational)
EP455 Jul91
Section 5.8.2
B
Solar
Radiation,
Test Description
1. Apply the specified chemical
solution with a brush until evenly
coated over the normally exposed
surface area.
1. UUT non-operational,
Ultraviolet
Effects
2. Expose for 300 hours to UV light
source of 280 to 400 nm
wavelength,
(NonOperational)
3. Distance of .75 metres from light
source,
•
Expose to a range of spectral
2
energy from 43 to 75 W/m ,
Section 5.4.1
•
Test for impaired function at end
of test.
Random
Vibration
1. UUT operational,
(Operational)
2. Test all three mutually
perpendicular axes,
J-1455
Aug94
3. Power spectral energy profiles to
match the profiles as set out in J1455, figure 10
Section
4.9.4.2
4. Vibration duration of 8 hours per
axis
/Fail
No
Pass
No
Pass
No
Pass
Yes
Pass
Test for impaired function
during and at end of test.
Operational
Shock
1. UUT operating during test
(Operational)
3. Subject UUT to a single 11ms half
2
sine pulse of 490m/s in all 3 axes
J-1455
Aug94
4. Inspect for physical damage
Section
4.10.3.4
Y/N
Comments
3. Check for impaired function or
detrimental corrosion during the
test and at the end of a 100-hour
minimal interval following exposure
to test conditions.
•
C
Pass
2. Repeat once per day for three
days.
EP455 Jul91
C
Deviate
2. Deviate to EP455 section 5.14.1
•
Test for impaired function
during and at end of test.
Ref. EP455
5.14.1
page 296
Hardware Manual
Page 33 of 50
VMM Specifications
Grp
C
Test Name
Test Spec
Test Description
Pressure
Washing
1. Place UUT in normal operating
position
(NonOperational)
2. If integral connector is used, it
shall be mated
EP455 Jul91
3. Test apparatus, per EP455 5.6
Level 1
Section 5.6
4. Use flat fan nozzles 10 cm away
Level 1
5. Source pressure 7000kPa, flow
rate of 15.9 litre/min
Deviate
Pass
Y/N
/Fail
Yes
Pass
No
Pass
No
Pass
Comments
6. Deviate: use water/detergent
mixture at 40°C
7. Expose to sweeping spray for 2
minute period
C
•
Inspect for water ingress,
•
Test for impaired function at end of
test.
Installation
Harness
Shock
1. Allow non-operating UUT to free
fall while attached to all harness
connectors.
(NonOperational)
2. Hold harness securely 1 metre
from connector/product end
3. Repeat 2 times,
J-1455
Aug94
•
Inspect harness terminals or main
relief area for damage.
Section
4.11.3.3
C
Handling
Drop Test
1. Drop non-operational UUT 1 m
onto a level concrete surface
(NonOperational)
2. One time in each of the three
mutually perpendicular surfaces
J-1455
Aug94
3. Choose different impact surfaces
for each sample to ensure every
surface is impacted during the test
Section
4.11.3.1
Page 34 of 50
•
Test for impaired function at end of
test regardless of visible UUT
damage
Connector shell
damage may
result if UUT is
dropped such
that the
connector hits
concrete first.
UUT will
continue to
function
electrically even
with connector
damage present.
It is not
recommended
that a dropped
unit showing
connector
damage be used
for end customer
applications.
Vansco Multiplex Module (VMM) 2820
VMM Specifications
Grp
C
D
Test Name
Test Spec
Test Description
Humidity
Soak
1. Set the chamber humidity to 96%
RH.
(NonOperational)
2. Place the UUT in the chamber and
set the temperature to +38°C.
EP455 Jul91
3. Allow the UUT to remain in the
chamber for 240 hours.
Section
5.13.2
•
Inspect for physical damage.
•
Test for impaired function at end of
test.
Humidity
Cycling
1. Set the chamber humidity to 90%
RH.
(Operational)
2. Place the UUT in the chamber with
temperature stabilized at +85°C.
J-1455
Aug94
3. Attach test loads and apply 14VDC
power to the UUT.
Section 4.2.3
4. Allow the UUT to remain at +85°C
for 2 hours.
Method 1
Page 13, Fig.
4a.
Deviate
Pass
Y/N
/Fail
No
Pass
No
Pass
Yes
Pass
Comments
5. Set the chamber temperature to 40°C and maintain the
temperature for 2 hours.
6. Set the chamber temperature to
+38°C and maintain the
temperature for 1 hour.
7. Set the chamber temperature to
+85°C and maintain the
temperature for 30 minutes.
8. Set the chamber temperature to
ambient.
D
Operating
Voltage
•
Temperature transition must be at
an average rate of 1.5°C/minute.
•
Test for impaired function during
and at end of test.
12 Volt System
•
Test UUT for impaired function
while operating between 9 and 16
VDC.
J-1455
Aug94
•
Deviate: 6 V minimum continuous
operating voltage
Section
4.11.1.1.1
24 Volt System
(Operational)
Hardware Manual
•
Test UUT for impaired function
while operating between 9 and 32
VDC.
•
Deviate: 6 V minimum continuous
operating voltage
Tested both
12 V and 24 V
system levels
Page 35 of 50
VMM Specifications
Grp
D
Test Name
Test Spec
Starting
Voltage
Test Description
Deviate
Pass
Y/N
/Fail
•
Test UUT for impaired function at
5.3 VDC after having ramped up
from 0VDC.
No
Pass
•
Test UUT for impaired function as
its power source is ramped from
0 VDC to 6 VDC at a rate of
1V/msec.
No
Pass
•
Repeat test but ramp from 0VDC
to 28 VDC at a rate of .25 V/sec.
No
Pass
Since the UUT is
normally
specified to
operate at 24 V
continuous, the
test was
conducted to
24 V levels only.
No
Pass
Both 12 V and
24 V levels were
tested.
(Operational)
EP455 Jul91
Section
5.10.6
D
Operational
Power-up.
(Operational)
EP455 Jul91
Comments
UUT was nonoperational at
5.3 V since it is
specified to
operate from 6 V
and up. No
impaired
function at 5.3 V
was recorded.
Section
5.10.7
D
D
Jump Start
12 Volt System
(Operational)
•
J-1455
Aug94
24 Volt System
Test UUT for impaired function
while operating at +24 VDC for a
period of 5 minutes.
Test UUT for impaired function
while operating at +48 VDC for a
period of 5 minutes.
Section
4.11.1.1.1
•
Reverse
Polarity
12 Volt System
(Operational)
EP455 Jul91
Section
5.10.4
Modified for
24 volt
system
Page 36 of 50
•
•
Test UUT for impaired function
following exposure of -12VDC to
its power source for 5 minutes.
Test setup must include all normal
loads connected to the UUT to
provide a worst case test scenario.
24 Volt System
•
Test UUT for impaired function
following exposure of -24VDC to
its power source for 5 minutes.
•
Test setup must include all normal
loads connected to the UUT to
provide a worst case test scenario.
UUT outputs
turn on in
reverse battery
mode. Short
circuit protection
is not available
in reverse
battery mode. If
the load
connected
externally allows
reverse currents
higher than
specified output
ratings, the
loads and/or
UUT outputs
may be
damaged.
Vansco Multiplex Module (VMM) 2820
VMM Specifications
Grp
D
Test Name
Test Spec
Short-Circuit
Protection
Test Description
•
Test UUT for impaired function
after shorting each external lead to
system ground and maximum
continuous system battery voltage
for a period of 5 minutes with all
protection systems in place.
•
Deviate: Maximum system battery
voltage = +32 VDC
•
(NonOperational)
Test UUT for impaired function
after power line exposure to a
-t/.038
transient of -90e
V
•
Deviate: Source impedance =
10Ω,
EP455 Jul91
•
Section
5.11.2
The test shall be repeated at a rate
of 0.2 Hz for 60 test cycles
•
Test UUT for impaired function
after exposure to test pulse
•
UUT operational
(Operational)
EP455 Jul91
Section
5.10.4
Deviate
Pass
Y/N
/Fail
Yes
Pass
At the time and
date that this
test was
performed, the
UUT software
was designed to
restart outputs
shorted to
ground every 5
seconds.
Yes
Pass
This test
disconnects the
battery voltage
from the UUT at
the time the
pulse is
energized and
remains off for a
period of
200 ms. The
UUT may reset
during this
period, but must
function properly
when power
returns.
Yes
Pass
J1455 defines a
total of 10
inductive load
pulses, which is
what the UUT is
designed to
meet. It is
recommended
that any
inductive
elements
connected to the
product
(particularly to
product inputs)
in actual
applications be
suppressed with
suppression
transorbs or
diodes.
Modified for
24 volt
system
D
D
Alternator
Field Decay
Inductive
Load
Switching
Transient
12 Volt System
•
Apply to the power source 14
-t/.001
±600e^
V,
•
J-1455
Aug94
Deviate: Source impedance of
10Ω
•
Section
4.11.2.2.2
The test shall be repeated for 10
pulses at 1 sec. Intervals.
24 Volt System
(Operational)
Hardware Manual
•
Apply to the power source 28
-t/.001
V,
±600e^
•
Deviate: Source impedance of
10Ω
•
The test shall be repeated for 10
pulses at 1 sec. Intervals.
•
No impaired function occurs during
or at end of either test.
Comments
Page 37 of 50
VMM Specifications
Grp
D
Test Name
Test Spec
Load Dump
Transient
(Operational)
Test Description
•
UUT operational,
Deviate
Pass
Y/N
/Fail
Yes
Pass
Transient
generator
equipment is
designed for ISO
pulse
generation. Load
dump pulse
deviated to ISO
specified decay
rates. Refer to
ISO pulse 5 in
ISO 7637
specifications.
Yes
Pass
24V testing for
accessory noise
is not defined by
EP455. A 24 V
system version
has been
defined as
deviations to the
EP455
specification
12 Volt System
•
J-1455
Aug94
Deviate: Apply to the power
-t/0.133
source 14 +86e
V (based on
ISO pulse 5)
•
Section
4.11.2.2.1
Deviate: Source impedance of
.5Ω
•
Ref: ISO
7637
Deviate: The test shall be
repeated for 5 pulses at 90 sec.
intervals
•
No impaired function occurs during
or at end of test.
Comments
24 Volt System
E
Accessory
Noise
•
Deviate: Apply to the power
-t//0.133
source 28 +122e
V (based
on ISO pulse 5)
•
Deviate: Source impedance of 1Ω
•
Deviate: The test shall be
repeated for 5 pulses at 90 sec.
intervals,
•
No impaired function occurs during
or at end of test.
•
UUT Operational
•
Apply a voltage of 14 + 1.5 sin
(2πf⋅t), where frequency f is to be
swept from 50Hz - 10 kHz over a
5min period
•
Deviate: Add 24V system test
where voltage applied is 28 + 1.5
sin (2πf⋅t)
•
Deviate: Source impedance is less
than 1Ω
•
Test throughout exposure for
impaired function.
EP455 Jul91
Section
5.11.1
Page 38 of 50
Vansco Multiplex Module (VMM) 2820
VMM Specifications
Grp
E
Test Name
Test Spec
Batteryless
Operation
Test Description
•
UUT operational,
•
Apply a voltage of 6 + |12.6 sin
(2πf⋅t)|, where frequency f is to be
swept from 500 Hz - 1.5 kHz over
a 5min period,
•
Deviate: Add 24 V system test
where voltage applied is 6 + |25.2
sin (2πf⋅t)|
•
Deviate: Source impedance is less
than 2.5Ω
•
Test throughout exposure for
impaired function.
•
Setup product with test harness,
inputs and loads in EMC Chamber
according to J1113/41 Jul95
figures 8 and 9
•
Expose 1.5 metres of harness in
front of EMC antenna
J-1455
Aug94
•
Distance from antenna to harness
is 1 metre
Section
4.11.3.3.1
•
Antenna located in center of 1.5
metre harness length
•
Deviate: Chamber size is 3 m x 3
m x 3 m. Chamber wall to antenna
distance is < 1m in some
instances.
•
Apply 14 V power to the product
and while operating in a normal
manner capture radiated noise
from 9 kHz to 1 GHz (vertical and
horizontally polarized where
applicable)
•
Capture plots of emissions based
over full test bandwidth.
EP455 Jul91
Section
5.11.3 Level
1
E
Radiated
Emissions
(Operational)
In House
Ref:
J-1113/41
Jul95
Hardware Manual
Deviate
Pass
Y/N
/Fail
Comments
Yes
Pass
24 V testing for
batteryless
operation is not
defined by
EP455. A 24 V
system version
has been
defined as
deviations to the
EP455
specification
Yes
Pass
Pass criteria
defined as
follows:
Narrow Band
Class 2 from
9 kHz to 70 MHz
Narrow Band
Class 1 from
70 MHz to
90 MHz
Narrow Band
Class 2 from
90 MHz to
1 GHz
Where broad
band noise
above narrow
band limits is
found,
broadband
testing and limit
lines are to be
used.
Page 39 of 50
VMM Specifications
Grp
E
Test Name
Test Spec
Test Description
Radiated
Susceptibility
•
Setup product with test harness,
inputs and loads in EMC Chamber
(Operational)
•
Expose 1.5 metres of harness in
front of EMC antenna
•
J-1455
Aug94
Distance from antenna to harness
is 1 metre
•
Section
4.11.3.3.2
Antenna located in centre of 1.5
metre harness length
•
Deviate: Chamber size is 3 m x 3
m x 3 m. Chamber wall to antenna
distance is < 1m in some
instances.
In House
Ref:
J-1113/21
J-1113-1
E
Mutual
Coupling
(Operational)
J-1455
Aug94
Section
4.11.2.2.3
•
Apply 14 V power to the product
and operating in a normal manner
•
Apply frequency sweeps from
9 kHz to 1 GHz horizontal and
vertical polarization at levels of
50 V/m. Antenna types will vary
depending on frequency band
being tested.
•
Test full sweep with continuous
wave (no modulation)
•
Repeat full sweep with 80%
amplitude modulated (AM) 1 kHz
waveform
•
Test product for impaired operation
during and following test
•
UUT operational
Deviate
Pass
Y/N
/Fail
Yes
Pass
Comments
Pass criteria
defined as
follows:
UUT shall be
considered
Class C
UUT Shall
conform to the
following levels:
Level II <=
50 V/m
For definition of
classes, levels
and regions
refer to SAE
J1113-1 Jul95
No
Pass
12 Volt System
•
Subject to the UUT`s power source
-t/(15 × 10-6)
14 ± 300e^
V,
•
Source impedance of 50Ω
•
The test shall be repeated for 10
pulses at 1sec intervals
•
No impaired function or UUT
damage occurs following test
24 Volt System
Page 40 of 50
•
Subject to the UUT`s power source
-t/(15 × 10-6)
28 ± 300e^
V,
•
Source impedance of 50Ω
•
The test shall be repeated for 10
pulses at 1sec. Intervals,
•
No impaired function or UUT
damage occurs following test
Vansco Multiplex Module (VMM) 2820
VMM Specifications
Grp
E
Test Name
Test Spec
Electrostatic
Discharge
Handling
(NonOperational)
J-1455
Aug94
Section
4.11.2.2.5.1
Ref:
J-1113/13
section 5
pages 9 - 11
Hardware Manual
Test Description
•
Set up per SAE J1113/13
•
UUT non-operational,
•
Temp. 20°C ± 3°C,
•
RH 20% - 50%,
•
Discharge a 150 pF capacitor
through a 2KΩ resistor at the
following voltage levels ±15 k
•
Apply ESD to each connector pin,
and 10 predefined case locations
•
Use a wire 14 AWG to 20 AWG to
access recessed pins. Wire to be
solid core and no more than
25 mm long,
•
Each discharge point shall be
subjected to a minimum of 3
positive and 3 negative polarity
discharges at each voltage level,
•
Each ESD pulse shall be followed
by a discharge of the UUT
pin/surface through a 1 MΩ
resistance to ground
•
Duration between charges shall be
5 seconds minimum,
•
Test for impaired function prior to
start of test and at end of each
individual test.
Deviate
Pass
Y/N
/Fail
No
Comments
Pass
Page 41 of 50
VMM Specifications
Grp
E
Test Name
Test Spec
Electrostatic
Discharge
In Vehicle
(Operational)
J-1455
Aug94
Section
4.11.2.2.5.2
Test Description
•
Set up per SAE J1113/13
•
UUT operational
•
Temp. 20°C ± 3°C
•
RH 20% - 50%
•
Each exposed IO pin at the end of
the UUT test harness shall be
tested for direct contact and air
discharge
•
ESD gun setup with a 330 pF
capacitor through a 2KΩ resistor at
the following voltage levels ±15 kV
•
Each discharge point shall be
subjected to a minimum of 3
positive and 3 negative polarity
discharges at each voltage level
•
Each ESD pulse shall be followed
by a discharge of the UUT
pin/surface through a 1 MΩ
resistance to ground
•
Duration between charges shall be
5 seconds minimum
•
Test for impaired function prior to
start of test and at end of each
individual test.
Ref:
J1113/13
section 4
pages 6 - 8
Page 42 of 50
Deviate
Pass
Y/N
/Fail
No
Comments
Pass
Vansco Multiplex Module (VMM) 2820
VMM Connectors
7. VMM Connectors
The VMM2820 has connectors for inputs and outputs.
7.1. Input Connectors
There are two input connectors in the VMM2820 (J1 and J2) as shown in the
figure below:
Input connectors (J1 and J2)
7.1.1.
35 Pin Input Connector (J1)
The following part numbers are used for the 35-pin (J1) connector:
•
35PIN VMM Connector: AMP P/N 1-776163-1
•
Mating Connector: AMP P/N 776164-1
•
Mating Terminals: AMP P/N 770854-3
The following table shows the pin-out for the 35-pin input connector:
Hardware Manual
Page 43 of 50
VMM Connectors
35 pin input connector pin-out
Pin #
Page 44 of 50
Pin Function
1
Input 1
2
Input 2
3
Input 3
4
Input 4
5
Input 5
6
Input 6
7
Input 7
8
Input 8
9
Input 9
10
Input 10
11
Input 11
12
Input 12
13
Address 1
14
Address 2
15
Address 3
16
Address 4
17
Address 5
18
Analog Input 1
19
Analog Input 2
20
Reserved
21
Reserved
22
Reserved
23
Reserved
24
+Vbatt
25
+Vbatt
26
+Vbatt
27
GND
28
GND
29
GND
30
GND
31
CAN Shield
32
CAN High
33
CAN Low
34
Reserved
35
Reserved
Vansco Multiplex Module (VMM) 2820
VMM Connectors
7.1.2.
23 Pin Input Connector (J2)
The following part numbers are used for the 23-pin (J2) connector:
•
23PIN VMM Connector: AMP P/N 1-776087-1
•
Mating Connector: AMP P/N 770680-1
•
Mating Terminals: AMP P/N 770854-3
The following table shows the pin-out for the 23-pin input connector:
23 pin input connector pin-out
Pin #
Pin Function
1
Input 13
2
Input 14
3
Input 15
4
Input 16
5
Input 17
6
Input 18
7
Input 19
8
Input 20
9
Input 21
10
Input 22
11
Input 23
12
Input 24
13
Input 25
14
Input 26
15
Input 27
16
Input 28
17
Analog Input 3
18
Reserved
19
Reserved
20
Reserved
21
Reserved
22
Reserved
23
Reserved
7.2. Output Connectors
There are two output connectors in the VMM 2820 (J3 and J4) as shown in the
figure below:
Hardware Manual
Page 45 of 50
VMM Connectors
Output Connectors (J3 and J4)
7.2.1.
35 pin output connector (J3)
The following part numbers are used for the 35-pin (J3) connector:
•
35PIN VMM Connector: AMP P/N 1-776163-1
•
Mating Connector: AMP P/N 776164-1
•
Mating Terminals: AMP P/N 770854-3
The following table shows the pin-out for the 35-pin output connector:
35 pin output connector pin-out
Pin #
Page 46 of 50
Pin Function
Output Bus Bar
1
Output 6
1
2
Output 5
1
3
Output 4
1
4
Output 3
1
5
Output 2
1
6
Output 1
1
7
Output 10
2
8
Output 11
2
9
Output 12
2
10
Output 13
2
11
Output 14
2
12
Output 15
2
13
Output 7
1
14
Reserved
N/A
15
Reserved
N/A
16
Reserved
N/A
17
Reserved
N/A
Vansco Multiplex Module (VMM) 2820
VMM Connectors
Pin #
7.2.2.
Pin Function
Output Bus Bar
18
Reserved
N/A
19
Reserved
N/A
20
Reserved
N/A
21
Reserved
N/A
22
Reserved
N/A
23
Output 16
2
24
Output 8
1
25
Output 9
1
26
Output 19 A
N/A
27
Output 19 B
N/A
28
Reserved
N/A
29
Reserved
N/A
30
Reserved
N/A
31
Reserved
N/A
32
Output 20 B
N/A
33
Output 20 A
N/A
34
Output 18
2
35
Output 17
2
3 pin output connector
The following part numbers are used for the 3-pin (J4) connector:
•
3PIN VMM Connector: AMP P/N 213899-2
•
Mating Connector: AMP P/N 213905-1
•
Mating Terminals: AMP P/N 213841-3
The following table shows the pin-out for the 3-pin output connector:
3 pin output connector pin-out
Pin #
Pin Function
1
Bus bar for outputs 1 to 9
2
Bus bar for outputs 10 to 18
3
Reserved
1
Bus bar for outputs 1 to 9
Hardware Manual
Page 47 of 50
VMM Connectors
Page 48 of 50
Vansco Multiplex Module (VMM) 2820
Feedback
8. Feedback
In order to ensure the manual meets your needs, we need your feedback. Please answer the
questions on this page and then fax the page to the Marketing Services group at Vansco
Electronics LP. Or, use the e-mail address shown below to send us your comments.
Mailing address:
Fax:
E-mail:
Vansco Electronics LP
1305 Clarence Ave
Winnipeg MB R3T 1T4
Canada
204.478.1749
[email protected]
1. What is your comfort level with the subject matter?
Beginner — Intermediate — Advanced — Professional
2. How would you rate the quality of this manual?
1 (low) — 2 — 3 — 4 — 5 (high)
3. What do you like about this manual?
4. What do you dislike about this manual?
Hardware Manual
Page 49 of 50
Feedback
Page 50 of 50
Vansco Multiplex Module (VMM) 2820