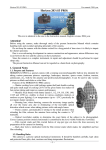
1
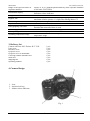
ZENIT KM
User manual, 2003 year
Zenit-KM
This text is identical to the one in the Instruction manual, English version.
Attention!
Before using the camera, study the operating procedure in this manual. When not using the camera for
long periods of time (a month or more) remove the batteries from the device and store them separately
in the dry place keeping them away from children.
Before using the camera, study the operating procedure in this manual. When not using the camera
for long periods of time (a month or more) remove the batteries from the device and store them
separately in the dry place keeping them away from children.
Properly dispose of the used batteries, burying them in the ground and disposing of them at dumps
it is forbidden.
The camera bought by you may differ in slightly appearance from a photo in the operation manual
as during manufacture of cameras their external configuration and operational qualities are
continuously improved.
As the camera is a complex device, any repair and adjustment should be made only in specialized
workshops. This operation manual is not a manual on photography in general.
1. General Instructions
1.1. Purpose of the Camera and its Advantages
“Zenit – km” – 35-mm single lens reflex camera intended for a wide range of amateur photographers.
It is intended for use with various kinds of black-and-white and color films.
The camera is designed to use interchangeable lenses with K-bayonet fittings.
The camera has the following advantages:
– Automatic shutter speed selection based on diaphragm and film speed. With the lightmeasurement system TTL (through the lens) it ensures correct exposure while photographing with the
regular lens and with the use of interchangable lenses, light filters, and adapter lenses;
– Semiautomatic mode, makes it possible for the operator to select the combination of shutter speed
and diaphragm and to estimate the correct exposure;
– Focal lock with the metallic shutter blade and the electronic shutter speed from 16 to 1/2000 s;
– Use of electronic flash at a shutter speed of 1/125 s;
– Light-emitting diode indication in the viewfinder gives information about the exposure settings;
– The built-in electric auto wind feature ensures the automatic frame advance and rewinding
of film;
– The field of vision in the viewfinder of 92%, produces a more precise layout;
– The combined focusing system facilitates sharp focusing;
– Film speed detection is accomplished automatically with the installation of a film cassette with
the “DX” code into the camera;
– Auto return mirror enables viewing the subject before and after exposure;
– Fast lens with automatic diaphragm.
1.2. Handling Rules
The camera is a precise optical-mechanical instrument with an electric drive and electronic
exposure control. It should be handled with great care, kept clean, protected from sharp impacts, dust,
dampness and sharp drops in the temperature.
–1–
ZENIT KM
User manual, 2003 year
Keep the camera closed in its case with the cap put on the lens. Do not remove the lens from the
camera without need to prevent dirt and dust from getting both onto the surfaces of the lens optical
parts and into the camera itself.
Do not touch the surfaces of the optical parts with fingers since it may damage their coatings. Clean
the optical coated lens surfaces with a clean soft cloth or cotton wool wad slightly moistened with
rectified alcohol or ether. The surfaces of the mirror and the focusing device may be cleaned only if
absolutely necessary with a dry soft brush but in no case with damp cleaning agents.
Do not allow contact of moisture or lubricants with the shutter blades, since this degrade their
performance. Keep the camera closed in its case with the cap put on the lens.
Do not remove the camera from its case the moment it is brought indoors from cold to avoid
sweating of its parts, especially the optical ones.
When taking pictures in frosty weather keep the camera under your street-clothes, not in the open
air and take it out only when ready to take a picture.
Load and unload your camera either indoors or in shade protecting it against direct sun light and
bright artificial light. Cap camera lens, if the intervals between photographing exceed 5 minutes.
The camera corresponds to requirements GOST. 19821-83, GOST. 10313-87, GOST. 27570.0-87,
GOST. R iso 10330-96.
1.3. Functional Special Features of the Camera
• The shutter release button of the camera works in a two step action: with the release button
presses one half of the way (first flick) and released the exposure meter is turned on; the picutre is
taken and the film is advanced one frame with continued pressure on the release button (second flick)
and its release.
• If a picture is not taken within approximately 1 minute, the camera is automatically turned off.
The indicator of the frame counter and the indicator in the viewfinder go out when the camera turns
off.
• The operating modes of the camera are selected by the switch item 5 in Fig. 2. Turn the switch
with the desired number or letter to line up with the indication mark on the body of the camera. Pay
atttention to precisely align the switch to the chosen mode. It is possible to rotate the switch either
clockwise or counterclockwise.
Numbers on the switch show shutter speed in the fraction of a seconds (for example: 2000 – this is a
shutter speed of 1/2000 s).
“A” – The automatic mode of the camera (shutter speed is determined automatically).
“B” – Shutter speed is determioned manually (shutter is opened for the duration of the entire time of
the release button is fully pressed).
“125” – On this shutter setting, equal to 1/125 s, it is possible to photograph with a flash bulb.
2. Technical Specifications
Type of camera
Operating modes
Types of exposure
Film loading
Frame size
Film used
Film speed selection
Shutter speed
Eyepiece magnification
Single-lens reflex compact camera, equipped with focal lock with
the metallic shutter blades and programmed shutter speeds;
Automatic exposure control Semiautomatic exposure control
Manual mode of exposure (B)
Delayed timer, series (with a frequency of 2 frames/sec. with
shutter speeds from 1/30 to 1/2000 s), self timer release
Automatic
24×36 mm
35-mm, perforated, in the cassettes with the code “DX”
Automatic for the films with the photosensitivity unit. GOST./ISO
50, 100, 200, 400, 800, 1600, 3200 in the cassettes with the code
“DX”
Automatic mode from 16 to 1/2000 s Semiautomatic mode from 1
to 1/2000, “B”
4x
–2–
ZENIT KM
Range of the exposure meter in
exposure numbers
Information display
Flange/film distance
Regular lens
Lens fitting
Tripod bush thread
Photographing with flash
Power supply
Battery voltage state
Operating temperature range
Overall dimensions
User manual, 2003 year
From 2 to 16 ev (with the photosensitivity in the exposure numbers
of 100 unit. GOST./ISO)
Frame counter Viewfinder
Self timer release indicator
45.5 mm
“MC Zenitar-.K-2” 2/50 with a focal length of 50 mm and
maximum relative aperture 1:2; light filter fillting M46×0.75
Bayonet (mounting “k”)
1/4"
Shutter speed of 1/125 s;
Provided the camera hot shoe is used
Four 1.5 V alkaline batteries of the type AA
Information is displayed on the frame counter
From 0 to +45°C with the use of power sources rated to work in this
temperature range
157×99×77 of mm
3. Delivery Set
Camera with lens “MC Zenitar-.K-2” 2/50
Lens cover
Hot shoe cover
Eyepiece cover
Eyepiece cover is detachable
Case-bag with the shoulder belt
Neck belt
Shipping box
Operating manual
1 pcs.
1 pcs.
1 pcs.
1 pcs.
1 pcs.
1 pcs.
1 pcs.
1 pcs.
1 pcs.
4. Camera Design
01 – lens;
02 – bayonet lock key;
03 – shutter release indicator;
Fig. 1
–3–
ZENIT KM
User manual, 2003 year
04 – shutter release;
05 – operating mode switch;
06 – film rewind button
07 – frame counter display;
08 – hot shoe cover;
09 – hot shoe;
10 – self timer release button;
Fig. 2
11 – cassette chamber;
12 – viewfinder eyepiece;
13 – detachable eyepiece;
14 – back cover;
15 – take up spool;
16 – sprocket teeth;
Fig. 3
17 – aperture setting ring;
18 – depth-of-field scale;
19 – distance scale;
20 – focusing ring;
21 – red dot on bayonet ring;
22 – bayonet ring;
Fig. 4
23 – battery section cover plate lock;
24 – battery section cover;
25 – tripod mount;
26 – back cover unlock button.
Fig. 5
–4–
ZENIT KM
User manual, 2003 year
5. Operating Procedure
5.1. Preparing the Camera for Use
5.1.1. Installing batteries
Open the battery cover 24, after unlocking the cover 25 Fig. 5. Install batteries into the battery section
Fig. 6 in accordance with the polarity on the contacts of the cover of battery section.
Shut the cover of battery section, after fixing by its lock 23. Slightly press on the
shutter release button 4 Fig.2 and then let go of it, the frame counter display 7 Fig. 2
will show the symbol
If the batteries are discharged while using the camera, the frame counter display
shows the blinking symbol “low battery voltage” and blink three light-emitting diodes
of the indicator of viewfinder. Batteries must be replaced.
Attention! Be sure to use only approved batteries in your camera!
Replace batteries or open the cover of the battery only with the camera turned off (led frame
counter indicator is not lit).
If camera is operating, wait for automatic turn off (approximately 1 min.), in this case the
frame counter display must go out.
If it is necessary to estimate the state of the batteries, set the camera to mode “B”,
then press the self timer release button 10 Fig. 2, the frame counter display will show
the percentage of the charge of batteries remaining, for example, 80.
Fig. 6
5.1.2. Loading the Camera with Film
ATTENTION! If the following steps are not performed in the correct order, your camera may
not function properly.
Load the camera with film in the following sequence:
– open rear cover 14, after having pressed the back cover unlock button 26;
– put a film cassette into cassette chamber 11;
– extend the film leader from the cassette approximately to the middle of the take up spool 15 so
that the sprocket teeth engage the film perforation hole. The film must lie between the film guides
without misalignment;
– shut back cover 14;
– set the operating mode switch to “250”;
– turn on the camera;
– press the shutter release 4 Fig. 2 fully and do not release it before the film leader is
completly loaded (approximately two sequences), loading will be completed
automatically, and the frame counter show “1” – the frame number.
If the film did not automatically load (electric motor continues run, but after the release of shutter
release button the frame counter continues to show the symbol “– 0”, open back cover 14, and check
for correct installation of the film cassette and arrangement of film in the camera;
– the selection of film speed from 50 to 3200 GOST is made automatically with the installation of a
film cassette with the code “DX”.
–5–
ZENIT KM
User manual, 2003 year
Position of the film leader
the sprocket teeth engaging the film perforation
hole.
Fig. 7
5.2. Camera Exposure Modes
5.2.1. Automatic mode of exposure control
Remove the cover from the camera lens. Set the camera to mode “A”. In this mode shutter speed is
controlled automatically depending on the brightness of the subject, and the values of diaphragm and
photosensitivity of film. This mode excludes exposure errors due to the inexperience of the operator.
Guide the camera through the eyepiece of viewfinder to the subject. Turn on the
camera. If expected shutter speed is between 1/30 and 16 s, the green lightemitting diode flashed in the viewfinder: the use of a tripod is recommended (Fig.
A).
A
If the expected shutter speed is between 1/30 and 1/2000 s – average lightemitting diode shines continuously: it is possible to use the camera hand held (Fig.
B).
Continuous glow or flashing of the green light-emitting diode indicates favorable
conditions for photographing.
The flashing of the upper red light-emitting diode with the continuously
luminous green indicates excess light (Fig. C).
You can photograph, but the quality of photographs can be unsatisfactory.
In this case to achieve normal exposure it is necessary either to select a larger
diaphragm number, to use a neutral light filter, or subsequently for such
conditions to use a film of lower photosensitivity.
The flashing of the lower red light-emitting diode with the blinking green
indicates insufficient light (Fig. D).
You can photograph, but the quality of photographs can be unsatisfactory.
In this case it is necessary either to select a smaller diaphragm number or
subsequently for such conditions to use a film of larger photosensitivity.
B
C
D
The camera is provided with a function to memorize exposure conditions of an object. This makes it
possible to make a “local” light-measurement of a small part of your subject, and use this setting for
the entire photo. Use as follows:
– Bring the camera close to that portion of the subject in such a way that it would be located in the
center of viewfinder and would occupy approximately 60% or more than the field of the viewfinder;
– Slightly press on the shutter release button (one flick) and, holding it in this position, arrange your
subject;
– Refocus the lens press the shutter release button fully to take the picture.
This function of camera makes it possible to photograph against the sun, on snow and so forth, etc..
5.2.2. Semi-automatic mode of exposure control
Semiautomatic mode makes possible the operator to select the combination of shutter speed and
diaphragm and to estimate the error of exposure with the selected combination. This mode provides
great possibilities to the qualified operator.
–6–
ZENIT KM
User manual, 2003 year
Direct the camera through the eyepiece of viewfinder to thesubject. Turn on the
camera. If the combination of the diaphragm, shutter speed and photosensitivity of
film provides a correct exposure, green light-emitting diode continuously shines or
blinks.
If the difference between that manual and calculated exposure exceeds one exposure number,
lower red light-emitting diode will shine, informing operator of an exposure error.
The flashing of the upper red light-emitting diode with the continuously
luminous green indicates excess light for this combination of diaphragm, shutter
speed and photosensitivity of film.
The flashing of the lower red light-emitting diode with the blinking green
indicates insufficient light for this combination of diaphragm, shutter speed and
photosensitivity of film.
5.2.3. Mode “B”
This mode is selected by the mode selection switch 5. During photographing in mode “B” the
shutter is opened as long as the shutter release button 4 is pressed. With operation in mode “B” of
camera, as tripod should be used.
5.3. Use of the Diaphragm
The value of the lens aperture is established against the index by turning the aperture setting ring
17. In this case the diaphragm of the lens does not change, but the value to which the diaphragm will
close during shooting is determined.
5.4. Focusing
The camera viewfinder has a composite focusing device, which consists of focusing wedges 29,
microprism collar 30 and a gound glass collar 28. Focusing should be done at all shooting distances
including ∞.
Guide the camera through the eyepiece of the viewfinder to the subject. Turn the lens focusing ring
until the subject is sharply focused. You can use either the ground glass collar 28 or microprism collar
30, or the combination of the upper and lower parts of the image in focusing wedges 29 (combination
of upper and lower parts corresponds to maximum sharpness).
One should remember that the focusing wedges and the microprism collar, which provide the best
possible focusing, are of no use with interchangable lenses having aperture values greater than 4. In
these cases, and also for micro- and macrophotography, focusing should be done on the ground class
collar.
The index, designated by Latin letter “R”, is used when photographing with infra red film. In such
cases focus the image and introduce a correction by bringing the distance figure you have obtained
opposite the index mark “R”.
After focusing, it is possible, using scales 18 and 19, to determine distance from the film to the front
and rear boundaries of the sharply focused area (depth of field). On scale 19 against two identical
numbers of scale 18, corresponding to the aperture that you are going to use, will be two sests of
–7–
ZENIT KM
User manual, 2003 year
figures, indicating the distance range within which objects will be focused on the film. For example,
lens”MC Zenitar-.K-2” is focused up to the distance of 3 m, and the value of the diaphragm, with
which the survey will be produced, it is equal to “11”. In this case on scale 19 against two numbers
“11” of scale 18 the image will be focused from 1,5 to ∞.
5.5. Photographing
To obtaining a sharp image, the camera must be held motionless, by smoothly pressing the shutter
release button. To prevent movement of the camera, it is recommended to press the left elbow against
the body for horizontal pictures, and for vertical pictures – the right elbow.
Turn on the camera. The frame number will light up in the frame counter.
Having prepared the camera for picture taking, make certain of correct focusing and framing, take
the picture by smoothly pressing the shutter release fully.
The camera provides three kinds of shooting:
1. Time lapse shooting
Smoothly press fully and then let go of the shutter release button:
– The shutter will open and then close;
– The film will advance one frame;
– The shutter will reset;
– The frame counter will advance by one number – the photographic cycle is complete.
The cycle will be repeated with the repeated pressure of the shutter release button.
2. Series shooting with a frequency of 2 frames/s with shutter speeds from 1/30 to 1/2000 s
Smoothly press the shutter release button fully, and hold it in this position.
The camera will work continuously for several cycles.
The quantity of photographs will correspond to the time of the retention of the shutter release
button. The recommended series is not more than 8 frames. It is recommended to wait not less than 10
minutes between series. Ignoring these recommendations sharply reduces the life of the batteries!
3. Photographing with the self timer
Photographing with the self timer it is recommended to mount the camera on a tripod, then:
– Compose the image;
– Focus the camera;
– Select the correct exposure in accordance with the selected subject, the photographing in mode
“A” you must install the eyepiece cover of the viewfinder, having previously removed the eye piece
cover 13 Fig. 3;
– Press the self timer release button 10 Fig. 2 and take your planned place before the lens. The
countdown shutter release begins with the pressure on the self timer release button:
– The shutter release indicator begins to flash 3 Fig. 1 and the frame counter for appromimately 15
seconds.;
– The approach of the shutter release is determined by an increase in the frequency of flashing of
the shutter release indicator and frame counter during the final two 2 seconds;
– Ater which the shutter operates, the film advances one frame and the shutter is reset;
– The frame counter will advance by one number.
If the self timer release button is pressed by mistake, to end the automatic release repeatedly press
on the same button.
5.6. Unloading the Camera
When the end of film in the cassette is reached, the camera automatically stops
advancing frames, and the blinking number of the last frame taken is displayed in the
frame counter. This it signals that the film needs to be rewound (rewind of film into
the cassette). To rewind the film, press and do not release the film rewind button
Fig. 2 until the film is completely rwound into the cassette (the camera rewind motor
stops running).
–8–
ZENIT KM
User manual, 2003 year
During the rewind process, the frame counter displays a running “snake”,
and when rewinding is complete (motor turns off) the frame counter display shows the
symbol “o _”.
Release the film rewind button , and the frame counter display shows the symbol
“– O”.
Press the back cover unlock button 26 Fig. 5, open the back cover, and take out the film cassette
from the cassette chamber 11. The Camera will allow you to rewind the film on any frame (not
necessarily on the very last fame). To do this it is necessary to press the film rewind button on any
frame and to perform all steps above.
If for some reason film does not wind into the cassette (broken film, film is wedged
in the cassette, etc.), the frame counter display shows the blinking symbol “_o”.
In this case it is necessary to open the camera back cover in complete darkness,
take out the cassette, remove the film from take up spool, and wind the film into the
cassette.
5.7. Photographing with Flash
Fig. 8 The camera shutter is synchronized to work with an electronic flash bulb with the
synchronization of type X. The design of the camera provides a cableless connection with the flash.
The camera is provided with a hot shoe for this purpose clip 9 (Fig. 2).
Flash units with the low-voltage or high-voltage ignition cicuits can be
used.
To photograph with flash perform the following:
– remove the hot shoe cover 8 from the hot shoe 9 (Fig. 2) and install the
flash unit in the hot shoe clip Fig. 8;
– set the shutter speed to 1/125 sec;
– set the aperture in accordance with the recommendations of the flash
instructions;
– turn on the camera, focus the camera, wait the flash to charge, and take
the picture.
Fig. 8
5.8. Changing the Lens
To remove the lens from the camera it is necessary to press the bayonet lock key 2 Fig. 1, turn the
lens counter clockwise to disconnect it from the camera. To install a lens onto the camera line up the
red dots on the bayonet ring on the lens 21 Fig. 4 and the bayonet ring on the camera, turn the lens
clockwise as far as it will go. The camera uses interchangable lenses with a bayonet type mount
(mounting “K”).
The camera may use domestic lenses with the index “K”, for example: “MC Zenitar-K 2,8/16”,
“MC Variozenitar-K 2,8-3,5/25-45”, “MC APO Telezenitar-K 4,5/300” and others.
5.9. Information Displayed on the Frame Counter
– film rewinding is complete (information shows with the film rewind button is
pressed)
– film rewinding in progress
–9–
ZENIT KM
User manual, 2003 year
– film rewind error occurred (flashing symbol)
– low battery voltage, replace batteries (flashing symbol)
– the camera is turned on but no film is loaded
– film frame number (for example)
– The end of film is reached, perform film rewinding (36 – quantity of frames
exposed)
– the mode of automatic release
– the percentage of the battery charge remaining (displayed when checking batteries
state) – decimal point is excluded
6. Error Messages, Reasons, Possible Solution(s)
Error message
Reason
After turning on the camera the
The batteries were
frame counter display shows the discharged or were
symbol “low battery voltage”
established to be dead.
Camera does not work.
The electric motor starts after the The batteries were
pressing the shutter release button discharged or were
fully, but it stops, without having established to be dead.
completed advancing the film. The
frame counter display shows the
symbol “low battery voltage”.
After installing new batteries, the Battery polarity is not
camera will not turn on nor show correct.
anything in the frame counter
display.
Or after opening and shutting the The replacement of
cover of the battery section the
batteries or the opening
information on the frame counter of the battery section
display changes after replaceming cover was done with the
the batteries.
camera switched on (the
frame counter display
was lit).
After completing film rewinding, Dirt has gotten into the
the frame counter does not return contacts (film presence
to “0”.
sensor) of 27 Fig. 7
– 10 –
Possible solutions
Wait for the camera to turn off
automaticaly, install new recommended
batteries (see section 2), turn on camera
and take pictures.
Wait for the camera to turn off
automaticaly, install new recommended
batteries, turn on the include camera. To
complete the interrupted cycle, press the
shutter release release button fully, release
it, then continue photography.
You will establish battery polarity in
accordance with the requirements of
section 5.1.1.
The recommendations of section 5.1.1
were ignored. Restoring the information
on the frame counter display is
impossible. Replace the batteries or open
the battery section cover only with the
camera turned off (the frame counter
display is not lit.
Carefully, using a thin object. wipe clean
the spring-opposed contact plate and wipe
the contiguous surfaces of mobile and
ZENIT KM
Photographs are blurry.
User manual, 2003 year
Camera moved with
pressure on the shutter
release button
Photograph was taken
hand held when the
flashing green light–
emitting diode was
present in the
viewfinder.
fixed contacts with cotton, moistened in
alcohol. Pay careful attention that nap
from the cotton does not remain on the
contact surfaces.
Press the shutter release button smoothly
in accordance with the recommendations
of section 5.5.
Focus attention on the blinking green
light-emitting diode in the viewfinder and
observe the recommendation of section
5.2.1.
http://eugigufo.net/en/download/photovideo/
– 11 –