1
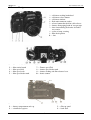
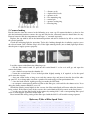
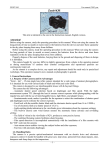
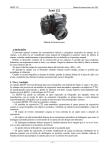
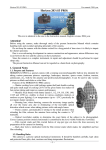
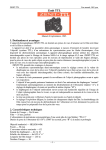
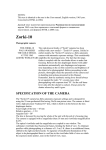
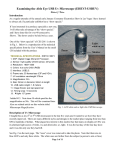
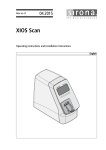
ZENIT-122
User manual, 1992 year
Zenit 122
This text is identical to the one in the Instruction Manual, English version, 1992 year.
1. Purpose and advantages
ZENIT-122 is a 35-mm single lens reflex camera intended for taking various amateur pictures on
black-and-white and color films. It can be used for special kinds of photography as well, such as
copying, taking close-up pictures of small-size objects at short distances (ultra-close-up photography),
taking pictures with the help of a microscope (photomicrography), etc.
The camera accepts interchangeable lenses with M42x1 screw fittings and mechanical back focal
distance of 45,5 mm.
The following features are remarkable with the camera:
• semi-automatic exposure meter operating through the lens (TTL system) provides for correct
exposure setting when taking pictures with the standard lens as well as with interchangeable
lenses, light filters, supplementary lenses, extension tubes;
• light-emitting diodes in the viewfinder, indicating correct exposure setting, can be clearly seen
both with the diaphragm fully open and stopped down;
• instant return mirror ensures continuous viewing of a subject before ;and after exposure;
• high speed lens is provided with a pre-set diaphragm mechanism which automatically closes
the diaphragm down for the moment of shutter operation;
• fully open diaphragm ensures maximum brightness of the image in the view-finder which is
very important for viewing and focusing;
• composite focusing device provides excellent image sharpness in various conditions of
shooting;
• speedy exposure setting, simplified film loading procedure and frame counter automatically resetting to “0” upon pressing the film rewind button reduce the time required for preparing the
camera for picture taking;
• built-in self-timer enables you to take picture of yourselves among your friends or to make a
self-portrait;
• secret lock of the back door interlocked with the film rewind knob provides for reliable locking
of the back door and convenient unloading of the camera;
• flash unit connector socket and hot-shoe enable to use flash units both with cable and cableless
connection;
• shutter disengaging bush of stay-put type simplifies the film rewind procedure;
• film-checking pocket on the camera body contains characteristics information of the film the
camera is loaded with.
Before using the camera, make thorough study of the present Description. In so doing bear in mind
that the present Description can not be regarded as a handbook on photography.
Due to ever-advancing development in camera construction, minor differences may occur between
the text and your camera.
2. Handling Rules
The camera is a precise optical-mechanical instrument. It should be handled carefully, kept clean and
protected from jolts, dust, moisture, and sharp temperature fluctuations.
–1–
ZENIT-122
User manual, 1992 year
Do not remove the camera from its case the moment it is brought indoors from cold to avoid
sweating of its parts, especially the optical ones.
Do not touch the surfaces of the optical parts with fingers since it may damage their coatings. Clean
the optical coated lens surfaces with a clean soft cloth or cotton wool wad slightly moistened with
rectified alcohol or ether. The surfaces of the mirror and the focusing device may be cleaned only if
absolutely necessary with a dry soft brush but in no case with humid cleaning agents.
Keep the camera closed in its case with the cap put on the lens.
Do not remove the lens from the camera without need to prevent dirt and dust from getting both
onto the surfaces of the lens optical parts and into the camera itself.
If you don’t use your camera for some period of time (a month and more) remove the batteries from
the camera. Keep the batteries separately in places inaccessible for children.
Load and unload your camera either indoors or in shade protecting it against direct sun light and
bright artificial light.
Always cock the shutter as far as it will go to avoid blank exposures.
Do not keep the camera with the shutter cocked for a long period of time since it is likely to impair
the shutter operation.
Do not try to rotate the shutter speed dial with the index moving along its short section from
“500” to “B”. Do not rotate shutter speed dial when self-timer is running and when setting the
release button in “T” position. When taking pictures in frosty weather, keep the camera under your
street-clothes but not. in the open air and take it out only for the moment of picture taking.
Since the camera is a complex instrument, its repair and adjustment should be performed in repair
shops only.
3. Specifications
Frame size, mm, — 24x36
Film used — 35 mm, perforated
Length of film in cassette, m — 1,65
Number of frames — 36 Shutter speeds, s — from 1/30 to 1/500, “В” (by hand) and long exposure
One of the lenses:
HELIOS-44M-4MC
MC HELIOS-44M-4
HELIOS-44M-5
MC HELIOS-44M-5
HELIOS-44M-6
MC HELIOS-44M-7
58
f/2
from 2 to 16
from 0,5 to ∞
HELIOS-77M-4
Focal length, mm —
52
Maximum relative aperture —
f/1,8
Aperture scale —
from 1,8 to 16
Distance scale, m —
from 0,45 to ∞
Lens fitting — M42x1
Light filter fitting — M52x0,75
Sun shade fitting, mm — Ø54
Viewfinder field of view, mm — 20x28
Eyepiece magnification — 4.3x
Flange/film distance, mm — 45,5
Tripod bush thread — 1/4ʺ
Overall dimensions (without case), mm — 142x97x99
Power supply voltage, V — 3 (2x1,5)
Power supply — from 2 batteries of Mallory D 386, Seiko SB-B8, СЦ-32, МЦ0.105 types.
Mass, kg — 0,82
Certificates of Authorship:
No 102683, No 150360; No 153652; No 178682; No 366447; No 476534; No 1015330; No 1247817.
–2–
ZENIT-122
User manual, 1992 year
4. Camera Design
1 — self-timer cocking handwheel
2 — self-timer release button
3 — self-timer window
4 — flash unit connector socket
5 — release button threaded for cable release
6 — shutter disengaging knob of stay-put type
7 — shoe for mounting flash units and other
accessories
8 — eyelet of strap securing
9 — film check pocket
10 — lens
11 — film rewind knob
12 — film rewind crank
13 — film speed dial
14 — film speed scale
15 — film speed index mark
16 — protective strip
17 — shutter speed dial
18 — shutter speed index mark
19 — shutter cocking and film advance lever
20 — frame counter
21 — cassette chamber
22 — battery compartment end cap
23 — viewfinder eyepiece
24 — sprocket teeth
25 — take-up spool
26 — back door
–3–
ZENIT-122
User manual, 1992 year
27 — distance scale
28 — depth-of-field scale
29 — aperture scale
30 — lens mounting ring
31 — control pin
32 — aperture setting ring
33 — focusing ring
5. Camera loading
Put the batteries into the camera in the following way: turn cap 22 counterclockwise so that its slot
take the horizontal position, remove the cap and take out the exhausted batteries should there be any.
Put new batteries into the compartment with signs “+” outward (upwards).
Replace the cap with its slot in the horizontal position and turn it clockwise by 90° to set the slot in
the vertical position.
Check the indicating light for operation. To do this, looking through the viewfinder eyepiece press
the release button 5 till a definite stop is felt. If the light-emitting diodes (one or both) light up it means
that the power supply operates properly.
Load the camera with film in the following way:
— lift the film rewind crank 12, pull out the rewind knob 11 as far as it will go, and open the
camera back door;
— put a loaded cassette into the chamber 21;
— return the rewind knob 11 to a locked position slightly turning it, if required, to let the spool
guide enter the cassette;
— draw out a film leader as long as to reach the camera edge and insert it into the slot of the takeup spool 25; in so doing make sure that a sprocket 24 tooth engage a film perforation hole;
— close the back door 26, tightly pressing it to make the lock latch;
— to transport a nonexposed portion of film to the film gate, cock and fire the shutter twice. In so
doing the frame counter should be set at “0”.
Should the film be wound tightly in the cassette, the film rewind knob will rotate when the shutter is
being cocked. If the film is loose in the cassette, the rewind knob will fail to rotate at the first frames;
— set the speed of the film loaded in the camera by turning dial 13 till a corresponding film speed
value is click-stopped against the index mark 15.
Bear in mind that wrong setting of the film speed with the dial 13 will result in wrong exposure.
Reference Table of Film Speed Units
Designation on film speed scale
16 . 25 32 . 50 64 . 100 125 . 200 250 . 400 500 .
GOST-ISO 16 20 25 32 40 50 64 80 100 125 160 200 250 320 400 500 640
DIN
13 14 15 16 17 18 19 20 21 22 23 24 25 26 27 28 29
–4–
ZENIT-122
User manual, 1992 year
6. Shutter Speed Setting
Turn the shutter speed dial 17 to bring a selected shutter speed opposite to the index mark 18 on the
camera top plate. In so doing the dial is click-stopped. Figures on the shutter speed dial show shutter
speeds in corresponding fractions of a second and “B” indicates a hand-controlled shutter speed.
Shutter speeds can be set with the shutter both cocked and released. When taking pictures at “B” the
shutter remains open for as long as the release button 5 is pressed down. To obtain a long exposure
turn the depressed release button counter-clockwise as far as it will go (“T” position). The exposure
over, return the release button 5 to its normal (middle) position and release it. This will result in
closing the shutter.
To take a picture at “B” or long exposures one is recommended to use a cable release which can be
screwed into the release button thread. In so doing the camera should be mounted on a tripod.
7. Stop Setting
Set a selected aperture against the index mark by turning the aperture setting ring 32.
When taking pictures with a self-timer, the procedure of stop setting is somewhat different as
described in the section “Operating the Self-Timer“.
8. Focusing
The camera viewfinder is provided with a composite focusing device consisting of microprism collar
and ground glass collar or focusing wedges, microprism collar and ground glass collar. Before
shooting remove the lens cap. Looking through the viewfinder turn the lens focusing ring to obtain
sharp image of the object within the ground glass and microprism collars and for cameras with
focusing wedges to match the upper and lower parts of the split image. The best sharpness is obtained
when focusing is done at full aperture.
It should be noted that the focusing wedges and microprism collar, ensuring the best possible
focusing, are of no use when low speed interchangeable lenses are used and focusing is done at
apertures more than 4. In these cases as well as in photomicrography and macrophotography focusing
should be done on the ground glass collar.
Focusing can be done as well without looking in the viewfinder. To do this turn the focusing ring
and, making use of distance scale 27, set the distance from the film plane marked O on the camera top
plate to the subject being shot against the larger index mark.
The smaller index mark with letter “R” is used for shooting on infra-red films. In such a case focus
the image and introduce a correction by bringing the distance figure you have obtained opposite to the
index mark “R”.
Focusing over, you can determine distances from the film plane to the near and far limits of the
depth of field making use of scales 27 and 28. On scale 27 against two identical figures of scale 28
corresponding to the aperture with which you are going to take pictures there will be set two figures,
indicating the distance range within which all the subjects will be sharp on film. For example, the lens
is focused for 3 m and the aperture to be used is that of 8. In such a case on scale 27 against two
figures 8 of scale 28 you can read that the image will be sharp within the distance range from 2,3 to
4,5 m.
Approximate depth-of-field limits can be determined visually as well by pressing the release button
till a definite stop is felt with the aperture value set beforehand. On the ground glass collar of the
viewfinder you will see what subjects will be sharp on film.
–5–
ZENIT-122
User manual, 1992 year
9. Exposube Setting with the Help of Exposure Meter
The camera semi-automatic exposure meter measures the light passing through the lens (TTL system).
As a result, making use of various combinations of aperture and shutter speed values, you can set the
exposure depending upon the brightness of can object and the speed of film being used with a high
degree of accuracy. It remains true as well when interchangeable lenses, light filters, supplementary
lenses and extension tubes are used. For more accurate exposure determination in conditions of poor
brightness of the subject to be photographed the lens cap should be removed a bit earlier, before
shooting.
Looking through the viewfinder eyepiece in such a way that the whole its frame could be clearly
seen, press the release button 4 till a definite stop is felt but not till the shutter “firing”, should it be
cocked, and hold the button in this position. On the right-hand side of the viewfinder light-emitting
diodes can be seen.
There are two modifications of cameras: one with two red and the other one green and two red
diodes.
9.1. Exposure setting in cameras with two-diode indication
Lighting of the upper diode indicates overexposure and of the lower one — underexposure. Turn
the aperture setting ring 32 and the shutter speed dial 17 till the moment when both of the diodes are
lighting. It indicates the best possible combination of the shutter speed and aperture providing for
correct exposure. However, if you fail to obtain simultaneous blinking of both of the diodes, and
changing the shutter speed and aperture values over between the two neighbouring ones results in
switching the lighting from one diode to the other, you may select one of these values. In such a case
the exposure will be still acceptably correct.
9.2. Exposure setting in cameras with three-diode indication
Lighting of the upper (red) diode indicates over-exposure and of the lower (red) one — underexposure. Turn the aperture setting ring 32 and shutter speed dial 17 till the moment when the middle
(green) diode is lighting continuously. It indicates the best possible combination of the shutter speed
and aperture providing for correct exposure. However, if you fail to obtain continuous blinking of the
middle (green) diode, and changing the shutter speed and aperture values over between the two
neighbouring ones results in switching the lighting from one red diode to the other red one, you may
select one of these values. In such a case the exposure will be still acceptably correct.
10. Picture Taking
Having prepared the camera for picture taking, cock the shutter, make sure of correct focusing,
framing and exposure setting and smoothly press the release button to take a picture.
BEAR IN MIND that sharp pressure on the release button results in camera shaking at the moment
of exposure and thus in blurring of the picture.
When taking pictures see to it that index marks on the release button and the camera top plate
(between “T” and “V”) should be lined up.
To take a picture with long exposure mount the camera on a tripod, set the shutter speed dial 17 at
“B”, slightly press release button 5 (the shutter should be set beforehand in the “ready to fire” position)
and turn it counter-clockwise as far as it will go (“T” position).
The exposure over, return the button to its normal (middle) position and release it. As a result the
shutter will close.
11. Camera Unloading
When the exposure counter shows figure 36, rewind the film into the cassette. To do this:
— release the shutter, pressing release button 5;
— press bush 6 downwards as far as it will go;
–6–
ZENIT-122
User manual, 1992 year
— flip open crank 12 and rotate it in the arrow direction until the film leaves the take-up spool. Try
and rotate the crank smoothly, without jerks, and not too fast to avoid traces of static electricity on
film;
— pull film rewind knob 11 all the way out, open the back door and remove the cassette;
— turn the cocking lever 19 and, holding the sprocket teeth 24 with your finger, make sure that it is
engaged.
Do not try to take more than 36 shots. However if it has happened and the film, fixed in the cassette,
prevents full shutter cocking, unload the camera in the following way:
— press button 6 and hold it down rewinding the film into the cassette;
— remove the cassette;
— cock and fire the shutter;
— press button 6 to reset the frame counter to “0”.
12. Operating the self-timer
To use self-timer mount the camera on a tripod, then do the following:
— focus the image;
— press the release button 5 till a definite stop is felt and turn it clockwise (“V” position). This will
enable you to set the aperture manually since the diaphragm does not operate automatically when the
self-timer is used;
— set the aperture and the shutter speed;
— cock the shutter;
— wind the self-timer by turning lever 1 downwards as far as it will go in the direction of the
camera top plate. Red light in the self-timer window indicates that the self-timer mechanism is not
cocked, green light indicates that it is cocked;
— press the self-timer release button 2 and take your place in front of the lens.
The shutter will operate no sooner than in 7 seconds after pressing the button — self-timer
operation over, return button 5 to its home position.
13. Taking flash pictures
The camera shutter is synchronized for use with electronic flashes. To
connect a flash unit with the camera, the latter is fitted with socket 4 on the
front wall of the camera.
The camera design provides a well for cableless connection of flash units.
For this aim it is fitted with hot-shoe 7.
Before mounting a flash unit on the camera remove protective strip 16
from shoe 7.
The shutter speed of 1/30 s only can be used for flash photography.
The aperture is selected in accordance with the instructions given in the
Instruction Manual on a flash unit being used.
14. Interchangeable lenses and close-up shooting
The camera accepts interchangeable lenses provided with M42x1 mounting thread, and mechanical
back focal distance of 45.5 mm.
The lenses with index mark “MC” are provided with multicoating
of optical surfaces that ensures better protection against reflexes —
(halos, glares, and light spots) when taking pictures of objects with
sharply heterogeneous illumination against light as well as improves
color rendition.
If an interchangeable lens has no automatic diaphragm, the
diaphragm can be handled manually. If a picture is taken with a longfocus lens, the left-hand and right-hand edges of the frame will be
slightly cut off.
–7–
ZENIT-122
User manual, 1992 year
With the help of a special stand the camera can be used for making copies of drawings,
manuscripts, photographs. To do this use should be made of extension tubes by setting them between
the camera body and the lens. To obtain the magnification you want either one tube or a combination
of some tubes can be used.
Extension tubes provided with a control pin should be used with lenses where no diaphragm manual
mode switch is provided (“HELIOS-44M-4” for example).
Extension tubes without control pins should be used with the lenses in which the aperture is set
manually (the diaphragm mode selector switch should be set to “M”.
15. Interchangeable Lenses
Lens name
Mir-20M
MC Mir-20M
Mir-10A
MC Mir-24M
MC Industar-61
Helios-40-2
Jupiter-9
MC Jupiter-9
Tair-11A
Jupiter-37°
MC Jupiter-37A
MC Granit-11M
Jupiter-21M
3M-6A
(right: ZM-6A)
MC MTO-11 CA
focal length in
mm
relative
aperture
angle of field of
view
minimum focusing distance in
m
20
f/3.5
96°
0.18
28
35
50
85
f/3
f/2
f/2.8
f/1.5
75°
66°
45°
28°
0.20
0.30
0.30
0.80
85
f/2
28°
0.80
135
f/2.8
18°
1.20
135
1/3.5
l8°
1.20
80—200
200
f/4.5
f/4
30°—12°
12°
1.50
1.80
500
f/6.3
5°
6.0
1000
f/10
2°30’
8.0
http://eugigufo.net/en/download/photovideo/
–8–