1
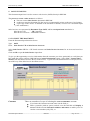
The University of Hull
DREAM USER MANUAL
THE UNIVERSITY
OF HULL
DREAM USER MANUAL
Manual 3
Document Input in DREAM
_____________________________________________________________________________________________________________
Document Input in Dream
Manual 3
Page 1 of 27
The University of Hull
DREAM USER MANUAL
CONTENTS
Section
1
2
3
4
5
6
7
8
8.1
8.2
8.3
Description
Document Input Screens
Input Forms
Transfer Journal
Research Journal
Sales Invoicing
Sales Credit Notes
Accruals & Prepayments
Inter-Departmental / Faculty Journal
Originator
Recipient
Viewing Inter-Faculty Documents
Appendix I - Amendments to Manual
Appendix II - Sales Credit Note Request Form
Page
3
3-4
5-7
8-11
12-14
15
16-17
18
18-21
21-25
25
26
27
_____________________________________________________________________________________________________________
Document Input in Dream
Manual 3
Page 2 of 27
The University of Hull
DREAM USER MANUAL
1. DOCUMENT INPUT SCREENS
To enter data into DREAM you must find the appropriate document input form (UDI) to enter it on. Each UDI
is attached to a Document Type within DREAM. The full list of Document Types is available by running the
Documents Query in Sorsis for Dream. Authorised DREAM users outside Central or Faculty Finance Offices
have access to a limited number of Document Types for input purposes. These are:
JRNL
XFAC
SOIN
Transfer Journal
Inter-Faculty Journals
Sales Order Invoice
How to use each of these Document Types, and the Input Forms that go with them, is covered in this
Manual.
2. INPUT FORMS
2.1 SELECTING AN INPUT FORM
There are several different ways of selecting the required form.
click on the pencil icon on the Toolbar
;
click on OPTIONS from the Menu Bar along the top of the screen then click DOCUMENT INPUT;
press CONTROL J.
Any of these will display the Document Input selection screen shown below. Which one you use is entirely
your choice, although you will find that using the pencil icon is the most popular.
The date and period appear automatically.
The TRANSACTION
TYPE should always be
set to ACTUAL
Select the TYPE required
by pressing the ?
Then select the FORM
you require; options
available will be dependent on the document type you have
chosen. Press OK. If
there is only one form
available, this area will
be greyed out.
_____________________________________________________________________________________________________________
Document Input in Dream
Manual 3
Page 3 of 27
The University of Hull
DREAM USER MANUAL
2.2 INPUT FORMS – COMMON ELEMENTS
There are a number of elements that are common to all input screens.
At the top left there is the University of Hull logo with the name of the input screen.
At the top right you will see the date, the period and year the document will post to, the document type and the document number (the system will sequentially number the document types).
DO NOT RESIZE THE INPUT SCREENS – THESE HAVE BEEN DESIGNED TO BE
THE CORRECT SIZE FOR THE TYPE OF INPUT INVOLVED
If you are entering data or narrative into an input screen which you want to be exactly the same as
is in the field immediately above it, enter a full stop (.) then tab over and the line above will be
copied.
To post a document press F9.
You cannot tab out of a table. If you need to move outside the table once you have entered it use
the mouse.
On each input screen there is an Authorised By field. You should enter the username of the individual who is the authorised signatory on the codes you are using.
When in a table use tab to move forward through the fields and shift-tab to move backwards
through the fields. If the cursor is on a mandatory field you must enter a value or text in that
field before the cursor will allow you to move.
If you need to delete a row in a table, or have unintentionally tabbed onto a new row, click on
Post, on the menu bar and select delete row.
Where possible use the tab key to navigate the screen.
All input screens have the system coding rules embedded and will not post if there is a coding error
Any error messages will appear in the bottom left corner of the screen
To review the document you have recently input press File/Recent Documents. This will list the
last four documents you have input. Select the document you require.
If you have input and posted a document and realise that it is incorrect do not try and correct it,
contact the Systems Office (Tel 6560/6860).
When more than one user is attempting to post the same document type at the same time, the
system may give you a message to say that your document number has already been used, and
has allocated you the next number. Click OK if this happens.
_____________________________________________________________________________________________________________
Document Input in Dream
Manual 3
Page 4 of 27
The University of Hull
3.
DREAM USER MANUAL
TRANSFER JOURNAL
This document input form is used for three purposes:
(i)
(ii)
(iii)
Entries within a department
Entries between departments where both parties have agreed the entry in both departments. This
will mean the originator must have access to post in the recipient department‟s books.
Entries by Central Finance
This form is not to be used for journals on Research Account 1‟s. Please see Section 4 Research Journals
From the Document Input Selection Screen
Type: JNRL
Form: JOURNAL
The following screen will be displayed:
Authorised by
Your cursor will be in this field when the screen opens. Press the Tab key on the
keyboard to bring up a drop-down list of the individuals who can authorise documents. This is the individual who is the authorised signatory on the nominal
/account.
The user name of the authoriser appears on all document reports and cannot be
removed. Please remember therefore to obtain authorisation before completing
the document.
Highlight the user authorising the document and click on Select, or highlight and
double click. The cursor will then move into the table.
Nominal
You can either type the Nominal code into the field or press Tab which will bring up
a list of the Nominals that you have access to. Either move the cursor down the table
until you reach the Nominal you want to select, or type in the first part of the nominal which will highlight the first Nominal beginning with the digits you have entered.
Once you have selected the Nominal you need, either double click or highlight and
click on Select.
Tab into the Account field.
_____________________________________________________________________________________________________________
Document Input in Dream
Manual 3
Page 5 of 27
The University of Hull
Account
DREAM USER MANUAL
You can either type the Account code into the field or press Tab which will bring up
a list of the Accounts that you have access to.
In addition on the List of Accounts box there is a search facility. You access this
by clicking on the
button which displays the following box
If you know that part or all of the title of the Account you can type it into the Title
and it will find all accounts which contain that title. If you are searching on a Creditor or Debtor Account you can also search on other master data such as address and
postcode.
The
buttons can be used to go to the next or last Account which con
tains the given criteria or to go back one or go back to the first Account.
If you click on the
button after you have input your search criteria you will see a
list of the Accounts with that Criteria. The example below shows all the Accounts
with the word Danish in the title
Once you have selected the Account you need, either double click on it, or highlight
and click on Select.
Tab - If an Account2 is required the cursor will stop in the Account2 field, if not the
cursor will move to the Description field.
If the coding rules are broken (see 02 Manual Coding Rules) then an N will appear
in the OK column and an error message will appear in the bottom of the form in red
to show what type of error has been made on that line. You will not be able to post
the document until the error or errors on each line have being corrected.
Description
Enter a meaningful description. Each has a maximum length of 30 Characters.
Tab into the Amount field.
Amount
Enter the debit amounts as positive numbers and credits as negatives.
_____________________________________________________________________________________________________________
Document Input in Dream
Manual 3
Page 6 of 27
The University of Hull
DREAM USER MANUAL
Tab into the „rest field‟. Tab again if this is not the last line of the journal.
Repeat the sequence for all lines in the journal. There is no limit to the number of lines you can enter on the
journal. You will see that as you select the Nominal, Account and Account2, the description of your selection
appears at the bottom left of the input screen. If you are entering multiple lines, the descriptions are for your
entries on the current line.
When the entry is complete, the Control Total Field should be „0.00‟. Press F9 to post. If the Control Total
Field is not „0.00‟ or if there are coding errors, the document will NOT post.
Having successfully completed the document, the entry now appears in the books. If you want to review the
postings made, select File-Recent Documents – this shows the last four documents you have posted.
Having selected the document from the Recent Document menu, clicking on your document reference number
will pull up a document report as below:
By pressing the right button on the mouse, you can pull up a list of the options available to you to customise the
Document Report. These options are set out in detail in Section 1 of the “Reporting in DREAM” Manual.
_____________________________________________________________________________________________________________
Document Input in Dream
Manual 3
Page 7 of 27
The University of Hull
4.
DREAM USER MANUAL
RESEARCH JOURNALS
This document input form is used for any journal entry that has postings to a Research Account 1. This
therefore covers all Accounts that have a Funding Source identifier (the first digit of the Account) of L (Research Support Fund), W (Research Investment Fund), X (TCS & KTP), Y (Research Grants) and Z
(Research Contracts).
This is a specific document input form to enable Post Award Finance to authorise all entries to Research Accounts.
4.1
CREATION OF THE JOURNAL – FACULTIES etc
From the Document Input Selection Screen
How you complete the Select Screen Field differs from that for the other journal input forms.
The originator posts this document input form to a REGISTER, rather than directly to the books, to enable the
Research Office to review the entry before posting to the books. For this purpose, a Register called
ARCH.REG has been created, into which all RNJL documents are posted by the originator.
The TRANSACTION
TYPE should always be
set to ACTUAL
Check radio button
set for Register
Type RJNL
Will default to
REG.ARCH
Click OK.
This will pull up the Research Journal Input Form
_____________________________________________________________________________________________________________
Document Input in Dream
Manual 3
Page 8 of 27
The University of Hull
DREAM USER MANUAL
You will note that on the input screen, instead of the current period and year, ARCH and REG are shown.
Authorised by
Your cursor will be in this field when the screen opens.
This screen now works the same as a normal Journal so just follow the instructions
as laid down in Section 3 Journal Transfer.
It is important to remember that documents are not posted to the books at this stage, although they can be
viewed in DREAM. You can review the postings through File – Recent Documents
Having selected the document from the Recent Document menu, clicking on your document reference number
will pull up a document report as below - you will see that the Period and Year posting reference is ARCH
REG.
By pressing the right button on the mouse, you can pull up a list of the options available to you to customise the
Document Report. These options are set out in detail in Section 1 of the “Reporting in DREAM” Manual. If
you add the User Fields to the Columns you want to see on the Document report, you will find that the name
of the Originator of the document appears in User Field 1. User Fields 2 and 3 are not used. The name of the
Originator appears in the User Field 1 even after the document has been authorised and posted by Post Award
Finance.
4.2
AUTHORISING THE JOURNAL (POST AWARD FINANCE ONLY)
To review or accept a Research Journal, click on the pencil icon as normal to generate the Document Input
Selection Screen [figure 1.] Choose Type RJNL using the „?‟ next to the box. The box “To Period” will have
defaulted to REG.ARCH.
Change the „Post To‟ button to “Books”.
Set the „From Period‟ using the „?‟ to “REG.ARCH”. The “To Period” will change to the current
posting period for Journals once the radio button is changed to “Books”.
Select RESEARCH JOURNAL (BOOKS) from the Form drop-down.
Press OK to proceed.
_____________________________________________________________________________________________________________
Document Input in Dream
Manual 3
Page 9 of 27
The University of Hull
DREAM USER MANUAL
The following screen will be displayed.
Highlight the
first line of the
document to be
reviewed
Click on OK
when you
have selected
a document
This lists the individual documents posted through RJNL currently in the REG.ARCH register awaiting clearance by Post Award Finance.
Having pressed OK to proceed, the following screen will be displayed. This displays the document that was
created by the Originator, the only change being that the Year and Period now show the current year and period
for Journals in the books.
Authorised by
Your cursor will be in this field when the screen opens. The member of staff in Post
Award Finance must authorise the journal and press F9 to post.
If an amendment is needed to the Research Account posting, the Post Award Finance can make the change; it is recommended that they notify the originator before
doing so. If the document is not to be posted at this stage, then press F4 key to clear
the form. The document will remain unchanged in the Register.
If the entry is not approved following conversations with the originator then the
original entry into the Register should be deleted. The originator should contact the
System Office (6560/6860) to delete the document.
Once the document has been posted using the F9 key, the registered document screen will re-appear. If another
document in the Register is to be reviewed, follow the selection process as described above, if not click Cancel.
_____________________________________________________________________________________________________________
Document Input in Dream
Manual 3
Page 10 of 27
The University of Hull
DREAM USER MANUAL
If you want to review the postings made, select File - Recent Documents and click on the document reference,
this will pull up a document report. The postings will now show the period & year the document has been
posted to, rather than REG.ARCH.
Right click anywhere in the body of the report to show the options to customise your report. These options are
set out in detail in Section 1 of the “Reporting in DREAM”. The authorisers of both the original charge and
the approval from the REO are shown as User Fields 1 and 2
_____________________________________________________________________________________________________________
Document Input in Dream
Manual 3
Page 11 of 27
The University of Hull
DREAM USER MANUAL
5. SALES INVOICING
This document input form is used to create a sales invoice (SOIN) directly in DREAM.
The process to create a sales invoice is as follows:
The user creates Sales Invoice document in DREAM
As the user posts the document (F9) the invoice is automatically printer on the user‟s local printer
A pdf copy of the invoice is attached to the document in Dream, accessed via a document report
(view attachments)
Sales Invoices are represented by Document Type SOIN, and has two input forms attached to it:
Sales Invoice UK
– UK Customers
Sales Invoice Overseas – Overseas Customers
5.1 TO INPUT THE DOCUMENT
From the Document Input Selection Screen
Type: SOIN
Form: Sales Invoice UK or Sales Invoice Overseas
Select Sales Invoice UK for a UK based customer and Sales Invoice Overseas for an Overseas-based customer.
Click on OK to open the Sales Invoice input form.
To give you the opportunity to review information about the customer you select, particularly to verify that you
have made the correct selection, DREAM has a Contact Information feature. Select View - Contact Information (from the Menu bar across the top of the screen). A green Account Information box will open, move it
out of the way of the Sales Invoice document screen
Customer
There are a number of ways of selecting the correct customer account:
If you know the Customer account enter it in the field; or
Enter a postcode (with no spaces) and tab over the field this will display a
screen with the relevant Customer numbers and names to enable you to locate the correct number (only UK); or
_____________________________________________________________________________________________________________
Document Input in Dream
Manual 3
Page 12 of 27
The University of Hull
DREAM USER MANUAL
Tab over the field, this will display a screen with all the Customer numbers
and names to enable you to locate the correct number. This screen also has
the search facility which is detailed on pages 5-6 (above)
Choose the customer you require, and click on Select. When you have selected an account the Contact Information box will tell you the Customers Name and Details
so that you can ensure you
have made the correct selection.
If the Customer does not have an account contact Anne Coates in Finance by email or send her a form
(found on the Intranet) to set up a new one. You cannot proceed with creating the Sales Order until the customer has been created in the master file.
Customer Contact
The data held in the master data table for the Customer Pre-name will appear
and will be printed as the top line of the address on the invoice. There is a
maximum of 30 characters for the Customer Contact field.
If nothing appears in the Customer Contact field then there is no data held as
the Pre-name.
If the Prename is not the name you want the invoice to be sent to overtype
the data in the Customer Contact field with the name you wish the invoice to be
sent to
UoH Contact
Your name will default into it. Amend as required and add a contact number, this will
appear on the invoice as a contact name and telephone number. There is a maximum
field length of 30 characters for the name and address.
ADDITIONAL FIELDS ON OVERSEAS SALES INVOICES
When raising an Overseas Sales Invoice (NewSalesDoc(For)) there is are 2 additional fields:
Currency
This field cannot be changed but shows the currency the account is set up on.
If the currency is anything other than GBP (£) the value you enter on the Sales
Invoice Request screen must be entered in the currency of the customer, as
shown in the Currency box, (i.e. If you enter 90 on a customer set up in USD,
an invoice will be raised for $90 not £90).
If you have an invoice to raise where you know the £ value but need to enter in a currency contact Dave Crooks, Accounting Services (5323) who will give you the current currency conversion.
Type of Supply:
Tab over the field and select whether you are invoicing for goods or services.
The cursor will then move into the table.
TABLE ON BOTH FORMS
Nominal
Either type the Nominal code into the field or press tab to bring up a drop-down list of
the nominals that you have access to. Once you have selected the Nominal you need,
either double click on it, or highlight and click on Select then tab.
Account
Follow the same process for selecting an Account as for a Nominal.
Account2
If there is an Account2 attached to the selected Nominal. Follow exactly the same
process for selecting a Nominal and Account. If there is no Account2 attached, the
cursor will have moved to the description field.
OK
If the coding rules are broken (see 02 Manual Coding Rules) then an N will appear
in the OK column and an error message will appear in the bottom of the form in red
_____________________________________________________________________________________________________________
Document Input in Dream
Manual 3
Page 13 of 27
The University of Hull
DREAM USER MANUAL
showing what type of error has been made on that line. You will not be able to
post the document until the error or errors on each line have being corrected.
VAT
For UK Sales invoices there are VAT rules embedded. If either the nominal or ac
count does not have VAT rules set up in the system you will not be able to post the
document. Contact Accounting Services on 5223.
Description
Enter a description for this line of the invoice. The description should be meaningful
and be a maximum length of 250 characters.
Quantity
Enter the quantity.
Unit Price
Enter the price per unit.
The document will automatically calculate the Net Value (exc. VAT) and moves the cursor to the VAT field.
DREAM has been customised for the University to automatically calculate the VAT based on the Nominal and
Account combination selected in the Sales Order document.
If you believe that the calculated VAT value is, for your sales order, incorrect, you are able to overtype
the VAT amount with 15% of the Net Value if the calculated value is Nil, and vice-versa. If you are unsure as to whether VAT is chargeable on your sales order, contact Pam Beecroft, Accounting Services
(5223).
Delivery Date
Enter the delivery date of the goods or services. It is recommended that you com
plete this field, as it is a VAT requirement to show the delivery date of all goods and
services on your invoices.
Repeat the sequence for all lines. There is no limit to the number of lines you can enter. If you inadvertently
tab onto a blank line, you can remove it by selecting Post – Delete Row. Don‟t use a new line for the purpose
of inserting extra description without any costs as this will prevent the invoice being printed.
When the entry is complete, the Control Total field will show the total value of your Order, showing the Total Net, VAT and Gross Values.
When your document is complete, Press F9 to post. As you post the document the invoice will print on your
local printer and a copy of the invoice saved and attached to the sales invoice.
You can view the invoice by running a document report and selecting Document, View Attachments from the
menu
_____________________________________________________________________________________________________________
Document Input in Dream
Manual 3
Page 14 of 27
The University of Hull
6.0
DREAM USER MANUAL
SALES CREDIT NOTES
The manual process for requesting a Sales Credit Note has changed – the Sales Credit Note Request form is
shown in Appendix II of this Training Manual and can also be found on the University Portal, Services & Support, Finance Office, Financial Procedures, 2. The request should be printed on pink paper.
The key requirements for submitting the credit note request form are:
One request form must be submitted for a credit against each invoice
The original invoice number in DREAM (SOIN) the credit note refers to must be quoted on
the form.
An attachment showing the lines of the invoice to be credited (see below) must be attached
The reason for the credit note being raised must be meaningful – this is shown on the actual
credit note sent to the customer
The nominal and account (Analysis Details) must show the same codes as the original invoice
Ensure that the form is properly Authorised
Which Lines of the Invoice are to be Credited?
The input screen for creating a Sales Credit Note, in Finance, requires the entry of the line number of the original invoice. For ease of use we have created a query in the „General Reports‟ to give this information and it
should be attached to the back of the Sales Credit Note request.
In Sorsis for Dream „General Reports‟
Open - Query: Credit Note Attachment.
Invoice Type: Select either SOIN or FINV from the drop down
Invoice No:
Enter the SOIN or FINV number you wish to credit
Print the detail, highlight the row(s) you wish to credit and attach to the back of the Sales Credit Note request.
When complete it should be sent to Debtors Control, Finance.
_____________________________________________________________________________________________________________
Document Input in Dream
Manual 3
Page 15 of 27
The University of Hull
7.0
DREAM USER MANUAL
ACCRUALS & PREPAYMENTS
Accruals & Prepayments are posted to Dream using the Accrual Application in Sorsis for Dream. This is used
for both period-end and year-end accruals and prepayments. The application is held in the report group called
Accruals.
In addition there is an excel file called „Accruals SS Template for Users.xls‟. This is in the same format as the
application and enables the user to build up their accruals/prepayments, save them and copy them into the application once complete. It is sent out with the year-end instructions.
The user can complete their accruals directly into the application but they must then be posted immediately as
there is not facility to save them. When entering the figures directly you can use a full stop and tab to copy the
line above (as in Dream).
Accruals Application
In report group „Accruals‟ highlight „Application: Accruals & Prepayments‟ and press preview. The application has 5 worksheets:
A. Accrued Expenditure (ACCR) : Only allows entry of positive values & only allows entry of I&E Expenditure nominals or AJD000/AJE000
B. Accrued Income (PPAY) :Only allows entry of negative values & only allows entry of I&E Income
nominals
C. Prepaid Expenditure (PPAY): Only allows entry of negative values & only allows entry of I&E Expenditure nominals or AJD000/AJE000
D. Income in Advance (ACCR): Only allows entry of positive values & only allows entry of I&E Income
nominals
E. Accrued Debtor Credit Notes (ACCR) :Only allows entry of positive values & only allows entry of
I&E Income nominals
Complete the top section first:
„Faculty‟ selection determines the control line account 1
The name in the „Department‟ field posts to the description on the control line
The name in the „Created by‟ field posts to the userfield2 on the document
The period selected will be the current period at standard month end and any of 12,13 or 14 at year end
Then enter the accruals & prepayments on the appropriate sheets
Each sheet posts separately. When you have completed the sheet press the „Post‟ button.
A log-in box will appear, enter your Dream USERID and Password. The application will then validate
the entries against the rules on the system
If there are coding errors you will see „Sorry Verification Failed‟. Press OK. Any errors will be highlighted in pink
Place the cursor over the pink cell and a comments box will appear advising you why the posting has
failed
Correct the errors and press the „Post‟ button again
If there are no errors you will see „Posting was successful‟. Press OK. The document date and number
are now allocated
If you require a hard copy of your accruals highlight the area you wish to print and print just that selected area
Check the postings in Dream using the document number allocated and also the number after for the
reversal
When you close the application use File and Exit
_____________________________________________________________________________________________________________
Document Input in Dream
Manual 3
Page 16 of 27
The University of Hull
DREAM USER MANUAL
Checking the entries you have made
It is the Finance Officer‟s responsibility to check the department‟s accruals & prepayments are accurate and
complete. Run an account report with the following criteria:
Ledger
Account
Period
Doc Date
Areas
Select the appropriate account
Enter the period to which you have posted your documents
Enter the document date, this will ensure you only see the entries you have
just posted and not the reversals from the previous period
Tick „Combine in One Window‟
Subtotal
By nominal
This report will show you all the documents you have posted
_____________________________________________________________________________________________________________
Document Input in Dream
Manual 3
Page 17 of 27
The University of Hull
8.
DREAM USER MANUAL
INTER DEPARTMENT / FACULTY JOURNAL
This document input form is used for any transfers between departments and faculties/areas of the University,
where the recipient needs to both approve and code the charge in their books. The process works by having
different document input forms for the Originator and the Recipient, and relies on the originator notifying the
recipient by e-mail that the document is awaiting their attention.
8.1
ORIGINATOR
Click on the pencil icon to open the Document Input selection screen
Click on the ? to the right of the „Type‟ box and select XFAC.
This changes the Post To button from Books to Register, and confirms that the document you create will be
posted to a DREAM Register, not directly to the accounts. This is because until both originator and recipient
have completed the document it does not become live in Dream.
Click on the OK button. This will pull up the „Originator‟ document.
The document is defaulted to post to a “Register Period” which is shown in the boxes at the top right as
REG.XFAC.
WHEN ENTERING VALUES, IT IS IMPORTANT TO GET THE SIGNS CORRECT.
If you are charging a department for costs enter an amount
If you are giving credit to a department enter a minus amount
Receiving Faculty
Your cursor will be in this field when the screen opens. Press the tab , this will
bring up a drop-down list of the Faculties / Areas of the University set up within
DREAM.
Highlight and double click on the receiving location or press Select. The cursor
will then move to the Recipient field.
_____________________________________________________________________________________________________________
Document Input in Dream
Manual 3
Page 18 of 27
The University of Hull
DREAM USER MANUAL
Recipient
To ensure that name of the person you are sending the document to is part of the
posting in DREAM; enter the name and department of the recipient. The cursor
will then move to the table.
Nominal
Either type the Nominal code into the field or press tab to bring up a drop-down list of
the nominals that you have access to. Once you have selected the Nominal you need,
either double click on it, or highlight and click on Select then tab.
Account
Follow the same process for selecting an Account as for a Nominal.
On the List of Accounts box there is a search facility. You access this by clicking
on the
button which gives you the following box
If you know that part or all of the title of the Account you can type it into the Title
and it will find all accounts which contain that title.
The
buttons can be used to go to the next Account which contain contains the given criteria or last Account which has the given criteria. Also to go back
one or go back to the first Account.
If you click on the
button after you have input your search Criteria it will only
show you the Accounts with that Criteria. The example below shows all the Accounts
with the word Danish in the title.
Once you have selected the Account you need, either double click on it, or highlight
and click on Select.
Account2
If there is an Account2 attached to the selected Nominal. Follow exactly the same
process for selecting a Nominal and Account. If there is no Account2 attached, the
cursor will have moved to the description field.
OK
If the coding rules are broken (see 02 Manual Coding Rules) then an N will appear
in the OK column and an error message will appear in the bottom of the form in red
showing what type of error has been made on that line. You will not be able to
post the document until the error or errors on each line have being corrected.
Description
Enter a description for this line of the entry. The description should be a meaningful
one, and has a maximum length of 30 Characters.
Authorisation
This document input form has the ability to enter an authorisation on each line if required. Press Tab again to bring up a drop-down list of the individual users who can
authorise the line. This means authorised to spend on the account. Please remember
therefore to obtain authorisation before completing the document.
Highlight the user name and double click, or click on Select. This places the authorised user in the Auth field on the document.
_____________________________________________________________________________________________________________
Document Input in Dream
Manual 3
Page 19 of 27
The University of Hull
Amount
DREAM USER MANUAL
Make sure you follow the earlier rules to get the sign correct on your entry.
Press Tab to move the cursor to a „rest‟ field. Press Tab again if this is not the last line of the journal. Repeat
the sequence for all lines in the journal. There is no limit to the number of lines you can enter on the
journal.
The Nominal, Account and Account2, the description of your selection appears at the bottom left of the input screen. If you are entering multiple lines, the descriptions are for your entries on the current line.
When the entry is complete, the Control Total field will show the total value of your document.
Press F9 key to post the document when it is completed.
You must then e-mail the recipient to advise them that there is an XFAC document for them to review and
complete ensure that you tell them the number of the document.
It is important to remember that this document has NOT been posted to the books, as it is in the
REGISTER area awaiting the recipient completing their side of the document.
If you want to review the postings made, select File – Recent Documents. This will list the last four documents you have created. Double click on the first document listed.
Having selected the document from the Recent Document menu, clicking on your document reference number
will pull up a document report as below. You will see that the codes you entered on the document do NOT
show up as the Nominal / Account1 – instead DREAM has posted your entry to Suspense Codes – Nominal
XXX999 and Account1 the same as the Recipient Faculty you entered on the document.
DREAM does this to enable the document to be completed when the recipient has added their codes. While the
document is still in the Register awaiting completion, DREAM has placed your codes in columns called User
Fields 1,2 and 3. To be able to see them, right click anywhere in the body of the report and select Columns
_____________________________________________________________________________________________________________
Document Input in Dream
Manual 3
Page 20 of 27
The University of Hull
DREAM USER MANUAL
from the options. Highlight Userfields 1, 2, and 3 on the selection screen and click OK. Also in UserField 3 is
the authoriser‟s user ID you entered on the document. The description on the other line on the entry contains
the name and department of the Recipient you entered on the document
If you are the originator it is your repsonsibility to ensure that recipients clear your documents as quickly as
possible. Leaving them incomplete will mean that the entries are not in your accounts. You should contact the
recipient if you document is not cleared in a reasonable timescale. If a document requires cancelling contact
the Systems Office (6560/6860).
THE FINANCE OFFICE WILL DELETE ALL XFAC DOCUMENTS, WHICH HAVE NOT BEEN
COMPLETED AFTER THREE MONTHS & AT THE YEAR END.
8.2
RECIPIENT
When you receive an email from the Originator quoting the document number, run a document report by clicking on the
icon on the menu bar. This will pull up the document report selection screen.
Transaction Type
Should always be ACTUAL
Document Type
XFAC
Number box.
The number the Originator gave you. If you want to review a number of sequential
documents, enter the first Document Number in the first box, and the last Document
Number in the „to‟ box). Click on OK.
The document report displayed as follows:
Click on Document – Change Document from the menu bar
This will open the Recipient Document for you to complete.
_____________________________________________________________________________________________________________
Document Input in Dream
Manual 3
Page 21 of 27
The University of Hull
DREAM USER MANUAL
If any other document format is displayed, do not proceed any further. The configuration of your screen
is incorrect. Please call the Systems Office (6560/6860) to have your configuration changed.
The document will show the detail of the charges/credits the Originator is wants you to accept.
Nominal
Either type the Nominal code into the field or press tab to bring up a drop-down list of
the nominals that you have access to. Once you have selected the Nominal you need,
either double click on it, or highlight and click on Select then tab.
Account
Follow the same process for selecting an Account as for a Nominal.
On the List of Accounts box there is a search facility. You access this by clicking
on the
button which gives you the following box
If you know that part or all of the title of the Account you can type it into the Title
and it will find all accounts which contain that title.
The
buttons can be used to go to the next Account which contain contains the given criteria or last Account which has the given criteria. Also to go back
one or go back to the first Account.
_____________________________________________________________________________________________________________
Document Input in Dream
Manual 3
Page 22 of 27
The University of Hull
DREAM USER MANUAL
If you click on the
button after you have input your search Criteria it will only
show you the Accounts with that Criteria. The example below shows all the Accounts
with the word Danish in the title.
Once you have selected the Account you need, either double click on it, or highlight
and click on Select.
Account2
If there is an Account2 attached to the selected Nominal. Follow exactly the same
process for selecting a Nominal and Account. If there is no Account2 attached, the
cursor will have moved to the description field.
OK
If the coding rules are broken (see 02 Manual Coding Rules) then an N will appear
in the OK column and an error message will appear in the bottom of the form in red
showing what type of error has been made on that line. You will not be able to
post the document until the error or errors on each line have being corrected.
Description
Enter a description for this line of the entry. The description should be a meaningful
one, and has a maximum length of 30 Characters.
Authorisation
This document input form has the ability to enter an authorisation on each line if required. Press Tab again to bring up a drop-down list of the individual users who can
authorise the line. This means authorised to spend on the account. Please remember
therefore to obtain authorisation before completing the document.
Highlight the user name and double click, or click on Select. This places the authorised user in the Auth field on the document.
Amount
Make sure you follow the earlier rules to get the sign correct on your entry. The rule
is that if the control total box has a negative number in it then you will need to enter
your values as positives and vice-versa.
Press Tab to move the cursor to a „rest‟ field. Press Tab again if this is not the last line of the journal. Repeat
the sequence for all lines in the journal. There is no limit to the number of lines you can enter on the
journal.
The Nominal, Account and Account2, the description of your selection appears at the bottom left of the input
screen. If you are entering multiple lines, the descriptions are for your entries on the current line.
When you have completed all your entries, the total in the control box should be 0.00. If not, go back and alter
your entry until the total is 0.00 as the document will only post if the total in the Control Box is 0.00.
Press the F9 key to post the document.
Remember that posting the document retains the document in the REGISTER, not in the books. Individual users do not have the authorisation to release postings from the REGISTER it is done by Finance.
If you want to review the postings made, select File – Recent Documents. This will list the last four documents you have created. Double click on the first document listed. You will see that the codes you entered on
the document do NOT show up as the Nominal / Account1 – instead DREAM has posted your entry to Suspense Codes – Nominal XXX999 and Account1 the same as the Recipient Faculty you entered on the document.
DREAM does this to enable the document to be completed when the recipient has added their codes. While the
document is still in the Register awaiting completion, DREAM has placed your codes in columns called User
Fields 1,2 and 3. Also included in UserField 3 are the usernames of the authorisers of both the originator and
_____________________________________________________________________________________________________________
Document Input in Dream
Manual 3
Page 23 of 27
The University of Hull
DREAM USER MANUAL
the recipient document. There is now a third line in the posting that shows a 0.00 value – this indicates that the
document is complete. The narrative on this line shows the name and department of the recipient.
To be able to see the additional data, right click anywhere in the body of the report and select Columns from
the options. Highlight Userfields 1, 2, and 3 on the selection screen and click OK.
If you are a recipient it is in your interest to clear the document as quickly as possible to ensure the entries appear in the books. If you have a query or wish to dispute the charge you must contact the originator straight away. If a document requires cancellation contact the Systems Office (6560/6860). Requests must be with the agreement of the originator
THE FINANCE OFFICE WILL DELETE ALL XFAC DOCUMENTS, WHICH HAVE NOT BEEN
COMPLETED AFTER THREE MONTHS & AT THE YEAR END.
8.3
VIEWING INTER-FACULTY TRANSFER DOCUMENTS
You can enquire at any time on the status of your document – i.e. whether the recipient has completed their
side of the entry, or whether it has been posted to the books once completed.
To view the status, run a Document Report (see earlier instructions for Recipient)
If the document is still awaiting completion by the recipient, the document report will appear as below.
If the recipient has completed their entries, the Document Report will appear as below, with an additional line:
_____________________________________________________________________________________________________________
Document Input in Dream
Manual 3
Page 24 of 27
The University of Hull
DREAM USER MANUAL
If the completed document has been created in the books, by Accounting Services, you will get an error message as below.
This error message arises because DREAM changes the document type from XFAC to XFAD when it creates
the completed document in the books. Although the document type has changed, the original document number
is retained. To see the completed entry, run a Document Report and complete the selection screen as below
Leave the Period boxes blank.
The Document Report for a completed XFAD is shown as below
The nominals and accounts entered by the Originator and the Recipient now appear in the posting fields,
and have disappeared from the User Fields 1 and 2.
The user names of the authorisers of both the Originator and Recipient documents now appear in UserField
1.
_____________________________________________________________________________________________________________
Document Input in Dream
Manual 3
Page 25 of 27
The University of Hull
DREAM USER MANUAL
Appendix I – Amendments to Manual
Date
Page(s)
21.10.2002 26-31
17.02.03
26
24.01.2005 11
Dec 2005
Feb 2008
Aug 2009
12-14
Description of amendment
Change to Customer Contact information. New pictures on pages 26, 27,28 & 31.
Amendment to narrative on pages 28 & 29
New pictures for Sales Order request with advice to clear memory before adding subsequent documents
Correction to Research Journal Authorisation routine
Fully checked and updated
Updated for Dream 3.2
Change to Sales Invoicing – post and print/attachments
_____________________________________________________________________________________________________________
Document Input in Dream
Manual 3
Page 26 of 27
The University of Hull
DREAM USER MANUAL
_____________________________________________________________________________________________________________
Document Input in Dream
Manual 3
Page 27 of 27