1
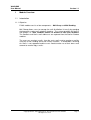
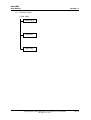
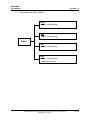
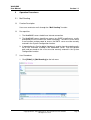
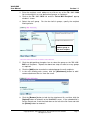
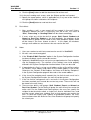
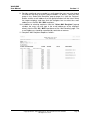
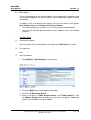
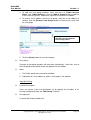
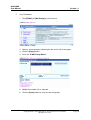
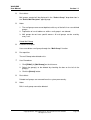
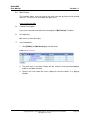
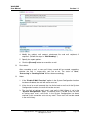
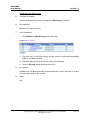
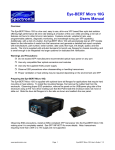
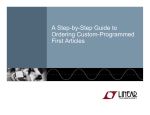
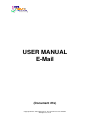
USER MANUAL
E-Mail
(Document 27e)
Copyright © 2007. Education Bureau. The Government of the HKSAR.
All Rights Reserved.
WebSAMS
User Manual
Version 1.1
Table of Contents
1
MODULE OVERVIEW.............................................................................................................. 1
1.1
INTRODUCTION ........................................................................................................................ 1
1.1.1 Objective.............................................................................................................................. 1
1.2
FUNCTION CHART ................................................................................................................... 2
1.3
FLOW DIAGRAM ...................................................................................................................... 3
1.4
INTERACTIONS WITH OTHER MODULES ................................................................................... 4
2
OPERATION PROCEDURES................................................................................................... 6
2.1
2.2
MAIL SENDING ........................................................................................................................ 6
MAIL GROUP ......................................................................................................................... 10
Add Mail Group........................................................................................................................ 10
Modify Mail Group................................................................................................................... 11
Copy Mail Group ...................................................................................................................... 12
Delete Mail Group .................................................................................................................... 14
2.3
MAIL HISTORY ...................................................................................................................... 15
View and Resend Mail.............................................................................................................. 15
Delete Mail from Mail History ................................................................................................. 17
Copyright © 2007. Education Bureau. The Government of the HKSAR.
All Rights Reserved.
WebSAMS
User Manual
Version 1.1
1
Module Overview
1.1
Introduction
1.1.1 Objective
E-Mail module consists of two components – Mail Group and Mail Sending.
Mail Group allows users to manage the mail distribution list easily by grouping
the frequently used e-mail recipients together. The system provides four built-in
mail groups, i.e. Staff, Student, Parent and Alumni or Past Year Students.
The members and their e-mail addresses are captured from the Staff or Student
modules.
The users can send out e-mails, view the sent e-mails and re-send an e-mail by
using the e-mail sending and e-mail history functions. In WebSAMS, receiving
of e-mails is not supported and the users need to make use of their own e-mail
account to receive reply e-mails.
Copyright © 2007. Education Bureau. The Government of the HKSAR.
All Rights Reserved.
Page 1
WebSAMS
User Manual
1.2
Version 1.1
Function Chart
E-Mail (INM)
Mail Sending
Mail Group
Mail History
Copyright © 2007. Education Bureau. The Government of the HKSAR.
All Rights Reserved.
Page 2
WebSAMS
User Manual
1.3
Version 1.1
Flow Diagram
E-Mail
Mail Group
Mail Sending
Copyright © 2007. Education Bureau. The Government of the HKSAR.
All Rights Reserved.
Mail History
Page 3
WebSAMS
User Manual
1.4
Version 1.1
Interactions with other modules
SCH
- INM01 Mail Sending
STU
- INM01 Mail Sending
E-Mail
STF
- INM01 Mail Sending
SEC
- INM01 Mail Sending
- INM03 Mail History
Copyright © 2007. Education Bureau. The Government of the HKSAR.
All Rights Reserved.
Page 4
WebSAMS
User Manual
Version 1.1
INM01 – Mail Sending
•
SCHOOL MANAGEMENT
•
•
•
STUDENT
•
Retrieve Student e-mail address
•
Retrieve Guardian e-mail address
STAFF
•
•
Retrieve school level / session / class information
Retrieve Staff e-mail address
SECURITY
•
Retrieve E-Mail Settings
•
E-Mail Recipient Report retrieves user ID from user account information
INM03 – Mail History
•
SECURITY
•
Retrieve Maximum Size of E-Mail History Setting
Copyright © 2007. Education Bureau. The Government of the HKSAR.
All Rights Reserved.
Page 5
WebSAMS
User Manual
Version 1.1
2
Operation Procedures
2.1
Mail Sending
Function Description
Users can send out e-mails through the “Mail Sending” function.
Pre-requisites
1. The WebSAMS server should have Internet connection.
2. The WebSAMS server should have access to a SMTP e-mail server, usually
provided by the ISP to which the school subscribes. The SMTP server name,
e-mail account and password to access the SMTP server must be correctly
entered in the System Configuration function.
3. If organizational e-Cert for digital signature is used to sign the outgoing mails,
the e-Cert should be installed in the WebSAMS server. Then the location
path and password of the e-Cert must be correctly entered in the System
Configuration function.
User Procedures
1. Click [E-Mail] [Mail Sending] on the left menu.
Copyright © 2007. Education Bureau. The Government of the HKSAR.
All Rights Reserved.
Page 6
WebSAMS
User Manual
Version 1.1
2. Enter the recipient e-mail addresses or click on any of the TO / CC / BCC
link to select built-in or user-defined mail groups as recipients.
3. Click on the TO / CC / BCC link and the “Select Mail Recipient” pop-up
window is shown.
4. Select the mail group.
filtering criteria.
For the four built-in groups, specify the recipient
Click the icon to
add the group as
the mail recipient
5. Click the right-pointing triangular icon to select the group as the TO / CC /
BCC mail recipients. Repeat the above two steps to select as many groups
as required.
6. Click the [Add] button to make the selected groups the mail recipients.
7. In the mail sending main screen, click the [Attachment] button to add /
remove attachment files to / from the e-mail.
8. Click the [Browse] button to look for the attachment file, and then click the
[Upload] button to upload it to the WebSAMS server. If the uploaded file is
not the correct one, mark the check box on the left of the file name and click
the [Delete] button to remove it.
Copyright © 2007. Education Bureau. The Government of the HKSAR.
All Rights Reserved.
Page 7
WebSAMS
User Manual
Version 1.1
9. Click the [Save] button to add the attachment file to the e-mail.
10. In the mail sending main screen, enter the Subject and the mail content.
11. Specify the report options, which is applicable only if any one of the 4 built-in
mail groups has been selected as the recipients.
12. Click the [Send] button to send out the e-mail.
Post-effects
1. After sending a mail, a new record will be created in the mail history,
regardless whether the mail is successfully sent out or not. The status of
‘Sent’, ‘Processing’ or ‘Sending Failed’ will be shown accordingly.
2. If users select any of the four built-in groups Staff, Parent, Student and
Alumni or Past Year Student as the mail recipients, the members of the
selected built-in groups will be listed in the E-Mail Recipient Report, which
will be shown if the users choose to view it. In this report, the members
having e-mail addresses are the ones who can receive the mail.
Notes
1. Users can send out e-mails but cannot receive e-mails in WebSAMS.
2. All mails sent are not encrypted.
3. If the “Enable E-Mail Function” option in the System Configuration function
has been disabled, e-mails cannot be sent out.
4. Optionally, WebSAMS can be set-up to use organizational e-Cert to digitally
sign the outgoing mails. The relevant e-Cert settings have to be properly
entered in the System Configuration function before e-Cert can be used.
5. If organizational e-Cert is set up, e-mail address of the e-Cert will be used as
the school's e-mail address and shown as the sender address in the e-mail.
Otherwise, the “School's E-Mail Address for Return of E-Mail by Recipients”
in the System Configuration page will be used as the sender address.
6. If the size of the outgoing email exceeds the size limit of each e-mail set in
the System Configuration function, the mail will not be sent out.
7. If the size limit for storing each user’s sent mails in the System Configuration
has been reached, mails cannot be sent out any more. These mails will not
be stored in the mail history.
8. There are four built-in mail groups: Staff, Student, Parent and Alumni or
Past Year Student. For the Staff mail group, the mail will only be sent to the
active staff. For the Student and Parent groups, the users can specify the
recipient to be the whole school, a single class level or individual class; and
only the current school year students and / or their parents can receive the
mail. To send mail to past year students or graduated students, the users
have to choose from the Alumni or Past Year Student mail group and specify
the school year.
Copyright © 2007. Education Bureau. The Government of the HKSAR.
All Rights Reserved.
Page 8
WebSAMS
User Manual
Version 1.1
9. Besides sending to every member in a mail group, the users can also choose
to send the mail only to certain group members. To do this, select the mail
group in the “Select Mail Recipient” pop-up page first, click the “Retrieve”
button, and the e-mail addresses of the group members will be listed. Select
the target recipients and then click the triangular icon to select the e-mail
addresses as the TO / CC / BCC recipients.
10. In addition to selecting recipients from the “Select Mail Recipient” pop-up
window, the users can also type in the e-mail addresses of the recipients
directly into the TO / CC / BCC input boxes of the “Mail Sending” page. The
e-mail addresses should be separated by semicolon or comma.
11. Sample E-Mail Recipient Report as follows:
Copyright © 2007. Education Bureau. The Government of the HKSAR.
All Rights Reserved.
Page 9
WebSAMS
User Manual
2.2
Version 1.1
Mail Group
To ease management of the mail distribution list by grouping the frequently used
mail recipients together, this function allows users to add, copy, update or delete
mail groups.
In addition to the user-defined mail groups, there are four built-in mail groups:
Staff, Student, Parent and Alumni or Past Year Student.
•
These four groups are not shown in this function and cannot be deleted.
•
They are only available during selection of mail recipients in the mail sending
functions.
Add Mail Group
Function Description
Users can add a new mail distribution list through the “Mail Group” function.
Pre-requisites
N/A
User Procedures
1. Click [E-Mail] [Mail Group] on the left menu.
2. Click the [Add] button at the bottom of the page.
3. Enter the “E-Mail Group Name”.
4. Enter a new pair of “E-Mail Account Name” and “E-Mail Address”, click
the [Add to Group] button to add the e-mail to the mail group. Repeat the
step until all members have been added.
Copyright © 2007. Education Bureau. The Government of the HKSAR.
All Rights Reserved.
Page 10
WebSAMS
User Manual
Version 1.1
5. Click the [Save] button to save the new mail group.
Post-effects
Mail groups created will be displayed in the “Select Group” drop-down box in
the “Select Mail Recipient” pop-up page.
Notes
1. The mail group name cannot duplicate with any of the built-in or user-defined
groups.
2. Duplication of e-mail addresses within a mail group is not allowed.
3. Mail groups do not have specific owners. All mail groups can be used by
every user.
Modify Mail Group
Function Description
Users can add or remove a modify members of a mail distribution list through the
“Mail Group” function.
Pre-requisites
Mail Group exists.
User Procedures
1. Click [E-Mail] [Mail Group] on the left menu.
2. Click on the E-Mail Group Name link.
Copyright © 2007. Education Bureau. The Government of the HKSAR.
All Rights Reserved.
Page 11
WebSAMS
User Manual
Version 1.1
3. To add new mail group members, enter new pairs of “E-Mail Account
Name” and “E-Mail Address”, click the [Add to Group] button to add the
e-mail to the mail group. Repeat the step until all members are added.
4. To remove e-mail address from the mail group, select the e-mail address to
remove, click the [Remove from Group] button to remove the e-mail from
the mail group.
Highlight the e-mail to remove,
and then click the [Remove
from Group] button.
5. Click the [Save] button to save the changes.
Post-effects
Changes to the group members will take effect immediately. New mails sent to
the mail group will be addressed to the updated list of members.
Notes
1. The E-Mail group name cannot be modified.
2. Duplication of e-mail addresses within a mail group is not allowed.
Copy Mail Group
Function Description
Users can create a new mail distribution list by copying the members of an
existing mail group through the “Mail Group” function.
Pre-requisites
A source Mail Group should exist.
Copyright © 2007. Education Bureau. The Government of the HKSAR.
All Rights Reserved.
Page 12
WebSAMS
User Manual
Version 1.1
User Procedures
1. Click [E-Mail] [Mail Group] on the left menu.
2. Select a source group by checking the box on the left of the group.
3. Click the [Copy] button.
4. Enter the “E-Mail Group Name”.
5. Modify the member list as required.
6. Click the [Save] button to save the new mail group.
Copyright © 2007. Education Bureau. The Government of the HKSAR.
All Rights Reserved.
Page 13
WebSAMS
User Manual
Version 1.1
Post-effects
Mail groups created will be displayed in the “Select Group” drop-down box in
the “Select Mail Recipient” pop-up page.
Notes
1. The mail group name cannot duplicate with any of the built-in or user-defined
groups.
2. Duplication of e-mail addresses within a mail group is not allowed.
3. Mail groups do not have specific owners. All mail groups can be used by
every user.
Delete Mail Group
Function Description
Users can delete a mail group through the “Mail Group” function.
Pre-requisites
The mail Group to be deleted exists.
User Procedures
1. Click [E-Mail] [Mail Group] on the left menu.
2. Select the group(s) to be deleted by checking the box on the left of the
group(s).
3. Click the [Delete] button.
Post-effects
Deleted mail groups are removed from the system permanently.
Notes
Built-in mail groups cannot be deleted.
Copyright © 2007. Education Bureau. The Government of the HKSAR.
All Rights Reserved.
Page 14
WebSAMS
User Manual
2.3
Version 1.1
Mail History
This function allows users to view all the mails sent out by them and to resend
the mail. The users can also delete the past mails.
View and Resend Mail
Function Description
Users can view and resend the mails through the “Mail History” function.
Pre-requisites
Mail exists in the mail history.
User Procedures
1. Click [E-Mail] [Mail History] on the left menu.
2. The past mails in the Mail History will be sorted in reversed chronological
order of sent date and time.
3. Click on the link under the e-mail subject to view the details in a pop-up
window.
Copyright © 2007. Education Bureau. The Government of the HKSAR.
All Rights Reserved.
Page 15
WebSAMS
User Manual
Version 1.1
4. Modify the subject, mail content, attachment files and mail recipients if
required. (Follow the steps in “Mail Sending”.)
5. Specify the report options.
6. Click the [Resend] button to resend the e-mail.
Post-effects
After resending a mail, a new mail history record will be created, regardless
whether the mail is successfully sent out or not. The status of ‘Sent’,
‘Processing’ or ‘Sending Failed’ will be shown accordingly.
Notes
1. If the “Enable E-Mail Function” option in the System Configuration function
has been disabled, the mail will not be sent out.
2. If the size of an e-mail exceeds the size limit of each e-mail set in the System
Configuration function, the mail will not be sent out.
3. The size limit of storing each user’s sent mails in Mail History is set in the
“System Configuration” page. The default value is 10 MB. If the size limit
of storing each user’s sent mails in the System Configuration has been
reached, mails cannot be sent out any more. These mails will not be stored
in the mail history.
Copyright © 2007. Education Bureau. The Government of the HKSAR.
All Rights Reserved.
Page 16
WebSAMS
User Manual
Version 1.1
Delete Mail from Mail History
Function Description
Users can delete the past mails through the “Mail History” function.
Pre-requisites
Mail exists in the mail history.
User Procedures
1. Click [E-Mail] [Mail History] on the left menu.
2. The past mails in the Mail History will be sorted in reversed chronological
order of sent date and time.
3. Check the box(es) on the left of the mail(s) to be deleted.
4. Click the [Delete] button to delete the mail(s).
Post-effects
Deleted mails will be permanently removed from the system and there is no way
to restore them back to the system.
Notes
N/A
Copyright © 2007. Education Bureau. The Government of the HKSAR.
All Rights Reserved.
Page 17