1
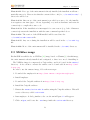
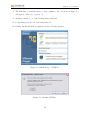
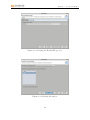
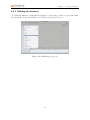
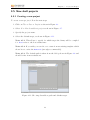
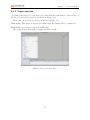
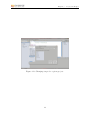
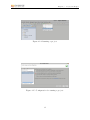
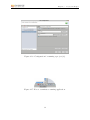
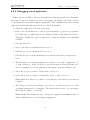
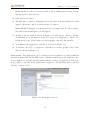
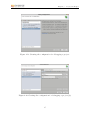
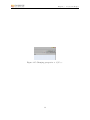
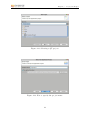
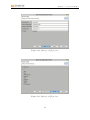
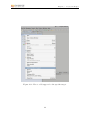
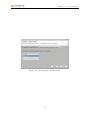
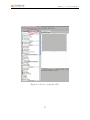
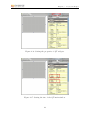
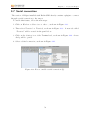
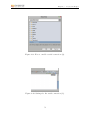
“Embedded Linux development made easier”
User’s manual
Version: 3.0
March 14, 2011
About Evidence S.r.l.
Evidence is a company operating in the field of software for embedded real-time systems.
It started in 2002 as a spin-off company of the Real-Time Systems (ReTiS) Lab of the
Scuola Superiore Sant’Anna (Pisa, Italy). Today, Evidence is a dynamic company having
collaborations in the field of electronics, telecommunications, automotives, and industrial
automation.
People at Evidence are experts in the domain of embedded and real-time systems, with
a deep knowledge on the design and specification flow of embedded software, especially
for the embedded market.
Besides providing consultancy services, Evidence also provides: BSPs based on Linux
for embedded devices, evaluation boards featuring most innovative 8, 16 and 32-bit
microcontrollers for the embedded market, development tools for making embedded
software development easier, and tools for the schedulability analysis of real-time tasks
running on your final product.
Contact Info
Evidence Srl,
Via Carducci 56
Localitá Ghezzano
56010 S.Giuliano Terme
PISA Italy
Tel: +39 050 99 11 224
Fax: +39 050 99 10 812
For more information about Evidence products, please send an e-mail to the following address: [email protected]. Other information about the Evidence product
line can be found at the Evidence web site at: http://www.evidence.eu.com.
This document is Copyright 2005-2010 Evidence S.r.l.
Information and images contained within this document are copyright and the property of Evidence
S.r.l. All trademarks are hereby acknowledged to be the properties of their respective owners. The
information, text and graphics contained in this document are provided for information purposes only by
Evidence S.r.l. Evidence S.r.l. does not warrant the accuracy, or completeness of the information, text,
and other items contained in this document. Matlab, Simulink, Mathworks are registered trademarks
of Matworks Inc. Microsoft, Windows are registered trademarks of Microsoft Inc. Java is a registered
trademark of Sun Microsystems. in the USA. and other countries, and are used under license. All
other trademarks used are properties of their respective owners. This document has been written using
LATEX.
2
Contents
1 Introduction
1.1 Description of the SDK . . . . . . . . . . . . . . . . . . . . . . . . . . . .
1.2 Technical features . . . . . . . . . . . . . . . . . . . . . . . . . . . . . . .
2 Installation
2.1 Requirements . . . . . . .
2.2 Installation of the SDK . .
2.3 VMWare image . . . . . .
2.4 Removing the environment
.
.
.
.
.
.
.
.
.
.
.
.
.
.
.
.
.
.
.
.
.
.
.
.
.
.
.
.
.
.
.
.
.
.
.
.
.
.
.
.
.
.
.
.
.
.
.
.
.
.
.
.
.
.
.
.
.
.
.
.
.
.
.
.
.
.
.
.
.
.
.
.
.
.
.
.
.
.
.
.
.
.
.
.
.
.
.
.
.
.
.
.
.
.
.
.
.
.
.
.
.
.
.
.
8
8
8
10
10
10
13
15
3 Usage from shell
16
3.1 Entering the environment . . . . . . . . . . . . . . . . . . . . . . . . . . 16
3.2 Compiling and building a project . . . . . . . . . . . . . . . . . . . . . . 16
3.3 Running a compiled binary . . . . . . . . . . . . . . . . . . . . . . . . . . 17
4 Usage from Eclipse
4.1 Requirements . . . . . . . . . . . . . . .
4.2 Running the GUI . . . . . . . . . . . . .
4.3 Basic usage . . . . . . . . . . . . . . . .
4.3.1 Disabling automatic build . . . .
4.3.2 Visible/hidden windows . . . . .
4.3.3 Eclipse perspectives . . . . . . . .
4.3.4 Scratchbox path . . . . . . . . . .
4.4 Building existing firmware . . . . . . . .
4.4.1 Import of the project . . . . . . .
4.4.2 Building the firmware . . . . . . .
4.5 New shell projects . . . . . . . . . . . . .
4.5.1 Creating a new project . . . . . .
4.5.2 Target selection . . . . . . . . . .
4.5.3 Building the project . . . . . . .
4.5.4 Running the application . . . . .
4.5.5 Debugging a local application . .
4.5.6 Debugging a remote application .
4.6 New graphical projects . . . . . . . . . .
4.6.1 Creating a new project . . . . . .
4.6.2 Designing the graphical interface
4.6.3 Building the project . . . . . . .
3
.
.
.
.
.
.
.
.
.
.
.
.
.
.
.
.
.
.
.
.
.
.
.
.
.
.
.
.
.
.
.
.
.
.
.
.
.
.
.
.
.
.
.
.
.
.
.
.
.
.
.
.
.
.
.
.
.
.
.
.
.
.
.
.
.
.
.
.
.
.
.
.
.
.
.
.
.
.
.
.
.
.
.
.
.
.
.
.
.
.
.
.
.
.
.
.
.
.
.
.
.
.
.
.
.
.
.
.
.
.
.
.
.
.
.
.
.
.
.
.
.
.
.
.
.
.
.
.
.
.
.
.
.
.
.
.
.
.
.
.
.
.
.
.
.
.
.
.
.
.
.
.
.
.
.
.
.
.
.
.
.
.
.
.
.
.
.
.
.
.
.
.
.
.
.
.
.
.
.
.
.
.
.
.
.
.
.
.
.
.
.
.
.
.
.
.
.
.
.
.
.
.
.
.
.
.
.
.
.
.
.
.
.
.
.
.
.
.
.
.
.
.
.
.
.
.
.
.
.
.
.
.
.
.
.
.
.
.
.
.
.
.
.
.
.
.
.
.
.
.
.
.
.
.
.
.
.
.
.
.
.
.
.
.
.
.
.
.
.
.
.
.
.
.
.
.
.
.
.
.
.
.
.
.
.
.
.
.
.
.
.
.
.
.
.
.
.
.
.
.
.
.
.
.
.
.
.
.
.
.
.
.
.
.
.
.
.
.
.
.
.
.
.
.
.
.
.
.
.
.
.
.
.
.
.
.
.
.
.
.
.
.
.
.
.
.
.
.
.
.
.
.
.
.
.
.
.
.
.
.
.
.
.
.
.
.
.
.
.
.
.
.
.
.
.
.
.
.
18
18
18
18
18
18
19
21
22
22
25
26
26
27
29
30
33
39
41
41
46
49
Contents
4.7
Serial connection . . . . . . . . . . . . . . . . . . . . . . . . . . . . . . .
50
5 Known issues
53
5.1 Installation . . . . . . . . . . . . . . . . . . . . . . . . . . . . . . . . . . 53
4
List of Figures
2.1
2.2
2.3
How to install Evelin SDK. . . . . . . . . . . . . . . . . . . . . . . . . . .
Initial dialog of VMWare. . . . . . . . . . . . . . . . . . . . . . . . . . .
Starting VMWare. . . . . . . . . . . . . . . . . . . . . . . . . . . . . . .
11
14
14
4.1
4.2
4.3
4.4
4.5
4.6
4.7
4.8
4.9
4.10
4.11
4.12
4.13
4.14
4.15
4.16
4.17
4.18
4.19
4.20
4.21
4.22
4.23
4.24
4.25
4.26
4.27
4.28
4.29
4.30
4.31
4.32
4.33
Disabling automatic build. . . . . . . . . . . . . . . . .
Setting visible/hidden windows. . . . . . . . . . . . . .
Changing perspective. . . . . . . . . . . . . . . . . . .
Scratchbox preferences . . . . . . . . . . . . . . . . . .
Changing Scratchbox path. . . . . . . . . . . . . . . . .
Creating a new project on Eclipse. . . . . . . . . . . .
Creating a Scratchbox project on Eclipse. . . . . . . . .
Creating the Evelin BSP project. . . . . . . . . . . . .
Selecting the target. . . . . . . . . . . . . . . . . . . .
Building the project. . . . . . . . . . . . . . . . . . . .
Choosing Scratchbox path and default target. . . . . .
Project properties. . . . . . . . . . . . . . . . . . . . .
Changing target for a given project. . . . . . . . . . . .
Running a project. . . . . . . . . . . . . . . . . . . . .
Configuration for running a project. . . . . . . . . . . .
Configuration for running a project (2). . . . . . . . . .
How to terminate a running application. . . . . . . . .
Debugging a project. . . . . . . . . . . . . . . . . . . .
Creating the configuration for debugging a project. . .
Creating the configuration for debugging a project (2).
Changing the port used for debugging. . . . . . . . . .
Changing perspective to Debug. . . . . . . . . . . . . .
Debugging on unsupported target. . . . . . . . . . . . .
Debug running. . . . . . . . . . . . . . . . . . . . . . .
Debug features. . . . . . . . . . . . . . . . . . . . . . .
Terminating a debugged application. . . . . . . . . . .
Changing perspective to C/C++. . . . . . . . . . . . .
Selecting a QT project. . . . . . . . . . . . . . . . . . .
How to specify the project name. . . . . . . . . . . . .
Dialog for QT project. . . . . . . . . . . . . . . . . . .
Dialog for QT project. . . . . . . . . . . . . . . . . . .
How to add support for the specific target. . . . . . . .
Selecting the specific target. . . . . . . . . . . . . . . .
19
19
20
21
21
23
23
24
24
25
26
27
28
31
31
32
32
34
35
35
36
36
36
37
37
37
38
42
42
43
43
44
45
5
.
.
.
.
.
.
.
.
.
.
.
.
.
.
.
.
.
.
.
.
.
.
.
.
.
.
.
.
.
.
.
.
.
.
.
.
.
.
.
.
.
.
.
.
.
.
.
.
.
.
.
.
.
.
.
.
.
.
.
.
.
.
.
.
.
.
.
.
.
.
.
.
.
.
.
.
.
.
.
.
.
.
.
.
.
.
.
.
.
.
.
.
.
.
.
.
.
.
.
.
.
.
.
.
.
.
.
.
.
.
.
.
.
.
.
.
.
.
.
.
.
.
.
.
.
.
.
.
.
.
.
.
.
.
.
.
.
.
.
.
.
.
.
.
.
.
.
.
.
.
.
.
.
.
.
.
.
.
.
.
.
.
.
.
.
.
.
.
.
.
.
.
.
.
.
.
.
.
.
.
.
.
.
.
.
.
.
.
.
.
.
.
.
.
.
.
.
.
.
.
.
.
.
.
.
.
.
.
.
.
.
.
.
.
.
.
.
.
.
.
.
.
.
.
.
.
.
.
.
.
.
.
.
.
.
.
.
.
.
.
.
.
.
.
.
.
.
.
.
.
.
.
.
.
.
.
.
.
.
.
.
.
.
.
.
.
.
.
.
.
.
.
.
.
.
.
.
.
.
.
.
.
.
.
.
.
.
.
.
.
.
.
.
.
.
.
.
.
.
.
.
.
.
.
.
.
.
.
.
.
.
.
.
.
.
.
.
.
.
.
.
.
.
.
.
.
.
.
.
.
List of Figures
4.34
4.35
4.36
4.37
4.38
4.39
4.40
4.41
Main QT form. . . . . . . . . . . . . . .
How to design the GUI. . . . . . . . . .
Setting the properties of QT widgets. . .
Setting the size of the QT main window.
How to enable a serial connection (1). . .
How to enable a serial connection (2). . .
Settings for the serial connection (1). . .
Settings for the serial connection (2). . .
6
.
.
.
.
.
.
.
.
.
.
.
.
.
.
.
.
.
.
.
.
.
.
.
.
.
.
.
.
.
.
.
.
.
.
.
.
.
.
.
.
.
.
.
.
.
.
.
.
.
.
.
.
.
.
.
.
.
.
.
.
.
.
.
.
.
.
.
.
.
.
.
.
.
.
.
.
.
.
.
.
.
.
.
.
.
.
.
.
.
.
.
.
.
.
.
.
.
.
.
.
.
.
.
.
.
.
.
.
.
.
.
.
.
.
.
.
.
.
.
.
.
.
.
.
.
.
.
.
.
.
.
.
.
.
.
.
.
.
.
.
.
.
.
.
46
47
48
48
50
51
51
52
About this document
This document explains how to use the Evelin SDK development environment.
Function of the document
The function of this document is to provide information about the usage of the environment to developers who are going to use it.
Document history
Version
Date
Author
Company
Change Description
2.10-Alpha
Sept. 15th 2008
Claudio Scordino
Evidence Srl
Initial version
2.10-Beta
Oct. 21st 2008
Claudio Scordino
Evidence Srl
Second draft
2.10-Beta2
Nov. 20th 2008
Claudio Scordino
Evidence Srl
Third draft
2.10-Beta3
Jan. 22nd 2009
Claudio Scordino
Evidence Srl
Fourth draft
2.10.0
Jan. 29th 2009
Claudio Scordino
Evidence Srl
First version
2.11.0
Dec. 23rd 2009
Claudio Scordino
Evidence Srl
QT and serial
2.11.1
Apr. 20th 2010
Claudio Scordino
Evidence Srl
Remote debugging
3.0
Dec. 20th 2010
Alessandro Biasci
Evidence Srl
Ubuntu 10.04 LTS support
Acronyms
BSP Board Support Package
SDK Software Development Kit
7
1 Introduction
This manual contains the instructions for the installation and the usage of Evelin SDK.
Evelin (which stands for “EVidence Embedded LINux”) is the suite of tools for embedded
Linux systems created and maintained by Evidence S.r.l..
1.1 Description of the SDK
Evelin SDK is based on the Scratchbox2 [2] environment.
Scratchbox2 is a very powerful environment that allows to develop target binaries in
a way completely transparent to the developer. In particular, Scratchbox2 is a crosscompilation toolkit developed by the Open Source community and designed to make
embedded Linux application development easier. It provides a full set of tools to integrate and cross-compile an entire Linux distribution. Once the target has been chosen,
Scratchbox2 allows to configure and compile the binaries regardless of the target machine and without worrying about cross compilation. This way, even the higher level
software based on GNU Autotools is capable of compiling transparently.
Evelin SDK includes improvements to the original Scratchbox2 environment: patches
to fix existing bugs, toolchains for new target architectures, plugin for integration with
the Eclipse [5] IDE, etc. Evidence also made some modifications to the original environment, in order to let it capable of supporting new architectures. Last but not least,
Evidence provides technical support for its environment.
1.2 Technical features
Evelin SDK has the following technical features:
• Based on the Scratchbox2 [2] project;
• Easy-to-use installer;
• Additional Scratchbox2 scripts;
8
Chapter 1. Introduction
• Transparent cross-compilation based on GNU gcc [6];
• Target software emulation: cpu-transparency mechanism that allows to execute
target binaries on the host platform through Qemu [3]. Qemu is a generic and
Open Source processor emulator which achieves a good emulation speed by using
dynamic translation. Qemu is automatically invoked by the environment when
needed (i.e., no intervention of the user is needed). Note that Evelin SDK uses a
proprietary version of Qemu with better support for big-endian targets [7];
• GUI based on the well-known Eclipse IDE [5], with:
– CDT [1] plugin for development of C and C++ programs;
– Proprietary plugin for Scratchbox2 integration;
– Graphical debugging of both host and target binaries;
– Plugin to support the graphical design of QT-based GUIs.
• Support for the following targets:
– ARM7
– ARM9 little-endian and big-endian
– ARM11
– Renesas SH4
9
2 Installation
2.1 Requirements
In order to install the development environment, a PC with the following characteristics
is required:
• Ubuntu 10.04 LTS 32-bit distribution installed;
Note 2.1.1: Evelin SDK Full includes an image that can be run on any operating
system supporting VMWare.
• 1 GB of free space on the hard disk plus 2.5 GB for each user who will use the
environment;
• bash, apt-get, dpkg, and gzip utilities already installed;
Note 2.1.2: If bash is not installed, just type
apt-get update; apt-get install bash
with superuser permissions (i.e., as root user, or using the sudo command).
• /proc and /proc/sys filesystems mounted;
• A Linux kernel with the binfmt misc module (required for the CPU-transparency
mechanism) loaded (as a loadable kernel module or built in the kernel image).
Note 2.1.3: For the supported Linux distributions this is already available on the
default kernel.
Note 2.1.4: If it is not available, you need to recompile the kernel in order to add
this support.
2.2 Installation of the SDK
Most of Evelin SDK is installed inside the user’s home directory. Therefore, the installation must be done for every user who wants to use the environment.
10
Chapter 2. Installation
To start the installation of Evelin SDK follow the next steps:
1. Check to have a working network connection on your host machine.
Note 2.2.1: If your host platform is behind a firewall or a proxyweb, the installation may fail, because the Ubuntu repositories may be unreachable. Please, check
this condition with your network administrator.
Note 2.2.2: In case of very slow network connection the installation may fail,
because the apt-get utilities may experience a timeout.
Note 2.2.3: On Ubuntu machines the universe repositories must be enabled in
the /etc/apt/sources.list file. If disabled, the installation script will enable
those repositories automatically, depending on your Linux distribution.
2. Enter the directory containing the Evelin SDK distribution (typically, the CDROM)
3. Read the license in the COPYRIGHT file
4. Start the installation by typing
sudo bash install.sh [<targets>]
as shown in Figure 2.1.
Figure 2.1: How to install Evelin SDK.
Enter your password, if required.
11
Chapter 2. Installation
Note 2.2.4: The sudo command requires the user to belong to some specific
groups (e.g., admin or sudo) on the Linux machine. If your user does not have
permissions for using the sudo command, just follow the next steps:
a) Enter as root user by typing su
b) Enter root’s password and press Enter
c) Edit the /etc/sudoers file and add the following line:
<username> ALL=(ALL) ALL
d) Type exit
e) Then, start the installation as specified above
Note 2.2.5: <targets> is the list of targets (e.g., armle, armeb, arm7, arm11,
sh4, etc.) to be installed.
Note 2.2.6: Type install.sh --help to have the list of available targets.
Note 2.2.7: If called without arguments, the install.sh script will install all
available targets.
5. Type accept if you accept the license (otherwise Evelin SDK will not be installed).
6. Accept Java license by Sun (the environment needs Java to run Eclipse)
7. Wait for the EVELIN SDK INSTALLED message.
Note 2.2.8: If you are using the Gnome desktop manager, and if your Linux
distribution is fully supported, some icons will appear on your desktop. Do not
worry if the icons do not appear, since the environment can be easily used also
without them.
8. Reboot the machine in order to make the system read the new settings.
Note 2.2.9: The installation tries to detect your Linux distribution automatically.
However, if not detected, or detected wrongly, the installation program will ask you the
right Linux distribution installed on your host machine. In this case, the user must
specify a Linux distribution between those present in the distro/ directory.
Note 2.2.10: The installation configuration for a given target is written in the
targets/<target>/target.conf configuration file. Do not change the values unless
you really know what you are doing!
12
Chapter 2. Installation
Note 2.2.11: If a copy of the environment is already installed, the installation will automatically remove it. Please notice that the content of the rootfs (i.e., ∼/ev-sdk/rootfs/...)
directories will be lost.
Note 2.2.12: Since most of the environment is provided as source code, the installation requires some time (up to 1 hour, depending on your host hardware and network
connection) to compile the source code.
Note 2.2.13: If the installation is interrupted for some reason (e.g., lack of Internet
connection) restart the installation with the same command specified above.
Note 2.2.14: The version of the SDK installed will be saved into the
∼/ev-sdk/ev-sdk.version file.
Note 2.2.15: Any error during the installation will be saved in the ∼/.ev-sdk.log
file.
Note 2.2.16: Most of the environment will be installed in the ∼/ev-sdk/ directory
2.3 VMWare image
Evelin SDK is available also as VMWare [10] image based on Ubuntu [9]. On this image,
the environment is already installed and configured, so there is no need of installing it.
The VMWare image is compressed as 7-zip archive, and it is located in the vmware/
directory. A free client to extract the archive can be downloaded from http://www.
7-zip.org.
In order to use the vmware image, follow the next steps:
1. Download the vmplayer from http://www.vmware.com/products/player/
2. Install vmplayer
3. Download the 7-zip file archiver from http://www.7-zip.org
4. Install the 7-zip file archiver
5. Extract the vmware/evelin-sdk.7z archive using the 7-zip file archiver. This will
create a directory called evelin-sdk
6. Run vmplayer. A dialog similar to the one shown in Figure 2.2 will appear.
7. Click on Open, and locate the .vmx image inside the evelin-sdk directory
13
Chapter 2. Installation
8. The first time you run the image, a dialog similar to the one shown in Figure 2.3
will appear. Click on I copied it.
9. At this point the boot of the Ubuntu image will start
10. Login using user as both login and password
11. Finally, run Evelin SDK as explained in the following chapters.
Figure 2.2: Initial dialog of VMWare.
Figure 2.3: Starting VMWare.
14
Chapter 2. Installation
2.4 Removing the environment
If you ever want to remove the SDK from the host machine, just type:
sudo ev-sdk-uninstall
and type your password if asked. Then, wait the EVELIN SDK UNINSTALLED message.
15
3 Usage from shell
This section explains how to use the main commands of Evelin SDK. The path of the
commands is automatically appended to user’s ∼/.bashrc file during the installation.
3.1 Entering the environment
• Type sb2-config -l to know the list of available targets
• Type sb2-config -d <target> to set the default target
• Type sb2 to enter the Scratchbox environment using the default target:
– To exit the environment, just type exit
– You can also specify a specific target, using
sb2 -t <target>
• Type sb2 <command> to execute a command inside Scratchbox using the default
target:
– This command runs the given command inside Scratchbox, without the need
of entering the environment
– You can also specify a specific target, using
sb2 -t <target> <command>
3.2 Compiling and building a project
Once entered the environment as explained in the previous section, you can run the
typical commands (i.e., gcc, make, etc.) to build your application. Depending on the
chosen target, Evelin SDK will invoke the right toolchain and will build the application
for such target. In other words, the application can be compiled in the common way as
if we were compiling it for our host architecture: Evelin SDK will do the rest for us.
16
Chapter 3. Usage from shell
3.3 Running a compiled binary
Once the application has been compiled as explained in the previous section, it can be run
on the host architecture, even if the binary has been compiled for a target architecture.
Evelin SDK, in fact, remembers which target the application has been compiled for, and
automatically starts Qemu to run your application! This way, it is possible to run and
debug applications compiled for an embedded microcontroller directly on the host PC.
Note 3.3.1: When using Eclipse, do not use the environment from shell, otherwise the
commands from shell may interfere with Eclipse settings.
17
4 Usage from Eclipse
This section explains how to use the GUI based on the Eclipse IDE [5] provided with
the SDK.
4.1 Requirements
In order to run the development environment, a Java 1.6 virtual machine is needed. This
means that the package sun-java6-jre must be installed.
The installation script will try to install the virtual machine automatically from the
repositories.
4.2 Running the GUI
To start the GUI, type ev-sdk-eclipse (without any parameter) on a X11 terminal.
Alternatively, if an icon Evelin SDK Eclipse has been created at installation time on
your desktop, just click the icon.
Note 4.2.1: The installer creates a default workspace located in the /sim/<username>
/ev-sdk/workspace/ directory.
4.3 Basic usage
4.3.1 Disabling automatic build
We strongly suggest to disable the automatic building of the project, by clicking on the
Project menu and disabling (i.e., uncheck) the related item, as shown in Figure 4.1.
4.3.2 Visible/hidden windows
The list of visible/hidden windows can be easily changed at any time by clicking on
Window → Show View as shown in Figure 4.2.
18
Chapter 4. Usage from Eclipse
Figure 4.1: Disabling automatic build.
Therefore, if at some time you cannot see a window anymore, just click on this menu
to make the window visible.
Figure 4.2: Setting visible/hidden windows.
4.3.3 Eclipse perspectives
Eclipse has a set of views, called “perspectives”. Each perspective allows to make certain
operations or see certain kind of information.
19
Chapter 4. Usage from Eclipse
To change perspective, just click on the icons on the top right corner of the main
window, as shown in Figure 4.3.
Figure 4.3: Changing perspective.
Note 4.3.1: The list of running processes (shown in Figure 4.24) can be seen at any
time by entering the Debug perspective.
20
Chapter 4. Usage from Eclipse
4.3.4 Scratchbox path
To change the Scratchbox path click on Window → Preferences as shown in Figure 4.4.
Then, click on Scratchbox2 Preferences as shown in Figure 4.5.
Note 4.3.2: The default path should be fine in most situations.
Figure 4.4: Scratchbox preferences
Figure 4.5: Changing Scratchbox path.
21
Chapter 4. Usage from Eclipse
4.4 Building existing firmware
Some versions of Evelin SDK (e.g., the version for Xflar) are provided with firmware for
a specific board. This firmware is called “Evelin BSP”.
To build the firmware for your embedded board (if any) follow the operations described
in the next paragraphs.
4.4.1 Import of the project
First of all, disable automatic build of the project as explained in Section 4.3.1.
Then, create a new project:
1. Click on File → New → Project as shown in Figure 4.6.
2. Select C → New Scratchbox2 project as shown in Figure 4.7.
3. Specify evelin-bsp as project name (see Figure 4.8)
Note 4.4.1: Do not use a different name, otherwise the firmware will not be
compiled correctly.
4. Select your target, as shown in Figure 4.9.
Note 4.4.2: Do not select to start from an existing template, otherwise the
firmware will not be compiled correctly.
Note 4.4.3: The default path is taken from the dialog shown in Figure 4.4 and
should be fine in most situations.
22
Chapter 4. Usage from Eclipse
Figure 4.6: Creating a new project on Eclipse.
Figure 4.7: Creating a Scratchbox project on Eclipse.
23
Chapter 4. Usage from Eclipse
Figure 4.8: Creating the Evelin BSP project.
Figure 4.9: Selecting the target.
24
Chapter 4. Usage from Eclipse
4.4.2 Building the firmware
To build the firmware, click with the right key of the mouse on the project name inside
the left frame, as shown in Figure 4.10. Then, select Build Project.
Figure 4.10: Building the project.
25
Chapter 4. Usage from Eclipse
4.5 New shell projects
4.5.1 Creating a new project
To create a new project, follow the next steps:
1. Click on File → New → Project as shown in Figure 4.6.
2. Select C → New Scratchbox2 project as shown in Figure 4.7.
3. Specify the project name.
4. Select the default target, as shown in Figure 4.11.
Note 4.5.1: This allows to specify for which target the binary will be compiled
for. Host refers to the host architecture.
Note 4.5.2: If you wish, you can choose to start from an existing template which
shows how to write the Makefile (strongly recommended).
Note 4.5.3: The default path is taken from the dialog shown in Figure 4.4 and
should be fine in most situations.
Figure 4.11: Choosing Scratchbox path and default target.
26
Chapter 4. Usage from Eclipse
4.5.2 Target selection
To change the target for a given project, click with the right button of the mouse on
the project, and select Properties as shown in Figure 4.12.
Then, click on Scratchbox2 Options as shown in Figure 4.13.
Note 4.5.4: This allows to specify for which target the binary will be compiled for.
Note 4.5.5: Host refers to the host architecture.
Choose the target, then click on Apply and then on OK.
Figure 4.12: Project properties.
27
Chapter 4. Usage from Eclipse
Figure 4.13: Changing target for a given project.
28
Chapter 4. Usage from Eclipse
4.5.3 Building the project
Before building the project, disable automatic build of the project as explained in
Section 4.3.1.
Then, to build the project, click with the right key of the mouse on the project name
inside the left frame, as shown in Figure 4.10. Select Clean Project followed by Build
Project.
29
Chapter 4. Usage from Eclipse
4.5.4 Running the application
To run the application, follow the next steps:
1. Select your target as explained in Section 4.5.2
2. Build the project as explained in Section 4.5.3
3. Click the Run icon as shown in Figure 4.14 and select the Run configurations . . .
item.
4. The first time you run the application you have to create the configuration. To do
that, click twice on the Scratchbox2 application item as shown in Figure 4.15. A
new configuration for your application will appear, as shown in Figure 4.16.
5. Select the project you wish to run in the Project box.
6. Select the project you wish to run in the C/C++ Application box.
Note 4.5.6: It would not be possible to select the project if it has not been already
compiled.
7. Click the Run button.
8. To terminate the application, click the icon shown in Figure 4.17.
Note 4.5.7: The application can be run even if compiled for a target different than the
host machine: Evelin SDK will automatically detect the type of binary and will start
Qemu to run the application.
Note 4.5.8: The list of running processes (shown in Figure 4.24) can be seen at any
time by entering the Debug perspective.
30
Chapter 4. Usage from Eclipse
Figure 4.14: Running a project.
Figure 4.15: Configuration for running a project.
31
Chapter 4. Usage from Eclipse
Figure 4.16: Configuration for running a project (2).
Figure 4.17: How to terminate a running application.
32
Chapter 4. Usage from Eclipse
4.5.5 Debugging a local application
Eclipse provides a GUI to debug your application using an internal gdb. Internally,
the debug works as a client-server remote debugging: the Eclipse gdb client connects
to the Qemu gdb server which runs the application. The communication between client
and server is made through a network port of the host machine.
To debug the application, follow the next steps:
1. First of all, edit the Makefile of the project and add the -g option to gcc parameters. This option compiles the project adding all symbolic information needed for
debugging. Usually the option is appended to either the CFLAGS or the CPPFLAGS
variables.
2. Save the Makefile
3. Select your target as explained in Section 4.5.2
4. Build the project as explained in Section 4.5.3
5. Click the Debug icon as shown in Figure 4.18 and select the Debug configurations . . .
item.
6. The first time you debug the application you have to create the configuration. To
do that, click twice on the Scratchbox2 application item as shown in Figure 4.19.
A new configuration for your application will appear, as shown in Figure 4.20.
7. Select the project you wish to debug in the Project box.
8. Select the project you wish to debug in the C/C++ Application box.
Note 4.5.9: It would not be possible to select the project if it has not been already
compiled.
9. The Debugger tab shown in Figure 4.21 allows to set the network port of the
operating system used for debugging. The default value is 1234. You can change
this value according to your needs.
Note 4.5.10: This feature allows to debug more applications simultaneously, by
using a different port for each debugged application.
33
Chapter 4. Usage from Eclipse
Note 4.5.11: See the /etc/services file to know which ports are busy because
already used by other services.
10. Click the Debug button
11. The first time you start a debugging session, the window shown in Figure 4.22 will
appear. Check the combobox and press the Yes button.
Note 4.5.12: Debugging on some targets is not yet supported. For those targets,
the window shown in Figure 4.23 will appear.
12. At this point the window shown in Figure 4.24 will appear. Refer to Eclipse
documentation for information about how debug your application. Figure 4.25
briefly shows some of the features about debugging offered by the interface.
13. To terminate the application, click the icon shown in Figure 4.26.
14. To return to the C/C++ perspective, click the icon on the top right corner of the
window, shown in Figure 4.27.
Note 4.5.13: The application can be debugged even if compiled for a target different
than the host machine: Evelin SDK, in fact, remembers which target the application has
been compiled for, and automatically starts Qemu to debug your application! This way,
it is possible to run and debug applications compiled for an embedded microcontroller
directly on the host PC.
Figure 4.18: Debugging a project.
34
Chapter 4. Usage from Eclipse
Figure 4.19: Creating the configuration for debugging a project.
Figure 4.20: Creating the configuration for debugging a project (2).
35
Chapter 4. Usage from Eclipse
Figure 4.21: Changing the port used for debugging.
Figure 4.22: Changing perspective to Debug.
Figure 4.23: Debugging on unsupported target.
36
Chapter 4. Usage from Eclipse
Figure 4.24: Debug running.
Figure 4.25: Debug features.
Figure 4.26: Terminating a debugged application.
37
Chapter 4. Usage from Eclipse
Figure 4.27: Changing perspective to C/C++.
38
Chapter 4. Usage from Eclipse
4.5.6 Debugging a remote application
The same GUI shown in Section 4.5.5 can be used also to debug applications running
on the target. In practice, the Eclipse frontend connects to a local gdb client which,
in turn, connects to a gdbserver running on the target. The communication is done
through Ethernet, and the target must have a gdbserver installed.
To debug the application, follow the next steps:
1. First of all, edit the Makefile of the project and add the -g option to gcc parameters. This option compiles the project adding all symbolic information needed for
debugging. Usually the option is appended to either the CFLAGS or the CPPFLAGS
variables.
2. Save the Makefile
3. Select your target as explained in Section 4.5.2
4. Build the project as explained in Section 4.5.3
5. Transfer the binary of the application to the target (e.g., using FTP, TFTP, HTTP,
LRZ)
6. Connect to the target using a serial connection (see Section 4.7) and run the
application using the following command:
gdbserver <Host IP>:1234 application
Note 4.5.14: 1234 is the default port, but you can use different values.
7. Click the Debug icon as shown in Figure 4.18 and select the Debug configurations . . .
item.
8. The first time you debug the application you have to create the configuration. To
do that, click twice on the Scratchbox2 application item as shown in Figure 4.19.
A new configuration for your application will appear, as shown in Figure 4.20.
9. Select the project you wish to debug in the Project box.
10. Select the project you wish to debug in the C/C++ Application box.
Note 4.5.15: It would not be possible to select the project if it has not been
already compiled.
39
Chapter 4. Usage from Eclipse
11. In the Main tab, uncheck “Connect process input output to a terminal”
12. In the Debugger: tab, select
• Debugger: gdbserver Debugger
• Connection: TCP
• Host name or IP address: host IP address
• Port number: 1234, or any other value
13. In the Common tab, uncheck “Allocate console”
40
Chapter 4. Usage from Eclipse
4.6 New graphical projects
The version of Eclipse installed with Evelin SDK already contains a plugin to design
graphical applications using the QT framework [4, 8].
This section explains how to create a graphical application using the Eclipse IDE.
4.6.1 Creating a new project
To create a new project, follow the next steps:
1. Click on File → New → Project as shown in Figure 4.6.
2. Select Qt → Qt Gui Project as shown in Figure 4.28. Then, click on Next.
3. Specify the project name, as shown in Figure 4.29. For instance, we have supposed
to use the name myproject. Then, click on Next.
4. The dialog shown in Figure 4.30 will appear. Just click on Next.
5. The dialog shown in Figure 4.31 will appear. Just click on Finish.
6. You then have to add the support for the specific target. Click with the right key
of the mouse on the project name inside the left frame, as shown in Figure 4.32.
Select Add Scratchbox 2 support.
7. A dialog similar to the one shown in Figure 4.33 will appear. Select your target
and click Finish.
41
Chapter 4. Usage from Eclipse
Figure 4.28: Selecting a QT project.
Figure 4.29: How to specify the project name.
42
Chapter 4. Usage from Eclipse
Figure 4.30: Dialog for QT project.
Figure 4.31: Dialog for QT project.
43
Chapter 4. Usage from Eclipse
Figure 4.32: How to add support for the specific target.
44
Chapter 4. Usage from Eclipse
Figure 4.33: Selecting the specific target.
45
Chapter 4. Usage from Eclipse
4.6.2 Designing the graphical interface
To design the graphical interface of your application, follow the next steps:
1. Click twice on the file with .ui extension in the left panel, as shown in Figure 4.34.
An empty form will appear on the central panel.
2. Click on the Qt C++ Widget tab, as shown in Figure 4.35. The list of widgets will
appear on the left panel.
3. Drag and drop your favourite widgets from the left panel to the central form.
4. To set the size of the QT form, click on the QT/C++ tab in the right dialog, as
shown in Figure 4.36.
5. Then, set the geometry of the form, as shown in Figure 4.37. These values should
be set equal to the size of the display of your target.
Figure 4.34: Main QT form.
46
Chapter 4. Usage from Eclipse
Figure 4.35: How to design the GUI.
47
Chapter 4. Usage from Eclipse
Figure 4.36: Setting the properties of QT widgets.
Figure 4.37: Setting the size of the QT main window.
48
Chapter 4. Usage from Eclipse
4.6.3 Building the project
To build the project, follow the instructions of Section 4.5.3.
49
Chapter 4. Usage from Eclipse
4.7 Serial connection
The version of Eclipse installed with Evelin SDK already contains a plugin to connect
through a serial connection to the target.
To enable this feature, follow the next steps:
1. Click on Window → Show view → other..., as shown in Figure 4.38.
2. Then select Terminal → Terminal, as shown in Figure 4.39. A new tab called
“Terminal” will be created in the panel below.
3. Click on the Settings icon of the Terminal tab, as shown in Figure 4.40. A new
dialog will be opened.
4. Select a Serial connection, as shown in Figure 4.41.
Figure 4.38: How to enable a serial connection (1).
50
Chapter 4. Usage from Eclipse
Figure 4.39: How to enable a serial connection (2).
Figure 4.40: Settings for the serial connection (1).
51
Chapter 4. Usage from Eclipse
Figure 4.41: Settings for the serial connection (2).
52
5 Known issues
This section contains the list of known issues. Please, check this list before sending any
help request to the technical support services.
5.1 Installation
Note 5.1.1: Evelin SDK may stop working if QTCreator is installed after it. In this
case, overwrite the installed copy by re-installing Evelin SDK.
53
Bibliography
[1] Eclipse C/C++ Development Tooling - CDT http: // www. eclipse. org/ cdt .
[2] Scratchbox 2. http: // www. freedesktop. org/ wiki/ Software/ sbox2 .
[3] Fabrice Bellard. Qemu Open Source Processor Emulator, http: // bellard. org/
qemu/ .
[4] Jasmin Blanchette and Mark Summerfield. C++ GUI Programming with Qt 4, 2nd
edition. Prentice Hall, 2008.
[5] Eclipse — an open development platform. http: // www. eclipse. org/ .
[6] GNU Compiler Collection. http: // gcc. gnu. org/ .
[7] Qemu Mailing List. qemu-armeb linux stat64 syscall fix, http: // lists. gnu.
org/ archive/ html/ qemu-devel/ 2006-09/ msg00137. html .
[8] Nokia. Qt — A Cross-platform application and UI framework, http://qt.nokia.
com.
[9] Ubuntu. http: // www. ubuntu. com/ .
[10] VMWare. http: // www. vmware. com/ .
54