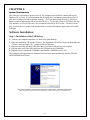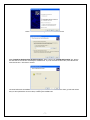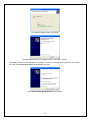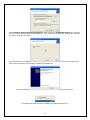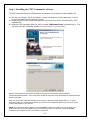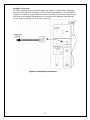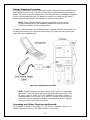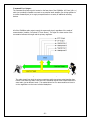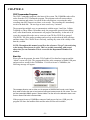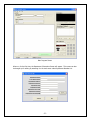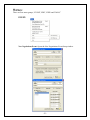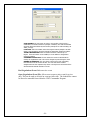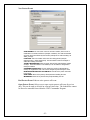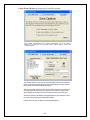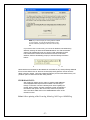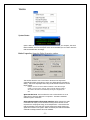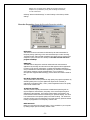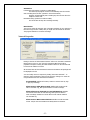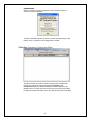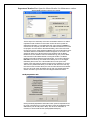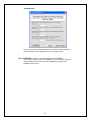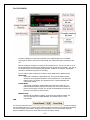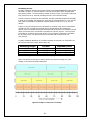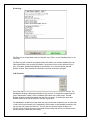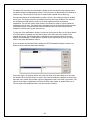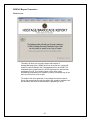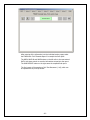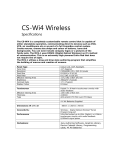
1
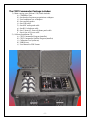
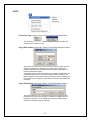
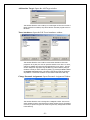
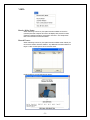
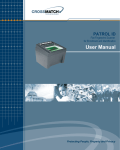
“Bringing Negotiations into the 21st Century”
Complete
Installation and Operation Manual
836 Technologies – 2008
-1-
MCC-2008.1a
Copyright © 2006 836 Technologies. All Rights Reserved.
No part of this manual, including the products and software described in it, may be reproduced,
transmitted, transcribed, stored in a retrieval system, or translated into any language in any form
or by means, except documentation kept by the purchaser for backup purposes, without the
express written permission of 836 Technologies.
Product warranty or service will not be extended if: (1) the product is repaired, modified or altered,
unless such repair, modification or alteration is authorized in writing by 836 Technologies; or (2)
the serial number of the product is defaced or missing.
836 TECHNOLOGIES PROVIDES THIS MANUAL “AS IS” WITHOUT WARRANTY OF ANY KIND,
EITHER EXPRESS OR IMPLIED, INCLUDING BUT NOT LIMITED TO THE IMPLIED WARRANTIES OR
CONDITION OR MERCHANTABILITY OR FITNESS FOR A PARTICULAR PURPOSE. IN NO EVENT
SHALL 863 TECHNOLOGIES, ITS DIRECTORS, OFFICERS, EMPLOYEES OR AGENTS BE LIABLE FOR
ANY INDIRECT, SPECIAL, INCIDENTAL, OR CONSEQUENTIAL DAMAGES (INCLUDING DAMAGES
FOR LOSS OF PROFITS, LOSS OF BUSINESS, LOSS OF USE OR DATA, INTERRUPTION OF
BUSINESS AND THE LIKE), EVEN IF 836 TECHNOLOGIES HAS BEEN ADVISED OF THE POSSIBILITY
OF SUCH DAMAGES ARISING FROM ANY DEFECT OR ERROR IN THIS MANUAL OR PRODUCT.
Products and corporate names appearing in this manual may or may not be registered trademarks
or copyrights of their respective companies, and are used only for identification or explanation and
to the owner’s benefit, without intent to infringe.
836 Technologies – A Solo dérivative.
-2-
CHAPTER 1:
The CINT Commander System
The CINT Commander is a complete networked incident management system designed
specifically for critical incident negotiations. The unit can be used with land line phones, cellular
phones, and certain throw phones. It is not a throw phone, although it does have throw phone
capabilities. The CINT Commander system focuses on landline negotiations, which are the most
common type of negotiation performed today. It also makes communicating with a cellular
telephone quick and easy. All recordings are done inside the computer, storing the digital
recordings safely on the hard drive in high quality MP3 format.
The device itself comes with a negotiator headset for the primary negotiator on scene, and four
additional headphones for the team scribe and others who are present in the negotiations room.
The device also comes with both an internal speaker and an external speaker with a nine foot cord
to enable others in the room or in an adjoining room to monitor the negotiations as they occur. In
addition there is a 1Vpp adjustable composite audio output which can be used to drive external
audio amplifiers and/or other recording devices. The user friendly panel on the device has a room
monitor volume control, volume control for the primary headset, and individual volume controls for
each of the four headphones. There are jacks for both landline/throw phone and cellular phone
negotiations, USB and PC microphone jacks, and both a power and reset button. The panel
contains LED’s which indicate data transfer, line hook status, and when a cellular phone is in use.
The device is equipped with a standard cigarette lighter plug, which provides 12 VDC to any cellular
telephone charger. This allows indefinite cellular telephone negotiations when a landline is
unavailable.
The computer software is the backbone of the entire CINT Commander system. Once the software
is installed into a laptop computer, the scribe has the capabilities of documenting any and all events
as they occur. Each entry made by the scribe is automatically time and date stamped into two
ongoing logs of events. These logs can be instantly accessed for review. In landline mode all
telephone activities can be automatically logged (on hook, off hook, numbers dialed, duration of
calls, and incoming calls including caller identification). The software also logs and digitally records
each telephone call that is placed to or received from the target of the operation. Each audio file is
recorded and compressed (in real time) into an MP3 format. In an event where the target fails to
answer the phone or a voicemail connects, the software will enable the device to continuously auto
redial the target’s phone and disconnect prior to the voicemail connection. The scribe has the ability
to select how many times to ring the target’s phone before hanging-up and redialing, and he/she
can select up to a 2 minute delay between re-dials.
The main CINT Commander Program’s log files and audio recordings can be accessed and amended
(Main Log) over a LAN (Local Area Network). Simply install the CINT Commander Satellite
software onto any computer on a LAN and connect. The CINT Commander Software can host up to
100 satellite connections (computers). The Satellite computers have the ability to review the entire
Main Log in real time, as it happens and, if permission is granted they can make notations remotely
into the Main Log. They can also download and display the Negotiation Position Paper at any time.
You also have the ability to review the list of recordings and listen to them through any of the
remote connections. Complete detailed records of every person involved (subjects, hostages,
victims ect...) can be maintained and distributed using the records editor. The network uses
standard TCP/IP protocol and can be wired (Cat 5) or wireless.
-3-
At the conclusion of an event, the event logs and all audio files can be transferred to any type of
storage media (CD, DVD, memory stick, etc.), which can be booked into evidence. Additional copies
of the event can also be produced and later reviewed, however the scribe’s log and audio files
cannot be altered within the CINT Commander program. A folder, which is named by the case
number entered, is created on the computer’s hard drive. All associated event files will remain
there until deleted by the user. The two event logs are saved in a common Microsoft Word©
document format (.doc), which can easily be printed and serve as the scribe’s completed report.
The documentation can also be easily transferred (Cut & Paste) to a departmental narrative if
preferred.
An Evidence Review program is included on every evidence CD you create. This program allows
your prosecutor to easily confirm CRC values (digital thumbprints) in court on all MP3 recordings,
proving their validity, and play them back for the court. Your prosecutor can also review and
display all records developed during the incident. This will reduce court preparation time and
increase your prosecutor’s productivity. Simply place the CD in a computer and you’re ready for
court.
-4-
The CINT Commander Package includes:
1) Main carrying case (Pelican 1550) which includes:
a) COMMBox Unit
b) One headset for primary negotiations w/adaptor
c) Four headphone sets w/adapters
d) One external speaker
e) One USB cable
f) One MIC audio patch cable
g) One RJ11 telephone cable
h) One 3.5mm to 2.5mm cell phone patch cable
i) One 6 foot AC Power cable
2) Software Installation CD:
a) CINT Commander Program (installer)
b) CINT Commander Satellite Program (installer)
c) Calibration Tool (software)
d) USB Drivers
e) User Manual in PDF format
-5-
CHAPTER 2:
System Requirements:
This software is designed to operate on a Lap Top computer (not included), running Microsoft ©
Windows XP or Vista. It is recommended that the laptop have a minimum processor speed of 1.5
GHz and 512 Megs of RAM (minimum memory). We recommend a large hard drive (40 Gig or
higher), as all recorded audio will be stored on the drive. To save the events on a CD Rom, the Lap
Top must have a CD or DVD writer. We recommend a duel layer DVD writer. The lap top must
have an Audio Device (sound card) installed with an external microphone input, and one available
USB port.
Software Installation:
Step 1 - Installation of the USB drivers.
1 - Turn on your computer and allow it to boot to the main desktop.
2 - Place the installation CD into the CD drive. The installation CD will not auto-run. Remember the
CD-drive letter (example “F:\”), which will be needed later.
3 - Plug one end of the provided USB cable into an available USB port on your computer.
4 - Plug the other end of the USB cable into the USB port on the COMMBox.
5 - Plug the power cord into the COMMBox and turn the COMMBox power ON.
The computer will report that new hardware has been found and automatically start the FOUND
NEW HARDWARE Wizard:
The wizard will ask if it can search the internet for a device driver. Select NO and click next.
(NOTE: If you have Internet access, you can allow windows to search the web. The drivers are available online.)
-6-
Select “Install from a list or specific location” then click next.
Select “Search for the best driver in these locations.” Place a check in the “Include this location” box. Write in
the drive letter for the CD drive containing the installation CD. If you do not know the drive letter, select Browse and
locate the CD Drive. Click Next to continue.
The wizard will search the installation CD for the appropriate drivers. If it fails to locate the driver, go back and confirm
that you have specified the correct CD drive, containing the installation CD.
-7-
The wizard will install the driver once located.
The USB Converter driver has successfully installed. Click Finish to continue.
The COMMBox requires one more USB driver to be installed. The driver will automatically be requested by the converter
driver and the NEW HARDWARE WIZARD will immediately start again.
Select “Install from a specific location” then click next.
-8-
Select “Search for the best driver in these locations.” Place a check in the “Include this location” box. Insert the
drive letter for the CD drive containing the installation CD. If you do not know the drive letter, select Browse and locate
the CD Drive. Click Next to continue.
The wizard will search the installation CD for the appropriate drivers. If it fails to locate the driver, go back and confirm
that you have specified the correct CD drive, containing the installation CD.
The wizard will install the driver and complete the USB driver installation. Click Finish to continue.
The computer will indicate that the new hardware is installed and ready for use.
-9-
Step 2 - Installing the CINT Commander software.
The CINT Commander Setup file (CINTsetup.exe) is located on the root directory of the installation CD.
1 - Click the “My Computer” icon on the desktop, or select “My Computer” from the start menu. Your CD
Drive will be listed in the “My Computer” window.
2 - Double click the CD Drive to open a window which will contain all the files in the root directory of the
installation CD.
3 - Locate the CINT Commander Setup file, which is named “CINTCommXXX.exe” and double click it. This
will launch the CINT Commander Installer. (the XXX represents the current version number)
CINT Commander Installer
After the license agreement, the installer will install the program in the default path “Program Files\836
Technologies\CINTCommander”. Icons will be placed in both the start menu and on the desktop. All program files will be
placed in that folder.
When you run the CINT Commander software for the first time, it will create a blank member INI file. You will be
prompted to add all your department information. You can then use the Department Member List editor (from TOOLS
menu) to add members to your team list.
NOTE* If you launch the software without a powered COMMBox connected to a USB port on your computer, the
program will report the missing COMMBox and go into Review Only Mode. You must have a powered COMMBox
connected to your computer to start a new incident or pretext call.
- 10 -
The CINT Satellite software installs similar to the main program. Refer to the aforementioned steps if needed.
All CINT Commander Software may be installed on as many computers as you
like. There are no licensing restrictions or limitations.
If you have any problems installing the CINT Commander Software or USB
drivers, or if you have any questions, contact Technical Support at 836
Technologies:
(209) 367-5619
Or, send E-Mail to
[email protected]
- 11 -
CHAPTER 3:
COMMBox:
The CINT Commander’s COMMBox is a self contained embedded computer communications
system. It interfaces the negotiator with the selected mode of communications (landline, cell phone,
throwphone). The COMMBox also provides the audio signal to be recorded and allows four (4)
members to directly listen in on the conversation using headphones. The headphone amplifiers have
independent volume controls. A composite audio output allows for an external command post
amplifier to drive speakers inside a command post area. An internal room monitor speaker (with
independent volume control) can be over-ridden by plugging in the external room monitor speaker,
which can be moved up to 9 feet away from the COMMBox.
Figure 1: Panel Layout
I – Status Indicators and RESET button
J – Internal room monitor speaker
K – Room Monitor Volume Adjust
L – MIC Output preset level adjust
M – Room Monitor External Speaker Jack
N – Command Post output preset level adjust
O – Headphone jacks and independent volume
adjusts
A – USB Connector to Computer
B – MIC out to Computer MIC Input
C – RJ11/14 Phone Line Input
D – Cellular Telephone Input/Output
And Bluetooth indicators
E – Command Post Audio Output
F – Main Power Switch
G – Primary Headset Volume
H – Primary Headset Jack
- 12 -
A) USB Connection: The COMMBox communicates to the computer via a USB (Universal Serial Bus)
link. The COMMBox reports the status and receives commands via this link.
B) MIC out to Computer MIC Input: All related audio signals are transmitted from the MIC output on
the COMMBox to the Microphone Input of the computer. This is the line that the recorder will record
during negotiations.
C) RJ11/14 Phone Line Input: This input accepts a modular (standard) phone plug. This is where you
plug in a landline or a compatible throw phone.
D) Cellular Telephone Input/Output: When using a cellular telephone for negotiations, the provided cell
phone cable connects the headset output of a cellular telephone to the cell phone input on the
COMMBox. When the Blue Tooth function is enabled, a blue LED will blink from inside the jack.
When placed into pairing mode, a red and blue led will flash.
E) Command Post Audio Output: Composite 1Vpp audio output. This jack accepts a MONO 3.5mm
audio plug. It outputs a mirror signal of the MIC output. It can be used to drive an audio amplifier,
which provides speaker level output to speakers mounted in a command post area. It can also be
plugged into a separate recording device.
F) Main Power Switch: Turns power On & Off to the COMMBox.
G) Primary Headset Volume: Volume adjustment control for the Primary’s headset.
H) Primary Headset Jack: The Primary’s headset plugs into this stereo 3.5mm jack. A 2.5mm stereo
adapter can be used for headsets with a 2.5mm plug.
I) Status Indicators and RESET Button:
1- Reset and Status: Green when connected to computer AND communicating with the CINT
Commander Software. Red when not connected to the Main Program. Also briefly turns red (or
orange) when acquiring data from Land Line.
Press this button to reset the COMMBox. Pressing will also hang-up the phone if OFF-HOOK in
Land Line or Throw phone mode.
2- USB: Flashes blue when communicating with the computer.
3- OFF-HOOK: Red when line is off hook in Land Line or Throwphone mode.
4- CELLPHONE: Green when in Cellular Telephone Mode.
J) Internal Room Monitor Speaker: Small Mylar speaker for room monitoring at low levels.
K) Room Monitor Volume Adjust: Volume control for the room monitor speaker and (if connected)
external room monitor speaker.
L) MIC Output Preset Level Adjust: This is a preset level control used to set the MIC output level. Once
this has been adjusted to the computer you’re using, it will not need further adjustments.
M) Room Monitor External Speaker Jack: When an external speaker is plugged into this jack, it overrides the internal room monitor speaker. 150mW max output into 8 ohms.
N) Command Post Output Preset Level Adjust: Factory preset level for Command Post output jack.
Level is set at 1vPP.
O) Headphone Jacks and Independent Volume Adjusts: These four individual audio amplifiers and
their respective jacks allow four team members to listen in to the conversation and adjust their own
volume level to a comfortable setting.
- 13 -
Calibration:
MIC Output: (MIC Adj)
The calibration of the MIC Output may only be needed upon the initial set up of the
CINT Commander as long as the same computer will be used with the device at all times.
If an alternate computer is used, you may find that adjustments to the MIC Output are
needed for optimal sound quality. The CINT Commander has been designed to provide
high fidelity audio to your computer. An overdriven distorted audio recording or a high
noise/low level audio recording will indicate that a MIC Output adjustment (calibration)
is needed.
The MIC Output is controlled by an attenuator which requires a counter clockwise
rotation to increase the audio output amplitude (THIS IS NOT A VOLUME
ADJUSTMENT). The attenuator port is located on the face plate of the COMMBox,
(Fig.1 #L). The supplied small flathead screwdriver should be used to adjust the MIC
Output level. The attenuator is very sensitive therefore minor adjustments are usually
sufficient.
Command Post Output: (CP Adj)
The Command Post Output is preset to 1Vpp, which is an industry standard low level and
should not be adjusted. However if an adjustment to this setting is deemed to be
necessary, it can easily be done.
The Command Post Output is controlled by an attenuator which requires a counter
clockwise rotation to increase the audio output amplitude (this is not a volume
adjustment). The attenuator port is located on the face plate of the COMMBox, (Fig.1
#N). A small flathead screwdriver should be used to carefully adjust the Command Post
Output level. The attenuator is very sensitive therefore minor adjustments are usually
sufficient.
This output was intended to be used not only as a means of driving an external amplifier,
but as a low level supply for future and experimental applications. This output is AC
coupled through a 10uF capacitor and DC coupled to earth ground.
- 14 -
Connecting / Setting Up the System:
Basic Set-Up:
Setting up the CINT Commander system will be the same each time it is used. The only
change might be mode of communication (landline, cell phone or throwphone). Figure #2
shows the basic set up of the CINT Commander system, without the communications
connection made.
Figure #2a: Basic set-up
Figure #2b: Optional Network set-up (up to 100 client computers)
- 15 -
Networking:
The CINT Commander can be connected to up to 100 computers on a Local Area Network (LAN)
by using a hub, switch or router (including wireless routers or Access Points).
Primary Headset:
The Primary headset jack is located on the face plate of the COMMBox (Fig.1 #H). The jack
accepts a 3.5mm stereo audio plug. The device comes with an adapter which accepts a 2.5mm
plug. This setup allows for a wide variety of headsets to be used.
Connect to Computer:
Two cables are required to connect the COMMBox to the computer. A standard USB cable
attaches to the face plate of the COMMBox, (Fig.1 #A), and to any USB port on the computer.
The second required cable is a mono microphone cable. This cable attaches to the microphone
port on the face of the COMMBox, (Fig.1 #B), and to the microphone port on the computer. The
industry standard color for the computer microphone jack is red (or sometimes pink).
External Speaker:
The COMMBox includes a room monitor amplifier and built in speaker, which is controlled by a
room monitor volume control. In normal operation, the internal speaker is in use. When an
external speaker is plugged into the external speaker jack (figure #1, M), the internal speaker is
disconnected. The room monitor is a convenience accessory and, if not used, can simply be
turned all the way down.
- 16 -
Landline Connection:
The CINT Commander system is primarily designed to operate in Landline mode. A negotiation
team will typically take over a telephone line for use during the negotiations. This line might be
residential or commercial. If the residence or business providing the phone line has DSL service,
a DSL filter will be required. The telephone line is brought into the negotiator room and plugs
into the landline jack (figure #1, C) as shown in figure #3.
Figure #3: Connecting to a Land Line
- 17 -
Cellular Telephone Connection:
If a landline is not available, the CINT Commander system is designed to allow negotiations via a
cellular telephone. When using a cell phone, all calls must be manually dialed on the cell phone
keypad. The cell phone must be equipped with a 2.5mm headset jack. The COMMBox is equipped
with a 12 Volt cigarette lighter jack. This allows for the use of a car charger to keep the cell
phone’s battery charged and allow the negotiation to continue uninterrupted.
NOTE* Cellular Telephone battery chargers are electrically noisy and might
introduce a buzzing noise in the headset and headphones. However this noise
will NOT be included or noticed in the recordings.
To connect a cellular telephone to the COMMBox, use the supplied 3.5mm to 2.5mm cable. Plug
the small end (2.5mm) into the cell phone and the large end (3.5mm) into the cell phone jack
(figure #4) on the COMMBox panel.
Figure #4: Connecting a cell phone
NOTE* Cellular Telephones use Radio Frequency (RF) energy to communicate
with towers. Some cell phones emit this RF energy at higher power levels. This
RF energy might be picked up by the COMMBox and its cables, resulting in
unwanted audible noise. You can try to rectify the problem by moving the cell
phone away from the COMMBox and cables. We recommend you try a different
cell phone, as some are “quieter” than others.
Connecting you Cellular Telephone via Bluetooth:
The COMMBox is capable of connecting to a Cell Phone via Bluetooth. Refer to the
Cellular Telephone Connection in the Software section of this manual.
- 18 -
Throw Phone Connection:
The throw phone connection uses a standard RJ11/14 telephone plug and cable, which attaches
to the face plate of the COMMBox, (Fig.1 #C). This will allow any RESCUE PHONE® throw phone
including the RESCUE PHONE® CRV (Crisis Response Video) or telephone with a standard
RJ11/14 telephone plug to connect to the COMMBox. If you own a RESCUE PHONE® simply plug
the cable from your wire spool into the COMMBox instead of plugging it into the CRT Rescue
Phone Console. For more information on the high quality throw phones produced by Rescue
Phone Inc. call 1-800-737-2832 or visit them at www.rescue-phone.com.
Covert Microphone Option:
When using a throw phone, your team has the option to enable the cover microphone. This will
allow your team to monitor and record audio captured by the throw phone’s covert microphone.
To enable this option, place a check in the “Enable Covert MIC” box in the Throwphone Control
Screen. When the MIC is enabled, the CINT Commander system will automatically switch to the
covert MIC anytime the throw phone is on hook. The covert MIC recordings are stored in the
same format as the conversation recordings and default to the same file and storage size set for
the conversation recordings (default at 15 minute recordings). To differentiate the covert MIC
recordings from the conversation recordings, the covert MIC recordings are annotated with the
letters “CM”. An example of this would be 06-1234_CM_1a.mp3.
Once the Record Covert MIC button is pressed, the recorder will continue recording the covert
MIC until ether stopped by the user, or until a call is placed on the throw phone itself. Once
either end of the throw phone is taken off of the hook, the covert MIC recording will
automatically stop and a new conversation recording will start.
Figure 5: Connecting a Throw Phone to the COMMBox
- 19 -
Command Post Output:
The Command Post Output jack is located on the face plate of the COMMBox. A 3.5mm (1/8th inch)
cable (not provided) is needed to connect to any external audio amplifier (for driving speakers in
a remote command post) or to supply composite audio to a variety of additional recording
devices.
All of the COMMBox audio outputs supply the same audio signal, regardless of the mode of
communication (Landline, Cell phone or Throw Phone). The signal is a clean version of the
conversation between the target and the primary negotiator.
Figure 6: Basic Audio Path Concept
The audio signals from both the primary negotiator and the target are mixed together then
filtered. From there the audio is sent out to the individual outputs. Each output contains the
same audio, just at different levels. This method allows for four team members to listen in
on the negotiations on their own individual headphone.
- 20 -
CHAPTER 4:
CINT Commander Program:
The CINT Commander program is the heart of the system. The COMMBox takes all its
orders from the CINT Commander program. The program tracks all team members,
events, notations and actions. It records all the conversations, converting the audio
recordings into MP3 format in real time, as it records. The recordings are immediately
saved to the hard disk. The text logs are auto-saved every 5 minutes.
The program has multiple ways to communicate with the target; Land Line, Cellular
Telephone or Throw Phone. In landline mode, the program has powerful auto-dialing
tools, caller identification, and automatic call progress functionality. At the end of an
event, the program allows the user to create an event CD-R or DVD-R (or group of
CDs/DVDs). All of the audio recordings and text logs are placed on the disk with time
and date stamps. The CDs/DVDs are read only, assuring any court of the validity of the
data they contain.
NOTE: Throughout this manuel you will see the reference “Target” when referring
to the hostage taker/person in crisis. This is a variable term along with several
others that you can customize. This is covered in the Department Member List
window.
Start Up:
When you run the program, the main GUI (Graphical User Interface) appears and the
“About” screen will cycle. The program then looks at the computers available USB ports
and proceeds to search for the COMMBox. If it fails to locate a COMMBox, the
following message will appear:
This message allows to user to either run the program in REVIEW ONLY mode or exit. Review
Only mode will allow the user to load previous events and pretext events for full review. The user
can also create/edit HOBAS reports in Review Mode. The user will not be allowed to start a new
Event or Pretext Call while in Review Mode.
If the program locates a COMMBox connected (and powered up) to a USB port, the
program will show the landline dialer and the menu will become available.
- 21 -
Main Program Screen
When run for the first time, the Department Information Screen will appear. This screen can also
be brought up for editing by accessing it in the tools menu under Department Member List.
- 22 -
Menus:
There are four menu groups; “EVENT, EDIT, VIEW and TOOLS.”
EVENT:
New Negotiations Event: Opens the New Negotiations Event Setup window.
- 23 -
This window allows the user to start a new event.
CASE NUMBER: The user enters an event or case number, which can be a
combination of numbers and letters (example: 06-4587a). The CINT Commander
will name all files and folders by this number (example of an audio recording: 064587a_1a.mp3).
LOCATION: This is the location where the target is located (example: 432 Oak
Street). This information cannot be changed or edited after starting an incident.
TARGET INFORMATION: Place the names and dates of birth of up to 7
targets. If this information is not available, it can be added or changed later
during the incident.
COMMUNICATIONS TYPE: The user selects the mode of communications
used by the negotiations team. This can be changed any time during the event.
MEMBER ATTENDANCE: The user places a check next to each responding
team member from the member list box. The user then selects member
assignments from their respective drop boxes. The drop boxes will contain all the
aforementioned selected members on scene.
End Negotiations Event: Ends an active event.
Open Negotiations Event File: Allows user to open a prior event for review
only. This can be used to de-brief an event at a later time. The loaded files cannot
be altered or amended from within the CINT Commander Program.
- 24 -
New Pretext Event:
CASE NUMBER: The user enters a case or reference number, which can be a
combination of numbers and letters (example: 06-4587a). The CINT Commander
will name all files and folders by this number (example of an audio recording: 064587a_1a.mp3).
LOCATION: This is the location where the call is being placed (example:
Interview Room 3, Police Department). This information cannot be changed or
edited after starting an incident.
TARGET INFORMATION: Place the name, date of birth and telephone number
of target. If this information is not available, it can be added or changed later
during the incident.
COMMUNICATIONS TYPE: The user selects the mode of communications
used by the negotiations team. This can be changed any time during the event.
PERSON INITIATING CALL OR CONTACT: This will be the person who talks
to the target.
CASE AGENT: Name of the primary officer/Detective handling the case.
WITNESSES: Names of any and all other people attending the call.
End Pretext Event: Ends an active pretext call/event.
Open Pretext Event: Allows user to open a prior pretext call/event for review
only. This can be used to de-brief an event at a later time. The loaded files cannot
be altered or amended from within the CINT Commander Program.
- 25 -
Create Event CD (Save): Opens Save Event Files window.
By default, the CINT Commander does not save a copy of the Negotiator’s Position
Paper, ADMIN Communications Log or NOC Communications Log to the evidence
CD/DVD. If you want them to be included with the evidence, place a check in the
corresponding box.
This window allows the user to save all the associated event files to a selected
media. A list box lists all the files that were created during the event and lists
their total file size below (Required Disk Space).
The user can select a disk drive (any storage media connected to the computer,
including USB Jump Drives) from the drop box. Once a drive is selected, the
space available on the drive will be shown below the drive select drop box.
The Source Directory box displays the physical path (on your computer) where
the event files have been stored during the incident.
Pressing Save will copy the files to the selected drive/device.
- 26 -
NOTE: If you have third party CD writing software installed
on your computer, you can save the files directly to a CD
from this window by selecting the CD Drive from the drop
box.
If you want to save to a CD or DVD, you can use the Windows® CD ROM Burning
Wizard by selecting the SAVE TO CD BURN FOLDER tab. The CINT Commander
software will automatically locate your CD Burn Folder and display the path.
Press COPY FILES to transfer all the associated event files to this folder.
Windows® will then automatically prompt you with the following information
balloon:
Click on the balloon to start the CD ROM Burning Wizard.
NOTE: Windows XP and VISTA CD Burn Wizards do not finalize the CD, thereby allowing additional
files to be later added to the CD. However the data (files) initially placed on the CD cannot be
edited, removed or altered. Third party CD Burning software (such as Roxio Media Creator©) will
provide an option to finalize the CD after writing the files.
FBI HOBAS FD-522:
After creating an incident CD, the option to complete a FBI HOBAS FD522 Hostage/Barricade Report becomes available. This will step you
through a succession of screens containing check boxes regarding the
incident. When complete, the CINT Commander system will assemble a
formatted FD-522 report in Rich Text format, which can be printed or
sent to the FBI via E-Mail. Refer to the HOBAS REPORT section of this
manual for further.
Print: Allows printing of the Event log, Main log, NOC log or ADMIN log.
- 27 -
About CINT Commander: Opens the About Window.
This screen displays the current software & firmware versions, and department information.
Exit: Exits program.
NOTE* The program cannot be closed until the event has been ended! This
feature helps prevent against accidental program closure.
- 28 -
EDIT:
Connection Type: Allows you to select the mode of communication.
The connection type can also be changed by right-clicking in the dialer area
and selecting from a pop-up menu.
Target Dial Number: Opens the Change Target Phone Number window.
This window allows the user to change the target telephone number any time
during the negotiations. It allows the user to add a 9 to the number (for
example: when taking over an analogue phone line that is integrated into a
business’ computerized system).
It also allows the user to add a Star Number (for example: The team takes over
a residential telephone line in which the resident has caller ID blocking. The
target’s telephone will not take calls from a number with caller ID blocking. The
user can add “*82” to temporarily allow caller ID information and connect with
the target).
Target Information: Opens the Change Target Information window.
This window allows the user to change the target’s name and date of birth
information at any time during the event. The Main Log is updated with the
information. This edit box is not available when there are multiple targets.
However a multi target edit box will be used.
- 29 -
Add Another Target: Opens the Add Target window.
This window allows the user to add up to 7 total targets. If there is more than 1
target involved in an incident, they will be listed on the main program screen in
tab boxes.
Team Attendance: Opens the Edit Team Attendance window.
This window allows the user to add or remove team members as the event
progresses. At any time, the user can open this window to see who is on scene,
and who is available from the main team member list (not on scene). The user
can also stamp both logs (Event Log and Main Log) with a notation, listing all
members currently on scene and who is primary, by pressing the MAKE A NOTE
OF MEMBERS ON SCENE button. This will be useful during multi-day incidents.
Any addition or removal of members on scene will be noted in the Main Log.
Change Personnel Assignments: Opens Personnel Assignment Window.
This window allows the user to change who is assigned to what. The user can
select members from the drop down boxes (which contains a list of all members
on scene) or he/she can type in the name of a guest. Any changes will be noted
in the Main Log.
- 30 -
VIEW:
Receive Sticky Notes:
When networking is turned on, this option becomes available. If turned on
(Checked) then this computer will receive and display sticky noted from other
computers (Satellite Computers) connected to the event. See “Sticky Notes”
later in this manual for further information.
Record Viewer:
When networking is turned on, this option becomes available. When clicked, the
record viewer window becomes available. Any additional information added to a
target or other involved person can be viewed in detail:
Double clicking on a record will open the viewer:
- 31 -
2nd View Window: Opens a second Main Log view window.
This widow has no controls and is for display purposes only. The user can drag
this window onto a second monitor screen, thereby allowing others (who might
not be in the room) to watch and read the main log on a remote monitor/screen
as the event is in progress. This requires a second monitor or video projector.
Refer to your computer’s operating manual for instructions on operating your
computer in duel display/extended desktop mode.
NOC Communications Viewer:
When networking is turned on, this option becomes available. When clicked, the
NOC Communications window opens. From here the user of the CINT
Commander can receive remote information from anyone on the network who
has NOC permissions. This is a read only viewer.
Clear all Sticky Notes:
When networking is turned on, this option becomes available. Removes (closes)
all sticky notes present on the screen. There is also a button (which becomes
visible when “Receive Sticky Notes” is checked) at the bottom of the main screen
which allows you to completely remove all sticky notes:
Sticky notes can be sent to all connected incident PCs. They appear on the
screen as a standard yellow sticky note. They can be moved about the screen
and/or closed.
- 32 -
TOOLS:
System Status:
Opens a Status Window, which displays the amount of RAM in your computer; how much
RAM in available, and how much space is free on the hard disk (the one used to store the
CINT Commander MP3 recordings).
Dialer Properties: Opens the Dialer Properties window.
This window allows the user to set a limit to the amount of rings before
automatically hanging up the phone, and to set a delay between automatic redialing. This tool is only helpful when using the AUTO DIAL function to call the
target number.
Example: The user can set the CINT Commander to auto-dial the target
number, let it ring 3 times, hang up, wait 30 seconds, and then redial. It
will continue this action until answered by the target or stopped by the
user.
Ignore No Dial Tone: This box allows the user to select whether or not to
advise when a phone line dial tone is not present. The CINT Commander
defaults to ignore no dial tone.
Allow Fully Automatic Call Progress Functions: When selected, the CINT
Commander will employ a series of cadence timing routines to listen to and
respond to the call-progress energy on the telephone line. This will allow the
CINT Commander to auto start the recorder; detect busy signals; detect ring
signals and to detect error signals. When not selected, the CINT Commander’s
automatic recording functions will not be available.
- 33 -
Example: The user might elect to disable call progress functions if the
telephone line is problematic, causing false recordings and detections,
or a lack of detections.
Selecting “Restore Default Settings” re-sets all setting to their factory default
settings.
Recorder Properties: Opens the Recorder Properties window.
Buffer Size:
This selects the amount of RAM to be allocated by the CINT Commander for
temporary storage (buffering) of the audio information prior to MP3 encoding.
The default buffer setting is 50Mb (50000000) and should only be lowered if the
computer’s system resources are critically low! A buffer overrun will cause
program instability!
MMX Mode:
The MMX Mode is designed to accelerate multimedia and communications
applications by including new instructions and data types that allow applications
to achieve a new level of performance. It exploits the parallelism inherent in
many multimedia and communications algorithms, yet maintains full compatibility
with existing operating systems and applications. If your computer’s
microprocessor supports MMX technology, this box should be checked. Default is
ON.
PSY Mode: (Psycho-Acoustics)
The psychoacoustic function provides for high quality lossy signal compression by
describing which parts of a given digital audio signal can be removed (or
aggressively compressed) safely - that is, without significant losses in the quality
of the sound. Default is ON.
16 KHz low-pass filter
This filter provides a quality enhancement of band limited speech signals. In
regular telephone communication, the quality of the received speech signal is
degraded by band limitation. This function utilizes aliasing components in the
inverse discrete wavelet transform and filtering for spectrum shaping. The result
is an enhancement of the speech quality in the final recording. The 16 KHz lowpass filter will also save more data-bits for the lower frequency spectrum without
noticing any degradation of sound quality. Default is ON.
Multi CPU Mode:
Makes use of the Duel Core microprocessor, if one is available on your computer
by adding multiple process threading. Default is OFF.
- 34 -
Automation:
Full Auto-Record Functions: (Default in Landline Mode)
Use cadence/call progress routines to automatically start the recorder.
Start recording when off-hook: (Default in Throw Phone Mode)
Recorder will automatically start recording any time the user takes the
telephone off the hook.
Manual Recording: (Default in Cell Phone Mode)
User must start and stop the recordings manually.
Max File Size:
The user can select the maximum size of the MP3 recordings. If your computer is
fast with a large amount of RAM, then you might elect to increase the file sizes.
The program defaults to 15 minute recordings.
Network Properties:
Placing a check in the “Allow Network Access” will turn on the CINT Commander
Network server. Once on, the “This PC’s Connection INFO” boxes will be
populated. Computers running the CINT Satellite software on the LAN will need
to know the IP address to connect.
All connected PCs and their associated connection information and privileges will
be displayed in the list.
You can forcibly remove a computer by clicking “Disconnect Selected”. To
change a client’s permissions, select it from the list by clicking on it. Select the
new permissions then click “Send New Permissions”.
Access Denied: Satellite will connect, however it cannot view any logs
or play any recordings.
Allow Access to View Main Log Only: Satellite will connect and be
able to view Main Log, NPP report and listen to audio recordings.
Allow Full Access to View Main Log and Add Notations: Satellite
will connect and be able to view Main Log, NPP report and listen to
audio recordings. Satellite user will be able to make remote notations
into the Main Log.
Allow Access to NOC Communications: Satellite user will have NOC
access. She/he can send notations and Sticky Notes into the NOC.
- 35 -
CONNECTIONS:
When a connection request is received from a LAN connected computer, a
connection request is displayed:
The CINT Commander operator can choose the client’s privilege setting or deny
him/her access. Permissions can be changed later if needed.
NPP Editor: Negotiator’s Position Paper Editor
This editor will allow the scribe to maintain a position paper throughout the
incident. The three areas of the paper (STATUS, ASSESSMENT and
RECOMMENDATIONS) are edited individually then compiled together in the
REVIEW screen. The scribe can print the report at any time during the incident,
providing the tactical team leader with an up to date assessment of the situation.
- 36 -
Department Member List: Opens the Master Member List Maintenance window.
This is accessible only when an event is not in progress.
The first step in the initial setup of the CINT Commander software is to add all
negotiations team members into the master member list and to provide all
department information. To accomplish this task, ensure that the COMMBox is
connected to the computer, and then click on the CINT Commander icon to load
the program. Once the software has finished loading, click on the Tools tab at
the top of the screen. Select Department Member List from the drop down menu.
The Master Member List Maintenance window will appear on the screen. This
window will allow you to add and remove team members from the Master
Member list. As new members come and old members go, they can be added
and removed from the Master Member List using this window. The Master
Member List should be updated at each training day. You can also change the
font size for the main log. The default font is factory set at 12. We suggest
maintaining this font size as it is the standard size for most report writer
systems, and it will reduce the number of pages at the completion of an event.
This is the only window that allows you to alter the font size for the main log.
Once the font size has been altered, the new size value will become the default
font size, and it will remain the default font size until it is changed within this
window. The Main Log font size cannot be changed outside this window.
Modify Department Info:
Clicking the Modify Department Information button opens the Department SetUp screen, which allows you to insert the agency name and negotiations team
abbreviation (such as CINT, CNU or HNT). The rest of the information is
necessary to submit an FBI FD-522 (Hostage/Barricade Report).
- 37 -
Customize Text:
Here you can customize the global attributes for key terms used throughout the
CINT Commander Program. Adjust them to fit your agency’s needs.
Reset COMMBox: Sends a reset command to the COMMBox.
In the event that power is lost to the COMMBox, it may be necessary to reset the
communications between the computer and COMMBox by selecting Reset
COMMBox from the menu.
- 38 -
The RECORDER:
Figure #7: Recorder control box
The CINT Commander records audio presented on the computers MIC input. The CODEC
compresses the audio in real time into MP3 Format. This compression keeps recording file sizes
low.
When a recording is completed, it is placed in the recording list box. The user can click on any of
the recordings then press play on the playback control box to listen to the recording. The user can
also double click any file to immediately start playback. A SEEK bar is included in the playback
controls for manually moving within the recording.
The user has the option of placing the recorder in AUTO, SEMI-AUTO or MANUAL mode:
AUTO Mode:
Auto mode is available in Landline Mode only. The CINT Commander software
will monitor all call progress information on the telephone line. It can distinguish
between rings, busy signals, error signals and voice. It will automatically start
and stop the recorder.
S-AUTO Mode:
S-Auto mode is available in Landline Mode and Throw Phone mode only. The
CINT Commander Software will start the recorder any time the user places the
phone (or throw phone) off hook. The recorder will automatically stop when the
phone (or throw phone) is placed on hook.
MANUAL Mode:
Manual mode is available in Landline, Throw Phone and Cell Phone Modes. The
user must manually press “FORCE RECORD” and “FORCE STOP” to record
conversations.
SUB:
You can at any time force the recorder to begin a sub recording without disturbing the current conversation.
This is beneficial when you or someone on the network needs to hear what was just said without disturbing
the current recording (conversation). Simply press the SUB button. The current recording stops and
becomes available to everyone for review while a new sub-recording is started.
- 39 -
File Naming Process:
The CINT Commander program uses the data entered into the CASE NUMBER field to label all files
and folders. In Figure #7, the Case Number is “06-1234” and therefore all the recording names
start with this number. The first recording is named “06-1234_1a.mp3”. The second is named “061234_2a.mp3” and so on. Each call (recording) will have a new successive number.
In order to keep the recording file sizes reasonable, the CINT Commander program has the ability
to break one conversation into multiple files. These files are sub-lettered from “a” to “zZ”. Sub file
sizes, which are selectable in the Recorder Properties window, can be set at 15, 30, 45 or 60
minutes.
In figure #7, the file size has been set at 15 Minutes per recording. There are four conversations
recorded. The first 3 recordings were smaller than 15 minutes and are all sub-lettered “a”.
However the 4th conversation went beyond 45 minutes and was broken into 4 recordings. The first
portion (15 minutes) of the conversation is recorded in file “06-1234_4a.mp3.” The next portion
(15 minutes) is recorded in file “06-1234_4b.mp3.” The next portion (15 minutes) is recorded in
file “06-1234_4c.mp3.” The final portion of the conversation was recorded into file “061234_4d.mp3.”
The CINT Commander defaults to use 15 minute recordings. In this mode, one conversation can
sub-record for 168 hours (7 days). Refer to figure #8.
Recording Length
15
30
45
60
Minute
Minute
Minute
Minute
File Size
14
28
42
56
Megs
Megs
Megs
Megs
Maximum Hours
168 Hours (7 Days)
336 Hours (14 Days)
504 Hours (21 Days)
672 Hours (28 Days)
Figure #8: File size vs. conversation length approximation
Figure #9 illustrates the way files are named, based on the selected recording size. In this
example, a 120 minute conversation takes place.
Figure #9: Example of a 120 minute conversation
- 40 -
Dialer:
Landline Mode:
The CINT Commander has a variety of dialer functions which are accessible in the line control
box. In landline mode the line control box will be present in the lower right portion of the main
screen. The line control box lists the target telephone number. By right clicking the mouse over
the telephone number, the Change Target Number window will appear and enable the user to
change the target’s telephone number.
While the telephone is not in use, the line control box will indicate that the phone is “On Hook.”
In order to place a telephone call to the target, the user can click the Dial button within the line
control window. The phone will automatically be taken Off Hook as indicated by a red text box.
The system will then auto dial the target number. At the completion of the call the user can click
the Hang Up button to disconnect the call and stop the recording. If the system receives a busy
signal the device will automatically hang up. If the phone call goes to voicemail or the target
simply lets the phone ring without answering, the user can click the Auto Re-Dial button and the
system will automatically dial the target’s telephone number and disconnect after a specified
number of rings as set in the dialer properties window. The user can right click over the Auto ReDial button to access the Dialer Properties window. This will enable the user to change the ring
limit and call delay.
The user can also choose to manually dial the target’s phone number or any alternate numbers.
To accomplish this task the user must click the Take Off Hook button and then dial the number
using the adjacent key pad. If the recorder is set to auto mode, any calls dialed manually will
receive the automatic recording functions.
In landline mode all calls will be automatically recorded once the phone is answered on the
target’s end. When the phone is taken off hook (with the recorder in AUTO mode) the MUTE MIC
button will flash pink and red. This will advise the user that the Auto Muting function is engaged.
This will prevent the recorder from falsely starting (due to the primary talking) until the phone is
connected on the target’s end.
The CINT Commander system incorporates caller identification. When it receives an incoming
call, the text logs will be noted with the caller identification; the computer will ring like a phone
and the TAKE OFF HOOK button will turn red and say “Answer”. If the call is coming from the
target, the text logs will be noted with “Incoming call from TARGET”.
- 41 -
Throw Phone mode:
When in Throw Phone mode, the THROWPHONE CONTROL box appears in the lower right corner
of the main screen.
OFF HOOK:
When pressed, this starts the recorder (if in S-Auto Mode) and, if the throw phone is on
hook, it will ring the throw phone. If the throw phone is off hook, it will connect and
conversation can begin.
ON HOOK:
Pressing this will hang-up and (if in S-Auto Mode) stop the recorder.
MIC Mute:
This button is normally green (MIC on). When pressed, it will flash red, indicating that
the primary’s microphone is muted.
Enable Covert MIC:
Placing a check in this box will switch the COMMBox to “listen” to the covert microphone
inside the throwphone. When this box is checked, the COMMBox will automatically switch
between the covert MIC and the throwphone MIC based on the Hook status.
Auto-Record Covert MIC:
Placing a check in this box will cause the CINT Commander to start a new Covert MIC
recording every time you hang-up the throw phone. This function is available only if the
Enable Covert MIC box is checked.
Record Covert MIC:
Pressing this button starts the recorder, which will continue recording the covert MIC
until ether stopped by the user, or until a call is placed on the throw phone itself. Once
either end of the throw phone is taken off of the hook, the covert MIC recording will
automatically stop and a new conversation recording will start. The covert MIC
recordings are stored in the same format as the conversation recordings and default to
the same file and storage size set for the conversation recordings (preset default at 15
minute recordings). To differentiate the covert MIC recordings from the conversation
recordings, the covert MIC recordings are annotated with the letters “CM”. An example of
this would be 06-1234_CM_1a.mp3.
If the target takes the throw phone off hook, it will ring the CINT Commander Software and the
OFF HOOK button will turn red.
- 42 -
Cellular Telephone Mode:
Cell Phone mode allows you to use any cell phone as a means of communication. You can
directly connect a cell phone to the COMMBox using the supplied 3.5mm to 2.5mm cable, or pair
the phone to the COMMBox via Bluetooth. In Cell Phone mode, there is no phone control
through software between the program and the cell phone (with the exception of the
Multifunction button in Bluetooth mode). The user must manually dial the target number on the
cell phone keypad and start the recorder manually. All other CINT Commander functions remain
the same.
DIRECT (Wired) Connection:
Connect your cell phone to the COMMBox using the supplied cable. One end has a 2.5mm plug,
the other is 3.5mm.
Using Bluetooth® Wireless Technology:
To turn on the Bluetooth transceiver, place a check in the “Use Bluetooth” box. When Bluetooth
is turned on, you will see a blue light shining (blinking) from inside the Cell Phone jack on the
COMMBox.
When Bluetooth is turned on, the COMMBox will automatically try to connect to any pre-paired
cell phone. To pair your Bluetooth capable cell phone to the COMMBox, press the HELP button
and follow the simple step by step instructions.
- 43 -
TEXT LOGS:
Main Log:
The Main Log contains all of the text information generated within an event. To access the Main Log click on
the View Main Log button located at the lower left portion of the main screen. The log is maintained in a
standard Rich Text Format and uses the common document extension “.doc”. The top of the log lists the
agency, case number, target information, original team members present, and the original primary
negotiator. Each text entry in the log is listed in sequential order, and all of which are time and date
stamped. Information is added automatically by the software, or by the user through the ADD Notation
window.
A search field is available at the top of the Main Log screen. This field enables the user to search for and
locate any word within the log. For instance, if the user wanted to locate what he/she had previously
entered regarding a gun, the user would enter the word “gun” into the search field and then click the “Find”
button. The system will search throughout the log and highlight the first instance of the word “gun”. If the
word “gun” was listed multiple times throughout the log, the Find button would show “Find Next”. After
clicking on the Find Next icon the system would then skip to the next portion of the log that listed the word
“gun”. The Find function locates partial matches.
The Find and Highlight function will not only locate the word to be searched for, but it will also highlight the
word every time it appears in the log. The highlight color can be changed between four colors by right
clicking the “Find and Highlight” button. This function looks for an exact match only.
Highlighting text can de accomplished by selecting text to be highlighted within the log, then clicking one of
the two colorized highlight buttons. The highlight button colors can be changed by right clicking on them. A
selection of highlighted text can be de-highlighted by clicking “Clear Selected”. To remove all highlights,
click “Remove All Highlights”. Highlights will be automatically removed from the final log when saved to a
CD/DVD.
The Main Log can be printed at any time throughout the event as long as a printer is properly installed on
the computer. The top of the Main Log screen has both a Print Preview button and a Print button. The Print
Preview button allows the user to view the format and set up of the document prior to printing. The user
can either select the Print icon from the top of the Print Preview screen or return to the Main Log screen
and select the Print button from that page.
- 44 -
Event Log:
The Event Log is a scaled down version of the Main Log. There is no text formatting done in the
Event Log.
The Event Log will include the originating incident information, any notation added by the user,
Caller Identification, and recording information. Its purpose is to be a quick reference for the
user. Information is added automatically by the software, or by the user through the Add
Notation window. Once inserted, the information cannot be removed or changed.
Add Notation:
One of the user’s main responsibilities is to add pertinent notations throughout the event. The
Add Notation window is designed specifically for this purpose. To access this window select the
green “Add Notation” button, which is located at the bottom of the main screen. The Add
Notation window can also be accessed from the Main Log screen, by clicking the green Add
Notation button at the top left portion of the Main Log window.
The Add Notation window has a large main text entry window that enables the user to enter data
in real time, as he/she listens to the negotiations. Each notation is automatically entered into the
log once the user presses the Enter key. The user can also choose to select the Next Line
function, which will allow the user to enter several lines of data that will not be entered into the
log until the user presses the Insert button.
- 45 -
The default font size within the Add Notation window will be the same font size selected within
the Master Member List Maintenance window. The font size can be altered within this window for
notations only. This will alter the font size of notation when entered into the Main Log.
One important feature of the Add Notation window is that it is set to always be the top window
that is open. The window cannot be concealed behind any other open windows. The reason for
this is because the Add Notation window is the most important window during active
negotiations. The user will need to have access to this window in order to properly notate the
negotiations as they occur. Everything that is entered by the user through this window becomes
a permanent record of events and they cannot be altered. Each line of text entered will be
viewable in both the main log and the event log.
To close out of the Add Notation window, the user can click either the Done or the Cancel button.
If the Done button is selected, any text that remains in the main text entry window will be
entered into the log. If the Cancel button is selected any text remaining within the text box
window will be discarded. The Add Notation window can be reopened at any time by clicking
either of the green Add Notation buttons.
If your computer has Microsoft Word installed, the CINT Commander Software will borrow its
dictionary and provide automatic spell checking:
As the User types, the program will list any words not found in the main dictionary in the lower
left window. When the user clicks on a word in the lower left window it highlights the word in the
main text entry window and provides a group of suggestion words in the lower right window. The
user can then select a replacement word from the lower right window by double clicking on it.
This will replace the misspelled word in the main text entry window.
- 46 -
HOBAS Report Generator:
Main Screen:
This editor will allow you to quickly compile and complete a
Hostage/Barricade report (HOBAS) which can be printed out, copied and
pasted or simply E-Mailed to the Crisis Negotiations Unit at the FBI. The
completed report format follows the FD-522 reporting form and has been
accepted by the FBI. The narrative portion of the report will be
automatically completed by the software by placing a complete copy of the
main log of the event into the report.
The usage of the report generator is very straight forward and intuitive.
Simply step successively through the section tabs. Questions marked in red
are mandatory and must be answered before generating a report.
- 47 -
After entering all the information into the individual section pages, select
the FINISH tab. Click “Generate Report” to compile the final report.
The OPEN, SAVE AS and SAVE buttons on the left refer to the raw entered
DATA. Use these controls to save the information entered into the report.
The SAVE REPORT button on the right saves the compiled final report.
The final report will be saved as a Rich Text Document (*.rtf), which can
be opened with any word processor.
- 48 -
If you have any problems or questions regarding operating the CINT Commander
System, please contact our technical support at:
836 Technologies: (209) 366-3242
Or, send an E-Mail to
[email protected]
Visit us on the Web at:
http://www.836technologies.com
836 Technologies
2715 West Kettleman Lane
Ste. 203-340
Lodi, Ca. 95242
- 49 -