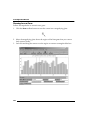
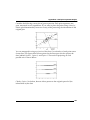
1
GeneSight
Users Manual
Updated for Version 3.5
Sept. 3, 2002
Copyright Notice
©1997-2002 BioDiscovery, Inc. All Rights Reserved.
The GeneSight™ Users Manual was written at BioDiscovery, Inc., 4640 Admiralty
Way, Suite 710, Marina Del Rey, CA 90292.
Printed in the United States of America.
The software described in this book is furnished under a license agreement and may
be used only in accordance with the terms of the agreement.
Every effort has been made to ensure the accuracy of this manual. However,
BioDiscovery makes no warranties with respect to this documentation and disclaims
any implied warranties of merchantability and fitness for a particular purpose.
BioDiscovery shall not be liable for any errors or for any incidental or consequential
damages in connection with the furnishing, performance, or use of this manual or the
examples herein. The information within this manual is subject to change.
Trademarks
GeneSight™, ImaGene™, GeneSight-Lite™, GenePie®, GeneDirector™, and
CloneTracker™ are trademarks of BioDiscovery, Inc.
Windows, Wordpad, and Excel are either registered trademarks or trademarks of
Microsoft Corporation in the United States and/or other countries.
Other product names mentioned in this manual may be trademarks or registered
trademarks of their respective companies and are the sole property of their respective
manufacturers.
License Agreement and Limited Warranty
THIS SOFTWARE LICENSE AGREEMENT AND LIMITED WARRANTY
(“AGREEMENT”) IS ENTERED INTO BY AND BETWEEN BIODISCOVERY, INC.
(“LICENSOR”) AND YOU WHETHER YOU ARE AN INDIVIDUAL OR AN ENTITY
(“LICENSEE”). READ THE FOLLOWING TERMS AND CONDITIONS
CAREFULLY BEFORE OPENING THIS SEALED PACKAGE CONTAINING THE
ENCLOSED SOFTWARE, OR BEFORE PROCEEDING FURTHER WITH THE USE
OR INSTALLATION OF THIS SOFTWARE. BY YOUR OPENING OF THE
PACKAGE CONTAINING THIS SOFTWARE, OR BY INSTALLING OR UTILIZING
THE INSTANT SOFWARE, YOU AGREE TO BE BOUND BY THE TERMS AND
CONDITIONS SET FORTH HEREIN. IF YOU DO NOT AGREE TO BE BOUND BY
THE TERMS AND CONDITIONS, YOU MUST RETURN THIS PACKAGE AND
THE SOFTWARE WHICH IT CONTAINS TO YOUR PLACE OF PURCHASE NO
LATER THAN TEN (10) DAYS FROM YOUR RECEIPT OF THE SOFTWARE. UPON
RECEIPT OF THE UNOPENED PACKAGE, YOUR PURCHASE PRICE WILL BE
REFUNDED. THIS SOFTWARE PRODUCT IS PROTECTED BY COPYRIGHT LAWS
AND INTERNATIONAL COPYRIGHT TREATIES, AS WELL AS OTHER
INTELLECTUAL PROPERTY LAWS AND TREATIES, AND THIS AGREEMENT.
THE SOFTWARE PRODUCT WHICH IS THE SUBJECT OF THIS AGREEMENT IS
LICENSED UNDER THIS AGREEMENT, NOT SOLD.
1. LICENSE GRANT - For consideration promised and/or received, Licensor
hereby grants to Licensee one non-exclusive, nontransferable, internal, end-user
license (the “License”) to use the basic software product entitled GeneSight®
version 3.0, and those software modules expressly authorized in writing by
Licensor, if any, (the “Software”), and the accompanying documentation in the
form delivered to Licensee. Unless Licensee has requested and expressly obtained
written permission from Licensor, and until such time that Licensee has paid a
multiple licensee fee for the concurrent use of the Software, the Software is
licensed as a single product and, notwithstanding the fact that the Software itself
does execute and/or access multiple central processing units (“CPU”)
concurrently, Licensee shall not separate, execute, or access the Software for use
on more than one CPU at any one given time. Subject to Licensee’s purchase of
more than one License, this license granted hereunder is for use only upon a
single stand alone computer and only one instance of the Software may be
executed and/or accessed at any one time, where such computer upon which the
Software is executed and/or accessed is owned, leased, or otherwise substantially
controlled by Licensee. Subject to Licensee’s purchase of more than one License,
neither concurrent use on two or more computers nor use in a local area network
or other network is permitted. Upon having purchased and obtained written
consent from Licensor to hold more than one License to the Software, Licensee
may concurrently load, use, or install the Software upon the number of
computers or CPU’s for which Licensee expressly holds a License. The terms and
conditions of this Agreement shall apply to all additional, subsequent or multiple
Licenses obtained by Licensee for the Software. Licensee agrees that it will not
assign, sublicense, transfer, pledge, lease, rent, or share its rights under this
License Agreement, nor will Licensee utilize the Software to provide image
processing services directly to third parties for any compensation without first
obtaining the express written consent of the Licensor.
Licensee shall not attempt to reverse engineer, decompile, disassemble, modify,
reproduce reverse assemble, reverse compile, or otherwise translate the Software
or any part thereof. Upon loading the Software, Licensee may retain the Software
for backup purposes only. In addition, Licensee may make one copy of the
Software on a second set of diskettes (or on compact disc or cassette tape) for the
purpose of backup in the event the Software Diskettes are damaged or destroyed.
Licensee may make one copy of the Users Manual for backup purposes only. Any
such copies of the Software or the Users Manual shall include Licensor’s
copyright and other proprietary notices. Except as authorized under this
paragraph, no copies of the Software or any portions thereof may be made by
Licensee or any person under Licensee’s control or authority.
2. LICENSOR'S RIGHTS - Licensee agrees and acknowledges that the Software
and the Users Manual which are the subject of this Agreement are proprietary,
confidential, and trade secret products of Licensor and/or Licensor’s suppliers
and that Licensee shall undertake all necessary steps and efforts to prevent
unlawful or illegal distribution of such proprietary, confidential and trade secret
information. Licensee further acknowledges and agrees that all right, title, and
interest in and to the Software, including associated intellectual property rights,
are and shall remain with Licensor and/or Licensor’s suppliers. This License
Agreement does not convey to Licensee an interest in or to the Software, but only
a limited right of use revocable in accordance with the terms of this License
Agreement.
3. RESTRICTED RIGHTS - Licensee hereby covenants that neither the Software
product nor any information or know-how embodied in such Software will be
authorized to be directly or indirectly transported or removed to any source for
use in any country or countries in contravention of any export laws, regulations,
or decrees of the U.S. Government or any agency thereof. This Agreement is
subject to termination by Licensor in the event Licensee fails to comply with any
such laws, regulations, or decrees.
4. LICENSE FEES - The license fees paid by Licensee in consideration of the license
granted under this License Agreement are non refundable and shall not be
returned to Licensee under any circumstance, including, but not limited to any
request for a pro-rata refund by Licensee.
5. TERM - This License Agreement is effective upon Licensee's opening of the
package containing the Software, or upon Licensee's acceptance of this
Agreement. This Agreement shall continue thereafter until terminated. Licensee
may terminate this Agreement at any time by returning the Software and all
copies thereof and extracts therefrom to Licensor. Licensor may terminate this
Agreement and revoke any license granted hereunder upon the breach by
Licensee of any term hereof. If the License granted hereunder is terminated for
any reason, upon notice of such termination Licensee shall immediately uninstall
the Software from the computer on which it is installed and shall certify to
Licensor in writing, under penalty of perjury of the laws of the United States of
America, that the Software is uninstalled and all copies thereof have either been
destroyed or returned to Licensor. Any confidential, proprietary, or trade secret
information or material provided to Licensee in connection with the Software
shall be immediately returned to Licensor, unless otherwise specified by Licensor.
Subject only to SECTION SIX (6) of this Agreement, under no circumstances is
Licensee entitled to a refund or credit of any licensee fees paid in consideration of
the license granted hereunder, regardless of the reason for termination of this
Agreement.
6. CONFIDENTIAL INFORMATION - Licensee hereby acknowledges that the
Software and any accompanying documentation contain confidential,
proprietary, and/or trade secret information belonging to Licensor. Licensee
further acknowledges and agrees that it shall not disclose the Software to any
third party. Licensee further acknowledges and agrees that any written
information or documentation provided by Licensor to Licensee which contains a
legend upon such documentation, whether or not such legend be a single legend
affixed upon a multiple page document, which legend identifies such documents
to be either proprietary, trademarked, registered, copyrighted, confidential, and/
or trade secret, shall impose a duty upon Licensee not to disclose to any third
party such information contained within such documents, either in writing or
orally, without the express written consent of Licensor. Notwithstanding the
foregoing provision, Licensor may notify Licensee in writing within TWENTY
(20) days after disclosure to Licensee of documents which do not contain a legend
identifying such documents to be either proprietary, confidential, and/or trade
secret, that such documents disclosed were either proprietary, trademarked,
registered, copyrighted, confidential, and/or trade secret in nature. Such notice
shall impose a duty upon the Licensee not to disclose to any third party such
written information, either in writing or orally, without the express written
consent of Licensor. Licensee further acknowledges that any oral information
provided by Licensor to Licensee which information is identified or summarized
in writing within TWENTY (20) days after such oral disclosure to be either
proprietary, trademarked, registered, copyrighted, confidential, and/or trade
secret in nature shall impose a duty upon Licensee not to disclose to any third
party such information disclosed by Licensor to Licensee, either in writing or
orally, without the express written consent of Licensor. The obligations of this
SECTION SIX (6) shall not extend to any information which is lawfully known to
Licensee prior to receipt from Licensor or Distributor; or enters the public domain
through no wrongful act or breach of this Agreement by Licensee; or is received
by Licensee from a third party having a legal right to disclose such information.
The provisions of this SECTION SIX (6) shall survive termination of this
Agreement.
7. LIMITED WARRANTY - Licensor warrants for a period of THIRTY (30) days
from the date of commencement of this Agreement (“Warranty Period”) that
during the Warranty Period the Software shall operate substantially in
accordance with the functional specifications in the Users Manual. LICENSOR
FURTHER WARRANTS THAT DURING THE WARRANTY PERIOD THE
MEDIA WHICH CONTAINS THE SOFTWARE SHALL BE FREE FROM
DEFECTS IN MATERIAL AND WORKMANSHIP. LICENSEE'S SOLE AND
EXCLUSIVE REMEDY, AND LICENSOR'S SOLE LIABILITY ARISING FROM
BREACHES OF THE ABOVE WARRANTIES IS THE REPLACEMENT OF
DEFECTIVE MEDIA OR, IF LICENSEE SHALL SO REQUEST, TO REFUND TO
LICENSEE THE PURCHASE PRICE FOR THE DEFECTIVE SOFTWARE AND
DOCUMENTATION, PROVIDED THAT LICENSEE NOTIFIES LICENSOR IN
WRITING OF SUCH DEFECT AND RETURN TO LICENSOR THE DEFECTIVE
MEDIA CONTAINING THE SOFTWARE AND THE DOCUMENTATION,
DURING THE ABOVE WARRANTY PERIOD.
EXCEPT AND TO THE EXTENT EXPRESSLY PROVIDED ABOVE, THE
SOFTWARE AND DOCUMENTATION WHICH ARE THE SUBJET OF THIS
LICENSE ARE PROVIDED ON AN “AS IS” BASIS, WITHOUT ANY
WARRANTIES OF ANY KIND, INCLUDING ANY AND ALL IMPLIED
WARRANTIES OR CONDITIONS OF TITLE, NONINFRIGEMENT,
MERCHANTABILITY, OR FITNESS OR SUITABILITY FOR ANY PARTICULAR
PURPOSE, WHETHER ALLEGED TO ARISE BY LAW, BY REASON OF
CUSTOM OR USAGE IN THE TRADE, OR BY COURSE OF DEALING. IN
ADDITION, LICENSOR AND DISTRIBUTOR EXPRESSLY DISCLAIM ANY
WARRANTY OR REPRESENTATION TO ANY PERSON OTHER THAN
LICENSEE WITH RESPECT TO THE SOFTWARE OR ANY PART THEREOF.
LICENSEE ASSUMES THE ENTIRE LIABILITY FOR THE SELECTION AND
USE OF THE SOFTWARE AND DOCUMENTATION, AND LICENSOR SHALL
HAVE NO LIABILITY FOR ANY ERRORS, MALFUNCTIONS, DEFECTS, LOSS
OF DATA, OR ECONOMIC LOSS RESULTING FROM OR RELATED TO THE
USE OF SOFTWARE AND/OR DOCUMENTATION.
8. LIMITATION OF LIABILITY - Notwithstanding any other provision of this
Agreement, the cumulative liability of Licensor and/or Licensor’s suppliers’,
distributors, and/or agents to Licensee or any other party for any loss or damages
resulting from any claims, demands, or actions arising out of or relating to this
Agreement shall not exceed that license fee paid to Licensor by Licensee for the
use of the Software. In no event shall Licensor and/or Licensor’s suppliers’ be
liable for any indirect, incidental, consequential, special, or exemplary damages or
lost profits, even if Licensor and/or Licensor’s suppliers have been advised of the
possibility of such damages. SOME STATES DO NOT ALLOW THE
LIMITATION OR EXCLUSION OF LIABILITY FOR INCIDENTAL OR
CONSEQUENTIAL DAMAGES, SO THE ABOVE LIMITATION OR
EXCLUSION MAY NOT APPLY TO LICENSEE.
9. TRADEMARK - GeneSight® and GenePie® are trademarks of Licensor. No right,
license, or interest to such trademarks is granted hereunder, and Licensee agree
that no such right, license, or interest shall be asserted by Licensee with respect to
such trademarks.
10. NOTICE - All notices required or provided under the terms of this Agreement
shall be given in writing to all parties and may be delivered by First Class U. S.
Mail, postage prepaid; U.S. Registered Air Mail, postage prepaid; overnight air
courier, courier charges prepaid; or facsimile. Notices shall be effective as follows:
FIVE (5) calendar days following mailing by First Class U.S. Mail, postage
prepaid; or SEVEN (7) calendar days following mailing by U.S. Registered Mail,
postage prepaid; TWO (2) business days following delivery by overnight courier;
and TWO (2) business days following confirmation of transmittal by facsimile.
Any notices provided under this Agreement shall be given at the address and/or
facsimile number for the parties as set forth upon the Sales Agreement, unless
change of such address and/or facsimile number has been provided previously
in writing.
11. GOVERNING LAW AND VENUE - This License Agreement shall be construed
and governed in accordance with the laws of the State of California. The parties
consent and agree that personal jurisdiction over them with respect to any
dispute arising as to this Agreement shall rest solely with the State or Federal
courts of the State of California. The parties hereby expressly waive the right to
bring an action in any State or Federal court other than the California State or
Federal Courts, located within the County of Los Angeles.
12. ATTORNEYS’ FEES - If any action is brought by either party to this License
Agreement against the other party in an effort to enforce or effect any provision
or language contained within this Agreement, the prevailing party shall be
entitled to recover, in addition to any other relief granted, reasonable attorney
fees and costs.
13. SEVERABILITY - If any provision of this Agreement shall be held illegal,
unenforceable, or in conflict with any law of a federal, state, or local government
having jurisdiction over this Agreement, the validity of the remaining portions or
provisions hereof shall not be affected thereby.
14. NO WAIVER - The failure of either party to enforce any rights granted hereunder
or to take action against the other party in the event of any breach hereunder shall
not be deemed a waiver by that party as to subsequent enforcement of rights or
subsequent actions in the event of future breaches.
15. ENTIRE AGREEMENT - The Parties hereto acknowledge that each has read this
Agreement, understands it, and agrees to be bound by its terms. The Parties
further agree that this Agreement and any modifications made pursuant to it,
constitutes the complete and exclusive written expression of all terms of the
Agreement between the Parties, and supersedes all prior or contemporaneous
proposals, understandings, representations, conditions, warranties, covenants,
and all other communications between the Parties relating to the subject matter of
this Agreement, whether oral or written. The Parties further agree that this
Agreement may not in any way be explained or supplemented by a prior or
existing course of dealing between the Parties, by any usage of trade or custom, or
by any prior performance between the Parties pursuant to this Agreement or
otherwise.
16. AMENDMENTS - No amendments or other modifications to this Agreement
may be made except by a writing signed by both parties.
17. ACKNOWLEDGMENT - By Licensee’s installation or use of this Software,
Licensee acknowledges that Licensee has read and understand the foregoing and
agrees to be bound thereby.
Skin Look and Feel 0.3.1 License
Copyright © 2000-2001 L2FProd.com. All rights reserved.
Redistribution and use in source and binary forms, with or without modification, are
permitted provided that the following conditions are met:
1. Redistributions of source code must retain the above copyright notice, this list of
conditions and the following disclaimer.
2. Redistributions in binary form must reproduce the above copyright notice, this
list of conditions and the following disclaimer in the documentation and/or other
materials provided with the distribution.
3. The end-user documentation included with the redistribution, if any, must
include the following acknowledgement:
“This product includes software developed by L2FProd.com (http://www.L2FProd.com).”
Alternately, this acknowledgement may appear in the software itself, if and
wherever such third-party acknowledgements normally appear.
4. The names “Skin Look and Feel,” “SkinLF,” and “L2FProd.com” must not be used to
endorse or promote products derived from this software without prior written
permission. For written permission, contact [email protected].
5. Products derived from this software may not be called “SkinLF” nor may
“SkinLF” appear in their names without prior written permission of L2FProd.com.
THIS SOFTWARE IS PROVIDED “AS IS” AND ANY EXPRESSED OR IMPLIED
WARRANTIES, INCLUDING, BUT NOT LIMITED TO, THE IMPLIED
WARRANTIES OF MERCHANTABILITY AND FITNESS FOR A PARTICULAR
PURPOSE ARE DISCLAIMED. IN NO EVENT SHALL L2FPROD.COM OR ITS
CONTRIBUTORS BE LIABLE FOR ANY DIRECT, INDIRECT, INCIDENTAL,
SPECIAL, EXEMPLARY, OR CONSEQUENTIAL DAMAGES (INCLUDING, BUT
NOT LIMITED TO, PROCUREMENT OF SUBSTITUTE GOODS OR SERVICES;
LOSS OF USE, DATA, OR PROFITS; OR BUSINESS INTERRUPTION) HOWEVER
CAUSED AND ON ANY THEORY OF LIABILITY, WHETHER IN CONTRACT,
STRICT LIABILITY, OR TORT (INCLUDING NEGLIGENCE OR OTHERWISE)
ARISING IN ANY WAY OUT OF THE USE OF THIS SOFTWARE, EVEN IF
ADVISED OF THE POSSIBILITY OF SUCH DAMAGE.
Packages cern.colt*, cern.jet*
Copyright © 1999 CERN - European Organization for Nuclear Research. Permission
to use, copy, modify, distribute and sell this software and its documentation for any
purpose is hereby granted without fee, provided that the above copyright notice
appear in all copies and that both that copyright notice and this permission notice
appear in supporting documentation. CERN makes no representations about the
suitability of this software for any purpose. It is provided “as is” without expressed
or implied warranty.
Package com.imsl.math
Written by Visual Numerics, Inc. Check the Visual Numerics home page for more
info. Copyright © 1997 - 1998 by Visual Numerics, Inc. All rights reserved.
Permission to use, copy, modify, and distribute this software is freely granted by
Visual Numerics, Inc., provided that the copyright notice above and the following
warranty disclaimer are preserved in human readable form. Because this software is
licenses free of charge, it is provided “AS IS,” with NO WARRANTY, TO THE
EXTENT PERMITTED BY LAW, VNI DISCLAIMS ALL WARRANTIES, EXPRESS
OR IMPLIED, INCLUDING BUT NOT LIMITED TO ITS PERFORMANCE,
MERCHANTABILITY AND FITNESS FOR A PARTICULAR PURPOSE. VNI WILL
NOT BE LIABLE FOR ANY DAMAGES WHATSOEVER ARISING OUT OF THE
USE OF OR INABILITY TO USE THIS SOFTWARE, INCLUDING BUT NOT
LIMITED TO DIRECT, INDIRECT, SPECIAL, CONSEQUENTIAL, PUNITIVE, AND
EXEMPLARY DAMAGES, EVEN IF ADVISED OF THE POSSIBILITY OF SUCH
DAMAGES.
Packages jal*
Written by Matthew Austern and Alexander Stepanov. Check the JAL home page
(http://reality.sgi.com/austern_mti/java/) for more info. Copyright © 1996 Silicon
Graphics, Inc. Permission to use, copy, modify, distribute and sell this software and
its documentation for any purpose is hereby granted without fee, provided that the
above copyright notice appear in all copies and that both that copyright notice and
this permission notice appear in supporting documentation. Silicon Graphics makes
no representations about the suitability of this software for any purpose. It is
provided “as is” without expressed or implied warranty.
Java 3D 1.2.1_01 Binary Code License Agreement
SUN MICROSYSTEMS, INC. (“SUN”) IS WILLING TO LICENSE JAVA 3D 1.2.1_01
TO YOU ONLY UPON THE CONDITION THAT YOU ACCEPT ALL OF THE
TERMS CONTAINED IN THIS LICENSE AGREEMENT (“AGREEMENT”). PLEASE
READ THE TERMS AND CONDITIONS OF THIS AGREEMENT CAREFULLY. BY
CLICKING “ACCEPT” BELOW, OPENING THE PACKAGE, DOWNLOADING
THE SOFTWARE, INSTALLING THE SOFTWARE, OR USING THE SOFTWARE,
YOU ACCEPT THE TERMS AND CONDITIONS OF THIS AGREEMENT. IF YOU
ARE NOT WILLING TO BE BOUND BY ITS TERMS:
•
•
•
SELECT THE “DO NOT ACCEPT” BUTTON AT THE BOTTOM OF THIS PAGE
AND THE INSTALLATION PROCESS WILL NOT CONTINUE,
RETURN THE UNOPENED SOFTWARE TO THE PLACE OF PURCHASE FOR
A REFUND, OR
DO NOT DOWNLOAD THE SOFTWARE.
1. Licensed Software. “Licensed Software” means the JAVA 3D 1.2.1_01 software in
binary form, any other machine readable materials (including, but not limited to,
libraries, source files, header files, and data files) and any user manuals,
programming guides and other documentation provided to you by Sun under
this Agreement.
2. License to Use. Sun grants to you a non-exclusive, non-transferable and limited
license to download, install and use the Licensed Software by the number of users
and the class of computer hardware for which the corresponding fee, if any, has
been paid. No license is granted to you for any other purpose. You may not sell,
rent, loan or otherwise encumber or transfer the Licensed Software in whole or in
part, to any third party.
3. License Restrictions. The following restrictions apply to your license:
• The Licensed Software is confidential and copyrighted. You must take
appropriate steps to protect the Licensed Software from unauthorized
disclosure or use. Title to the Licensed Software and all associated intellectual
property rights is retained by Sun and/or its licensors.
• Except as specifically authorized in this Agreement or any supplemental
license terms, you may not make copies of the Licensed Software, other than a
single copy of the Licensed Software for archival purposes. You agree to
reproduce any copyright and other proprietary right notices on any such
copy.
• Except as otherwise provided by law for purposes of decompilation of the
Licensed Software solely for purposes of inter-operability, you may not
modify or create derivative works of the Licensed Software, decompile,
disassemble, or otherwise reverse engineer the binary portions of the
Licensed Software or otherwise attempt to derive the source code from such
portions.
• The Licensed Software is not designed or licensed for use in the design,
construction, operation or maintenance of any nuclear facility.
• You may not publish or provide the results of any benchmark or comparison
tests run on the Licensed Software to any third party without the prior written
consent of Sun.
• No right, title or interest in or to the Licensed Software, any trademark,
service mark, logo, or trade name of Sun or its licensors is granted under this
Agreement. Sun, Sun Microsystems, the Sun logo, and Sun Ray are
trademarks or registered trademarks of Sun Microsystems, Inc. in the U.S. and
other countries.
4. Limited Warranty. Sun warrants to you that for a period of ninety (90) days from
the date of purchase, as evidenced by a copy of the receipt, the media on which
Licensed Software is furnished (if any) will be free of defects in materials and
workmanship under normal use. Except for the foregoing, THE LICENSED
SOFTWARE IS PROVIDED “AS IS.” YOUR EXCLUSIVE REMEDY AND SUN'S
ENTIRE LIABILITY UNDER THIS LIMITED WARRANTY WILL BE AT SUN'S
OPTION TO REPLACE THE LICENSED SOFTWARE MEDIA OR REFUND THE
FEE PAID FOR THE LICENSED SOFTWARE. UNLESS SPECIFIED IN THIS
AGREEMENT, ALL EXPRESS OR IMPLIED CONDITIONS,
REPRESENTATIONS AND WARRANTIES, INCLUDING ANY IMPLIED
WARRANTY OF MERCHANTABILITY, FITNESS FOR A PARTICULAR
PURPOSE, OR NON-INFRINGEMENT, ARE DISCLAIMED, EXCEPT TO THE
EXTENT THAT THESE DISCLAIMERS ARE HELD TO BE LEGALLY INVALID.
5. Limitation of Liability. TO THE EXTENT NOT PROHIBITED BY APPLICABLE
LAW, IN NO EVENT WILL SUN OR ITS LICENSORS BE LIABLE FOR ANY
LOST REVENUE, PROFIT OR DATA, OR FOR SPECIAL, INDIRECT,
CONSEQUENTIAL, INCIDENTAL OR PUNITIVE DAMAGES, HOWEVER
CAUSED AND REGARDLESS OF THE THEORY OF LIABILITY, ARISING OUT
OF OR RELATED TO THE USE OF OR INABILITY TO USE THE LICENSED
SOFTWARE, EVEN IF SUN HAS BEEN ADVISED OF THE POSSIBILITY OF
SUCH DAMAGES. In no event will Sun’s liability to you, whether in contract, tort
(including negligence), or otherwise, exceed the amount paid by you for the
Licensed Software under this Agreement. The foregoing limitations will apply
even if the above stated warranty fails of its essential purpose.
6. Termination. This Agreement is effective until terminated. You may terminate
this Agreement at any time by destroying all copies of the Licensed Software. This
Agreement will terminate immediately without notice from Sun if you fail to
comply with any provision of this Agreement. Upon termination, you must
destroy all copies of the Licensed Software. Rights and obligations under this
Agreement that by their nature should survive, will remain in effect after
termination or expiration of this Agreement, including without limitation the
provisions set forth in Sections 2, 3, 4, 5, 7, 8, 9, 10, 11, 12, and 13.
7. Export Regulations. The Licensed Software and technical data delivered under
this Agreement are subject to U.S. export control laws and may be subject to
export or import regulations in other countries. You agree to comply strictly with
all such laws and regulations and acknowledge that you have the responsibility to
obtain such licenses to export, re-export, or import as may be required after
delivery to you.
8. U.S. Government Restricted Rights. If the Licensed Software is being acquired
by or on behalf of the U.S. Government or by a U.S. Government prime contractor
or subcontractor (at any tier), then the Government’s rights in the Licensed
Software and accompanying documentation shall be only as set forth in this
Agreement; this is in accordance with 48 C.F.R. 227.7201 through 227.7202-4 (for
Department of Defense (DoD) acquisitions) and with 48 C.F.R. 2.101 and 12.212
(for non-DoD acquisitions).
9. Governing Law. This Agreement will be governed by California law and
controlling U.S. federal law. Neither the United Nations Convention on the
International Sale of Goods nor the choice of law rules of any jurisdiction will
apply. Any dispute relating to or arising out of this Agreement shall be resolved
solely by an action filed in the Santa Clara County Superior Court or the United
States District Court for the Northern District of California.
10. Severability. If any provision of this Agreement is held to be unenforceable, this
Agreement will remain in effect with the provision omitted, unless omission of
the provision would frustrate the intent of the parties, in which case this
Agreement will immediately terminate.
11. Integration. This Agreement is the entire agreement between you and Sun
relating to its subject matter. It supersedes all prior or contemporaneous oral or
written communications, proposals, representations and warranties and prevails
over any conflicting or additional terms of any quote, order, acknowledgment, or
other communication between the parties relating to its subject matter during the
term of this Agreement. No modification of this Agreement will be binding,
unless in writing and signed by an authorized representative of each party.
12. Remedies. It is understood and agreed that, notwithstanding any other provision
of this Agreement, your breach of the provisions of Section 3 of this Agreement
will cause Sun irreparable damage for which recovery of money damages would
be inadequate, and that Sun will therefore be entitled to seek timely injunctive
relief to protect Sun’s rights under this Agreement in addition to an and all
remedies available at law.
13. Nonassignment. Neither party may assign or otherwise transfer any of its rights
or obligations under this Agreement without the prior written consent of the
other party, except that Sun may assign this Agreement to an affiliated company.
Java 3D (TM) Software Version 1.2.1_01 Supplemental License Terms
These supplemental license terms (“Supplement”) add to or modify the terms of the
Binary Code License Agreement (collectively “the Agreement”). Capitalized terms
not defined in this Supplement shall have the same meanings ascribed to them in the
Agreement. These Supplement terms shall supersede any inconsistent or conflicting
terms in the Agreement, or in any license contained within the Software.
1. License to Distribute. Sun grants to Licensee a non-exclusive, non-transferable,
royalty-free limited license to reproduce and distribute the binary code form of
the Licensed Software provided that Licensee:
• Distributes the Licensed Software complete and unmodified (except for the
specific files identified as optional in the Licensed Software README file),
only as part of, and for the sole purpose of running, Licensee's Java
compatible applet or application (“Program”) into which the Licensed
Software is incorporated;
• Does not distribute additional software intended to replace any component(s)
of the Licensed Software;
• Agrees to incorporate the most current version of the Licensed Software that
was available 180 days prior to each production release of the Program;
• Does not remove or alter any proprietary legends or notices contained in the
Licensed Software;
• Includes the provisions of Sections 2, 3, 4, 5, 6, 7, 8, 9 of the Binary Code
License and Sections 1 and 2 of the Supplemental terms in Licensee's license
agreement for the Program;
• Agrees to indemnify, hold harmless, and defend Sun and its licensors from
and against any claims or lawsuits, including attorneys’ fees, that arise or
result from the use or distribution of the Program;
• Does not modify, or authorize its licensees to modify, the Java Platform
Interface (“JPI,” identified as classes contained within the “java” package or
any subpackages of the “java” package), by creating additional classes within
the JPI or otherwise causing the addition to or modification of the classes in
the JPI; and
• Only distributes the Licensed Software pursuant to a license agreement that
protects Sun's interests consistent with the terms contained in the Agreement.
2. In the event that Licensee creates any Java-related API and distributes such API to
others for applet or application development, Licensee must promptly publish
broadly, an accurate specification for such API for free use by all developers of
Java-based software, and Licensee must incorporate this term into its license
agreements.
3. Trademarks and Logos. This License does not authorize Licensee to use any Sun
name, trademark or logo. Licensee acknowledges that Sun owns the Java
trademark and all Java-related trademarks, logos and icons including the Coffee
Cup and Duke (“Java Marks”) and agrees to:
• Comply with the Java Trademark Guidelines at http://java.sun.com/
trademarks.html;
• Not do anything harmful to or inconsistent with Sun’s rights in the Java
Marks; and
• Assist Sun in protecting those rights, including assigning to Sun any rights
acquired by Licensee in any Java Mark. For inquiries please contact: Sun
Microsystems, Inc., 901 San Antonio Road, Palo Alto, California 94303
Introduction
Overview
Thank you for purchasing GeneSight. This program is an efficient data mining,
visualization, and reporting tool that you can use to analyze the massive gene
expression data generated by microarray technology. GeneSight 3 includes the
following enhancements:
•
•
•
•
•
•
•
Ability to perform cluster confidence analysis.
Options for viewing dataset in terms of chromosome location.
Addition of a two-dimensional self-organizing map (SOM) analysis tool.
Options for displaying data three-dimensionally with the Scatterplot and PCA
analysis tools.
Addition of a “brightness” option to the Confidence Analyzer tool produce more
accurate results.
Addition of new tests to the Significance Analyzer tool to produce more accurate
results.
Addition of method to map existing Gene IDs to Gene IDs from other sources.
17
GeneSight Users Manual
How to Use this Manual
This manual contains all the information you need to install and use GeneSight. Each
chapter is briefly described below:
•
•
•
•
•
•
•
•
•
•
•
Installation - Walks you through the program installation process. See “Installing
GeneSight” for the details.
License Manager - Describes how to use the License Manager tool to gain
unrestricted access to GeneSight. Refer to “Using the License Manager” for more
details.
GeneSight Main Window - Identifies the components of the primary program
interface. Refer to “Working in the Main Window” for more details.
Preferences - Explains how to modify the default program and database settings.
Go to “Setting System Preferences” for more information.
GeneSight Wizard - Describes how to build a dataset with this (automated) tool.
See “Using the GeneSight Wizard” for the details.
Dataset Builder - Explains how to construct a dataset manually with this tool. Go
to “Building a Dataset” for more information.
Data Preparation - Describes how to transform the data in a dataset. See
“Preparing a Dataset” for more details.
Other Dataset Editing Tools - Explains how to use the Partition Editor, Query/
Group Builder, Confidence Analyzer, Significance, and Template Matching tools. See
“Using Other Dataset Tools” for the details.
Data Analysis - Reviews each of GeneSight’s eight plotting tools. Refer to
“Analyzing Datasets with Plotting Tools” for more information.
Reports - Describes how to use Report tool. Refer to “Generating Reports” for more
details.
Appendices - Provide detailed information about the program and technical
support. See “Appendices A through E” for more details.
Tip:
18
This manual also includes a comprehensive glossary and index.
Introduction
Text Conventions
The following text conventions are used throughout this manual:
Convention
Description
Example
Menu
Command
Commands executed from the menu bar are
displayed in a bold Book Antiqua font with a
carot between menu steps.
Select Plots >
Histogram
Buttons
Commands executed by clicking a button or
tab are displayed in a bold Arial font.
Click the Data
Preparation
toolbar button
Keyboard
Commands, text, and numerics entered from
the keyboard are displayed in a bold
Courier New font.
Enter Group3
Fields
Field names, radio buttons, and drop-down lists
are displayed in a bold Book Antiqua font.
Enter Dataset2
in the File Name
field
Program
Interfaces
The title of windows and dialog boxes are
displayed in a bold/italic Book Antiqua font.
Click the OK
button to display
the Save Dataset
dialog box
Area and
Column
Names
The title of areas and columns within a window
appear in an italic Book Antiqua font. Important
words and phrases also appear in this font style.
The replicated spots
in an array
19
GeneSight Users Manual
Related Documents
Refer to the documentation listed below for more information about GeneSight:
•
•
•
20
Quick Reference Card - Identifies the function of each component of the
GeneSight Main window and overviews the dataset building and data
preparation processes.
Tutorial - Overviews the dataset analysis process and includes three detailed
tutorials designed to teach new and inexperienced users how to use GeneSight.
Online Help - Provides interactive on-screen information about the active
GeneSight interface. Select Help > Help from the GeneSight Main window to
access the online help documentation.
Table of Contents
Introduction
How to Use this Manual . . . . . . . . . . . . . . . . . . . . . . . . . . . . . . . . . . . . . . . . . . . . . . . . . . . . . . . . . . 18
Text Conventions . . . . . . . . . . . . . . . . . . . . . . . . . . . . . . . . . . . . . . . . . . . . . . . . . . . . . . . . . . . . . . . . 19
Related Documents . . . . . . . . . . . . . . . . . . . . . . . . . . . . . . . . . . . . . . . . . . . . . . . . . . . . . . . . . . . . . . 20
Chapter 1 - Installing GeneSight
Program Requirements . . . . . . . . . . . . . . . . . . . . . . . . . . . . . . . . . . . . . . . . . . . . . . . . . . . . . . . . . . . . 2
Program Installation . . . . . . . . . . . . . . . . . . . . . . . . . . . . . . . . . . . . . . . . . . . . . . . . . . . . . . . . . . . . . . 3
Program Uninstallation . . . . . . . . . . . . . . . . . . . . . . . . . . . . . . . . . . . . . . . . . . . . . . . . . . . . . . . . . . . . 7
GeneSight Sub-Menu Options . . . . . . . . . . . . . . . . . . . . . . . . . . . . . . . . . . . . . . . . . . . . . . . . . . . . . . 8
Chapter 2 - Using the License Manager
Obtaining a GeneSight Authorization Code . . . . . . . . . . . . . . . . . . . . . . . . . . . . . . . . . . . . . . . . . 10
Unlocking Demo Mode . . . . . . . . . . . . . . . . . . . . . . . . . . . . . . . . . . . . . . . . . . . . . . . . . . . . . . . . . . . 11
Using the Advanced Interface . . . . . . . . . . . . . . . . . . . . . . . . . . . . . . . . . . . . . . . . . . . . . . . . . . . . . 15
Chapter 3 - Setting System Preferences
Preferences Dialogue . . . . . . . . . . . . . . . . . . . . . . . . . . . . . . . . . . . . . . . . . . . . . . . . . . . . . . . . . . . . . 18
Preferences Tab . . . . . . . . . . . . . . . . . . . . . . . . . . . . . . . . . . . . . . . . . . . . . . . . . . . . . . . . . . . . . . 18
Annotations Tab . . . . . . . . . . . . . . . . . . . . . . . . . . . . . . . . . . . . . . . . . . . . . . . . . . . . . . . . . . . . . 21
Chapter 4 - Working in the Main Window
GeneSight Main Window . . . . . . . . . . . . . . . . . . . . . . . . . . . . . . . . . . . . . . . . . . . . . . . . . . . . . . . . .
Menu Bar . . . . . . . . . . . . . . . . . . . . . . . . . . . . . . . . . . . . . . . . . . . . . . . . . . . . . . . . . . . . . . . . . . .
View Menu . . . . . . . . . . . . . . . . . . . . . . . . . . . . . . . . . . . . . . . . . . . . . . . . . . . . . . . . . . . . . . . . . .
Toolbar . . . . . . . . . . . . . . . . . . . . . . . . . . . . . . . . . . . . . . . . . . . . . . . . . . . . . . . . . . . . . . . . . . . . .
Dataset View Panel . . . . . . . . . . . . . . . . . . . . . . . . . . . . . . . . . . . . . . . . . . . . . . . . . . . . . . . . . . .
Partition Panel . . . . . . . . . . . . . . . . . . . . . . . . . . . . . . . . . . . . . . . . . . . . . . . . . . . . . . . . . . . . . . .
24
26
27
29
31
32
GeneSight Users Manual
Dataset Information Bar . . . . . . . . . . . . . . . . . . . . . . . . . . . . . . . . . . . . . . . . . . . . . . . . . . . . . . . 33
Chapter 5 - Using the GeneSight Wizard
Building a Single Source Dataset . . . . . . . . . . . . . . . . . . . . . . . . . . . . . . . . . . . . . . . . . . . . . . . . . . . 36
Building a Paired Source Dataset . . . . . . . . . . . . . . . . . . . . . . . . . . . . . . . . . . . . . . . . . . . . . . . . . . . 41
Building a Replicated Source Dataset . . . . . . . . . . . . . . . . . . . . . . . . . . . . . . . . . . . . . . . . . . . . . . . 47
Chapter 6 - Opening and Saving GS Files
Loading a Dataset . . . . . . . . . . . . . . . . . . . . . . . . . . . . . . . . . . . . . . . . . . . . . . . . . . . . . . . . . . . . . . . . 54
Saving a Dataset . . . . . . . . . . . . . . . . . . . . . . . . . . . . . . . . . . . . . . . . . . . . . . . . . . . . . . . . . . . . . . . . . 55
Chapter 7 - Building a Dataset
Dataset Builder Window . . . . . . . . . . . . . . . . . . . . . . . . . . . . . . . . . . . . . . . . . . . . . . . . . . . . . . . . . . 58
Menu Bar . . . . . . . . . . . . . . . . . . . . . . . . . . . . . . . . . . . . . . . . . . . . . . . . . . . . . . . . . . . . . . . . . . . . 60
Toolbar. . . . . . . . . . . . . . . . . . . . . . . . . . . . . . . . . . . . . . . . . . . . . . . . . . . . . . . . . . . . . . . . . . . . . . 61
Source Panel . . . . . . . . . . . . . . . . . . . . . . . . . . . . . . . . . . . . . . . . . . . . . . . . . . . . . . . . . . . . . . . . . 63
Setup Panel . . . . . . . . . . . . . . . . . . . . . . . . . . . . . . . . . . . . . . . . . . . . . . . . . . . . . . . . . . . . . . . . . . 64
Dataset Panel . . . . . . . . . . . . . . . . . . . . . . . . . . . . . . . . . . . . . . . . . . . . . . . . . . . . . . . . . . . . . . . . 65
Using the Dataset Builder . . . . . . . . . . . . . . . . . . . . . . . . . . . . . . . . . . . . . . . . . . . . . . . . . . . . . . . . . 66
Loading a Dataset . . . . . . . . . . . . . . . . . . . . . . . . . . . . . . . . . . . . . . . . . . . . . . . . . . . . . . . . . . . . 66
Creating a Dataset from a Multi-Channel Slide . . . . . . . . . . . . . . . . . . . . . . . . . . . . . . . . . . . 67
Showing the File Path to Data Sources . . . . . . . . . . . . . . . . . . . . . . . . . . . . . . . . . . . . . . . . . . . 69
Sorting Data Sources . . . . . . . . . . . . . . . . . . . . . . . . . . . . . . . . . . . . . . . . . . . . . . . . . . . . . . . . . . 69
Removing a Data Source. . . . . . . . . . . . . . . . . . . . . . . . . . . . . . . . . . . . . . . . . . . . . . . . . . . . . . . 70
Viewing the Contents of a Data Source . . . . . . . . . . . . . . . . . . . . . . . . . . . . . . . . . . . . . . . . . . 70
Viewing Data Source Properties . . . . . . . . . . . . . . . . . . . . . . . . . . . . . . . . . . . . . . . . . . . . . . . . 71
Converting ImaGene Files . . . . . . . . . . . . . . . . . . . . . . . . . . . . . . . . . . . . . . . . . . . . . . . . . . . . . 73
Selecting a File Handling Option. . . . . . . . . . . . . . . . . . . . . . . . . . . . . . . . . . . . . . . . . . . . . . . . 74
Exiting and Saving a Dataset . . . . . . . . . . . . . . . . . . . . . . . . . . . . . . . . . . . . . . . . . . . . . . . . . . . 74
Exiting Without Saving Changes. . . . . . . . . . . . . . . . . . . . . . . . . . . . . . . . . . . . . . . . . . . . . . . . 75
Exiting and Cancelling Changes . . . . . . . . . . . . . . . . . . . . . . . . . . . . . . . . . . . . . . . . . . . . . . . . 75
Alien Text . . . . . . . . . . . . . . . . . . . . . . . . . . . . . . . . . . . . . . . . . . . . . . . . . . . . . . . . . . . . . . . . . . . . . . . 76
Required Information Tab . . . . . . . . . . . . . . . . . . . . . . . . . . . . . . . . . . . . . . . . . . . . . . . . . . . . . 78
File Display Area . . . . . . . . . . . . . . . . . . . . . . . . . . . . . . . . . . . . . . . . . . . . . . . . . . . . . . . . . . . . . 79
Field Separator Tab . . . . . . . . . . . . . . . . . . . . . . . . . . . . . . . . . . . . . . . . . . . . . . . . . . . . . . . . . . . 80
Slide Configuration Tab . . . . . . . . . . . . . . . . . . . . . . . . . . . . . . . . . . . . . . . . . . . . . . . . . . . . . . . 81
Other Information Tab . . . . . . . . . . . . . . . . . . . . . . . . . . . . . . . . . . . . . . . . . . . . . . . . . . . . . . . . 82
Pairing Information Tab . . . . . . . . . . . . . . . . . . . . . . . . . . . . . . . . . . . . . . . . . . . . . . . . . . . . . . . 83
Genomic Information Tab. . . . . . . . . . . . . . . . . . . . . . . . . . . . . . . . . . . . . . . . . . . . . . . . . . . . . . 83
Button Bar . . . . . . . . . . . . . . . . . . . . . . . . . . . . . . . . . . . . . . . . . . . . . . . . . . . . . . . . . . . . . . . . . . . 84
Table of Contents
Chapter 8 - Preparing a Dataset
Data Preparation Window . . . . . . . . . . . . . . . . . . . . . . . . . . . . . . . . . . . . . . . . . . . . . . . . . . . . . . . .
Menu Bar . . . . . . . . . . . . . . . . . . . . . . . . . . . . . . . . . . . . . . . . . . . . . . . . . . . . . . . . . . . . . . . . . . .
Transformations Panel . . . . . . . . . . . . . . . . . . . . . . . . . . . . . . . . . . . . . . . . . . . . . . . . . . . . . . . .
Dataset Contents Panel. . . . . . . . . . . . . . . . . . . . . . . . . . . . . . . . . . . . . . . . . . . . . . . . . . . . . . . .
86
87
90
92
Working with the Data Preparation Tool . . . . . . . . . . . . . . . . . . . . . . . . . . . . . . . . . . . . . . . . . . . . 93
Adding a Background Correction Transformation . . . . . . . . . . . . . . . . . . . . . . . . . . . . . . . . 93
Adding an Omit Flagged Spots Transformation . . . . . . . . . . . . . . . . . . . . . . . . . . . . . . . . . . 95
Adding a Combine Replicates Transformation . . . . . . . . . . . . . . . . . . . . . . . . . . . . . . . . . . . 96
Adding a Fill in Missing Values Transformation . . . . . . . . . . . . . . . . . . . . . . . . . . . . . . . . . . 98
Adding a Floor Data Transformation. . . . . . . . . . . . . . . . . . . . . . . . . . . . . . . . . . . . . . . . . . . . 99
Adding a Shifted Log Transformation. . . . . . . . . . . . . . . . . . . . . . . . . . . . . . . . . . . . . . . . . . 100
Adding a Ratio Transformation . . . . . . . . . . . . . . . . . . . . . . . . . . . . . . . . . . . . . . . . . . . . . . . 101
Adding a Difference Transformation . . . . . . . . . . . . . . . . . . . . . . . . . . . . . . . . . . . . . . . . . . . 101
Adding an Omit Low Expression Levels Transformation . . . . . . . . . . . . . . . . . . . . . . . . . 102
Adding a Normalization Transformation . . . . . . . . . . . . . . . . . . . . . . . . . . . . . . . . . . . . . . . 102
Applying Data Changes . . . . . . . . . . . . . . . . . . . . . . . . . . . . . . . . . . . . . . . . . . . . . . . . . . . . . . 107
Removing a Transformation . . . . . . . . . . . . . . . . . . . . . . . . . . . . . . . . . . . . . . . . . . . . . . . . . . 107
Saving a Transformation Sequence . . . . . . . . . . . . . . . . . . . . . . . . . . . . . . . . . . . . . . . . . . . . 108
Loading a Transformation Sequence . . . . . . . . . . . . . . . . . . . . . . . . . . . . . . . . . . . . . . . . . . . 108
Applying the Simple Preset Sequence . . . . . . . . . . . . . . . . . . . . . . . . . . . . . . . . . . . . . . . . . . 109
Applying the Normalized Preset Sequence . . . . . . . . . . . . . . . . . . . . . . . . . . . . . . . . . . . . . 109
Applying the Log Scale Preset Sequence. . . . . . . . . . . . . . . . . . . . . . . . . . . . . . . . . . . . . . . . 110
Applying the Log Scale / Replicates Preset Sequence . . . . . . . . . . . . . . . . . . . . . . . . . . . . 111
Displaying Selected Rows . . . . . . . . . . . . . . . . . . . . . . . . . . . . . . . . . . . . . . . . . . . . . . . . . . . . 112
Using Preview Mode . . . . . . . . . . . . . . . . . . . . . . . . . . . . . . . . . . . . . . . . . . . . . . . . . . . . . . . . 113
Viewing Spot Information . . . . . . . . . . . . . . . . . . . . . . . . . . . . . . . . . . . . . . . . . . . . . . . . . . . . 113
Saving Dataset Contents as Text . . . . . . . . . . . . . . . . . . . . . . . . . . . . . . . . . . . . . . . . . . . . . . . 113
Saving Highlighted Data Rows as Text . . . . . . . . . . . . . . . . . . . . . . . . . . . . . . . . . . . . . . . . . 114
Chapter 9 - Using Other Dataset Tools
Partition Editor Window. . . . . . . . . . . . . . . . . . . . . . . . . . . . . . . . . . . . . . . . . . . . . . . . . . . . . . . . . 116
Menu Bar . . . . . . . . . . . . . . . . . . . . . . . . . . . . . . . . . . . . . . . . . . . . . . . . . . . . . . . . . . . . . . . . . . 118
Using the Partition Editor . . . . . . . . . . . . . . . . . . . . . . . . . . . . . . . . . . . . . . . . . . . . . . . . . . . . . . . .
Opening a Partition File . . . . . . . . . . . . . . . . . . . . . . . . . . . . . . . . . . . . . . . . . . . . . . . . . . . . . .
Changing the Color of a Partition. . . . . . . . . . . . . . . . . . . . . . . . . . . . . . . . . . . . . . . . . . . . . .
Changing the Name of a Partition . . . . . . . . . . . . . . . . . . . . . . . . . . . . . . . . . . . . . . . . . . . . .
Creating a New Partition . . . . . . . . . . . . . . . . . . . . . . . . . . . . . . . . . . . . . . . . . . . . . . . . . . . . .
120
120
121
122
122
Text-Based Query Window. . . . . . . . . . . . . . . . . . . . . . . . . . . . . . . . . . . . . . . . . . . . . . . . . . . . . . . 123
Menu Bar . . . . . . . . . . . . . . . . . . . . . . . . . . . . . . . . . . . . . . . . . . . . . . . . . . . . . . . . . . . . . . . . . . 124
GeneSight Users Manual
Toolbar. . . . . . . . . . . . . . . . . . . . . . . . . . . . . . . . . . . . . . . . . . . . . . . . . . . . . . . . . . . . . . . . . . . . . 125
Using the Text-Based Query Tool. . . . . . . . . . . . . . . . . . . . . . . . . . . . . . . . . . . . . . . . . . . . . . . . . . 126
Importing a Group. . . . . . . . . . . . . . . . . . . . . . . . . . . . . . . . . . . . . . . . . . . . . . . . . . . . . . . . . . . 126
Sub-Selecting a Group. . . . . . . . . . . . . . . . . . . . . . . . . . . . . . . . . . . . . . . . . . . . . . . . . . . . . . . . 126
Adding a New Group . . . . . . . . . . . . . . . . . . . . . . . . . . . . . . . . . . . . . . . . . . . . . . . . . . . . . . . . 127
Deleting a Group . . . . . . . . . . . . . . . . . . . . . . . . . . . . . . . . . . . . . . . . . . . . . . . . . . . . . . . . . . . . 127
Building a Query . . . . . . . . . . . . . . . . . . . . . . . . . . . . . . . . . . . . . . . . . . . . . . . . . . . . . . . . . . . . 128
Removing a Query. . . . . . . . . . . . . . . . . . . . . . . . . . . . . . . . . . . . . . . . . . . . . . . . . . . . . . . . . . . 128
Confidence Analysis Window. . . . . . . . . . . . . . . . . . . . . . . . . . . . . . . . . . . . . . . . . . . . . . . . . . . . . 129
Menu Bar . . . . . . . . . . . . . . . . . . . . . . . . . . . . . . . . . . . . . . . . . . . . . . . . . . . . . . . . . . . . . . . . . . . 130
Using the Confidence Analyzer . . . . . . . . . . . . . . . . . . . . . . . . . . . . . . . . . . . . . . . . . . . . . . . . . . . 134
Analyzing Ratio Data . . . . . . . . . . . . . . . . . . . . . . . . . . . . . . . . . . . . . . . . . . . . . . . . . . . . . . . . 134
Saving a Screen Shot as a Graphic File . . . . . . . . . . . . . . . . . . . . . . . . . . . . . . . . . . . . . . . . . . 135
Printing a Screen Shot . . . . . . . . . . . . . . . . . . . . . . . . . . . . . . . . . . . . . . . . . . . . . . . . . . . . . . . . 136
Sub-Selecting Genes. . . . . . . . . . . . . . . . . . . . . . . . . . . . . . . . . . . . . . . . . . . . . . . . . . . . . . . . . . 137
Selecting an Entire Gene Set . . . . . . . . . . . . . . . . . . . . . . . . . . . . . . . . . . . . . . . . . . . . . . . . . . . 137
Adding a New URL . . . . . . . . . . . . . . . . . . . . . . . . . . . . . . . . . . . . . . . . . . . . . . . . . . . . . . . . . . 137
Significance Tool Window . . . . . . . . . . . . . . . . . . . . . . . . . . . . . . . . . . . . . . . . . . . . . . . . . . . . . . . . 138
Working in the Significance Tool Window . . . . . . . . . . . . . . . . . . . . . . . . . . . . . . . . . . . . . . . . . . 139
Determining Differential Expression . . . . . . . . . . . . . . . . . . . . . . . . . . . . . . . . . . . . . . . . . . . 139
Rearranging Columns . . . . . . . . . . . . . . . . . . . . . . . . . . . . . . . . . . . . . . . . . . . . . . . . . . . . . . . . . 140
Selecting Multiple Rows . . . . . . . . . . . . . . . . . . . . . . . . . . . . . . . . . . . . . . . . . . . . . . . . . . . . . . 141
Template Matching Window. . . . . . . . . . . . . . . . . . . . . . . . . . . . . . . . . . . . . . . . . . . . . . . . . . . . . . 142
Working in the Template Matching Window. . . . . . . . . . . . . . . . . . . . . . . . . . . . . . . . . . . . . . . . 143
Creating a Template . . . . . . . . . . . . . . . . . . . . . . . . . . . . . . . . . . . . . . . . . . . . . . . . . . . . . . . . . 143
Removing a Template . . . . . . . . . . . . . . . . . . . . . . . . . . . . . . . . . . . . . . . . . . . . . . . . . . . . . . . . 144
Annotation Collector Window . . . . . . . . . . . . . . . . . . . . . . . . . . . . . . . . . . . . . . . . . . . . . . . . . . . . 145
Display Control . . . . . . . . . . . . . . . . . . . . . . . . . . . . . . . . . . . . . . . . . . . . . . . . . . . . . . . . . . . . . 145
Gene . . . . . . . . . . . . . . . . . . . . . . . . . . . . . . . . . . . . . . . . . . . . . . . . . . . . . . . . . . . . . . . . . . . . . . . 146
Previous Gene. . . . . . . . . . . . . . . . . . . . . . . . . . . . . . . . . . . . . . . . . . . . . . . . . . . . . . . . . . . . . . . 146
Next Gene . . . . . . . . . . . . . . . . . . . . . . . . . . . . . . . . . . . . . . . . . . . . . . . . . . . . . . . . . . . . . . . . . . 146
Experimental Condition . . . . . . . . . . . . . . . . . . . . . . . . . . . . . . . . . . . . . . . . . . . . . . . . . . . . . . 146
Previous Condition . . . . . . . . . . . . . . . . . . . . . . . . . . . . . . . . . . . . . . . . . . . . . . . . . . . . . . . . . . 146
Next Condition . . . . . . . . . . . . . . . . . . . . . . . . . . . . . . . . . . . . . . . . . . . . . . . . . . . . . . . . . . . . . . 146
Refresh . . . . . . . . . . . . . . . . . . . . . . . . . . . . . . . . . . . . . . . . . . . . . . . . . . . . . . . . . . . . . . . . . . . . . 147
From . . . . . . . . . . . . . . . . . . . . . . . . . . . . . . . . . . . . . . . . . . . . . . . . . . . . . . . . . . . . . . . . . . . . . . . 147
Fetch . . . . . . . . . . . . . . . . . . . . . . . . . . . . . . . . . . . . . . . . . . . . . . . . . . . . . . . . . . . . . . . . . . . . . . . 147
Working in the Annotation Collector Window . . . . . . . . . . . . . . . . . . . . . . . . . . . . . . . . . . . . . . 148
Selecting a Gene . . . . . . . . . . . . . . . . . . . . . . . . . . . . . . . . . . . . . . . . . . . . . . . . . . . . . . . . . . . . . 148
Table of Contents
Displaying an Experimental Condition . . . . . . . . . . . . . . . . . . . . . . . . . . . . . . . . . . . . . . . . . 149
Searching the Web for Gene Information . . . . . . . . . . . . . . . . . . . . . . . . . . . . . . . . . . . . . . . 150
Chapter 10 - Analyzing Datasets with Plotting Tools
Data Plotting Tools. . . . . . . . . . . . . . . . . . . . . . . . . . . . . . . . . . . . . . . . . . . . . . . . . . . . . . . . . . . . . . 152
Menu Bar . . . . . . . . . . . . . . . . . . . . . . . . . . . . . . . . . . . . . . . . . . . . . . . . . . . . . . . . . . . . . . . . . . 153
Toolbar Buttons . . . . . . . . . . . . . . . . . . . . . . . . . . . . . . . . . . . . . . . . . . . . . . . . . . . . . . . . . . . . . 155
Working With Plotting Tools . . . . . . . . . . . . . . . . . . . . . . . . . . . . . . . . . . . . . . . . . . . . . . . . . . . . . 157
Chromosomal Mapping Window . . . . . . . . . . . . . . . . . . . . . . . . . . . . . . . . . . . . . . . . . . . . . . . . .
Choose Organism . . . . . . . . . . . . . . . . . . . . . . . . . . . . . . . . . . . . . . . . . . . . . . . . . . . . . . . . . . .
Common Scale for All Chromosomes . . . . . . . . . . . . . . . . . . . . . . . . . . . . . . . . . . . . . . . . . .
Show Only Genes in Selected Partition . . . . . . . . . . . . . . . . . . . . . . . . . . . . . . . . . . . . . . . . .
Refresh View . . . . . . . . . . . . . . . . . . . . . . . . . . . . . . . . . . . . . . . . . . . . . . . . . . . . . . . . . . . . . . .
158
159
159
159
159
Histogram Window . . . . . . . . . . . . . . . . . . . . . . . . . . . . . . . . . . . . . . . . . . . . . . . . . . . . . . . . . . . . .
Bin Number . . . . . . . . . . . . . . . . . . . . . . . . . . . . . . . . . . . . . . . . . . . . . . . . . . . . . . . . . . . . . . . .
Tails . . . . . . . . . . . . . . . . . . . . . . . . . . . . . . . . . . . . . . . . . . . . . . . . . . . . . . . . . . . . . . . . . . . . . . .
Boundaries . . . . . . . . . . . . . . . . . . . . . . . . . . . . . . . . . . . . . . . . . . . . . . . . . . . . . . . . . . . . . . . . .
Total Genes. . . . . . . . . . . . . . . . . . . . . . . . . . . . . . . . . . . . . . . . . . . . . . . . . . . . . . . . . . . . . . . . .
Selected Genes . . . . . . . . . . . . . . . . . . . . . . . . . . . . . . . . . . . . . . . . . . . . . . . . . . . . . . . . . . . . . .
160
160
161
161
161
162
Using the Histogram Tool. . . . . . . . . . . . . . . . . . . . . . . . . . . . . . . . . . . . . . . . . . . . . . . . . . . . . . . .
Selecting a Gene. . . . . . . . . . . . . . . . . . . . . . . . . . . . . . . . . . . . . . . . . . . . . . . . . . . . . . . . . . . . .
Zooming In on a Gene . . . . . . . . . . . . . . . . . . . . . . . . . . . . . . . . . . . . . . . . . . . . . . . . . . . . . . .
Sub-Selecting Genes . . . . . . . . . . . . . . . . . . . . . . . . . . . . . . . . . . . . . . . . . . . . . . . . . . . . . . . . .
163
163
164
165
K-means Clustering Window . . . . . . . . . . . . . . . . . . . . . . . . . . . . . . . . . . . . . . . . . . . . . . . . . . . . .
Cluster Choice . . . . . . . . . . . . . . . . . . . . . . . . . . . . . . . . . . . . . . . . . . . . . . . . . . . . . . . . . . . . . .
Distance Metric . . . . . . . . . . . . . . . . . . . . . . . . . . . . . . . . . . . . . . . . . . . . . . . . . . . . . . . . . . . . .
Number of Gene Clusters . . . . . . . . . . . . . . . . . . . . . . . . . . . . . . . . . . . . . . . . . . . . . . . . . . . .
Number of Experimental Condition Clusters. . . . . . . . . . . . . . . . . . . . . . . . . . . . . . . . . . . .
Apply . . . . . . . . . . . . . . . . . . . . . . . . . . . . . . . . . . . . . . . . . . . . . . . . . . . . . . . . . . . . . . . . . . . . .
Make Partition . . . . . . . . . . . . . . . . . . . . . . . . . . . . . . . . . . . . . . . . . . . . . . . . . . . . . . . . . . . . . .
Add Cluster Centroids . . . . . . . . . . . . . . . . . . . . . . . . . . . . . . . . . . . . . . . . . . . . . . . . . . . . . . .
Cluster Confidence . . . . . . . . . . . . . . . . . . . . . . . . . . . . . . . . . . . . . . . . . . . . . . . . . . . . . . . . . .
Cluster Enrichment Analysis. . . . . . . . . . . . . . . . . . . . . . . . . . . . . . . . . . . . . . . . . . . . . . . . . .
Color Map. . . . . . . . . . . . . . . . . . . . . . . . . . . . . . . . . . . . . . . . . . . . . . . . . . . . . . . . . . . . . . . . . .
166
167
167
168
168
168
169
169
169
169
170
Using the K-Means Clustering Tool . . . . . . . . . . . . . . . . . . . . . . . . . . . . . . . . . . . . . . . . . . . . . . .
Selecting a Gene. . . . . . . . . . . . . . . . . . . . . . . . . . . . . . . . . . . . . . . . . . . . . . . . . . . . . . . . . . . . .
Zooming In on a Gene . . . . . . . . . . . . . . . . . . . . . . . . . . . . . . . . . . . . . . . . . . . . . . . . . . . . . . .
Sub-Selecting Genes . . . . . . . . . . . . . . . . . . . . . . . . . . . . . . . . . . . . . . . . . . . . . . . . . . . . . . . . .
Saving a Partition . . . . . . . . . . . . . . . . . . . . . . . . . . . . . . . . . . . . . . . . . . . . . . . . . . . . . . . . . . .
171
171
172
174
174
GeneSight Users Manual
Analyzing Cluster Confidence. . . . . . . . . . . . . . . . . . . . . . . . . . . . . . . . . . . . . . . . . . . . . . . . . 175
1D SOM Clustering Window . . . . . . . . . . . . . . . . . . . . . . . . . . . . . . . . . . . . . . . . . . . . . . . . . . . . . 176
Cluster Choice . . . . . . . . . . . . . . . . . . . . . . . . . . . . . . . . . . . . . . . . . . . . . . . . . . . . . . . . . . . . . . 177
Distance Metric. . . . . . . . . . . . . . . . . . . . . . . . . . . . . . . . . . . . . . . . . . . . . . . . . . . . . . . . . . . . . . 177
Apply . . . . . . . . . . . . . . . . . . . . . . . . . . . . . . . . . . . . . . . . . . . . . . . . . . . . . . . . . . . . . . . . . . . . . . 177
Cluster Enrichment Analysis . . . . . . . . . . . . . . . . . . . . . . . . . . . . . . . . . . . . . . . . . . . . . . . . . . 177
Color Map . . . . . . . . . . . . . . . . . . . . . . . . . . . . . . . . . . . . . . . . . . . . . . . . . . . . . . . . . . . . . . . . . . 177
Using the 1D SOM Clustering Tool . . . . . . . . . . . . . . . . . . . . . . . . . . . . . . . . . . . . . . . . . . . . . . . . 178
Selecting a Gene . . . . . . . . . . . . . . . . . . . . . . . . . . . . . . . . . . . . . . . . . . . . . . . . . . . . . . . . . . . . . 178
Zooming In on a Gene. . . . . . . . . . . . . . . . . . . . . . . . . . . . . . . . . . . . . . . . . . . . . . . . . . . . . . . . 179
Sub-Selecting Genes. . . . . . . . . . . . . . . . . . . . . . . . . . . . . . . . . . . . . . . . . . . . . . . . . . . . . . . . . . 180
2D SOM Clustering Window . . . . . . . . . . . . . . . . . . . . . . . . . . . . . . . . . . . . . . . . . . . . . . . . . . . . . 181
Cluster View . . . . . . . . . . . . . . . . . . . . . . . . . . . . . . . . . . . . . . . . . . . . . . . . . . . . . . . . . . . . . . . . 182
Distance Metric. . . . . . . . . . . . . . . . . . . . . . . . . . . . . . . . . . . . . . . . . . . . . . . . . . . . . . . . . . . . . . 182
Cluster Genes or Experiments . . . . . . . . . . . . . . . . . . . . . . . . . . . . . . . . . . . . . . . . . . . . . . . . . 182
Number of Horizontal Clusters . . . . . . . . . . . . . . . . . . . . . . . . . . . . . . . . . . . . . . . . . . . . . . . . 182
Number of Vertical Clusters. . . . . . . . . . . . . . . . . . . . . . . . . . . . . . . . . . . . . . . . . . . . . . . . . . . 183
Apply . . . . . . . . . . . . . . . . . . . . . . . . . . . . . . . . . . . . . . . . . . . . . . . . . . . . . . . . . . . . . . . . . . . . . . 183
Make Partition . . . . . . . . . . . . . . . . . . . . . . . . . . . . . . . . . . . . . . . . . . . . . . . . . . . . . . . . . . . . . . 183
Add Cluster Centroids . . . . . . . . . . . . . . . . . . . . . . . . . . . . . . . . . . . . . . . . . . . . . . . . . . . . . . . 183
Cluster Confidence . . . . . . . . . . . . . . . . . . . . . . . . . . . . . . . . . . . . . . . . . . . . . . . . . . . . . . . . . . 183
Use the Same Scale in All Cluster . . . . . . . . . . . . . . . . . . . . . . . . . . . . . . . . . . . . . . . . . . . . . . 184
Show Points . . . . . . . . . . . . . . . . . . . . . . . . . . . . . . . . . . . . . . . . . . . . . . . . . . . . . . . . . . . . . . . . 184
Show . . . . . . . . . . . . . . . . . . . . . . . . . . . . . . . . . . . . . . . . . . . . . . . . . . . . . . . . . . . . . . . . . . . . . . 184
Using the 2D SOM Tool . . . . . . . . . . . . . . . . . . . . . . . . . . . . . . . . . . . . . . . . . . . . . . . . . . . . . . . . . . 185
Zooming In on a Gene. . . . . . . . . . . . . . . . . . . . . . . . . . . . . . . . . . . . . . . . . . . . . . . . . . . . . . . . 185
Sub-Selecting Genes. . . . . . . . . . . . . . . . . . . . . . . . . . . . . . . . . . . . . . . . . . . . . . . . . . . . . . . . . . 186
Hierarchical Clustering Window . . . . . . . . . . . . . . . . . . . . . . . . . . . . . . . . . . . . . . . . . . . . . . . . . . 187
Partition Mode . . . . . . . . . . . . . . . . . . . . . . . . . . . . . . . . . . . . . . . . . . . . . . . . . . . . . . . . . . . . . . 187
Cluster Choice . . . . . . . . . . . . . . . . . . . . . . . . . . . . . . . . . . . . . . . . . . . . . . . . . . . . . . . . . . . . . . 188
Cluster Linkage . . . . . . . . . . . . . . . . . . . . . . . . . . . . . . . . . . . . . . . . . . . . . . . . . . . . . . . . . . . . . 188
Distance Metric. . . . . . . . . . . . . . . . . . . . . . . . . . . . . . . . . . . . . . . . . . . . . . . . . . . . . . . . . . . . . . 188
Apply . . . . . . . . . . . . . . . . . . . . . . . . . . . . . . . . . . . . . . . . . . . . . . . . . . . . . . . . . . . . . . . . . . . . . . 189
Make Partition . . . . . . . . . . . . . . . . . . . . . . . . . . . . . . . . . . . . . . . . . . . . . . . . . . . . . . . . . . . . . . 189
Cluster Enrichment Analysis . . . . . . . . . . . . . . . . . . . . . . . . . . . . . . . . . . . . . . . . . . . . . . . . . . 189
Color Map . . . . . . . . . . . . . . . . . . . . . . . . . . . . . . . . . . . . . . . . . . . . . . . . . . . . . . . . . . . . . . . . . . 189
Using the Hierarchical Clustering Tool . . . . . . . . . . . . . . . . . . . . . . . . . . . . . . . . . . . . . . . . . . . . . 190
Selecting a Gene . . . . . . . . . . . . . . . . . . . . . . . . . . . . . . . . . . . . . . . . . . . . . . . . . . . . . . . . . . . . . 190
Zooming In on a Gene. . . . . . . . . . . . . . . . . . . . . . . . . . . . . . . . . . . . . . . . . . . . . . . . . . . . . . . . 191
Table of Contents
Creating a Partition . . . . . . . . . . . . . . . . . . . . . . . . . . . . . . . . . . . . . . . . . . . . . . . . . . . . . . . . . . 192
Saving a Partition . . . . . . . . . . . . . . . . . . . . . . . . . . . . . . . . . . . . . . . . . . . . . . . . . . . . . . . . . . . 193
PcaPlot Window . . . . . . . . . . . . . . . . . . . . . . . . . . . . . . . . . . . . . . . . . . . . . . . . . . . . . . . . . . . . . . . .
Percentages. . . . . . . . . . . . . . . . . . . . . . . . . . . . . . . . . . . . . . . . . . . . . . . . . . . . . . . . . . . . . . . . .
Select a Mode . . . . . . . . . . . . . . . . . . . . . . . . . . . . . . . . . . . . . . . . . . . . . . . . . . . . . . . . . . . . . . .
Select a Number of Axes . . . . . . . . . . . . . . . . . . . . . . . . . . . . . . . . . . . . . . . . . . . . . . . . . . . . .
Vector Bar Chart . . . . . . . . . . . . . . . . . . . . . . . . . . . . . . . . . . . . . . . . . . . . . . . . . . . . . . . . . . . .
OK . . . . . . . . . . . . . . . . . . . . . . . . . . . . . . . . . . . . . . . . . . . . . . . . . . . . . . . . . . . . . . . . . . . . . . . .
Parameters . . . . . . . . . . . . . . . . . . . . . . . . . . . . . . . . . . . . . . . . . . . . . . . . . . . . . . . . . . . . . . . . .
194
195
195
195
196
196
196
Using the PCA Tool . . . . . . . . . . . . . . . . . . . . . . . . . . . . . . . . . . . . . . . . . . . . . . . . . . . . . . . . . . . . .
Selecting a Gene. . . . . . . . . . . . . . . . . . . . . . . . . . . . . . . . . . . . . . . . . . . . . . . . . . . . . . . . . . . . .
Zooming In on a Gene . . . . . . . . . . . . . . . . . . . . . . . . . . . . . . . . . . . . . . . . . . . . . . . . . . . . . . .
Sub-Selecting Genes . . . . . . . . . . . . . . . . . . . . . . . . . . . . . . . . . . . . . . . . . . . . . . . . . . . . . . . . .
197
197
198
199
Scatter Plot Window . . . . . . . . . . . . . . . . . . . . . . . . . . . . . . . . . . . . . . . . . . . . . . . . . . . . . . . . . . . .
Log (2D) . . . . . . . . . . . . . . . . . . . . . . . . . . . . . . . . . . . . . . . . . . . . . . . . . . . . . . . . . . . . . . . . . . .
Animation (3D) . . . . . . . . . . . . . . . . . . . . . . . . . . . . . . . . . . . . . . . . . . . . . . . . . . . . . . . . . . . . .
Zoom In (3D) . . . . . . . . . . . . . . . . . . . . . . . . . . . . . . . . . . . . . . . . . . . . . . . . . . . . . . . . . . . . . . .
Zoom Out (3D) . . . . . . . . . . . . . . . . . . . . . . . . . . . . . . . . . . . . . . . . . . . . . . . . . . . . . . . . . . . . .
Reset (3D) . . . . . . . . . . . . . . . . . . . . . . . . . . . . . . . . . . . . . . . . . . . . . . . . . . . . . . . . . . . . . . . . . .
200
200
201
201
201
201
Using the Scatter Plot Tool . . . . . . . . . . . . . . . . . . . . . . . . . . . . . . . . . . . . . . . . . . . . . . . . . . . . . . .
Selecting a Gene. . . . . . . . . . . . . . . . . . . . . . . . . . . . . . . . . . . . . . . . . . . . . . . . . . . . . . . . . . . . .
Zooming In on a Gene . . . . . . . . . . . . . . . . . . . . . . . . . . . . . . . . . . . . . . . . . . . . . . . . . . . . . . .
Sub-Selecting Genes . . . . . . . . . . . . . . . . . . . . . . . . . . . . . . . . . . . . . . . . . . . . . . . . . . . . . . . . .
202
202
203
204
GenePie Window . . . . . . . . . . . . . . . . . . . . . . . . . . . . . . . . . . . . . . . . . . . . . . . . . . . . . . . . . . . . . . .
Pie Color Key . . . . . . . . . . . . . . . . . . . . . . . . . . . . . . . . . . . . . . . . . . . . . . . . . . . . . . . . . . . . . . .
Diameter Encoding Maximum Intensity . . . . . . . . . . . . . . . . . . . . . . . . . . . . . . . . . . . . . . . .
Legend . . . . . . . . . . . . . . . . . . . . . . . . . . . . . . . . . . . . . . . . . . . . . . . . . . . . . . . . . . . . . . . . . . . .
205
206
206
206
Using the GenePie Tool . . . . . . . . . . . . . . . . . . . . . . . . . . . . . . . . . . . . . . . . . . . . . . . . . . . . . . . . . .
Selecting a Gene. . . . . . . . . . . . . . . . . . . . . . . . . . . . . . . . . . . . . . . . . . . . . . . . . . . . . . . . . . . . .
Zooming In on a Gene . . . . . . . . . . . . . . . . . . . . . . . . . . . . . . . . . . . . . . . . . . . . . . . . . . . . . . .
Sub-Selecting Genes . . . . . . . . . . . . . . . . . . . . . . . . . . . . . . . . . . . . . . . . . . . . . . . . . . . . . . . . .
207
207
208
209
Time Series Plot Window . . . . . . . . . . . . . . . . . . . . . . . . . . . . . . . . . . . . . . . . . . . . . . . . . . . . . . . .
Template . . . . . . . . . . . . . . . . . . . . . . . . . . . . . . . . . . . . . . . . . . . . . . . . . . . . . . . . . . . . . . . . . . .
Save Template . . . . . . . . . . . . . . . . . . . . . . . . . . . . . . . . . . . . . . . . . . . . . . . . . . . . . . . . . . . . . .
Log. . . . . . . . . . . . . . . . . . . . . . . . . . . . . . . . . . . . . . . . . . . . . . . . . . . . . . . . . . . . . . . . . . . . . . . .
Shuffle . . . . . . . . . . . . . . . . . . . . . . . . . . . . . . . . . . . . . . . . . . . . . . . . . . . . . . . . . . . . . . . . . . . . .
Left. . . . . . . . . . . . . . . . . . . . . . . . . . . . . . . . . . . . . . . . . . . . . . . . . . . . . . . . . . . . . . . . . . . . . . . .
Right . . . . . . . . . . . . . . . . . . . . . . . . . . . . . . . . . . . . . . . . . . . . . . . . . . . . . . . . . . . . . . . . . . . . . .
Metric . . . . . . . . . . . . . . . . . . . . . . . . . . . . . . . . . . . . . . . . . . . . . . . . . . . . . . . . . . . . . . . . . . . . .
210
210
211
211
211
211
211
212
GeneSight Users Manual
Threshold . . . . . . . . . . . . . . . . . . . . . . . . . . . . . . . . . . . . . . . . . . . . . . . . . . . . . . . . . . . . . . . . . . 212
Match . . . . . . . . . . . . . . . . . . . . . . . . . . . . . . . . . . . . . . . . . . . . . . . . . . . . . . . . . . . . . . . . . . . . . . 212
Count . . . . . . . . . . . . . . . . . . . . . . . . . . . . . . . . . . . . . . . . . . . . . . . . . . . . . . . . . . . . . . . . . . . . . . 212
Using the Time Series Tool . . . . . . . . . . . . . . . . . . . . . . . . . . . . . . . . . . . . . . . . . . . . . . . . . . . . . . . 213
Creating a Template . . . . . . . . . . . . . . . . . . . . . . . . . . . . . . . . . . . . . . . . . . . . . . . . . . . . . . . . . 213
Selecting a Gene . . . . . . . . . . . . . . . . . . . . . . . . . . . . . . . . . . . . . . . . . . . . . . . . . . . . . . . . . . . . . 214
Zooming In on a Gene. . . . . . . . . . . . . . . . . . . . . . . . . . . . . . . . . . . . . . . . . . . . . . . . . . . . . . . . 215
Sub-Selecting Genes. . . . . . . . . . . . . . . . . . . . . . . . . . . . . . . . . . . . . . . . . . . . . . . . . . . . . . . . . . 216
Common Tools . . . . . . . . . . . . . . . . . . . . . . . . . . . . . . . . . . . . . . . . . . . . . . . . . . . . . . . . . . . . . . . . . 217
Using the Goto Web Tool . . . . . . . . . . . . . . . . . . . . . . . . . . . . . . . . . . . . . . . . . . . . . . . . . . . . . 217
Using the Find Tool . . . . . . . . . . . . . . . . . . . . . . . . . . . . . . . . . . . . . . . . . . . . . . . . . . . . . . . . . . 217
Using the Annotations Tool . . . . . . . . . . . . . . . . . . . . . . . . . . . . . . . . . . . . . . . . . . . . . . . . . . . 218
. . . . . . . . . . . . . . . . . . . . . . . . . . . . . . . . . . . . . . . . . . . . . . . . . . . . . . . . . . . . . . . . . . . . . . . . . . . 218
Using the Cluster Confidence Tool . . . . . . . . . . . . . . . . . . . . . . . . . . . . . . . . . . . . . . . . . . . . . 218
Chapter 11 - Generating Reports
Report Window . . . . . . . . . . . . . . . . . . . . . . . . . . . . . . . . . . . . . . . . . . . . . . . . . . . . . . . . . . . . . . . . . 220
Show Only Selected Genes . . . . . . . . . . . . . . . . . . . . . . . . . . . . . . . . . . . . . . . . . . . . . . . . . . . . 220
Select All Columns. . . . . . . . . . . . . . . . . . . . . . . . . . . . . . . . . . . . . . . . . . . . . . . . . . . . . . . . . . . 221
Deselect All Columns . . . . . . . . . . . . . . . . . . . . . . . . . . . . . . . . . . . . . . . . . . . . . . . . . . . . . . . . 221
Update Table View . . . . . . . . . . . . . . . . . . . . . . . . . . . . . . . . . . . . . . . . . . . . . . . . . . . . . . . . . . 221
Save Report . . . . . . . . . . . . . . . . . . . . . . . . . . . . . . . . . . . . . . . . . . . . . . . . . . . . . . . . . . . . . . . . . 221
Cancel . . . . . . . . . . . . . . . . . . . . . . . . . . . . . . . . . . . . . . . . . . . . . . . . . . . . . . . . . . . . . . . . . . . . . 221
Working With the Report Window . . . . . . . . . . . . . . . . . . . . . . . . . . . . . . . . . . . . . . . . . . . . . . . . 222
Sorting Data . . . . . . . . . . . . . . . . . . . . . . . . . . . . . . . . . . . . . . . . . . . . . . . . . . . . . . . . . . . . . . . . . 222
Rearranging Columns . . . . . . . . . . . . . . . . . . . . . . . . . . . . . . . . . . . . . . . . . . . . . . . . . . . . . . . . . 223
Creating a Report . . . . . . . . . . . . . . . . . . . . . . . . . . . . . . . . . . . . . . . . . . . . . . . . . . . . . . . . . . . . 224
Cluster Information . . . . . . . . . . . . . . . . . . . . . . . . . . . . . . . . . . . . . . . . . . . . . . . . . . . . . . . . . . . . . 225
K-Means . . . . . . . . . . . . . . . . . . . . . . . . . . . . . . . . . . . . . . . . . . . . . . . . . . . . . . . . . . . . . . . . . . . 225
Hierarchical. . . . . . . . . . . . . . . . . . . . . . . . . . . . . . . . . . . . . . . . . . . . . . . . . . . . . . . . . . . . . . . . . 225
Appendix A - Technical Support
Warranty Information . . . . . . . . . . . . . . . . . . . . . . . . . . . . . . . . . . . . . . . . . . . . . . . . . . . . . . . . . . . 228
Appendix B - Transformations
Background Correction . . . . . . . . . . . . . . . . . . . . . . . . . . . . . . . . . . . . . . . . . . . . . . . . . . . . . . . . . . 230
Combine Replicates . . . . . . . . . . . . . . . . . . . . . . . . . . . . . . . . . . . . . . . . . . . . . . . . . . . . . . . . . . . . . 231
Normalization . . . . . . . . . . . . . . . . . . . . . . . . . . . . . . . . . . . . . . . . . . . . . . . . . . . . . . . . . . . . . . . . . . 232
Ratio . . . . . . . . . . . . . . . . . . . . . . . . . . . . . . . . . . . . . . . . . . . . . . . . . . . . . . . . . . . . . . . . . . . . . . . . . . 234
Table of Contents
Appendix C - Clustering Algorithms
K-Means . . . . . . . . . . . . . . . . . . . . . . . . . . . . . . . . . . . . . . . . . . . . . . . . . . . . . . . . . . . . . . . . . . . . . . . 236
Hierarchical . . . . . . . . . . . . . . . . . . . . . . . . . . . . . . . . . . . . . . . . . . . . . . . . . . . . . . . . . . . . . . . . . . . . 237
Self-Organizing Map . . . . . . . . . . . . . . . . . . . . . . . . . . . . . . . . . . . . . . . . . . . . . . . . . . . . . . . . . . . . 238
Dendrograms . . . . . . . . . . . . . . . . . . . . . . . . . . . . . . . . . . . . . . . . . . . . . . . . . . . . . . . . . . . . . . . . . . 239
Distance Metrics . . . . . . . . . . . . . . . . . . . . . . . . . . . . . . . . . . . . . . . . . . . . . . . . . . . . . . . . . . . . . . . .
Euclidean . . . . . . . . . . . . . . . . . . . . . . . . . . . . . . . . . . . . . . . . . . . . . . . . . . . . . . . . . . . . . . . . . .
Squared Euclidean . . . . . . . . . . . . . . . . . . . . . . . . . . . . . . . . . . . . . . . . . . . . . . . . . . . . . . . . . .
Standardized Euclidean . . . . . . . . . . . . . . . . . . . . . . . . . . . . . . . . . . . . . . . . . . . . . . . . . . . . . .
City Block . . . . . . . . . . . . . . . . . . . . . . . . . . . . . . . . . . . . . . . . . . . . . . . . . . . . . . . . . . . . . . . . . .
Chebychev . . . . . . . . . . . . . . . . . . . . . . . . . . . . . . . . . . . . . . . . . . . . . . . . . . . . . . . . . . . . . . . . .
Pearson Correlation . . . . . . . . . . . . . . . . . . . . . . . . . . . . . . . . . . . . . . . . . . . . . . . . . . . . . . . . .
240
240
240
241
241
241
241
Cluster Linkage. . . . . . . . . . . . . . . . . . . . . . . . . . . . . . . . . . . . . . . . . . . . . . . . . . . . . . . . . . . . . . . . .
Single Linkage . . . . . . . . . . . . . . . . . . . . . . . . . . . . . . . . . . . . . . . . . . . . . . . . . . . . . . . . . . . . . .
Complete Linkage . . . . . . . . . . . . . . . . . . . . . . . . . . . . . . . . . . . . . . . . . . . . . . . . . . . . . . . . . . .
Average Linkage . . . . . . . . . . . . . . . . . . . . . . . . . . . . . . . . . . . . . . . . . . . . . . . . . . . . . . . . . . . .
Centroid Linkage. . . . . . . . . . . . . . . . . . . . . . . . . . . . . . . . . . . . . . . . . . . . . . . . . . . . . . . . . . . .
Ward’s Linkage . . . . . . . . . . . . . . . . . . . . . . . . . . . . . . . . . . . . . . . . . . . . . . . . . . . . . . . . . . . . .
243
243
243
243
243
244
Appendix D - Principal Component Analysis
About Principal Component Analysis . . . . . . . . . . . . . . . . . . . . . . . . . . . . . . . . . . . . . . . . . . . . . 246
Projection Mathematics . . . . . . . . . . . . . . . . . . . . . . . . . . . . . . . . . . . . . . . . . . . . . . . . . . . . . . . . . . 248
Applying PCA to “Real Data” . . . . . . . . . . . . . . . . . . . . . . . . . . . . . . . . . . . . . . . . . . . . . . . . . . . . 253
Eigenvector Analysis . . . . . . . . . . . . . . . . . . . . . . . . . . . . . . . . . . . . . . . . . . . . . . . . . . . . . . . . . . . . 254
Appendix E - Confidence Analysis
About Confidence Analysis . . . . . . . . . . . . . . . . . . . . . . . . . . . . . . . . . . . . . . . . . . . . . . . . . . . . . . 256
Appendix F - New Features in GeneSight 3.5
Informatics Enhancements . . . . . . . . . . . . . . . . . . . . . . . . . . . . . . . . . . . . . . . . . . . . . . . . . . . . . . . 262
Box Plot. . . . . . . . . . . . . . . . . . . . . . . . . . . . . . . . . . . . . . . . . . . . . . . . . . . . . . . . . . . . . . . . . . . . 262
LOWESS Normalization . . . . . . . . . . . . . . . . . . . . . . . . . . . . . . . . . . . . . . . . . . . . . . . . . . . . . 263
NCBI Annotations. . . . . . . . . . . . . . . . . . . . . . . . . . . . . . . . . . . . . . . . . . . . . . . . . . . . . . . . . . . 265
Partition Editor . . . . . . . . . . . . . . . . . . . . . . . . . . . . . . . . . . . . . . . . . . . . . . . . . . . . . . . . . . . . . . . . . 268
Partition Panel (at bottom GeneSight main window). . . . . . . . . . . . . . . . . . . . . . . . . . . . . . . . . 268
New Status Bar (at bottom of GeneSight main window) . . . . . . . . . . . . . . . . . . . . . . . . . . . . . . 268
Graphical Enhancements to Clustering Plots (Hierarchical, K-Means, 1D-SOM). . . . . . . . . . 269
Data Preparation Frame enhancements. . . . . . . . . . . . . . . . . . . . . . . . . . . . . . . . . . . . . . . . . . . . . 269
UI Enhancements . . . . . . . . . . . . . . . . . . . . . . . . . . . . . . . . . . . . . . . . . . . . . . . . . . . . . . . . . . . . . . . 269
Optimization Enhancements . . . . . . . . . . . . . . . . . . . . . . . . . . . . . . . . . . . . . . . . . . . . . . . . . . . . . . 270
Bug Fixes . . . . . . . . . . . . . . . . . . . . . . . . . . . . . . . . . . . . . . . . . . . . . . . . . . . . . . . . . . . . . . . . . . . . . . 270
Chapter 1 - Installing GeneSight
Overview
This chapter includes a list of system requirements, instructions for installing (and
uninstalling) the program, and a brief review of the options added to the Windows
Start menu during installation.
1
GeneSight Users Manual
Program Requirements
The following hardware and software is required to successfully install and run
GeneSight 3.0:
•
•
•
•
Operating System - Microsoft Windows 95, 98, 2000, or NT4.
Processor - An IBM PC or equivalent with a Pentium 333 MHZ or higher.
Pentium 700 or higher recommended.
Monitor - A SVGA or higher video system; 1280x1024 or higher recommended.
Random Access Memory (RAM) - At least 128 MB of RAM; 512MB or more
recommended.
Note: Program performance may suffer if you do not have adequate RAM installed
on your computer. GeneSight allocates 80% of your computer’s available RAM
to itself. If your operating system does not allow GeneSight to determine how
much RAM is currently available, the program will default to 200 MB of RAM.
•
Hard Drive - At least 30 MB of free hard disk space; 50 MB recommended.
Note: The amount of hard disk space listed above does not include the Java Runtime
Environment, which may also need to be installed. If you do not have the Java
1.3 Runtime Environment, you will need an additional 10 MB for this
installation.
•
2
CD-ROM - A CD-ROM Drive.
Introduction
Program Installation
Follow the steps below to install GeneSight:
1. If you are installing GeneSight 3.0 on a Windows NT or Windows 2000 operating
system, log in as Administrator.
Note: GeneSight 3.0 requires that JRE 1.3 be installed on the host computer. During
installation, GeneSight determines if the Java 1.3 Runtime Environment (JRE 1.3)
needs to be installed. If GeneSight cannot locate the proper runtime version,
you will be prompted to install Java before continuing the installation. The
installation will proceed after Java is installed.
2. Place the GeneSight 3.0 CD into the CD-ROM drive. An installation screen should
automatically appear.
Note: If the installation screen does not appear automatically, you will need to
double-click on the setup.exe icon in the GeneSight directory (on the GeneSight
3.0 CD) to begin the installation.
3. Select Install GeneSight to display the Welcome to GeneSight 3.0 Setup dialog box.
3
GeneSight Users Manual
4. Review the information on this screen, then click the Next button to display the
License Agreement dialog box.
5. Review the license agreement, then click the Yes button to display the
Information dialog box.
4
Introduction
6. Review the text, then click the Next button to display the Select Components
dialog box.
7. Review the information on this screen, then click the Next button to display the
Select Program Folder dialog box.
Note: If you have a previous version of GeneSight installed, do not install version 3.0
to the same directory.
5
GeneSight Users Manual
8. Review the information on this screen, then click the Next button to begin
installation. An Installation Progress dialog box appears on-screen so that you
can monitor the installation.
The Setup Complete dialog box displays when installation completes.
9. Leave the Yes, I Want to Restart my Computer Now radio button marked.
10. Click the Finish button to restart your computer. This is necessary so that any
changes made during the installation can take effect.
6
Introduction
Program Uninstallation
If you are no longer using an older version of GeneSight, you can use this procedure
to remove it from your computer. However, you should contact technical support at
[email protected] before removing any version of GeneSight 3.0 from your
computer. Follow the steps below to uninstall GeneSight:
1. Select Start > Settings > Control Panel to display the Control Panel window.
2. Double-click on the Add/Remove Programs icon to display the Add/Remove
Programs window.
3. Locate and click on GeneSight 3.0 to select this program from the Currently
Installed Programs list.
4. Click the Change/Remove button to initiate the uninstallation process and display
the GeneSight 3.0 confirmation dialog box.
5. Click the Yes button uninstall GeneSight 3.0. A second GeneSight 3.0 confirmation
dialog box displays when the uninstallation completes.
6. Click the OK button to acknowledge that GeneSight 3.0 has been removed from
your computer.
7. Restart your computer so that any system changes made during the uninstallation
can take effect.
7
GeneSight Users Manual
GeneSight Sub-Menu Options
The following sub-menu is added to the Windows Start menu when you install
GeneSight:
Tip:
Select Start > Programs > GeneSight 3 to display this sub-menu. The Start
menu/button is located in the lower-left corner of the Windows desktop.
The options on this menu are as follows:
•
•
•
•
•
•
8
GeneSight 3 - Launches the program.
License Manager - Displays the GeneSight Licensing dialog box. Refer to “Using
the License Manager” for more details.
License Agreement - Displays a text file that contains the licensing agreement for
GeneSight.
Readme - Displays a text file that contains installation and licensing information
about GeneSight 3.0.
Tutorial - Displays the GeneSight Tutorial in an Adobe Acrobat PDF file format.
User Manual - Displays this manual in an Adobe Acrobat PDF file format.
Chapter 2 - Using the License Manager
Overview
This chapter explains how to use the License Manager tool to control the license
operations needed to run GeneSight. This includes instructions for obtaining the
codes necessary to operate the program in full function mode.
9
GeneSight Users Manual
Obtaining a GeneSight Authorization Code
After you install GeneSight, it runs for up to 15 days in an introductory period called
Demo mode. To use your copy of GeneSight beyond this time frame, you must request
an authorization code from BioDiscovery. If you do not get an authorization code,
you will not be able to open the program after 15 days. Follow the steps below to
obtain your GeneSight authorization code:
1. Submit your registration form to BioDiscovery technical support via regular mail
or fax it to (310) 306-9109.
2. Send an e-mail to [email protected] or contact BioDiscovery at (310) 3069310 during normal business hours with the following information:
• The lock codes (code entry number and computer ID) generated by the
GeneSight Licensing Wizard.
• Your software serial number.
• Your name.
• Your institution/company name.
3. BioDiscovery will e-mail you an authorization code along with instructions for
entering this code within two business days. This code will allow GeneSight to
run normally.
Note: Licenses and license managers from previous versions of GeneSight will not
work with GeneSight 3.0.
10
Chapter Two - Using the License Manager
Unlocking Demo Mode
Follow the steps below to release GeneSight from Demo mode:
1. Select Start > Programs > GeneSight 3 > License Manager to display the
GeneSight Licensing dialog box.
2. Click the Licensing Wizard button to display the Introduction screen.
3. Review this information, then click the Next button to display the Step 1 screen.
11
GeneSight Users Manual
4. Review this information, then click the Next button to display the Step 2 screen.
5. Complete the following fields on this screen:
• Name - Enter your name.
• Company - Enter the name of your company.
• Serial Number - Enter the serial number listed on your GeneSight
registration card.
6. Click the Next button to display the Step 3 screen.
12
Chapter Two - Using the License Manager
7. Enter the numeric authorization code(s) provided to you by BioDiscovery in the
Code 1 and Code 2 fields.
Note: Most customers receive just one code. A second code is only necessary if you
require a custom program configuration. If you were only provided with one
code, enter 0 the Code 2 field.
8. Click the Unlock GeneSight button to unlock your copy of GeneSight and display
a Success dialog box.
9. Click the OK button to return to the Step 3 screen. You’ll notice that the Mode
field has changed from Expired (red background) to Node (green background).
This indicates that you now have full, unrestricted access to GeneSight.
13
GeneSight Users Manual
10. Click the Next button to display the GeneSight Licensing Wizard - Step 4 screen.
11. Enter the keys for any additional modules you purchased (if applicable), then
click the Next button to display the GeneSight Licensing Wizard - Finished!
screen.
12. Click the Finish button to exit the GeneSight Licensing Wizard.
14
Chapter Two - Using the License Manager
Using the Advanced Interface
The License Manager tool also includes an advanced interface that you can use to
select a licensing method, unlock the program, and disable the license for your copy
of GeneSight.
Note: You do not need to access this interface unless you plan to operate a floating
license system on a network. Contact technical support at (310) 306-9310 for
assistance.
Follow the steps below to access the advanced interface:
1. Select Start > Programs > GeneSight 3 > License Manager to display the
GeneSight Licensing dialog box.
2. Click the Advanced Interface button to display the License Manager dialog box.
3. Modify the following fields in the Current License Status area:
• Mode - Indicates the mode (node, expired, etc.) that GeneSight is currently
running in. This field is read-only.
• Expiration - Displays the expiration date (if applicable) for the current license.
This field is read-only.
15
GeneSight Users Manual
4. Mark one of the following radio buttons in the Licensing Method area to unlock
GeneSight:
• Demo Mode - Runs the program for a maximum of 15 days.
• Workstation Locked - Stores and runs the program license on only one
computer.
• Floating Network - Stores the program license on a shared network file,
allowing it to be run from any network computer.
5. Review the following fields in the Locking Codes area:
• Code Entry # - Displays the code entry number assigned to your copy of
GeneSight. This field is read-only.
• Computer ID - Displays the computer identification number assigned to your
copy of GeneSight. This field is read-only.
6. Modify the following fields in the Authorization Codes area:
• Code 1 and 2 - Enter the authorization code(s) provided to you by
BioDiscovery, Inc. See “Obtaining a GeneSight Authorization Code” on page 10
for more details.
7. Modify the following fields in the Module Keys area:
• Key 1 through 5 - Enter the authorization key(s) provided to you by
BioDiscovery to unlock advanced GeneSight modules.
8. Click the X button in the upper-right corner to close the License Manager dialog
box.
16
Chapter 3 - Setting System Preferences
Overview
You use the Preferences dialog box to customize GeneSight program settings. Each of
the options on this dialog box (on the Preferences and Annotations tabs) are described
in this chapter.
17
GeneSight Users Manual
Preferences Dialogue
To display to the Preferences dialog box, select the File > Preferences... command.
Preferences Tab
Follow the steps below to make changes to any of the default settings on the
Preferences tab:
1. Click the Preferences tab to display this portion of the dialog box.
2. Mark the Warn When Flags are Invalid check box if you want an Omit Flagged
Spots Error dialog box to display when gene flags are not valid. This check box is
unmarked by default.
Tip:
When this dialog box displays, you can mark the Do Not Show this Message
Again check box if you do not want it to appear in the future.
3. Mark the Warn When Background Correction Parameters are Invalid check box
if you want a Subgrid Background Correction Error dialog box to display when
background correction parameters are not valid. This check box is unmarked by
default.
18
Chapter Four - Setting System Preferences
Note: This dialog box will only display if you deselect all of the background
correction related columns in the Dataset Builder window and then attempt to
use a transformation formula in the Data Preparation window that includes
background corrections.
4. Mark the Notify When Spot Image File is Invalid check box if you want a Spot
Image File Error dialog box to display if a spot image file is invalid. This check
box is unmarked by default.
5. Mark the Warn When Piecewise Normalization Parameters are Invalid check
box if you want a Piecewise Normalization Parameters are Invalid dialog box to
display if the parameters for this type of normalization are not valid. This check
box is unmarked by default.
6. Enter the largest number of genes that you want GeneSight to load with a column
of genomic data in the Maximum Number of Genes to Load with Genomic Data
field. This option will help you to prevent a memory overload in your computer
by allowing you to limit the total number of genes to load genomic data for in
GeneSight.
7. Select one of the following radio buttons in the Toolbar Buttons area:
• Both Pictures and Text - Select to display both the name and graphical
representation for each toolbar button. This is the default selection.
19
GeneSight Users Manual
•
Pictures Only - Select to display only the graphical representation for each
toolbar button.
•
Text Only - Select to display only the name of each toolbar button.
8. Click the Add URL button to display the Input dialog box.
Enter the complete web addresss for the query page of your choice. The form of
the address should be
<web form address>?<search parameters>&<query term>=
where <web form address> is the web address of the query form, <search
parameters> is a string of name-value settings and <query term> is a symbol
denoting the key to be searched on the query form. Each query form has its own
<search parameters> and <query term> - please refer to those pages for more
information. Here is an example: to enter an url entry for the ncbi nucleotide
query page, enter
www.ncbi.nlm.nih.gov/entrez/query.fcgi?cmd=Search&db=Nucleotide&term=
in the Input dialog box above and click ok - where the <web form address>
correspond to everything before the question mark, <search parameters> refer to
“cmd=Search&db=Nucleotide” string and <query term> refers to “term” string.
After you click on ok to confirm the input, this entry will be added to the Choose
URL menus that appear on the menu bars accessible through the confidence and
significance analyzers and all plotting tools.
20
Chapter Four - Setting System Preferences
9. Select a web address from the Query URLs list and click the Remove URL button
to delete this web address.
10. Click the OK button to save your changes and close this dialog box.
Annotations Tab
Use this tab to enter information about your (optional) Oracle database you are going
to use to store gene data from the world wide web.
Note: The settings on this tab default to a generic flat database file (.fdb). If you are
not using an Oracle database, you should not adjust the settings on this tab.
Follow the steps below to complete the Annotations tab:
1. Click the Annotations tab to display this portion of the dialog box.
2. Mark the Database Present check box to if an Oracle database is available. This
check box is unmarked by default.
Note: The rest of the options on this tab are disabled when the Database Present
check box is unmarked.
21
GeneSight Users Manual
3. Mark the Database Local check box if the Oracle database is on your computer.
Unmark it to indicate that the database is on your network. This check box is
unmarked by default.
Note: The Database Source Name, Database IP Address, and Database Port fields
are disabled if the Database Local check box is marked.
4. The options on this tab are as follows:
• Database Username - Enter the name of the database user.
• Database Password - Enter an alpha-numeric access code that the database
user will be required to enter.
• Database Service Name - Enter the complete Oracle database service name.
• Database Source Name - Enter the network name for the Oracle database
source name. This field is disabled if the Database Local check box is marked.
• Database IP Address - Enter the complete internet protocol (IP) address for
your (non-local) database. This field is disabled if the Database Local check
box is marked.
• Database Port - Enter the name/location of the applicable database port. This
field is disabled if the Database Local check box is marked.
Tip:
Click the Restore Defaults button to return all the options on this tab to their
default setting.
5. Click the OK button to save your changes and close this dialog box.
22
Chapter 4 - Working in the Main Window
Overview
The GeneSight Main window serves as the focal point for dataset analysis. It displays
the name of the current dataset and all data sources included in the dataset. It
indicates the effects of data transformations on your dataset. It also includes a menu
bar and toolbar that you can use to display program interfaces. This chapter identifies
and describes each of these features.
23
GeneSight Users Manual
GeneSight Main Window
GeneSight’s primary graphical user interface consists of the five regions identified
below:
Note: The GeneSight Main window appears as shown above after you create and
save a dataset in the Dataset Builder window. Refer to “Dataset Builder
Window” on page 58 for more details.
24
Chapter Three - Working in the Main Window
Each region of the GeneSight Main window is briefly described below:
•
•
•
•
•
Menu Bar - Positioned across the top of the window. Click on a menu to view the
program commands available on that menu. Refer to “Menu Bar” on page 26 for
more information.
Toolbar - Located directly beneath the menu bar. This region is composed of
buttons that provide a one-click method for executing program commands. See
“Toolbar” on page 29 for more details.
Dataset View Panel - Located directly beneath the toolbar. The dataset that you
have most recently created, loaded, or imported displays in this panel. Refer to
“Dataset View Panel” on page 31 for more information.
Partition Panel - Located directly beneath the Dataset View panel. Use this panel
to choose and switch between subsets that you have created using an analysis
tool. See “Partition Panel” on page 32 for more details.
Dataset Information Bar - Situated at the bottom of the window. This area
displays identifies the name of the current dataset and the most recent operation
performed by the program. Refer to “Dataset Information Bar” on page 33 for more
information.
25
GeneSight Users Manual
Menu Bar
The GeneSight Main window includes a menu bar with File, View, Tools, Plots,
Utilities, and Help menus. The options on these menus are described in this section.
File Menu
The options on this menu are as follows:
Name
Description
Displays the Dataset Builder dialog box and GeneSight Wizard
window. See “Using the GeneSight Wizard” and “Building a Dataset”
for more information.
Displays the Open dialog box. Refer to “Loading a Dataset” on
page 66 for more details.
Saves the current dataset to a disk file. A Dataset Saved dialog box
displays to confirm that your changes have been saved.
Displays the Save dialog box. Use this interface to save a dataset
under another name. A dataset must be open to access this option.
Displays the Dataset Builder window and GeneSight Wizard dialog
box.
Displays the Preferences dialog box. See “Setting System
Preferences” for more details.
Closes the program. The Save Dataset dialog box will display if there
are any unsaved changes in the current dataset.
26
Chapter Three - Working in the Main Window
View Menu
The options on this menu are as follows:
Name
Description
Activates preview mode. In this mode, only the first thirty (30)
rows of genes are used. Select this option again to deactivate
preview mode. The check box is unmarked by default.
Select to hide the Partition panel. Select again to redisplay the
Partition panel. The check box is marked by default.
Tools Menu
The options on this menu are as follows:
Name
Description
Displays either the GeneSight Wizard or the Dataset Builder
window, depending on whether the wizard is disabled. See
Using the GeneSight Wizard and Building a Dataset for more
information.
Displays the Data Preparation window. Refer to “Data
Preparation Window” on page 86 for more details.
Displays the Partition Editor window. See “Partition Editor
Window” on page 116 for more information.
Displays the Text-based Query window. Refer to “Text-Based
Query Window” on page 123 for more details.
Displays the Confidence Analysis window. See “Confidence
Analysis Window” on page 129 for more information.
Displays the Significance Tool window. Refer to “Significance
Tool Window” on page 138 for more details.
Displays the Template Matching window. See “Template
Matching Window” on page 142 for more information.
Displays the Annotation Collector window. This interface
displays data for selected gene(s).
27
GeneSight Users Manual
Plots Menu
The options on this menu are as follows:
Name
Description
Displays the Chromosomal Map window. Use this interface
to visualize the expression levels in terms of the
chromosomal position of individual genes.
Displays the Histogram window. See “Histogram Window”
on page 160 for more information.
Displays the K-Means Clustering window. Refer to “K-means
Clustering Window” on page 166 for more details.
Displays the S.O.M. Clustering window. Go to “1D SOM
Clustering Window” on page 176 for more information.
Displays the 2-D SOM Clustering window. Refer to “2D SOM
Clustering Window” on page 181 for more details.
Displays the Hierarchical Clustering window. See
“Hierarchical Clustering Window” on page 187 for more
details.
Displays the PcaPlot window. Refer to “PcaPlot Window” on
page 194 for more information.
Displays the Scatterplot window. See “Scatter Plot Window”
on page 200 for more information.
Displays the GenePie window. Refer to “GenePie Window”
on page 205 for more details.
Displays the Time Series Plot window. See “Scatter Plot
Window” on page 200 for more information.
Utilities Menu
The options on this menu are as follows:
Name
Description
Displays the Login dialog box. Use this interface to connect to
a database.
28
Chapter Three - Working in the Main Window
Name
Description
Terminates your database connection.
Displays the Report window. Refer to “Report Window” on
page 220 for more details.
Help Menu
The options on this menu are as follows:
Name
Description
Displays the GeneSight Online Help documentation.
Displays the About GeneSight dialog box. This interface contains
information (license number, mode, etc.) about your copy of GeneSight
3.0.
Toolbar
The GeneSight Main window includes a series of toolbar buttons that allow you to
execute commands at the touch of a button. The options on the toolbar are as follows:
Button
Description
Displays the Dataset Builder dialog box. Refer to “Using the GeneSight
Wizard” and Building a Dataset for more details.
Displays the Open dialog box. See “Loading a Dataset” on page 66
for more information.
Saves changes to the current dataset. A dataset must be open to
access this menu option.
Displays the Data Preparation window. Refer to “Data Preparation
Window” on page 86 for more details.
Displays the Chromosomal Map window. Use this interface to measure
gene expression and identify the chromosomal position of individual
genes.
29
GeneSight Users Manual
Button
Description
Displays the Histogram window. See “Histogram Window” on
page 160 for more information.
Displays the K-Means Clustering window. Refer to “K-means
Clustering Window” on page 166 for more details.
Displays the S.O.M. Clustering window. See “1D SOM Clustering
Window” on page 176 for more information.
Displays the 2-D SOM Clustering window. Refer to “2D SOM Clustering
Window” on page 181 for more details.
Displays the Hierarchical Clustering window. Refer to “Hierarchical
Clustering Window” on page 187 for more information.
Displays the PcaPlot window. Refer to “PcaPlot Window” on page 194
for more details.
Displays the Scatterplot window. Refer to “Scatter Plot Window” on
page 200 for more details.
Displays the GenePie window. See “GenePie Window” on page 205
for more information.
Displays the Time Series Plot window. Refer to “Scatter Plot Window”
on page 200 for more details.
30
Chapter Three - Working in the Main Window
Dataset View Panel
This panel displays the components (data sources and quantified data) of the active
dataset. Select the data that you would like to review, then select the data plotting
tool (Histogram, K-Means, Time Series, etc.) you want to use to analyze the data.
Keep the following things in mind as you work in this panel:
•
•
•
The data tree does not display all data preparation. It only indicates if the signal
and background have been combined.
For any ratio combination, the ratioed conditions are displayed, along with the
numerator and denominator.
If any replicates are combined, each data condition will have a matching
confidence condition that corresponds to the coefficient of variance of the combined
replicate values.
Tip:
Click twice (as opposed to double-clicking) on a Level 2 or 3 item within a
dataset to change the name of that item. Click twice on Level 1 to hide Level 2
and 3.
31
GeneSight Users Manual
The Dataset View panel includes the following icons:
Icon
Description
Represents the entire dataset. This icon always appears at the top of the
tree in the Dataset View panel.
Represents a single data source that is included in the active dataset.
Represents a ratioed data source that is included in the active dataset.
Represents combined data sources that are included in the active dataset.
Represents quantified data included in a data source.
Click this icon to hide the contents of a data source.
Click this icon to display the contents of a data source.
Partition Panel
This panel displays any gene sub-groups that you have created with an analysis tool.
32
Chapter Three - Working in the Main Window
The options on this panel are as follows (note that the Reset Schemes button changes
to the Sub-Select and the Use Gene Set buttons depending on which color schemes i.e. partitions or groups - are selected):
•
•
•
•
•
•
•
•
Find - Click this button to display the Input dialog box. Use this dialog box to
enter a gene ID to search for in the active dataset.
Reset Schemes - This button is shown if no color schemes (i.e. neither partition
nor groups) is checked in left column of the partition panel. It deselects genes
previously displayed in the middle and right columns.
Use Gene Set - This button is shown if one and only one partition is checked in the
partition panel. It selects the genes defined by that partition to be targetted for
analysis (such as plotting).
Sub-Select - This button is shown if one or more groups (within a partition) is checked. It
selects the genes defined by the selected groups as the genes to be targetted for
analysis (such as plotting).
Create Partition - Click this button to displays the Input dialog box. Use this
dialog box to enter a name for a new partition consisting of the groups in the
checked boxes.
Union - Click this button to list the union of checked groups in the right-hand
column.
Intersection - Click this button to list the intersection of checked groups in the
right-hand column.
Create Subset - Click this button to display the Input dialog box. Use this dialog
box to enter a name for a new subgroup consisting of the genes listed in the righthand column.
Dataset Information Bar
This area displays information about the active dataset and current system
processing.
33
This area includes the following information:
•
•
DataSet - Displays the name of the active dataset. This is listed as Bca.gs in the
above screen shot.
Progress Bar - Indicates the task currently or most recently executed.
Chapter 5 - Using the GeneSight Wizard
Overview
The GeneSight Wizard tool “walks you through” the dataset building process. This
chapter describes how to use this tool to create a dataset from a single data source,
paired data sources, and replicated data sources.
Note: The GeneSight Wizard tool is the recommended dataset creation method for
new GeneSight users. However, if you would rather use the Dataset Builder tool
to construct datasets, see “Dataset Builder Window” on page 58.
35
GeneSight Users Manual
Building a Single Source Dataset
Follow the steps below to use one data source to create a new dataset:
1. Select Tools > Dataset Builder to display the Dataset Builder window.
2. Click the Start Wizard toolbar button to display the Welcome! dialog box.
3. Review the information on this dialog box, then click the Next button to display
the Dataset Information dialog box.
4. Enter a name for the new dataset in the Dataset Name field. For example, enter
SingleDS.
36
Chapter Five - Using the GeneSight Wizard
5. Click the Next button to display the Data Source Selection dialog box.
6. Review the information on this dialog box, then click the Browse button to
display the Select Data Source Files dialog box.
7. Locate and select the data source file that you want to include in the dataset.
Note: Multiple data source files can be added at the same time as single (non-ratio
and non-replicate) data sources.
37
GeneSight Users Manual
8. Click the Open button to add the file to the Data Source Selection dialog box.
Note: Since only one data source is selected, you do not need to select an option on
the Handling drop-down list.
9. Click the Next button to display the Data Source Classification dialog box.
10. Mark the Single Data Source radio button.
38
Chapter Five - Using the GeneSight Wizard
11. Click the Next button to display the Single Data Source dialog box.
12. Review the information on this dialog box, then click the Next button to display
the Dataset Complete! dialog box.
39
GeneSight Users Manual
13. Review the dataset information included on this dialog box, then click the Finish
button to display the Enter Experiment Information dialog box.
Note: The Enter Data File Parameters window displays instead if you selected an
alien data source file. See “Alien Text” on page 76 for more details.
14. Complete the following fields on this dialog box:
• Experiment Descriptor - Enter a name for the experiment.
• Experiment User - Enter your name.
• Experiment Date - Enter the start date for the experiment.
15. Click the OK button exit this dialog box and display the Select Experiment
Columns dialog box.
16. Remove the check marks from parameters you do not want in the dataset.
17. Click the OK button to exit this dialog box.
18. Select File > Done (on the Dataset Builder window) to add the new dataset to the
GeneSight Main window.
40
Chapter Five - Using the GeneSight Wizard
Building a Paired Source Dataset
Follow the steps below to use a two data sources to create a new dataset:
1. Select Tools > Dataset Builder to display the Dataset Builder window.
2. Click the Start Wizard toolbar button to display the Welcome! dialog box.
3. Review the information on this dialog box, then click the Next button to display
the Dataset Information dialog box.
4. Enter a name for the new dataset in the Dataset Name field. For example, enter
PairedDS.
41
GeneSight Users Manual
5. Click the Next button to display the Data Source Selection dialog box.
6. Review the information on this dialog box, then click the Browse button to
display the Select Data Source Files dialog box.
7. Hold down the Ctrl key and select the two data source files that you want to
include in the dataset.
42
Chapter Five - Using the GeneSight Wizard
8. Click the Open button to add the two selected files to the Data Source Selection
dialog box.
9. Select one of the following options from the Handling drop-down list:
•
•
•
No Handling - Select this option if gene names across all files are listed in the
same order. This is the default option.
Union - Select this option if gene names are not in the exact same order.
Intersection - Select this option to only use genes that appear in all the
selected files.
Note: A selection from this drop-down list is only necessary if you are including two
or more data sources in your dataset.
10. Click the Next button to display the Data Source Classification dialog box.
43
GeneSight Users Manual
11. Mark the Paired Data Sources radio button.
12. Click the Next button to display the Paired Data Sources dialog box.
13. Select a data source to use as the control and click the Move Right button to move
this data source to the Control column.
44
Chapter Five - Using the GeneSight Wizard
14. Click the Next button to display the Dataset Complete! dialog box.
15. Review the information on this dialog box, then click the Finish button to display
the Enter Experiment Information dialog box.
Note: The Enter Data File Parameters window displays instead if you selected alien
data source files. See “Alien Text” on page 76 for more details.
16. Complete the following fields on this dialog box:
• Experiment Descriptor - Enter a name for the experiment.
• Experiment User - Enter your name.
• Experiment Date - Enter the start date for the experiment.
45
GeneSight Users Manual
17. Click the OK button exit this dialog box and display the Select Experiment
Columns dialog box.
18. Remove the check marks from array result parameters (mean, median, area, etc.)
you do not want to include in the dataset.
19. Click the OK button to exit this dialog box.
20. Select File > Done (on the Dataset Builder window) to add the new dataset to the
GeneSight Main window.
46
Chapter Five - Using the GeneSight Wizard
Building a Replicated Source Dataset
Follow the steps below to use replicated data sources to create a new dataset:
1. Click the Dataset Builder toolbar button to display the Dataset Builder window.
2. Click the Start Wizard toolbar button to display the Welcome! dialog box.
3. Review the information on this dialog box, then click the Next button to display
the Dataset Information dialog box.
4. Enter a name for the new dataset in the Dataset Name field. For example, enter
ReplicatedDS.
47
GeneSight Users Manual
5. Click the Next button to display the Data Source Selection dialog box.
6. Review the information on this dialog box, then click the Browse button to
display the Select Data Source Files dialog box.
7. Hold down the Ctrl key and select the data source files that you want to include
in the dataset.
48
Chapter Five - Using the GeneSight Wizard
8. Click the Open button to add the selected files to the Data Source Selection dialog
box.
9. Select one of the following options from the Handling drop-down list:
•
•
•
No Handling - Select this option if gene names across all files are listed in the
same order. This is the default option.
Union - Select this option if gene names are not in the exact same order.
Intersection - Select this option to only use genes that appear in all the
selected files.
Note: A selection from this drop-down list is only necessary if you are including two
or more data sources in your dataset.
10. Click the Next button to display the Data Source Classification dialog box.
49
GeneSight Users Manual
11. Mark the Replicated Data Sources radio button.
12. Click the Next button to display the Replicated Data Sources dialog box.
13. Click the Add New Group button to move the data source files from the Group
Sources column and combine them in the Replicated Groups column.
50
Chapter Five - Using the GeneSight Wizard
14. Click the Next button to display the Dataset Complete! dialog box.
15. Review the dataset information on this dialog box, then click the Finish button to
display the Enter Experiment Information dialog box.
Note: The Enter Data File Parameters window displays instead if you selected alien
data source files. See “Alien Text” on page 76 for more details.
16. Complete the following fields on this dialog box:
• Experiment Descriptor - Enter a name for the experiment.
• Experiment User - Enter your name.
• Experiment Date - Enter the start date for the experiment.
51
GeneSight Users Manual
17. Click the OK button exit this dialog box and display the Select Experiment
Columns dialog box.
18. Remove the check marks from array result parameters (mean, median, area, etc.)
you do not want to include in the dataset.
19. Click the OK button to exit this dialog box.
20. Select File > Done (on the Dataset Builder window) to add the new dataset to the
GeneSight Main window.
52
Chapter 6 - Opening and Saving GS Files
Overview
While one of the strenghts of GeneSight is the ability to import ImaGene and alien
data files, it is more convenient to store your work in GS (*.gs) files when working
between sessions to store the session in addition to data information - including
settings and partitions information.
53
GeneSight Users Manual
Loading a Dataset
Follow the steps below to load a previously saved dataset from the GeneSight Main
window:
1. Select File > Open to display the Open dialog box.
2. Locate and select the applicable dataset file.
3. Click the Open button to load the selected dataset file. The Loading Dataset...
dialog box displays while GeneSight opens the selected dataset file.
54
Chapter Five - Opening and Saving GS Files
Saving a Dataset
Follow the steps below to save a dataset from the GeneSight Main window:
1. Select File > Save to Disk to display the Save dialog box.
2. Locate the appropriate folder and type in an applicable filename.
3. Click the Save button to save to the dataset file. The Saving Dataset... dialog box
displays while GeneSight saves the dataset file.
55
GeneSight Users Manual
56
Chapter 7 - Building a Dataset
Overview
A dataset groups together individual data sources. You can arrange a dataset so that
it reflects the nature of the gene data. For example, if there are two files, mousecy3.txt
and mousecy5.txt, containing cy3 and cy5 experimental data respectively, they can be
arranged as ratios.
There are two combinations of arrangements that data sources can take (ratio and
replicated experiments). The two files may be ratios, as in the example cited above
(case 1 only), several files may be replicated experiments (case 2 only), or several ratio
files may even be replicated (cases 1 and 2). You specify these arrangements with the
Dataset Builder tool.
Note: After you build and save a dataset with the Dataset Builder tool, it displays in
the GeneSight Main window. Refer to “Working in the Main Window” for more
information.
57
GeneSight Users Manual
Dataset Builder Window
Select Tools > Dataset Builder to display the Dataset Builder window. This window
consists of the five regions identified below:
Tip:
58
You can also click the New toolbar button to display this dialog box.
Chapter Six - Building a Dataset
Each region of the Dataset Builder window is briefly described below:
•
•
•
•
•
Menu Bar - Located along the top of the window. Click on a menu to view the
window commands available on that menu. See “Menu Bar” on page 60 for more
information.
Toolbar - Located directly beneath the menu bar. This region is composed of
buttons that provide a one-click method for executing window commands. Refer
to “Toolbar” on page 61 for more information.
Source Panel - Contains all of the available data sources. Use this area to identify
and select data that you want to add to a dataset. Refer to “Source Panel” on
page 63 for more information.
Setup Panel - Contains three columns (Experiment, Control, and Replicate) that you
can place data sources into prior to inclusion in a dataset. See “Setup Panel” on
page 64 for more details.
Dataset Panel - Contains a column where you can add single, paired, replicate,
and/or ratioed data sources that you want to include in a dataset. Refer to
“Dataset Panel” on page 65 for more information.
Tip:
Right-clicking in the Setup or Dataset panels displays a context menu that
provides a third method for executing several window commands. See “Data
Context Menu” on page 62 for more details.
59
GeneSight Users Manual
Menu Bar
The Dataset Builder window includes a menu bar with File, Tools, and Help menus.
The options on each of these menus is described in this section.
File Menu
The options on this menu are as follows:
Name
Description
Adds the new dataset to the GeneSight Main window without
saving it. You will not be able to reload this dataset after closing
the Main window. See “Exiting Without Saving Changes” on
page 75 for more information.
Saves the dataset into a GeneSight data format (with a .gs file
extension) and display it on the GeneSight Main window. Refer to
“Exiting and Saving a Dataset” on page 74 for more details.
Tools Menu
The options on this menu are as follows:
Name
Description
Sorts data files in the Setup and Dataset panels in
ascending order. Refer to “Sorting Data Sources” on
page 69 for more details.
Displays the ImaGene 4.0 Converter window. See
“Converting ImaGene Files” on page 73 for more
information.
Displays the full path to data files. See “Showing the File
Path to Data Sources” on page 69 for more details.
60
Chapter Six - Building a Dataset
Help Menu
The options on this menu are as follows:
Name
Description
Displays the GeneSight Online Help documentation.
Displays the About GeneSight dialog box. This interface contains
information (license number, mode, etc.) about your copy of
GeneSight 3.0.
Toolbar
The Dataset Builder window also includes a toolbar. The options on this toolbar are
as follows:
Button
Description
Nullifies any changes and returns to the GeneSight Main window
without loading the dataset. Refer to “Exiting and Cancelling
Changes” on page 75 for more details.
Adds the new dataset to the GeneSight Main window without
saving it. You will not be able to reload this dataset after closing
the Main window. See “Exiting Without Saving Changes” on
page 75 for more information.
Saves the dataset into a proprietary GeneSight data format with a
.gs file extension. Refer to “Selecting a File Handling Option” on
page 74 for more details.
Sorts data files in the right two-thirds of the window in ascending
order. Refer to “Sorting Data Sources” on page 69 for more details.
Removes selected items from a column in the Setup or Dataset
panel. See “Removing a Data Source” on page 70 for more
information.
Displays the contents of selected data sources in a Preview
window. Refer to “Viewing the Contents of a Data Source” on
page 70 for more details.
61
GeneSight Users Manual
Button
Description
Displays the Enter Experiment Information dialog box. This dialog
box contains information about the selected data sources. See
“Viewing Data Source Properties” on page 71 for more
information.
Displays the GeneSight Online Help documentation.
Launches the GeneSight Wizard tool. Refer to “Using the
GeneSight Wizard” for more details.
Data Context Menu
The Dataset Builder window also includes a context menu that you can access by
right-clicking the mouse over the Setup or Dataset panel. Each option on this menu is
described in this section.
The options on this menu are as follows:
Name
Description
Removes selected items from a column in the Setup or
Dataset panel. See “Removing a Data Source” on
page 70 for more information.
Displays the contents of a selected data source in a
Preview window. Refer to “Viewing the Contents of a
Data Source” on page 70 for more details.
Displays the Enter Experiment Information dialog box.
See “Viewing Data Source Properties” on page 71 for
more information.
Launches the GeneSight Wizard tool. Refer to “Using the
GeneSight Wizard” for more details.
62
Chapter Six - Building a Dataset
Source Panel
Use the upper part of this panel to locate and select data sources to add to a dataset.
Use the lower portion of this panel to copy a selected data source file to other parts of
the Dataset Builder window.
The options on this panel are as follows:
•
•
•
•
Add to Dataset - Copies the selected file to the Dataset panel.
Add as Experiment - Copies the selected file to the Experiment column.
Add as Control - Copies the selected file to the Control column.
Add as Replicate - Copies the selected file to the Replicate column.
Tip:
You can also drag the selected data source file from the Source panel to the
proper column in the Setup panel or double-click on a file to move it to the
Dataset panel.
63
GeneSight Users Manual
Setup Panel
Use this panel to select and place a data source into the proper data category (ratio,
replicate, or both).
The options on this panel are as follows:
•
•
•
•
•
•
64
Experiment - Place a data source in this column to use as the experiment for ratio
analysis.
Control - Place a data source in this column to use as the control for ratio analysis.
Pair Data / Perform Ratio - Click this button to pair experiment and control data
sources and move them to the Dataset panel.
Perform Ratio & Add as Replicate - Click this button to pair experiment and
control data sources and move them to the Replicate column.
Repeated Experimental Conditions (Replicate) - Place data sources in this
column that contain replicated genes (i.e., which use the same mRNA).
Add Repeated Experimental Conditions to Dataset - Click this button to move
replicate data sources to the Dataset panel.
Chapter Six - Building a Dataset
Dataset Panel
Use this panel to enter a name for your dataset name and to indicate how differences
in data sources should be handled.
The options on this panel are as follows:
•
Experiment Information File - Click the Browse button to display the Open
dialog box. Use this interface to select a standard text file (a .txt file created by you
in a text editor, such as NotePad) that contains additional information about the
data sources you are including in the dataset. This can include the full path to the
data source, data source file name, user name, and date (MM/DD/YYYY).
Note: You must press the Tab key between each item in your text file for GeneSight
to correctly load the information.
•
•
•
Dataset Name - Enter a name for the dataset currently under construction. The
default name is DefaultDS1.gs.
Handling - Displays a drop-down list of options for dealing with data source files
that do not contain identical gene data.
Contents - Displays the components (i.e., data sources) of the dataset currently
under construction.
65
GeneSight Users Manual
Using the Dataset Builder
This section explains how work with data sources in the Dataset Builder window.
Loading a Dataset
Follow the steps below to load a previously saved dataset from the GeneSight Main
window:
1. Select File > Open to display the Open dialog box.
2. Locate and select the applicable dataset file.
3. Click the Open button to load the selected dataset file. The Loading Dataset...
dialog box displays while GeneSight opens the selected dataset file.
66
Chapter Six - Building a Dataset
Creating a Dataset from a Multi-Channel Slide
Follow the steps below to build a dataset from multi-channel slides (i.e., more than
two panels per slide):
1. Select a control data source and move it to the Control column.
2. Select the first experimental data source and move it to the Experiment column.
67
GeneSight Users Manual
3. Click the Pair Data / Perform Ratio button to pair and ratio these data sources and
move them to the Dataset panel.
4. Repeat these steps for the additional experimental data sources.
5. Select File > Done to save your new dataset.
Note: The number of data sources in a dataset is always equal to the number of
channels across microarrays.
68
Chapter Six - Building a Dataset
Showing the File Path to Data Sources
Follow the steps below to display the entire file path for data sources in the Setup and
Dataset panels:
1. Select Tools > Show Paths to display the complete file path for data sources.
2. Click on Tools again to redisplay the Tools menu. A check mark now appears in
the check box to indicate that this option is activated.
3. Select Show Paths again to display just the name of the file.
Tip:
You can also press Alt+T, then H to execute this command.
Sorting Data Sources
This procedure shows you how to pair the corresponding data sources for ratios and
organizes the files for replicate analysis. Sorting does not affect data values and is
designed to aid the organization of data sources. Follow the steps below to sort
multiple data sources:
1. Move multiple data sources, out of sequence, into the Experiment and Control
columns.
2. Select Tools > Sort Trees to put the data sources in ascending order.
Tip:
You can also click the Sort All toolbar button to execute this command.
69
GeneSight Users Manual
Removing a Data Source
Follow the steps below to remove a data source from the Setup or Dataset panel:
1. Select a data source in any of the columns in the Setup or Dataset panel.
2. Right-click to display the context menu.
3. Click on Remove Selected to remove the data source.
Tip:
You can remove more than one data source at the same time by selecting them
(i.e., holding down the Shift key and clicking on each data source) and
clicking the Remove Selected Item toolbar button or pressing the Delete key.
Viewing the Contents of a Data Source
Follow the steps below to look at the contents of a data source:
1. Select a data source in any of the columns in the Setup or Dataset panel.
2. Right-click to display the context menu.
70
Chapter Six - Building a Dataset
3. Select Preview Selected to view the data source contents in a Preview window.
4. Click the X button in the upper-right corner to close this window.
Viewing Data Source Properties
Follow the steps below to take a look at the properties of an ImaGene data source:
1. Select a data source in any of the columns in the Setup or Dataset panel.
2. Right-click to display the context menu.
71
GeneSight Users Manual
3. Click on View Data Source Properties to display the Enter Experiment Information
dialog box.
4. Modify any of the following fields:
• Experiment Descriptor - Enter a name for the experiment.
• Experiment User - Enter your name.
• Experiment Date - Enter the start date for the experiment.
5. Mark the Use this as Default for all Experiments check box if you want the
designated descriptor, user, and date used for all future experiments.
6. Click the OK button to save your changes and display the Select Experiment
Columns dialog box.
7. Remove the check mark from any field you do not want to load.
Tip:
Only use required data columns. This will reduce overall computer system
requirements and help to increase processing speed.
8. Click the OK button to return to the Dataset Builder window.
72
Chapter Six - Building a Dataset
Converting ImaGene Files
Follow the steps below to convert ImaGene files to a GeneSight format:
1. Select Tools > Convert ImaGene Files to display the ImaGene 4.0 Converter
window.
2. Locate and select an ImaGene 3.0 data source file.
3. Drag this file to the right side of the window.
4. Repeat Steps 2 and 3 until all the files you want to convert have been selected and
moved to the right side of the window.
5. Click the Convert Files button to convert the selected files.
Note: If you do not manually convert your ImaGene 3.0 data source files, an
ImaGene 3 Files Detected dialog box displays when you exit the DataSet
Builder. Click the Yes button to convert the files to an ImaGene 4.0 format.
73
GeneSight Users Manual
Selecting a File Handling Option
Use file handling to tell GeneSight what to do with files that contain different
numbers of genes. The program uses the Gene ID to identify mutual genes. If a Gene
ID is not included, GeneSight will execute file handling on the GeneSight default Gene
ID of the Gene + the Gene’s number within the file. Follow the steps below to select a file
handling option:
1. Click the Handling drop-down list.
2. Select one of the following options:
• No handling (files are consistent) - Loads files with exactly the same number
of genes. Do not select this option if you know that the files are different sizes.
• Union (use all genes from all files) - Loads all the genes for a given data
source file and runs calculations based on all the genes. If a matching gene
name cannot be found, GeneSight will still load the data. Missing genes will
contain null values.
• Intersection (use common genes only) - Processes only those genes that
included in all the data source files.
Note: If GeneSight detects inconsistent numbers of genes in different data source
files, you will be prompted to chose between Union and Intersection. If you
believe the files are consistent, use a tool, such as Microsoft Excel, to verify that
the files contain the same number of genes.
Exiting and Saving a Dataset
Follow the steps below to save a new dataset and close the Dataset Builder window:
1. Select File > Save Dataset to display the Save File dialog box.
2. Enter a name for your dataset. For example, enter MyDataset.
74
Chapter Six - Building a Dataset
3. Click the Save button to save the dataset with the file name you entered. The
Dataset Saved dialog box displays.
4. Click the OK button to acknowledge that the dataset has been saved.
5. Select File > Done to return to the GeneSight Main window.
Exiting Without Saving Changes
Follow the steps below to close the Dataset Builder window without cancelling or
saving changes:
1. Select File > Done to exit from the Dataset Builder window.
Tip:
You can also click the Done toolbar button to close this window.
Exiting and Cancelling Changes
Follow the steps below to close the Dataset Builder window and cancel any changes:
1. Click the Cancel toolbar button to display the Confirm Cancel dialog box.
2. Click the Yes button to confirm that you want to cancel your changes and exit
from the Dataset Builder window.
75
GeneSight Users Manual
Alien Text
When GeneSight identifies an alien (non-ImaGene) data source file included in a
dataset, it displays an Enter Data File Parameters window. Use this interface to enter
the conversion information necessary to load the alien data source file into
GeneSight.
Select an alien data source file, then click the View Properties button to display the
Enter Data File Parameters window.
Note: This window automatically displays if any alien data source files are included
in the dataset when you select the Save Dataset or Done options on the
Dataset Builder window.
76
Chapter Six - Building a Dataset
The features of the Enter Data File Parameters window are as follows:
•
•
•
•
•
•
•
•
Required Information - Includes the options that require an entry to successfully
import an alien data source file. See “Required Information Tab” on page 78 for more
details.
File Display Area - Displays the columns included in the data source file after
you enter this information on the Required Information tab. Refer to “File Display
Area” on page 79 for more information.
Field Separator - Lists the options for applying a field separator to the alien data
source file. Refer to “Field Separator Tab” on page 80 for more information.
Slide Configuration - Includes fields for you to enter location information for
each gene in the alien data source file. See “Slide Configuration Tab” on page 81 for
more details.
Other Information - Contains additional options for identifying the data you are
converting into a GeneSight format. This includes the x-coordinate, y-coordinate,
spot diameter, and flag value. Refer to “Other Information Tab” on page 82 for more
details.
Ratio Information - Allows you to identify which column numbers to use as
ratios. See “Pairing Information Tab” on page 83 for more details.
Genomic Information - Allows you to identify which column contains genomic
data. Refer to “Genomic Information Tab” on page 83 for more information.
Button Bar - A group of action buttons located along the bottom of the window.
See “Button Bar” on page 84 for more details.
77
GeneSight Users Manual
Required Information Tab
This tab contains the fields that you must complete to import an alien data source file.
This tab includes the following options:
•
•
•
•
•
Number of Header Rows - Enter the total number of header rows before the
experimental data rows in the data source file.
Gene ID Column Number - If the data source file has a column that lists gene
IDs, or a gene name, enter that column number in this field. This information is
required to distinguish genes.
Enter the Number of Measurement Columns & Hit Enter - Type the total
number of columns in the data source file that contain data you want to import,
then click the Enter button or press the Enter key. GeneSight will display an
equivalent number of text fields in the left portion of the File Display area. You can
enter names for each column displayed in this area.
‘Guess’ Names - Click this button if you want GeneSight to try to apply the
proper name for each column of data.
Contains Both Signal & Background Columns - Mark this check box to tell
GeneSight to perform background correction during data preparation. This check
box is unmarked by default.
Note: GeneSight will let you perform background corrections during data
preparation, whether or not this check box is marked. However, if it is not
marked, no transformation will actually be applied to the data.
78
Chapter Six - Building a Dataset
File Display Area
This area works in tandem with the Required Information tab described on the
previous page.
This area includes the following options:
•
•
Measurement Name & Column Number - GeneSight needs to know the column
that contains the actual data values. After entering the number of measurement
columns, this number of columns will be listed here. If you clicked the ‘Guess’
Names button, GeneSight will attempt to provide names based on the data in file.
If the program is unable to guess column names, it will provide default names
(i.e., Measurement Name 1, Measurement Name 2) instead. You can modify
whatever column names GeneSight uses.
Context Menu - Right-clicking over the table displays a context menu that allows
you to remove columns. For example, if a gene ID has accidentally been included
within the measurements, you can use this feature to remove it.
The context menu also displays a list of color options that allow you to change the
colors for each signal and background combination.
Note: Make sure that the signal column and corresponding background column
share the same color and are adjacent to each other. If these columns have
different colors, GeneSight will not calculate background corrections properly.
79
GeneSight Users Manual
Field Separator Tab
GeneSight assumes that all data source files are tab delimited text files. If your data
source file uses another type of delimiter, you must indicate the type of delimeter on
this tab.
This tab includes the following options:
•
•
•
•
•
80
Tab - Select this radio button to a tab return as the field separator in the data
source file. This is the default selection.
Comma - Select this radio button to use a comma as the field separator in the data
source file.
Space - Select this radio button to use a character space as the field separator in
the data source file.
Semicolon - Select this radio button to use a semi-colon as the field separator in
the data source file.
User Defined - Select this radio button to enter your own field separator for the
data source file.
Chapter Six - Building a Dataset
Slide Configuration Tab
Use this tab to enter location information for genes. GeneSight needs two sets of
information. The first set corresponds to the geometry of the array. The second set
includes field, row, and column locations.
This tab includes the following options:
•
•
•
•
•
•
•
•
•
Number of Meta-Rows - Enter the number of subgrids contained in a row.
Number of Meta-Columns - Enter the number of subgrids contained in a
column.
Number of Rows - Enter the number of spots in a subgrid row.
Number of Columns - Enter the number of spots in a subgrid column.
Field - Enter the column number that contains this value.
Meta-Row - Enter the column number that contains this value.
Meta-Column - Enter the column number that contains this value.
Row - Enter the column number that contains this value.
Column - Enter the column number that contains this value.
Note: If meta row/column or row/column information is available and you want to
use background corrections with this information, you must specify these
columns.
•
Meta Row Major & Row Major - Mark either/both of these check boxes to
establish the reading order for data in the file. These check boxes are both
unmarked by default.
81
GeneSight Users Manual
Other Information Tab
Use this tab to specify other types of information that are often included in an alien
data source file. All of the values described on this page must be in a pixel format.
This means that values should be expressed in terms of pixels and not another unit of
measure such as microns or millimeters.
This tab includes the following options:
•
•
•
•
•
X-coordinate - Enter the column number that represents the x-coordinate of the
upper-left hand pixel position of the spot.
Y-coordinate - Enter the column number that represents the y-coordinate of the
upper-left hand pixel position of the spot.
Spot Diameter - Enter the column number that expresses the diameter of the
spot.
Flag - If the text files contains a column for spots that have been flagged, enter
this column number here. A flag usually refers to a gene that has been selected for
some reason, such as poor hybridization and/or contamination.
Spot Image Filename - If you have access to the image that generated the data,
enter information about the file in this field.
Tip:
82
Click the Browse button to display the Specify Image File dialog box. Use this
dialog box to manually search for and select the desired image.
Chapter Six - Building a Dataset
Pairing Information Tab
If you want to generate ratio data from the alien data source file, specify the
numerator and denominator for the desired column on this tab.
Tip:
Remove a row by clicking on it with the right mouse button.
By default, nothing is entered in the Experiment/Control area. To specify which
columns to pair as experiment and control, click directly under the Experiment and
Control column titles. A white cell appears allowing you to enter column number for
each. To enter the column numbers, double-click the white cell and enter the desired
values. If you want to pair more than two columns, repeat this process as often as
necessary.
Note: If you want to ratio background corrected columns, only enter the experiment
column data on this tab.
Genomic Information Tab
Use this tab to indicate which column in the data source file contains genomic data.
83
GeneSight Users Manual
Button Bar
The button bar includes the following options:
Name
Description
Restores the default view of the alien data source file in the File
Display area.
Restores the default settings in all areas of the window.
Applies your conversion parameters to the alien data source file
without exiting the window.
Applies your conversion parameters to the alien data source file
and exit from the window (returning you to the Dataset Builder
window).
Displays the Header Parameters dialog box. Use this interface to
save the current parameters. The parameters are then stored in a
text file with a .hp file extension.
Displays the Header Parameters dialog box. Use this interface to
open a previously saved parameters file.
Returns you to the Dataset Builder window without applying your
conversion parameters to the alien data source file.
84
Chapter 8 - Preparing a Dataset
Overview
This chapter explains how to use the Data Preparation tool to construct a sequence of
data transformations and apply them to a dataset. This step is essential to ensure that
you get completely accurate and reliable results from your dataset.
Tip:
Refer to “Appendix B - Transformations” for more detailed information about the
Background Correction, Combine Replicates, Normalization, and Ratio
transformations.
85
GeneSight Users Manual
Data Preparation Window
Select Tools > Data Preparation to display the Data Preparation window. This
window includes the three regions identified below:
Tip:
86
You can also click the Data Preparation toolbar button to display this window.
Chapter Seven - Preparing a Dataset
Each region of the Data Preparation window is briefly described below:
•
•
•
Menu Bar - Located along the top of the window. Click on a menu to view the
window commands available on that menu.
Transformations Panel - Located directly beneath the menu bar. This panel
provides you with a visual, intuitive method for telling the program how to
modify and transform the dataset. See “Transformations Panel” on page 90 for more
information.
Dataset Contents Panel - Located in the bottom portion of the window. This
panel contains a table with the processing results available for the genes in the
merged replicate experiments contained in the current dataset. Refer to “Dataset
Contents Panel” on page 92 for more details.
Menu Bar
The Data Preparation window includes a menu bar with File, Preset Preparation
Sequences, Sub-Select Genes, View, and Help menus. The options on each of these
menus is described in this section.
File Menu
The options on this menu are as follows:
Name
Description
Displays the Save File dialog box. See
“Saving Dataset Contents as Text” on
page 113 for more information.
Displays the Save File dialog box. Refer to
“Saving Highlighted Data Rows as Text” on
page 114 for more details.
Displays the Save File dialog box. See
“Saving a Transformation Sequence” on
page 108 for more details.
87
GeneSight Users Manual
Name
Description
Displays the Load Transformation Sequence
From File dialog box. See “Loading a
Transformation Sequence” on page 108 for
more information.
Exits the Data Preparation window.
Preset Preparation Sequences Menu
Several of the most common transformation formulas are included as preset options
under this menu. These options are as follows:
Name
Description
Use this formula for minimal data manipulation. Refer to
“Applying the Simple Preset Sequence” on page 109 for more
details.
Use this formula with single channel (non-ratio) data. See
“Applying the Normalized Preset Sequence” on page 109 for
more information.
Use this formula with ratio data. Refer to “Applying the Log
Scale Preset Sequence” on page 110 for more details.
Use this formula with replicate ratio data. See “Applying the
Log Scale / Replicates Preset Sequence” on page 111 for
more information.
Sub-Select Genes Menu
The options on this menu are as follows:
Name
Description
Displays the Input dialog box. Use this interface to enter a
sub-group name for the selected rows of genes and display
only these genes on-screen.
88
Chapter Seven - Preparing a Dataset
Name
Description
Displays the Input dialog box. Use this interface to enter a
sub-group name for the selected rows of genes but still
display the entire gene set on-screen.
Displays every gene in the dataset in the Dataset Contents
panel.
View Menu
The options on this menu are as follows:
Name
Description
Displays only those rows in the Dataset Contents panel that
are currently selected. A check mark displays in the check
box when this option is activated. Refer to “Displaying
Selected Rows” on page 112 for more details.
Displays only the first 30 gene rows in the dataset. Select this
option again to deactivate preview mode and display every
gene in the dataset. See “Using Preview Mode” on page 113
for more information.
Help Menu
The options on this menu are as follows:
Name
Description
Displays the GeneSight Online Help documentation.
Displays the About GeneSight dialog box. This interface lists information
(license number, mode, etc.) about your copy of GeneSight 3.0.
89
GeneSight Users Manual
Transformations Panel
Use this panel to designate which transformations to apply and in what order.
GeneSight includes four preset transformation sequences under the Preset
Preparation Sequences menu. However, you can create virtually any sequence you
like on the Transformations panel.
The options on this panel are as follows:
Icon
90
Name
Description
Background
Correction
Applies background corrections to the dataset. See
“Adding a Background Correction Transformation” on
page 93 for more information.
Omit Flagged
Spots
Removes flagged or unflagged spots from the dataset. This
transformation can be applied more than once in the
same formula. Refer to “Adding an Omit Flagged Spots
Transformation” on page 95 for more details.
Combine
Replicates
Combines replicate genes and generates confidence
statistics. See “Adding a Combine Replicates
Transformation” on page 96 for more information.
Fill In Missing
Values
Fills in (i.e., extrapolates) missing values in a dataset. Refer
to “Adding a Fill in Missing Values Transformation” on
page 98 for more details.
Floor
Raises to a chosen minimum value data below the
designated value. See “Adding a Floor Data
Transformation” on page 99 for more information.
(Shifted) Log
Takes the log of the dataset and supplies a shift value. See
“Adding a Shifted Log Transformation” on page 100 for
more information.
Chapter Seven - Preparing a Dataset
Icon
Name
Description
Ratio
Calculates inter-experiment ratios during dataset building.
This icon appears in the Transformations panel by default.
Refer to “Adding a Ratio Transformation” on page 101 for
more details.
Difference
Subtracts the value of one data source from another. See
“Adding a Difference Transformation” on page 101 for
more information.
Omit Low
Expression
Levels
Removes low expression levels (given a specified minimum
value) from a dataset. See “Adding an Omit Low
Expression Levels Transformation” on page 102 for more
information.
Normalization
Eliminates differences in intensities between equal
experiments due to external conditions. See “Adding a
Normalization Transformation” on page 102 for more
details.
91
GeneSight Users Manual
Dataset Contents Panel
Use this panel to view the results of transformation calculations on the genes in the
active dataset.
Tip:
92
Click on a column heading to sort the gene data by that column.
Chapter Seven - Preparing a Dataset
Working with the Data Preparation Tool
This section explains how to create, apply, and save transformation formulas. The
system enforces the use of certain required operations, depending on the specified
dataset structure:
•
•
•
•
If the dataset consists of data source ratios, ratio or difference is required.
If the dataset contains replicate data sources, combine replicates is required.
If alien text files contain background and signal columns, background correction is
required.
In preset sequences, the basic sequence can have either or both of these two
added in, depending on the dataset.
Adding a Background Correction Transformation
Follow the steps below to add this type of transformation:
1. Click the
Background Corrections icon.
2. Place the icon on the Transformation panel and the Background Correction
Parameters dialog box displays.
3. Click the Select the Type of Background Correction You Wish to Use dropdown list to view the available options.
93
GeneSight Users Manual
4. Select one of the following options:
• Local Background Correction - Subtracts each spot’s background from the
signal (foreground) value of the same spot. Use this mode when the
background intensity level varies significantly from spot-to-spot. This is the
most common type of background correction and is also the default selection.
• Subgrid Median - Subtracts the median of the background values of the spots
of the current subgrid. The median of the background values in a subgrid is
subtracted from the signal of all spots in that subgrid. Use this mode when the
background is consistent from spot to spot, but there is concern about
contamination of some of the spot’s background regions.
• Local Group Median - Subtracts the median of the background values within
a small square region of spots from the signal value of the center spot. This is
useful when some background values are corrupted but the background
intensity varies within the subgrid (necessitating a smaller region of analysis).
• Local Blank Median - Uses the circular region to measure background
intensity. The median of a local group of blank spots is subtracted from the
signal. The background values of local genes with blank IDs are used in the
calculation.
5. If you selected Local Group Median or Local Blank Median in the previous step,
enter the applicable number in the Enter the Number of Local Spots field.
6. Click the OK button to add this transformation to the formula.
7. Add other transformations to your formula.
Note: When you click the Apply Data Preparation button, the current columns in your
dataset are combined into one or more Background Correction (BGC) columns.
94
Chapter Seven - Preparing a Dataset
Adding an Omit Flagged Spots Transformation
If a column exists in the dataset that specifies flagged spots, use this transformation to
filter the information. During and after image analysis, spots can be flagged for poor
hybridization, contamination, or other reasons which leads you to identify the spot
data as unique. Follow the steps below to add this type of transformation:
1. Click the
Omit Flagged Spots icon.
2. Drag the icon onto the Transformation panel and the Omit Flag Type dialog box
displays.
3. Click the OK button to accept the default value of 1 in the Enter the Flag Value...
field and add this transformation to the formula.
Note: 1 is the value for bad spots and 0 is the value for good spots.
4. Add other transformations to your formula.
Note: For ImaGene data sources, GeneSight automatically knows what columns to
use for flagged values. However, if you are importing alien data sources, you
must specify this location information in the Dataset Builder window.
95
GeneSight Users Manual
Adding a Combine Replicates Transformation
If the dataset contains replicate spots, as indicated by repeated Gene IDs, you can use
this transformation to combine replicates into a single value. GeneSight allows the
user to specify the type of combination to be used and what to do if it encounters
values beyond acceptable ranges. Follow the steps below to add a combine replicates
transformation:
1. Click the
Combine Replicates icon.
Note: Each spot in a data source has its own flag value. Therefore, if you want to
omit flagged spots, you must use the Omit Flagged Spots filter before the
Combine Replicates filter.
2. Place the icon on the Transformation panel and the Parameters for Combining
Replicates dialog box displays.
3. Click the Mean drop-down list to display the available options.
4. Select one of the following options:
• Mean - Uses the mean value of replicated spots. This is the default selection.
• Median - Uses the median value of replicated spots.
96
Chapter Seven - Preparing a Dataset
5. Click the Keep All Replicated Spots drop-down list to display the available
options.
6. Select one of the following options:
• Keep All Replicated Spots - Uses all the spots values. This is the default
selection.
• Omit Outliers - Uses the cut off number you enter in the Enter the Outlier
Limit field.
7. If you selected Omit Outliers in the previous step, enter the applicable number in
the Enter the Outlier Limit field. All spots with values beyond this standard
deviation are automatically eliminated from the calculations.
8. Click the OK button to add this transformation to the formula.
9. Add other transformations to your formula.
Note: When you click the Apply Data Preparation button, one or more Coefficient of
Variance (CV) columns are added to your dataset. These numbers reflect the
standard deviation divided by the mean derived from combining the
replicates for each gene.
97
GeneSight Users Manual
Adding a Fill in Missing Values Transformation
GeneSight may encounter missing values for many reasons, such as omitting flagged
spots, removing certain values, or as a result of merging datasets in the Dataset
Builder window. If this occurs, follow the steps below to add this transformation:
1. Click the
Fill in Missing Values icon.
2. Drag the icon onto the Transformation panel and the Parameters for Filling in
Missing Values dialog box displays.
3. Click the Select the Method... drop-down list to display the available options.
4. Select one of the following options:
• Use Specified Value - Uses the value entered in the Enter the Value... field.
• Use Mean of Genes - Uses the mean of that column/channel from the
existing data. This is the default selection.
• Use Median - Uses the median value (if there are only two replicates, the
median is the mean).
• Use Mode - Uses the mode value (the most frequently occurring value).
• Use Mean of Gene’s Experiments - Uses the average of all experimental
conditions for the gene.
5. If you selected Use Specified Value in the previous step, enter the applicable
number in the Enter the Value to Fill In field.
98
Chapter Seven - Preparing a Dataset
6. Click the OK button to add this transformation to the formula.
7. Add other transformations to your formula.
Adding a Floor Data Transformation
Use this transformation to raise all values below a specified threshold to that
threshold. For example, if the floor value is 5, when a value such a 4.2 is encountered,
it is automatically raised to 5. This addresses negative spots, where a spot’s expression
level, after background correction, is small or less than zero. Follow the steps below
to add a floor correction:
1. Click the
Floor icon.
2. Place the icon on the Transformation panel and the Floor dialog box displays.
3. Enter the applicable value in the Enter the Value for the Floor field.
4. Click the OK button to add this transformation to the formula.
5. Add other transformations to your formula.
99
GeneSight Users Manual
Adding a Shifted Log Transformation
Use this transformation to take the log of the dataset and (optionally) supply a shift
value. When using this transformation, you must specify the Base (b) and Shift Value
(c) variables. Follow the steps below to add a shifted log transformation:
1. Click the
(Shifted) Log icon.
2. Drag the icon onto the Transformation panel and the Log dialog box displays.
3. Click the Base (b) drop-down list to display the available options.
4. Select one of the following values (or type your own value):
• e - Uses the natural log.
• 10 - Uses the log base ten.
• 2 - Use the log base two. This value is often selected since, after
transformation, two-fold up regulated ratios have a value of 1 and two-fold down
regulated ratios have a value of -1. This is the default selection.
5. Enter the applicable number in the Shift Value (c) field.
6. Click the OK button to add this transformation to the formula.
7. Add other transformations to your formula.
100
Chapter Seven - Preparing a Dataset
Adding a Ratio Transformation
If your experiment involves two-channel analysis, use this transformation to generate
a ratio between the channels by dividing one data source by another. During dataset
building, you must specify which data source is the experiment and which is the
control. If you specify in the Dataset Builder window that data sources are to be
combined as a ratio, the ratio transformation is required. Follow the steps below to
add this transformation:
1. Click the
Ratio icon.
2. Place the icon on the Transformation panel.
3. Add other transformations to your formula.
Adding a Difference Transformation
Use this transformation to generate a difference between the channels by subtracting
one data source from another. As with the ratio transformation, you must specify
which data source is the experiment and which is the control during the dataset
building.
1. Click the
Difference icon.
2. Place the icon on the Transformation panel.
3. Add other transformations to your formula.
101
GeneSight Users Manual
Adding an Omit Low Expression Levels Transformation
Use this transformation to omit spots with expression levels below a certain
expression value. Follow the steps below to add an omit low expression levels
transformation:
1. Click the
Omit Low Expression Levels icon.
2. Drag the icon onto the Transformation panel and the Omit Low Expression Levels
dialog box displays.
3. Enter the applicable number in the Enter the Minimum Value of Spots to Keep
field.
4. Click the OK button to add this transformation to the formula.
5. Add other transformations to your formula.
Adding a Normalization Transformation
Use this transformation to eliminate differences in intensities between experiments
due to systematic biases between channels or arrays which are experimental artifacts.
For a multi-channel experiment, one channel (i.e., control) should be taken as
reference and all normalization should be done with respect to this channel. Follow
the steps below to add a normalization transformation:
1. Click the
102
Normalization icon.
Chapter Seven - Preparing a Dataset
2. Place the icon on the Transformation panel and the Parameters for Normalization
dialog box displays.
3. Click the Select the Genes to Normalize With drop-down list to select from the
available options.
4. Select one of the following options:
• Use All Genes - Uses all of the genes in your dataset to calculate the
normalization parameters. Using all genes assumes that the majority of the
genes measured are not differentially regulated. Therefore, when taken as a
whole, the population accurately represents the channel bias. This is the
default selection.
• Select Genes Using a File - Allows you to specify IDs for the normalization
genes included on the array. The names must exactly match the IDs in data
sources used to build the dataset. If you select this option, the dialog box
transforms as follows:
Note: If you select this option, click the Browse button to locate and select the
applicable file.
103
GeneSight Users Manual
•
Select Genes by Name Pattern - Allows you to specify the normalization
genes included on the array by name, using a gene ID, character sequence, or
wildcard (*) within the gene ID. If you select this option, the dialog box
transforms as follows:
Note: If you select this option, enter a query string in the Gene Name Query String
field.
5. Click the Select the Type... drop-down list to select from the available options:
• Divide By Mean - If Use All Genes is selected, the values for genes in one
experiment will be divided by the mean of the values for all the genes in that
experiment. If genes are selected using a file or a name pattern, the values for
the genes in each experiment will be divided by the mean of the values of the
selected genes for that experiment. This is the default selection.
• Divide By Percentile - If Use All Genes is selected, the values for genes in one
experiment will be divided by the value of the gene in the nth percentile
(where n ranges from 0 - 1) for that experiment. If genes are selected using a
file or a name pattern, the values for all genes in each experiment will be
divided by the value of genes in the nth percentile of the selected genes for that
experiment.
• Subtract Mean - If Use All Genes is selected, the values for genes in one
experiment will be subtracted by the mean of the values for all the genes in
that experiment. If genes are selected using a file or a name pattern, then
values for all genes in each experiment will be subtracted by the mean of the
values of the selected genes for that experiment.
104
Chapter Seven - Preparing a Dataset
•
•
Subtract Percentile - If Use All Genes is selected, the values for genes in one
experiment will be subtracted by the value of the gene in the nth percentile
(where n ranges from 0 - 1) for that experiment. If genes are selected using a
file or a name pattern, the values for all genes in each experiment will be
subtracted by the value of gene in the nth percentile of the selected genes for
that experiment. If this normalization type is selected, a Percentile field
appears so that you can enter the value for nth percentile to use.
Piece-Wise Linear - This option works on paired data only (e.g.
measurements from 2-channel array). Divides the range of control expression
values into several bins that you select. For each bin, GeneSight calculates a
mean value for the expression values of the experiment. Based on the
experimental and bin (control) means, the program calculates a new slope
parameter for each bin in such a way that the whole curve is mapped onto the
first diagonal. If this normalization type is selected, a Piecewise Linear field
appears so that you can enter the number of bins to use.
Note: This type of normalization cannot be placed before Ratio in the transformation
sequence. It cannot be placed after Combine Replicates unless no data sources
have been specified as replicated sources (i.e., if only genes were combined.
•
•
Z-Score - Only available if Use All Genes is selected. All the values will be zscored, which is the value of the gene minus the mean of all the genes, which
is then divided by the standard deviation of all the genes.
Linear Regression Normalization - This option works on paired data only
(e.g. measurements from 2-channel array). Use this normalization if no overall
differential regulation is expected. Any such regulation is assumed to be
caused by systematic bias and removed by the normalization as follows. Fit
original values in a straight line so that the mean squared difference between
the data and the line is minimized. Subsequently, the data is adjusted by
shifting and rotating such that this line is shifted to correspond to the first
diagonal y=x.
6. Click the OK button to add this transformation to the formula.
105
GeneSight Users Manual
7. Add other transformations to your formula.
106
Chapter Seven - Preparing a Dataset
Applying Data Changes
Follow the step below to apply selected transformations to your dataset:
1. Click the Apply Data Preparation button to initiate the specified transformations.
Removing a Transformation
Follow the steps below to remove a transformation:
1. Select a transformation to remove from the Transformation panel. For example,
click on
Background Corrections.
2. Drag the icon in any direction to remove it from the formula.
Note: The cursor turns into a circle with a diagonal line through it when you have
moved the transformation out of the formula.
3. Release the left mouse button to remove the transformation from the formula.
107
GeneSight Users Manual
Saving a Transformation Sequence
Use this feature to save a transformation sequence you have created to a file with a
.tsq extension. This saves you the time and effort required to build transformation
sequences that you will be using frequently. Follow the steps below to save a
transformation sequence:
1. Build a transformation sequence.
2. Select File > Save Transformation Sequence to display the Save File dialog box.
3. Enter a name for the transformation sequence file. For example, enter Trans1.
4. Click the Save button to save the transformation sequence.
Loading a Transformation Sequence
Follow the steps below to open the transformation sequence you saved in the
previous section:
1. Select File > Load Transformation Sequence to display the Load Transformation
Sequence from File dialog box.
2. Click on MyTransformation.tsq to select this file.
3. Click the Open button to place this transformation sequence in the Transformations
panel.
108
Chapter Seven - Preparing a Dataset
Applying the Simple Preset Sequence
Use this option to transform data with minimal manipulation. The following
transformations occur with this option:
•
•
Removal of flagged spots.
Background corrections. If the dataset contains ratioed data sources, the ratio is
also computed during this transformation. If the dataset contains replicate spots,
they are combined during this transformation.
Follow the steps below to apply this transformation sequence:
1. Select Preset Preparation Sequences > Simple to place this sequence in the
Transformation panel.
2. Click the Apply Data Preparation button to calculate the data transformations.
3. Select File > Close to exit the Data Preparation window.
Applying the Normalized Preset Sequence
Use this option to transform single channel (non-ratio) data. The following
transformations occur with this option:
•
•
•
Removal of flagged spots.
Background corrections. If the dataset contains ratioed data sources, the ratio is
computed during this transformation.
Normalization of the dataset by dividing the mean for each channel. If the dataset
contains replicate spots, they are combined during this transformation.
109
GeneSight Users Manual
Follow the steps below to apply this transformation sequence:
1. Select Preset Preparation Sequences > Normalized to place this sequence in the
Transformation panel.
2. Click the Apply Data Preparation button to calculate the data transformations.
3. Select File > Close to exit the Data Preparation window.
Applying the Log Scale Preset Sequence
Use this option to transform ratio data. The following transformations occur with this
option:
•
•
•
•
•
Removal of flagged spots.
Background corrections.
Establishment of a floor value. If the dataset contains ratioed data sources, the
ratio is computed during this transformation.
Application of a shift value to the natural dataset log.
Normalization of the dataset by subtracting the mean from each channel. If the
dataset contains replicate spots, they are combined during this transformation.
Follow the steps below to apply this transformation sequence:
1. Select Preset Preparation Sequences > Log Scale to place this sequence in the
Transformation panel.
110
Chapter Seven - Preparing a Dataset
2. Click the Apply Data Preparation button to calculate the data transformations.
3. Select File > Close to exit the Data Preparation window.
Applying the Log Scale / Replicates Preset Sequence
Use this option to transform ratio data. The following transformations occur with this
option:
•
•
•
•
•
•
Removal of flagged spots.
Background corrections.
Establishment of a floor value. If the dataset contains ratioed data sources, the
ratio is computed during this transformation.
Application of a shift value to the natural dataset log.
Normalization of the dataset by subtracting the mean from each channel. If the
dataset contains replicate spots, they are combined during this transformation.
Combination of replicate spots.
Follow the steps below to apply this transformation sequence:
1. Select Preset Preparation Sequences > Log Scale / Replicates to place this
sequence in the Transformation panel.
2. Click the Apply Data Preparation button to calculate the data transformations.
3. Select File > Close to exit the Data Preparation window.
111
GeneSight Users Manual
Displaying Selected Rows
Follow the steps below to display only selected dataset rows:
1. Select the rows you want to display in the Dataset Contents panel.
2. Select the rows you want to display. For example, hold down the Shift key and
click on Rows 3 through 5.
3. Select View > Show Selected Only to display only these three rows in the Dataset
Contents panel.
112
Chapter Seven - Preparing a Dataset
Using Preview Mode
Follow the steps below to display only the first thirty dataset rows in the Data
Preparation window:
1. Select View > Use Preview Mode to display only the first thirty rows in the
Dataset Contents panel.
Viewing Spot Information
Follow the steps below to access information about a gene:
1. Select a gene to view details for in the Dataset Contents panel.
2. Double-click on the gene to display the Annotation Collector window. This
interface provides data about the selected gene for different experimental
conditions.
3. Click the X button (in the upper-right corner of the window) when you are ready
to return to the Data Preparation window.
Saving Dataset Contents as Text
Follow the steps below to save an entire dataset to a text file:
1. Select File > Save Dataset Contents as Text to display the Save File dialog box.
2. Enter Text as the name of the file.
3. Click the Save button to save your new file and close the Save File dialog box.
113
Saving Highlighted Data Rows as Text
Follow the steps below to save highlighted rows to a text file:
1. Highlight the rows of data you want to save.
Tip:
Hold down the Shift key and click to select a range of rows or the Ctrl key
and click to select individual rows.
2. Select File > Save Highlighted Dataset Contents as Text to display the Save File
dialog box.
3. Enter Highlighted as the name of the file.
4. Click the Save button to save your new file and close the Save File dialog box.
Chapter 9 - Using Other Dataset Tools
Overview
This chapter explains how to use the Partition Editor, Text-Based Query, Confidence
Analysis, Significance, Template Matching, and Annotation Collector tools to modify a
dataset.
Partition is a GeneSight construct to hold groups of related genes or conditions. In
general, one may create as many paritions as one needs for a given dataset. For each
partition, genes or conditions (depending whether it is a Gene Parition or Condition
Partition) of the current dataset are organized into non-overlapping groups. The genes
or conditions can be distributed to the groups within each partition either in whole or
in parts.
115
GeneSight Users Manual
Partition Editor Window
The Partition Editor window is a useful tool creating or editing partitions. With the
partition editor, one organizes related genes or conditions for each partition into
groups of unique names and colors. Once you have created partitions (with either
this tool or a plotting tool such as K-means), you can use this window to:
•
•
•
•
•
•
View current partitions.
Remove existing partitions.
Change partition name and colors.
Add and remove group members.
Sub-select to report or plot selected groups of genes in a partition.
Read and write partitions from a file.
Select Tools > Partition Editor to display the Partition Editor window:
Keep the following rules in mind when working in this window:
•
•
116
Both gene and condition partitions can be imported or created with the Gene
Partition Editor.
In addition, gene paritions can be created from all plot windows using the
“Subselect Chosen Genes” or “Create Gene Subset” functionalities, the Parition
Manager (i.e. GeneSight Main Window) using the “Create Parition” and “Create
SubSet” functionalities, the K-means, 2-D SOM, and Hierarchical Clustering
windows using the “Make Partition” functionality, and the Query/Group Builder
Chapter Eight - Using Other Dataset Tools
•
•
Text-based Query Window using the “Add Parition” and “Sub-select”
functionalities.
Almost all plots (except the Histogram plot) can be effectively plotted in
conjunction with partition information. Simply choose from the “Color Scheme”
menu an appropriate partition color, and the plot will be color coded to reveal the
distributions of the groups within that partition.
Note:Refer to “Analyzing Datasets with Plotting Tools” for more information about
each analysis tool.
117
GeneSight Users Manual
Menu Bar
The Partition Editor window includes a menu bar with File, Select Partition, Remove
Partition, Add Group, Remove Group, and Help menus. The options on each of these
menus are described below.
File Menu
The options on this menu are as follows:
Name
Description
Displays the Choose Partition File dialog box. Use this interface
to open a partition file from your hard drive. See “Opening a
Partition File” on page 120 for more details.
Displays the Create Partition File dialog box. Use this interface
to save a partition file to a specific location on your hard drive.
Displays the New Partition dialog box. Use this interface to
create a new partition. See “Creating a New Partition” on
page 122 for more details.
Select Partition Menu
Existing partitions are listed on this menu, along with the following default option:
Name
Description
Displays no partition in the Partition Editor window.
Remove Partition Menu
Deletes the partition you select from this menu. If no partitions have been created, no
options are available under this menu.
Add Group Menu
Places a new group on the Partition Editor window.
118
Chapter Eight - Using Other Dataset Tools
Remove Group Menu
Delete an existing group by selecting the name from this menu. If you have not
created any groups, no options are available under this menu.
Help Menu
The options on this menu are as follows:
Name
Description
Displays the GeneSight Online Help documentation.
Displays the About GeneSight dialog box. This interface contains
information (license number, mode, etc.) about your copy of GeneSight.
119
GeneSight Users Manual
Using the Partition Editor
This section explains how to use the Partition Editor window with a dataset.
Opening a Partition File
Use the Choose Partition File dialog box to select a tab delimited file with a .txt
extension to use for loading a list of “a priori” known groups of genes. The first
column must contain the gene ID and the second the name of the group it is included
in. No gene ID should be listed more than once, since only the first occurrence is
used. Follow the steps below to open a gene partition file:
1. Select File > Load to display the Choose Partition File dialog box.
2. Locate and select the applicable gene partition file.
3. Click the Open button to display this file in the Partition Editor window.
Tip:
120
Click on the Partitions menu to display a list of previously created (with Kmeans, 2-D SOM, or Hierarchical analysis tools) partitions.
Chapter Eight - Using Other Dataset Tools
Changing the Color of a Partition
Follow the steps below to change the color of a group of genes:
1. Click on the Color area of the group to display the Choose Color dialog box.
2. Click on a color to select it.
Tip:
Click on the HSF or RGB tabs to customize the selected color.
3. Click the OK button to apply this color to the group and exit the dialog box.
121
GeneSight Users Manual
Changing the Name of a Partition
Follow the steps below to change the name of a group of genes:
1. Select the group name that you want to change.
2. Edit the name of the group and press Enter.
Creating a New Partition
Follow the steps below to add a new partition:
1. Select File > New to display the New Partition dialog box.
2. Mark the Gene Partition or Condition Partition radio button.
3. Enter a name in the Partition Name field.
4. Click the OK button to create the new partition.
122
Chapter Eight - Using Other Dataset Tools
Text-Based Query Window
Use this tool to generate a partition or export a report from existing dataset based on
criteria that you define. This Text-Based Query tool is also useful for sub-selecting
genes before using memory intensive plotting or clustering analysis tools (such as the
Hierarchical Clustering tool). In addition, this tool allows complex boolean expressions
to be linked together, which is helpful when mining large datasets. Query
expressions can then be built and applied consecutively.
Select Tools > Query/Group Builder to display the Text-based Query window:
Note: When more than one query exists, the top query takes precedence. If a gene
satisfies the selecting criteria of two queries, it will belong to the topmost
query and be distributed to that corresponding group.
123
GeneSight Users Manual
Menu Bar
The Text-based Query window includes a menu bar with File, Group, and Column
menus. The options on each of these menus is described in this section.
File Menu
The options on this menu are as follows:
Name
Description
Displays the Open dialog box. Use this interface to open an existing
query group. Refer to “Importing a Group” on page 126 for more
details.
Displays the Save dialog box. Use this interface to save a query
group.
Displays the Save dialog box for the whole table or a selected group.
Use this interface to save all or a portion of the data to a text file.
Displays the Input dialog box. Use this interface to create a new
gene partition (which appears on the GeneSight Main window).
Displays the Input dialog box. Use this interface to create a new
gene partition consisting of the currently selected genes.
Exits the Text-based Query window.
Group Menu
The options on this menu are as follows:
Name
Description
Displays the Group Editor dialog box. See “Building a Query” on
page 128 for more information.
Adds a new group to the Text-based Query window. Refer to
“Adding a New Group” on page 127 for more details
Removes the selected group from the Text-based Query window.
See “Deleting a Group” on page 127 for more information.
124
Chapter Eight - Using Other Dataset Tools
Name
Description
Moves the selected group one row up.
Moves the selected group one row down.
Column Menu
The option on this menu is as follows:
Name
Description
Adds an Editing area to the bottom of the Text-based Query window.
Use this area to modify the column selection query. Selecting this
command toggles a view of existing conditions and their syntax.
Toolbar
The Text-based Query window includes a toolbar with a series of buttons that let you
execute commands at the touch of a button. The options on the toolbar are as follows:
Button
Name
Description
Edit
Displays the Group Editor dialog box. See “Building a
Query” on page 128 for more information.
New
Adds a new group to the Text-based Query window. Refer
to “Adding a New Group” on page 127 for more details
Delete
Removes the selected group from the window. See
“Deleting a Group” on page 127 for more information.
Move Up
Moves the selected group one row up.
Move Down
Moves the selected group one row down.
125
GeneSight Users Manual
Using the Text-Based Query Tool
This section describes how to use the Text-based Query window to work with a
dataset.
Importing a Group
A group consists of genes that you have selected, applied conditions to, and saved
using the File > Export command. Follow the steps below to import a group file:
1. Select File > Import to display the Open dialog box.
2. Locate and select the group file that you want to load.
3. Click the Open button to display this file in the Text-based Query window.
Sub-Selecting a Group
Use this dialog box to sub-select genes from the dataset. When sub-selection is
performed, a group of sub-selected genes will be created based upon the results from
the query builder. This group of genes will then be available for further analysis
within the various plots. Follow the steps below to create a new group:
1. Select File > Sub-Select to display the Input dialog box.
2. Enter a name in the Please Enter Name for Sub-selection field.
3. Click the OK button to save the new group.
126
Chapter Eight - Using Other Dataset Tools
Adding a New Group
Follow the steps below to add a new group:
1. Select Group > New to place a new (blank) group to the window.
Deleting a Group
Follow the steps below to delete an existing group:
1. Click on the group you want to delete.
2. Select Group > Delete to remove this group from the window.
127
GeneSight Users Manual
Building a Query
Follow the steps below to modify query building conditions and build query
expressions to mine your data:
1. Select Group > Edit to display the Group Editor dialog box.
2. Enter a name for the new group in the Group Name field.
3. Click on the Group Color field to display the Choose Group Color dialog box.
4. Click on a new color to select it for the group.
5. Click the OK button to apply the new color to the group and return to the Group
Editor dialog box.
6. Double-click on a folder (Gene, Experimental Conditions, or Query Syntax) in the
Available Expressions area to select expressions to add to the Group Condition area.
Note: If a syntax error is made, the text displays in red. When the error is corrected
the text redisplays in black.
7. Click the OK button to save your changes and close this dialog box.
Removing a Query
Follow the steps below to delete query:
1. Highlight the group name to be removed by clicking the corresponding row.
2. Select Group > Delete or click the Delete toolbar button.
128
Chapter Eight - Using Other Dataset Tools
Confidence Analysis Window
Use this tool to analyze ratio data where each gene is measured under two different
experimental conditions using two channels on a microarray. This process involves
measuring the ratio of the two measurements of each microarray spot. Before using
this tool, you must do the following:
•
•
Dataset Builder Window - Create a dataset that contains one or more ratioed
data sources, with each coming from microarrays with replicate spots. Refer to
“Building a Dataset” for more information.
Data Preparation Window - Select and apply the Log Scale / Replicates preset
sequence to your dataset. See “Applying the Log Scale / Replicates Preset Sequence”
on page 111 for more details.
Select Tools > Confidence Analyzer to display the Confidence Analysis window.
Note: See “Appendix E - Confidence Analysis” for a more detailed look at how this tool
works.
129
GeneSight Users Manual
Menu Bar
The Confidence Analysis window includes a menu bar with File, Edit, Sub-Select
Genes, Color Scheme, Choose URL, and Help menu options. The options on each of these
menus is described in this section.
File Menu
The options on this menu are as follows:
Name
Description
Displays the Save dialog box. Use this interface to save a screen
shot in a graphic file format. See “Saving a Screen Shot as a
Graphic File” on page 135 for more details.
Displays the Print dialog box. Use this interface to select printing
parameters. Refer to “Printing a Screen Shot” on page 136 for
more information.
Exits the Confidence Analysis window.
Edit Menu
The option on this menu is as follows:
Name
Description
Cancels the last action.
130
Chapter Eight - Using Other Dataset Tools
Sub-Select Genes Menu
The options on this menu are as follows:
Name
Description
Displays the Input dialog box. Use this interface to enter a
sub-group name for the selected rows of genes display only
these genes on-screen. Refer to “Sub-Selecting Genes” on
page 137 for more details.
Displays the Input dialog box. Use this interface to enter a
sub-group name for the selected rows of genes but still
display the entire gene set on-screen.
Enables use of the entire dataset. See “Selecting an Entire
Gene Set” on page 137 for more information.
Color Scheme Menu
Existing partitions are listed on this menu, along with one default option:
Name
Description
Displays no partition in the Partition Editor window.
Choose URL Menu
GeneSight includes several built in URLs for retrieving information from the Internet.
You use these preset URLs or enter your own, custom URL. The options on this menu
are as follows:
Name
Description
Links to the Entrez Nucleotides gene sequences database
on the National Center for Biotechnology information
world wide web site. This link is selected by default.
Links to the experimental human UniGene system on the
National Center for Biotechnology information world wide
web site.
Links to the experimental mouse UniGene system on the
National Center for Biotechnology information world wide
web site.
131
GeneSight Users Manual
Name
Description
Links to the PubMed database on the National Center for
Biotechnology information world wide web site. This
database is maintained by the National Library of
Medicine
Displays the Input dialog box. Use this interface to add a
new URL to the menu.
Help Menu
The options on this menu are as follows:
Name
Description
Displays the GeneSight Online Help documentation.
Displays the About GeneSight dialog box. This interface contains
information (license number, mode, etc.) about your copy of GeneSight.
Toolbar
The options on the toolbar are as follows:
Name
Description
Displays the Print dialog box. Use this interface to select printing
parameters. Refer to “Printing a Screen Shot” on page 136 for
more information.
Displays the Save dialog box. Use this interface to save a screen
shot in a graphic file format. See “Saving a Screen Shot as a
Graphic File” on page 135 for more details.
Allows you to query all genes that contain the search text within
their gene name. Refer to “Using the Find Tool” on page 217 for
more information.
Allows you to query information from a remote web site (if
accession number information has been included in the dataset).
See “Using the Goto Web Tool” on page 217 for more details.
132
Chapter Eight - Using Other Dataset Tools
Name
Description
Displays additional information about selected gene(s) in the
Annotation Collector window.
Allows you to enter a value between zero and one as the p-level.
GeneSight uses this value to identify genes that belong to their
cluster at the specified confidence level.
133
GeneSight Users Manual
Using the Confidence Analyzer
This section explains what type of work you can do with a dataset in the Confidence
Analysis window.
Analyzing Ratio Data
This tool identifies and selects genes with a differential regulation with a significance
level greater than or equal to a threshold chosen by you. Since gene statistics vary
based upon spot brightness, GeneSight separates the selected genes into one or more
brightness bins. Follow the steps below to analyze ratio data:
1. Select Tools > Confidence Analyzer to display the Confidence Analysis window.
2. Select a radio button in the Choose Regulation area to designate the type of gene
regulation (up, down, or both) to measure.
3. Select a radio button in the Multi-Experiment area to indicate if all or any
conditions should be regulated. This area only displays if more than one
experimental condition is selected in your dataset.
134
Chapter Eight - Using Other Dataset Tools
4. Enter the number of brightness bins to divide genes into in the Number of Bins
field. A typical number of bins is five.
Tip:
Leave the bin number at one if you do not want to use this feature.
5. Use the Confidence slider to adjust the confidence level. The area beneath the
slider tells you how many genes are differentially regulated at the current
confidence level.
6. Click the Apply button to set the new confidence level.
Saving a Screen Shot as a Graphic File
Use this dialog box to save a screen shot as a graphic (.tif) file. The saved image can
then be opened in most image or multimedia editing software. Follow the steps
below to save a screen shot to file:
1. Select File > Save Image As... to display the Save dialog box.
Tip:
You can also click the Save Image toolbar button to display this dialog box.
2. Enter a name for the file in the File Name field.
3. Click the Save button to save the image as a graphic file. GeneSight automatically
adds a .tif file extension.
Note: The image saving feature of GeneSight is designed to generate basic images to
be used in later analysis or as a reference aid. For images requiring publication
quality resolution and color, you should use a third party screen capture
product.
135
GeneSight Users Manual
Printing a Screen Shot
Follow the steps below to print a screen shot of the current appearance of the
Confidence Analysis window:
1. Select File > Print Image to display the Print dialog box.
Tip:
You can also click the Print Image toolbar button to display this dialog box.
2. Adjust the print settings.
3. Click the OK button to print to your default printer. A GeneSight confirmation
dialog box appears when printing completes.
4. Click the OK button to acknowledge that printing has completed.
136
Chapter Eight - Using Other Dataset Tools
Sub-Selecting Genes
Use this option to sub-select genes from the full dataset. You can then manipulate
and work a smaller subset of data. Follow the steps below to sub-select a group of
genes within a dataset:
1. Select Sub-Select Genes > Sub-Select Chosen Genes to display the Input dialog
box.
2. Enter a name for the group in the Please Enter Name... dialog box.
3. Click the OK button to save the new gene subset.
Selecting an Entire Gene Set
Use this option if you are currently analyzing a gene subset and want to want to
switch to the full dataset. Follow the steps below to use all the genes in the dataset:
1. Select Sub-Select Genes > Use Full Gene Set.
Adding a New URL
Follow the steps below to add a new uniform resource locator (URL) to the Choose
URL menu:
1. Select Choose URL > Enter a URL to display the Input dialog box.
2. Enter the complete web address (including www) in the Please Enter a New URL
Query field.
3. Click the OK button to place the new URL on the Choose URL menu.
Note: Refer to “Using the Goto Web Tool” on page 217 for details on accessing a web
site through GeneSight.
137
GeneSight Users Manual
Significance Tool Window
The Significance tool displays a table of numbers similar to the way gene data is
displayed in the Data Preparation window. Use this tool to determine, for each gene,
the significance of the difference in expression between two or more groups of
experimental conditions (i.e., to what extent the gene differentiates each condition).
You must choose an experimental condition partition from the Color Scheme menu.
(See “Partition Editor Window” on page 116 for details on importing an experimental
condition.) This color codes the columns in the table. Then you can perform several
statistical tests, with the results displaying in the up value column. You can then sort
the data by that column and select the most significant genes.
Select Tools > Significance Analyzer to display the Significance Tool window.
Note: The Gene Partition column represents the name and color of the partition that
includes each gene.
138
Chapter Eight - Using Other Dataset Tools
Working in the Significance Tool Window
This section explains what type of work you can do with a dataset in the Significance
Tool window.
Determining Differential Expression
Follow the steps below to determine the significance of differential expression
between two experiments for selected genes:
1. Select Tools > Significance Analyzer to display the Significance Tool window.
2. Hold down the Ctrl key and select the genes that you want to test.
3. Select Sub-Select Genes > Subselect Chosen Genes to display the Input dialog
box.
4. Enter Different in the Please Enter Name for Subselection field.
5. Click the OK button to return to Significance Tool window.
6. Mark the Omit Genes with Missing Values check box to tell GeneSight not to
use any genes for determining differential expression that have a value absent.
7. Mark the Obtain Permutation P-Values check box to instruct GeneSight to
perform a large number of transformations with the experiment columns. This
option helps to provide a more refined estimate of gene significance.
Note: An ideal number of permutations is 10,000. Therefore, this process is
potentially time consuming.
8. Mark the Apply Holm’s P-Value Adjustment check box to ask GeneSight to
adjust p-levels upward to compensate for the possibility that some
undifferentiated genes will, by chance, show differential expression.
Note: P-level is a statistical test for determining the probability that a null hypothesis
is true.
139
GeneSight Users Manual
9. Select the test that you want to run from the Please Choose Statistical Test to
Perform drop-down list.
10. Click the Compute Overall Significance button to determine the significance of
differential expression for the selected genes.
Rearranging Columns
Follow the steps below to rearrange data columns:
1. Select Tools > Significance Analyzer to display the Significance Tool window.
2. Click on a column header and drag the column to a new location. For example,
move the Gene column one space to the right.
3. Release the mouse button to place this column in the new location.
140
Chapter Eight - Using Other Dataset Tools
Selecting Multiple Rows
Follow the steps below to select more than one row at the same time:
1. Select Tools > Significance Analyzer to display the Significance Tool window.
2. Hold down the Ctrl key and click on each row you want to select.
Tip:
To select a range of rows, hold down the Shift key and click on the first and
last row in the range.
141
GeneSight Users Manual
Template Matching Window
Use this window to dial in a pattern of expression with the slider bars. Select a
distance metric and threshold to choose similar genes.
Select Tools > Template Matcher to display the Template Matching window.
Note: The number of Data sliders appearing on this window always equals the
amount of quantified data selected in the GeneSight Main window. See
“Dataset View Panel” on page 31 for more information.
142
Chapter Eight - Using Other Dataset Tools
Working in the Template Matching Window
This section explains how to create and remove templates in the Template Matching
window.
Creating a Template
Follow the steps below to create a new template:
1. Enter a name for the template in the Gene Name field (the default name is
Template). For example, enter Template 1.
2. Select an option from the Metric drop-down list.
•
•
•
•
•
•
Euclidean - Uses the standard concept of distance in day-to-day life, applied
to gene expression measurement, and extended beyond three dimensions.
Squared Euclidean - Identical to Euclidian except that it omits the square root
operation.
Standardized Euclidean - Divides distance by the variance of the gene
expression values across the applicable experimental condition.
City Block - Omits squaring the terms in the distance computation.
1 - Correlation - Defines distance as one minus the correlation coefficient.
Chebychev - Like the City Block distance metric, but instead of summing the
differences, this metric takes the maximum.
3. Use the Data slider(s) to select the vertical threshold value(s). For example, set
this/these value(s) to 2.
4. Use the Threshold slider to select the horizontal threshold value. For example, set
this value to 1.5.
5. Click the OK button to select, in all open plots, genes that match the template with
the chosen threshold.
143
GeneSight Users Manual
6. Select Sub-Select Genes > Subselect Chosen Genes to display the Input dialog
box.
7. Enter a name for the sub-selected group of genes in the Please Enter Name for
Subselection field.
8. Click the Save Template button to display the Input dialog box.
9. Enter a name for the template in the Gene Name field. The default name is
Template.
10. Click the OK button to save your template.
Removing a Template
Follow the steps below to delete a template:
1. Click the Remove Template button to display a list of existing templates.
2. Select the template that you want to delete.
144
Chapter Eight - Using Other Dataset Tools
Annotation Collector Window
Use this tool to view general information about the genes included in selected
experimental conditions. You can also search an internal database and/or the world
wide web for additional information about the selected genes.
Select Tools > Annotation Collector to display the Annotation Collector window.
Display Control
Click this button to display a dialog box that contains image contrast controls. This
button is disabled unless their are images available with your dataset.
145
GeneSight Users Manual
Gene
Use this drop-down list to select a gene, within the subset of selected genes, to
display information about.
Previous Gene
Click this button to display information for the previous gene on the drop-down list.
Next Gene
Click this button to display information for the previous gene on the drop-down list.
Experimental Condition
Use this drop-down list to select an experimental condition, within the subset of
selected conditions, to display information about.
Previous Condition
Click this button to display the previous experimental condition.
Next Condition
Click this button to display the next experimental condition.
146
Chapter Eight - Using Other Dataset Tools
Refresh
Use this drop-down list to select which genes to get from external internet databases.
The following options are available on this drop-down list:
•
•
•
Currently Selected Gene - Search only for information about the gene currently
displayed on the Gene drop-down list. This is the default selection.
Any Genes in Current Selection Lacking Database Entry - Search for
information about any gene on the Gene drop-down list that does not have an
entry in the internal database.
All Genes in Current Selection - Search for information about every gene on the
Gene drop-down list.
From
Use this drop-down list to select the type of gene information to search the internal
database and/or the world wide web for information about.
The following options are available on this drop-down list:
•
•
NCBI Nucleotide - Search for data from the NCBI nucleotide database. This is the
default selection.
NCBI Protein - Search for data from the NCBI protein database.
Fetch
Click this button to initiate your search.
147
GeneSight Users Manual
Working in the Annotation Collector Window
This section describes how to use the Annotation Collector tool.
Selecting a Gene
Follow the steps below to select a gene:
1. Select Tools > Annotation Collector to display the Annotation Collector
window.
2. Select a gene from the Gene drop-down list.
3. Look in the Experimental Conditions area to view information specific to the
selected gene within the displayed experiments.
4. Click the X button (in the upper-right corner of the window) when you are ready
to exit from this window.
148
Chapter Eight - Using Other Dataset Tools
Displaying an Experimental Condition
The Experimental Conditions area can only display two experiments at a time. As a
result, if you selected more than two experiments in the GeneSight Main window,
you need to select the one you want to view from the Experiment Condition dropdown list. Follow the steps below to display a specific experimental condition:
1. Select Tools > Annotation Collector to display the Annotation Collector
window.
2. Select a gene from the Gene drop-down list.
3. Select an experiment from the Experimental Condition drop-down list.
4. Look in the Experimental Conditions area to view information specific to the
selected gene within the experiment you selected (in the left column).
5. Click the X button (in the upper-right corner of the window) when you are ready
to exit from this window.
149
Searching the Web for Gene Information
Follow the steps below to search the web for gene data:
1. Select Tools > Annotation Collector to display the Annotation Collector
window.
2. Select an option on the Refresh drop-down list.
3. Select an option on the From drop-down list.
4. Click the Fetch! button to start your query. The Querying Gene... dialog box
displays while the query is in process.
When the process completes, the Query area displays all the data that GeneSight
located on the web.
Note: If you are searching for information about a large number of genes, the query
process will take a significant amount of time to complete.
5. Double-click on a row to go to the corresponding web site.
Chapter 10 - Analyzing Datasets with Plotting Tools
Overview
This chapter describes how to compare and analyze a dataset with a series of
advanced visualization tools. These tools include GenePie visualization, chromosome
mapping, scatter plots, interactive ratio histogram plotting, K-means clustering,
hierarchical/neural network clustering, principal component analysis, and time
series analysis.
151
GeneSight Users Manual
Data Plotting Tools
Each of GeneSight’s data analysis tools is briefly described below:
•
•
•
•
•
Chromosome Mapping - TBD
Histogram - Provides a two-dimensional representation of data based upon the
frequency of occurrence against a given value. Refer to “Histogram Window” on
page 160 for more details.
K-Means - Presents a diagram of K clusters of genes and/or conditions, where
you choose the number of clusters, K. Refer to “K-means Clustering Window” on
page 166 for more information.
One Dimensional SOM - Displays genes and/or conditions in clusters based on
their relative similarity. See “1D SOM Clustering Window” on page 176 for more
information.
Two Dimensional SOM - Displays genes and/or clusters in a set of rows and
columns as either a time series or list of gene names. Go to “2D SOM Clustering
Window” on page 181 for more details.
Note: SOM is an acronym for self-organizing map.
•
•
Hierarchical Clustering - Displays a hierarchy of gene clusters. Refer to
“Hierarchical Clustering Window” on page 187 for more details.
PCA - Provides a compact representation of large amount of data by finding the
dimensions where data varies the most. Refer to “PcaPlot Window” on page 194 for
more information.
Note: PCA is an acronym for principal component analysis.
•
•
•
152
Scatter Plot - Provides a two-dimensional representation of the values of two
conditions. See “Scatter Plot Window” on page 200 for more details.
GenePie - Presents values of each condition as different colors that occupy
percentages of a circle. Refer to “GenePie Window” on page 205 for more details.
Time Series - Plots changes in genes over time. See “Time Series Plot Window” on
page 210 for more information.
Chapter Nine - Analyzing Datasets with Plotting Tools
Menu Bar
One feature that every type of plot window has in common is a menu bar with File,
Edit, Sub-Select Genes, Color Scheme, Choose URL, and Help menus. The options on each
of these menus is described in this section.
File Menu
The options on this menu are as follows:
Name
Description
Displays the Save dialog box. Use this interface to save a screen
shot in a graphic file format. See “Saving a Screen Shot as a
Graphic File” on page 135 for more details.
Displays the Print dialog box. Use this interface to select printing
parameters. Refer to “Printing a Screen Shot” on page 136 for
more information.
Exits the window.
Edit Menu
The option on this menu is as follows:
Name
Description
In K-Means, S.O.M., and Hierarchical clusters, if you select a gene and
right-click in Select mode, you lose the selection. This activates Undo,
which allows you to restore the lost selection.
153
GeneSight Users Manual
Sub-Select Genes Menu
The options on this menu are as follows:
Name
Description
Displays the Input dialog box. Use this interface to enter a
sub-group name for the selected rows of genes and display
only those genes on-screen. Refer to “Sub-Selecting Genes”
on page 137 for more details.
Displays the Input dialog box. Use this interface to enter a
sub-group name for the selected rows of genes but still
display the entire gene set on-screen.
Enables use of the entire dataset. See “Selecting an Entire
Gene Set” on page 137 for more information.
Color Scheme Menu
Existing partitions are listed on this menu, along with one default option:
Name
Description
Displays no partition in the Partition Editor window.
Choose URL Menu
GeneSight includes several built in URLs for retrieving information from the Internet.
You use these preset URLs or enter your own, custom URL. The options on this menu
are as follows:
Name
Description
Links to the Entrez Nucleotides gene sequences database
on the National Center for Biotechnology information
world wide web site. This link is selected by default.
Links to the experimental human UniGene system on the
National Center for Biotechnology information world wide
web site.
Links to the experimental mouse UniGene system on the
National Center for Biotechnology information world wide
web site.
154
Chapter Nine - Analyzing Datasets with Plotting Tools
Name
Description
Links to the PubMed database on the National Center for
Biotechnology information world wide web site. This
database is maintained by the National Library of
Medicine
Displays the Input dialog box. Use this interface to add a
new URL to the menu.
Help Menu
The options on this menu are as follows:
Name
Description
Displays the GeneSight Online Help documentation.
Displays the About GeneSight dialog box. This interface lists information
(license number, mode, etc.) about your copy of GeneSight 3.0.
Toolbar Buttons
The options on the toolbar are as follows:
Name
Description
Allows you to sub-select genes. Refer to the section for each
analysis tool for instructions on using the Select feature with that
tool.
Allows you to focus on a specific region in a plot. See the section
for each analysis tool for instructions on using the Zoom feature
with that tool.
Displays the Print dialog box. Use this interface to select printing
parameters. Refer to “Printing a Screen Shot” on page 136 for
more information.
Displays the Save dialog box. Use this interface to save a screen
shot in a graphic file format. See “Saving a Screen Shot as a
Graphic File” on page 135 for more details.
155
GeneSight Users Manual
Name
Description
Lets you query from a remote web site (if accession number data
is included in the dataset). See “Using the Goto Web Tool” on
page 217 for more details.
Allows you to query all genes that contain the search text within
their gene name. Refer to “Using the Find Tool” on page 217 for
more information.
Displays additional information about selected gene(s) in the
Annotation Collector window. See “Working in the Annotation
Collector Window” on page 148 for more information.
Allows you to enter a value between zero and one as the p-level.
GeneSight uses this value to identify genes that belong to their
cluster at the specified confidence level.
156
Chapter Nine - Analyzing Datasets with Plotting Tools
Working With Plotting Tools
Before selecting a plotting tool, make sure the proper dataset is seleted. This is simply
done by selecting the appropriate conditions/experiments in the GeneSight main
window (assuming that data is already loaded - see Using the GeneSight Wizard and
Building a Dataset for more details on importing new data). Note that the buttons
corresponding to the graphical tools on the GeneSight Mainwindow Toolbar (see
“GeneSight Main Window” on page 24) are all dimmed, indicating that the tools are
unavailable, when no condition/experiment is selected. Selecting one or more
conditions will undim and make available the appropriate tools.
157
GeneSight Users Manual
Chromosomal Mapping Window
A chromosomal map measures gene expression and displays information at the
chromosomal position of each gene. Each row displayed on the left side of this
window is a chromosome. Base pairs are shown to the right of the chromosome. Each
experimental condition selected in the GeneSight Main window is displayed on the
right side of the window along with the type of organism you have selected.
Select Plots > Chromosome to display the Chromosomal Map window.
Tip:
158
You can also click the Chromosome toolbar button to display this window.
Chapter Nine - Analyzing Datasets with Plotting Tools
Choose Organism
Use this drop-down list to select the organism that you want to view chromosome
data about.
The following options are available on this drop-down list:
•
•
Scerevisiae – Selects the Scerevisiae (yeast) gene. This is the default selection.
Ecoli – Selects the Ecoli virus gene.
Common Scale for All Chromosomes
Mark this check box to display all chromosomes with the same expression level. This
check box is unmarked by default.
Show Only Genes in Selected Partition
Mark this check box to only display those genes included in the partition currently
selected from the Color Scheme menu. This check box is unmarked by default.
Refresh View
Click this button to return to the default chromosome display zoom level.
159
GeneSight Users Manual
Histogram Window
A histogram is a two-dimensional representation of the frequency of occurrence
against its given value. Each bar in the histogram can represent one or more genes.
The primary use of a histogram with microarray data is to identify measurements
(especially log ratios) which are particularly high or low, reflecting significant up or
down regulation of gene expression. These values lie in the two tails of the
distribution. In addition, it is easy to see the mode (the central high point) which
shows the most frequently occurring value in the microarray.
Select Plots > Histogram to display the Histogram window.
Tip:
You can also click the Histogram toolbar button to display this window.
Bin Number
The bin number represents the number of horizontal segments the plot is divided
into. The default is 10; however, the number of bins can be set for values between 1
and 100. Settings between 75 and 100 are the most desirable.
160
Chapter Nine - Analyzing Datasets with Plotting Tools
There are three ways to adjust the number of bins:
•
•
•
Use the Bin Number slide bar. Click and drag the slider to the left to decrease the
number of bins or drag the slider to the right to increase the number of bins.
Click on the Bin Number slide bar and then press the Right Arrow or Left
Arrow key to adjust the bin number.
Enter a value between 1 and 100 in the field to the right of the slide bar and press
Enter to update the plot.
Tails
Mark this check box to have the Selection tool highlight outliers in the distribution.
Leave this check box unmarked to have the Selection tool highlight an interior
distribution region. This check box is marked by default.
Boundaries
When selecting a range of genes, you can use the Selection tool or enter the boundaries
manually. These values should correspond to the unit currently displayed in the plot.
For example, if the current unit is the standard deviation, you should not enter an
intensity value of 4,101. Instead, you should enter an intensity value of 2 or 3 two
represent two or three standard deviations from the center of the distribution. Press
the Enter key to set the value and update the plot.
•
•
Lower Bound - The lower bound is the location to stop or start selection located
on the left side of the plot.
Upper Bound - The upper bound is the location to start or stop selection located
on the right side of the plot.
Total Genes
Lists the total number of genes included in the selected data files.
161
GeneSight Users Manual
Selected Genes
The number of genes currently selected is displayed on the bottom of the plot. This
number is always displayed in the Total Genes field, while the other fields depend
on if the Tails check box is marked. If marked, the values for left and right selected
genes are visible. If unmarked, the value of middle selected genes is visible.
•
Left Selected Genes - Displays the number of genes selected in the left tail of the
distribution.
•
Middle Selected Genes - Displays the number of genes selected in the middle of
the distribution. The Tails check box must be unmarked to activate this field.
•
Right Selected Genes - Displays the number of genes selected in the right tail of
the distribution.
•
Total Selected Genes - Displays the total number genes selected.
162
Chapter Nine - Analyzing Datasets with Plotting Tools
Using the Histogram Tool
This section explains how to use the Histogram window to analyze gene data.
Selecting a Gene
Follow the steps below to select a gene:
1. Drag the Bin Number slider to the right until the bin number reads as 30.
2. Click the Select toolbar button.
3. Click on the range of genes that you want to analyze.
163
GeneSight Users Manual
Zooming In on a Gene
Follow the steps below to zoom in on a gene:
1. Click the Zoom toolbar button to turn the cursor into a magnifying glass.
2. Move the magnifying glass above the region of the histogram that you want to
look at more closely.
3. Left-click and drag the mouse over the region to create a rectangular blue box.
164
Chapter Nine - Analyzing Datasets with Plotting Tools
4. Release the left mouse button and the region that you selected will now occupy
the entire display area of the plot.
Sub-Selecting Genes
Follow the steps below to create a sub-group for selected genes:
1. Select Sub-Select Genes > Subselect Chosen Genes to display the Input dialog
box.
2. Enter a name for the sub-group in the Please Enter Name... field.
3. Click the OK button to save your changes and exit the dialog box.
165
GeneSight Users Manual
K-means Clustering Window
K-means is a common clustering algorithm which bases the number of clusters upon
a user-defined value (K). The advantages of this method include speed and
simplicity. The primary disadvantage is that it assumes that you have a certain
amount of knowledge about the data.
Note: BioDiscovery does not provide an algorithm for the determination of K. The
number K should be set by a user who is familiar with the dataset being
clustered.
Select Plots > K Means to display the K-Means Clustering window.
Tip:
166
You can also click the K-Means toolbar button to display this window.
Chapter Nine - Analyzing Datasets with Plotting Tools
Cluster Choice
Use this drop-down list to specify what axis of data to cluster.
The following options are available on this drop-down list:
•
•
•
Rows and Columns – Clusters experiments and genes. This is the default
selection.
Rows Only – Clusters genes only.
Columns Only – Clusters experiments only.
Distance Metric
Use this drop-down list to select the distance measurement to use for calculating
clusters.
The following options are available on this drop-down list:
•
•
•
•
Euclidean - Uses the standard concept of distance in day-to-day life, applied to
gene expression measurement, and extended beyond three dimensions. This is
the default selection.
Squared Euclidean - Identical to Euclidian except that it omits the square root
operation.
Standardized Euclidean - Divides distance by the variance of the gene expression
values across that experimental condition.
City Block - Omits squaring the terms in the distance computation.
167
GeneSight Users Manual
•
•
Pearson Correlation - Defines distance as one minus the correlation coefficient.
Chebychev - Like the City Block distance metric, but instead of summing the
differences, this metric takes the maximum.
Note: See “Appendix C - Clustering Algorithms” for more detailed information about
each distance metric.
Number of Gene Clusters
This value represents the number of gene clusters to form from the dataset. The
default value is 5. However, this number should originate from user experience and
knowledge of the dataset.
Number of Experimental Condition Clusters
This value represents the number of experimental condition clusters to form from the
dataset. The default value is 1. However, as with gene clusters, this number should
originate from user experience and knowledge of the dataset.
Apply
Click this button to recalculate K-means clustering and display it within the plot.
168
Chapter Nine - Analyzing Datasets with Plotting Tools
Make Partition
Click this button to display the Input dialog box. Use this dialog box to create a gene
sub-group.
Add Cluster Centroids
Click this button to display the Input dialog box. Use this interface to enter a name for
cluster centroids. This adds K gene expression patterns, the center of the derived
clusters, to the active dataset.
Cluster Confidence
Click this button to enter a value between zero and one as the p-level. GeneSight uses
this value to identify genes that belong to their cluster at the specified confidence
level. See “Analyzing Cluster Confidence” on page 175 for more details.
Cluster Enrichment Analysis
Enter a value between zero and one as the p-level value to use to determine the
probability that the cluster is predominately represented by genes from a particular
group.
169
GeneSight Users Manual
Color Map
Use this drop-down list to apply a color map to selected genes. This feature allows
you to display the relative intensities of genes in color. Each color map displays a
range of colors that extend from low to high intensity. Certain maps provide better
visualization of selected genes while other maps provide better representations in
publications.
170
Chapter Nine - Analyzing Datasets with Plotting Tools
Using the K-Means Clustering Tool
This section explains how to use the K-Means Clustering window to analyze gene
data.
Selecting a Gene
Follow the steps below to select a gene:
1. Click the Select toolbar button.
2. Click on the gene that you want to analyze. A yellow line displays behind the
selected gene.
Tip:
Click the Annotations toolbar button to view additional information about the
selected gene.
171
GeneSight Users Manual
Zooming In on a Gene
Follow the steps below to zoom in on a gene:
1. Click the Zoom toolbar button to turn the cursor into a magnifying glass.
2. Move the magnifying glass above the region of the K-means cluster that you want
to look at more closely.
3. Left-click and drag the mouse over the region to create a rectangular black box.
The selected region will now occupy the entire plot display area.
172
Chapter Nine - Analyzing Datasets with Plotting Tools
4. Repeat Step 3 (if necessary) to zoom in further. (This is often necessary if you are
working with a large set of data.) After zooming, the window will be focused on
just a few genes.
Tip:
Right-click anywhere in the plot with the Zoom tool selected to return to a full
view of the gene data.
173
GeneSight Users Manual
Sub-Selecting Genes
Follow the steps below to create a sub-group for selected genes:
1. Select Sub-Select Genes > Subselect Chosen Genes to display the Input dialog
box.
2. Enter a name for the sub-group in the Please Enter Name for Subselection field.
3. Click the OK button to save your changes and exit the dialog box.
Saving a Partition
Follow the steps below to save a partition:
1. Click the Make Partition button to display the Input dialog box.
2. Enter a unique name for the group of genes in the Please Enter Name for
Partition field.
3. Click the OK button to save the new partition.
174
Chapter Nine - Analyzing Datasets with Plotting Tools
Analyzing Cluster Confidence
Follow the steps below to measure cluster confidence:
1. Select Plots > K Means to display the K-Means Clustering window.
2. Create a gene partition (as described on the previous page).
3. Click the Cluster Confidence button. A series of messages will appear on-screen to
indicate that GeneSight is collecting magnitude data. The Cluster Confidence
Analysis window displays when this process completes.
4. Mark the applicable radio button (Analyzing Gene Data or Analyzing
Conditions) to indicate which type of cluster analysis you want to perform.
5. Enter the desired p-value (a number between zero and one) or use the P-value
slider to set this value. A low p-value (close to zero) color codes only a few
clusters that are most heavily represented by a gene group. A high p-value (close
to one) will identify most clusters that are represented by a gene group.
6. Use one of the following methods to close this window:
• Click the X button in the upper-right corner of the window.
• Click the GeneSight icon in the upper-left corner of the window and select
Close from the sub-menu.
• Press Alt+F4.
7. As an additional step, you can enter a number in the Cluster Enrichment
Analysis field to further refine your cluster analysis. Then click the Apply button
to see the effect on the displayed gene clusters.
175
GeneSight Users Manual
1D SOM Clustering Window
The self-organizing map (SOM) clusters genes according to their relative similarity.
This is the method popularized by the Whitehead Institute. Self-organizing maps
attempt to show the relationship between similar genes. Due to the random nature of
SOM clustering, results may vary between recalculation of clusters. This is a common
effect. However, as with K-means clustering, if, over time, clusters exist, the pattern
becomes apparent after a few recalculations.
Select Plots > 1D SOM to display the S.O.M. Clustering window.
Tip:
176
You can also click the 1D SOM toolbar button to display this window.
Chapter Nine - Analyzing Datasets with Plotting Tools
Cluster Choice
Use this drop-down list to specify what axis of data to cluster. Refer to “Cluster
Choice” on page 167 for more details.
Distance Metric
Use this drop-down list to select the distance measurement to use for calculating
clusters. See “Distance Metric” on page 167 for more information.
Apply
Click this button to recalculate SOM clustering and display it in the plot.
Cluster Enrichment Analysis
Enter a value between zero and one as the p-level value to use to determine the
probability that the cluster is predominately represented by genes from a particular
group.
Color Map
Use this drop-down list to apply a color map to selected genes. See “Color Map” on
page 170 for more information.
177
GeneSight Users Manual
Using the 1D SOM Clustering Tool
This section explains how to use the S.O.M. Clustering window to analyze gene data.
Selecting a Gene
Follow the steps below to select a gene:
1. Click the Select toolbar button.
2. Click on the gene that you want to analyze in the cluster. A yellow line displays
behind the selected gene.
Tip:
178
Click the Annotations toolbar button to view additional information about the
selected gene.
Chapter Nine - Analyzing Datasets with Plotting Tools
Zooming In on a Gene
Follow the steps below to zoom in on a gene:
1. Click the Zoom toolbar button to turn the cursor into a magnifying glass.
2. Move the magnifying glass above the region of the cluster that you want to look
at more closely.
3. Left-click and drag the mouse over the region to create a rectangular black box.
The region that you selected will now occupy the entire display area of the plot.
179
GeneSight Users Manual
4. Repeat Step 3 (if necessary) to zoom in further. (This is often necessary if you are
working with a large set of data.) After zooming, the window will be focused on
just a few genes.
Sub-Selecting Genes
Follow the steps below to create a sub-group for selected genes:
1. Select Sub-Select Genes > Subselect Chosen Genes to display the Input dialog
box.
2. Enter a name for the sub-group in the Please Enter Name... field.
3. Click the OK button to save your changes and exit the dialog box.
180
Chapter Nine - Analyzing Datasets with Plotting Tools
2D SOM Clustering Window
This tool is a two-dimensional version of the SOM tool described in the previous
section. The primary difference is that you select the number of rows and columns in
the cluster array. The cluster included in each cell can be displayed as a time series or
as a list of gene names.
The time series is useful for genes measured in a temporal series of microarrays, since
the temporal behavior of the genes is easy to see. Gene names are most helpful when
you are clustering experiments, since the important result is the grouping together of
items within a cell to reflect their similarity. As is characteristic of SOMs, similar
clusters are placed close together in the cluster array.
Select Plots > 2D SOM to display the 2D SOM window.
Tip:
You can also click the 2D SOM toolbar button to display this window.
181
GeneSight Users Manual
Cluster View
Click on the applicable tab to view the clusters as a time series graph or a list of gene
names. The Graph tab is selected by default.
Distance Metric
Use this drop-down list to select the distance measurement to use for calculating
clusters. See “Distance Metric” on page 167 for more information.
Cluster Genes or Experiments
Use this drop-down list to select a clustering method.
The following options are available on this drop-down list:
•
•
Genes - Select this option to cluster by genes. This option is selected by default.
Experiments - Select this option to cluster by the experimental conditions select
in the GeneSight Main window.
Number of Horizontal Clusters
Enter the number of columns of clusters to display. The default is 5 columns.
182
Chapter Nine - Analyzing Datasets with Plotting Tools
Number of Vertical Clusters
Enter the number of rows of clusters to display. The default is 5 rows.
Apply
Click this button to recalculate SOM clustering and display it in the plot.
Make Partition
Click this button to display the Input dialog box. Use this dialog box to create a gene
sub-group.
Add Cluster Centroids
Click this button to display the Input dialog box. Use this interface to enter a name for
cluster centroids. This adds K gene expression patterns, the center of the derived
clusters, to the active dataset.
Cluster Confidence
Click this button to enter a value between zero and one as the p-level. GeneSight uses
this value to identify genes that belong to their cluster at the specified confidence
level. A low p-value (close to zero) color codes only a few clusters that are most
heavily represented by a gene group. A high p-value (close to one) will identify most
clusters that are represented by a gene group.
183
GeneSight Users Manual
Use the Same Scale in All Cluster
Mark this check box if you want the same scale used in each cluster cell. This check
box is unmarked by default.
Show Points
Mark this check box if you want individual points in each cluster cell to be
highlighted by a red box. This check box is marked by default.
Show
Mark a radio button to indicate if you want to view all the data or just the average for
each gene or experimental condition cluster. The Show All Data radio button is
selected by default.
184
Chapter Nine - Analyzing Datasets with Plotting Tools
Using the 2D SOM Tool
This section explains how to use the 2D SOM window to analyze gene data.
Zooming In on a Gene
Follow the steps below to zoom in on a gene:
1. Click the Zoom toolbar button to turn the cursor into a magnifying glass.
2. Move the magnifying glass above the region of the histogram that you want to
look at more closely.
3. Left-click and drag the mouse over the region to create a rectangular blue box.
4. Release the left mouse button and the region that you selected will now occupy
the entire display area of the plot.
185
GeneSight Users Manual
Sub-Selecting Genes
Follow the steps below to create a sub-group for selected genes:
1. Select Sub-Select Genes > Subselect Chosen Genes to display the Input dialog
box.
2. Enter a name for the sub-group in the Please Enter Name... field.
3. Click the OK button to save your changes and exit the dialog box.
186
Chapter Nine - Analyzing Datasets with Plotting Tools
Hierarchical Clustering Window
Use this analysis tool creates a gene cluster hierarchy for the selected gene data. Select
Plots > Hierarchical Clustering to display the Hierarchical Clustering window.
Tip:
You can also click the Hierarchical toolbar button to display this window.
Partition Mode
Click this toolbar button (which is unique to the Hierarchical Clustering window) to
turn the cursor into a partitioning tool. Use this tool to create partitions within the
families of gene clusters.
187
GeneSight Users Manual
Cluster Choice
Use this drop-down list to specify the axis of data to cluster. Refer to “Cluster Choice”
on page 167 for more details.
Cluster Linkage
Use this drop-down list to select a method to use for calculating distances between
clusters. Your selection will affect both the speed and the type of clusters produced.
The following options are available on this drop-down list:
•
•
•
•
•
•
Division - This option accelerates the clustering algorithm for large datasets and
requires a minimal amount of RAM. This is the default selection.
Single - The distance between two clusters is the distance between the nearest pair
of points.
Complete - The distance between two clusters is the distance between the furthest
pair of points.
Average - The distance between two clusters is the average of the distances
between all possible pairs of points.
Centroid - The distance between clusters is the distance between their centroids.
Ward - The distance between two clusters is the incremental sum of squares of
the two clusters merged into one.
Distance Metric
Use this drop-down list to select the distance measurement to use for calculating
clusters. See “Distance Metric” on page 167 for more information.
188
Chapter Nine - Analyzing Datasets with Plotting Tools
Apply
Click this button to recalculate hierarchical clustering and display it within the plot.
Make Partition
Click this button to display the Input dialog box. Use this dialog box to create a
partition (i.e., a group of gene groups).
Note: Both options, name and color, can be changed with the Partition Editor
window. Refer to “Partition Editor Window” on page 116 for more details.
Cluster Enrichment Analysis
Enter a value between zero and one as the p-level value to use to determine the
probability that the cluster is predominately represented by genes from a particular
group.
Color Map
Use this drop-down list to apply a color map to selected genes. See “Color Map” on
page 170 for more information.
189
GeneSight Users Manual
Using the Hierarchical Clustering Tool
This section explains how to use the Hierarchical Clustering window to analyze gene
data.
Selecting a Gene
Follow the steps below to select a gene:
1. Click the Select toolbar button.
2. Click on the gene that you want to analyze in the cluster. A yellow line displays
behind the selected gene.
Tip:
190
Click the Annotations toolbar button to view additional information about the
selected gene.
Chapter Nine - Analyzing Datasets with Plotting Tools
Zooming In on a Gene
Follow the steps below to zoom in on a gene:
1. Click the Zoom toolbar button to turn the cursor into a magnifying glass.
2. Move the magnifying glass above the region of the cluster that you want to look
at more closely.
3. Left-click and drag the mouse over the region to create a rectangular black box.
The region that you selected will now occupy the entire display area of the plot.
191
GeneSight Users Manual
4. Repeat Step 3 (if necessary) to zoom in further. (This is often necessary if you are
working with a large set of data.) After zooming, the window will be focused on
just a few genes.
Creating a Partition
Follow the steps below to create a new partition:
1. Click the Partition Mode toolbar button to turn the cursor into a partitioning icon.
2. Click along the left of the plot within the dendrogram.
192
Chapter Nine - Analyzing Datasets with Plotting Tools
3. Drag the cursor left or right to apply partitioning to the genes.
The colors change depending on the location of the partition. As you move the
mouse to the left, the number of colors displayed decreases. This is because the
number of groups, or clusters, beneath this point is decreasing. Conversely, as
you move the mouse to the right, the number of clusters increases and so do the
colors representing partitions.
Saving a Partition
Follow the steps below to save a partition:
1. Click the Make Partition button to display the Input dialog box.
2. Enter a unique name for the group of genes in the Please Enter Name for
Partition field.
3. Click the OK button to save the new partition.
193
GeneSight Users Manual
PcaPlot Window
Use this analysis tool to provide a compact representation of large amounts of data
by finding the dimensions where the data varies the most. This process is called
principal component analysis (PCA). PCA provides n possible axes (called
eigenvectors), two of which you choose to make the 2-D PCA plot. (n equals the lesser
of the number of genes in the current dataset and the number of experimental
conditions.)
There are two PCA modes, principal gene analysis (PGA) and principal experiment
analysis (PEA). PGA produces a scatter plot of experiments and PEA produces a
scatter plot of genes. In PGA the axes are combinations of the actual experiments,
while in PEA the axes are combinations of the actual genes.
Select Plots > PCA to display the PcaPlot (parameters) window.
Tip:
194
You can also click the PCA toolbar button to display this window.
Chapter Nine - Analyzing Datasets with Plotting Tools
Percentages
Listed along the right side of the windows are percentages that correspond to the
amount of variance in the direction of that vector. For example, if the value of the first
eigenvector is 83.7% then 83.7% of the total variance is found within this vector.
Select a Mode
This area includes the following options:
•
•
Principle Gene Analysis - Select this radio button to make each point in the plot
correspond to one experiment.
Principle Experiment Analysis - Select this radio button to make each point in
the plot represent one gene. This is the default selection.
Select a Number of Axes
This area includes the following options:
•
•
Two - Select to display the scatter plot in two dimensions. This is the default
selection.
Three - Select to display the scatter plot in three dimensions.
195
GeneSight Users Manual
Vector Bar Chart
The value of each eigenvector is displayed graphically. To learn the value of a
particular vector, click the corresponding bar within the plot. The value is then
displayed above the bar chart in blue. Select the desired axis button to view this axis.
OK
Click this button to apply your selections and switch to the PcaPlot (scatterplot)
window.
Note: Remember that your selection in the Select a Number of Axes area determines
whether the scatter plot displays two or three dimensionally.
Parameters
Click this button to return to the PcaPlot (parameters) window.
196
Chapter Nine - Analyzing Datasets with Plotting Tools
Using the PCA Tool
This section explains how to use the PcaPlot window to analyze gene data.
Selecting a Gene
Follow the steps below to select a gene:
1. Click the Select toolbar button.
2. Click on the gene that you want to analyze in the cluster. A shaded square
displays around the selected gene.
Note: The Select tool works the same way in a three dimensional scatter plot, except
that animation must be deactivated to select a gene. Refer to “Scatter Plot
Window” on page 200 for more details about the special options available with
three dimensional scatter plots.
197
GeneSight Users Manual
Zooming In on a Gene
Follow the steps below to zoom in on a gene:
1. Click the Zoom toolbar button to turn the cursor into a magnifying glass.
2. Move the magnifying glass above the region of the cluster that you want to look
at more closely.
3. Left-click and drag the mouse over the region to create a rectangular blue box.
The region that you selected will now occupy the entire display area of the plot.
198
Chapter Nine - Analyzing Datasets with Plotting Tools
4. Repeat Step 3 (if necessary) to zoom in further. (This is often necessary if you are
working with a large set of data.) After zooming, the window will be focused on
just a few genes.
Sub-Selecting Genes
Follow the steps below to create a sub-group for selected genes:
1. Select Sub-Select Genes > Subselect Chosen Genes to display the Input dialog
box.
2. Enter a name for the sub-group in the Please Enter Name... field.
3. Click the OK button to save your changes and exit the dialog box.
199
GeneSight Users Manual
Scatter Plot Window
Use this analysis tool to view a two-dimensional (with two experimental conditions
selected) or three dimensional (with three experimental conditions selected)
representation of two condition values. Select Plots > Scatter Plot to display this
window:
Note: The above screen shot demonstrates how the Scatterplot window appears
with three experimental conditions selected.
Log (2D)
Mark this check box to enable a log transformation of the data. Leave it unmarked to
remove the log transformation and return to the original data view. This check box is
unmarked by default.
200
Chapter Nine - Analyzing Datasets with Plotting Tools
Animation (3D)
Click this button to make the three experimental conditions rotate. Click it again to
stop the rotation. Animation is active by default.
Zoom In (3D)
Click this button to increase the on-screen display size of the three-dimensional
scatterplot.
Zoom Out (3D)
Click this button to decrease the on-screen display size of the three-dimensional
scatterplot.
Reset (3D)
Click this button to restore the default zoom level.
201
GeneSight Users Manual
Using the Scatter Plot Tool
This section explains how to use the Scatterplot window to analyze gene data.
Selecting a Gene
Follow the steps below to select a gene:
1. Select two experimental conditions in the GeneSight Main window.
2. Select Plots > Scatter Plot to display the Scattterplot window.
3. Click the Select toolbar button.
4. Click on the gene that you want to analyze in the scatter plot. A shaded square
displays around the selected gene.
Note: The Select tool works the same way with three experimental conditions, except
that animation must be deactivated to select a gene.
202
Chapter Nine - Analyzing Datasets with Plotting Tools
Zooming In on a Gene
Follow the steps below to zoom in on a gene:
1. Click the Zoom toolbar button to turn the cursor into a magnifying glass.
2. Move the magnifying glass above the region of the scatter plot that you want to
look at more closely.
3. Left-click and drag the mouse over the region to create a rectangular blue box.
The region that you selected will now occupy the entire display area of the plot.
203
GeneSight Users Manual
4. Repeat Step 3 (if necessary) to zoom in further. After zooming, the window will
be focused on just a few genes.
Note: The Zoom tool does not work with three experimental conditions selected. You
must click the ZoomIn and ZoomOut buttons instead.
Sub-Selecting Genes
Follow the steps below to create a sub-group for selected genes:
1. Select Sub-Select Genes > Subselect Chosen Genes to display the Input dialog
box.
2. Enter a name for the sub-group in the Please Enter Name... field.
3. Click the OK button to save your changes and exit the dialog box.
204
Chapter Nine - Analyzing Datasets with Plotting Tools
GenePie Window
This analysis tool displays a pie plot where the values of each condition are
represented as portions of a circle. The pies are arranged according to their group
membership. The most common use of the GenePie tool is to plot differential
expression patterns between channels.
Select Plots > GenePie to display this window:
Tip:
You can also click the GenePie toolbar button to display this window.
205
GeneSight Users Manual
Pie Color Key
This area serves two purposes. First, it tells you which pie colors represent each
selected condition. Secondly, you can click on any color key to display the Select a
Color dialog box. Use this interface to select a different color to use with the
corresponding condition.
Diameter Encoding Maximum Intensity
Mark this check box to make the pie size for the spots relative to the intensity of the
spot. If left unmarked, all the spots are displayed with the same size regardless of
their total intensities. This check box is unmarked by default.
Legend
Mark this check box to display a key at the bottom of the window that explains which
color corresponds to which condition. If this check box is unmarked, the legend does
not display at the bottom of the window. This check box is marked by default.
Tip:
206
Unmark the Legend check box if you are only working with a few conditions
or if your monitor has a low display resolution.
Chapter Nine - Analyzing Datasets with Plotting Tools
Using the GenePie Tool
This section explains how to use the GenePie window to analyze gene data.
Selecting a Gene
Follow the steps below to select a gene:
1. Click the Select toolbar button.
2. Click on the gene that you want to analyze. A shaded circle displays around the
selected gene.
Note: If you sub-select a gene partition, the gene pies will be grouped according to
their partition membership and the background will be color coded based
upon the partition color.
207
GeneSight Users Manual
Zooming In on a Gene
Follow the steps below to zoom in on a gene:
1. Click the Zoom toolbar button to turn the cursor into a magnifying glass.
2. Move the magnifying glass above the region of the genepie plot that you want to
look at more closely.
3. Left-click and drag the mouse over the region to create a rectangular blue box.
The region that you selected will now occupy the entire display area of the plot.
208
Chapter Nine - Analyzing Datasets with Plotting Tools
4. Repeat Step 3 (if necessary) to zoom in further. (This is often necessary if you are
working with a large set of data.) After zooming, the GenePie window will be
focused on just a few genes.
Sub-Selecting Genes
Follow the steps below to create a sub-group for selected genes:
1. Select Sub-Select Genes > Subselect Chosen Genes to display the Input dialog
box.
2. Enter a name for the sub-group in the Please Enter Name... field.
3. Click the OK button to save your changes and exit the dialog box.
209
GeneSight Users Manual
Time Series Plot Window
Use this analysis tool to plot changes in genes over time or a series of conditions.
Select Plots > Time Series to display the Time Series Plot window.
Tip:
You can also click the Time Series toolbar button to display this window.
Template
Click this toolbar button (which is unique to the Time Series Plot window) to turn the
mouse pointer into a template creation tool. Reshape the template by left-clicking
within the plot. Right-click to change the color of the template line.
210
Chapter Nine - Analyzing Datasets with Plotting Tools
Save Template
Click this toolbar button (which is also unique to the Time Series Plot window) to
display the Input dialog box. Use this interface to enter a file name for a newly
created template.
Log
Mark this check box to enable a log transformation of the data. Leave it unmarked to
remove a log transform and return to the original data view. This check box is
unmarked by default.
Shuffle
Click this button to display the Shuffle Conditions... dialog box. Use this interface to
modify the temporal order of the plot.
Left
Click this button to display the plot from left to right.
Right
Click this button to display the plot from right to left.
211
GeneSight Users Manual
Metric
Use this drop-down list to select the distance measurement to use for calculating
clusters. See “Distance Metric” on page 167 for more information.
Threshold
Use the Threshold slide bar to set the threshold value to use for recognizing genes in
the time series plot with the selected metric.
There are three ways to adjust the threshold value:
•
•
•
Use the Threshold slide bar. Click and drag the slider to the left to decrease the
threshold value or drag it to the right to increase the threshold value.
Click on the Threshold slide bar and then press the Right Arrow or Left Arrow
key to adjust the threshold value.
Enter a value between 0.0 and 1.4 in the Threshold field and press Enter to
update the plot.
Match
Click this button to highlight the genes in the time series plot that match the current
template.
Count
Displays the number of genes that match the template, given the current threshold
value.
212
Chapter Nine - Analyzing Datasets with Plotting Tools
Using the Time Series Tool
This section explains how to use the Time Series Plot window to analyze gene data.
Creating a Template
Follow the steps below to create a time series template:
1. Click the Template toolbar button to turn the following icon:
2. Click on points in the plot to draw a line.
3. Select a distance metric from the Metric drop-down list.
4. Use the Threshold slider, or enter a value in the Threshold field, to set the
threshold for matching genes.
5. Click the Match button to identify which genes match the template line that you
drew in Step 2.
Tip:
You can also enter a value in the Count field to identify matching genes.
6. Click the Save Template button to display the Input dialog box.
7. Enter a name for the template in the Gene Name field.
8. Click the OK button to save your new time series template.
Note: If replicate spots have been combined, vertical error bars will display above
and below the time series point by half the standard deviation of the combined
replicated spots.
213
GeneSight Users Manual
Selecting a Gene
Follow the steps below to select a gene:
1. Click the Select toolbar button.
2. Click on the gene that you want to analyze in the right-hand column. GeneSight
displays the line representing the selected gene in black.
Tip:
214
Click the Annotations toolbar button to view additional information about the
selected gene.
Chapter Nine - Analyzing Datasets with Plotting Tools
Zooming In on a Gene
Follow the steps below to zoom in on a gene:
1. Click the Zoom toolbar button to turn the cursor into a magnifying glass.
2. Move the magnifying glass above the region of the time series plot that you want
to look at more closely.
3. Left-click and drag the mouse over the region to create a rectangular blue box.
The region that you selected will now occupy the entire display area of the plot.
215
GeneSight Users Manual
4. Repeat Step 3 (if necessary) to zoom in further. (This is often necessary if you are
working with a large set of data.) After zooming, the window will be focused on
just a few genes.
Sub-Selecting Genes
Follow the steps below to create a sub-group for selected genes:
1. Select Sub-Select Genes > Subselect Chosen Genes to display the Input dialog
box.
2. Enter a name for the sub-group in the Please Enter Name... field.
3. Click the OK button to save your changes and exit the dialog box.
216
Chapter Nine - Analyzing Datasets with Plotting Tools
Common Tools
This section explains how some of the tools common to all plotting windows.
Using the Goto Web Tool
Follow the steps below to query gene information from the Internet:
1. Click the Select toolbar button.
2. Select the gene of interest.
3. Select Choose URL and choose one of the listed Internet databases listed on this
menu.
4. Click the Goto Web toolbar button to launch your default web browser. Any gene
information that is available at the selected web site is queried and displayed in
the web browser.
Note: This tool uses your default web browser to access on-line databases. If you do
not want to use the default browser, you can specify another browser in the
Preferences dialog box. See “Preferences Tab” on page 18 for more details. In
addition, if you are running Windows 95 or 98, GeneSight will prompt you to
specify a browser manually.
Using the Find Tool
Follow the steps below to identify a particular gene of interest:
1. Click the Find toolbar button to display the Specify a Gene dialog box.
2. Enter a valid gene ID or ID substring in the Gene field.
3. Click the OK button and, once all the genes containing the entered search string
are located, the Annotation Collector window displays and the genes will be
selected within the plot.
217
GeneSight Users Manual
Using the Annotations Tool
Using the Cluster Confidence Tool
218
Chapter 11 - Generating Reports
Overview
This chapter explains how use the Reporting tool to create and generate a report about
a dataset. This tool includes many useful reporting options that allow you to export
data from almost any GeneSight interface.
Note: This feature is disabled in the evaluation copy of GeneSight.
219
GeneSight Users Manual
Report Window
Select Utilities > Generate Report to display the Report window.
Note: The values displayed in this window result from the transformations and
modifications made to a dataset. For example, if Normalization is performed,
the values used are listed in the window. If you believe that a value generated
by GeneSight is incorrect, e-mail BioDiscovery at [email protected].
Show Only Selected Genes
Mark this check box to display only the values for the currently selected genes in the
data table. Leave this check box unmarked to view the entire dataset. This check box
is unmarked by default.
220
Chapter Ten - Generating Reports
Select All Columns
Click this button to mark all of the check boxes in the upper-left corner of the
window, which selects all the data columns. After clicking this button, you must click
the Update Table View button to apply the changes to the data table.
Deselect All Columns
Click this button to unmark all of the check boxes in the upper-left corner of the
window, which deselects all the data columns. After clicking this button, you must
click the Update Table View button to apply the changes to the data table.
Update Table View
Click this button to update the columns displayed in the data table. All the selected
columns will be displayed in the table.
Save Report
Click this button to save all the data columns shown on the right side of the window.
Cancel
Click this button to exit the window without saving selected data values to a text file.
221
GeneSight Users Manual
Working With the Report Window
This section explains how to organize and generate a report for a dataset.
Sorting Data
Follow the steps below to sort data in ascending order:
1. Select a subset of genes (or, if you prefer, the full gene set).
2. Select Utilities > Generate Report to display the Report window.
3. Click on a column to resort the rows in ascending order based on the gene data in
that column.
Tip:
Hold down the Shift key while clicking the column header to sort the data
descending order.
Note: If you are working with the full dataset, there may be a slight delay depending
on the size of the dataset.
222
Chapter Ten - Generating Reports
Rearranging Columns
Follow the steps below to rearrange data columns:
1. Select a subset of genes (or, if you prefer, the full gene set).
2. Select Utilities > Generate Report to display the Report window.
3. Click on a column header and drag the column to a new location. For example,
move the Group column two spaces to the left.
4. Release the mouse button to place this column in the designated new location.
Tip:
Click the Update Table View button to return all columns to their default
positions in the table.
223
GeneSight Users Manual
Creating a Report
Follow the steps below to generate a report about your selected data:
1. Select a subset of genes (or, if you prefer, the full gene set).
2. Select Utilities > Generate Report to display the Report window.
3. Remove the check boxes from any data columns that you do not want to include
in the report.
Note: All the check boxes are initially marked by default.
4. Click the Save Report button to display the Specify File to Save Report In dialog
box.
5. Enter a name for the report in the File Name field. For example, enter
DataReport as the report name.
6. Click the Save button to save the data report as a text (.txt) file and display a
Report Saved dialog box.
7. Click the Yes button to view the report in a Report window.
8. Click the X button in the upper-right corner when you are ready to exit the Report
window.
224
Chapter Ten - Generating Reports
Cluster Information
This section describes the types of cluster information that can be included in two
dataset analysis reports.
K-Means
K-means analysis r optionally adds a section to the report in the following format:
K-Means Plot:
Gene Clusters:
<tab>Number of leaves: <number of subclusters>
<tab>Cluster centers
<tab><tree report>
Experimental Condition Clusters:
<tab>Number of leaves: <number of subclusters>
<tab><tree report>
Hierarchical
Hierarchical analysis optionally adds a section to the report in the following format:
Hierarchical Cluster Plot:
Gene Clusters:
<tab>Number of leaves: <number of subclusters>
<tab>Tree Depth: <number of sub-levels>
<tab><tree report>
Experimental Condition Clusters:
<tab>Number of leaves: <number of subclusters>
<tab>Tree Depth: <number of sub-levels>
<tab><tree report>
In the above reports, <tree report> consists of:
Cluster centroid: <centroid values>
within-cluster variance: <value>
Cluster centroid: <centroid values>
within-cluster variance: <value>
225
GeneSight Users Manual
<etc.>
<leaf name>: <leaf values>
<leaf name>: <leaf values>
<etc.>
Cluster nesting is shown by indentation. The innermost clusters are leaves. For each
cluster, the centroid (average of all contained leaves) is shown, along with the withincluster variance, which is defined to be the average distance from each element
within the cluster to the centroid. It's a measure of how dispersed the cluster is. <leaf
name> can be the name of a gene or the name of an experimental condition. The
name is followed by the expression values for that gene or condition.
226
Appendix A - Technical Support
Overview
BioDiscovery is available to answer any questions that you have about GeneSight.
Your questions will be addressed promptly so you can focus on what is most
important - your research. Your GeneSight serial number will be requested when you
contact technical support using any of the following methods:
•
•
•
•
E-mail - [email protected]
Phone - (310) 306-9310 (United States)
Fax - (310) 306-9109
Mail - 4640 Admiralty Way, Suite 710, Marina del Rey, CA 90292, USA
Note: Free technical support is available for one year from your date of purchase.
227
GeneSight Users Manual
Warranty Information
BioDiscovery guarantees GeneSight 3.0 to be free from defects up to 30 days from the
date of purchase. BioDiscovery will promptly address any problems you may have
through either technical support or by sending you a replacement copy of GeneSight.
For warranty information, review the license agreement or contact us via:
•
•
•
228
E-mail - [email protected]
Phone - (310) 306-9310 (United States)
Mail - 4640 Admiralty Way, Suite 710, Marina del Rey, CA 90292, USA
Appendix B - Transformations
Overview
This appendix provides additional details about four of the more subtle
transformations (Background Correction, Combine Replicates, Normalization, and Ratio)
described in Preparing a Dataset.
229
GeneSight Users Manual
Background Correction
When you select this transformation, the Background Correction Parameters dialog
box displays. The source data must include foreground, or signal, values as well as
background values for each spot. In addition, grid information (row, column, metarow, meta-column) is needed for some types of background correction. Each option
on the drop-down list is described below:
•
•
•
•
230
Local Background Correction - Each spot’s background is subtracted from the
signal (foreground) value of the same spot. This mode is used when the
background intensity level varies significantly from spot-to-spot.
Subgrid Median - The median of the background values in a subgrid is
subtracted from the signal of all spots in that subgrid. This is used when the
background is consistent from spot to spot within a sub-grid, but there is concern
about contamination of some of the spot’s background regions. Grid information
is needed to identify the spots common to a subgrid.
Local Group Median - Similar to the Subgrid Median option, but allows a smaller
area to be used. The median of the background values within a small square
region of spots is subtracted from the signal value of the center spot. This is useful
if some background values are corrupted (and so the median of a population is
desired) but the background intensity varies within the subgrid (necessitating a
smaller region of analysis). With this option, you are prompted for the desired
local group size, expressed as the number of spots along the side of the square
region.
Local Blank Median - In certain arrays, so called blank spots (spot sized regions
with no cDNA) are intentionally placed on the microarray. Instead of subtracting
the intensity of an annulus shaped background region, the circular region
corresponding to this blank is used to measure the background intensity. In this
mode, the median of a local group of such blank spots is subtracted from the
signal. You enter the number of local spots to take in computing the median.
GeneSight searches outward from each spot until it finds the requisite number of
blanks, identified by having the name Blank in place of a Gene ID or accession
number.
Appendix B - Transformations
Combine Replicates
If the same clone is spotted in replicate on a slide, or if multiple slides include the
same clones, use this transformation to combine their expression values into a single
value. You control the sequence of data preparation operations, thereby controlling if
other steps occur on the expression values for individual spots or on the combined
value.
Typically, background correction takes place spot by spot, before replicate
combination. GeneSight determines which values to combine by comparing the Gene
IDs, and combining all spots with the same ID. You determine how the values are
combined by selecting Mean or Median on the Parameters for Combining Replicates
dialog box.
You also have the option to omit values which are outliers compared with the other
values for the same gene ID. If you select this option, you must enter a threshold for
omission, in terms of standard deviations from the mean, in the Enter the Outlier
Limit field. For example, a threshold value of 2 means that, for each set of replicate
values, any values more than two standard deviations from the mean of the set will
be omitted from further analysis. For the remaining genes, GeneSight computes the
coefficient of variance, as a measure of confidence, which is available later for queries
and in reports.
231
GeneSight Users Manual
Normalization
When you select this transformation, the Parameters for Normalization dialog box
displays. You must select one of the following options on the Select the Genes...
drop-down list:
•
•
•
Use All Genes - All genes are used to calculate the normalization parameters.
This is done if no normalization (often called housekeeping) genes are available.
Using all genes implicitly assumes that the majority of the genes measured are
not differentially regulated, and so, taken as a whole the population accurately
represents the bias in the channel.
Select Genes Using a File - If there are normalization genes placed on the array,
this option allows you to specify the gene IDs for these in a file. The names in the
file must exactly match the IDs in the data sources used to build the dataset. The
file should consist of the textual gene IDs separated by carriage returns (i.e. put
one ID on each row in the file). The dialog prompts the user to browse for the file
containing the Gene IDs.
Select Genes By Name Pattern - If there are normalization genes placed on the
array, you can specify them by name, using a special gene ID or special character
sequence within the gene ID. The pattern may include asterisks (“*”) at the
beginning or the end for wildcard ID matching.
Note: If you choose the Select Genes using a File or Select Genes by Name Pattern
options, a Click to Combine Replicated Normalization Genes button is added to
the dialog box. If you don’t click this button, each normalization spot is added
to the normalization population. If you do click this button, normalization
spots with the same Gene ID are combined and another dialog box displays so
you can choose the method for combining replicate normalization spots. You
also have the option to dispose of outlier spots. Outliers are defined as values
which are beyond some chosen distance from the mean of the group. The
threshold distance is expressed in terms of standard deviations. Typically, a
value around 2 is used.
You must also select one of following options in the Select the Type of Normalization...
drop-down list:
•
232
Divide By Mean - Divides all values by the mean of values for that experimental
condition. Therefore, each channel on a microarray would be divided by their
Appendix B - Transformations
own mean value. The population used to calculate the mean is the Set of
Normalization Genes.
•
•
•
•
•
•
Divide by Percentile - Divides all values by the nth percentile of the values for
that experimental condition, where n is a value between 0 and 1. A value of 0.5 is
the 50% percentile (i.e., the median of the population). The population used to
calculate this value is the Set of Normalization Genes.
Subtract Mean - Subtracts the mean of the population from each value. Each of
the two channels on a microarray would have their own mean value subtracted.
The population used to calculate the mean is the Set of Normalization Genes.
Subtract Percentile - Subtracts all values by the nth percentile of the values for
that experimental condition, where n is a value between 0 and 1. A value of 0.5 is
the 50% percentile (i.e., the median of the population). The population used to
calculate this value is the Set of Normalization Genes.
Piece-wise Linear - Divides the range of control expression values into several
user-selected bins. For each bin, the GeneSight will calculate a mean value for the
expression values of the experiment. Based on these values, the program will
calculate a new slope parameter for each bin in such a way that the whole curve is
mapped onto the first diagonal. These slope parameters will be used to normalize
the expression values of the experiment.
Z-Score - Subtracts the mean and divides by the standard deviation. The entire
population of genes for this experimental condition is used for this operation.
Linear Regression Normalization - Fits values in a straight line so that the mean
squared difference between the data and the line is minimized. Subsequently, the
data is adjusted by shifting and rotating the line so that it corresponds to the first
diagonal y=x.
233
GeneSight Users Manual
Ratio
When you have two-channel data, before taking the ratio (to the left of the Ratio
transformation in the formula), the operation acts separately on each channel. In
other words, the Shifted Log transformation operates on the experiment and control
independently. After taking the ratio (to the right of the Ratio transformation in the
sequence), GeneSight maintains three values instead of two:
1. The experiment.
2. The control.
3. A new value, the ratio of experiment/control.
After the ratio operation, transformations apply independently to each value. This
means that the Shifted Log transformation operates independently for all three
values. A possible side effect is that the ratio value will no longer be the ratio of the
numerator and denominator:
if E/C = R, then E’ = log(E), C’=log(C), and R’= log(R)
It is not the case that:
R’ = E’ / C’ (in fact, log(R) = log(E) - log(C))
Note: This applies to normalization methods as well. Remember that, if you want to
maintain the relationship R = E/C, you must put the Ratio transformation last
in the sequence.
The Omit Flagged Spots transformation operates independently on each of the three
values. However, on the Ratio transformation, if the experiment and control have
inconsistent flags, the ratio is omitted for any choice of flag value. This normalization
acts on experiment/control pairs, afterwards setting the ratio value to be the ratio of
experiment/control. This is different then the behavior of subtypes Divide by Mean,
Divide by Percentile, and Subtract Mean which operate independently on each of
the three values.
234
Appendix C - Clustering Algorithms
Overview
This appendix describes the clustering algorithms that are used with the K-means
Clustering, Hierarchical Clustering, and SOM plotting tools described in Analyzing
Datasets with Plotting Tools.
235
GeneSight Users Manual
K-Means
This algorithm requires you to specify the number (K) of clusters you want to find. It
defines K number of cluster centers, randomly placed among the data, then proceeds
as follows:
1. Assigns each datum to the cluster center nearest to it.
2. Moves each cluster center to the center (the average) of the data points which
have joined it.
After the K centers move in Step 2, the membership in Step 1 may be invalidated, so
the steps must be repeated. In practice, the number of data points which change
cluster membership quickly decreases. When no data points change their
membership, the algorithm halts. If each datum corresponds to a single gene (i.e., is
the expression level for a gene across several experimental conditions), then each of
the K cluster centers can be thought of as a pattern of expression for a prototypical, or
representative, virtual gene for its cluster.
If each datum corresponds to a single experimental condition, (i.e., is the list of
expression levels for all measured genes in that experimental condition) then each of
the K cluster centers can be thought of as a pattern of expression for a prototypical, or
representative, virtual condition for its cluster. For example, in a tumor classification
study where patients were grouped into two clusters, each of the two derived cluster
centers would provide prototypical gene expression to characterize the tumor type.
236
Appendix C - Clustering Algorithms
Hierarchical
This algorithm begins by determining the distance of each data point to other data
points. At each step, for each element, the nearest neighboring element is located. In
this bottom-up approach, the closest elements are then grouped into clusters of two.
In the element list, grouped pairs are removed and replaced by two-element clusters.
As you can see, the list of elements initially consists only of data points. Gradually,
the points are replaced by clusters. As the process proceeds, the clusters are replaced
by clusters of clusters, each a binary tree. Each time a pair is clustered, the size of the
element list is reduced by one. The algorithm halts when the list has just one element,
a tree that joins all the original data points.
While closeness between points is defined by a distance metric, closeness of clusters
requires further calculations. This is because a technique is needed to combine the
distances between the member points into a single value for the distance between
two clusters. This technique is called linkage.
237
GeneSight Users Manual
Self-Organizing Map
This algorithm seeks to order the list of elements (of genes or experimental
conditions) so that similar elements are close together. In the figure below, the data is
represented by nine X’s, which need to be associated with the linear array of bins.
The goal is to place each X in a bin so that the X’s close together in the original high
dimensional space are in nearby bins. A deformable map (the zig-zag line shown at
the bottom of the box) is used to accomplish this. The line is distorted and moved
until it touches all the data points. Following the steps below to create this line:
1. Pick one datum (one X) at random.
2. Find the closest node (angle or bend) in the deformable map (the zig-zag line).
3. Move this node (call it the winner) closer to the X.
4. Move the neighbors of the winner toward the input.
5. Repeat Steps 1-4 for the entire dataset to gradually reduce the neighborhood size.
Finally, the map converges on the data points as shown below, generating the
desired ordering. GeneSight employs two such SOMs, one for ordering genes and
one for ordering experiments. Each SOM operates independently.
238
Appendix C - Clustering Algorithms
Dendrograms
After clustering is complete, a tree diagram called a dendrogram is drawn on-screen.
(Actually, two dendrograms are drawn, one for the gene clusters and one for the
experiment clusters). The dendrogram shows cluster membership and the physical
size of each cluster.
Cluster membership is shown, in an intuitive way, by the branching pattern of the
tree. Each cluster has a root connected to the roots of its children via a cross bridge.
Cluster size is represented by the position of the cross bridge and the height of the
tree. The cross bridges are positioned relative to a graduated scale, shown parallel to
the tree.
The cluster size is the average of the squared Euclidean distances from each point in
the cluster to the cluster center. This value can be read off of the scale. Typically, the
cross bridge height gives an intuitive, relative indication of the size (i.e., dispersion)
of the clusters relative to their separation. If the cross bridges for clusters indicate that
their dispersion is on par with the dispersion of the parent super-cluster, the clusters
are not very well defined. However, if the clusters are tight compared to the
dispersion of the clusters in space, they are considered well defined.
239
GeneSight Users Manual
Distance Metrics
There are a number of distance metrics in GeneSight, some of which may not be
commonly used. If there is not a strong preference for a certain metric, you might use
Euclidean, the basic distance computation. If the gene expression data comprises
measurements across time, or you otherwise wish to compare trends in expression
rather than absolute values, then Pearson Correlation is the recommended metric.
In the following descriptions of GeneSight’s distance metrics, x and y represent the
vectors of gene expression values across the experiments being considered. xi and yi
are the gene expression values in the ith:
Euclidean
This metric is the standard concept of distance in day-to-day life, applied to gene
expression measurement, and extended beyond three dimensions.
1
2 2
dis tan ce ( x, y ) = [ Σ i ( xi – y i ) ]
Squared Euclidean
This metric omits the square root operation. It is therefore faster than Euclidean
distance computation, but produces the same result in hierarchical and K-means
clustering for certain choices of linkage.
dis tan ce ( x, y ) =
Σi ( xi – yi )2
This is because the algorithms look at relative distance between genes (i.e., is X closer
to Y or Z?) for which Euclidean and Squared Euclidean metrics give the same answer
(i.e., positive number a is smaller than positive number b if and only if a2 is smaller
than b2.)
240
Appendix C - Clustering Algorithms
Standardized Euclidean
This metric normalizes each component of the difference between two genes’
expressions (i.e., the difference between the genes within one condition) by dividing
it by the variance of the gene expression values across that experimental condition.
dis tan ce ( x, y ) =
(xi
2
– yi)
Σi -var
-----------j x ji
City Block
This metric, which is another variation on Euclidean distance, omits squaring the
terms in the distance computation.
dis tan ce ( x, y ) =
Σi xi – yi
The results include both computational simplicity and decreased emphasis on big
differences, since the squaring operation emphasizes these values.
Chebychev
This metric, which is a final variation on Euclidean distance, is like City Block, but
instead of summing the differences, this metric takes the maximum.
dis tan ce ( x, y ) = max x i – y i
Pearson Correlation
This distance metric is:
COV [x,y]
dis tan ce ( x, y ) = 1 – ---------------------------VAR [ x ] ¥ VAR [ y ]
241
GeneSight Users Manual
Where:
n
∑ (x – x)(y – y )
i-=--1---------------------, VAR [ x ] = COV [x,x]
COV [x,y] = n–1
Where n is the dimensionality of x and y, x is the mean of the values in the vector x,
and y is the mean of the values in the vector y. Notice that the distance is defined as
one minus the correlation coefficient. This is because a correlation coefficient of 1
means perfectly correlated (giving zero distance), a correlation coefficient of 0 means
uncorrelated (giving unit distance), and a correlation coefficient of –1 means oppositely
correlated (giving distance two).
242
Appendix C - Clustering Algorithms
Cluster Linkage
As previously discussed, the hierarchical clustering algorithm must compute the
distance between clusters, not just between points. GeneSight offers five different
algorithms, or linkages, for performing this computation. Each of these algorithms is
described below:
Single Linkage
The distance between two clusters is the distance between the nearest pair of points.
This linkage tends to produces large clusters.
Complete Linkage
The distance between two clusters is the distance between the furthest pair of points.
This linkage tends to produces tight clusters, since all points in the joined clusters
must be at least as near as those two furthest points.
Average Linkage
A compromise between the Single Linkage and Complete Linkage. The distance between
the two clusters is the average of the distances between all possible pairs of points.
This computation dampens the effect of outliers (i.e., pairs of points that are
particularly close or far from each other).
Note: The Single Linkage, Complete Linkage, and Average Linkage methods work
efficiently with GeneSight’s hierarchical clustering algorithm, because they
can be efficiently computed for each cluster from the precomputed inter-point
distance matrix. The two linkages described on the next page do not have this
advantage and consequently risk slowing hierarchical clustering.
Centroid Linkage
The distance between the clusters is the distance between their centroids. The effect is
similar to that of the Average linkage. Since new clusters are constantly formed during
hierarchical clustering, centroids, and inter-centroid distances have to be constantly
recalculated during clustering, potentially slowing the algorithm’s progress.
243
GeneSight Users Manual
Ward’s Linkage
The distance between two clusters is the incremental sum of squares of the two
clusters merged into one. (The sum of squares of a cluster is defined as the sum of the
squares of the distance between all objects in the cluster and the centroid of the
cluster.) This incremental sum of squares (i.e., the increase in the total within group
sum of squares as a result of joining groups r and s) is given by:
N r ¥ Ns
2
------- X dcentroid(r,s)
dis tan ce ( r, s ) = --N r + Ns
where Nr is the number of elements in cluster r, Ns is the number of elements in
cluster s, and dcentroid(r,s) is the distance computed by Centroid Linkage. This method
tends to join clusters with a small number of observations, and is biased toward
producing clusters with roughly the same number of observations.
244
Appendix D - Principal Component Analysis
Overview
This appendix provides additional information about the Principal Component
Analysis tool discussed in “PcaPlot Window” on page 194.
245
GeneSight Users Manual
About Principal Component Analysis
The concept of principal component analysis (PCA) is to replace a large number of
variables with smaller number of variables by preserving as much information as
possible. The PCA tool seeks to create a scatter plot of gene expression over a number
of experiments, with each point in the plot representing one gene. If there are only
two experimental measurements per gene, it is easy to create a two-dimensional
scatter plot, with one dimension per experiment. PCA generates scatter plots when
the number of dimensions (experiments) is higher than two and works for an
arbitrary number of dimensions. As with any dimensionality reduction technique,
some information is lost. PCA provides supplementary information about how much
data is discarded during dimensionality reduction, for using in judging whether the
resulting plot is representative of the original data.
There are two types of PCA scatter plots created by this tool. One is the type
described above, in which each point represents one gene, is called Principal
Experiment Analysis (PEA). PCA also generates a scatter plot in which each point
corresponds to one experiment. This plot is called Principal Gene Analysis (PGA).
Follow the steps below to produce a two-dimensional scatter plot for a set of seven
experimental conditions:
1. Measure the variance of gene expression in each condition.
2. Pick the two with the biggest variance.
3. Discard the other five experiments.
4. Create a two-dimensional scatter plot from the two primary experiments.
PCA works something like this, but the two chosen axes for the plot are not
necessarily two of the original experiments. Instead, they are diagonal combinations
of the original experiments, vectors in the original seven-dimensional space along
which the greatest variation in expression occurs. The expression of any gene in one
of these virtual experiments is called a principal component of the gene, while each
virtual experiment is termed a principal experiment. Alternatively, in PGA the axes are
combinations of the original genes. The points in the plot give the principal
components of each experiment, corresponding to each of the two chosen principal
genes.
246
Appendix D - Principal Component Analysis
Consider the following scatter plot of gene expression. Each point represents one
gene, measured in two experiments. If you want to place the points along a line (i.e.,
reduce plot dimensionality from two to one), while preserving the information in the
original plot:
You can attempt this using a projection of the data. Cast a shadow of each point onto a
chosen line. The figure shows three options for the line upon which to project the
data, labeled Option 1, Option 2, and Option 3. The result of projecting on each
possible axis is shown below:
Clearly, Option 3 is the best, because it best preserves the original spread of (the
information in) the data.
247
GeneSight Users Manual
Projection Mathematics
The mathematics of projection are as follows:
1
2
Z i = a1 x + a2 x
i
i
Where:
x
Xi =
1
i
x2
i
Is the ith data point, and:
a =
a1
a2
Characterize the line. The components of a describe the slope of the line, with a1 as
the horizontal component, and a2 the vertical component. For example, for Option 1:
a =
1
–1
For Option 2:
a = 1
0
For Option 3:
a = 1
1
248
Appendix D - Principal Component Analysis
Further, the spread of the data can be represented by the variance of z:
2
1
1
i
Var [ z ] = a Var x
1
2
2
2
i
i
2
i
+ a 1 a 2 COV [x ,x ] + a Var x
It is this quantity that you want to maximize by your projection target line choice.
You can make the mathematical notation more general in terms of the number of
dimensions discussed by utilizing the vector notation introduced above. Note that
the equation above is the inner product of two vectors (xi and a). This inner product
can be written as:
T
zi = a xi
Where aT indicates the transpose of a, i.e.:
a
T
= a a
1 2
And matrix multiplication is used to combine the two elements, aT and xi. The
equation is applicable for vectors of arbitrary dimensionality (i.e., for examples
greater than the two-dimensional one used above). Adopting this vector notation,
you can now write the variance of z as:
T
Var [ z ] = A Ca
Where C is the covariance matrix for the data, i.e.:
C i, j = COV x , X
i
j
You can now proceed to calculate the vector a (i.e., the choice of projection line)
which maximizes the variance Var[z]. First, note that there are many vectors a which
characterize a single line. For example aT= [1 2] and aT = [2 4] characterize the same
line, since the slope 2/1 equals the slope 4/2. You want there to be exactly one vector
a for each line.
249
GeneSight Users Manual
You accomplish this by imposing the constraint that the magnitude of the vector a =
1, as described below:
2
2
2
( a1 ) + ( a2 ) + ( a3 ) = 1
This prevents arbitrary scaling of a (which would change its magnitude), but does
not constrain its direction. This constraint can be written compactly in vector notation
as:
T
a a = 1
The maximization problem can now be stated as follows:
•
Maximize Var[z] subject to the constraint:
T
a a = 1
•
You can replace Var[z] by:
T
a Ca
•
Maximize:
T
a Ca
subject to:
T
a a = 1
This problem can be solved by the method of Lagrange:
T
T
∇( a Ca ) = λ ∇( a a )
250
Appendix D - Principal Component Analysis
Where ! is the derivative operator (also called the gradient), which computes the
derivative with respect to each element of the vector a, and λ is some scalar (not a
vector or matrix) constant to be determined. Applying the gradient operator:
aT C + aT CT = λ 2 aT
but C = CT, a property of covariance matrices, so the above becomes:
aT C + aT C = λ 2 aT,
2 aT C = λ 2 aT,
aT C = λ aT,
Or, taking the transpose of each side of the equation:
C a = λ a
The result has special meaning to students of linear algebra. It says the result of
multiplying a, by the matrix C is the same as multiplying a by the scalar λ. In general,
this is not true for just any vector, but only for special vectors, related to the matrix C
and called eigenvectors. For each eigenvector, for which this relationship holds, there
is an associated scalar λ which makes the equation true. This scalar is called an
eigenvalue. Generally, for an n-by-n matrix C, there are n eigenvector/eigenvalue
pairs (i.e., n solutions to equation). Call the ith eigenvector Ei, and the corresponding
eigenvalue λ i. Recall that the eigenvector solutions characterize the slope of the line
that you intend to project the data points. Choosing an eigenvector (and therefore a
projection target line), Ei, you can prove that the eigenvalue λi is the variance of the
data projected onto that line. Substituting a = Ei into:
T
Var [ z ] = E CEi
i
But (G.4) says, C Ei = λ i Ei , so this becomes:
Var[z] = Ei T λ i Ei
251
GeneSight Users Manual
By rearranging terms, you can rewrite this:
Var[z] = λ i (Ei
T
Ei)
Note that the quantity in parentheses is forced by the earlier constraint to have value
1:
Var[z] = λ x 1 = λ i
As a result, the solution to the problem of maximizing the variance of the data after
projection is as follows:
1. Determine the covariance matrix for the data, C.
2.
Calculate the eigenvectors and eigenvalues of C.
3. Pick the biggest eigenvalue.
4. The corresponding eigenvector gives the line onto which the data should be
projected.
Returning to the example, you can get the numerical values used to produce the
scatter plot, and calculate the covariance matrix:
C = 0.9250 0.4774
0.774 0.3395
There are readily available software tools (linear algebra packages) for calculating
eigenvectors and eigenvalues of matrices. Since the covariance matrix is 2-by-2, there
are, in general, two eigenvector/eigenvalue pairs. For this example, they are:
E 1 = 0.87 , λ 1 = 1.19
0.49
E1 =
252
0.49 , λ = 0.07
2
– 0.87
Appendix D - Principal Component Analysis
Applying PCA to “Real Data”
In a real microarray data analysis study, the dimensionality of the data would be
much larger than two. You would need to reduce the dimensionality to two or three
to create a two-dimensional or three-dimensional scatter plot that best preserves the
spread of the data. To do this, pick two or three eigenvector to project the data onto.
List the eigenvectors according to the sizes of their eigenvalue, greatest to smallest,
and go down the list to pick the two or three most dominant axis. How much of the
variance is accounted for in the projection? The total variance of the data is the sum of
the eigenvalues, so it’s possible to calculate how much variance each eigenvector
accounts for, by dividing the variance for that eigenvector by the total variance:
λ i ⁄ Σi λ i x 100%
If the projection is onto a two-dimensional plane (to create a two-dimensional scatter
plot), you will just sum up the percentages accounted for by each of the two chosen
axes. Below you see GeneSight’s user interface for choosing the axes. The variance
percentages are shown to the right and the eigenvector make up is shown as a pair of
bar plots.
253
GeneSight Users Manual
Eigenvector Analysis
You have learned how to use the derived eigenvalues to understand how much of
the information in the original data has been preserved in the projection. This in itself
is useful. However, you can further understand the data by analyzing the eigenvector
makeup. Several examples are listed below, all of which assume that the original data
is four dimensional.
1. The eigenvector has a dominant component: E = (1, 0, 0, 0) means the first
experiment accounts for all the variance in the direction of eigenvector E. If E is
the dominant eigenvector (the eigenvector with the biggest eigenvalue), this tells
you that the first of the four experiments produces the greatest variation in gene
expression.
2. There are several large components in E. E = (.7, .7, 0, 0) means genes’ expressions
are regulated similarly in the first and second experiments. If these two are the
dominant eigenvectors, then they account for the variance in the data.
3. The dominant eigenvector has nearly equal values throughout. If E = (.5, .5, .5, .5)
is dominant, then inter-gene variation is greater than inter-experiment variation. This
is because E points along the main diagonal, showing a big spread of expression
values along that diagonal (inter-gene variation) compared to a smaller spread
away from the diagonal (inter-experiment variation).
4. There are large terms with opposite signs. E = (+.7, -.7, 0, 0) means that genes’
expressions are regulated oppositely in the first two experiment. If dominant,
then inter-experiment variation exceeds inter-gene variation.
254
Appendix E - Confidence Analysis
Overview
This appendix provides additional information about the Confidence Analysis tool
described in “Confidence Analysis Window” on page 129.
255
GeneSight Users Manual
About Confidence Analysis
The most basic question in microarray experiments is which genes are differentially
expressed between a control and experimental condition? To answer this question, a twochannel microarray is usually prepared, one channel for control and one for the
experiment. Gene expression values for the two channels, at each microarray spot,
are combined into a ratio, under suitable normalization.
The question then becomes for which genes is the computed expression ratio different from
unity? Since it is extremely unlikely you will get a ratio of precisely one, some
threshold of significance, above and below one, must be established to select genes
with significant differential regulation. Historically, researchers have selected genes
expression ratios that are two fold up or down regulated (i.e., with (normalized) ratios
that are less than one-half or greater than two).
Avoiding these arbitrary thesholds, the Confidence Analysis tool allows you to instead
choose a confidence level of differential expression. GeneSight then computes the
appropriate cut-offs for the ratio data. This approach is loosely based on the paper by
Kerr and Churchill, “Analysis of Variance for gene expression microarray data,”
http://www.jax.org/research/churchill/pubs/index.html and requires replicate spots on the
microarray slide. The idea is to estimate the inherent variability in gene expression
measurement on a slide. Then it establishes bounds that separate ratio levels which
are likely to occur from this inherent variability that are only likely to occur because
of true differential regulation between the experiment and control.
If you do a two-channel experiment on a single array, which has m replicates each of
n genes (n*m total spots). Define R(g,s), g=1 to n, s=1 to m be the ratio of the
measurement from each channel for the s-th replicate of the g-th gene (i.e., after
background correction). Assume the following statistical model:
1µ = -mn
∑
log ( R (g,s) )
s, g
Where µ is the average log ratio over the whole array, estimated by:
log R(g,s) = µ + G(g) + noise(g,s)
256
Appendix E - Confidence Analysis
G(g) is a term for the differential regulation of gene g, estimated by subtracting µ and
averaging over g’s replicates:
G ( g ) = 1- ∑ [ log ( R (g,s) ) – µ ]
m
s
Noise (g,s) is a zero-mean noise term, estimated by subtracting µ and G(g):
noise (g,s) = log R (g,s) – µ – G ( g )
This produces m noise samples for each gene, or n*m total samples – an empirical
distribution of the inherent variability in measured gene expression on the array.
There is an assumption in the statistical model that the variability is the same across
the whole array, and it is additive, once you take the log of the ratio data.
The left sub-plot in the figure below shows G(g) for 1152 genes spotted on an array in
triplicate. The right sub-plot shows the empirical distribution of the 1152x3 = 3456
noise terms.
Assume that you want to find the 95% confidence interval for up-regulation. In the
empirical distribution, you can count through the population 5% of the way from the
left, which puts you at -0.48 on the horizontal scale. This means that in the top
histogram, a gene’s log ratio of expression must be 0.48 above the mean to be
upregulated with 95% confidence.
257
GeneSight Users Manual
GeneSight includes a graphical tool for this analysis. To use it, you construct a dataset
using two-channel ratios. Then you open the Data Preparation window and add the
Background Correction, Ratio, Log, Normalization (subtract mean), and Combine
Replicates transformations as shown below:
Note: Refer to Preparing a Dataset for more detailed information about the Data
Preparation window.
The Ratio and Log transformations follow from the statistical model described earlier.
The Combine Replicates transformation is required to identify the repeated
measurements. The Confidence Analysis tool will not work if you omit this step.
Background correction is typical, but optional. Normalization is also optional. The
Confidence Analysis tool computes and subtracts the mean of the log ratios itself.
258
Appendix E - Confidence Analysis
In the GeneSight Main window, you select the ratio data to be analyzed, then select
Tools > Confidence Analyzer to display the Confidence Analysis window:
Use the slider bar to set the confidence level and to select up-regulated genes, downregulated genes, or both. The sub-selection is viewable in any of GeneSight plotting
tools. The histogram view is shown below:
259
GeneSight Users Manual
If the confidence level is set to 95%, this means that there is only a 5% chance that the
selected, up-regulated genes had high ratio values due to inherent variation on the
array, rather than true up-regulation. Moving the slider to 99% reduces that chance to
1%, selecting fewer genes. The same logic applied to selecting down-regulated genes.
In the displayed histogram, the highlighted bars indicate the genes differentially
regulated with the desired confidence. The sub-selected genes can be reported and/
or isolated in GeneSight for further analysis (e.g., via clustering).
The Confidence Analysis tool allows a similar analysis using multiple two-channel
experiments simultaneously. In this case, the Confidence Analyzer tool contains an
additional choice, allowing you to select whether the chosen confidence level applies
to differential regulation in any two-channel experiment, or to differential regulation
in all the two-channel experiments analyzed. Choosing all provides a far more
discriminating analysis, since to be selected, a gene must have an expression ratio
consistently far from unity. You might choose all in the case that the multiple arrays
are intended to verify each others’ results. You might choose any in the case that the
multiple arrays are intended to expose the genes to different conditions, and the
researcher wishes to find which (if any) of the many conditions has an effect on a
gene.
260
Appendix F - New Features in GeneSight 3.5
Overview
This appendix describes the new features and enhancements in GeneSight 3.5. It
includes information about Box Plot, LOWESS Normalization, NCBI Annotations,
Partition Editor, Partition Panel, Status Bar, Clustering Plots, Data Preparation Frame,
UI enhancements, as well as Optimization Enhancement and Bug Fixes.
261
GeneSight Users Manual
Informatics Enhancements
•
Box Plot
A way of summarizing a set of data measured on an interval scale. It is used to show
the shape of the distribution, its central value, and variability.
GeneSight now has a 'box plot', which looks like:
262
Appendix F - New Features in GeneSight 3.5
The x-axis is discretized into categorical bins; the y axis is gene expression.
The majority of the genes in each bin are lumped into the boxes, the outliers are
shown as individual points.
The plot has two modes in GeneSight:
(1) If you choose one condition, the values for that condition are 'binned' according
to the source microarray's meta-grid.
(2) If you choose multiple conditions, then the conditions serve as the bins.
A main purpose of the box plot is to allow the user to see the normalization across
print-tips afforded by the print-tip variation of LOWESS, a new normalization
feature described below.
For more on ‘box plots’, see
http://davidmlane.com/hyperstat/A37797.html
http://www.stat.yale.edu/Courses/1997-98/101/boxplot.html
•
LOWESS Normalization
In the data prep window, we now have "LOWESS" normalization, a popular
statistical algorithm. The parameter dialog looks like:
263
GeneSight Users Manual
The procedure strings out the spots according to brightness, then normalizes each
spot by looking at a neighborhood of nearby spots, and normalizing the group.
The parameters to be documented are:
Smoothing parameter: The level of influence of a spot's neighbors on its
normalization adjustment. Higher values mean that the normalization is more
continuous across spots.
Linear/quadratic: The assumed shape of the curve relating interchannel bias to spot
brightness. Quadratic provides more flexibility, linear is faster.
Normalization Scope: You can group all spots together ("Global" choice) or separate
spots into groups by their meta-grid ("Print-tip", see below).
264
Appendix F - New Features in GeneSight 3.5
For more on LOWESS in microarrays, see, for example,
http://www.stat.Berkeley.EDU/users/terry/zarray/TechReport/578.pdf
•
NCBI Annotations
GeneSight can now download gene annotations from NCBI. To do this the genes in
the dataset must have associated Genbank Accession numbers, Unigene clusters, or
gene symbols. There are two ways that a gene can have such an associated index: (1)
The gene ID in the dataset may be one of the three above, (2) you may create a text file
which maps your gene IDs to one of the three above. Each row of the text file has two
entries, the first is a gene ID present in the dataset, the second is an ID recognized by
NCBI. The file must be located in the main GeneSight directory and be called
“GeneIDMap.txt”.
With such an appropriate dataset loaded into GeneSight, go to the Partition Editor
and choose “Import NCBI Annotations.”
265
GeneSight Users Manual
Annotation information is updated periodically at NCBI. GeneSight allows you to
choose the annotations already downloaded, or you can download the latest.
266
Appendix F - New Features in GeneSight 3.5
You are then prompted to choose the organism represented in your dataset. The
choices are:
Drosophila melanogaster
Homo sapiens
Rattus norvegicus
Mus musculus
GeneSight then categorizes the genes in the dataset appropriately, and color codes
annotations.
The color-coded annotations can be used to highlight genes of known function in
various graphics such as scatter plots, cluster diagrams and time series plots.
Further, the annotations can be used in cluster enrichment analysis, to search for
groupings of genes within cluster plots that have the same annotations.
267
GeneSight Users Manual
Partition Editor
The look and feel of the partition editor has been completely redesigned. Every
operation is now accessible by a context-sensitive right clicking of the mouse. In
addition, to add and remove members from groups, drag-and-drop functionality has
been added to ease the addition and removal of members from groups. One can
access basic partition and group related operations also from the “Manage
Partitions” menu.
Partition Panel (at bottom GeneSight main window)
•
The look and feel of the partition tree on the left is slightly changed. The
root label “Gene Partitions” is added to remind user that only gene
partitions (and not condition partitions) are shown in this panel. The tree is
displayed in more standard format, with the +/- symbols at the partition
nodes. These symbols help to cue user to the expansion/ minimization
functionality of the tree (which formerly was accessible only by double
clicking in previous versions).
•
Several partition and group related operations that were exclusively
available only in the Partition Editor can now be accessed by a contextsensitive right- clicking of the mouse on the partition tree. These operations
include: deleting a partition; and renaming, deleting, and editing the color
of a group.
New Status Bar (at bottom of GeneSight main window)
The new status bar at the bottom of the main window has been enhanced to alleviate
several subtle and confusing concepts for the user. For a given dataset, there is the
concept of the total dataset (the entire gene loaded from the files), the active dataset
(the set of genes currently under study – these can be subselected by tools such as
those in plots or the Partition Panel), and the selected dataset (the dataset explicitly
marked by the user in one of the plots). Often, a user becomes confused about their
results because they do not know what the active set is. With a quick check of the
status bar, the user can easily decide whether they need to enlarge or sub-select their
dataset for further analysis. In addition to the three types of datasets, the status bar
268
Appendix F - New Features in GeneSight 3.5
also informs the user the number of sources (files) used to construct the current
dataset and alerts the user when GeneSight is operating under preview mode.
Graphical Enhancements to Clustering Plots (Hierarchical, K-Means,
1D-SOM)
Previously, the color-map for the plots could only be normalized on a global scale.
Global based color-maps, however, are useful only to spot patterns significant across
all genes across all experiments. To spot expression independent variations across
experiments for each gene, gene based color-maps are more useful. Gene based
color-maps have been added for Hierarchical, K-Means, and 1D-SOM plots in GS 3.5.
Data Preparation Frame enhancements
The Data Preparation frame launched in Preview mode has been modified to include
two buttons viz. ‘Apply to Preview Set’ and ‘Apply to Entire Dataset’. These options
are useful when in preview mode, they enable the user to understand that the user is
in the preview mode and can apply the selected transformation sequence to the
preview set which consists of 30 genes or can apply the selected transformation to the
entire dataset. Earlier when the Data Preparation frame was launched in preview
mode there used to be just one button ‘Apply Data Preparation”, this was not explicit
in conveying to the user that the transformation sequence was being applied only to
the genes in the preview set. With the above mentioned enhancements the user is
explicitly given a choice to either apply the transformation sequence to the preview
dataset or to the entire dataset.
UI Enhancements
•
Tooltips have been added to all buttons on the GeneSight main window
toolbar.
•
Menu items in the sub-select menus of all plot windows have been changed
to better reflect their operations.
269
GeneSight Users Manual
•
The "Preset Preparation Sequences" menu have been changed to "Select
transformation Sequence” menu. Further, when a predefined
transformation has been selected, the corresponding transformation will be
checked in the menu. The check will be removed only after the sequence is
modified.
•
Modal dialogues have been modified to ensure that they appear on top even
after focus is regained. This eliminates the annoying need to use the alt-tab
operation to find the hidden modal dialogues.
•
Raw data display on the main Panel of GeneSight. The raw data responds to
gene selections within GeneSight, if ‘Highlight Selected Genes’ is selected.
•
All the plots have SplitPane so that the actual graph can occupy the
available screen real estate. (Assuming the user knows how to use the
splitpane)
•
The label for the button to create a new dataset has been changed from
“New’ to ‘Create New’; similarly the button previously labeled ‘Import’ has
been changed to ‘Add to Dataset’
•
The indices for the 2-D SOM in the UI have been changed to begin with 1
and not 0.
Optimization Enhancements
•
Loading for certain datasets (especially in GD version of GS) is now about 2x
the speed of previous version.
Bug Fixes
270
•
The bug where the data pairing information cannot be reviewed except
during the initial pairing stage has been fixed.
•
The bug where the Data Prep and Save buttons are disabled when a dataset
is first opened/imported is now fixed.
Glossary
Alien Text - Expression data contained in an unknown (i.e., non-ImaGene) file
format.
Background Correction - The removal of natural background intensities from the
signal values.
Chebychev - A distance metric like City Block, but instead of summing the
differences, this metric takes the maximum. This is a variation of the Euclidian
distance metric.
City Block - A distance metric that omits squaring the terms in the distance
computation. This is a variation of the Euclidian distance metric.
Cluster - A group of genes that have similar expression patterns.
Coefficient of Variance - Standard deviation divided by mean. GeneSight calculates
this value as a measure of confidence for expression levels of replicated gene
measurements.
Column - A vertical line of data that is part of one category.
Confidence Analysis - A GeneSight tool for analyzing ratio data that contains
replicate measurements.
Contamination - Data that is tainted due to the presence of unwanted substances.
CPU - An acronym for central processing unit.
271
GeneSight Users Manual
Data Preparation - A GeneSight tool for selecting the sequence of transformations to
apply to a dataset.
Data Source - A text file or other source of gene expression data.
Dataset - One or more data sources grouped together with the Dataset Builder or
GeneSight Wizard tools.
Dataset Builder - A GeneSight tool for constructing a dataset from one or more data
sources.
Demo - An acronym for demonstration (i.e., Demo mode).
Dendrogram - A tree diagram that shows gene cluster membership and the physical
size of each gene cluster.
Denominator - The expression written below the line in a fraction that identifies the
number of parts a whole is divided into.
Distance Metric - A mathematical formula for calculating the distance between two
objects (i.e., two vectors of gene expression).
DNA - An acronym for deoxyribonucleic acid.
Euclidean - A distance metric that uses the standard concept of distance in day-today life, applied to gene expression measurement, and extended beyond three
dimensions.
Expression - A process that converts the coded information within a gene into the
structures present and operating in the cell.
FAQ - An acronym for frequently asked questions.
Flag - Marking gene data for identification purposes.
FLP - An acronym for floating license program.
Gene - A hereditary unit that occupies a specific location on a chromosome and
determines a particular characteristic in an organism.
272
Glossary
GenePie - A GeneSight tool for viewing values of each condition in different colors
comprising percentages of a circle.
Grid - A pattern of regularly spaced horizontal and vertical lines.
GS - An acronym for a GeneSight file extension. This is a GeneSight dataset file.
GUI - An acronym for graphical user interface.
Hierarchical Clustering - A GeneSight tool for grouping genes or experimental
conditions according to similarity of expression.
Histogram - A GeneSight tool for displaying a two-dimensional representation of
data based upon the frequency of occurrence against a given value.
JRE - An acronym for Java Runtime Environment.
HSB - An acronym for hue, saturation, and brightness.
HTTP - An acronym for hyper text transfer protocol.
Hybridization - A process for bonding RNA to DNA on a microarray.
IP - An acronym for internet protocol.
K-means - A GeneSight tool that finds K number of clusters, given the elements to
cluster, and K, the number of clusters to find. Means refers to the average or cluster
center, of which there are K in number.
License Manager - External software that controls the locking and unlocking of
specific GeneSight functions.
Linkage - An association between two or more genes where the traits they control
tend to be jointly inherited. This is also the method for measuring distance between
clusters.
MB - An acronym for megabytes.
Mean - The sum of the values in a gene population divided by the population size.
273
GeneSight Users Manual
Median - The value where there are the same number of genes in the population with
greater and lesser values.
Meta-Column - A column of subgrids within an array. This is part of the
BioDiscovery indexing scheme for the spots on a microarray.
Meta-Row - A row of subgrids within an array. This is also part of the BioDiscovery
indexing scheme for the spots on a microarray.
MHZ - An acronym for megahertz.
Microarray - A physically small substrate where cDNA has been spotted.
Mode - The value that occurs most frequently in a gene population.
mRNA - An acronym for messenger ribonucleic acid.
Normalization - A process where systematic biases between channels and/or
microarrays, due to experimental artifacts, are eliminated.
Numerator - The expression written above the line in a fraction that identifies the
total number of parts of a whole.
Outliers - Values that are beyond a chosen distance from the mean of a group.
Partition - A set of groups (of genes or conditions) that do not overlap.
Partition Editor - A GeneSight tool for choosing which partitions to use for color
coding the genes in the currently instantiated plots.
PCA - An acronym for principal component analysis.
PDF - An acronym for portable document format.
PEA - An acronym for principal experiment analysis.
Pearson Correlation - A distance metric that defines distance as one minus the
correlation coefficient.
PGA - An acronym for principal gene analysis.
274
Glossary
Plot - Points of data represented on a graph.
Principal Component Analysis - A GeneSight tool for viewing a compact
representation of large amounts of data by finding the dimensions where the data
varies the most.
Query - A sub-selection of a dataset according to prescribed data characteristics.
RAM - An acronym for random access memory.
Ratio - The relation between two quantities expressed as the quotient of one divided
by the other.
Replicate - A spot which repeats the cDNA found in another spot on the same
microarray.
RGB - An acronym for red-green-blue.
RNA - An acronym for ribonucleic acid.
Row - A horizontal line of data in a tabular dataset.
Scatter Plot - A GeneSight tool for viewing a two-dimensional representation of the
values of two conditions.
Self-Organizing Map - A GeneSight tool for displaying genes in clusters based on
their relative similarity.
SOM - An acronym for self-organizing map.
Spot - A single gene in a data source or dataset.
Squared Euclidean - A distance metric identical to Euclidian except that it omits the
square root operation.
Standardized Euclidean - A distance metric that divides distance by the variance of
the gene expression values across that experimental condition.
Subgrid - An array structure generated by a single pin from the print head.
275
GeneSight Users Manual
Sub-Selection - A method for changing the genes being visualized in the plots,
omitting the ones not selected. Changing the sub-selection does not change the choice
of partition.
SVGA - An acronym for super video graphics adapter.
Syntax - A set of rules for developing a query.
Text-Based Query - A GeneSight tool for generating a dataset or a subset based upon
standard query syntax.
TIF - An acronym for the tagged image file format.
Time Series - A GeneSight tool for displaying trends in gene expression for multiple
genes simultaneously. Each time point typically represents one microarray.
Tool - A GUI window or dialog box used to complete a task in GeneSight.
TSQ - An acronym for the transformation sequence file format. This is a GeneSight
file that contains a user-defined transformation sequence created in the Data
Preparation window.
TXT - An acronym for the text file format.
URL - An acronym for uniform resource locator.
Variance - The square of the standard deviation.
Vector - A one-dimensional array.
Z-Score - A transformation that replaces a value with the number of standard
deviations it is from its’ population mean.
276
Index
Numerics
2D SOM window
distance metric 182
2D som window 181
A
a priori 120
add group menu 118
add template window
creating a template 143
removing a template 144
advanced interface 15
annotation collector window 27, 133, 156, 217
annotations tab 21
authorization code 10, 16
average cluster linkage 188, 243
B
background corrections 93, 230
base (b) 100
bin number 160
both pictures and text 19
boundaries 161
button bar 84
C
centroid cluster linkage 188, 243
chebychev 143, 168, 241
choose URL menu 131
chromosomal map window 158
city block 143, 167, 241
cluster
choice 188
linkage 188
cluster choice 167, 177
code entry number 16
color
map 170, 177, 189
scheme menu 131, 154
columns, rearranging 140, 223
combine replicates 96, 231
comma, field separator 80
complete cluster linkage 188, 243
computer ID 16
confidence analysis window 256
adding a new URL 137
analyzing ratio data 134
features 129
menu bar 130, 136
printing a screen shot 136
saving screen shot 135
current license status 15
D
data plotting windows
command buttons 132, 155
menu bar 153
data preparation window
datasets contents 92
features 86–87
menu bar 87
transformations panel 90
data sources
multi-channel slide 67
277
GeneSight Users Manual
removing from the dataset builder 70
showing file path 69
sorting 69
viewing contents 70
viewing properties 71
database, annotations tab 21
dataset
cancelling changes 75
exiting 74–75
information bar 33
loading 54–55, 66
open 54
save 55
saving 74
saving as text file 113
view panel 31
dataset builder window
data context menu 62
dataset panel 65
features 58–59
menu bar 60
setup panel 64
source panel 63
toolbar 61
demo mode 10–11, 16
diameter
encoding as maximum intensity 206
spot 82
difference 101
distance metric 167, 177, 182, 188
divide
by mean 104, 232
by percentile 104, 233
division cluster linkage 188
E
eigenvector 253–254
enter data file parameters 76
button bar 84
field separator tab 80
file display area 79
genomic information tab 83
other information tab 82
pairing information tab 83
278
required information tab 78
slide configuration tab 81
euclidean 143, 167, 240
expiration 15
export table 124
F
fdb file 21
field separator tab 80
file
display area 79
handling options 74
open 54
path 69
save 55
file type
.fdb 21
.gs 60–61
.hp 84
.tif 135
.tsq 108
.txt 120
fill in missing values 98
find tool 217
flag 82
floating network 16
floor 99
G
genepie window 205
genes
gene ID column number 78
maximum number 19
select by name pattern 104
select using a file 103
selected 162
selecting entire gene set 137
use all 103
GeneSight main window
dataset information bar 33
dataset view panel 31
features 24–25
menu bar 26
partition panel 32
Index
toolbar 29
GeneSight wizard
paired source dataset 41
replicated source dataset 47
single source dataset 36
genomic information tab 83
goto web tool 217
group editor dialog box 128
gs file 60–61
guess names 78
H
hard drive 2
header parameters dialog box 84
hierarchical clustering window 187
apply 189
cluster choice 188
cluster linkage 188
color map 189
distance metric 188
make partition 189
partition mode 187
histogram window 160
bin number 160
boundaries 161
selected genes 162
tails 161
hp file 84
I
ImaGene files, converting to GeneSight
format 73
installation 3
IP address 22
K
keep all replicated spots 97
k-means clustering window 166
add cluster centroids 169
apply 168
cluster choice 167
color map 170
distance metric 167
make partition 169
number of experimental condition
clusters 168
number of gene clusters 168
L
left selected genes 162
legend 206
license
agreement 8
manager 8
licensing
method 16
wizard 11
linear regression normalization 105, 233
local
background correction 94, 230
blank median 94, 230
group median 94, 230
lock codes 10, 16
log
scale / replicates preset sequence 111
scale preset sequence 110
scatterplot window 200
shifted 100
low expression levels, omit 102
M
make partition 169, 189
maximum number of genes 19
mean 96
mean of
gene’s experiments 98
genes 98
measurement columns 78
median 96, 98
middle selected genes 162
mode 15, 98
module keys 16
monitor 2
multi-channel slide 67
N
normalization 102, 232
normalized preset sequence 109
279
GeneSight Users Manual
notify when spot image file is invalid 19
number of
experimental condition clusters 168
gene clusters 168
number of header rows 78
O
omit
flagged spots 95
low expression levels 102
outliers 97
operating system 2
other information tab 82
outliers 97
P
paired source dataset 41
pairing information tab 83
partition
changing color 121
changing name 122
file 120
mode 187
partition editor window
changing the color of a partition 121
changing the name of a partition 122
features 116
menu bar 118
opening a partition file 120
partition panel 27, 32
password 22
pcaplot window 194
parameters 196
percentages 195
select a mode 195
vector bar chart 196
pearson correlation 168, 241
percentages 195
pictures only 20
piece-wise linear 105, 233
plotting windows
command buttons 132, 155
menu bar 153
port 22
280
preferences
dialog box 17
tab 18
preset sequences
log scale 110
log scale / replicates 111
normalized 109
simple 109
preview mode, use 27, 89, 113
principal
component analysis 246
experiment analysis 246
gene analysis 246
processor 2
program requirements 2
Q
query
building 128
deleting 128
R
random access memory (RAM) 2
ratio 101
readme 8
remove
group menu 119
partition menu 118
replicated source dataset 47
report window
creating a report 224
features 220
rearranging columns 223
sorting data 222
required information tab 78
right selected genes 162
S
s.o.m. clustering window 176
apply 177
cluster choice 177
color map 177
distance metric 177
scatterplot window 200
Index
select genes
name pattern 104, 232
using a file 103
select genes using a file 232
select partition menu 118
selected genes 162
semi-colon, field separator 80
serial number 12
service name 22
shift value (c) 100
shifted log 100
show
partition panel 27
selected only 89, 112
shuffle 211
significance tool window
features 138
rearranging columns 140
simple preset sequence 109
single
cluster linkage 188, 243
source dataset 36
slide configuration tab 81
sorting data sources 69
source name 22
space, field separator 80
specified value 98
spot
annotation collector 113
diameter 82
squared euclidean 143, 167, 240
standardized euclidean 143, 167, 241
subgrid median 94, 230
sub-select genes menu 131
subtract
mean 104, 233
percentile 105, 233
T
tab, field separator 80
tails 161
technical support 227
template
creating 143
matcher 27
removing 144
text only 20
text-based query window
adding a group 127
building a query 128
deleting a group 127
deleting a query 128
features 123
importing a group 126
menu bar 124
sub-selecting a group 126
toolbar 125
tif file 135
time series plot window 210
count 212
left 211
log 211
match 212
metric 212
right 211
save template toolbar button 211
shuffle 211
template toolbar button 210
threshold 212
toolbar
both pictures and text 19
pictures only 20
text only 20
total selected genes 162
transformation sequence
loading 108
saving 108
transformations
applying changes 107
background corrections 93
combine replicates 96
difference 101
fill in missing values 98
floor 99
normalization 102
omit flagged spots 95
omit low expression levels 102
ratio 101
removing 107
281
GeneSight Users Manual
shifted log 100
tsq file 108
txt file 120
U
URL 20, 137
use
mean of gene’s experiments 98
mean of genes 98
median 98
mode 98
specified value 98
use all genes 103, 232
use preview mode 89, 113
user-defined field separator 80
username 22
V
vector bar chart 196
W
ward cluster linkage 188, 244
warn when background correction
parameters are invalid 18
warn when flags are invalid 18
warn when piecewise normalization
parameters are invalid 19
warranty information 228
workstation locked 16
X
x-coordinate 82
Y
y-coordinate 82
Z
z-score 105, 233
282