1
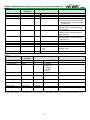
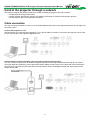
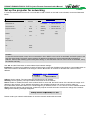
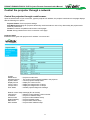
DDU6871/DW6851/DX6831 DLP Projector Remote Communication Manual Table of Contents The serial interface RS-232 command ............................................................................................................... 2 Communication parameter setup ...................................................................................................................................................... 2 Operation commands........................................................................................................................................................................ 2 Operation command syntax ...................................................................................................................................................... 2 List of operation commands ..................................................................................................................................................... 3 Simulated IR remote controller commands .................................................................................................................................... 11 Control the projector through a network ........................................................................................................ 12 Cable connection ............................................................................................................................................................................ 12 Set up the projector for networking ................................................................................................................................................ 13 Control the projector through a network ........................................................................................................................................ 14 Control the projector through a web browser ......................................................................................................................... 14 Control projector with the PJLink protocol ............................................................................................................................ 17 Control projector with TCP/IP communication protocol........................................................................................................ 17 About the VIVITEK support ............................................................................................................................ 18 1 DDU6871/DW6851/DX6831 DLP Projector Remote Communication Manual The serial interface RS-232 command This controller supports projectors with a RS-232 serial interface. There exist two types of serial commands: Operation command: Available menu options are INPUT, PICTURE, LAMP, ALIGNMENT, CONTROL, SERVICE, and OTHERS. Simulated IR remote controller commands: Controls projector with serial command analog IR remote controller and its control keys. Communication parameter setup You can use the serial control command to input commands for projector control or retrieve its operational data through Windows client terminal software, e.g. Hyper Terminal, with ASCII characters.You need to set up the following communication parameters in advance: Item Parameter: Bit per Second 115200 (default), 57600, 38400, 19200, 14400, 9600, 4800, 2400, 1200bps Data Bit 8-bit Parity None Stop Bit 1 Flow Control None Port 7000 Caution: The terminal software does not return every command input character The transmission performance varies with the matching length of RS-232 cable and transmission speed. Please select proper transmission from the OSD menu. Operation commands Operation command syntax An operation command is prefixed by character "op", followed by control commands and settings separated by space blank [SP], and ended by carriage return pair "CR" and "ASCII hex 0D".Syntax of serial control commands: op[SP]<operation command>[SP]<Setting Value>[CR] op [SP] [CR] Setting value : : : : A constant indicating this is an operation command. Indicate one blank space. Indicate the command ending carriage return pair "CR" and "ASCII hex 0D". Settings of operation command Types of setup strings Query current setup Setup Increase setup order of adjustment items Decrease setup order of adjustment items Execute operation command Examples: Control items Query current brightness settings Set up brightness Set up input signal source to HDMI Characters of settings ? = <settings> + None Description Question mark "?" indicates querying current setup Syntax of settings: Symbol "=" suffixed with setup values Some settings are changed in steps. Symbol "+" indicates changing one step up Some settings are changed in steps. Symbol "-" indicates changing one step down Certain operation commands execute after input without further setting or regulators. Input command row op bright ? [CR] Projector return message OP BRIGHT = 101 op bright = 127 [CR] op input.sel = 0 [CR] OP BRIGHT = 127 OP INPUT.SEL = 0 2 DDU6871/DW6851/DX6831 DLP Projector Remote Communication Manual Reset camera to center position lens.center Caution: When controlling the projector to execute multiple commands, make sure the return message of the last command is received before sending out the next one. List of operation commands Input OSD function Input Select Test Pattern Color Space Input Lock Background Operation command input.sel pattern color.space input.lock no.signal Settings/return values ? = ? = ? = ? = ? = 0 = HDMI 1 = DVI 2 = VGA 3 = Component / BNC 4 = DisplayPort 5 = Digital 0 = Color Bar 1 = Cross Hatch 2 = Burst 3 = Red (TI) 4 = Green (TI) 5 = Blue (TI) 6 = WHITE (TI) 7 = BLACK (TI) 8 = HRamp (TI) 9 = Red (uncorrected) 10 = Green (uncorrected) 11 = Blue (uncorrected) 12 = White (uncorrected) 13 = Black (uncorrected) 14 = Off 0 = Auto 1 = YcbCr (Rec. 601) 2 = YPbPr (Rec. 709) 3 = RGB-PC (0-255) 4 = RGB-Video (16-235) 0 = Auto 1 = 48 Hz 2 = 50 Hz 3 = 60 Hz 0 = Logo 1 = Blue 2 = Black 3 = White 3 Note Do not apply when the project is in standby mode a. Standby mode b. When the blank function is activated Do not apply when the project is in standby mode Do not apply when the project is in standby mode or the input signal is not yet locked. Do not apply when the project is in standby mode or the input signal is not yet locked. Do not apply when the project is in standby mode DDU6871/DW6851/DX6831 DLP Projector Remote Communication Manual Picture OSD function Picture Mode Contrast Brightness Saturation Hue Gamma Color.Temp Trim/Red Lift Trim/Green Lift Trim/Blue Lift Hue/Red Gain Hue/Green Gain Hue/Blue Gain Operation command pic.mode contrast bright saturat tint gamma color.temp red.offset green.offset blue.offset red.gain green.gain blue.gain Settings/return values ? = ? = + ? = + ? = + -? = + ? = ? = ? = + ? = + ? = + ? = + ? = + ? = + - Note 0 = High Bright 1 = Presentation 2 = Video 0-200 Do not apply when the project is in standby mode or the input signal is not locked yet. 0-200 Do not apply when the project is in standby mode or the input signal is not locked yet. 0-200 0-200 0 = Film 1 = Graphics 2 = Video 3 = Linear 0 = Native 1 = 5400K 2 = 6500K 3 = 9300K c. Apply for YUV signal input d. Do not apply when the project is in standby mode or the input signal is not locked yet. a. Apply for YUV signal input b. Do not apply when the project is in standby mode or the input signal is not locked yet. Do not apply when the project is in standby mode or the input signal is not locked yet. Do not apply when the project is in standby mode or the input signal is not locked yet. 0-200 Do not apply when the project is in standby mode or the input signal is not locked yet. 0-200 Do not apply when the project is in standby mode or the input signal is not locked yet. 0-200 Do not apply when the project is in standby mode or the input signal is not locked yet. 0-200 Do not apply when the project is in standby mode or the input signal is not locked yet. 0-200 Do not apply when the project is in standby mode or the input signal is not locked yet. 0-200 Do not apply when the project is in standby mode or the input signal is not locked yet. 4 DDU6871/DW6851/DX6831 DLP Projector Remote Communication Manual OSD function Sharp Noise Reduction Aspect Ratio Overscan H Total H Start H Phase V Start Operation command sharp nr aspect zoom h.total h.pos h.phase v.pos Auto Sync auto.img Color/Red Gain hsg.r.gain Color/Green Gain hsg.g.gain Settings/return values ? = + ? = + ? = ? = ? = + ? = + ? = + ? = + - 0-31 Do not apply when the project is in standby mode or the input signal is not locked yet. 0-15 (Noise Reduction) Do not apply when the project is in standby mode or the input signal is not locked yet. 0 = 5:4 1 = 4:3 2 = 16:10 3 = 16:9 4 = 1.88 5 = 2.35 6 = Letterbox 7 = Native 8 = Unscaled 0 = Off 1 = Crop 2 = Zoom 0-200 0-200 0-200 0-200 (execute) ? = + ? = + - Note 0-200 0-200 5 a. Do not apply when the project is in standby mode or the input signal is not locked yet. b. When the Zoom function is set to Zoom in, the Unscaled function is disabled. a. Do not apply when the project is in standby mode or the input signal is not locked yet. b. When the Aspect Ratio function is set to Unscaled, the Zoom function is disabled. a. Do not apply when the project is in standby mode or the input signal is not locked yet. b. Apply for VGA and Component signal input. a. Do not apply when the project is in standby mode or the input signal is not locked yet. b. Apply for VGA and Component signal input. a. Do not apply when the project is in standby mode or the input signal is not locked yet. b. Apply for VGA and Component signal input. a. Do not apply when the project is in standby mode or the input signal is not locked yet. b. Apply for VGA and Component signal input. Do not apply when the project is in standby mode or the input signal is not locked yet. Do not apply when the project is in standby mode or the input signal is not locked yet. Do not apply when the project is in standby mode or the input signal is not locked yet. DDU6871/DW6851/DX6831 DLP Projector Remote Communication Manual OSD function Color/Blue Gain Color/Cyan Gain Color/Magenta Gain Color/Yellow Gain Saturation/Red Saturation/Green Saturation/Blue Saturation/Cyan Saturation/Magenta Saturation/Yellow Hue/Red Hue/Green Hue/Blue Hue/Cyan Operation command Hsg.b.gain hsg.c.gain hsg.m.gain Hsg.y.gain hsg.r.sat hsg.g.sat Hsg.b.sat hsg.c.sat hsg.m.sat Hsg.y.sat hsg.r.hue hsg.g.hue Hsg.b. hue hsg.c. hue Settings/return values ? = + ? = + ? = + ? = + ? = + ? = + ? = + ? = + ? = + ? = + ? = + ? = + ? = + ? = + - Note 0-200 Do not apply when the project is in standby mode or the input signal is not locked yet. 0-200 Do not apply when the project is in standby mode or the input signal is not locked yet. 0-200 Do not apply when the project is in standby mode or the input signal is not locked yet. 0-200 Do not apply when the project is in standby mode or the input signal is not locked yet. 0-200 Do not apply when the project is in standby mode or the input signal is not locked yet. 0-200 Do not apply when the project is in standby mode or the input signal is not locked yet. 0-200 Do not apply when the project is in standby mode or the input signal is not locked yet. 0-200 Do not apply when the project is in standby mode or the input signal is not locked yet. 0-200 Do not apply when the project is in standby mode or the input signal is not locked yet. 0-200 Do not apply when the project is in standby mode or the input signal is not locked yet. 0-200 Do not apply when the project is in standby mode or the input signal is not locked yet. 0-200 Do not apply when the project is in standby mode or the input signal is not locked yet. 0-200 Do not apply when the project is in standby mode or the input signal is not locked yet. 0-200 Do not apply when the project is in standby mode or the input signal is not locked yet. 6 DDU6871/DW6851/DX6831 DLP Projector Remote Communication Manual OSD function Hue/Magenta Hue/Yellow Operation command hsg.m. hue Hsg.y. hue White Blance/Red Gain hsg.wr.gain White Blance/Green Gain hsg.wg.gain White Blance/Blue Gain Hsg.wb.gain LAMPS OSD function Lamp Mode Operation command lamps Lamp Power Settings/return values ? = + ? = + ? = + ? = + ? = + - 0-200 Do not apply when the project is in standby mode or the input signal is not locked yet. 0-200 Do not apply when the project is in standby mode or the input signal is not locked yet. 0-200 Do not apply when the project is in standby mode or the input signal is not locked yet. 0-200 Do not apply when the project is in standby mode or the input signal is not locked yet. 0-200 Do not apply when the project is in standby mode or the input signal is not locked yet. Settings/return values ? = 0 = Dual 1 = Lamp1 2 = Lamp2 3 = Single lamp.mode ? = Custom Lamp Power lamp.pwr High Altitude altitude Lamp 1 Status lamp1.stat ? = ? = ? 0 = Standard 1 = Economy 2 = Custom Power Level 0-31 (75 % ~ 100.0 %) Lamp 2 Status lamp2.stat ? ALIGNMENT OSD function Projection Mode Zoom Operation command proj.mode zoomio 0 = Off 1 = On 0 = Off 1 = On 0 = Off 1 = On Settings/return values ? = Note 0 = Front 1 = Rear 2 = Ceiling + Front 3 = Ceiling + Rear 4 = Up + Front 5 = Down + Front + - Note a. Do not apply when the project is in standby mode b. Do not apply when the project is in cooling or lighting up status. Please send control command after the said commands are completed. Do not apply when the project is in standby mode Do not apply when the project is in standby mode Do not apply when the project is in standby mode Do not apply when the project is in standby mode Do not apply when the project is in standby mode Note Do not apply when the project is in standby mode The camera control command does not apply when the projector is in standby mode. 7 DDU6871/DW6851/DX6831 DLP Projector Remote Communication Manual Focus focus + - Shift V vert.offset + - Shift H horiz.offset + - Load Memory lens.load = 1 to 10 Edit Memory lens.save = 1 to 10 Center Lens lens.center Keystone v.keystone CONTROL OSD function Standby Mode Auto Power Off Auto Power On Operation command eco.net.pow auto.powoff auto.powon IP Address net.ipaddr Subnet net.subnet Gateway net.gateway DHCP net.dhcp Baud Rate rs232.speed (execute) ? = + - -80 ~ 80 Settings/return values ? = ? = ? = ? = ? = ? = ? = ? = The camera control command does not apply when the projector is in standby mode. The camera control command does not apply when the projector is in standby mode. The camera control command does not apply when the projector is in standby mode. The camera control command does not apply when the projector is in standby mode. The camera control command does not apply when the projector is in standby mode. The camera control command does not apply when the projector is in standby mode. Do not apply when the projector is in standby mode. Note 0 = Off (Standard Standby Mode) 1 = On (ECO Standby Mode) 0 = Off 1 = On Do not apply when the projector is in standby mode. 0 = Off 1 = On <String> <String> <String> 0 = Off 1 = On 0 = 115200 bps 1 = 57600 bps 2 = 38400 bps 3 = 19200 bps 4 = 14400 bps 5 = 9600 bps 6 = 4800 bps 7 = 2400 bps 8 = 1200 bps 8 This command is not required as the setting is default to "9600" when RS232 commands are sent to the projector through RJ45 cable by external integrated video and control signal transmission box. DDU6871/DW6851/DX6831 DLP Projector Remote Communication Manual OSD function Channel Startup Logo Trigger Auto Search Dynamic Black 3D Format DLP Link 3D Swap Operation command rs232.channel startup.logo trig.1 auto.src dblack 3d.format 3d.dlplink 3d.swap Settings/return values ? = ? = ? = ? = ? = ? = ? = ? = 3D 24Hz Display 3d.24 ? = Language lang ? = 0 = Local 1 = Digital Note This setting is default to "9600" when RS232 commands are sent to the projector through RJ45 cable by external integrated video and control signal transmission box. 0 = Off 1 = On 0 = 5:4 1 = 4:3 2 = 16:10 3 = 16:9 4 = 1.88 5 = 2.35 6 = Letterbox 7 = Native 8 = Unscaled 9 = Auto 0 = Off 1 = On 0 = Off 1 = On 0 = Off 1 = Auto 2 = Side by Side 3 = Top / Bottom 4 = Frame Sequential 0 = Off 1 = On 0 = Normal 1 = Reverse 0 = 96 Hz 1 = 144 Hz 0 = English 1 = French 2 = Spanish 3 = German 4 = Portuguese 5 = Chinese Simplified 6 = Chinese Traditional 7 = Japanese 8 = Korean 9 Do not apply when the projector is in standby mode. Do not apply when the projector is in standby mode. Do not apply when the projector is in standby mode. Do not apply when the project is in standby mode or the input signal is not locked yet. Do not apply when the project is in standby mode or the input signal is not locked yet. Do not apply when the project is in standby mode or the input signal is not locked yet. a. Do not apply when the project is in standby mode or the input signal is not locked yet. b. Apply to input signal 3D 24Hz only DDU6871/DW6851/DX6831 DLP Projector Remote Communication Manual SERVICE OSD function Model Serial Number Software Version Pixel Clock Operation command model ser.no sw.ver pixel.clock ? ? ? ? <String> <String> <String> <String> Signal signal ? <String> H Refresh Rate h.refresh ? <String> V Refresh Rate v.refresh ? <String> Lamp1.Hours Lamp2.Hours Projecotor Runtime Blue.Only lamp1.hours lamp2.hours proj.runtime blue.only ? ? ? ? = <String> <String> <String> Factory Reset Others OSD function Settings/return values 0 = Off 1 = On (execute) fact.reset Power On Power Off Projector Status Operation command power.on power.off status Focus focus Zoom zoomio Vertical Lens Shift Vert.offset Horizental Lens Shift horiz.offset Center Lens Shutter lens.center shutter Settings/return values (execute) (execute) ? Note a. In unit of MHz b. Do not apply when the project is in standby mode or the input signal is not locked yet. Do not apply when the project is in standby mode or the input signal is not locked yet. Do not apply when the project is in standby mode or the input signal is not locked yet. Do not apply when the project is in standby mode or the input signal is not locked yet. Do not apply when the projector is in standby mode. Note 0 = standby 1 = warm up 2 = imaging 3 = cooling 4 = reset + + + + (execute) + - Caution: The projector returns string "NA" when the input command does not apply to current projector status or setup. 10 DDU6871/DW6851/DX6831 DLP Projector Remote Communication Manual Simulated IR remote controller commands This control command simulates the IR remote controller and its control keys. It shares the same syntax of operation command. It begins with characters "ky", followed by control commands and settings separated by space blank [SP], and ended by carriage return pair "CR" and "ASCII hex 0D".Control command syntax: ky[SP]<operation command>[CR] Examples: Power On Power Off ky power.on [CR] ky power.off [CR] List of simulated IR remote controller commands Item Function Operation Description command 1 Power On power.on Power On 2 Power Off power.off Power Off 3 Menu menu Display OSD menu 4 Exit exit Exit 5 Enter enter ENTER key 6 Up up Move cursor upward or change upward 7 Down down Move cursor downward or change downward 8 Left left Move cursor to the left or change to the left 9 Right right Move cursor to the right or change to the right 11 DDU6871/DW6851/DX6831 DLP Projector Remote Communication Manual Control the projector through a network This machine supports the following methods in remote controlling the projector through a network: Control projector through web browser. Control projector with RS-232 control or simulated IR commands via TCP/IP communication protocol. Control projector with PJLink standard commands. Cable connection You may connect the projector to a PC or to an external integrated video and control signal transmission box through LAN for remote control. Connect the projector to a PC See figure below for connecting the projector to a PC in RJ-45 cable for control.For connection through LAN, connect the PC to a hub through to the projector's Digital/Lan port. Connect with an external integrated video and control signal transmission box You may connect the projector to an external integrated video and control signal transmission box with RJ-45 cable for concurrent video and networking control signal transmission.Please connect the PC to the input end of the transmission box with one RJ-45 cable and the output end of the transmission box to the Digital/LAN input end of the projector with another RJ-45 cable. 12 DDU6871/DW6851/DX6831 DLP Projector Remote Communication Manual Set up the projector for networking In case the remote network control is not connected to LAN or DHCP or the LAN is not activated, connect as illustrated below: INPUT PICTURE LAMP ALIGNMENT CONTROL SERVICE Eco Network Power < Standard > Auto Power off < Off > IP Address < xxx.xxx.xxxx.xxx > Auto Power On < Off > Subnet < 255.255.255.0 > Projector Control < Both > Gateway < xxx.xxx.xxxx.xxx > Network Network Enter DHCP Off RS232 Enter Apply Apply Startup Logo < Off > Trigger < Off > Auto Search < Off > Dynamic Black < Off > 3D Enter Language Enter Caution: In case the remote network control is not connected to LAN or DHCP or the LAN is not activated, set DHCP option to Off and then select Apply.The DHCP service assigns IP address and settings to devices automatically and keeps IP Address, Subnet, and Gateway options away from editing. In case the DHCP service of the LAN is not activated, set up the network manually. Use ▲▼ and the Enter button to select Network and network settings: IP Address: To specify an IP address, press the Enter button to show the IP address input window. Use the ◄► button to select the number in the address to be changed. Use the ▲▼ button to increase or decrease the number in the IP address. Subnet: Set the subnet. The input method is the same as the IP address. Gateway: Set the gateway. The input method is the same as the IP address. DHCP: Enable or disable the DHCP service.When DHCP is set to ON, the DHCP server of the domain will assign an IP address to the projector. The IP address will appear in the IP address window and you don't need to make any input.Otherwise, the domain does not or cannot assign any IP address, and 0. 0. 0. 0 is shown on the IP address window. Apply: Select this button and press Enter. It takes the projector several seconds to execute the change of the network setting till the following message disappears. Please contact your network administrator in case the network remains disconnected. 13 DDU6871/DW6851/DX6831 DLP Projector Remote Communication Manual Control the projector through a network Control the projector through a web browser Open the web browser of your control PC, type the projector's IP address, the projector's web server homepage displays with the following four options: Projector Status: Current projector settings. Alert Mail Setup:Settings for projector abnormality email reminders.In case of any abnormality the project sends emails to preset users. Crestron: Crestron compatible web browser control pages PJLink: Set up password for PJLink connection in this page. Projector Status Illustration below goes with projector at IP address "192.168.0.100": System Model Name Software Version System Status Display Source Lamp 1 Hours Lamp 2 Hours Error Status : : : : : : : Projector model name. The version of the software installed in the projector Current projector startup status Display the current source. Display the usage hours of Lamp 1 Display the usage hours of Lamp 2 Indicate projector diagnosis message Network control setup message (RJ-45 Version) LAN Version : Network control software version number IP address : Projector IP address setup Subnet mask : Projector subnet address setup Default gateway : Projector gateway setup DNS server : Projector DNS server setup MAC address : Projector MAC address setup 14 DDU6871/DW6851/DX6831 DLP Projector Remote Communication Manual Alert Mail Setup This projector can send emails with projector abnormality messages to preset users. Set up the projector before enabling this function: SMPT Server : Set up SMTP server name as the projector sends email via a SMTP server. Port : Set up transmission port User Name : Input target user name for the projector to send the reminder email to, through a SMTP server. Password : Input user password. E-mail Alert : Enable or Disable reminder email. From : Set up email address of the email sender. To : Set up email address of the email recipient. CC : Set up email address of the email CC recipient. Projector Name : Set up projector name or ID. Location : Set up projector installation location. Apply : Confirm your settings.Press this button to save changes you have made. Send Test Mail : Send test email.The reminder email is sent only in the event of a projector error.Press this button to validate email settings after setup is completed. 15 DDU6871/DW6851/DX6831 DLP Projector Remote Communication Manual Crestron control page Click the Crestron option in your project's wen server homepage. The Crestron control page displays in new tab Power: Press this button to power on or off the projector Source List: Switch projector input signal sources. Press the ▲ or ▼ arrow key to scroll through the dropdown list of available signal sources Image adjust options Press the ◄ or ► arrow key to scroll through available adjustment options. Freeze: Freeze current projection screen.The projection screen prompts the "Still open" message after the freeze function enabled.Press the Freeze button again to unfreeze the screen. Contrast: Click this button and the adjustment window displays. Click the ◄► arrow keys to adjust contrast. Brightness: Click this button and the adjustment window displays. Click the ◄► arrow keys to adjust brightness. Sharpness: Click this button and the adjustment window displays. Click the ◄► arrow key to adjust sharpness. Zoom: Zoom the projection image.Click the "+" key to zoom in and "-" to zoom out.You may click the four arrow keys in the window to move the zoomed projection image. 16 DDU6871/DW6851/DX6831 DLP Projector Remote Communication Manual Control key window This window simulates keys on the remote controller and control panel. Enter: Confirm and select function options Menu: Press to display OSD menu. Press again to exit it. Auto: Run the auto image adjustment function. Blank: Pause the image projection, i.e. the projection image is masked.Press again to resume the projection. Source: The signal source menu displays.Press to display signal source in the projection screen. Tool: See user manual included with the products you want to use together with your Crestron equipment for its setup Info: Display current projector status and Crestron setup. Control projector with the PJLink protocol PJLink is a standard designed by the Japan Business Machine and Information System Industries Association (JBMA) for controlling projectors with genuine commands.A PJLink standard compliant projector from any supplier can be controlled with these genuine commands.This product supports PJLink control commands. Please set up password for PJLink connection in this page. PJLink Security Password : Select On to enable PJLink password or Off to disable it. : Set up password at length up to 32 characters. For details on PJLink standard commands and connection methods, please visit the PJLink official web site. Control projector with TCP/IP communication protocol This projector supports TCP/IP communication protocol which enables you to send RS-232 operation commands or simulated IR commands to control projectors connected with RJ45 cable via terminal connection application software, e.g. Tera Term.Please set up IP address and port number with the terminal connection application software before controlling your projector with TCP/IP communication protocol: IP Address: IP address of projector Port: Please set transmission port number to 7000 See the section on serial interface RS-232 control commands for details on RS-232 operation commands or simulated IR commands. 17 DDU6871/DW6851/DX6831 DLP Projector Remote Communication Manual About the VIVITEK support If you cannot find solutions from this user guideline, please contact us using the contact information below: North America Vivitek Service Center 15700 Don Julian Road, Suite B City of Industry, CA. 91745 U.S.A Tel: 855-885-2378 (Toll-Free) Email: [email protected] URL: www.vivitekusa.com Europe and Africa Vivitek Service & Support Zandsteen 15 2132 MZ Hoofddorp The Netherlands Tel: +31 20 655 0960 Email: [email protected] URL: www.vivitek.eu China Vivitek Service Center 201209, Room 1802, 18/F, Cimic Tower, No.1090, Century Avenue, Pudong, Shanghai Tel: 400-888-3526 (Toll-Free) Tel: 021-58360088-142 (Direct) Email: [email protected] URL: www.vivitek.com.cn Asia and Taiwan VIVITEK after-sales service Vivitek Corporation, Co., Ltd. 4F., No.186, Ruiguang Rd., Neihu Dist., Taipei City 11491 TEL: 86-28-797-2088 FAX: 86-26-600-2358 E-mail: [email protected] URL: www.vivitek.com.tw 18