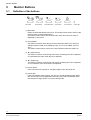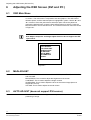
1
15”/17” CCTV Colour Monitor
User Manual
Fire & Security Products
Siemens Building Technologies
Liefermöglichkeiten und technische Änderungen vorbehalten.
Data and design subject to change without notice. / Supply subject to availability.
© 2004 Copyright by
Siemens Building Technologies AG
Wir behalten uns alle Rechte an diesem Dokument und an dem in ihm dargestellten Gegenstand vor. Der Empfänger erkennt diese Rechte
an und wird dieses Dokument nicht ohne unsere vorherige schriftliche Zustimmung ganz oder teilweise Dritten zugänglich machen oder
außerhalb des Zweckes verwenden, zu dem es ihm übergeben worden ist.
We reserve all rights to this document and to the subject thereof. By accepting the document, the recipient acknowledges these rights and
undertakes not to publish the document or the subject thereof in full or in part, and will not make these available to any third party without
our prior express written authorization, and will not use these for any purpose other than that for which they were delivered to him.
Contents
FCC Requirements....................................................................................................5
1
Product Safety Precautions ...................................................................6
2
Introduction .............................................................................................7
3
3.1
3.2
3.2.1
3.2.2
Hardware Installation..............................................................................8
Unpacking .................................................................................................8
Installation .................................................................................................8
Hardware Installation ................................................................................8
Connection ................................................................................................9
4
4.1
The Display Timing of PC Mode ..........................................................11
Applicable video timing for PC- analog video .........................................11
5
5.1
5.2
Monitor Buttons ....................................................................................12
Definition of the buttons ..........................................................................12
Screen Adjustment Operation Procedure ...............................................13
6
6.1
6.2
6.3
6.4
6.5
6.6
6.7
6.8
6.9
Adjusting the OSD Screen (DVI and PC ) ...........................................14
OSD Main Menu......................................................................................14
MAIN ADJUST ........................................................................................14
AUTO ADJUST (does not support DVI source)......................................14
COLOR ADJUST ....................................................................................15
IMAGE ADJUST (does not support DVI source) ....................................15
PIP (Picture In Picture) SETTING...........................................................15
SETUP MENU.........................................................................................15
INFORMATION .......................................................................................16
RECALL ..................................................................................................16
7
7.1
7.2
7.3
7.4
7.5
7.6
7.7
7.8
Adjusting the OSD Screen (AV Equipment) .......................................17
OSD Main Menu......................................................................................17
MAIN ADJUST ........................................................................................17
COLOR ADJUST ....................................................................................17
SCAN SETTING......................................................................................18
MOTION SETTING .................................................................................18
VOV (Video On Video) SETTING ...........................................................18
SETUP MENU.........................................................................................18
RECALL ..................................................................................................18
8
Troubleshooting Tips ...........................................................................19
9
Specifications........................................................................................20
10
10.1
10.2
10.2.1
10.2.2
10.2.3
10.2.4
Appendix................................................................................................21
Safety Guidelines ....................................................................................21
Important notice concerning power cord selection .................................21
Compliance Information for the U.S.A. ...................................................23
FCC Warning ..........................................................................................23
CE Conformity for Europe.......................................................................23
EMC - Declaration Of Conformity ...........................................................24
3
Siemens Building Technologies
Fire & Security Products
1715 Monitor UG_EN.doc
06.2004
Product Safety Precautions
Caution and Warning
CAUTION !!
RISK OF ELECTRIC SHOCK
DO NOT OPEN
CAUTION: To reduce the risk of electric shock, do not
remove cover (or back).
No internal parts can be serviced by users.
Refer servicing to qualified personnel
Warning
TO PREVENT FIRE OR SHOCK HAZARD, DO NOT EXPOSE THIS MONITOR
TO RAIN OR MOISTURE.
“HIGH VOLTAGE EXISTS ON THE BACK LIGHT POWER LEAD OF THIS
MONITOR. BEFORE SERVICING, DETERMINE THE PRESENCE OF HIGH
VOLTAGE BY CONNECTING THE H.V. METER BETWEEN THE BACK LIGHT
POWER LEAD AND CHASSIS ONLY.“
4
Siemens Building Technologies
Fire & Security Products
1715 Monitor UG_EN.doc
06.2004
Product Safety Precautions
FCC Requirements
This device complies with Part 15 of the FCC Rules and Regulations. Operation is
subject to the following two conditions: (1) This device may not cause harmful
interference, and (2) this device must tolerate any interference encountered,
including interference that may cause improper operation.
The equipment has been tested and found to comply with the requirements
stipulated in Part 15 of FCC regulations for a Class B digital device. These
requirements are designed to provide reasonable protection against harmful
interference in a residential installation. This equipment generates, uses and can
radiate radio frequency energy and, if not installed and used in strict compliance
with the instructions, may disrupt radio communications. However, there is no
guarantee that interference will not occur in a particular installation. If this
equipment does cause detrimental interference with radio or television reception,
which can be determined by turning the equipment off and on, the user is
encouraged to try to correct the interference by taking one or more of the following
measures:
•
Reorienting or relocating the receiving antenna.
•
Increasing the separation between the equipment and the receiver.
•
Connecting the equipment into an outlet on a circuit different from that to which
the receiver is connected.
•
Consulting the dealer or an experienced radio/TV technician for help.
Shielded interconnected cables and shielded power cords must be used with this
equipment to ensure compliance with the pertinent RFD emission limits governing
this device.
Changes or modifications not expressly approved by the manufacturer could void
the user’s right to operate the equipment.
Notice of Compliance with Canadian Interference-causing Equipment
Regulations
This Class B digital apparatus meets all requirements of the Canadian
Interference-Causing Equipment Regulations.
Cet appareil numérique de classe B satisfait toutes les exigences des
réglementations canadiennes inhérentes aux équipements générant des
interférences.
5
Siemens Building Technologies
Fire & Security Products
1715 Monitor UG_EN.doc
06.2004
Product Safety Precautions
1
Product Safety Precautions
Follow all warnings and instructions marked on the product.
Do not use this product near water.
This display should be installed on a stable horizontal base.
When cleaning, use only a neutral detergent cleaner with a soft damp cloth. Do
not spray with liquid or aerosol cleaners.
Do not expose this monitor to direct sunlight or heat. Hot air may cause damage to
the cabinet and other parts.
Adequate ventilation must be maintained to ensure reliable and continued
operation and to protect the monitor from overheating. Do not block ventilation
slots and openings with objects or install the monitor in a place where ventilation
may be obstructed.
Do not install this monitor near a motor or transformer where strong magnetism is
generated. Images on the monitor will be distorted and the color irregular.
Do not allow metal pieces or objects of any kind fall into the monitor through
ventilation holes.
Do not attempt to service this unit yourself. Removal of the monitor cover may
expose you to dangerous voltage or other hazards. Refer all servicing to qualified
service personnel.
Unplug this product from the wall outlet and refer servicing to qualified service
personnel in the event that:
1. Liquid is spilled into the product or the product is exposed to rain or water.
2. The product does not operate normally when the operating instructions are
followed.
3. The product has been dropped or the cabinet has been damaged.
4. The product exhibits a distinct change in performance, indicating a need for
service.
5. The power cord or plug is frayed or damaged.
6
Siemens Building Technologies
Fire & Security Products
1715 Monitor UG_EN.doc
06.2004
Introduction
2
Introduction
Welcome to a fantastic new technology whichwill completely change the way you
view monitors. The following sections describe just a few of the major advantages
of this LCD monitor. You’ll discover more of its wonderful features as you use it.
1. Low radiation and reduced flickering compared to the traditional CRT monitors
minimize hazards to your health.
2. Its compact size requires only minimal desktop space. This makes
transportation easier and, combined with the aforementioned properties,
facilitates use in nearly any environment.
3. The LCD monitor uses little power, thus reducing power bills and protecting
natural resources.
4. The special design of the LCD cabinet is both attractive and ergonomic.
5. The LCD monitor is used in the same way as the CRT monitor. There is no need
to change the hardware of your computer: just plug it in and it is ready for use.
6. This LCD monitor can accept PC-analog, PC-DVI, composite and S-video signals.
7. The composite video input and S-video ports accept different signal sources,
e.g. VCR, DVD player, etc.
8. The unit is equipped with VESA wall and RACK mounting functions.
9. This monitor supports some special functions for video/audio application: PIP
(Picture In Picture), VOV (Video On Video), 3D comb filter, de-interlace,
overscan, auto impedance switch for looping video connection and looping
audio connection.
7
Siemens Building Technologies
Fire & Security Products
1715 Monitor UG_EN.doc
06.2004
Hardware Installation
3
Hardware Installation
This chapter will guide you through the correct installation procedures for the LCD
monitor.
3.1
Unpacking
When you unpack your LCD monitor, make sure the following items are included in
the box and are in good condition. If you find that any of these items are damaged
or missing, please contact your dealer immediately.
3.2
•
One LCD monitor mounted on its stand
•
AC power cord
•
This user manual
•
PC DVI-A to D-sub 15-pin cable
Installation
This LCD monitor DOES NOT require any special drivers.
For PC system applications with a DVI-D & D-sub analog input source, the
necessary drivers are supplied by the video card manufacturer and may be found
on the diskettes supplied with the video card that came with your computer.
Windows 98/XP/2000 drivers for both the display and the video card are supplied
on the Windows 98/XP/2000 CD or diskettes. Unfortunately, Microsoft did not
provide a complete listing of the monitors at the time of the initial retail release. You
may use the standard SXGA (1280X1024) for 17” LCD monitors and XGA
(1024x768) for 15” LCD monitors as the monitor type. The video card must also be
set up correctly in Windows 98/XP/2000. Make sure that the video output of the
VGA card is listed in Section 6.1 or check your video card manual or Windows
98/XP/2000 “Read Me” file for further information on the video card. After these
issues have been resolved, continue the setup procedure as described below.
3.2.1
Hardware Installation
1.
2.
3.
4.
Before connecting any devices, please make sure that your monitor and all
other equipment are turned off.
Place the monitor on a stable horizontal surface such as a table or a desk.
Attach the power cable to the monitor and then to a power outlet.
The LCD monitor comes with two video cables (D-sub 15-pin to DVI-I 29-PIN
and DVI-D 24-pin to 24-pin) for computer video applications; one each for
analog and digital signals.
8
Siemens Building Technologies
Fire & Security Products
1715 Monitor UG_EN.doc
06.2004
Hardware Installation
5.
6.
7.
3.2.2
Example:
a). Analog signal (D-sub 15-pin to DVI-A 29-pin cable):
Connect the DVI-A connector to the DVI input at the back of the monitor,
then connect the D-sub 15-pin connector at the back of computer.
b). Digital signal (DVI-D 24-pin to DVI-D 24-pin cable)
Connect one end of the signal cable to the DVI input on the rear of the
monitor, and connect the other end to the DVI connector to the rear of
computer.
Tighten the screws of the monitor cable until the connectors are fastened securely.
Alternatively, connect the composite signal (video, S-video) cable from the
back of the video unit to the back of the monitor.
Switch on the power supply to the computer system or AV equipment, then to
the LCD monitor.
Connection
A
B
C
D
E
A.
Composite (AV) video input and output:
There are two sets of AV video inputs and outputs that can be used. This
monitor also suipports the “auto looping” function, permitting the connection of
another monitor from the output connectors.
1 is for the AV 1 video connector, 2 is for the AV 2 video connector.
IN is for the AV video input. Connect the “yellow” (video) connector from the
AV equipment to the monitor.
OUT is for the AV video output. Connect the “yellow” (video) connector from
this monitor to the input connector of another equipment.
B.
Composite (AV) audio input and output:
R is for the right channel (red) of the audio connector, L is for the left channel
(white) of the audio connector.
IN is for the AV audio input. Connect the audio connector from the AV
equipment to the monitor.
OUT is for the AV audio output. Connect the audio connector from the monitor
to the input connector of another AV equipment.
There are some connection methods for stereo/mono and input/output
applications. Please refer to below application table.
R-IN
L-IN
R-OUT
L-OUT
Mono
AV1 R (Red)
AV2 R (Red)
AV1 R (Red)
AV2 R (Red)
Mono
AV1 L (White)
AV2 L (White)
AV1 L (White)
AV2 L (White)
Stereo
AV1 R (Red)
AV1 L (White)
AV1 R (Red)
AV1 L (White)
Stereo
AV2 R (Red)
AV2 L (White)
AV2 R (Red)
AV2 L (White)
9
Siemens Building Technologies
Fire & Security Products
1715 Monitor UG_EN.doc
06.2004
Hardware Installation
Mono sound application:
1. Input: Connect one of the AV1/AV2 audio cables (R or L) from the AV
equipment to R-IN or L-IN.
2. Output: Connect from R-OUT or L-OUT to the input of AV equipment.
NOTE:
If you connect the audio cables of AV1 and AV2 to R-IN and L-IN
simultaneously, the sound of AV1 and AV2 will be transmitted to the
speakers at the same time.
Stereo sound application:
1. Input: Connect only one set of AV audio cables to R-IN and L-IN.
2. Output: Connect from R-OUT and L-OUT to the input of the AV
equipment.
C.
S-video input:
1. Connect the S-video (4-pin DIN) connector (labeled “S”) from the AV
equipment to the monitor.
2. Connect the red (R) and white (L) audio jacks from the AV equipment to
the monitor.
D.
PC Audio line input
E.
DVI connector
10
Siemens Building Technologies
Fire & Security Products
1715 Monitor UG_EN.doc
06.2004
The Display Timing of PC Mode
4
The Display Timing of PC Mode
4.1
Applicable video timing for PC- analog video
The following table lists the better display quality modes for analog signal (PC)
supported by this LCD monitor. If other video modes are input, the monitor will stop
working or display unsatisfactory picture quality.
Mode
Resolution
DOS
720x400@70 Hz
640x480@60 Hz
640x480@72 Hz
640x480@75 Hz
800x600@56 Hz
800x600@60 Hz
800x600@72 Hz
800x600@75 Hz
1024x768@60 Hz
1024x768@70 Hz
1024x768@75 Hz
1152x864@75 Hz
1280x1024@60 Hz
1280x1024@75 Hz
VGA
SVGA
XGA
**
SXGA
EGA
DOS
VGA
XGA
640x350@70 Hz
720x400@70 Hz
640x480@60 Hz
1024x768@72 Hz
VGA
SVGA
XGA
640x480@60 Hz
832x624@75 Hz
1024x768@75 Hz
VESA MODES
Horizontal
Nominal
Total
Frequency
+/- 0.5 kHz
900x449
31.469
800x525
31.469
832x520
37.861
840x500
37.500
1024x625
35.156
1056x628
37.879
1040x666
48.077
1056x625
46.875
1344x804
48.363
1328x806
56.476
1312x800
60.023
1600x900
67.500
1688x1066
63.981
1688x1066
79.976
IBM MODES
800x449
31.469
900x449
31.469
800x525
31.469
1304x798
57.515
MAC MODES
800x525
31.469
1152x667
49.725
1328x804
60.241
Vertical
Nominal
Frequency
+/- 1 Hz
70.087
59.940
72.809
75.000
56.250
60.017
72.188
75.000
60.004
70.069
75.029
75.000
60.020
75.025
Nominal
Pixel Clock
(MHz)
28.322
25.175
31.500
31.500
36.000
40.000
50.000
49.500
65.000
75.000
78.750
108.00
108.00
135.00
70.086
70.087
59.940
72.1
25.175
28.322
25.175
75.000
59.940
74.551
74.927
25.175
57.283
80.000
**Note: SXGA modes are not supported by the 15” LCD monitor.
11
Siemens Building Technologies
Fire & Security Products
1715 Monitor UG_EN.doc
06.2004
Monitor Buttons
5
5.1
Monitor Buttons
Definition of the buttons
Menu/Exit
Source/Enter
Down/Decrease
Up/Increase
Power Switch
Power LED
1) Menu/Exit:
Enters the OSD adjustment main menu. This button is also used to return to the
previous menu or submenusubmenu.
This button is also used to exit the OSD main menu when the main menu is
displayed on the screen.
2) Source/Enter:
This button is used to select the input source when the OSD is off. The input
changes must be made in the following order: AV1, AV2, S-VIDEO, DVI, PC,
AV1….
This button is also used to confirm the current selection when the OSD is on.
3) ▼/- (Adjust down)
This button is used to scroll through the screen containing items to be adjusted,
or to decrease the value of the item to be adjusted.
4) ▲/+ (Adjust up)
This button is used to scroll through the screen containing items to be adjusted,
or to increase the value of the item to be adjusted.
5) Power Switch
Press once to turn the power on, and press again to turn the power off.
6) Power LED
If the LED indicator lamp is green, the unit is in normal operating mode. When
DVI and PC input source applications are being used, the LED indicator lamp
will change to orange when it is in power-saving mode.
12
Siemens Building Technologies
Fire & Security Products
1715 Monitor UG_EN.doc
06.2004
Monitor Buttons
5.2
Screen Adjustment Operation Procedure
1) This screen is used for making adjustments.
In normal operating mode, press the Menu/Exit button to enter the main menu,
which contains adjustment options.
2) Select the option you want.
Use either of the two ▲/+,▼/- buttons to move the cursor up and down to select
your desired option. After selecting your desired option, press the Source/Enter
button to enter the submenu for adjusting items.
3) Change the value you wish to adjust.
After entering the submenu, use the ADJUST ▲/+,▼/- buttons to increase or
decrease the value to be adjusted.
4) Save file
After you have made the adjustment, the volume or setting will be automatically
saved to the monitor's memory.
5) Exit the main menu
Press the “Menu/Exit” button once to exit the main menu. If the Menu/Exit
button is not pressed, the monitor will automatically exit the adjusting screen
after a preset time (in seconds).
13
Siemens Building Technologies
Fire & Security Products
1715 Monitor UG_EN.doc
06.2004
Adjusting the OSD Screen (DVI and PC )
6
Adjusting the OSD Screen (DVI and PC )
6.1
OSD Main Menu
After the Menu/Exit button is pressed for the first time, the main menu will appear
on screen. The main menu is composed of text and graphics. The OSD shows
different options, and the selected option is highlighted in yellow. Use the ▲/+ and
▼/- buttons to move the yellow bar to select the option. When the yellow bar
reaches the desired option, press the Source/Enter button to select it. Press the
Menu/Exit button once to exit this menu. The contents of the main menu are shown
in Figure 6-1.
NOTE:
Auto Adjust, Sharpness and Image Adjust functions do not support the DVI
input source.
MAIN MENU
MAIN ADJUST
AUTO ADJUST
COLOR ADJUST
IMAGE ADJUST
PIP SETTING
SETUP MENU
INFORMATION
RECALL
Figure 6-1
6.2
MAIN ADJUST
There are four items on this submenu: BRIGHTNESS, CONTRAST, SHARPNESS
and VOLUME.
BRIGHTNESS: This is used to adjust the brightness of the screen.
CONTRAST: This is used to adjust the image contrast.
SHARPNESS: This is used to adjust the focus of the screen image (does not
support DVI source).
VOLUME: This is used to adjust the sound volume.
6.3
AUTO ADJUST (does not support DVI source)
This is used for automatic configuration of the phase, clock, vertical and horizontal
positioning of image.
14
Siemens Building Technologies
Fire & Security Products
1715 Monitor UG_EN.doc
06.2004
Adjusting the OSD Screen (DVI and PC )
6.4
COLOR ADJUST
The option “Color Adjust” in the main menu contains a submenu of options, which
is used to set the color of the screen. The submenu includes 3 color settings:
“9300K”, “6500K” and “User Color” (including RED, GREEN and BLUE).
The option “9300K” adds blue to the screen image for cooler white.
The option “6500K” adds red to the screen image for warmer white and richer red.
The option “RED” is used to increase the red color.
The option “GREEN” is used to increase the green color.
The option “BLUE” is used to increase the blue color.
6.5
IMAGE ADJUST (does not support DVI source)
This contains a submenu of options used to adjust the screen position and video
quality. The contents of the submenu include 4 options: “H-Position”, “V-Position”,
“Phase” and “Clock”.
The option “H-POSITION” is used to adjust the horizontal position of the image.
The option “V-POSITION” is used to adjust the vertical position of the image.
The option “Phase” is used to reduce horizontal stripingin the screen image.
The option “Clock” is used to reduce vertical striping in the screen image.
6.6
PIP (Picture In Picture) SETTING
The option “PIP setting” contains a submenu of options for adjusting the PIP
setting. The submenu includes five options: “PIP”, “PIP source”, “PIP H-position”,
“PIP V-position” and “Ratio”. The main image source of the PIP function is the DVI
or PC.
The option “PIP” is used to enable or disable PIP function.
The option “PIP source” is used to select the source signal between AV1, AV2, and
S-VIDEO.
The option “PIP H-position” is used to adjust the PIP horizontal position of the
image.
The option “PIP V-position” is used to adjust the PIP vertical position of the image.
The option “Ratio” is used to select the subvideo size ratio 1, 2, 3.
6.7
SETUP MENU
The “Setup” menu includes 4 additional items for providing more options for OSD
setup and other accessory items. The submenu contains 4 options: “Select
Language”, “OSD H-Position”, “OSD V-Position” and “OSD Timeout”.
”Select Language” can be used to select from the following eight languages:
English, French, German, Spanish, Italian, Polish, Czech and Swedish.
“OSD H-Position” is used to set up the horizontal position of the OSD menu.
“OSD V-Position” is used to set up the vertical position of the OSD menu.
“OSD Timeout” is used to set the timeout of the OSD Menu. There are seven
options for the automatic timeout: 5, 10, 15, 20, 30, 45 and 60 seconds.
15
Siemens Building Technologies
Fire & Security Products
1715 Monitor UG_EN.doc
06.2004
6.8
INFORMATION
The “INFORMATION” menu provides the user with detailed information regarding
the version, resolution, H-FREQ and V-FREQ.
6.9
RECALL
The option “Memory Recall” returns the monitor to its factory default settings.
NOTE:
If there is no operation or automatic adjustment within the set time, the
screen will be closed automatically.
16
Siemens Building Technologies
Fire & Security Products
1715 Monitor UG_EN.doc
06.2004
Adjusting the OSD Screen (AV Equipment)
7
Adjusting the OSD Screen (AV Equipment)
7.1
OSD Main Menu
After the Menu/Exit button is pressed initially, the main menu will appear on the
screen. The main menu is composed of text and graphics. The OSD shows
different options, and the selected option is highlighted in yellow. Use the ▲/+ and
▼/- buttons to move the yellow bar to select the option. When the yellow bar
reaches the desired option, press the Source/Enter button to select it. Press the
Menu/Exit button once to exit this menu. The contents of the main menu are shown
in Figure 7-1.
MAIN MENU
MAIN ADJUST
COLOR ADJUST
SCAN SETTING
MOTION SETTING
VOV SETTING
SETUP MENU
RECALL
EXIT MENU
Figure 7-1
7.2
MAIN ADJUST
There are seven items on this submenu: BRIGHTNESS, CONTRAST,
SHARPNESS, SATURATION, TINT, 3D COMB and VOLUME.
BRIGHTNESS: This is used to set the brightness of the screen.
CONTRAST: This is used to adjust the image contrast.
SHARPNESS: This is used to adjust the clarity of the screen image.
SATURATION: This is used to adjust the color density.
TINT: This is used to adjust the color tint (NTSC only).
3D COMB: This is used to enable or disable the 3D comb filter function. (NTSC
only)
VOLUME: This is used to adjust the sound volume.
7.3
COLOR ADJUST
The option “Color Adjust” in the main menu contains a submenu of options, which
is used to set the color of the screen. The submenu includes three color settings:
“9300K”, “6500K” and “User Color” (including RED, GREEN and BLUE).
Select the option “9300K” to add blue to the screen image for cooler white.
Select the option “6500K” to add red to the screen image for warmer white and
richer red.
The option “RED” is used to increase the red color.
The option “GREEN” is used to increase the green color.
The option “BLUE” is used to increase the blue color.
17
Siemens Building Technologies
Fire & Security Products
1715 Monitor UG_EN.doc
06.2004
Adjusting the OSD Screen (AV Equipment)
7.4
SCAN SETTING
There are two screen size settings on this function: OVER and UNDER.
“Over” is used to expand the screen size to 5% larger than the normal screen.
“Under” is used to select the normal screen size.
7.5
MOTION SETTING
There are two options for this setting: STILL and MOTION.
The option “Still” is used to disable the de-interlace function.
The option “Motion” is used to enable the de-interlace function.
7.6
VOV (Video On Video) SETTING
The option “VOV setting” in the main menu contains a submenu of options for
adjusting the VOV setting. The submenu includes six options: “VOV“, “SUB
SOURCE SELECT”, “SUB H-POSITION”, “SUB V-POSITION”, “RATIO” and
“EXCHANGE”.
The option “VOV “ is used to enable the VOV function.
The option “Sub Source Select” is used to select the source signal between
AV1, AV2, and S-VIDEO.
The option “Sub H-Position” is used to vary the horizontal position of the sub video.
The option “Sub V-Position” is used to vary the vertical position of the sub video.
The option “Ratio” is used to select the sub video size ratio 1,2, 3.
The option “Exchange” is used to exchange the video source between main
video and sub video source directly.
7.7
SETUP MENU
The “Setup” menu includes 4 additional items for providing more options for OSD
setup and other accessory items. The submenu contains 4 options: ”Select
Language”, “OSD H-Position”, “OSD V-Position” and “OSD Timeout”.
”Select Language” can be used to select from the following eight languages:
English, French, German, Spanish, Italian, Polish, Czech and Swedish.
“OSD H-Position” is used to set up the horizontal position of the OSD menu.
“OSD V-Position” is used to set up the vertical position of the OSD menu.
“OSD Timeout” is used to set the timeout of the OSD Menu. There are seven
options for the automatic timeout: 5, 10, 15, 20, 30, 45 and 60 seconds.
7.8
RECALL
The option “Recall” returns the monitor to its factory default settings.
NOTE:
If there is no operation or automatic adjustment during the setting interval,
the screen will be closed automatically.
18
Siemens Building Technologies
Fire & Security Products
1715 Monitor UG_EN.doc
06.2004
Troubleshooting Tips
8
Troubleshooting Tips
In the event that you experience trouble with your monitor, check the following
items before contacting the dealer from whom the monitor was purchased. The
most common problems usually involve an incorrect connection from the video
card or AV equipment to the monitor. We recommend that you also consult your
user manuals for your video card or AV equipment during the troubleshooting
procedure. Do not exceed the maximum refresh rate recommended for the
monitor.
Problem
No image on
display screen
Abnormal image.
Colors of image
on screen are
abnormal
Disturbances on
Screen
Can hear sound
but no picture is
visible
Can see picture
but no sound is
audible
Troubleshooting Tip
1. Check that the power cord of the computer or AV
equipment has been connected securely to the wall outlet
or grounded extension cable or strip.
2. Check that the monitor power switch is “on” and the LED
on the front of the monitor is lit.
3. Check that the video (signal) cable from the computer or
AV equipment has been connected correctly and securely.
4. Check to ensure that the video card is firmly seated in the
card slot of of the computer’s motherboard.
5. Check that the video input from the video card falls within
the timing range (listed in the table of section 4) of the
monitor.
1. Check to ensure that the video input from the video card
falls within the timing range (listed in the table of section 4)
of the monitor.
2. Check to ensure that the video (signal) cable from the
computer or AV equipment has been securely and
correctly connected to the connector at the back of the
monitor.
1. Check to ensure that the video (signal) cable from the
monitor has been securely and correctly connected to the
DVI, AV, and S-video connector at the back of the
computer.
1. OSD adjustment is incorrect. Please consult section 5 for
OSD screen adjustment procedures.
1. Make sure that both video inputs (AV/ S-video and RGB)
are correctly connected.
1. Make sure that both audio inputs are connected properly.
The audio input connectors have AV/ S-video/PC line in.
2. Check to see whether the volume is turned all the way
down.
19
Siemens Building Technologies
Fire & Security Products
1715 Monitor UG_EN.doc
06.2004
Specifications
9
Specifications
Model No.
CMTC1515
CMTC1715
LCD panel type
Pixel dimension (HxV)
Resolution (Max.)
LCD display color
Frequency Range of
analog input
H Sync:
V Sync:
Input video signal
15.0" TFT LCD
0.297 mm x 0.297 mm
XGA 1024 x 768
16.7M colors
17.0" TFT LCD
0.264 mm x 0.264 mm
SXGA 1280 x 1024
16.7M colors
Input terminals
Output video
Output audio
Regulation
Power Management
AC power
Temperature
Plug & Play
Tilt
Dimensions (HxLxW)
Weight (monitor only)
31.5 kHz ~ 60 kHz
31.5 kHz ~ 80 kHz
56.0 Hz ~ 75.0 Hz
56.0 Hz ~ 75.0 Hz
1. Video analog RGB 0.7 Vp-p. 75 ohms sync. TTL
Level, positive/negative, separate sync.
2. DVI : REV1.0 digital : Single T.M.D.S (Transition
Minimized Differential Signaling)
3. AV/S-VIDEO: 1Vp-p. (0.7V video+ 0.3V sync.), 75
ohms.
1. Computer signal: DVI-I 29-pin x 1
2. Computer audio: Mini stereo jack (Ø 3.5mm) x 1
3. Video image : BNC x 2
4. S-video image : x 1
5. Audio : RCA jack x 4
6. AC power input x 1
Two BNC connectors for
video loop-through
Two RCA jacks
CUL, TUV/GS, FCC-B, CE
Yes
AC 100~240V, 50/60 Hz
Operation: 5° ~ 35°C ,
Storage: -25° ~ 60°C
DDC 2B
-5° ~ +20°
335x349x160 mm
380x374x160 mm
6.0 kg
8.5 kg
20
Siemens Building Technologies
Fire & Security Products
1715 Monitor UG_EN.doc
06.2004
Appendix
10
Appendix
10.1
Safety Guidelines
10.2
WARNING
This device must be operated with the original power supply, part number: LI
SHIN 0219B1280 or LINEARITY LAD10PFKB6.
CAUTION
The socket outlet should be installed near the equipment and should be easily
accessible.
CAUTION
Use a power cable that is properly grounded. Always use the appropriate AC
cord that is certified for the individual country. Some examples are listed below:
USA………..UL
Switzerland…….SEV
Canada……CSA
Britain…………..BASE/BS
Germany…..DE
Japan…………...Electric Appliance Control Act.
Important notice concerning power cord selection
The power cord set for this unit has been enclosed and has been selected
according to the country of destination. It must be used to prevent electric shock.
Use the following guidelines if it is necessary to replace the original cord set, or if
the cord set is not enclosed.
The female receptacle of the cord set must meet IEC-60320 requirements and may
look like this (Figure A1 below):
Figure A1
Figure A2
FOR THE UNITED STATES AND CANADA
In the United States and Canada the male plug is a NEMA5-15 style (Figure A2),
UL Listed, and CSA Labeled. For units which are mounted on a desk or table, SVT
or SJT type cord sets may be used. For units which sit on the floor, only SJT type
cord sets may be used. The cord set must be selected according to the current
rating for your unit. Please consult the table below for the selection criteria for
power cords used in the United States and Canada.
Code Type
Size of Conductors in Cord
Maximum Current Rating of Unit
SJT
18 AWG
16 AWG
14 AWG
10 Amps
12 Amps
12 Amps
SVT
18 AWG
17 AWG
10 Amps
12 Amps
21
Siemens Building Technologies
Fire & Security Products
1715 Monitor UG_EN.doc
06.2004
Appendix
FOR EUROPEAN COUNTRIES
In Europe you must use a cord set which is appropriate for the receptacles in your
country. The cord set is HAR-Certified, and a special mark that will appear on the
outer sheath, or on the insulation of one of the inner conductors.
AC PLUG CORD PRECAUTIONS FOR THE UNITED KINGDOM
FOR YOUR SAFETY PLEASE READ THE FOLLOWING TEXT CAREFULLY.
IF THE FITTED MOLDED PLUG IS UNSUITABLE FOR THE SOCKET OUTLET,
THEN THE PLUG SHOULD BE CUT OFF AND DISPOSED OF SAFELY.
THERE IS A DANGER OF SEVERE ELECTRICAL SHOCK IF THE
PLUG WHICH HAS BEEN CUT OFF IS INSERTED INTO AN APPROPRIATE
SOCKET.
If a new plug is to be fitted, please observe the wiring code as shown below. In
case of doubt, please consult a qualified electrician.
WARNING
THIS APPLIANCE MUST BE (EARTHED (GROUNDED).
IMPORTANT: The wires in this mains lead are colored in accordance with the
following code:
Green-and-Yellow : Ground (Earth)
Blue : Neutral
Brown : Live
If the colored wires of the mains lead of this appliance do not correspond with the
colored markings identifying the terminals in your plug, proceed as follows:
The wire which is colored GREEN-AND-YELLOW must be connected to the
terminal in the plug which is marked by the letter E or by the Earth symbol or
colored GREEN or GREEN-AND-YELLOW.
The wire which is colored BLUE must be connected to the terminal in the plug
which is marked with the letter N or colored BLACK. The wire which is colored
BROWN must be connected to the terminal in the plug which is marked with the
letter L or colored RED.
If you have any questions concerning the proper power cord to use, please consult
the dealer from whom you purchased the product.
22
Siemens Building Technologies
Fire & Security Products
1715 Monitor UG_EN.doc
06.2004
Appendix
10.2.1 Compliance Information for the U.S.A.
The equipment has been tested and found to comply with the requirements for a
Class B digital device, pursuant to part 15 of the FCC Rules. These requirements
are designed to provide reasonable protection against harmful interference in a
residential installation. This equipment generates, uses, and can radiate radio
frequency energy, and if not installed and used in accordance with the instructions,
may cause harmful interference to radio communications.
However, there is no guarantee that interference will not occur in a particular
installation. If this equipment does cause harmful interference to radio or television
reception, which can be determined by turning the equipment off and on, the user
is encouraged to try to correct the interference by taking one or more of the
following measures:
• Reorienting or relocating the receiving antenna.
• Increasing the separation between the equipment and receiver.
• Connecting the equipment to an outlet on a circuit different from that to which
the receiver is connected.
• Consulting the dealer or an experienced radio/TV technician for help.
10.2.2 FCC Warning
To ensure continued FCC compliance, the user must use a grounded power supply
cord and the shielded video interface cable with bonded ferrite cores provided. If a
BNC cable is going to be used, use only a shielded BNC (5) cable. Also, any
unauthorized changes or modifications not expressly approved by the party
responsible for compliance could void the user’s authority to operate this device.
10.2.3
CE Conformity for Europe
The device complies with the requirements of the ECC directive
89/336/EEC as amended by 92/31/EEC and 93/68/EEC Art.5
with regard to “Electromagnetic compatibility”, and 73/23/EEC as
amended by 93/68/EEC Art.13 with regard to “Safety”.
23
Siemens Building Technologies
Fire & Security Products
1715 Monitor UG_EN.doc
06.2004
Appendix
10.2.4 EMC - Declaration Of Conformity
For the equipment :
Model designation/Trade name :
15/17 inch CCTV color monitor
CMTC1515/CMTC1715
it is herewith confirmed that this equipment complies with the requirements set out
in the Council Directive on the Approximation of the Laws of the Member States
relating to Electromagnetic Compatibility Directive (89/336/EEC, amended by
92/31/EEC). For the evaluation regarding the Electromagnetic Compatibility
(89/336/EEC, amended by 92/31/EEC and 93/68/EEC), the following standards are
applied :
RFI Emission:
EN55022 : 1998 Class B: Generic emission standard
EN61000-3-2 : 1995 Class D:
Limits for harmonic current emission
Amendment 1: 1998
Amendment 2: 1998
EN61000-3-3: 1995 :
Limitation of voltage fluctuation and flicker in
low voltage supply systems.
Immunity :
EN55024: 1998
Generic immunity standards.
The following manufacturer/importer or authorized representative established
within the EU is responsible for this declaration.
Company name: Siemens Building Technologies
Fire & Security Products GmbH & Co. oHG
Address:
D-76181 Karlsruhe
24
Siemens Building Technologies
Fire & Security Products
1715 Monitor UG_EN.doc
06.2004
Issued by:
Siemens Building Technologies
Fire & Security Products GmbH & Co. oHG
D-76181 Karlsruhe
www.sbt.siemens.com/FSP
Part no.
A24205-A336-S510
Edition
06.2004
© 2004 Copyright by
Siemens Building Technologies AG
Data and design subject to change without notice.Supply subject to
availability.Printed in the Federal Republic of Germany on environmentfriendly chlorine-free paper.