1
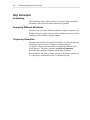
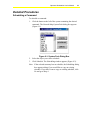
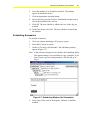
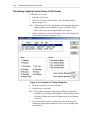
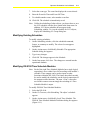
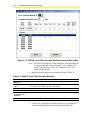
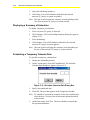
Operator Workstation User’s Manual
9-1
Chapter 9
Scheduling Commands and
Summaries
Introduction
This section describes scheduling commands and summaries. This
section describes how to:
•
schedule a command
•
copy a schedule
•
schedule Trend and Totalization
•
scheduling summaries
•
scheduling process triggers
•
schedule Lighting Control Group (LCG) events
•
view LCG scheduled events
•
modify LCG scheduled events
•
delete LCG scheduled events
•
modify schedules
•
modify DX-9100 Time Schedule Modules
•
clear schedules
•
print a summary of schedules
•
display a summary of schedules
•
schedule a temporary calendar date
•
modify a calendar date
© November 1, 2001 Johnson Controls, Inc.
Code No. LIT-120173
www.johnsoncontrols.com
9-2
Operator Workstation User’s Manual
Key Concepts
Scheduling
The Scheduling feature allows operators to specify when commands
and features take effect and when summaries are printed.
Assigning Different Schedules
Operators can create three different schedules: Regular, Alternate, and
Holiday. Operators assign each day in the calendar year to one of these
schedules in the Schedule Calendar window.
Temporary Schedules
Operators can schedule one-shot daily schedules. Use these Temporary
schedules for special events. Temporary schedules apply to
one specific calendar date only and are automatically deleted at the
end of that day. Temporary schedules override all commands
scheduled under Regular, Alternate, and Holiday schedules.
Each scheduled item (that is, object, system, or PC group) can have up
to 12 temporary schedule days with 32 schedules per day.
Operator Workstation User’s Manual
9-3
Detailed Procedures
Scheduling a Command
To schedule a command:
1.
Click the button to the left of the system containing the desired
command. The Network Map-System Peek dialog box appears
(Figure 9-1).
Figure 9-1: System Peek Dialog Box
2.
Select the object you want to schedule.
3.
Click Schedule. The Scheduling window appears (Figure 9-2).
Note: If the selected summary has no schedule, the Scheduling dialog
box appears asking if you would like to copy an existing
schedule. If you don’t want to copy an existing schedule, click
No and go to Step 4.
9-4
Operator Workstation User’s Manual
Figure 9-2: Scheduling Window
4.
Select a day of the week in the Regular, Alternate, or Holiday
schedule.
5.
On the Action menu, click Add Schedule Operation or Add
Schedule Communication option. The Schedule Operation or
Schedule Communication dialog box appears.
Note: The options in the dialog box are appropriate to the type of
object you are scheduling.
Figure 9-3: Schedule Communication-Analog Device
6.
Specify the type of command and specify the time you want the
command to take place.
Operator Workstation User’s Manual
7.
9-5
Click OK. The new scheduled command is added to the row of the
day you selected in Step 4.
Figure 9-4: Scheduling Window with Warnings Command
8.
On the Item menu, click Save. The new schedule is added to the
operational database
Copying a Schedule
To copy a schedule:
1.
Click the button to the left of the system containing the desired
object. The Network Map-System Peek dialog box appears
(Figure 9-1).
2.
Select the object to schedule for Trend or Totalization.
3.
Click Schedule. A dialog box appears saying that no schedule
exists, and asks you if you want to copy an existing schedule.
4.
Click Yes. The Schedule Copy dialog box appears (Figure 9-5).
Figure 9-5: Schedule Copy Dialog Box for an Object
9-6
Operator Workstation User’s Manual
5.
Select the system and object with the desired schedule.
Note: If you are copying a summary, there is only one list box. Select
the PC group or system to copy.
6.
Click OK. The object or summary Scheduling window appears
containing the same schedules as that of the object or summary
you copied.
Note: If you are copying the schedule of an analog object, both
objects must use the same engineering units.
7.
Make necessary modifications.
8.
On the Item menu, click Save.
Scheduling Trend and Totalization
To schedule Trend and Totalization:
1.
Click the button to the left of the system containing the object.
The Network Map-System Peek dialog box appears (Figure 9-1).
2.
Select the desired object to schedule for Trend or Totalization.
3.
Click Schedule. The Scheduling window appears (Figure 9-2).
Note: If the selected object has no schedule, the Scheduling dialog
box appears asking if you would like to copy a schedule. If you
don’t want to copy an existing schedule, click No and go to
Step 5.
4.
Select the desired day of the week.
5.
On the Action menu, click Add Schedule Trend or Add Schedule
Totalization. The Schedule-Trend (Figure 9-6) or Schedule
Totalization dialog box appears.
Figure 9-6: Schedule-Trend Dialog Box
Operator Workstation User’s Manual
9-7
6.
Select the attribute to be Trended or totalized. The attribute
appears in Attribute text box.
7.
Click the appropriate operation button.
8.
Specify the time you want Trend or Totalization to begin, end, or
reset in the Schedule Time text box.
9.
Click OK. The new schedule is added to the row of the day you
selected.
10. On the Item menu, click Save. The new schedule is entered into
the database.
Scheduling Summaries
To schedule a summary:
1.
Go to any window displaying a PC group or system.
2.
Select the PC group or system.
3.
On the Go To menu, click Schedule. The Scheduling window
appears (Figure 9-7).
Note: If the selected summary has no schedule, the Scheduling dialog
box appears asking if you would like to copy a schedule. If you
don’t want to copy an existing schedule, click No and go to
Step 5.
Figure 9-7: Scheduling Window (for Summaries)
4.
Select a day of the week in the Regular, Alternate, or Holiday
schedule.
9-8
Operator Workstation User’s Manual
5.
On the Action menu, click Add Schedule Summary. The Schedule
Summary dialog box appears (Figure 9-8).
Figure 9-8: Schedule Summary Dialog Box
6.
Select the type of summary.
7.
Select a defined printer or type the name of a print file in the
Destination text box (for example, C:\ALARMS.TXT).
Notes:
If you specify a print file, the selected summary is sent to
the print file at the workstation you are using, at the time
you specify. You can then either print the file from DOS, or
view it in any ASCII text editor.
This temporary print file is not the same as a PC file report
destination displayed on the Network Map.
8.
In the Schedule Time text box, specify the time you want the
summary to be sent to the destination.
9.
Click OK. The scheduled summary is added to the row of the day
you selected.
10. On the Item menu, click Save. The new scheduled summary is
added to the database.
Operator Workstation User’s Manual
9-9
Scheduling Process Triggers
To schedule process triggers:
1.
Click the system that contains the desired process to schedule.
2.
On the Go To menu, click Process. The Process window appears.
3.
Select the desired process.
4.
On the Go To menu, click Schedule. The Scheduling window for
the selected process object appears, displaying the current
schedule.
Note: If the selected process has no schedule, the Scheduling dialog
box appears asking you if you would like to copy a schedule. If
you don’t want to copy an existing schedule, go to Step 8.
5.
Select a day in the Scheduling window.
6.
On the Action menu, click Add Schedule Process Trigger. The
Schedule – Process Trigger dialog box appears (Figure 9-9).
Figure 9-9: Schedule Process Trigger Dialog Box
7.
Specify the time you want the process to be triggered.
8.
Click OK. The scheduled trigger is added to the row of the day
you selected in Step 5.
9.
On the Item menu, click Save. The new schedule is added to the
operational database.
9-10
Operator Workstation User’s Manual
Scheduling Lighting Control Group (LCG) Events
To schedule LCG events:
1.
Select the LCG object.
2.
On the Go To menu, click Schedule. The Scheduling window
appears (Figure 9-2).
Note: If the selected LCG has no schedule, the Scheduling dialog box
appears asking if you would like to copy a schedule. If you
don’t want to copy an existing schedule, go to Step 3.
3.
On the Action menu, click Add Schedule Event. The Schedule-LC
Group dialog box appears (Figure 9-10).
Figure 9-10: Schedule-LC Group Dialog Box
4.
Click the event line you want to schedule.
5.
Click the type of schedule.
Note: The Lighting Controller supports only Holiday and Regular
schedules. All days that are designated as Alternate days in the
Schedule Calendar are treated as Regular days by the Lighting
Controller.
6.
If you selected the Regular schedule type, specify the days by
clicking the appropriate option boxes. The event line displays the
selected days.
Operator Workstation User’s Manual
9-11
7.
Select the event type. The event line displays the event selected.
8.
Enter the Event On Time and Event Off Time.
9.
To schedule another event, select another event line.
10. Click OK. The schedule is immediately saved.
Note: Unlike the scheduling of other objects, you do not have to save
the LCG schedule with the Save option in the Item menu. In
addition, LCG object schedules do not appear in the
Scheduling window. To view the schedule for LCG objects,
display the Scheduling-LC Group dialog box.
Modifying Existing Schedules
To modify existing schedules:
1.
On the Scheduling window, click the scheduled command,
feature, or summary to modify. The selected event appears
highlighted.
2.
On the Action menu, click Modify Schedule. The appropriate
Schedule dialog box appears.
3.
Type in any changes.
4.
Click OK. The changes appear in the Schedule.
5.
On the Item menu, click Save. The changes are entered into the
operational database.
Modifying DX-9100 Time Schedule Modules
Note: Each of the eight Time Schedule Modules has a single logical
output that is set to either On or Off according to the module’s
schedule. These outputs can be used as inputs to other
functions within the DX-9100. The feature described can only
be used to modify the schedules, not the logical connections of
the outputs to other functions. The term “event” is therefore
used in this context to mean simply the switching of a Time
Schedule Module’s output.
To modify DX9100 Time Schedule Modules:
1.
Select the DX-9100.
2.
On the Go To menu, click Scheduling. The object’s schedule
appears.
3.
On the Action menu, click Modify Local Time Schedule. The
DX9100 Time Schedule Modules Definition dialog box appears
(Figure 9-11).
9-12
Operator Workstation User’s Manual
Figure 9-11: DX9100 Local Time Schedule Modules Definition Dialog Box
Note: The name in the title bar of the dialog box varies depending on
the name of the DX-9100. In Figure 9-11, for example, the
name of the DX9100 is DX91_90. Therefore, DX91_90
appears in the title bar.
4. Make the desired changes to the schedule. Refer to Table 9-1.
Table 9-1: DX9100 Local Time Schedule Modules
Field
Description
Time Schedule
Module #
Displays the time selected for the schedule
Extension Override
Time
Extends the occupancy period for a programmable time. This is active only during
the occupancy time. Valid range is 0 to 255 minutes.
Start Time
Displays the time the schedule begins
End Time
Displays the time the schedule ends
Mon, Tue, Wed, Thu,
Fri, Sat, Sun, Hol,
Weekdays
Checkboxes indicate if a schedule is collected on particular day
Events
Displays the schedule information
5.
Click Save. A message box appears asking you to confirm that
you want to download the new schedules to the DX-9100.
Operator Workstation User’s Manual
6.
9-13
Click OK.
Notes:
When you download the new schedules to the DX-9100, they
are also saved (archived) in a file on the OWS under the
system in which the DX-9100 is located. The name of the file
is the device name with a .TSD extension.
If you later download a configuration file to the DX-9100,
the download dialog box allows you to choose whether to
download the new schedules (.TSD file), or the schedules
originally defined in the configuration file.
Clearing Schedules
To clear existing schedules:
1.
Select the scheduled command, feature, or summary you want to
clear.
2.
On the Action menu, click Clear Schedules. A dialog box appears,
asking whether you want to clear the schedules.
3.
Click OK. The selected schedules are cleared.
4.
On the Item menu, click Save. The changes are entered into the
operational database.
Printing a Summary of Schedules
To print a summary of schedules:
1.
Click on a network, PC group, or system.
2.
Click Summary. The Network Map-Summary dialog box appears
(Figure 9-12).
Figure 9-12: Network Map-Summary Dialog Box
9-14
Operator Workstation User’s Manual
3.
Select the Scheduling summary.
4.
Click Print. A list of all schedules defined for the selected
network, PC group, or system are printed.
Note: The time it takes to print the summary varies depending on the
size of the network, PC group, or system selected.
Displaying a Summary of Schedules
To display a summary of schedules:
1.
Select a System, PC group, or Network.
2.
Click Summary. The Network Map-Summary dialog box appears
(Figure 9-12).
3.
Select Scheduling.
4.
Click Display. A list of all schedules defined for the selected
network, PC group, or system appears.
Note: The time it takes to display the summary varies depending on
the size of the network, PC group, or system selected.
Scheduling a Temporary Calendar Date
To schedule a temporary calendar date:
1.
Display the Scheduling window.
2.
On the Action menu, click Add Calendar Date. The Schedule
Calendar Date dialog box appears (Figure 9-13).
Figure 9-13: Schedule Calendar Date Dialog Box
3.
Specify the month and date.
4.
Click OK. The new date appears in the Temporary schedule.
Note: To schedule a command or summary for the new calendar date,
select the date. Use any of the Action menu options described
in this section.
5.
On the Item menu, click Save. The new schedule is entered into
the operational database.
Operator Workstation User’s Manual
9-15
Modifying a Calendar Date
To modify a calendar date:
1.
Display the Scheduling window.
2.
Select the calendar date.
3.
On the Action menu, click Modify Calendar Date. The Schedule
Calendar Date dialog box appears, displaying the scheduled
month and date.
4.
Select the field to change and type in corrections.
5.
Click OK. The new date appears in the Temporary schedule.
6.
To schedule a command or summary for the new calendar date,
select the date. Use any of the Action menu options to add or
modify a scheduled event.
7.
On the Item menu, click Save. The new schedule is entered into
the operational database.