1
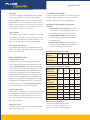
Application Note
NetFlow Tracker
Quick Install Guide for Product Evaluations
Pre-installation and installation tasks
• Any modern Linux distribution capable of running
Minimum system requirements
Java 1.4.2 and MySQL™ 5.0 (Intel-compatible
The type of system required to run NetFlow Tracker depends
processors). Not supported for trial systems.
on the number of devices sending NetFlow information to
it and the amount and nature of traffic handled by those
Installation on Microsoft Windows™
devices. The following requirements are a guideline; the
Installation is straightforward and should take no more than
only way to determine your requirements is by testing the
a few minutes. If you received NetFlow Tracker on CD, the
software’s performance in your network environment. Note
setup program should start automatically. If not, simply open
– NetFlow Tracker requires a dedicated server with no other
the CD drive in My Computer and double-click “setup.exe.”
applications or spurious system processes running. Refer to
If you downloaded the software, simply double-click the file
the document NetFlow Tracker performance and scalability
you downloaded. Installation involves several steps. At each
information available at www.flukenetworks.com for full
step, you can click the “Next >” button to accept the default
system requirements.
choices and continue.
• Single processor 2 Ghz Pentium IV or Xeon class,
although multiple processors can improve the
Java Runtime Environment installation
performance of most reports.
If the server does not have the required version of the Java
• 1 GB RAM, although performance will increase
with the amount of RAM available for the disk
cache and database buffers.
• High-performance disk subsystem with substantial
free space – the exact nature of this is dependent
on system load. For all but the lightest of loads,
a server RAID card running RAID 5 over at least
Runtime Environment installed, you will be prompted to
press OK to install it. It will take several seconds to launch
the Java installer, after which you must accept Sun’s licence
agreement. You will then be given the choice of Typical
or Custom installation; if you wish not to have your web
browser configured to use Sun’s Java plug-in, you must
choose custom installation.
three high-performance disks is recommended.
Welcome and licence agreement
NetFlow Tracker stores and queries full information
Once the Java Runtime Environment is installed, you can
for a week; a busy enterprise router can generate
press the “Next >” button to view Fluke Networks’ licence
in the order of 20 GB of NetFlow information in
agreement, which you must agree to before pressing “Next >”
this time.
again.
Operating system support
• Microsoft Windows™ 2000 or above; server
Customer information
You will be asked to provide your name and company name,
versions will provide better performance due to
and whether to install the software just for yourself or for
more advanced disk caching and memory manage-
every user that logs in to the system. If you choose to install
ment. 64 Bit OS is not recommended at this time.
the software just for yourself, only you will see the shortcut
to the web front-end and only you will be able to uninstall
the software.
NetFlow Tracker
Application Note
Setup type
Set up SNMP community strings
If you choose “Complete,” NetFlow Tracker will be installed
If any of the devices you intend to be monitoring do not use
to the folder “nftracker” on your system drive, MySQL to
a read-only SNMP community of “public,” you will need to
the folder “MySQL” on the same drive, and the internal web
add their communities to the list in SNMP settings.
server will run on port 80 if available. If port 80 is unavailable, you will be prompted to choose another. If you want to
Recommended system changes and performance
change the install folders or choose a different port (even if
information
80 is available), you must choose “Custom.”
• Average sample storage duration, the amount
of time to store a one minute bucket of data into
Ready to install
Click “Install” to start. Installation should take no more than
a few minutes; if it appears to have stopped for a long time
you should contact Fluke Networks. When installation is complete, you can click “Finish” to close the install program.
Accessing the web front-end
The install program will have placed a shortcut to the web
front-end in a folder called “NetFlow Tracker” in the Programs
section of your start menu.
the database. Should be less than 20 seconds.
• Long-term DB maintenance, the amount of time
taken to generate long term reports. Should be
less than two hours.
• Real-time DB maintenance, amount of time to
purge the real-time database and to update the
archives (should be less than one hour).
Recommended initial memory settings
Memory server
memory
Post-installation tasks
Initial /
Access the web front-end
max memory
You can access the web front-end from any workstation
Listener port
on the network by opening the following address in a web
browser: http://address:port where “address” is the address
of the server and “port” is the http port you chose, or 80 if
1GB
1.5GB
2GB
3GB+
64/128
128/256
284/384 384/384
262144
262144
262144
262144
Recommended initial database settings
Expect large
Auto
Auto
Auto
Auto
64
128
256
512
32
64
128
128
0
0
0
0
Store 1 hour
999
999
999
999
Store 6 hours
0
0
0
0
Open the settings page
Store 12 hours
0
0
0
0
The first thing you’ll see when you access the web front-end
Store 1 day
0
0
0
0
Store 2 days
0
0
0
0
Listener port
262144
262144
262144
262144
you accepted default settings. Note that the web browser
must support Java applets; when you installed the Java
Runtime Environment it will have set up any browsers on
the server with this capability, but you may find that other
machines on your network do not display applets correctly,
especially those running Windows XP. You can easily download the Java Plug-in from http://www.javasoft.com if you
find a browser that does not support Java applets.
is a splash screen displaying the product version and your
licence details. This will disappear after a few seconds, or
you can click anywhere on the page to dismiss it. You can
then click on “Settings.”
Install your licence
If you have a full or trial licence, you should install it using
the licensing settings page.
results sets
Max in-memory
temp table size
Sort buffer size
Store
10 minutes
All options above accessed via:
main menu > settings > memory settings
main menu > settings > listener ports
main menu > settings > database settings
Application Note
Setting up your IP Flow network devices
NetFlow Tracker is compatible with many IP Flow variants supported by many vendors including 3Com, Alcatel, Cisco, Enterasys,
Expand, Extreme, Force10, Foundry, HP, Huawei, Juniper, Nortel, Packeteer, Riverbed. The Flow standards supported are
NetFlow (V1, V5, V7, V9), IPFIX (emerging standard), jFlow / cFlowd, NetStream and sFlow (from NetFlow Tracker V3.5).
Please consult with your specific equipment vendor for the specific hardware and software platforms that support these IP Flow
protocols and for the appropriate commands required to configure and invoke them to point to your new NetFlow Tracker server
installation.
Given the popularity of Cisco Systems Router and Switch equipment, we have included below the generic NetFlow IOS commands for your information.
Sample Cisco IOS NetFlow commands
Router IOS 12.2 or 12.3 code, we recommend the following:
router(config)# ip cef
router(config)# ip flow-export so u r c e L o o p b a c k 0 (M us t be a val id addr e s s e d inte r fac e )
router(config)# ip flow-export ve r s i o n 5
router(config)# ip flow-export de s t i n a t i o n <ip- addr e s s > <Por t>
router(config)# snmp-server commu n i t y <c om m unity s tr ing >
router(config)# interface Etherne t 0 / 0
router(config)# ip route-cache fl o w
Router IOS 12.4 code, we recommend the following:
router(config)# ip cef
router(config)# ip flow-export sou r c e L o o p b a c k 0 (M us t be a val id addr e s s e d inte r fac e )
router(config)# ip flow-export ver s i o n 9
router(config)# ip flow-export des t i n a t i o n <ip- addr e s s > <por t>
router(config)# snmp-server commun i t y <c om m unity s tr ing >
router(config)# interface FastEthe r n e t 0 / 0
router(config)# ip flow ingress
Router IOS 12.4 code and you wish to monitor only ONE interface, we recommend the following:
router(config)# ip cef
router(config)# ip flow-export sou r c e L o o p b a c k 0 (M us t be a val id addr e s s e d inte r fac e )
router(config)# ip flow-export ver s i o n 9
router(config)# ip flow-export des t i n a t i o n <ip- addr e s s > <por t>
router(config)# snmp-server commun i t y <c om m unity s tr ing >
router(config)# interface FastEthe r n e t 0 / 0
router(config)# ip flow ingress
router(config)# ip flow egress
Application Note
Use the IP address of your NetFlow Tracker and configured listening port (Port: 2055 default).
If your router uses BGP protocol, you can configure AS to be included in exports with the command:
router(config)# ip flow-export ver s i o n 5 [ p e e r - a s | o r i g i n - a s ]
or
router(config)# ip flow-export ver s i o n 9 [ p e e r - a s | o r i g i n - a s ]
The following commands should be included in all configurations. They break up flows into one-minute segments and ensure
flows are exported in a timely manner:
router(config)# ip flow-cache time o u t a c t i v e 1
router(config)# ip flow-cache time o u t i n a c t i v e 1 5
You will need to enable NetFlow on each interface you would like to track traffic flow, this will normally be the Ethernet and
WAN interfaces.
Note: There are several commands to enable NetFlow on an interface and you must use the same command for every interface.
IP route-cache flow and IP flow ingress enable NetFlow for inbound traffic on the interface; the only difference between the
two is that the latter can be applied to individual sub-interfaces whereas the former must be applied to the physical interface.
Be careful not to enable NetFlow for both a physical interface and one or more of its sub-interfaces. IP flow egress enables
NetFlow for outbound traffic on the interface and is required if you are using input filters. You may enable NetFlow for both
inbound and outbound traffic on a single interface if you are interested only in its traffic; in this case ensure that no other
interface has NetFlow enabled.
ip route-cache flow or ip flow ing r e s s o r i p r o u t e - c a c h e c e f b a n d w i d t h < k b p s >
Now write your configuration with the “write mem” or “copy run start” commands.
The command below shows the current configuration:
router(config)# show ip flow expor t
When in enabled mode, you can see current NetFlow cache with the following commands:
router(config)# show ip cache flow
router(config)# show ip cache verb o s e f l o w
Further information and support
1. Consult with your local Fluke Networks account manager, sales engineer or
reseller team
2. Refer to the current NetFlow Tracker user manual, available on request.
3. Refer to the online training and product documentation available at
http://www.flukenetworks.com/netflowtracker
4. Contact [email protected]
N E T W O R K S U P E R V I S I O N
Fluke Networks
P.O. Box 777, Everett, WA USA 98206-0777
Fluke Networks operates in more than 50 countries
worldwide. To find your local office contact details,
go to www.flukenetworks.com/contact.
©2007 Fluke Corporation. All rights reserved.
Printed in U.S.A. 7/2007 3077135 A-EN-N Rev A