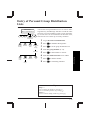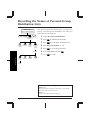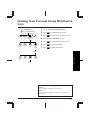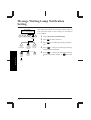
1
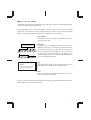
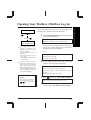
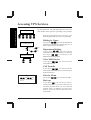
Voice Processing System
SUBSCRIBER'S
UIDE
G
Please read before using.
TVP10
VOICE PROCE
SSING SYSTE
0
M KX-TVP100
MODEL
KX-TVS100E
Panaso
nic
Introduction
The Panasonic Voice Processing System (VPS) provides you with powerful, convenient ways to manage your voice communications and increase your productivity
through your voice mailbox. As the owner of a VPS mailbox, or Subscriber, you can:
• send a message to one or many people inside or outside of your office
• transfer messages (with your annotation) to another VPS Subscriber
• take messages when you are on the phone or unavailable
• receive your messages from any touch-tone telephone
• be notified by extension message waiting lamp, telephone or beeper (radio
pager) of messages waiting
• screen your calls
• automate the handling of callers
• and more...
This guide is your reference to using and optimizing your VPS mailbox.
NOTE:
• This Subscriber’s Guide does not show complete model numbers that indicate the
country where your models should be used. The model number of your unit is found
on the label affixed to the unit.
MODEL NO. - - - - - - - (label)
73/23/EEC
89/336/EEC
92/31/EEC
93/68/EEC
APPROVED for connection to
telecommunication systems specified in the instructions for use
subject to the conditions set out in
them.
606168
i
i
■ How to Use this Manual
This Subscriber’s Guide explains the Voice Processing System’s (VPS) operations by
touch tone telephone for Subscribers.
Each operation consists of a description, a diagram, tips and some notes. During
operations, the VPS plays voice prompts telling you what to do at each step though
they do not appear in this guide except for Voice Mail Service Entry.
Description
Describes the operation with the telephone keys to be
pressed step by step.
Subscriber's
Main Command Menu
1
2
3
5
4
6
Receive
Message
1
2
3
4
7
*
0
Diagram
A diagram is provided for each function on the
lefthand of the text. It will help you understand how
the operation goes on in the tree-structured VPS
menu. You will know other options you can choose in
a certain step. It will also help you to perform your
desired operation faster if you press the outlined keys
in a row along the bold line.
Repeat Next Erase Reply Transfer Help
Tip
Step 3 —
You can call the message
sender by pressing [1].
Tip
Tips framed in a square are used to make you aware of
alternate options available at a particular step.
Note
This symbol describes additional information or useful advice about each feature.
Once you become familiar with operating the VPS, use the Quick Reference Section,
which appears at the end of this guide.
ii
ii
■ Terms to Know
The following words are used in this guide.
Subscriber
The owner of a VPS mailbox. The System Manager can create
a mailbox for you.
System Manager
The System Manager is the person who manages and maintains
the VPS to make it work efficiently. He controls mailbox creating and authorizes some of the features.
Caller
A caller is any person who is connected to a VPS service
besides the Subscriber or the System Manager.
iii
iii
■ Getting Started
— Required Numbers
Get the following information before you begin the operation.
(1) Telephone Number Directly Connected to Voice Mail Service
If your VPS does not have one, call any extension number connected to the VPS
and press [#] [6] (Service Access Command).
(2) Your Mailbox Number
Usually, the same number as your extension number. Check with your System
Manager to be sure.
(3) The System Manager’s Phone Number
In case you need their help or need to change certain mailbox settings.
— Basic Steps
You need to know your mailbox number to use this guide.
If you are going into your mailbox for the first time, read Chapter 5 “Mailbox Setup”
first. You need to customize it before sending or receiving messages. Especially, it is
important to identify yourself as the owner of the mailbox by setting the following.
• Recording Personal Greetings (See page 5-7)
• Recording Your Name (See page 5-9)
• Changing Your Password (See page 5-8)
Then customize it as it suits you by setting the additional features as appropriate.
• Setting the Call Transfer Status (See page 5-2)
• Setting the Incomplete Call Handling Status (See page 5-4)
• Message Waiting Lamp Notification Setting (See page 5-13)
• Setting Notification by Calling (See page 5-14)
...
Once you complete your setting, find your desired operation from the titles, then call
the VPS.
iv
iv
Table of Contents
Chapter 1
Using Your Mailbox and the VPS
Opening Your Mailbox (Mailbox Login) .......................................... 1-2
Accessing VPS Services ...................................................................... 1-3
Chapter 2
Receiving Messages
Receiving Messages ............................................................................. 2-2
Message Playback Options ................................................................ 2-3
Replying to Messages ......................................................................... 2-5
Message Transfer ................................................................................ 2-6
Erasing Messages ................................................................................ 2-7
Receiving Message Waiting Notification .......................................... 2-8
Live Call Screening ............................................................................. 2-9
Recording a Two-Way Conversation .............................................. 2-10
Chapter 3
Sending Messages
Delivering Messages to Other Subscribers ......................................
Checking Mailbox Distribution .........................................................
Setting up an External Message Delivery List .................................
Sending External Delivery Messages ................................................
Checking and Setting External Message Delivery Status ...............
Chapter 4
Caller Handling
Recording Messages (for any caller) .................................................
Recording Messages (from a rotary phone) .....................................
Receiving External Delivery Messages .............................................
Replying to External Delivery Messages ..........................................
v
3-2
3-3
3-4
3-6
3-7
4-2
4-3
4-4
4-5
v
Chapter 5
Mailbox Setup
Setting the Call Transfer Status
(Call Block/Call Screening/Intercom Paging/Beeper Access) ........ 5-2
Setting up a Covering Extension ....................................................... 5-3
Setting the Incomplete Call Handling Status ................................... 5-4
Setting the Message Reception Mode ............................................... 5-6
Recording Personal Greetings ........................................................... 5-7
Changing Your Password ................................................................... 5-8
Recording Your Name ........................................................................ 5-9
Entry of Personal Group Distribution Lists .................................. 5-10
Recording the Names of Personal Group Distribution Lists ....... 5-11
Deleting from Personal Group Distribution Lists ......................... 5-12
Message Waiting Lamp Notification Setting .................................. 5-13
Setting Notification by Calling ........................................................ 5-14
Setting Answer Lengths for the Interview Mailbox ...................... 5-16
Recording Questions for the Interview Mailbox ........................... 5-17
Erasing Questions from the Interview Mailbox ............................ 5-18
vi
vi
Using Your Mailbox and the VPS
Chapter 1
Using Your Mailbox and the VPS
This chapter tells you how to enter Subscriber Service and other services
provided by the VPS.
Contents
Opening Your Mailbox (Mailbox Log in) ......................................... 1-2
Accessing VPS Services ...................................................................... 1-3
Opening Your Mailbox (Mailbox Log in)
*
+ Mailbox No.
Password +
To access Subscriber Services, you must open your
mailbox first. Follow the operation below.
1
Dial an extension number which is connected
to the Voice Mail Service.
#
Good morning/Good afternoon/Good evening
Welcome to the Voice Processing System.
Subscriber's
Main Command Menu
If the system is equipped with multiple languages (up to three languages), you will hear
a selection prompt as follows.
If you just want to record a
message in someone else’s
mailbox, you do not have to
use this procedure.
See the following topic in
Chapter 4.
• Recording Messages (for
any caller)
• Recording Messages (from a
rotary phone)
If your company is using a
Panasonic KX-TD series telephone system, you can directly
access your mailbox just by
dialing the number of the V.M.
Service, depending upon System Programming. Check with
your System Manager.
Tip
Step 1 —
If no ports are assigned to
Voice Mail Service, press
# 6 after calling the
VPS.
(ex.)
For English, press [7].
For French, press [8].
For Chinese, press [9].
2
If you hear the above prompt, press the
number of the appropriate language.
Please enter your party’s mailbox number.
To enter by name, press [#] and [1].
If you are using a rotary telephone, stay on
the line.
To call the operator, press [0].
3
Press
*
, then enter your mailbox number.
Enter your password, followed by [#].
4
Enter the password if you have one.
You are now in the main command menu.
1-2
Using Your Mailbox and the VPS
Call VPS
Using Your Mailbox and the VPS
Accessing VPS Services
In VPS operation, the following functions are available whenever the system is providing voice prompts.
Call VPS
#
1
#
3
#
6
Press the appropriate key to receive your
desired option (Service Access Commands).
#
9
#
8
Dialing by Name
If you press # 1 , you can call the desired
extension or mailbox by entering first 3 or 4
letters of the person’s last name.
Voice Mail Service
* +Mailbox No
Password+
#
Subscriber's Service
#
5
#
7
* Retry
* Retry
Department Dialing
3 , you can call the
If you press #
intended extension and mailbox by pressing
one digit ( 1 – 9 ) according to the
Department Dialing Menu.
Voice Mail Service
If you press # 6 , you can access the
Voice Mail Service.
Call Transfer
If you press # 8 , you can access the
Automated Attendant Service and call your
desired extension.
Tip
# 5 and # 7 are
valid only for Subscriber
Service.
Exit the Menu
If you press #
9 , you can exit the VPS.
Back up
If you press * , you can retry to enter a
mailbox number, a password and also an
extension number while you are in the call
transfer status. In addition, you can move
back to a previous menu in the main command menu.
1-3
Accessing VPS Services
If you press # 5 , you can reselect a mailbox while you are in the main command
menu.
Restart
If you press # 7 , you can be back in the
initial main command menu.
1-4
Using Your Mailbox and the VPS
Log in
Chapter 2
Receiving Messages
Receiving Messages
This chapter tells you how to access and manage received messages: Replying
immediately, transferring messages with or without an additional comment, and
replaying messages.
Contents
Receiving Messages ............................................................................
Message Playback Options ...............................................................
Replying to Messages ........................................................................
Message Transfer ...............................................................................
Erasing Messages ...............................................................................
Receiving Message Waiting Notification .........................................
Live Call Screening ............................................................................
Recording a Two-Way Conversation ...............................................
2-2
2-3
2-5
2-6
2-7
2-8
2-9
2-10
Receiving Messages
The VPS plays new messages and saved messages in
your mailbox with the information of the message
sender and the recorded date respectively.
Subscriber's
Main Command Menu
1
Receive
Message
2
3
4
5
6
*
1
Log in the main command menu.
• The VPS tells you the number of messages.
Go to
Step 3
2
Press 1 to use the Receive Message menu.
• The VPS tells you the number of messages.
Then it plays the messages.
3
Press 0 to listen to the whole menu (for
Help).
#
9 .
Tip
Step 3 —
You do not have to listen to the whole menu if you do not
wish to.
1
Repeat this message
1 1 Play the previous message
2
Play the next message
3
Erase this message
4
Reply
5
Rewind
6
Fast forward
7
Transfer
8
Message scan
2-2
Receiving Messages
• You can end your call by pressing
Message Playback Options
While receiving messages, several message playback
options are available for efficient receiving.
Subscriber's
Main Command Menu
1
2
3
5
4
*
6
Receive
Message
1
Repeat
1
1
2
3
4
5
6
7
1-2
3
8
Next Erase Reply Rewind Fast Transfer Scan
forward
Previous
Go to
Step 4
Same as Receiving Messages.
Press the appropriate key to receive your
desired option. If you choose 8 , go to the
next step.
Repeating Messages
If you press 1 , you can listen to the current
message again.
Replaying the Previous Message
Receiving Messages
If you press 1 1 while receiving a message, you can listen to the previous message.
Playing the Next Message
If you press 2 while receiving a message,
you can listen to the next message.
Rewinding Messages
If you press 5 while receiving a message,
you can listen to it again.
Fast Forwarding Messages
If you press 6 while receiving a message,
you can fast forward it to the end.
Scanning Messages
If you press 8 , you can listen to the first
four seconds of each message.
2-3
Message Playback Options
4
Note :
Option 3 is available only
once.
Second time will erase the
message.
Messages are scanned one at a time.
If you press 1 , you will hear the previous
message.
If you press 2 , you will hear the next message.
If you press 3 , you will hear the entire message.
Receiving Messages
Tip
Step 3 —
You can receive the whole menu by pressing [0] for Help.
2-4
Replying to Messages
1-2
3
4
3 4 5 6 *
5
6
3
7
4
0
7
Erase Reply Transfer Help
8
Go to
Step 4
9
Subscriber's
Main Command Menu
1
2
Receive
Message
1
2
Repeat Next
Receiving Messages
This feature is available only
when the message has been
delivered from a Subscriber
using his mailbox i.e. Message
Transfer and Message Delivery.
Otherwise, you will hear this
prompt: “Sorry, you cannot reply. The message sender is unknown.”
Same as Receiving Messages.
Press 4 to reply to the message.
Press 2 to record a message.
Record your message at the tone.
Press 1 to end recording.
Press 2 to accept.
Press 1 to set delivery time.
Press 1 to specify the delivery time or the
private status.
10
11
12
13
Press 1 to specify the delivery time.
14
15
Press 2 to accept.
Enter the time and # .
Press 1 for AM or 2 for PM.
Enter the date (the day of the month) and
# .
Press 1 to set this message to a private
message. Otherwise, press 2 .
Tip
Step 4 —
You can call the message sender by pressing [1].
Step 6 —
You can pause/restart recording by pressing [2].
Step 9 —
You can make your reply immediate by pressing [2].
You will skip to step 15.
Step 11 —
If you press [0] for help here, “For example, to enter 5
o’clock press [5] and [#] or 5 : 15 press [5], [1], [5] and
[#]”.
2-5
Message Transfer
This function allows you to transfer messages to other
mailboxes.
Subscriber's
Main Command Menu
1
2
3
5
4
*
6
Receive
Message
1
2
Repeat
Next
3
7
4
0
Press 7 to use the Message Transfer menu.
Enter the mailbox number of the intended
recipient.
2
3
Change
Accept
Repeat
M.B. Info.
2
3
Add
Transfer
W. Comment M.B.
4
Review
Mailing
List
*
Cancel
Transfer
5
6
7
Press 2 to accept.
8
Press 2 if the comment is acceptable.
Press 2 to record a comment.
State your comment and press 1 to end
recording.
Receiving Messages
1
Transfer
Same as Receiving Messages.
Erase Replay Transfer Help
Mailbox No.
XXXX
1
1-2
3
4
*
Cancel
Tansfer
Go to
Step 7
If the message has been
assigned as private, you cannot
transfer it to other mailboxes.
Tip
Step 4 —
You can enter by name by pressing [#] [1] first. Also, you
can specify a Personal Group Distribution List or a System
Group Distribution List by entering the number followed
by [#].
Step 6 —
You can transfer the message without comment by pressing [1].
You can add the mailbox number by pressing [3].
You can review the mailing list by pressing [4].
You can cancel message transfer by pressing [*].
Step 7 —
You can press [2] to pause/restart recording.
Step 8 —
You can press [3] to change your comment.
You can press [1] to review your comment.
2-6
Erasing Messages
You can erase messages during playback. Erased messages cannot be recovered.
Subscriber's
Main Command Menu
1
2
3
5
4
6
Receive
Message
1
*
1
Log in the main command menu.
• The VPS tells you the number of messages.
2
3
4
7
2
0
Erase
• The VPS tells you the number of messages,
and the message information. Then it plays
the message.
3
Press 3 to erase the messages.
Receiving Messages
The VPS will automatically
erase messages after a certain
number of days. Check with
your System Manager to find
out how many days you can
keep messages in your mailbox.
Press 1 to use the Receiving Messages
menu.
Tip
Step 3 —
Messages are erased one at a time. After a message is
erased, you will hear the following prompt and repeat step
3 for the next message.
“The message is erased.”
If all messages have been erased, you will hear “All messages are erased”.
2-7
Receiving Message Waiting Notification
The Message Waiting Notification is a feature to
notify you that unplayed messages are waiting in your
mailbox. Notification Calls are sent to you via specified device after the message is recorded.
VPS Calls you
1
2
Receive
Message
Hold
Password +
1
2
3
4
5
6
Pick up a call from the VPS.
If the system is equipped with multiple languages (up to three languages), you will hear
a selection menu.
#
Subscriber's
Main Command Menu
Receive
Message
1
*
2
3
Press 1 to receive the message.
Enter the password and # .
Now, you are in the main command menu.
Follow steps 2 – 3 of Receiving Messages.
Tip
Step 3 —
If a password is not assigned, skip this step.
2-8
Receiving Messages
4
Live Call Screening
Receiving Messages
This feature is available only if
your company is using a Panasonic KX-TD series telephone
system.
By assigning one of your telephone keys to this feature, you can monitor incoming calls that have been
forwarded to the Voice Mail Service.
In Hands-Free Mode, you can monitor the incoming
call through built-in speaker of the telephone. Also,
you can speak with the caller by picking up the handset.
In Private Mode, you can monitor the incoming call
by going off-hook after you hear the notification tone.
You can speak with the caller by pressing the feature
key. Or you can stop listening to the message by going
on-hook.
Note :
For detailed information,
please refer to the Installation
Manual of Panasonic KX-TD
series telephone systems'
PBXs (KXTD816,
KXTD1232).
2-9
Recording a Two-Way Conversation
This feature is available only if
your company is using a Panasonic KX-TD series telephone
system.
By assigning one of the function keys on your telephone to this feature, you can record the conversation
that you are having.
You should give your party a notice before recording
that your conversation will be recorded.
A beep sounds every sixteen
seconds during recording .
Receiving Messages
2-10
Chapter 3
Sending Messages
This chapter tells you how to send messages, including recording and delivery.
Contents
Sending Messages
Delivering Messages to Other Subscribers ......................................
Checking Mailbox Distribution .........................................................
Setting up an External Message Delivery List .................................
Sending External Delivery Messages ................................................
Checking and Setting External Message Delivery Status ...............
3-2
3-3
3-4
3-6
3-7
Delivering Messages to Other Subscribers
If you are sending an identical message to several
Subscribers, follow the steps below.
You can send it with a single operation.
Subscriber's
Main Command Menu
1
2
3 4
5
6
Deliver
Message
Mailbox No.
*
Go to
Step 5
XXXX
To use Personal Group Distribution
Lists, they must have been created
beforehand. To use the System
Group Distribution Lists, check
with your System Manager to see
if there is any list in your VPS.
1
• The VPS tells you the number of messages.
2
3
Press 2 for Message Delivery.
4
Press 2 to accept the mailbox number if it
is correct.
5
Press 1 to record a message.
Tip
Step 4 —
You can review the mailing list by
pressing [3].
Step 6 —
You can press [2] to pause recording
while you are in the message recording process. Restart the recording
within 20 seconds, or the VPS will
stop it automatically.
You can deliver the message immediately and return to the main command
menu by pressing [2].
Step 10 —
You can deliver your message immediately after recording by pressing [2].
Then you will skip to step 14.
Step 11 —
You can press [0] for Help menu. It
will guide you how to enter the time.
6
7
8
9
State your message at the tone.
Press 1 to end recording.
Press 2 to accept.
Press 1 to set delivery time or private status.
10
11
12
13
Press 1 to specify the delivery time.
14
15
Press 2 to accept.
Enter the time and # .
Press 1 for AM or 2 for PM.
Enter the date (the day of the month) and
# .
Press 1 to set this message to a private
message. Otherwise, press 2 .
3-2
Sending Messages
Step 9 —
Enter the mailbox number of the intended
recipient.
You can add mailbox numbers by pressing
2 . Then repeat step 3 and step 4. You can
specify a maximum of 20 mailboxes as the
destination.
Step 3 —
You can enter by name if you press [#]
[1] first. Also, you can specify a Personal Group Distribution List or a System Group Distribution List by entering the number followed by [#].
Log in the main command menu.
Checking Mailbox Distribution
This function lets you check the status of messages
which you have recorded in your mailbox to deliver
to other mailboxes.
Subscriber's
Main Command Menu
1
2
3
4
Check
M.B.
Distribution
Sending Messages
Go to
Step 3
5
6
*
You can check the history (delivery status) of up to
84 message transmissions.
1
2
3
Log in the main command menu.
4
Select 1 to delete verification of this
message or 2 to cancel message delivery.
Press 3 to check distribution status.
Press 3 to cancel the message or delete
verification.
Tip
Step 3 —
You can listen to the message by pressing [1].
You can check the previous message by pressing [1] twice.
You can check the next message by pressing [2].
3-3
Setting up an External Message Delivery
List
Subscriber's
Main Command Menu
1
3
2
4
5
6
Other
Features
*
1
2
3
Interview
M.B.
Management
Message
Waiting
Notification
Setting
External
Message
Delivery
1
2
3
Record
Message
Check
Delivery
Status
Mailing
List
Setting
Go to
Step 5
To use this feature, you must
have your System Manager
authorize it beforehand.
Tip
Step 8 —
1
2
1
2
3
4
5
Log in the main command menu.
Press 6 for Other Features.
Press 3 for External Message Delivery.
Press 3 to set up the mailing list.
Press 1 or 2 to choose the delivery list.
(Up to two delivery lists can be established.)
To add members:
6
Press 1 to add members to the list.
You can have up to 8 members on the list.
7
8
9
10
11
Enter the telephone number.
Press 2 to accept the number.
Record the name and press 1 .
Press 2 to accept.
Press 1 to continue adding members or
2 to end.
If you press
7 – 11.
1 , you will repeat steps
3-4
Sending Messages
3
4
5
6
7
Change the telephone
number
Accept
Review
Add more digits
Insert a pause
Set dial mode
Insert a wait for dial
tone
Setting up an External Message Delivery List lets you
send the same message to several people outside of
the system with a single operation. Up to two lists can
be maintained at the same time, and each list can contain up to eight members.
Setting up an External Message Delivery
List
To delete members:
Sending Messages
Go to the Delivery List Menu.
(See steps 1 – 5 in “Setting up an External Message
Delivery List”.)
3-5
6
7
Press 2 to delete members from the list.
8
Press 1 to delete the number, or 2 to
keep the number and play the next telephone
number.
Press 1 to delete all members from the list.
Otherwise, press 2 .
Sending External Delivery Messages
Subscriber's
Main Command Menu
1
2
3
4
5
6
Other
Features
*
1
2
3
Interview
M.B.
Management
Message
Waiting
Notification
Setting
External
Message
Delivery
1
2
3
Record
Message
Check
Delivery
Status
Mailing
List
Setting
Go to
Step 5
To use this feature, you must
have your System Manager
authorize it beforehand.
Tip
Step 5 —
You can press [2] to send
your message by mailing
list 1 or 2.
Step 7 —
1
2
3
6
7
5
6
7
8
9
10
11
12
13
14
Log in the main command menu.
Press 6 for Other Features.
Press 3 for External Message Delivery.
Press 1 to record an external delivery message.
Press 1 to send to a recipient.
Enter the telephone number.
Press 2 to accept the number.
Enter the password.
Record the recipient’s name and press 1 .
Enter the time and press # .
Press 1 for AM or 2 for PM.
Enter the date and press # .
Review your setting and press 2 to accept
the setting.
Record your message.
(See Recording Messages.)
Sending Messages
4
5
Change the telephone
number
Accept
Review
Add more digits
Insert a pause
Set dial mode
Insert a wait for dial
tone
1
2
3
4
Step 10 —
You can press [0] for Help
menu. It will guide you
how to enter the time.
3-6
Checking and Setting External Message
Delivery Status
Subscriber's
Main Command Menu
1
2
3
4
5
6
Other
Features
1
Interview
M.B.
Management
2
Message
Waiting
Notification
Setting
*
3
External
Message
Delivery
1
2
3
Record
Message
Check
Delivery
Status
Mailing
List
Setting
Go to
Step 5
To use this feature, you must
have your System Manager
authorize it beforehand.
After recording your external delivery messages, you
may want to check the delivery schedules or the recipients. You can listen to the report from the VPS unless
the messages have been delivered yet. After listening,
you have the option of deleting unnecessary ones or
changing the schedules.
1
2
3
4
Log in the main command menu.
Press 6 for Other Features.
Press 3 for External Message Delivery.
Press 2 to check External Message Delivery status.
• The VPS tells you when the message is
being sent.
5
6
Press 1 to reschedule the setting.
Press 1 to cancel the external message
delivery.
(To change the time and date, press 2 .
See Sending External Delivery Messages
steps 10 to 13.)
Tip
Sending Messages
Step 3 —
You can skip the Help menu.
Step 5 —
You can play the next schedule by pressing [2], repeat this
schedule by pressing [3] or play the previous schedule by
pressing [4].
Step 6 —
If you press [*] twice, you will return to the External Message Delivery menu.
3-7
Chapter 4
Caller Handling
This chapter describes how callers can be handled by the Subscriber’s mailbox.
Caller Handling
Contents
Recording Messages (for any caller) .................................................
Recording Messages (from a rotary phone) .....................................
Receiving External Delivery Messages .............................................
Replying to External Delivery Messages ..........................................
4-2
4-3
4-4
4-5
Recording Messages (for any caller)
Anyone who reaches the Voice Mail Service can
record messages in the mailboxes.
Caller Handling
Call VPS
1
Selection
Prompt
Mailbox
No.
#
1
Name
Rotary
Phone
XXXX XXXX
Tip
Step 3, 6 —
When the beeper callback no.
entry mode is not disabled,
the VPS will ask you a
callback number according
to the intended mailbox setting; before recording a
message, after recording a
message or after selecting an
urgent message.
“Please enter your callback
number.
You can enter up to ... digits.”
1 Enter the number.
2 Press 2 to accept.
Step 6 —
1 Review
2 Accept
3 Record a new one
4 Add
5 Erase and exit
4-2
If the system supports multiple service (up to
three languages), you will hear a selection
menu.
0
Operator
Go to
Step 4
Call the VPS and access the Voice Mail Service.
2
If you hear the above prompt, press the
number of the appropriate language.
3
Enter the mailbox number of the intended
recipient.
To enter by name, press # 1 and first 3
or 4 letters of the recipient last name.
4
5
6
7
State your message at the tone.
Press 1 to end recording.
Press 2 to accept.
Press 1 to set this message to a private
message. Otherwise, press 2 .
Recording Messages (from a rotary phone)
Call VPS
Mailbox
No.
#
1
Name
Rotary
Phone
XXXX XXXX
0
Operator
Go to
Step 2
From a rotary phone, once your
message has been recorded, you
cannot re-record nor erase it.
1
Call the VPS and access the Voice Mail Service.
2
3
4
Wait a moment.
State your message.
Hang up the phone.
4-3
Caller Handling
Selection
Prompt
If you are using a rotary phone, you cannot specify a
mailbox because every key entry is invalid. Wait a
moment until the VPS guides you to the General
Delivery Mailbox where you can leave your message.
The recorded messages will be delivered to your
intended party later. Callers who do not enter anything because they are unfamiliar with the VPS can
also leave messages in the same way.
Receiving External Delivery Messages
External Delivery Messages are delivered by the VPS
to telephone numbers instead of mailboxes.
Caller Handling
VPS Calls you
1
Selection
Prompt
1
2
3
Receive
Message
Hold
Call
Back
Password +
#
Receive Message
1
2
Repeat
Reply
*
End
Pick up a call from the VPS.
If the system is equipped with multiple languages (up to three languages), you will hear
a selection prompt.
2
Press the number of the appropriate language.
3
4
Press 1 to receive the message.
0
Enter the password and # .
• Then the VPS plays the external message.
Help
5
Press
*
to end the call.
Tip
Step 4 —
If a password is not assigned, you can listen directly to
the message.
If you enter the incorrect password three times, the VPS
will play the following prompt and you cannot receive the
external message any more.
“This message is from ‘SENDER’ of ‘Company Name.’
Please call ‘TELEPHONE NUMBER.’
Extension number ... .
To repeat, press [1].
To end this call, press [*].”
When you press [1], the VPS will repeat this prompt.
4-4
Replying to External Delivery Messages
1-4
VPS Calls you
1
2
3
Receive
Message
Hold
Call
Back
Password +
#
7
8
Press 2 to reply to the message.
Record the message and press 1 to continue.
Press 2 to accept.
Press 1 to set this message to a private
message. Otherwise, press 2 .
Receive Message
1
2
Reply
*
0
Go to
Step 6
4-5
Caller Handling
5
6
Selection
Prompt
Same as Receiving External Delivery Messages.
Chapter 5
Mailbox Setup
Mailbox Setup
This chapter describes the setup procedures using a touch-tone telephone for
subscribers.
Contents
Setting the Call Transfer Status
(Call Block/Call Screening/Intercom Paging/Beeper Access) ....... 5-2
Setting up a Covering Extension ........................................................ 5-3
Setting the Incomplete Call Handling Status .................................... 5-4
Setting the Message Reception Mode ................................................ 5-6
Recording Personal Greetings ............................................................ 5-7
Changing Your Password .................................................................... 5-8
Recording Your Name ......................................................................... 5-9
Entry of Personal Group Distribution Lists ..................................... 5-10
Recording the Names of Personal Group Distribution Lists .......... 5-11
Deleting from Personal Group Distribution Lists ............................ 5-12
Message Waiting Lamp Notification Setting ..................................... 5-13
Setting Notification by Calling ........................................................... 5-14
Setting Answer Lengths for the Interview Mailbox ......................... 5-16
Recording Questions for the Interview Mailbox .............................. 5-17
Erasing Questions from the Interview Mailbox ............................... 5-18
Setting the Call Transfer Status
(Call Block/Call Screening/Intercom Paging/Beeper Access)
Subscriber's
Main Command Menu
1
2
3
4
5
6
Automated
Attendant
Status
1
4
3
2
1
Call
Transfer
Status
*
You can specify how the VPS should handle a call
when a caller specifies your extension number in the
Automated Attendant Service. You can set one of the
four functions or you can set none of them.
Covering Message Incomplete
Extension Reception Handling
Mode
Status
Setting
2
3
4
5
Call
Intercom Calling
Disable
Call
Blocking Screening Paging a Beeper all transfer
services
1
2
3
Log in the main command menu.
Press 4 for Automated Attendant status.
Press 1 to set the call transfer status.
• The VPS tells you the current status.
4
Press the appropriate key to receive your
desired option.
1
Call Blocking
Blocks all incoming calls to your extension.
2
Call Screening
Tells you the caller’s name before you
answer the call. Then you can decide
whether or not to answer it.
3
Intercom Paging
Pages you over the Intercom Paging
System.
4
Calling a Beeper
Calls your beeper and displays the caller’s callback number on the LCD.
5
Disable all transfer services
Rings your extension directly.
5-2
Mailbox Setup
The Intercom Paging feature is
available only if your company
is using a Panasonic KX-TD
series telephone system.
Setting up a Covering Extension
Setting up a Covering Extension lets you have incoming calls and messages transferred to a designated
extension.
Subscriber's
Main Command Menu
1
2
3
4
5
Automated
Attendant
Status
1
Call
Transfer
Status
2
3
6
*
4
Covering Message Incomplete
Extension Reception Handling
Mode
Status
Setting
Go to
Step 4
The owner of this extension
should be someone whom you
can rely on, as he will be handling your calls when you are
not available.
Mailbox Setup
This extension also performs as a personal operator.
When the caller presses ‘0’ while receiving the personal
greeting, the call is transferred to this extension.
This feature does not work unless Covering Extension Transfer
is enabled (see page 5-4).
1
2
3
4
5
Log in the main command menu.
Press 4 for Automated Attendant status.
Press 2 to set up a covering extension.
Press 1 to set the extension.
Enter the extension number.
• The VPS tells you the number you have just
entered.
6
Press 2 to accept.
Tip
Step 4 —
You can accept the current status by pressing [2].
You can delete the current extension by pressing [3] if you
don’t need it.
5-3
Setting the Incomplete Call Handling
Status
Subscriber's
Main Command Menu
1
2
3
5
4
6
Automated
Attendant
Status
2
1
Call
Transfer
Status
1
*
Incomplete calls are calls which are unanswered or for
which the line is busy. The Incomplete Call Handling
status can be set to record a message from the caller,
transfer the caller to a covering extension, page the
mailbox’s owner by intercom, notify the mailbox’s
owner via beeper, transfer the caller to the operator, or
let the caller try another extension. You may enable as
many features as you may need among the six.
4
3
Covering Message Incomplete
Extension Reception Handling
Mode
Status
Setting
2
3
4
5
6
Leave Covering Intercom Beeper Operator Return to
Message
Ext.
Paging
Transfer A.A. Service
Transfer
Top Menu
1
2
3
Log in the main command menu.
Press 4 for Automated Attendant status.
Press 4 to set the Incomplete Call Handling
status.
1
Mailbox Setup
Enabling Leaving a Message Status
The Intercom Paging feature is
available only if your company
is using a Panasonic KX-TD
series telephone system.
Press 1 .
• The VPS tells you the current status.
2
Press 1 to change or
(enable/disable).
2
to accept
Enabling Covering Extension Transfer
Status
1
Press 2 .
• The VPS tells you the current status.
2
Press 1 to change or
(enable/disable).
2
to accept
Enabling Intercom Paging Status
1
Press 3 .
• The VPS tells you the current status.
2
Press 1 to change or
(enable/disable).
2
to accept
5-4
Setting the Incomplete Call Handling
Status
Enabling Beeper Access Status
1
Press 4 .
• The VPS tells you the current status.
2
Press 1 to change or
(enable/disable).
2
to accept
Enabling Operator Transfer Status
1
Press 5 .
• The VPS tells you the current status.
2
Press 1 to change or
(enable/disable).
2
to accept
Mailbox Setup
Returning to Top Menu Automated
Attendant Service Status
1
Press 6 .
• The VPS tells you the current status.
2
5-5
Press 1 to change or
(enable/disable).
2
to accept
Setting the Message Reception Mode
Subscriber's
Main Command Menu
1
2
3
4
5
Automated
Attendant
Status
1
Call
Transfer
Status
2
3
6
*
If you are not available to answer calls, those calls are
treated according to the Incomplete Call Handling
Status setting. When callers decide to leave messages
in your mailbox, you can specify whether callers are
directed to your regular mailbox or your interview
mailbox.
4
Covering Message Incomplete
Extension Reception Handling
Mode
Status
Setting
Go to
Step 4
Log in the main command menu.
Press 4 for Automated Attendant status.
Press 3 to set the message reception mode.
Press 1 to change the current setting to the
other (interview mode/message recording
mode).
Mailbox Setup
To use an interview mailbox,
you must have the System
Manager assign an interview
mailbox number beforehand.
1
2
3
4
Tip
Step 4 —
You can press [2] to accept the current setting.
5-6
Recording Personal Greetings
Subscriber's
Main Command Menu
1
2
3
4
5
6
Mailbox
Management
1
2
Change
Personal
Greeting
Change
Password
3
Change
Owner's
Name
*
After reaching your mailbox, callers will hear your
personal greeting messages first. You will record three
kinds of the personal greetings; (1) No Answer Greeting, (2) Busy Greeting and (3) After Hours Greeting.
The VPS plays one of them as appropriate by each
call.
4
Group
Distribution
List
Setting
Go to
Step 4
1
2
3
4
Log in the main command menu.
Press 5 for Mailbox Management.
Press 1 to record a personal greeting.
Press 1 – 3 to change the greeting.
Mailbox Setup
• The VPS tells you the current personal
greeting (if it exists).
Note:
It is helpful to include a
statement of your answering
telephone number with the
exchange name or normal
code in the greeting message.
A greeting message begins
within 3 seconds of answering, of paytone ceasing, or of
answering ceasing, as appropriate.
5
6
7
8
Press 1 to record a greeting.
Record your greeting and press 1 .
Press 2 to accept.
Confirm your setting and press 2 to accept.
Tip
Step 4 —
1 No answer greeting
2 Busy greeting
3 After hours greeting
Step 7 —
1 Review
2 Accept
3 Record a new one
4 Add
5 Erase and exit
Step 8 —
You can erase the greeting by pressing [3].
5-7
Changing Your Password
Subscriber's
Main Command Menu
1
2
3
4
5
6
Mailbox
Management
1
2
Change
Personal
Greeting
Change
Password
Go to
Step 4
3
Change
Owner's
Name
*
You have the option of assigning a password to your
mailbox to prevent someone else accessing it to receive
Subscriber’s Service. A password should be no longer
than eight digits and the valid keys are from ‘0’ to ‘9’.
You can change it at any time.
4
Group
Distribution
List
Setting
For your password, avoid setting
it to obvious combinations of
numbers.
Log in the main command menu.
Press 5 for Mailbox Management.
Press 2 to change the password.
Press 1 to set the mailbox password.
Enter the password and # .
• The VPS tells you the password.
6
Mailbox Setup
If you forget your password,
have your System Manager
delete it, then you can assign a
new one.
1
2
3
4
5
Press 2 to accept.
5-8
Recording Your Name
Subscriber's
Main Command Menu
1
2
3
4
5
6
Mailbox
Management
1
2
3
Change
Personal
Greeting
Change
Password
Change
Owner's
Name
*
4
Group
Distribution
List
Setting
Go to
Step 4
Record the name by which most
people know you.
Mailbox Setup
This recording is played for callers who have reached
your mailbox. This assures them that they are in the
right mailbox. In addition, when a caller is specifying
the mailbox by entering first three or four letters of the
owner’s last name, the VPS will announce a series of
the recorded names among which they can select.
If a name has been already
recorded, the VPS plays the
recording for you. You can then
make a new recording.
1
2
3
4
5
Log in the main command menu.
Press 5 for Mailbox Management.
Press 3 to record the owner’s name.
Press 1 to record a new one.
Record your name and press 1 .
• The VPS tells you the owner’s name.
6
Press 2 to accept.
Tip
Step 4 —
You can accept the current owner’s name by pressing [2].
You can erase the name by pressing [3].
5-9
Entry of Personal Group Distribution
Lists
Subscriber's
Main Command Menu
1
2
3
4
5
6
Mailbox
Management
1
2
Change
Personal
Greeting
Change
Password
3
Change
Owner's
Name
*
A Personal Group Distribution List is used in Message Delivery and Message Transfer to send the same
message to several mailboxes with a single operation.
Up to four lists can be maintained at the same time,
and each list can contain up to twenty members.
4
Group
Distribution
List
Setting
Group No.
2
Change
Group
Name
Add
Members
Go to
Step 6
3
Delete
Members
4
Review
List
Log in the main command menu.
Press 5 for Mailbox Management.
Press 4 to set the group distribution list.
Enter the group number (1 – 4).
Press 2 to add members to the list.
Enter the mailbox number to be added.
Mailbox Setup
1
1
2
3
4
5
6
7
8
Press 2 to add the number.
Press 2 to end adding members.
Tip
Step 7 —
You can change the number by pressing [1].
You can end adding members by pressing [*].
Step 8 —
You can continue adding members by pressing [1].
5-10
Recording the Names of Personal Group
Distribution Lists
The VPS will play the recording for you when you
specify a personal group distribution list. Then you
assure that it is the right one.
Subscriber's
Main Command Menu
1
2
3
4
5
6
Mailbox
Management
1
2
Change
Personal
Greeting
Change
Password
3
Change
Owner's
Name
*
4
Group
Distribution
List
Setting
Mailbox Setup
Group No.
1
2
Change
Group
Name
Add
Members
3
Delete
Members
1
2
3
4
5
6
7
Log in the main command menu.
Press 5 for Mailbox Management.
Press 4 to set the group distribution list.
Enter the group number (1 – 4).
Press 1 to record the group name.
Record the name and press 1 .
Press 2 to accept.
4
Review
List
Go to
Step 6
Tip
Step 5, 6 —
If a group name is already recorded, press [1] to change
this name, then record the new one.
Step 7 —
You can erase the name by pressing [3].
5-11
Deleting from Personal Group Distribution
Lists
Subscriber's
Main Command Menu
1
2
3
4
5
6
Mailbox
Management
1
2
Change
Personal
Greeting
Change
Password
3
Change
Owner's
Name
*
4
Group
Distribution
List
Setting
1
2
3
4
5
6
7
Log in the main command menu.
Press 5 for Mailbox Management.
Press 4 to set the group distribution list.
Enter the group number (1 – 4).
Press 3 to delete members from the list.
Press 2 to delete a member.
Press 1 to delete the mailbox.
Group No.
2
Add
Members
3
Delete
Members
4
Mailbox Setup
1
Change
Group
Name
Review
List
Go to
Step 6
Tip
Step 6 —
You can delete all members by pressing [1].
Step 7 —
You can keep the mailbox and play the next mailbox by
pressing [2].
5-12
Message Waiting Lamp Notification
Setting
The VPS illuminates the message waiting lamp of
your extension when a new message is recorded in
your mailbox.
Subscriber's
Main Command Menu
1
2
3
4
5
6
1
Mailbox Setup
Interview
M.B.
Management
2
Message
Waiting
Notification
Setting
*
1
2
3
Log in the main command menu.
External
Message
Delivery
4
Press 1 to change the Message Waiting
Lamp Notification Status.
5
Press 1 to change the Message Waiting
Lamp Notification Status, or 2 to accept
it.
Other
Features
3
1
2
3
Message
Waiting
Lamp
Status
Change
Device
Status
Assign
Tel. No.
Go to
Step 5
5-13
Press 6 for Other Features.
Press 2 to set Message Waiting Notification.
Setting Notification by Calling
The VPS calls the preset telephone or beeper when a
new message is recorded in your mailbox. Set the following three parameters as appropriate.
Subscriber's
Main Command Menu
1
2
3
4
5
6
Other
Features
1
Interview
M.B.
Management
2
Message
Waiting
Notification
Setting
*
3
External
Message
Delivery
2
3
Change
M.W.
Lamp
Status
Change
Device
Status
Assign
Tel. No.
Device No.
1
2
3
Schedule
Continuously
Do not use
Setting Device Status
For each device, the notification is enabled, disabled
or enabled on the preset schedule.
If you want to enable it on the schedule, contact your
System Administrator as you are not allowed to set
the schedule by yourself.
1-3
4
5
6
Same as the Message Waiting Lamp Status.
Press 2 to set the device status.
Enter the device number.
Press 1 – 3 to select the status.
Tip
Step 6 —
1 Schedule (enabled on the schedule)
2 Continuously (enabled whole day)
3 Do not use (disabled whole day)
5-14
Mailbox Setup
1
The VPS can notify your beeper with the callback
number of the party who left the message. For this
feature to work, the telephone number stored on the
VPS for your beeper must include the beeper display
command.
Setting Notification by Calling
You must have your System
Manager authorize the use of
the Callback Number Entry
Mode beforehand.
Subscriber's
Main Command Menu
1
2
3
4
5
6
Other
Features
1
Mailbox Setup
Interview
M.B.
Management
2
Message
Waiting
Notification
Setting
*
3
External
Message
Delivery
1
2
3
Change
M.W.
Lamp
Status
Change
Device
Status
Assign
Tel. No.
Notification Number Assignment
You can set the telephone or beeper numbers where
you wish to receive notification calls up to three. You
can use the keys ‘0’ to ‘9’, a tone/pulse switch.
1-3
4
5
6
7
8
9
Same as the Message Waiting Lamp Status.
Press 3 to assign the telephone number.
Press 1 to change the first telephone
number, 2 to change the second telephone
number, 3 to change the third telephone
number.
Press 1 to set the telephone number.
Enter the telephone number.
Press 2 to accept.
Select 1 to be notified by telephone or 2
by a beeper.
Go to
Step 5
Tip
Step 8 —
1 Change the telephone number
2 Accept
3 Review
4 Add more digits
5 Insert a pause
6 Set dial mode
7 Insert a wait for dial tone
8 Insert a beeper display command
5-15
Setting Answer Lengths for the Interview
Mailbox
Subscriber's
Main Command Menu
1
2
3
4
5
6
Other
Features
1
Interview
M.B.
Management
2
Message
Waiting
Notification
Setting
*
3
External
Message
Delivery
1
2
3
Record
Question
Answer
Length
Erase
Question
Every Subscriber can maintain
an interview mailbox. Be sure
to have your System Manager
assign an interview mailbox
number.
1
2
3
Log in the main command menu.
Press 6 for Other Features.
Press 1 for Interview Mailbox Management.
4
Press 2 to set the answer length.
• The VPS plays the question No.1 if it has
been recorded.
5
Press 1 to set or change the length of question No. 1.
• The VPS plays the length if it has been set.
6
7
Press 1 to change the length.
8
Accept the length by pressing 2 .
• Then, the VPS plays the next question if it
has been recorded.
9
Repeat steps 5 – 8.
Press 1 for 4 seconds , 2 for 8 seconds,
3 for 16 seconds or 4 for 32 seconds.
• The VPS plays the length that you have just
entered.
Tip
Step 5 —
You can go to the next question by pressing [2] and to the
previous question by pressing [3].
You can jump to the desired question by pressing [4], then
the question number and [#].
5-16
Mailbox Setup
Go to
Step 5
An Interview Mailbox plays prerecorded questions to
callers and records their answers. You can record up to
ten questions and set the answer lengths from four to
thirty-two seconds. The answers are recorded in a
string and stored in your mailbox.
Recording Questions for the Interview
Mailbox
Subscriber's
Main Command Menu
1
2
3
4
5
6
Other
Features
1
Mailbox Setup
Interview
M.B.
Management
2
Message
Waiting
Notification
Setting
*
Log in the main command menu.
4
Press 1 to record questions.
1
2
3
Answer
Length
Erase
Question
Press 6 for Other Features.
Press 1 for Interview Mailbox Management.
• The VPS plays the question.
3
External
Message
Delivery
Record
Question
Go to
Step 5
1
2
3
5
6
Press 1 to record question No. 1.
7
Press 2 to accept the question.
Record the question and press 1 to end
recording.
• The VPS plays the next question.
8
Repeat steps 6 – 8.
Tip
Step 5 —
You can go to the next question by pressing [2] and to the
previous question by pressing [3].
You can jump to the desired question by pressing [4], then
the question number and [#].
Step 7 —
1 Review
2 Accept
3 Record a new one
4 Add
5 Erase and exit
5-17
Erasing Questions from the Interview
Mailbox
Subscriber's
Main Command Menu
1
2
3
4
5
6
Other
Features
*
1
2
3
4
1
Interview
M.B.
Management
2
Message
Waiting
Notification
Setting
Press 6 for Other Features.
Press 1 for Interview Mailbox Management.
Press 3 to erase the question.
• The VPS plays question No. 1.
3
External
Message
Delivery
Log in the main command menu.
5
Press 1 to erase question No. 1.
• The VPS plays the next question.
1
2
3
Record
Question
Answer
Length
Erase
Question
6
Repeat step 5.
Mailbox Setup
Go to
Step 5
Tip
Step 5 —
You can go to the next question by pressing [2] and to the
previous question by pressing [3].
You can jump to the desired question by pressing [4], then
the question number and [#].
5-18
1 Receive
******** Quick Reference ********
Entering a Mailbox
1
Repeat
1 1 Previous
Next
2
Erase
3
Reply
4
Rewind
5
6
Fast Forward
7
Transfer
8
Scan
1 Name
#
(Help Menu)
2 Deliver
Enter the mailbox number.
RECORD MESSAGES
Mailbox No.
1 Record message
2 Add Mailbox
3 Review Mailing List
3 Check Mailbox Distribution
Status
*
Mailbox No.
Play the message
1
1 1 Play previous message
Play next message
2
3
Cancel
4 Automated Attendant Status
Password #
1
2
3
4
Set Call Transfer Status
Set Covering Extension
Set Message Reception Mode
Set Incomplete Call Handling
Status
MAIN COMMAND
5 Mailbox Management
1
2
3
4
5
6
*
Receive message
Deliver message
Check mailbox
distribution
For Automated
Attendant Status
For Mailbox
Management
Other features
End this call
1
2
3
4
Record Personal Greetings
Set Password
Enter Owner's Name
Set Group Distribution Lists
6 Other Features
1 Set Interview Mailbox
2 Set Message Waiting Notification
3 Set External Delivery Message
1 Call Transfer Status
Note:
●
1
2
3
4
5
Call Blocking
Call Screening
Intercom Paging
Beeper Access
All disable
●
●
Press * at any time to exit the menu.
Press 0 to have the Help menu.
If you have to hang up before the prompt is
finished, press # 9 . Then hang up the
phone.
***** Service Access Commands *****
Commands
4 Incomplete Call Handling Status
1
2
3
4
5
6
Leaving a Message
Covering Extension
Intercom Paging
Beeper Access
Operator
Return to A.A. Service Top Menu
1 Personal Greetings
1 No Answer
2 Busy
3 After Hours
1 Interview Mailbox Management
1
ABC
2
#1
Dialing by
Name
#D
Department
Dialing
JKL
5
MNO
6
#L
Login
#M
Voice Mail
PRS
7
TUV
8
WXY
9
#R Restart
(Main Menu)
#T
Transfer
#X
Exit
*
*
Backup
0
#
GHI
4
1 Record Question
2 Set Answer Length
3 Erase Question
2 Message Notification
1 Message Waiting Lamp
2 Device Status
3 Assign Telephone Numbers
3 External Message Delivery
1 Record message
2 Check delivery status
3 Set a mailing list
DEF
3
2
1 Schedule
2 Continuously
3 Do not use
Memo
Memo
Matsushita Electric Industrial Co., Ltd.
Central P.O. Box 288, Osaka 530-91, Japan
Printed in Japan
PSQX1102ZA KK0596CK0
To expand the sub-menu, left click the
mouse on the symbol, located to the left of
the selected text.
for version 3 Adobe Reader
for version 4 Adobe Reader