1
section 2
SETUP
This section describes the simple steps required to prepare the MAC 600/E for operation.
Unpacking
The MAC 600/E package includes:
•
•
•
•
2 Fast-Lock Omega clamp brackets
5-meter XLR-XLR control cable
Light snoot
User manual
The packing material is carefully designed to protect the fixture during shipment - always use it or a custom MAC 500/600
flight case to transport the fixture.
Installing or changing the lamp
WA R N I N G !
Disconnect the fixture from AC power before proceeding. Always wear safety goggles to protect your eyes and allow a hot lamp to cool for at least 15 minutes
before removing it from the fixture.
The MAC 600/E works with the Philips MSR-575/2 and MSD-575, and the Osram HSR-575/2. Installing any other lamp may
damage the fixture. The lamp holder is pre-adjusted at the factory; precise alignment may be necessary due to slight variations
between lamps. The procedure is described on page 15.
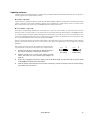
1.
The MAC 600/E must be cool and isolated from AC power. Remove the 2 thumbscrews securing the
lamp-socket assembly to the rear of the head. Pull out the lamp-socket assembly.
2.
If changing the lamp, remove the old lamp from the socket.
3.
Holding the new lamp by its ceramic base (do not touch the glass), insert it firmly and squarely into the
lamp socket.
4.
Clean the glass bulb with the cloth supplied with the lamp, particularly if your fingers touch the glass. A
clean, lint-free cloth wetted with alcohol may also be used.
5.
Keep the lamp wire between the fins as you insert the lamp-socket assembly into the head. Turn the
assembly counterclockwise to align the holes with the spacer nuts. Replace the thumbscrews and
tighten them by hand.
6.
Before striking the lamp, reset the RLAH and RLST counters under the TIME menu to track lamp hours
and lamp strikes. See page 11.
Powering the fixture
Check voltag e and frequency settings
The settings must match the local AC power supply. These settings are printed on the serial number label on the base. If the
settings do not match the local conditions, then the ballast and/or transformer must be rewired. See section 5 for details.
User Manual
3