1
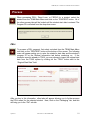
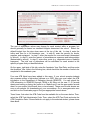
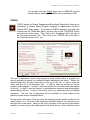
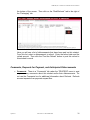
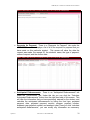
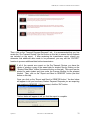
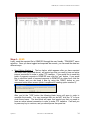
GEMCOR, Inc. Institutional Software & Servicing Copyright © 2000, GEMCOR, Inc. GEMCOR, Inc. TEAM User’s Manual 2010-2011 Edition Introduction TEAM was developed by GEMCOR, Inc. in response to the overwhelming need for a user friendly, Windows based, software system for use by post secondary institutions to transmit electronic applicant and award information directly to GEMCOR from the school’s on campus computer systems. TEAM (Title IV Electronic Awarding Module) is an optional software system that allows schools the ease of electronically transmitting award requests to GEMCOR. Electronic processing is undoubtedly the fastest and most accurate way for our offices to communicate. It allows you to receive ISIRS the same day we get them from the department, reduces the turnaround time on your awards, allows you to originate your payment requests electronically all while using today’s state of the art technology. Either way, additional benefits include reduced paper waste and postage expense for both of our offices as well the obvious time benefit of being able to initiate payment requests the same day that an ISIR is produced by the department! In most cases you'll be able to process actual payments within 2-3 days of filing the FAFSA. TEAM is an optional system. Physical review of ISIR files is still available for those schools who like the "second set of eyes" confirming the accuracy of the ISIR file. Our TEAM system allows users to preview or print ISIRS to the screen or printer, print award letters at your location, view disbursement journals via TEAM, preview a short copy of the ISIR called the "QUICK VIEW ISIR,” view a transmission log for payment requests and confirmations, view disbursement information, pull information from your existing TRAX System into TEAM, change your school name and address, view new student award information, screen for all payment types, preview EFC intermediate values available for direct loan processing, has the ability to scroll through all payment records for subsequent payment requests, and offers multi-user functionality on your existing network. Your TEAM system also includes electronic withdrawal and refund notifications, electronic subsequent payment requests, and most importantly, report capability ensuring that no students "slip through the cracks" and end up unprocessed. GEMCOR's new TEAM now joins the best technical support team in the country, combining to give you effortless administration of your Title IV funds. In past years TEAM was only used by clients who requested this service, and an annual software fee was charged. We are very happy to announce that our TEAM system is now free of charge to all of our clients. We feel that the savings generated by the system will cover any development costs and are passing that savings on to you. We are also confident that you will benefit from reduced postage and express mail expenses on your end too. Lastly, regulations allow you to maintain your records electronically so you need not even print your ISIRS on campus. Once they are in your TEAM system, they are part of your permanent records. As with any software system, April 2011 Call Toll Free 1-888-GEMCOR-8 1 GEMCOR, Inc. TEAM User’s Manual 2010-2011 Edition we encourage routine backups of your data but should you lose any data, we can regenerate a year to date batch of ISIRS at any time. It's a classic win-win situation. GEMCOR, Inc. is now paperless for the 2010-2011 ISIRs and 2011-2012 Award Letters. If you are not already a TEAM Client, please call our offices at 1-888GEMCOR-8 to receive your TEAM Installation Package for 2010-2011 so that you can print your 2010-2011 ISIRS and 2010-2011 Award Letters. This user’s manual will outline the features of the TEAM software system and will provide instructions for the use of all TEAM features. If at any time you require technical support, help is only a phone call away. Just dial toll free 1-888-GEMCOR-8. 2011-2012 TEAM System Features Receive ISIRs electronically through Internet based transfers Print/Preview ISIR records by daily batch or individual basis Request Federal Pell Grant Awards Request Federal SEOG Awards Request Federal Direct Loan Awards Print Award Letter Notifications Notify GEMCOR of refunds deposited Computer based recordkeeping of all your file submissions and disbursements SSCR Functionality View Disbursement Journal Information Full-Time Technical Support via Your Computer Screen Annual Licensing Fee: FREE to all GEMCOR Clients System Requirements IBM Compatible Personal Computer (PC) Windows XP Operating System A CD, CDR, or DVD Drive DSL Connection April 2011 Call Toll Free 1-888-GEMCOR-8 2 GEMCOR, Inc. TEAM User’s Manual 2010-2011 Edition Table of Contents Procedural Information………………………………….….……………....…4 Overview of TEAM buttons…………………………………….……….…….5 Installation……………………………………..………………………...….…..6 Getting Started………………………………..…………………………….…11 Utilities………………………………………………………………………….15 School Information…………………………………………..……..…...16 Program Information……………………………………………….…...16 Budget Information……………………………………………….……..17 Sorting the Student Records…………………………………………....….18 Process PELL……………………………………………………………..……….19 Direct Loan………………………...……………………………..….…..21 FSEOG………………………………………………………….…….....26 Subsequent Payments…………………………………..……….…….27 Refunds………………………………………………..…………..….....27 Transmit…………………………………...…………..………………..….…..30 Receive…………………………………………………………………….……36 Print, Preview, and Quick View…………………………………………..…37 Gainful Employment Reporting…………………………………………….37 How to check or clear your messages………………………..…………..40 Versions of TEAM…………………………………………………….……....41 Training………………………………………………………………….…......43 Support………………………………………………………………………....43 April 2011 Call Toll Free 1-888-GEMCOR-8 3 GEMCOR, Inc. TEAM User’s Manual 2010-2011 Edition Procedural Information Application Processing After a Students' Free Applications for Federal Student Aid (FAFSA) is filed, a need analysis report will provide you with an immediate calculation of the student's expected family contribution (EFC). After all of your applications are entered, an export routine will extract your application records into a single data file. This data file containing your student applications can then be electronically transmitted to GEMCOR (or to the Student Aid Internet Gateway (SAIG) for schools that submit data to the central processor under their own "TG" account). Approximately two to three days later, the students' Institutional Student Information Records (ISIRs) are available for retrieval. ISIR Processing Any ISIR files for your school are downloaded into your computer each time you perform the "receive" function from the TEAM Main Menu. Any ISIR data that GEMCOR has prepared for you will be returned during this transmission. If you received any ISIR files from GEMCOR, they must be imported into the TEAM database, and then you will have the option to preview or print selected students’ ISIRs. Schools who receive data from the Student Aid Internet Gateway (SAIG) system under their own "TG" account can choose whether they want to import and print their ISIRs through EDExpress, or through TEAM. Pell Award Processing After your ISIRs have been imported into the TEAM system, you can enter "Formula Sheet" information for students who are ready for a first Pell payment for the award year. For subsequent payments, simply enter the payment eligibility date into the student's record in the TEAM system. All Pell award files can then be exported into a single data file, and the file will be transmitted to GEMCOR during your next “send” function. When we receive the file, your students' Pell awards will be processed accordingly. Federal Direct Loan Processing After your ISIRs have been imported into the TEAM system, you can enter “Certification Worksheet” information for students who are ready for a first Direct Loan payment for the award year. For subsequent payments, simply enter the payment eligibility date into the student’s record in the TEAM system. All Direct Loan award files can then be exported into a single data file, and the file will be transmitted to GEMCOR during your next “send” function. When we receive the file, your students’ Direct Loan awards will be processed accordingly. Campus-Based Award Processing In similar fashion to the procedures for electronic Pell award requests, campusbased award requests can also be data entered into the student's record in the TEAM system. The campus-based award requests will be transmitted to GEMCOR April 2011 Call Toll Free 1-888-GEMCOR-8 4 GEMCOR, Inc. TEAM User’s Manual 2010-2011 Edition during your next “send” function. Upon receipt of your electronic file, the students' campus-based awards will be processed accordingly. Refund / Withdrawal Processing Refund information and withdrawal date information can be entered into the student's record in the TEAM system. As with Pell and campus-based award requests, any pending refund or withdrawal information is automatically exported from the TEAM system. Upon receipt of your electronic data file, any refund or withdrawal information is processed accordingly. The above descriptions represent a simple overview of the TEAM administrative processes. Please review the respective sections in this manual for detailed information on entering data and navigating through the TEAM Software System. Overview of TEAM Buttons Upon entering the TEAM system, a main menu will be displayed showing the eight administrative functions available to you as well as an “EXIT” command button. If at any point when you are in the TEAM program, and you want to get back to the Command Center screen, simply click the “EXIT” button at the bottom left of the screen. Try not to “X” out of any TEAM screens using the red “X” on the upper right section of the screen. The “PRINT ISIR SUMMARY” button is used if you want to print a listing of all current ISIRs in TEAM. The “PROCESS” button allows you to go into each student’s record and request PELL grants, Loans, and FSEOG (if school is eligible). This function also allows you to report refunds as well. Once you have entered each student for payment and toggled each student record, you are ready to transmit the data to Gemcor. If you want to transmit student award data to GEMCOR, click the “TRANSMIT” button. From this menu, you will be able to preview a list of all students toggled, preview/print a April 2011 Call Toll Free 1-888-GEMCOR-8 5 GEMCOR, Inc. TEAM User’s Manual 2010-2011 Edition copy for a student’s file, export and send to GEMCOR, and view your Transmission Log. The “UTILITIES” button allows you to set up Program Information, Budget Information, School Information, view GEMCOR Disbursement Reports and Transmission Log. The “PREVIEW” button allows you to preview the selected student’s ISIR to the screen rather than printing it to the printer. First, select a student from the list and click the “PREVIEW” button at the bottom of the screen. The “QUICK VIEW” button allows you to view a single-page “Quick View” of a student’s ISIR. If you would like to see a student’s ISIR Quick View, select a student from the list and click on the “Quick View” button at the bottom of the screen. The “PRINT” button is used if you would like to print a student’s ISIR. First, select a student from the list and click on the “PRINT” button at the bottom of the screen. “SSCR” stands for Student Status Confirmation Report. 2011-2012 TEAM now offers SSCR functionality. Instead of listing student enrollment statuses and sending them to us via fax or mail as in the past, you are now able to enter student statuses on your computer via TEAM. You can electronically transmit your SSCR information to GEMCOR through the “SEND” function. Upon receipt, we will then send your school information to the Department of Education. Installation GEMCOR now installs TEAM and TRAX remotely through LogMeIn software! This is the fastest and most convenient way to install our software on your computer, and it only takes a few easy steps! First, we need to install LogMeIn on the computer in which you want to run TEAM or TRAX. Please call our Technical Support Staff when you are ready to install the LogMeIn software on your machine. We will then send you an installation link via email that looks like the one below: April 2011 Call Toll Free 1-888-GEMCOR-8 6 GEMCOR, Inc. TEAM User’s Manual 2010-2011 Edition When you click the link in the email, the following message will appear. You should check the box next to, “I have received this link from a trusted source,” and then click “Continue.” Next, the following screen will appear, and you should click “Install LogMeIn.” April 2011 Call Toll Free 1-888-GEMCOR-8 7 GEMCOR, Inc. TEAM User’s Manual 2010-2011 Edition The following screen will appear, and you should click “Next.” The following screen will appear, and you should click “Next.” The following screen will appear, and you should click “I Agree.” April 2011 Call Toll Free 1-888-GEMCOR-8 8 GEMCOR, Inc. TEAM User’s Manual 2010-2011 Edition The following screen will appear, and you should choose “Typical (recommended)” and click “Next.” The following screen will appear, and you should click “Next.” The following screen will appear, and you should wait until the green bar finishes loading and wait until the following box appears: April 2011 Call Toll Free 1-888-GEMCOR-8 9 GEMCOR, Inc. TEAM User’s Manual 2010-2011 Edition When this box appears your setup is completed, and you can click “Finish.” Once you have completed the installation of LogMeIn on the computer that you wish to have TEAM installed, our Technical Support Staff can log into your machine remotely and install the TEAM software. After the installation is complete, we will load your Year to Date ISIR files, updated Disbursement Journals, and Confirmation Files into your TEAM mailbox and activate your license. You can also choose to install our TEAM software through a CD mailer package Workstation Installation from CD: Close any programs which may be minimized or running on your system. Place the TEAM CD into your CD-ROM, CD-RW, or DVD-ROM drive. Click the Start button, then Run, then click Browse. Select your CD/DVD drive from the pick list marked “Look In”. To install, select and run the “Setup.exe” file to begin your installation. April 2011 Call Toll Free 1-888-GEMCOR-8 10 GEMCOR, Inc. TEAM User’s Manual 2010-2011 Edition #1) Welcome Screen, click “NEXT” #2) Customer Information Screen, Enter User Name and Organization and click ”NEXT” #3) Choose Setup Type, Select ”CUSTOM” #4) Custom Setup, Select ”BROWSE” #5) Change Destination Folder, Change Folder Name to “C:\TEAM” and click ”OK” #6) Custom Setup Screen, Click ”NEXT” #7) Ready to Install Screen, Click ”INSTALL” After Installation: Once your installation is complete, please call our Technical Support Staff at 1-888GEMCOR-8 and we will load your Year to Date ISIR files, updated Disbursement Journals, and Confirmation Files into your TEAM mailbox and activate your license. We have an optional Support Package available that will allow our Technical Support Staff to connect to your computer screen to assist with your installation (if needed), online training and troubleshooting. Please ask our Technical Support Staff about this very valuable support package. Getting Started Now that you have installed and reviewed the layout and basic features of your new TEAM system, you are ready to start using the software. In order to open the TEAM system, you must first launch the Command Center. On your desktop there is an icon titled “Command Center - GEMCOR, Inc.” Double click this icon to open the Command Center. April 2011 Call Toll Free 1-888-GEMCOR-8 11 GEMCOR, Inc. TEAM User’s Manual 2010-2011 Edition The left side of the Command Center contains all TEAM Software functions. The right side of the Command Center contains all TRAX Software functions. TRAX, Institutional Student Tracking System, is another software package that we offer our clients. TRAX provides modules to efficiently monitor and track prospects; Admissions and Enrollment; Document Tracking; Marketing and Admissions Rep Performance; Attendance, Grades and Services Tracking; Satisfactory Academic Progress (SAP) Reports; Accounts Receivable; Placement Tracking; Default Management; 90-10 Revenue Tracking & 1098T Reporting; and Unearned Tuition Calculations. If you would like to receive more information on our TRAX Software package, or information on how to receive a TRAX Demo, please call our office at 1-888-GEMCOR-8. Please notice the new addition of a version number to the top of the Command Center (see arrow above). The version of the Command Center pictured above is Version 012. If the “2011-2012” button on your Command Center is not enabled, please call our offices at 1-888-GEMCOR-8 for assistance. April 2011 Call Toll Free 1-888-GEMCOR-8 12 GEMCOR, Inc. TEAM User’s Manual 2010-2011 Edition To enter into the TEAM System from your Command Center, simply click on the award year in which you wish to enter. The first time that you click on the “2011-2012” button from the Command Center, the following box will appear. This message box tells you that the TEAM program is loading your school information from TEAM 2010-2011 and will now close. Click ok, and it will bring you right back to the Command Center where you can re-enter TEAM by clicking on the “2011-2012” button again. If you did not have TEAM 2010-2011, you will have alternate steps to load your school information into the TEAM system. Please see the following section titled, “Utilities,” for more information. The image below displays the 2011-2012 TEAM Main Menu. The background of the 11-12 TEAM Main Menu displays the 2011-2012 new award year color, which is pink. In the upper right hand corner of this TEAM main menu, you will see the TEAM logo, along with the current version number of the TEAM system that you are running. Below this, you will see the Name, School Code, and Address of your Institution. In the lower right corner of this screen, there is an option of how to sort the Student ISIR List. You can choose to sort the list of student ISIRS by Name, Student ID, or Date Added by simply selecting the circle to the left of each option (see below). April 2011 Call Toll Free 1-888-GEMCOR-8 13 GEMCOR, Inc. TEAM User’s Manual 2010-2011 Edition If you have not done so already, please complete the following before you attempt to initiate 2010-2011 Payment Requests to GEMCOR via TEAM. April 2011 Call Toll Free 1-888-GEMCOR-8 14 GEMCOR, Inc. TEAM User’s Manual 2010-2011 Edition Utilities Loading the School Information, Program Information, and Budget Information Go to the “Utilities” Module and click on the “Miscellaneous” tab. Click on “School Global Import from TEAM 2010-2011” to automatically load the Program Information and Budget Information from TEAM 2010-2011 into TEAM 2011-2012. On this Miscellaneous tab, you will also find the “Disbursement Report by Payment Date.” To print a report of all of the disbursements in your TEAM 2011-2012 database, click “Disbursement Report by Payment Date”. This report should match your daily disbursement journals from GEMCOR, Inc. You should periodically match the disbursement journals to this report. Data may not reflect refunds processed outside of this system. If you would like to hand key the information from scratch or you do not have any previous information to load, click on the “Program Information” tab, the “Budget Information” tab, and the “School Information” tab and add the information manually. April 2011 Call Toll Free 1-888-GEMCOR-8 15 GEMCOR, Inc. TEAM User’s Manual 2010-2011 Edition School Information Enter your school information by selecting the “UTILITIES” button and selecting the “School Information” tab. Enter your school’s name, address, and phone number. Select your School Type (Clock Hour School or Term-Based School). This will aid in calculating the Anticipated Disbursements on your TEAM Award Letters. Program Information The Program Information Module includes constant information about Academic Programs at each of your schools. Go to the “Utilities” section and click on the “Program Information” tab. Complete the following information to create a program record for each academic program at your school. The asterisk “*” key at the bottom of the screen, allows you to add a new record. You can use the binoculars button to search for a specific program. Enter your first program ID and description. Enter the program length by typing in the clock/credit hours (or terms) and the number of weeks in the selected program. Then, enter the academic year length by typing in the clock/credit hours (or terms) and the number of weeks in the academic year. Enter the number of payments in each program, the breakdown in units or terms for each pay period and the number of weeks in each pay period. This will aid in calculating the Anticipated Disbursements on your TEAM Award Letters. April 2011 Call Toll Free 1-888-GEMCOR-8 16 GEMCOR, Inc. TEAM User’s Manual 2010-2011 Edition Budget Information Enter your Budget Information by selecting the “UTILITIES” button and selecting the “Budget Information” tab. Complete each field on this page to create a Cost of Attendance record for each standard Budget used at your school. Use the navigation toolbar at the bottom of the screen to navigate through the budget records. The asterisk ** key below adds a new record. Use the binoculars at the bottom of the screen to search for a specific Budget. First enter your Budget ID and Budget Description. Then enter the amounts for each field A-E for your Budget. Do not leave any fields blank. The total cost of attendance for the specific, standard Budget will be calculated. April 2011 Call Toll Free 1-888-GEMCOR-8 17 GEMCOR, Inc. TEAM User’s Manual 2010-2011 Edition Sorting the Student Records You can sort the student information on your TEAM Main Menu one of three ways. In the lower corner of the TEAM Main Menu, you will see the image to the right. You can sort the information by the Student’s Name, the Student’s ID, or the Date Added. This feature makes it much easier for you to find the student record that you wish to view or process. The default selection will be to sort the student records by Student Name. You can change this option by simply clicking in the circle next to the choice that you wish to sort the student records, and the ISIR List on the TEAM main Menu will change accordingly. April 2011 Call Toll Free 1-888-GEMCOR-8 18 GEMCOR, Inc. TEAM User’s Manual 2010-2011 Edition Process When processing PELL, Direct Loan, or FSEOG for a student, select the student from the TEAM Main Menu and click on the “PROCESS” button. All of the other process tabs will be locked until the student start date is entered. The Program ID is reflected from the drop-down menu. PELL To process a PELL payment, first select a student from the TEAM Main Menu and click on the “PROCESS” button at the bottom of the screen. The following menu will appear asking you to enter the student’s start date and the student’s program ID on the General Information tab before continuing on. If the student’s record is already in TRAX, you may choose to import the original start date from the TRAX system by clicking on the “TRAX” button next to the “Original Start Date” field. After you key in this information, other tabs will appear allowing you to further process the PELL award for the selected student. Next, click on the “Packaging” tab, and this will bring you to the “Pell” sub-tab. April 2011 Call Toll Free 1-888-GEMCOR-8 19 GEMCOR, Inc. TEAM User’s Manual 2010-2011 Edition The cost of attendance values may change for each student within a program, but should generally be based on standard budgets determined the school. Select the default budget from the drop down menu at the top of this tab. In step A, enter the tuition and fees for a full academic year. In step B, enter the amount for books, supplies, and equipment. In step C, enter the amount for room and board (determined by school). In step D, enter the amount of miscellaneous expenses and transportation (determined by school). In step E, enter other costs (e.g., dependent care or disability expenses). The total cost of attendance will be calculated for each student in the specific program that you identified above. On the upper, right side of this tab, enter the Academic Year Start Date, and then enter the Academic Year Units in the following box, which should be the number of units to be completed in this academic year. Four new ATB fields have been added to this menu. If your school accepts students who possess neither a high-school diploma or a GED, then you must report the ATB information to the Department of Education through GEMCOR. You can submit the ATB information to GEMCOR through TEAM or by filling out the new 11-12 formula sheets and mailing or faxing the forms to us. Make sure to use the appropriate formula sheet for your school (clock/credit hour or term-based). These new formula sheets are now on our website for downloading at your convenience. Go to www.gemcorinc.com and click on the Downloads page to find your appropriate formula sheet. Team Users: first select the ATB Code from the available list on the menu below. Then, select the ATB Test Administrator Code. Then, select the ATB Test Code and enter the ATB Completion Date. If these fields do not apply to the selected student, please leave them blank. April 2011 Call Toll Free 1-888-GEMCOR-8 20 GEMCOR, Inc. TEAM User’s Manual 2010-2011 Edition On the bottom of this tab, enter the payment period number you would like to start the award, either 1 or 2. Once you have entered all of the student’s information in the PELL tab, you are ready to export and send this data to GEMCOR, Inc. First, make sure that you are on the correct award year by using the navigation buttons at the bottom left side of the screen. In the screen image above, award year 1 is viewed (see arrow above). To request a payment for award year 2, use the right arrow at the bottom of the screen to navigate back and forth through the award years. If this is a first payment request, check the “1st Payment” toggle box on the bottom right side of this screen. If this is a 2nd payment request, check the “2nd Payment” toggle box on the bottom right side of this screen. The data for this student is now toggled and will be exported and sent to GEMCOR, Inc. during the next “SEND” transmission. Direct Loan A first payment of a Stafford or PLUS loan is accomplished by submitting a file to our office for loan origination. This file can now be submitted electronically via our TEAM system. To process a Direct Loan payment, first select the student from the TEAM Main Menu and press the “PROCESS” button at the bottom of the screen. Click on the “Packaging” tab to the right of the “General Information” tab, and then click on the “Direct Loan” tab to the right of the “PELL” tab. This will bring you to the menu below. April 2011 Call Toll Free 1-888-GEMCOR-8 21 GEMCOR, Inc. TEAM User’s Manual 2010-2011 Edition The following questions you might already be familiar with if you have submitted FDSL Certification Worksheets to us in the past. You can now submit the same information to us electronically via TEAM. Select the grade level of the loan by checking either the “1” or “2” boxes (question 2 on certification worksheet). Generally, the grade level represents the student’s grade level at your institution. If you offer a one-year diploma or certificate program in a particular occupation, the student’s grade level will be a “1.” If a student has attended two years of college at another school prior to enrolling at your school, that does NOT put the student into grade level “3.” The grade level represents the student’s grade level for training received at your institution only. If this student is a first time borrower, check either the “yes” or “no” boxes. Then, enter the loan period start date and end dates (question 3 on certification worksheet). The loan period should coincide with the length of the student’s program or academic year, whichever is shorter. Payments will be distributed in accordance with your payment periods during that loan period. Enter the student’s anticipated graduation date. If you have TRAX and the student’s record is already in your TRAX system, you can choose to import this information by clicking on the “TRAX” button. Enter the number of clock/credit hours (or terms) in the loan period. Then, select the cost of attendance budget from the drop down menu. The cost of attendance can be changed for each student within a program, but should generally be based on standard budgets determined by you. Select the student’s dependency status: independent, dependent, or you can select the “Parent Plus Denied Credit Check” option. To determine eligibility for subsidized loans, any other financial aid and the EFC must be subtracted from the total cost of attendance. The resulting figure represents “unmet need” and is the amount a student can apply for in a subsidized loan. In the “Subsidized Loan Determination” box, enter the total cost of attendance for the period of the loan. The EFC will be automatically entered in the next box based on the loan April 2011 Call Toll Free 1-888-GEMCOR-8 22 GEMCOR, Inc. TEAM User’s Manual 2010-2011 Edition period that you entered in the “general information” tab. Enter the less other financial aid for period of loan. Then, you can click the under the “Calculate Loan Amounts” heading to the right, click the “SUB” button to calculate the amount of the award. This calculated amount will appear in the “Subsidized$” box below. In the “Unsubsidized/Plus Loan Determination” box, a similar calculation to the Subsidized loan is performed to determine the eligibility for Unsubsidized and PLUS loans, except that the EFC figure is not used in these calculations. Eligibility for Unsub and Plus loans is limited only by cost of attendance less other financial aid. In the “Unsubsidized/Plus Loan Determination” box, the information should already be calculated for you. This calculated amount will appear in the “Unsubsidized$” box below. Under the “Calculate Loan Amounts” heading to the right, click the “UNSUB” button to calculate the amount of the award. Click the “PLUS” button to calculate the amount of the PLUS award. This calculated amount will appear in the “Plus$” box below. Enter the payment period number to start this award (range 1-3). Once you have entered all of the student’s information in the Direct Loan tab, you are ready to toggle the record for export and send this data to GEMCOR. Make sure that you are on the correct award year by using the navigation buttons at the bottom left side of the screen. In the screen image above, award year 1 is being viewed. If you are requesting payment for award year 2, use the right arrow at the bottom of the screen to navigate to the correct year. If this is a first payment request, check the “1st Payment” toggle box on the bottom right side of this screen. If this is a 2nd payment request, check the “2nd Payment” toggle box on the bottom right side of this screen. The student record is now toggled and will be exported and sent to GEMCOR. during the next “SEND” transmission. Next, click on the “Sub/Unsub Borrower” tab to the right of the Direct Loan tab. April 2011 Call Toll Free 1-888-GEMCOR-8 23 GEMCOR, Inc. TEAM User’s Manual 2010-2011 Edition Enter the student borrower’s information accordingly. When you are finished entering the information on this tab, you can move on to clicking on the “Parent Borrower” tab. Enter the parent borrower’s information accordingly on this tab. All questions on this tab need to be entered in order to send the information to GEMCOR for Plus loans. The information on the “Parent Borrower (cont.)” tab is optional for your school. If you choose to enter this information, simply click on the “Parent Borrower (cont.)” tab and enter the parent borrower’s information accordingly. April 2011 Call Toll Free 1-888-GEMCOR-8 24 GEMCOR, Inc. TEAM User’s Manual 2010-2011 Edition When you are finished entering the Loan Borrower information, click on the “Interm. EFC” tab. This tab includes information on the student’s Intermediate Values (EFC) that were automatically pulled from the student’s ISIR. You do not have to enter any information here, but it is convenient for you to view the information in each Month’s box. Verification: is a process that requires an institution to confirm the data that a student has included in his/her application for federal assistance. Generally, institutions must perform verification procedures on selected files. A file has been selected for verification if the EFC number on the SAR or ISIR is followed by an asterisk, “*.” If the student you selected has been selected for “verification,” a box will appear asking if complete and accurate information is on file. You must have this completed before requesting any Financial Aid for a student. Additional Documentation: Other additional documentation that GEMCOR will need to receive in order to process the students’ direct loans include the students’ Promissory Notes and/or the Parent PLUS note. The student can fill out an electronic master promissory note, or E-MPN, as well as a Parent PLUS E-MPN at www.studentloans.gov. This will automatically link with the loan origination, and is much faster and convenient than the paper prom notes. April 2011 Call Toll Free 1-888-GEMCOR-8 25 GEMCOR, Inc. TEAM User’s Manual 2010-2011 Edition You can also send the original paper note to GEMCOR, but this usually takes an additional 2-3 weeks to be processed by COD. FSEOG FSEOG stands for Federal Supplemental Educational Opportunity Grant and is considered a Campus Based Program designed to supplement a student’s Federal PELL Grant award. To process an FSEOG payment, first select the student from the TEAM Main Menu, and then click on the “PROCESS” button at the bottom of the screen. Then, click on the “Packaging” tab to the right of the “General Information” tab. Then, click on the “FSEOG” tab to the right of the “Parent Borrower (cont.)” tab. The cost of attendance values may change for each student within a program, but should generally be based on standard budgets determined the school. Select the default budget from the drop down menu at the top of this tab. In step A, enter the tuition and fees for a full academic year. In step B, enter the amount for books, supplies, and equipment. In step C, enter the amount for room and board (determined by school). In step D, enter the amount of miscellaneous expenses and transportation (determined by school). In step E, enter other costs (e.g., dependent care or disability expenses). The total cost of attendance will be calculated for each student in the specific program that you identified above. On the bottom left corner of this tab, enter the starting payment period number for the award, either 1 or 2. Once all of this information has been entered, you can move on to the right side of this menu. Here you will find a summary of the resources this student expects to receive during the award period from each source. Next, calculate unmet April 2011 Call Toll Free 1-888-GEMCOR-8 26 GEMCOR, Inc. TEAM User’s Manual 2010-2011 Edition need by clicking the “Calculate Unmet Need” button. This will calculate the FSEOG Amount to be requested. Once you have entered all of the student’s information in the FSEOG tab, you are ready to export and send this data to GEMCOR. First, make sure that you are on the correct award year by using the navigation buttons at the bottom left side of the screen. In the screen image above, award year 1 is viewed (see arrow above). To request a payment for award year 2, use the right arrow at the bottom of the screen to navigate back and forth through the award years. If this is a first payment request, check the “1st Payment” toggle box on the bottom right side of this screen. If this is a 2nd payment request, check the “2nd Payment” toggle box on the bottom right side of this screen. The data for this student is now toggled and will be exported and sent to GEMCOR, Inc. during the next “SEND” transmission. Please see the next section titled, “Subsequent Payments” for information on second payment requests. Subsequent Payments Our systems will automatically schedule future payments to a student at the time the first payment on a SAR or ISIR is processed. The schedule shall coincide with the remaining payment periods in the institution’s academic year. When students reach a subsequent payment period and the institution has determined that the students have been maintaining satisfactory progress in accordance with published standards, you may request subsequent payments through your TEAM software’s electronic process. We will then process the students’ next payments. GEMCOR does not automatically process future payments based on scheduled dates. You must notify us that a student has completed all requirements of the prior payment period before future payments are generated. Refunds In the event a borrower withdraws from your school, you may discover that some of the loan/pell money received by the borrower was unearned. After determining how much loan/pell money is unearned, you will return these funds by depositing the unearned amount back into your federal funds bank account and notifying GEMCOR about this return of funds. We will then adjust the borrower’s account with the Department of Education and either use the returned funds on hand for a future borrower, or return them to the Department of Education electronically. If you would like to request a refund for a particular student, first select the student from the TEAM Main Menu, and then click the “PROCESS” button at April 2011 Call Toll Free 1-888-GEMCOR-8 27 GEMCOR, Inc. TEAM User’s Manual 2010-2011 Edition the bottom of the screen. Then click on the “Disb/Refunds” tab to the right of the “Packaging” tab. Here you will see a list of disbursements that have been paid on this student. From this list, select a disbursement to refund. Enter the refund date and the refund amount. Then click the “Post the Refund” button to post this refund to this student’s record. Comments, Requests for Payment, and Anticipated Disbursements April 2011 Comments: There is a “Comments” tab under the “PROCESS” menu to post any necessary comments about this student and/or their disbursements. Do not use the Comments box for additional information about Refunds. Refunds are sent separate from payment request files. Call Toll Free 1-888-GEMCOR-8 28 GEMCOR, Inc. TEAM User’s Manual 2010-2011 Edition Requests for Payment: There is a “Requests for Payment” tab under the “PROCESS” menu that displays a list of all of the requests for payment that you have made on this particular student. This screen will show the date the request was made, the request ID, the student’s name, the type of payment, status of request, and the confirm date. Anticipated Disbursements: There is an “Anticipated Disbursements” tab under the “PACKAGING” tab. Under this tab you can click the “Calculate Anticipated Disbursements” button from the right hand side of this screen. This will take the information that you have previously entered for the student, and calculate the anticipated disbursements by listing the fund type, projected payment date, projected payment amount, program payment number, academic year payment number, and academic year. Once you click “calculate anticipated disbursements,” you can modify any information as necessary. April 2011 Call Toll Free 1-888-GEMCOR-8 29 GEMCOR, Inc. TEAM User’s Manual 2010-2011 Edition Please make sure that all of the program payment information has been entered accurately for each of your school programs and that all of the necessary student information is present. If you have not yet selected the type of school “term or clock/credit hour” please so do so by clicking on the “UTILITIES” button from the TEAM Main Menu, and then clicking on the “School Information” tab. There is also an “Award Letter” button on this menu, that allows you to print the student’s award letter for their student file. Transmit The TEAM System provides all the software necessary for you to begin processing your Title IV award data through GEMCOR electronically. After entering your FAFSA documents into the federal CPS web site through the Department of Education’s EDExpress FAA On-Line Access system, you will be able to electronically receive your students’ ISIRs through our TEAM System. Once you have received your ISIRs through TEAM, you will be able to electronically request Federal Pell awards, FSEOG awards or Federal Direct Loan awards with virtually no paperwork. Simply select the desired student record from the easy to use pick lists, enter your “Formula Sheet” or “Loan Certification Worksheet” information, then export your data and send it all electronically through today’s state of the art FTP, Internet based file transfers. Further, you will be able to request second payments and notify GEMCOR of any April 2011 Call Toll Free 1-888-GEMCOR-8 30 GEMCOR, Inc. TEAM User’s Manual 2010-2011 Edition refunds paid through the same FTP, batch and transfer process. The entire process works on an easy to remember acronym we call E-T-E-S Enter, Toggle, Export, Send. Step 1 - ENTER Enter the award information (formula sheet, or loan certification worksheet) into your TEAM student record. You can do this by first selecting a student from the student record list on the 2011-2012 home screen and then click the “PROCESS” button at the bottom of the screen. You have now entered into this student’s record. Enter the student’s award information here. When you are finished with this student, Toggle/Flag each student payment type by checking the box on the bottom right hand side of the screen (explained in the “Process” section of this manual). This student’s record is now ready to be exported and sent to GEMCOR. You can now move on to another student record and enter their award information. (These toggle boxes are located under the “PROCESS” function in the Pell and Direct Loan tabs) Step 2 - TOGGLE When you are ready to export and send a payment request to GEMCOR, you must first toggle the student record. This is explained above in the “PROCESS” section of the manual. Step 3 - EXPORT Each day, export the award data that was entered into TEAM during step 1. This process batches all of your payment request information for that day into a single, easy to transmit file that remains on your machine until you “SEND” it to GEMCOR. After you export the award data, you can either choose to send the data now or you can choose to send it at a later time. After you have processed all of your TEAM data for the day, the data must be exported into a file to be transmitted. The first way to export and send records to GEMCOR is to click on the “TRANSMIT” button on the TEAM Main Menu. April 2011 Call Toll Free 1-888-GEMCOR-8 31 GEMCOR, Inc. TEAM User’s Manual 2010-2011 Edition Then, click on the “Transmit Payment Requests” tab. It is recommended that you first review the “Pre-Transmit Review” (the first button on this tab) to ensure that all students are included on the report. If after reviewing the transmission report, should you determine that additional data needs to be processed, you may exit the “EXPORT” function to process additional data before transmission. If all of the records are correct on the Pre-Transmit Review, you have the choice of printing a copy of the award data for student files by clicking on the “Student Data Sheet” button (the second button on this tab). This report can be printed for each student any time under the Process Module for the selected student. Then, click on the “Export and Send to GEMCOR” button (the third button on this tab). Once you click on the “Export and Send to GEMCOR button,” the box below will appear to tell you how many Student Payment Requests you are exporting and sending to GEMCOR. If this is correct, click the “OK” button. The box below will appear to tell you that the export is complete. April 2011 Call Toll Free 1-888-GEMCOR-8 32 GEMCOR, Inc. TEAM User’s Manual 2010-2011 Edition The next tab under the Transmit Menu is the “Transmission Log – All Activity” tab. This will show a listing of all of the transmissions that you have sent to GEMCOR by Status Date, Status, Student Name, Student ID, Pell Requested Amount, DL Requested, FSEOG Requested Among, and Refund Requested. A payment request is not successfully received until you have received a payment confirmation for the request. If you do not receive a payment confirmation within one business day of transmittal, please call our offices at 1888-GEMCOR-8. The next tab under the Transmit Menu is the “Pending Refund Requests” tab. This menu will list the Pending Refund Requests by Type, Loan Type, Check #, Program #, Year, Payment Amount, Payment Date, Refund Status, Refund Status Date, Student ID, and Student Name. April 2011 Call Toll Free 1-888-GEMCOR-8 33 GEMCOR, Inc. TEAM User’s Manual 2010-2011 Edition Step 4 – SEND Lastly, send the exported file to GEMCOR through the user friendly, “TRANSMIT” menu selection. Once you have toggled and exported the records, you can send the data two different ways. Send Option Number 1: The box below, which appears after you have exported the award data (explained above), will remind you that you need to have an active internet connection in order to make FTP transfers. If you would like to send this batch of payment requests to GEMCOR now, click the “yes” button. If you would like to send this batch of payment requests to GEMCOR at a later time, click the “NO” button, and you can send it later by using the “SEND” button on your command center home screen (which is explained in sending option number 2). After you hit the “YES” button the following black boxes will open in order to complete the transfer. It is very important that you do NOT click the “X” to force close these boxes. The box below will open, and remind you that you need to have an active internet connection in order to make FTP transfers. It will ask you to press any key to continue, and you should press the space bar. April 2011 Call Toll Free 1-888-GEMCOR-8 34 GEMCOR, Inc. TEAM User’s Manual 2010-2011 Edition The transfer will now begin. Once the transfer is completed another black box will appear. It will ask you to press any key to continue, and you should hit the space bar again. A third black box will appear. It will ask you to press any key to continue, and you should hit the space bar for the third time. This will complete the FTP transfer and your payment request files have now been exported and sent to GEMCOR. If you do not receive a confirmation file within 24 hours, please call GEMCOR at 1-630-633-5600. Send Option Number 2: The second way in which you can send records to GEMCOR is to click the “SEND” button on the Command Center home screen. In order to send records to GEMCOR in this way, you must have already exported the data prior to hitting the send button on the Command Center home screen. Once you have clicked the “SEND” button, the following box will appear. This box reminds you that this function will send data for all award years. In order to send data to GEMCOR in this way, you must have exported the data prior to hitting the send button on the Command Center screen. This box also reminds you that you need an active internet connection in order to send the data. Click the “Yes” button in this box. Just like in the first option to send the data to Gemcor, the black boxes will appear. It is very important that you do NOT click the “X” to force close these boxes. You should follow the prompts that the boxes give you, and when they ask you to press any key, you should hit the space bar to continue. Always remember ETES, Enter, Toggle, Export, Send April 2011 Call Toll Free 1-888-GEMCOR-8 35 GEMCOR, Inc. TEAM User’s Manual 2010-2011 Edition Receive In order to receive information from GEMCOR, such as your school’s ISIR’s and confirmation of payments, you will need to click on the “RECEIVE” button on your Command Center screen. The following black boxes will open in order to complete the transfer. It is very important that you do NOT click the “X” to force close these boxes. The box below will open, and remind you that you need an active internet connection in order to make an FTP transfer. It will ask you to press any key to continue, and you should press the space bar. The transfer will now begin. Once the transfer is completed another black box will appear. It will ask you to press any key to continue, and you should hit the space bar again. After you hit the space bar for the second time, the following box will appear. This box will tell you if you have any new messages or if you have any new ISIR files that can be printed. In the box below, there are no new messages and no new ISIR files to be printed. This box will ask you to press any key to continue, and you should hit the space bar for the third time to complete the receive function. April 2011 Call Toll Free 1-888-GEMCOR-8 36 GEMCOR, Inc. TEAM User’s Manual 2010-2011 Edition Print, Preview, & Quick View During a "receive" function, you will automatically receive any new ISIR data in GEMCOR's systems. After receipt of an ISIR file from GEMCOR, the file must be imported into the TEAM database. This import function will not only allow you to print the ISIRs, but will also store the data in the TEAM database for future electronic award request functions. If you want to print an ISIR Summary of all current ISIRs in TEAM, click the “PRINT ISIR SUMMARY” button. All student’s names, student ID numbers, EFC’s, and the date the ISIRs were added into TEAM will be included on the selected student’s ISIR Summary. If you would like to preview a student’s ISIR, select a student from the list and click the “Preview ISIR” button at the bottom of the screen. Select this option if you want to view the student’s ISIR on your computer screen instead of printing the ISIR out. This is a preview of all of the information that is on the student’s printed ISIR. If you would like to see a student’s ISIR quick view, select a student from the list and click on the “Quick View” button at the bottom of the screen. The ISIR Quick View includes a summary of the information that appears on the selected student’s ISIR. If you would like to print a student’s ISIR, select a student from the list and click on the “Print” button at the bottom of the screen. This will print the selected student’s ISIR to your computer’s default printer. Gainful Employment Reporting To enter the Gainful Employment Reporting Requirement Form, click on the “Gainful Employ button on the bottom of the Command Center home screen. This will bring you to the following screen. April 2011 Call Toll Free 1-888-GEMCOR-8 37 GEMCOR, Inc. TEAM User’s Manual 2010-2011 Edition The first time that you open this form, the following message box should appear asking you to enter your school’s OPE ID in the Utilities Module under the School Information tab. You should do this right away so that you do not forget. Otherwise, you will have to enter the OPE ID for each student manually. If you are not a TRAX user, the TEAM system will automatically detect that you do not have a TRAX database file on your computer, and the default value of the “Your TRAX Database is Located:” field will be “No Database Found” and the “IMPORT FROM TRAX” button will be disabled. Disregard this part of the form, for it is only for TRAX clients. If you are a TRAX user, the TEAM program will automatically detect where your TRAX database is located, so that you can easily import your TRAX data into TEAM for Gainful Employment reporting. On the screen above, the TEAM system had detected that this TRAX user’s Database is located on their C drive in “C:\TRAX\traxdata.mdb”. Double check to make sure that this default value is correct for your TRAX system, and click the “IMPORT FROM TRAX” button. The following message box will appear asking you if you want to delete any data that currently exists in the Gainful Employment Reporting table. Click yes. April 2011 Call Toll Free 1-888-GEMCOR-8 38 GEMCOR, Inc. TEAM User’s Manual 2010-2011 Edition This will bring you to the following screen where you will enter information about your programs in TRAX. If you look towards the bottom of this screen you will see navigation buttons that you will use to navigate through each of your programs that have imported from TRAX. The purpose of this form is to assign each of your TRAX programs to its corresponding CIP Code. If the program that you are on is NOT a Gainful Employment program, please select “000000” as the CIP Code so that these records will not be imported into TEAM from TRAX. Please notice that you have the option to sort the CIP Codes either by Description or by CIP Code. Use whichever method is easiest for you, and assign each of your programs to its correct corresponding CIP Code. When you are finished, click the “IMPORT NOW” button at the bottom of the screen. The following message box will appear letting you know that the students have been added to the Gainful Employment Reporting table. TRAX students who started 07/01/2006 or later will be added to the Gainful Employment Reporting Table. April 2011 Call Toll Free 1-888-GEMCOR-8 39 GEMCOR, Inc. TEAM User’s Manual 2010-2011 Edition When you click ok, the Gainful Employment Reporting Requirement form will re-appear. All of the students have now been imported into TEAM. You can now navigate through the students using the navigation buttons at the bottom of the screen. Add/edit any of the information that was imported as needed. To add a new student record, click on the arrow with the “*” next to it at the bottom of the screen. Enter the student’s information accordingly. Notice that if you entered your OPE ID and Institution name into the School Information tab in the Utilities Module, both fields will be automatically entered for each new record that you create. The default credential level will be “Undergraduate Certificate.” The default GE Program Indicator will be “Yes.” The default Medical/Dental Internship/Residency will be “No.” Make sure that you change any information accordingly if these are not the correct defaults for the student’s record that you are creating. In an upcoming version of TEAM, the “SEND” button at the bottom of the screen will be enabled so that you can transmit all of your Gainful Employment Reporting data to GEMCOR, and we will submit it to the Department in a batched format. How to Check or Clear Your Messages You will find these two buttons on the bottom left hand side of your Command Center home screen. If you want to check to see if you have any messages waiting to be read, click the “Check Messages” button. When you are done reading your messages, you can click the “Clear Messages” button. If you have a message that says there are ISIRs that are currently waiting to be imported into TEAM, you must first import those ISIRs before you can draw down more ISIRS through your next receive. If you have a message that says you have a pending payment file waiting to be sent, make sure that all of your selected student records are marked as toggled, and do a “SEND” function to export the student records to GEMCOR. April 2011 Call Toll Free 1-888-GEMCOR-8 40 GEMCOR, Inc. TEAM User’s Manual 2010-2011 Edition Versions of TEAM How to find out what version of TEAM you currently have In order to find out what version of TEAM you currently have, open the Command Center and click on the correct TEAM award year. On your TEAM home screen, look at the upper right hand side of the screen, under the TEAM logo and above your school name. Here, in red letters, you will find your current version of TEAM. In the photo to the right, the current version of TEAM is version 001C. In this example, the “001” represents the version number of TEAM that the system is currently using. The “C” represents that this user’s TEAM system is operating off of their computer’s C drive. Next to the version number (ex. 001), you will see either the letter C, T, or Q. If you have the letter C, this means that your TEAM software is running off of your C drive on your computer, and you can only use team on one user’s machine. If you have the letter T, this means that your TEAM software is running off of your school’s T drive, which is a network drive. If you have the T version, users can access the TEAM software from multiple machines/locations. If you have the letter Q, this means that your TEAM software is running off of your school’s Q drive, which is also a network drive. If you have the Q version, users can access the TEAM software from multiple machines/locations. How to find out what the most current version of TEAM is In order to find out what the most current version of TEAM is, open your web browser and go to www.gemcorinc.com. Then, click on the “Software” link at the top of the page. Under the picture that is labeled “TEAM,” you can see the number of the most current version of TEAM. In the photo to the right, the current version of team is version 13. If the version number on your home screen of TEAM does not match the most current version number on the website, read on to find our how to get the most current version of TEAM. How to get the most current version of TEAM In order to get the most current version of TEAM, first make sure that you are closed out of the TEAM program. Then, open your April 2011 Call Toll Free 1-888-GEMCOR-8 41 GEMCOR, Inc. TEAM User’s Manual 2010-2011 Edition Command Center. On the TEAM side of the command center, click on the “Team Upgrade” button. The box below will open and remind you to exit your TEAM System. Make sure you are out of TEAM, and click yes saying that you want to continue. The following black boxes will open in order to complete the transfer. It is very important that you do NOT click the “X” to force close these boxes. The box below will open, and remind you to be closed out of your TEAM program. It will ask you to press any key to continue, and you should press the space bar. The transfer will now begin. Once the transfer is completed another black box will appear. It will ask you to press any key to continue, and you should hit the space bar again. After you hit the space bar for the second time, the black box should close and the following box will appear. You should click the “ok” button. April 2011 Call Toll Free 1-888-GEMCOR-8 42 GEMCOR, Inc. TEAM User’s Manual 2010-2011 Edition You should now have the most current version of TEAM. You can verify this by checking your current version of TEAM on your TEAM home screen. (See the section titled “How to find out what version of TEAM you currently have” above). If you do not have the “Team Upgrade” button on the TEAM side of your Command Center, or if the button is not enabled, please call GEMCOR at 1-888-GEMCOR-8 so that we can give you the necessary update. Training GEMCOR hosts a series of small, informal training sessions on Title IV program administration each year. These sessions will be condensed to a one-day format and will cover a brief overview of FAFSA and ISIR processing with more significant emphasis on new regulations and policies that have been enacted through recent legislation. Usually the training sessions are held at our Bolingbrook, Illinois office. Most sessions can comfortably accommodate 12 to 14 participants per session. Meetings of this size should provide a great opportunity for hands-on training in an informal and open forum like setting. There will be no charge for participants to attend these sessions. When the new Seminar Schedule is updated it will be posted to our webpage at www.gemcorinc.com. You can confirm your wish to attend any of the meetings by fax or email. Email Steve at [email protected]. Your registration will be confirmed by email. Space is limited, so let us know as soon as possible. Call our office with any questions and we hope to see you at one of our meetings. Support Our office provides toll free technical support on any educational or financial aid issues during normal business hours (Monday-Friday 9:00am to 5:00pm Central Time). In addition to general daily inquiries, we can provide assistance to you with program review responses, accreditation concerns, and eligibility and certification issues. We would be happy to assist you with any questions you might have regarding the services that GEMCOR, Inc. can provide to your business. Should you want to contact us for more detailed information on how GEMCOR, Inc. can support your institution, please let us know. Your questions are very important to us. April 2011 Call Toll Free 1-888-GEMCOR-8 43 GEMCOR, Inc. TEAM User’s Manual 2010-2011 Edition For support with any questions that you have, you can contact Don Grybas, President of GEMCOR, Inc. Don can be reached at 1-630-633-5600 ext. 101 or by email at [email protected]. PELL Department For support on PELL grants please contact Steve Berry, Vice President of GEMCOR, Inc. Steve can be reached at 1-630-633-5600 ext. 103 or by email at [email protected]. Federal Direct Student Loan Department For support with Direct Loans please contact Megan Refness, Director of Federal Direct Student Loan Division, or Michele Thompson, Federal Direct Loan Officer. Megan can be reached at 1-630-633-5600 ext. 105 or by email at [email protected]. Michele can be reached at 1-630-633-5600 ext. 111 or by email at [email protected]. Information Systems & Technologies Department For support with TEAM or TRAX please contact Laurie Grybas, Director of Information Systems & Technologies Division, or Terrah Spoolstra, Software Developer. Laurie can be reached at 1-630-633-5600 ext. 107 or by email at [email protected]. Terrah can be reached at 1-630-633-5600 ext. 108 or by email at [email protected]. April 2011 Call Toll Free 1-888-GEMCOR-8 44 GEMCOR, Inc. TEAM User’s Manual 2010-2011 Edition Charles Kindt, Computer Programmer, can be reached at 1-630633-5600 ext. 102 or by email at [email protected]. Administrative Support For support with Cash Management or Bank Reconciliations please contact Carri Catalano, Cash Management Officer. Carri can be reached at 1-630-633-5600 ext. 106 or by email at [email protected]. For support with SSCR’s (Student Status Confirmation Report) or FAFSA’s (Free Application for Federal Student Aid), please contact Jacki Griffin, Administrative Officer. Jacki can be reached at 1-630-633-5600 ext. 104 or by email at [email protected]. April 2011 Call Toll Free 1-888-GEMCOR-8 45