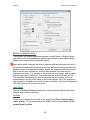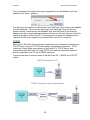
1
RavTrack PC
User’s Guide
Real-time GPS Tracking Software
PC Compatible Version 5.1.6
Section1
RavTrack PC User Manual V5.1
Disclaimers
Copyright © 2013 Raveon Technologies Corporation
All rights reserved.
The information in this document is subject to change without notice. The statements, configurations, technical
data, and recommendations in this document are believed to be accurate and reliable, but are presented
without express or implied warranty. Users must take full responsibility for the applications of any products
specified in this document.
RAVEON TECHNOLOGIES DISCLAIMS ALL WARRANTIES WITH REGARD TO THIS SOFTWARE,
INCLUDING ALL IMPLIED WARRANTIES OF MERCHANTABILITY AND FITNESS. IN NO EVENT SHALL
CMU BE LIABLE FOR ANY SPECIAL, INDIRECT, OR CONSEQUENTIAL DAMAGES OR ANY DAMAGES
WHATSOEVER RESULTING FROM LOSS OF USE, DATA, OR PROFITS, WHETHER IN AN ACTION OF
CONTRACT, NEGLIGENCE, OR OTHER TORTIOUS ACTION, ARISING OUT OF OR IN CONNECTION
WITH THE USE OR PERFORMANCE OF THIS SOFTWARE.
The information in this document is proprietary to Raveon Technologies, Inc.
Trademarks
Raveon, M7 GX, ATLAS and RavTrack are trademarks of Raveon Technologies Corporation.
All other trademarks are the property of their respective owners. Mention of third-party products is for
informational purposes only and constitutes neither an endorsement nor a recommendation. Raveon assumes
no responsibility with regard to the performance or use of these products.
Statement of Conditions
In the interest of improving internal design, operational function, and /or reliability, Raveon Technologies, Inc.
reserves the right to make changes to the products described in this document without notice.
Raveon Technologies, Inc. does not assume any liability that may occur due to the use or application of the
product(s) or network configurations described herein.
Raveon Technologies Corporation
2461 Impala Drive
Carlsbad, CA 92010
USA
[email protected]
2
Section1
RavTrack PC User Manual V5.1
Table of Contents
Documentation and Conventions
Section1 ........................... 7
General ............................................................................................................... 7
Overview of Major Capabilities
Section2 ........................... 8
General ............................................................................................................... 8
RavTrack PC Features: ....................................................................................... 8
RavTrack PC Versions................................................................. 10
Version 5.X Upgrade Changes .......................................................................... 11
Legal Notice ...................................................................................................... 11
Installation
Section 3 ........................ 12
Recommended System requirements ............................................................... 12
Program Dependencies..................................................................................... 12
Upgrade Note .................................................................................................... 13
Installation Steps ............................................................................................... 13
Microsoft SQL Server Configuration ..................... Error! Bookmark not defined.
RavTrack PC First-Time Setup ......................................................................... 16
Entering the License Key .................................................................................. 17
Changing to the SQL Server Database ............................................................. 18
Admin User ....................................................................................................... 18
Crystal Reports ................................................................................................. 18
Directory Structure on the PC ........................................................................... 23
System Database .............................................................................................. 24
Microsoft ACCESS Log and TrackedObjects .................................................... 24
Microsoft SQL Server Database ........................................................................ 25
Main Screen Operation
Section 4 ........................ 27
Database Window ............................................................................................. 27
Object Info Window ........................................................................................... 29
Info Tab ............................................................................................................. 30
Map ................................................................................................................... 30
Layers ............................................................................................................... 31
On Screen Information ...................................................................................... 31
Communication Status ...................................................................................... 31
3
Section1
RavTrack PC User Manual V5.1
Zooming and Home ........................................................................................... 32
Mouse Operation ............................................................................................... 33
Smart Buttons .................................................................................................... 33
Jump To ............................................................................................................. 35
Selecting User Groups to View .......................................................................... 35
Program Configuration
Section 5 ......................... 37
System Log Database........................................................................................ 38
Current Map File ................................................................................................ 38
Units and Display Options .................................................................................. 38
Metric or English Units ....................................................................................... 39
Icon Font ............................................................................................................ 39
Circles ................................................................................................................ 39
Track Dots.......................................................................................................... 40
Naming the Digital Inputs ................................................................................... 40
Adding and Editing Tracked Objects .................................................................. 42
Program Operation
Section 6 ......................... 45
Special Keys ...................................................................................................... 45
Mouse Operation: .............................................................................................. 45
Track Dots.......................................................................................................... 45
Locating Nearby POIs or Tracked Objects ......................................................... 46
Pop-Up Vehicle Information Boxes .................................................................... 46
Creating a Map
Section 7 ......................... 48
Executing MapManager ..................................................................................... 48
Icons .................................................................................................................. 49
Overlaying an ESRI Shape File ......................................................................... 51
Drawing Tools
Section 8 ......................... 53
Placing a simple graphic on the map ................................................................. 53
Creating an Electronic Fence (Geo-Fence) ....................................................... 53
Deleting a Graphic From the Map ...................................................................... 54
Drawing Polygons .............................................................................................. 54
The Log File
Section 9 ......................... 55
Enabling Activity Logging of Tracking Objects .................................................. 56
Log Table Size Limitation ................................................................................... 57
4
Section1
RavTrack PC User Manual V5.1
Log Table Management .................................................................................... 58
Pruning the LOG table....................................................................................... 59
Backing Up the LOG Table ............................................................................... 59
Third-Party SQL Table backups Software ......................................................... 60
Displaying and Replaying Historical Information ............................................... 60
Alerts and Alarms
Section 10 ...................... 64
Identifying Alert Conditions................................................................................ 64
Reviewing Alert Conditions ............................................................................... 64
Setting up an Alert ............................................................................................. 65
Digital Input Alerts ............................................................................................. 67
Geo-Fences ...................................................................................................... 67
Time and Day of Week ...................................................................................... 68
Actions .............................................................................................................. 68
Global Alert Settings.......................................................................................... 69
Alert Processing ................................................................................................ 70
Email Alerts ....................................................................................................... 71
Monitoring your System..................................................................................... 72
Multi-User Operation
Section 11 ...................... 74
Restricting Access by User Group .................................................................... 75
User Privileges and Login ................................................................................. 77
Printing
Section 12 ...................... 79
Printing Reports ................................................................................................ 79
Filtering Reports ................................................................................................ 80
Reports from the Historical Log file ................................................................... 80
Screen and Map Printing ................................................................................... 80
Crystal Reports ................................................................................................. 80
Importing Waypoint/Track Files
Section 13 ...................... 81
File Formats ...................................................................................................... 81
File Selection ..................................................................................................... 81
Communication Statistics
Section 14 ...................... 83
Communication Statistics .................................................................................. 83
TCP/IP............................................................................................................... 85
5
Section1
RavTrack PC User Manual V5.1
Google Earth Integration
Section 15 ....................... 87
Overview ............................................................................................................ 87
Microsoft MapPoint Integration
Section 16 ....................... 90
Overview ............................................................................................................ 90
Using MapPoint 2010 Maps ............................................................................... 90
Reverse Geo-Coding ......................................................................................... 90
GpsGate Integration
Section 17 ....................... 92
Overview ............................................................................................................ 92
Installing GpsGate ............................................................................................. 92
Configuring RavTrack PC to Communicate with GpsGate ................................. 92
How RavTrack PC works with GpsGate ............................................................ 94
RavTrack PC Revision History
Section 18 ....................... 95
Software License
Section19 ........................ 98
1. License .......................................................................................................... 98
2. Restrictions .................................................................................................... 98
3. Protections and Security ................................................................................ 99
4. Termination .................................................................................................... 99
5. Limited Warranty ............................................................................................ 99
6. Enhancements ............................................................................................. 100
7. Disputes ....................................................................................................... 100
8. General ........................................................................................................ 101
9. Acknowledgment.......................................................................................... 101
End User Registration Form
6
Section20 ...................... 102
Section1
RavTrack PC User Manual V5.1
Documentation and Conventions
Section1
General
This manual uses the following conventions to present information:
Convention (TypeFace)
Description
Convention (Typeface) Description
bold italic
bold italic sans serif
terminal
bold terminal
Italic
Menu commands and button names
Web GUI page links
Computer display text
User-entered text
Italic type indicates the titles.
Icon
Description
Requests that you pay particular attention to a
specified procedure or piece of information in the
text. The NOTE message has a regular type style.
Information shown here describes a difference
between the Lite version of the program and the
Standard version of the program. .
CAUTION Icon: Suggest you review the
referenced details and heed the instructions
offered. The CAUTION message has a bold type
style.
WARNING Icon: Demands that you observe the
actions given in the text. The WARNING
message has a bold italic type style.
COMPASS Icon: Points the user to additional
information concerning the topic under discussion.
The COMPASS message has a regular type style.
7
Section2
RavTrack PC User Manual
Overview of Major Capabilities
Section2
General
RavTrack™ PC by Raveon is a PC software application for displaying, tracking,
alarming, and logging the activity of RavTrack Transponders.
This easy-to use PC application graphically shows the location and status of cars,
trucks, people, or anything equipped with RavTrack Transponders. The displayed
map may be any graphic image, bitmap, or .jpg. Additional graphics such as lines,
shapes, and icons may be added by the user.
RavTrack PC Features:
The features below are what make a RavTrack PC the right choice for real-time
tracking:
1) Real-time. Position and status updates are available as quickly as
every second. The installer may configure the system report interval, to
whatever update interval he wishes, trading off latency of reporting for
power-consumption and number-of-assists tracked.
2) Simple. A single PC is all that is required. No server, no Internet, no
cellular carrier is needed. The map on the display may be any graphics
image.
One-click on an icon, and the user can see complete vehicle status
8
Section2
RavTrack PC User Manual
including location, distance, heading, speed, I/O status, temperature,
voltage, and radio signal strength.
3) Geo Fencing. Geo-fences are virtual boundaries you can draw on the
map, and then create rules to trigger an alert when tracked object are in,
out, or speeding in the fence. They can also be used to create reports,
specifying the geo-fenced area to include on the report.
4) Custom Alerts. The program may be configured to alert the operator
when certain events occur. Operator alerts, audio alerts, and email
notices are triggered by various transponder-specific events such as
speeding, proximity to Points of Interest, Geo-fence violations, idling,
and digital input status.
5) One-Click Status. Individual vehicle status, alerts, and rule status is
only one click away. Easily identify which vehicles are violating your
rules, where they are, and how long the condition has existed. With a
couple more clicks, print an easy-to-read report.
6) Database Driven. The information on all units being tracked is stored in
a table within a MS Access database or Microsoft SQL Server database.
All movements and events are logged in a separate table. Users may
create custom reports using Access, Crystal Reports, or other SQL tools
interfacing with the data in real-time.
7) Interactive Replay Historical location and status information can be
retrieved from the log file, printed on a report, and played-back on the
map. Replay includes fast-forward, rewind, pause, and single-stepping.
Replay information includes location, status, speed, heading, voltage,
temperatureH
8) Google Earth Enabled RavTrack PC may be configured to send the
position and status information from the Tracked Object to the Google
Earth program so that a Google Earth will show the location and status
of the tracked objects.
9) UHF Licensed Radio Channels. RavTrack Transponders utilized
licensed UHF radio channels. Unlike spread-spectrum system, the
operator owns the right to use the channel. And UHF radio channels
have 10X or more the communication range of unlicensed spreadspectrum radios.
10) Low Cost Transponders. The highly integrated M7 GX Transponder
has a radio, modem, and GPS in one assembly. The per-unit cost is
lower than any other UHF AVL product on the market. It is simple-touse, so the cost in installation is very low. There is no cost for a wireless
carrier or satellite provider.
11) Secure. All position transmissions are encrypted, so that only radios
with the same pass-key code can communicate.
The RavTrack PC program is also administrator-rights protected,
allowing a view-only user mode, and total-control for the administrator.
9
Section2
RavTrack PC User Manual
12) Advanced Features. Advanced features are configured when the
Transponder is installed. The RavTrack Transponders have alarm
inputs, and status output pins for specialized applications.
All RavTrack Transponders have the ability to send time, temperature,
voltage, altitude, I/O status, alarms, satellite signal quality, and radio
signal quality in each transmission, so the system operator has
enormous visibility on the status and location of his tracked objects.
13) Advanced Reporting. RavTrack PC uses the industry leading Crystal
Reports to provide powerful and flexible reporting capabilities. Standard
reports are included with RavTrack PC, and the user may create custom
reports using Crystal Reports or Microsoft Access.
14) Managed Alerts. The operator may review individual alert conditions,
and selectively acknowledge them. An easy-to-use alert list highlights
alert conditions, and allows the operator to review, sort, filter, and
acknowledge them.
15) Muli-User RavTrack PC may be run on multiple-computers at the same
time, sharing the position and status information among the computers.
Also, RavTrack PC allows individual login user names with preconfigured user-rights. Users may be limited to viewing only certain
groups.
16) User Groups Tracked vehicles may be assigned to pre-defined User
Groups. You can define the names and features of these groups to
suite your system needs, and then reports, displays, and alerts can be
applied to certain groups.
RavTrack PC Versions
Information shown here describes a difference between the Trial, Limited and the
Unlimited license for the RavTrack PC program. The software activation key
purchased from Raveon determines the level of functionality. The table below
outlines the differences between the various versions of the RavTrack PC.
Version
Duration
operation
Number of
common
channels
Multi-user
operation
Maximum
number of
tracked
objects
TCP/IP
comms
Logging
location
and status
to disk
Microsoft
SQL Server
Updating
Trial
30 days
6
Yes
10
Yes
Yes
No
Lite
unlimited
1
No
Not limited
No
No
No
Standard
unlimited
6
Yes
Not limited
Yes
No
No
Server
unlimited
6
Yes
Not limited
Yes
Yes
Yes
10
Section2
RavTrack PC User Manual
The Trial license of the RavTrack PC is strictly for short-term evaluation of the
program to determine its suitability for a particular use. All features of the software
are enabled, but only a maximum of 10 transponders may be tracked and the trial
version will not store to Microsoft SQL server databases.
The Lite license of RavTrack PC is for use on a stand-alone computer or tablet
that does not share position/tracking information with other computers in its
network. Typically the Lite version is used for in-vehicle display or simple position
visualization. It does not log to disk, print reports, or receive position reports over
a network interface.
The Standard license is suitable for workstations at dispatch, control centers, and
anywhere that the computer running RavTrack PC Server will be sharing its
position/status information with other users. Standard can read data from SQL
databases, but it does not store GPS position data from GPS transponders to a
SQL database.
The Server version has all features of the Standard version, plus it can update and
manage the database on a Microsoft SQL server. It stores the GPS position and
status information from GPS transponders to a SQL database (Microsoft Access or
Microsoft SQL Server).
Regardless of the type of license acquired from Raveon, one license may only be
used on one PC. Multi-user systems must purchase one license per computer.
Version 5.X Upgrade Changes
Version 5.1 and above have some fundamental differences from the previous 3.x
and 4.x versions. You cannot upgrade from 3.X to 4.X by simply replacing the .exe
file. The main changes are related to the file locations, and the license keys.
If you are using a version of RavTrack PC 3.0 – 4.4, you will need to purchase a
new license key for RavTrack PC 5.1 and higher
Legal Notice
GPS tracking may be illegal in certain states and in certain circumstances.
Raveon’s tracking devices may not be used to violate the privacy rights of others,
or in violation of local, county, state or federal statutes. In no way will Raveon
Technologies Corporation, dealers or partners be held responsible for
inappropriate use of these products.
IT IS THE SOLE RESPONSIBILITY OF THE BUYER TO CONSULT LEGAL
COUNSEL FOR THE INTERPRETATION OF ANY LAWS APPLICABLE TO THE
AREA OF INTENDED USE OF THESE PRODUCTS.
11
Section3
RavTrack PC User Manual
Installation
Section 3
Recommended System requirements
RavTrack PC is a Windows application. For small or stand-alone systems, it uses a
Microsoft Access database to store its information in. For larger system, deep
logging, or multi-user applications, we recommend using a Microsoft SQL server to
store the primary database.
Desktops
Intel i5 or i7 processor
4GB RAM
10GB free hard disk space
128MB graphics card (NVidia, Matrox or ATI recommended), UXGA (1600x1200) resolution display
19-inch CRT screens, resolution 1600x1200
Windows Vista, Windows 7, Windows 8. 32 or 64 bit versions.
Microsoft .NET framework 4.0 (Will be automatically installed if it is not on the target PC)
Laptops
Intel i3 process or faster.
2GB RAM
5GB free hard disk
15-inch TFT internal screen plus 19-inch external display
Windows Vista, Windows 7, Windows 8. 32 or 64 bit versions.
Microsoft .NET framework 4.0 (Will be automatically installed if it is not on the target PC)
Server (Optional)
If your server will LOG tables with more than 300,000 log entries at a time or your refresh rate in a multi-user
environment will be faster than 10 seconds, we recommend you use a business-grade server to hold the
LOG and TrackedObject database. Typical minimum requirements are:
Intel® Xeon® E55xx processor or faster
6GB of RAM
Server-grade hard-drives
Supported Databases:
1. Microsoft SQL Server 2005
2. Microsoft SQL Server 2005 express (10GB database limit)
3. Microsoft SQL Server 2008
4. Microsoft SQL Server 2008
5. Microsoft SQL Server 2012
Program Dependencies
RavTrack PC is built using Microsoft’s .NET foundation. The computer
RavTrack PC is installed on must have Microsoft’s .NET version 4.0 or higher. If
.NET is not on the computer, the RavTrack PC install program will initiate a
download of it first, before installing RavTrack PC.
12
Section3
RavTrack PC User Manual
RavTrack PC uses Crystal Reports 10 to create and view reports.
Upgrade Note
RavTrack PC 5.x and higher version are not compatible with prior versions of the
program. You must do a full install even if upgrading a previous version of RavTrack
PC with a version number less than 4.0
RavTrack PC Lite Installation Steps
Follow these steps to install the Lite version of RavTrack PC. The Lite version is
suitable for mobile installations where not connection to a SQL database is required.
1. Visit www.ravtrack.com and go to the “Downloads” section of the website.
2. Click on the download RavTrack PC link on the website. It will ask you to
register the download.
3. Click on the download RavTrack PC software program link to download it to
your computer. It is a 30-day free trial, and with the appropriate activation
key, can be later authorized for Lite, Standard, or Server operation.
4. A ZIP file containing an executable program called Setup5.zip will download
to your computer. It is a fairly large download, typically 100-130MB, so it will
take some time to download.
5. Once the download is complete, open the .ZIP file and double-click on the file
RavTrackPC.exe contained in the .ZIP file.
6. Run the downloaded setup.exe file, and follow the setup instructions.
7. RavTrack PC is now installed on the computer. Proceed with the first-time
setup instructions. RavTrack PC by default uses a locally stored Microsoft
Access database to hold its information.
8. The first computer to start RavTrack PC will create the tables in the RavTrack
database, so that computer must have full administration rights to the
database. For Microsoft ACCESS databases, this should not be an issue.
Standard and Server Installation Steps
1. Visit www.ravtrack.com and go to the “Downloads” section of the website.
2. Log into the website. If you are a new user, create a user account.
3. Click on the RavTrack PC software program link to download it to your
computer.
4. A ZIP file containing an executable program called Setup5.zip will download
to your computer. It is a fairly large download, typically 100-130MB, so it will
take some time to download.
5. Once the download is complete, open the .ZIP file and double-click on the file
RavTrackPC.exe contained in the .ZIP file.
13
Section3
RavTrack PC User Manual
6. Run the downloaded setup.exe file, and follow the setup instructions.
7. RavTrack PC is now installed on the computer. Proceed with the first-time
setup instructions. Ravtrack PC by default uses a locally stored Microsoft
Access database to hold its information. Once installed, you can modify this
default to utilize a SQL server if you wish.
8. If you will be using Microsoft SQL Server as your database, install the SQL
Server software first and create a “RavTrack” database, before running
RavTrack PC.
9. The first computer to start RavTrack PC will create the tables in the RavTrack
database, so that computer must have full administration rights to the
database. For Microsoft ACCESS databases, this should not be an issue. For
SQL databases, you may need to temporarily allow the client full rights to the
RavTrack database.
Databases
On multi-user systems, or where the GPS tracking system must store a large
amount of historical data, Raveon suggests setting up RavTrack PC to utilize a SQL
database instead of the build-in JET database engine. An external database server
will be faster, easier to back up, and able to hold much more historical data.
By default, RavTrack PC uses a built-in Jet database engine which utilizes
databases in the Microsoft Access database format. No additional database
software is required, because the Jet database engine is included with RavTrack
PC. RavTrack PC Lite uses the Jet database engine. The Standard and Server
versions of RavTrack PC can use the Jet engine or MS SQL Server.
Microsoft SQL Server Configuration
If you are going to use a Microsoft SQL Server 2005, 2008, 2012, or 2014, database
with RavTrack PC, then you will need to prepare the SQL Server first, before running
RavTrack PC. Microsoft SQL Server requires expertise in database installation and
administration. Microsoft SQL Server does not have to be installed on a computer
running a server operating system. It may be run on a Windows XP, Vista, 7 or 8
computer.
SQL Server installation is often very challenging for personnel not trained in
Microsoft SQL Server management. Raveon highly recommends that professional
IT consultants with proper experience and training setup and configure the SQL
Server software and computer.
If your network has a domain controller, then all computers, clients, and servers
should be part of that domain, or a member of a domain with a mutual trust between
the domains. Setting up mutual trust is a complicated procedure and should be done
with a great deal of care and due security considerations.
Client computers running RavTrack PC Standard that remotely connect via a
network to the SQL Server computer will need to be “Authenticated”. Authentication
14
Section3
RavTrack PC User Manual
ensures that the client computers have the right to access the SQL Data. There are
two ways a client computer will be authenticated by SQL Server.
Windows Authentication. The user name and password that the person
logged onto Windows on the client computer is used by SQL Server to
authenticate the user.
SQL Server Authentication. With this method, RavTrack PC must be
configured with a password and login name. The same login name and
password will be configured at the SQL Server. By default Raveon configures
SQL Server authentication login name as “RavTrackUser” and the password
is “password”. You my configure it to a name and password that you would
like.
Here are some suggested steps when installing MS SQL Server. Your installation
may vary:
1. If you are using Windows Authentication to connect and authenticate
your computers, make sure that all client computers have
A) A login name
B) A password
that matches the EXACT login name and password on the server.
Windows Login will not work if the account names and passwords are
not the exact same on the server that runs SQL Server and any client
machine that wants to connect to it.
2. Install Microsoft SQL Server or SQL Server Express. SQL Server
Express is available from Microsoft at no charge.
3. Use the “SQL Server Configuration Manager” software program that is
installed with MS SQL Server to configure the server. Be sure to
enable the TCP/IP Client Protocol (SQL Server Configuration Manager > SQL
Native Client Configuration > Client Protocols > TCP/IP).
4. Also download and install the “Management Studio” for SQL Server.
The Express version may be downloaded at the same website as the
SQL Server Express is downloaded from. To run Management Studio
as an administrator, right-click on it when you start it, and say “Run
As6” and then select the administration account to run as.
5. Configure the SQL Server Settings using Management Studio
a. Set the default transaction time-out to 600 seconds (Tools> Options>
Designers> Transaction Timeout)
b. Set the “Server Authentication” method to both Windows and SQL Server.
(right click on the Server in Object Explorer, select Properties, Security
page) Check the correct button.
c.
Right click on your SQL database server, and select Properties. Enable the
type of user authentication you wish to use. We also recommend enabling
“Login Auditing” of all login attempts to help trouble shoot authorization
issues. Make sure if you use SQL Authentication, that the SQL Server and
15
Section3
RavTrack PC User Manual
Windows Authentication is selected.
d. Using Management Studio, create a database with the name “RavTrack”.
You do not need to create any tables in the database, as RavTrack PC will
add them to the database the first time it connects to this database. Set the
Server Role for the users to “serveradmin”.
e. Add Logins to the SQL Server for any user ID that will be using the database.
(Security > Logins then right-click Logins and select “New LoginC”)
Add your user account and password here.
f.
Add the Logins or users that will use RavTrack PC software to the RavTrack
database. To add Logins, expand the RavTrack database tab, Security,
Users. Then right-click Users to add new users to the database.
Set the new Login’s “Default Database” to RavTrack.
Very Important: Set the “Database Role Membership” for the Login to
db_datawriter, db_owner, and db_datareader.
g. Verify the “SQL Server Browser” service is running on the computer. To
verify or start the server, go to Control Panel > Administrative Tools >
Services, and scroll down to find the SQL Server Browser. Make sure the
service is Started. If it is not running, other computers cannot discover the
sever when they scan for SQL servers on the network.
6. If SQL Server was installed on a Windows XP computer, make sure
the “Simple File Sharing” is turned off. To do this, open Windows
Explorer, select Tools > Folder Options > View, and verify the Use
Simple File Sharing box is not checked.
7. On the computer running MS SQL Server, make sure the directory
services are running so that RavTrack PC workstations can discover
the SQL Server. To see if the services are running on the SQL server
computer, go to Start > Control Panel > Administrative tools >
Services. The SQL “Server Browser service”, “SQL Server, and SQL
Server Active Directory Helper” services should all be started. If they
are not running, enable and start them.
RavTrack PC First-Time Setup
Once the RavTrack PC software is loaded on the computer, you must configure a
number of settings and add your tracked objects to the database.
16
Section3
RavTrack PC User Manual
Begin by running the RavTrack PC application. Select the Start Menu and then
under All Programs, select Raveon, and then RavTrack PC.
This will start-up the RavTrack PC software. The first time the software is run, you
will see a pop-up window showing the message:
RavTrack PC Trial Software License. Contact Raveon sales to
purchase a license to use this product.
Click OK, and let the program begin normally. Once it begins, enter your license
information. RavTrack PC will run for 30 days with the Evaluation license key that is
automatically installed with the product.
The first computer to start RavTrack PC will create the tables in the RavTrack
database, so that computer must have full administration rights to the database. For
Microsoft ACCESS databases, this should not be an issue. For SQL databases, you
may need to temporarily allow the user on the RavTrack PC computer to have full
rights to administer the RavTrack database.
Entering the License Key
To use RavTrack PC, you must purchase a license for each copy you will be using.
Contact Raveon sales ([email protected]) to purchase a license. Your license key
will be emailed to you.
To enter the license key into RavTrack PC, start up the software and select Help >
About Ravtrack.
On the About RavTrack PC help window, there is a button labeled “Modify
License”.
Click on the Modify License button. When the pop-up box appears asking for your
license key, enter the license key that was emailed to you from Raveon.
Enter your license and press the OK button.
17
Section3
RavTrack PC User Manual
Changing to the SQL Server Database
By default, RavTrack PC will run using the built-in Microsoft Access database. To
reconfigure RavTrack PC to use a Microsoft SQL Server database, select Tools >
Database Administration from the main RavTrack PC screen.
Set the Database Type to “Microsoft SQL”, and choose your server computer from
the list of servers in the drop-down list. Then click Connect.
Once RavTrack PC successfully connects to the SQL server, click Close. If this is
the first time that RavTrack PC has connected to the particular SQL database, you
will get two warning messages. Click YES on both. The two warning messages are:
1. Warning. Missing TrackedObject table. Do you want to re-create it?
Click Yes to create you new TrackedObject table in the RavTrack SQL
database.
2. Warning. Missing LOG table. Do you want to re-create it?
Click Yes to create you new LOG table in the RavTrack SQL database.
At this point, is it suggested you restart RavTrack PC by selecting File > Exit. This
will save the settings and exit the program. Then restart RavTrack PC.
Admin User
Upon installation, the default RavTrack PC user is “admin” and the password for this
user is “admin” (all lower case letters).
Crystal Reports
Crystal Reports from SAP is a report generation and viewing program used by
RavTrack PC to view and print various reports. To view the Crystal Reports
included with RavTrack PC 5.x, you must install SAP’s Crystal Reports, version for
Visual Studio 2010. It is a free download available from SAP here:
http://scn.sap.com/community/crystal-reports-for-visual-studio In most installations,
18
Section3
RavTrack PC User Manual
there is a link to the Crystal Reports installer setup on the computer where RavTrack
PC was installed. From the Start Menu, open the RAVEON > RavTRACK PC
folder. Click on the install Crystal Reports link in this menu. Or, follow the steps
below to download the Crystal Reports runtime file from SAP.
Download the current “Support Pack” for SAP Crystal reports, and install it on the
computer. This will install Crystal Report runtime module on the computer.
If RavTrack PC is not installed on the C:\ drive of the computer, you will need to
modify a registry setting for Crystal Reports. Perform these steps on the registry.
a) Using Regedit, find the registry sub-key that holds the
ConnectionDirectoryPath in it. This will usually have a value of C:\
b) Do not changed the ConnectionDirectoryPath value.
c) Add a new entry in the same sub-key that holds the
ConnectionDirectoryPath. The new entry you must create is called
ReportDirectoryPath.
d) Set the ReportDirectoryPath value to the drive letter where RavTrack PC
resides. For example, if RavTrack PC is on the E: drive, set the value of
ReportDirectoryPath to E:\ .
19
Section3
RavTrack PC User Manual
RavTrack PC Main Screen Overview
This is the main user-window for the RavTrack PC software program. You will note
in the lower-right corner are buttons showing the status of the communications from
the radio and GPS. When they show red, there is a problem with the radio
communications set-up.
Configure your Communications settings
Data from a Raveon base station such as the M7-GX enters the RavTrack PC
software program through one of 6 “Channels”. Channels are either serial (COM)
ports or TCP/IP sockets. They must be configured so that the program can receive
over-the-air data from GPS transponders. Computer workstations running RavTrack
PC Standard may also get their data from a shared SQL database, and do not need
to use the Communication Channels. Any PC running RavTrack PC Server will
most likely need at least one channel configured to receive the data from the base
station.
From the main screen, select File and Configure IO as shown below.
20
Section3
RavTrack PC User Manual
This will bring up the configuration tabs for the communication ports. The RavTrack
PC program has 6 communication “Channels”. The 6 channels are used to specify
up to 6 different serial COM ports or TCP/IP connections on the computer that may
be used for communications with a RavTrack radio transceiver.
The Lite version of the RavTrack PC only allows data communications using
Channel 1. The Standard and Server versions allows up to 6 simultaneous data
ports to be used.
Make sure the “Enable this channel item is checked. If it is unchecked, the
software will ignore this channel.
21
Section3
RavTrack PC User Manual
RS-232 Serial Communications
If you are using an RS232 serial port to communicate with the RV-M7 radio, check
the Use a serial COM port, and then select the COM Port port number that is
connected to the RV-M7 transceiver. Note: In the pull-down list of COM ports, the
ports listed are the valid ports that the software has detected on the computer.
Also, ensure that the device selected is the “Raveon RV-M7”.
TCP/IP Communications: Server - Listener
If you are using TCP/IP to communicate with the RV-M7 radio, check the TCP/IP
Connection and the Server or Client button and then enter the local computer’s
Port Number that is used to establish the connection. Raveon recommends using
network port numbers 53885 – 53890 for the port numbers on the 6 RavTrack PC
Communication channels.
In the pull-down menu labeled “Device Connected to COM port”, select Raveon
RV-M7 (38.4K baud) This is the device driver for the RV-M7 transceiver.
Important! If you are using the TCP/IP,Server-Listener feature, you must
disable your firewall, or configure the firewall to pass the port number you are using
through it. On Windows based server’s, if you are using NAT, you should disable
the Basic Firewall or configure a route/pin-hole in it for the port that RavTrack PC is
using as a Server-Listener.
TCP/IP Communications: Client - Relay
The Client – Relay communication option is available only on the Server
version of the software, and is used to relay position reports from one computer to
another. To configure a computer running RavTrack PC to automatically send all of
the position reports it receives via its RS232 serial connection or TCP/IP Server
ports to a remote computer, select Client - Relay. There are 4 items to configure
when setting up the Client – Relay.
1. Local Port number. Choose any appropriate un-used TCP/IP port
number, but Raveon suggests one in the range of 53885-53890.
2. Remote IP address. Enter the IP address of the computer you wish to
relay the position reports to. Note, the remote computer must be a
Server – Listener.
3. Remote Port number. Enter the port number that the remote Server is
listening on.
4. My IP Address. If the computer you are configuring has more than one
network interface or IP address in it, select the IP address to use. .
5. Device. Select RavTrack PC from the drop-down list.
Once the Client – Relay is configured, the remote receiving computer must be setup
as a TCP Server - Listener as if it were receiving a data feed from a Raveon RV-M7
radio modem.
22
Section3
RavTrack PC User Manual
Directory Structure on the PC
When RavTrack PC is installed, a number of directories are created on the
computer. There are data directories for maps, sounds, log files, and data. These
directories are all located under one \Ravtrack PC\ sub-directory. Normally this
directory is in the C:\RAVEON\... subdirectory. Previous version of RavTrack PC
(3.X and 4.X) stored their data in C:\Program Data\RAVEON\... Currently, version
5.x stores RavTrack PC data here:
C:\ Raveon\RavTrack PC\...
=\RavTrack PC\Data\
This directory will hold all of the data files for the program
if the program is configured to use the MS Access database. The database with for
the tracked objects, the log file, the system databases are all stored in this directory.
=\RavTrack PC\Maps\ This directory hold the maps used the the program.
RavTrack PC installs with a world-map. Custom maps created by the program’s
user are stored in this directory.
=\RavTrack PC\Icons\ This directory has various icons that the user may edit
and merge into their custom maps.
=\RavTrack PC\Logfiles\
This directory holds the weekly program operation
log file. This is not a database, but a text file describing general program operation,
events, and errors. It holds the event logs for RavTrack PC, not the log file for
vehicle movements.
=\RavTrack PC\Reports\
RavTrack PC.
This directory hold the Crystal Report files used by
=\RavTrack PC\Sounds\
This directory holds sound files (.wav) that can be
played when an alert is triggered.
(3.X versions) If you cannot view the C:\ProgramData\... directory, perform the
following steps so this directory is no longer hidden:
Windows Vista:
1. Select Start > Explore.
2. Open the C: drive and locate the ProgramData folder. If you do not see the
ProgramData folder, take these additional steps to make it visible:
a. Select Organize > Folder And Search Options.
b. In the Folder Options window, select the View tab.
c. In Advanced Settings, select Show hidden files and folders.
d. Click OK to close the Folder Options window.
Windows XP Professional and Windows 2000:
1. If you use Windows XP Professional, temporarily disable simple file sharing (if you
use Windows 2000, skip this step and start with Step 2):
a. Select Start > My Computer.
b. Select Tools > Folder Options.
23
Section3
2.
RavTrack PC User Manual
c. In the Folder Options window, select the View tab.
d. In the Advanced Settings, deselect Use Simple File Sharing.
e. Click OK to close the Folder Options window.
Using Explorer (Start > Explore)
a. Select Tools > Folder Options.
b. Click on the View tab.
Show hidden files and folders.
c. Under Hidden files and folders, click
System Database
RTsystem.mdb
The RTsystem.mdb database holds configuration information about the RavTrack
system.
It has these tables in it:
Fences
The records in this table hold information about the geofences that have been established, as well as points of
interest and all user-created graphics and shapes on the
map.
AlarmRules
As the table name implies, each entry in this table holds an
individual alarm/alert rule. Alarm/alert rules specify the
conditions that trigger alerts as well as the action to take if
an alert is triggered. The rules processor in the RavTrack
PC monitors the objects and verifies every position report
against these rules, and generates alerts based upon the
rules.
RouteData
As the table name implies, each this table holds the
waypoints for routes. At this time, this table is unused.
AlertingObjects Used by RavTrack PC to manage the list of alerting objects.
Microsoft ACCESS Log and TrackedObjects
If the program is configured to use the Microsoft Access database (default setting),
then the Tracked Object database and the activity log are stored in MS ACCESS
databases as described in this section.
TrackLog.mdb
The TrackLog.mdb database holds the activity log for the RavTrack system. It has
one table in it, the activity log:
Log
Records for each position/status received by the RavTrack
PC program. The RavTrack PC program may be configured
to store every reception in the log, store only data from
moving objects in the log, or store nothing in the log.
TheTrackedObjects.mdb
24
Section3
RavTrack PC User Manual
The TheTrackedObjects.mdb database holds the ID-specific data for the
tracked objects. This is the master database for the system, and is shared by
all users. Data such as the unit ID, name, location, and current speed are
stored in this database. It has these tables in it:
ObjectData
Records for each tracked object. Any object such as a car,
bike, truck, that has a GPS radio transponder on it will have
an entry in this table, which maintains the current information
about the object (location, speed, headingH) as well as a
user-friendly name.
LocationInfo
If reverse geo-coded address information is available, this
table will hold the street, city, state, country and zip code of
the location of each tracked object.
GroupMembers The list of groups and the IDs that belong to the groups.
Groups
The list of all groups defined in the system.
ObjectInfo
The free-format table containing user-defined fields with
information about the IDs in the system.
UserRestrictions The list of restrictions applied to the various users.
Users
The list of all of the user names in the system.
LanufageText
A table with columns for various languages. The translation
text for much of the text in RavTrack PC is stored in this file,
and users may add new language columns as needed.
.
Microsoft SQL Server Database
If the program is configured to use the Microsoft SQL Server database, then the activity log
is stored in one table, and the tracked object information in a second table. A third table will
hold the street-address location information for the tracked objects. All three tables are held
in one SQL database called “RavTrack”. There may also be numerous backup copies of the
LOG table.
ObjectData
Records for each tracked object. Any object such as a car,
bike, truck, that has a GPS radio transponder on it will have
an entry in this table, which maintains the current information
about the object (location, speed, headingH) as well as a
user-friendly name.
LocationInfo
If reverse geo-coded address information is available, this
table will hold the street, city, state, country and zip code of
the location of each tracked object.
GroupMembers The list of groups and the IDs that belong to the groups.
Groups
The list of all groups defined in the system.
ObjectInfo
The free-format table containing user-defined fields with
information about the IDs in the system.
25
Section3
RavTrack PC User Manual
UserRestrictions The list of restrictions applied to the various users.
Users
The list of all of the user names in the system.
LanufageText
A table with columns for various languages. The translation
text for much of the text in RavTrack PC is stored in this file,
and users may add new language columns as needed.
Log
Records for each position/status received by the RavTrack
PC program. The RavTrack PC program may be configured
to store every reception in the log, store only data from
moving objects in the log, or store nothing in the log.
LOG_-xxxxx
Backup-copies of the LOG table. The date of the backup is
in the table name. For example, the table LOG_2009_10_27
was created October 27, 2009. .
26
Section4
RavTrack PC User Manual
Main Screen Operation
Operation
Section 4
The main screen for the factory default configuration will look similar to the picture
below. RavTrack PC is shipped with a default world-map and 3 entries in the
object database. All items that are tracked by the RavTrack PC are referred to as
“tracked objects”. Typically these are cars, trucks, people, but to be general,
throughout this manual, “Tracked objects” refer the things being tracked.
There are three primary functions of the main screen:
1. Display a map and on it, display the location of the tracked objects.
2. Display status and information for tracked objects.
3. Provide the user with quick-access to vehicle and system status.
The three areas of the main screen (map, database, information) may be resized
depending upon what type of information the user wishes to see. This allows the
user to customize the main screen to his or her needs.
Database Window
On the left side of the screen is the database window. This window shows the
data for each tracked object. It is updated in real-time as new position and status
information is received for each Tracked Object.
27
Section4
RavTrack PC User Manual
If the “Show All” button above the window is selected, then the window is
displaying every object in the Objectdata database.
There is a drop-down list above the database window, and the use can select a
filtered sub-set of the Tracked Objects to view.
Filters are provided for showing moving objects, stopped objects, speeding, and a
host of other conditions.
Right-clicking the mouse on an item listed in the Database Window will bring up a
list of shortcuts:
Center
To center the map on the tracked object that was
clicked on
Locate
To draw circles around the tracked object so the
operator can easily find it.
Display on Map
Enables the selected object to be displayed, if
previously it had been configured as “not Displayed”
Hide on map
Remove’s the objects Icon from the map.
28
Section4
RavTrack PC User Manual
Edit
Pops up the Edit Object Data window for the selected
tracked object.
Delete
Deletes the object from the database. To select more
than one object at a time, hold the shift key down as
you click and drag the mouse across the rows you
wish to select. This will allow you to delete multiple
objects at one time.
You must be an administrator to Edit or Delete objects.
Object Info Window
Above the Database window is the “Object Info” window.
The Object Information Window displays status and location information about a
selected tracked object. Selecting an object for display its is done by right-clicking
on the object in the database window, or right-click on its icon on the map.
This window can also be used to identify geo-fences, track-dots, and points-ofinterest on the map by right-clicking on them.
There are four tabs in the Object Info Window. One tab shows the status of the
currently selected object. The Nearby tab shows a list of the vehicles nearby to the
selected vehicle as well as the distance and bearing to the other vehicles. The
Alerts tab shows a list of active alerts for the selected object, and the Info tab show
information from the ObjectInfo database table that users configure for their
system.
29
Section4
RavTrack PC User Manual
Info Tab
You may customize the information in the Info tab for your application. In the main
server database called TheTrackedObjects, there is a table called ObjectInfo. By
default it has only one column in it, called ID. To have RavTrack PC put your
custom information into the Info tab on-screen, create columns in the ObjectInfo
table for each type of information you would like displayed. In the above example,
the ObjectInfo table has three columns in it : ID, Driver, and CarNumber. Once
you have created the columns in the ObjectInfo table, add records to it to suit your
system needs. There need not be an entry for every transponder ID, but there
must only be on entry for any one particular transponder ID.
Map
The map shown on the main-screen may be the stock world map shipped with the
RavTrack PC software, or a custom-map. You may create your own custom map
by using the built-in map calibration tools, importing a geo-tiff map file, or contact
Raveon for assistance with creating a map for your particular application. Virtually,
any graphic file may be converted to a RavTrack PC map file.
Maps are stored in a \Maps sub-directory. All maps used by the RavTrack PC
program must be stored in the \Maps sub-directory after they have been calibrated.
See the section entitled “Directory Structure on the PC” for information on where
this directory is on your computer.
The on-screen map has a number of “Layers”. These layers are like transparent
sheets stacked up, each having different type of information drawn on them. The
operator may turn various layers on or off to help clarify the current location and
status of the tracked objects.
If the center of the screen is not on the map, the user may select View, Go to
map from the main window. This will center put the map window at the upper-right
corner of the map.
Maps are stored in the “.maplib” file format, and multiple maps be stored in one
file. When using a .maplib file with more than one map image in it, the user may
quickly switch between map images using the drop-down box on top the main
RavTrack PC screen.
30
Section4
RavTrack PC User Manual
Layers
The layers can be enabled or disabled, so that the map displays only the desired
information. The standard layers with RavTrack PC are:
Object Layer
This is the layer on the map that the icons for all tracked
objects are placed.
Fence Layer
This is the layer that “Geo-Fences” are drawn on. When a
shape is drawn on this layer, it is assigned a name, and may
be used by the rules processor to check if objects are inside
the shape or not.
Graphics Layer The user may draw shapes or place icons on this layer to add
graphics to the map.
POI Layer
Points of Interest are named icons that the user may place on
the map. The points may be used by the rules processor to
generate operator alerts.
Alarms Layer
When the rules processor detects a rule has been met, it
places an icon on this layer to identify the location of the
object which triggered the rule alert.
Filtered Objects Only objects that are currently listed in the Database Window
will appear on the map, and if a filter is applied to the
Database Window, then the same filtered objects will be
displayed on the map.
Imported Tracks Only the track files and waypoints that were imported into
RavTrack PC are on this layer. If the option “Convert to
RavTrack POI” was used when a waypoint is imported, it is
not placed on this layer, but instead placed on the POI Layer.
The operator may select various layers to be
displayed or hidden by clicking on the View dropdown menu. The first selection is Overall System,
and if selected, displays all layers.
On Screen Information
RavTrack PC is rich with on-screen information to make using it more informative.
The user can easily see the geographic position of the mouse, the status of the
radio communications, the status of any local GPS receivers, street location of
tracked vehicles, and various map display options such as the zoom level and
visible layers.
Communication Status
To assist in monitoring the status of the communication port, or the diagnose
problems with communications, a number of status buttons are located in the
31
Section4
RavTrack PC User Manual
lower-right corner of the screen.
The color of all three buttons indicate their current status. Blue means that
everything is OK, yellow mean possible problem, and red means a serious
problem exists.
The Com Port Status button is blue when the communications port is working and
receiving valid data. It will quickly blink darker blue at the moment it receives a
valid position/status message from the connected device. If data stops coming into
the port, it will turn yellow, and then later red if it appears all data has stopped
coming into the port.
The operator may double-click on this button to bring up a window that will display
the list of communication ports, and their individual status.
The Local GPS Status button is blue when valid NMEA position messages are
received into any of the 6 communication ports. RavTrack PC can accept
standard NMEA $GPGGA and $GPGLL messages into any of the 6
Communication Ports to tell it the local GPS position. When either of these NMEA
messages is received with valid position data, the Local GPS Status button is
turned blue. If after a long time, no valid NMEA position message is received,
then the Local GPS Status button turns yellow, and then later red indicating the
local GPS may have failed or lost satellite visibility. The operator may double-click
on this button to bring up a window that will display the list of communication ports,
and their individual status.
Note: For the RavTrack PC to obtain
a position fix using local GPS, the My
GPS option in the Interpret GPS
data w/o ID as: must be selected on
at least one Communications Port in the Configure IO menu. When this option
is checked, any valid NMEA messages on this port will be interpreted as a local
GPS position fix. The local position fix may be used to center the map and/or
determine the “Home” location.
The Error Log button is blue if there are no system errors, and turns red if there
are system errors. Clicking on this button will bring up the error log so that the
operator can investigate the cause of the system error.
Zooming and Home
In the upper right of the main screen is a zoom dropdown menu the operator may use to zoom in or out
on the map. The zoom value is in percent.
Alternately, the Page Up and Page Down keys on
the keyboard may be pressed, and the map will zoom in/out appropriately.
32
Section4
RavTrack PC User Manual
Hint: If the map appears blank, zoom back (10% or smaller) until the map image
appears in the map window of the main screen. To find a map if it is off-screen,
select View, Go To Map from the main screen.
The RavTrack PC keeps track of a “Home” position. Home may be used for
centering the map or referenced by the rules processor. For example, a rule may
be configured to alert the operator if an object is too
far from the Home position. Or, the RavTrack PC
may be configured to automatically keep the map
centered on the Home position.
Home may be either a fixed location, manually
entered by the operator, or it may be the current
position as reported by a local GPS receiver
connected to a Communications Port. This may be
configured on the Program Operation tab of the Program Properties form as
shown on the right.
The Raveon RV-M7 series of GPS transponders will output NMEA position
messages mimicking the messages from a standard GPS as well as $PRAVE
position/status messages from other transceivers, so that a separate local GPS
receiver is often not needed.
Mouse Operation
The current position of the mouse pointer is shown and the bottom of the screen.
The position is shown in the dd mm.mmmm format, where dd is the degrees, and
mm.mmmm is the decimal minutes. You may change for position display format in
the File > Program Properties menu.
If the use right-clicks the mouse on the map, the ID of the closest Tracked Object
will be shown on the bottom of the screen, and the distance to it show to the right
of the ID.
Smart Buttons
There are three smart-button that may appear on the top of the window above the
map. They appear when the function they perform is active. The three buttons
are: HOME, CLEAR, and ALERTS.
33
Section4
RavTrack PC User Manual
The HOME button will cause the map to be centered on the “HOME” location. IN
the FILE, PROGRAM PROPERTIES, Program Operation tab, the user may
configure home to be either at a fixed location, or at the position of thelocal My
GPS data.
The CLEAR button will appear whenever there are track-dots on the map.
RavTrack PC can place up to 10,000 track dot to show “breadcrumb trails” of
where the tracked objects have been. Clicking CLEAR will erase them from the
map. When the number of track dots gets above about 1000, the responsiveness
of the map to pan and zooms may slow down, and clearing the track dots will
alleviate this.
The ALERT button will appear with red lettering when a rule alert occurs. Clicking
on the ALERT button will bring up a table showing all of the current and past
alerts. An example of the table is shown below.
The operator may click on the Ack checkbox to signify that the alert is
acknowledged. Acknowledged alerts change from red background to grey. Once
the alert condition is gone, the row in the table will change to a white background,
and the Active checkbox will not be checked. The operator may click the
Acknowledge All button to check all Ack checkboxes. The operator may click
the Remove Cleared Alerts button to remove alerts from the list that are no
longer active.
There are three short-cuts available to the operator by right-clicking on a vehicle in
the list of alerts. The shortcuts are Center, Locate and Acknowledge. These
shortcuts assist the operator in locating alerting vehicles, and acknowledging them.
34
Section4
RavTrack PC User Manual
Jump To
Use the quick Jump To drop down list is on top the main screen to quickly move
the map center.
In the drop-down list is each POI defined on the map, and by selecting one of the
POIs from the Jump To drop down, the map will re-center on the selected POI.
Selecting User Groups to View
The user may choose to display all tracked objects, or only certain User Groups.
Each tracked object is assigned to a User Group. By default, a tracked object is a
member of User Group Everyone. You may create any number of User Groups,
and assign any tracked object to any group.
On the tool bar of the main screen is a drop-down list of the groups. The operator
may choose which group(s) to display on the map by clicking the mouse on the
group to enable or disable it. If there is a check mark
in front of the group, it is
displayed on the map. If there is not a check mark, it is not displayed unless the
group Everyone is checked. Then all tracked objects are displayed.
If there is a dash
in front of the User Group name, then this group is not
displayed, and this group is restricted from being displayed. Groups are restricted
35
Section4
RavTrack PC User Manual
from being displayed when RavTrack PC is configured by an administrator using
the File > Program Properties set of tabs.
36
Section5
RavTrack PC User Manual
Program Configuration
Section 5
To configure the various options within the RavTrack PC program, select File, and
then Program Properties. This will bring up a form with 6 tabs.
The operator must be logged in as an Administrator to change the configuration of
the RavTrack PC. To log in as an administrator, select Tools, Login and enter
the administrator password.
The default user name and password is “admin” and “admin”, all lower-case
letters. To change the password, enter the current password in the Password text
field, check the Change Password box, and enter the new password into the
required text boxes. Then click OK.
When an user stops and restarts the RavTrack PC program, the RavTrack PC
keeps the user logged in with the same privileges even if the program is stopped
37
Section5
RavTrack PC User Manual
and re-started. This may be disabled in the Program Properties window
described later.
System Log Database
On the Program Operation tab, the user may enable the Track Log. The Activity
Log is a database table that holds position and status information about the objects
that have reported their position and it holds each Alert Event if the alert was
configured to be logged. Select Log position and alerts to database to enable
saving position/status reports to the Log table.
On busy systems, the Log table in the database may grow quite large, so there is
an option to limit the logging of position/status report from object to only those from
moving objects. Click on Only Log moving object and enter the distance they
must move if only position/status information about moving objects is to be saved
to the log.
Current Map File
The user may easily switch between maps using the Current Map File list. All
.maplib type files that are stored in the /maps subdirectory are listed in the file list
box. Note: Each .maplib file may have multiple maps within it.
To change the currently displayed map, select a new .maplib file, and then click
Save and Exit
Units and Display Options
The Units and Display tab allow the operator to select how some aspects of the
RavTrack PC display information.
38
Section5
RavTrack PC User Manual
Metric or English Units
The program can display speed and distance in either Metric or English format.
Log entries in the Log database as well as status entries in the tracked objects
database are stored using the selected format.
Use caution when changing the units or measure and later analyzing the data. If
the system of measurement was set to one type and then data was stored in the
database, when it is changed to another format, the databases still holds the old
data in the old units of measure, and thus data recalled from them may be
displayed incorrectly. For example, if the program is set to metric, and an object
was recorded going 100km/hour, the speed is saved in the LOG table as 100.
This simplifies the reporting for anyone using the log file, because the unit of
measurement in the log is the same as set in the program. But if the program is
later changed to English units and the log file is retrieved, it will show the speed as
100 miles per hour for the previous entry.
Icon Font
Use the Icon Label Font drop-down list to choose the font and font size when
labeling object Icons on the map.
Circles
To put a set of circles on the center of the map, select Draw Circles around
center of map. TO put them around the HOME location, select Draw Circles
around home location.
39
Section5
RavTrack PC User Manual
Track Dots
Track dots are a powerful way of showing where tracked objects have gone. The
RavTrack PC can display up to 10,000 track-dots at one time. If Track Dots are
enabled, position/status reports are stored along with a dot when it is placed on the
map at the location of the object.
The color of the dot for a particular Tracked Object is configured when the Tracked
Object is added to the program.
To make the color of the dot proportional to the radio signal strength, select Make
Dot color proportional to RSSI. The dot colors will then correspond to the
following signal levels:
• - Violet
• - Light Violet
• - Dark Blue
• - Medium Blue
• - Light Blue
• - Purple
• - Green
• - Dark Green
• - Orange
• - Red
• - Dark Red
• - Black
0 to -49dBm
-50 to -59dBm
-60 to -65dBm
-66 to -70dBm
-70 to -75dBm
-75 to -80dBm
-80 to -89dBm
-90 to -99dBm
-100 to -106dBm
-107 to -110dBm
-111 to -116
< -117
Left click the mouse on any dot on the screen, and the Object Info box will display
the ID, Name, and status of the object that cause the dot to be placed.
RavTrack PC has a 10000 dot memory, and once the 10000 dots are placed, the
oldest one is re-used for new receptions, and the previous information stored in the
dot is erased. This does not affect the TrackLog database file. The log retains all
position reports in it, and erasing a dot does not erase the database entry in the
TrackLog.
Naming the Digital Inputs
Most GPS transponders have some digital input capability. To make using the
program easier, each digital input may be assigned a name or description. To
assign the various inputs a user-friendly name, select File > Program Properties
and then click on the Alerts tab. On the Alert tab is a list of all of the digital inputs,
and the descriptions for each input. Double-click on a description and type in the
text to change it.
By default RavTrack PC allows up to three digital inputs. Each input may have a
“high” state and a “low” state. The high state is when the input is a positive
voltage, and a “low” state is when the input has no voltage on it, or is connected to
ground. You may assign descriptions to the high and low states, based upon how
40
Section5
RavTrack PC User Manual
your inputs are used. For example, if input number 2 of the transponder is
connected to a door-open sensor, you could name the low state “Door is Open”
and the high state “Door is Closed”.
Once you have named your inputs, you must enable the use of the input signal for
each individual tracked object that uses it. Some tracked objects may not use
digital inputs and others may use them. Each individual tracked object may be
configured to also monitor certain inputs and others may ignore the digital inputs.
This is configured in the individual tracked object’s configuration. To enable or
disable digital inputs for a particular tracked object, edit the Tracked Object’s
information by either double-clicking on the tracked object in the database window,
or select Tools > Edit/Add Tracked Objects. Find the record for the tracked
object you wish to configure, and check the Digital Input Bits Used input for
each input bit that is used on this individual transponder.
41
Section5
RavTrack PC User Manual
Adding and Editing Tracked Objects
The individual configuration information for each tracked object is stored in a table
in the RavTrack database called TheTrackedObjects. There is one entry for each
ID. The ID is the ID of the transponder. The user may assign a name to this ID,
as well as assign the ID to be a member of a group.
From the main menu toolbar, select Tools > Edit/Add Tracked Objects. This will
bring up the Edit Object Information window. An alternate method to bring up
this window is to double-click on a particular row in the database window of the
main screen.
42
Section5
RavTrack PC User Manual
Click on the Prev/Next buttons to scroll through the IDs in the tracked object
database.
To assign or change the name of a tracked object, type the name that is
associated with the ID in the name box.
The following options may be configured for each individual ID in the tracked
object database.
Enabled. Check if you want RavTrack PC to display and process this ID.
Displayed on Map. Check if you want this ID’s icon on the map. Clear the check
if you do not.
Store reports to the LOG table. Check if you want position/status reports from
this ID stored to the LOG table. Note, Logging must be enabled in the Program
Configuration for any logging to occur.
Place Track Dots along path. Check if you want track dots (snail trail) on the
map to show where this tracked object traveled.
Rotate Icon. Check if the position of the object’s icon on the map should rotate
around in the direction of travel. Uncheck if you always want the icon oriented in its
default position.
43
Section5
RavTrack PC User Manual
If the ID is to be assigned to a particular group, use the drop-down list to select the
group. Assigning it to a group facilitates the displaying of different groups and
reporting on tracked objects by group.
Once you configure a particular ID, click the Save button to store it to the
database.
To delete the ID from the database, click Delete. To add a new ID, click on Add
New.
44
Section6
RavTrack PC User Manual
Program Operation
Section 6
Special Keys
F2 = Center map on selected object, and draw circles around it
F3 = Draw circles around selected object to locate it
F4 = Center map on the HOME location
F5 = Toggle range circles on/off
F6 = Find nearest POI to the currently selected tracked object
F7 = Find nearest Tracked Object to the currently selected Tracked Object
F9 = Clear the alert flag for the selected tracked object
F10 = Pop up a status box for the currently selected Tracked Object
F12 = Reset measured distance to 0 (when measuring)
[ctrl] F9 = Clear all alert flags for ALL tracked objects
ESC = Close the window
PageUp = Zoom in on the map
PageDown = Zoom out on the map
Mouse Operation:
Right Click Put mouse over any object on
the map, and right click to
display information about that
object. The information will
appear in the Object Info
window of the main window.
Left Click
Single left click on an object in the database window to see
information on that object. Double click on an object in the database
window to bring up a form to view its status and edit its name, dot
color, and digital input port descriptors.
Track Dots
To enable track dots (snail trail of dots behind moving objects), select File,
Program Properties, from the main window.
On the Units and Display, tab, enable the Draw
Track Dots for all objects checkbox. Also check
the Make dot color proportional to RSSI if you
wish the dot color to change with radio signal
strength. Note, the Radio Signal Strength (RSSI)
displayed by RavTrack PC is the strength received at the radio connected to the
computer running RavTrack PC. If a repeater is used in the system, the RSSI
45
Section6
RavTrack PC User Manual
reported will be that of the repeaters signal strength when the tracked object
reporting is using the repeater to send messages to the RavTrack PC.
Set the Minimum distance between dots to any value you would like. There is a
limit to the RavTrack PC’s track dot memory, so setting the distance between dots
to a larger number will allow longer trails.
Locating Nearby POIs or Tracked Objects
Pressing the F6 key when a tracked object is selected in the Database Window
will display the nearest Point Of Interest (POI) to the selected object. POIs are
placed on the map by the user to identify specific locations.
Pressing the F7 key when a tracked object is selected in the Database Window
will display the nearest other tracked object to the selected object. This is very
useful when trying to locate other nearby vehicles or personnel.
Pop-Up Vehicle Information Boxes
To pop-up Information box for a particular Tracked Object, click on the Object’s
icon or row in the database window. Then press F10, and a status box will pop up.
If an Alert is currently active for the particular Tracked Object, the caption in the
Vehicle Information box will be Red. If the vehicle is moving, the background of
the ID box will turn light green. If the vehicle breaks the speed limit set in the
Program Properties, then the background of the ID box will turn light red.
46
Section6
RavTrack PC User Manual
The user may pop up as many as 20 Information boxes on screen at any one time.
47
Section6
RavTrack PC User Manual
Creating a Map
Section 7
All map files used by RavTrack PC will have an extension of “.maplib”. For
example, the default map is called worldmap2.maplib. Using the MapManager.exe
program, the user may import custom maps, images, plans, into RavTrack PC, and
have them converted to a .maplib file. The MapManager program is a utility by
Franson Technology, Inc., and is used to calibrate maps into .maplib files. It is
integrated into RavTrack PC, and is accessed from the Tools menu.
The first time the Map Calibration Tool is accessed, MapManager.exe will be
installed on the PC. Simply follow the dialog box prompts to install it. RavTrack
PC executes a program called GPSToolsXPRunTime.exe to install MapManager.
MapManager is used to calibrate a graphic image, turning it into a .maplib file.
Graphic files are imported into MapManger, calibrated, and then stored as .maplib
files. If geotiff images are imported, then calibration is not required, because
geotiff images and maps already have calibration data stored in the file. Graphic
images that are imported as maps, such as jpeg, gif, and tiff images, will have to
be calibrated before use. Calibration consists of entering three known geographic
latitude/longitude points on the image.
Along with the map image, you may also add your own custom icons to the
.maplib. Icons are used to show the location of tracked objects on the map, or to
designate Points of Interest (POIs) on the map. RavTrack PC comes loaded with
many stock icons, but you may also add your own using the Map Creation Tool.
Executing MapManager
In the Tools menu, click on Map Creation Tool to create a new .maplib map or
open an existing map. This will cause RavTrack PC to execute another program
called MapManager.exe. MapManager is the program used to import maps,
calibrate them and save them in the .maplib format. When MapManager creates a
.maplib file, it contains the graphic image or the map, its calibration data, and any
additional icons created for use in the specific map.
Import your map graphic or file into the MapManager tool, and follow the
calibration instructions. The graphic file to be converted into a map is loaded by
selecting Map, New Map… from the MapManager main window.
Once this selection is made, a calibration wizard will run, and ask a series of
questions to assist with the map calibration.
Step 1
Selects the map datum. Select your country/region from the drop
down list, and then choose the map datum you will use. In the USA,
currently the most common map datum is WGS-84. The datum will
be in Longitude/latitude.
Step 2
Choose the map projection. Most projections are Cartesian.
48
Section6
RavTrack PC User Manual
Step 3, 4, and 5 Require the user to click on known location on their image, and
enter the latitude and longitude of these points. These three
calibration points are used to calculate all other points on the map
image. It is best to choose these three points on far sides of the map
from each other.
You may also load icons into the .maplib map. Raveon has provided stock icons in
the RavTrack PC program, and a large library of additional icon graphics can be
found in the /icons subdirectory.
Save your calibrated .maplib file in the /maps subdirectory.
Icons
Icon images are stored together with the map in a .maplib file. When the user
creates a map, they also may load icons into the .maplib file for use with the map.
Supplied with RavTrack PC is a rich set of quality icons stored in the file
StandardIcons.maplib. This file is merged with the currently selected map
whenever the RavTrack PC begins. This merging of files is transparent to the
user, and the end result is a larger list of icons to select from in RavTrack PC.
When an icon is assigned to an object, a drop-down list of available icons is
shown, and this list include the icon loaded in the current map’s .maplib file along
with all the icons from the StandardIcons.maplib file. The standard icons included
with RavTrack PC contain like these:
49
Section6
RavTrack PC User Manual
50
Section6
RavTrack PC User Manual
The icon named default has a special usage. If the Auto-Add feature is enabled,
and a position/status is reported from an object that is not in the database, it will
automatically be added to the Tracked Objects database, and assigned the
Default icon.
Overlaying an ESRI Shape File
This feature of RavTrack PC works with some ESRI shape files, but sometimes will
not work with others. From the RavTrack PC main screen select File, ESRI
Files…, Load ESRI Shape File. This will bring up an open file dialog box to
allow you to select the file to load. RavTrack PC will assume the file extension of
the shape file is .shp.
Once the file is loaded, it will be displayed on the map. The color and default
shape settings may be configured by the user. To set the ESRI default settings,
select Program Properties, ESRI Data. The ESRI Data tab is shown below.
The user may configure the font size of the shape captions, as well as various
shape file options.
51
Section6
RavTrack PC User Manual
The map datum of the ESRI shape file loaded into RavTrack PC must match
the map datum of the currently displayed base map.
52
Section7
RavTrack PC User Manual
Drawing Tools
Section 8
To draw graphics on the map, or place points of interest (POIs), use the drawing
tools built into RavTrack PC. Select Tools, Drawing Tools to bring up a small
window that displays the drawing tools.
There are three primary uses of the drawing tools.
1.
Draw geo-fences for use in alerts and alarms.
2.
Draw lines and graphics on the map.
3.
Place points of interest (POIs) to show the location of
specific places that may also be used in alerts and alarms.
The layer on the map that the object is drawn on is very
important. The Map Graphic layer is for graphics only, and
any object placed on it is for visual purposes only. No point
or object on the map Graphic layer can be used as a geofence or POI.
Circles, squares, and ellipses shapes placed on the Virtual
Fence layer are given names when they are created. The
shapes may be used for alerting and alarming when tracked
objects move into or out of the area defined by the shape put
on the Virtual Fence layer.
Points are specified on the map by placing an icon at the
location using the Place POI function. If a POI icon is
placed on the Points of Interest layer of the map, the POI may be used to trigger
alerts and alarms. If it is placed on any other layer, it will not be used when
checking for rule alerts.
Placing a simple graphic on the map
Select the layer Map Graphic from the pull-down menu.
Select the shape you wish to draw (line, Ellipse, Circle, Rectangle, POI Icon).
When drawing a shape, the color of the pen may also be selected.
Click on the map, and draw the shape.
Creating an Electronic Fence (Geo-Fence)
Select the layer Virtual Fence from the pull-down menu.
Select the shape you wish to draw (Ellipse, Circle, or Rectangle). When drawing a
shape, the color of the pen may also be selected.
Click on the map, and draw the shape.
When the shape is complete, RavTrack PC will prompt the operator to give the
shape a name. This named shape may be used when creating alert rules related
53
Section7
RavTrack PC User Manual
to this fence. Fence names used in geo-fencing are not case sensitive. Carlsbad
and CARLSABD will be treated as the same fence name.
Deleting a Graphic From the Map
To delete any POI, fence, or shape placed on the map, right-click on the graphic
item. Its location and information will be displayed in the Object Info window.
Press the Del button to delete it. You must be logged into the program as
Administrator to delete shapes, graphics, POIs, and fences.
To delete POIs and Fences, you may also open a list of the POIs or Fences from
the View menu, select the POI or Fence you wish to delete, and press the delete
button.
Drawing Polygons
Polygons may have up to 15 sides. Select “Draw Polygon” on the Drawing Tools
menu, and then click on the map to draw the polygon. When you are finished
drawing the polygon, press the Enter key. If the polygon was drawn on the Virtual
Fences layer, then you will be prompted to enter a name for the fence you just
created.
54
Section8
RavTrack PC User Manual
The Log File
Section 9
A LOG table is a table stored in a database that holds historical information about
the location and status of the tracked objects. The LOG table may be stored in
either an ACCESS database or an SQL database.
ACCESS: The file name is TrackLog.mdb and it is in Microsoft Access format.
The table in this database file is named LOG.
MS SQL: The log table is named LOG. It is in the RavTrack SQL database.
Following is a list of the fields stored in the log file for each position/status
reception from a tracked object.
The LOG table holds the data for the log entries. The field in the LOG table named
“EntryType” identifies the type of entry in this log file. The valid types are:
Update
A position/status update was received over the radio from a tracked
object, and this is the log entry for that event.
Alert
A rule was triggered and this is the log entry for the alert.
Clear
A tracked object had been triggering a rule alert, but the event has
cleared.
System Log
Additionally, a text file is created and various system activities related to the
RavTrack PC operation and its actions are recorded in it. The system log file is
called RT-w-yyyy.txt where w is the current week number, and yyyy is the current
year. Every week a new system log file is created.
The RT- system log files are stored in a subdirectory under the H\RavTrack
PC\Logfiles directory.
55
Section8
RavTrack PC User Manual
Any text viewing program may be used to review the system log file. These are
provided for system and installation debugging purposes.
Enabling Activity Logging of Tracking Objects
Logging the position, status, and alerts received by RavTrack PC to the LOG table
is a two-step process.
1. Enable the activity logging feature in RavTrack PC.
2. Enable logging for the individual tracked object
To enable RavTrack PC to store GPS position data, status, and alerts in the LOG
table, select File, Program Properties from the main screen. From the Properties
screen, check Log position and alerts to database.
If you only wish to log objects that are moving(recommended), also check Only
Log moving objects, and specify the minimum distance an object must move
before its location and status are stored to the LOG table.
If you only store information to the Log table when an obejct is moving, you may
also want to also periodically store an update to the Log table. To for a periodic
entry in the log table for stationary objects, check the Log at least every xx
seconds box, and enter the maximum number of seconds you wish to have
between Log table entries for any particular vehicle.
For example: In the configuration above, RavTrack PC will store every postion
report received from any vehcile that moves more than 100 feet. If the vehicle
does not move in 15 minutes (900 seconds), then it will store an entery in the Log
table anyway, and continue to do so every 15 minutes seconds untill the object
begins moving. Each time the object moves more than 100ft between postion
reports, a log entry will be made. This configuration is recommend so that the Log
table does not grow excessivly large.
Once logging is enabled, it still must be enabled for the individual tracked objects.
When a tracked object is first defined, by default, activity logging for the object is
enabled.
To enable/disable logging of individual tracked objects, first double-clicking on the
object in the database window, or select Tools, Add/edit tracked objects.
56
Section8
RavTrack PC User Manual
Locate the object in question, and check Store reports to the log file to enable
logging for this object. If checked, every time the object transmits a
position/status, the specifics of the transmission are stored in the LOG table.
Log Table Size Limitation
All databases have size limitations, and because the LOG table can grow over
time to be quite large, the user must be aware of the size of the LOG table, and
manage it properly by “Pruning” it to remove old data, and periodically backing it
up.
For Microsoft ACESSS LOG tables, the table should be limited to about 100,000
entries. For Microsoft SQL Server the LOG table should be kept to 400,000
entries. These are not “Hard” limits, and the actual limit will greatly depend upon
the performance of the computers running the database software. A highperformance business-class server should have no trouble processing 1,000,000
LOG table entries.
Below is a table to help you estimate the number of LOG table entries that
RavTrack PC will make per day, week, and month. This will help you configure
how often RavTrack PC should prune the records in the LOG table.
Number
of
Tracked
Objects
Update
Rate
(seconds)
Usage
per day
Log Only
Moving?
10
10
10
50
50
50
200
200
10
10
30
10
30
60
30
60
24
24
8
24
24
8
24
24
no
Yes
Yes
no
Yes
Yes
no
Yes
57
Log Entries
per day
Log Entries per
week
Log Entries
per month
86,400
604,800
4,233,600
8,640
60,480
423,360
960
6,720
47,040
432,000
3,024,000
21,168,000
14,400
100,800
705,600
2,400
16,800
117,600
576,000
4,032,000
28,224,000
28,800
201,600
1,411,200
Section8
200
RavTrack PC User Manual
120
8
4,800
Yes
33,600
235,200
Log Table Management
Position reports and alert events may be stored in a database table called the
LOG. Each individual tracked object may be configured to store its postion/status
reports to the LOG table, as well as rules may be configured to store events to the
LOG table if the rule is triggered.
All entries in the LOG table are sequentially numbered and dated. This facilitates
management and reporting. To erase some or all of the entries in the LOG table,
select File, Manage Log Database from the main screen. When you start this
Log Table Management utility, a window will pop-up allowing you to review and
configure how the LOG table is managed.
A RavTrack PC user must be either an Administrator or have the rights to “Manage
the LOG table” assigned to the user to open this Log Table Management window.
To enable a computer to manage the LOG table and its backups, check the
Enable LOG Management checkbox on the top left of the window.
The window “List of LOG tables and backups” will show you the LOG table which
has the table name “LOG” and the number of records in it, as well as a list of
backup-copies of the LOG table. The backup copies have the date they were
created in their name, such as Log_2010_1_13. This table was created January
13st, 2010.
58
Section8
RavTrack PC User Manual
The main LOG table that holds the current log information in it is simply called
“LOG”.
Use the Manually Delete Old LOG Entries selection to erase old log entries
and reduce the size of the log database.
To erase all entries in the log file, select Clear All.
To delete an old log table, right-click on it, and select Delete.
Note, each entry in the log file uses approximately 300 bytes of disk space in an
ACCESS database, or 1000 bytes in a MS SQL Server database.
Microsoft Access databases do not release spare disk space, even when an entry
in a database is deleted. A special process called “Compacting” must be done
after an entry is deleted to free-up the disk space. Click on the Compact Now
button to free-up the disk space for log entries that have been deleted. This will
often free up 50-80% of the log file disk space, and not delete historical
information.
Pruning the LOG table
For optimum performance, the main LOG table should not grow excessively large,
so it periodically should be “Pruned”. Pruning removes old entries. Use the Auto
Prune feature to automatically have RavTrack PC remove old log entries from the
LOG table.
Check the Erase Old Entries checkbox to enable the LOG table Auto Prune
feature. The select the maximum age for LOG table entries by setting the Older
Than XX days value. For example, if it is set to Older Than 10 days, RavTrack
PC will automatically remove log entries that were placed in the LOG table more
than 10 days ago. T
The date of an individual record in the LOG table is dependent upon the date
set on the computer that stored the LOG entry. Care should be taken to ensure
that computers which store LOG entries have their date and time properly set.
Backing Up the LOG Table
Only one computer on a RavTrack PC system should be configured to
automatically backup the LOG table. All others should have their backup option
set to “Manual”.
Configure automatic backups using the “Backup Log Table” drop-down list on the
Mange Lot Table window. Daily, Weekly, Monthly, or Manual may be
selected. At the interval you select, RavTrack PC will copy the LOG table to
another table named LOG_xxxx where xxxx is the date of the copy.
59
Section8
RavTrack PC User Manual
Third-Party SQL Table backups Software
On RavTrack PC systems with a large number of vehicles or vehicles that report
very quickly, the LOG table may get large quickly. In this case, Raveon
recommends that a third-party table backup program be used so that the SQL
database does not get excessively large.
Configure your backup software to periodically backup the LOG tables, and once
they are backed up, delete the old ones from the SQL database so they do not
consume resources. Then, if the historical log data is ever needed, you can
restore the appropriate log table back to the database so it can be reviewed or
replayed.
The following is a list of possible third-party SQL backup software vendors.
Quest Software
http://www.quest.com/sql-server/backup-and-recovery.aspx
SteeleEye Technologies
http://www.steeleye.com/
Red-Gate
http://www.red-gate.com/index.htm
Displaying and Replaying Historical Information
To display the position/status of log file entries on the map, select Tools, Load
Replay Log File on Map. Enter the range of log-file entries you wish to display.
60
Section8
RavTrack PC User Manual
Begin by selecting the date-range you wish to load the log entries from. If you
only wish to load entries for specific Tracked Objects, or a range of them, select
the appropriate option.
Each log entry has a comment stored with it. The comment that was stored with
the entry was defined on the File, Program Properties window, in the box
labeled Log File Entry Comments.
You may also limit which log entries are retrieved by using a parameter filter and/or
a geofence filer. Often, it is best to only retrieve log entries for vehicles that are
moving (speed > 0). The geo-fence filter is used to retrieve log entries from
vehicles that are within a certain geo-fenced area.
When a log entry is retrieved, the RavTrack PC program will put a dot on the map
at the location of the log entry if the particular Tracked Object has “Place Tracked
Dots” enabled. Up to 10,000 track dots may be displayed as dots on the map, and
thus up to 10,000 log entries may be displayed. If more than 10,000 are recalled,
then the last 10,000 loaded will be displayed.
A playback Window will pop-up, displaying the data from the log as selected. The
61
Section8
RavTrack PC User Manual
The Log Replay window displays a table that holds the information about each log
entry that was retrieved from the log. The user may click on any row, and the
tracked objects on the map will automatically reposition themselves to the location
in time that was clicked.
The Play button is used to automatically re-play the historical data. The rate it is
replayed may be adjusted with the Replay Rate drop-down selection. The single
arrows ( < and > ) are for single-stepping through the table. The double arrows (
<< and >>) are for jumping 20 log entries forward and backward in time.
As the log is replaying, the virtual time of the replay is displayed in the Replay
Time/Date box.
The log file dots on the map are linked to the log file, so the user may right-click on
a dot, and the RavTrack PC program will display the location and status
information in the Object Info: window that was stored with that particular log
entry.
Whenever log file dots are displayed on the map, a Clear Track button will appear
on the top of the main window. Click this button to erase the log entries from the
map.
When a log file is recalled, the current position shown on the map of any tracked
object recalled from the log will be the last one recalled from the log. As soon as
RavTrack PC receives a new position from the Tracked Object, it will move its icon
to the current position.
62
Section8
RavTrack PC User Manual
Note, whenever the Log Replay window is open, RavTrack PC no long
displays the current vehicle locations. It is displaying historical data.
Once the Log Replay window closes, RavTrack PC will automatically
resume displaying the live data.
63
Section9
RavTrack PC User Manual
Alerts and Alarms
Section 10
Alerts are triggered events caused by tracked objects meeting (or violating) pre-set
rules. RavTrack PC has provisions to trigger alerts based upon:
Electronics Fences (Geo-fences)
Inside the fence (stays active as long as event is inside fence)
Outside the fence (stays active as long as event is outside fence)
Entering a fence (triggers once)
Leaving a fence (triggers once)
Parameters
Idle Time
Speed
Voltage
Missing (no reports)
Digital Inputs
Input is high (positive voltage on it)
Input is low (0 volts on it)
Any combination of the above on any combination of inputs
Distance
Distance from home
Distance from a Point of Interest
Identifying Alert Conditions
There are many ways the operator will notice that an alert is triggered.
1. The red Alert button appears on the top of the main window.
2. The Tracked Object’s ID will be highlighted in red in the database window.
3. The text under the Tracked Object’s icon will change to the alert color.
4. An Alert Window may be configured to pop-up on screen.
5. An alert may be configured to play a sound on the computer’s speaker.
6. An email may be sent when the alert triggers.
7. A Twitter posting may be made to notify everyone of the alert condition
8. An active alert entry will be made in the Active Alert list, with an
icon.
alert
Reviewing Alert Conditions
Clicking on the Tracked Object’s entry in the database window, while holding the
shift key down will display the object’s alert status in the Object Info window.
Clicking on the Alert button on the top of the screen, or selecting View > Current
Alerts, from the main toolbar will bring up the Alert Table. The Alert table lists all
of the alerts, as shown below.
64
Section9
RavTrack PC User Manual
Setting up an Alert
To configure an alert, select Tools, Alarms and Rules.
This will bring up a small window with a list of all of the current alerts configured in
the system. Each alert is given a rule name by the user who created the alert.
To create a new rule, click the New Rule button. To edit an existing rule, doubleclick the rule in the list or select it, and
click Edit.
Enter the name for the rule in the Name
of this rule text box. The name of the
rule will appear in an alert box if the rule is
triggered, and the operator of the program
needs to be notified.
Use a name for the rule that the operator
will understand. For example, instead of
calling a rule “Rule A”, call it “Speeding Rule – Object is exceeding the preset
speed limit. “ This will allow the operator to better understand the situation that
triggered the rule.
In the Rule Applies To box, select the range of object IDs that this rule will apply
to. Every time an object reports its position and status, the RavTrack PC’s rule
processor checks the position and status against all rules that apply to the object.
65
Section9
RavTrack PC User Manual
You may also choose a single User Group that this rule will apply to. A rule will
apply only if the reporting object’s ID is within the ID range specified in the Object
ID boxes and the specified user group (if This Group is enabled).
Various models of location transponders can transmit “Flags” indicating certain
conditions such as a proximity flag, vibration flag, collision flag, and others. These
flags are product-dependent, and not all Raveon products support all flags. If an
alert rule is to only apply to Tracked Objects that have a certain flagged condition,
check the “Rule only applies to this flag…” box. In the example above, the rule
will apply only to vehicle #6, when his vibration warning flag is set.
There are four basic types of rules, and
the user must select which one to
perform. Under these four basic types,
are a variety of variations. If more than
one type of rule should apply to a
tracked object, create another rule for
each additional rule type desired. The
rule types are:
1. Check rule every time a unit reports
Geo-fence monitoring
Alert Flag monitoring
Off-hours activity and theft monitoring
GPS location updates via email
2. Parameter Monitoring
Speed
Voltage
Idle Time (not moving)
Missing (No position reports received)
3. Digital Inputs
Input is high (positive voltage on it)
Input is low (0 volts on it)
Any combination of the above on any combination of inputs
4. Distance Monitoring
66
Section9
RavTrack PC User Manual
Distance from a POI
Distance from Home
Once the rule type is selected, select the appropriate logic for the rule, and any
required parameters.
Digital Input Alerts
An alert may be triggered when a digital input meets a certain condition. Digital
inputs are “0” or “low” when there is no voltage on them. Digital inputs are called
“high” or “1” when there is a positive voltage on them.
To enable an alert using the status of the digital input on a tracked object, first click
on the Digital Input Monitoring button on the Rule Edit form.
The put a check in the box corresponding to each input that should be monitored.
Once you check the input numbers, then check the condition for the alert based
upon that input. For the example above, input number 2 will be used to trigger an
alert. The alert will trigger when input 2 is low (Door is Open). Note that the user
had previously configured input number 2’s high and low states to mean “Door is
Open” and “Door is Closed”. The actual text assigned to the high and low states
is not important.
Geo-Fences
For Geo-Fences, a fence must first be drawn on the “Fences” layer of the map,
and then given a name. Once a fence is drawn on the map, a geo-fence rule may
be created using the named fence. The rule may include any Parameter, Input, or
Distance rule, but when the geo-fence option is selected, the rule will only be
checked if the tracked object is inside or outside the designated Geo-Fence area.
To configure an alert to apply only inside or outside a geo-fence, select the type of
geo-fence from the drop-down list in the “Location Where This Rule Applies”
box. The select the geo-fence name.
If you do not want any geo-fence to apply to the rule, select EVERWHERE.
67
Section9
RavTrack PC User Manual
Time and Day of Week
The time of day and day of week that a rule applies to may also be defined for
each rule you set up. By default, rules apply all-day every day. Change the Time
Limit to set the time of day the rule applies to, and uncheck individual Days of the
Week that the rule should not apply to.
Note: If two fences on the map have the same name, a rule alert may not be
triggered even if the tracked object is inside or outside of either fence. Do not use
the same name for two different fences.
Actions
When a rule’s conditions are meet, a variety of actions may be taken. The
possible actions are:
Play A Sound
The sound files to play and the shell programs to execute are configured in the
File, Program Properties, Alerts menu and the File, Program Properties,
Shells selections.
If a rule is set to play a sound whenever it is triggered, the configured sound will be
played when a rule is triggered but it will not be played again for at least 5
seconds, even if another rule is triggered.
Highlight the Icon Label
To have an object that triggers an alert be highlighted in red in the tracked objects
window, select File, Program Properties, Alerts, and check the Highlight
object in RED when it triggers a rule alert box.
68
Section9
RavTrack PC User Manual
Send an Email or SMS
To have an email sent or SMS message sent when a rule is triggered, select Send
Email. Whenever the rule is triggered, an email will be sent to the email address
as configured in the File, Program Properties, Servers tab. The email will show
the ID, name, location, and the description of the alert condition.
You may enter an email address or addresses where this rule will be sent to. If
multiple email address are entered, separate them with a semicolon “;”. If you do
not enter any email address in the rule’s email address box, then the email will be
sent to the default email address as specified in the programs configuration.
Enter the Alert into the LOG table
If you would like an entry to be made into the main log table (RavTrackActivty
database, LOG table), then select either or both of the Log the rule event check
boxes. This will cause the program to put an entry in the log file when a particular
rule is first triggered by a particular tracked object. One entry is made when the
rule is first triggered. Continuous triggering of a particular rule type (distance, geofence..) will not create another entry in the log file until the trigger event clears and
then re-triggers. For example a unit with a speeding trigger and then entering a
geofence while speeding will cause two entries in the log file. One for the
speeding and one for entering the fence. If the unit is in one geo-fenced area, and
enters a second area, another entry will not be made. If the unit is in one geofence, slows down, and then speeds up to cause another speeding alert, a third
entry will be put in the log file noting that the speeding violation is occurring again.
Execute Shell Program
A “Shell” program refers to a software program outside of RavTrack PC. It is
called a shell because if RavTrack PC is to execute it in a parallel thread, causing
it to run along with RavTrack . If you would like to execute a software program
when an alert is triggered, click on one or both of the Execute Shell X boxes to
enable the specific shell program. The actual shell program to run is configured on
the Program Properties > Shell Programs tab. Up to two different shell
programs may be configured.
Global Alert Settings
When an alert triggers, there are a number of configuration settings that can
determine how it is handled. From the main screen, select File, Configure, and
then select the Alerts tab.
If you would like the color of the object’s name on the map to change to red
whenever it is triggering an alert, select this option.
The names for the digital input conditions may be changed. Click on the Digital
Input Descriptor to change, and type the new description. For example, if the Input
#1 high descriptor is set to “Siren On”, and a rule is set to alert the operator
whenever the input 1 is high, then the operator will see the text “Siren On”
whenever the rule is triggered.
69
Section9
RavTrack PC User Manual
Alert Processing
When an alert is triggered, the rule triggering event is stored in a table and it is
tagged as being “Active”. When the alert clears, it remains in the alert table, but
the “Active” tag is removed. The list of Alerts may be displayed by either clicking
on the “Alert” button above the map, or by selecting View > Current Alerts from
the main screen.
The Left column shows the status of the alert.
70
Section9
RavTrack PC User Manual
Means that the alert is currently active, but the operator has not
acknowledged it.
Means the alert is active, and the operator has acknowledged it.
Means the alert is no longer active. A configuration option is available to
have RavTrack PC automatically removed cleared alerts from the list. Or, the
program may be configured to only remove cleared alerts when the “Remove
Cleared Alerts” button is clicked.
Email Alerts
Setting up email alerts is a two-step process. Step 1 is to configure the email
server and account information that will be used to send the email. RavTrack PC
will work with most SMTP mail servers. Step 2 is to enable the email alert for the
individual alert that will issue the email.
To configure the email server, select File, Program Properties, Servers to
display the email server configuration settings.
Check the “Email Client Enabled” checkbox. Enter the DNS name or IP address
of the email server in the SMTP Host box. Port 25 is a typical email port number,
but consult your email service provider to verify this. Enter you email account login
username in the SMTP Host Login box. Enter your email account password in the
Password box. Enter the email address to send the emailed alert l to in the “Email
71
Section9
RavTrack PC User Manual
Address to send to” box. Enter the email address you wish the recipient to see as
being the sender in the “Show email as From” box. Once the email server is
configured, click Save and Exit.
In the alert rule, check the “Send Email” checkbox. You can edit any alert rule by
viewing the alert list (Tools > Alarms and Rules), and then double-click the alert
you wish to edit. Check the Send Email on the alert rule and enter the email
addresses to send the alert to.
To send an SMS alert, simply configure the “Email Address to send from” to be
the SMS email address of the mobile device. Typically the SMS email address is
the phone number followed by the domain. For example, an SMS to a wireless
device on the Cingular network will with phone number 760-555-1212 would have
an SMS email address of [email protected]. Check with your service
provider to find you email address at their gateway.
Monitoring your System
You can configure an Alert to help you monitor your radio network, server, or
system operation. Using the “No Reports” parameter monitoring feature, you can
configure an alert to send an email to IP or Management personnel if your system
stops working.
Monitoring System Components
To determine if part of all of the GPS tracking system is working, the periodic GPS
position messages sent over the air may be monitored, and if they stop coming in,
an alert can be generated to notify personnel of a potential system problem.
The easiest way to monitor the radios in your network is to configure them to report
their GPS positions over-the-air. Then configure an Rule Alert using the No
Reports parameter monitor to send an email if the item being monitored does not
report in within a preset time period. This will cause the Alert email to be sent if a
part of the GPS tracking system fails such as broken antenna, cut cable, failed
power supply, lightning damage, and unplugged serial cable.
Most radio transceivers, such as the M7 GX series of radios, which are used at a
base station site may also be configured to output standard NMEA GPS position
messages every 5 seconds. This periodic local NMEA GPS message can also be
used to determine if the base station radio is alive and operational. To use the
NMEA GPS position in an alert, you must configure the Communication Channel to
interpret the NMEA GPS data as a tracked object in your system. There is an
option to Interpret GPS data w/o ID as ObjectData in the Systems
Communications configuration tab. If this enabled, RavTrack PC will create a new
tracked vehicle with an ID 900X where X is the communications channel.
RavTrack PC will place the location of the vehicle 900X at its GPS position.
72
Section9
RavTrack PC User Manual
If there is a GPS transponder in the network that always is powered on and
working, then the position report from that unit may also be used to check for
system operation.
Monitoring a Server running RavTrack PC
The technique above will work to monitor individual system components such as
receivers, cabling, repeaters, and antennas. But if a main server running RavTrack
PC fails, the failed server cannot report itself failing. A solution to this dilemma is
to also run RavTrack PC on a management workstation, and then configure the
same No Reports Alert on the workstation. If the a server fails, causing the
RavTrack system to stop recording GPS tracking data, the workstation’s No
Reports Alert will then trigger, send an email, and/or alert the operator.
73
Section10
RavTrack PC User Manual
MultiMulti-User Operation
Section 11
RavTrack PC may be run on multiple computers, all monitoring, tracking, alerting,
logging, and reporting on the activity of the system. If a RavTrack PC is configured
as a “Client” it will get the information it displays on the map and in the Tracked
Object database window from a remote Database Server.
RavTrack PC uses a time/date field in the database to synchronize the
various workstations running RavTrack PC. It is very important that the time and
the date on all of the PCs in the system be correct, to within 20 seconds of each
other.
RavTrack PC may be configured to use either a Microsoft ACCESS database or a
Microsoft SQL Server database.
On RavTrack PC systems using Microsoft ACCESS databases (default), the
“TheTrackedObjects” database is stored on the local hard drive in the default
location of …\Raveon\RavTrack PC\Data directory. If Microsoft SQL Server is used,
the shared database name is RAVTRACK and the table that holds the
location/status information for all tracked objects is called ObjectData.
To configure a PC for multi-user operation:
1. {MS ACCESS} Share the C:\Program Files\Raveon\RavTrack PC\Data
directory, or copy the file to a shared directory on a server.
{MS SQL Server} Setup the RavTrack database on an SQL server,
accessible on your network.
2. Select File> Program Properties> Servers tab to configure access to the
Tracked Object database.
3. {MS ACCESS} Click on Configure Database Server. Change the “Tracked
Object Database File Location” to the common shared directory where the
“TheTrackedObjects” database is stored. In the example below, it was
stored on a server’s P: drive in the RavTrackPC subdirectory.
{MS SQL Server} Click on Configure Database Server. Set the Database
Type to Microsoft SQL Server. In the Server: drop-down list, choose the
server that you installed the RavTrack database on.
4. On the Servers tab of the Program Properties window check the Client –
Periodically Read from Server radio button.
74
Section10
RavTrack PC User Manual
Client computers on a multi-user RavTrack PC systems will periodically
synchronize the Tracked Objects that are displayed on the map with the data in the
shared database table. How often this refresh is done may be set in with the
“Database Refresh Interval”. During refresh, the PC may respond a bit slower,
so it is best to do this as infrequently as possible. Raveon suggests every 60
seconds.
When Multi-User Operation is configured as a Client, RavTrack PC will
periodically send a query to the Database Server asking for a list of all new
position information. When new position/status information is returned from the
Database Server, this new information will be processed as new position/status
reports, checked against the rules, and logged to the LOG table as appropriate.
On a multi-user system, one computer is acts as a database Server, and will hold
the database tables with the Tracked Object information and event Log table.
One computer in a multi-user system is connected to the Raveon GPS
transponder and receives position information over-the-air from the vehicles being
tracked. This computer may be configured as a Stand-Alone because it does not
have to retrieve position information from the server. It already knows the position
of all objects because it is receiving them over-the-air and storing them to the
database.
Restricting Access by User Group
When an installation of RavTrack PC is configured for Multi-User, it retrieves
information about the location and status of all vehicles from an SQL or ACCESS
database. It periodically retrieves the location/status records from the database.
You may restrict which vehicles the RavTrack PC program displays. The
restriction is based upon the User Group that the vehicle is assigned to. For
example, you may have a RavTrack system tracking trucks and cars, but would
like to have a workstation that only shows the location of the trucks. Enabling the
75
Section10
RavTrack PC User Manual
Restrict Access by User Group feature will block viewing of all vehicles unless
the User Group is enabled for viewing.
To enable the Restriction by User Group, from the main screen, select File >
Program Properties and click on the Options tab. Check the Restrict Access by
User Group checkbox. In the My Record Restrictions frame, you will see a list
of all of the groups on your system. Check the groups that this computer should
be able to see.
Like most all RavTrack PC configuration options, you must be signed into
RavTrack PC with administrator privileges to modify the Record Restrictions.
Once a workstation is configured for Restricted Access by User Group, you may
want to login to RavTrack PC with a user name that has limited rights to modify the
configuration. This will stop the RavTrack PC user from modifying the restriction
and viewing the location of vehicles that he/she is restricted from viewing.
Note: When the Restricted Access by User Group feature is enabled, the
“Auto-Add” feature will not work. “Auto-Add” is a feature that will automatically add
new vehicles to the list of tracked objects if the GPS data from a new previously
unheard-from vehicle is received. Because RavTrack PC assumes that a
computer with restricted group access is only supposed to view and track certain
groups, the location and status information from new vehicles which are not
already a member of one of the allowed groups will be ignored.
76
Section10
RavTrack PC User Manual
User Privileges and Login
By default the user named “admin” is the master system operator and
administrator. When a user is logged into RavTrack PC as admin, he/she may be
able to perform and all functions. Other users may be setup within RavTrack PC
to allow the program to be operated by individuals with restricted rights.
To configure users, the person setting up other users must be an “Administrator”.
Select File, Program Properties, Users&Login and then create another
username. Once the new username is created, click on the various user rights
that should be assigned to the new user.
To ensure that the user logs into RavTrack PC when the program starts, enable
the “Require Users to Login upon Program Start” option. This will cause the
login box to appear every time the program starts. If this option is not enabled,
then the program will start using the same user name and privileges as when it
was stopped.
Admin
Report
Print
Edit
Basic
Importer
Load a log file to the
map
Load ESRI Shape
Files
■
■
■
■
Import Track Files
■
■
77
Ack
Alerts
Exit
Program
Add /
Edit
Manage
LOG
Section10
RavTrack PC User Manual
and waypoints
Configure the I/O
■
Run Reports
■
Clear Imported
tracks and waypoints
■
Clear Alerts
■
Edit Tracked Objects
■
■
Delete Tracked
Objects
■
■
Change maps
■
■
Change label colors
and font
Change comment for
log file
Exit the program
using the “File, Exit”
option
Edit, add, delete
Rules
Modify Program
Properties
■
■
■
■
Delete GeoFences
■
Manage the Log
Database
■
■
■
■
■
■
■
■
■
78
Section11
RavTrack PC User Manual
Printing
Section 12
Printing Reports
From the main screen, select View, and then Reports.
Select the report you wish to print, choose the filtering options, and then click the
mouse on the Create Report button.
A preview of the report will be generated on screen. Click on the printer button on
the report-preview screen to send the report to a printer.
Besides the built-in reports, you may create your own reports using either crystal
reports or Microsoft Access. The built-in reports are:
1. List all tracked objects, summary
2. List all tracked objects, detailed
3. List all tracked objects with alerts
4. List all moving tracked objects
79
Section11
RavTrack PC User Manual
5. List all idling tracked objects
6. List historical log entries
7. Daily Usage Report
8. Weekly Usage Report
9. Monthly Usage Report
10. Plot Parameters from Log Data
Filtering Reports
By default, the report will use all records from the applicable table. But, many
reports may be filtered. You may Geo-fence filter a report, to only include objects
within a certain geofence. You may parameter-filter reports, only including objects
that have certain parametric values such as excessive speed or idling. You may
input-filter a report, and include only objects with certain inputs triggered such as a
door open or siren on. You may group-filter a report, to have it include only
information about vehicles in a certain User Group.
Reports from the Historical Log file
If the selected report used data from the historical log file, a Replay on Map
button will appear on the bottom of the RavTrack Report Builder window. Click this
button to bring up the Log Replay window. All entries listed on the report will also
be replaying on the map.
Screen and Map Printing
To print a copy of the whole RavTrack PC window, select File, Print RavTrack
Screen from the main window.
To print a copy of just the map area of RavTrack PC, select File, Print Map from
the main screen.
Crystal Reports
Reports are built using a program called Crystal Reports from Business Objects. A
Crystal Reports viewer is incorporated into RavTrack PC and is installed when you
install RavTrack PC. There is no additional charge for the Crystal Reports viewer.
If you would like to edit or create your own reports, you will need to install
Crystal Reports Designer which is available from Business Objects (a SAP
company) onto a computer. If you have the designer, you may customize the
reports included with RavTrack PC, or create your own.
The RavTrack PC Crystal Reports report files are stored on each computer
running RavTrac PC. You can see the directory name on the local hard-drive
where the report files are stored by clicking on Help > About RavTrack from the
main RavTrack PC screen.
80
Section12
RavTrack PC User Manual
Importing Waypoint/Track Files
Section 13
File Formats
The user may import data from other programs into Ravtrack PC. There are three
types of data to import: Track Points, Waypoints, and $PRAVE messages.
Track Points
These are data points created in other programs which show
the direction of travel. Currently RavTrack PC can import
track points stored in the .plt file format of Ozi Explorer.
Waypoints
Waypoints are preset points stored in a GPS to assist in
navigation or creating routes. Currently RavTrack PC can
import waypoints in the Garmin .upt format.
$PRAVE messages For debugging remote system, RavTrack PC can read a text
file that has $PRAVE messages stored in it. It will import the
$PRAVE messages as Track Points onto the map.
File Selection
From the main screen, select File, Import Tracks, Plots, Waypoints. The
following screen will appear.
81
Section12
RavTrack PC User Manual
Select the File type to import, the directory of the file, and then choose the file to
import. If you would like RavTrack PC to convert the imported data to RavTrack
Points Of Interest (POIs), then check that box before clicking on Load.
If the file format you wish to import is not supported by RavTrack PC, consider
using the commercially available GPS tools Ozi Explorer or GPSBabal to convert
the format into one that is supported.
Currently, RavTrack PC can import files in these formats:
Originator
Extension
Type
Garmin
.upt
Waypoint list
Ozi Explorer
.plt,
Track plot
Ozi Explorer
.wpt
Waypoint list
Garmin
.gpx
Waypoints or POIs
Raveon
$PRAVE messages
Raw position messages
82
Section13
RavTrack PC User Manual
Communication Statistics
Section 14
Communication Statistics
A Communication Statistics window is available to see an overview of how the
Communication Ports are configured and working. From the main screen, select View,
Communication Stats to bring up a screen that displays how the radio communications
is working. You may also click on the GPS or CH x buttons on the bottom of the main
screen to bring this up.
RavTrack PC has the ability to send and receive data through up to 6 communication
“Channels”. Statistic for each channel are accumulated, and displayed on the
Communication Statistics window.
Messages x/y
The first number is the number of NMEA GPS messages and the
second number is the number of over-the-air position messages
received in via this channel.
Last MSG
Shows the first few characters of the last message that came in the
channel.
I/O Status
Describes the status of I/O used on this channel. The various status
messages are:
Not Connected
Means the RS232 serial cable does not appear to
be connected to any serial device, and there is no
serial data coming in the COM port.
83
Section13
RavTrack PC User Manual
Connected – CTS Means that there is data coming in the serial
port, and it is probably working OK, but the serial
cable show a hardware connection issue with the
CTS signal.
No Communications
Means there is no data coming in the
serial port, but it appears to be connected to the
device and the device is powered on.
Connected
All is good. Data is coming in. Serial cable is
connected properly.
Connected to:
All is good. Data is coming in. Cable is connected
properly. Shows IP address of remote computer
this channel is connected to.
Connection Refused:
The remote computer refuses to
communicate via TCP/IP with this computer.
Shows IP address of remote.
Attempting Connection:
RavTrack PC is attempting to connect to
a remote computer via TCP/IP. Data is not yet
coming in. Shows IP address of remote computer.
Chan Type
Describe the type (RS232, TCP/IP..) of communication channel.
Blank if the channel is not used.
Errors
Counts the number of communiocation errors detected on this
channel.
Device
The type of radio device connected to this channel.
Tries
The number of times that the RavTrack PC software tried to
initialize the communication channel. If no data communications is
taking place on the channel, RavTrack PC will periodically close the
port and then re-open it, trying again to communicate.
OS Thread
Each communication channel runs on a separate thread in the
Windows operating system. This lists the status of the threads.
Settings
Describes the specific communication settings for the channel.
Messages Out
Counts the number of messages sent out of this channel.
Local IP addr
The IP address used by this channel, if TCP/IP is used.
Sender
If TCP/IP Server is enabled, and another RavTrack PC computer is
sending position data to this one, then the Sender field displays
information about the client computer.
The Ave MPT is the Average Message Processing Time. This is the average time it
takes your computer to process one position report. MPTs of greater than 10mS
indicate the computer may not be fast enough to handle the RavTrack messages.
84
Section13
RavTrack PC User Manual
The two numbers to the right of the green progress bar are the database “get” and
database “put” times. (get/put).
The get time is the number of milliseconds it took RavTrack PC to retrieve new updates
from the database. The put time is how long it took RavTrack PC to put the new
position reports it received into the database. Note that RavTrack PC performs all
database access in a multi-tasking background thread, so this time does not reflect the
speed of operation of RavTrack PC. It is a measure of how fast the database server
responds as well as the speed of the computer RavTrack PC is running on.
TCP/IP
Each of the 6 RavTrack Communication channels may be configured to operate as a
TCP/IP Server, using the TCP/IP protocol and a local network connection. TCI/IP
clients and Telnet clients may connect to RavTrack PC’s TCP/IP Server, and
communicate with RavTrack PC using TCP/IP via a network connection instead of
directly connected to the PC via an RS232 serial port.
There are two ways to connect radios to the RavTrack PC. 1)Rs232 and 2)TCP/IP
socket.
RS-232 Connection to PC
TCP/IP Connection using Terminal Server
85
Section13
RavTrack PC User Manual
A Terminal Server is a device that converts RS232 serial data into Ethernet packets.
Once the serial data from the M7 is converted to Ethernet, it may be sent over any LAN
, WAN, or the Internet. Terminal servers are an excellent way to expand the coverage
of your system, by allowing M7 base stations to be remotely located around a wide
area, all feeding the position and status data from the Tracked Objects, back to a
central computer running RavTrack PC.
RavTrack PC operates as a TCP/IP Server, so the remote terminal server must be
configured as a “Client”. For a list of terminal server vendors, please contact Raveon
Sales or visit our web site. RavTrack PC may be configured to be a TCP socket client,
if the terminal server needs to be configured as a server.
86
Section13
RavTrack PC User Manual
Google Earth Integration
Section 15
Overview
RavTrack PC may be configured to send the position and status information from the
Tracked Object to the Google Earth program. It passes the position and status
information from RavTrackPC over to Google Earth using a .kml file. The .kml file type
is used by Google Earth to exchange position and map information.
Enabling the Google Earth interface is a two-step process:
1. Configure RavTrack PC to periodically create and store .kml files byte selecting
File, Program Properties, Servers from the main RavTrack PC window.
Check the “Periodically Generate .KML fileH” box. You may also select the
Google Earth icon to be used when displaying the tracked objects. The .kml file
will be stored in the same location as the Tracked Object Database File Location
shown on the Servers tab. You may change this location, and it may be a local
hard-drive or a network drive.
2. Install Google Earth, and start it up. From the Google Earth main screen, select
Add, Network Link. This option is used to create a link to a .kml file on a
network, or the local computer. Give the new network connection a name.
Next to Link:, click on the button labeled Browse… and select the .kml file that
RavTrack PC is periodically saving. The .kml file is in the directory you defined in
step 1. It name is TheTrackedObjects.kml.
87
Section13
RavTrack PC User Manual
Click on the Refresh tab, and configure Google Earth to periodically retrieve the
.kml file. The refresh interval will depend upon the speed of your network and
the number of users, but an interval of 15seconds to a minute is reasonable.
Once RavTrack PC and Google Earth are configured, the process of exchanging the
.kml file will take place automatically and the icons will appear on the earth for each
Tracked Object that is enabled in RavTrack PC. If the Tracked Object has an alert, the
icon used in Google Earth will be red, otherwise it will be the default color.
With the no-cost version of Google Earth that may be freely downloaded, Google
has disabled many of their icons that are ideal for tracking vehicles. Their icon list is
show below, but you may find that vehicle icons will display as pins or drops unless you
purchase the upgrade to Google Earth Plus. Please consult the Google Earth License
terms of use for information about using it to plot the location of your vehicles.
88
Section13
RavTrack PC User Manual
The standard Google Earth Icons, are show below There are 4 pallets (2-5), and 64
icons in each pallet.
89
Section13
RavTrack PC User Manual
Microsoft MapPoint Integration
Section 16
Overview
RavTrack PC may be configured to send the position information from the Tracked
Object to Microsoft’s MapPoint 2010 and Microsoft MapPoint Fleet 2010 program. It
passes the position information using Microsoft’s MapPoint APIs. MapPoint is run in
parallel to RavTrack PC, and tracked objects will be shown on both the RavTrack PC
window and the MapPoint window.
MapPoint may also be configured to reverse geo-code the locations of the tracked
objects. This process determines the street address, city, and state that the object is
located in. The address location information is the passed back to RavTrack PC,
displayed to the user, and also stored in the activity log.
Use of MapPoint 2010 is optional, and is not required for RavTrack PC to operate. It is
up to the user of MapPoint to determine which version of MapPoint to license and use.
Using MapPoint 2010 Maps
Install MapPoint 2010 on the computer that is running RavTrack PC. A 60 day
evaluation copy is available from Microsoft. Only MapPoint 2010 has been tested with
RavTrack PC, although older versions of MapPoint may work.
Enable the MapPoint feature within RavTrack PC by selecting File > Program
Properties > Options > Microsoft MapPoint 2010.
Click Save and Exit. Once this option is enabled, the MapPoint button will appear on
the main screen. Click this button to pull-up a MapPoint map.
You will see vehicle icons on the MapPoint map at the location of each tracked object.
Reverse Geo-Coding
To display the actual street address of a tracked object on RavTrack PC, RavTrack PC
needs a program that can look-up an address based upon the latitude and longitude of
an object. MapPoint 2010 can be used for this. To enable reverse Geocoding, select
File > Program Properties > Options > from the main menu.
90
Section13
RavTrack PC User Manual
In the Geocoding drop-down box, select MP2010 to turn on reverse geocoding, or
NONE to turn it off.
When geocoding is enabled, RavTrack PC will use MapPoint 2010 to look-up street
address. MapPoint 2010 must be installed on the computer running RavTrack PC for
this to work. If it is not installed, and error will the thrown if geocoding is enabled.
Once enabled, street address information is available to the user in both the object info
window and the tracked object database.
The address is also stored to the LOG table, and is available for use on reports.
Reverse geocoding can be a computationally intensive activity for the computer.
RavTrack PC runs its reverse geocode routines in a background thread, so that the
user’s interaction with the map and the software is not affected by the geocoding
process. Because it is a background task, the street address information may not
populate in the data table at the exact same time as the latitude and longitude
information. The delay is typically less than 1-2 seconds between position reports and
address being updated in the Tracked Objects window.
91
Section13
RavTrack PC User Manual
GpsGate Integration
Section 17
Overview
RavTrack PC may forward the position information it receives from the transponders to
a server running GpsGate Vehicle Tracker software.
GpsGate VehicleTracker is a web based application from Franson Technology AB for
real time vehicle. See more information about GpsGate at: http://gpsgate.com/
GpsGate Server is a web based real time tracking platform for vehicles, valuable
assets, people and other mobile objects. You can use GpsGate Server to track moving
objects on maps with status information updated in real time in a standard web browser.
Historical information is also readily available in the user interface and reports can be
created for further analysis. You can receive notifications over SMS and email for
events that require your attention, such as SOS, vehicle theft, high temperature,
speeding, excessive idling, off hours vehicle usage and geofence violations.
Installing GpsGate
Please refer to Franson Technology and the gpsgate.com website for information on
installing, configuring, and using GpsGate.
Once GpsGate is installed, you will need to configure RavTrack PC to send messages
to the GpsGate Server.
Be sure to configure your RavTrack PC machine’s firewall and any other
routers/firewalls in the system to allow RavTrack PC to communicate to the GpsGate.
Configuring RavTrack PC to Communicate with GpsGate
1. Configure your password
Each vehicle on the GpsGate server has a “Username” and a “Password”
associate with it. All vehicles must use the same Password. To set the
password that RavTrack PC will send to GpsGate when it reports the position of
a vehicle, select File > Program Properties and then click on the Options tab.
On the Options tab, you will see the area with the GpsGate options. Set the
Password to the password you use for your GpsGate tracked vehicles.
2. Set the System ID
The System ID is a phrase that will be used to make up the User ID for a vehicle.
You may leave it blank.
When RavTrack PC sends a vehicle’s position to GpsGate, the “User ID” that it
sends is a combination of the System ID and the vehicles ID. For example, if the
System ID is ABC and the vehicle ID is number 18, then the User ID that
RavTrack PC assigns to this vehicle when communicating with GpsGate is
ABC0018. The vehicle ID is always treated as a 4 digit number (0001-9999) and
92
Section13
RavTrack PC User Manual
the System ID is added to the vehicle ID to make up the User ID. If the System
ID is left blank in RavTrack PC, then the User ID is the Vehicle number.
GpsGate User ID = “System ID” + “Vehicle ID”
Once you set your Password and System ID, click Save to save your settings.
3. Enable the TCP/IP connection to the GpsGate Server
Configure any one of the 6 communication channels in RavTrack PC to connect
to the GpsGate server by selecting File > Configure IO. The settings you must
configure are:
Enable the Channel
Check TCP/IP Server
Check the Client – Relay button
Enter the IP address of the GpsGate in the Remote IP Address box.
Enter the Remote Port (typically 30175) that GpsGate uses.
In the Device drop down list, select GpsGate Server.
Once you configured your channel, click Save to save your settings.
93
Section13
RavTrack PC User Manual
How RavTrack PC works with GpsGate
When configured to work with GpsGate, RavTrack PC will route position reports to the
GpsGate server. You can then use either RavTrack PC or GpsGate or both to track
you vehicles.
Each time a vehicle reports its GPS position, a radio connected to the computer
running RavTrack PC receives the position information and passes it to RavTrack PC
via a COM port or a TCP/IP connection.
RavTrack PC then processes the position report. It puts an icon on its map at the
vehicle’s location, and logs the data to a database. It checks the vehicle against the
rules.
If the GpsGate interface is enabled, RavTrack PC will connect to the GpsGate server,
login as the vehicle that reported the position, and then report the position, speed,
heading, and altitude to the GpsGate server.
94
Section13
RavTrack PC User Manual
RavTrack PC Revision History
Section 18
The following is a list of major changes that have been done to the RavTrack PC
software. First release of version 1.0 was February 2008.
Version 5.1 June 20, 2013
New server table ”Groupmembers” holds a common list of all groups and the transponders that belong to
them.
New server table ”LanguageText” holds the text for various languages.
New server table ”Objectinfo” is a user-definable table holding general information fields about the
transponders. Information from table is displayed in the Info tab for the transponder.
New Server table “UserRestrictions” contains the shared table defining the functions and features of the
program that a particular user may perform.
LanguageText table may be imported and exported to/from XML.
“Keep Map Centered on selected object” is added to main screen “Jump” menu
Zoom in/Out buttons may be displayed on map.
Info tab added to tracked object information window. Text may be defined by user in ObjectInfo table.
“Display System Event Log”, “List of Tracked Objects” table, added to View drop down list
View Selected Object Info pops up re-sizable window with details on the selected tracked object. Window
may be scaled to full-screen.
Additional non-docked windows added for list of tracked objects and viewing object information on
computers with multiple monitors.
System Status window added for quick overview of system operation and number of transponders reporting
and moving.
Alerts may have a background color associated with them, so that different alerts show a different
background color on the alert list.
Users may be assigned a password and required to login when the program starts.
Users may be limited to viewing only certain groups.
Users may be restricted from performing various functions such as closing program, editing information,
printing reports, creating rules, and clearing alerts.
User rights and groups are stored on the main “server” database, simplifying central administration.
Layers may be selectively turned on/off from the main screen drop-down list.
User Groups visible on screen may be selectively turned on/off from the User Groups drop-down list on the
main screen.
A Jump drop down list lists all Points of Interest to easily change the center of the map to a POI location.
Program may be configured to keep map centered on Home, Local GPS, or some other tracked object.
A direction arrow may be enabled in the center of the map, showing current location and direction of travel
for computer is going.
Optional Alert Finder feature pulses arrow in direction of the selected alerting object.
Zoom buttons and alert finder optimized for touch-screen and Windows 8 operation.
$PRAVE message files may be imported and replayed on the map.
Log replay of historical position may be filtered by date, speed, altitude, direction, and geofences.
All reports converted to the SAP “Crystal Reports for Visual Studio 2010” format.
New Crystal Report added to graphically plot parameters from the historical log file.
Any of the 6 Communication Channels may be Serial, TCP/IP Socket Server, or TCP/IP Socket Client.
5.1.6 GPSgate interface updated to report knots.
Version 4.5 May 2013
Redesigned the way groups are created an managed. Group membership stored on server now.
Added ObjectInfo table to server allowing users to create free-format text information
TCP Socket communication to base stations may be as either client or server.
Added language table to database to allow certain text fields to be language-specific.
Added mass-update feature in View > List of Tracked Objects. User can update names, groups, and
certain features of large quantities of transponders.
Users log-ins may be limited to viewing only certain groups of transponders.
Drop-down list of groups may be edited by user to select which groups are on-screen.
Added View > System Status window for quick view of how many transponders are reporting in.
95
Section13
RavTrack PC User Manual
Version 4.2 Nov 2012
NMEA tracking uses RMA and GGA
On-map dot limit increased to 10,000
Added Alert List.
TCP server connection can receive PRAVE messages.
Version 3.5 August 1, 2010
Added monthly backup of .ini file.
Improve memory utilization
Version 3.4 June 10, 2010
Fixed bug with adding/deleting User Groups
Added Communications interface to GPSgate servers
Improved Serial COM port reliability when plugging/unplugging USB serial adaptors.
Version 3.4 June 10, 2010
Fixed bug with adding/deleting User Groups
Added Communications interface to GPSgate servers
Improved Serial COM port reliability when plugging/unplugging USB serial adaptors.
Multiple email addresses parsing corrected.
Added icons in Active Alert table to more quickly identify alert status
Objects that are not moving do not have redundant track dots placed on map.
Average Message Processing Time (MPT) calculation is more accurate.
Added Copy Screen Snapshot to .jpf file feature.
Added ability to periodically save a position report to the Log table, even if the object is not moving.
Added Tracked Objects Window collapse/expand button to main screen.
Added ability to pop-up a separate window to show the selected tracked object’s status.
Added ability to pop-up a separate window to show the list of all tracked objects.
Admin user can now select multiple rows of the tracked object table to bulk delete them via right click.
Clicking on the words “View Filter” will cause the selected filter to be applied without the drop-down list
dropping.
Changed MP2010 reverse geo-coder. If no address is available at the current location, the previous address
will be used as long as it is within 300 meters of the current location.
Version 3.3 April 3, 2010
Added ability to restrict viewing by User Group.
Added new Plot Parameters from Log Data Crystal Report to plot data from the Log Table onto graphs.
Log Reports can limit the interval between entries on the report to a minimum time.
Version 3.2 March 2010
Added
Added
Added
Added
alerts via Twitter.
EntersFence and Exists Fence rules.
"ALERT_NOTICE" as a type of rule (transient).
Home Arrow icon that can rotate in local GPS direction of travel
Version 3.1 Jan 20, 2010
Added ability to select which user group(s) are to be displayed, using a drop-down list.
Added “Manage Log” rights to user accounts.
Moved the location of the /data, /maps, /sounds, /logfiles from the ProgramFiles directory to the default
user data directory on the computer.
Added support for Microsoft SQL Server 2008.
Added ability to individually select which layers to display on the map.
Added more system status information into the System Event Log File.
Added support for Microsoft SQL Server 2008.
96
Section13
RavTrack PC User Manual
97
Section13
RavTrack PC User Manual
Software License
Section19
ATTENTION: PLEASE READ THIS DOCUMENT CAREFULLY BEFORE
PURCHASING THIS PROGRAM. THE INDIVIDUAL OR ENTITY READING THIS
PACKAGE (THE "END USER") AGREES TO BE BOUND BY THE TERMS OF THIS
LICENSE. IF YOU PURCHASE THIS PACKAGE AND DO NOT AGREE TO THE
TERMS OF THIS LICENSE, DO NOT USE THE SOFTWARE AND PROMPTLY
NOTIFY US, AND THE LICENSE PRICE WILL BE REFUNDED.
The RavTrack PC computer program(s) and the accompanying documentation are
provided to the End-User by Raveon Technologies Corporation ("Licensor") for use only
under the following terms. Licensor reserves any right not expressly granted to the
End-user. The End-User owns the disk on which the Software is recorded, but Licensor
retains ownership of all copies of the Software itself. The End-User assumes sole
responsibility for the installation, use and results obtained from use of the Software.
1. License
End-User is granted a limited, non-exclusive license to do only the following:
A) Install and maintain the Software on one computer at any one time.
B) Make copies in machine-readable form solely for backup or archival purposes
for the computer, which the Software is installed. Copyright law protects the Software.
As an express condition of this License, the End-User must keep the file "License.txt"
with the archival copies.
C) Transfer the Software and all rights under this License to another party
together with a copy of this License and all written materials accompanying the
Software, provided (i) the End-User gives Licensor written notice of the transfer
(including in such notice the identity of the transferee), and (ii) the other party reads and
agrees to accept the terms and conditions of this License.
Raveon restricts certain features of the program based upon the type of License Key
purchased. Regardless of the type of License Key acquired by the end user, only one
copy of the Program may be utilized for each individual License Key acquired. If the
Program is used with a Trial Key, then the End-User may only use the Program for 30
days after the Program is first installed, after which the Program must be un-installed or
a Lite, Standard, or Server Key Purchased. It may not be re-installed and used with the
Trial License.
2. Restrictions
The End-User may NOT sublicense, assign, or distribute copies of the Software to
others. The Software contains trade secrets. The End-User may NOT decompile,
reverse engineer, disassemble, or otherwise reduce the Software to a human readable
form. THE END-USER MAY NOT MODIFY, ADAPT, TRANSLATE, RENT, LEASE,
LOAN, RESELL FOR PROFIT, DISTRIBUTE, OR OTHERWISE ASSIGN OR
TRANSFER THE SOFTWARE, OR CREATE DERIVATIVE WORKS BASED UPON
98
Section13
RavTrack PC User Manual
THE SOFTWARE OR ANY PART THEREOF, EXCEPT AS EXPRESSLY PROVIDED
IN SECTION 1.C. ABOVE.
3. Protections and Security
The End-User agrees to use its best efforts and to take all reasonable steps to
safeguard the Software to ensure that no unauthorized person shall have access
thereto and that no unauthorized copy, publication, disclosure or distribution in whole or
in part, in any form, shall be made. The End-User acknowledges that the Software
contains valuable confidential information and trade secrets and that unauthorized use
and/or copying are harmful to Licensor.
4. Termination
This License is effective until terminated. This License will terminate immediately
without notice from Licensor if the End User fails to comply with any of its provisions.
Upon termination the End User must destroy the Software and all copies thereof, and
the End-User may terminate this License at any time by doing so.
5. Limited Warranty
Licensor warrants that, for 90 days from the date of initial use by the original End User,
the Software shall operate substantially in accordance with the published functional
specifications current at the time of shipment. If, during the warranty period, a defect
appears, End User shall return the Software to Licensor and Licensor's only obligation
shall be, at Licensor's election, to replace the defective Software or refund the purchase
price. The End-User agrees that the foregoing constitutes the End-User's sole and
exclusive remedy for breach by Licensor under any warranties made under this
Agreement. This warranty does not cover any Software that has been altered or
changed in any way by anyone other than Licensor. It does not cover bugs, memory
leaks, stability issues, security, or problems related to Windows, .NET, SQL Server, or
any other third-party computer software interacting with the Software. Licensor is not
responsible for problems associated with or caused by incompatible operating systems
or equipment, or for problems in the interaction of the Software with software not
furnished by Licensor. No oral or written information or advice given by Licensor or its
dealers, distributors, employees or agents shall in any way extend, modify or add to the
foregoing warranty.
THE WARRANTY AND REMEDY PROVIDED ABOVE ARE EXCLUSIVE AND IN LIEU
OF ALL OTHER WARRANTIES, EXPRESS OR IMPLIED, INCLUDING BUT NOT
LIMITED TO THE IMPLIED WARRANTIES OF MERCHANTABILITY AND FITNESS
FOR A PARTICULAR PURPOSE. THE END-USER ASSUMES ALL RISK AS TO THE
SUITABILITY, QUALITY, AND PERFORMANCE OF THE SOFTWARE. IN NO EVENT
WILL LICENSOR, OR ITS DIRECTORS, OFFICERS, EMPLOYEES OR AFFILIATES,
BE LIABLE TO THE END-USER FOR ANY CONSEQUENTIAL INCIDENTAL,
INDIRECT, SPECIAL OR EXEMPLARY DAMAGES (INCLUDING DAMAGES FOR
LOSS OF BUSINESS PROFITS, BUSINESS INTERRUPTION, LOSS OF DATA OR
BUSINESS INFORMATION, AND THE LIKE) ARISING OUT OF THE USE OF OR
INABILITY TO USE THE SOFTWARE OR ACCOMPANYING WRITTEN MATERIALS,
99
Section13
RavTrack PC User Manual
EVEN IF LICENSOR HAS BEEN ADVISED OF THE POSSIBILITY OF SUCH
DAMAGES.
LICENSOR'S LIABILITY TO THE END-USER (IF ANY) FOR ACTUAL DIRECT
DAMAGES FOR ANY CAUSE WHATSOEVER, AND REGARDLESS OF THE FORM
OF THE ACTION, WILL BE LIMITED TO, AND IN NO EVENT SHALL EXCEED, THE
AMOUNT ORIGINALLY PAID TO LICENSOR FOR THE LICENSE OF THE
SOFTWARE.
6. Enhancements
From time to time Licensor may, in its sole discretion, advise the End-User of updates,
upgrades, enhancements or improvements to the Software and/or new releases of the
Software (collectively, "Enhancements"), and may license the End-User to use such
Enhancements upon payment of prices as may be established by Licensor from time to
time. All such Enhancements to the Software provided to the End-User shall also be
governed by the terms of this License. IN ORDER FOR THE END-USER TO BE
ASSURED THAT IT WILL BE ADVISED OF AND LICENSED TO USE ANY
ENHANCEMENTS TO THE SOFTWARE, THE END-USER MUST COMPLETE, SIGN
AND RETURN TO LICENSOR THE ATTACHED END-USER REGISTRATION FORM.
Generally, licensed und-users may obtain minor upgrades at no charge. Major updates
of RavTrack PC may be obtained for an upgrade fee. Please contact Raveon for
upgrade fees. Minor upgrades are designated by version numbers where the integer
portion does not change. For example, version 2.3 to 2.7 is a minor upgrade. Major
upgrades are where the integer portion of the version number changes. Version 2.7 to
3.0 is major upgrade and will require the purchase of a license for the upgraded version
of the software.
7. Disputes
This license agreement shall be governed by, construed and enforced in accordance
with the laws of the California, as it is applied to agreements entered into and to be
performed entirely within such jurisdiction.
To the extent you have in any manner violated or threatened to violate Raveon
Technologies Corporation and/or its affiliates' intellectual property rights, Raveon
Technologies Corporation and/or its affiliates may seek injunctive or other appropriate
relief in any state or federal court in the State of California, and you consent to exclusive
jurisdiction and venue in such courts.
Any other disputes will be resolved as follows:
If a dispute arises under this agreement, we agree to first try to resolve it with the help
of a mutually agreed-upon mediator in the following location: San Diego County, USA.
Any costs and fees other than attorney fees associated with the mediation will be
shared equally by each of us.
If it proves impossible to arrive at a mutually satisfactory solution through mediation, we
agree to submit the dispute to binding arbitration at the following location: San Diego
County, under the rules of the American Arbitration Association. Judgment upon the
award rendered by the arbitration may be entered in any court with jurisdiction to do so.
100
Section13
RavTrack PC User Manual
8. General
If any provision of this License is held by a court of competent jurisdiction to be invalid
or unenforceable to any extent under applicable law, that provision will be enforced to
the maximum extent permissible and the remaining provisions of this License will
remain in full force and effect. Any notices or other communications to be sent to
Licensor must be mailed first class, postage prepaid, to the following address: Raveon
Technologies Corporation, 2460 Impala Drive, Carlsbad, CA 92010 – USA.
This Agreement constitutes the entire agreement between the parties with respect to
the subject matter hereof, and all prior proposals, agreements, representations,
statements and undertakings are hereby expressly cancelled and superseded.
This Agreement may not be changed or amended except by a written instrument
executed by a duly authorized officer of Licensor.
9. Acknowledgment
BY INSTALLING THIS SOFTARE PROGRAM, THE END-USER ACKNOWLEDGES
THAT IT HAS READ THIS LICENSE, UNDERSTANDS IT, AND AGREES TO BE
BOUND BY ITS TERMS AND CONDITIONS.
If you have any questions concerning this License, contact Licensor at the address set
forth below.
Raveon Technologies Corporation
2460 Impala Drive
Carlsbad, CA 92010 – USA
www.raveon.com
Phone +1-760-444-5995
101
Section13
RavTrack PC User Manual
End User Registration Form
Section20
To be eligible for upgrades and notices of improvements to RavTrack PC, please
register your software with Raveon by mailing or emailing in the following information.
Your Name:
_____________________________________
Company Name
_____________________________________
Address:
_____________________________________
City:
_____________________________________
State:
_____________________________________
Postal Code:
_____________________________________
Email Address:
_____________________________________
License Code:
_____________________________________
Current RavTrack PC Version: __________________
Send the above to:
Raveon Technologies Corporation
2461 Impala Drive
Carlsbad, CA 92010
Phone: +1-760-444-5995
Fax: +1-760-444-5997
Or Email it to your account manager at Raveon.
Raveon also appreciates any suggestions you may have for improvements to this
product. Please let us know about any ideas or suggestions you have.
______________________________________________________________
______________________________________________________________
______________________________________________________________
______________________________________________________________
______________________________________________________________
______________________________________________________________
102
Section13
RavTrack PC User Manual
For More Information
For more information about this or any other Raveon product, call in the U.S.A.
1-760-444-5995 or visit us a www.ravtrack.com.
Raveon Technologies Corporation
990 Park Center Drive, Suite C
Vista, CA 92081
Phone: +1-760-727-8004
Fax: +1-760-598-8004
103