1
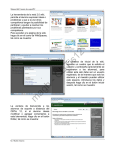
PolyVision Interactive Whiteboard Basics
For more information and lesson plans, please check out http://polyvision.wikispaces.com.
CONNECTING YOUR BOARD:
1. In order for your board to be interactive, you will need to connect two
cables to your laptop. First, attach the projection cable. This is the large
black cable with blue connection ends. One end will plug into the wall
port located near the desktop computer in your room. The other will
connect to the left side of your laptop.
2. Next, attach the computer to the whiteboard using one of the USB ports on the laptop. This is the
cable that runs from your projector, through the ceiling, and dangles from the ceiling somewhere
near the desktop computer in your room.
3. Turn on projector using your remote. You should see your computer screen come up on the
interactive board. If not, you may need to hit “Source Search” on your white remote.
CONFIGURING THE WHITEBOARD:
1. You can either use the buttons located on the left side of your board or an on-screen remote to
work your interactive board. First, you will need to make sure that you configure your board.
2. Step 1: Make sure the PolyVision Walk and Talk software is on. In the lower right corner of your
screen you should see an icon that looks like a white screen. You can configure this program by
right clicking on the icon and selecting “Configure Walk and
Talk.” If the icon is not in your system tray in the lower right
corner, you can turn the application on by clicking on “Start,”
then “Programs,” and selecting “Polyvision” from your list of
programs.
3. By selecting “Configure Walk and Talk” a pop-up menu will
appear. Select “Projection” from the tabs at the top of the
pop-up menu.
4. Change the “Alignment Points” to 16 points and check off the
box for “Fixed Projector.” Then select “Apply” at the bottom
of the menu. You will need to align your board after you have
finished configuring your options.
5. Next, select the “Save” button and click the pop-up
menu next to “Save File As.” Select the file type
you want for all screen shots that are saved by the
board. A jpg is a good choice for most projects you
might use the images for. You will want to change
where the image is saved to since the default is to
save it to your desktop (which we cannot do). Click
on the “Browse” button and change this option to
your personal folder on the server. You may want
to create a new folder just for images you save from
your PolyVision projects.
6. To set your selections, click “OK.” Now you will need to configure your board in order to make sure
it is aligned. Select the “Projection” icon on the right side of your board. This will bring up a
series of boxes. Touch the corners of each box to align your screen. Then, you are ready to go!
BOARD BASICS:
•
Touch the Å button on the left side of your board to open up a blank screen. Use this screen to take
notes during your interactive lesson. You will return to this same page each time you hit this button.
•
Use the Æ button after you have opened a blank screen to return to the original page you were
working on.
•
Select the “Show Board” icon to toggle between a cursor and a pen.
•
Select your pen color or eraser using the buttons on the left.
•
Since you have configured your “Save As” option, when you select “Save” an image of your screen will
save in the file you designated.
•
For more information, you will also find a user’s manual in the PolyVision folder in your
Programs file.