1
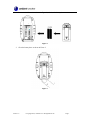
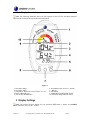
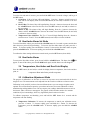
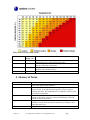
Ambient Weather WS-HE01 Heat Index Monitor with Temperature, Humidity, Dew Point User Manual Table of Contents 1 2 3 4 5 6 7 8 9 Introduction ..................................................................................................................................... 2 2.4 Display Console Set Up ................................................................................................................ 2 2.4.1 Display Console Layout ..................................................................................................... 4 Display Settings .............................................................................................................................. 4 2.1 Set Mode ................................................................................................................................ 5 2.2 Heat Index Alarm Set Mode ................................................................................................... 5 2.3 Heat Index Alarm ................................................................................................................... 5 2.4 Temperature, Heat Index and Dew Point Display .................................................................. 5 2.5 Calibration Adjustment Mode ................................................................................................ 5 Heat Index Safety Discussion ......................................................................................................... 6 Glossary of Terms ........................................................................................................................... 7 Specifications .................................................................................................................................. 8 5.1 Measurement Specifications ......................................................................................................... 8 5.2 Power Consumption ...................................................................................................................... 8 Troubleshooting Guide.................................................................................................................... 8 Accessories ..................................................................................................................................... 8 Liability Disclaimer ........................................................................................................................ 8 Warranty Information ...................................................................................................................... 9 Version 1.0 ©Copyright 2012, Ambient LLC. All Rights Reserved. Page 1 1 Introduction Thank you for your purchase of the Ambient Weather WS-HE01 Heat Index Indicator with Temperature, Humidity and Dew Point. The following user guide provides step by step instructions for installation, operation and troubleshooting. To download the latest manual and additional troubleshooting tips, please visit: http://ambientweather.wikispaces.com/wshe01 2.4 Display Console Set Up 1. Remove the battery door on the back of the sensor, as shown in Figure 1. Figure 1 Version 1.0 ©Copyright 2012, Ambient LLC. All Rights Reserved. Page 2 2. Insert two AAA batteries as shown in Figure 2, and close the battery door. Figure 2 3. Close the battery door, as shown in Figure 3. Figure 3 Version 1.0 ©Copyright 2012, Ambient LLC. All Rights Reserved. Page 3 2.4.1 Display Console Layout Note: The following illustration shows the full segments of the LCD for description purposes only and will not appear like this during normal operation. Figure 4 1. Heat Index Range 2. Heat Index Alarm 3. Temperature, Heat Index or Dew Point (°F or °C) 4. Relative Humidity (%) 5. Time of Day (HH:MM:SS) 6. Alarm Button (also serves as – button) 7. + Button 8. SET Button 9. TEMP/HEAT INDEX/DEW POINT 10. Heat Index Range Indicator Arrow 2 Display Settings Note: The console has three buttons for easy operation: SET button, + button, and ALARM button (which also serves as the – button). Version 1.0 ©Copyright 2012, Ambient LLC. All Rights Reserved. Page 4 2.1 Set Mode To set the time and units of measure, press and hold the SET button 3 seconds or longer, and let go of the SET button. 1. 12/24 Hour. 12 Hr or 24 hour will begin flashing. Press the + button to switch between 12 hour and 24 hour display mode. Press the SET button (do not hold) to advance to the next setting. 2. Hour of Day. The hour of day will begin flashing. Press the + button to increase the hour, and the ALARM button to decrease the hour. Press the SET button (do not hold) to advance to the next setting. 3. Minute of Day. The minute of day will begin flashing. Press the + button to increase the minute, and the ALARM button to decrease the minute. Press the SET button (do not hold) to advance to the next setting. 4. Temperature Units of Measure. The °F or °C icon will begin flashing. Press the + button to switch between °F and °C. Press the SET button (do not hold) to exist the Set Mode. 2.2 Heat Index Alarm Set Mode To set the Heat Index Alarm, press and hold the ALARM button for 3 seconds or greater, and the heat index alarm set point will begin flashing. To increase the Heat Index alarm set point, press the + button. To increase rapidly, press and hold the + button. To decrease the Heat Index alarm set point, press the ALARM button. To decrease rapidly, press and hold the ALARM button. To confirm the Alarm setting and return to normal mode, press the SET button (do not hold). 2.3 Heat Index Alarm To turn on the Heat Index Alarm, press (do not hold) the ALARM button. The alarm icon will appear. To turn off the alarm, press the ALARM button again, and the alarm icon will disappear. 2.4 Temperature, Heat Index and Dew Point Display Press the SET button (do not hold) to switch the display between temperature, heat index and dew point, or: temperatureheat indexdew point temperature 2.5 Calibration Adjustment Mode The purpose of calibration is to fine tune or correct for any sensor error associated with the devices margin of error. The measurement can be adjusted from the console to calibrate to a known source. Calibration is only useful if you have a known calibrated source you can compare it against, and is optional. This section discusses practices, procedures and sources for sensor calibration to reduce manufacturing and degradation errors. Do not compare your readings obtained from sources such as the internet, radio, television or newspapers. The purpose of the heat index monitor is to measure conditions of your surroundings, which vary significantly from location to location. To calibrate temperature and humidity, press and hold the SET button for 9 seconds and the temperature will start flashing. 1. Temperature Calibration. To increase the temperature to match your calibration source, press the + button. To increase rapidly, press and hold the + button. To decrease the temperature, press the ALARM button. To decrease rapidly, press and hold the ALARM button. Version 1.0 ©Copyright 2012, Ambient LLC. All Rights Reserved. Page 5 To confirm the temperature calibration, press the SET button (do not hold), and the humidity will begin flashing. 2. Humidity Calibration. To increase the humidity to match your calibration source, press the + button. To increase rapidly, press and hold the + button. To decrease the humidity, press the ALARM button. To decrease rapidly, press and hold the ALARM button. To confirm the humidity calibration and return to normal mode, press the SET button (do not hold). Temperature Calibration Discussion: Temperature errors can occur when a sensor is placed too close to a heat source (such as a building structure, the ground or trees). To calibrate temperature, we recommend a mercury or red spirit (fluid) thermometer. Bi-metal (dial) and other digital thermometers are not a good source and have their own margin of error. Using a local weather station in your area is also a poor source due to changes in location, timing (airport weather stations are only updated once per hour) and possible calibration errors (many official weather stations are not properly installed and calibrated). Place the sensor in a shaded, controlled environment next to the fluid thermometer, and allow the sensor to stabilize for 24 hours. Compare this temperature to the fluid thermometer and adjust the console to match the fluid thermometer. Humidity Calibration Discussion: Humidity is a difficult parameter to measure electronically and drifts over time due to contamination. In addition, location has an adverse affect on humidity readings (installation over dirt vs. lawn for example). Official stations recalibrate or replace humidity sensors on a yearly basis. Due to manufacturing tolerances, the humidity is accurate to ± 5%. To improve this accuracy, the indoor and outdoor humidity can be calibrated using an accurate source, such as a sling psychrometer or one step humidpak calibration kits (reference Section 7). 3 Heat Index Safety Discussion The following section is courtesy of the United States National Weather Service Office of Climate, Water and Weather Services. The Heat Index, sometimes referred to as the apparent temperature is given in degrees Fahrenheit. The Heat Index is a measure of how hot it really feels when relative humidity is factored with the actual air temperature. To find the Heat Index temperature, look at the Heat Index chart below. As an example, if the air temperature is 96°F and the relative humidity is 65%, the heat index (how hot it feels) is 121°F. IMPORTANT: Since heat index values were devised for shady, light wind conditions, exposure to full sunshine can increase heat index values by up to 15°F. Also, strong winds, particularly with very hot, dry air, can be extremely hazardous. The Heat Index Chart shaded zone above 105°F shows a level that may cause increasingly severe heat disorders with continued exposure or physical activity. Version 1.0 ©Copyright 2012, Ambient LLC. All Rights Reserved. Page 6 Effects of the heat index (shade values): Level Caution Heat Index Range (°F) 80-90 Extreme Caution 90-105 Danger 105-130 Extreme Danger Over 130 Notes Fatigue is possible with prolonged exposure and activity. Continuing activity could result in heat cramps. Heat cramps and heat exhaustion are possible. Continuing activity could result in heat stroke. Heat cramps and heat exhaustion are likely; heat stroke is probable with continued activity. Heat stroke is imminent. 4 Glossary of Terms Term Accuracy Dew Point Heat Index Hygrometer Range Version 1.0 Definition Accuracy is defined as the ability of a measurement to match the actual value of the quantity being measured. The dew point is the temperature at which a given parcel of humid air must be cooled, at constant barometric pressure, for water vapor to condense into water. The condensed water is called dew. The dew point is a saturation temperature. The Heat Index, sometimes referred to as the apparent temperature, is a measure of how hot it really feels when relative humidity is factored with the actual air temperature. A hygrometer is a device that measures relative humidity. Relative humidity is a term used to describe the amount or percentage of water vapor that exists in air. Range is defined as the amount or extent a value can be measured. ©Copyright 2012, Ambient LLC. All Rights Reserved. Page 7 5 Specifications 5.1 Measurement Specifications The following table provides specifications for the measured parameters. Measurement Range Accuracy Resolution Temperature 14 to 140 °F ± 2 °F 0.1 °F Humidity 20 to 99 % ± 5% 1% Note: when temperature or humidity read out of range, the display will read LL (out of range low) or HH (out of range high). 5.2 Power Consumption 2 x AA 1.5V Alkaline or Lithium batteries (not included) Battery life: Approximately one year 6 Troubleshooting Guide If your question is not answered here, you can contact us as follows: 1. Email Support: [email protected] 2. Live Chat Support: www.ambientweather.com/chat.html (M-F 8am to 4pm Arizona Time) 3. Technical Support: 480-283-1644 (M-F 8am to 4pm Arizona Time) Problem Display console contrast is weak Temperature or humidity is inaccurate Temperature, Heat Index appear to read high Solution Replace console batteries with a fresh set of batteries. Use the humidity and temperature calibration to match your calibration source. Since heat index values were devised for shady conditions, exposure to full sunshine can increase heat index values by up to 15°F. Make sure you take your readings in a shaded area if possible. 7 Accessories The following software and hardware accessories are available for this weather station at www.AmbientWeather.com . Accessory Ambient Weather Humidity Calibration Kits Image Description One step calibration kits for digital hygrometers use salt slurry formula to accurately calibrate the indoor and outdoor hygrometers. 8 Liability Disclaimer Please help in the preservation of the environment and return used batteries to an authorized depot. The electrical and electronic wastes contain hazardous substances. Disposal of electronic waste in wild country and/or in unauthorized grounds strongly damages the environment. Reading the “User manual” is highly recommended. The manufacturer and supplier cannot accept any Version 1.0 ©Copyright 2012, Ambient LLC. All Rights Reserved. Page 8 responsibility for any incorrect readings and any consequences that occur should an inaccurate reading take place. This product is designed for use in the home only as indication of weather conditions. This product is not to be used for medical purposes or for public information. The specifications of this product may change without prior notice. This product is not a toy. Keep out of the reach of children. No part of this manual may be reproduced without written authorization of the manufacturer. Ambient, LLC WILL NOT ASSUME LIABILITY FOR INCIDENTAL, CONSEQUENTIAL, PUNITIVE, OR OTHER SIMILAR DAMAGES ASSOCIATED WITH THE OPERATION OR MALFUNCTION OF THIS PRODUCT. 9 Warranty Information Ambient, LLC provides a 1-year limited warranty on this product against manufacturing defects in materials and workmanship. This limited warranty begins on the original date of purchase, is valid only on products purchased and only to the original purchaser of this product. To receive warranty service, the purchaser must contact Ambient, LLC for problem determination and service procedures. Warranty service can only be performed by a Ambient, LLC. The original dated bill of sale must be presented upon request as proof of purchase to Ambient, LLC. Your Ambient, LLC warranty covers all defects in material and workmanship with the following specified exceptions: (1) damage caused by accident, unreasonable use or neglect (lack of reasonable and necessary maintenance); (2) damage resulting from failure to follow instructions contained in your owner’s manual; (3) damage resulting from the performance of repairs or alterations by someone other than an authorized Ambient, LLC authorized service center; (4) units used for other than home use (5) applications and uses that this product was not intended (6) the products inability to receive a signal due to any source of interference or metal obstructions and (7) extreme acts of nature, such as lightning strikes or floods. This warranty covers only actual defects within the product itself, and does not cover the cost of installation or removal from a fixed installation, normal set-up or adjustments, claims based on misrepresentation by the seller or performance variations resulting from installation-related circumstances. Version 1.0 ©Copyright 2012, Ambient LLC. All Rights Reserved. Page 9