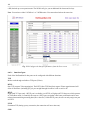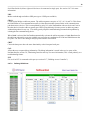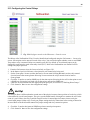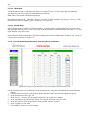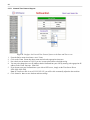
1
NetGuardian 832A G4 Web Browser USER MANUAL Visit our website at www.dpstelecom.com for the latest PDF manual and FAQs. July 15, 2013 D-UM-NETG4 Firmware Version 4.3A.0211 Revision History June 20, 2013 Added XBee/DSCP device support. March 22, 2007 Revised with new Display Mapping. March 31, 2006 Revised to support firmware version 4.0C May 25, 2005 Revised to support 4.0A series updates: SNMP v2.0c support, Point Grouping, Filter or Reset Event Log, Alarm Sync, etc March 2, 2005 Revised to support firmaware version 3.0J: Proxy Time-out Timer December 30, 2004 Revised to support 3.0I. October 8, 2004 Revised to support firmware 3.0D. March 8, 2004 Revised to support firmware 3.0B. This document contains proprietary information which is protected by copyright. All rights are reserved. No part of this document may be photocopied without prior written consent of DPS Telecom. All software and manuals are copyrighted by DPS Telecom. Said software and manuals may not be reproduced, copied, transmitted or used to make a derivative work, by either mechanical, electronic or any other means in whole or in part, without prior written consent from DPS Telecom, except as required by United States copyright laws. © 2013 DPS Telecom Notice The material in this manual is for information purposes and is subject to change without notice. DPS Telecom shall not be liable for errors contained herein or consequential damages in connection with the furnishing, performance, or use of this manual. Contents Visit our website at www.dpstelecom.com for the latest PDF manual and FAQs 1 Overview 1 1.1 Introduction 1 1.2 Potential Problems using Web Interface in a Secure Proxy Network 1 1.3 What's New in NetGuardian 4.0 1 2 Unit Configuration 3 2.1 Logging on to the NetGuardian 3 2.2 Entering System Settings 3 2.3 Changing the Logon Password 4 2.4 2.5 2.3.1 Logon Profiles and Access Rights 5 2.3.2 Security Dial-Back 7 Configuring Port Parameters 7 2.4.1 Ethernet Ports 7 2.4.2 Using the Base URL Field 8 2.4.3 Setting Up The SNMP 9 2.4.4 Filter IPA Config and Operation 10 2.4.5 Changing Craft Port Communication Settings 12 2.4.6 Configuring Modem Port Settings 13 2.4.7 Configuring Data Ports 1 - 8 14 2.4.7.1 Data Port Types 15 2.4.7.2 Defining SPS8 Ports 16 2.4.7.3 Direct and Indirect Proxy Connections 17 Setting Up Notification Methods 18 2.5.1 Alpha Numeric Pager Setup 20 2.5.2 Numeric Pager Setup 20 2.5.3 Text Paging Setup 20 2.5.4 Email Notification Setup 21 2.5.4.1 SMTP POP3 Authentication Support 22 2.5.5 SNMP Paging Setup 22 2.5.6 TCP Paging Setup 23 2.5.7 Num17 Pager Setup 23 2.6 Defining Point Groups 24 2.7 Configuring Base Discrete Alarms 25 2.8 Event Qualification Timers 26 2.9 Setting System Alarm Notifications 28 2.10 Configure the Accumulation Timer 29 2.10.1 Disabling the Accumulation Timer 30 2.11 Configuring Ping Targets 30 2.12 Analog Parameters 31 2.12.1 Integrated Temperature and Battery Sensor (Optional) 32 2.12.2 Analog Polarity Override 33 2.12.3 Analog Step Sizes 33 2.13 Configuring the Control Relays 2.13.1 Activating Relays from an Alarm Point's Change of Status 34 35 2.13.1.1 Echoing alarm points to relays 35 2.13.1.2 Oring echoed alarm points 35 2.13.2 Derived Control Relays and Virtual Alarming 35 2.13.3 Relay Operating Modes 36 2.13.3.1 Echoed Mode 36 2.13.3.2 ORed Mode 37 2.13.3.3 Normal Mode 37 2.13.4 Override Default Relay Momentary Time Using Event Qualification 37 2.14 Setting System Timers 38 2.15 Setting the System Date and Time 40 2.15.1 Network Time Protocol Support 41 2.16 Configuring DSCP Devices 42 2.17 Configuring PPP Modes 44 2.18 Building Access Controller 47 2.19 Camera Settings 48 2.20 Alarm Sync 49 2.21 Saving Changes or Resetting Factory Defaults 49 2.22 Rebooting the NetGuardian 50 3 Web Server Monitoring Chapter 3 50 3.1 Alarm Summary Window 51 3.2 Monitoring Base Alarms 52 3.3 Monitoring Ping Targets 53 3.4 Monitoring Analogs 54 3.5 Monitoring DSCP Devices 54 3.6 Monitoring System Alarms 55 3.7 Operating Controls 56 3.8 Event Logging 57 3.9 Monitoring Data Port Activity 58 3.10 Monitoring Camera Activity 3.10.1 Pan-and-tilt Camera Controls 60 60 3.10.2 Monitoring Multiple Cameras 4 Appendixes 4.1 63 Appendix A — Display Mapping 4.1.1 61 System Alarms Display Map 63 65 4.2 Appendix B — SNMP Manager Functions 68 4.3 Appendix C — SNMP Granular Trap Packets 70 4.4 Appendix D — ASCII Conversion 71 5 Frequently Asked Questions 72 5.1 General FAQs 72 5.2 SNMP FAQs 73 5.3 Pager FAQs 74 6 Technical Support 75 7 End User License Agreement 75 1 1 Overview Fig. 1.1. NetGuardian 832A G4 monitors alarms, pings network elements, and reports via SNMP, pager, or email 1.1 Introduction The NetGuardian's Web Browser Interface lets you manage alarms and configure the unit through the Internet or your Intranet. You can quickly set up alarm point descriptions, view alarm status, issue controls, and configure paging information, and more. The NetGuardian supports Internet Explorer versions 4.0 and above and Netscape Navigator versions 4.7 and above. Fig. 1.2. NetGuardian 832A G4 has the capacity to monitor IP aware devices' network presence and also interfaces discrete alarm points and controls at your network sites 1.2 Potential Problems using Web Interface in a Secure Proxy Network Using the Web Browser Interface for the NetGuardian in a secure proxy network can cause certain problems to occur. If you are logged on to the NetGuardian from within your network through a proxy, and another user from within your network tries to access the same NetGuardian, the second user will not need to login to the NetGuardian. Both users will essentially be logged in using the same IP address because of the masking done by the proxy server. 1.3 What's New in NetGuardian 4.0 The NetGuardian G4 series, available April 2006, adds these new features: SNMP v2c Support and Robust Message Delivery NetGuardian G4 supports SNMP v2c, and the SNMP INFORM command, which permits robust delivery of 2 alarm notification to your SNMP manager. Alarm Point Grouping Each NetGuardian Alarm point can be assigned to one of eight groups, which are identified with a user-defined label. Some of the ways you can use Alarm Point Grouping include: Alarm Severity Levels: Configure the NetGuardian to indicate assigned alarm security levels like Critical, Major, Minor and Status in a variable binding within the SNMP TRAP or INFORM message — so alarms can be sorted by severity even if your SNMP manager doesn't support severity levels. Two Sets of Alarm Severity Levels: With 8 alarm groups to work with, you can easily create two different sets of severity levels. For example, you could separate power alarms (rated from Critical to Status) from environmental alarms (also rated Critical to Status). Custom Virtual Alarms: Create virtual alarms based on easy formulas like All security alarms or Critical power alarms. Flexible Custom Derived Controls: NetGuardian G4 lets you create Derived Controls formulas based on Alarm Point Groups. Granular Pager and Email Notification: Selectively assign alarm points to specific pager and email notification recipients. The NetGuardian can be configured to send pager notifications only for Critical or Major alarms — or you can send power alarms to repair technicians and intrusion alarms to a security guard. Global Support for Dual SNMP Managers NetGuardian G4 supports sending all SNMP TRAP and INFORM notifications to two global SNMP managers. This makes it easier to configure a secondary SNMP manager and frees up your NetGuardian configuration for additional notification devices and more flexible alarm reporting. You can easily send an alarm to your primary SNMP manager at the NOC; to a secondary backup SNMP manager at another location; to the pager of the on-call technician; and the email in-box of the technician's supervisor. Filter or Reset the NetGuardian Event Log The NetGuardian Event Log has been enhanced to support new NetGuardian G4 features: • You can filter Event Log entries by Alarm Point Group, to see only the alarms you want. • You can reset the Event Log, to clear old alarms from the display. • You can reset the Event Log by Alarm Point Group; for example, clear power alarms while retaining intruder alarms. Alarm Sync Makes Turnup and Testing Easy NetGuardian G4 also provides a new command to re-synchronize all alarms. This command clears all alarms, so that a new notification is sent for all standing alarms. You can easily test alarm connections during turnup without rebooting the NetGuardian unit. 3 2 Unit Configuration 2.1 Logging on to the NetGuardian For Web Interface functionality, the unit must first be configured with some basic network information. If this step has not been done, refer to the NetGuardian User Manual for initial software configuration setup. 1. To connect to the NetGuardian from your Web browser, you must know its IP address or domain name if it has been registered with your internal DNS. Enter it in the address bar of your Web browser. It may be helpful to bookmark the logon page to simplify access. 2. After connecting to the NetGuardian's IP address, enter your password and click Submit, see Figure 2.1. Note: The factory default password is dpstelecom. 3. In the left frame there is Monitor menu button and an Edit menu button. Most of the software configuration will occur in the Edit menu. The following sections provide detailed information regarding these functions. ! Hot Tip! If the Edit menu does not appear in the left frame after logging on, it means that another station has already logged on as the primary user. The maximum number of users allowed to simultaneously access the NetGuardian via Web is four. The primary user is the only user with access to the editing features. Exiting the Web interface without logging out prevents other users from accessing the Editing features, as well. Web sessions are tracked by IP Address and the session will time out after twelve minutes of inactivity, unless configured with a longer Web timeout duration. (See section 2.14, "Setting System Timers" for more information.) Fig. 2.1. Enter your password to enter the NetGuardian Web Browser Interface 2.2 Entering System Settings From the System screen you can enter the name, location, contact, features, and SNMP community names. Use the following steps to define your NetGuardian system information: 1. From the Edit menu choose System, see Figure 2.2. 2. Enter the designated user name for your NetGuardian.* 3. Enter the location or address of the NetGuardian.* 4. Set the contact by entering the telephone number or other contact information for the person or group responsible for this NetGuardian. 5. The Features field is used for entering feature codes for future upgrades. Do not change this code unless instructed by DPS Technical Support. 4 6. Click Submit to save your system information settings. * If using email pager type refer to Section 2.5 for correct name and location field formatting. Fig. 2.2. Configure the system information by selecting the System screen from the Edit menu Field Name Location Contact Phone Features Unit ID DCP Port Description Used to set the Name@Location email address. Note: Name is the portion before the @ character. Used to set the Name@Location email address. Note: Location is the portion after the @ character, this is a host name or IP address. Information for how to contact the person responsible for this NetGuardian. Contact's telephone number. Used for entering feature codes for future upgrade features. User definable ID number for this NetGuardian (DCP Address). Enter the DCP Port for this NetGuardian. (1-8 serial otherwise UDP/IP Port) Table 2.A. System fields 2.3 Changing the Logon Password The password can be configured from the Edit menu > Logon screen > Master Password section. The minimum password length is four characters; however, DPS recommends setting the minimum password length to at least five characters. You can also configure security logon profiles to individual access rights and security dial-back functions in the Logon Profile screen. (See section 2.3.1 for dial-back and logon profile configuration information.) Note: The factory default password is dpstelecom. DPS Telecom strongly recommends that the default password be changed. Use the following steps to change the logon password: 1. From the Edit menu select Logon. 5 2. Enter the minimum password length you wish to set. 3. Enter your new password in the Password and Confirm Password fields. 4. Click the Submit Data button. Fig. 2.3. Configure the password parameters from the Login screen 2.3.1 Logon Profiles and Access Rights Creating logon profiles allows you to grant personnel access to certain functions of the NetGuardian without allowing access to sensitive or secure areas of the database. Use the following steps to create logon profiles: 1. From the Edit menu select Logon, then click on the Available link. (See Figure 2.3.) 2. Enter the user information in the appropriate fields. See Table 2.B for field and access privileges descriptions. 3. Click Submit Data to save the user profile. 6 Fig. 2.4. Configure access privileges for users in the Logon Profile screen Profile Field User Password Confirm Password Call Back Admin DB Edit Monitor SDMonitor Control Reach-Through Modem Telnet PPP Description Enter a username or a user description. (18 characters maximum) Enter a unique user password. (4 character minimum) Note: This password will be used by the NetGuardian to determine whether or not to initiate the "Call-Back" function and also if any limited access applies. Re-enter the password. This is the phone number the NetGuardian uses to call back to the user's modem. Access Privileges Enables the user to add/modify logon profiles and NetGuardian password information. Note: Selecting security also automatically activates the DB Edit. Enables the user to perform database edits in the NetGuardian. Enables the user to have Monitor access of the NetGuardian. Enables the user to view serial port buffers. Gives the user the ability to issue controls. This also automatically activates Monitor. Enables the user to achieve reach-through (Proxy) access. Enables the user to call into the unit. Enables the user to have Telnet access to the unit. Enables the user to access the PPP server with the user defined password. Table 2.B. Logon profile field descriptions 7 2.3.2 Security Dial-Back The Dial-Back feature serves as an additional level of security when accessing the NetGuardian from the modem. Once users are assigned a logon profile, along with a unique NetGuardian logon password, the unit can be set to initiate a dial-back when a valid logon password is entered. If a valid password is entered users will see accepted, Disconnecting. The NetGuardian will then hang up and dial back to the users modem using the number entered in the logon profile. When the NetGuardian dials back, the user will be logged on to whatever security access that user has been granted in their logon profile. ! Hot Tip! To enable dial-back security, at least one of the access privileges must be activated and a call back phone number must be defined. As long as the dial-back security mode is enabled, that will be the only method of external dial-up access to the unit. 2.4 Configuring Port Parameters The Edit menu > Ports screen allows you to configure the ethernet, modem, craft port and data port settings. 2.4.1 Ethernet Ports Use the following steps to configure the ethernet port settings: 1. Configure the NetGuardian ethernet port by clicking on the Ports link from the Edit menu. 2. Enter the appropriate information for your ethernet port in the corresponding fields. Refer to Figure 2.5 and Table 2.C.. 3. Click Submit Data to save your configuration settings. 8 Fig. 2.5. All port configuration is accomplished from the Edit menu > Ports screen Field Unit Address Description IP address of the NetGuardian The Subnet mask is a road sign to the NetGuardian telling it whether your packets Subnet Mask should stay on your local network or be forwarded somewhere else on a wide area network. An important parameter if you are on a network that is connected to a wide area Default Gateway network. It tell the NetGuardian which machine is the gateway out of your local network. Set to 255.255.255.255 if not using . DNS Address IP address of the domain name server. Set to 255.255.255.255 if not using. Defines the NetGuardian TCP ports used by data ports 1-8 (serial ports). Data port 1 receives the port number entered here. Data ports 2-8 receive the next 7 port Proxy Base numbers in ascending order. (i.e. TCP port 3000 through port 3007 at the IP address of the NetGuardian). DCHP Toggles the Dynamic Host Connection Protocol On or Off The Base URL is the destination website address o the alarm point descriptions Base URL hyperlinks. See Section 2.4.2, "Using the Base URL Field." MAC Address Hardware address of the NetGuardian (not editable, for reference only). Table 2.C. Fields in the Edit > Ports > Ethernet Port settings 2.4.2 Using the Base URL Field The NetGuardian allows users to turn each alarm point description into a hyperlink. When utilized, the alarm description for each alarm point that appears in the monitor mode (for base alarms, ping targets, or system alarms) becomes a link that directs technicians/managers to specific Web pages or to other files viewable by a Web browser. This allows users to create easily accessible informational databases on how to handle specific alarm conditions or other instructions. The hyperlinked page or file will be displayed in the main window frame of the NetGuardian Web browser. Follow the directions below to create hyperlinks for alarm point descriptions. 1. From the Edit Menu select Ports. Scroll down to the Base URL field, see Figure 2.5. 2. Enter your base URL (e.g. http://www.dpstelecom.com). The NetGuardian creates the links from the alarm point descriptions based on the URL. Once the base URL is entered, the NetGuardian automatically attaches a unique suffix to each alarm point. For example, if the base URL is http://www.dpstelecom.comthe link for the base alarm at point 1 would be http://www.dpstele.com/base1.html , Base Alarm Point 2 would be http://www.dpstele.com/base2.html , and so on. 3. To add a suffix other than html to the hyperlinks, insert the text &pntID; into the base URL. This allows the user to specify the extension. For example, if the base URL is http://www.dpstele.com/&pntID;.pdf , the link for the base alarm at point 1 would be http://www.dpstele.com/base1.pdf/ . ! Hot Tip! Any file type that is viewable in your Web browser (e.g. word document, PDF, txt, etc.) is a linkable file. 4. The same link structure applies to the Ping Alarms, System Alarms, and Analog Alarms fields. See Table 2.D for specific URL extension link information. 9 Alarm Page Base Alarms Ping Alarms System Alarms Analog Alarms Base URL web page link* Base1.html - Base32.html Ping1.html - Ping32.html System1.html - System64.html Analog1.html - Analog8.html Table 2.D. Specific link extensions * Using the &pntID; code in the base URL enables you to link to any file type viewable in your Web browser. 2.4.3 Setting Up The SNMP Use the following steps to define your NetGuardian system information: 1. From the Edit menu choose SNMP, see Figure 2.6. 2. Enter the community name for SNMP GET requests. 3. Enter the community name for SNMP SET requests. 4. Enter the community name for SNMP TRAPs. 5. Define the IP address of your trap manager. Set to 255.255.255.255 if not using. 6. Define the UDP port set by the SNMP manager to receive traps; usually 162. 7. Select the Format in which you want your traps to be sent to your manager in. 8. Click Submit to save your system information settings. Fig. 2.6 SNMP Menu 10 G)et S)et T)rap Field IPA Port Format Communities Community name for SNMP requests. Community name for SNMP SET requests. Community name for SNMP TRAP requests. Description Defines the SNMP trap manager's IP address. Set to 255.255.255.255 if not using. The SNMP port is the UDP port set by the SNMP manager to receive traps, usually set to 162. Select between SNMPv1 TRAP, SNMP v2c TRAP, and SNMP v2c INFORM. Table 2.E. Fields in the Edit > SNMP settings 2.4.4 Filter IPA Config and Operation The Filter IPA table allows you to increase the NetGuardian's network security by allowing or blocking packets from specified IP addresses. Addresses which appear in the table will be processed by the NetGuardian. Defined IP addresses associated with network cameras or the network time server are automatically processed and will not be filtered out by this feature. Broadcast packets of 255.255.255.255 and ARP requests for the NetGuardian IP address are also not filtered. 1. From the Edit menu select Filter IPA. 2. A warning prompt will appear, see Figure 2.7. Click OK to continue, or Exit to cancel. Fig. 2.7. Filter IPA warning prompt 3. 4. 5. 6. Once enabled only the IP addresses in the table will be allowed access to the NetGuardian. Select to Enable IPA Table. Enter the IP address of the machine(s) you would like to give access to the NetGuardian. Click Submit to save the configuration settings. ! Hot Tip! Entering a zero in any of the octet fields will declare that part of the octet to be a wildcard. WARNING: Does not work with networks that assign IP addresses. Use the wildcard field to open an entire subnet. Two Modes: Firewall: Block specific addresses Filter table: only allow specific addresses 11 ! Hot Tip! Filter IPA table is primarily used for diagnostic purposes and should not be required unless to increase security. Fig. 2.8. Select Filter IPA from the Edit menu to configure your Filter IPA table 12 2.4.5 Changing Craft Port Communication Settings Use the following steps to change the craft port communication settings: 1. From the Edit menu > Ports screen, scroll down to the Craft section, see Figure 2.9. 2. You can set the baud rate for the craft port to 300, 1200, 2400, 9600, 19200, 38400, 57600, 115200. (Default Baud is 9600) 3. Under the Wfmt (word format) field, select the appropriate data bits, parity, and stop bits setting to match your terminal emulation software or device connected to the NetGuardian craft port. (Default designation is 8,N,1) 4. Click Submit Data to save the craft port settings. Fig. 2.9. Configure the front panel craft port parameters from the Ports screen 13 2.4.6 Configuring Modem Port Settings Use the following steps to configure the modem port settings: 1. From the Edit menu > Ports screen, scroll to the Modem section, see Figure 2.10. 2. In the Ring Count field enter the number of rings before answering. (Default = 1) 3. The Dial Init and the Answer Init fields can be used if any other modem initialization settings need to be set. For example, the modem can be set to ignore the dial-tone by entering a character code in either the Answer Init (into the NetGuardian) or the Dial Init (out from the NetGuardian). 4. Click Submit Data to save your modem port settings. Note: The default setting for these fields is blank. Fig. 2.10. Change the modem settings from the Edit menu > Ports screen 14 Command A Bn Description Answer command Select communications standard Dial P Pulse dial T Tone dial R Connect as answering modem D W Wait for dial tone , Pause for the duration of S8 @ Wait for silence ! Switch hook flash ; Return to the command state En Command echo Hn Switch hook control In Modem identification Ln Speaker volume Mn Speaker activity On Online Qn Responses Sr? Interrogate register Sr=n Set register value Vn Result codes Xn Result code set Z Reset Table 2.F. Standard modem commands (Hayes) Note: Modem commands may vary. See your modem user manual for commands specific to your modem. 2.4.7 Configuring Data Ports 1 - 8 Data port settings can be configured in the Edit menu > Ports screen. Use the following steps to define your data port settings: 1. From the Ports window, scroll down to the Data Ports section, see Figure 2.11. 2. Under the options heading, enter in the appropriate number of NetGuardian Discrete Expansions (1-3) installed.* Entering zero disables these options. 3. Enter a description for each port with a connected device. The communication settings for each port can be configured for baud rate, word format and to ignore or remove CR/LF (carriage return/line feed) characters in either the input or output data stream. 4. Advanced settings can also be configured when you select an appropriate data port type. See section 2.4.7.1 to select the appropriate data port type setting for your application. ! Hot Tip! NGDdx is an abbreviation for "NetGuardian Expansion." Expansion units enable you to scale from 32 base alarms and 8 base relays to a maximum of 176 alarm and 32 relays.You can also have one NG480 (configured as 15 a DX) hooked up as an expansion unit. The NG480 will give you an additional 80 alarms and 4 relays. Note: You can have either 1 NG480 or 1 to 3 NGDdx units. You cannot have both at the same time. Fig. 2.11. Configure the data port parameters from the Ports screen 2.4.7.1 Data Port Types Each of the NetGuardian's 8 data ports can be configured with different functions: TCP Makes reach-through available at TCP ports (Telnet). RTCP Raw TCP (negates Telnet negotiation). The RTCP (Raw TCP Data Port) negates Telnet negotiation and will allow all characters (including [FF]) to pass straight through from IP to serial or serial to IP. HTCP High speed TCP port (only 1 HTCP port is available). An HTCP, or High-speed TCP data port, which operates in Telnet Raw mode, is essentially the same as a RTCP port except that it has better performance and is more robust when transferring streaming data (like a data file). Unlike RTCP ports, the user can only assign one port as HTCP. PTCP Permanent TCP (during a proxy connection, the connection will never time out). SPS8 16 Serial Port Switch 8 (allows eight serial devices to be connected to single port). See section 2.4.7.2 for more information. UDP Makes reach-through available at UDP ports (up to 4 UDP ports available). CHAN Creates logical bridge to odd/even partner. The odd/even partners are pairs of 1-2, 3-4, 5-6, and 7-8. This allows the NetGuardian to view communication traffic in either direction when inserted in the serial communication path between two devices. This is accomplished by going "in" to the NetGuardian with one device and "out" to the other device from the odd/even partner port. Data is passed directly from one port to its odd/even partner without being altered in any way. This ability greatly simplifies troubleshooting communication problems by isolating the non-communicating device. When CHAN is selected, the NetGuardian automatically activates the odd/even partner as CHAN. Baud rates for the odd/even pairs can be set to any available rate except for any combination of 19200 and 38400 between the two ports. Use "SPO" filter debug to analyze protocol traffic in a terminal. CRFT Causes the data port to have the same functionality as the front panel craft port. CAP Allows the user to capture debug information. The debug information is stored in the receive queue of the NetGuardian (See section 3.8, "Monitoring Data Port Activity" for more information). This is used primarily as a troubleshooting feature. ECU For use if an ECU is connected to this port (see section 2.17, "Building Access Controller"). 2.4.7.2 Defining SPS8 Ports 17 Fig. 2.12. Select SPS8 port type from the Edit > Ports, Data Ports screen The SPS8 port type can be selected in the Type option when configuring data ports with NGEdit4 or the Web Browser Interface. However, you may only edit SPS8 port descriptions in NGEdit4. The Web Browser Interface will allow you to set SPS8 type, but not the port descriptions. The Serial Port Switch 8 (SPS8) is an external device hub that allows the connection of up to eight serial port devices to a single NetGuardian data port. When an SPS8 port is selected, the NetGuardian will negotiate the connection for the user. To break the SPS8 connection and return to the normal NetGuardian interface, type @@@ and press Enter. ! Hot Tip! SPS8 ports do not support direct proxy. You must navigate via the TTY menu. Use the following steps to select a SPS8 port: 1. From the Edit menu > Ports screen, scroll to the Data Ports section. 2. Enter a description and click on the TCP link, see Figure 2.11. 3. Under the Type column, click on the drop-down menu and select SPS8, see Figure 2.12. 4. Click Submit Data to save your configuration settings. CAUTION: If you initialize the NVRAM, the NetGuardian will erase all SPS8 port descriptions. ! Hot Tip! If interfacing an IAM-5 to SPS8 through a NetGuardian set port type to TCP. 2.4.7.3 Direct and Indirect Proxy Connections The NetGuardian supports two proxy connections, direct and indirect. In a direct proxy connection, the user enters an IP address and port number to Telnet directly to a TCP serial port. In an indirect connection, the user navigates the TTY menu to select a proxy port. Since the TTY interface is password protected, indirect connections are preferred. Some users prefer to disable direct proxy for all connections in order to enforce the password security provided by the TTY interface. One way to disable proxy connections is to set the proxy port to an uncommon value. This restricts the access of other users, but it is more convenient and secure to set the data ports to off in the Type field. When set to off , the port is no longer associated with a TCP socket, which effectively disables the port from direct access. Use the following steps to select proxy connections: 1. From the Edit menu > Ports screen, scroll down to the Data Ports section. 2. Enter a description and click on the TCP link, see Figure 2.11. 3. Under the Type column click on the drop-down menu and select the appropriate proxy connection, see Figure 2.13. 4. Click the Submit Data button to save your configuration settings. 18 Fig. 2.13. Set proxy connections in Edit menu > Ports screen > Data Ports 2.5 Setting Up Notification Methods The Edit menu > Pagers screen allows you to configure several alarm notification methods in addition to pagers. Each notification method is defined as a pager type in this screen. To define a pager as the primary or secondary notification of alarm conditions, select the pager in the appropriate alarm point provisioning screens. ! Hot Tip! Refer to Section 2.9, "Configuring Base Discrete Alarms," and Section 2.9, "Setting System Alarm Notifications," for more information. 19 Fig. 2.14. Multiple notification methods and group assignments are configured from the Notification screen Pager Format Alphanumeric Paging Numeric Paging Text Paging T/Mon Paging Email/SMTP Paging SNMP Paging TCP (ASCII) Paging Num17 Paging Description Format recognizes numbers, letters, and symbols. Can receive information including alarm point addresses, alarm descriptions, time of alarms, and alarm state. Format recognizes numbers only. Message is reported in the following order: [IP]*[Display] [Address]*[State]. When read on the pager it appears as follows: 192.168.1.100 99.01.01.01 Can receive information including alarm point addresses, alarm descriptions, time of alarms, and alarm state. May be accessed using a terminal. The T/Mon may receive alarm information from the NetGuardian via dial-up and display alarm information, alarm description, and threshold status. (Only activates if DCP Poller is inactive) Provides alarm notification via email, with a description similar to the Alphanumeric pager. May send alarm status to multiple SNMP managers, including the SNMP that alarms are reporting to. The SNMP tray format is v1. Alarm status notification via multiple TCP or HTCP ports. Connection from a higher level master must be established for alarm notification. Provides alarm notification in a manner similar to that of the Numeric pager. However, Num17 eliminates the (*) symbol from the page. Message is reported in the following order: [IP][Display][Address][State]. When read on the pager it appears as follows: 192.168.1.100 99.01.01.01 Table 2.G. Notification formats 20 2.5.1 Alpha Numeric Pager Setup The alpha numeric pager can receive text messages including alarm descriptions, time of occurrence, and point addresses. Use the following steps to configure the alpha numeric pager settings: 1. From the Edit menu > Notification screen, select an ID number to use. See Figure 2.14 for pager descriptions. Note: Pager IDs are used in the alarm provisioning screen to designate the primary and secondary person/device being paged when an alarm condition occurs or clears. 2. Under the Type column, select type Alpha from the drop-down menu, see Figure 2.14. 3. Enter the phone number of the Alpha numeric pager under the Phone/Domain heading. 4. Enter a personal identification number under the PIN/Rcpt/Port heading. 5. Set the pager data rate (i.e. 300, 1200, 2400 or 9600). The default baud is 1200. 6. Select a pager word format (Data Bits, Parity, Stop Bits). The default setting is 7,Even,1. 1 3 8 5 2 4 6 01: Net Guardi an 14 99.1.1.3.1 9:20 TOWER LIGHTS A l arm 9:22 06/20/00 10 1. Number of pages 2. Unit name 3. Port # and Address (Applicable to T/Mon and IAM only) 7 4. Display number 9 5. Alarm point number 6. Alarm status: 1=alarm, 0=clear 7. Time Net Guardian sent page 8. Alarm point description 9. Alarm status 10. Time & date pager received Fig. 2.15. Alpha numeric pager description 2.5.2 Numeric Pager Setup The numeric pager can receive point addresses of alarms. Use the following steps to configure the numeric pager settings: 1. From the Edit menu > Notification screen, select an ID number to use, see Figure 2.14. Note: Pager IDs are used in the alarm provisioning screen to designate the primary and secondary person/device being paged when an alarm condition occurs or clears. 2. Under the Type column select Numeric from the drop-down menu, see Figure 2.14. 3. Enter the phone number of the numeric pager under the Phone/Domain heading, followed by 7 commas (e.g. 555-1212,,,,,,,). Placing a comma after the phone number initiates a two second pause (per comma). This allows enough time for the pager to answer before the NetGuardian sends the alarm information. Note: The Baud/Wfmt and IPA fields are not used from numeric pager types. 2.5.3 Text Paging Setup Text pages can receive information including the point addresses of alarms, the alarm description, time of the alarm, and state (alarm or clear). The text pages may be viewed using a terminal such as HyperTerminal. Use the following steps to configure the text paging settings: 1. From the Edit menu > Notification screen, select an ID number to use, refer to Figure 2.14. Note: Pager IDs are used in the alarm provisioning screen to designate the primary and secondary person/device being paged when an alarm condition occurs or clears. 21 2. 3. 4. 5. Under the Type column select Text from the drop-down menu, see Figure 2.14. Enter the phone number of the text paging device under the Phone/Domain heading. Set the pager data rate (i.e. 300, 1200, 2400 or 9600). The default baud is 1,200. Select a pager word format (e.g Data bits: 7 or 8, Parity: none (N), even (E) or odd (O), and Stop Bits: 1). The default setting is 7, Even,1. Note: To set up text paging from T/Mon see the T/Mon user manual. 2.5.4 Email Notification Setup Fig. 2.16. Email notification from the NetGuardian The email pager provides alarm notification via email, with a description similar to that of the alpha-numeric pager. Use the following steps to configure the email notification settings: 1. From the Edit menu > Notification screen, select an ID number to use, see to Figure 2.14. Note: Pager IDs are used in the alarm provisioning screen to designate the primary and secondary person/device being paged when an alarm condition occurs or clears. 2. Under the Type column, select Email from the drop-down menu, see Figure 2.14. 3. Enter the domain name of the email address under the Phone/Domain heading. This is the portion of an email address after the @ symbol in [email protected]. Note: There cannot be any spaces in the domain name. 4. Enter the email recipient's user name under the PIN/Rcpt/Port heading. This is the portion of an email address before the @ symbol in the [email protected]. Note: There cannot be any spaces in the recipient's user name 5. Enter the IP address of the SMTP mail server in the IPA field. 6. Click Submit Data to save your email notification settings. 7. Click on the System link. If you have not done so, set up the "from" address sent in email messages sent from the NetGuardian by entering the appropriate information in the Name and Location fields. The email notification from the NetGuardian will appear as follows: name@location. ! Hot Tip! Most email programs can be set to perform a certain action if a message is received from a specified address, 22 such as moving the message to a special Alarms folder. Use the address entered in the Systems screen for such purposes. 8. Click Submit Data to save your new system information settings. Note: The "from" email address is for identification purposes. It is not necessarily a real email address that can be replied to unless one is entered. 2.5.4.1 SMTP POP3 Authentication Support This section contains steps to configure your NetGuardian for SMTP POP3 Authentication support. Unauthenticated Emails: The configuration setup will not change. If you want the email to send to [email protected], use the following steps: 1. In the Phone/Domain field type yourdomain.com. 2. In the Pin/Rcpt field type user. 3. Click Submit Data to save the configuration settings. The "from" location is specified by the system info name and location strings, which also do not change. Use the following steps to configure the "from" location [email protected]: 1. Click on the Edit menu > System link. 2. In the Name field type from. 3. In the Location field type fromdomain.com. 4. Click Submit Data to save the new system information settings. Authenticated Emails: If you want to send an authenticated email to [email protected] from [email protected], password = authentic, then use the following steps: 1. In the Pin/Rcpt field type authentic. 2. Click Submit Data to save your changes. 3. Click on the Edit menu > System link. 4. In the Name field type user. 5. In the Location field type yourdomain.com. 6. Click Submit Data to save the new system information settings. 2.5.5 SNMP Paging Setup The SNMP paging feature allows you to view alarm status from multiple SNMP managers in addition to the main one. Use the following steps to configure the SNMP paging settings: 1. From the Edit menu > Notification screen select an ID number to use, refer to Figure 2.14. Note: Pager IDs are used in the alarm provisioning screen to designate the primary and secondary person/device being paged when an alarm condition occurs or clears. 2. Under the Type column, select SNMP from the drop-down menu, see Figure 2.14. 3. Set the SNMP port under the PIN/Rcpt/Port heading, usually 162. 4. Enter the IP address of the SNMP manager in the IPA field. Note: SNMP trap format is v1. 23 2.5.6 TCP Paging Setup <MSG_BEG 00001> VID : DPS Telecom FID : NetGuardian SNMP v4.0B.0033 SITE: Yale Office PNT : 99.01.01.01 DESC: RECTIFIER 1 STAT: CLEAR DATE: 01/01/2001 TIME: 12:17:02 <MSG_END 00001> Fig. 2.17. Example TCP message Heading MSG_BEG MSG_END VID FID SITE PNT DESC STAT DATE TIME Description Sequential message number used to group the message and detect missing messages (e.g. 00001, 00002, etc...). Vendor ID NetGuardian Firmware ID. NetGuardian system name. Point ID (port.address.display.point). See Appendix A for display mapping. Description set forth in the Alarm parameters. Status of the alarm (Clear or Alarm). Date the alarm occurred. Time the alarm occurred. Table 2.H. TCP alarm message field descriptions The NetGuardian offers alarm status notification via multiple TCP ports. When an alarm condition occurs, an alarm condition formatted according to Figure 2.17 will be sent to the specified TCP points for use by a higher level master. This connection must be established by the master. Any applicable alarm activity occurring prior to an established connection will be discarded. Use the following steps to configure the TCP paging settings: 1. From the Edit menu> Notification screen, select an ID number to use, see Figure 2.14. Note: Pager IDs are used in the alarm provisioning screen to designate the primary and secondary person/device being paged when an alarm condition occurs or clears. 2. Under the Type column, select TCP from the drop-down menu, see Figure 2.14. 3. In the Pin/Rcpt/Port field enter the NetGuardian TCP port number where alarm messages will be sent (from 1 to 65,536). Multiple ports can be defined by defining multiple pager IDs as TCP pagers and then entering the desired ports. 4. The TCP message can be viewed by a Telnet session by connecting to the NetGuardian's IP address and the TCP port entered in this screen. For example, Telnet to 126.10.220.199 5000 if port 5000 is selected and 126.10.220.199 is the unit's IP address. See Figure 2.17 for an example message and Table 2.H for TCP message format information. 2.5.7 Num17 Pager Setup The Num17 Pager can receive point addresses of alarms. It is quite similar to the Numeric Paging format in the way it receives and reports alarms. However, on certain pager systems the symbol * will cause a freeze or other undesirable situations. Num17 eliminates the * symbol from the pages it receives and reports alarms as a 17-digit series of numbers. 24 User the following steps to configure Num17 Pager settings: 1. From the Edit menu > Notification screen select an ID number to use, refer to Figure 2.14. Note: Pager IDs are used in the alarm provisioning screen to designate the primary and secondary person/device being paged when an alarm condition occurs or clears. 2. Under the Type column select Num17 from the drop-down menu, see Figure 2.14. 3. Enter the phone number of the numeric pager under the Phone heading, followed by commas (for example 555-1212,,,,,,,). Placing a comma after the phone number initiates a two second pause per comma. This allows enough time for the pager to answer before the NetGuardian sends the alarm information. The Baud/Wfmt and IPA fields are not used from Num17 pager types. 4. Click Submit Data to save the configuration settings. 2.6 Defining Point Groups ! New Feature! Each NetGuardian Alarm point can be assigned to one of eight groups, which are identified with a user-defined label. Once the point groups are defined, the Point Group IDs can be used to group base and system alarms, see section 2.7, "Configuring Base Discrete Alarms." Use the following steps to define alarm messages for alarm point groups: 1. To define the point groups, select Point Group from the Edit menu. 2. Then enter the appropriate descriptions in the Description, When Set and When Clear fields for each point group. 3. Click Submit Data to save the point group settings. Fig. 2.18. Define the Alarm and Clear messages for up to eight different point groups 25 2.7 Configuring Base Discrete Alarms All of the NetGuardian's 32 discrete alarms are configured from the Edit menu > Base Alarms screen. Descriptions of the alarm point, polarity (normal or reversed), whether to use an SNMP Trap or not, and the primary and secondary pager used to report the alarm, and group assignments, are configured in this screen. Use the following steps to configure base discrete alarm settings: 1. From the Edit menu select the Base Alarms link, see Figure 2.19. 2. Enter a description for each discrete input alarm being used in the Description field. 3. Under the Polarity column, you can choose to reverse the polarity or leave it normal. If you select Normal, a contact closure is an alarm. If the Reverse option is selected, the alarm is clear when closed. 4. Select the Trap check box to send an SNMP trap for that alarm point in the event of an alarm condition. Leave the box blank if you do not wish the NetGuardian to send an SNMP trap. 5. Set the primary and secondary pagers with a pager ID from your defined pager list. (See Section 2.5, "Setting up Notification Methods" for more information.) Note: The NetGuardian will notify both the primary and the secondary notification device when point status changes (both alarm and clear). 6. Under the Group column enter the appropriate point group ID, see section 2.6, "Defining Point Groups." 7. Under the Qual column click the None link to configure an event qualification time setting for the alarm point. The Event Qual screen will appear, refer to section 2.8, "Event Qualification Timers" for more information. 8. Click Submit Data to save base alarm configuration settings. ! Hot Tip! The pager device can be an ASCII terminal, T/Mon element manager, email, or multiple SNMP managers as well as an alpha or numeric pager. 26 Fig. 2.19. Configure the 32 discrete alarms from the Base Alarms screen 2.8 Event Qualification Timers Fig. 2.20. Edit the Even Qualification Timer settings from the Edit > Even Qual screen Use the following steps to configure your Event Qual timer settings: 1. From the Edit menu select from the Event Qual drop down menu. 2. The standard NetGuardian units can have up to 128 Event Quals, which are grouped into sections of sixteen. 27 3. 5. 6. 7. Enter the display and point number for the point you wish to qualify in the appropriate ID row. Note: the ID will correspond to Event Qualification. A list of displays and points can be found in Appendix B. In the Value field enter the appropriate amount of time (1 - 127). Under the Units column, click on the drop-down menu and select the appropriate unit (min, sec, hour). Under the Type column click on the drop-down menu and select the appropriate event type (Alm = alarm, Pri = primary, Sec = secondary). ! Hot Tip! To delete the entry, set the Type to None. 8. When you are done making changes, scroll to the bottom of the page and click Submit Data. CAUTION: Set conditions are qualified, clears are not. 28 2.9 Setting System Alarm Notifications Fig. 2.21. SNMP Traps and primary or secondary pager devices can be selected for each system alarm The System Alarms screen allows you to individually set the notification method for each system alarm. See Appendix A for system alarm point descriptions. Use the following steps to configure your system alarm notification settings: 1. From the Edit menu select the System Alarms link, see Figure 2.21. 2. Check the Trap box to send an SNMP trap for that alarm point. Selecting the box will set that point to send a SNMP trap, leaving the box blank will set that point to not send an SNMP trap. 3. Set the primary and secondary pagers with a pager ID from your defined pager list. (See Section 2.5, "Setting up Notification Methods" for more information.) Note: The NetGuardian will notify both the primary and the secondary notification device when point status changes (both alarm and clear). 4. Under the Group column enter the appropriate point group ID, see section 2.6, "Defining Point Groups." 5. Click Submit Data to save the configuration settings. 29 2.10 Configure the Accumulation Timer Fig. 2.22. Define the Accumulation Timer settings to send an Accumulation Event alarm Field Description Display and Point Reference Indicates which alarm point is to be monitored Point Description The user-defined description of the monitored alarm point. Point Status The current status of the monitored point. The amount of time allowed to accumulate before the "Accumulation Event" Event Threshold system alarm is set. Maximum is 45 days. Accumulated Time The total time the monitored point has been in ALARM state. Accumulated Since Indicates the last time the accumulation timer was reset. Placing a check mark here will reset the timer when the user presses the Reset Accumulation Timer Submit button. Table 2.I. Fields in the Accumulation Timer screen The NetGuardian's Accumulation Timer keeps a running total of the amount of time a point is in an alarm state to send an Accumulation Event system alarm once the total time exceeds a defined threshold. Refer to Table 2.I for field descriptions. Use the following steps to configure the accumulation timer settings: 1. Go to the Edit menu and select the Accum. Timer link, see Figure 2.22. 2. In the Display Reference field enter the corresponding display number to be monitored. 3. In the Point Reference field enter the corresponding alarm point to be monitored. 4. In the Event Threshold row enter the appropriate running total days, hours and minutes a point is in a alarm state in order to send an accumulation event system alarm. 5. Click Submit Data to save the configuration settings. 30 ! Hot Tip! Only check the Reset Accumulation Timer box if you wish to reset the timer. The Point Description, Point Status, Accumulated Time, and Accumulated Since fields are not configurable. These fields will show the corresponding data of the point you configure for the accumulation timer after you have hit the Submit Data button. 2.10.1 Disabling the Accumulation Timer To disable the accumulation timer, set all fields for the event threshold (days, hours, and minutes) to 0. 2.11 Configuring Ping Targets Fig. 2.23. Configure the ping target parameters from the Ping Info screen Each of 32 the ping targets can be provisioned with a description, an IP address, a choice whether to send SNMP Traps, and the primary and secondary pager devices being used. Use the following steps to configure the ping targets: 1. From the Edit menu select Ping Targets, see Figure 2.23. 2. In the Description field, enter a description of the device to be pinged. 3. In the IP Address field enter the IP address of the device to be pinged. 4. Under the Trap column check the box to designates that an SNMP trap will be sent when an alarm condition exists. Leaving the box blank designates that an SNMP trap will not be sent when an alarm condition exists. 5. Set the primary and secondary pagers with a pager ID from your defined pager list. (See Section 2.5, "Setting up Notification Methods" for more information.) Note: The NetGuardian 832A G4 will notify both the primary and the secondary notification device when 31 point status changes (both alarm and clear). 6. Under the Group column enter the appropriate point group ID, see section 2.6, "Defining Point Groups." 7. Click Submit Data to save the configuration settings. 2.12 Analog Parameters Each of the NetGuardian 832A G4's analog channels must be individually configured to monitor data. The ADCs (analog to digital converters) support a range of –70 to 94 VDC. There are four alarm trip points (thresholds) in ascending order: major under, minor under, minor over, and major over. You can choose the values for each of the thresholds on all channels. As with the other alarms, you can designate whether or not to send an SNMP trap when a threshold is crossed. The primary/secondary pager used to report the alarm is also set here. The thresholds must be set from Under to Over in either ascending or descending potential (or current) order. Thus the settings of –10, –5, 5 and 10 corresponding respectively to major under, minor under, minor over and major over is valid. The analog alarms are set to measure voltage by default and the thresholds are reported as "native units." For example, you may set Channel 3 to measure outside temperature. If you were using a sensor with a measurable temperature range between –4° to 167° Fahrenheit (–20° to 75° Celsius). The voltage for that channel varies between 1 and 5 VDC for that sensor, which is to be reported as ° Fahrenheit (native units) where 1 volt represents –4° Fahrenheit and 5 volts represents 167° Fahrenheit. To change any one analog alarm to measure current instead, a dip switch setting must be changed. Refer to the NetGuardian hardware user manual for details on jumper locations and positions. The jumper inserts a 250 ohm shunt resistor across the input to convert the sensors current output to volts. Use ohms law to find the voltage drop across the 250 ohm shunt resistor (multiply the current by the resistance 250 ohms). Please refer to the operation manual for your sensor to determine any other conversion factors. This will allow you to correctly set the thresholds for over and under conditions. Fig. 2.24. The Analog Parameters can be viewed and changed from the Analogs screen 1. From the Edit menu click on the Analogs link. 32 2. In the Description field enter a description for each analog channel being utilized. 3. Under the Unit column, click on the abbreviated units link (e.g VDC, RH, F, etc.) to convert the reference units and the native units for that analog channel, see Figure 2.24. 4. Set Reference 1 (VDC) to the minimum output (in volts DC) of the analog device being configured. 5. In the box next to VDC (the space may already contain the abbreviation VDC) enter an abbreviation for the native units (e.g. RH for relative humidity, F for ° Fahrenheit, etc.). 6. In the box below the abbreviated native unit setting enter the native unit amount that corresponds to the minimum output entered in the previous step. 7. Set Reference 2 (VDC) to the maximum output (in volts DC) of the analog device being configured. 8. In the box next to VDC enter an abbreviation for the native units (e.g. RH for relative humidity, F for ° Fahrenheit, etc.). 9. In the box below the abbreviated native unit setting enter the native unit amount that corresponds to the maximum output entered in the previous step. 10. Enter the Point Group ID designated for each alarm level (MjU = Major Under, MnU = Minor Under, MjO = Major Over, MnO = Minor Under), see section 2.6, "Defining Point Groups." 11. Follow these steps for each analog channel being configured. 12. Click the Submit Data button to save the configuration settings. Fig. 2.25. Reference 1 and reference 2 correspond to the minimum and maximum output values of your analog device 2.12.1 Integrated Temperature and Battery Sensor (Optional) The optional integrated temperature and battery sensor allows the user to monitor surrounding temperature as well as the unit's current draw. This is only available if the NetGuardian was purchased with this option. If you are using the temperature or battery sensor, you must dedicate an analog port to each one (see user manual for connection information). CAUTION: Abort ambient room temperature cooler than the NetGuardian unit temperature. Temperature Sensor 1. In the Description field enter a description in the analog channel you are using for the integrated 33 temperature sensor (either 4 or 8). 2. Under the Unit column, click on the abbreviated units link (e.g VDC, RH, F, etc.) to convert the reference units and the native units for that analog channel, see Figure 2.24. 3. In Reference 1 enter iF (internal Fahrenheit) in the box next to VDC (the space may already contain the abbreviation VDC), see Figure 2.24. This enables the NetGuardian's pre-configured temperature settings. Repeat this step for Reference 2. 4. Set your desired thresholds, see section 2.12 for instructions. Current Sensor 1. In the Description field enter a description in the analog channel you are using for the integrated current sensor (either 5 or 7 for power feed "A" or 6 for power input "B"). 2. Set your desired thresholds, see section 2.12 for instructions. Be sure to set your thresholds in reference to your NetGuardian's power input (e.g. –24 VDC, –48 VDC, or wide range). 2.12.2 Analog Polarity Override iF : internal temperature sensor in fahrenheit or iC for celsius oV+ : override polarity VDC to positive oV- : override polarity VDC to negative If you have a positive powered NetGuardian, you may want to use this feature if you are using the internal battery sensor. The Web Browser Interface will override oV+ and oV- tags and show VDC. So you won't have to view an uncommon looking tag while in monitor mode. Analog Accuracy: +/- 1% of analog range. 2.12.3 Analog Step Sizes Analog Step Sizes Input Voltage Range 0-5 V 5-14 V 14-30 V 30-70 V 70-90 V Resolution (Step Size) .0015 V .0038 V .0081 V .0182 V .0231 V Table 2.J. Analog step sizes 34 2.13 Configuring the Control Relays Fig. 2.26. Configure controls in the Edit menu > Controls screen The Relays of the NetGuardian 832A G4 can be identified and configured using the Edit menu > Controls screen. A description can be entered for each of the relays. You can also designate whether or not to send SNMP Traps when a relay is actuated. Relays are normally open (N/O) by default. A circuit board jumper can be changed for each control to make it normally closed (N/C). Refer to the NetGuardian user manual for PCB settings and jumper positions. 1. From the Edit menu, select the Controls link, see Figure 2.26. 2. In the Description field enter a description for each control/relay being used. 3. Set the Energize State to either Normal or Inverted. Selecting Normal sets the relay's normal electrical state to De-energized. Selecting Inverted sets the relay's normal electrical state to Energized. 4. Check the Trap box to send an SNMP trap for that alarm point. Selecting the box will set that point to send a SNMP trap, leaving the box blank will set that point to not send an SNMP trap. 5. Under the Group column enter the appropriate point group ID, see section 2.6, "Defining Point Groups." 6. Click Submit Data to save the configuration settings. ! Hot Tip! The Energize State is different than the normal state of the physical contact closure position of each relay, which is determined by circuit board jumpers. This gives you the added benefit of being able to monitor the wire. In the event of a power failure, the relay would de-energize back to it's normal physical contact closure set by the circuit board jumper for that relay. Check your jumper settings and relay connections before setting to Normal or Inverted. Refer to the NetGuardian manual for jumper settings and relay connection options. 4. 5. Check the Trap box designate an SNMP trap when a control point operates. Click Submit Data to save the configuration settings. 35 2.13.1 Activating Relays from an Alarm Point's Change of Status The NetGuardian allows the user to echo an alarm point state to activate a relay. Any of the NetGuardian's discrete alarms, system alarms, ping alarms, or analog alarms may be echoed to activate a relay in the event that alarm is triggered. However, a relay set to echo an alarm point cannot be manually activated. To allow the relay to be manually activated while still maintaining its echoed status, the relay point must be set to ORed. See sections 2.13.1.1 and 2.13.1.2 for information regarding echoing and ORing alarm points to relays. 2.13.1.1 Echoing alarm points to relays In the Description field (see Figure 2.26) enter the display, alarm point, a dash (-), and the description of the alarm you wish to echo. For example, if echoing discrete alarm 8, enter 01.08-your alarm description. (The display and alarm point are formatted as DD.PP, where DD = the display number and PP = the point number or GX where X is the group number) See Appendix A for a complete list of display and point numbers. 2.13.1.2 Oring echoed alarm points In the Description field enter the display, alarm point, an under bar (_), and the description of the alarm you wish to set to ORed. For example, if ORing discrete alarm 8, enter 01.08_your alarm description. The display and alarm point are formatted as DD.PP, where DD = the display number and PP = the point number or GX where X is the group number) See Appendix A for a complete list of display and point numbers. 2.13.2 Derived Control Relays and Virtual Alarming Control relays and virtual alarms can be created from derived formulas using the following operations: _OR : Set the current operation to OR. _AN : Set the current operation to AND. _XR : Set the current operation to XOR. D : Tag to change the active display number. . : Used like a comma to delimit numbers. - : Used to specify a range of points. Note: Spaces included here are for readability purposes only. ! Hot Tip! Precedence of the operations are always left to right. All number references can either be one or two digits. 36 Fig. 2.27. Derived control relays _OR D1.3-5 is logically equivalent to (1.3 || 1.4 || 1.5) _AN D 1.3-5 D2.6 _OR D3.7 is logically equivalent to ((1.3 && 1.4 && 1.5 && 2.6) || 3.7) _OR D01.03-05 D02.06 _AN D02.07 D03.10.-12 is logically equivalent to ((1.3 || 1.4 || 1.5 || 2.6&& (2.7 && 3.10 && 3.12)) _AN D1.3-5D2.6_OR.7D3.10.12 is logically equivalent to ((1.3 && 1.4 && 1.5 && 2.6 ) || 2.7 || 3.10 || 3.12)) o will not parse _AN D1-2 : Control will parse _OR G1 will latch if any alarm in group 1 is active 2.13.3 Relay Operating Modes A trap is sent on a relay COS for normal or echoed controls when the send trap option is selected. A trap is also sent when an oRed relay is manually controlled. A trap will not be sent for an ORed relay latched or released due to an alarm echo. Each relay can be mapped to one alarm point. Any system, base, or expansion point can be used. Multiple alarm points cannot be mapped to the same control. The operation of a control is determined by the first six characters of the control description. The format DD.PP is used to specify the display and point number of the alarm to be mapped to the control. 2.13.3.1 Echoed Mode An echoed control reflects the state of the alarm for which it is assigned. The user is blocked from using manual control commands, like opr and rls. Description format DD.PP- where DD = Display #, and PP = Point #. Example: 01.08-My Control : Echoes the state of the alarm at display 1, point 8 to the relay, see Figure 2.27. 37 2.13.3.2 ORed Mode An ORed control is active if the alarm for which it is assigned is active or if the control has been manually activated. The user will see the relay mode displayed in red text. Note: This will not work with Boolean equations. Description format DD.PP_ where DD = Display #, and PP = Point #. Example: 01_08_My Control : ORs the state of the alarm at display1, point 8 to the relay, see Figure 2.27. 2.13.3.3 Normal Mode Relay energized state is similar to alarm point polarity. A normal control is latched when the relay state is opr, and open when the relay state is rls. Conversely, an inverted control is latched when the relay state is rls, and open when the relay state is opr. In normal mode, the description does not follow formatting for echoed or ORed modes. Example: My Control : Normal relay operation, see Figure 2.27. 2.13.4 Override Default Relay Momentary Time Using Event Qualification Fig. 2.28. Using Event Qualification to override default relay momentary time Use the following steps to override default relay momentary time, using the NetGuardian's Event Qualification feature: 1. From the Edit menu click on the Event Qual drop-down menu and select the appropriate group. 2. In the Display text box, type 11. 3. In the Point text box, type the number of the relay you would like to change. 4. In the Value box, type the amount of time. You may not select more than 127 units. 5. In the Units box, select the appropriate units (seconds, minutes, or hours). 6. In the Type box, select Alm. 7. Click Submit Data to save the changes. 38 2.14 Setting System Timers Ping Cycle Period Min. 1 2 3 Ping Fail Time Min. 4 5 6 7 Fa il Fa il Fa il Fa il Fa il Fa il O K K O O K Fig. 2.29. When a target fails to respond to a ping within the fail time period, a fault is declared 8 9 Failure Declared 0 1 2 3 4 5 Fig. 2.30. Default timer settings The NetGuardian's System Timers allow you to control the rate of your pinging activity, time of speaker sounding, inactivity time for data ports, and discrete alarm detect time. Ping timer settings allow you to balance network traffic against alarm response times. Although you can change the values from their default settings, it is recommended that you use either the default settings or plan your settings so that there is no conflict among the timers. Specifically, the FAIL time should be set to several times the CYCLE time to allow multiple PINGs before a FAIL is declared. Likewise, the CYCLE time should be set to several times the wait time. ! Hot Tip! 39 The smaller the CYCLE number, the sooner you will find out about failures; however, you will increase traffic on your LAN. 1. From the Edit menu select System Timers, see Figure 2.29. 2. Set the Cycle time. This determines how often the NetGuardian will go through its list of ping targets and attempts to reach them with an ICMP ping. Set the value between zero and 120 and set the units to either seconds or minutes. Default is 60 seconds. 3. Set the Wait time. The NetGuardian waits after sending a ping request before it determines that the target is unreachable. Set the value between zero and 12 and set the units to either seconds or minutes. Default is 8 seconds. 4. Set the Fail time. This determines the period of time over which, if a unit has not responded, it is considered failed. Set the value between zero and 120 and set the units to either seconds or minutes. Default is 5 minutes. 5. Set the Sound time. This determines how long the NetGuardian's speaker will sound when an alarm occurs or clears. The alarm condition will still be present after the speaker shuts off. The sound timer only affects the duration of the audible alarm annunciation. Set the value between zero and 120 and set the units to either seconds or minutes. 6. Set the Channel time. This determines the period of time over which, if there is no activity on the data ports designated as channel ports (see Section 2.2.4), it is considered failed. Set the value between zero and 120 and set the units to either seconds or minutes. Alarm activity is indicated in Display 11, Point 62. (See Appendix A, "Display Mapping.") 7. Set the Craft time. This determines the period of time over which, if the device connected through a port designated as a craft port doesn't reset the timer, an alarm will be triggered. Set between 0 and 120 (min or sec). Alarm activity is indicated in Display 11, Point 63. (See Appendix A, "Display Mapping.") 8. Set the DCP time. Set between 0–120 (sec or min). This determines the period of time over which, if the NetGuardian does not receive a DCP poll, to trigger an alarm. Once the alarm is triggered, then dial back-up may be enabled if a T/Mon pager profile is configured. 9. Set the Timed Tick between 0–60 minutes. This is a "keep alive or heartbeat" function that can be used by Masters who don't perform integrity checks. For example, if you entered 30, the NetGuardian would notify you every 30 minutes. See section 2.5, "Setting Up Notification Methods" for paging information. 10. Set the PPP time. Set between 0–120 for onDemand mode. 11. Set the NTP Sync. Set between 0–120 (sec or min). ! Hot Tip! The timer settings are accurate to ± one tick. This means that if a timer is set to one minute, it may actually respond anywhere from zero to two minutes. If your target time is one minute, then set the timer to 60 seconds so that it will respond anywhere from 59-61 seconds. 13. Set the Web Edit Timeout time between 5–120 minutes. This determines the period of time a Web edit page may be active without any activity. A logon is required if a Web edit timeout occurs. The default Web edit time is 10 mins. Note: The time units are preset to minutes by default and cannot be changed. 40 14. Set the Web Monitor Refresh time between 5–120 seconds. This timer enables the user to specify how long the NetGuardian should wait before auto-refreshing a Monitor page to the Web browser. The default Web monitor refresh time is 60 seconds. Note: The time units are preset to seconds by default and cannot be changed. 2.15 Setting the System Date and Time Fig. 2.31. The current date and time can be entered from the Date and Time screen or from an SNMP manager The date is entered in the mm/dd/yyyy format and the time is entered in the hh:mm:ss format. ! Hot Tip! The date and time can also be set from an SNMP manager. Use the following steps to manually set the system's time and date: 1. From the Edit menu, select Date and Time, see Figure 2.31. 2. Enter the appropriate date, the day of the week, and time. 3. Click Submit Data to save the data and time settings. Note: The date and time will need resetting following a power failure or reboot unless your NetGuardian is equipped with the real-time clock option or network time is enabled. (See the section 2.15.1 for instructions on setting the network time configuration.) 41 2.15.1 Network Time Protocol Support Fig. 2.32. Configure the Network Time Protocol feature in the Date and Time screen 1. 2. 3. 4. 5. 6. From the Edit menu select Date and Time. Click on the Time Zone drop-down menu and select the appropriate time zone. Put a check next to Observe DST if you are in an area that observes daylight saving. You may also change the server IP Address that the NetGuardian syncs with by entering a the appropriate IP address in the Time Server IPA field. If you do not want your NetGuardian to sync with an NTP server, simply set the Time Server IPA to 255.255.255.255. Note: If Time Server IPA is set to 255.255.255.255, you will be able to manually adjust the date and time. Click Submit Data to save the date and time settings. 42 2.16 Configuring DSCP Devices Note: This feature requires a special firmware. DSCP wireless support firmware restricts the use of some other NetGuardian G4 features, such as GLD, Building Access ECU, and Cameras. Configure your Serial/Data Ports through the Edit > Ports screen Use the following steps to configure your DSCP device settings: 1. From the Edit > Ports menu, select the 'DSCP' type for the serial port the DSCP device is connected to. Note: Refer to section 2.4.7 Configuring Data Ports 1-8 for detailed instructions regarding configuring the Data Ports. 2. From the Edit > DSCP menu, input a value for the Update Frequency (the rate the sensor will report data back to the host NetGuardian unit). 3. Select the type of DSCP device. 4. Click 'Submit Data' to save your settings. 43 Configure your external DSCP devices through the Edit > DSCP screen Advanced Configuration and Details: Module Configuration Module Address High 4-byte identification address that is automatically acquired when the DSCP device is sync'd with the NetGuardian. Module Address Low 4-byte identification address that is automatically acquired when the DSCP device is sync'd with the NetGuardian. Update Frequency Type The rate that the DSCP device will collect information from the sensor. The specific type of DSCP device (Propane Monitor, Track Monitor, etc...). Level Detection (Propane Sensor Type Only)* Read Frequency The DSCP device will read the propane level at this frequency and will remember the last read value. Input '0' to disable this feature. Level Threshold If the propane level reading differs by the Level Threshold value from the previous reading, then the most recently read value will immediately be sent to the NetGuardian once. Generator Running Detection (Propane Sensor Type Only)* Gen. Running Frequency Generator Point Reference When the specified alarm point (from Generator Point Reference) is set, the timer value for Generator Running Frequency will override the timer value for Update Frequency (under Module Configuration). This takes effect after the next update. Specify the Display and Point attached to Gen. Running Frequency. Input '0' to disable this feature. *Note: Generator Run and Level Detection features are designed to detect changes faster while maximizing battery life. They are entirely optional to use. Refer to section 2.12 Analog Parameters for detailed instructions on analog channel configuration. 44 2.17 Configuring PPP Modes Fig. 2.33. Configure the PPP port settings in the Edit menu > PPP screen If the LAN connection to your remote sites fails, you can still keep in touch with your remote equipment by using the NetGuardian as a PPP (Point-to-Point Protocol) server via dial-up. Use the following steps to configure the NetGuardian as a PPP Server: 1. Select PPP from the Edit menu. 2. In the Server section check the Enable Server (also known as Hosting Mode) box. 3. Set the IP address that is given to the guest dialing in. (This must be a valid and available IP address for the subnet on the LAN you will be connecting to, the same one the NetGuardian is connected to.) 4. Click Submit Data to save your PPP settings. 45 Fig. 2.34. Edit the Modem settings for the PPP server in the Edit menu > Ports screen > Modem section 5. Select Ports from the Edit menu. 6. Scroll down to the Modem section. In the Ring Count field enter a ring count greater than zero, see Figure 2.34. 7. In Answer Init String field type &Q6. 8. Click Submit Data to save your Modem changes. 46 Fig. 2.35. Select PPP and Telnet access privileges in the Edit menu > Logon > Logon Profiles screen 9. Select Logon in the Edit menu. ! Hot Tip! There can be up to 16 different user names and each one must have its own password. 10. 11. 12. 13. Click the Available link or the user you want to have PPP and Telnet access privileges. Under the Access Privileges section check the PPP and Telnet boxes. Click Submit Data to save the configuration settings. Select Reboot in Edit menu to reboot the NetGuardian. (See section 2.21, "Rebooting the NetGuardian.") You also need to configure your remote terminal modem in order to access your NetGuardian by following these steps: Windows 98 users: Set baud rate to 9600. Windows 2000, XP users: In Modem Configuration General tab uncheck Enable modem error control and Enable compression. Mac OSX users: Use standard dial-in. 47 2.18 Building Access Controller Fig.2.36. Edit BAC configuration settings in the Edit menu > BAC screen The Building Access Controller (BAC) option is only available if the BAC is installed on the NetGuardian. (See BAC user manual for more information.) Use the following steps to configure the BAC settings: 1. Enter a password for each door point being used. The passwords entered here are for turnup and test procedures only and are only effective until the BAC provisioning information is downloaded from an T/Mon master. Once the information is downloaded from T/Mon, the passwords entered here will be replaced with the new passwords. 2. Enter the BAC unit ID number. This is the DCP address of the BAC module. It must match the base address being polled by the Master. Any range from 1-255 is acceptable or enter zero to disable. ! Hot Tip! When Direction is enabled, users are required to enter a 1 for Enter immediately following their password or a 4 for Exit immediately following their password. Be sure to define the data port you are using for the ECU as an ECU type. (See Section 2.4.6.1, "Data Port Types.") If there is no information downloaded from the T/Mon regarding a door point with a NetGuardian password, the NetGuardian password will remain valid. 48 2.19 Camera Settings The NetGuardian SiteCam provides users with live streaming video of their remote sites. The direct pan-and-tilt features allows users to visually check the status of their sites from the convenience of their desktop. Use the following steps to configure your camera settings: 1. From the Edit menu select Camera, see Figure 2.37. 2. Refer to Table 2.K and enter the appropriate information in the Name, Description, IP Address, and MAC Address fields. Note: See Section 3.9, "Monitoring Camera Activity" for camera viewing options. 3. Click Submit Data to save your camera configuration settings. Fig. 2.37. View live streaming video of your remote sites via Web browser Camera Field Name Description IP Address MAC Address Refresh Description Enter the name of the camera. Enter a description of the camera. Enter the IP Address of the camera (not the NetGuardian). The NetGuardian will provision this in the camera. The unit will also send the NetGuardian subnet and gateway information. Enter the hardware address of the camera (not the NetGuardian). Enter the refresh time. This determines the amount of time (in seconds) that elapses before the image will be updated. Entering 0 will cause uninterrupted, live streaming video (bandwidth rated at 146 kB per second). Table 2.K. Camera field descriptions Camera Internet Settings In order to perform the pan-and-tilt functions of the camera, your Web browser must be set to check for newer 49 versions of stored pages at every visit to the page. Note: The directions for checking for newer versions of stored pages may vary depending on what version of Windows you are running. The instructions below are relevant to Windows 2000 only. 1. With the Web browser open (Internet Explorer version 5.5 or later), click on Tools and select Internet Options from the drop-down menu. 2. Click on the Settings button under the Temporary Internet files heading. 3. Click on the Every visit to the page button and click Ok. 2.20 Alarm Sync ! New Feature! Clicking on the Alarm Sync link from the Edit menu will re-synchronize all of the NetGuardian alarms. This command clears all alarms, so that a new notification is sent for all standing alarms. You can easily test alarm connections during turnup without rebooting the NetGuardian unit. A warning prompt will appear, click Ok to continue or Cancel to exit without resynchronizing your alarms, see Figure 2.38. Fig. 2.38. Click Ok to re-synchronize the NetGuardian alarms or Cancel to exit 2.21 Saving Changes or Resetting Factory Defaults Your NetGuardian 832A G4 comes equipped with Non Volatile RAM (NVRAM), which enables the retention of data in the event of power loss. This section allows you to write and initialize the NVRAM. Note: Some changes require a reboot of the NetGuardian to take effect, see Section 2.21, "Rebooting the NetGuardian." 1. From the Edit menu select NVRAM, see Figure 2.39. 2. Select Write to cause the current data in RAM to be written to NVRAM and then verified. 3. Select Initialize to reload factory defaults into NVRAM. DO NOT SELECT THIS OPTION UNLESS YOU WANT TO RE-ENTER ALL OF YOUR CONFIGURATION INFORMATION AGAIN. 4. Select Purge BAC to delete the Building Access Controller profile database. 50 Fig. 2.39. NVRAM enables the NetGuardian to retain data even through a power loss 2.22 Rebooting the NetGuardian Click on the Reboot link from the Edit menu to reboot the NetGuardian after writing all changes to NVRAM. Any changes to port settings require a reboot to take effect. The window footer will display the text Reboot Needed if a reboot is necessary to initiate changes. 3 Web Server Monitoring Chapter 3 The Web browser allows you to do full-system monitoring for your NetGuardian, which includes all alarms, ping information, relays, analogs and system status. To connect to the NetGuardian from your Web browser, you must know it's IP address or domain name if it has been registered with your internal DNS. Enter it in the address bar of your Web browser (it may be helpful to bookmark the logon page to simplify access). After connecting to the NetGuardian's IP address, enter your password and click Submit (factory default password is dpstelecom). Note: If the Edit menu does not appear in the left frame after logging on, it means that another station has already logged on as the primary user. 51 3.1 Alarm Summary Window Fig. 3.1. The Alarm Summary display can be accessed by selecting either the Monitor or the Summary link Clicking on the Monitor or Summary buttons shows the Alarm Summary display. The Summary screen gives you a quick indication of any alarms that have been triggered in the NetGuardian's base alarms, ping targets, analogs, system alarms, and any NetGuardian discrete expansions. 52 3.2 Monitoring Base Alarms Fig. 3.2. View the status of the Base Alarms from the Monitor > Base Alarms screen This selection provides the status of the system's base alarms by indicating if an alarm has been triggered. Under the State column, the description defined in Edit menu > Point Groups will appear in red if an alarm has been activated. The description defined in Edit menu > Point Groups will be displayed in green when the alarm condition is not present. 53 3.3 Monitoring Ping Targets Fig. 3.3. View the status of the Ping Targets from the Monitor > Ping Targets screen This selection provides the status of the system's ping targets by indicating if an alarm has been triggered. Under the State column, the description defined in Edit menu > Point Groups will appear in red if an alarm has been activated. The description defined in Edit menu > Point Groups will be displayed in green when the alarm condition is not present. 54 3.4 Monitoring Analogs Fig. 3.4. View the status of the Analogs from the Monitor > Analogs screen This selection provides the status of the system's analogs by indicating if an alarm has been triggered. The Monitor menu > Analogs screen provides a description of each analog channel, the current reading, the units being read, and alarm conditions (major under, minor under, major over, minor over) according to your analog settings. 3.5 Monitoring DSCP Devices Fig. 3.5. View the status of the DSCP Analogs from the Monitor > DSCP screen This Monitor > DSCP screen provides a description of each DSCP device alarm point state and each DSCP device analog channel, the current reading, the units being read, and alarm conditions (major under, minor under, major over, and minor over) according to your analog settings. 55 3.6 Monitoring System Alarms Fig.3.6. View the status of the System Alarms from the Monitor > System Alarms screen This selection provides the status of the system alarms by indicating if an alarm has been triggered. Under the State column, the description defined in Edit menu > Point Groups will appear in red if an alarm has been activated. The description defined in Edit menu > Point Groups will be displayed in green when the alarm condition is not present. Refer to Appendix A for system alarm trap numbers. 56 3.7 Operating Controls Fig. 3.7. Issue controls from the Monitor > Controls screen Use the following rules to operate controls: 1. Select Controls from the Monitor menu. 2. Under the State field, choose a command (Opr - operate, Rls - release, or Mom - momentary). 3. Click Submit Data to issue the control. ! Hot Tip! The control relay's normal state - open or closed - is determined by a PCB jumper. Operating a control thus changes the normal state of the relay (energizes it) until it is released (de-energized). The momentary command energizes the relay for approximately one second before it is released again. 57 3.8 Event Logging Fig. 3.8. Monitor the last 100 events recorded by the NetGuardian in the Event Log window . Event Log Field Evt Date Time St Pref Description Description Event number (1-100) Date the event occurred* Time the event occurred* State of the event (A=alarm, C=clear) Point reference. See Appendix A for display descriptions. User defined description of the event as entered in the alarm point and relay description fields Table 3.A. Event Logging window field descriptions ! New Feature! The NetGuardian Event Log has been enhanced to support new NetGuardian G4 features: • You can filter Event Log entries by Alarm Point Group, to see only the alarms you want. • You can reset the Event Log, to clear old alarms from the display. • You can reset the Event Log by Alarm Point Group; for example, clear power alarms while retaining intruder alarms. Click on the Monitor menu > Event Log link to view the event log. The NetGuardian's Event Log allows the NetGuardian to post and monitor up to 100 events including power up, base and system alarms, ping alarms, analog alarms, and controls. Posted events for the various alarms include both alarm and clear status. See Table 3.A for Event Alarm field descriptions. 58 Note: All information in the event log will be erased upon reboot or a power failure. * DCPx versions of the NetGuardian automatically timestamp events before sending them to the event logs. The time is based on the real-time clock (if installed). If there is no real-time clock installed, the time is based on the NetGuardian's software clock (requires resetting after power failure or power cycle). 3.9 Monitoring Data Port Activity Fig. 3.9. To view the data being received by the connected equipment, select the data port number from the Monitor menu > Port Receive drop-down menu The Port Transmit and Port Receive screens provide live status information for the eight data ports by displaying transmit or receive activity in ASCII for the selected port. See Appendix C, "ASCII Conversion" for specific ASCII symbol conversion. 59 Fig. 3.10. To view the data being transmitted to the connected equipment, select the data port number from the Monitor menu > Port Transmit drop-down menu ! Hot Tip! Use the NetGuardian's CHAN feature to analyze bi-directional communication between two device in real time, see section 2.4.7.1, "Data Port Types." 60 3.10 Monitoring Camera Activity Fig. 3.11. Monitor live streaming video via the NetGuardian's Web browser Select the Site Camera drop-down menu from the Monitor menu to view activity from the site camera. Bandwidth usage in live streaming mode is rated at 146 kB per second. Note: The NetGuardian only sends the camera data when a user is monitoring the image. 3.10.1 Pan-and-tilt Camera Controls Control left-right and up-down viewing options via the Pan/Tilt options. Clicking on the image will make that the new center point. Note: In order to have pan-and-tilt controls, your Internet settings must be set to check for newer versions of stored pages every visit to the page, see section 2.18 , "Camera Internet Settings." 61 Fig. 3.12. Use the arrow buttons to use the pan-and-tilt features of the NetGuardian SiteCAM The preset number controls allow you to tilt to the four corners of the screen (1-4). To alter the screen size click on the Program link . To adjust the brightness, click on the – to darken the image screen or + to brighten it. Click on STD to return to the default settings. 3.10.2 Monitoring Multiple Cameras Fig. 3.13 View up to 4 multiple cameras. You can monitor multiple cameras at one time by clicking the Multiple link. To view individual screens you may select the site camera under the Monitor menu > Camera drop-down menu or click on the title of the screen you wish to view individually. To configure your multiple camera settings, click on the Setup-Multiple link, see Figure 3.13. 62 Fig. 3.14 Enter the IP Address or Host Name of each camera, and title your camera Before you can setup multiple camera views, you will need to set up your camera for "live streaming." See your camera user manual to configure your camera for live streaming. You may only use up to 15 alphanumeric characters to name your camera. Once you have finished click the Save button. 63 4 Appendixes 4.1 Appendix A — Display Mapping Port 99 99 99 99 99 99 99 99 99 99 99 99 99 99 99 99 99 99 99 Address Display 1 1 1 2 1 3 1 4 1 5 1 6 1 7 1 8 1 9 1 10 1 11 1 12 1 12 1 13 1 1 1 1 1 13 14 15 16 17 Description Discrete Alarms 1-32 Ping Table Analog Channel 1** Analog Channel 2** Analog Channel 3** Analog Channel 4** Analog Channel 5** Analog Channel 6** Analog Channel 7** Analog Channel 8** Relays/System Alarms (See table below) NetGuardian Expansion 1 Alarms 1-48 NetGuardian 480 (as DX) Alarms 1-64 NetGuardian Expansion 1 Relays 1-8 or NetGuardian 480 (as DX) Relays 1-4 NetGuardian 480 (as DX) Alarms 65-80 NetGuardian Expansion 2 Alarms 1-48 NetGuardian Expansion 2 Relays 1-8 NetGuardian Expansion 3 Alarms 1-48 NetGuardian Expansion 3 Relays 1-8 Set 8001-8032 8065-8096 8129-8132 8193-8196 8257-8260 8321-8324 8385-8388 8449-8452 8513-8516 8577-8580 8641-8674 6001-6064 6001-6064 6065-6072 Clear 9001-9032 9065-9096 9129-9132 9193-9196 9257-9260 9321-9324 9385-9388 9449-9452 9513-9516 9577-9580 9641-9674 7001-7064 7001-7064 7065-7072 6081-6096 6129-6177 6193-6200 6257-6305 6321-6328 7081-7096 7129-7177 7193-7200 7257-7305 7321-7328 Table A.1. Display descriptions and SNMP Trap numbers for the NetGuardian * The TRAP number ranges shown correspond to the point range of each display. For example, the SNMP Trap "Set" number for alarm 1 (in Display 1) is 8001, "Set" for alarm 2 is 8002, "Set" for alarm 3 is 8003, etc. ** The TRAP number descriptions for the Analog channels (1-8) are in the following order: minor under, minor over, major under, and major over. For example, for Analog channel 1, the "Set" number for minor under is 8129, minor over is 8130, major under is 8131, and major over is 8132. 64 SNMP Trap #s Points 1 2 3 4 5 6 7 8 17 18 19 21 33 36 37 38 41 42 43 44 45 46 47 48 49 50 51 52 53 54 55 56 57 58 62 63 64 Description Relays Relays Relays Relays Relays Relays Relays Relays Timed Tick Exp. Module Callout Network Time Server Duplicate IP Address Power Up Lost Provisioning DCP Poller Inactive LAN not active Modem not responding No Dial Tone SNMP Trap not Sent Pager Que Overflow Notification failed Craft RcvQ full Modem RcvQ full Serial 1 RcvQ full Serial 2 RcvQ full Serial 3 RcvQ full Serial 4 RcvQ full Serial 5 RcvQ full Serial 6 RcvQ full Serial 7 RcvQ full Serial 8 RcvQ full NetGuardian DX 1 fail NetGuardian DX 2 fail NetGuardian DX 3 fail Chan. Port Timeout Craft Timeout Event Que Full Set 8641 8642 8643 8644 8645 8646 8647 8648 8657 8658 8659 8661 8673 8676 8677 8678 8681 8682 8683 8684 8685 8686 8687 8688 8689 8690 8691 8692 8693 8694 8695 8696 8697 8698 8702 8703 8704 Clear 9641 9642 9643 9644 9645 9646 9647 9648 9657 9658 9659 9661 9673 9676 9677 9678 9681 9682 9683 9684 9685 9686 9687 9688 9689 9690 9691 9692 9693 9694 9695 9696 9697 9698 9702 9703 9704 Table A.2 Display 11 System Alarms point descriptions Note: See Table A.3 for detailed descriptions of the NetGuardian's system alarms. 65 4.1.1 System Alarms Display Map Display Points 17 18 19 11 20 21 33 36 Alarm Point Timed Tick Exp. Module Callout Description Toggles state at constant rate as configured by the Timed Tick timer variable. Useful in testing integrity of SNMP trap alarm reporting. Alarm is triggered whenever an alarm point from an Entry Control Unit (ECU) is collected. A notification event may be associated with the alarm to force a call out or trap. Network Time Communication with Network Time Server Server has failed. Solution To turn the feature off, set the Timed Tick timer to 0. Disable Building Access Control (BAC) by setting the BAC Unit ID to 0. If Building Access is being used, then investigate the ECU alarm source or don’t associate notification with the alarm event. Try pinging the Network Time Server’s IP Address as it is configured. If the ping test is successful, then check the port setting and verify the port is not being blocked on your network. An alarm has been standing for the time configured under Accum. Timer. The Accumulation timer enables you To turn off the feature, under Accumulation Accum.Timer, set the display and to monitor how long an alarm has Event been standing despite system reboots. point reference to 0. Only the user may reset the accumulated time, a reboot will not. Unplug the LAN cable and contact your network administrator. Your Duplicate IP The unit has detected another node network and the unit will most likely Address with the same IP Address. behave incorrectly. After assigning a correct IP Address, reboot the unit to clear the System alarm. The unit has just come-online. The Seeing this alarm is normal if the unit set alarm condition is followed Power Up is powering up. immediately by a clear alarm condition. The internal NVRAM may be Use Web or latest version of NGEdit4 Lost damaged. The unit is using default to configure unit. Power cycle to see if Provisioning configuration settings. alarm goes away. May require RMA. Table A.3. System Alarms Descriptions Note: Table A.3 continues on following pages. 66 Display Points 37 38 39 40 Alarm Point DCP Poller Inactive NET1 not active NET2 not active LNK Alarm 41 Modem not responding 42 No Dial Tone 43 SNMP Trap not Sent 44 11 Description The unit has not seen a poll from the Master for the time specified by the DCP Timer setting. The Net1 LAN port is down. The Net2 LAN port is down. No network connection detected An error has been detected during modem initialization. The modem did not respond to the initialization string. During dial-out attempt, the unit did not detect a dial tone. SNMP trap address is not defined and an SNMP trap event occurred. Over 250 events are currently queued Pager Queue in the pager queued and are still trying Overflow to report. 45 Notification failed A notification event, like a page or email, was unsuccessful. 46 Craft RcvQ full The Craft port received more data than it was able to process. 47 Modem RcvQ The modem port received more data full than it was able to process. 48 49 50 51 52 53 54 55 Solution If DCP responder is not being used, then set the DCP Unit ID to 0. Otherwise, try increasing the DCP timer setting under timers, or check how long it takes to cycle through the current polling chain on the Master system. Check LAN cable. Ping to and from the unit. Remove configured modem initialization string, then power cycle the unit. If alarm persists, try resetting the Modem port from the TTY interface, or contact DPS for possible RMA. Check the integrity of the phone line and cable. Define the IP Address where you would like to send SNMP trap events, or configure the event not to trap. Check for failed notification events that may be filling up the pager queue. There may be a configuration or communication problem with the notification events. Use RPT filter debug to help diagnose notification problems. Disconnect whatever device is connected to the craft serial port. This alarm should not occur. Check what is connecting to the NetGuardian. This alarm should not occur. Serial 1 RcvQ full Serial 2 RcvQ full Serial 3 RcvQ full Serial 4 RcvQ Serial port 1 (or appropriate serial port Check proxy connection. The serial full number) receiver filled with 8 K of data port data may not be getting collected Serial 5 RcvQ (4 K if BAC active). as expected. full Serial 6 RcvQ full Serial 7 RcvQ full Serial 8 RcvQ full Table A.3 System Alarms Descriptions (continued) 67 Note: Table A.3 continues on following page. Display Points Alarm Point Description 56 NetGuardian NGDdx 1 Fail (Expansion shelf 1 DX 1 fail communication link failure) 57 NetGuardian NGDdx 2 Fail (Expansion shelf 2 DX 2 fail communication link failure) 58 NetGuardian NGDdx 3 Fail (Expansion shelf 3 DX 3 fail communication link failure) 62 11 63 64 Chan. Port has not forwarded any traffic in the time specified by the Channel Timeout Timer. The channel Chan. Port feature forwards data between two Timeout ports so the NG may be used to analyze serial traffic using CHAN filter debug. The Craft Timeout Timer has not been reset in the specified time. This feature is designed so other machines Craft Timeout may keep the TTY link active. If the TTY interface becomes unavailable to the machine, then the Craft Timeout alarm is set. Event Que Full Solution Under Ports > Options, verify the number of configured NGDdx units. Use EXP filter debug and port LEDs to help diagnose the problem. Use DB9M to DB9M with null crossover for cabling. Verify the DIP addressing on the back of the NGDdx unit. Change the data port type to OFF, or set the Channel Timer to a different setting. Change the Craft Timeout Timer to 0 to disable the feature. Enable DCP timestamp polling on the The Event Que is filled with more than master so events are collected, or 500 uncollected events. reboot the system to clear the alarm. Table A.3 System Alarms Descriptions (continued) 68 4.2 Appendix B — SNMP Manager Functions The SNMP Manager allows the user to view alarm status, set date/time, issue controls, and perform a resync. The display and tables below outline the MIB object identifiers. Table B.1 begins with dpsRTU; however, the MIB object identifier tree has several levels above it. The full English name is as follows: root.iso.org.dod.internet.private.enterprises.dps-Inc.dpsAlarmControl.dpsRTU. Therefore, dpsRTU's full object identifier is 1.3.6.1.4.1.2682.1.4. Each level beyond dpsRTU adds another object identifying number. For example, the object identifier of the Display portion of the Control Grid is 1.3.6.1.4.1.2682.1.4.3.3 because the object identifier of dpsRTU is 1.3.6.1.4.1.2682.1.4 + the Control Grid (.3) + the Display (.3). Tbl. B1 (O.)_OV_Traps points _OV_vTraps (1.3.6.1.4.1.2682.1.4.0) Tbl. B2 (.1) Identity points Tbl. B3 (.2) DisplayGrid points Ident (1.3.6.1.4.1.2682.1.4.1) DisplayEntry (1.3.6.1.4.1.2682.1.4.2.1) Manufacturer (.1) Port (.1) PointSet (.20) Model (.2) Address (.2) PointClr (.21) Firmware Version (.3) Display (.3) SumPSet (.101) DateTime (.4) DispDesc (.4)* SumPClr (.102) ResyncReq (.5)* PntMap (.5)* ComFailed (.103) ComRestored (.014) P0001Set (.10001) through P0064Set (.10064) * Must be set to "1" to perform the resync request which will resend TRAPs for any standing alarm. P0001Clr (.20001) through P0064Clr (.20064) Tbl. B3 (.3) ControlGrid points Tbl. B5 (.5) AlarmEntry points AlarmEntry (1.3.6.4.1.2682.1.4.5.1) ControlGrid (1.3.6.1.4.1.2682.1.4.3) Aport (.1) Port (.1) AAddress (.2) Address (.2) ADisplay (.3) Display (.3) APoint (.4) Point (.4) APntDesc (.5)* Action (.5) AState (.6) * For specific alarm points, see Table B6 Disp 1 Disp 2 Description No data* Undefined** No data* Port 99 99 99 Address Display 1 1 1 1 1 2 Points 1-32 33-64 1-32 69 Disp 3 Disp 4 Disp 5 Disp 6 Disp 7 Disp 8 Disp 9 Disp 10 Disp 11 Undefined** Analog 1 Undefined** Analog 2 Undefined** Analog 3 Undefined** Analog 4 Undefined** Analog 5 Undefined** Analog 6 Undefined** Analog 7 Undefined** Analog 8 Undefined** No Data* Undefined** Timed Tick Exp. Module Callout Network Time Server Undefined** Duplicate IP Address Undefined** Power up Undefined** Lost DCP poll inactive LAN not active Undefined** Modem not No dial-tone SNMP trap not Pager Que Notification Craft RCVQ full Modem RCVQ Data 1-8 RCVQ NGDdx 1-3 fail CHAN timeout CRFT timeout 99 99 99 99 99 99 99 99 99 99 99 99 99 99 99 99 99 99 99 99 99 1 1 1 1 1 1 1 1 1 1 1 1 1 1 1 1 1 1 1 1 1 2 3 3 4 4 5 5 6 6 7 7 8 8 9 9 10 10 11 11 11 11 33-64 1-4 5-64 1-4 5-64 1-4 5-64 1-4 5-64 1-4 5-64 1-4 5-64 1-4 5-64 1-4 5-64 1-8 9-16 17 18 99 1 11 19 99 99 99 99 99 99 99 99 99 99 99 99 99 99 99 99 99 99 99 99 1 1 1 1 1 1 1 1 1 1 1 1 1 1 1 1 1 1 1 1 11 11 11 11 11 11 11 11 11 11 11 11 11 11 11 11 11 11 11 11 20 21 22-32 33 34-35 36 37 38 39-40 41 42 43 44 45 46 47 48-55 56-58 62 63 Table B.6. Alarm Point Descriptions * "No data" indicates that the alarm point is defined but there is no description entered. 70 ** "Undefined" indicates that the alarm point is not used. 4.3 Appendix C — SNMP Granular Trap Packets Tables C.1 and C.2 provide a list of the information contained in the SNMP Trap packets sent by the NetGuardian. SNMP Trap managers can use one of two methods to get alarm information: 1. Granular traps (not necessary to define point descriptions for the NetGuardian) or 2. The SNMP manager reads the description from the Trap. UDP Header Description 1238 Source port 162 Destination port 303 Length 0xBAB0 Checksum Table C.1. UDP Headers and descriptions SNMP Header Description 0 Version Public Request Trap Request 1.3.6.1.4.1.2682.1.4 Enterprise 126.10.230.181 Agent address Enterprise Specific Generic Trap 8001 Specific Trap 617077 Time stamp 1.3.7.1.2.1.1.1.0 Object NetGuardian 216 v1.0K Value 1.3.6.1.2.1.1.6.0 Object 1-800-622-3314 Value 1.3.6.1.4.1.2682.1.4.4.1.0 Object 01-02-1995 05:08:27.760 Value 1.3.6.1.4.1.2682.1.4.5.1.1.99.1.1.1 Object 99 Value 1.3.6.1.4.1.2682.1.4.5.1.2.99.1.1.1 Object 1 Value 1.3.6.1.4.1.2682.1.4.5.1.3.99.1.1.1 Object 1 Value 1.3.6.1.4.1.2682.1.4.5.1.4.99.1.1.1 Object 1 Value 1.3.6.1.4.1.2682.1.4.5.1.5.99.1.1.1 Object Rectifier Failure Value 1.3.6.1.4.1.2682.1.4.5.1.6.99.1.1.1 Object Alarm Value Table C.2. SNMP Headers and descriptions 71 4.4 Appendix D — ASCII Conversion The information contained in Table D.1 is a list of ASCII symbols and their meanings. Refer to the bulleted list below to interpret the ASCII data transmitted or received through the data ports. Port transmit and receive activity can be viewed from the Web Browser Interface. • Printable ASCII characters will appear as ASCII. • Non-printable ASCII characters will appear as labels surrounded by { } brackets (e.g. {NUL}). • Non-ASCII characters will appear as hexadecimal surrounded by [ ] brackets (e.g. [IF]). • A received BREAK will appear as <BRK>. Abbreviation Description Abbreviation Description NUL Null DLE Data Link Escape SOH Start of Heading DC Device Control STX Start of Text NAK Negative Acknowledge ETX End of Text SYN Synchronous Idle EOT End of Transmission ETB End of Transmission Block ENQ Enquiry CAN Cancel ACK Acknowledge EM End of Medium BEL Bell SUB Substitute BS Backspace ESC Escape HT Horizontal Tabulation FS File Separator LF Line Feed GS Group Separator VT Vertical Tabulation RS Record Separator FF Form Feed US Unit Separator CR Carriage Return SP Space (blank) SO Shift Out DEL Delete SI Shift In BRK Break Received Table D.1. ASCII symbols 72 5 Frequently Asked Questions Here are answers to some common questions from NetGuardian users. The latest FAQs can be found on the NetGuardian support web page, http://www.dpstelecom.com. If you have a question about the NetGuardian, please call us at (559) 454-1600 or e-mail us at [email protected] 5.1 General FAQs Q. How do I Telnet to the NetGuardian? A. You must use Port 2002 to connect to the NetGuardian. Configure your Telnet client to connect using TCP/IP (not Telnet, or any other port options). For connection information, enter the IP address of the NetGuardian and Port 2002. For example, to connect to the NetGuardian using the standard Windows Telnet client, click Start, click Run, and type Telnet <NetGuardian IP address> 2002. Q. How can I back up the current configuration of my NetGuardian? A. There are two ways. NGEdit can read the configuration of your NetGuardian and save the configuration to your PC's hard disk or a floppy disk. With NGEdit you can also make changes to the configuration file and write the changed configuration to the NetGuardian's NVRAM. The other way is to use File Transfer Protocol (FTP). You can use FTP to read configuration files from or write files to the NetGuardian's NVRAM, but you can't use FTP to edit configuration files. Q. Can I use my NetGuardian as a proxy server to access TTY interfaces on my third-party serial equipment? A. You can use Data Ports 1–8, located on the back of the NetGuardian, to connect to serial devices, as long as your devices support RS-232. To make a proxy connection, you must define the correct TCP port for each serial port. To define TCP ports, you must first connect directly to the NetGuardian through its IP address. Once you have connected to the NetGuardian, you can define the TCP ports through the NetGuardian's TTY or Web Browser Interface configuration interfaces. Q. What do the terms alarm point, display, port, and address mean? A. These terms define the exact location of a network alarm, from the most specific (an individual alarm point) to the most general (an entire monitored device). An alarm point is a number representing an actual contact closure that is activated when an alarm condition occurs. For example, an alarm point might represent a low oil sensor in a generator or a open/closed sensor in a door. A display is a logical group of 64 alarm points. A port is traditionally the actual physical serial port through which the monitoring device collects data. The address is a number representing the monitored device. The terms port and address have been extended to refer to logical, or virtual, ports and addresses. For example, the NetGuardian reports internal alarms on Port 99, address 1. Q. What characteristics of an alarm point can I configure through software? For instance, can I configure Point 4 to sense an active-low (normally closed) signal, or Point 5 to sense a level or edge? A. The NetGuardian alarm points are level sensed and can be software-configured to generate an alarm on either a high (normally open) or low (normally closed) level. Q. When I connect to the NetGuardian through the craft port on the front panel it either doesn't work right or it doesn't work at all. What's going on? A. Make sure your using the right COM port settings. The standard settings for the craft port are 9600 baud, 8 bits, no parity, and 1 stop bit. Flow control must be set to none. Flow control normally defaults to hardware in most terminal programs, and this will not work correctly with the NetGuardian. Q. I just changed the port settings for one of my data ports, but the changes did not seem to take effect 73 even after I wrote the NVRAM. A. In order for data port and craft port changes (including changes to the baud rate and word format) to take effect, the NetGuardian must be rebooted. Whenever you make changes, remember to write them to the NetGuardian's NVRAM so they will be saved when the unit is rebooted. Q. How do I get my NetGuardian on the network? A. Before the NetGuardian will work on your LAN, the unit address (IP address), the subnet mask, and the default gateway must be set. A sample configuration could look like this: unit address: 192.168.1.100 subnet mask: 255.255.255.0 Default Gateway: 192.168.1.1 Always remember to save your changes by writing to the NVRAM. Any modifications of the NetGuardian's IP configuration will also require a reboot. Q. Does the PPP allow upload of new firmware over PPP? A. The NetGuardian supports all PPP upload capabilities with the exception of firmware. Q. I'm using HyperTerminal to connect to the NetGuardian through the craft port, but the unit won't accept input when I get to the first level menu. A. Make sure you turn off all handshaking in HyperTerminal. Q. I can't change the craft port baud rate. A. Once you select a higher baud rate, you must set your terminal emulation to that new baud rate and enter the DPSCFG and press Enter escape sequence. The craft port interprets a break key as an override to 9600 baud. At slower baud rates, normal keys can appear as a break. Q. The LAN line LED is green on my NetGuardian, but I can't poll it from my T/MonXM master. A. Some routers will not forward to an IP address until the MAC address has been registered with the router. You need to enter the IP address of your T/MonXM system or your gateway in the ping table. 5.2 SNMP FAQs Q. Which version of SNMP is supported by the SNMP agent on the NetGuardian? A. SNMP v1 and v2.0C on the NetGuardian G4 series. Q. How do I configure the NetGuardian to send traps to an SNMP manager? Is there a separate MIB for the NetGuardian? How many SNMP managers can the agent send traps to? And how do I set the IP address of the SNMP manager and the community string to be used when sending traps? A. The NetGuardian begins sending traps as soon as the SNMP managers are defined. The NetGuardian MIB is included on the NetGuardian Resource CD. The MIB should be compiled on your SNMP manager. (Note: MIB versions may change in the future.) The unit supports a main SNMP manager, which is configured by entering its IP address in the trap address field of Ethernet Port Setup. You can also configure up to eight secondary SNMP managers, which is configured by selecting the secondary SNMP managers as pager recipients. Community strings are configured globally for all SNMP managers. To configure the community strings, choose System from the Edit menu, and enter appropriate values in the Get, Set, and Trap fields. Q. Does the NetGuardian support MIB-2 and/or any other standard MIBs? A. The NetGuardian supports the bulk of MIB-2. Q. Does the NetGuardian SNMP agent support both NetGuardian and T/MonXM variables? A. The NetGuardian SNMP agent manages an embedded MIB that supports only the NetGuardian's RTU variables. The T/MonXM variables are included in the distributed MIB only to provide SNMP managers with a single MIB for all DPS Telecom products. 74 Q. How many traps are triggered when a single point is set or cleared? The MIB defines traps like major alarm set/cleared, RTU point set, and a lot of granular traps, which could imply that more than one trap is sent when a change of state occurs on one point. A. Generally, a single change of state generates a single trap, but there are two exception to this rule. Exception 1: the first alarm in an all clear condition generates an additional summary point set trap. Exception 2: the final clear alarm that triggers an all clear condition generates an additional summary point clear trap. Q. What does point map mean? A. A point map is a single MIB leaf that presents the current status of a 64-alarm-point display in an ASCII-readable form, where a "."represents a clear and an "x" represents an alarm. Q. The NetGuardian manual talks about eight control relay outputs. How do I control these from my SNMP manager? A. The control relays are operated by issuing the appropriate set commands, which are contained in the DPS Telecom MIB. For more information about the set commands, see Reference Information, Display Mapping, in any of the NetGuardian software configuration guides. Q. How can I associate descriptive information with a point for the RTU granular traps? A. The NetGuardian alarm point descriptions are individually defined using the Web Browser Interface, TTY, or NGEdit configuration interfaces. Q. My SNMP traps aren't getting through. What should I try? A. Try these three steps: 1. Make sure that the trap address (IP address of the SNMP manager) is defined. (If you changed the trap address, make sure you saved the change to NVRAM and rebooted.) 2. Make sure all alarm points are configured to send SNMP traps. 3. Make sure the NetGuardian and the SNMP manager are both on the network. Use the NetGuardian's ping command to ping the SNMP manager. 5.3 Pager FAQs Q. Why won't my alpha pager work? A. To configure the NetGuardian to send alarm notifications to an alpha pager, enter the data phone number for your pager in the Phone Number field. This phone number should connect to your pager services modem. Then enter the PIN for your pager in the PIN/Rcpt/Port field. You don't need to enter anything in any of the other fields. If you still don't receive pages, try setting the Dial Modem Init string to ATS37=9. This will limit the NetGuardian's connection speed. Q. Numeric pages don't come in or are cut off in the middle of the message. What's wrong? A. You need to set a delay between the time the NetGuardian dials your pager number and the time the NetGuardian begins sending the page message. You can set the delay in the Pager Number field, where you enter your pager number. First enter the pager number, then enter some commas directly after the number. Each comma represents a two-second delay. So, for example, if you wanted an eight-second delay, you would enter 555-1212,,,, in the Pager Number field. Q. What do I need to do to set up email notifications? A. You need to assign the NetGuardian an email address and list the addresses of email recipients. Let's explain some terminology. An email address consists of two parts, the user name (everything before the @ sign) and the domain (everything after the @ sign). To assign the NetGuardian an email address, choose System from the Edit menu. Enter the NetGuardian's user name in the Name field (it can't include any spaces) and the domain in the Location field. For example, if the system configuration reads: Name: netguardian Location: proactive.com Then email notifications from the NetGuardian will be sent from the address [email protected]. 75 The next step is to list the email recipients. Choose Pagers from the Edit menu. For each email recipient, enter his or her email domain in the Phone/Domain field and his or her user name in the PIN/Rcpt/Port field. You must also enter the IP address of an SNMP server in the IPA field. 6 Technical Support DPS Telecom products are backed by our courteous, friendly Technical Support representatives, who will give you the best in fast and accurate customer service. To help us help you better, please take the following steps before calling Technical Support: 1. Check the DPS Telecom website. You will find answers to many common questions on the DPS Telecom website, at http://www.dpstelecom.com/support/. Look here first for a fast solution to your problem. 2. Prepare relevant information. Having important information about your DPS Telecom product in hand when you call will greatly reduce the time it takes to answer your questions. If you do not have all of the information when you call, our Technical Support representatives can assist you in gathering it. Please write the information down for easy access. Please have your user manual and hardware serial number ready. 3. Have access to troubled equipment. Please be at or near your equipment when you call DPS Telecom Technical Support. This will help us solve your problem more efficiently. 4. Call during Customer Support hours. Customer support hours are Monday through Friday, from 7 A.M. to 6 P.M., Pacific time. The DPS Telecom Technical Support phone number is (559) 454-1600. Emergency Assistance: Emergency assistance is available 24 hours a day, 7 days a week. For emergency assistance after hours, allow the phone to ring until it is answered with a paging message. You will be asked to enter your phone number. An on-call technical support representative will return your call as soon as possible. 7 End User License Agreement All Software and firmware used in, for, or in connection with the Product, parts, subsystems, or derivatives thereof, in whatever form, including, without limitation, source code, object code and microcode, including any computer programs and any documentation relating to or describing such Software is furnished to the End User only under a non-exclusive perpetual license solely for End User's use with the Product. The Software may not be copied or modified, in whole or in part, for any purpose whatsoever. The Software may not be reverse engineered, compiled, or disassembled. No title to or ownership of the Software or any of its parts is transferred to the End User. Title to all patents, copyrights, trade secrets, and any other applicable rights shall remain with the DPS Telecom. DPS Telecom's warranty and limitation on its liability for the Software is as described in the warranty information provided to End User in the Product Manual. End User shall indemnify DPS Telecom and hold it harmless for and against any and all claims, damages, losses, costs, expenses, obligations, liabilities, fees and costs and all amounts paid in settlement of any claim, action or suit which may be asserted against DPS Telecom which arise out of or are related to the non-fulfillment of any covenant or obligation of End User in connection with this Agreement. This Agreement shall be construed and enforced in accordance with the laws of the State of California, without regard to choice of law principles and excluding the provisions of the UN Convention on Contracts for the International Sale of Goods. Any dispute arising out of the Agreement shall be commenced and maintained only in 76 Fresno County, California. In the event suit is brought or an attorney is retained by any party to this Agreement to seek interpretation or construction of any term or provision of this Agreement, to enforce the terms of this Agreement, to collect any money due, or to obtain any money damages or equitable relief for breach, the prevailing party shall be entitled to recover, in addition to any other available remedy, reimbursement for reasonable attorneys' fees, court costs, costs of investigation, and other related expenses. 77 Warranty DPS Telecom warrants, to the original purchaser only, that its products a) substantially conform to DPS' published specifications and b) are substantially free from defects in material and workmanship. This warranty expires two years from the date of product delivery with respect to hardware and ninety days from the date of product delivery with respect to software. If the purchaser discovers within these periods a failure of the product to substantially conform to the specifications or that the product is not substantially free from defects in material and workmanship, the purchaser must promply notify DPS. Within reasonable time after notification, DPS will endeavor to correct any substantial non-conformance with the specifications or substantial defects in material and workmanship, with new or used replacement parts. All warranty service will be performed at the company's office in Fresno, California, at no charge to the purchaser, other than the cost of shipping to and from DPS, which shall be the responsiblity of the purchaser. If DPS is unable to repair the product to conform to the warranty, DPS will provide at its option one of the following: a replacement product or a refund of the purchase price for the non-conforming product. These remedies are the purchaser's only remedies for breach of warranty. Prior to initial use the purchaser shall have determined the suitability of the product for its intended use. DPS does not warrant a) any product, components or parts not manufactured by DPS, b) defects caused by the purchaser's failure to provide a suitable installation environment for the product, c) damage caused by use of the product for purposes other than those for which it was designed, d) damage caused by disasters such as fire, flood, wind or lightning unless and to the extent that the product specification provides for resistance to a defined disaster, e) damage caused by unauthorized attachments or modifications, f) damage during shipment from the purchaser to DPS, or g) any abuse or misuse by the purchaser. THE FOREGOING WARRANTIES ARE IN LIEU OF ALL OTHER WARRANTIES, EXPRESS OR IMPLIED, INCLUDING BUT NOT LIMITED TO THE IMPLIED WARRANTIES OF MERCHANTABILITY AND FITNESS FOR A PARTICULAR PURPOSE. In no event will DPS be liable for any special, incidental, or consequential damages based on breach of warranty, breach of contract, negligence, strict tort, or any other legal theory. Damages that DPS will not be responsible for include but are not limited to, loss of profits; loss of savings or revenue; loss of use of the product or any associated equipment; cost of capital; cost of any substitute equipment, facilities or services; downtime; claims of third parties including customers; and injury to property. The purchaser shall fill out the requested information on the Product Warranty Card and mail the card to DPS. This card provides information that helps DPS make product improvements and develop new products. For an additional fee DPS may, at its option, make available by written agreement only an extended warranty providing an additional period of time for the applicability of the standard warranty. Technical Support If a purchaser believes that a product is not operating in substantial conformance with DPS' published specifications or there appear to be defects in material and workmanship, the purchaser should contact our technical support representatives. If the problem cannot be corrected over the telephone and the product and problem are covered by the warranty, the technical support representative will authorize the return of the product for service and provide shipping information. If the product is out of warranty, repair charges will be quoted. All non-warranty repairs receive a 90-day warranty. Free Tech Support in Your Email: The Protocol Alarm Monitoring Ezine The Protocol Alarm Monitoring Ezine is your free email tech support alert, delivered directly to your in-box every two weeks. Every issue has news you can use right away: Free Tech Support on the Web: MyDPS Free Tech Support is Only a Click Away