1
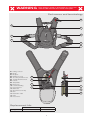
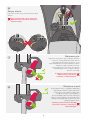
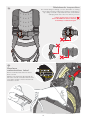
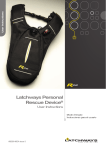
Examination guide
Latchways Personal
Rescue Device
®
Periodic Examination
Instructions Guide
62801-97UK_Issue 1
R20
Guidance notes in the use of this periodic
examination instructions manual
Periodic examination should be carried out by an authorised
Latchways technician only. An authorised Latchways technician
means a person who is trained and approved by Latchways
in identifying hazards or dangerous conditions of the PRD.
This manual is intended to serve as a reminder of the processes
required for a full examination, and not a comprehensive set
of instructions.
Periodic examination
instructions
These are the detailed descent device and harness checks
that should be carried out by a competent person at least once
every twelve months; however, local, state, governmental and
jurisdictional agencies may require more frequent or mandatory
periodic examinations of which the user is required to comply.
Additionally, environmental conditions may be such that
more frequent periodic examinations may also be necessary.
The periodic examination should be recorded in the periodic
examination log.
Periodic examination log
Dates and Details of examinations must be recorded in the
‘Periodic Examination Log’ and the label located on the device
drum (‘Examination Date’ label—Latchways part number
68200-42) must be updated accordingly.
WARNING: No repairs, modifications or alterations are
to be carried out on the Latchways Personal Rescue
Device™ (PRD).
Safety equipment
Ensure that you carry out any service procedures in conjunction
with local safety rules.
Competency
The PRD has been specifically designed as a user-friendly
device, incorporating a range of features to aid pre-use checks
and on-site periodic examination. Therefore, no disassembly or
servicing is required. However, if during the examination defects
or concerns are found, the unit shall be removed from service
and returned to Latchways or authorised agent.
In addition, ensure that you are wearing gloves.
Note
This service guide must be reproduced or printed in colour to
ensure correct guidance is followed.
Examination procedure
Tools needed
1
To carry out this periodic examination of the PRD you
will require the following basic tool set.
Safety Gloves
1 x 3 mm Hexagonal Bit
1 x Torque Wrench capable of 1 – 3 Nm
Loctite 2701 Thread Locker
1 x Hole Punch
THREAD
LOCKER
WARNING
Never attempt to modify or disassemble any components
within the PRD other than those stated in this guide.
2
WARNING
Never attempt to modify or disassemble any components
within the PRD other than those stated in this guide.
Part names and terminology
04
01
05
06
02
03
07
08
01
02
03
04
05
06
07
08
09
10
11
12
13
14
15
16
17
D-Ring connector
Buckle
Backpack
Red Release Cord
Secondary Activation Point
Toolbag Attachment Point
Harness
Strap Sliders
Release Pin
Load-line Webbing
Descent Device
PRD Label
Green Release Pin Clip
Rack
Examination Label
Drum
Descent Line
09
13
10
14
11
15
12
16
17
Replacement kits
Latchways part number
‘Examination Date’ labels
68200-42
Back cover gasket
68200-22
3
2
General inspection
Inspect the general condition of
the PRD harness and backpack for
signs of damage, contamination,
abrasion, fraying, tears, burns, mould
discolouration or chemical attack.
If excessive signs of the above
are found, remove the PRD from
service and refer to Latchways
or authorised agent.
4
DESCENT DEVICE
PRD D-ring
3
Inspect the D-ring connector for signs of
damage, excessive wear, distortion, corrosion
or cracking. Ensure that the descent line is not
paid out of the device, this would indicate
that a descent has occurred.
If descent line is paid out remove the PRD
from service and refer to Latchways or
authorised agent.
4
Open backpack
Open the backpack containing the descent device.
Inspect the general condition of the descent device
for signs of damage or corrosion. Ensure that the
drum label is present and legible.
Damage to the drum label may indicate
potential misuse, in which case further
investigation would be necessary by
Latchways or authorised agent.
If damage is apparent, remove the PRD
from service and refer to Latchways or
authorised agent.
5
5
Rope slack
Inspect descent line for any ‘slack’ between the drum
and rack.
If line shows any sign of slack, remove the
PRD from service and refer to Latchways or
authorised agent.
6
Release pin
Inspect the release pin for signs of damage, distortion,
corrosion or cracking. Ensure that it has not been
disengaged. Ensure that the red release cord is
positioned under the release pin and that the load-line
webbing is looped around the release pin.
Ensure that the green release pin clip is present
and undamaged—check for signs of damage,
distortion or cracking.
If damage is apparent remove the
PRD from service and refer to
Latchways or authorised agent.
7
Release cord
Ensure that the release cord guide is undamaged.
Inspect the descent line, load-line and release
cord for signs of cuts, abrasion, fraying, tears,
mould, discolouration, chemical attack or
excessive build-up of dirt. Check the stitching for
signs of loosening, pulling or cut thread. Excessive
build-up of dirt may prevent the descent line from
pulling through the device.
If damage is apparent remove the PRD
from service and refer to Latchways or
authorised agent.
6
8
Open backpack and
remove descent device
Remove descent device from backpack. Undo the
seven M4 × 12 socket caphead bolts using a
3 mm hexagonal bit. Carefully remove the back
cover, retaining the silicon gasket in the cavity.
9
Remove back case
Once the back cover is removed, inspect the
general conditions for signs of water ingress,
corrosion, contamination or damage.
If any damage is found, remove
the PRD from service and refer to
Latchways or authorised agent.
7
10
Check main gear and ratchet
Rotate the ratchet clockwise. Turn the main gear by hand in both
directions to ensure that it is still free to rotate.
If the gear is not free to rotate, remove the PRD from
service and refer to Latchways or authorised agent.
11
Replace ratchet
and main gear
Ensuring no slack line on the
drum, rotate the gear clockwise
as far as it will go. Whilst holding
the gear, rotate the ratchet
anti-clockwise, back into place,
then release the main gear. The gear
may rotate anti-clockwise for one or two
clicks—this is acceptable. Check that the
ratchet tip is fully engaged with the teeth in the
main gear.
Inspect the back cover gasket, checking for
damage, contamination, degradation and ensure
that it is fully seated and not twisted in the back
cover cavity.
If damage is apparent to the gasket,
it must be replaced (Latchways
part number 68200-22), or the
PRD removed from service
and referred to Latchways
or authorised agent.
8
7
12
5
Replace back cover
Apply Loctite 2701 threadlocker to the
seven M4 × 12 socket caphead bolts.
Replace the back cover onto the unit,
and secure using the bolts,
torqueing to 1.5 Nm each.
2
It is good practice to tighten
bolts at opposite ends
of the back cover.
3
1
6
1.5
Nm
4
THREAD
LOCKER
13
Replace descent device
into backpack
Replace descent device into backpack.
After inspection close the zip on the
backpack fully.
9
Open back side of backpack
14
Unzip the back panel of the backpack and inspect the harness
connector for signs of damage, distortion, corrosion or
cracking. Ensure that the fastening bolt is secure.
If damage is apparent remove the
PRD from service and refer to
Latchways or authorised agent.
HARNESS
NOTE: If PRD is used with a harness not
supplied by Latchways, inspect the harness
in accordance with the instructions provided
with the harness in addition to the following
instructions. Note that in such cases, labels
and/or metalwork may be in different locations
to those pictured.
15
Webbing inspection—
part 1
Check the legibility of the product markings on
the harness.
If any sections of webbing show
damage, remove the PRD from
service and refer to Latchways
or authorised agent.
Tel: +44 (0)1380 732700 www.latchways.com
RH2 07 2011 ??????
59 KG (130 LBS) –
140 KG (310 LBS)
EN 361: 2002 ANSI Z359.1: 2007
68002-00XL
POLYESTER WEBBING
SANGLE EN POLYESTER
MATERIALE IN POLIESTERE
POLYESTERGEWEBE
CINCHA DE POLIÉSTER
POLYESTER WEB
WARNING: READ INSTRUCTIONS BEFORE USE. INSPECT BEFORE EACH USE.
AVERTISSEMENT: LIRE LES CONSIGNES AVANT UTILISATION ET INSPECTER AVANT CHAQUE UTILISATION.
ATTENZIONE: LEGGERE LE ISTRUZIONI PRIMA DELL'USO E CONTROLLARE PRIMA DI OGNI UTILIZZO.
WARNUNG: ANWEISUNGEN VOR NUTZUNG DURCHLESEN UND VOR JEDER NUTZUNG INSPIZIEREN.
ADVERTENCIA: LEA LAS INSTRUCCIONES ANTES DEL USO E INSPECCIONE ANTES DE CADA USO.
WAARSCHUWING: LEES DE AANWIJZINGEN VOOR GEBRUIK EN INSPECTEER ELKE KEER VOOR GEBRUIK.
10
A
1
A
2
XL
Check all webbing for signs of cuts, abrasion,
fraying, tears, burns, mould, discolouration or
chemical attack.
Webbing inspection—part 2
16
Run webbing through the hands whilst twisting lightly to check
for surface defects or changes in the flexibility of the material.
Localised hardening of the webbing may indicate damage or
excessive wear. Rough areas present on the surface of the
webbing may indicate abrasion of the webbing.
If any sections of webbing show damage, remove
the PRD from service and refer to Latchways or
authorised agent.
If the harness has been subjected
to paint overspray, it must not be
used and should be referred to
Latchways or authorised agent.
Stitching inspection
17
Check all stitching for signs of loosening, pulling or
cut thread. There must be no evidence of damaged
stitching on either side of the stitch pattern.
If any sections of stitching show damage,
remove the PRD from service and refer to
Latchways or authorised agent.
11
18
Metalwork inspection
Check metal fittings for damage, corrosion, deformation or cracking.
Check edges of buckles and D-rings for burring or sharp edges. If
any coatings on metallic components have worn, ensure that the
underlying metal surface does not show any corrosion.
If there are any signs of corrosion,
remove the PRD from service and refer
to Latchways or authorised agent.
19
Remove examination date label from device
drum as shown.
Mark the new examination date label with the
date of the next due certification with the aid of
a hole punch, and place into the window in the
main label as shown.
tchways.com
DMM
Replace
examination label
EXAMINATION
DATE
CHECK BEFORE
EACH USE
PERIODIC INSPECTION
SHOULD BE CARRIED OUT
BY A COMPETENT PERSO
AT LEAST ANNUALLY.
12
Complete periodic
examination log
20
Complete the periodic examination log
found in the user manual of the PRD,
including the date of inspection and
date of next examination. If the periodic
examination log is missing or illegible,
contact Latchways for a replacement.
Providing every section of this service guide has been completed,
the PRD is now fully examined and can be returned to service.
13
Notes
14
15
Latchways Personal Rescue Device® is a registered trademark of Latchways plc
Latchways plc, Hopton Park, Devizes, Wiltshire, SN10 2JP, England
Tel: +44 (0)1380 732700 Fax: +44 (0)1380 732701
Email: [email protected] Website: www.latchways.com
62801-97UK_Issue 1