1
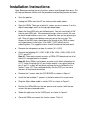
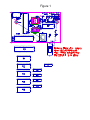
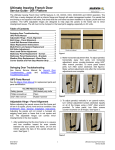
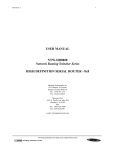
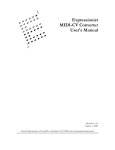
OBXa MIDI KIT
User's Manual
Encore Electronics 2455 Bates Ave. Unit E. Concord, CA 94520
email: [email protected] website:www.encoreelectronics.com
INTRODUCTION
Thank you for purchasing an Encore product.
We hope you are as excited about analog synthesis as we are!
The OBXa-MK allows your Oberheim OBXa to receive MIDI
data and perform as a basic MIDI controller.
In addition to giving your OBXa MIDI capability, we have
expanded the patch storage from 32 up to 120, giving an
earlier OBXa the same capability as a later one.
If you purchased your OBXa second hand and didn't receive
the factory sounds, don't worry, because we have included
them! You can load them at any time using a special power on
sequence. You may then edit them to suit your own tastes.
One of the most important features of the OBXa-MK is the
storage of patches and firmware in flash ROM. The OBXa-MK
can now be upgraded with bug fixes and new features using
MIDI. The patches are also stored in flash ROM, and this
means no more battery maintenance issues!
The next section of this manual is a quick reference guide
which gives you step-by-step instructions for performing the
new procedures.
Quick Reference Guide
Controls
The primary buttons you will use in conjunction with your OBXa MIDI
KIT are listed below.
MANUAL is used to enter MIDI mode.
PROGRAM BUTTONS are used to select the MIDI function you wish
to perform.
GROUP BUTTONS are used to select the value of the respective MIDI
function.
How to Enter MIDI Mode
•
•
Momentarily press the [MANUAL] button.
The MANUAL LED will flash, indicating that you are in MIDI
mode. If you press it for more than 1/2 second, you will
enter the normal manual mode.
How to Exit MIDI Mode
•
•
Momentarily press the [MANUAL] button.
The MANUAL LED will return to its previous state.
How to send a MIDI tune request
•
Press the [AUTO] button.
This will tune the OBXa and also send a MIDI tune request
for any other synthesizer that can receive the command.
How to toggle MIDI Program enable
•
•
Make sure that you are in MIDI mode.
Press the [PROGRAM 2] button. GROUP A LED will be on if
the OBXa responds to MIDI program changes. Any GROUP
button will toggle GROUP A LED. When the LED is off, the
OBXa will ignore program change messages.
How to Change MIDI Channels
•
•
Make sure that you are in MIDI mode.
Press the [PROGRAM 1] button. One or more of the 4 group
LEDs will light showing the current MIDI channel. Press a
combination of GROUP buttons to select a new MIDI
channel. See the GROUP map on the next page. (The MIDI
channel isn't 'saved' until you exit MIDI mode.)
•
Quick Reference Guide, cont
Group MAP
In the following table, an "O" indicates the LED is ON, and an “X”
indicates the LED is OFF. Group A is on the left, and Group D is on
the right. (This table is a binary increment with the LSB on the left.)
Oxxx
xOxx
OOxx
xxOx
OxOx
xOOx
OOOx
xxxO
OxxO
xOxO
OOxO
xxOO
OxOO
xOOO
OOOO
- CHANNEL 1
- CHANNEL 2
- CHANNEL 3
- CHANNEL 4
- CHANNEL 5
- CHANNEL 6
- CHANNEL 7
- CHANNEL 8
- CHANNEL 9
- CHANNEL 10
- CHANNEL 11
- CHANNEL 12
- CHANNEL 13
- CHANNEL 14
- CHANNEL 15 (All LEDs on)
How to Save a Patch via System Exclusive
•
•
•
Select the patch to be saved.
Enter MIDI mode.
Press [PROGRAM 7]. The OBXa-MK is now ready to
dump the current patch. Press any of the group buttons to
actually dump the selected patch to MIDI.
How to Save All Patches via System Exclusive
•
•
Enter MIDI mode.
Press [PROGRAM 8]. The OBXa-MK is now ready to dump all
the patches. Press any of the group buttons to actually start
dumping patches to MIDI.
How to Load the Factory Sounds
•
•
Turn off the OBXa.
Press and hold [CHORD]. While holding [CHORD], turn on the
power.
WHAT'S NEW
Expanded Memory
The original OBXa had the ability to save 32 patches. Later in
production, Oberheim expanded this to 120 patches.
With the OBXa-MK, you can now save 120 patches regardless of the
actual production configuration. All the patches are accessible from the
front panel, or by sending MIDI program change commands ranging
from 0 to 119.
ROM Patches
The original late model OBXa came programmed with 104 factory
sounds. They were supplied on cassette tape, but have commonly
been lost or damaged. We have included this preset data in the OBXaMK. They can be loaded into RAM by turning on the OBXa while
holding the CHORD button. This will erase any previous sounds in
those locations.
MIDI Messages
The OBXa-MK responds to the following types of messages:
NOTE ON, NOTE OFF, PROGRAM CHANGE, CONTROL
CHANGE, PITCH BEND, and SYSTEM EXCLUSIVE
The follow is a list of the MIDI controllers that the OBXa-MK
responds to:
Control Number
(dec)
(hex)
1
01h
5
05h
7
07h
16
10h
17
11h
18
12h
19
13h
20
14h
21
15h
22
16h
23
17h
24
18h
25
19h
26
1Ah
27
1Bh
28
1Ch
29
1Dh
30
1Eh
Function
LFO freq depth
Portamento time
Loudness envelope sustain (VCA Sustain)
Filter cutoff
Filter resonance
Filter modulation
Oscillator Pulse Width
VCF Attack
VCF Decay
VCF Sustain
VCF Release
VCA Attack
VCA Decay
VCA Sustain
VCA Release
*Osc Freq 1
*Osc Freq 2
*Osc 2 Detune
64
80
81
82
83
40h
50h
51h
52h
53h
Sustain
Modulation LFO Rate
Modulation Pulse Width Depth
*LFO Mod PW to Osc1
*LFO Mod PW to Osc2
85
86
87
88
89
90
55h
56h
57h
58h
59h
5Ah
*LFO routing to Osc1
*LFO routing to Osc2
*LFO routing to Filter
*LFO Shape: Sine / Square / S&H
*SPLIT / DOUBLE
*UPPER / LOWER
102
103
104
105
106
66h
67h
68h
69h
6Ah
*VCO1 Saw / Pulse
*Balance
*VCO1 Sync
*VCO2 Filter Envelope
*VCO2 Saw / Pulse
108
109
6Ch
6Dh
*FILTER Osc1
*FILTER Osc2: Off, 1/2, Full
111
112
113
114
6Fh
70h
71h
72h
*FILTER Noise
*FILTER 4 Pole
*FILTER Track
*Unison
123
7Bh
All notes off
*new in 2014.
WHAT'S NEW, cont
System Exclusive Commands
00 - Single Patch Load
F0 00 00 2F 08 00 <number> <patch data> F7
<number> Patch number to load sysex data
01 - Request Data
F0 00 00 2F 08 01 <type> <number> F7
<type>
00
to request 120 patches
01
to request a single patch
02
to request edit buffer
<number> is patch number when type 01.
Nonexistent when type 00 or type 02.
NOTE: When you request all 120 patches, each patch is sent
individually in ascending order.
02 - Edit Buffer Load
F0 00 00 2F 08 02 <edit buffer data> F7
<edit buffer data> is the same as patch data, but it is only
placed in the temporary edit buffer. It would be a good place
for an editor to deposit data while editing, instead of writing to
flash memory constantly.
03 - Reserved for firmware updates.
04 - Save Edit Buffer to Patch #
F0 00 00 2F 08 04 < number > F7
<number> is patch #. Once you're done editing the edit buffer,
this will save it permanently to flash memory. This is typical for
a software editor to perform.
Universal Device Inquiry message < F0 7E 7F 06 01 F7 >
OBXaMK responds with:
F0 7E 7F 06 02 Universal Device Reply
00 00 2F Encore Manufacturer ID
00 00
Family ID, LSB first
00 08 Family Member, LSB first
00 01 02 00 Software revision (ex: 01.20 in 2014)
F7 End-Of-Exclusive
The controllers modify the OBXa as if you were turning the OBXa
knobs while in edit mode. This is important to remember when using
MIDI controllers. They may not behave exactly as you might expect.
For example, when the mod lever is used on the OBXa, it only adds
the triangle waveshape as a modulation. Using the MIDI mod lever,
the OBXa-MK will "add" whatever LFO waveshape is programmed for
the current patch. If the LFO is not routed anywhere, the MIDI
controller won't work. On the other hand, you can use the square or
S/H function for a controlled LFO if it's enabled as part of the patch.
The OBXa-MK can also send MIDI note information when you play its
keyboard. It cannot send pitchbend or modulation because the CPU
doesn't have control of them. That is a limitation of the original design.
Also, the pitch bend from MIDI is limited to one whole step. This is
because we had to "trick" the OBXa into performing pitch bend. The
built in pitch bender directly modifies the voice cards without CPU
intervention. The CPU can roughly pitch a voice with one control
voltage, and then it has to get it really in tune with a fine adjustment
control voltage. We are controlling these to allow pitch bend from
MIDI. If the voices are not dead-center tuned, the pitch bend on some
notes may reach the limit before others. This has a side effect of
possibly detuning a chord.
Installation Instructions
Note: Before performing these instructions, please read through them once. This
will help you become familiar with the procedure and possibly prevent mistakes.
o
Save the patches.
o
Unplug the OBXa from the AC line and any other audio cables.
o
Open the OBXa. There are a total of 4 screws you must remove: 2 on the
top left wood edge, and 2 on the top right wood edge.
o
Mount the three MIDI jacks on the back panel. You will need to drill a 5/8"
hole for each MIDI jack. We recommend using a chassis punch. Be sure
to check for obstructions, wires, etc... behind the area you are planning to
drill. Clean all loose metal before continuing on to the next step. The
flanges of the MIDI jacks should go on the outside of the OBXa to cover
any imperfections in the holes. Use a 5/64" (.078") drill bit for the
mounting holes. The supplied screws should thread into the back panel.
o
Remove the microprocessor from its socket. (It is U101)
o
Remove the following ICs: U102, U103, U104, U164, U108, U109, U110,
U111, and U117.
Note #1: There were several revisions of OBXa CPU board and not all of
these ICs are populated in all models.
Note #2: Early OBXas had a power on mute circuit which utilized part of
U117. If after installing this kit, you find the output is very quiet, bend up
pins 3 and 11 so they will not touch anything and re-install back in the
socket. If your U117 was soldered directly into the PCB, just cut those
two pins so they break connection.
o
Remove the 2 screws from the CPU BOARD as shown in Figure 1.
o
Install the two included 1" spacers in the holes where the screws were.
o
Plug the 40 pin ribbon cable in socket U101 as shown in Figure 2.
o
Position the OBXa-MK over the two spacers and secure it with the two
screws that were removed earlier.
o
Solder the eight wires to the 3 MIDI jacks as shown in Figure 2.
o
Close the OBXa and secure the 4 outer screws. That's it!
Figure 1
1
2
1
14
1
1
1
1
1
1
1
8
21
20
22
19
23
18
24
17
25
16
0
A
1
K
1
2
4
3
2
1
5
6
7
8
2
0
2
1
1
1
2
2
2
2
1
1
1
1
7
2
6
5
4
3
2
1
44
43
42
41
40
1
7
39
8
38
1
2
1
26
15
27
14
28
13
29
12
9
37
10
36
2
0
11
35
12
34
13
33
14
32
15
31
16
30
17
29
2
2
1
2
1
2
2
2
2
1
1
1
1
1
2
0
0
30
1
11
12
11
10
9
8
7
6
5
4
3
2
1
13
14
15
16
17
18
19
20
21
22
23
24
1
18
31
10
32
9
33
8
34
7
35
6
36
5
37
4
38
3
39
2
40
1
1
19
20
21
22
23
24
2
25
26
27
1
28
1
2
2
1
1
1
2
K
A
2
1
1
4
2
32
30
6
3
1
31
29
2
20
19
18
17
16
15
14
13
12
11
10
9
8
7
6
5
4
3
2
1
2
5
21
22
23
24
25
26
27
28
29
30
31
32
33
34
35
36
37
38
39
40
19
18
17
16
15
14
13
12
11
10
9
8
7
6
5
4
3
2
1
21
22
23
24
25
26
27
28
29
30
31
32
33
34
35
36
37
38
39
40
13
12
11
10
9
8
7
6
5
4
3
2
1
15
16
17
18
19
20
21
22
23
24
25
26
27
28
14
13
12
11
10
9
8
7
6
5
4
3
2
1
15
16
17
18
19
20
21
22
23
24
25
26
27
28
14
13
12
11
10
9
8
7
6
5
4
3
2
1
15
16
17
18
19
20
21
22
23
24
25
26
27
28
14
13
12
11
10
9
8
7
6
5
4
3
2
1
15
16
17
18
19
20
21
22
23
24
25
26
27
28
14
13
12
11
10
9
8
7
6
5
4
3
2
1
15
16
17
18
19
20
21
22
23
24
25
26
27
28
8
28
27
9
10
26
25
11
12
24
23
13
15
17
19
22
21
14
16
18
20
0
1
20
14
7
1
1
9
8
7
6
5
4
3
2
1
10
11
12
13
14
15
16
17
18
9
8
7
6
5
4
3
2
1
10
11
12
13
14
15
16
17
18
9
8
7
6
5
4
3
2
1
10
11
12
13
14
15
16
17
18
9
8
7
6
5
4
3
2
1
10
11
12
13
14
15
16
17
18
7
6
5
4
3
2
1
8
9
10
11
12
13
14
Figure 2
5
13
11
10
1
20
19
23
18
24
17
25
16
26
15
27
14
28
13
29
12
30
11
31
10
32
9
33
8
34
7
35
6
36
5
37
4
38
3
39
2
40
1
4
3
2
8
22
5
6
4
9
21
7
7
14
12
1
1
1
1
1
1
1
0
1
A
K
1
4
3
2
1
5
6
7
8
2
1
2
0
A
19
18
1
0
K
20
17
16
15
14
13
12
11
10
9
8
7
6
5
4
3
2
1
1
15
16
17
18
19
20
21
22
23
24
25
26
27
28
14
13
12
11
10
9
8
7
6
5
4
3
2
1
15
16
17
18
19
20
21
22
23
24
25
26
27
28
14
13
12
11
10
9
8
7
6
5
4
3
2
1
15
16
17
18
19
20
21
22
23
24
25
26
27
28
14
13
12
11
10
9
8
7
6
5
4
3
2
1
15
16
17
18
19
20
21
22
23
24
25
26
27
28
14
13
12
11
10
9
8
7
6
5
4
3
2
1
15
16
17
18
19
20
21
22
23
24
25
26
2
27
28
1
9
8
7
6
5
4
3
2
1
10
11
12
13
14
15
16
17
18
9
8
7
6
5
4
3
2
1
10
11
12
13
14
15
16
17
18
9
8
7
6
5
4
3
2
1
10
11
12
13
14
15
16
17
18
9
8
7
6
5
4
3
2
1
10
11
12
13
14
15
16
17
18
7
6
5
4
3
2
1
8
9
10
11
12
13
14
2
6
3
1
MIDI
OBXa-MK MIDI IMPLEMENTATION VERSION 1.2
CHANNEL VOICE MESSAGES
STATUS
Data Bytes
Description
1000 xxxx
0kkk kkkk
0vvv vvvv
Note off.
0vvv vvvv = note off
1001 xxxx
0kkk kkkk
0vvv vvvv
Note on.
0vvv vvvv = 7FH
1011 xxxx
0ccc cccc
0vvv v000
Control Change.
0ccc cccc = Control number (e.g. 01 = Mod lever)
0vvv vvvv Control value. (range 0-7FH)
1100 xxxx
0nnn nnnn
Program select.
0nnn nnnn = 0 through 77h
1110 xxxx
0vvv vvvv
0vvv vvvv
Pitch Bend change LSB
Pitch Bend change MSB
CHANNEL MODE MESSAGES
1011 xxxx
0111 1011
All Notes Off. The OBXa-MK turns off all notes that were
turned on by MIDI.
SYSTEM MESSAGES
1111 0000
00 00 2Fh
08
pph
qqh
data
F7h
System Exclusive, Encore ID number
Device number OBXa-MK = 08h
Command Byte1 : See description of command byte.
Command Byte2 : Program number.
Program Data
End of System Exclusive Status Byte.
Command Byte Description- pp:
00
01
02
-
Request Data from OBXa-MK
Single Patch Load
Edit Buffer Load