1
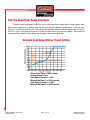
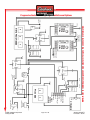
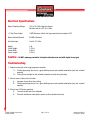
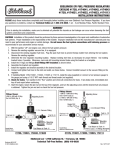
Catalog #71900
Progressive Nitrous Controller
www.edelbrock.com
Please study these instructions carefully before installing your new Progressive Nitrous Contoller. If you have any questions,
please contact our Technical Hotline at : 1-800-416-8628 from 7 am - 5pm, Monday-Friday, Pacific Standard Time or e-mail
us at [email protected].
Important Information -
You must use Static Suppression Ignition Wires with this controller. The
71900 Progressive Nitrous Controller contains high frequency digital electronics and will NOT function correctly
without suppression wires.
Warning - Do not mount the progressive controller anywhere near ignition components or any other
source of electronic noise.
Notice - The controller must be grounded directly to the vehicle’s battery.
Caution - Do not submerge the controller in liquid or directly wash the unit with liquid of any type!
Warning - The programming switches are delicate electronic items and can be damaged by misuse
and/or carelessness. If the controller is close to your nitrous bottle, be careful when installing the bottle.
The weight of the bottle is enough to easily damage the switches. Switches that have been determined
to be damaged due to neglect will NOT be covered under warranty.
Notice:
It is the responsibility of the purchaser to follow all guidelines and safety procedures supplied with this product and any
other manufactures product used with this product. If is also the responsibility of the purchaser to determine compatibility of
this device with the vehicle and other components.
Edelbrock Corporation assumes no responsibility for damages resulting from accident, improper installation, misuse,
abuse, improper operation, lack of reasonable care, or all previously stated reasons due to incompatibility with other
manufacturer’s products.
Edelbrock Corporation assumes no responsibility or liability for damages incurred fron the use of products manufactured
or sold by Edelbrock Corporation on vehicles used for competition racing.
Edelbrock Corporation neither recommends nor approves the use of products manufactured or sold by Edelbrock
Corporation on vehicles which may be driven on public highways or roads, and assumes no responsibility for damages incurred
from such use.
It is the purchaser’s responsibility to check the state and local laws pertaining to the use of Nitrous Oxide for racing
applications. Edelbrock Corporation does not recommend nor condone the use of its products for illegal street racing.
Installation of this Edelbrock product signifies that you have read this document and agree to the terms
stated within.
Caution:
Follow all recommended safety guidelines from this and other manufacturer’s installation guides. Never install any
device which pulsates nitrous solenoids without a safety solenoid installed. Static Suppression ignition wires must be used with
this unit! Mount the unit as far away from secondary ignition components (coil, ignition wires, etc.) as physically possible.
©2007 Edelbrock Corporation
Catalog #71900
Page 1 of 16
Brochure #63-0473
Rev. 08/07 - DC/mc
www.edelbrock.com
71900 - Progressive Nitrous Controller
The 71900 Progressive Nitrous Controller was designed using the latest digital technology available. The
result is a controller which is extremely accurate and user-friendly. A simple and functional programming interface
allows the user to set important nitrous parameters in a matter of seconds, all without the use of external
programmers or computers. An Options Menu has been included to enable the user to customize the controller for a
particular application. The Options Menu also contains a function that if selected will return the contoller to its original
factory Pre-Programmed state.
Features:
Full Digital Circuitry:
This design approach assures the best in performance and reliability.
Digital technology provides extremely accurate control that cannot be achieved with analog systems.
Easy to Read LED Display with Touch Switch Programming: This user
interface is very user-friendly and provides quick and accurate programming of the progressive nitrous controller.
Integrated Battery Voltage Monitor:
The battery voltage is displayed periodically on
the LED display.
Non-Volatile Data Memory:
No battery or power connection is needed to retain the
controllers parameter settings. There is no need to re-program the controller after the battery is disconnected. There
is NO internal battery, all data is stored in flash memory and will be retained for up to 10 years with no power applied
to the controller.
Separate Nitrous and Fuel Solenoid Outputs: This design provides more output
current capability. By using separate outputs, better control of the solenoid is achieved. The response of the nitrous
system is improved and much more accurate. The fuel output is programmed to function as though the fuel and
nitrous solenoids were on the same output terminal. The Options Menu allows the user to program the fuel solenoid
to operate in full progressive mode (i.e. - The fuel solenoid will pulse through the entire progression).
+12 Volt Timer Output: A digital timer is provided that can be used to activate an ignition retard
controller or a 2nd stage of nitrous. The output from activation terminal is on (+12 volt applied). If the activation
signal is removed, the +12V timer will halt until the signal is re-applied. The +12v timer can be programmed from
0.000 to 9.999 seconds. The Options Menu allows the user to configure the timer output behavior while the controller
is in the activated state. Optionally, the output can be configured to remain ON regardless of the activation input.
NOTE - Setting the timer to 0.000 will disable the timer output.
©2007 Edelbrock Corporation
Catalog #71900
Page 2 of 16
Brochure #63-0473
Rev. 08/07 - DC/mc
www.edelbrock.com
Nitrous Delay Timer: A digital timer is provided that can be used to delay the start of the nitrous.
This timer begins counting down when the activation terminal is on (+12v applied). If the activation signal is removed,
the delay timer will halt until the signal is re-applied. The delay timer can be programmed from 0.000 to 9.999
seconds.
Nitrous Starting Percentage: The user can program the amount of nitrous power that will
be applied after the nitrous delay timer has elapsed (Immediately if delay timer is set at 0.000). This parameter is set
as a percentage and can range from 10% to 100%. If the starting power is more than the ending power, the nitrous
power will decrease with time.
Final Nitrous Percentage:
This setting allows the user to program how much nitrous power
is applied after the nitrous ramp has completed. This parameter is also set as a percentage and can range from 10%
to 100%. By setting the final power percentage less than the starting percentage, the user can back off the nitrous
power.
The Options Menu allows the user to select a single or dual ramp nitrous power ramp. When the dual ramp
mode is selected, there will be two final percents and two power ramp times.
Nitrous Power Ramp Time:
The power ramp time is used to determine the rate at which
the nitrous power goes from the start percentage to the final percentage. The nitrous power ramp time can be set
from .200 to 9.900 seconds.
The Options Menu allows the user to select a single or dual ramp nitrous power ramp. When the dual ramp
mode is selected, there will be two final percents and two power ramp times.
Intelligent Nitrous Progressive Timer: The progressive nitrous timer system will wait
at its present state if the activation signal is removed. Nitrous progression will resume when the controller is reactivated. The entire nitrous and +12 volt timer system is automatically reset 20 seconds after activation.
Optionally the nitrous timer system can be configured to RESET each time the activation signal is applied.
This method would allow the nitrous power to be applied with each gear change or each time the throttle is lifted and
re-applied. This feature is selected with the Options Menu.
An added feature has been included to the timer system to help the user tune the nitrous power ramp. When
the timer system is activated (+12v at the activation input) an internal timer is started which will record the time and
percent of the progressive cycle when the activation signal is removed. This data can be used to determine at what
point in the progressive cycle that the power ramp is too aggressive and the driver is lifting the throttle.
©2007 Edelbrock Corporation
Catalog #71900
Page 3 of 16
Brochure #63-0473
Rev. 08/07 - DC/mc
www.edelbrock.com
TABLE OF CONTENTS
Page #
Programming
+12 Volt Timer. . . . . . . . . . . . . . . . . . . . . . . . . . . . . . . . . . . . . . . . . . . . . . . . . . . . . . . . . . . . . . 5
Nitrous Delay Timer . . . . . . . . . . . . . . . . . . . . . . . . . . . . . . . . . . . . . . . . . . . . . . . . . . . . . . . . . . 5
Nitrous Starting Percentage . . . . . . . . . . . . . . . . . . . . . . . . . . . . . . . . . . . . . . . . . . . . . . . . . . . . 6
Nitrous Ending Percentage. . . . . . . . . . . . . . . . . . . . . . . . . . . . . . . . . . . . . . . . . . . . . . . . . . . . . 6
Nitrous Power Ramp Time . . . . . . . . . . . . . . . . . . . . . . . . . . . . . . . . . . . . . . . . . . . . . . . . . . . . . 7
Example Nitrous Power Setting . . . . . . . . . . . . . . . . . . . . . . . . . . . . . . . . . . . . . . . . . . . . . . . . . 7
Options Menu, Programming
Viewing Run Data and Entering the Options Menu . . . . . . . . . . . . . . . . . . . . . . . . . . . . . . . . . . . 8
Clearing Run Data (Reset for Next Run) . . . . . . . . . . . . . . . . . . . . . . . . . . . . . . . . . . . . . . . . . . . 8
Resetting Controller to Factory Default. . . . . . . . . . . . . . . . . . . . . . . . . . . . . . . . . . . . . . . . . . . . 8
Calibrating the Voltage Monitor . . . . . . . . . . . . . . . . . . . . . . . . . . . . . . . . . . . . . . . . . . . . . . . . . 8
Setting the Dual Nitrous Power Ramp ON/OFF . . . . . . . . . . . . . . . . . . . . . . . . . . . . . . . . . . . . . . 9
Setting Progressive Fuel Output ON/OFF . . . . . . . . . . . . . . . . . . . . . . . . . . . . . . . . . . . . . . . . . . 9
Setting Activation Wait and Hold ON/OFF . . . . . . . . . . . . . . . . . . . . . . . . . . . . . . . . . . . . . . . . . . 9
Setting +12V Timer Output Hold ON/OFF . . . . . . . . . . . . . . . . . . . . . . . . . . . . . . . . . . . . . . . . . 10
Enabling Quick Data Access. . . . . . . . . . . . . . . . . . . . . . . . . . . . . . . . . . . . . . . . . . . . . . . . . . . 10
Setting the RESET Timeout Period . . . . . . . . . . . . . . . . . . . . . . . . . . . . . . . . . . . . . . . . . . . . . . 10
Exiting the Options Menu . . . . . . . . . . . . . . . . . . . . . . . . . . . . . . . . . . . . . . . . . . . . . . . . . . . . . 10
Using the Dual Ramp Feature
How the Dual Power Ramp Functions . . . . . . . . . . . . . . . . . . . . . . . . . . . . . . . . . . . . . . . . . . . 11
Example Dual Ramp Nitrous Power Setting . . . . . . . . . . . . . . . . . . . . . . . . . . . . . . . . . . . . . . . 11
Installation
Items Included with 71900 Controller . . . . . . . . . . . . . . . . . . . . . . . . . . . . . . . . . . . . . . . . . . . 12
Items Needed that are NOT Supplied. . . . . . . . . . . . . . . . . . . . . . . . . . . . . . . . . . . . . . . . . . . . 12
Cautions and Warnings . . . . . . . . . . . . . . . . . . . . . . . . . . . . . . . . . . . . . . . . . . . . . . . . . . . . . . 12
Wiring Diagrams . . . . . . . . . . . . . . . . . . . . . . . . . . . . . . . . . . . . . . . . . . . . . . . . . . . . . . . . . . . 13
Technical Information
Electrical Specifications. . . . . . . . . . . . . . . . . . . . . . . . . . . . . . . . . . . . . . . . . . . . . . . . . . . . . . 15
Troubleshooting . . . . . . . . . . . . . . . . . . . . . . . . . . . . . . . . . . . . . . . . . . . . . . . . . . . . . . . . . . . . 15
Service . . . . . . . . . . . . . . . . . . . . . . . . . . . . . . . . . . . . . . . . . . . . . . . . . . . . . . . . . . . . . . . . . . 16
Warranty . . . . . . . . . . . . . . . . . . . . . . . . . . . . . . . . . . . . . . . . . . . . . . . . . . . . . . . . . . . . . . . . . 16
©2007 Edelbrock Corporation
Catalog #71900
Page 4 of 16
Brochure #63-0473
Rev. 08/07 - DC/mc
www.edelbrock.com
Programming the +12 Volt Timer
Press and release the FUNCTION switch until the message “+12V Timer Delay” appears on the display. After
the function message has scrolled across the display, the current +12 Volt Timer setting will appear on the display.
To adjust the +12 volt timer value, press the desired digit button and the value of that digit will increment.
The digit will roll over to 0 and begin counting up again if the user continues to release and press the digit button.
To exit without saving the new value, press the FUNCTION switch and select another function.
To save the new value, press and release the ENTER switch and the display will read “SAVED” and the new
setting is now saved.
The range of the +12 volt timer is 0.000 to 9.999 seconds with a .001 second resolution.
This setting will determine the amount of time in seconds before the +12 volt timer output becomes active
(goes to +12V) after controller activation.
NOTE - Setting timer to 0.000 will disable the +12V timer output. Set to 0.001 for quick
activation.
Programming the Nitrous Delay Timer
Press and release the FUNCTION switch until the message “Nitrous Delay Timer” appears on the display. After
the function message has scrolled across the display, the current Nitrous Delay Time setting will appear on the display.
To adjust the nitrous delay timer value, press the desired digit button and the value of that digit will increment.
The digit will roll over to 0 and begin counting up again if the user continues to release and press the digit button.
To exit without saving the new value, press the FUNCTION switch and select another function.
To save the new value, press and release the ENTER switch and the display will read “SAVED” and the new
setting is now saved.
The range of the +12 volt timer is 0.000 to 9.999 seconds with a .001 second resolution.
This setting will determine the amount of time in seconds before the nitrous becomes active (nitrous begins
at starting percentage) after controller activation.
©2007 Edelbrock Corporation
Catalog #71900
Page 5 of 16
Brochure #63-0473
Rev. 08/07 - DC/mc
www.edelbrock.com
Programming the Nitrous Starting Percentage
Press and release the FUNCTION switch until the message “Starting Percentage” appears on the display.
After the function message has scrolled across the display, the current nitrous starting percentage setting will appear
on the display.
To adjust the nitrous starting percentage value, press the desired digit button and the value of that digit will
increment. The digit will roll over to 0 and begin counting up again if the user continues to release and press the digit
button. If the .1 digit button is pressed, the starting percentage will go to 100%, pressing again will set the starting
percentage back to 0%. The 1. digit is ignored for this function.
To exit without saving the new value, press the FUNCTION switch and select another function.
To save the new value, press and release the ENTER switch and the display will read “SAVED” and the new
setting is now saved.
The range of nitrous starting percentage is 10% to 100% in 1% increments.
This setting will determine the amount of nitrous to be applied after the nitrous delay timer has elapsed.
Programming the Final Nitrous Percentage
NOTE - If the dual ramp feature is enabled fron the options menu, there will be a “Final Percent #2” in the
menu list. The programming method is the same as the “Final Percent #1”. Please refer to the section “Options
Menu” and “Using the Dual Ramp Feature” for more information.
Press and release the FUNCTION switch until the message “Final Percent #1” appears on the display. After
the function message has scrolled across the display, the current final nitrous percentage setting will appear on the
display.
To adjust the final nitrous percentage value, press the desired digit button and the value of that digit will
increment. The digit will roll over to 0 and begin counting up again if the user continues to release and press the digit
button. If the .1 digit button is pressed, the final percentage will go to 100%, pressing again will set the starting
percentage back to 0%. The 1. digit is ignored for this function.
To exit without saving the new value, press the FUNCTION switch and select another function.
To save the new value, press and release the ENTER switch and the display will read “SAVED” and the new
setting is now saved.
The range of the nitrous final percentage is 10% to 100% in 1% increments.
This setting will determine the amount of nitrous to be applied at the end of the nitrous power ramp time.
©2007 Edelbrock Corporation
Catalog #71900
Page 6 of 16
Brochure #63-0473
Rev. 08/07 - DC/mc
www.edelbrock.com
Programming the Nitrous Power Ramp Time
NOTE - If the dual ramp feature is enabled fron the options menu, there will be a “Nitrous Build Time #2” in
the menu list. The programming method is the same as the “Build Time #1”. Please refer to the section “Options
Menu” and “Using the Dual Ramp Feature” for more information.
Press and release the FUNCTION switch until the message “Nitrous Build Time #1” appears on the display.
After the function message has scrolled across the display, the current nitrous power ramp time setting will appear
on the display.
To adjust the nitrous build time, press the desired digit button and the value of that digit will increment. The
digit will roll over to 0 and begin counting up again if the user continues to release and press the digit button. The
.01 and .001 digit is ignored for this function.
To exit without saving the new value, press the FUNCTION switch and select another function.
To save the new value, press and release the ENTER switch and the display will read “SAVED” and the new
setting is now saved.
The range of the nitrous build time is .200 to 9.900 seconds in .1 second increments.
This setting will determine the rate at which the nitrous power goes from starting to final percent. A short
power ramp will make the nitrous power very aggressive and a long power ramp will make the nitrous power less
aggressive.
Nitrous Delay Timer = 1.000 seconds
Nitrous Starting Percentage = 20%
Final Nitrous Percentage = 100%
Nitrous Power Ramp Time = 6.000 seconds
©2007 Edelbrock Corporation
Catalog #71900
Page 7 of 16
Brochure #63-0473
Rev. 08/07 - DC/mc
www.edelbrock.com
Viewing Run Data and Entering the Options Menu
Press and release the FUNCTION switch until the message “Edelbrock Nitrous Systems - 71900” appears on
the display.
Press and hold the ENTER switch, the display will show the time at which the activation input was turned OFF
for the previous progressive cycle. After 5 seconds, the display will show the nitrous percent at which the activation
input was tuned OFF for the previous progressive cycle. The controller will only save the first occurence after
activation and only if the run data has been cleared (This procedure is outlined below).
Continue to hold the ENTER switch until the display reads “RELEASE”. At this time, the controller has entered
the Options menu. Please refer to the following instructions regarding the selections available here.
NOTE - You may release the ENTER switch before entering the options menu and return to the Main Menu.
Clearing Run Data
(Reset for next run)
Enter the Options Menu, “Clear Run Data” is the first option. Pressing ENTER will erase the current run data and then
return to the Main Menu. Pressing FUNCTION will select the next option available.
Resetting Controller to Factory Defaults
Enter the Options Menu, press and release the FUNCTION switch until the message “Reset Factory Default
Settings” appears on the display.
Pressing ENTER will restore the controller to the factory default settings and then return to the Main Menu.
Pressing FUNCTION will select the next option available.
Calibrating the Voltage Monitor
Enter the Options Menu, press and release the FUNCTION switch until the message “Calibrate Voltage
Monitor” appears on the display.
Using a volt meter, compare the volt reading on the display to the volt meter reading. Press and release the
ENTER switch to adjust the reading until it is correct.
Refer to “Exiting the Options Menu” to return to the main menu.
Pressing FUNCTION will select the next option available.
©2007 Edelbrock Corporation
Catalog #71900
Page 8 of 16
Brochure #63-0473
Rev. 08/07 - DC/mc
www.edelbrock.com
Setting the Dual Nitrous Power Ramp ON/OFF
Enter the Options Menu, press and release the FUNCTION switch until the message “Dual Ramp Nitrous”
appears on the display.
Press and release the ENTER switch to turn this feature ON or OFF. After pressing the ENTER switch, the
display will show the new state of the selected option. Refer to the “Exiting the Options Menu” to return to the main
menu.
If this option is ON (Factory Default is OFF) two more selections will appear on the Main Menu. Please refer
to the section “Using the Dual Ramp Feature” for more information.
Setting Progressive Fuel Output ON/OFF
Enter the Options Menu, press and release the FUNCTION switch until the message “Progressive Fuel Solenoid
Driver” appears on the display.
Press and release the ENTER switch to turn this feature ON or OFF. After pressing the ENTER switch, the
display will show the new state of the selected option. Refer to the “Exiting the Options Menu” to return to the main
menu.
When the option is ON (Default), the fuel output will pulsate through the entire nitrous progressive cycle. If
this option is OFF, then the fuel solenoid will pulsate for the first 5 pulses and then go to 100%.
Setting Activation Wait and Hold ON/OFF
Enter the Options Menu, press and release the FUNCTION switch until the message “Progressive Fuel Solenoid
Driver” appears on the display.
Press and release the ENTER switch to turn this feature ON or OFF. After pressing the ENTER switch, the
display will show the new state of the selected option. Refer to the “Exiting the Options Menu” to return to the main
menu.
When this option is ON (Factory Default) all timers, including the progressive timers, will halt if the activation
signal (+12V) is removed and will resume when the signal is re-applied. If this option is OFF, all timers will be reset
each time the activation signal (+12V) is removed (i.e. - Each time the activation signal is applied the controller starts
at the beginning of the timing cycle).
©2007 Edelbrock Corporation
Catalog #71900
Page 9 of 16
Brochure #63-0473
Rev. 08/07 - DC/mc
www.edelbrock.com
Setting +12V Timer Output Hold ON/OFF
Enter the Options Menu, press and release the FUNCTION switch until the message "+12V Timer Output Hold"
appears on the display.
Press and release the ENTER switch to turn this feature ON or OFF. After pressing the ENTER switch, the
display will show the new state of the selected option. Refer to "Exiting the Options Menu" to return to the Main Menu.
When this option is OFF (Factory Default) the +12V timer output will turn OFF each time the activation signal
is removed.
Enabling Quick Data Access
Enter the options menu, press and release the FUNCTION switch until the message "Quick Data Access"
appears on the display.
Press and release the ENTER switch to turn this feature ON or OFF. After pressing the ENTER switch, the
display will show the new state of the selected option. Refer to "Exiting the Options Menu" to return to the Main
Menu.
auto
When this option is ON (Factory default is OFF), the data will appear before the text in the Main Menu. Those
familiar with the controller can access or check the current setup much more quickly.
Setting the RESET Timeout Period
Enter the Options Menu, press and release the FUNCTION switch until the message "Timeout in Seconds"
appears on the display.
Press and release the ENTER switch to increase the timeout period in 10 second increments. If the timeout
period is more than 180 seconds, the controller will default back to 20 seconds. Refer to "Exiting the Options Menu"
to return to the Main Menu.
NOTE - If the timeout period is 100 seconds or more the Run Data Time will be recorded in .01 second resolution.
Exiting the Options Menu
Press and release the FUNCTION switch until the message "Exit Options Menu" appears on the display.
auto
Press and release the ENTER switch to return to the Main Menu.
Press and release the FUNCTION switch to return to the top of the options menu.
©2007 Edelbrock Corporation
Catalog #71900
Page 10 of 16
Brochure #63-0473
Rev. 08/07 - DC/mc
www.edelbrock.com
How the Dual Power Ramp Functions
The dual nitrous ramp feature enables the user to have more precise control over the nitrous power ramp.
When the dual ramp feature is enabled, there are two more selections added to the Main Menu. These are "Final
Percent #1" and "Nitrous Build Time #2". Using these extra set points the user can build a power ramp that in nonlinear (i.e.- can be small power increase for 2 seconds and then ramp to full power very rapidly). Please view the
example outlined bellow for help in determining the proper setup for your application.
Example Dual Ramp Nitrous Power Setting
Nitrous Delay Timer = 1.000 seconds
Starting Percent = 20%
Final Nitrous Percent #1 = 40%
Nitrous Build Time #1 = 4.000 seconds
Final Nitrous Percent #2 = 100%
Nitrous Build Time #2 = 2.000 seconds
©2007 Edelbrock Corporation
Catalog #71900
Page 11 of 16
Brochure #63-0473
Rev. 08/07 - DC/mc
www.edelbrock.com
Items Included with the 71900 Controller
1 - Wiring Harness
2 - Installation & User Manual
Items Needed that are NOT Supplied with Controller
1 - Nitrous Kit
2 - Safety Solenoid
3 - Activation Switches as needed, if they were not included with the nitrous kit.
4 - RPM Window Switch; required in EFI vehicles that have an over-rev fuel cut (See pg. 13)
Cautions and Warnings
1 - Always follow installation guidelines and safety precautions when installing any other related
components.
2 - Remove battery connections when installing new components and/or wiring.
3 - Always use proper circuit protection where required (Fuse).
4 - Always test system operation after installation to insure proper operation.
5 - Connect ground wire direct to battery negative terminal and then to controller.
6 - EFI engines using an over-rev fuel cut must use an RPM window switch to avoid potential engine damage.
IMPORTANT - Must use Static Suppression Ignition Wires. You cannot use any type of metal spiral core and/or metal
core ignition wires. Controller contains high frequency digital circuitry and cannot function properly with RFI or EMI
interference.
©2007 Edelbrock Corporation
Catalog #71900
Page 12 of 16
Brochure #63-0473
Rev. 08/07 - DC/mc
www.edelbrock.com
Typical Progressive Controller Wiring Diagram
An optional RPM window switch may be
connected here. Any RPM switch with a ground
control output may be used.
NOTE - Most factory fuel injection systems will
cut the fuel during an over-rev condition. If the
nitrous is NOT controlled by an RPM switch,
engine damage may result.
Progressive Controller with Transbrake Wiring Diagram
Ground
Transbrake
Solenoid
Transbrake
Switch
Activation
+12 Volts
+12 Volt
+12V Timer Output
Ground
W.O.T.
Switch
87
87
87A
Fuel Solenoids
Nitrous Soelnoids
86
Nitrous
Solenoid
Ground
©2007 Edelbrock Corporation
Catalog #71900
30
87A
85
Fuel
Solenoid
+12 Volts
Page 13 of 16
86
Ground
30
85
Arming
Switch
Ground
+12 Volts
Brochure #63-0473
Rev. 08/07 - DC/mc
©2007 Edelbrock Corporation
Catalog #71900
Page 14 of 16
86
1
Ground
Ground
Nitrous
Solenoid
Ground
Fuel
Solenoid
Ground
Ground
Ground to Battery
85
86
30
87A
87
86
85
Ground
Ground
Trans Brake
Solenoid
Micro
Switch
30
87A
87
85
Nitrous
Solenoid
2
1
Fuel
Solenoid
3
4
5
8
1
Time
Delay
Relay
Ground
To Other Side of
Toggle Switch on
Shock Controller
Ground
Ground
6
7
+12 Volt
+12 Volt
30
To Power Side of
Togge Switch on
Shock Controller
86
87A
87
2
85
1
3
4
B+
Time
Delay
Relay
2
Ground
Micro
Switch
5
8
6
7
+12 Volt
Ground
3
MSD Multi Step Retard
NOTE: Refer to individual component manufacturer for specific connection information
Coil +
Coil IGN
Points
M+
M-
2
87A
87
30
MSD 2 Step
Progressive
Controller
71900
Activation
+12 Volt
+12 Timer Output
Ground
Fuel Solenoid
Nitrous Solenoid
MSD 7AL-2
+12 Volt
Trans Brake Button
+12 Volt
Nitrous Arming Switch
To Crank
Trigger
Progressive Controller Wiring Diagram with Several Options
Brochure #63-0473
Rev. 08/07 - DC/mc
www.edelbrock.com
Electrical Specifications
Normal Operating Voltage
10.0 to 16.0 Volts, Negative Ground
Controller will turn OFF at 6.2 Volts
+12 Volt Timer Output
1 AMP Maximum, 80mA sink to ground when timer output is OFF.
Nitrous Solenoid Ground
45 AMPs Maximum
Activation Input
.5mA at 12.0 Volts
Weight
Overall Height
Overall Width
Overall Length
.8 lb.
1.125 in.
4.000 in.
4.700 in.
Caution - DO NOT submerge controller in liquid or directly wash unit with liquid of any type!
Troubleshooting
1 - Engine running rich while using progressive controller.
A - Starting percentage too low for a given bottle pressure and solenoid combination (only fuel solenoid
opening).
B - Fuel pressure too high for fuel solenoid to operate correctly when pulsating.
2 - Nitrous seems to delay after activation.
A - Improper nitrous delay timer setting.
B - Starting percentage too low for a given bottle pressure and solenoid combination (only fuel solenoid
opening).
3 - Nitrous turns OFF during operation.
A - To much current draw from solenoids.
B - Electrical interference from ignition system or other electronic device(s).
©2007 Edelbrock Corporation
Catalog #71900
Page 15 of 16
Brochure #63-0473
Rev. 08/07 - DC/mc
www.edelbrock.com
SERVICE
In the event that your Progressive Nitrous System should need servicing, return the unit freight pre-paid to the
Edelbrock Service and Repair facility at 2700 California Street, Torrance, CA 90503. Do not attempt to disassemble or
service the components of the system yourself. Doing so may void the warranty.
WARRANTY
It is the constant endeavor of the Edelbrock Corporation to provide our customers with the highest quality performance
products. Edelbrock warrants to the original purchaser that the 71900 controller be free from defects in both
workmanship and materials for a period of six(6) months from date of purchase, provided that the product is properly
installed and subjected to normal use and service, and that the product is not modified or altered in any way unless
specified by our instructions. The warranty will not apply if the 71900 controller has been installed incorrectly,
repaired, damaged, or tampered with by misuse, negligence or accident. Our warranty service and repair facility is
located at 2700 California Street, Torrance, CA 90503. Should Edelbrock determine that the product be returned to
the factory, it should be accompanied by proof of purchase and a clear description of the exact problem or warranty
will be void. The product must be returned freight pre-paid. If a thorough inspection of the product by the factory
indicates defects in workmanship or material, our sole obligation shall be to repair or replace the product. This
warranty covers only the product itself and not the cost of installation or removal.
EDELBROCK CORP. SHALL NOT BE LIABLE FOR ANY AND ALL CONSEQUENTIAL DAMAGES OCCASIONED BY THE
BREACH OF ANY WRITTEN OR IMPLIED WARRANTY PERTAINING TO THIS SALE, IN EXCESS OF THE PURCHASE PRICE
OF THE PRODUCT SOLD.
If you have any questions regarding this product or installation, please contact our Technical Department
1-800-416-8628 from 7:00 am - 12:30 pm; 1:30 pm - 5:00 pm, Pacific Standard Time, Monday through Friday.
Edelbrock Corporation
2700 California Street
Torrance, CA 90503
Tech Telephone: (800) 416-8628
©2007 Edelbrock Corporation
Catalog #71900
Page 16 of 16
Brochure #63-0473
Rev. 08/07 - DC/mc