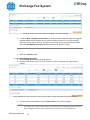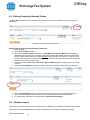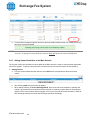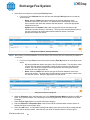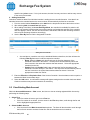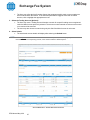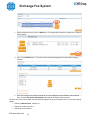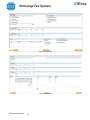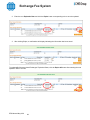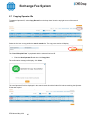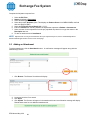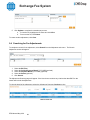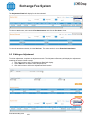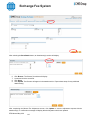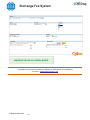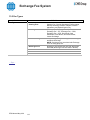
1
Exchange Fee System (EFS) User Manual May 2012 Global Operations Education Exchange Fee System Contents 1. EXCHANGE FEE SYSTEM (EFS) 1.1 1.2 1 Security Requirements Accessing EFS 1 1 2. EFS HOMEPAGE 2 3. TRANSACTION VIEWER 3 3.1 3.2 3.3 3.4 3.5 3.6 Accessing Transaction Viewer 3 Performing a Basic Search for Trades 3 3.2.1 Date Selection ........................................................................................................................... 4 3.2.2 Mode Selection .......................................................................................................................... 6 3.2.3 Summarized By Selection .......................................................................................................... 6 3.2.4 Firm Selection ........................................................................................................................... 6 3.2.5 Location .................................................................................................................................... 6 3.2.6 Show Criteria ............................................................................................................................ 6 3.2.7 Saved Search and Saved Search Groups................................................................................... 6 Performing an Advanced Search 7 3.3.1 Transaction Viewer Advanced Search Field Descriptions ........................................................ 7 3.3.2 Transaction Viewer Advanced Search Operator Descriptions ................................................. 8 3.3.3 Additional Features................................................................................................................... 8 View Trades Search Result List - Sorted by Mode 9 3.4.1 Edit Trades Mode .....................................................................................................................12 3.4.2 Edit Trader ID Mode................................................................................................................17 3.4.3 View Non-Trades Mode ...........................................................................................................18 Appendix I - Transaction Viewer Basic Search Field Definitions 20 Appendix II - Transaction Viewer Advanced Search Field Definitions 20 4. ALLOCATION 4.1 4.2 4.3 4.4 4.5 4.6 4.7 Accessing Allocation 24 Searching for Transactions to Allocate 25 4.2.1 Additional Allocation Notes .....................................................................................................25 Performing Allocations 27 4.3.1 Performing Allocations by Main/Trading Account ..................................................................27 4.3.2 Performing Allocations by Trading Account ...........................................................................29 Editing Previously Allocated Trades 31 Allocation Import 31 4.5.1 Import Instructions...................................................................................................................32 Allocation Screen Key Concepts 33 Appendix III - Allocation Field Descriptions 35 5. ACCOUNT MAINTENANCE 5.1 5.2 5.3 5.4 5.5 5.6 5.7 24 37 Accessing Account Maintenance 37 Account Maintenance – View 37 Single Exchange and Across Exchange Modes 38 Create a New Main Account 39 5.4.1 Adding Trading Accounts.........................................................................................................42 5.4.2 Adding Owners/Controllers to the Main Account ....................................................................44 View Existing Main Account 46 5.5.1 Editing Main Accounts/Trading Accounts/Account Owners/Controllers ................................48 Account Maintenance – Search 56 Account Maintenance – Mass Expire 59 EFS Manual May 2012 2 Exchange Fee System 6. MEMBERSHIP INFORMATION 6.1 6.2 6.3 6.4 6.5 Accessing Membership Information Recent Membership Updates Search Mode by Exchange Searching for Membership Information Search Results 7. REPORTS 7.1 7.2 7.3 8.5 8.6 8.7 8.8 Accessing Reports 68 Report Request 68 7.2.1 Report Packet ...........................................................................................................................70 7.2.2 Report Types ............................................................................................................................70 7.2.3 Report Basic Search Criteria ...................................................................................................72 7.2.4 Report Advanced Search Criteria ............................................................................................73 7.2.5 Submit a Report........................................................................................................................73 Report Viewing 73 7.3.1 View Report ..............................................................................................................................74 7.3.2 View Report Criteria ................................................................................................................75 7.3.3 Delete Report ...........................................................................................................................77 7.3.4 Extract Report ..........................................................................................................................77 7.3.5 Other Report Viewing Features ...............................................................................................78 79 Accessing Globex Registration 79 Registration Form - Step 1: General Information 80 Registration Form - Step 2: Incentive Information 81 Registration Form - Step 3: Participant’s Information 84 8.4.1 Registering Participant Information of a Non-ATS or an ATS Individual Operator ID ..........84 8.4.2 Registering an ATS Team Operator ID ....................................................................................88 Globex Registration Search 91 8.5.1 Searching by Firm/Entity Type ................................................................................................91 8.5.2 Searching by Operator ID or User Name ................................................................................92 8.5.3 Search Results ..........................................................................................................................92 Editing Operator IDs 93 8.6.1 Expire Registered Operator IDs ..............................................................................................93 Copying Operator IDs 95 Extracting Operator IDs 96 9. ADJUSTMENT 9.1 9.2 9.3 9.4 9.5 61 61 61 62 63 68 8. GLOBEX® REGISTRATION 8.1 8.2 8.3 8.4 61 Accessing Adjustment Creating an Adjustment Adding an Attachment Searching for Fee Adjustments Editing an Adjustment 97 97 97 98 99 100 10. PREFERENCES 102 11. CONTACT US 103 12. HELP AND LOG OUT 103 13. APPENDIX 104 EFS Manual May 2012 3 Exchange Fee System 13.1 13.2 13.3 13.4 Login Troubleshooting 104 Navigating the Data Results 105 Errors in Selecting Search Criteria 105 Manual Fee Adjustment Instructions 106 13.4.1 Downloading the Fee Adjustment Template ..........................................................................106 13.4.2 Entering data into the Position Transfer Rebate worksheet ..................................................108 13.4.3 Entering data into the Rate Adjustment worksheet ................................................................108 13.4.4 Attaching the Manual Adjustment Worksheet Template ........................................................109 13.5 Fee Types 112 EFS Manual May 2012 4 Exchange Fee System 1. Exchange Fee System (EFS) The Exchange Fee System (EFS) is a browser-based application that enables clearing firm fee administrators to: • Search, view and edit transactions; • Maintain account and electronic Trader ID information; and • Execute reports to confirm and reconcile transaction fees charged. 1.1 Security Requirements To request access to the Exchange Fee System, fax a completed System Access Request Form to the CME Group Customer Support Group at (312) 338-2626. (Form is available at http://www.cmegroup.com/clearing/files/onlineaccess.pdf.) Please allow 24-48 hours for processing. 1.2 Accessing EFS To access the EFS application, users must first log on to CME Group Connect by entering the following address in the internet browser: http://connect.cme.com. 1. Enter your CME Group Connect Username and Password, and then click Login. Note: The product selection should be set to CME Portal. Note: If the user does not have the Username and Password information, please refer to the Message Center. Upon successful login, the user will be directed to the CME Applications menu. 2. Select the Exchange Fee System icon Exchange Fee System Icon Note: If the user does not have access to CME Group Connect or the Fee Systems Portal, please contact CME Group Firm Support at 312.930.3444 between the hours of 6:30am CST and 5:30pm CST. 3. Log into the Exchange Fee System using your CME Group Connect portal User ID and Password. EFS Manual May 2012 1 Exchange Fee System . 2. EFS Homepage Once successfully logged in to the application, the EFS Homepage will appear. Note the following EFS features: • Multi-Exchange Accessible – Firms will be able to access CBOT, CCE, CME, DME, GREEN, and/or NYMEX/COMEX based on the user’s security access. • Homepage Information – The CME Group fee team utilizes this screen to communicate important messages to the Users. Information on this page is subject to change, but will display such items as the Fee Schedule, Banking Schedule, Contact Information, System Availability, Commodity Code Listing, Glossary of Terms, etc. • Help – click on the Help link on the top right corner of the page (on any EFS screen) to be directed to the EFS User Manual. If further help is needed, please call the EFS Hotline at 312-648-5470 or email [email protected]. The Exchange Fee System offers 24x7 accessibility except on weekdays from 7:00 to 10:00 p.m. (CST) to perform scheduled maintenance. If the maintenance window extends beyond this time, a message will be listed on the home page. Navigation within EFS is driven by the top menu bar. The user first selects the appropriate Exchange, and then within that Exchange, selects the appropriate function to be performed. EFS Manual May 2012 2 Exchange Fee System The EFS homepage also includes a link to the CME Group website. Select the CME Group logo in the top left corner to be redirected to the CME Group website (www.cmegroup.com). Select the Exchange Fee System logo at the top of any page to be redirected to the homepage of that Exchange. 3. Transaction Viewer The Transaction Viewer screen offers both basic and advanced search options to View Trades, Edit Trades, Edit Trader ID, and View Non-Trades (Exercises, Assignments, Deliveries, Expired Options, Cash Settlements and Futures from Exercise and Assignment). 3.1 Accessing Transaction Viewer To access Transaction Viewer select the option from the navigation menu. 3.2 Performing a Basic Search for Trades When the Transaction Viewer link is chosen from the EFS Homepage, the Transaction Viewer’s basic search page appears. Transaction Viewer Main Page/Basic Search Page NOTE: Refer to section 3.2.7 Saved Search for more information about this function. A Basic Search consists of: EFS Manual May 2012 3 Exchange Fee System • • • • • • • Selecting a check box for Process Date and/or Trade Date identifying the date search criteria. Selecting the Mode identifying the action to be taken. Selecting the criteria by which the results should be organized in the Summarized By field. Selecting a Firm. Selecting the Location of the transaction, if applicable. Clicking the Show Criteria box to view the search criteria on the results page. Once the search criteria are defined, select the Submit button to execute the search and retrieve the data. The User will receive a message indicating that the search is in progress. Two fields are required in order to complete a basic search: Date and Firm. If one or more of these fields are left blank, an error message will appear. For the best search results, all fields should be completed, however, if not modified, the default fields will be used for the Date, Mode, and Summarized By selections. The Location field will default to both Pit and Electronic if left blank. NOTE: Refer to section Errors in Selecting Search Criteria for more information about Error Messages. 3.2.1 Date Selection A date selection is required to execute a search. Limit the search using Process Date and/or Trade Date by checking the box in front of one or both of these date selections. A. Transaction Viewer Date Selection Descriptions SELECTION DESCRIPTION Month to Date Month to Date automatically sets the beginning date to the first day of the current month and the end date to the prior trading day. Equals NOTE: Dates cannot be changed while in the Month-To-Date mode. Equals specifies only one day. The system default displays the prior trading day. Between Between specifies the beginning and end dates for a date range. NOTE: With a “Between” search criteria, it is only possible to view a maximum of one calendar month at a time. Last Month defaults the beginning and end dates to the first and last days of the previous month. Two Months Ago defaults the beginning and end dates to two months prior to the current month. Three Months Ago defaults the beginning and end dates to three months prior to the current month. Last Month Two Months Ago Three Months Ago NOTE: Data viewed Three Months Ago is outside of the open adjustment period and therefore cannot be edited. When using the Between and Equals selections, specific dates must be entered by clicking in the date fields and entering the in the MM-DD-YYYY format, or by choosing a using the calendar to the right of the date field. on the calendar icon for the calendar window. EFS Manual May 2012 4 either date date Click Exchange Fee System EFS Manual May 2012 5 Exchange Fee System 3.2.2 Mode Selection Select the Mode using the drop-down menu. • View Trades allows the User to view all transactions as read-only. • Edit Trades allows the User to view and submit trades for recalculation, or to change trading accounts. • Edit Trader ID allows the User to view transactions by a specific trader and change the Trader ID for both pit and electronic trades. NOTE: With this mode the user can only summarize the data by Trader ID or by Trader ID/Trade Account. • View Non-Trades allows the User to view all non-trade activity such as Exercises, Assignments, Deliveries, Expirations, Cash Settlements and Futures from Exercise/Assignment. 3.2.3 Summarized By Selection Select how to sort the data by choosing an option from the Summarized By drop-down menu. • Main Account/Trade Account summarizes data by Main Account and then by Trading Account. • Trading Account summarizes data by Trading Account. • Trader ID/Trading Account summarizes data by Trader ID and then by Trading Account. • Product summarizes data by commodity code. • Trader ID summarizes data by Trader ID (broker symbol for pit and operator ID for electronic). 3.2.4 Firm Selection The firm list displays all of the firms the User is authorized to view. • To select a firm, click on a firm (the firm will then be highlighted). • To select multiple firms, hold down the CTRL key on the keyboard and click to highlight all desired firms. (Note: a maximum of five firms may be selected at one time). • To deselect a firm, hold down the CTRL key on the keyboard and click to highlight all desired firms. 3.2.5 Location Select the location where the transaction took place: • ELC is for electronic trades/transactions. • PIT is for any transaction that took place on the floor/open outcry. • No selection defaults to both locations. 3.2.6 Show Criteria The default setting is for the Show Criteria box to be checked. • This displays a summary of all of the search criteria above the search results. • Uncheck the Show Criteria box to display the results only. 3.2.7 Saved Search and Saved Search Groups The Saved Search function provides the ability to save and load frequently used Transaction Viewer and Report search parameters. Saved Search also has an administrative function ‘Saved Search Groups’ which allows users to make common searches available to other users within the same clearing firm, upon request. • To create a predefined search click Saved Search and the My Criteria screen will display. • Enter a name for the search criteria and click Save. EFS Manual May 2012 6 Exchange Fee System • • To use the saved criteria, highlight the search name and click the action Load, then click Submit. The User will be redirected back to the primary screen with the search criteria loaded, the User has the opportunity to make any updates and then click Submit to retrieve the search results. 3.3 Performing an Advanced Search In order to perform a more specific search, choose an Advanced Search by selecting the Advanced button at the bottom left of the search screen. The basic search selections will remain at the top of the page and must be completed as noted above, and the advanced fields will appear below. Refer to Appendix I – Basic Search Screen or Appendix II – Advanced Search Screen for detailed field definitions. 3.3.1 Transaction Viewer Advanced Search Field Descriptions FIELD NAME DESCRIPTION Quadrant It is not mandatory to choose a selection from the Quadrant or Product Venue fields. The default setting will search all quadrants or product venues. It is possible to narrow a search to a single quadrant or product venue, however, by clicking on the specific quadrant or product venue in the list to highlight it. Product Venue (NYMEX) NOTE: Any time a specific quadrant or product venue is chosen, the Product list will automatically update to reflect only the products available within that quadrant or product venue. To narrow the search to a particular product, select the desired products identified in the Product field for the chosen quadrant/venue. It is not mandatory to choose a selection from the Product field. The default setting will search all Products. To narrow a search by Product, select a single product either by scrolling through the list OR type the product code in the text field above the product list. The system will automatically locate the first item in the list that matches the entry. • To Add a Product from the product list: o Highlight the product in the list. o Click the Add hyperlink or press the enter key. o The product’s code will then populate in the box to the right of the product list. • To Select multiple products: o Repeat the steps above for each product; OR hold down the CTRL key on the keyboard. o Click each product to highlight it. o Click the Add hyperlink to add all of the products at once. • To Delete a product from the search list: o Click and highlight that product code in the list box. o Click the Delete hyperlink. • To Delete multiple products from the search list: o Click and highlight more than one product code in the list box. o Click the Delete hyperlink. Product F/O Choose to search for either a Future or an Option to narrow the search. Currency Choose to select a specific currency. Venue (NYMEX/DME/GREEN) This field allows the User to search by a specific Venue. Main Account This field specifies the grouping account. EFS Manual May 2012 7 Exchange Fee System Trading Account This field identifies a specific trading account or sub account of the Main Account indicated in the previous field, or can be used alone to search for a specific trading account where the main account is unknown. Broker This field allows the User to search for a trade transacted by a specific broker. Operator ID This field allows the User to search for a trade by the Operator ID on the trade. Order Number This field allows the User to search by the order number. Transaction Type This field specifies the type of transaction executed. Fee Type This field allows the User to search by the fees charged to the transaction. Applied Fee Indicator This field identifies the fee level that corresponds to the fee schedule. Hours This field identifies the trading session as Electronic Trading Hours (ETH) or Regular Trading Hours (RTH). This field indicates the fee incentive program associated to the transaction. Fee Incentive Indicator 3.3.2 Transaction Viewer Advanced Search Operator Descriptions Several of the Advanced Transaction Viewer fields offer a drop-down list with operators or functions that allow the User to sort or narrow the search criteria within that field. The definitions for those operators or functions are: OPERATOR DESCRIPTION Any Allows the User to search for all items and is the default selection. Begins With Allows the User to enter the first few numbers and/or letters of the desired search item(s). Allows the User to enter a string of numbers and/or letters and search for all items that contain that string. Allows the User to enter the last few number and/or letters of the desired search item(s). Allows the User to enter the exact search item. “Equals” may also be used to enter multiple accounts so that it works as an “is in” option. Contains Ends With Equals To Add a Search Item 1. For all selections except Any, type the desired search item in the text field below the drop-down menu. 2. Click the Add hyperlink to add that item to the search list. NOTE: The Add hyperlink must be selected in order for inputted text to be captured. To Delete a Search Item 1. Find the item to be deleted in the search list. 2. Click to highlight the item. 3. Click the Delete hyperlink. 3.3.3 • Additional Features To clear all selected search criteria; select the Clear button at the bottom of the search form. EFS Manual May 2012 8 Exchange Fee System • To switch back to the Basic Search form, select the Basic button at the bottom of the search form. 3.4 View Trades Search Result List - Sorted by Mode The View Trades Mode provides the User a read only view of any trade results returned from the search criteria entered. The results of all searches are initially sorted based upon the Mode selected in the basic search. The below explanation of search results is organized based on each of the possible mode choices: View Trades, Edit Trades, Edit Trader ID and View Non-Trades. After being sorted by mode, a secondary sort is organized by the Summarized By field. The Main Account/Trading Account option is the default selection for organizing results within the Transaction Summary view. NOTE: See Summarized By Selection section above for further details. Once sorted by Mode and then Summarized By, the data is returned in a first level view called the Transaction Summary, where a summary of all trades or non-trades is visible. Each returned record can then be chosen individually and displayed at the Transaction Details level. Fee Details is the third level, where basic fee information can be identified for each transaction. A. Transaction Summary After executing a search in the View Trades mode, the Transaction Summary screen will be displayed. Transaction Summary Defined • • • • • Show Search Criteria hyperlink will allow the user to view the search form and see the field parameters utilized to obtain the results. Go to Page allows the user to enter a page number to navigate through the results. Set Page Length allows the user to modify the number of records displayed in a single page on the screen. Show All hyperlink allows the user to view all records on one screen. Extract hyperlink converts the results into a Tab Delimited format that enables users to import into any machine readable format. 1. Viewing or Modifying Search Criteria EFS Manual May 2012 9 Exchange Fee System a. To view the search criteria form and the parameters previously selected, click on the Show Search Criteria hyperlink located just below the Transaction Viewer title. b. After selecting the Show Search Criteria hyperlink, the screen will display the Basic or Advanced Search mode based on the previous search criteria selected. c. To modify the search criterion simply change the input values and then select the Submit button. d. Upon viewing the criterion, the Show Search Criteria hyperlink now displays as Hide Search Criteria. To hide the search form criterion, simply select the Hide Search Criteria hyperlink. Show Search Criteria Chosen in the Transaction Summary View B. Transaction Details and Fee Details To view the Transaction Details and Fee Details for a line item displayed within the Transaction Summary screen, simply click on that line item. As mentioned above, the fee system drills down from a general summary to the specific detail of the trade. The below image shows the general Transaction Summary followed by the Transaction Details. Select a line item within the Transaction Detail level and the Fee Details for that trade will be displayed. EFS Manual May 2012 10 Exchange Fee System Trade Details and Fee Details EFS Manual May 2012 11 Exchange Fee System 1. • • • 3.4.1 Additional Navigation Features To go back to the Transaction Summary screen, select Back to Summary button. To go back to the Transaction Details screen, select Back to Details button. To start a brand new search, select the New Search button. Please note that selecting this button will clear all search criteria. Edit Trades Mode The Edit Trades Mode allows the User to view, adjust and submit transactions for recalculation. This mode also allows the User to change the trading account when a transaction has cleared with an incorrect account number. Recalculation of trades and changing of the trading account can occur at the Transaction Summary and Transaction Details levels. Fee Details can also be viewed from this area. Note that the User must return to the Transaction Viewer and choose the Edit Trades Mode from the mode drop down menu, in order to execute these edit processes. NOTE: 1. If you have executed a change to an account within the Account Maintenance screen during the current business day, the system will automatically submit those transactions for recalculation during the open adjustment period. Therefore, if you are unable to view trades in the edit mode, they may have already been submitted. Select “View Trades” mode in your search criteria and check for one of the following adjustment indicators in your search results: A = Allocation N = No Adjustment S = Record is split (i.e. left over quantity or unallocated quantity) Y = Resubmit, Change Account, Change Trader ID 2. There is a Rebate Period for these changes. Trades may only be EDITED during the current month and two months prior. The User may only view trades three months prior. 3. The User will need to manually submit transactions for recalculation in the Transaction Viewer for which the User had added or modified Operator IDs in the Globex Registration Screen. A. Transaction Summary After executing a search in the Edit Trades Mode, the Transaction Summary screen will display. The Edit Trades Mode defaults to View Details displayed in the top right corner of the Transaction Summary screen. Using the Edit Trades Mode within the Transaction Summary Screen of Transaction Viewer B. Edit Functions The User may choose the action to be performed, whether it is to view the transactions, change the trading account number or submit transactions for recalculation. At the Transaction Summary level or at the Trade Details level, the User may select from the drop-down list: • View Details • Change Account • Recalculate EFS Manual May 2012 12 Exchange Fee System Following is a description of these actions: • View Details allows the User to select a specific line item from the Transaction Summary in order to view the Trade Details for that item (similar to the View Trades Mode). The User may also select View Details from the Trade Details level in order to view the associated Fee Details. • Change Account allows the User to change the trading account number on transactions that cleared under incorrect account numbers, or to modify the account number associated to position transfer and adjustments records. An account change can be performed at the Transaction Summary level or at the Trade Details level. • Recalculate allows the User to submit transactions for recalculation. Trades may be recalculated at the Transaction Summary level or at the Trade Details level. NOTE: In order to use the Change Account and Recalculate functions at the Trade Details level, the User must select View Details at the Transaction Summary level. 1. View Details To view the Trade Details for a particular item at the Transaction Summary level: 1. Select View Details from the drop-down list. 2. Click the check box in the row of one line item in order to view the details of that transaction. View Details of a Trade within Edit Trades Mode of the Transaction Summary 3. After selecting the appropriate item, select the Continue button. NOTE: Only one line item can be selected at a time. If more than one check box has been selected, the User will receive an error message. View Details - Error - Only One Item May be Viewed at a Time EFS Manual May 2012 13 Exchange Fee System At the Trade Details level, the User may again select from the drop-down list: Show Fee Details Change Account Recalculate Transaction Detail Screen in the Edit Trades Mode of the Transaction Viewer Also at the Transaction Details level • To Change an Account or to Recalculate Transactions, follow the same steps outlined above. • To view Fee Details for a particular trade, select Show Fee Details in the drop-down menu. 2. Change Account Changing an account in EFS allows the user to move trades from one account to another. a. To Change a Single Account Number: 1. Select Change Account from the Select Action drop-down list. 2. Click the check box in the row of the line item to be changed. Selecting a Single Account to Change the Account Number within the Edit Trades Mode of Transaction Summary 3. Select the Continue button. EFS Manual May 2012 14 Exchange Fee System Changing a Single Account within the Edit Trades Mode of Transaction Summary 4. Locate the New Trading Account Number by utilizing the auto complete feature that suggests possible trading account matches as you enter text within the text box, or scroll through the drop-down box to find the account. To input an account that is not currently registered in EFS select the Non-Member Account radio button and enter an account number. 5. Select the Continue button. b. To Change Multiple Accounts 1. Select Change Account from the drop-down list. 2. Click the check boxes in the rows of all of the accounts to be changed to a single account number. Selecting Multiple Accounts to Change into a Single Account within the Edit Trades Mode of Transaction Summary 3. To select all accounts displayed, click the Check All box in the column header. NOTE: The Check All option will only select the accounts that are displayed on the current screen. If more than one screen of data exists; select the accounts on all pages by first clicking the Show All hyperlink next to the drop-down box and then click on the Check All box. EFS Manual May 2012 15 Exchange Fee System 4. After selecting the appropriate account(s), select the Continue button and a Change Account section will display. 5. Locate the New Trading Account Number by utilizing the auto complete feature that suggests possible trading account matches as you enter text within the text box, or scroll through the drop-down box to find the account. To input an account that is not currently registered in EFS select the Non-Member Account radio button and enter an account number. 6. Select the Continue button. The Adj column at the right will change from N to Y to indicate that this item has been submitted for reprocessing during that night’s batch cycle. Changing Accounts by Creating a New Account to Encompass Multiple Accounts within the Edit Trades Mode of Transaction Summary 3. Recalculate In the Edit Trades Mode of Transaction Viewer, the User can recalculate a single item, or a group of items, at one time. This feature should be used to manually submit trades for recalculation when the associated operator ID has been added or modified in the Globex Registration screen. a. To Submit an Item for Recalculation 1. Select Recalculate from the drop-down list. 2. Click the check box in the row of the line item that is to be recalculated. Recalculating a Trade within Edit Trades Mode of the Transaction Summary b(1). To Select Multiple Items for Recalculation 1. Click the check boxes in front of all line items to be submitted for recalculation. b(2). To Select All Items on the Screen for Recalculation 1. Click the Check All box in the column header to highlight all the items displayed on the screen. NOTE: The Check All option will only select the accounts that are displayed on the current screen. If more than one screen of data exists, select the accounts on all pages by first clicking the ‘Show All’ hyperlink next to the drop-down list and then click on the Check All box. 2. After selecting the appropriate item(s), select the Continue button. 3. A message window will appear asking for confirmation to recalculate the trades - click OK to confirm or Cancel. 4. If OK is selected, a confirmation message will be displayed stating that the request has been submitted for recalculation. EFS Manual May 2012 16 Exchange Fee System 5. The Adj column at the right will change from N to Y to indicate that this item has been submitted to be reprocessed during that night’s batch cycle. After submitting a request to edit trades, the User will receive a message indicating that the resubmission is in progress. 3.4.2 Edit Trader ID Mode Trader ID is a single field used to identify an individual executing either a Pit or Electronic transaction. The field contains the “Broker Symbol” for Pit transactions and the “TAG 50” Operator ID for Electronic transactions. If it has been determined that a Trader ID has been passed through incorrectly for either a Pit or Electronic transaction, you may update the ID through the Edit Trader ID Mode, utilizing the instructions below: 1. 2. 3. 4. From the Mode field, choose Edit Trader ID. Trader ID will default in the Summarized By field. Trader ID/Trd Acct can be selected if needed. Select the Firm. In the Location field, if left blank, electronic and pit will be included. Select ELC (to update only the “TAG 50” Operator ID) or select PIT (to update only the “Broker Symbol”). 5. Click Submit. Edit Trader ID Summary Results 6. Select the Change Trader ID option from the drop-down menu. 7. Enter the New Trader ID. EFS Manual May 2012 17 Exchange Fee System New/Change Trader ID Entry Screen 8. Click the Continue button. The Change Trader ID screen will be returned, with a confirmation message. The adjustment status has changed to “Y”. The old trader ID is still displayed at this time, but will be updated in that night’s processing cycle. Auto Response Identifying Trader ID Updated 3.4.3 View Non-Trades Mode The View Non-Trades mode allows the User to view allocated and unallocated Exercises, Assignments and Deliveries, plus other non trade activity such as Cash Settlements, Futures from Exercise, Futures from Assignments and Expirations. NOTE: Account numbers are not attached to these transaction types and as a result, non-trade exchange fees are applied at the NON-MEMBER RATE. Therefore, it is important to utilize this mode to determine which activity should be allocated to member accounts in order to receive the reduced non-trade exchange fee rate. A. Transaction Summary After executing a search in the View Non-Trades Mode, the Transaction Summary will be displayed. The nontrade activity will be summarized to either a blank account (denoting unallocated activity) or to previously allocated accounts. Simply click on one of the summary line items in order to obtain the details. View Non-Trade Transaction Summary Screen B. Transaction Details After selecting one of the line items from the Transaction Summary screen, the screen will display all the associated non-trade activity Transaction Details. From the Transaction Details section the User may execute the following action items: EFS Manual May 2012 18 Exchange Fee System 1. Reallocate – This feature will redirect the User to the Allocation screen with the fields pre-populated based on the line item selected in the Transaction viewer. • For instance if a User selects a single transaction of Firm ID = 999, Transaction Type = Assignment, Product = C, then upon redirection to the allocation screen the user will have those fields pre-populated. Plus, within the allocation screen, the month will automatically obtain month-to-date activity (even though one-date may have been selected in the transaction viewer). • For CBOT, this feature is not available on transaction types Futures from Exercise and Futures from Assignment as the allocations for these transactions are systematically performed when the corresponding Exercises and Assignments are allocated. View Non-Trades Transaction Detail Screen NOTE: If the User goes to the Allocation Screen and then back to the Transaction Viewer, the search results will be in the same state; therefore in order to refresh the result set the User must re-perform the search. To do this, select the NEW SEARCH button below the transaction detail section. EFS Manual May 2012 19 Exchange Fee System 3.5 Appendix I - Transaction Viewer Basic Search Field Definitions FIELD NAME DESCRIPTION Firm Location Represents the filling firm (executing firm) of the transaction. Mode Process Date Summarized By Trade Date The location in where the trade was executed (Pit or Electronic). The action to be taken (e.g. Edit Trader ID, Edit Trades, View Non-Trades, View Trades). The date that the trade was processed in EFS. How the data will be grouped (e.g. Main Account/Trading Account, Product, Trader ID, Trader ID/Trading Account, Trading Account). The date that the trade was executed. 3.6 Appendix II - Transaction Viewer Advanced Search Field Definitions FIELD NAME DEFINITION Applied Fee Indicator (CME) Applied Fee Indicator (AFI) corresponds to the respective levels on the fee schedule. B BP C E Applied Fee Indicator (CBOT) CBOE Member eFX Bank Incentive Program (BIP) Participant Non-Member Individual Equity Member, Clearing Member, Rule 106.J Corporate Equity Member Firm, Rule 106.I Member Firm, Rule 106.S Member Approved Fund F Rule 106.F Employee L Rule 106.D Lessee O Rule 106.H/N Firm RH Rule 106.R Electronic Corporate Member – Holding Member RW Rule 106.R Electronic Corporate Member – Volume Incentive Program X Out of Division Applied Fee Indicator corresponds to the respective levels on the fee schedule. L1 Individual Equity Member trading for own account. L1D Individual Lessee (Delegate/106.D) trading for own account. L1F Individual Clearing Firm Employee (Firm Appointee/106.F) trading for own account (delegate rates will apply). L2 Individual Equity Members (where another individual is executing the trade) and Equity Firms that have the trading rights and share minimum for the product traded. L3 Individual Non-Equity Members (where another individual is executing the trade) and Non-Equity Member Firms that have the trading rights but do not have share minimum for the product traded. L3D Individual Delegate Members where another individual is executing the trade. L3F Individual Clearing Firm Employee where another individual is executing the trade. L4 Electronic Corporate Member Firms L5 Non-Member EFS Manual May 2012 20 Exchange Fee System FIELD NAME DEFINITION L6 L6D Applied Fee Indicator (CCE) Applied Fee Indicator (DME) Applied Fee Indicator (NYMEX/GREEN) Broker Product Fee Incentive Indicator (CME, CBOT and NYMEX) Mini-sized Contract Permit Holders (also known as a CMACE Permit) Individual Lessee (Delegate/106.D) whom is also holding a CMACE permit. L6F Individual Clearing Firm Employee (Firm Appointee/106.F) whom is also holding a CMACE permit. L7 CME Members eligible for discounted rates on the Mini-Dow. Applied Fee Indicator corresponds to the respective levels on the fee schedule. M Member N Non-Member Applied Fee Indicator corresponds to the respective levels on the fee schedule. DFF DME Floor Member DOF Off-Floor Member DCM DME Clearing Member DMM DME Market Maker DNM NYMEX Member DCU Non-Member Applied Fee Indicator corresponds to the respective levels on the fee schedule. C Non-Member E Equity (Firm or Individual) F 106.F Member L Lessee Member (Rule106.D) (Formerly referred to as Licensee) X Blended - Member Trading Outside Division, eligible for blended rates Field identifies the member’s acronym, typically referred to as Broker Symbol. This field should be predominately utilized for isolating PIT trading activity. Indicator code (usually a two to five character code) for the contract traded. Fee Incentive Indicator corresponds to the respective Incentive Program status. Blanks (or spaces) in this field mean no incentive program status applies. Note: The Applied Fee Indicator for these Incentive Programs corresponds to Non-Member status, so this field is used to determine if Incentive Program rates were applied. AIP Asian Incentive Program IIP International Incentive Program SAIP South American Incentive Program, also known as the Latin American Bank Incentive Program (LABIP) LACIP Latin American Corporate Incentive Program FMIP Latin American Fund Manager Incentive Program Facilitation Fees (CME, CBOT and NYMEX) Fee Type Facilitation Desk Fees Allows a user to narrow the search by the fees charged to the transaction(s). Following is a list of fee types, grouped by the category under which they are billed to the clearing firm: CBOT Clearing Clearing Fee, , E/A Surcharge, Expired Option Fee, Fees Fung Surcharge, Give-Up Surcharge, Position Adjustment, Position Transfer CBOT Exchange EFP Surcharge, Exchange Fee, Exchange FeeFees NonTrd CCE Transaction Cash Settlement, Give-Up Surcharge, Position EFS Manual May 2012 21 Exchange Fee System FIELD NAME DEFINITION Fees CME Clearing Fees CME Globex Fees CBOT Brokerage Fees CME Brokerage Fees NYMEX/GREEN Exchange Fees DME Exchange Fees Adjustment, Position Transfer, Trans Fee – NonTrd, Transaction Fee Clearing Fee, E/A Surcharge, EFP Surcharge, Fee Credit, Give-Up Surcharge, New Brokerage-106F, Position Adjustment, Position Transfer, 106F Brokerage Globex Fee Brokerage, 106F Brokerage, 106F Brokerage Ind (These Brokerage Fees are billed to the Broker, not the clearing firm.) New Brokerage-Other, 106D Brokerage (These Brokerage Fees are billed to the Broker, not the clearing firm.) Block Surcharge, Cash Settlement, Day Credit, E/A/D Notice, EFS Surcharge, , Exchange Fee – CPC, Exchange Fee – GBX, Exchange Fee – PIT, Exchange Fee – NONTRD, Fee Credit, Give-Up Surcharge, Lessee Surcharge, Position Adjustment, Position Transfer, Power Credit Block Surcharge, Cash Settlement, E/A/D Notice, Exchange Fee – CPC, Exchange Fee – GBX, Exchange Fee – NONTRD F/O Trading activity may be isolated by either the Futures or Option indicator. Currency Fees billed may be isolated by the currency in which they are billed. Hours Regular Trading Hours (RTH), the trading session that takes place during the timeframe that the trading floor is open, whether the trade is done on the floor or electronically. Extended Trading Hours (ETH), the electronic trading session that takes place outside of the hours during which the trading floor is open. This is the grouping account created by firms via the account maintenance screen to group all trading accounts with the same account owner(s) and controller(s). Field identifies the customer’s order. This number is internally generated by the order routing software that uniquely identifies an order instruction. ALL NYMEX and COMEX products COMEX COMEX products only NYMEX NYMEX products only Each product can be identified by one of the following classifications: Agriculture (AGS), Currency (CURR), ), Equity Index (INDEX), Interest Rate (INT RATE) and ERIS (CME only) For DME and GREEN, there are no Quadrant classifications, so the selection criterion is ALL. Product Venue is used instead of Quadrant for NYMEX. Field identifies the executor’s user ID, typically referred to as an Operator ID or TAG 50 for electronic activity, and broker symbol for pit activity. Main Account Order Number Product Venue (NYMEX only) Quadrant (CBOT, CCE, CME, DME & GREEN) Trader ID Trading Account This is the actual trading account number that was listed on the transaction. Transaction Type Field identifies the specific type of transaction executed, below are the descriptions: PIT PIT SPRD, PIT TRD Ex-PIT BLOCK, BLOCK SPREAD, EFP, EFR, EFS, EXCHANGE OPTIONS FOR OPTIONS EFS Manual May 2012 22 Exchange Fee System FIELD NAME DEFINITION Electronic Non-Trades Over The Counter Other Trading Activity Venue (NYMEX/DME/GREEN) NYPIT CXPIT CPC GLBX EFS Manual May 2012 23 ELC SPRD, ELC TRD, GBX SPRD, GBX TRD CASH SETTLE, DELIVERY, EXERCISE, ASSIGNMENT, EXPIRED OPTION, FUTURE FROM ASN, FUTURE FROM EXE OTC (CME Only) GIVE UP, POS ADJ, TRANSFER, TRANSFER RFO, EXCHANGE FOR MINI NYMEX Floor Trading (Open Outcry) COMEX Floor Trading (Open Outcry) ClearPort Clearing Globex – CME Group electronic trading platform for NYMEX, COMEX, GREEN and DME products. Exchange Fee System 4. Allocation The Allocation screen allows the allocation of non-trade transactions (for example, Exercise, Assignment, Delivery, Cash Settlement, Expired Options, Future from Exercise and Future from Assignment) to the appropriate main and/or trading account, as well as the ability to edit previously allocated transactions. These Non-trade transaction types do not have account numbers associated to them when the records are received from CME Group Clearing. Therefore, they are charged at Non-Member rates until the firm allocates them to the appropriate underlying main and/or trading account. Note for CBOT: Future from Exercise and Future from Assignment transactions do not need to be allocated separately. These transaction types will systematically be allocated to the same main and/or trading account entered for the associated Exercise or Assignment transaction. NYMEX, GREEN, CCE and DME feature only: ‘Show Optional Types’ by selecting the check box. The fees for these optional transaction types are not based on membership status, therefore, they are not required to be allocated, however the User may do so if desired. 4.1 Accessing Allocation To access Allocation select the option from the navigation menu. The following transaction types are available for allocation by Exchange: Transaction Type CBOT CME X NYMEX/COMEX/DME/GREEN Optional CCE Optional Assignment X Delivery X X Optional Optional Exercise X X Optional Optional Expirations X N/A N/A N/A Cash Settlement Future from Assignment N/A N/A X N/A N/A X Future from Exercise N/A N/A X N/A Swap from Assignment N/A N/A N/A X N/A X X N/A Swap from Exercise N/A N/A X = Full allocation functionality N/A = Not valid for allocation for that product exchange Optional = Available for allocation, but will have no fee impact if applied. Feature was made available per request, for bookkeeping purposes. EFS Manual May 2012 24 Exchange Fee System 4.2 Searching for Transactions to Allocate After the User selects the Allocation menu option from the navigation bar, the allocation search screen will be displayed. Refer to Appendix III – Allocation Field Descriptions. Allocation Search Screen To execute a search for unallocated transactions, the User must select the following fields: • Firm • Trade Month • Product (Filter by Code or Name) • Transaction Type • Mode (to allocate by Main/Trading Account or Trading Account) After completing these fields, select the Get Quantity button. The Reallocation screen will display. Depending on the Mode selected, the User will be able to select the Main Account and/or Trading Account to which transactions should be allocated. 4.2.1 Additional Allocation Notes For NYMEX/COMEX, GREEN, CCE and DME Exchanges Only: • The Show Optional Types selection allows the user to allocate the optional transaction types (those that do not have a fee impact associated with the allocation). For CBOT Only: • Future from Assignment or Exercise transactions will systematically be allocated to the same main and/or trading account when the corresponding Assignment or Exercise is allocated. • A Future from Assignment or Exercise has the same product code as the option Assignment or Exercise, with the exception of Flex Options, Weekly Treasury Options and Weekly Ag Options. In order to allocate transactions associated with these option types, the allocation must be done using the underlying future product code. NOTE: A translation of the Flex and Weekly option codes to the underlying futures codes is available within the Commodity Code Listing on the EFS Home Page. • For Soybean Crush Options the product code and quantity ratio differ between the option and the underlying futures, as shown in the table below. NOTE: A Crush Option Exercise or Assignment can be allocated using the option product code 31. The allocation will automatically apply the correct ratio to the corresponding Futures from Exercise or Assignment. Commodity Code S Commodity Code 06 EFS Manual May 2012 25 10 Soybean Futures 11 Soybean Meal Futures Exchange Fee System Commodity Code 07 EFS Manual May 2012 26 9 Soybean Oil Futures Exchange Fee System 4.3 Performing Allocations Allocations will be performed based on the Mode selected in the allocation search screen: • • By Main/Trading Account By Trading Account Each mode will display the Current Transactions (current unallocated transaction count) and the Current Quantity (current number of available contracts to be allocated) at the top of the allocation form. These numbers cannot be edited. 4.3.1 Performing Allocations by Main/Trading Account The following screen will be displayed when selecting the Main/Trading Account Mode in the search form. Allocating Transactions by Main Account/Trading Account This feature provides only those accounts that have been registered in the Account Maintenance section of the EFS application. This ensures the User will not input an incorrect account number. Note: once the User allocates transactions, the User will have to wait until the next business day to correct those transactions if an error was made. To Allocate Transactions by Main Account/Trading Account 1. In the Account field, select the Main Account number to which the transactions will be allocated. 2. In the Trading Account field, select the Trading Account to which the transactions will be allocated. Note: Trading Account is an optional field. 3. Go to the Quantity field and enter the number of contracts to be allocated to that account. 4. To complete this entry, select the Add button (or tab to the Add button and then select Enter on the keyboard) 5. To Allocate Items to More than One Main/Trading Account, simply repeat steps #1 through #4. The User can continue to allocate to additional accounts as long as the Current Quantity available to be allocated is greater than zero. 6. To complete the allocations, the User must select the Reallocate button. If this is not done, the allocations will not be processed. Please verify the data in the list is correct before reallocating. EFS Manual May 2012 27 Exchange Fee System 7. Upon selecting the Reallocate button, the User will be prompted to confirm the submission. Select OK to confirm or select Cancel to exit. Alert Message for Submitting Allocations 8. If the User selected OK, a confirmation message will display. Confirmation Message for Submitting Allocations To Remove an Allocated Account (prior to completing the Allocation) 1. Highlight the line(s) to be removed within the allocation box. EFS Manual May 2012 28 Exchange Fee System 2. Select the Remove button. The User will be prompted to confirm the request. Select OK to confirm or select Cancel to exit. 3. If OK was selected, a confirmation message will display and the unallocated transaction count will be updated. Alert Message for Removing Allocated Transaction 4.3.2 Performing Allocations by Trading Account The following screen will be displayed when selecting the Trading Account Mode in the search form. Allocating Transactions by Trading Account EFS Manual May 2012 29 Exchange Fee System The Trading Account mode allows the User to input the respective trading account without restricting the User to what has been registered within the EFS application. This feature may also be utilized for allocating transactions to non-member accounts. The system will automatically correlate the inputted trading account to a main account if one exists in the EFS account registration database. To Allocate Transactions by Trading Account 1. In the Trading Account field, enter the Trading Account to which the transactions will be allocated. The trading account can be a maximum of 20 characters. 2. Go to the Quantity field and enter the number of contracts to be allocated to that account. 3. To complete this entry, select the Add button (or tab to the Add button and then select Enter on the keyboard). 4. To Allocate Items to More than Trading Account, simply repeat steps #1 through #3. The User can continue to allocate to additional accounts as long as the Current Quantity available to be allocated is greater than zero. 5. To complete the allocations, the User must select the Reallocate button. If this is not done, the allocations will not be processed. Please verify the data in the list is correct before reallocating. 6. Upon selecting the Reallocate button, the User will be prompted to confirm the submission. Select OK to confirm or select Cancel to exit. 7. If the User selected OK, a confirmation message will display. To Remove an Allocated Trading Account (prior to completing the Allocation) 1. Highlight the line(s) to be removed within the allocation box. 2. Select the Remove button. The User will be prompted to confirm the request. Select OK to confirm or select Cancel to exit. 3. If OK was selected, a confirmation message will display and the unallocated transaction count will be updated. Alert Message for Removing Allocated Transaction NOTE: Once the allocations have been submitted, they CANNOT be changed the same day. The allocations will be processed by the system overnight and the transactions will not be available for edit until the next day. EFS Manual May 2012 30 Exchange Fee System 4.4 Editing Previously Allocated Trades The Prev Alloc checkbox on the search form will allow the User to correct/update a previously allocated transaction. Reallocation Screen with Prev Alloc Selection Search Criterion for Previously Allocated Transactions 1. Select the Firm. 2. Select the Prev Alloc checkbox. 3. After selecting the Prev Alloc checkbox, the Trade Month and Process Month will be displayed, defaulting to the current month. The trade month denotes when the original trade was cleared while process month denotes when the original allocation was processed. For instance, if a January 2010 Exercise was allocated in February 2010, the User must select January 2010 as the trade month and February 2010 as the process month. 4. Continue to select the Product, Transaction Type and Mode (By Main/Trading Account or Trading Account). 5. Enter the Account Number (trading account) to which the transactions were previously allocated. 6. Select the Get Quantity button to obtain the results based on the criterion selected in Steps 1-5. 7. The results will display in the same format as if the transaction had never been allocated. 8. To complete the reallocation, follow the steps for Performing Allocations. 4.5 Allocation Import This feature provides the ability to import allocations from a CME Group provided Excel spreadsheet template. Please note, to use the Import feature the User must adhere to the following navigational processes: EFS Manual May 2012 31 Exchange Fee System • If the User has selected mode “Main/Trading Account”, Main account is required when populating your spreadsheet. Trading account is not required. This will follow the same rules as when performing the allocations via the Allocations screen. • If the User has selected mode “Trading Account”, Trading Account is required when populating your spreadsheet. Main Account must NOT be populated. If the Main account is populated the validation will fail. This will follow the same rules as when performing the allocations via the Allocations screen. Once data has been imported into the screen the User will still be able to “Add” additional allocations if needed. The User will also be able to “Remove”, “Clear”, and “Extract” any of the data on the screen. The import function only affects the population of the data in the allocation box. 4.5.1 Import Instructions The User will continue to execute the search feature for allocations based on the Trade Month, Product, Transaction Type, and Mode, prior to selecting the “Get Quantity” feature. After the search has been executed, the “Import” feature will now be made available. If the provided CME Group spreadsheet (located on the homepage) is complete, the end user may select the “Import” hyperlink. Once the “Import” hyperlink has been selected, the User will locate the Excel spreadsheet that has been saved/created using the “Browse” button. Once the file has been located, select the file utilizing the standard window prompts. The User will be able to view the filename in the Allocation Import Window’s textbox, to denote whether the file selected is accurate. If the file selected is accurate, select the “Upload” button. If the file selected is not accurate, re-execute the “Browse” button to find the file. EFS Manual May 2012 32 Exchange Fee System After the “Upload” button has been selected, the system will process the file to ensure the content is valid prior to populating the screen. If there are errors noted, the system will display those errors to denote what needs to be corrected; if the data is valid the allocation box will be populated just as when utilizing the online application. Sample Error Message 4.6 Allocation Screen Key Concepts What does the term “Reallocate” signify? Non Trade transactions are initially directed to a “blank” account for the firm, any allocation the User performs is known as Reallocation. May I correct an allocation after submitting the records for allocation? The User may only allocate transactions ONE time per business day. If a mistake is made and submitted, it cannot be corrected until the next business day. If I allocate many trading accounts at once, how am I best able to view them in the allocation screen? If the scroll bar is not sufficient for viewing entries in the allocation box, the User may select the Extract hyperlink. Refer to the image below for reference. EFS Manual May 2012 33 Exchange Fee System Allocation Search Extract Feature After selecting the Extract hyperlink the User will be prompted to Open or Save the extracted list of main/trading accounts to be allocated. To obtain a quick view of the accounts, select Open; to review at a later time or to save the data for import into another application, select Save. What happens if the allocated quantity exceeds the available quantity, as shown in the image below? If an entered quantity causes the Total Reallocated Quantity to exceed the number of contracts available for allocation, an error message will appear in a pop-up window. Click OK to remove the error message, return to that section and revise the quantity. Reallocation Screen with Quantity Exceeds Error What if I don’t know what specific transactions are unallocated? The User may execute the Unallocated Non-Trades Report in the Reports screen, or the User may utilize the Transaction Viewer’s “View Non-Trades” mode, to determine what transactions may need to be allocated. EFS Manual May 2012 34 Exchange Fee System 4.7 Appendix III - Allocation Field Descriptions See the below table for more detailed descriptions of each Allocation field. FIELD NAME DESCRIPTION Firm This is equivalent to the trading member firm or also known as the executing firm. The User has authority to view specific firms and should choose the appropriate firm from their customized list. Product From the drop-down list, select the specific product associated with the transaction to be allocated. Allocations must be done one product at a time. The Product list can be sorted using ‘Filter By’ Code or Name. Prev Alloc (Optional) Select this box to edit transactions that were previously allocated. The User will need to enter the specific trading account to which the items were previously allocated. Trade Month Select the month in which the transaction took place. Users are able to allocate transactions for the current month and the prior two months. NOTE: During the first two business days of the month, the Trade Month field will default to the previous month. Thereafter, the Trade Month field will default to the current month. Mode Feature allows the User to perform allocations using the following options: Selection Criterion Main/Trading Account Trading Account Description This feature allows the User to allocate by the Main Account only. However, it is strongly encouraged by the CME Group Auditors to do allocations by Main Account and Trading Account, as this information is required in reviewing allocations during fee audit examinations. Also, this feature provides only those accounts that have been registered in the Account Maintenance section of the EFS application. This feature allows the User to enter the respective trading account without restricting the User to what has been registered within the EFS application. This feature may also be utilized for allocating transactions to non-member accounts. NOTE: EFS will automatically correlate the entered trading account to a main account if one exists. Allocations must be completed for one transaction type at a time. The types of transactions are: Exercise The process of exchanging an option for the underlying Futures contract. Delivery The tender and receipt of an actual commodity or financial instrument, or cash in settlement of a futures contract. Assignment The designation of an option writer for fulfillment of his obligation to sell the underlying futures contract (call options writer) or buy the underlying futures contract (put option writer) upon notice from the Clearing House. Notice to the seller of an option that has been exercised by the buyer. EFS Manual May 2012 35 Exchange Fee System FIELD NAME DESCRIPTION EFS Manual May 2012 36 Expired Options When the expiration date for an option passes without the option being exercised or offset. Cash Settlement The transfer of the associated cash position. Future from Assignment or Exercise The future created upon option exercise or assignment. Exchange Fee System 5. Account Maintenance The Account Maintenance screen allows the User to add, edit, move and view accounts within the fee system. 5.1 Accessing Account Maintenance To access Account Maintenance select the option from the navigation menu. When Account Maintenance is selected, the sub-menu options appear. Dropdown Menu: • View – Select this option to create a new account or to view or update an existing account. • Search – Select this option to search accounts across exchanges. • • Mass Expire – Select this option to expire multiple accounts at once, at the Main Account level. 5.2 Account Maintenance – View The Account Maintenance – View screen allows the User to add accounts and associate the owners and controllers (individuals trading with discretion) to those accounts. Without registered account information, the EFS application will default to the non-member rate. Therefore, it is important to ensure that accounts are registered timely and accurately. Account creation is done at a Main Account level (also known as an account alias, grouping account or roll-up account). All Trading Accounts are then associated to the Main Account. The User can enter the account owner/controller association(s) once for the Main Account rather than several times for each individual Trading Account. Upon accessing the Account Maintenance – View screen, the User will be able to perform the following functions: • Create a New Main Account – This function allows the User to create/register new Main Accounts, which entails associating the underlying Trading Accounts and the account owners/controllers. • View Existing Main Account – This function allows the User to search by Main Account or Trading Account and view the associated account details. • Edit Existing Main Accounts/Trading Accounts/Account Owners/Account Controllers – These functions allow the User to modify the details for existing Main Accounts, including the associated Trading Accounts and the account owners/controllers. EFS Manual May 2012 37 Exchange Fee System Account Maintenance – Initial Screen Following is a description of the fields on this screen: FIELD NAME DESCRIPTION Firm Firm that the Main/Trading Account clears under. Main Account List Drop down list that is automatically pre-populated with all the Main Accounts registered under the Firm selected. Main Account ID Trading Account NOTE: To view expired Main Accounts, select the Show Expired box next to the Main Account List. Field that is automatically filled with the Main Account ID once the User chooses it from the Main Account List. The User may also choose the Firm and then type the Main Account number directly into the Main Account ID field. The User may search for a registered Trading Account by entering a Trading Account number in this field and clicking Submit. NOTE: Trading account number entered must be an exact match, otherwise no results will be returned. 5.3 Single Exchange and Across Exchange Modes When using the Account Maintenance – View screen to create or edit Main Accounts, the User will be able to perform these functions either for a single Exchange or for multiple Exchanges at once by selecting one of the following: • Single Exchange Mode – This is the default mode which allows the User to apply changes to the single exchange under which the search was executed. • Across Exchange Mode – This is an optional mode which allows the User to apply changes across multiple exchanges. Therefore, this mode can be used to create or update account information that is the same at multiple exchanges. This feature is enabled by selecting the radio button for the “Across Exchange Mode”. This mode does not apply to CCE, DME and GREEN. EFS Manual May 2012 38 Exchange Fee System The actions allowed within each mode are summarized in the following table: Location Main Account Details Account Owner Controllers Action Single Mode Across Exchange Mode Copy Main/Trade Account(s) X Expire Main Account X X Edit Main Account X X Add/Modify Trading Account(s) Add Owner X X X X Copy Owner(s) X Add Controller X Copy Controller(s) X X Across Exchange Mode When this mode is selected, the User will need to perform the following additional selections: a. Exchange Selection: Select the additional Exchange(s) to which the changes should be applied. Note: The other exchanges the User has been granted security access to will be available for selection, based on what exchange the User is in; for example, if the user is in the ‘CME’ exchange, selecting this mode will display CBOT and NYMEX, if the user has security access to those exchanges. b. Firm Selection: After the exchange selection is complete, select the appropriate firm for each exchange (the firm number under which the account is/will be registered). Note: Firms available for selection are also based on the User’s security access and only one firm per exchange may be selected. 5.4 Create a New Main Account Within the Account Maintenance – View screen, the User can create a new Main Account by performing the following steps: 1. Select the Firm under which the main account will clear. 2. Select the Create Main Account button. • After the Create Account button has been selected, additional fields (Main Account, Account Type, Effective and Expiration Date, Account Title, Omnibus and Non Mbr Indicators) will appear. 3. Select Single Exchange Mode to create the Main Account within only the current Exchange or Across Exchange Mode to create the Main Account in the current Exchange and one or more additional Exchanges. Note: In order to use the Across Exchange Mode when creating a new Main Account, the following conditions must exist: • Account owner must be the same across the selected Exchanges. • Account owner must have a membership/incentive program status across the selected Exchanges. • Main Account Number, Firm Type and effective date must be the same across the selected Exchanges. • Controllers must be members at each of the selected Exchanges. If Controllers differ across the selected Exchanges, the User will need to edit the Controllers in the Single Exchange Mode. EFS Manual May 2012 39 Exchange Fee System If Across Exchange Mode is selected, the following steps will have to be completed: a. Select the Exchange(s) by clicking the corresponding checkbox(es). b. Select the Firm(s) from the drop-down list. Creating a New Main Account using Across Exchange Mode Creating a New Main Account (Single Exchange Mode) and Associated Fields to be populated 4. Complete the Main Account Details Field Descriptions of the Main Account Details: FIELD NAME DESCRIPTION Main Account This is the Main Account (roll up account, account alias or grouping account) to which the User wishes to associate the Trading Account(s). Account Type selection determines the list available for the account owner selection: • Firm – Only Firm/Entities may be the account owner • Individual – Only Individual Members may be the account owner • Joint – Two or more Individual Members may be listed as the account owner • Non-Member – An account that is jointly owned by a Member and a Non-member can be registered under this account type. Account Type Effective Date The date the main account became effective. Account Title The date the main account is no longer active. If the account is active, the expiration date should be left as the default date of 12-31-9999. This field is required as an audit trail of the underlying account owner whenever the account owner identified in the clearing member’s equity system (i.e. account statement) does not exactly match the account owner registered in EFS. Otherwise, this field is optional for the User to add a description for tracking purposes. Omnibus This indicator is used to identify an omnibus account for audit purposes only. Non Mbr This indicator is used to identify that the account is jointly owned by a Non-member. This will automatically be checked when an Account Type of Non-Member is Expiration Date EFS Manual May 2012 40 Exchange Fee System FIELD NAME DESCRIPTION selected, and will automatically result in the account receiving Non-member rates. a. Enter the Main Account Number in the Main Account field. b. Select the Account Type from the drop-down list. c. Enter the Main Account’s Effective Date by either: • Typing in the date (in the format of MM-DD-YYYY) or; • Select the calendar icon to the right of the Effective Date field and select the appropriate date. d. The Expiration Date will default to 12-31-9999 to indicate that the account will be active until a further update is made. To select a different Expiration Date either: • Type in the date (in the format of MM-DD-YYYY) or; • Select the calendar icon to the right of the Expiration Date text field and click on the appropriate date. e. Enter a title in the Account Title field. f. Select the check box if this is an Omnibus account. g. Select the check box if a Non-Member jointly owns the account. h. After completing each field, select the Submit button to create the main account details. A message will display confirming the main account has been created. NOTE: Performing the above steps only creates the Main Account record. The User must also add the respective Trading Accounts and associate the account owners/controllers in order for the account to be eligible to receive reduced rates. Refer to the screen below noting the remaining fields that need to be completed. EFS Manual May 2012 41 Exchange Fee System New Main Account Successfully Created 5.4.1 Adding Trading Accounts Trading Accounts that have the same owner(s) and controller(s) can be grouped together under a single Main Account. If no grouping is done, then each Trading Account must be registered separately and will reflect the Trading Account number as the associated Main Account record. The Main Account record is utilized for applying the associated Exchange fees, so it is important that the Trading Account relationships are registered correctly. NOTE: The Trading Account may only exist under one main account/clearing firm for a specific date range. Also, the Main Account entered will automatically become a Trading Account; therefore, this does not need to be re-entered. EFS Manual May 2012 42 Exchange Fee System The following is displayed for the Trading Accounts section: Trading Accounts a. To add a new Trading Account enter the account number (up to 20 characters) into the textbox in the first row under Add Trading Account(s). b. Enter the associated Effective and Expiration dates (should be equal to or between the Main Account’s effective and expiration dates). • To add multiple Trading Accounts where the effective and expiration dates are the same, use the ENTER key on the keyboard. After selecting ‘ENTER’, a new row will automatically be displayed to input the next Trading Account and the dates will already be populated. • c. To add multiple Trading Accounts where the effective and/or expiration dates differ, use the TAB key on the keyboard. The TAB key will bring the User to the next field and will create a new row once the Trading Account, Effective Date and Expiration Date have been entered in the current row. After entering all of the Trading Accounts, click the Add (when a single Trading Account has been added) or Add All (when more than one Trading Account has been added) link under the Actions column. EFS Manual May 2012 43 Exchange Fee System d. A confirmation message will appear above the Account Details stating that the new Trading Account(s) have been successfully added. NOTE: If the number of Trading Accounts registered exceeds 10, the system will automatically paginate the list at this time. To display all Trading Accounts, select the Show All hyperlink to remove the pagination. 5.4.2 Adding Owners/Controllers to the Main Account The account owners and controllers must be added to the Main Account in order to ensure that the appropriate fees will be applied. To add an owner/controller to a Main Account, the User will need to do the following: 1. Adding Owners a. From the section labeled Account Owners, select Add from the drop-down list above the Actions column. Add an Account Owner b. After selecting Add, the search form will appear. c. When adding Owner(s) in Across Exchange Mode, the account owner list available for selection will contain only potential account owners that have member or incentive program status at all exchanges specified. If the account owner does not appear in the list, the User should review the owner’s status at each Exchange selected and revise the Exchange selections accordingly. EFS Manual May 2012 44 Exchange Fee System d. Select the Account Owner by utilizing the Filter By feature. • For Account Type Individual the User will have the following Filter By features to locate the account owner: o Name: Select the Name radio button and type the first few characters of the individual’s last name in the textbox. The drop-down will automatically narrow the User’s search to the name that matches what was entered. Select the appropriate member from the list. o Symbol: Select the Symbol radio button and type the first few characters of the individual’s member acronym in the textbox. The drop-down will automatically narrow the User’s search to the symbol that matches what was entered. Select the appropriate member from the list. Adding Account Owner: Filter By Individual NOTE: When adding an Individual Member as account owner, that individual will also automatically be added as a controller. • For Account Type Firm the User will have the following Filter By features to locate the account owner: o ID: Select the ID radio button and type the firm ID in the textbox. The drop-down menu contains firm IDs and will automatically narrow the User’s search to the ID that was entered. If the ID does not appear in the drop-down list scroll through the list and select the ID of the appropriate firm. o Name: Select the Name radio button and type the first few characters of the firm’s name in the textbox. The drop-down will automatically narrow the User’s search to the firm that was entered. Select the appropriate firm from the list. Adding Account Owner: Filter By Firm e. Select an Exchange. Note: this field exists only in the Single Exchange Mode and applies to CME and CBOT only, where members of one Exchange can also be registered as account owners for the other Exchange. f. Select the Firm Type (Member or Incentive Program category). g. Enter the Effective and Expiration Date of the Account Owner. Note that dates must be equal to or between the Main Account’s date range. h. Select the Add button. A confirmation message will appear above the Account Owner, stating that the account owner has been added. Note that only one owner is allowed unless the account type is EFS Manual May 2012 45 Exchange Fee System specified as a joint account. If it is a joint account, then the User may continue to add as many owners to the account as needed. 2. Adding Controllers Controllers should be added if an individual member is trading the account with discretion. Note that for an individual account the member listed as the account owner will automatically be listed as a controller. 1. From the section labeled Controllers, select Add from the drop-down list above the Actions column. 2. After selecting Add, the search form will appear. 3. When adding Controller(s) in Across Exchange Mode, the controller list available for selection will contain only potential controllers that have member status at all exchanges specified. If the controller does not appear in the list, the User should review the individual’s status at each Exchange selected and revise the Exchange selections accordingly. 4. Use the Filter By fields to find the designated Controller. Adding Account Controller • As noted above, controllers can only be Individual Members therefore, the User will have the following Filter By features to locate the respective controller: o Name: Select the Name radio button and type the first few characters of the individual’s last name in the textbox. The drop-down will automatically narrow the User’s search to the name that matches what was entered. Select the appropriate member from the list. o Symbol: Select the Symbol radio button and type the first few characters of the individual’s member acronym in the textbox. The drop-down will automatically narrow the User’s search to the symbol that matches what was entered. Select the appropriate member from the list. 5. Enter the Effective and Expiration Date of the Account Controller. Note that dates must be equal to or between the Main Account date range. 6. Select the Add button. A confirmation message will appear stating that the controller has been added. Continue to add as many account controllers as necessary. 5.5 View Existing Main Account Within the Account Maintenance – View screen, the User can view an existing registered Main Account by performing the following steps: 1. Select Firm • If the firm number is known, type it in the Firm box. • If the firm number is not known, click the arrow for the Firm drop-down, scroll through the list and click to highlight the appropriate firm. 2. Select the Main Account • Click the arrow for the Main Account List drop-down. The User will then be able to scroll through the list of main account numbers for that firm until the desired account is located or; EFS Manual May 2012 46 Exchange Fee System • The User may utilize the AutoComplete feature that suggests possible main account matches as text is entered within the textbox. If the AutoComplete feature suggests more than one Main Account, click to highlight the appropriate account. 3. Select the Trading Account (Optional) • The User may enter a Trading Account Number to search for a specific trading account registered under the Main Account previously selected. The account number entered must be an exact match or no results will be returned. • The user may also choose to search using only this field if the Main Account is not known. 4. Select Submit • The associated account details will display after selecting the Submit button. NOTE: To view expired Main Accounts in the Main Account List drop-down, and to display expired account information in the corresponding results, check the box labeled “Show Expired”. Account Maintenance – Results after Search Performed EFS Manual May 2012 47 Exchange Fee System 5.5.1 Editing Main Accounts/Trading Accounts/Account Owners/Controllers Within the Account Maintenance – View screen, the User can modify the details for existing Main Accounts, including the associated Trading Accounts and the account owners/controllers. NOTE: For any modifications made within the Account Maintenance screen the system will automatically submit for recalculation the associated transactions for the open adjustment period (current plus two prior billing months). A. Modifying Main Accounts After the User locates an existing main account, the following action items are available: Modifying Main Account: Select Action Items 1. Copy Main/Trading Account(s) This feature is available in Single Exchange Mode only. The most common use of the Copy Main/Trading Account(s) feature is when the Account Type is changing for an existing Main Account, for example, from Individual to Firm or vice versa. The User can expire the existing Main Account and then use the Copy feature to recreate the same Main/Trading account grouping with a modified account type. The Main/Trading Account ‘to be copied’ must be expired prior to executing the Copy Main/Trading Account(s) functionality; two active instances of the same Main/Trading Account(s) cannot exist. Once the Main Account the User is copying from has been expired, perform a search for that Main Account by selecting the Show Expired box. a. Select Copy Main/Trading Account(s). b. The Copy Main/Trade Account section will display. c. The User can edit the following: • Account Type • Effective or Expiration Date (Note: The effective date must be greater than or equal to the next calendar date after the expired date, so there is no overlap). • Account Title • Omnibus Indicator • Non-Member Indicator d. After the appropriate fields have been updated, click Submit. EFS Manual May 2012 48 Exchange Fee System A confirmation message will display above the account details stating that the account has been copied. NOTE: The copy feature will NOT copy over the Owners and Controllers since the account type has likely changed. The User is required to add the Owners and Controllers as needed. 2. Expire Main Account This feature allows the Main account and all of its associations (trading accounts and owners/controllers) to be expired. Note: The User may use the Across Exchange Mode to expire the Main Account at multiple Exchanges simultaneously, as long as that account exists at each selected Exchange. a. From the drop-down, select Expire Main Account. b. The Expire Main Account section will display. c. Enter the Expiration Date (MM-DD-YYYY) manually or use the calendar icon to select the expiration date. d. Select the Submit button. e. A Message Box will display asking the User to confirm the expiration of this account. Select OK to continue the expiration, or select Cancel. Editing Main Account: Expire Account Screen f. If OK was selected, then a confirmation message will display above the Account Details section stating that the account has been expired. NOTE: Once the main account has been expired, the only way to view this account and all its associated trading accounts is to click the “SHOW EXPIRED” box when submitting a search. 3. Edit Main Account This feature allows the User to edit the Main account details. Note: The User may use the Across Exchange Mode to edit the Main Account at multiple Exchanges simultaneously, as long as that account exists at each selected Exchange. EFS Manual May 2012 49 Exchange Fee System a. From the drop-down, select Edit Main Account. b. The User can edit the following: • Main Account Number • Effective or Expiration Date • Account Title • Omnibus Indicator • Non-Member Indicator Note: The Account Type field cannot be modified; the user must instead expire the Main Account and create a new Main Account record using the Copy Main/Training Account(s) function noted above. c. After the appropriate fields have been updated, click Submit. A confirmation message will display above the Account Details stating that the account has been updated. B. Modifying Trading Accounts When viewing an existing Main Account, the associated trading accounts are displayed under the Trading Accounts section. Note: The User may use the Across Exchange Mode to edit Trading Account(s) at multiple Exchanges simultaneously, as long as the Trading Account(s) exist at each selected Exchange. The User can perform the following with respect to Trading Accounts: • • • Delete Trading Account Update Trading Account Number and/or Effective/ Expiration Dates Mass Update Trading Account Effective and/or Expiration Dates EFS Manual May 2012 50 Exchange Fee System Modifying Trading Account: Action Items 1. Delete Trading Account a. Identify the appropriate row containing the trading account to be deleted. Select the Delete hyperlink in the Actions column for that row. b. A Message Box will display asking the User to confirm the deletion of the trading account. Select OK to continue, or select Cancel. c. If OK was selected then a confirmation message will display above the Account Details section noting the trading account has been deleted. Deleting Trading Account: Confirmation Message 2. Update Trading Account Number and/or Effective/Expiration Dates a. Identify the appropriate row containing the trading account to be updated. b. The following may be updated: Trading Account Number, Effective Date and/or Expiration Date. • If an existing Trading Account Number needs to be updated, simply type over what is listed in the textbox. • If the Effective Date needs to be updated, the User may manually type over the date (MM-DD-YYYY) or select the calendar icon to select the effective date. Note that the effective date must be equal to or greater than the main account’s effective date. • If the Expiration Date needs to be updated, the User may manually type over the date (MM-DD-YYYY) or select the calendar icon to select the expiration date. Note that the expiration date must be equal to or less than the main account‘s expiration date. c. Click on the Update hyperlink in the Actions column for that row. d. A Message Box will display asking the User to confirm the modification(s).Select OK to continue, or select Cancel. e. If OK was selected then a confirmation message will display above the Account Details section noting the trading account has been updated. EFS Manual May 2012 51 Exchange Fee System Modifying Trading Account: Confirmation Message 3. Mass Update Trading Account Effective and/or Expiration Dates This feature allows the Effective Date and/or Expiration Date to be updated on multiple Trading Accounts simultaneously. a. The User can either designate individual Trading Accounts to be updated by selecting the check box in front of each account, or the User may designate all the Trading Accounts displayed on the screen to be updated by selecting the Check All box. • If the Trading Account list is paginated, the user must first select the Show All hyperlink at the top right of the Trading Accounts section in order to update the entire list of accounts at once using the Check All feature. Otherwise, only the Trading Accounts displayed on the current page will be updated. b. Enter the new Effective Date and/or Expiration Date in the Mass Update Trading Account section. If updating only one of these dates, leave the other date field blank. c. Select the Mass Update hyperlink in the Actions column. d. A confirmation message will display. C. Modifying Account Owners When viewing an existing Main Account, the associated account owner(s) are displayed under the Account Owners section. Note: The User may use the Across Exchange Mode to edit account owner(s) at multiple Exchanges simultaneously, as long as the Main Account(s) exist at each selected Exchange. The User can perform the following with respect to Account Owner: • Delete Account Owner • Update Account Owner(s) Effective and/or Expiration Dates • View Membership will redirect the User to the Membership screen to view the account owner’s membership status. EFS Manual May 2012 52 Exchange Fee System 1. Delete Account Owner a. Identify the appropriate row containing the account owner to be deleted. Select the Delete hyperlink in the Actions column for that row in order to the delete that account owner. b. A Message Box will display asking the User to confirm the deletion of the owner. Select OK to continue, or select Cancel. c. If OK was selected then a confirmation message will display above the Account Details section confirming the account owner has been deleted. Deleting Account Owner: Confirmation Message NOTE: If you are deleting an individual member account owner, the system will also automatically delete the controller record for that member. 2. Update Account Owner(s) Effective and/or Expiration Dates a. Identify the appropriate row containing the account owner to be updated. • If the Effective Date or Expiration Date needs to be updated, the User may manually type over the date (MM-DD-YYYY) or select the calendar icon to select the effective date. o Effective Date must be equal to or greater than the Main Account’s effective date. o Expiration Date must be equal to or less than the Main Account‘s expiration date. b. Select the Update hyperlink in the Actions column for that row to apply the updates to the Owners’ Effective and/or Expiration Dates. c. A Message Box will display asking the User to confirm the updates. Select OK to continue, or select Cancel. d. If OK was selected then a confirmation message will display above the Account Details section confirming the account owner has been updated. NOTE: If you are updating an individual member account owner, the system will automatically update the controller record for that member. 3. View Membership a. Identify the appropriate row containing the account owner to view. Select the View Membership hyperlink in the Actions column for that row in order to the view that account owner’s membership information. EFS Manual May 2012 53 Exchange Fee System b. The User will be redirected to the Membership Information screen. To return back to the Account Maintenance screen click on the Main Account ID line item within the Account Owners section. D. Modifying Account Controllers When viewing an existing Main Account, the associated account controller(s) are displayed under the Controllers section. Note: The User may use the Across Exchange Mode to edit controller(s) at multiple Exchanges simultaneously, as long as the Main Account(s) exist at each selected Exchange. The User can perform the following with respect to Account Controller: • Delete Account Controller • Update Account Controller(s) Effective and/or Expiration Dates 1. Delete Account Controller a. Identify the appropriate row containing the account controller to be deleted, select the Delete hyperlink in the Actions column for that row in order to delete that account controller. b. A Message Box will display asking the User to confirm the deletion of the controller. Select OK to continue, or select Cancel. c. If OK was selected then a confirmation message will display above the Account Details section confirming the account controller has been deleted. Deleting Account Controller: Confirmation Message NOTE: In order to delete a controller who is also an account owner, that member’s account owner record must be deleted. 2. Update Account Controller(s) Effective and/or Expiration Dates a. Identify the appropriate row containing the controller to be updated. • If the Effective Date or Expiration Date needs to be updated, the User may manually type over the date (MM-DD-YYYY) or select the calendar icon to select the effective date. o Effective Date must be equal to or greater than the Main Account’s effective date. o Expiration Date must be equal to or less than the Main Account‘s expiration date. b. Select the Update hyperlink in the Actions column for that row to apply the updates to the Controller’s’ Effective and/or Expiration Dates. c. A Message Box will display asking the User to confirm the updates. Select OK to continue, or select Cancel. e. If OK was selected then a confirmation message will display above the Account Details section confirming the account controller has been updated. EFS Manual May 2012 54 Exchange Fee System Updating Account Owner: Confirmation Message NOTE: If you are updating an individual member account controller who is also listed as an account owner, the system will automatically update the owner record for that member. E. Copy Owners/Controllers This feature will copy all active owners/controllers from one registered main account to another within the same Exchange; these features are available only in the Single Exchange Mode. To copy owners/controllers the User will need to do the following: 1. Copying Owners a. From the section labeled Account Owners, select Copy Owner(s) from the drop-down list above the Actions column. The Copy To Main Account field will display. Copy an Account Owner b. Select the registered Main Account from the drop-down list to copy the Owner(s) to. c. After selecting an account, click Copy. A confirmation message will display: NOTE: When an individual is copied as an owner to another account, they are also automatically added to that account as a controller. 2. Copying Controllers Note: Only copy individuals can be controllers. The following rules apply when copying account controllers: • If the Account Type equals Firm, then the controllers will be copied to the designated Main Account. • If the Account Type equals Individual, Joint or Non-Member and the controller to be copied is not an owner, then the controller will be copied to the designated Main Account. • If the Account Type equals Individual, Joint or Non-Member and one of the controllers to be copied is already an owner, then that specific individual(s) will not get copied over to the new designated account. Only controllers where there is no owner relationship will be eligible for copy. a. From the section labeled Controllers, select Copy Controller(s) from the drop-down list above the Actions column. The Copy To Main Account field will display. Copy a Controller b. Select the registered Main Account from the drop-down list to copy the Controller(s) to. EFS Manual May 2012 55 Exchange Fee System c. After selecting an account, click Copy. A confirmation message will display. 5.6 Account Maintenance – Search The Account Maintenance – Search screen is a read-only screen that allows the User to view all accounts (regardless of exchange) and the respective details, in one centralized place. Also on this screen, the User can view the ‘Max Last Trade Date’ for the Main Accounts viewed, which identifies the most recent Trade Date for which any of the underlying registered Trading Accounts had trading activity. • Searches can be done by: o One or More Main Accounts OR o Single Trading Account OR o One or More Account Owners NOTE: The User cannot refine the search to have a combination of Main, Trade and Account Owner; the OR condition will only allow selection of ONE of the options noted above. Account Search a. Select the Exchange(s) to search; this will filter the firm list below to contain only firms associated with the Exchange(s) selected. b. From the Firms list, select the firm(s) to search. The Firm list will default to ALL firms to which the User has security access. Note: Depending on the Exchange(s) selected in the previous step, a firm that exists at more than one Exchange may appear multiple times in the Firm list. The Exchange designation appears after the firm name, prior to the firm’s date range; the User should be sure to consider this when selecting firms from the list. To select multiple firms, hold the Ctrl key and click on each firm name. EFS Manual May 2012 56 Exchange Fee System c. After selecting the firm(s), click the Add button. The designated firms will be added to the ‘Selected Firms’ section. d. Click on the Submit button. The search criteria results will display the firm(s) and Exchange(s) selected. e. If the User would like to obtain an extract of all of the registered account details for the selected firms, click the Extract Account Details button below the Search Criteria section. The User can further search within the selected Exchange(s)/Firm(s) by clicking the link for one of the following options: • Search by Main Account (default); or • Search by Trading Account; or • Search by Account Owner EFS Manual May 2012 57 Exchange Fee System 1. Search by Main Account a. From the Main Account list, select the Main Account(s) to view. To select multiple accounts, hold the Ctrl key and click on each account number. b. After selecting the Main Account(s), click Submit. The Main Accounts details will display. Search by Main Account 2. Search by Trading Account a. From the Trading Account list, select the Trading Account to view. b. After selecting the Trading Account, click Submit. The associated Main Accounts details will display for the Main Account under which the Trading Account is registered. Search by Trading Account 3. Search by Account Owner a. Select the Account Type: Firm (default) or Individual. b. From the Account Owner list, select the Account Owner(s) for which to bring back results and then click the Add button. To include non-member accounts in the search results, check the ‘Include non-members’ checkbox. EFS Manual May 2012 58 Exchange Fee System c. After selecting the Account Owner(s), click Submit. The Main Accounts details will display for all Main Accounts associated to the selected Account Owner(s). Search by Account Owners 5.7 Account Maintenance – Mass Expire The Account Maintenance – Mass Expire screen allows the User to expire multiple accounts at once at the Main Account level. Main Accounts available to be expired will only be those where all of the associated trading accounts have not traded for the past four months or more. A ‘Max Last Trade Date’ will be displayed on the screen for reference, which identifies the most recent Trade Date for which any of the underlying registered Trading Accounts had trading activity. 1. Within the Mass Expire screen, select a Firm. 2. If desired, filter the results by Main Account. The User can search for Main Account(s) that ‘Begins with’, ‘Contains’, ‘Ends with’ or ‘Equals’ a string of characters entered into the textbox. EFS Manual May 2012 59 Exchange Fee System 3. Click Submit. The Inactive Main Accounts window will display listing all inactive accounts matching the criteria entered. 4. Click the checkbox of the Main Account(s) to expire or select Check All to expire all of the accounts displayed on the current page. Note: The Check All feature will only select those accounts displayed on the current page. If there is more than one page of results, the user can first select the Show All link in order to display all of the accounts on a single page. 5. After selecting the account(s) to expire, click the Submit button. 6. To confirm the expire request, click the OK button. Note: The accounts will expire as of the prior business date. 7. A confirmation message will display confirming the selected account(s) have been expired. NOTE: The expired accounts will no longer display in the Inactive Main Accounts list. To view expired accounts, navigate to the Account Maintenance – View screen and complete a search using the ‘Show Expired’ checkbox. EFS Manual May 2012 60 Exchange Fee System 6. Membership Information The Membership Information screen displays membership information for individual members, member firms and incentive program participants. This information is interpreted from the CME Group membership database. Note this screen is available for CBT, CME, DME and NYMEX/COMEX. 6.1 Accessing Membership Information To access Membership Information select the option from the navigation menu. 6.2 Recent Membership Updates For an extract of recent membership updates (within the past 30 days), click on either the Extract Members or Extract Organizations hyperlink. The Extract Members link will provide an extract of recent updates for Individual Members, while the Extract Organizations link will provide an extract of recent updates for Member Firms and Incentive Program Participants. The extract provides the current and historical status for any individual/firm whose status changed within the last 30 days. 6.3 Search Mode by Exchange To assist the User in searching for membership information, there are search categories provided, as described below. There is also a secondary filter available to streamline the search process. For example, if the User selects Incentive Programs a secondary filter will be available with the various incentive program categories. Exchange Membership Exchange Search Mode Secondary Search Filter CBOT Firm Details Member Details Organization Details Incentive Programs Not applicable Not applicable Not applicable Asian Incentive Program (AIP) International Incentive Program (IIP) Latin American Commercial Incentive Program (LACIP) Latin American Fund Manager Incentive Program (FMIP) South American Incentive Program (SAIP) [also known as Latin American Bank Incentive Program (LABIP)] CME Firm Details Not applicable EFS Manual May 2012 61 Exchange Fee System Member Details Incentive Programs Corporate Memberships Not applicable eFX Bank Incentive Program Asian Incentive Program (AIP) CTA Hedge Fund Incentive Program International Incentive Program (IIP) Latin American Commercial Incentive Program (LACIP) Latin American Fund Manager Incentive Program (FMIP) South American Incentive Program (SAIP) [also known as Latin American Bank Incentive Program (LABIP)] Hedge Fund Group 106.H Trading Member Firm 106.I Affiliate Member Firm 106.J Equity Member Firm 106.N CME GEM 106.R ECM – Holding Member 106.R ECM – Volume Incentive Program 106.S Family of Funds Member Firm DME Firm Details Not applicable NYMEX/COMEX Firm Details Member Details Organization Details Incentive Programs Not applicable Not applicable Not applicable Asian Incentive Program (AIP) International Incentive Program (IIP) Latin American Commercial Incentive Program (LACIP) Latin American Fund Manager Incentive Program (FMIP) South American Incentive Program (SAIP) [also known as Latin American Bank Incentive Program (LABIP)] 6.4 Searching for Membership Information To search for Membership Information the User must perform the following steps: • Select a Search Mode from drop-down menu. • To filter the search further, select the secondary option from the drop-down menu, where applicable. • Once the filters have been selected, the User may then scroll through the resulting list, or type in the first few characters of the name to use the auto-complete function to navigate the list. • Click the appropriate selection in the list and then click the Submit button to retrieve the details. Search Mode without Secondary Option Search Mode with Secondary Option EFS Manual May 2012 62 Exchange Fee System 6.5 Search Results The search results will be displayed below the Membership Information Search form with the following information: • • • • The membership status in each of the membership divisions; The effective and expiration dates associated with each change in membership status; The Account Owners section, reflecting all main accounts for which the selected entity or individual is registered as the account owner, with the associated effective and expiration dates; and For individuals only, the Account Controllers section, reflecting all main accounts for which the selected individual is registered as the account controller, with the associated effective and expiration dates. There is also a redirect function that allows the User to select a specific Main Account within the search results and be redirected to the account maintenance screen, where the respective account details will automatically be displayed. Click on the line item to be redirected. Following are examples of the search results for the various search modes: Search Mode: Firm Details - the search results will return the following information: • Firm Details: Firm Name, Membership Status (details vary by Exchange), Effective and Expiration Dates. • Account Owners: Firm Name, Main Account ID, Effective and Expiration Dates. Exchange: CBOT EFS Manual May 2012 63 Exchange Fee System Exchange: CME Exchange: DME Exchange: NYMEX/COMEX EFS Manual May 2012 64 Exchange Fee System Search Mode: Member Details - the search results will return the following information: • Broker Details: Broker Name, Broker Symbol, Effective and Expiration Dates, Membership Details (details vary by Exchange), Qualifying Firm ID and Name, Badge Firm ID and Name. • Account Owners: Firm Name, Main Account ID, Effective and Expiration Dates. • Account Controllers: Firm Name, Main Account ID, Effective and Expiration Dates. Exchange: CBOT Exchange: CME EFS Manual May 2012 65 Exchange Fee System Exchange: NYMEX/COMEX Search Mode: Incentive Programs - the search results will return the following information: • Firm Details: Firm Name, Membership Details (details vary by Exchange), Effective and Expiration Dates. • Account Owners: Firm Name, Main Account ID, Effective and Expiration Dates. Exchange: CBOT Incentive Program: International Incentive Program (IIP) Exchange: CME Incentive Program: International Incentive Program (IIP) EFS Manual May 2012 66 Exchange Fee System Exchange: NYMEX/COMEX Incentive Program: International Incentive Program (IIP) Search mode: Organization Details - the search results will return the following information: • Firm Details: Firm Name, Membership Details, Effective and Expiration Dates. • Account Owners: Firm Name, Main Account ID, Effective and Expiration Dates. Exchange: CBOT Exchange: NYMEX/COMEX Search mode: Corporate Membership - the search results will return the following information: • Firm Details: Firm Name, Membership Details, Effective and Expiration Dates. • Account Owners: Firm Name, Main Account ID, Effective and Expiration Dates Exchange: CME EFS Manual May 2012 67 Corporate Membership: 106.N. Exchange Fee System 7. Reports Reports offer both basic and advanced search options to generate, customize, and retrieve reports displaying fees and fee discount programs. Other reports are also available to assist in determining how fees were applied and to whom the fees will be billed. Data available for the reports is the current month to date, plus the three prior months. All reports are viewable in PDF format and may also be extracted into any machine readable format. The exception to this is the Condensed Trade Detail Extract, which is available for extraction only. 7.1 Accessing Reports To access Reports select the option from the navigation menu. 7.2 Report Request When Reports is selected, two sub-menu options appear. • • Request – Select this option to request a report. Viewing – Select this option to view, extract, or delete a report. To request a report, select the Request option from the Reports sub-menu. When this option is chosen, the Report Request page appears. To request a Report, click on the report name within the report drop-down list, or select the checkbox next the appropriate Report Type filter. When a Report Type filter is selected, the report drop-down list will immediately update to reflect only the reports within that Report Type. EFS Manual May 2012 68 Exchange Fee System Report Request: CBOT Report Request: CCE EFS Manual May 2012 69 Exchange Fee System Report Request: CME, DME, GREEN, NYMEX/COMEX 7.2.1 Report Packet The Report Packet provides an ‘overview’ of the report suite available to assist in reconciling, for each product exchange: • the various fees charged, • the registration of accounts and operator IDs, • the validation of membership status for firms, entities, individuals or special programs participants, and • the discounts associated with various fee incentive programs. To access the report packet, click the Report Packet hyperlink in the top right corner of the screen. The report packet provides detailed descriptions of all the reports available, as well as key items to note when using the various reports. 7.2.2 Report Types There are several pre-defined reports to choose from the Report drop-down list. To limit the Report list, the User may select the Report Type that contains the type of report the User wants to execute. The main Report Type categories are as follows: • General Reports • Reconcile Reports EFS Manual May 2012 70 Exchange Fee System The main Report Types are then broken down to further assist the User in identifying the best report to utilize when reviewing the fees charged. Following are descriptions of the Report Types: Report Type General Reports Report Type Across Exchange Brokerage Exchange Specific Fee Summary Non-Member Activity Non-Trade Activity Reconcile Reports Unregistered Activity Other EFS Manual May 2012 71 DESCRIPTION This report type will include activity for qualified participants where discounts are applied based upon volume accumulation or fees charged across the product exchanges (e.g. CME, CBOT, NYMEX/COMEX) or where the discount program is identical across the exchanges. NOTE: This report will only return/display data for the specific product exchange that the end user has selected. This report type contains fees that are charged directly to the broker. This is the only area where this activity can be isolated in the fee system. Currently, this fee is only applicable to CME and CBOT product exchanges. This report type isolates activity to address fee discount programs unique to an individual product exchange (e.g. CME Interest Rate Volume Discount, CBOT U.S. Treasury Volume Discount, NYMEX Day Credits, etc). Fee Summary reports provide various high-level overviews of fees applied by account, commodity and/or transaction type, specifically to facilitate reconciliation to the Clearing Member Firm’s billing statement. This report type isolates trade activity (e.g. PIT, Electronic, ClearPort) where the non-member rate was applied. This report is tailored to review and manage non-trade activity (e.g. cash settlements, exercise, assignment, delivery, future from exercise/assignment, expired option) that could be eligible for reduced rates based on the rules prescribed for each product exchange. This report type focuses on activity that is not registered or recognized in the fee system that could ultimately trigger non-member rates to be applied. The main areas of registration anomalies are: Accounts and Operator IDs. This report type will assist in validating what has been registered within the fee system and provide assistance monitoring adjustments (prior period or manual requests). Exchange Fee System 7.2.3 Report Basic Search Criteria The basic report search requires the User to select a date selection by either Process Date or Trade Date by checking the box in front of one or both of the date selections. The User must also select the corresponding Firm, prior to submitting a report. FIELD NAME DESCRIPTION Process Date The date that the trade was processed in EFS. Refer to section below for the Date Selection choices. The date that the trade was executed. Refer to section below for the Date Selection choices. Represents the filling firm (executing firm) of the transaction. This is an optional field that allows a user to include All Fees, Exchange Fees or Clearing Fees. This is an optional field that allows a User to include or exclude NonTrade activity from Exchange Fee reports. To include or exclude this data, simply select the checkbox under the NTA column. Trade Date Firm Fee Type Group (CBOT Option Only) NTA Non-Trade Activity (CBOT Option Only) Basic Search Criterion - Date Selection DATE SELECTION DESCRIPTION Month to Date Month to Date automatically sets the beginning date to the first day of the current month and the end date to the prior trading day. Equals Between Last Month Two Months Ago Three Months Ago NOTE: Dates cannot be changed while in the Month-To-Date mode. Equals specifies only one day. The system default displays the prior trading day. Between specifies the beginning and end dates for a date range. NOTE: With a “Between” search criteria, it is only possible to view a maximum of one calendar month at a time. Last Month defaults the beginning and end dates to the first and last days of the previous month. Two Months Ago defaults the beginning and end dates to two months prior to the current month. Three Months Ago defaults the beginning and end dates to three months prior to the current month. When using the Between and Equals selections, specific dates must be entered either by clicking in the date fields and typing in the date in the MM-DD-YYYY format, or by choosing a date using the calendar to the right of the date field. Click the calendar icon to have the calendar window appear. EFS Manual May 2012 72 Exchange Fee System 7.2.4 Report Advanced Search Criteria There are dynamic advanced search features available, depending on the report selected. Not all reports will have the advanced search criterion. When advanced options are available for the selected report, the User will be able to select the Advanced button at the bottom left of the screen. For Advance Criteria field descriptions, refer to the Transaction Viewer section 3.3.2 and Appendix II - Transaction Viewer Advanced Search Field Definitions. The basic search selections will remain at the top of the page and must be completed as noted above; the advanced search fields will appear below the basic search fields. While the advanced search criterion available to select will vary per report; the operand selections are consistent as follows: Advanced Search Criterion Operands OPERATOR NAME DESCRIPTION Any Allows the User to search for all items and is the default selection. Begins With Allows the User to enter the first few numbers and/or letters of the desired search item(s). Allows the User to enter a string of numbers and/or letters and search for all items that contain that string. Allows the User to enter the last few number and/or letters of the desired search item(s). Allows the User to enter the exact search item. “Equals” may also be used to enter multiple accounts so that it works as an “is in” option. Contains Ends With Equals To Add a Search Item • For all selections except Any, type the desired search item in the text field below the drop-down menu. • Click the Add hyperlink to add that item to the search list. NOTE: The Add hyperlink must be selected in order for entered text to be captured. To Delete a Search Item • Find the item to be deleted in the search list. • Click to highlight the item. • Click the Delete hyperlink to remove that item from the search list. 7.2.5 • • Submit a Report Once the search criterion has been defined, select the Submit button to generate the report. A confirmation message will be displayed stating that the report has been submitted. 7.3 Report Viewing To access a report submitted, select Viewing from the Reports sub-menu. The Report Viewer window will appear displaying all the reports that have been submitted during the current day. The Report Viewer screen lets the User execute the following action items: • View Report EFS Manual May 2012 73 Exchange Fee System • • • View Report Criteria Extract Report Delete Report Report Viewing: Report Viewer Screen Report Viewer Column Descriptions The columns can be sorted in ascending or descending order by clicking the sorting arrow to the right of the column header. Data can only be sorted by one column at a time. COLUMN NAME DESCRIPTION Report Status Displays the status of the reports submitted: • Requested – Report has been submitted for processing. • Running – Report is currently being processed by the Report Server. • Ready – Report has completed processing and is ready to be viewed. • No Data – There was no data matching the submitted criteria. • Reviewed – Report has been viewed, printed and/or extracted. Requested By Displays the User ID of the individual who requested the report. Report Pos Exchange (If applicable) This will display the order in which the report was submitted in the queue, if there are several reports pending. Displays the Exchange for which the report was submitted. Firm(s) Displays the Firm(s) for which the report was submitted. Report Type Displays the Report Type for the report submitted. Report Name Displays the Report name. Time Requested Displays the date and time the report is requested. 7.3.1 View Report To view a report in the Report Viewer: 1. Select View Report from the drop-down list in the top right corner of the Report Viewer. 2. Select the line item corresponding to the report to be viewed. Note: a report will not be viewable unless the Report Status is “Ready or “Reviewed”. Report Viewer: Report Action Items After selecting the line item for the appropriate report, a new window will open to display the report. EFS Manual May 2012 74 Exchange Fee System Once Adobe Acrobat has completed loading the PDF format, the report will be displayed. If the report is not being displayed, make sure that the most recent version of Adobe Acrobat is available. Report Viewer: PDF Report Sample Adobe PDF Functions Within the PDF document, the following functions can be accessed by clicking the associated icon. Functions that can be accessed ABOVE the report Functions that can be accessed BELOW the report Save the report as a .pdf file View the first page of the report Print the report View the previous page of the report Search for items within the report View the next page of the report View the last page of the report 7.3.2 View Report Criteria To view the criteria entered for a report in the Report Viewer: 1. Select View Report Criteria from the drop-down list in the top right corner of the Report Viewer. 2. Select the line item corresponding to the report to view the criteria. 3. The Report Criteria window will appear, displaying the criteria submitted for that report. 4. To close the Report Criteria window, select the Exit button or the close icon. EFS Manual May 2012 75 Exchange Fee System Report Viewer: View Report Criterion EFS Manual May 2012 76 Exchange Fee System 7.3.3 Delete Report To delete a report from the Report Viewer: 1. Select Delete Report from the drop-down list in the top right corner of the Report Viewer. 2. Select the line item corresponding to the report to delete. 3. An alert message will appear requesting confirmation of the report deletion - click OK to confirm or Cancel to exit. Report Viewer: Delete Report Alert Message 7.3.4 Extract Report To extract a report from the Report Viewer 1. Select Extract Report from the drop-down list in the top right corner of the Report Viewer. 2. Select the line item corresponding to the report to be extracted. 3. A File Download message box will appear - click OPEN to open the file and the data will display in Notepad; click SAVE to save the report; or click CANCEL to exit. Report Viewer: File Download Message Dialog Box 4. If the user selects SAVE, a Save As box will appear to indicate where to save the file. Once indicating the location and File name, click Save. The file is saved in a tab delimited format and may be imported into any machine readable format such as MS Excel or MS Access. EFS Manual May 2012 77 Exchange Fee System Report Viewer: Save As Message Dialog Box 7.3.5 Other Report Viewing Features Report Display The Report Viewer will default to showing only reports requested during the current day. To view reports requested prior to the current day, click the Show All Reports hyperlink in the upper right corner of the Report Viewer. The Report Viewer will retain two weeks of reports. To go back to only viewing the current day’s report requests, click the Today’s Reports hyperlink. Other Report Features: Report Display All Users’ Reports To display a report request by another EFS User, click “All Users’ Reports”. Refresh Reports When the report is in the “Requested” status, to refresh the Report Viewer to see if the Report Status has changed the user may: • • at the top of the browser or Select the Refresh Icon button Select the F5 key from the keyboard. The Report Status will automatically refresh every 45 seconds. New Report To submit a new report request when in the Report Viewer window, click Reports and select the Request submenu to navigate back to the Report Request screen. EFS Manual May 2012 78 Exchange Fee System 8. Globex® Registration The Globex® Registration screen allows Users to register Globex Operator IDs (also known as Trader IDs or “Tag 50” IDs), as well as edit and view details for previously registered IDs. 8.1 Accessing Globex Registration To access Globex Registration select the option from the navigation menu. Globex Registration has two sub-menu options: • Form - Select this option to register Operator IDs. • Search - Select this option to view Operator IDs that are already registered. This feature also enables the User to edit and/or copy an Operator ID. NOTE: All market Users should be aware that CME Group Rule 576 (“Identification of Globex Terminal Operators”) requires that terminal operators be identified to the Exchange in the manner prescribed by the Exchange. CME Group Clearing Member Firms/Entities are reminded that the rule also makes it “the duty of the clearing member to ensure that registration is current and accurate at all times.” After selecting Globex Registration, the User will be directed to the Fee Registration System (FRS). The Fee Registration System has the following menu options: • Return to Fee System - Select this option to return to the Exchange Fee System (EFS). • Registration Form - Select this option to register Operator IDs. • Registration Search – Select this option to view, edit, or copy registered Operator IDs. EFS Manual May 2012 79 Exchange Fee System 8.2 Registration Form - Step 1: General Information To register an Operator ID, select the Registration Form option from the Globex Registration sub-menu. The Registration Form will display. Registration Form Step 1: General Information To complete Step 1 of the registration form, perform the following steps: 1. Type the Operator ID in the Operator ID text field (maximum of 18 characters). 2. Highlight the Guaranteeing Firm in the firm list box. 3. Choose the Exchange(s) for this Operator ID (multiple Exchanges can be selected): CME, CBOT and/or NYMEX. Note: The NYMEX Exchange represents both NYMEX and COMEX. 4. Click Next to continue. Step 1 General Information will display as read-only text and Step 2 of the registration form will display below. Below are the associated definitions of the Step 1 General Information Fields: FIELD NAME DESCRIPTION Operator ID The operator identifier (also known as Trader ID or TAG 50) is required on all orders entered through CME Group’s iLink connections. The ID registered must be unique for each individual operator at the clearing firm level across Exchanges, and may be a maximum length of 18 characters. Guaranteeing Firm This is the firm that guarantees the trades for a particular ID (This is equivalent to the Class A Clearing Firm under which the Trader’s trades clear). Exchange The Exchange indicator identifies which Exchange’s products the trader will be trading and also determines the required fields to complete within the remainder of the registration form. Following are the indicators that the User may chose: • CME - If the Operator ID to be registered will be trading CME products, select “CME”. • CBOT - If the Operator ID to be registered will be trading CBOT products, select “CBOT”. • NYMEX - If the Operator ID to be registered will be trading NYMEX/COMEX products, select “NYMEX”. If the Operator ID to be registered will be trading multiple or all Exchanges, select the appropriate Exchange check boxes. EFS Manual May 2012 80 Exchange Fee System 8.3 Registration Form - Step 2: Incentive Information Complete the incentive information that applies to the Operator ID being registered. Registration Form Step 2: Incentive Information To complete Step 2 of the registration form, perform the following steps: 1. Select the Same For All Exchanges checkbox when the Operator ID has multiple exchanges and the User Type, Effective Date, Expiration Date, ATS information and Incentive program status are the same for each Exchange. Otherwise, leave this checkbox blank. 2. Select the User Type from the drop down list for each Exchange (one selection if the Same For All Exchanges checkbox was selected in the previous step). 3. Enter the Effective Date to indicate when this Operator ID should be effective for the specific User Type and Exchange. The effective date defaults to the current business day; to select a different date, type in the date (MM-DD-YYYY) or click the calendar next to the Effective Date text field. 4. The Expiration Date defaults to 12-31-9999, which represents no expiration date. To select a different date, type in the date (MM-DD-YYYY) or click the calendar next to the Expiration Date text field. 5. Select “Yes” from the ATS (Automated Trading System) dropdown if the Operator ID represents an ATS operation; otherwise select “No”. If the User is unsure what qualifies a user to be an ATS, select the ATS FAQ hyperlink. o Individual: If the Operator ID represents only one individual person operating the ATS, select Individual. o Team: If the Operator ID represents an ATS being operated by a team of individuals, select Team and enter the team’s name in the ATS Group Name field. Note: The Clerk for Member user type cannot be associated with an ATS Team. 6. Select the Incentive Indicator if the Operator ID is associated with a listed CME Group Fee Incentive Program, otherwise leave as the default selection of “None”. 7. Click Next to continue. Step 1 and 2 display as read-only text. If something was entered in error within Step 1 of the process, select the Previous button to go back to that Step. To start completely over, simply click Registration Form on the menu bar. EFS Manual May 2012 81 Exchange Fee System Below are the associated definitions of the Step 2 Incentive Information Fields: FIELD NAME DESCRIPTION Same For All Exchanges This box should be checked if the ID has the same user type across all Exchanges selected in Step 1. The valid user types for this selection are: • Asia-Pacific Entity • Clearing Member Firm Trader • FMIP Participant • IIP Participant • LACIP Participant • Member • Non-Member/Customer • SAIP Participant If the check box is not selected the User may separately select the respective user type that applies to each exchange. User Type Asia-Pacific Entity Clearing Member Firm Trader Clerk for Member Electronic Corp Member (106R) FMIP Participant FX Bank Incentive IIP Participant LACIP Participant EFS Manual May 2012 82 An individual trading for a firm that is a registered participant in the Asian Incentive Program (AIP). An individual trading on behalf of an Exchange Member Firm. When the User selects this user type, a Trader Type sub-category will also need to be chosen. The trader types that an individual may be classified under are as follows: • Registered Commodity Trading Advisor (CTA) • Independent Contractor receiving a 1099-MISC • Owner of the firm with at least $250,000 invested in the firm • Rule 106.F trader holding the Firm seat • W-2 employee of that clearing firm (CME and CBOT Only) A clerk who acts in an order filling capacity for an individual member. The Clerk must be registered with the CME Group Membership department. NOTE: If a Member is also a Clerk, they should be registered under this category. The appropriate rates will be applied when the individual is trading for his/her own account. (CME Only) An individual trading for a firm that is registered as an Electronic Corporate Member (ECMHolding/ECM-Waiver). An individual trading for a firm that is a registered participant in the Latin American Fund Manager Incentive Program (FMIP). (CME Only) An individual trading for a firm that is registered as a participant in the eFX Bank Incentive Program (BIP). An individual trading for a firm that is a registered participant in the International Incentive Program (IIP). An individual trading for a firm that is a registered Exchange Fee System Member Non-Member/ Customer Power of Attorney (NYMEX Only) An individual who has been granted POA of electronic trading discretion. The individual must be registered with the CME Group Membership department. SAIP Participant An individual trading for a firm that is a registered participant in the South American Incentive Program (SAIP) also known as Latin American Bank Incentive Program (LABIP). (CME Only) An individual trading for a firm registered as a Rule 106.H Corporate Member. 106.H Entity Effective Date participant in the Latin American Commercial Incentive Program (LACIP). The individual is a CME Group member whom is currently holding a membership. The individual does not qualify for any of the other registration categories and therefore, receives nonmember rates. This is the date the Operator ID for the specific user type and the Exchange became effective. NOTE: The default date will be the current business day when registering a new User ID. Expiration Date This is the date the Operator ID for the specific user type and Exchange was expired. NOTE: The expiration date will default to 12-31-9999 when registering a new User ID. This date just means that this will be the active Operator ID. There is no set expiration date at the time of registration. ATS (Automated Trading System) This is used to indicate whether Operator ID represents an Automated Trading System. Incentive Indicator This indicates whether the Operator ID is associated with one of the CME Fee Incentive Programs: None (default) NTIP EFS Manual May 2012 83 Operator ID is not associated with an incentive program. Operator ID is trading for a registered participant in the New Trader Incentive Program (NTIP) which allows fee discounts to new traders associated with proprietary trading firms and trading arcades located in countries outside the USA and Canada. Exchange Fee System 8.4 Registration Form - Step 3: Participant’s Information Complete the participant’s information that applies to the Operator ID being registered. Registration Form Step 3: Participant’s Information 8.4.1 Registering Participant Information of a Non-ATS or an ATS Individual Operator ID To complete Step 3 of the registration form for a Non-ATS or an ATS Individual, perform the following steps: • In the Name Section, fill out the following when a user type other than Member or Clerk for Member is selected: • Select the Title and then enter the First Name, Middle Initial, Last Name and Suffix in the appropriate text fields. The Title, Middle Initial and Suffix are optional fields. Registration Form Step 3: Name Section • In the Name Section, fill out the following when user type is Member: • Select the respective Member from the drop-down list. The User may scroll through the list, or enter a string of characters of the member’s last name in the text field, to find the appropriate name in the list. EFS Manual May 2012 84 Exchange Fee System Registration Form Step 3: Name Section – Member • In the Name Section, fill out the following when user type is Clerk for Member: • Select the respective Clerk for Member from the drop down list. If the clerk is not found, contact CME Group’s membership department to ensure the appropriate paperwork has been submitted. Registration Form Step 3: Name Section – Clerk for Member • In the Name Section, fill out the following when Incentive Indicator is NTIP: • Select the respective NTIP Participant from the drop down list. If the NTIP participant is not found, contact CME Group’s membership department to ensure the appropriate paperwork has been submitted. • In the Name Section, fill out the following when user type is Power of Attorney (Exchange-NYX): • Select the respective Power of Attorney from the drop down list. If the Power of Attorney is not found, contact CME Group’s membership department to ensure the appropriate paperwork has been submitted. • In the Additional Information Section, fill out the following: • Date of Birth (Required) – In the Date of Birth text field, type in the birth date (in the format of MMDD-YYYY) or click on the calendar to the right of the Date of Birth text field and click on the appropriate date. The Date of Birth must represent a user that is at least 18 years old. • Last 4 digits - SSN/Tax ID (Optional) – In the SSN/Tax ID text field, type in the last 4 digits of the participant’s social security number or Tax ID. For foreign traders, type the last 4 characters of the unique government issued tax code or insurance number. • Trading Location (Required) – Select the appropriate country that represents where the trader is located. EFS Manual May 2012 85 Exchange Fee System • Email Address (Optional) – Enter the participant’s email address. • If the user type selected was Clearing Member Firm Trader then an additional field will be required, Clearing Member Firm Individual Type. Select from the drop-down list the appropriate status of the trader: • Commodity Trading Advisor (CTA) • Independent Contractor receiving a 1099-MISC • Owner of the firm with at least $250,000 invested in the firm • Rule 106.F trader holding the Firm seat • W-2 employee of that clearing firm • Select the Trading Entity to which the participant is associated by highlighting the entity in the Trading Entity list. The User may utilize the auto-text feature by entering the first few characters of the entity name in the text field to avoid scrolling through the entire list. • If in Step 2, the Incentive Indicator was set to “NTIP”, then before the User can select the Trading Entity the user will be prompted to enter the following: • Enter the NTIP Effective Date for when the participant will begin trading under this program. Type in the date in MM-DD-YYYY format. Note: The earliest Effective Date allowed is the first day of the current month. • Select the Trading Entity that is part of the NTIP program. Once selected, the associated NTIP eligible sites for that entity will appear in the NTIP Site drop down list. Select the appropriate site from the list. • If the trader is trading for the NTIP Site, but is an experienced trader, they are not eligible for the NTIP discounts; therefore the Experienced Trader indicator should be changed to “Yes”. Otherwise, the Experienced Trader Indicator will default to “No” so that the discounts will apply. NOTE: Trading Entity must be approved and registered with the CME Group Membership department as a participant in NTIP. Lack of this registration will be evident if there are no NTIP sites in the Site drop down list. If this occurs, please contact the CME Group Membership department for further assistance. Registration Form Step 3: EMIP Registration • Once all of this information has been entered, the User will have one of the following buttons to chose from, depending on the selection criterion from Step 1: • If the User is only registering an Operator ID for one Exchange, then click Save to complete the registration process. • If the User is registering an Operator ID for multiple Exchanges, and the User Type represented “Same For All Exchanges” click Save and Continue to Next Exchange to complete the registration process for the next Exchange. Note: As applicable, the information entered will be carried forward for the other EFS Manual May 2012 86 Exchange Fee System • Exchange(s) for the User to verify and save. The registration process is not complete until all Exchanges have been completed and saved. If the User is registering an Operator ID for multiple Exchanges, with different User Types; then click Save and Continue to Next Exchange to complete the registration process for the next Exchange. Note: As applicable, the information entered will be carried forward for the other Exchange(s) for the User to verify and save. The registration process is not complete until all Exchanges have been completed and saved. If registration was successfully completed the user will receive a confirmation message stating “Your Information has been saved”. If something was entered in error within Step 2 of the process, select the Previous button to go back to that Step. To start completely over, simply click Registration Form located at the top of the page. NOTE: Upon completion of registering the Operator ID, trades will need to be submitted for recalculation manually in the Transaction Viewer when the Operator ID’s effective date is earlier than the current business date. EFS Manual May 2012 87 Exchange Fee System 8.4.2 Registering an ATS Team Operator ID If in Step 2, it was identified that the Operator ID represented an ATS Team, the following details will need to be completed in Step 3 of the registration process: Registration Form Step 3: Participant’s Information – ATS Team 1. In the Name Section, fill out the following for the first member of the ATS Team: • Select the Title and then enter the First Name, Middle Initial, Last Name and Suffix in the appropriate text fields. The Title, Middle Initial and Suffix are optional. Registration Form Step 3: Name Section If the user Type is Member, select the appropriate Member by scrolling through the list and highlighting the member name. The other fields (Title, First Name, Middle Initial, Last Name and Suffix) in the name section will become disabled after the selecting the member via the drop down list. 2. In the Additional Information section, fill out the following: EFS Manual May 2012 88 Exchange Fee System • Date of Birth (Required) – In the Date of Birth text field, type in the birth date (in the format of MMDD-YYYY) or click on the calendar to the right of the Date of Birth text field and click on the appropriate date. • Last 4 digits - SSN/Tax ID (Optional) – In the SSN/Tax ID text field, type in the last 4 digits of the participant’s social security number or Tax ID. For foreign traders, type the last 4 characters of the unique government issued tax code or insurance number. • Trading Location (Required) – Select the appropriate country that represents where the trader is located. • Email Address (Optional) – Enter the participant’s email address. • ATS Role (Required) – Select the role of that individual on the ATS team (Head Trader, Trader, Risk Monitor, Trading Monitor, Technical/Programmer, Other) from the drop-down list. There must be one Head Trader role. • Enter the ATS Effective Date (Required) for the team member. The system will default to the current business day, to select a different date, type in the date (in MM-DD-YYYY format) or click on the calendar to the right of the Effective Date text field and click on the appropriate date. • The ATS Expiration Date (Required) will default to 12-31-9999. To select a different date, type in the date (in MM-DD-YYYY format) or click on the calendar to the right of the Expiration Date text field and click on the appropriate date. • Once all the required information for an individual team member has been entered, select the ADD button and the user will be added to the ATS Team list. To submit the information for another individual team member, repeat the steps above. NOTE: Each ATS group must have a Head Trader. Also, if the user type is a “Member” then the User must designate the “Head Trader” as a member to ensure the appropriate fees are applied. Registration Form Step 3: ATS Team List EFS Manual May 2012 89 Exchange Fee System To edit an ATS participant, select Edit next to the participants name in the ATS team list. The information for that team member will be populated into the form above for updating. When done editing the record, select the Update button. Registration Form Step 3: EDIT an ATS Team List To remove an ATS participant, select Remove next to the participants name in the ATS team list. An alert message will appear; select OK to continue with the deletion or Cancel. If OK is selected, the user will be removed from the list. 3. If the user type selected was Clearing Member Firm Trader then an additional field will be required, Clearing Member Firm Individual Type. Select from the drop-down list the appropriate status of the trader which will be as follows: • Commodity Trading Advisor (CTA) • Independent Contractor receiving a 1099-MISC • Owner of the firm with at least $250,000 invested in the firm • Rule 106.F trader holding the Firm seat • W-2 employee of that clearing firm 4. Select the Trading Entity to which the participant is associated by highlighting the entity in the Trading Entity list. The User may utilize the auto-text feature by entering of the first few characters of the entity name in the text field to avoid scrolling through the entire list. EFS Manual May 2012 90 Exchange Fee System 8.5 Globex Registration Search To view the details for previously registered Operator IDs, select Search from the Registration sub-menu. The User will be redirected to the search screen. There are three different methods by which the registered Operator IDs may be retrieved: • Firm/Entity Type • Operator ID • User Name Select the radio button in front of the preferred search option. For detailed descriptions on these search types, refer to the sections below. CME Globex Registration Search Form 8.5.1 Searching by Firm/Entity Type To search by Firm/Entity Type the User must perform the following steps: • Select the Firm/Entity Type radio button. • Select the appropriate Firm/Entity Type to search for within the drop down list. • Select the Apply button. o If the User leaves the textbox above the Apply button blank, the list will contain all entities for the firm/entity type selected. o If the User enters a string of characters in the textbox above the Apply button, the list will contain only entities whose name contains that string of characters, within that firm/entity type selected. • Select the desired Firm/Entity from the Firm/Entity List. o Scroll through the list utilizing the scroll bar or enter the first few characters of the entity name in the textbox above the Firm/Entity List. o Click to highlight the appropriate firm/entity. • To include expired Operator IDs in the search, check the Show Expired box under Search Options. • Select the ‘Search’ button to retrieve the registered Operator IDs. EFS Manual May 2012 91 Exchange Fee System 8.5.2 Searching by Operator ID or User Name To search by Operator ID or User Name the User must perform the following steps: • Select the Operator ID or User Name radio button and type in the string of characters contained in the Operator ID or User Name that is to be retrieved. The string of characters entered does not have to be an exact match; it will pull back all items that contain that string. • Click the Search button to retrieve the information. 8.5.3 Search Results The search results will be displayed in a section below the CME Globex Registration Search form and will contain all field values associated with the ID. Registration Search Results To start a new search: • Go back to the search form at the top of the page, change the search parameters as needed and then click the Submit button. OR • Select the New Search button at the bottom right to completely clear the search form. EFS Manual May 2012 92 Exchange Fee System 8.6 Editing Operator IDs To edit an Operator ID, select Edit Record from the drop-down list at the top right corner of the search results. (Note: This is the default selection.) Then click to select the line item to be modified from the search results list. The User will be redirected to the registration form edit mode with the fields pre-populated with what was previously registered. 1. To edit information in Step 1 General Information, click Edit Step 1 and update fields as needed. The User will also need to proceed through Steps 2 and 3 in order to save the updated ID. Any required changes can also be made in Steps 2 and 3 as needed.. 2. If there are no changes to be made within Step 1, to edit information in Step 2 Incentive Information, click Edit Step 2 and proceed through Step 2 and Step 3, making any required changes. 3. If there are no changes required within Steps 1 or 2, to edit information in Step 3 Participant’s Information, click Edit Step 3 and update the participant’s information as needed. 4. Click Complete Registration when finished. Editing an Operator ID 8.6.1 Expire Registered Operator IDs To expire an Operator ID, select Edit Record from the drop-down list at the top right corner of the search results. (Note: This is the default selection.) Then click to select the line item to be expired from the search results list. The User will be redirected to the registration form edit mode with the fields pre-populated with what was previously registered. 1. To modify the Operator ID’s Expiration Date, click Expire within Step 2. EFS Manual May 2012 93 Exchange Fee System 2. Enter the new Expiration Date and click the Expire button corresponding to the row to be updated. 3. After clicking Expire, a confirmation will display indicating the information has been saved. To update all of the associated Exchanges’ Expiration Dates, click the Expire All button after entering the new expiration date in all rows. EFS Manual May 2012 94 Exchange Fee System 8.7 Copying Operator IDs To copy an Operator ID, select Copy Record from the drop-down list at the top right corner of the search results. Select the line item to copy within the search results list. The copy user section will display. The “User ID Copied From” is populated with the selected line item ID. • Enter the New Operator ID and then click Copy User. The confirmation message will display, click Close. The new Operator ID will be displayed in the search results list with all other field values matching the Operator ID that was copied. EFS Manual May 2012 95 Exchange Fee System 8.8 Extracting Operator IDs To extract the Operator ID search results click the Extract, Extract by Trading Entity or ATS Extract link located at the top right corner of the search results section. Extract Hyperlink The Extract hyperlink will provide an extract of the data results sorted by ID. The Extract by Trading Entity hyperlink will provide an extract of the data results sorted by Trading Firm. The ATS Extract will provide an extract of all ATS Team registration details within your search results. After selecting one of the extract hyperlinks, a windows dialog box will appear requesting the User to Open or Save the tab delimited file. To cancel the extract process, simply select Cancel. The tab delimited file will contain all of the field values displayed on the search results screen. EFS Manual May 2012 96 Exchange Fee System 9. Adjustment The Adjustment screen allows the User to add, edit and view manual fee adjustment requests. Manual fee adjustment requests are used only for scenarios that cannot be updated automatically within the Exchange Fee System (EFS). Any adjustment that CAN be processed through EFS MUST be processed through EFS. This section is for the exception cases only. Note: All adjustment requests are subject to the Adjustment Deadlines/Banking Schedule posted on the EFS Homepage. The User is encouraged to complete the Adjustment template, located on each Exchange’s Homepage, in order to provide the necessary supporting calculation for the adjustment request. Refer to the Adjustment Template Instructions, also located on each Exchange’s Homepage, for assistance with completing the template. 9.1 Accessing Adjustment To access the Adjustment screen select the option from the navigation menu. Dropdown Menu: • • Create - Select this option to add a new fee adjustment request. Search - Select this option to edit, or view the status of, existing fee adjustment requests. 9.2 Creating an Adjustment To create an adjustment, select Create from the Adjustment sub menu. The Adjustment screen will display. EFS Manual May 2012 97 Exchange Fee System Complete the Adjustment request form: 1. 2. 3. 4. 5. 6. 7. 8. Select the Bill Firm. Status will default to Requested. Select the Fee Type. Select the product Quadrant (Note: This displays as Product Venue for NYMEX/COMEX; this field does not apply for DME). Select the Original Process Month (MM - YYYY). Enter an Amount after selecting whether the adjustment represents a Rebate or Assessment. Select a reason for the adjustment from the pre-populated drop-down list or type the reason in the Description text box. To add an attachment click Save/Attach NOTE: Adjustments can only be submitted for the open adjustment period, refer to the EFS Adjustment Deadlines/Banking Schedule located on the homepage. 9.3 Adding an Attachment To add an attachment, click the Save/Attach button. A confirmation message will appear along with the Attachment(s) section. 1. Click Browse. The Choose file window will display. 2. Locate and click the file to attach. 3. Click Open. 4. Click Upload. The filename will appear in the attachment list and a confirmation message will display. Repeat these steps for any additional attachment(s). EFS Manual May 2012 98 Exchange Fee System 5. Click Update to complete the attachment process. a. To view the file, highlight the file name and click View. b. To remove the file, click Delete. To create another adjustment, click Clear. 9.4 Searching for Fee Adjustments To complete a search for an adjustment, select Search from the Adjustment sub menu. The Search Adjustment screen will appear. 1. 2. 3. 4. 5. Select the Bill Firm. Select the Original Process Month (YYYY-MM) (optional). Select the Payment Month (YYYY-MM) (optional). Select the Status (optional). Click Search. The Adjustment Summary page will appear. If the User does not select any criteria other than Bill Firm the search will include all adjustments. To view the detail of the adjustment, select the Adjustment Summary line item to view. Search results list EFS Manual May 2012 99 Exchange Fee System The Adjustment Detail will display for the item selected. To view an attachment, select action View Attachments and click the line item to view. To view the attachment details, click the line item. The select action is set to Download Attachment. 9.5 Editing an Adjustment To edit an adjustment, complete an adjustment search. The Adjustment Summary will display the adjustments matching the search criteria entered. 1. Click the line item to edit. The Adjustment Detail will display. 2. Select Edit from the Select Action drop-down list. 3. Click the line item to edit in the Adjustment Detail section. EFS Manual May 2012 100 Exchange Fee System The User will be redirected to the ‘Create/Edit Adjustment’ screen. Enter the updated information and click the Update button. A confirmation message will display. To add an attachment click the Attach button (refer to section 9.3 Adding an Attachment). EFS Manual May 2012 101 Exchange Fee System 10. Preferences The Preferences section allows the User to edit their personal EFS settings. To access Preferences click the Preferences hyperlink, located in the upper right corner. The Preferences screen will display. To update any of the settings, highlight the selection in the appropriate drop-down list by clicking on the item. Once the selections have been completed, select the Submit button. To cancel out of the screen at any time, select the Cancel button. The User will receive a confirmation message that the selected preferences have been saved. EFS Manual May 2012 102 Exchange Fee System 11. Contact Us To obtain contact information for the Exchange Fee System support team, click the Contact Us hyperlink. 12. Help and Log Out The Help hyperlink will display the EFS User Manual. To Exit the Exchange Fee System, click the Log Out hyperlink. EFS Manual May 2012 103 Exchange Fee System 13. Appendix 13.1 Login Troubleshooting If unable to log in, follow these instructions: From the Fee Systems Portal login page: • Click the Reset button. The login page will reset so that the password and User ID can be re-entered. • If the problem does not resolve, click the Help link. The below screen will then appear: Login Help Page Follow the instructions. If the login continues to fail, contact CME Group Customer Support at 312-930-3444 or e-mail [email protected] . EFS Manual May 2012 104 Exchange Fee System 13.2 Navigating the Data Results There are multiple ways to navigate through the data results within the EFS screens. If there is only one page of data, some of these options will not be available. • • • • • • • • Show All – selecting this hyperlink (located in the upper right-hand corner above the Transaction Summary screen) will change the display to show all transactions on one page. Use the scroll bar on the right of the browser window to scroll through the data. Reset – this hyperlink will appear after the Show All hyperlink has been selected. Use this to change the display back to show one page of data at a time. Extract – selecting this hyperlink will extract the data into a text format. Then, open the file in other applications such as Microsoft Excel or Access. Prev and Next – selecting the previous or next hyperlinks will bring the User to the previous or next page of data. Go to Page – allows the User to enter a specific page number to view. To use this feature, type in a page number and click the “Go” button. Page Length – allows the User to select the number of rows of data to see per page. To use this feature, type in a number and click the “Set” button. 1 2 3 4 … - selecting one of these hyperlinks will bring the User to that specific page. To view the next page, click the link displayed as three dots. Sorting Columns – To sort the column data in ascending or descending order. Select the arrow next to the header of the column to sort. Data can only be sorted by one column at a time. To view all the columns in the search results, use the left/right scroll bar at the bottom of the search results. 13.3 Errors in Selecting Search Criteria • • • When executing a search, if there were any errors made in selecting search criteria, a message will appear in red at the top of the page stating the number of errors identified. A red flag will also display next to the field(s) containing the error(s). To see detailed information about the error(s), click the Show Errors hyperlink at the top of the Transaction Viewer. EFS Manual May 2012 105 Exchange Fee System • • The details of the error(s) will then be displayed at the top of the page, and changes can be made to the search screen to correct the error(s). To hide the error details, click the Hide Errors hyperlink. 13.4 Manual Fee Adjustment Instructions The Manual Fee Adjustment template is used for submitting adjustment requests for scenarios that cannot be updated automatically within the Exchange Fee System (EFS). 13.4.1 Downloading the Fee Adjustment Template The Manual Fee Adjustment Template for each Exchange is located on the Exchange’s homepage. Click on the hyperlink ‘Adjustment Template’ to download the template. The Fee Adjustment template has two types of worksheets: Position Transfer Rebate and Rate Adjustment. EFS Manual May 2012 106 Exchange Fee System • The Position Transfer Rebate template should be used to request an adjustment associated with position transfer fees charged in excess of any applicable caps, which are not automated within EFS. Note: This worksheet is not applicable for NYMEX/COMEX or DME. • The Rate Adjustment template should be used to request an adjustment associated with incorrect rates applied that cannot be updated within EFS. Note: any adjustment that CAN be processed through EFS MUST be processed through EFS. This template is for the exception cases only. EFS Manual May 2012 107 Exchange Fee System 13.4.2 Entering data into the Position Transfer Rebate worksheet 1. Select the Position Transfer Rebate worksheet. 2. Enter the Firm Number, Firm Name and Process Month (YYYY - MM). 3. Continue to enter the appropriate information in the shaded areas (refer to example highlighted in yellow). Field Cell Description Main Account C 12 A ‘grouping account’ created by firms to associate trading accounts with identical account ownership; enter the Main Account where the positions reside. Trading Account D 12 The trading account received from CME Clearing; enter the trading account where the positions reside. Date of Transfer E 12 The date the position was transferred. Quantity G 12 Quantity of positions transferred. For any additional line items repeat step 3. 4. After completing the Manual Adjustment Request worksheet; save the adjustment template. Note: The adjustment worksheet will need to be attached to the manual adjustment request submitted through the Adjustment screen. 13.4.3 Entering data into the Rate Adjustment worksheet 1. Select the Rate Adjustment worksheet. 2. Enter the Firm Number, Firm Name and Process Month (YYYY - MM). EFS Manual May 2012 108 Exchange Fee System 3. Continue to enter the appropriate information in the shaded areas (refer to example highlighted in yellow). Field Cell Description Main Account C 13 A ‘grouping account’ created by firms to associate trading accounts with identical account ownership; enter the Main Account associated with the adjustment request. Trading Account D 13 The trading account received from CME Clearing; enter the trading account associated with the adjustment request. Product E 13 Product Code Futures/Options F 13 F (Futures) or O (Options) Fee Type G 13 See Appendix I for a list of Fee Types. Quantity H 13 Quantity to be adjusted. Rate Charged I 13 Rate charged that was deemed incorrect. Correct Rate K 13 Note: Please refer to the applicable Exchange’s Fee Schedule to identify the correct rate. Description N 13 Description of the reason for the adjustment request. For any additional line items repeat step 3. 4. After completing the Manual Adjustment Request worksheet; save the adjustment template. Note: The adjustment worksheet will need to be attached to the manual adjustment request submitted through the Adjustment screen. 13.4.4 Attaching the Manual Adjustment Worksheet Template To submit the manual adjustment request and attach the completed template, go to the Adjustment screen within the appropriate Exchange. Complete the Adjustment request: 9. 10. 11. 12. 13. 14. 15. 16. Select the Bill Firm. Status will default to Requested. Select the Fee Type. Select the product Quadrant (Note: This displays as Product Venue for NYMEX/COMEX; this field does not apply for DME). Select the Original Process Month (MM - YYYY). Enter an Amount after selecting whether the adjustment represents a Rebate or Assessment. Select a reason for the adjustment from the pre-populated drop-down list or type the reason in the Description text box. To add an attachment click Save/Attach. EFS Manual May 2012 109 Exchange Fee System After selecting the Save/Attach button, an Attachment(s) section will display. 6. 7. 8. 9. Click Browse. The Choose file window will display. Locate and click the saved file. Click Open. Click Upload. The filename will appear in the attachment list. Repeat these steps for any additional attachment(s). After completing the Manual Fee Adjustment screen, click Update to save the adjustment request with the attachment(s). A confirmation message will display that the Adjustment has been updated. EFS Manual May 2012 110 Exchange Fee System If you have any questions, telephone: CME Group EFS Hotline at 312-648-5470 or e-mail: [email protected]. EFS Manual May 2012 111 Exchange Fee System 13.5 Fee Types Field Name Fee Type Definition Clearing Fees Exchange Fees Ex-Pit Surcharges Brokerage Fees Globex Fees Facilitation Fee - - Top - - EFS Manual May 2012 112 Clearing Fee, Give-Up Surcharge, E/A Surcharge, Delivery Surcharge, Position Transfer, Position Adjustment, and Expired Option Fee Exchange Fee, Exchange Fee-NonTrd Exchange Fee – PIT, Exchange Fee – GBX, Exchange Fee – CPC, Day Credit, Cash Settlement, E/A/D Notice, Ex-Pit Movement, Lessee Surcharge EFP Surcharge, Fung Surcharge, EFS Surcharge and Block Surcharge NOTE: Surcharges are associated with Exchange Fees for billing purposes. Brokerage, 106F Brokerage and 106F Brokerage Individual (Brokerage Fees are billed to Broker) Globex Fee Facilitation Desk Fees Exchange Fee System 20 South Wacker Drive Chicago, Illinois 60606-7499 Tel: 1 312 930 1000 Fax: 1 312 466 4410 E-mail: [email protected] Futures trading is not suitable for all investors, and involves the risk of loss. Futures are a leveraged investment, and because only a percentage of a contract’s value is required to trade, it is possible to lose more than the amount of money deposited for a futures position. Therefore, traders should only use funds that they can afford to lose without affecting their lifestyles. And only a portion of those funds should be devoted to any one trade because they cannot expect to profit on every trade. The Globe Logo, CME®, Chicago Mercantile Exchange®, and Globex® are trademarks of Chicago Mercantile Exchange Inc. CBOT® and the Chicago Board of Trade® are trademarks of the Board of Trade of the City of Chicago. NYMEX, New York Mercantile Exchange, and ClearPort are trademarks of New York Mercantile Exchange, Inc. COMEX is a trademark of Commodity Exchange, Inc. CME Group is a trademark of CME Group Inc. All other trademarks are the property of their respective owners. The information within this presentation has been compiled by CME Group for general purposes only. CME Group assumes no responsibility for any errors or omissions. Although every attempt has been made to ensure the accuracy of the information within this presentation, CME Group assumes no responsibility for any errors or omissions. Additionally, all examples in this presentation are hypothetical situations, used for explanation purposes only, and should not be considered investment advice or the results of actual market experience. All matters pertaining to rules and specifications herein are made subject to and are superseded by official CME, CBOT, NYMEX and CME Group rules. Current rules should be consulted in all cases concerning contract specifications. Copyright © 2011 CME Group. All rights reserved. EFS Manual May 2012 113