1
DCN Next Generation
Delegate Database
en Software User Manual
LBB 4180/00
About this manual
This user manual is divided into five chapters.
Chapters 1 and 2 provide background information
and chapters 3 and 4 provide detailed user
information and chapter 5 describes the API as
follows:
•
Chapter 1 - Delegate Database - containing a
brief overview of the Digital Congress Network
Next Generation and an overview of the
functionality of the Delegate Database
application.
•
Chapter 2 - Getting started - containing details of
how to start the Delegate Database application
from the DCN Startup screen and a description
of the Help facility.
•
Chapter 3 - Preparing for a conference containing details about pre-conference activities
using Delegate Database and setting up the
delegate database. Information on how to work
with names files, entering delegate data, screen
card options, viewing and screen configuration
possibilities, and printing the current names file.
•
Chapter 4 – Applying Data during a Conference
- containing details of Delegate Database
possibilities during a conference. Information on
downloading delegate data to the CCU, and
exiting Delegate Database.
•
Chapter 5 – DCNNG API - containing an
overview of all API functions
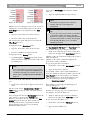
Manual conventions
For clarity this user manual uses consistent styles,
symbols and typographical conventions. They are:
i
Note
General notes are contained within rules and
indicated with this symbol at the left margin.
Notes are used to draw attention to special
actions or information.
i
Caution
A caution is contained within rules and
indicated with this symbol at the left margin.
Cautions are used to draw attention to actions
or commands that could lead to a loss of
information or damage to equipment
i
Tip
A tip is contained within a box and indicated
with this symbol at the left margin. Tips are
used to provide supplementary information that
may make an action quicker or easier to carry
out.
•
An action (to be carried out by the user) is shown
with a larger round bullet mark.
Typographical conventions
The following typographical conventions (text styles)
are used in this manual:
•
Typed input - information to be typed in using
the keyboard is shown as:
Filename
•
•
•
Single key - input via a single key (or keys) on
the keyboard is shown as:
<enter>, <shift>, etc.
Multiple keys - input via a combination of keys
pressed together is shown as:
<ctrl>+<p>, <alt>+<f4>
Screen text - information that appears on screen
is shown as:
‘Choose Startup Modules:’
Hyperlinks
This manual is also available as a digital document in
the Adobe Portable Document Format (PDF). All
references to pages, figures, tables, etc. in this digital
document contain hyperlinks to the referenced location.
DCN Next Generation Delegate Database
en | 3
Table of contents
1
1.1
1.1.1
2
2.1
2.1.1
2.2
2.2.1
2.2.2
2.2.3
2.2.4
2.2.5
2.2.6
2.2.7
2.2.8
3
3.1
3.1.1
3.2
3.2.1
3.3
3.3.1
3.3.2
3.3.3
3.4
Delegate Database................................................... 4
About delegate database ..................................... 4
What is Delegate Database? .............................. 4
Getting Started........................................................... 5
Starting Delegate Database ................................ 5
The Startup screen ................................................ 5
Selecting an installation (and a names) file...... 5
The Delegate Database icon ............................... 5
Using Help ............................................................... 5
The Help menu........................................................ 5
Index .......................................................................... 5
Keyboard .................................................................. 6
Commands............................................................... 6
Procedures............................................................... 6
Glossary.................................................................... 6
Using Help ............................................................... 6
About ......................................................................... 7
Preparing for a conference .................................. 8
The main window.................................................... 8
The menu bar........................................................... 8
Working with names files ..................................... 8
Names files options................................................ 8
Creating a new names file.................................... 9
Opening an existing names file ........................... 9
Copying a names file ...........................................10
Deleting a names file ...........................................10
Importing & Exporting names file ......................10
Field Definitions ....................................................11
Entering delegate data ........................................13
Defining conference data options ....................14
Editing screen-card fields...................................14
Specifying the PIN size .......................................14
Configuring the multiple names window.........15
Configuring and producing ID-card labels .....15
Configuring the screen line................................16
Entering conference data ...................................16
Authorizing microphones, voting and intercom
18
Entering personal data ........................................18
Working in names files........................................19
3.4.1 Searching for delegate screen cards.............. 19
Repeating the search.......................................... 19
Searching by card................................................ 19
Moving through delegate screen cards.......... 19
3.4.2 Editing names files............................................... 20
Cutting data........................................................... 20
Copying data......................................................... 20
Deleting data......................................................... 20
Selecting a complete screen card................... 20
Deleting a record ................................................. 21
Pasting data .......................................................... 21
3.5
Viewing names files ............................................. 21
3.5.1 Viewing options .................................................... 21
Viewing multiple names ...................................... 21
Viewing the ID-card label ................................... 21
Viewing the screen line....................................... 22
3.6
Printing.................................................................... 22
4
Applying data during a conference ............... 24
4.1
Downloading delegate data............................... 24
4.2
Exiting delegate database.................................. 24
4.2.1 Temporarily exiting Delegate Database .......... 24
4.2.2 Permanently exiting Delegate Database......... 24
5
DCNNG API................................................................ 25
5.1
Introduction............................................................ 25
5.1.1 DCNNGAPI.DLL .................................................. 25
5.1.2 DCNNGOLE.EXE ................................................ 25
5.2
API functions ......................................................... 25
5.2.1 ApplyAll................................................................... 25
5.2.2 ApplyOne ............................................................... 26
5.2.3 ProduceCard......................................................... 27
5.2.4 Terminate ............................................................... 28
5.3
Apply file format.................................................... 29
5.4
DCNNGOLE Automation Server ..................... 30
5.4.1 Registering the server ......................................... 30
5.4.2 Start the server ..................................................... 30
5.4.3 Call methods ......................................................... 30
5.4.4 Stop the server ..................................................... 30
Bosch Security Systems B.V. | 2004 December | 9922 141 70421
DCN Next Generation Delegate Database
1
Delegate Database
1.1 About delegate database
1.1.1 What is Delegate Database?
The Delegate Database software allows users to
compile a comprehensive database of information
relating to participants at a conference or meeting.
The delegate information is classed as either
‘conference-related’ or ‘personal’.
•
Conference-related deals with parameters like
interpretation language, vote weight and
microphone authorization. This data is used by
the system for conference controlling.
•
Personal information deals with data such as
home address and telephone number, date of
birth and fax number. This data is for reference
only.
en | 4
A screen card is entered for each delegate. All
delegate data is input via the main window. For some
entries (first name, last name) the only restriction is
the number of characters entered. For other entries
(country, group etc.) the input must be selected from
a list of options which is presented by the system
when the user activates that particular field. This
options list can be edited and expanded by the user.
Once all delegate data has been specified, the ‘Apply’
menu option is used to make the data contained in
the current names file functional. This is assuming
that all input data is valid, and the PC is properly
connected to the Central Control Unit. If these
criteria are met, the system adopts the conferencerelated data entered in the screen card.
i
All information is entered via a PC before or during
a conference. Conference- related parameters are not
general but delegate specific, with many of them
unique to that delegate. The parameters are:
•
Delegate last name
•
Delegate first name
•
Delegate country
•
Simultaneous interpretation language
•
Language of delegate screen display
•
Delegate group
•
Delegate title
•
Delegate seat number
•
PIN code
•
Card code for ID-card
•
Delegate vote weight
If a card encoder and a label printer are connected to
the system, ID-cards can be encoded and the labels
for the ID-cards printed. In Delegate Database it is
possible to grant or deny authorization for the
following:
•
Microphone
•
Voting
•
Intercom
i
Note
This information is stored in a ‘screen card’
which is displayed in the main window of
Delegate Database. Each delegate has a
separate screen card, with text boxes, edit
fields and check boxes for specifying the
details for that delegate. Screen cards are
stored by the system in a names file.
Bosch Security Systems B.V. | 2004 December | 9922 141 70421
Note
Parameters specified in Delegate Database are
used by certain other modules, and have a
significant influence on the use of those
modules. For instance, if authorization to use a
microphone is not granted for a delegate (or a
number of delegates) then this cannot be
overruled using the Synoptic Microphone
Control module. Similarly, if voting rights are
not granted, then this cannot be overruled
using the Parliamentary Voting or Multi Voting
modules. The contents of a screen line
specified in Delegate Database cannot be
altered using the Microphone Management
module.
DCN Next Generation Delegate Database
2
Getting Started
2.1 Starting Delegate Database
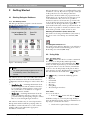
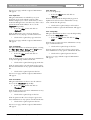
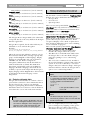
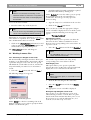
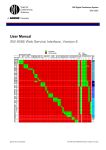
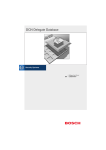
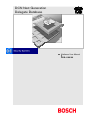
2.1.1 The Startup screen
The Delegate Database program is started from the
Startup screen (shown below).
en | 5
Delegate Database requires an installation file in order
to function correctly. If you do not specify a names file
at this point, then once the Delegate Database
application is loaded it will be in preparation mode.
In this mode you can edit and create delegate screen
cards within names files, but it is not possible to
download conference data from the open names file
to the Central Control Unit (CCU). If you do specify
a names file, the Delegate Database application
opens in that names file, and in operational mode. In
this mode it is possible to download conference data
to the CCU, provided certain criteria are met.
Selecting an installation (and a names) file
For details on selecting an installation (and a names)
file, please refer to the Startup user manual (LBB
4190).
The Delegate Database icon
For details on the Delegate Database icon and how to
start Delegate Database from Startup, please refer to
the Startup user manual (LBB 4190).
2.2 Using Help
Figure 1 The Startup screen.
i
Note
For starting the Startup program from an icon
in the desktop, refer to the Startup user
manual.
The software uses two user-created files that contain
important information about the installed hardware
configuration and about delegates’ names. These files
are:
•
Installation file - containing information about
channel assignment and the numbers that have
been assigned to all microphones connected to
the system. These seat numbers are assigned
using this software module.
•
Names file - containing information about the
name, seat number and other conference and
personal details of participating delegates. Names
files are created using Delegate Database.
The software modules may be started up from the
Startup main window without specifying either an
installation or names file. However, some software
modules will not run without the appropriate
installation or names file.
2.2.1 The Help menu
The ‘Help’ menu in the title bar contains commands
for an on-screen help facility. This help facility
contains information on all commands in the ‘File’
menu, on which keyboard keys are functional, a
description of how to use the software, information
on how to use the help facility itself, plus an index
and a glossary of terms. All information contained in
this user manual is also found in the ‘Help’ facility.
The ‘Help’ facility contains the following options:
•
Index
•
Keyboard
•
Commands
•
Procedures
•
Glossary
•
Using Help
•
About Delegate Database.
2.2.2 Index
To access the index:
•
Select the ‘Help’ menu and click on ‘Index’.
A full list of subjects covered by the help facility is
given in alphabetical order. For more information on
any subject contained in the index:
•
Bosch Security Systems B.V. | 2004 December | 9922 141 70421
Click on the required subject in the index.
DCN Next Generation Delegate Database
An on-screen page with the requested information
will appear.
2.2.3 Keyboard
This gives information on which keys on your
keyboard can be used with the software. This
includes using keys to activate menu items, to move
around in dialogue boxes, for short cuts, and to select
options from the main window. To access the
‘Keyboard’ help facility:
•
Select the ‘Help’ menu and click on
‘Keyboard’.
A list of different key types is given. For more
information on any key type contained in the list:
•
Click on the required key type in the list.
An on-screen page with the requested information
will appear.
2.2.4 Commands
This gives information on all menu options, covering
the ‘File’, ‘Edit’, ‘View’, ‘Settings’ and ‘Help’ menus.
To access the ‘Commands’ help facility:
•
Select the ‘Help’ menu and click on
‘Commands’.
A list of menu groups is given. For more information
on any menu group contained in the list:
•
en | 6
2.2.6 Glossary
To access the glossary:
•
A list of terms used in the help facility is given in
alphabetical order. For more information on any
term contained in the glossary:
•
2.2.7 Using Help
This gives information on how to use the help facility.
To access the ‘Using Help’ facility:
•
•
•
Click on the required option in the list.
An on-screen page with the requested information
will appear.
Click on the required menu group in the list.
Click on the required option in the list.
Select the ‘Help’ menu and click on
‘Procedures’.
A list of topics is given. For more information on any
topic contained in the list:
Click on the required topic in the list.
A list of options for the selected topic is given. For
more information on any option contained in the list:
•
Click on the required topic in the list.
A list of options for the selected topic is given. For
more information on any option contained in the list:
2.2.5 Procedures
This gives information on how to use the software.
To access the ‘Procedures’ help facility:
•
Select the ‘Help’ menu and click on ‘Using
Help’.
A list of topics is given. For more information on any
topic contained in the list:
An on-screen page with the requested information
will appear.
•
Click on the required subject in the index.
A window with the requested information will appear.
A list of options in the selected menu group is given.
For more information on any option contained in the
list:
•
Select the ‘Help’ menu and click on
‘Glossary’.
Click on the required option in the list.
An on-screen page with the requested information
will appear.
Bosch Security Systems B.V. | 2004 December | 9922 141 70421
DCN Next Generation Delegate Database
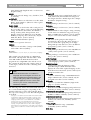
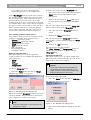
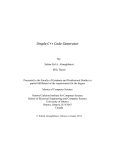
2.2.8 About
This provides software release information. To
display the ‘About...’ window:
•
Select the ‘Help’ menu and click on ‘About
Delegate Database...’.
The following window appears:
Figure 2 The ‘About Del. Database…’ window
To remove this window:
Click on the ‘OK’ push button.
Bosch Security Systems B.V. | 2004 December | 9922 141 70421
en | 7
DCN Next Generation Delegate Database
3
Preparing for a conference
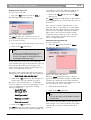
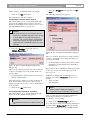
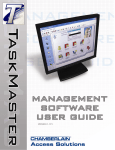
3.1 The main window
The Delegate Database main window is used to input
delegate data and parameters and to access the other
dialogue boxes of the Delegate Database program.
en | 8
3.1.1 The menu bar
All menu options referred to in this user manual are
contained within the menu bar, located underneath
the title bar at the top of the main window. Access to
drop-down menus is gained by clicking on the menu
title, displayed in the menu bar. The full list of menu
options is as follows:
File
Edit
Search
View
Fields
Configure
Apply
Help
New…
Cut
Find…
Multiple
Names
Group…
Multiple
Names View…
All
Index…
Open…
Copy
Find
Next…
One
Keyboard
Copy…
Paste
Delete…
Delete
Import…
Select All
Export…
Delete
Record
Title…
Id Card Label
ID Card…
Country…
Find by
Card…
Screen Line
Commands
Screen Line
Interpretation…
Procedures
Pin size…
Glossary
Print…
Using Help
About…
Exit
3.2 Working with names files
Figure 3 The Delegate Database main window
In the title bar at the top of this window, the names
file name is displayed. If a names file was selected
from the main menu of the Startup program, this file
will be opened and the name of this file will appear
in the title bar.
If no ‘Current Names File’ has been selected from the
main menu of the Startup program, then Delegate
Database will open in preparation mode. In this
mode, pre-conference data can be entered after first
opening or creating a names file from the ‘File’ menu
on the main menu bar. It is possible to access any
existing names file or enter data into a new names
file. To download delegate data from such a file to
the CCU it is necessary to return to Startup and
select a names file in the Startup file menu. For more
details, please refer to chapter 4.
3.2.1 Names files options
If you wish to use an existing names file or open a
completely new one, the ‘File’ menu includes
commands for doing so.
The ‘File’ menu has commands for:
•
Creating a new names file
•
Opening an existing names file
•
Copying a names file
•
Deleting a names file
•
Importing a names file
•
Exporting a names file
•
Printing
•
Exiting the Delegate Database program.
i
The main window contains the following elements:
•
‘Previous Name’, ‘New Name’, and ‘Next Name’
push buttons
•
‘Records’ text and field
•
‘Conference Data’ dialogue box
•
‘Personal Data’ dialogue box or push button
•
‘Screen Line’ text box
•
‘ID Card Label’ text box
•
‘Produce Card’ push button
•
‘Read Card’ push button
Bosch Security Systems B.V. | 2004 December | 9922 141 70421
Note
Exiting the Delegate Database program is
covered in paragraph 4.2. Printing is covered in
paragraph 3.6.
DCN Next Generation Delegate Database
Creating a new names file
To open a new names file:
•
Select the ‘File’ menu and click on ‘New...’.
The following dialogue box appears:
Figure 4 The ‘New...’ dialogue box
The ‘New’ dialogue box contains a text box for
entering the names file name. You can type a name
up to 12 characters long.
•
Type the desired names file name in the text box.
•
Click on the ‘Ok’ push button.
en | 9
seat number or card code) will be deleted from the
current names file. To replace the invalid data:
•
Click on the ‘Cancel’ push button in the ‘New’
dialogue box.
The ‘New’ dialogue box will disappear. The invalid
data is highlighted in the current names file. You can
then alter it.
Once you have entered a valid file name, a new
names file will be created. The screen cards within
this names file will contain unique system-specified
entries for card code, PIN code and seat number.
These values can be altered, but under normal
circumstances there will be no need to. If you do
wish to change them, you must ensure the new
values are valid and unique.
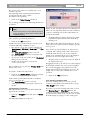
Opening an existing names file
To open a names file:
•
i
Select the ‘File’ menu and click on ‘Open...’.
The following dialogue box appears:
Note
Clicking on the ‘Cancel’ push button closes
the dialogue box without performing the
function. This applies to all dialogue boxes in
the Delegate Database program.
If a file name has been entered, a new names file
opens and the name appears in the title bar at the top
of the window. If you have made changes to the
current names file, they will be automatically saved
before a new names file is opened.
If you have entered a file name that already exists, a
warning message with the following text is displayed:
‘A file already exists with this name’
•
Click on the ‘Ok’ push button. The dialogue box
returns and a new name should be typed in.
If you have entered invalid data (i.e. invalid PIN
code, seat number or card code) and attempt to open
a new or existing file, the appropriate warning
message is displayed:
‘Invalid PIN code’
‘Use 1, 2, 3, 4 or 5’
or
‘Invalid seat number’
or
‘Duplicate seat number’
or
‘Card code not correct’
•
Click on the ‘Ok’ push button.
The ‘New’ dialogue box returns. If you proceed with
opening a new names file, the invalid data (PIN code,
Figure 5 The ‘Open’ dialogue box
When the ‘Open’ dialogue box opens, a list box
appears with all names files currently available. The
currently open names file is also shown. If the list
contains more names than can be displayed, a scroll
bar is provided. To open a names file:
•
Click on the name in the list.
•
Click on the ‘Ok’ push button.
i
Tip
You can also open a file by double-clicking on
the file name.
The selected names file will be opened. If you have
made changes to the current names file, they will be
automatically saved before another names file is
opened.
Bosch Security Systems B.V. | 2004 December | 9922 141 70421
DCN Next Generation Delegate Database
en | 10
If you have entered invalid data (i.e. invalid PIN
code, seat number or card code) an appropriate
warning message is displayed. For more details,
please refer to page 9.
Copying a names file
Allows you to save the current names file under a
new name. The original file remains unaltered. To do
so:
•
Select the ‘File’ menu and click on ‘Copy...’.
The following dialogue box appears:
Figure 7 The 'Delete' dialogue box
•
Click on the name in the list.
•
Click on the ‘Delete’ push button.
Another dialogue box will appear, with the text:
‘Are you sure you want to delete file <file
name>’
If you still want to continue:
•
Click on the ‘Ok’ push button.
Figure 6 The ‘Copy’ dialogue box
The file is deleted and the main window returns.
The ‘Copy’ dialogue box contains a text line giving
the current name of the file and a text box for
entering the new names file name. You can type a
name up to 12 characters long.
Importing & Exporting names file
•
Type the new file name in the text box.
•
Click on the ‘Ok’ push button.
The current names file will be saved under the new
name if all data in the file is valid.
If you have typed a file name that already exists, a
warning message with the following text is displayed:
‘A file already exists with this name’
•
Click on the ‘Ok’ push button. The dialogue box
returns and a valid name can be typed in.
Deleting a names file
To delete a redundant names file:
•
Delegate Database application can import and export
a names file in ASCII format. This allows external
programs to produce or process DCN Next
Generation names files. These import/export names
files are also used to transfer a names file to a newer
version of the DCN Next Generation software. The
old names file is exported from the old database and
then imported into the new one. Exported names
files are “upwardly-compatible”. This means that
newer DCN Next Generation versions can read old
files, but not the other way around.
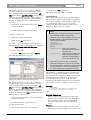
To import a names file:
•
Select the ‘File’ menu and click on ‘Import...’.
The dialogue box on the following page appears:
Select the ‘File’ menu and click on ‘Delete...’.
The following dialogue appears:
Figure 8 The ‘Import names file’ dialogue box
Bosch Security Systems B.V. | 2004 December | 9922 141 70421
DCN Next Generation Delegate Database
The dcnng\export directory is opened as default.
Any file(s) with a .txt or .csv extension are shown.
You can display all file types by selecting the ‘All
Files’ option in the ‘List Files of Type:’ drop-down list
box in the bottom left hand corner of the dialogue
box. A scroll bar is present if the number of files is
too large to display. To select a different drive or
directory:
•
Click on the required drive letter in the ‘Drives:’
drop-down list box.
•
Double-click on the required directory.
en | 11
•
Click on the ‘Ok’ push button.
The current names file will be exported.
Field Definitions
Some values in the import file may be left blank in
which case they will be automatically set to default
values. These defaults are usually empty strings, 0 in
case of numerical values or yes in case of the
authorization fields. The default separator for the
fields in the import file is the comma.
i
Note
Before a file is imported, new default values for
the authorization fields and the import
separator can be set by adding a section to the
DCNNG.INI file as described below (values
shown are the defaults):
To import a names file:
•
Click on the file to be imported.
•
Click on the ‘Ok’ push button.
[Database]
ImportSeparator=,
Authorization=Yes
If you have typed a file name that already exists, a
warning message with the following text is displayed:
‘A file already exists with this name’
where:
ImportSeparator
To export a names file:
•
Select the ‘File’ menu and click on ‘Export...’
Authorization
The following dialogue box appears:
Defines the separator
character between fields in
the import file.
Determines the default value
for the voting, microphone
and intercom-authorization
(Yes or No) Default is Yes
Upon export of a names file, any separator
character that appears as part of an exported
text is replaced by a single space. This ensures
that the names file can be re-imported using
the same setting for the separator character.
Figure 9 The ‘Export names file’ dialogue box
The dcnng\export directory is opened as default.
Any files with a .txt or .csv file extension are shown.
You can display all file types by selecting the ‘All
Files’ option in the ‘List Files of Type’: drop-down list
box in the bottom left hand corner of the dialogue
box. A scroll bar is present if the number of files is
too large to display in the ‘Files’: window. To select a
different drive or directory:
•
Click on the required drive letter in the ‘Drives’:
drop-down list box.
•
Double-click on the required directory.
To export a names file:
•
Enter a name for the file to be exported.
The CSV files are ASCII based files and numerical
values are represented by strings (card code 1234 is
represented by the string 1234). When omitted fields
are followed by other fields the separators of the
omitted fields must be present in the line. The
separators of the fields omitted at the end of the line
can be omitted (also see examples in this section).
First line:
DCNNG NAMES
X.0<SEP>filename<SEP>pinsize<SEP>width
field1<SEP>field1<SEP> field2<EOL>
where:
DCNNG NAMES x.0
Where x represents the DCN Next Generation
software version number. Fixed text that indicates
the type of file and the version of DCN Next
Generation that produced the file. (Required
entry.)
Filename
The name under which this file appears in the
DCN Next Generation application, not the csv file
Bosch Security Systems B.V. | 2004 December | 9922 141 70421
DCN Next Generation Delegate Database
name. String with length >0 and < 13 characters.
(Required entry)
pinsize
Size of the pincode. Range: 3,4,5, default 3. (Can
be omitted)
width field1
The size in characters of the first screen line field.
Range: 0-30, default 15. (When no value is given
the default is used)
field1, field2
The fields to use for the first and second parts of
the screen line. These can be any of the following
strings: Last Name, First Name, Seat Number,
Group, Country, Title, Interpretation, User
Display, Card Code, PIN Code, Vote Weight,
Birthday, Company, Street, Post Code, City, EMail, Fax, Phone. (Can be omitted)
field1 and field2 defaults to [None].
<SEP>
Indicates a separator character.
<EOL>
Indicates an end of line (carriage return (0x0D)
and newline character(0x0A)).
Example:
DCNNG NAMES x.0,Test DB,4,20,Last Name,Company
This example gives the first line of a DCN Next
Generation x.0 import file. The file will be called
“Test DB” within the DCN Next Generation
program. It uses 4-digit PIN-codes and the screen
line contains the last name and company name of
each delegate, with the last name consisting of 20
characters.
i
Note
If DCN Next Generation is installed in a
language other than English, the names for
field1 and field2 are translated. Refer to the
corresponding entry fields in the Delegate
Database application for the correct field
names in your version of the DCN Next
Generation software.
The following table defines the fields which make up
the second and following lines (depending on the
amount of delegate records) of the CSV file. Each
line represents a delegate record. The following fields
are defined :
Delegate ID<SEP>lastname<SEP>firstname<SEP>
seatnumber<SEP>groupname<SEP>country name
<SEP>title<SEP>audio language<SEP>display
language<SEP>card code<SEP>PIN code<SEP>
authorization voting<SEP>authorization
microphone<SEP>authorization intercom<SEP>
voting weight<SEP>birth date<SEP>company
name<SEP>street<SEP>ZIP code<SEP>city<SEP>Email address<SEP>fax number<SEP>phone number
<EOL>
en | 12
where:
delegate ID
A number in the range 1-1000 (single CCU) or 11500 (multi-CCU) that identifies the delegate in
the delegate database. Each delegate has a unique
ID-number. (Required entry.)
lastname
string with up to 40 characters. (Can be omitted.)
firstname
string with up to 14 characters. (Can be omitted.)
seatnumber
The seat number of the delegate. string consisting
of four characters within the range 0..9,A..Z (e.g.
0001 or 2CHR, must be unique. (Can be omitted
only if a card code for this record is available.)
groupname
The name of the group for this delegate as
determined by the names file. If the delegate is
not associated with a group this part is empty.
String with up to 20 characters, max. 32 different
group names per file. (Can be omitted.)
country name
string with up to 20 characters, max. 200 different
country names per file. (Can be omitted.)
title
string with up to 14 characters, max. 50 different
titles per file. (Can be omitted.)
audio language
string with up to 12 characters, max. 32 different
audio languages per file. (Can be omitted.)
display language
a string representing the language of this
particular delegate, DCN Next Generation
displays the texts in this required language on the
DCN Next Generation unit. (Can be omitted.) See
remark and table below.
card code
a number within the range 1..999999999 must be
unique within the file. (Can be omitted only if a
seat number for this record is available.)
PIN code
<pinsize> (see first line definitions) digits in the
range 1..5. (Can be omitted.)
authorization voting
DCN Next Generation language independent text
NoVoting or Voting (=default). (Can be omitted.)
authorization microphone
DCN Next Generation language independent text
NoMicro or Micro (=default). (Can be omitted.)
authorization intercom
DCN Next Generation language independent text
NoIntercom or Intercom (=default). (Can be
omitted.)
voting weight
a number within the range 1..99999999
(1=default). (Can be omitted.)
birth date
Bosch Security Systems B.V. | 2004 December | 9922 141 70421
DCN Next Generation Delegate Database
string with up to 19 characters. (Can be omitted.)
company name
string with up to 19 characters. (Can be omitted.)
street
string with up to 40 characters. (Can be omitted.)
ZIP code
string with up to 9 characters. (Can be omitted.)
city
string with up to 19 characters. (Can be omitted.)
E mail address
string with up to 19 characters. (Can be omitted.)
fax number
string with up to 19 characters. (Can be omitted.)
phone number
string with up to 19 characters. (Can be omitted.)
The delegate ID is a unique number, the other fields
correspond directly to the entry fields in the Delegate
Database application.
Delegate ID is required, but the other fields may be
left blank or can be omitted all together.
Example:
1,Doe,John,A1,My group,United
States,Dr.,English,,12345678,123,Voting,NoMicro
This is the entry for Dr. John Doe, sitting at seat A1.
He is from the United States, belongs to group “My
group” and has English as audio language. Display
language is as default. His card code is 12345678
with PIN code 123. He has voting but no
microphone authorization, and all other fields are
omitted and thus left as default. The DCN Next
Generation system holds a subset of six different
languages. If another language, other than the six
available, is present in the import file this delegate’s
display language will be English. These abbreviations
are DCN Next Generation language version
independent.
en | 13
details for that delegate. Screen cards are
stored by the DCN system in a names file.
The data fields contained within the ‘Conference Data’
dialogue box can be divided into three categories:
•
User-specified
•
User-selected
•
System-specified
There are two user-specified fields: ‘Last Name’ and
‘First Name’. The only restriction on entries in these
fields is the number of characters; maximum 40 for
‘Last Name’ and 14 for ‘First Name’.
There are five user-selected fields: ‘Country’,
‘Interpretation’, ‘User Display’, ‘Group’, ‘Title’.
Entries in these fields must be selected from a list of
options offered by the system. However, all lists
except User Display can be edited or updated. For
more details on editing lists, please refer to ‘Editing
screen-card fields’ on page 14.
There are four system-specified fields: ‘Seat Number’,
‘Pin Code’, ‘Card Code’ and ‘Vote Weight’.
•
The seat number is a unique number that
identifies the delegate unit to the system.
•
The PIN code is an identification number that
the delegate has to enter into his/her delegate
unit before gaining access to conferencing
facilities.
•
The card code is a numerical code, invisible to
the user that identifies a delegate’s ID-card to the
system. A card code is shared by a card and a
delegate unit, but is otherwise unique. A delegate
must insert his/her card into the delegate unit to
gain access to conferencing facilities.
i
Note
The address of the card code on the chip card
is configurable. The default address is 25. To
change the default value, the following line
must be added in the DCNNG.INI file:
3.3 Entering delegate data
Delegate data is classed either as conference data or
personal data. Conference data is information that is
directly related to the conference in which the
delegate is participating. Personal data is additional
information that is not-conference related. All data is
entered into the screen card via the main window.
[Startup]
DataStart= #
where
#
i
i
Note
The Read Card push button allows you to
automatically read the code on an ID-card with
the ID-card encoder.
Note
A screen card is what is displayed in the main
window of Delegate Database, and is used to
store data on delegates. Each delegate has a
separate screen card, with text boxes, edit
fields and check boxes for specifying the
is the specified address of the
card code.
•
The vote weight facility increases the voting
power of delegates by assigning a value greater
than one to their vote. This is often used in
shareholder meetings. It is possible to specify a
Bosch Security Systems B.V. | 2004 December | 9922 141 70421
DCN Next Generation Delegate Database
vote weight between one and 99,999,999.
Normal delegates have a vote weight of one.
In the ‘Vote Weight’ field, the default value is always
one. For the other three fields, the system generates a
list of available values. These values do not appear
automatically on-screen, but can be selected by
clicking on the up or down scroll buttons to the right
of each field. These values can be altered, if required,
but any new values entered must be valid. The data
fields contained within the personal data dialogue
box are all user-specified. The only restriction on
entries in these fields is the number of characters.
3.3.1 Defining conference data options
It is possible to define parameters relating to certain
conference data fields. These parameters are:
•
‘Country’ option list contents
•
‘Interpretation’ option list contents
•
‘Group’ option list contents
•
‘Title’ option list contents
•
PIN code length
•
ID-card label contents
•
Screen line contents
Editing screen-card fields
This option allows you to edit the option lists
contained within screen-card fields. The fields that
can be edited are:
•
‘Group’
•
‘Title’
•
‘Country’
•
‘Interpretation’
en | 14
To insert extra entries into the ‘Group List’ field:
•
Type in the desired entry in the text box entitled
‘Entry’, situated at the left-hand side of the
dialogue box.
•
Click on the arrow-shaped ‘Insert’ push button.
You can also insert by pressing the <ENTER>
key.
The new entry will be inserted into the ‘Group List’
field. To delete entries in the ‘Group List’ field:
•
Select the entry in the ‘Group List’ field to be
deleted.
•
Click on the ‘Delete’ push button.
The selected entry in the ‘Group List’ field will be
deleted. When you have finished editing the ‘Group
List’ field:
•
Click on the ‘Ok’ push button.
You will return to the main window.
The ‘Title’, ‘Country’ and ‘Interpretation’ fields are
edited in the same manner as described for the
‘Group List’ field.
Specifying the PIN size
This option enables you to specify the length of the
PIN code for the current names file. You can choose
between three, four or five numbers.
i
Caution
Once a PIN code has been specified and
saved within the current names file, it is no
longer possible to specify another PIN code
length smaller than the current one.
To edit the ‘Group List’ field:
•
Select the ‘Fields’ menu and click on ‘Group’.
The following dialogue box appears:
To specify the PIN code length:
•
Select the ‘Fields’ menu and click on ‘PIN Size...’.
The following dialogue box appears:
Figure 10 The ‘Edit group list’ dialogue box
The list box entitled ‘Group List’ contains a list of all
current possibilities. If it contains more entries than
can be displayed, a scroll bar is provided.
i
Note
If you are working with a new names file, the
Group List is empty.
Figure 11 The ‘Edit PIN size’ dialogue box
•
Select the desired length by clicking on the radio
button.
Bosch Security Systems B.V. | 2004 December | 9922 141 70421
DCN Next Generation Delegate Database
en | 15
•
Select the ‘Configure’ menu and click on ‘IDcard...’.
When you have specified the PIN code length:
•
Click on the ‘Ok’ push button.
The following dialogue box appears:
You will return to the main window.
Configuring the multiple names window
This option allows you to specify which fields will
appear in the multiple names window. (For more
details on the multiple names window, please refer to
‘Viewing Multiple Names’ on page 21).
i
Caution
The maximum amount of information that can
be present is 64,000 characters. If this amount
is exceeded (in a very large names file, for
example), one or more columns of information
will be removed from the right hand side and
replaced by the word ‘None’. There is no error
message.
•
Select the ‘Configure’ menu and click on
‘Multiple Names View...’.
The following dialogue box appears:
Figure 13 The ‘Configure ID Card Label’ dialogue
box
There are six drop-down list boxes with scroll bars,
each one containing a list of all possible fields. To
specify the first field:
•
Scroll through the top drop-down list box until
you find the required field. Select this field by
clicking on it.
Figure 12 The ‘Configure Multiple Names View’
dialogue box
There are five drop-down list boxes with scroll bars,
each one containing a list of all possible fields. To
specify a field:
•
Scroll through the drop-down list box until you
find the required field.
Select this field by clicking on it. Repeat this for all
fields. If you wish to alter any of your selections
simply repeat the above process. Once all fields have
been specified:
•
Repeat this for the remaining five fields. If you wish
to alter any of your selections simply repeat the
above process.
Within the Configure ID-card dialogue box is a
dialogue box entitled ‘Production’. There are two
options:
•
Card encoding
•
Label printing
i
Click on the ‘Ok’ push button.
Configuring and producing ID-card labels
This option allows you to specify which fields will
appear in the ID-card label when printed.
i
Caution
The maximum dimensions of labels are 25 x 55
mm.
Note
Please read the Software Installation
Instructions how to install the card encoder.
Card encoding involves transferring information
from Delegate Database to the ID card.
To authorize card encoding:
•
Click on the ‘Card Encoding’ check box.
A (√) will appear in the box, indicating this function
is enabled. The ‘Produce Card’ push button in the
main window will become active if LBB 4181/00
Bosch Security Systems B.V. | 2004 December | 9922 141 70421
DCN Next Generation Delegate Database
en | 16
ID_Card encoder software is enabled and a card
encoder is present.
Label printing involves printing the information
specified for the ID-card as a label.
To authorize label printing:
•
Click on the ‘Label Printing’ check box.
An (√) will appear in the box, indicating this function
is enabled.
i
Note
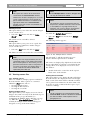
Figure 14 The ‘Configure Screen Line’ dialogue box
These two functions are not mutually exclusive,
so it is possible to specify both card encoding
and label printing.
There are two drop-down list boxes with scroll bars,
each one containing a list of all possible fields. To
specify the first field:
Once you have specified all parameters:
•
Click on the ‘Ok’ push button.
An ID-card can be produced for the current screen
card if the following conditions are met:
•
The current screen card contains valid data for
‘Seat Number’, ‘PIN Code’, ‘Card Code’ and ‘Vote
Weight’
•
The ‘View ID-card label’ option is selected
•
The ‘Personal Data’ window is not displayed in
the main window
•
At least one of the two options in the ‘Production’
dialogue box is selected
•
An ID-card encoder has been properly
connected to the PC
If the conditions are not met, the ‘Produce Card’ push
button is not active.
To produce an ID-card and/or label:
•
Click on the ‘Produce Card’ push button situated
at the bottom right of the main window.
A label will be printed if the first three conditions
above are met and also:
•
The ‘Label Printing’ option is selected
•
A label printer has been properly connected to
the PC
Configuring the screen line
This option allows you to specify which fields will
appear in the screen line.
•
•
Select the ‘Configure’ menu and click on ‘Screen
Line...’.
Scroll through the left drop-down list box until
you find the required field. Select this field by
clicking on it.
Repeat this for the right drop-down list box. If you
wish to alter any of your selections simply repeat the
above process.
You can also specify the number of characters for
each field. The combined sum of the characters in
both fields must always be 30, so increasing the
length of one automatically decreases the length of
the other. To alter the lengths of the fields:
•
Drag the block located between the two fields in
the required direction.
Dragging the block to the left decreases the length of
the first field (and therefore increases the length of
the second). Dragging to the right increases the
length of the first field (and therefore decreases the
length of the second). Once all fields have been
specified:
•
Click on the ‘Ok’ push button.
3.3.2 Entering conference data
If you are working with a new screen card, all
conference data fields in the main window (except
‘Vote Weight’) will be empty.
If you have opened an existing names file, or used
the ‘Previous Name’ or ‘Next Name’ button, the
conference data fields will display the data already
specified for those fields. You can edit some or all of
the fields simply by typing over the existing data.
The following dialogue box appears:
Bosch Security Systems B.V. | 2004 December | 9922 141 70421
DCN Next Generation Delegate Database
en | 17
To specify a ‘Vote Weight’ other than the default
value (1):
•
Type the required number in the text box.
i
Figure 15 New fields
Note
Figure 16 Existing fields
The number you type must be a decimal
number, and may not be larger than
99,999,999.
Whether you are working in a new screen card or an
existing one, a text insertion point is located in the
‘Last Name’ text box. To input data in the ‘Last
Name’ field:
•
Type the desired last name in the text box.
•
Press the <Tab> key on the keyboard.
i
Tip
You can also use the up or down scroll buttons
to locate the number you require. Scrolling
down from 1 takes you to 99,999,999 and then
continues downwards from there. Scrolling up
from 99,999,999 takes you to 1 and then
upwards from there.
The text insertion point will now be located in the
‘First Name’ text box.
•
Type the desired first name in the text box.
If you are working with a new delegate screen card,
the ‘Seat Number’, ‘PIN Code’, and ‘Card Code’ fields
will be blank. To specify a unique seat number:
•
Press the <TAB> key on the keyboard.
•
To input data in the ‘First Name’ field:
To input data in the ‘Country’ field:
•
Scroll through the ‘Country’ drop-down list box
until you find the required entry. Select this entry
by clicking on it.
i
Note
If you cannot find the country you are looking
for, it is possible to update the ‘Country’ list to
include the information you require. For more
details, refer to ‘Editing screen-card fields’ on
page 14.
To access any field other than the currently selected
one:
•
Position the cursor in the required text box and
click.
The procedure for the ‘Interpretation’, ‘Group’ and
‘Title’ fields is exactly the same as described for the
‘Country’ field.
You can input data into the ‘User Display’ field in the
same manner as given for the ‘Country’ field.
However, you cannot alter the options in the ‘User
Display’ drop-down list box. These options are
system-specified, and are dependent on which
display languages have been selected during
installation of the software.
Click on the either the up or down scroll button
situated to the right of the ‘Seat Number’ text box.
Clicking on the up scroll button displays the next free
valid seat number.
Clicking on the down scroll button displays the
previous free valid seat number.
To specify a particular seat number:
•
Position the cursor in the ‘Seat Number’ text box.
•
Type the desired seat number.
A seat number must consist of four alphanumeric
characters (numbers and letters). When you leave the
‘Seat Number’ text box after typing a seat number,
the system performs a check. If the number is not
valid, the following error message will appear:
‘Invalid seat number’
If the number is not unique, the following error
message will appear:
‘Duplicate seat number’
If either error message appears, you must input a
new number. To alter the PIN code:
•
Click on either the up or down scroll button
situated to the right of the ‘PIN Code’ text box.
To specify a particular PIN code:
•
Position the cursor in the ‘PIN Code’ text box.
•
Type the desired PIN code.
Bosch Security Systems B.V. | 2004 December | 9922 141 70421
DCN Next Generation Delegate Database
To specify the length of the PIN code, refer to page
14. The PIN code can consist of either three, four or
five numbers. It only uses the numbers 1 to 5
inclusive. When you leave the current screen card,
the system performs a check on the PIN code you
have entered. If the code is not valid, the following
error message will appear:
‘Invalid PIN code.
Use 1, 2, 3, 4 or 5’
If this error message appears, you must input a new
PIN code. To alter the card code:
•
Click on either the up or down scroll button
situated to the right of the ‘Card code’ text box.
To specify a particular card code:
•
Position the cursor in the ‘Card code’ text box.
•
Type the desired card code.
A card code consists of up to nine numbers. If you
input a code of less than nine numbers, the system
fills in the leading zeros. When you leave the ‘Card
code’ text box after typing a card code, the system
performs a check. If the code is not valid, the
following error message will appear:
‘Card code not correct’
If the code is not unique, the following error message
will appear:
‘Duplicate card code’
If either error message appears, you must input a
new code. If you are using ID-cards that already have
their own card code, it is possible to import this code
into the current screen card. It is necessary to
connect a card encoder to the PC and enter the IDcard into the card encoder. To import the card code:
•
Click on the ‘Read Card’ push button situated to
the right of the ‘Card Code’ field.
The card code will be imported and will appear in
the ‘Card Code’ field. Leaving the current screen card
and accessing another (i.e. Next, Previous, New...)
causes the system to automatically save the data you
have entered, providing all data is valid.
Authorizing microphones, voting and intercom
This option allows you to specify whether individual
delegates are allowed to use the microphone on their
contribution unit, take part in electronic voting or use
intercom facilities.
en | 18
•
Click on the appropriate check box.
The (√) will disappear to indicate this function has
been disabled. To re-enable the function:
•
Click on the check box again.
These functions are not mutually exclusive, so any
combination can be specified.
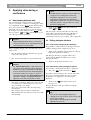
3.3.3 Entering personal data
The ‘Personal Data’ window offers you the possibility
of entering additional, personal information about
conference delegates. Each delegate screen card has a
corresponding ‘Personal Data’ window. It is possible
to enter data into the ‘Personal Data’ window and
thereafter to disable the window, so this personal
data is not displayed on-screen. The data is not
required for conference proceedings, but is intended
for database purposes.
Figure 17 The ‘Personal data’ window
The ‘Personal Data’ window contains fields for the
following data:
•
Street name and number
•
Postal code
•
City
•
Company
•
Date of birth
•
Telephone number
•
Fax number
•
E-mail address
When entering personal data for a new delegate, all
of the above fields will be blank. If you are editing an
existing personal data card, the fields will display the
original information. If the ‘Personal Data’ window is
not displayed on screen, you must first enable it. To
do so:
•
Click on the ‘Personal Data’ push button, located
below the ‘Conference Data’ dialogue box and
marked with a downward pointing arrow.
The ‘Personal Data’ window will appear. There will
be a text insertion point in the first text box, ‘Street’.
•
Type in the appropriate information.
The ‘Authorization’ dialogue box is situated at the top
right of the ‘Conference Data’ dialogue box. All three
options are enabled by default, indicated by a (√) in
the corresponding check box.
To disable a delegate for any of these options:
Bosch Security Systems B.V. | 2004 December | 9922 141 70421
DCN Next Generation Delegate Database
i
Note
There is no horizontal scroll facility, so the
maximum number of characters in any field can
never be more than what can be displayed in
the text field.
en | 19
•
Scroll through the list until you find the required
field. Select this field by clicking on it.
Under ‘Look for:’ is a text box where you can specify
the particular entry in the selected field to be
searched for. You can type an entry up to five
characters long.
To access the next text field:
•
Type the entry to be searched for in the text box.
•
•
Click on the ‘Search’ push button.
Press the <Tab> key on the keyboard.
i
Tip
You can access any text field by positioning the
cursor in the required text field and clicking.
Information is entered into all fields in exactly the
same manner as explained above for the ‘Street’ field.
Once all information has been entered:
•
Click on the ‘Personal Data’ push button, located
at the top left of the ‘Personal Data’ window and
marked with an upward pointing arrow.
If the search is successful, the appropriate delegate
screen card will be displayed on screen. If the search
is unsuccessful, the following error message will
appear:
‘Text typed not found’
Repeating the search
This option allows you to repeat the search for the
data entered above. This is useful if there is more
than one entry corresponding to the entered data. To
repeat the search:
•
Select the ‘Search’ menu and click on ‘Find Next’.
The ‘Personal Data’ window will disappear.
i
3.4 Working in names files
3.4.1 Searching for delegate screen cards
The Search facility in Delegate Database allows you
to initiate a search through the current names file for
a particular delegate screen card. You can specify
which field the search will be based on, and also the
entry in that field you wish to locate. To initiate a
search:
•
Note
The ‘Find Next’ option is only active if the first
search has been successful.
The search is repeated. The next entry (if any)
corresponding to the entered data is shown.
Searching by card
This option allows you to present a particular
delegate ID-card to an ID-card reader, then find and
display the screen card related to the ID-card.
Select the ‘Search’ menu and click on ‘Find...’.
i
The following dialogue box appears:
Note
Before using this option, a card reader must be
connected.
•
Read the ID-card using the ID-card reader.
•
Select the ‘Search’ menu and click on ‘Find by
Card’.
The appropriate screen card will be displayed.
Figure 18 The ‘Find’ dialogue box
Under ‘Search’: is a list box containing a list of all
fields in a delegate screen card. To specify in which
field the search will take place:
Moving through delegate screen cards
You can also access other delegate screen cards
without having to initiate a search. There are push
buttons in the main window that allow you to access
the previous screen card, the following one, or to
clear the screen and set up a new one.
Bosch Security Systems B.V. | 2004 December | 9922 141 70421
DCN Next Generation Delegate Database
i
en | 20
i
Note
Tip
‘Previous Name’ and ‘Next Name’ will not be
enabled if there is only one screen card in the
current names file.
The system looks for ‘Previous Name’ and ‘Next
Name’ screen cards alphabetically, based on the last
names. If there are two or more entries with the same
last name, first names are used.
To access the next screen card:
•
Click on the ‘Next Name’ push button.
The next delegate screen card will be displayed onscreen.
i
Note
When the last delegate screen card is currently
on-screen and you press the ‘Next Name’
push button, then the first delegate screen card
will be displayed.
To access the previous screen card:
•
Click on the ‘Previous Name’ push button.
The previous delegate screen card will be displayed
on-screen. To clear the current delegate data:
•
Click on the ‘New Name’ push button.
A new delegate screen card will be displayed. This
card will be empty except for a vote weight value of
1.
3.4.2 Editing names files
There are a number of facilities available to simplify
editing and updating names files. You will find them
in the ‘Edit’ menu:
•
Cutting data
•
Copying data
•
Pasting data
•
Deleting data
•
Selecting a complete screen card for cutting,
copying or deleting
i
Note
It is not possible to edit the data shown in the
multiple names window, if present. The data
shown only alters when the delegate cards
themselves are edited.
You can move through the fields in a delegate
screen card by pressing the <TAB> key on the
keyboard.
Cutting data
This option allows you to remove the data from a
single field in a delegate screen card and store it in a
temporary buffer.
•
Select the field to be cut by clicking on it.
•
Select the ‘Edit’ menu and click on ‘Cut’.
The data is removed and stored in a temporary
buffer, and can be inserted into the same field of
another delegate screen card using the ‘Paste’ option
(see page 21).
Copying data
This option allows you to copy the data from a single
field in a delegate screen card and store it in a
temporary buffer.
•
Select the field to be copied by clicking on it.
•
Select the ‘Edit’ menu and click on ‘Copy’.
The data is copied and stored in a temporary buffer,
and can be inserted into the same field of another
delegate screen card using the ‘Paste’ option (see
page 21).
Deleting data
This option allows you to delete the data from a
single field in a delegate screen card.
•
Select the field to be deleted by clicking on it.
•
Select the ‘Edit’ menu and click on ‘Delete’.
The text will be deleted.
Selecting a complete screen card
This option allows you to select a complete
delegate screen card (except the seat number, PIN c
ode and card code) and cut, copy or delete it. To do
so:
•
Select the ‘Edit’ menu and click on ‘Select All’.
•
Click on ‘Cut’, ‘Copy’ or ‘Delete’.
If cut or copied, the screen card data is stored in a
temporary buffer, and can be inserted into another
delegate screen card using the ‘Paste’ option. If
deleted, the screen card data is removed and
destroyed.
Bosch Security Systems B.V. | 2004 December | 9922 141 70421
DCN Next Generation Delegate Database
i
en | 21
i
Note
This option also selects all the information
contained in the ‘Personal Data’ window,
whether this window is displayed or not. If the
screen card information is then pasted, the
personal data information is inserted into the
appropriate fields of the ‘Personal Data’
window of the new screen card, whether it is
displayed or not.
Note
In the ‘Multiple Names’ window, delegate data
can only be viewed, not edited.
i
Note
The maximum amount of information that can
be present is 64,000 characters. If this amount
is exceeded (in a very large names file, for
example), one or more columns of information
will be removed from the right hand side.
Deleting a record
This option allows you to delete the current delegate
screen card. To do so:
•
Select the ‘Edit’ menu and click on ‘Delete
Record’.
To enable the ‘Multiple Names’ window:
•
Select the ‘View’ menu and click on ‘Multiple
Names’.
The current screen card will be deleted.
Pasting data
This option allows you to paste cut or copied data
from the temporary buffer into another delegate
screen card. To do so:
•
The following window appears:
Select the ‘Edit’ menu and click on ‘Paste’.
The buffer text will be inserted in the correct field(s).
Figure 19 The ‘Multiple Names’ window
i
Note
Pasting does not empty the buffer; the cut or
copied text remains in the buffer until another
block of text replaces it. This means you can
paste the same block of text as many times as
you wish. If you paste onto existing text in a
screen card, this text will be deleted and
replaced by the buffer text.
The tick mark (√) will subsequently appear to
indicate that this option has been enabled.
The entries are displayed by alphabetical order of the
first specified field. A scroll bar is provided if the list
is longer than can be displayed on screen. To close
this window:
•
Double-click on the control box in the top lefthand corner of the window.
3.5 Viewing names files
3.5.1 Viewing options
There are a number of display options available for
the main window. These options are contained
within the ‘View’ menu, and are:
•
Viewing multiple names
•
Viewing the ID-card label
•
Viewing the screen line
Viewing multiple names
This option allows you to display on-screen a list of
delegate data, with each entry in the list made up of a
maximum of five pre-specified fields (see
‘Configuring the Multiple Names Window’ on page
15). When the ‘View Multiple Names’ option is
enabled, the multiple names window will appear
alongside or on top of the main window.
Viewing the ID-card label
This option allows you to display the ID-card label in
the main window. It is displayed in the bottom righthand section of the main window. The ID-card label
can be printed out and fixed to the front of ID-cards.
It can also be used as address labels for post- or preconference mailings.
i
Bosch Security Systems B.V. | 2004 December | 9922 141 70421
Note
The ID-card label can only be displayed if the
‘Personal Data’ window is disabled. To disable
the ‘Personal Data’ window please refer to
paragraph 3.3.3.
DCN Next Generation Delegate Database
i
en | 22
Note
The data displayed in the ‘ID-card label’
window is for reference only and cannot be
edited.
Figure 21The ‘Screen Line’ window
To enable the ID-card label in the main window:
To remove the screen line:
•
•
Select the ‘View’ menu and click on ‘ID Card
Label’.
The following window appears:
Select the ‘View’ menu and click on ‘Screen Line’
again.
The screen line will disappear.
3.6 Printing
It is possible to print a hard copy of the current
names file. You can also specify certain parameters
relating to the printing of the dialogue boxes. To do
so:
•
Select the ‘File’ menu and click on ‘Print’.
The following dialogue box appears:
Figure 20 The 'ID Card Label' window
The tick mark (√) will subsequently appear to
indicate that this option has been enabled.
Viewing the screen line
This option allows you to display the screen line in
the main window. This information is displayed in
the bottom left-hand section of the main window.
The screen line is the information that is shown on
delegate units with LCD displays, hall displays, and
in a number of DCN applications such as
Microphone Management.
i
Note
The screen line can only be displayed in the
main window if the ‘Personal Data’ window is
not enabled. If the ‘Personal Data’ window is
enabled and you wish to disable it, please refer
to page 18.
i
Note
The data displayed in the screen line is for
reference only and cannot be edited.
To enable the screen line in the main window:
•
Select the ‘View’ menu and click on ‘Screen Line’.
The tick mark (√) will subsequently appear to
indicate that this option has been enabled.
Figure 22 The ‘Print’ dialogue box
This dialogue box contains five drop-down list boxes
for specifying which fields are to be printed, and a
field for entering the number of copies required.
Each drop-down list box contains a list of all fields
available for printing. Some of these fields are related
to the names file (such as ‘Seat Number’ or ‘Card
Code’) and some are not (such as ‘Group’ or ‘Country’).
All available fields are shown in each drop-down list
box, arranged alphabetically and with the option
‘None’ at the top of the list. The default settings are
‘Last Name’ for the first field, ‘Country’ for the second,
‘Group’ for the third, ‘Seat Number’ for the fourth and
‘Card Code’ for the fifth. To specify a field:
•
Click on the name in the list.
It is also possible to specify a page header that will be
printed at the beginning of each page:
•
Click on the ‘Page Header’ text box.
An appropriate title for the chosen field(s) may be
entered up to 80 characters long (although only 20
characters are displayed in the text box). This text
box may also be left blank.
The following window appears:
Bosch Security Systems B.V. | 2004 December | 9922 141 70421
DCN Next Generation Delegate Database
i
Tip
If you are inserting more than 20 characters
long, you can scroll the text horizontally by
using the left and right arrow keys on the
keyboard.
To define the number of copies:
•
Select the ‘Number of Copies’ filed and type in the
required number.
i
Note
The up and down arrow buttons on the righthand side of this field can be used to scroll to
the required number. The maximum number of
copies that can be printed is nine.
When you have specified all print parameters:
•
Click on the ‘print’ button
The appropriate information will be printed.
Bosch Security Systems B.V. | 2004 December | 9922 141 70421
en | 23
DCN Next Generation Delegate Database
4
en | 24
Applying data during a
conference
i
Note
The ‘All’ sub-menu option is only possible if no
voting process is taking place, and if any
attendance registration or access control
requirements (specified in the Attendance
Registration module) are not active. The ‘One’
sub-menu option is only possible if no voting
process is taking place.
4.1 Downloading delegate data
You can download conference data to the DCN
system, even when a conference is taking place. This
is accomplished for the ‘Apply’ menu. Downloading
data can be done in two ways: all the data in the
names file can be downloaded, or only the data for
the delegate currently displayed. The ‘Apply’ menu
has two options, ‘All’ and ‘One’, which allows you to
select the type of data download.
i
Caution
Applying delegate data during a conference
causes all activities to be suspended while the
new information is downloaded.
Before applying delegate data, the following criteria
must be met:
•
The PC running Delegate Database is properly
connected to the system.
•
The current names file is in operational mode.
•
Click on the ‘Apply’ menu option and select
either ‘All’ or ‘One’.
The data in the current names file relevant to the
CCU will be downloaded. This data will then be
used by the DCN system for controlling and
monitoring conference proceedings, where applicable.
4.2 Exiting delegate database
4.2.1 Temporarily exiting Delegate Database
It is possible to temporarily leave Delegate Database
without closing it down completely. To do so:
•
Click on the 'minimize' button situated at the top
right of the application window.
The Delegate Database program will become
iconized in the Windows Taskbar. To re-enter
Delegate Database:
•
i
Caution
If a ’Current Names File’ is selected from the
main menu of the Startup program, Delegate
Database will open in operational mode. Data
from the selected names file will be displayed
in the main window. If you open or create a
names file other then the ‘Current Names File’
specified in Startup, the Delegate Database
application switches to Preparation mode.
•
•
•
Click on the Delegate Database icon.
All values specified for PIN code, card code and
seat number are valid and those for card code
and seat number are unique.
There is no other names file currently being
downloaded.
The delegate data you wish to download is
different from the data of the previous successful
downloading.
4.2.2 Permanently exiting Delegate Database
If you wish to exit Delegate Database completely:
•
Select the ‘File’ menu and click on ‘Exit’.
If you have made changes to the current names file,
they are saved automatically. If you have input
invalid data, an appropriate error message is
displayed.
•
Click on the ‘OK’ push button in the error
message box.
Delegate Database will close without saving the
invalid data.
i
Bosch Security Systems B.V. | 2004 December | 9922 141 70421
Tip
You can also exit Delegate Database by
clicking on the ‘close’ button at the far top right
corner of the window.
By closing the Startup program, all DCN
applications will close.
DCN Next Generation Delegate Database
5
en | 25
DCNNG API
5.1 Introduction
Delegate information, which is normally modified by means of the Delegate Database application and stored
in the DCN Next Generation database engine, can be activated by selecting a names-file in the startup
application. The selected names-files will then be the current working environment for delegate information.
Two libraries (a 16 bits DLL and an OLE automation server, the one used depends on the preferences and
environment of the caller) provide the ability to download delegate information into the current working
environment. I.e. the information is NOT stored in the database but only in memory. The download
overwrites or replaces the names-file, which is present in the current working environment.
5.1.1 DCNNGAPI.DLL
The standard 16 bits Windows DLL (DCNNGAPI.DLL) allows an external program to perform Apply
operations and to produce ID-cards and their labels. In order to use the API functions, the Delegate Database
application must be present (but not necessarily running). A C/C++ include file that prototypes the functions,
defines result codes and contains some C examples is provided with the DCN Next Generation software
(DCNNGAPI.H).
5.1.2 DCNNGOLE.EXE
To allow other applications (32 bit) to call the functions from DCNNGAPI.DLL, an OLE automation server
exists (DCNNGOLE.EXE). This automation server is a wrapper for the original DCNNGAPI.DLL, but
because it is an OLE automation server it is easier to use from 32 bits applications, e.g. Microsoft Office 97.
5.2 API functions
5.2.1 ApplyAll
DLL format:
WORD DCNNGAPI_ApplyAll(LPCSTR ImportFileName);
OLE automation server format:
long ApplyAll(LPCSTR ImportFileName);
Inputs:
ImportFileName
Filename including the full path for an “Apply format” importfile. This format is described in section 5.3.
Return values:
DCNNGAPI_NOERROR
DCNNGAPI_ERROR_DCN_NOT_RUNNING
DCNNGAPI_ERROR_NO_AUTHORISATION
DCNNGAPI_ERROR_NO_APPLY_ALLOWED
DCNNGAPI_GENERALERROR
There are no errors.
DCN Next Generation is not running.
The Delegate Database application is not available.
This function is not currently permitted because:
• A voting round is currently running.
• Attendance Registration is active.
• The DCN Next Generation is running off-line
i.e. is not connected to a running CCU.
An internal error has occurred. Make sure the
import file is in the correct format and the
communication with the CCU is ok.
Description:
The ApplyAll function will import all delegates present in the specified import file. The newly imported
names file will become the new current names file in Startup as if it was opened using “Open names file” in
the file menu of Startup.
Bosch Security Systems B.V. | 2004 December | 9922 141 70421
DCN Next Generation Delegate Database
i
en | 26
Note
Because the information that is imported in this manner is sent directly to the connected CCU it is not
added to the DCN Next Generation database as a regular names file. Therefore this names file cannot be
used in the Delegate Database application.
5.2.2 ApplyOne
DLL format:
WORD DCNNGAPI_ApplyOne
(
WORD
DelegateId,
LPCSTR LastName,
LPCSTR ScreenLine,
LPCSTR SeatNumber,
LPCSTR GroupName,
LPCSTR DisplayLanguage,
LONG
CardCode,
LONG
PinCode,
BOOL
VoteAuthorization,
BOOL
MicroAuthorization,
BOOL
IntercomAuthorization,
DWORD VotingWeight
);
OLE automation server format:
long ApplyOne
(
short DelegateId,
LPCSTR LastName,
LPCSTR ScreenLine,
LPCSTR SeatNumber,
LPCSTR GroupName,
LPCSTR DisplayLanguage,
long
CardCode,
long
PinCode,
short VoteAuthorization,
short MicroAuthorization,
short IntercomAuthorization,
long
VotingWeight
);
Inputs:
DelegateId
LastName
ScreenLine
SeatNumber
GroupName
DisplayLanguage
CardCode
PinCode
Delegate identification number. A number in the range 1-1000
(single CCU) or 1-1500 (multi-CCU) that identifies the delegate
in the delegate database. Each delegate has a unique ID-number.
Last name of the delegate. 40 characters maximum.
Text of 33 characters, which identifies the delegate as text. Can
be generated by either the DB application or using DCNNGAPI.
Default seat number for this delegate. The number is checked for
validity. 4 characters, only digits and upper case characters A-Z
are allowed.
The name of the group for this delegate as determined by the
names file. If the delegate is not associated with a group this part
is empty. 20 characters maximum. This group name must already
be present in the current names file.
Display language for the delegate. The default is English if the
specified language is not available.
Card code of the delegate’s ID-card. This is in the range
1-999999999.
PIN code to be used for identification. The digits of the pin code
Bosch Security Systems B.V. | 2004 December | 9922 141 70421
DCN Next Generation Delegate Database
VoteAuthorization
MicroAuthorization
IntercomAuthorization
VotingWeight
en | 27
can only be in the range of 1-5.
Voting authorization (0 = No, 1 = Yes).
Microphone authorization (0 = No, 1 = Yes).
Intercom authorization (0 = No, 1 = Yes).
The voting weight for weighted voting.
This is in the range 1-99999999 The default is 1 if the range is
exceeded.
Return values:
DCNNGAPI_NOERROR
DCNNGAPI_ERROR_DCN_NOT_RUNNING
DCNNGAPI_ERROR_NO_AUTHORISATION
DCNNGAPI_ERROR_NO_APPLY_ALLOWED
DCNNGAPI_GENERALERROR
DCNNGAPI_ERROR_BAD_CARDCODE
DCNNGAPI_ERROR_BAD_PINCODE
DCNNGAPI_ERROR_INVALID_SEATNR
DCNNGAPI_ERROR_GROUP_NOT_PRESENT
There are no errors.
DCN Next Generation is not running.
The Delegate Database application is not
available.
This function is not currently permitted
because:
• A voting round is currently running.
• The DCN Next Generation is running offline i.e. is not connected to a running CCU.
• The seat number, card code or PIN code
field has changed and Attendance
Registration is active.
• There is no current names file.
An internal error has occurred. Make sure the
import file is in the correct format and the
communication with the CCU is ok.
The card code is out of range.
The PIN code has too many numbers or uses
digits outside the range 1-5.
The seat number is invalid.
The group given is not present in the currently
open names file in ST.
Description:
The ApplyOne function applies existing data, which has changed, or new data for a single delegate. The apply
is carried out on the currently open names file in Startup. The ApplyOne on changed delegate data is only
allowed if the ‘seat number’, ‘card code’ and the ‘PIN code’ fields are not changed when Attendance
Registration is activated.
i
Note
Because the information that is imported in this manner is sent directly to the connected CCU, it does
not modify the DCN Next Generation database. As a result the Delegate Database application will not
show changes made using this function.
i
Note
If DCN Next Generation is installed in a language other than English, the name to be entered by the
parameter DisplayLanguage is also translated. Refer to the corresponding entry field in the Delegate
Database application for the language names that are available in your version of the DCN Next
Generation software.
5.2.3 ProduceCard
DLL format:
WORD DCNNGAPI_ProduceCard
(
BOOL
WriteCode,
BOOL
MakeLabel,
LONG
CardCode,
Bosch Security Systems B.V. | 2004 December | 9922 141 70421
DCN Next Generation Delegate Database
LPCSTR
LPCSTR
LPCSTR
LPCSTR
LPCSTR
LPCSTR
en | 28
CardField1,
CardField2,
CardField3,
CardField4,
CardField5,
CardField6
);
OLE automation server format:
long ProduceCard
(
short WriteCode,
short MakeLabel,
long
CardCode,
LPCSTR CardField1,
LPCSTR CardField2,
LPCSTR CardField3,
LPCSTR CardField4,
LPCSTR CardField5,
LPCSTR CardField6
);
Inputs:
WriteCode
MakeLabel
CardCode
CardField1
CardField2
CardField3
CardField4
CardField5
CardField6
Writes the card code when set.
Writes the card label when set.
Card code, which is written on the card.
User definable field for the card label. Max. 23 characters.
idem
User definable field for the card label. Max. 11 characters.
idem
idem
idem
Card label layout
Field 1
Field 2
Field 3
Field 5
Field 4
Field 6
Return values:
DCNNGAPI_NOERROR
DCNNGAPI_ERROR_DCN_NOT_RUNNING
DCNNGAPI_ERROR_NO_AUTHORISATION
DCNNGAPI_ERROR_CARDDEVICE_FAILURE
DCNNGAPI_ERROR_BAD_CARDCODE
There are no errors.
DCN Next Generation is not running.
The Delegate Database application is not
available.
The card-encoder reported an error. (No card
inserted. Card is not writeable.)
The card code is out of range.
Description:
The Produce card function sends the given information to the card encoding device and/or the card label
printer, connected to the DCN Next Generation system.
i
Note
Within the Delegate Database application it is only possible to use values from the database as text on
the card labels. The ProduceCard function allows any text to be placed on the card labels.
5.2.4 Terminate
OLE automation server format:
long Terminate()
Bosch Security Systems B.V. | 2004 December | 9922 141 70421
DCN Next Generation Delegate Database
en | 29
Description:
The terminate function tells the automation server that the calling application is finished with it and that it can
be removed from memory.
5.3 Apply file format
The API function ApplyAll uses an import file that contains the delegate data. This file has the following
structure:
First line of the file:
DCNNG APPLY x.y<SEP>filename<SEP>pinsize<EOL>
where:
DCNNG APPLY x.0
filename
pinsize
<SEP>
<EOL>
Fixed text that indicates the type of file and the version of DCN
Next Generation for which the file was produced (Required
entry). In this fixed text, the letter ‘x’ represents the major version
number of the DCN Next Generation software.
The name of this file in the DCN Next Generation Startup
application. 8 characters maximum (Required entry.)
Size of the pincode. Range: 3,4,5, default 3.
Indicates a separator character.
Indicates an end of line (carriage return (0x0D) and newline
character(0x0A)).
Example:
DCNNG APPLY x.0,Test DB,4
This example gives the first line of a DCN Next Generation x.0 apply file. The file will be
called “Test DB” in the DCN Next Generation program. It uses 4-digit PIN-codes.
The other lines in the apply file give all the information for one delegate. Layout is as follows:
delegate id<SEP>lastname<SEP>screenline<SEP>seat
number<SEP>group<SEP>display language<SEP>card code<SEP>PIN
code<SEP>authorization voting<SEP>authorization microphone<SEP>authorization
intercom<SEP>voting weight<EOL>
The delegate ID is a unique number that identifies this particular delegate. It is in the range 1-1000 for a single
CCU and 1-1500 for a multi-CCU system. The other fields correspond directly to the entry fields in the
Delegate Database application. The authorization voting field is set to either “Voting” or “NoVoting”, the
authorization microphone field is set to either “Micro” or “NoMicro” and the authorization intercom field is
set to either “Intercom” or “NoIntercom”. These texts are DCN Next Generation language independent.
Delegate ID is necessary, but the other fields may be left blank or can be omitted.
Example:
1,Doe,My first name is John,A1,My group,English,12345678,123,Voting,NoMicro
This is the entry for Doe. He is sitting at seat A1 and has a screen line with the text “My first
name is John”. He belongs to group “My group” and has English as the display language. His
card code is 12345678 with PIN code 123. He has voting but no microphone authorization
and all other fields are omitted and therefore contain the default values.
i
Note
The apply file format is a subset of the import file format. Because the data is not used in the Delegate
Database application, only the data that is relevant for the CCU is stored in the apply file.
i
Note
If the DCN Next Generation is installed in a language other than English, the name entered in the display
language field is also translated. Refer to the corresponding entry field in the Delegate Database
application for the language names that are available in your version of the DCN Next Generation
software.
Bosch Security Systems B.V. | 2004 December | 9922 141 70421
DCN Next Generation Delegate Database
en | 30
5.4 DCNNGOLE Automation Server
To use the automation server it must be registered with the windows environment first. After it is registered, it
can be started and it’s methods can be used. When the calling application is finished with it, it must call the
terminate method to instruct the server to stop. The data imported into DCN Next Generation will remain
valid, also when the automation server is stopped.
A sample database is installed into the sample directory during DCN Next Generation installation, which
shows the use of the automation server.
5.4.1 Registering the server
Any OLE server needs to be registered in the Windows environment, the DCNNGOLE application has a
build in register mechanism. To register the server just run the server once, e.g. from the command line, or
double click on it in explorer. It will register itself so other applications can use it.
5.4.2 Start the server
Example in Visual Basic for Applications:
Dim dcnng As Object
Set dcnng = CreateObject("DcnNgOle.Server")
5.4.3 Call methods
Example in Visual Basic for Applications:
Dim eRetVal As Integer
eRetVal = dcnng.ApplyAll("MYDATA.CSV")
5.4.4 Stop the server
Example in Visual Basic for Applications:
Dim eRetVal As Integer
eRetVal = dcnng.Terminate()
Set dcnng = Nothing
i
Note
To stop the server and remove it from memory, please call the terminate method. This will instruct the
server to stop.
Bosch Security Systems B.V. | 2004 December | 9922 141 70421
For more information please visit www.boschsecuritysystems.com
© 2004 Bosch Security Systems B.V.
Data subject to change without notice
December 2004 | 9922 141 70421