1
Scottish Curling-Ice Group
CUTTING EQUIPMENT
Overview
Curling ice has become a product of science, as technicians all over the world now strive to produce a
surface that is perfectly level and consistent. Inevitably, during the process of evolution, many practices
from the past have survived too, and considerable confusion can arise as to what is necessary, justified,
affordable or possible. This report will address only what is relevant to the modern curling-ice technician,
working in a reasonably modern facility where it is possible to produce excellent curling ice, and applying
himself to the task in a professional manner. The members of the SCIG who are involved in this report
have all worked hard to develop a system that is easy and foolproof, and it is to support this system of ice
maintenance that we need modern cutting equipment.
Whether it is a Zamboni, an Olympia or an ice-resurfacing machine from any other manufacturer, these
machines were designed to address problems in arenas where skating takes place. They do so very well,
and there are some extremely skilful operators who use these to a very high standard. But these
machines were designed for skating ice, not curling ice, and will not be considered here.
Using a hand scraper was common in years gone by. The implements ranged from a foot wide to several
feet wide, some very sharp and some not so sharp, and some skating rinks still use them to clear the
surface of skating debris and frost in preparation of a cleaner surface for curling. A good hand scraper
with a ground and honed edge does have a purpose in a curling rink, such as around or behind the
hacks, but these are generally too narrow for use on the full ice surface and – for the operator – too much
like very hard work.
The powered cutter was not always easy to use, and the early models can only be described as primitive.
Most technicians will remember the cable machines, which had some fifty metres of cable connected to
the wall and snaking all over the ice surface as work progressed, scattering snow, entangling with
anything in the way and doing its best to be nothing but a nuisance. Then came battery power, no cable,
and heaven was on the horizon. Now these machines also have hydraulic components that lift or swivel
the blade assembly and any number of extras to persuade the purchaser to part with his money. It is
unfortunate that batteries do not last as well as the nuisance cable, and even the most modern machine
will have limitations on what it can or can't do, while every modern extra is just something else that can –
and usually will – break at the wrong moment.
In order to understand what these powered cutters should be able to do, it is best to look at the essential
components one at a time. It is not the purpose of this report to compare manufacturers or models,
because these evolve year by year, but to look at what we as curling-ice technicians need, and what the
machine should be able to do.
Terminology
Different countries use different words, and it is never easy to compromise by creating a different
terminology. Over the years we have worked towards common words for an accurate description, not only
for our reports or for use in Curling Ice Explained (WCF), but principally so that we all know exactly what
we're talking about. While not everyone will agree with our terminology, this is as far as it has developed
and evolved.
Ice surface
Playing surface
IST
Scrape
Scraper
Cut
Cutter
Shave
Knife
Blade
Beam
Slant
Angle
Straight
The ice pad installed by flooding and maintained, without pebble.
The ice pad with pebble, suitably prepared for a game of curling.
Ice surface temperature.
To address the ice surface with a hand scraper.
The implement used to scrape, with a blade usually less sharp than a cutting blade.
To address the ice surface with a powered cutter.
The powered cutter, with a blade sharper than a scraper.
To address the pebble with a Nipper, using a blade more sharp than a cutter.
The cutting part, commonly referred to as the blade.
The actual knife of the blade assembly.
The metal rectangular tube ("box") to which the knife is fixed.
The degree of adjustment applied to the blade to cut the ice at a shallow pitch.
The adjustment of the blade assembly on the swivel, to be able to cut at an angle.
The position of the blade in a neutral position without angle.
2.
The blade
This is the bit that really matters. It is usually supplied with the powered cutter, but can be bought
separately as a spare, and should ALWAYS be mounted to a beam.
The knife is a flat piece of steel. The steel is typically an alloy of iron and carbon, with the percentage of
carbon having an influence on the strength of the steel – the more carbon, the harder the steel, but also
the more brittle. The percentage of carbon will be quite small ( less than 1% by weight), while the
maximum will be less than 2%. Elements such as manganese, chromium or nickel can be added to
create more suitable steel for other purposes, while for knives tool steel will be the most common type of
steel. Tool steel for cutting purposes will have a carbon content of 1-1.4% and a low quantity of
manganese, and acquires its strength from careful tempering rather than additives. A common steel used
for knives is D-2 steel, which contains chromium as well, and is harder and more durable.
An even harder steel used is HSS, which stands for High Speed Steel, and is expressed in the formula
Fe-C-X for Iron-Carbon-Additive. The additive will usually be chromium, tungsten or molybdenum in
quantities exceeding 7%. HS steel is used extensively in manufacturing for cutting metals due to its
hardness and toughness, but it can also be used for low-speed applications where its resistance to
abrasion is valuable, such as knives.
What does all this really mean? It means that there are many different types and grades of steel,
developed for many different purposes, and some of these are used to make knives for powered cutters.
Some types of steel are designed to cope with high temperatures, some are designed to stay sharp for
very long and some are designed to be honed to perfection whenever required. For use on ice, forget
high temperatures. For those who don't like honing their blades every day, choose HS steel. For those
who do like to hone their blades every day, do NOT choose HS steel.
This is not the full picture. Water at 1ºC cuts very easily, but at – 1ºC less easily, yet with a sharp blade it
will cut easily enough. Even at – 3ºC it will cut very well, but colder than – 4ºC the blade will have to be
very sharp. There are technicians who cut their ice colder even than that, and the blade will not stay
sharp for very long unless it is of a very hard steel. In order to maintain the sharpness in any scenario the
blade will have to be honed, usually every day. If it is a carbon tool steel this will be easy, but the edge
will blunt sooner, and only by warming the ice to – 3ºC can a workable balance be found between honing
and blunting. D-2 steel can also still be honed effectively and will cut well at – 4ºC, without blunting too
quickly. HS steel, however, will be very difficult to hone to perfection, yet will remain sharp for much
longer. The colder (and so harder) the ice, the sooner the blade will blunt, while the harder the steel, the
better the blade will last. The main disadvantage of using HS steel for the knife is that any flaw cannot
easily be removed by honing, and one small fault will be sufficient to render the blade useless for cutting
curling ice – no-one wants to see those tell-tale lines down the length of the sheets of ice.
Cutting dirty ice, or ice that is too cold, is the quickest way to blunt a blade. Incorrect honing is the next.
Grinding the blade is a precision job best left to experts. Whether the blade contains an inlay of HS steel
or not makes no difference here, the edge is ground at the determined angle and finished to perfection. In
order to understand the grinding every technician will gain from watching the entire process, if an
opportunity ever presents itself. First the blade will be matched and fitted to the beam, and once this is
done it should never need to be repeated, so NEVER remove the knife from its beam. (The holes in the
top of the beam, that we use to guide us through the cutting patterns, are there to enable the engineer to
reach the bolts which hold the blade to the beam.) Now the engineer might skim the top of the beam to
remove any uneven spots and have a totally even surface. The assembly will be turned upside down and
fixed to the machine bed (using electro-magnetism), so that the bottom of the blade can also be skimmed
smooth and even. If a 2º back grind is needed (see later), this can also be applied now. The assembly is
again turned over, now sitting on the smooth bottom of the blade, and the final precision grind can be
applied to the cutting area, usually as a hollow grind. Once the machining is finished the cutting edge can
be honed and polished by hand to remove the minute burrs that remain.
The cutting edge of a blade is a precision instrument, the importance of which cannot be understated. It is
very sharp and must be kept so, and a competent ice technician will be able to use the same blade every
day for at least two months.
The back grind has been the subject of controversy. It is not essential, but many machinists insist that it
is, because it enables them to produce a better and straighter edge. It also keeps the actual cutting edge
off the surface if the blade is laid down flat for storage, helping to protect it. It enables honing of the
bottom, same as the top, because the honing stone only slides on a narrow strip of metal and can
therefore be controlled better. The only difference between blades with or without the back grind is the
slant of the blade, to ensure that the ice surface is approached at the proper pitch.
3.
Honing a blade is a serious business. When newly ground, the cutting edge will be so sharp that it will
want to dig in at the least opportunity, and it always pays to "run the blade in". This is best done on a new
ice pad that has been recently flooded and cut smooth and free of salts. NEVER use a new blade on
newly flooded ice, because the salts and dirt in the surface will very quickly ruin the cutting edge – finish
the surface with an old blade ready for a regrind, until all the salts have been removed and the snow is a
pure white, and then use the new blade. Start with a low slant of say eight turns of the cranking lever from
zero, see how much it is cutting off, and increase the slant by a turn at a time. Most new blades will cut
well at about twelve turns, with the back of the blade about one centimetre off the ice. After a week or so
of patience the blade will lose the extreme sharpness simply from the continuous friction and abrasion of
the ice, the slant will be around sixteen turns and the blade is run in, so the honing should begin.
Should the blade have a flaw, there could be several reasons. The machine shop will be warm,
somewhere around 15-25ºC, while the ice-surface area will be close to freezing – the metal of the beam
and blade can distort in any direction, causing the blade to bow. A brace across the top of the beam will
raise the tips of the blade, while a bi-directional brace can also lower the tips – it is for this fine adjustment
that a level ice pad is essential. Other flaws can be a poor grind, which will be easy to see even before
the blade is on the ice, and such a blade simply should not be in the ice – send it back for a regrind,
preferably by someone more competent. There could also be small areas with lesser flaws that the ice
will soon reveal, especially on a level pad without pebble – as a general guide hone the top of the flaw to
improve cutting there, or the bottom to reduce cutting. If the flaws are small burrs remaining after the
regrind, it is usually better not to panic, as the ice itself will remove these within a few days.
However, beware. The sharp edge of a regrind is a very sensitive piece of metal. DO NOT HONE
HEAVILY. Using anything coarser than an extra-fine honing stone will destroy the cutting edge
immediately, so work with gentle swipes, only a few at a time, and be patient. A properly run-in blade will
work for many months, but doing too much too soon will destroy it.
Once the blade is run in and in regular use, the honing routine has to be established. Of the many types
of honing stones in use, the only stones we recommend are of the diamond-tungsten type sold as DMT,
mounted onto solid plastic boxes, using the large 200mm sizes in grades of Extra Fine, Fine and Medium.
The Medium is for hand scrapers and not for the cutting blade. The XF is the one first in use when the
blade is still very sharp, while the F is used once the XF cannot keep up. For the usual carbon-steel blade
about 6-10 swipes of the XF stone across the top will be sufficient as a daily routine, gradually increasing
to perhaps 20-25. Then it will become 10 F and 6 XF, adjusting as required but ONLY honing as much as
needed for an hour's cutting. Blades with harder steel will take much, much more than this.
The advantage of the DMT stones is that water can be used as lubricant, a light spray with a small spray
bottle will do, and the dirt can be wiped from both the blade and the stone with paper towelling – if the dirt
is not removed, it will stick to the blade and stone and become a nuisance next time. Always also wipe
the blade with paper towelling soaked with a little WD40 oil, both top and bottom, after honing, which will
protect it from corrosion. Using protective gloves is recommended at all times, although they are a
nuisance to have to wear and make feeling very difficult.
The hollow grind comes into its own with honing. Because of the hollow the stone is only in contact with
the actual cutting edge and the shoulder of the grind, both of which now require much less honing than
the entire area. As the weeks progress the honing produces a shiny line along these two areas referred to
as the "hologram", initially less than a millimetre wide and gradually widening. This provides a very good
indication of how even the blade and the honing is, and also how long the blade has been in use – by the
time the hologram becomes a near-continuous smooth surface the blade will be very difficult to hone and
should be sent for a regrind.
Shoulder
Cut
Hologram
tin g
edg
e
4.
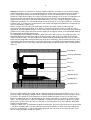
Storage of a blade is as important as using it. A blade-and-beam assembly is heavy and will normally
require two people to move. It is recommended that the cutting edge must ALWAYS be covered with a
plastic sheathe when being moved and stored, but this can have its own dangers: in order to fit the
sheathe the edge will have to be accessible (and exposed to anything near it), or the assembly will have
to lie on the back of the beam with the cutting edge in the air (and one slip will be dangerous). We
suggest that this protection is only fitted to the blade when necessary, usually for long-term storage or
shipping to somewhere else. For storage within the rink we prefer to use a purpose-built box, each blade
having its own, as shown in the sketch below. A few strong shelving brackets bolted to a strong wall can
store several blades in total safety.
Blades must be stored in a dry, protected room away from the public, and in a stable and cool
temperature not warmer than about 15ºC. Before it is placed in its box the entire assembly has to be
wiped in oil, preferably WD40, on ALL surfaces that can be reached. Once in its box a pin spray along the
shoulder of the cutting edge will ensure that the edge itself is properly sealed, as the oil will flow down to
the cutting edge and largely remain there.
For shipping the blade, two bolts through the back of the beam will secure the assembly to the box. Use
two 10mm bolts that do not have thread all the way, but only sufficient for a nut within the beam and
another outside the box – this will enable you to hold the bolts by hand while the outer nuts are fitted. A
blade sheathe will provide extra protection and safety when removing it. Ensure also that the box is well
marked with signs of warning that it is a precision instrument, and should not be knocked about, and two
strips of wood to serve as "feet" for the box will enable people to slip their hands under it and lift the box
with ease.
Plywood lid
Screw to solid wood
Beam
Inner nut
Bolt
Outer nut
Wooden spacer
Plywood base
25x25mm feet
The brace will not always be needed, but once fitted should remain on the blade while it is in use. The
blade assembly, including the weights within, should be properly chilled before use by leaving it near the
ice surface. The simplest is to use two pieces of plastic (about 5mm thick) to act as feet and rest the
blade assembly flat on the feet, directly onto the ice surface, somewhere safe where it cannot be hit by
stones, feet, or anything else. Against a sideboard is an obvious place, but along a sideline is as good
when there is no-one else in the rink. In a rink with an air temperature of say 6ºC it will take about thirty
minutes to chill the blade.
Cutting ice colder than – 4ºC will blunt the blade much quicker, and it is best to warm the ice up to around
– 3ºC while the blade chills. This will enable the technician to cool the ice down again after cutting and
before the curling begins, as most refrigeration equipment can extract the necessary heat in the same
time as it takes to pebble and nip the surface.
5.
Slant and angle
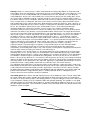
The slant or pitch of the blade is important. Older machines have a cranking lever on a thread that is both
simple and foolproof, while more modern machines have introduced hydraulics to do the job at the push
of a button. It is not clear why this should be seen as a necessary development because simple is good,
and it is very easy to adjust the slant with a turn or half a turn of the lever while the adjustment is more or
less permanent. A good pitch will produce a roll of snow about 50mm in diameter in one pass down the
length of the sheet, if the cutting edge is in good shape. Taking off too much is risky (make small
mistakes rather than big ones), while taking off too little will waste time and not achieve much. As a rough
guide it should be possible to remove four XF or F layers of pebble by covering the sheet three times,
which can be done in ten passes (see the report on Cutting Technique, using a 3-4-3 pattern).
Once the correct slant has been established, it should not be necessary to change it. The proper way is to
maintain the cutting ability with honing rather than adjustment, until the cutting edge deteriorates well
beyond honing. If the normal amount of turns for a good pitch on a blade is say 16-18, this could increase
towards the end to 24-26, by which time the blade should be reground.
Note: As the cutting edge wears over the weeks the slant is gradually increased. A more severe slant
forces the blade into the ice, and weights are often added to force a blunt blade to cut. This practice
achieves one thing only: it blunts the blade even faster.
Being able to angle the blade is important too, by means of a swivel mechanism on the horizontal plane.
On older models a lever disengages a pin and enables the operator to swing the handle assembly one
way or the other to achieve an angle on the blade assembly and this works well, the only problem being
the lever mechanism itself – it is in an awkward place and would work much better if a pull mechanism is
fitted to one side of the handle bar (similar to a bicycle brake lever). Newer models have a hydraulic
system to achieve this and again it is difficult to see why this is considered progress, unless there are so
many changes in angle during a pattern that justifies the expense (the 3-4-3 pattern mentioned only
needs two angle changes, from straight to angle and angle back to straight).
It is important that powered cutters have a floating blade that can also swivel on a vertical plane. A blade
assembly with weights inside the beam will be heavy enough to cut evenly along its length regardless of
the actual level of the ice, but the slightest bias will cause it to cut more on one side than the other.
Sometimes this is useful, such as trying to cut a line against the sideboard that has become high, but this
can easily be achieved by adding weight to that side with an additional weight on top of the beam. For
normal cutting the blade must be able to float evenly and without the swivel this will not happen.
Mounting and safety
It is the norm that the blade assembly is fixed to the cutter with bolts through the beam, accessed through
the holes in the front of the beam. This requires removal of the weights and the correct socket and ratchet
with a short extension, and threads on the bolts can easily be damaged because the work is out of sight.
It is unclear why this is considered the simplest and safest way of mounting, and we believe a simpler
way can be found where no bolts are needed at all. We hope manufacturers will give this serious
consideration.
Safety guards too can be a real nuisance. On some models it is difficult to hold them out of the way when
honing the blade and they can even come crashing down onto whatever is in the way. The question must
be asked if these guards are necessary when the blade is on the ice, because normally the only person at
risk is the technician who is behind the cutter, and the dangerous sharp area of the blade is actually on
the ice and simply cannot cut anything other than the ice itself. We believe here too that a simpler method
can be found to protect the blade and anyone on the ice when the blade is not on the ice surface, and
even an easily removed guard would be better than what is now in use. It is true that most technicians will
cut themselves at least once, but it is equally true that they soon learn not to and are in fact extremely
careful. Perhaps they have such concern that the blade might be damaged, never mind their fingers or
unwanted blood on the ice, that the guards are only needed to protect the blade.
An unsafe surface underfoot can be very serious. To turn a machine requires substantial leverage, from
the hands through to the shoulders, spine, hips and legs, down to the feet. Good footwear with grippy
soles is essential, and the ice surface should be kept clear of water, snow and any slippery object left
lying about. Simply cutting with a blunt blade will leave a surface covered in fine snow which makes
walking difficult, let alone turning, and it is the body that suffers. If the operator is not comfortable and in
control of the machine, the machine will have a mind of its own and accidents will be inevitable. The
cutting patterns developed in Cutting Technique were designed to avoid ever having to walk in snow (see
page 7).
6.
Power
It is, after all, a powered cutter we are dealing with here. As such it has to be propelled by a motor and
transmission, with many variations on the theme, and simply cannot be pushed to achieve the same
result.
Cable power has the enormous advantage that it can work for as long as needed. If, as stated above, the
cutting edge of the blade is kept on the ice, it is almost impossible to cut the cable and should be
considered quite safe. However, the snaking cable is a curse when it comes to scattered snow over an
area that has just been swept, and the only way to avoid this is to have a second technician on hand
simply to deal with the cable. It can be said that a serious cutting session will be removing salts through
endless pebble cutting and the spillage of snow is less than important, but it is equally true that snow on
ice is very slippery and all snow should be kept clear of the working area.
The length of cable should be at least fifty metres on the ice (for a four-sheet rink), with an added length
for reaching from the ice to the power supply. The cable must be flexible and insulated with no joins or
connections on the ice, and there MUST be an insulated on/off switch on the machine itself, in addition to
the dead-man switch.
When ordering a new machine, it is important to ensure that the voltages of mains supply and motor are
matched.
Battery power has now become the norm. By freeing the machine of its cable, the powered cutter has
become highly manoeuvrable, and much time can be saved. Individual sheets can be cut even with play
continuing on adjacent sheets, and moving the cutter from the building is a simple task.
Like most ice technicians, members of the SCIG are not experts on battery technology, nor have we had
the pleasure to meet experts on the subject. We can therefore only look at the requirements rather than
the reality of provision, from an ice technician's point of view.
The batteries supplied with a powered cutter have to drive the machine forwards, and at times
backwards, for a considerable period of time, and usually against substantial resistance from the ice it is
meant to cut. There must be sufficient energy to finish the entire cutting routine without fail, which will vary
from about an hour for four sheets to double that for eight sheets. Anything less and savings have to be
made by cutting less or not completing the job, neither of which is an option to the dedicated technician. If
the slant is too severe the machine has to work harder to remove more ice, so the batteries work harder
and lose their reserves sooner. If the batteries are not fully charged the machine will work well on the first
sheets and then fade, very quickly, before the job is done. While attempts have been and are being made
to increase the time available, we believe much more should be done to ensure that the machines can
and will be able to do the work they are designed to do.
The chargers supplied with the machines have given trouble from the start. Sometimes the voltages don't
match, sometimes the charging cycles are incorrect, sometimes the chargers will be unable to "pick up"
flat batteries (while a cheap trickle charger from the motor factors will). The batteries are expensive and
should last two years, but they don't, and when the replacements arrive they are of a different kind. The
list goes on, and we can only hope that manufacturers and engineers will make more progress.
The ideal set of batteries will give the operator at least ninety minutes of cutting time on a full charge, for
at least a year, and will do so in a working temperature of about 6ºC. As a guide, there should be at least
sufficient charge to cut every sheet in fifteen passes, and preferably twenty – this might not always be
needed, but it will be on occasion. The batteries must be fully recharged within six hours, must be easily
replaced and must be readily available for renewal.
No matter how good the batteries, if the connections are poor the full power cannot be easily transferred.
The terminals should be clean and protected from corrosion once connected, usually with a little
petroleum jelly. If the terminals become warm during use (be careful when checking, they can become
very hot!), the connection is poor – remove the connectors, clean the terminals and connectors with a
little sodium bicarbonate and then steel wool when dry, reconnect firmly and seal afterwards.
Transmission is also not our field of expertise, but it is very important. The machine must start and stop
both easily and fluently and accelerate smoothly. There have been many improvements recently and it is
difficult to understand the value of these without careful comparison, for us again simple is good. Uneven
transmission is not only dangerous, but it can also cause the blade to dig into the ice – never mind the
danger, think of the time it takes to fill in the scar!
Modern machines usually have a differential drive, which eliminates most of the stress to the operator's
back and joints when turning. In the past it was an art to get the wheels to spin and then slide the
machine into position, now it is simply guidance with a single finger.
6.
Traction is often taken for granted. Because the tyres spend their working lives on the ice and do not
wear much for decades, it is assumed that they behave perfectly without trouble. To start with, the tyre
pressure is critical. The recommended pressure is 0.5 bar (6-8 lbs/in²), where the wheels will be flat on
the ice and neither rounded or bowed, ensuring maximum contact and grip. If the machine consistently
pulls to one side with a straight blade, the reason is probably that the tyre pressures are not even.
The next important point is the weight of the machine, which on its own will be insufficient to provide
adequate drive against the resistance of the ice. To help with this the wheels are charged with a brine or
anti-freeze solution (clean water will freeze), and of course the valve should not be opened while the
machine is on the ice, for fear of spillage.
Rubber is soft, but becomes harder when cooled down. It will also deform if a wheel is left sitting on one
spot. When leaving the cutter on the ice for more than fifteen minutes, it is wise to put mats or cardboard
under the wheels as extra insulation from the ice. Beware, though, that the mass of the machine is
sufficient to slowly melt the ice surface and so cause the mats or cardboard to freeze to the ice, often
leaving marks that can be difficult to remove. If a machine is not being used regularly or being stored for
summer, it should be blocked up with the wheels in the air, to avoid formation of flat spots.
Summary
A powered cutter will be sold by reputable companies, who will have spent both time and money on its
development. A curling rink will take receipt of the machine and, if all goes well, will use the machine for
many years without any serious problems or even regular maintenance. Herein lies the problem: once
bought, the operator is stuck with it, because he is unlikely to be in a position to buy another. For this
reason it is essential to focus on what is important:
•
•
•
•
•
•
A good, true and sharp blade (or two, or even three)
An accurate and reliable means of adjusting the slant or pitch
A means of changing the angle of a floating blade
Reliable and durable power, especially from batteries
Smooth transmission and acceleration, and ease of turning
Excellent traction
Fortunately today's machines can already provide all the above. Unfortunately it is often the case that
machines have been overdeveloped and fitted with "improvements" that are perhaps unnecessary, or not
properly engineered. The ideal cutter should be simple, effective, durable and worth every penny, and
must be able to be repaired by inexperienced operators at the other side of the world.
If there is one thing that is sadly missing from machines, it is a mirror mounted on the front of the cover,
which will enable the operator to see the snow on the blade as he walks behind the machine. This is not
difficult and the relatively low cost will be well justified.
It is hoped that, very soon, manufacturers will supply with every machine a comprehensive user manual,
which not only guides the operator through every step of regular maintenance, but also educates him in
the various aspects of his machine. Such a manual would be of more use than any hydraulics or other
clever additions to a machine which, after all, has to do a very simple job.
John Minnaar
June 2009