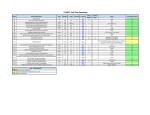
1
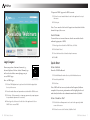
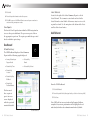
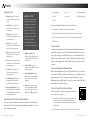
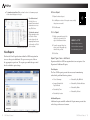
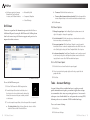
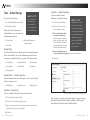
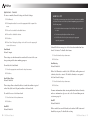
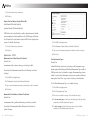
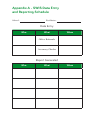
User’s Manual Version 5.1 | January 2014 How to Find Help This manual is your first step for SWIS support. Can’t find the information you need? Contact your SWIS Facilitator. My SWIS Facilitator Information Facilitator Name: Phone Number: Email Address: For More Information Are you still stuck? Visit the PBISApps support website online at support.pbisapps.org There you will find answers to many common questions, a searchable knowledge base and discussion forum, and ways to contact PBISApps to ask your question directly. User’s Manual Version 5.1 | January 2014 Table of Contents Overview. . . . . . . . . . . . . . . . . . . . . . . . . . . . . . . . . . . . . . . . . . . . . . . 4 Who Should Use This Manual? . . . . . . . . . . . . . . . . . . . . . . . . . . . . . . . . . . . . What is PBISApps? . . . . . . . . . . . . . . . . . . . . . . . . . . . . . . . . . . . . . . . . . . . . . . What is the SWIS Suite? . . . . . . . . . . . . . . . . . . . . . . . . . . . . . . . . . . . . . . . . . . What is SWIS? . . . . . . . . . . . . . . . . . . . . . . . . . . . . . . . . . . . . . . . . . . . . . . . . . . About the QR Codes . . . . . . . . . . . . . . . . . . . . . . . . . . . . . . . . . . . . . . . . . . . . . 4 4 4 5 5 Login/Logout . . . . . . . . . . . . . . . . . . . . . . . . . . . . . . . . . . . . . . . . . . . 6 Switch Schools. . . . . . . . . . . . . . . . . . . . . . . . . . . . . . . . . . . . . . . . . . . . . . . . . . 7 Quick Start . . . . . . . . . . . . . . . . . . . . . . . . . . . . . . . . . . . . . . . . . . . . . 7 Enter a Referral. . . . . . . . . . . . . . . . . . . . . . . . . . . . . . . . . . . . . . . . . . . . . . . . . . 7 Enter a Student or Staff. . . . . . . . . . . . . . . . . . . . . . . . . . . . . . . . . . . . . . . . . . . 7 View Reports. . . . . . . . . . . . . . . . . . . . . . . . . . . . . . . . . . . . . . . . . . . . . . . . . . . . 8 Dashboard. . . . . . . . . . . . . . . . . . . . . . . . . . . . . . . . . . . . . . . . . . . . . . 8 School Summary. . . . . . . . . . . . . . . . . . . . . . . . . . . . . . . . . . . . . . . . . . . . . . . . 8 Latest Referrals. . . . . . . . . . . . . . . . . . . . . . . . . . . . . . . . . . . . . . . . . . . . . . . . . . 9 Add Referral . . . . . . . . . . . . . . . . . . . . . . . . . . . . . . . . . . . . . . . . . . . . 9 Required Fields. . . . . . . . . . . . . . . . . . . . . . . . . . . . . . . . . . . . . . . . . . . . . . . . . 10 Copy Referral Information to Next Referral . . . . . . . . . . . . . . . . . . . . . . . . . 10 Custom Fields. . . . . . . . . . . . . . . . . . . . . . . . . . . . . . . . . . . . . . . . . . . . . . . . . . . 11 Harassment Type and Weapon Type. . . . . . . . . . . . . . . . . . . . . . . . . . . . . . . . 11 Find and View, Edit, or Delete Referral. . . . . . . . . . . . . . . . . . . . . . . . . . . . . . . 11 View Reports. . . . . . . . . . . . . . . . . . . . . . . . . . . . . . . . . . . . . . . . . . . 12 Refine a Report. . . . . . . . . . . . . . . . . . . . . . . . . . . . . . . . . . . . . . . . . . . . . . . . . Print a Report . . . . . . . . . . . . . . . . . . . . . . . . . . . . . . . . . . . . . . . . . . . . . . . . . . Report Types: Core vs Additional. . . . . . . . . . . . . . . . . . . . . . . . . . . . . . . . . . Core Reports. . . . . . . . . . . . . . . . . . . . . . . . . . . . . . . . . . . . . . . . . . . . . . . . . . . . . . . Additional Reports. . . . . . . . . . . . . . . . . . . . . . . . . . . . . . . . . . . . . . . . . . . . . . . . . . 13 13 13 13 13 Drill Down . . . . . . . . . . . . . . . . . . . . . . . . . . . . . . . . . . . . . . . . . . . . . 14 Drill Down Options. . . . . . . . . . . . . . . . . . . . . . . . . . . . . . . . . . . . . . . . . . . . . . 15 Print a Drill Down Report. . . . . . . . . . . . . . . . . . . . . . . . . . . . . . . . . . . . . . . . . 15 Applications - SWIS. . . . . . . . . . . . . . . . . . . . . . . . . . . . . . . . . . . . . . . . . . . . . Referral Category Sort. . . . . . . . . . . . . . . . . . . . . . . . . . . . . . . . . . . . . . . . . . . . . . Default Report Sort. . . . . . . . . . . . . . . . . . . . . . . . . . . . . . . . . . . . . . . . . . . . . . . . . Default Referral Type Selection for Reports. . . . . . . . . . . . . . . . . . . . . . . . . . Show Only With Data Selected by Default for reports. . . . . . . . . . . . . . . . 16 16 17 17 17 Tools – School Settings. . . . . . . . . . . . . . . . . . . . . . . . . . . . . . . . . . 18 School Profile . . . . . . . . . . . . . . . . . . . . . . . . . . . . . . . . . . . . . . . . . . . . . . . . . . 18 School Profile – Contact Information. . . . . . . . . . . . . . . . . . . . . . . . . . . . . . 18 Core Data – School Days . . . . . . . . . . . . . . . . . . . . . . . . . . . . . . . . . . . . . . . . 18 Core Data – School Enrollment. . . . . . . . . . . . . . . . . . . . . . . . . . . . . . . . . . . 19 Applications - General . . . . . . . . . . . . . . . . . . . . . . . . . . . . . . . . . . . . . . . . . . 20 Start Month. . . . . . . . . . . . . . . . . . . . . . . . . . . . . . . . . . . . . . . . . . . . . . . . . . . . . . . . 20 Use 24-Hour Time . . . . . . . . . . . . . . . . . . . . . . . . . . . . . . . . . . . . . . . . . . . . . . . . . 20 Use 504. . . . . . . . . . . . . . . . . . . . . . . . . . . . . . . . . . . . . . . . . . . . . . . . . . . . . . . . . . . 20 Use Ethnicity. . . . . . . . . . . . . . . . . . . . . . . . . . . . . . . . . . . . . . . . . . . . . . . . . . . . . . . 21 Use IEP. . . . . . . . . . . . . . . . . . . . . . . . . . . . . . . . . . . . . . . . . . . . . . . . . . . . . . . . . . . . 21 Require Staff and Require Student District IDs . . . . . . . . . . . . . . . . . . . . . . . 22 Applications - SWIS. . . . . . . . . . . . . . . . . . . . . . . . . . . . . . . . . . . . . . . . . . . . . 22 Maximum Actions Taken Allowed Per Referral. . . . . . . . . . . . . . . . . . . . . . . 22 Maximum Problem Behaviors Allowed Per Referral. . . . . . . . . . . . . . . . . . 22 Track Harassment Types . . . . . . . . . . . . . . . . . . . . . . . . . . . . . . . . . . . . . . . . . . . 23 Track Weapon Types . . . . . . . . . . . . . . . . . . . . . . . . . . . . . . . . . . . . . . . . . . . . . . . 24 Custom Fields. . . . . . . . . . . . . . . . . . . . . . . . . . . . . . . . . . . . . . . . . . . . . . . . . . . . . . 24 Person Management . . . . . . . . . . . . . . . . . . . . . . . . . . . . . . . . . . . . 26 Add a New Record . . . . . . . . . . . . . . . . . . . . . . . . . . . . . . . . . . . . . . . . . . . . . . Merge Duplicate Records . . . . . . . . . . . . . . . . . . . . . . . . . . . . . . . . . . . . . . . . Revise a Record. . . . . . . . . . . . . . . . . . . . . . . . . . . . . . . . . . . . . . . . . . . . . . . . . Delete a Record. . . . . . . . . . . . . . . . . . . . . . . . . . . . . . . . . . . . . . . . . . . . . . . . . Update a Record Status. . . . . . . . . . . . . . . . . . . . . . . . . . . . . . . . . . . . . . . . . . 27 28 29 29 29 Student Dashboard. . . . . . . . . . . . . . . . . . . . . . . . . . . . . . . . . . . . . 30 Appendix A - SWIS Data Entry and Reporting Schedule . . . . . . . . . . . . . . . . . . . Inside Back Cover Tools – Account Settings . . . . . . . . . . . . . . . . . . . . . . . . . . . . . . . . 15 Account Profile. . . . . . . . . . . . . . . . . . . . . . . . . . . . . . . . . . . . . . . . . . . . . . . . . 16 Applications - General. . . . . . . . . . . . . . . . . . . . . . . . . . . . . . . . . . . . . . . . . . . 16 2 SWIS User’s Manual SWIS User’s Manual 3 Overview time. The SWIS Suite provides school/facility personnel with the information they need to be successful decision makers. Who Should Use This Manual? The purpose of the SWIS User’s Manual is to provide SWIS users a quick reference and trouble-shooting guide. The manual is for use by SWIS facilitators and SWIS users during initial start-up, training, and ongoing use. Much of the information found in this manual is also available online at www.pbisapps.org. What is PBISApps? PBISApps is a not-for-profit group, developed and operated by Educational and Community Supports (ECS), a research unit at the University of Oregon. The PBISApps team manages a series of educational tools related to the implementation of multi-tiered systems of support (MTSS) . These tools include the School-Wide Information System (SWIS) Suite, PBIS Assessment, and PBIS Evaluation. These applications have been implemented in more than 25,000 schools in the US and abroad. PBISApps has been making schools safer and more productive places for over 10 years by empowering educators to make data-based decisions as problems emerge. 4 What is the SWIS Suite? HERE ’S A T I P The SWIS Suite — a set of four applications (SWIS, CICO-SWIS, ISIS-SWIS, and SAMI) — is a reliable, confidential, web-based information system built to collect, summarize, and use Some aspects of SWIS may be inaccessible based on your access level. Please contact your facilitator to have your access modified. For more information about student behavior data for decision making. Research demonstrates that educators can make more effective and efficient decisions when they have the right data in the right format at the right access levels, see the support article on PBISApps. SWIS User’s Manual What is SWIS? SWIS allows users to collect information about discipline events. The behavior data can be instantly accessed in tables, reports, and graphs allowing for teams to easily monitor and analyze behavior trends at the school-wide, small group, and individual levels. Information entered into SWIS is confidential and secure. SWIS protects data through the use of account-specific passwords and high-quality data protection procedures. The SWIS Confidentiality & Security Statement can be accessed at www.pbisapps.org. About the QR Codes The QR codes in this manual direct you to video tutorials or additional content as supplements to the written instructions. To use the QR codes you need a smartphone or tablet with internet access and software that can read and interpret the codes. There are many free QR code An example of a QR code. reader apps found in your device’s app store - for example, the Apple App Store for iOS, Google Play for Android, or Windows Phone Store for Windows Phone. To download an app, search “QR code reader” in the app store on your device and download. All videos can be found on our website http://www.pbisapps.org by navigating to Resources > Video Tutorials in the main navigation. SWIS User’s Manual 5 To logout of PBIS Apps and a SWIS account: 1. Click on the user’s email address located in the app bar at the top of the screen. 2. Click Logout. Note: Users can also click on the Logout icon located in the blue bar at the top of the screen. Switch Schools Users with access to more than one school can switch schools without logging out of SWIS. 1. Once logged in and inside the SWIS Suite, click Tools. 2. Click Switch School. 3. Select the desired school from the drop-down menu. The login is located in the black bar at the top of the screen. 4. Click OK. Login/Logout Quick Start From your preferred internet browser (e.g., Internet Explorer, Firefox, Safari, Chrome) type in the website address www.pbisapps.org to access PBIS Apps. Enter a Referral Once at PBIS Apps: From the SWIS Dashboard 1. Click Add Referral located at the top of the Dashboard screen. Scan for video tutorial For instructions see page 5 1. Click on PBIS Applications Login located in the black bar (app bar) at the top of the screen. 2. Enter the email address and password associated with the SWIS account. 3. Click Login. (If the password is a temporary password, a prompt appears for a permanent password to be created.) 4. Once logged in, slide over to the left side of the app bar and click on SWIS Suite to access SWIS. 2. Enter all required fields. 3. Click Save. Note: SWIS will not save a referral until all required fields are completed. Any missing information will be highlighted in red and identified with a red exclamation mark when left blank. Enter a Student or Staff 1. Click the Person Management icon located in the upper right-hand corner of the screen 2. Click on the correct tab: Students, Staff, Non-Staff. 6 SWIS User’s Manual SWIS User’s Manual 7 3. Click Add. Latest Referrals 4. Enter all required information about the person. Located to the right of the School Summary Report is a list of Latest Referrals. The ten most recent referrals are listed in the Latest Referrals section. Double click on any entry to review, edit, or print the referral. Use the navigation at the bottom of the list to scroll to older referral entries. 5. Click OK to save or click OK and New to save and open a new form to continue adding new person records. View Reports Click on the View Reports button within the SWIS navigation bar to access the reports dashboard. To open a new report, click on the appropriate report icon. The report opens with data presented based on default report settings. Add Referral Dashboard School Summary The SWIS Dashboard displays a School Summary Report with the following graphs displayed: Scan for video tutorial For instructions see page 5 Average Referrals per Day per Month Referrals By Grade Referrals By Time Referrals By Student Referrals By Location Referrals By Day Of Week The Add Referral workspace. Referrals By Problem Behavior From the SWIS Dashboard 1. Click Add Referral. Click on any of these reports to open it in a new screen displayed with the report and associated data table. 2. Enter all required fields (either type directly or click to select in any field) 3. Click Save. Note: SWIS will not save a referral until all required fields are completed. Any missing information will be highlighted in red and identified with a red exclamation mark when left blank. The SWIS Dashboard. 8 SWIS User’s Manual SWIS User’s Manual 9 Required Fields Referral Type: Select major or minor from the drop-down menu Student: Type or select the student name from the dropdown menu. Grade: Type or select the student’s grade level from the drop-down menu. Staff: Type or select the referring staff member’s name from the drop-down menu. Date: Type the referral date in the field or select it from the calendar icon. Time: Select the nearest time the referral occurred from the drop-down menu. Location: Select where the referral occurred from the drop-down menu. Problem Behavior: Select the primary problem behavior from the drop-down menu. Perceived Motivation: Select the perceived student motivation for the problem behavior from the drop-down menu. HERE ’S A T I P The star icon identifies the primary problem behavior and primary action taken. To remove any problem behavior or action taken, click the red X next to the data to delete. See School Settings on page 18 for additional information you can collect with each referral. Others Involved: Select whether others were involved in the referral from the dropdown menu. Action Taken: Select the primary Action Taken from the drop-down menu. Seclusion/Restraint: Select whether the referral included the use of seclusion and/or restraint. Notes: Type any necessary anecdotal information about the referral incident into the Notes field (500 characters). Copy Referral Information to Next Referral Use Save & Copy when more than one student is involved in the same incident. The following referral information will be copied over to the next referral: 10 SWIS User’s Manual Referral Type Time Problem Behavior Staff Location Others Involved Date To copy information from one referral to the next: 1. Complete the referral entry for the first student. 2. Click Save & Copy at the bottom of the referral data entry screen. 3. Enter the missing information into the second student’s referral. 4. Click Save. Custom Fields A school or facility may identify additional information about a referral necessary for local decision making, district/state reporting, or other purposes. SWIS allows up to ten custom fields to be added. Custom Fields can be enabled, disabled, or modified to fit local needs. Management for Custom Fields is located in School Settings. Harassment Type and Weapon Type When Track Harassment Types and Track Weapon Types settings are enabled, SWIS provides the subcategories to identify the type of harassment or type of weapon associated with the referral. Harassment Type and Weapon Type labels can be enabled, disabled, or modified in School Settings. Find and View, Edit, or Delete Referral To find a specific referral, or group of referrals to view, edit, print, or delete: 1. Click the Find Referral button located in the upper right-hand corner of the Add Referral data entry screen. Note: You can also locate Find Referral in the Tools menu. Scan for video tutorial For instructions see page 5 2. Enter search criteria into the chosen fields, and click Search. SWIS User’s Manual 11 a. To view the referral data: Click a referral to select it. A summary report of the referral displays to the right. b. To edit the referral: Double click on a referral. Revise referral information as necessary. Click Save. c. To delete the referral: Click a referral to select it. Click the Delete button located in the upper right-hand corner of the result set. Click Yes to confirm. The Find Referral workspace. View Reports Refine a Report 1. Open the desired report. 2. In the Options section of the report screen, modify the options as needed. 3. Click Generate. Scan for video tutorial For instructions see page 5 Print a Report 1. Within a generated report, click the Print icon located to the right of the Generate button. H E RE ’S A TI P 2. From the pop-up dialog box, select to print the graph only, the table only, or both. Open multiple reports in tabs for efficient access to the information you need. 3. Click Print. Click on the View Reports button within the SWIS navigation bar to access the reports dashboard. To open a new report, click on the appropriate report icon. The report opens with data presented based on default report settings. Report Types: Core vs Additional Reports available in SWIS are organized into two categories: Core Reports and Additional Reports. Core Reports The Core SWIS reports present data necessary for monitoring school-wide problem behavior patterns. School Summary Referrals By Day Of Week Average Referrals Per Day Per Month Referrals By Problem Behavior Referrals By Time Referrals By Location Referrals By Grade Referrals By Student Additional Reports Additional reports available within the Reports menu present data related to specific areas of concern. The View Reports dashboard. 12 SWIS User’s Manual SWIS User’s Manual 13 Multi-year reports for: Average Referrals Per Day Per Month, Location, and Problem Behavior Referrals By Staff b. To remove: Click the filter’s trashcan icon. Suspension/Expulsion c. To move a filter between include and exclude: Click on the report filter to move. Drag and drop it to the include or exclude from dataset section. School Ethnicity 4. Click Generate. Drill Down Drill Down Options Teams can expand on the information presented in the Core or Additional Reports by using the Drill Down tool. Drilling down data leads to more targeted behavior supports and practices for improved student outcomes. 1. Change the graph type: Use the Graph Type drop-down menu to the right of the graph to change the graph type. 2. Sort the data table: Click the triangle in any column header to sort the data in ascending or descending order.. 3. Save report template: Click Save Report Temple to save the specific data filters. Choose to share the template with another SWIS user in the school/facility by checking the Share Template Within School option. 4. Load a saved template: Saved Report Templates can be easily accessed in the future by using the Load Report drop-down menu located in the top right-hand corner of the Drill Down dashboard space. Print a Drill Down Report 1. Click the Print icon located beside the report’s graph. 2. Select to print either the graph only, the table only, or print both the graph and table. The Drill Down workspace. Tools – Account Settings To use the Drill Down report: 1. Click on Drill Down in the SWIS navigation bar. 2. From the Report Filters listed on the left, select the data to include or exclude from the dataset. By default, the current school year is already included in the dataset. 3. Click Print. Scan for video tutorial For instructions see page 5 3. To select a specific report filter, click on the report filter to expand it. a. To include/exclude: Right-click on a filter and choose to Add to Included Filters or Add to Excluded Filters. Account Settings allow an individual user to update personal profile information and update personalized application settings to accommodate data entry or reporting preferences. An account’s settings are stored individually for each password accessing SWIS, allowing each user to customize SWIS for individual usage. To access Account Settings: 1. Click Tools. 2. Click Account Settings. 14 SWIS User’s Manual SWIS User’s Manual 15 Within the Account Settings menu, schools/ facilities can view and modify information related to Account Profile and SWIS Suite Applications. Account Profile Alphabetical will sort the labels alphabetically. SWIS Order will sort the labels based on national usage trends. Scan for video tutorial For instructions see page 5 Account Profile Settings allow a user to verify and update name, contact email, username, password, or avatar. To modify Account Profile Settings, in Account Settings: 1. Click on Profile under Account Profile. 2. Click the name of the section to edit. 3. Type the new information to modify Account Profile information. 4. Enter your current password for changes to take effect. 5. Click Save. Applications - General Applications settings allow users to enable specific settings according to personal preference. General settings include: Locale Name Sort Order (First Last vs Last First) Default Graph Size To modify General settings, in Account Settings: 1. Click on General under Applications. 2. Select the setting to modify. 3. Type or select the preferred option for the setting. 4. Click Save. Applications - SWIS SWIS-specific account settings include: Referral Category Sort Default: SWIS Order 16 SWIS User’s Manual Default Report Sort The Account Settings > Applications > SWIS settings. Default: Frequency Frequency will order items on reports from least to most frequent. Alphabetically will order items on reports alphabetically. SWIS Order will order items on reports based on national trends. Default Referral Type Selection for Reports Default: All Referrals & Majors When graphs first display, they will display with Minors only, Majors only, or All Referrals & Minors based on the preferense selected. Show Only With Data Selected by Default for reports Default: Yes When enabled, graphs will only include items associated with one or more referral in the report. When disabled, graphs will display all possible items in the report, including those not associated with any referral. To modify SWIS Application settings, in Account Settings: 1. Click SWIS under the Applications menu. 2. Select the setting to modify and select the preferred option for the setting. 3. Click Save. SWIS User’s Manual 17 Tools – School Settings Core Data – School Enrollment HERE ’S A T I P To access School Settings: 1. From the SWIS Dashboard click Tools. 2. Click School Settings. Within the School Settings menu, schools/facilities can view and modify information related to: School Profile School Settings are set for the entire school and will be the same for all the school’s SWIS users. General and ApplicationSpecific Settings Core Data School Profile The School Profile includes all physical and contact information for the school/facility. Any of the information provided in this section can be updated with the exception of the District Name: District Name Physical Address Phone Number School Name Grade Range Fax Number To enter or modify School Enrollment, in School Settings: 1. Click on School Enrollment. 2. Click on the correct school year to expand the menu. 3. If the school/facility collects race/ethnicity information: Enter the number of students within each ethnic group. Total School Enrollment calculates automatically based on the race/ ethnicity enrollment entered. H E RE ’S A TI P Enrollment data should be entered at the same time as the annual census count (typically by October 1st). Enrollment totals only change during a school year if a large (10-20%) change in enrollment occurs mid-year. 4. If the school/facility does not collect race/ethnicity information: Enter the total enrollment 5. Click Save. Mailing Address School Profile – Contact Information Contact information for the following roles can be located and/or edited as changes occur. SWIS Contact Admin Contact Billing Contact Core Data – School Days To enter or modify School Days, from School Settings: 1. Click School Days under Core Data. 2. Click on the school year to expand the menu. 3. Type or select the number of schools days for each calendar month (Early release days count as one full day). The School Settings > Core Data > School Enrollment settings. Note: In order to generate school-wide reports such as the Average Referral Per Day Per Month or Ethnicity Reports, SWIS requires details about School Days and School Enrollment. 4. Click Save. 18 SWIS User’s Manual SWIS User’s Manual 19 Applications - General To enter or modify General Settings, in School Settings: 1. Click General. 2. Click anywhere within the row of the appropriate field to expand the menu. The federal government requires schools, districts, and states to collect individual-level race and ethnicity data and report aggregated data in the following ways: 3. Choose Yes to enable the identified feature. Individual students must report both his/her ethnicity as well as race. 4. Choose No to disable the feature. Students may identify more than one race. 5. Click Save. Multi-Racial is listed only as a category for aggregate reporting purposes. 6. Close School Settings by clicking on the red X icon in the upper right corner of the screen. Start Month Default: August This setting sets which month is considered the start of the year for reporting and decision-making purposes. To modify the Start Month: 1. Select the appropriate month from the drop-down menu. 2. Click Save. Use 24-Hour Time Schools/Facilities may opt to collect data about individual students’ 504 status. To disable this feature: 1. Select No from the drop-down menu. 2. Click Save Use Ethnicity Default: Enabled When Use Ethnicity is enabled, the SWIS Suite will require race/ ethnicity data to be entered. To disable ethnicity as a required field, in School Settings: Default: Disabled 1. Select No from the drop-down menu. This setting allows schools/facilities to track data within a typical school day (8:00 am-5:00 pm) or within a 24-hour clock. 2. Click Save. To enable the use of a 24-hour clock: 1. Select Yes from the drop-down menu. 2. Click Save. Use 504 Default: Enabled 20 HERE ’S A TI P SWIS User’s Manual For more information about entering individual student ethnicity and race information, please refer to the Person Management section on page 26. Use IEP Default: Enabled When enabled, users will identify each student’s IEP status and disability category. To disable this setting: SWIS User’s Manual 21 1. Select No from the drop-down menu. 2. Click Save. Require Staff and Require Student District IDs Staff District ID Default: Enabled Student District ID Default: Enabled SWIS allows the school/facility to utilize district/internal identification numbers for staff in addition to the SWIS assigned ID number. If disabled, the staff and/or student SWIS ids are displayed on reports. To disable this feature: 1. Click SWIS under Applications. 1. Select No from the drop-down menu. 2. Click Maximum Problem Behaviors Allowed Per Referral. 2. Click Save. 3. Type or select the maximum number of behaviors to add to a referral. Applications - SWIS Maximum Actions Taken Allowed Per Referral Default: One A maximum of five actions taken per referral is possible. To modify the Maximum Actions Taken Per Referral, in School Settings: 1. Click SWIS under Applications. 2. Click Maximum Actions Taken Allowed Per Referral. 3. Type or select the maximum number of actions taken to add to a referral. 4. Click Save. Maximum Problem Behaviors Allowed Per Referral Default: One A maximum of five problem behaviors per referral is possible. To modify the Maximum Problem Behaviors Per Referral, in School Settings: 22 The School Settings > Applications > SWIS settings. SWIS User’s Manual 4. Click Save. Track Harassment Types Default: No Schools/Facilities may choose to track specific harassment types for fine-grained identification. With Track Harassment Types enabled, SWIS provides a list of federally recognized harassment types from which to select when Harassment is chosen as a problem behavior during data entry. These types can be edited per school/facility. To edit Track Harassment Types, in School Settings: 1. Click SWIS under Applications. 2. Click Track Harassment Types. 3. Choose Yes to enable the setting or No to disable the setting. 4. To edit an existing type: click to select the label from the list and edit the information in the Edit Harassment Type box. 5. To add a new type: click the Add button and enter the new label’s information in the Add Harassment Type box. SWIS User’s Manual 23 6. To delete an existing type: click to select the label from the list and click the Delete button. 7. Click Save Some examples of Custom Fields categories and labels: Category: Parent Contact Category: Hallway Labels: Email, Mail, Phone, In Labels: East Wing. West Wing, Person, and Unable to Contact North Wing, and South Wing Track Weapon Types Default: No Schools/Facilities may choose to track specific weapon types to allow for fine-grained identification. With Track Harassment Types enabled, SWIS provides a list of the most common weapon types from which to select when Use/Posession of Weapons is chosen as a problem behavior during data entry. These types can be edited per school/facility. 2. Click Custom Fields. 2. Give your new Custom Field a name by entering it in the Label field. 2. Click Track Weapon Types. 3. Choose Yes to enable the setting or No to disable the setting. 4. To edit an existing type: click to select the label from the list and edit the information in the Edit Weapon Type box. 5. To add a new type: click the Add button and enter the new label’s information in the Add Weapon Type box. 6. To delete an existing type: click to select the label from the list and click the Delete button. 7. Click Save 3. Click Continue. 4. If integrating SWIS data with another system, type the identifier. 5. Create a new item for the drop-down menu by entering the item’s name in the Label field under Add Label. 6. Click Save. 7. Keep adding new items until all information is displayed. 8. Click Continue. To modify an existing custom field: Custom Fields SWIS User’s Manual 1. Click SWIS the Applications. 1. Click Add. 1. Click SWIS under the Applications menu. 24 To add or modify Custom Fields, in School Settings: To add a new custom field: To edit Track Weapon Types, in School Settings: A school/facility may identify additional information needed for local decision making, district/state reporting, or other purposes. For this information, SWIS allows up to 10 custom fields to be established. HERE ’S A TI P 1. Double-click the label to modify. 2. Modify any of the information displayed. 3. Click Save. Scan for video tutorial For instructions see page 5 To merge two labels: 1. Select the item to keep. SWIS User’s Manual 25 2. Click Merge. 3. Select the item to remove. 4. Click Merge. This will update all existing referrals to use the item label retained. To Delete a custom field: 1. Click on the field to delete. The School Settings > Applications > SWIS > Custom Fields > Edit Custom Field settings. 2. Click the Delete button. Deleting a field will remove the data for all existing referrals associated with the field. The Person <anagement workspace. 3. Click Yes to confirm the deletion. Note: Person Management is also located in the top right-hand corner of the application next to the Logout icon. To disable a specific Custom Field rather than delete it: 1. Click the name of the field to hide. 2. Click Edit. 3. Uncheck the Display box to disable the Custom Field. 4. Click Save. Person Management Person Management allows schools/facilities to organize students, staff, and non-staff records associated with SWIS Suite data. To access Person Management: 1. Click Tools. 2. Under the Person Management header, select the appropriate list (Student, Staff, Non-Staff) to review or modify. 26 SWIS User’s Manual Within Person Management, only records with a status matching the selected filters will be displayed. The filters Active, Inactive, and Archived can be checked and unchecked to display or hide a name from the list. Scan for video tutorial For instructions see page 5 To see all currently active person records, check only the Active box from the filters. The first 15 active records display in the result set. Use the navigation at the bottom of the screen to tab through the list and view additional records. Click on a name to display the person’s information to the right of the list. Add a New Record 1. In the Tools menu, click Person Management. 2. Click on the correct tab: Students, Staff, Non-Staff. SWIS User’s Manual 27 3. Click Add. 4. Enter all required information about the person. 5. Click OK to save or click OK and New to save and open a new form to continue adding new person records. Merge Duplicate Records Merging two names will move all referrals from the “Student/ Staff/Non-Staff to Delete” to the “Student/Staff/Non-Staff to Retain.” 8. Click Merge. HERE ’S A T I P For students on an IEP, a disability category must be selected. “To Be Obtained” should only be selected when a record urgently needs to be recorded but the disability category is not available. It is critical to update this information to keep records current for reporting and decision making. 1. Check the Active, Inactive, and Archived filter boxes to display all person records associated with the SWIS account. 2. Locate the name of the person to be retained by typing the name in the Search field. 3. Click the Search icon. 4. Click to select the name of the record to retain. Revise a Record 1. In the Search field, type name of the record to modify. 2. Click the Search icon. 3. In the result set, double click on the record to revise. 4. Revise the necessary information. H E RE ’S A TI P The SWIS Suite prevents deleting person records attached to referral data. If there are duplicate person records and each has referral data, merging the two records is recommended over deleting. 5. Click OK. Delete a Record 1. Type the name of the record to be deleted in the Search field. 2. Click the Search icon. 3. Click to select the record to delete 4. Click the Delete button. 5. Click Delete to confirm. Click Cancel to return to the roster. Update a Record Status 1. Check the Active, Inactive, and Archived filter boxes to display all persons associated with the SWIS account. 5. Click Merge. 2.Type the name of the record to update in the Search field. Click the search icon. 6. In the Student/ Staff/Non-Staff to Delete field type the name of the person record to delete. The edit student workspace. All referrals from this record will be moved to the Student/Staff/Non-Staff record chosen to be retained. 3.Right-click on the record and select Set Status. Select the appropriate status for the record: 7. Click to select the name of the label to delete. The peron management workspace with set status menu. 28 SWIS User’s Manual SWIS User’s Manual 29 Active: the person is currently associated with the school. Inactive: the person is not currently associated with the school, but may return (e.g., transfer students). Archived: the person is not currently associated with the school and will not be returning (e.g., graduated students). Click OK. Student Dashboard The Student Dashboard provides school/facility personnel with a comprehensive report for an individual student with data in SWIS, CICO-SWIS, and/or ISIS-SWIS. Scan for video tutorial For instructions see page 5 To access the Student Dashboard: 1. Click Tools, then click Student Dashboard. 2. Select a student to view from the Find a Student drop-down menu or the Students with Referrals list. Clicking the name will open the dashboard for the selected student. Student Dashboard reports include: Summary Referrals By Time Latest Referrals—the student’s 10 most recent referrals. Referrals By Problem Behavior Referrals Per Year Suspension/Expulsion Referrals By Motivation 30 SWIS User’s Manual Referrals By Location Referrals By Day Of Week Average Referrals Per Day Per Month Appendix A - SWIS Data Entry and Reporting Schedule School: Facilitator: Data Entry Who What When Office Referrals Accuracy Checks Report Generated Who What When