1
Your solution for office automation!!
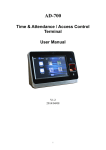
AD-350WFP
Web-based Biometric
Access Control/Time & Attendance
Terminal
User Manual
Ver. 2.1
Dec 9, 2011
1
Your solution for office automation!!
Contents
I. Product features: ............................................................................................................................................. 3
II. Specifications: ............................................................................................................................................... 3
III. Exterior ........................................................................................................................................................ 4
IV. Setup the clock ............................................................................................................................................. 4
V. Pin assignment & Wiring .............................................................................................................................. 6
VI. Super Master(KATES) Central Management Software ............................................................................... 7
VII. AD-350WFP Built-in Web-based Time & Attendance Management System ............................................ 7
2
Your solution for office automation!!
I. Product features:
ARM 9 405MHz CPU; communication speed 100MB.
Windows CE 6.0 operating system, built-in web server, FTP server & SQL server.
3.5-inch blue backlit monochrome LCD.
Each terminal has a built-in web-based software for small application while we also provide a free central
management web-based software(ASP.NET + SQL Express) for control & manage multiple terminals in
a network.
Can use either a terminal or a PC as the server for synchronizing all the connected slave terminals.
TCP/IP interfaced. LAN / WAN supported.
Daylight Saving Time setting.
Auto reconciliation of user & fingerprint accounts among multiple terminals in network.
64MB RAM + 1GB Micro SD.
Optical fingerprint reader + 125KHz card reader (Mifare 13.56MHz for option).
Can store 9,500 fingerprints(2 fingerprints each user), 30,000 cards and 250,000 events.
50 programmable bell ring times (through web browser). Music ring file(.wav) is changeable via FTP.
II. Specifications:
RF Card Reader
EM 125KHz or Mifare 13.56MHz
Fingerprint Scanner
Optical; 1:N Authentication
Input
2 Sensor(Push Button, Door Sensor)
Output
2 Relays(Door Lock, Alarm or Door Bell)
Indicator
Back-lit graphic LCD(128x64 dots)
Key
16 Keys
Beep Tone
Buzzer
Events Memory
250,000 events
Fingerprint Storage
9,500 fingerprints
Card Storage
30,000 cards
Comm. Interface
TCP/IP. LAN / WLAN(Wi-Fi) for option.
Slave Reader Interface
Wiegand 26-bit
Card Reading Range
5~10 CM
Power In
DC 8V ~ 12V
Power Consumption
3W(max.)
Operating Temperature
0 ~ 50°C / 32 ~ 122°F
Operating Humidity
20 ~ 95%(non-condensing)
Measurements
168*164.5*39 mm
Weight
460 g
3
Your solution for office automation!!
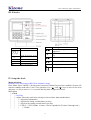
III. Exterior
Key
Function
0、1、2、
3、4、5、
6、7、8、9
Numeric keys
Icon
()
()
Meaning
Current item supported/not
supported
Upward & Downward moving
key
Not selected/Selected
()
Not selected/Selected
()
F2、F3 Upward & Downward moving
keys
*
Quit & back to upper menu
#
Enter/Confirm/
F4 MENU
Enter main menu
F1
Show system information
Need password to enter menu
Memory capacity status
…
IV. Setup the clock
Menu operation:
Remark: Go to only letters in BLUE for fast(basic) setup.
Enter Menu: Press <MENU> directly(enter password if Menu Password was enabled). System will
return to standby mode after 3 min. if no operation. Use <> and <> keys to move to the item
and press <#> key to enter or <*> to cancel and skip back to upper directories.
Main Menu
|—Clock
|
|—Set Time
|
|—Adjust Time(only used when clock goes slower/faster than standard time)
|
|
|—Adj not(no adjustment)
|
|
|—Adj fast(for setting seconds/faster per day)
|
|
|—Adj slow(for setting seconds/slower per day)
|
|
|—CLK 01 ~ CLK 16(Max. 16 times. Can be expanded to 50 times if through web.)
|
|
|
|—Enable
4
Your solution for office automation!!
|
|
|
|—Alarm
|
|
|
|—Delay(Lasting time)
|
|
|
|—WeekSet—Weekly schedule(Sunday to Saturday)
|—Card
|
|—Add card
|
|—Modify card
|
|—Delete card
|—System
|
|—Model type—1 door / 2 door
|
|— Set TCP/IP {IP address, subnet mask, default gateway, DHCP}
|
|—Light mode—set backlight mode: NC(normal close), NO(normal open), Auto, Set Time.
|
|—Beep hint—Keys, Clock, Hints(On/Off).
|
|—Record option—In rec., Out rec., Events, Cycle(overwrite when memory’s full),
Sameness(duplicate card), Tol. Alarm(memory full), 5-digit card.
|
|—Menu PWD(password for access into the clock’s main menu through keypad)
|
|—Sys info(system information)
|
|—Clear system settings (null)
|
|—LCD contr(LCD contrast)
|
|—ALM switch(case sensor)—On / Off
|
|—Daylight(daylight saving setting)
|
|—Secu Level(for adjusting fingerprint verification strictness. The bigger the level the
stricter the verification will be.)
|—Door
|
|—Door1
|
|
|—Entry type— Only card、 Only PIN、 Card & PIN, Only fingerprint,
Card & fingerprint Card or fingerprint(factory default)
|
|
|—Sensor type— Sensor NO、 Sensor NC、Fire NO、Fire NC、NULL
|
|
|—Button type—NO.、NC.、NULL
|
|
|—OpenTime(door-open time)
|
|
|—CloseTime(door-close detect time)
|—IO Port
|
|—Relay 1—Lock 1、 Lock 2、 Bell、 Alarm 、 NULL
|
|—Relay 2—Lock 1、 Lock 2、 Bell、 Alarm 、 NULL
|
|—WG1(for connecting a Wiegand 26-bit slave reader)—In 1, Out 1, In 2, Out 2, Null.
|
|—WG2(for connecting a second Wiegand 26-bit slave reader)—In 1, Out 1, In 2, Out 2, In
1, Out 1, In 2, Out 2, Null.
|
|—Self reader(the clock’s built-in reader)— In 1、 Out 1、 In 2、 Out 2、
NULL
|—Language—Simplified Chinese,Traditional Chinese English(factory default)
|—Work Mode— Access Control Time & Attendance(Remark 1)
|—User —Add Fingerprints Delete Fingerprints Clear all fingerprints
Remark 1: While under Time & Attendance mode, users are allowed to enter(press) 1 before
reading a card or scanning a fingerprint for a clock-in and 2 for a clock-out. When any other
key other than 1 and 2 is pressed, this entered number will be recorded as part of the
complete clocking record which can be further utilized by an application software developer
as a Job Code.
5
Your solution for office automation!!
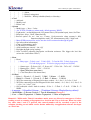
V. Pin assignment & Wiring
6
Your solution for office automation!!
VI. Super Master(KATES) Central Management Software
Recommended to use when you are running multiple time/access terminals in the same network and having large
numbers of employees(more than 50 employees) or daily attendance/access logs(above 200 records per day)!
The Super Master(KATES) Central Management system is a web-based application software for managing multiple
time/access terminals such as model AD-350W, AD-350WFP & IDF-200 in a network. The software is for installing on
a PC which runs Windows operating systems such as XP, Vista & 7(both Home & Professional editions). Super Master
provides following main functions:
1.
2.
3.
4.
5.
6.
Maintaining employee accounts (including fingerprints), work shifts, shifts rotation program, slave terminal
accounts & attendance reports.
Automatically synchronizing all the slave terminals employees & fingerprints from its own database.
Collecting enrolled fingerprints & attendance/access logs from all the slave terminals.
Calculating attendance & exporting reports (in .txt or .xls).
Automatically exporting attendance/access log in custom format to designated directory for being further applied to
enterprises’ existing payroll or ERP systems.
Setting User Groups(employee groups) for assigning different door access rights.
To get the software’s auto install package please contact Kizone (www.kizone.com) through an e-mail or a phone call.
Here is the fast guide for how to use:
Step 1: Set up Super Master(KATES web system) using the provided auto install package.
Step 2: Make sure DataSync.exe was activated.
Step 3: Enter Super Master management interface through a web browser.
Step 4: Enter Slave Host Setting to append slave terminals in the network.
Step 5: Append work shifts in Work Shift Setting. If you need only access control please skip to step 7.
Step 6: Edit employee work shift schedule(weekly, monthly or annual work shift programming).
Step 7: Enter Department to append department information.
Step 8: Program access rights for different user groups on different doors.
Step 9: Generate personnel information (employee accounts) in User.
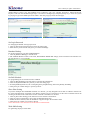
VII. AD-350WFP Built-in Web-based Time & Attendance Management System
AD-350WFP’s unique Built-in Web-based software is designed for fulfilling easy Time & Attendance management of
small businesses(especially good for stand-alone usage). It allows a system manager to manipulate it simply through a
Web Browser such as Microsoft Internet Explorer! Please setup the system accordingly following the below steps:
Log onto an AD-350WFP in the network.
Method 1:
Connect your AD-350WFP clock to Ethernet and the device will get an IP address for itself. Press F1 key and write
down the device IP address. Open your webpage browser(ex. Microsoft Internet Explorer) and enter the IP address
/login.asp(ie. 192.168.123.105/login.asp) and press [Enter] key to enter the system log-on page. Type in the default
password “admin” and click [Login] to enter the main page.
Method 2(for setting a designate IP address):
Press [Menu] key on AD-350WFP to enter the device’s function menu. Use the scroll down key(F3) to move to [System]
and press [#] key to enter. Select [Set TCP/IP] and press [Enter]. Set IP address, Subnet Mask, Gateway accordingly and
7
Your solution for office automation!!
disable DHCP. Connect your AD-350WFP clock to Ethernet, open your webpage browser(ex. Microsoft Internet
Explorer) and enter the IP address/login.asp(ie. 192.168.123.105/login.asp) and press [Enter] key to enter the system
log-on page. Type in the default password “admin” and click [Login] to enter the main page.
Login page
Main page
Set Login Password
For changing the default web login password.
1. Click on [Password] in the left menu to enter the setting page.
2. Enter the new password and click [Save] to confirm the change.
Database Backup
For saving a backup of your AD-350WFP database.
1. Click on [Database Backup] in the left menu.
2. AD-350WFP database consists of two files, KATS.SDF & DISTR.SDF. Simply click on each file to download it to a
favorite directory in your computer.
Set Bell Schedule
For programming 50 sets of bell activation schedule.
1. Click on [Bell Schedule] in the left menu to enter the bell schedule list.
2. Click on the [Bell Schedule No.] directly to enter the setting page.
3. Tick the [Enabled] check box, fill out the [Ring Time] and [Duration], and set the [Weekly Schedule].
4. Click [Save] to confirm change or [Cancel] to abort.
Slave Host Setting
If you have multiple AD-350WFPFP terminals in a network, you may designate one of them as a Master terminal. All
the users and fingerprints registered to the Master terminal will be reconciled to all the Slave terminals and all the
clocking In & Out records on the Slaves will be collected to the Master in real time.
1. Click on [Slave Host Setting] in the left menu to enter the Slave terminal list.
2. Click on a Slave terminal ID(1~30) to enter the detailed setting form.
3. Enable the Slave terminal, enter the IP address it applies and give the terminal a name.
4. Click [Save] to confirm or [Cancel] to discard.
Notice: Please leave the same form on all the Slave terminals blank.
Work Shift Setting
For generating employee work shifts.
8
Your solution for office automation!!
1. Click on [Work Shift Setting] in the left menu to enter the work shift list.
2. Click on an existing shift code to modify the details or click [Add New] to append a new work shift.
3. Enter Shift Code, Shift Name, Start Time, End Time and Auto Deduct Break time. Tick the Default Work Shift check
box if necessary.
4. Click [save] to confirm, [Cancel] to abort or [Delete] to delete an existing work shift.
Attendance Report (Detailed) – for fixed shifts users
For generating detailed employee attendance reports.
1. Click on [Attendance Report Detailed] in the left menu.
2. Select a searching criterion(by User, Department or All employee).
3. Set the query timeframe(yyyy/mm/dd ~ yyyy/mm/dd). Leave the timeframe blank for searching all time.
4. Click the [Query] button to generate the report. You may also click [Print] to print the report or export the report
in .csv, .txt and .xls.
Attendance Report (Total) – for fixed shifts users
For generating attendance summary(accumulated worked hours).
1. Click [Attendance Report Total] in the left menu.
2. Select searching criterion(by User, Department or All employee).
3. Set the query timeframe(yyyy/mm/dd ~ yyyy/mm/dd). Leave the timeframe blank for searching all time.
4. Click the [Query] button to generate the report. You may also click [Print] to print the report or export the report
in .csv, .txt and .xls.
.
Attendance Report (Multi Work Shift) – for multiple flexible shifts users
This function is for calculating work hour sum of employees who are requested to attend more than one flexible shifts a
day. Work hour sum can be calculated and displayed by each single shift, each day or selected date range. To apply this
function the clock(AD-350WFP series) needs to be switch from Access Control to Time & Attendance mode and
employees are requested to press 1 for a clock-in and 2 for a clock-out before they scan their fingerprints or read their
proximity badges.
1. Click [Attendance Report (Multi Work Shift)] in the left menu.
2. Select users(by User, Department or All employee).
3. Set the query date range(yyyy/mm/dd ~ yyyy/mm/dd). Leave the columns blank for searching all time.
4. Select report type(by work shift, daily sum or sum of selected date range).
5. Click the [Query] button to generate the report.
Transactions
For browsing or exporting attendance records.
1. Click [Transactions] in the left menu.
2. Click [Add New] directly to generate a new record manually→select a Card ID(Employee)→enter date & time for
that record(format: yyyy/mm/dd hh:mm:ss)→click [Save] to confirm or [Cancel] to abort.
3. Set searching criteria and click [Search] to browse current records stored in the clock database.
4. Click the [Query] button to generate the report. You may also click [Print] to print the report or export the report
in .csv, .txt and .xls.
Transactions Delete
For deleting Transactions(access/attendance records) to reduce database size.
1. Click [Transactions Delete] in the left menu.
2. Select date range and press DELETE button to clear access/attendance logs.
Job Code Setting
For defining reasons of punches(only valid in Time Attendance mode under which each user may enter a code from 1~9
before scanning a card or fingerprint).
1. Click [Job Code Setting] in the left menu.
2. Click ADD NEW to enter the setting page.
3. Enter a Job Code and its status definition and click Save.
Department
For browsing, modifying and generating departments.
1. Click [Department] in the left menu to browse the current departments list.
9
Your solution for office automation!!
2. Click the Department ID directly to get the detail→enter a new Department ID→click [save] to confirm or [Cancel]
to abort.
3. Click [Add New]→enter Department ID→enter Department Name→click [save] to confirm or [Cancel] to abort.
User
For browsing/modifying/deleting/adding users(employees).
1. Click [User] in the left menu to browse current users.
2. Click on User ID directly for modifying details of or deleting the user.
3. Click [Add New] to enroll a new user. Enter User ID →enter User Name→assign a department for the user→enter the
Card No. if a proximity card will be used(for those users who are using Fingerprints only please also enter virtual Card
No. ie. 0001, 0002, 0003, etc.)→click [save] to confirm or [Cancel] to abort.
Notice: All enrolled users will have door access right if AD-350WFP is applied for door control.
User Weekly Shift
For programming weekly shift schedules for each user.
1. Click [User Weekly Shift] in the left menu.
2. Select an user→select an work shift for each week day and weekend→click [Save] to confirm.
Notice:
1. The work shift choices contains a built-in shift named “Holiday”.
2. When it’s necessary to set an overnight shift(cross-day shift), both the current day and the next day need to be set as
overnight shift!
10