1
Data View Generator
User’s Manual
Version 2.2.2
May 2002
Data View Generator
User’s Manual
TABLE OF CONTENTS
Overview __________________________________________________________________3
Distribution and Installation__________________________________________________4
Requirements ______________________________________________________________4
GeneXus Data View Generator Wizard_________________________________________5
Page 1___________________________________________________________________________5
Page 2___________________________________________________________________________6
Page 3___________________________________________________________________________7
Page 4__________________________________________________________________________11
Conflicts: Duplicated names _________________________________________12
Conflicts: Normalization troubles _____________________________________13
Conflicts: Data type interpretation _____________________________________13
Rules operation____________________________________________________13
Rule’s scope modification ___________________________________________21
Modification of Rules application order_________________________________22
Attributes Types/length substitution rules _______________________________23
Page 5__________________________________________________________________________26
Trace Configuration (GeneXus DB activity trace) _______________________________27
2
Data View Generator
User’s Manual
Overview
This tool allows applying reverse engineering on existent databases. GeneXus objects
(Data Views and/or transactions, attributes, tables, indexes, etc.) can be defined
from the definition of the database's tables, indexes, etc.
It uses ODBC technology to access these data.
This application may be used from GeneXus (in the Design model) or from any
other machine, even if it does not have GeneXus installed. In this case, the
knowledge distribution files (xpw files) are generated, and they can be then
consolidated in any other machine with GeneXus.
Besides, it allows the resolution of conflicts caused by object names and attributes
data types
For example: It can be established that all attributes whose names begin with “Cli”
will be changed by “Cus”, etc.
It is similar to “Adapt From” (feature included in the GeneXus Version 6 Ev 1).
However, it doesn’t access to the Knowledge Base. That is to say, all trouble
detections, their correction, objects renaming, etc., are worked out in the XPW at the
end of the process. In the Adapt From some rules are established, and then, the
XPW is processed (and consolidated), presenting possible troubles with the
knowledge already existent in the KB.
For more details, refer to the Release Notes of 6 Ev 1 Version, in the part referent
to Adapt From.
3
Data View Generator
User’s Manual
Distribution and Installation
This tool consists of one SETUP independent from GeneXus. Once run, one icon is
created: “GeneXus Data View Generator”.
Besides, it can be run from inside GeneXus (Tools\Data View Generator option,
which is within the design model).
Requirements
The MicroSoft Data Access 2.6 or higher version must be installed. It can be
obtained for free at: http://www.microsoft.com/data.
NOTE:
• Several products (ODBC Pack from Microsoft, Developer Studio 6.0, drivers of
Intersolv 3.0, etc.) install all that is necessary. Therefore, you may already
have the required technology without the need to obtain extra products.
Tip: An easy way to know whether you have got the requirements to run it is using
ODBC Administrator, in the tab “About”. The “ODBC core components” must be 3.5
version or higher one.
4
Data View Generator
User’s Manual
GeneXus Data View Generator Wizard
This is a wizard of 5 pages. They are detailed hereunder, as well as the features
that can be obtained from each one of them.
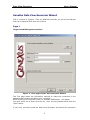
Page 1
Target: Establishing the connection.
Figure 1 - First page of Data View Generator Wizard
This first page shows the information required to make the connection to the
database that contains the tables to be “imported”.
When selecting the connection mode, all available DataSources will appear.
You must select one of them from the list, enter the user/password and press the
“Next” button.
If you have previously used the Data View Generator and saved the connection
5
Data View Generator
User’s Manual
information, then you can use the OPEN button to recover the information.
Page 2
Target: Selecting the tables and logical views to be imported
Figure 2 - Second Page of Data View Generator Wizard
In this page two windows appear; the left one shows the database tables, schemes,
logical views, etc., available to be imported according to the previously defined
connection.
Tip: The information shown in the left window depends on the user connected to
the database and the DBMS that are being used.
In AS/400 particularly, there can be seen the tables of those libraries specified in
the DataSource in the option “Default Libraries” from Tab “Server”. Remember to
begin the libraries list with a comma “,”; otherwise the following error can be
shown: “SQL0204 – QCMDEXC in XXX type *N not found”
The right window will show the selected tables to be imported. The user must
select them in the left window (double clicking). It is possible to select the scheme
6
Data View Generator
User’s Manual
(or library if it is an AS/400). In this case all the tables will be included.
The SAVE button is to save information entered up to the moment (connection and
list of selected tables). The file where this information will be saved has GDC
extension (GeneXus DVGenerator Configuration).
In future runs of DVG, this file can be opened (by means of the OPEN button of
page 1), and it isn’t necessary to repeat the selection operation.
Tip: If you are using the DVG with DB2/400 remember to configure the DataSource
to use the “System naming Convention (*SYS)” in the page “Format”, the option
“Naming convention”.
Otherwise, the following error may be shown: “SQL5016 Object name GXRCDFMT
not valid for naming option” o “SQL0204 – QCMDEXC in XXX type *N not found”
Besides, depending on the Client Access version used (for example 3.2), it will
appear a “tab” named “Other (2)” in which the type of connection may be
configured (normally the values are: “read/write”, “read/call” and “read Only”), and
“read/write” or “read/call” must be used.
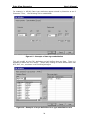
Page 3
Target: Configuring the import parameters
7
Data View Generator
User’s Manual
Figure 3 - Third page of Data View Generator Wizard
The information to be configured on this page depends on whether the Data View
Generator is run outside GeneXus or from GeneXus itself. The values described
below with an asterisk (*) cannot be modified if Data View Generator has been run
from GeneXus.
The display showed here will appear only if it is run as an independent program.
Export File Directory: (*) Enter the directory where the export file will be created
button
(GXW.XPW). You should not include the backslash (\) at the end. The
allows selecting the directory.
If it has been run from GeneXus, then that directory is the knowledge base's
directory and cannot be modified (it shows Disabled).
Tip: This directory must exist, otherwise the NEXT button will not be enabled.
Folder: Knowledge base folder’s name where the “imported” objects will be
created.
Transactions:
8
Data View Generator
User’s Manual
Generate Data Views: With this check we determine whether the Data View
will be generated with the structure of each table to be imported.
Retrieve Index Information: If this check box is selected, it means that for
each table to be imported there will also be imported all its indexes (primary,
foreign keys, user’s, etc.).
Besides selecting it, the transactions associated to the tables can also be
generated. If it is not selected, the indexes information will not be recovered.
Therefore, the transactions will not be generated. The tables will be imported as
Data Views but will not be associated to KB tables.
Tip: If the indexes ARE NOT imported, i.e.: the Data Views are not associated to
KB tables, the imported tables can only be accessed through Xs command (Xfor
Each, Xnew, etc.).
Although the created transaction is not used later, it is recommended to
associate it to KB tables in order to facilitate their use.
Generate transaction: If this check box is marked a transaction will be
generated with the structure of each table to be imported. See the information
with reference to “Retrieve Index Information” and “Identify multilevel
transactions”.
Identify multilevel transactions: If this check box IS NOT marked, each table
to be imported will define a transaction and/or a different Data View. The
generated transactions will then be of only one level.
If it is marked, then certain subordination patterns are looked for to define
transactions of more than one level. The following “patterns” must be complied:
1. The primary key of each subordinate level must be a superset of the
superordinate primary key.
Example:
Table 1(Superordinate level)
Table
2
level)
InvNo*
InvNo*
InvDate
InvLinNo*
InvLinAmt
(Subordinate
2. The name of the lines table (subordinate) must be included in the name of
the header table (superordinate), without considering the final numbers in
the name of both.
Compliant example:
Table’s name
Invoices
Invoice1
Included in transaction
Invoices
Invoices
Non-compliant example:
Table’s name
InvHead
InvLin
Included in trn
InvHead
InvLin
3. Redundant attributes of subordinate level must not exist in the superordinate
level.
9
Data View Generator
User’s Manual
NOTE: Although the Data View Generator recognizes tables as “multilevel”, the
developer may edit the transactions later, to design them in order to represent
their reality in the best way.
Maximum Name Length (*): This determines how many characters will
determine the name’s uniqueness. For example if 5 is entered, the first 5
characters will control the transactions unity name.
NOTE: This option, as well as the “table name length”, etc. exists only on
account of compatibility with GeneXus previous versions. It is recommended not
to modify them and to keep the default values.
If it was executed from GeneXus, this value coincides with the value entered in
the 'Significant object name Length' preference that was configured in the
design model and appears as disabled.
Tip: The first 7 characters of the transaction names and the 8 first characters of
the Data Views names must be unique, and this is duly controlled. The aim of
this check is not to determine how many characters make the object unique, but
the total characters that the object will have.
Tables:
Name Length (*): Same as Maximum numeric length of transactions.
Indexes:
Name Length (*): Same as Maximum transactions name length.
If it was executed from GeneXus, this value coincides with the value entered in
the 'Tables object name Length' preference configured in the design model and
appears as disabled.
When unknown file type:
Ignore file / Ignore attribute: The behavior to be followed in case of finding a
GeneXus unknown data type is determined with this radio button. The first value
determines that the table information is not imported, and the second value is to
import the information, but ignoring the “unknown” attribute.
Attributes:
Maximum Name Length (*): Same as Maximum transactions name length..
Maximum Numeric Length: It determines how many positions (digits) will
have the largest numeric to be imported. If an attribute is higher than this limit,
it is imported with the number of positions included in this parameter. Example:
If the Numeric is 20 and the Maximum numeric Length configured is 15, this
attribute will be defined as N (15).
Attributes sign: the attributes in the database don’t have sign:
When
importing them, these check boxes control what are the ones to which the sign
will be added and what are the ones to which the sign will not be added. .
10
Data View Generator
User’s Manual
Attributes without decimal places: The attributes without decimals will be
defined with sign.
Attributes with decimal places: The attributes with decimals will be
defined with sign.
Enlarge Picture: The picture will be enlarged one more position (Z) in all
numeric attributes.
General:
Generate schema: the scheme to which the tables and indexes imported
belong will be included in the information of these tables and indexes (It will not
be included in AS/400, where the schema concept does not exist).
Generate Location: The name of the database to which the table and indexes
imported belong to will be included in the information of these table and indexes.
In AS/400 this name is actually the library’s name.
Tip: If any of these check boxes is selected, the tables will be qualified, i.e., the
table schema or library/table will be used. For that reason, it is recommended
NOT to select this check box if other schemas/libraries' tables will be used.
For example: When the information of a table that is located in the PURCHASES
library is "imported", but later we want to use the SALES library, which has been
already qualified, we will not be able to do this, because the table “opening” is
library/table.
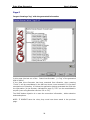
Page 4
Target: Solving
conflicts.
11
Data View Generator
User’s Manual
Figure 4 - Fourth page of Data View Generator Wizard
When generating GeneXus objects from a database, some conflicts may occur,
mainly in three aspects.
1. Duplicated names
2. Normalization/nomenclature troubles
3. Type/length changing need
CONFLICTS: DUPLICATED NAMES
The objects in GeneXus (transactions, procedures, etc.) are identified by the
number of characters indicated in the 'Significant object name length' Design
preference(30 characters by default). The attributes are identified by the number
of characters indicated in the 'Significant attribute length' Design preference (30
characters by default) and the rest (DataView, tables and indexes) are identified by
the characters indicated in the 'Significant table name Lenght' Design preference.
That is to say, in those N first characters the names must be unique; otherwise
there will be a names conflict.
When importing knowledge from a database it may occur that the uniqueness is not
fulfilled in the N fist characters. These cases will appear in this DVG page, and the
12
Data View Generator
User’s Manual
developer will be able to establish “rules” to solve them.
CONFLICTS: NORMALIZATION TROUBLES
The transformation rules could be used to solve any of the previously mentioned
cases indicating to GeneXus what is the exact relationship of the attributes making
up our database.
For GeneXus, the attributes with the same name represent the same, while those
with different names represent different concepts.
If, for example, the attribute, which represents the customer’s code, in the
customer’s table is named “CusCod”, while this attribute in the invoice headers
table is named “InvCusCod”.
If there is a definition in the database, at referential integrity level, GeneXus infers
that both are the same attribute. Otherwise, GeneXus won’t be able to deduce that
both attributes are the same.
The counter-example would be the case of two attributes with the same name in
different tables and without relation between them.
If there is a referential
integrity definition, the DVG identifies that the attributes represent the same
concept. If there is not a relationship, both attributes will be renamed so that
GeneXus can infer that they are two different concepts.
CONFLICTS: DATA TYPE INTERPRETATION
For GeneXus the existent data types are:
VarChar and LongVarChar.
Numeric, Date, DateTime, Character,
In many DBMS these data type don’t exist or there exist variations of them. For
example: the Data type “Date” does not exist in Oracle and thus, the GeneXus
“date” is created as “DateTime”. When performing the “reverse engineering”
GeneXus cannot know that the attribute that, according to Oracle, has DateTime
type, must actually be represented as a GeneXus “Date” and not as a GeneXus
DateTime.
The transformation rules could be used to “clarify” these ambiguities.
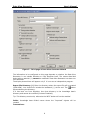
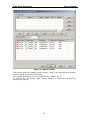
RULES OPERATION
Page 4 displays the objects that will be generated. The Database Objects combo
allows visualizing all the objects ("All" value) or just the conflicts, subtypes
definitions, warnings, modified ones or with edited name.
The possible error or “warning” messages to be found in the Dialog Description
column are the following:
•
No Conflict: There is no conflict for this object.
•
Name conflict: Two objects have the same internal name, considering their
uniqueness depending according to the number of characters indicated in
the object type "name length" (page 3 of DVG).
13
Data View Generator
•
•
•
User’s Manual
Duplicated Name: Two objects have exactly the same internal name,
independently from the name length (WARNING). This message will appear
when there is a referential integrity relationship between two attributes with
different names (and an index per primary key in one of them) defined in
the database.
Same name with different type: Two attributes of different type or with
different length have the same internal name. This could happen after
changing names or defining rules directly in the Data View Generator.
Duplicated Attribute: Two attributes with different names that belong to the
same type have the same internal name (WARNING).
The section where the rules are defined is displayed once the Show Rules check box
is enabled.
Rules Section:
The rules entered by the developer are visualized at the bottom..
There are two types of rules: particular and global. The first ones apply to one
object or to a specific group of objects. The global ones apply to all objects.
The "add" button can be used to create a new rule. Another possibility is pressing
the right button on an object and selecting the Rule option. In the first case, the
rule to be established by default is a global one. In the second case, the rule to be
established by default is specific to the object that appears as selected at that
moment.
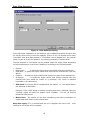
Rules for names substitution
An object has an internal name (object name in the knowledge base of GeneXus),
and an external name (name in the database). By default both names are defined
equal, including the transactions name (which does not exist in the database) and
will be given by the table’s name from its first level.
These rules basically seek a string in the object’s internal name, and they
substitute it by another one in the internal name.
Example (definition of global rule):
14
Data View Generator
User’s Manual
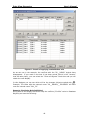
Figure 5 - Names Conflict
This picture shows the indexes names conflict, owed to the fact that their internal
names coincide in the first 6 characters.
It is decided to establish a rule to substitute “PK__DGNIV” by “P”.
To achieve this, the button “add” (screen bottom) is used and the following
dialogue will appear:
15
Data View Generator
User’s Manual
Figure 6 - Rule Definition Dialog
In the tab name substitution of this dialog it can be established which string to look
for and by which string it must be replaced. That is to say, all objects which name
“coincides” with what was entered in “Find What” will be seeked and the internal
name (or part of it) will be replaced by the string entered in “Replace With”.
The text entered in “Find What” will be seeked within the object name depending
on the selection done in the frame “Modifiers” according to the following detail:
•
•
•
•
•
•
Position
Begins with
- it seeks the object names that begin with the entered text
Ends With - it seeks the object names that end with the entered text (see GIK
Word)
Contains - it seeks the object names that contain any part of the entered text
Is Equal to
- it seeks the object names that exactly coincide with the
entered text (this would be similar to a particular rule, which is detailed
hereunder in this document)
GIK word: The format GIK is recognized for the names, i.e., the capital letters
are assumed as delimiters.
Example: If the “CUS” string is seeked, and this check box is selected, then the
“CusCod” object will fulfill the pattern while “CustNac “ will not, as CusCod
follows the GIK format.
•
Match Case: The search will be done considering the exact combination of
capital and small letters of the entered text.
Stop after apply: If it is selected and the rule is applied, the rest of the
existing for the object will be rejected.
16
rules
Data View Generator
User’s Manual
In our example we only entered:¨
Figure 7 - Substitution rule definition example
Once this option has been entered (OK button) it will appear at the top of the
screen, and with the “Apply" button the rule is applied (executed).
The result after the execution is shown in the following picture:
17
Data View Generator
User’s Manual
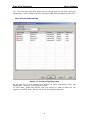
Figure 8 - Result of applying a substitution rule
As we can see in the example, the conflicts with the “PK__DGNIV” objects have
disappeared. If you want to see how it has been solved (which is the “rename”
that will take place), you can select the “Show all Objects” check box and you will
obtain the next display.
).
In this dialogue you can see which will be the changes (objects marked with
Example: The index with the external name “PK__DGNIV1__78D3EB5B” will have
now the internal name “P1U_78”.
Example (Particular Rule Definition)
Going back to the display that shows only the conflicts (“Conflict” value in Database
Objects) we have the following:
18
Data View Generator
User’s Manual
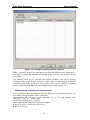
Figure 9 - Remaining conflicts after applying the substitution rule
In this case the conflicts with the indexes disappeared, however other conflicts are
pending to be solved. For example, the table “BANCOS” will generate a transaction
with the name “BANCOS”, In the same way; the “BANCOSNAC” table will generate
a “BANCOSN” transaction.
The problem is that both coincide in their first 6 letters (which is the maximum
defined for objects in this Data View Generator execution).
For that reason, in the first line of the upper part it is shown that BANCOS
generates conflict with BANCOSN. In the second line it shows that BANCOSN
generates conflict with BANCOS.
We could apply a global rule as the one seen previously, trying to reduce the
name’s length, substituting “BAN” by “B” or any other similar example.
However, it must be considered that this rule will be applied to all objects (whether
they have conflicts or not) and thus objects that we don’t want to rename can be
anyway renamed.
What we shall do is applying a specific rule, i.e., with a determined extent (scope).
19
Data View Generator
User’s Manual
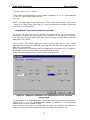
To these effects, press the right button over the object in conflict to visualize a
pop-up menu as the following one:
Figure 10 - Pop-up menu in object with conflict
This menu options allow creating a 'Create Rule' rule (to create a new rule with a
specific scope over the selected item), rename the object (Rename option) and the
Properties option of the selected item.
Create Rule can be selected to generate the rule. Another option is to use the
“Generate Rule” button that appears in the properties dialogue and select the
“Scope” section button from the rules definition dialogue seen previously.
In any of the previous cases, the following dialogue will appear:
Figure 11 - Example of rule scope definition
The scope of the rules (i.e.: the objects over which it will be applied) can be
determined in this dialogue;
To these effects, there are two grids. The left one shows the available objects and a
filter to quote said list. The right one shows the objects over which the rule will be
applied.
In this example, the rule (change BANCOSN by BAN) will be applied only for the
PRIMARY1 transaction.
Thus, the rule scope may be quoted, i.e., determining over which object or group of
objects the rule will be applied.
20
Data View Generator
User’s Manual
Tip: The rules that have been entered so far can be saved at any time, using the
SAVE button, which creates a file with extension GMR (GeneXus Mapping Rule Set).
RULE’S SCOPE MODIFICATION
Figure 12 - Result of applying rules
As we can see in this dialogue the conflict at these transactions level has
disappeared. However, other conflicts remain.
To solve them, global and specific rules are entered in order to reach the “No
objects" in conflict state. We can see this in the following dialogue.
21
Data View Generator
User’s Manual
Figure 13 - Example of dialog without conflicts
NOTE: remember to use the SAVE button to save the entered rules. Otherwise, if
you need to import the database knowledge again, you will have to enter all the
rules again.
Tip: Although there are no conflicts, the objects “rename” rules can be applied
(Rename option of the pop-up menu) to comply with the KB standard, which will
consolidate that XPW, or by any other reason that may be required (language
change, attributes with different name should have the same name, etc.).
MODIFICATION OF RULES APPLICATION ORDER
It is important to point out that the rules are applied over the internal names. For
this reason, their application order is essential.
Let’s suppose that we have a rule: substitute “A” by “B”, and another rule:
substitute “B” by “C”, in this order.
We have the objects, A, B, C and D.
When applying the rules the following will happen:
A will be B (rule 1), this B will be C (rule 2)
B will be C (rule 2)
22
Data View Generator
User’s Manual
The final result is C, C, C and D.
If the order is changed and the rules remain: substitute “B” by “C” and substitute
“A” by “B”, then the final result will be:
B,C, C,D
NOTE: The application order influences the final result and, besides, there is the
“check box” called “Stop after apply” in the rules definition dialogue (explained
previously in this document).
ATTRIBUTES TYPES/LENGTH SUBSTITUTION RULES
Up to now we have seen how to change the objects name, but it also may be
necessary to change the type/length of the attributes to be imported. Normally,
this is because GeneXus data types don’t’ have an exact correspondence with the
data types of all DBMS.
For example: The “DATE” data type doesn’t exist in SQL Server; thus, DATE
attributes are created as DATETIME, and they are then handled as date (only the
date part is considered).
When importing the information from the database the attribute will be created as
DATETIME, and it may occur that it must be handled as DATE.
In this case you can add a rule (“add” button), as the follows:
Figure 14 - Example of definition of a substitution rule for attribute
type/length.
In the dialogue it is established that “DateTime” data type will be substituted by
“Date” type, i.e., all the attributes that appear as datetime in the knowledge
database level will be created as Date.
More complex rules may be established that take into account the attribute’s
length, and you may add or substract positions, change the decimals, etc.
23
Data View Generator
User’s Manual
For example, in AS/400 Date type attributes appear stored by GeneXus as an 8
Character. Thus, the following rule is established::
Figure 15 - Example of data type substitution
This will modify all the C(8) attributes and will define them as Date, Then it is
decided to define the rule “scope” ´(Scope tab) looking for those whose name has
DTE, DAT, etc., as shown in the following dialogue:
Figure 16 - Example of scope definition for a type substitution rule.
24
Data View Generator
User’s Manual
This way, the rule will be applied only to the selected attributes.
25
Data View Generator
User’s Manual
Page 5
Target: Showing a"log" with the generated information
In this page (the last one of the Data View Generator ) a “log” of the generated
XPW is shown.
If the Data View Generator has been executed from GeneXus, when pressing
“Finish” it will be consolidated in the KB from where it was executed. If it has been
executed out of GeneXus, it finishes the application having generated the XPW with
the information (in the directory indicated on page 3). This can be consolidated in
any KB (even using GeneXus versions 5.6 or 6.0).
The SAVE button objective is to save the connection information , tables selection
and used options.
NOTE: IT DOESN’T save the rules; they must have been saved in the previous
page.
26
Data View Generator
User’s Manual
Trace Configuration (GeneXus DB activity trace)
This facility allows generating diagnosis information (trace), so the detection and
trouble report labor is performed more quickly in the Data View Generator
operation.
In order to execute it, double click in the file gxtrccfg.exe that is in the directory
where Data View Generator is installed.
More information at:
http://www.artech.com.uy/gxdl/pub/genexus/ClientServer/Docum/ReleaseNotes/7.
5/Trace.htm
27