1
SOHO LABELS & ENVELOPES™
USER’S GUIDE
CHRONOS LLC
AUGUST 23, 2004
1
2
LICENSE AGREEMENT, COPYRIGHTS, & TRADEMARKS
PLEASE READ THIS SOFTWARE LICENSE AGREEMENT ("LICENSE") CAREFULLY BEFORE USING THE CHRONOS SOFTWARE. BY USING THE
CHRONOS SOFTWARE, YOU ARE AGREEING TO BE BOUND BY THE TERMS OF THIS LICENSE. IF YOU DO NOT AGREE TO THE TERMS OF THIS LICENSE,
DO NOT INSTALL OR USE THE SOFTWARE. IF YOU DO NOT AGREE TO THE TERMS OF THE LICENSE, YOU MAY RETURN THE CHRONOS SOFTWARE TO
THE PLACE WHERE YOU OBTAINED IT FOR A REFUND. IF THE CHRONOS SOFTWARE WAS ACCESSED ELECTRONICALLY, CLICK "DISAGREE/DECLINE".
FOR CHRONOS SOFTWARE INCLUDED WITH YOUR PURCHASE OF HARDWARE, YOU MUST RETURN THE ENTIRE HARDWARE/SOFTWARE PACKAGE IN
ORDER TO OBTAIN A REFUND.
IMPORTANT NOTE: This software may be used to reproduce materials. It is licensed to you only for reproduction of non-copyrighted materials, materials in which you
own the copyright, or materials you are authorized or legally permitted to reproduce. If you are uncertain about your right to copy any material, you should contact your legal advisor.
1. General. The software, documentation and any images, read-made designs, or fonts accompanying this License whether on disk, in read only memory, on any other media
or in any other form (collectively the "Chronos Software") are licensed, not sold, to you by Chronos LLC ("Chronos") for use only under the terms of this License, and Chronos reserves all
rights not expressly granted to you. The rights granted herein are limited to Chronos' and its licensors' intellectual property rights in the Chronos Software and do not include any other
patents or intellectual property rights. You own the media on which the Chronos Software is recorded but Chronos and/or Chronos' licensor(s) retain ownership of the Chronos Software
itself. The terms of this License will govern any software upgrades or supporting materials provided by Chronos that replace and/or supplement the original Chronos Software product,
unless such upgrade is accompanied by a separate license in which case the terms of that license will govern.
Title and intellectual property rights in and to any content displayed by or accessed through the Chronos Software belongs to the respective content owner. Such content may
be protected by copyright or other intellectual property laws and treaties, and may be subject to terms of use of the third party providing such content. This License does not grant you any
rights to use such content.
2. Permitted License Uses and Restrictions. This License allows you to install and use one copy of the Chronos Software on a single computer at a time. This License does
not allow the Chronos Software to exist on more than one computer at a time, and you may not make the Chronos Software available over a network where it could be used by multiple
computers at the same time. This License does not allow you to separate the component parts of the Chronos Software including clip art images, photo images, and fonts for use on more
than one computer. The Chronos Software may be used to reproduce materials so long as such use is limited to reproduction of non-copyrighted materials, materials in which you own the
copyright, or materials you are authorized or legally permitted to reproduce. You may make one copy of the Chronos Software in machine-readable form for backup purposes only; provided
that the backup copy must include all copyright or other proprietary notices contained on the original.
Clip Art and Photo Images: The Chronos Software contains numerous clip art images and photo images (collectively known hereafter as “Images”) that are either owned by
Chronos or licensed from a third party. You are free to use, modify and publish the Images as you wish subject to the restrictions set out in this section. If you are uncertain about your rights
to use any material, you should contact your legal advisor.
You may incorporate any Image(s) into your own original work and publish, display and distribute your work in any media provided that you include a copyright notice in
any electronic or digital work reflecting on the copyright ownership of both you, Chronos and its licensors as follows and subject to the restrictions that follow: “Copyright © 2004 [your
name] and its licensors. All rights reserved.”
You may NOT, however, resell, sublicense or otherwise make available the Image(s) for use or distribution separately or detached from a product or Web page. For example,
the Image(s) may be used as part of a Web page design, but may not be made available for downloading separately or in a format designed or intended for permanent storage or re-use by
others. Similarly, clients may be provided with copies of the Image(s) (including digital files) as an integral part of a work product, but may not be provided with the Image(s) or permitted
to use the Image(s) separately or as part of any other product.
You may NOT a) create scandalous, obscene, defamatory or immoral works using the Image(s) nor use the Image(s) for any other purpose which is prohibited by law; b) use
or permit the use of the Image(s) or any part thereof as a trademark or service mark, or claim any proprietary rights of any sort in the Image(s) or any part thereof; c) use the Image(s) in
electronic format, on-line or in multimedia applications unless the Image(s) are incorporated for viewing purposes only and no permission is given to download and/or save the Image(s) for
any reason; d) use any Image(s) except as expressly permitted by this License; and e) use the Image(s) related to identifiable individuals, products or entities for any commercial purpose or
in a manner which suggests their association with or endorsement of any product or service.
Fonts. You may use the Chronos and third party fonts (“Fonts”), contained in or otherwise included with the Chronos Software, on a royalty-free basis, to create your own
original designs or projects using The Software. You may broadcast and/or distribute your own designs or projects that were created using the Fonts, however, individual fonts may not be
commercially or otherwise distributed on a standalone basis, nor may they be repackaged in whole or in part as font collections or font families.
Except as and only to the extent expressly permitted in this License or by applicable law, you may not copy, decompile, reverse engineer, disassemble, modify, or create derivative
works of the Chronos Software or any part thereof. THE CHRONOS SOFTWARE IS NOT INTENDED FOR USE IN THE OPERATION OF NUCLEAR FACILITIES, AIRCRAFT
NAVIGATION OR COMMUNICATION SYSTEMS, AIR TRAFFIC CONTROL SYSTEMS, LIFE SUPPORT MACHINES OR OTHER EQUIPMENT IN WHICH THE FAILURE OF THE CHRONOS SOFTWARE COULD LEAD TO DEATH, PERSONAL INJURY, OR SEVERE PHYSICAL OR ENVIRONMENTAL DAMAGE.
3. Transfer. You may not rent, lease, lend or sublicense the Chronos Software including clip art images, photo images, ready-made designs and fonts. You may, however, make
a one-time permanent transfer of all of your license rights to the Chronos Software to another party, provided that: (a) the transfer must include all of the Chronos Software, including all
its component parts, original media, printed materials, clip art images, photo images, ready-made designs, fonts and this License; (b) you do not retain any copies of the Chronos Software,
full or partial (except copies of Images incorporated into your work product as permitted under this License), including copies stored on a computer or other storage device; and (c) the
party receiving the Chronos Software reads and agrees to accept the terms and conditions of this License. All components of the Chronos Software are provided as part of a bundle and may
not be separated from the bundle and distributed as standalone applications or components.
Updates: If a Chronos Software update completely replaces (full install) a previously licensed version of the Chronos Software, you may not use both versions of the Chronos
Software at the same time nor may you transfer them separately.
NFR (Not for Resale) Copies: Notwithstanding other sections of this License, Chronos Software labeled or otherwise provided to you on a promotional basis may only be used
for demonstration, testing and evaluation purposes and may not be resold or transferred.
Academic Copies: If the Chronos Software package has an academic label or if you acquired the Chronos Software at an academic discount, you must be an Eligible Educational
End User to use the Chronos Software. "Eligible Educational End Users" means students, faculty, staff and administration attending and/or working at an educational institutional facility
(i.e., college campus, public or private K-12 schools).
4. Termination. This License is effective until terminated. Your rights under this License will terminate automatically without notice from Chronos if you fail to comply with
any term(s) of this License. Upon the termination of this License, you shall cease all use of the Chronos Software and destroy all copies, full or partial, of the Chronos Software.
5. Limited Warranty on Media. Chronos warrants the media on which the Chronos Software is recorded and delivered by Chronos to be free from defects in materials and
workmanship under normal use for a period of ninety (90) days from the date of original retail purchase. Your exclusive remedy under this Section shall be, at Chronos’ option, a refund of
the purchase price of the product containing the Chronos Software or replacement of the Chronos Software which is returned to Chronos or an Chronos authorized representative with a
copy of the receipt. THIS LIMITED WARRANTY AND ANY IMPLIED WARRANTIES ON THE MEDIA INCLUDING, BUT NOT LIMITED TO, THE IMPLIED WARRANTIES OF MERCHANTABILITY, OF SATISFACTORY QUALITY, AND OF FITNESS FOR A PARTICULAR PURPOSE, ARE LIMITED IN DURATION TO NINETY (90)
DAYS FROM THE DATE OF ORIGINAL RETAIL PURCHASE. SOME JURISDICTIONS DO NOT ALLOW LIMITATIONS ON HOW LONG AN IMPLIED WARRANTY
LASTS, SO THE ABOVE LIMITATION MAY NOT APPLY TO YOU. THE LIMITED WARRANTY SET FORTH HEREIN IS THE ONLY WARRANTY MADE TO YOU AND
IS PROVIDED IN LIEU OF ANY OTHER WARRANTIES (IF ANY) CREATED BY ANY DOCUMENTATION OR PACKAGING. THIS LIMITED WARRANTY GIVES YOU
SPECIFIC LEGAL RIGHTS, AND YOU MAY ALSO HAVE OTHER RIGHTS WHICH VARY BY JURISDICTION.
6. Disclaimer of Warranties. YOU EXPRESSLY ACKNOWLEDGE AND AGREE THAT USE OF THE CHRONOS SOFTWARE IS AT YOUR SOLE RISK AND
THAT THE ENTIRE RISK AS TO SATISFACTORY QUALITY, PERFORMANCE, ACCURACY AND EFFORT IS WITH YOU. EXCEPT FOR THE LIMITED WARRANTY
ON MEDIA SET FORTH ABOVE AND TO THE MAXIMUM EXTENT PERMITTED BY APPLICABLE LAW, THE CHRONOS SOFTWARE IS PROVIDED "AS IS", WITH
ALL FAULTS AND WITHOUT WARRANTY OF ANY KIND, AND CHRONOS AND CHRONOS' LICENSORS (COLLECTIVELY REFERRED TO AS "CHRONOS" FOR
THE PURPOSES OF SECTIONS 6 AND 7) HEREBY DISCLAIM ALL WARRANTIES AND CONDITIONS WITH RESPECT TO THE CHRONOS SOFTWARE, EITHER
3
EXPRESS, IMPLIED OR STATUTORY, INCLUDING, BUT NOT LIMITED TO, THE IMPLIED WARRANTIES AND/OR CONDITIONS OF MERCHANTABILITY, OF
SATISFACTORY QUALITY, OF FITNESS FOR A PARTICULAR PURPOSE, OF ACCURACY, OF QUIET ENJOYMENT, AND NON-INFRINGEMENT OF THIRD PARTY
RIGHTS. CHRONOS DOES NOT WARRANT AGAINST INTERFERENCE WITH YOUR ENJOYMENT OF THE CHRONOS SOFTWARE, THAT THE FUNCTIONS
CONTAINED IN THE CHRONOS SOFTWARE WILL MEET YOUR REQUIREMENTS, THAT THE OPERATION OF THE CHRONOS SOFTWARE WILL BE UNINTERRUPTED OR ERROR-FREE, OR THAT DEFECTS IN THE CHRONOS SOFTWARE WILL BE CORRECTED. NO ORAL OR WRITTEN INFORMATION OR ADVICE
GIVEN BY CHRONOS OR AN CHRONOS AUTHORIZED REPRESENTATIVE SHALL CREATE A WARRANTY. SHOULD THE CHRONOS SOFTWARE PROVE DEFECTIVE, YOU ASSUME THE ENTIRE COST OF ALL NECESSARY SERVICING, REPAIR OR CORRECTION. SOME JURISDICTIONS DO NOT ALLOW THE EXCLUSION
OF IMPLIED WARRANTIES OR LIMITATIONS ON APPLICABLE STATUTORY RIGHTS OF A CONSUMER, SO THE ABOVE EXCLUSION AND LIMITATIONS MAY
NOT APPLY TO YOU. Chronos has no obligation to issue any updates, revisions, corrections, new versions or documentation for the Chronos Software or otherwise to support the Chronos Software. Chronos reserves the right at any time to alter prices, features, specifications, capabilities, functions, licensing terms, release dates, general availability or other characteristics
of the Chronos Software.
7. Limitation of Liability. TO THE EXTENT NOT PROHIBITED BY LAW, IN NO EVENT SHALL CHRONOS BE LIABLE FOR PERSONAL INJURY, OR ANY
INCIDENTAL, SPECIAL, INDIRECT OR CONSEQUENTIAL DAMAGES WHATSOEVER, INCLUDING, WITHOUT LIMITATION, DAMAGES FOR LOSS OF PROFITS,
LOSS OF DATA, BUSINESS INTERRUPTION OR ANY OTHER COMMERCIAL DAMAGES OR LOSSES, ARISING OUT OF OR RELATED TO YOUR USE OR INABILITY
TO USE THE CHRONOS SOFTWARE, HOWEVER CAUSED, REGARDLESS OF THE THEORY OF LIABILITY (CONTRACT, TORT OR OTHERWISE) AND EVEN IF
CHRONOS HAS BEEN ADVISED OF THE POSSIBILITY OF SUCH DAMAGES. SOME JURISDICTIONS DO NOT ALLOW THE LIMITATION OF LIABILITY FOR PERSONAL INJURY, OR OF INCIDENTAL OR CONSEQUENTIAL DAMAGES, SO THIS LIMITATION MAY NOT APPLY TO YOU. In no event shall Chronos' total liability to
you for all damages (other than as may be required by applicable law in cases involving personal injury) exceed the amount of the price you paid or fifty dollars ($50.00), whichever is lower.
The foregoing limitations will apply even if the above stated remedy fails of its essential purpose.
8. Export Law Assurances. You may not use or otherwise export or reexport the Chronos Software except as authorized by United States law and the laws of the jurisdiction
in which the Chronos Software was obtained. In particular, but without limitation, the Chronos Software may not be exported or re-exported (a) into (or to a national or resident of) any
U.S. embargoed countries (currently Cuba, Iran, Iraq, Libya, North Korea, Sudan and Syria), or (b) to anyone on the U.S. Treasury Department's list of Specially Designated Nationals or
the U.S. Department of Commerce Denied Person’s List or Entity List. By using the Chronos Software, you represent and warrant that you are not located in, under control of, or a national
or resident of any such country or on any such list.
9. Government End Users. The Chronos Software and related documentation are "Commercial Items", as that term is defined at 48 C.F.R. §2.101, consisting of "Commercial
Computer Software" and "Commercial Computer Software Documentation", as such terms are used in 48 C.F.R. §12.212 or 48 C.F.R. §227.7202, as applicable. Consistent with 48 C.F.R.
§12.212 or 48 C.F.R. §227.7202-1 through 227.7202-4, as applicable, the Commercial Computer Software and Commercial Computer Software Documentation are being licensed to
U.S. Government end users (a) only as Commercial Items and (b) with only those rights as are granted to all other end users pursuant to the terms and conditions herein. Unpublishedrights reserved under the copyright laws of the United States.
10. Controlling Law and Severability. This License will be governed by and construed in accordance with the laws of the State of Utah, as applied to agreements entered into
and to be performed entirely within Utah between Utah residents. This License shall not be governed by the United Nations Convention on Contracts for the International Sale of Goods,
the application of which is expressly excluded. If for any reason a court of competent jurisdiction finds any provision, or portion thereof, to be unenforceable, the remainder of this License
shall continue in full force and effect.
11. Complete Agreement; Governing Language. This License constitutes the entire agreement between the parties with respect to the use of the Chronos Software licensed
hereunder and supersedes all prior or contemporaneous understandings regarding such subject matter. No amendment to or modification of this License will be binding unless in writing
and signed by Chronos. Any translation of this License is done for local requirements and in the event of a dispute between the English and any non-English versions, the English version
of this License shall govern.
CH080604
© 2004 Chronos LLC. All rights reserved. Chronos and SOHO Labels & Envelopes are trademarks of Chronos LLC. Mac, the Mac logo, iPhoto, Mac OS X, and Macintosh
are trademarks of Apple Computer, Inc. Digital image content © 1997-2004 Hemera Technologies, Inc., All Rights Reserved. Bitstream is a registered trademark and the Bitstream logo is
a trademark of Bitstream Inc. Americana, Caslon Openface, Commercial Script, Copperplate, Parisian and Park Avenue are trademarks of Kingsley-ATF Type Corporation. Playbill is a
registered trademark of Stephenson Blake & Company Ltd.Prima is a registered trademark of Bitstream Inc. Serifa is a registered trademark of Fundicion Tipografica Neufville SA. Davida
is a trademark of Visual Graphics Corporation. PaperDirect is a registered trademark of PaperDirect Inc. Postscript is a registered trademark of Adobe Systems Inc. All other trademarks,
registered trademarks, service names, product and/or brand names are the sole property of their respective owners.
4
Chapter 1: Welcome to SOHO Labels & Envelopes
Features at a Glance . . . . . . . . . . . . . . . . . . . . . . . . . . . . . . . . . . . . . . . . . . . . . . . . . . . . . . . . . . . . . . 7
System Requirements . . . . . . . . . . . . . . . . . . . . . . . . . . . . . . . . . . . . . . . . . . . . . . . . . . . . . . . . . . . . . 8
Installing SOHO Labels & Envelopes . . . . . . . . . . . . . . . . . . . . . . . . . . . . . . . . . . . . . . . . . . . . . . . . 8
Learning to Use SOHO Labels & Envelopes . . . . . . . . . . . . . . . . . . . . . . . . . . . . . . . . . . . . . . . . . . . 10
The SOHO Labels & Envelopes Window . . . . . . . . . . . . . . . . . . . . . . . . . . . . . . . . . . . . . . . . . . . . . 10
Chapter 2: Creating and Printing Labels, Envelopes, and Letterhead
Step 1: Select a Ready-Made Design. . . . . . . . . . . . . . . . . . . . . . . . . . . . . . . . . . . . . . . . . . . . . . . . . . 14
Step 2: Edit The Design. . . . . . . . . . . . . . . . . . . . . . . . . . . . . . . . . . . . . . . . . . . . . . . . . . . . . . . . . . . 15
Step 3: Preview Design. . . . . . . . . . . . . . . . . . . . . . . . . . . . . . . . . . . . . . . . . . . . . . . . . . . . . . . . . . . . 16
Step 4: Print. . . . . . . . . . . . . . . . . . . . . . . . . . . . . . . . . . . . . . . . . . . . . . . . . . . . . . . . . . . . . . . . . . . . 16
Chapter 3: Working With Labels, Envelopes, and Letterhead
Creating Labels, Envelopes, and Letterhead . . . . . . . . . . . . . . . . . . . . . . . . . . . . . . . . . . . . . . . . . . . . 18
Rulers. . . . . . . . . . . . . . . . . . . . . . . . . . . . . . . . . . . . . . . . . . . . . . . . . . . . . . . . . . . . . . . . . . . . . . . . . 21
Grid . . . . . . . . . . . . . . . . . . . . . . . . . . . . . . . . . . . . . . . . . . . . . . . . . . . . . . . . . . . . . . . . . . . . . . . . . . 21
Zoom . . . . . . . . . . . . . . . . . . . . . . . . . . . . . . . . . . . . . . . . . . . . . . . . . . . . . . . . . . . . . . . . . . . . . . . . . 22
Saving Your Work . . . . . . . . . . . . . . . . . . . . . . . . . . . . . . . . . . . . . . . . . . . . . . . . . . . . . . . . . . . . . . . 22
Recovered Files . . . . . . . . . . . . . . . . . . . . . . . . . . . . . . . . . . . . . . . . . . . . . . . . . . . . . . . . . . . . . . . . . 23
Chapter 4: Working With Text, Shapes, Graphics, & iPhoto
Working With Text . . . . . . . . . . . . . . . . . . . . . . . . . . . . . . . . . . . . . . . . . . . . . . . . . . . . . . . . . . . . . . 24
Changing Basic Text Attributes . . . . . . . . . . . . . . . . . . . . . . . . . . . . . . . . . . . . . . . . . . . . . . . . . . . . . 24
Text Rulers. . . . . . . . . . . . . . . . . . . . . . . . . . . . . . . . . . . . . . . . . . . . . . . . . . . . . . . . . . . . . . . . . . . . . 25
Text Tabs. . . . . . . . . . . . . . . . . . . . . . . . . . . . . . . . . . . . . . . . . . . . . . . . . . . . . . . . . . . . . . . . . . . . . . 26
Advanced Typography Options . . . . . . . . . . . . . . . . . . . . . . . . . . . . . . . . . . . . . . . . . . . . . . . . . . . . . 26
Text Case . . . . . . . . . . . . . . . . . . . . . . . . . . . . . . . . . . . . . . . . . . . . . . . . . . . . . . . . . . . . . . . . . . . . . . 29
Text Style Grabber . . . . . . . . . . . . . . . . . . . . . . . . . . . . . . . . . . . . . . . . . . . . . . . . . . . . . . . . . . . . . . . 29
Working With Shapes and Graphics . . . . . . . . . . . . . . . . . . . . . . . . . . . . . . . . . . . . . . . . . . . . . . . . . 29
Working With iPhoto . . . . . . . . . . . . . . . . . . . . . . . . . . . . . . . . . . . . . . . . . . . . . . . . . . . . . . . . . . . . 31
Resize, Move and Layer Text, Shapes or Graphics . . . . . . . . . . . . . . . . . . . . . . . . . . . . . . . . . . . . . . . 32
Flip Shapes & Graphics . . . . . . . . . . . . . . . . . . . . . . . . . . . . . . . . . . . . . . . . . . . . . . . . . . . . . . . . . . . 33
Alignment . . . . . . . . . . . . . . . . . . . . . . . . . . . . . . . . . . . . . . . . . . . . . . . . . . . . . . . . . . . . . . . . . . . . . 33
Scrapbook . . . . . . . . . . . . . . . . . . . . . . . . . . . . . . . . . . . . . . . . . . . . . . . . . . . . . . . . . . . . . . . . . . . . . 34
Chapter 5: Changing Object Properties
Size, Location and Angle Properties . . . . . . . . . . . . . . . . . . . . . . . . . . . . . . . . . . . . . . . . . . . . . . . . . . 36
Shape Properties. . . . . . . . . . . . . . . . . . . . . . . . . . . . . . . . . . . . . . . . . . . . . . . . . . . . . . . . . . . . . . . . . 37
Graphic Properties . . . . . . . . . . . . . . . . . . . . . . . . . . . . . . . . . . . . . . . . . . . . . . . . . . . . . . . . . . . . . . . 39
Text Properties. . . . . . . . . . . . . . . . . . . . . . . . . . . . . . . . . . . . . . . . . . . . . . . . . . . . . . . . . . . . . . . . . . 40
Advanced Special Effects Properties . . . . . . . . . . . . . . . . . . . . . . . . . . . . . . . . . . . . . . . . . . . . . . . . . . 41
Chapter 6: Working With Fields
Field Basics . . . . . . . . . . . . . . . . . . . . . . . . . . . . . . . . . . . . . . . . . . . . . . . . . . . . . . . . . . . . . . . . . . . . 46
Advanced Fields Options . . . . . . . . . . . . . . . . . . . . . . . . . . . . . . . . . . . . . . . . . . . . . . . . . . . . . . . . . . 47
Me & Others Fields . . . . . . . . . . . . . . . . . . . . . . . . . . . . . . . . . . . . . . . . . . . . . . . . . . . . . . . . . . . . . . 50
Misc Fields. . . . . . . . . . . . . . . . . . . . . . . . . . . . . . . . . . . . . . . . . . . . . . . . . . . . . . . . . . . . . . . . . . . . . 57
Barcode Fields . . . . . . . . . . . . . . . . . . . . . . . . . . . . . . . . . . . . . . . . . . . . . . . . . . . . . . . . . . . . . . . . . . 58
Counter or Automatic Numbering Fields. . . . . . . . . . . . . . . . . . . . . . . . . . . . . . . . . . . . . . . . . . . . . . 61
Data Syphon Via Tab Delimited Import Fields . . . . . . . . . . . . . . . . . . . . . . . . . . . . . . . . . . . . . . . . . 63
5
Miscellaneous Fields. . . . . . . . . . . . . . . . . . . . . . . . . . . . . . . . . . . . . . . . . . . . . . . . . . . . . . . . . . . . . . 65
One-Click Formatting . . . . . . . . . . . . . . . . . . . . . . . . . . . . . . . . . . . . . . . . . . . . . . . . . . . . . . . . . . . . 66
Chapter 7: Fluid Preview
Active Positioning & Quantities. . . . . . . . . . . . . . . . . . . . . . . . . . . . . . . . . . . . . . . . . . . . . . . . . . . . . 70
On-The-Fly Mac OS X Address Book Integration . . . . . . . . . . . . . . . . . . . . . . . . . . . . . . . . . . . . . . . 70
Live Editing . . . . . . . . . . . . . . . . . . . . . . . . . . . . . . . . . . . . . . . . . . . . . . . . . . . . . . . . . . . . . . . . . . . . 71
Dynamic POSTNET Barcodes . . . . . . . . . . . . . . . . . . . . . . . . . . . . . . . . . . . . . . . . . . . . . . . . . . . . . 72
Chapter 8: Printing
Printing Labels, Envelopes, and Letterhead . . . . . . . . . . . . . . . . . . . . . . . . . . . . . . . . . . . . . . . . . . . . 73
Printer Calibration . . . . . . . . . . . . . . . . . . . . . . . . . . . . . . . . . . . . . . . . . . . . . . . . . . . . . . . . . . . . . . . 74
Envelope Printing . . . . . . . . . . . . . . . . . . . . . . . . . . . . . . . . . . . . . . . . . . . . . . . . . . . . . . . . . . . . . . . 75
Printer Tools . . . . . . . . . . . . . . . . . . . . . . . . . . . . . . . . . . . . . . . . . . . . . . . . . . . . . . . . . . . . . . . . . . . 77
6
Features at a Glance
Chapter 1
Welcome to SOHO Labels & Envelopes
SOHO Labels & Envelopes is the fastest way to design and print professional labels, envelopes, or letterhead on
your Macintosh. Its next generation design eliminates the headaches typically associated with label, envelope, or
letterhead printing so you can focus on your business.
Features at a Glance
The following is a list of some of the major features of SOHO Labels & Envelopes. For a complete list of features
visit http://www.chronosnet.com.
■
■
■
■
Ready-Made Designs
• 13,000+ photographs & clip art graphics
• 50 Bitstream® fonts, PostScript® format
• Professional ready-made designs for labels, envelopes, or letterhead
• Matching label, envelope, and letterhead sets
Compatibility
• Compatible with virtually all label and envelope stocks from Avery, APLI, Herma and more
• Supports POSTNET, PLANET, U.K. Royal Mail, Japan Post, UPC-A, UPC-E, EAN13, EAN8, Industrial 2 of 5, Interleaved 2 of 5, Modified Plessey, Code 39, Code 39 Extended, Code 128, and Codabar barcodes
• Supports address labels, file folder labels, multi-use labels, disk labels, audio labels, video labels, name
badges, envelopes, letterhead, and more
• 1,500+ supported label and envelope stocks
• U.S. Letter & European label and envelope stocks
• Print to the edge (full bleed) support
• Order labels, envelopes, and letterhead from commercial online printer (additional fees apply)
Integration & Management
• Integrates with Mac OS X Address Book for seamless mail merge functionality
• Photos from iPhoto albums displayed in Graphics drawer for direct access
• Built-in Scrapbook stores favorite graphics, shapes, text for quick reuse
• Data Syphon sucks data from tab delimited text files for compatibility with Microsoft Excel, FileMaker,
Personal Organizer and other PIM software
• Fluid Preview allows live editing of text on preview pages; dynamic POSTNET barcode generation;
convenient contact selection; and precise label positioning.
Powerful Design Tools
• 30+ shapes with individual shape controls
• Rulers with grid lines & snap-to-grid
• Supports inches, centimeters, picas
• Real-time alignment guides
• Arrange and align objects
• Rotate any object
• Zoom to any size
• Make objects same width, height, or symmetrical
• Flip shapes and graphics horizontally or vertically
• Import logos, photos and clip art in popular formats
• Search graphics by category or keyword
• Simple and unique printer calibration for perfect label stock alignment
• Prints professional-quality registrations marks and bleed area
Welcome to SOHO Labels & Envelopes
7
System Requirements
■
■
Flexible Formatting Tools
• 8 automatic text fitting options
• Perfect Balance guarantees perfect label placement regardless of contact data size
• Pre-formatted return address and delivery address blocks
• One-Click Formatting for switching return and delivery address formats on-the-fly
• Use over 350 smart-fields to automatically place information from the Mac OS X Address Book directly
on your labels, envelopes, or letterhead. Smart-fields take care of the details like name, address and
phone number formatting so you don't have to. Plus, there are smart-fields for almost everything including logos, initials, one-line addresses and more.
Special Effects
• Linear & circular gradients
• 100+ image masks for shapes & clip art
• Clip an image to any shape
• Transparency
• Shadows with adjustment controls
• Image tinting
System Requirements
■
■
■
■
■
Apple Macintosh G3 or higher
Mac OS X v10.2 or later (v10.3 or later to use vector clip art)
30MB of available disk space (1.2GB for full clip art collection)
CD-ROM drive (Multi-CD Set Inside)
Inkjet or laser printer optional. Stunning results from all popular inkjet, laser and color laser printers including HP, DYMO, Epson, Canon, Lexmark, etc.
Installing SOHO Labels & Envelopes
■
■
To install SOHO Labels & Envelopes from a CD:
• Insert SOHO Labels & Envelopes Disc 1 into your computer’s optical drive and double-click the installation icon.
• Insert SOHO Labels & Envelopes Disc 2 into your computer’s optical drive and double-click the installation icon.
To install SOHO Labels & Envelopes from a download open the SOHO Labels & Envelopes disk image
on your desktop and double-click the installation icon.
What Gets Installed?
The SOHO Labels & Envelopes installer will install the following items on to your hard disk.
■
■
■
SOHO Labels & Envelopes. This is the main SOHO Labels & Envelopes application. The SOHO Labels
& Envelopes application will be installed into a folder named “SOHO Labels & Envelopes” which will be
installed in your main Applications folder: /Applications/SOHO Labels & Envelopes
Chronos. This folder stores the clip art, ready-made designs and other related files. The Chronos folder will
be installed into the “Application Support” folder of either your home Library or the main Library folder
(the installer asks where you’d like it installed, “~” denotes your home directory):
• ~/Library/Application Support/Chronos
• /Library/Application Support/Chronos
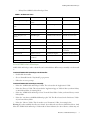
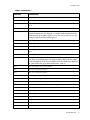
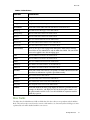
SOHO Labels & Envelopes Fonts. This folder contains the 50 included Bitstream® PostScript fonts as listed in Table 1 on page 9. This folder will be installed into the “Fonts” folder of either your home Library or
the main Library folder (the installer asks where you’d like it installed).
• ~/Library/Fonts/SOHO Labels & Envelopes Fonts
Welcome to SOHO Labels & Envelopes
8
Installing SOHO Labels & Envelopes
•
/Library/Fonts/SOHO Labels & Envelopes Fonts
TABLE 1. 50 Bitstream® Fonts
Americana™ Roman
Americana™ Italic
Americana™ Bold
Americana™ Extra Bold
Caslon Openface™ Regular
American Garamond
Roman
American Garamond Italic
American Garamond Bold
American Garamond Bold
Italic
Gothic 720 Light
Gothic 720 Light Italic
Gothic 720 Roman
Gothic 720 Italic
Gothic 720 Bold
Gothic 720 Bold Italic
Gothic 725 Bold
Gothic 725 Black
Gothic 821 Condensed
Gothic No. 13
Goudy Heavyface Regular
Goudy Heavyface Condensed
Playbill® Regular
Prima® Sans Mono Roman
Prima® Sans Mono Bold
Serifa® Thin
Serifa® Light
Serifa® Roman
Serifa® Bold
Serifa® Black
Square Slabserif 711 Bold
Clarendon Light
Clarendon Roman
Clarendon Bold
Clarendon Black
Clarendon Condensed
Clarendon Bold Condensed
Commercial Pi Regular
Commercial Script™ Regular
Copperplate™ Gothic Bold
Copperplate™ Gothic Bold
Condensed
Davida™ Bold
English 111 Vivace
Freehand 521 Regular
Humanist 521 Extra Bold
Humanist 521 Ultra Bold
Humanist 521 Extra Bold
Condensed
Modern 735 Roman
Orator 10 Pitch
Parisian™
Park Avenue™
Uninstall SOHO Labels & Envelopes
SOHO Labels & Envelopes and its related files can be uninstalled two different ways: manually or via the installer.
To uninstall SOHO Labels & Envelopes via the installer:
1. Double-click the installer.
2. Choose Uninstall from the “Easy Install” pop-up menu.
3. Follow the on-screen prompts.
To uninstall SOHO Labels & Envelopes manually:
1. Delete the “SOHO Labels & Envelopes” folder. This is located in the “Applications” folder.
2. Delete the “Chronos” folder. This is located in the “Application Support” folder of either your home Library
or main Library folder. See warning below.
3. Delete the “SOHO Labels & Envelopes Fonts” from the Fonts folder of either your home Library or main
Library folder.
4. Delete the “com.chronos.SOHOLabelsEnvelopes.plist” file. This file is located in the “Preferences” folder
of your home Library folder.
5. Delete the “Chronos” folder. This is located in your “Documents” folder. See warning below.
Warning: If you have installed other Chronos software, do not delete the two Chronos folders listed above. Only
delete the “SOHO Labels & Envelopes” folder inside of them. Otherwise, the other Chronos software may not
Welcome to SOHO Labels & Envelopes
9
Learning to Use SOHO Labels & Envelopes
function properly.
Learning to Use SOHO Labels & Envelopes
To learn how to use SOHO Labels & Envelopes, consult these resources:
User’s Guide
This guide describes the features and shows how to use SOHO Labels & Envelopes.
Onscreen Help
Help tags are available for many of the items in the SOHO Labels & Envelopes window. To see the help tags,
let the pointer rest over an item for a couple of seconds.
Ready-Made Designs
SOHO Labels & Envelopes ships with numerous ready-made designs for labels, envelopes, and letterhead. Examining how these ready-made designs were put together will help you design your own labels, envelopes, or
letterhead.
Technical Support
Chronos provides various support options for SOHO Labels & Envelopes. See http://www.chronosnet.com/
Support/index.html for technical support options.
Web Resources
Go to http://www.chronosnet.com/Products/index.html to get the latest software and updates for SOHO Labels
& Envelopes.
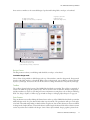
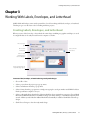
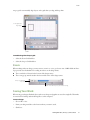
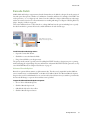
The SOHO Labels & Envelopes Window
The SOHO Labels & Envelopes window has two different modes: design mode and preview mode. Each of these
modes present a unique set of tools to help you create or customize your design and the preview it.
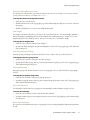
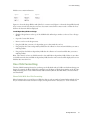
Design Mode
The design mode is comprised of three sections: the design canvas, the toolbox and the parts drawer. Each of
Welcome to SOHO Labels & Envelopes
10
The SOHO Labels & Envelopes Window
these sections contribute to the successful design of professional looking labels, envelopes, or letterhead.
Drag shapes, clip art and
The design canvas is where
you design your label, envelope, or letterhead.
fields from the parts
drawer to the design canvas.
The toolbox is where you access
powerful tools to help you create
professional labels, envelopes, or letterhead.
Design Canvas
The design canvas is where you will design and edit labels, envelopes, or letterhead.
To switch to design mode:
Choose View > Design Mode or click Design at the top of the window to switch to design mode. Design mode
is used to edit a label, envelope, or letterhead. When you are in design mode, you can add text, graphics and other
objects to your design. You can use the tools in the toolbox to change the attributes of objects on your design.
Toolbox
The toolbox is located at the bottom of the SOHO Labels & Envelopes window. The toolbox is comprised of
various tools which are grouped together by tabs. You can use these tools to add color, shadows, transparency
and other attributes to objects on your design. For more information on using these tools see Chapter 4 Working
With Text, Shapes, Graphics, & iPhoto on page 24 and see Chapter 5 Changing Object Properties on page 36.
Parts Drawer
The parts drawer is accessed by clicking the Drawer button at the top of the SOHO Labels & Envelopes window
while in design mode—the parts drawer hides when in preview mode. The parts drawer will open on the right
or left side of the window depending on which side has enough room. One of three drawers can be accessed while
in design mode: Graphic drawer, Contact Info drawer, and the Scrapbook drawer. Each of these drawers contain
various objects that can be added to the design. Some of these objects include, shapes, graphics, pictures from
Welcome to SOHO Labels & Envelopes
11
The SOHO Labels & Envelopes Window
iPhoto, etc. You can drag any of the objects in these drawers to the design canvas while in design mode to create
your design. For more information on the parts drawer see Chapter 4 Working With Text, Shapes, Graphics, &
iPhoto on page 24.
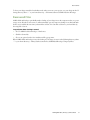
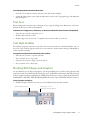
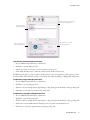
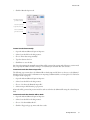
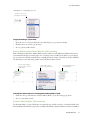
Preview Mode
The preview mode is comprised of two different sections: the preview canvas and the group and contact columns.
Easily choose which contracts
or group of contacts to use for
your label, envelope, or letterhead.
The preview canvas is used
to show how the label, envelope,
or letterhead will look when printed.
Quickly launch the Address Book
to add or edit a contact.
Preview Canvas with Fluid Preview
The preview canvas is used to view one or more pages of your labels, envelopes, or letterhead laid out on the page
like they will be when printed. The preview mode in SOHO Labels & Envelopes has a very powerful and fluid
design in order to provide a more natural working environment. For example, you can modify the text on individual labels, envelopes, or letterhead while in preview mode. For more information on Fluid Preview see Chapter 7 Fluid Preview on page 70.
To switch to preview mode:
1. Choose View > Preview Mode or click Preview at the top of the window. As soon as you switch to preview
mode, any contact fields in your design will be populated with contact information from the Address Book
application based on the selected contact(s) or group.
If you are printing labels, you will be able to specify which label to start on and choose the number of copies of
each label. If you’re printing envelopes, you will be able to specify the number of envelopes to print and specify
how envelopes are fed into the printer.
Welcome to SOHO Labels & Envelopes
12
The SOHO Labels & Envelopes Window
Group and Contact Columns
The group and contact columns section is used to let you choose which contact(s) or group to use to populate
the label, envelope, or letterhead design. These columns contain the same information as the Address Book application. If you need to add or edit a contact you can quickly launch the Address Book application from within
SOHO Labels & Envelopes via the Address Book button below these columns.
Advanced Options Inspector
The most commonly used tools in SOHO Labels & Envelopes are conveniently located within the SOHO Labels & Envelopes window. In particular, they can be found in the toolbox and parts drawer. Some of the more
advanced tools and features are located in a separate Advanced Options Inspector that can be displayed and hidden as desired.
To show the Advanced Options Inspector:
1. Choose View > Advanced Options.
The controls in the Advanced Options Inspector will be discussed in their relevant chapters.
Welcome to SOHO Labels & Envelopes
13
Step 1: Select a Ready-Made Design
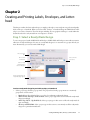
Chapter 2
Creating and Printing Labels, Envelopes, and Letterhead
This chapter outlines the basic tasks and steps you might go through to create and print out professional-quality
labels, envelopes, or letterhead. When you create a label, envelope, or letterhead design in SOHO Labels & Envelopes, you create a document. The entire design, including any text, graphics and shapes, is saved within this
document and can be easily moved from one computer to another.
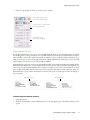
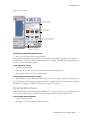
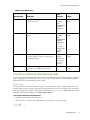
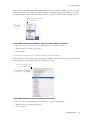
Step 1: Select a Ready-Made Design
To start a new project, launch SOHO Labels & Envelopes. SOHO Labels & Envelopes comes with an extensive
collection of ready-made designs. You can use a ready-made design as-is or customize it to get just the look you
want. Alternatively, you can start with a blank design.
Choose a project
type.
Choose a stock
manufacturer.
Choose a format
from the list.
Choose a readymade design from
the list of categories
Quickly expand/collapse all
ready-made design groups.
To select a ready-made design for your label, envelope, or letterhead:
1. Select a project type from the pop-up menu. The projects listed in the pop-up menu are conveniently
grouped into several sections.
•
•
•
•
Matched Sets. Select Matched Sets to see a list of coordinating ready-made designs.
Address Labels, Envelopes, and Letterhead. Select a project type in this section to filter the ready-made
designs accordingly.
Audio Tape Labels…Zip Disk Labels. Select a project type in this section to filter the ready-made designs accordingly.
All Avery and All DYMO. Select a project type in this section to conveniently see all the ready-made
designs for a particular manufacturer.
Creating and Printing Labels, Envelopes, and Letterhead
14
Step 2: Edit The Design
•
My Designs. Select My Designs to see a list of ready-made designs that you have saved at the following
path on your hard disk: ~/Documents/Chronos/SOHO Labels & Envelopes/
2. Select a manufacturer from the pop-up menu. This option may be grayed out depending on your selection
in the previous step.
3. Select a format from the pop-up menu or simply start typing the stock part number and SOHO Labels &
Envelopes will auto-complete it for you.
4. Select a ready-made design from the list of designs which has been organized into categories. Choose Blank
Horizontal or Blank Vertical if you would like to design completely from scratch. A Delivery and/or Return
Address Block will automatically be added to blank label and envelope designs.
5. Click Choose Design to select the ready-made design.
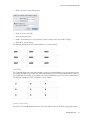
Step 2: Edit The Design
After you select a ready-made design, it will appear on the design canvas. If you like the way everything looks at
this point you can skip to the next step. Otherwise, you can edit the design by customizing it with text, shapes
and graphics.
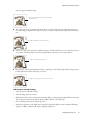
To add text to the design:
1. Click Design to switch to design mode.
2. Double-click in an existing text box and type your text.
3. Click the text box button to create a new text box.
Text box button
To add shapes and graphics:
1. Click the Graphics drawer button to open the parts drawer.
2. Click either Shapes or Clip Art.
3. Drag a shape or graphic object to your design.
Creating and Printing Labels, Envelopes, and Letterhead
15
Step 3: Preview Design
For more details on working with text, shapes and graphics see Chapter 4 Working With Text, Shapes, Graphics,
& iPhoto on page 24.
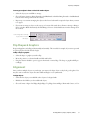
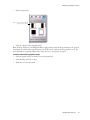
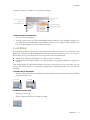
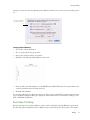
Step 3: Preview Design
When you’re finished editing your design, you’ll probably want to preview how it will look when printed. If the
design contains contact fields, the preview will fill in the contact fields with actual contact information from the
Mac OS X Address Book.
To preview your design:
1. Click Preview at the top of the SOHO Labels & Envelopes window (or choose View > Preview Mode).
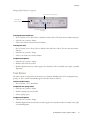
Switch to Preview mode to see how your design
will look when printed.
Choose the number of
label, envelopes, letterhead you want to print.
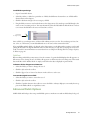
Step 4: Print
The final steps are to specify the number of labels, envelopes, or letterhead to print, select which contact(s) to
use, and then setup your printer.
To specify the number of labels, envelopes, or letterhead to print:
1. Type a number into the “# Copies” box while in preview mode. If your design contains contact fields, the
value specified here refers to the number of copies of the design to print for each contact.
To select which contact(s) to use for the design:
Designs that have contact fields on them will require that you first select the contacts you wish to produce your
design for. If your design does not have contact fields skip this step.
Creating and Printing Labels, Envelopes, and Letterhead
16
Step 4: Print
1. Select the contact(s) from the Contact column.Hold down the shift key to select multiple contiguous contacts. Hold down the command key to select multiple contacts in a non-contiguous fashion. A label, envelope, or letterhead will be created for each selected contact.
To setup the printer:
1. Choose File > Page Setup.
2. Verify that each of the settings are correct for your printer.
To print the labels, envelopes, or letterhead:
1. Choose File > Print.
2. Verify each of the settings are correct for your printer. Settings will vary from printer to printer so it’s important that you’re familiar with your printer’s settings.
3. Click Print.
You can also have your labels, envelopes, or letterhead printed at a commercial printer. For more information on
using a commercial printer see Printing Labels, Envelopes, and Letterhead in Chapter Printing on page 73.
Creating and Printing Labels, Envelopes, and Letterhead
17
Creating Labels, Envelopes, and Letterhead
Chapter 3
Working With Labels, Envelopes, and Letterhead
SOHO Labels & Envelopes comes with a powerful set of tools for working with labels, envelopes, or letterhead.
This chapter goes over the basic tools for working with these projects.
Creating Labels, Envelopes, and Letterhead
When you create a label, envelope, or letterhead, the entire design, including any graphics and shapes, is saved
in a single file that can be easily moved from one computer to another.
Choose a project
type.
Choose a stock
manufacturer.
Choose a format
from the list.
Choose a readymade design from
the list of categories
Quickly expand/collapse all
ready-made design groups.
To create a label, envelope, or letterhead using a ready-made design:
1. Choose File > New.
2. Select a project from the project type pop-up menu.
3. Select a manufacturer from the pop-up menu.
4. Select a format from the pop-up menu or simply start typing the stock part number and SOHO Labels &
Envelopes will auto-complete it for you.
5. Select a ready-made design from the list of designs which has been organized into categories. Choose Blank
Horizontal or Blank Vertical if you would like to design your label, envelope, or letterhead completely from
scratch. A Delivery and/or Return Address Block will automatically be added to blank label and envelope
designs.
6. Click Choose Design to select the ready-made design.
Working With Labels, Envelopes, and Letterhead
18
Creating Labels, Envelopes, and Letterhead
To create a custom label, envelope, or letterhead format:
1. Choose File > New.
2. Click the Custom tab located at the top of the sheet.
3. Fill in the appropriate information for the dimension settings. For more information on dimension settings
see Document Format on page 19.
4. Click Choose Design to select the custom design.
To create a label, envelope, or letterhead using a recent design:
1. Choose File > New.
2. Click the Recent tab located at the top of the sheet.
3. Select a design from the list of designs that you have recently worked on.
4. Click Choose Design to select the recent design.
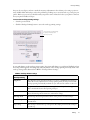
Document Format
As you begin working with a label, envelope, or letterhead, you can change the design format which defines its
size, orientation, etc.
To change the format of a label, envelope, or letterhead:
1. Click the Layout tab in the toolbox. The current format is displayed next to the Change Format button.
2. Click Change Format to view in detail the format of the selected design.
Click the Change Format button to modify the layout.
See the current format.
3. Click the Standard tab to change the format to another pre-made format, or click the Custom tab to specify
your own format.
4. If Custom was chosen in the previous step, change the various dimensions for the selected document type.
For a description of the various dimensions see TABLE 2. “Document Format Definitions”.
Working With Labels, Envelopes, and Letterhead
19
Creating Labels, Envelopes, and Letterhead
5. Click “Choose Format” to use the new format.
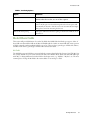
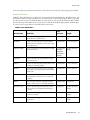
TABLE 2. Document Format Definitions
Setting Name
Layout Name
Document Type
Paper Size
Definition
This pop-up menu allows you to choose or create a name for the custom layout.
This pop-up menu allows you to choose the document type for your layout.
This pop-up menu allows you to choose from common paper sizes.
Width
This is the width of the design measured from left edge to the right edge.
Height
This is the height of the design measured from top edge to the bottom edge.
Rows
Columns
This is the number of rows of the design on the page.
This is the number of columns of the design on the page.
Top
This is the top margin measurement.The top margin is a measurement of the space from
the top of the page to the top edge of the design in the first row.
Left
This is the left margin measurement.The left margin is a measurement of the space from
the left side of the page to the left edge of the design in the first column.
Horizontal
This is the measurement of blank space between the right edge of the design in the first
column and the left edge of the design in the second column.
Vertical
This is the measurement of blank space between the bottom edge of the design in the first
row and the top edge of the design in the second row.
Corner radius
This is the measurement of the corner radius. This measurement will usually be provided
by the stock manufacturer. The corner radius measurement is only used for horizontal and
vertical rounded labels.
Working With Labels, Envelopes, and Letterhead
20
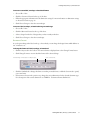
Rulers
Rulers
As you move your text, shapes, or graphics around on the design canvas, you can turn on rulers to help you precisely place objects. As you drag objects around on the design canvas, guidelines will appear in the ruler to show
you exactly where the object will be placed.
Use the rulers to precisely
place objects on the canvas.
To turn on rulers:
1. Select the Show Rulers checkbox in the Layout toolbox.
Turn rulers on/off
To change the units of measurement in the rulers:
1. Choose Preferences from the SOHO Labels & Envelopes menu.
2. Click the General tab.
3. Click the Units pop-up menu and select a unit of measurement.
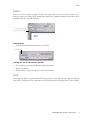
Grid
As you drag text, shapes, or graphics around on the design canvas, you can enable the grid to help you align and
place objects. The grid shows you exactly where the object will be placed on the design canvas. You can enable
Working With Labels, Envelopes, and Letterhead
21
Zoom
snap to grid to automatically align objects on the grid when you drag and drop them.
Use the grid to help
align objects.
Turn the Grid and Snap to Grid
On/Off.
To enable the grid and snap to grid:
1. Select the Show Grid checkbox.
2. Select the Snap to Grid checkbox.
Zoom
When working with your design, you may want to zoom in or out to get a better view. SOHO Labels & Envelopes provides two mechanisms for zooming in and out on the design canvas.
■
■
The zoom slide tool located at the bottom of the design canvas.
The zoom pop-up menu located in the bottom left corner of the design canvas.
Choose a pre-defined
zoom level.
Use the zoom slider for precise, but variable zooming.
Saving Your Work
When saving your design all related objects such as text, shapes and graphics are saved in a single file. This makes
it convenient for backups and transferring files to other computers.
To save a design:
1. Choose File > Save.
2. Name your design and choose the location where you want it saved.
3. Click Save.
Working With Labels, Envelopes, and Letterhead
22
Recovered Files
To have your design accessible from the Recent tab when you create a new project, save your design in the following directory (where “~” is your home directory): ~/Documents/Chronos/SOHO Labels & Envelopes
Recovered Files
SOHO Labels & Envelopes periodically makes a backup of your design in case the computer crashes or a power
outage occurs. If such an event occurs, it will automatically open any temporary backups it can find and mark
them as recovered files the next time you launch the software. You can then save them to your hard drive by
choosing File > Save As.
To specify how often a backup is created:
1. Choose SOHO Labels & Envelopes > Preferences.
2. Click the General tab.
3. Choose an option from the Save AutoRecover File popup menu.
When SOHO Labels & Envelopes creates the backup of your design, it saves it in the following directory (where
“~” is your home directory): ~Library/Caches/com.chronos.SOHOLabelsEnvelopes/Temporary Files/
Working With Labels, Envelopes, and Letterhead
23
Working With Text
Chapter 4
Working With Text, Shapes, Graphics, & iPhoto
In the design canvas you can easily manipulate text, shapes, graphics, photos in iPhoto, and masks all in the same
work space. Placing and editing text in SOHO Labels & Envelopes is as easy as working in any text editor. Manipulating graphics and shapes is just as simple. This chapter describes in detail how to add different objects to
your design.
Working With Text
SOHO Labels & Envelopes provides powerful yet simple tools for working with text. All text will reside in what
is called a text box. You can have multiple text boxes on a single design. The text box button will allow you to
add text boxes to your design.
Choose the text box
button to add a text box.
To create a text box and add text:
1. Click the text box button (or choose Edit > Place Text Box). A new text box will be created in the center of
the design canvas.
2. Double-click inside the text box to begin editing.
3. Enter your text. The text box will grow dynamically as you type your text.
4. Click outside the text box when you’re finished typing to deselect the text box.
To learn how to resize and move objects such as text boxes, see Resize, Move and Layer Text, Shapes or Graphics
on page 32.
To edit text in a text box:
1. Double-click in the text you wish to edit.
2. Edit the text.
3. Click outside of the text box when you are finished editing the text.
Changing Basic Text Attributes
Once you have added text to your design, you may want to adjust its look including the font, color, etc. You
make most text changes using the standard Mac OS X font selection window, the standard Mac OS X color selection window and the toolbox. You can also create stunning visual effects with text by changing its color, shadow, background graphic and orientation on the screen. To learn more about these other effects, see Chapter 5
Working With Text, Shapes, Graphics, & iPhoto
24
Text Rulers
Changing Object Properties on page 36
Opens the font selection window.
Opens the color
selection window.
Use the alignment buttons
to align text.
To change the font and font size:
1. Choose Format > Font > Show Fonts or click Fonts in the toolbox. The fonts selection window will open.
2. Select the text you want to change.
3. Select a font and size in the font selection window.
To change text color:
1. Choose Format > Font > Show Colors or click the color well in the toolbox. The color selection window
will open.
2. Select the text you want to change.
3. Select a color in the color selection window.
To adjust text alignment:
1. Select the text you want to change.
2. Click the Style tab in the toolbox.
3. Click the alignment button you wish to apply to the selected text. Choose from left, center, right, or justified
alignments.
Text Rulers
The rulers contain several special controls related to text attributes including controls for text alignment, line
spacing, etc. These controls automatically appear in the ruler when you edit text.
To show or hide the rulers:
1. Choose Format > Text > Show Ruler.
To adjust the line spacing of text:
1. Select the text you want to change.
2. Click the Spacing button in the ruler.
3. Select a spacing option.
To adjust text alignment:
1. Select the text you want to change.
2. Click the alignment buttons in the ruler you wish to apply to the selected text.Choose from left, center, right,
or justified alignments.
Working With Text, Shapes, Graphics, & iPhoto
25
Text Tabs
To adjust the kerning (spacing between letters):
1. Select the text you want to change.
2. Choose Format > Font > Kern
3. Select Tighten if you want the characters closer together, or select Loosen if you want the characters farther
apart.
Text Tabs
All text boxes have default tab stops already set. You can see the tab stops on the horizontal ruler when you choose
Format > Text > Show Ruler and select text in a text box.
Tab icons appear when text is selected.
By changing tab stops, you can indent text and create lists that line up correctly.
To change a tab stop:
1. Select the text you want to adjust.
2. On the horizontal ruler, drag the tab stop to change its location.
Choose left, center,
right, or decimal tabs stops.
To add a tab stop:
1. Select the text you want to adjust.
2. Drag the type of tab stop (left, center, etc.) you want onto the horizontal ruler.
To remove a tab stop:
1. Select the text you want to adjust.
2. Drag the tab stop off the horizontal ruler and release.
Advanced Typography Options
SOHO Labels & Envelopes contains some powerful typography options to make the text on designs look great
and provide for special effects. These advanced typography options are all centrally located on the Typography
tab of the Advanced Options Inspector.
To open the Typography options in the Advanced Options Inspector:
1. Select the text or a text box.
2. Choose View > Advanced Options and skip to step 4 or select the Style tab in the toolbox.
3. Click the Options button to open the Advanced Options Inspector. There are several tabs at the top of the
inspector window including the Typography tab.
Working With Text, Shapes, Graphics, & iPhoto
26
Advanced Typography Options
4. Select the Typography tab at the top of the inspector window.
Use text alignment for the perfect
placement of text within text boxes.
Use spacing options to create the perfect
look for text and paragraphs.
Use indenting for precise
control of lines in a paragraph.
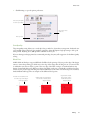
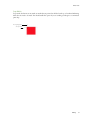
Perfect Balance For Text
Use the Perfect Balance For Text option to have SOHO Labels & Envelopes automatically balance text within
its bounding text box. This powerful option is especially useful for text boxes that contain fields since its impossible to predict in advance how much or how little text will be in a text box after the fields are filled in. For example, you can create a text box with right justified text, and tell SOHO Labels & Envelopes to center the final
right justified text in the text box once all the fields are filled in.
Perfect Balance For Text lets you choose how the final text will be positioned horizontally and vertically. Bear in
mind that Perfect Balance For Text acts independently from left, center, right, and justified text alignment. In
other words, you can use both simultaneously. Consider, for example, a text box that contains fields for a contact
from the Mac OS X Address Book. Some contacts have long names and addresses while others have short. Use
Perfect Balance For Text to make the final text box content look good on your design no matter the length of
the contact data.
Before text balancing.
After text balancing.
To balance the final content in a text box:
1. Select the text box.
2. Click a horizontal and/or vertical balancing button on the Typography page of the Advanced Options Inspector.
Working With Text, Shapes, Graphics, & iPhoto
27
Advanced Typography Options
Kerning (Spacing Between Letters)
You can increase or decrease the space between each letter in your text. For example, you can increase the letter
spacing of the word “Chronos” to look like “C h r o n o s”.
To change the amount of spacing between letters:
1. Select the text you wish to kern.
2. Click the Kern buttons on the Typography page of the Advanced Options Inspector to increase or decrease
the spacing.
3. Click the Default button to return to the default kerning value.
Line Height
Line height is the distance from the top of a line to the top of the line below it. Use the line height multiplier to
change line height by multiplying the current line height by the specified amount. For example, choose a line
height multiplier of 2.0 for double spaced text. Use 1.0 to restore the text to its default line height.
To change the line height of text:
1. Select the text you wish to change the line height of.
2. Specify a line height multiplier using the Line Multiplier control on the Typography page of the Advanced
Options Inspector.
Inter-line Spacing (Leading)
Inter-line spacing or leading is the distance from the bottom of a line to the top of the line below it.
To change the inter-line spacing of text:
1. Select the text you wish to change the inter-line spacing of.
2. Specify the inter-line spacing value in points using the Inter-line Spacing control on the Typography page
of the Advanced Options Inspector.
Paragraph Spacing
Paragraph spacing is the distance from the bottom of a paragraph to the top of the first line in the paragraph
below it.
To change the paragraph spacing of text:
1. Select the text you wish to change the paragraph spacing of.
2. Specify the paragraph spacing value in points using the Paragraph Spacing control on the Typography page
of the Advanced Options Inspector.
First Line Indenting
The left indent of the first line in a paragraph can automatically be indented without setting a tab stop.
To set first line indenting:
1. Select the text for which you wish to have the first line indented.
2. Specify the indent value in points using the First Line control on the Typography page of the Advanced Options Inspector.
Other Lines Indenting
Not only can you left indent the first line of a paragraph, but you can independently left indent subsequent lines
as well.
Working With Text, Shapes, Graphics, & iPhoto
28
Text Case
To set indenting for line other than the first line:
1. Select the text for which you wish to have lines other than the first indented.
2. Specify the indent value in points using the Other Lines control on the Typography page of the Advanced
Options Inspector.
Text Case
When working with text you may want to change the text so it appear in all uppercase, all lowercase, or lowercase
with just the first letter of each word capitalized.
To format text as all uppercase, all lowercase, or lowercase with the first letter of each word capitalized:
1. Select the text you wish to change the case of.
2. Click the Style tab in the toolbox.
3. Click the Upper Case, Lower Case, or Capitalize buttons in the toolbox to set the case.
Text Style Grabber
The attributes assigned to a selection of text such as font, font size and color are collectively called the “style” of
the text. It’s often useful to apply the style from one text selection to another without having to individually set
each text attribute manually.
To copy the text style from one selection of text to another:
1. Select the text you want to copy the style from.
2. Choose Format > Font > Copy Style.
3. Select the text you want to apply or paste the style to.
4. Choose Format > Font > Paste Style.
Working With Shapes and Graphics
You can add many types of shapes and graphics to your design including those created in other applications and
simple objects that you can draw directly on the design canvas. SOHO Labels & Envelopes ships with thousands
of clip art graphics and many standard shapes. SOHO Labels & Envelopes accepts popular graphic file formats
including PICT, GIF, JPEG, TIFF, PDF, BMP and EPS (this format only work with Mac OS 10.3 and above).
To access graphics and shapes:
1. Click the Graphics drawer button at the top of the SOHO Labels & Envelopes window.
Open/Close the Graphics drawer.
The drawer gives you access
to Shapes, Clip Art, iPhoto, and Masks.
Working With Text, Shapes, Graphics, & iPhoto
29
Working With Shapes and Graphics
The drawer gives you access to the shapes, graphics, iPhoto photos and masks that ship with SOHO Labels &
Envelopes. You can also add your own graphics and shapes to SOHO Labels & Envelopes by adding them to
the built-in scrapbook. For more information on the scrapbook see Scrapbook on page 34.
Shapes
SOHO Labels & Envelopes ships with a variety of shapes you can use on your design.
To add a shape:
1. Click Shapes to access the shapes that can be added to your design.
2. Drag a shape to your design.
3. Drag the selection handles to resize the shape.
Choose from different
sets of shapes.
Use the selection handles
to resize the shape.
Drag a shape to
the design canvas.
Once a shape is on the design canvas, you can change its stroke color and fill color. To learn more about changing
an shape’s colors and other properties see Chapter 5 Changing Object Properties on page 36.
If you customize a shape that you think you might want to reuse, you can save it along with the other shapes for
convenient reuse.
To save a shape:
1. Click Shapes to access the shapes that can be added to your design.
2. Drag your custom shape from the design canvas to an empty well in the drawer where the other shapes are
located
Graphics
SOHO Labels & Envelopes ships with thousands of clip art graphics you can use on your design. You can search
the clip art library by keywords and filter by categories to find just the right graphic. You can also use your own
Working With Text, Shapes, Graphics, & iPhoto
30
Working With iPhoto
graphics on your design.
Choose a category of
graphics to display.
Drag any graphic
to your document.
Use the slider to resize graphic
thumbnails in the drawer.
Use keywords to quickly
search for a specific graphic.
To search for a graphic in the Graphics drawer:
1. Enter one or more keywords into the search field.
Every graphic has several keywords assigned to it. Control-click or right-click on a graphic to get a list of keywords assigned to it and to get additional information about the graphic. This will help you to know what keywords to use when searching for graphics.
To add a graphic to a design:
1. Open the Graphics drawer.
2. Click Clip Art to access the clip art that ships with SOHO Labels & Envelopes.
3. Drag a graphic from the drawer to the design canvas.
To add a graphic from the Finder to a design:
1. Locate the file you want to add in the Finder and drag it to where you want it to appear on the design canvas.
You can adjust the shadow, transparency and other attributes of graphic objects. To learn more about changing
the attributes of a graphic see Chapter 5 Changing Object Properties on page 36.
Working With iPhoto
SOHO Labels & Envelopes integrates directly with iPhoto so you can use any photo in any album and place it
onto your design. You can access your iPhoto albums and photos directly from the Graphics drawer.
To access iPhoto albums and photos:
1. Open the Graphics drawer.
2. Click iPhoto to access your iPhoto albums and pictures.
Working With Text, Shapes, Graphics, & iPhoto
31
Resize, Move and Layer Text, Shapes or Graphics
To add pictures from iPhoto to a design:
1. Locate the picture you want to add from the Graphics drawer and drag it to the designcanvas.
Access your iPhoto albums
and photos directly from the
Graphics drawer.
Drag any photo from an iPhoto
album to the design canvas.
Resize, Move and Layer Text, Shapes or Graphics
Once text, shapes or graphics are on the design canvas, they behave very much the same. They can be resized,
moved and layered.
The blue dots around an
object are selection handles.
To resize an object:
1. Select the object to make the selection handles appear.
2. Move the pointer to a selection handle and click and hold it.
3. Drag the selection handle to expand or shrink the object in the direction of your drag.
To move an object:
1. Select the object to make the selection handles appear.
2. Place the pointer somewhere towards the center of the object and drag the object to a new location. Avoid
dragging the object by the selection handles because you may inadvertently resize the object.
As you move your text, shapes and graphics around on the design canvas, you will notice alignment guides appearing and disappearing. These alignment guides will appear as blue dotted lines These guides are built into the
design canvas to help you center and align objects on the design. They appear whenever the center or edge of an
object aligns with the center or edge of another object. These alignment guides can be disabled in the Preferences
dialog.
Working With Text, Shapes, Graphics, & iPhoto
32
Flip Shapes & Graphics
To arrange an object in front or in back of another object:
1. Select the object you would like to arrange.
2. Choose Format > Arrange > Bring Forward or Send Backward (or click the Bring Forward or Send Backward
buttons in the Arrange controls in the toolbox).
3. Repeat step 2 to continue arranging the object to the front or back until it occupies the layer where you want
it to appear.
4. If you want to arrange an object to the very top or bottom of the stack, choose Format > Arrange > Bring to
Front or Send to Back. Alternatively, click the Bring to Front or Send to Back buttons in the Arrange tab in
the toolbox).
Use the arrange buttons to arrange
objects in front or in back of
other objects.
Flip Shapes & Graphics
Shapes and graphics can be flipped horizontally and vertically. This is useful, for example, if you want a personal
in a photograph to face left instead of right.
To flip a shape or graphic:
1. Select the shape or graphic you wish to flip.
2. Move the pointer to a selection handle and click and hold it.
3. Drag the selection handle to past its opposite horizontal or vertical edge. The shape or graphic will flip accordingly.
Alignment
Once you have multiple objects on your design, you may need to align objects so they look good together. You
may also want to make the objects the same width and height or even symmetrical.
To align objects:
1. Select the first object you would like other objects to be aligned with.
2. Hold down the Shift key to select additional objects.
3. Choose Format > Align > Left Edges, Right Edges, Top Edges, Bottom Edges, Horizontal Centers, or Ver-
Working With Text, Shapes, Graphics, & iPhoto
33
Scrapbook
tical Centers. You may also click the appropriate alignment buttons on the Arrange tab in the toolbox).
Use the alignment buttons to
align objects with other objects.
Use the Width/Height buttons to
make objects the same width or height.
To make objects the same width and height:
1. Select the object whose width/height you would like to apply to other objects.
2. Hold down the Shift key to select additional objects.
3. Choose Format > Size > Make Same Width or Make Same Height. You may also click the Width or Height
buttons on the Arrange tab in the toolbox).
To make an objects symmetrical:
To make an object symmetrical means that the object will be restored to its natural width to height ratio. An oval
shape, for example, will be restored to its natural ratio of 1:1 which is a circle. A stretched photograph will be
restored to its original ratio of 4:3 or whatever the original or natural ratio was so it no longer appears stretched.
1. Select the object(s) you would like to make symmetrical.
2. Choose Format > Size > Make Symmetrical. You may also click the Symmetrical button on the Arrange tab
in the toolbox).
Scrapbook
SOHO Labels & Envelopes allows you to store objects along with their attributes in the Scrapbook drawer so
you can conveniently reuse them on other designs. Suppose, for example, you have a text box laid out exactly
how you want it or a graphic with the right amount of shadow that you think you’ll need to use again. You can
store these objects for later use in the scrapbook.
Open/Close Scrapbook drawer
Drag any object into the
Scrapbook drawer to re-use
it in other projects
Working With Text, Shapes, Graphics, & iPhoto
34
Scrapbook
To store an object in the scrapbook:
1. Open the Scrapbook drawer.
2. Drag the object you wish to store from the design canvas to an empty well in the Scrapbook drawer.
The object will be accessible every time you use SOHO Labels & Envelopes. Objects that you put in the Scrapbook drawer are saved in the following file on your hard disk (where “~” is your home directory): ~/Library/
Chronos/SOHO Labels & Envelopes/Shapes/Scrapbook.soho
Working With Text, Shapes, Graphics, & iPhoto
35
Size, Location and Angle Properties
Chapter 5
Changing Object Properties
This chapter describes some of the more advanced features for customizing graphics and other objects on your
design. These include transparency, shadow, color, line style and masks.This chapter will also discuss some amazing effects you can apply to objects including filling objects with color, assigning color gradients, adding transparency and even filling objects with an image.
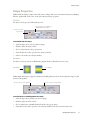
Size, Location and Angle Properties
When you’re working with objects, SOHO Labels & Envelopes has precision tools to help you change the object’s size, angle and location on the design canvas.
Precisely control the
location of an object.
Precisely control the
object size.
Use the rotation tools
to rotate the object.
To place an object at a precise location on the design canvas:
1. Select the object you wish to place at a precise location on the design canvas.
2. Click the Size tab in the toolbox.
3. Enter the X coordinate.
4. Enter the Y coordinate.
The coordinates you enter are based on the unit of measurement specified in the Preferences. The origin of the
coordinate system on the design canvas is the top left corner. For example, if you place a square in the top left
corner of the design canvas, the X, Y coordinates will be (0,0).
To change the size of an object:
1. Select the object you wish to resize.
2. Click the Size tab in the toolbox.
3. Enter the width and height.
The measurements you enter are based on the unit of measurement specified in the Preferences.
To rotate the angle of an object:
Shapes, graphics, and text can all be rotated at any angle.
1. Select the object you wish to rotate.
2. Click the Size tab in the toolbox.
3. Use the angle wheel to rotate the object or use the Rotation field to either select a common angle or enter
an angle.
Changing Object Properties
36
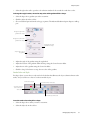
Shape Properties
Shape Properties
SOHO Labels & Envelopes ships with a wide variety of shapes that can be customized in many way including
fill color, gradient fills, stroke color, stroke style and custom shape properties.
Fill Color
The interior of a shape can be filled with any color.
Choose from Color, Linear Gradient, or
Radial Gradient to fill the object.
Click the color well to
select a fill color.
To set the fill color of a shape:
1. Select the shape whose color you wish to change.
2. Click the Styles tab in the toolbox.
3. Choose Color from the color pop-up menu.
4. Select the fill color well to open the color selection window.
5. Select a color in the color selection window.
Gradients
The interior of a shape can also be filled with a gradient which is a blend between two colors.
Radial Gradient
Linear Gradient
SOHO Labels & Envelopes supports both linear and radial gradients and you can also adjust the angle, size and
location of the gradient.
Choose the first color of the gradient.
Choose the second color of the gradient.
To set the linear or radial fill gradient of a shape:
1. Select the shape whose gradient you want to change.
2. Click the Styles tab in the toolbox.
3. Choose either Linear or Radial Gradient from the color pop-up menu.
4. Select the left color well to open the color selection window for the first color and select a color.
Changing Object Properties
37
Shape Properties
5. Select the right color well to open the color selection window for the second color and select a color.
To change the angle, location, size and to swap colors of the gradient fill for a shape:
1. Select the shape whose gradient you wish to customize.
2. Click the Styles tab in the toolbox.
3. Choose Gradient Options from the color pop-up menu. The Advanced Gradient Options Inspector will appear.
Change the angle of the
gradient in the shape.
Change the location of the
gradient in the shape.
Change the size of the
gradient in the shape.
Swap the two colors of
the gradient.
4. Adjust the angle of the gradient using the angle wheel.
5. Adjust the location of the gradient within the shape using the Center Location slider.
6. Adjust the size of the gradient using the Center Size slider.
7. Click the Swap Colors button to swap the two colors of the gradient.
Stroke Color and Style
For shape objects, you can choose a style and color for the line that delineates the object (otherwise known as the
stroke). Or you can choose to have no stroke around the object.
Turn the stroke on/off.
Choose the thickness of the stroke.
Select the color well
to choose the color
of the stroke.
Choose the style of the stroke.
To set the stroke color and style for a shape:
1. Select the shape whose stroke you want to customize.
2. Select the Styles tab in the toolbox.
Changing Object Properties
38
Graphic Properties
3. Select the Stroke checkbox.
4. Click the stroke color well and choose a color.
5. Choose the stroke thickness from the thickness pop-up menu.
6. Choose the stroke style from the style pop-up menu.
This triangle has a 6pt, red, solid stroke.
This triangle has a 1pt. purple,
dashed stroke.
Custom Shapes
Some shapes in SOHO Labels & Envelopes provide additional settings for further customizing of the shape. For
example, the starburst shape allows you to change the number of points (vertices) in the starburst and their size.
Star with 5 points.
Star with 10 points.
Star with shorter points.
Star with longer points.
To change additional settings for certain shapes:
1. Select the shape object.
2. Select the Styles tab in the toolbox.
3. Use the available slider(s) to modify the shape.
Use the Points slider to adjust the
number of points.
Use the Size slider to adjust the
size of the points.
Note: Only applicable shapes have tools for further customizing them.
Graphic Properties
SOHO Labels & Envelopes lets you customize graphics by applying a tint or a mask to a graphic. Tints and
masks provide a powerful way to create designer effects.
Changing Object Properties
39
Text Properties
Tint
The tint applied to a graphic is controlled by the color of the tint and the intensity of the tint.
Select the color well to
choose the color of tint.
Turn tint on/off
Use the intensity slider to
adjust the level of tint.
To apply a tint to a graphic:
1. Select the graphic.
2. Select the Style tab in the toolbox.
3. Select the Tint checkbox to turn on the tint.
4. Select the tint color well to select a color of tint from the color selection window.
5. Move the intensity slider to adjust the level of tint (the left-most position indicates no tint and the rightmost position indicates full tint).
Red tint
Purple tint
No tint
solid red tint
Masks
For information on applying masks to graphics, see Masks on page 44.
Text Properties
SOHO Labels & Envelopes offers text customizing beyond the standard typographical functions such as font,
font size, text color etc.
Text Fills
When working with text objects, you can change the fill of the text to either a solid color or some type of gradient.
You can also specify a background color for the text box.
Choose from Color, Linear Gradient, or
Radial Gradient to fill the text.
Use the slider to adjust the
transparency of the text.
Turn the Background
color on/off.
Changing Object Properties
40
Advanced Special Effects Properties
To fill text with a solid color or gradient:
1. Select the text box you wish to fill.
2. Select the Style tab in the toolbox.
3. Choose Color, Linear Gradient, or Radial Gradient from the fill pop-up menu.
4. If you chose Color, select the color well to select a color from the color selection window.
5. If you chose Linear or Radial Gradient see To set the linear or radial fill gradient of a shape: on page 37 for
more information on using gradients since gradients work similarly for text and shapes.
To set the background color of a text object:
1. Select the text box you wish to modify.
2. Select the Style tab in the toolbox.
3. Select the Background checkbox to enable a background color, otherwise none will be used.
4. Select the background color well to select a color for the background from the color selection window.
Advanced Special Effects Properties
There are several special effects that can be applied to objects including transparency, shadows, image fills, and
masks.
Transparency
With SOHO Labels & Envelopes you can adjust the transparency of any object to create interesting effects.
Transparency allows you to overlap one or more objects so that the underneath objects can be highly visible, partly obscured, or completely blocked from view depending on the transparency level.
Use the transparency slider to adjust
the transparency of an object.
To adjust the transparency of an object:
1. Select the object whose transparency you wish to adjust.
2. Select the Styles tab in the toolbox.
3. Adjust the Transparency slider as desired.
50% transparency
0% transparency
98% transparency
Shadows
SOHO Labels & Envelopes allows you to introduce an element of depth to your design by adding shadows to
Changing Object Properties
41
Advanced Special Effects Properties
objects. You can adjust the shadows blur factor, the position of the shadow in relation to the object and other
exciting effects.
Use the angle wheel to
adjust the angle of the
shadow.
Turn a shadow on/off
Use the height slider to
adjust the height
of the shadow.
To add a shadow to an object:
1. Select the object you wish to add a shadow to.
2. Select the Shadow tab in the toolbox.
3. Select the Shadow Height checkbox to enable a shadow for the object.
4. Use the Shadow Height slider to adjust the height of the shadow relative to the object.
5. Use the angle wheel to adjust the angle of the shadow relative to the object.
6. Use the Fuzziness slider to adjust the shadow’s fuzziness or blur.
7. Use the Transparency slider to adjust the shadow’s transparency.
This object’s shadow is a bit
fuzzy and transparent.
This object’s shadow is set at
a different angle and height.
This object’s shadow is less fuzzy and
less transparent.
This object’s shadow is set at a
different angle relative to the object.
Image Fill
Shapes and text can be filled with images from the clip art drawer or elsewhere. You can also set the background
image of the entire design canvas.Please note that when you fill text with an image, the interior of each letter in
the text is filled with the image, not the text box itself.
Drag an image to the image
well or click the Set button
to select the fill image.
Select a position for the
fill image.
Use the slider to change the
fill image transparency.
You can specify how an image fills a shape or text by choosing how the image is positioned and scaled within the
shape or text.
■
Center—This option places the center of the image at the center of the shape or text as best as is possible. If
the shape or text box has a different shape than the image, parts of the image will not appear and blank space
Changing Object Properties
42
Advanced Special Effects Properties
may also appear around the image.
This image is centered both vertically and horizontally
in the square shape.
■
Tile—This option repeats the image inside the shape or text box if the image is smaller than the shape or
text. If the image is larger than the shape or text box, you will see only part of the image inside the shape or
text.
This image is tiled through out the square shape.
■
Scale to fit—This option expands or shrinks the image to fit within the shape’s or text’s dimensions as best
as is possible. The image may become distorted depending on the shape or text’s shape and size.
This image is scaled to fit the square shape.
■
Proportional—This option maintains the image’s original aspect ratio while trying make the image as big as
possible within the bounds of the shape or text box.
This image is proportional to the square shape it occupies.
To fill a shape or text with an image:
1. Select the object to fill with an image.
2. Select the Image tab in the toolbox.
3. Click the Set button to choose an image from an Open dialog; or drag an image from the Finder to the image
well; or drag an image from the clip art drawer or iPhoto drawer to the image well.
4. Choose an image position from the pop-up menu.
5. Adjust the transparency of the filled image using the Transparency slider (use 0% to make the fill image
opaque; use 100% to make the fill image completely transparent).
Changing Object Properties
43
Advanced Special Effects Properties
To set an image fill for the entire design canvas:
1. Click anywhere on the design canvas except on an object.
2. Select the Image tab in the toolbox.
3. Click the Set button to choose an image from an Open dialog; or drag an image from the Finder to the image
well; or drag an image from the clip art drawer or iPhoto drawer to the image well.
4. Choose an image position from the pop-up menu.
5. Adjust the transparency of the filled image using the Transparency slider (use 0% to make the fill image
opaque; use 100% to make the fill image completely transparent).
To remove an image fill from an object:
1. Select the object that you wish to remove the image fill from.
2. Select the Image tab in the toolbox.
3. Click the Clear button.
Masks
You can apply image masks to graphics and shapes in SOHO Labels & Envelopes for some powerful special effects.Masks specify what portion of an image is displayed on the design canvas. Masks are usually partially transparent to control what portion of an image is shows through on the design canvas. SOHO Labels & Envelopes
ships with a wide variety of image masks.
Image with no mask applied.
Image with frame mask applied.
Image with left gradient mask
applied.
Image with star mask applied.
To apply a mask to a graphic or shape:
1. Select the graphic or shape you wish to mask.
2. Open the Graphics drawer.
3. Click Masks to access the masks that ship with SOHO Labels & Envelopes.
Changing Object Properties
44
Advanced Special Effects Properties
4. Select an image mask.
Choose from a variety of masks for
graphic or shape objects.
5. Select the “Apply to selected graphic/shape”.
Note: If a shape object has a color fill applied and you apply an image mask, the image mask may not be apparent
immediately. You will need to apply transparency to the fill color in order for the image mask to be seen. For
more information on applying transparency to shape objects see Transparency on page 41.
To remove a mask from a graphic or shape:
1. Select the graphic or shape you wish to remove the mask from.
2. Select the Image tab in the toolbox.
3. Click Clear to remove the mask.
Changing Object Properties
45
Field Basics
Chapter 6
Working With Fields
Fields are an integral part of a label, envelope, or letterhead since they provide a way to populate your design with
contact information. SOHO Labels & Envelopes integrates directly with the Mac OS X Address Book application so populating a label, envelope, or letterhead with contact information is easy and doesn’t require contact
data entry.
Field Basics
SOHO Labels & Envelopes makes it very easy to work with fields in your design. This section will focus on the
basics of accessing fields, using fields, and controlling the case of fields. It will also introduce you to some of the
fields you can use.
To access fields:
1. Open the Contact Info drawer.
2. Select Me, Others, or Misc for a particular set of fields (the differences between these set of fields will be
discussed later in this chapter).
Open/Close Contact Info drawer
Access the various types
of fields
To access a particular field:
1. Click the disclosure triangle next to a category name to see a list of the fields in that category.
Click the disclosure triangle to show
the fields for a particular category.
These are the fields in the Personal
category.
Working With Fields
46
Advanced Fields Options
To add fields to your design:
1. Open Contact Info drawer.
2. Select Me, Others, or Misc for a particular set of fields (the differences between these set of fields will be
discussed later in this chapter).
3. Click the disclosure triangle to show a category of fields.
4. Drag the field you want to use from the drawer to the design canvas. You can drag a text field directly to the
canvas or into an existing text box. You may alternatively select the field and then click the Insert Text button to insert the field where the cursor is located in a text box.
Drag fields to
the design canvas.
Once a field is on your design canvas, it behaves like ordinary text in a text box. You can change its font, font
size, color, etc. This means you can add additional text to the text box that contains the field.
If you would like multiple fields to be aligned on the design canvas, you should consider creating a text box and
placing all the fields to be aligned within the same text box.This way you only have to manage one text box instead of several. For more information on text and text boxes see Chapter 4 Working With Text, Shapes, Graphics,
& iPhoto on page 24.
Field Case
When working with fields you may want to force the contents of a particular field displayed in all uppercase or
all lowercase. Note: forcing the case of a field to all uppercase or all lowercase does not change any of the actual
data in the Mac OS X Address Book—it simply controls how the data is displayed in preview mode.
To format a field as all uppercase or lowercase:
1. Select the field(s) you want to change the case of.
2. Click the Style tab in the toolbox.
3. Click the Upper Case or Lower Case buttons in the toolbox to set the case.
To restore the original case to a field:
1. Select the field(s) you want to restore the case of.
2. Click the Style tab in the toolbox.
3. Click the Capitalize button in the toolbox to restore the field so it always displays its text exactly how it appears in the Address Book or original data source.
Advanced Fields Options
SOHO Labels & Envelopes has some powerful fields options to make sure text and text fields always look good.
Working With Fields
47
Advanced Fields Options
For example, there are options to make sure text and text fields fit their enclosing text boxes.
Before
After
Normal field
Expand text box right field
Normal field
Reduce font size field
Normal field
Expand text box down field
Increase letter spacing field
Increase font size field
Text Fitting
It’s sometimes hard to predict how much space a field will occupy once it is filled in with actual contact data.
SOHO Labels & Envelopes has some powerful text fitting features to make sure your field data always fits and
looks good in it enclosing text box. Address fields provide a good example of how text fitting can be useful. Suppose you have an address field in a small text box and choose to fill in the design with a contact that has a long
address. The contact’s address probably won’t fit in the text box and will appear cut off. Text fitting allows you
to precisely choose one of several options to make sure the contact’s address fits inside its enclosing the text box.
■
■
■
You can specify that the font size of the text in the text box be automatically increased or decreased as necessary.
You can specify that the spacing between letters in a text field be automatically increased or decreased as necessary.
You can tell the text box to automatically expand one of its sides far enough to accommodate all the text.
To add text fitting to a text box:
1. Select the text box you wish to add text fitting to. Text fitting options only apply to text boxes that contain
fields since text boxes that don’t contain any fields know the size of their contents in advance.
2. Select the Style tab in the toolbox.
Working With Fields
48
Advanced Fields Options
3. Click the Options button to open the Advanced Fields Options Inspector.
Cause the text box to expand
in a specified direction to
accommodate the text.
Scale the text to fit the text
box.
4. Select one of the text fitting options (multiple selections can be made depending on the options you select).
The following table provides a definition for each of the text fitting options.
TABLE 3. Text Fitting Options
Option
Definition
WIDER than the text box
When text fields are filled-in with actual contact data, if the result is
wider than the text box, use one of these options.
Expand text box left
This option expands the width of the text box far enough left to accommodate all of the text.
Expand text box right
This option expands the width of the text box far enough right to accommodate all of the text.
Reduce the font size
This option will reduce the size of the text font so that the text will fit
inside of the text box.
TALLER than the text box
When text fields are filled-in with actual contact data, if the result is
taller than the text box, use one of these options.
Expand text box up
This option expands the height of the text box far enough up to accommodate all of the text.
Expand text box down
This option expands the height of the text box far enough down to accommodate all of the text.
Working With Fields
49
Me & Others Fields
TABLE 3. Text Fitting Options
Option
Definition
NARROWER than the text box
When text fields are filled-in with actual contact data, if the result is
narrower than the text box, use one of these options.
Increase the font size
This option will increase the font size so that the text will fit the size of the
text box. If this option is selected, the Expand text box down option will
automatically be selected so that the text box can accommodate the height
change that comes from increasing the font size.
Increase the letter spacing
This option will increase the letter spacing so that the text will fit the size of
the text box.
Me & Others Fields
This section will provide definitions for each of the fields that SOHO Labels & Envelopes supports. Most of
these fields correlate with the fields in the Mac OS X Address Book. Others are smart-fields that extract portions
of fields or smartly combine multiple fields for ease of use. There are three general types of fields: Me, Others,
and Misc. Each of these general types of fields will be discussed in detail.
Me Fields
The Me fields represent fields that correspond with the contact selected in the My Contact Card. The My Contact Card by default uses your contact record in the Mac OS X Address Book. Each of the Me fields will begin
with “My” to distinguish them from other fields on the design canvas, e.g. “MyFirst”, “MyLast”, etc. The most
common place of using the Me fields is the return address on an envelope or label.
Working With Fields
50
Me & Others Fields
Quickly search for a contact record
in the Mac OS X Address Book
Select any contact for
the My Contact Card.
Add a company logo for
use with the MyLogo field.
Add a signature for use with
the My Signature field.
To specify the contact for the My Contact Card:
1. Choose SOHO Labels & Envelopes > Preferences.
2. Click Me to open the Me preferences.
3. Select your contact record or the contact record that you want to use.
4. Click “Make This My Card” to make the selected contact the My Contact Card.
In addition to choosing a a contact record for the My Contact Card, you can add a logo and a signature. These
two items will be used in the label, envelope, or letterhead when either the MyLogo or MySignature field is used.
To add/remove a logo on the My Contact Card:
1. Choose SOHO Labels & Envelopes > Preferences.
2. Click Me to open the Me preferences.
3. Click Set to choose an image from an Open dialog; or drag an image from the Finder to the logo image well.
4. Click Clear to remove the logo from the logo image well.
To add/remove a signature to the My Contact Card:
1. Choose SOHO Labels & Envelopes > Preferences.
2. Click Me to open the Me preferences.
3. Click Set to choose an image from an Open dialog; or drag an image from the Finder to the logo image well.
4. Click Create to have SOHO Labels & Envelopes create a signature automatically for you.
5. Click Clear to remove the signature from the signature image well.
Working With Fields
51
Me & Others Fields
Others Fields
The Others fields will be populated with contact information based on the contact(s) selected in preview mode.
An example would be the shipping address on a label or envelope. Suppose you use the “Addr.home” field on a
label. Each contact that you select in preview mode will have its home address populate the field on the label,
envelope, or letterhead.
Me & Others Field Definitions
This section will define both the Me and Others fields since both set of fields have similar definitions. The main
difference is that the Me fields get populated with contact information from the My Contact Card record, whereas the Other fields get populated with contact information from the contacts selected in preview mode.
For example, the “MyFirst” and “First” fields get populated with the first name of a contact. The “MyFirst” field
is populated with the first name from the contact that is selected in the My Contact Card (see Me Fields on page
50 for more information). The “First” field will get populated with the first name of the selected contact(s) in
preview mode.
TABLE 4. “Field Definitions” will list the Others fields and omit the Me equivalents for simplicity sake.
TABLE 4. Field Definitions
Field Name
Field Definition
RETURN
ADDRESS
BLOCKS & DELIVERY ADDRESS
BLOCKS
Return and Delivery Address Blocks smartly combine several Address Book fields
and text into a pre-formatted block that you can drag right onto your design.
Popular formats are included for both Return and Delivery Address Blocks. Further, once an address block is on your design, the One-Click Formatting feature
lets you change the format on-the-fly.
You can find the pre-formatted Return Address Blocks when viewing the Me
fields. Likewise, you can find Delivery Address Blocks when viewing the Others
fields. For more information on using Return and Delivery Address blocks see
One-Click Formatting on page 66.
Name
The.full name plus the complete address fields combined. Example:
John Doe
1345 E. Summerhill Lane
Las Vegas, NV 12345
Prefix+Name
The prefix plus the full name plus and the complete address fields combined. Example:
Mr. John Doe
1345 E. Summerhill Lane
Las Vegas, NV 12345
CompanyAddress
The company name plus the complete address fields combined. Example:
ABC Company
1345 E. Summerhill Lane
Las Vegas, NV 12345
Working With Fields
52
Me & Others Fields
TABLE 4. Field Definitions
Field Name
Field Definition
Name+Company
The full name plus the complete address fields combined. Example:
John Doe
ABC Company
1345 E. Summerhill Lane
Las Vegas, NV 12345
Company+Attention
The company name plus the text Attention plus the full name and the complete address
fields combined. Example:
ABC Company
Attention: John Doe
1345 E. Summerhill Lane
Las Vegas, NV 12345
Name+Title+Company
The full name plus the job title plus the company name and complete address fields
combined. Example:
John Doe
Manager
ABC Company
1345 E. Summerhill Lane
Las Vegas, NV 12345
Name+Dept+Company
The full name plus the department name plus the company name and complete address
fields combined. Example:
John Doe
Auto Body Department
ABC Company
1345 E. Summerhill Lane
Las Vegas, NV 12345
Name+Title+Dept+Co
mpany
The full name plus the job title plus the department plus the company name and complete address fields combined. Example:
John Doe
Manager
Auto Body Department
ABC Company
1345 E. Summerhill Lane
Las Vegas, NV 12345
Working With Fields
53
Me & Others Fields
TABLE 4. Field Definitions
Field Name
Field Definition
Name+Spouse
The full name plus the text “and” plus the spouse name and complete address fields
combined. Example:
John and Betty Doe
1345 E. Summerhill Lane
Las Vegas, NV 12345
Family
The text “The” plus the last name plus the text “Family” and complete address fields
combined. Example:
The Doe Family
1345 E. Summerhill Lane
Las Vegas, NV 12345
Wedding
The text “Mr. and Mrs” plus the full name and complete address fields combined.
Example:
Mr. and Mrs. John Doe
1345 E. Summerhill Lane
Las Vegas, NV 12345
ESSENTIALS
Each of these fields either directly corresponds to an Address Book field or
smartly combines more than one Address Book field.
The Address, Phone, Fax, Email, and Address (1-line) fields by default use their
primary value. For example, the Address field will be populated with the primary
address of a contact. The primary address is defined as the first address listed for
a contact record in the Mac OS X Address Book.
The One-Click Formatting features lets change on-the-fly which value of a field
is used. For example, the Phone field can be switched to use the Home or Work
phone number on-the-fly. For more information on Essentials Fields and OneClick Formatting see One-Click Formatting on page 66.
First+Last
The first name field plus the last name field combined.
First
The first name of a contact.
Last
The last name of a contact.
Address
The complete address of a contact.
Phone
The phone number of a contact.
Fax
The fax number of a contact.
Email
The email of a contact.
Company
The company name of a contact.
Job Title
The job title of the contact.
Picture
The picture that is assigned to a contact in the Address Book.
Working With Fields
54
Me & Others Fields
TABLE 4. Field Definitions
Field Name
Field Definition
MyLogo (Me field
only)
The logo from the selected My Contact Card. When the logo field gets filled in, it will
always maintains the aspect ratio of your logo. It will not distort the logo nor will it
increase the size of the logo. For example, if your logo is 1” x 1” in size and you stretch
the Logo field to 2” x 2”, when the logo field gets filled in the logo will only be 1” x1”.
However, if you make the logo field 1/2” x 1/2”, when the logo field gets field in the
logo will be 1/2” x 1/2”.
MySignature (Me
Field only)
The signature from the selected My Contact Card.
Address (1-line)
The complete address of a contact on one line.
PERSONAL
Each of these fields correspond to an Address Book field.
Middle
The middle name of a contact.
Prefix
The prefix of a contact (e.g. Mr., Dr.).
Suffix
The suffix of a contact (e.g. Jr., Sr.).
Nickname
The nickname of a contact.
Maiden
The maiden name of a contact.
PFirst
The phonetic first name of a contact.
PLast
The phonetic last name of a contact.
PMiddle
The phonetic middle name of a contact.
Birthday
The birth date of the contact.
INITIALS
Each of these fields smartly extract just a portion of a corresponding Address
Book field.
F
The first initial of the first name.
R (Me)
M
The first initial of the middle name.
D (Me)
L
The first initial of the last name.
S (Me)
C
The first initial of the company name.
P (Me)
ADDRESS
Each of these fields will be filled in with a complete address that has been smartly
formatted for the address’s country. A complete address includes all of the fields
that make up an address such as a street, city, state, postal code, etc.
Addr. primary
The complete primary address. The primary address is the first address of a contact in
the Address Book.
Working With Fields
55
Me & Others Fields
TABLE 4. Field Definitions
Field Name
Field Definition
Addr.1
The complete first address which is the first address listed in the Address Book.
Addr.2
The complete second address which is the second address listed in the Address Book.
Addr.home
The complete home address which is the address labeled as “Home” in the Address
Book.
Addr.work
The complete work address which is the address labeled as “Work” in the Address Book.
ADDRESS (1-LINE)
Each of these fields will be filled in with the complete address that has been
smartly formatted to fit on a single line. A complete address includes all of the
fields that make up an address, such as a street, city, state, postal code, etc. Any
carriage returns in an address will be ignored.
Addr(1-line).primary
The complete primary address which is the first address listed in the Address Book.
Addr(1-line).1
The complete first address which is the first address listed in the Address Book.
Addr(1-line).2
The complete second address which is the second address listed in the Address Book.
Addr(1-line).home
The complete home address which is the address labeled as “Home” in the Address
Book.
Addr(1-line).work
The complete work address which is the address labeled as “Work” in the Address Book.
ADDRESS FIELDS
Each of these fields are the individual parts that make up an address. This list will
only define the individual parts of the primary address which is the first address
listed in the Address Book. The same definitions for these fields can be applied to
the other fields in this group which include home, work, etc.
Street
The street address of the primary address.
City
The city of the primary address.
State
The state of the primary address.
Code
The ZIP/postal code of the primary address.
Country
The country of the primary address.
CC
The country code of the primary address.
PHONE
Each of these fields will be filled in with the appropriate phone number.
Ph.primary
The first phone number listed in the Address Book.
Ph.1
The first phone number listed in the Address Book.
Ph.2
The second phone number listed in the Address Book.
Ph.work
The phone number labeled “Work” in the Address Book.
Ph.home
The phone number labeled “Home” in the Address Book.
Ph.mobile
The phone number labeled “Mobile” in the Address Book.
Ph.main
The phone number labeled “Main” in the Address Book.
Working With Fields
56
Misc Fields
TABLE 4. Field Definitions
Field Name
Field Definition
Ph.homefax
The phone number labeled “Home Fax” in the Address Book.
Ph.workfax
The phone number labeled “Work Fax” in the Address Book.
Ph.pager
The phone number labeled “Pager” in the Address Book.
INTERNET
Each of these fields will be filled in with Internet related references.
Homepage
The URL labeled “Homepage” in the Address Book.
Email.primary
The first email address listed in the Address Book.
Email.1
The first email address listed in the Address Book.
Email.2
The second email address listed in the Address Book.
Email.home
The email address labeled “Home” in the Address Book.
Email.work
The email address labeled “Work” in the Address Book.
MESSAGING
There are five types of messaging fields: AIM, Jabber, MSN, Yahoo and ICQ.
Listed below are the definitions for only the AIM related fields. The same definitions can be applied to the other messaging types.
AIM
The first AIM account listed in the Address Book.
AIM.1
The first AIM account listed in the Address Book.
AIM.2
The second AIM account listed in the Address Book.
AIM.home
The AIM account labeled “Home” in the Address Book.
AIM.work
The AIM account labeled “Work” in the Address Book.
OTHER
Each of these fields either directly corresponds to an Address Book field, handles
miscellaneous information or provides special functionality.
Note
The note listed in the Address Book.
Created
The created date of the contact in the Address Book.
Modified
The modified date of the contact in the Address Book.
UniqueID
The unique ID of the contact in the Address Book.
LABELS
Each of the fields in the Label group displays the label for a particular field. For
example, the PhLabel.1, will display the label for the first phone number—not
the phone number itself. It’s best to use the label fields in conjunction with the
fields they represent.
Misc Fields
The Misc (short for Miscellaneous) fields are fields that don’t have a direct correspondence with the Address
Book. They can be used to create barcodes, counters, serial numbers, etc. Since many of these field types are more
sophisticated, each will be detailed within its own section.
Working With Fields
57
Barcode Fields
Barcode Fields
SOHO Labels & Envelopes supports many barcode formats that can be added to a design. A barcode consists of
bars and spaces that represent a number or combination of numbers and letters. For example, a POSTNET barcode represents a 5, 9, or 11 digit zip code. Once a barcode is added to a design it behaves like any other image
and can be resized, rotated, etc. For more information on working with images see Chapter 4 Working With Text,
Shapes, Graphics, & iPhoto on page 24.
This section will discuss how to add a barcode to a design, different barcode options including how to specify
the data from which to generate the barcode, and the definitions for each barcode type.
Drag and drop any barcode
directly onto the design canvas.
To add a barcode to the design canvas:
1. Open the Contact Info drawer.
2. Click Misc to access the Barcodes fields.
3. Drag a barcode field to your design canvas.
The preview mode contains a special control for adding POSTNET barcodes to designs just prior to printing
without affecting the original design. For more information on dynamic POSTNET barcode generation, see Dynamic POSTNET Barcodes in Chapter Fluid Preview on page 72.
Advanced Barcode Options
Barcodes are generated from numeric or alpha-numeric data. This data can be acquired from three different
sources: manual entry, a tab-delimited file, or the Mac OS X Address Book. The Advanced Barcode Options
Inspector lets you choose which method to use on a barcode by barcode basis. Once you switch to preview mode,
the barcode will change to represent the actual data source specified.
To open the Advanced Barcode Options Inspector:
1. Choose View > Advanced Options.
2. Click the Barcode Options tab.
3. OR click the Style tab in the toolbox
4. Click the Barcode Options button.
Working With Fields
58
Barcode Fields
5. Click the Barcode Options tab.
Enter data manually to
generate a barcode.
Select an import field
to generate a barcode.
Select a code field to
generate a barcode.
To enter barcode data manually:
1. Open the Advanced Barcode Options Inspector.
2. Select a barcode field on the design canvas.
3. Choose “Enter data string manually”.
4. Type the data into the box.
5. Click Enter to save the data.
One barcode containing the manually entered data will be generated in preview mode. However, preview mode
lets you specify the number of labels, envelopes, or letterhead you want with that same barcode.
To retrieve barcode data from an import file:
The following steps assume that a tab delimited file is already imported. If this is not the case, a tab delimited
file will need to be imported. For information on importing tab delimited files, see Data Syphon Via Tab Delimited Import Fields on page 63.
1. Open the Advanced Barcode Options Inspector.
2. Select a barcode field on the design canvas.
3. Choose “Get from tab delimited import file”.
4. Select an import field from the pop-up menu.
A barcode will be generated in preview mode for each record in the tab delimited file using the selected import
field.
To retrieve barcode data from the Address Book:
1. Open the Advanced Barcode Options Inspector.
2. Select a barcode field on the design canvas.
3. Choose “Get from Address Book”.
4. Click the Zip/postal pop-up menu and select a code.
Working With Fields
59
Barcode Fields
A barcode will be generated in preview mode for each selected contact using the selected zip/postal code field.
Barcode Definitions
TABLE 5. “Barcode Definitions” contains a list of supported barcodes, their definitions, allowed characters, and
the number of characters supported. Please note that some barcodes contain checksum digits. When you provide
the data for such barcodes, the checksum digits are optional. If you don’t provide the checksum digits, SOHO
Labels & Envelopes will calculate them for you. If you do include the checksum digits and the checksum digits
are incorrect, the barcode will not be included in the preview mode.
TABLE 5. Barcode Definitions
Valid
Characters
Barcode Name
Definition
Length
POSTNET
A barcode symbology used primarily by the U.S.
Postal Service for mail sortation.
01234567890
5, 9, or 11 characters.
PLANET
A barcode symbology that extends the POSTNET format. It’s primarily used for mail sorting
and tracking uses.
01234567890
12 or 14 characters.
U.K. Royal Mail
A barcode symbology used primarily in the UK
for mail sortation.
01234567890
ABCDEFGHIJKLMNOPQRSTU
VWXYZ
Variable (No fixed
length)
Japan Post
A barcode symbology used primarily in Japan
for mail sortation.
UPC-A
A barcode symbology used primarily in the retail
industry for labeling packages.
01234567890
12 or 8 characters.
UPC-E
A barcode symbology that is shorter in length
from UPC-A, and is primarily used for labeling
small items.
01234567890
12 or 8 characters.
EAN13
An international standard barcode symbology
used primarily outside the U.S. for retail food
packages.
01234567890
13 characters.
EAN8
An international barcode symbology used primarily outside the U.S. for labeling small items.
01234567890
8 characters.
Industrial 2 of 5
A barcode symbology used primarily in industrial applications and mechanical numbering
systems.
0123456789
Variable (No fixed
length)
Interleaved 2 of 5
A barcode symbology primarily used in the
warehouse industry.
0123456789
Variable (No fixed
length)
Modified Plessey
A barcode symbology primarily used in library
applications.
01234567890
Variable (No fixed
length)
Working With Fields
60
Counter or Automatic Numbering Fields
TABLE 5. Barcode Definitions
Valid
Characters
Barcode Name
Definition
Length
Code 39
A barcode symbology primarily used in the nonretail environment.
0123456789[S
pace]ABCDEFGHIJKLMNO
PQRSTUVWXYZ-.$/
+%
Variable (No fixed
length)
Code 39 Extended
A barcode symbology that extends the Code 39
format.
0123456789[S
pace]ABCDEFGHIJKLMNO
PQRSTUVWXYZ!#$%
&'()*+,-./
:;<=>?@[\]^_`
abcdefghijklmnopqrstuvwxyz{|}
Variable (No fixed
length)
Code 128
A barcode symbology primarily used by many
industry applications such as the shipping and
packaging industries.
Nearly the
complete
ASCII character set including control
characters.
Variable (No fixed
length)
Codabar
A barcode symbology primarily used in libraries,
medicine, and overnight package delivery.
01234567890$:/.+
Variable (No fixed
length)
Counter or Automatic Numbering Fields
Counter or automatic numbering fields can be used to create raffle tickets, sheets of serial numbers, numbered
groups of shipping cartons, and more. Counter, Total, Count of Total, and Serial Number fields along with sophisticated options are all included for precise control.
Counter Field
The Counter field is used when each label, envelope, or letterhead needs to have a unique number on it. The
Counter field can begin counting at any number and increment by any value. For example, the Counter field
can begin counting at the number 5 and increment each time by 3: 5, 8, 11, 14, etc. Additionally, the Counter
field can be formatted with leading zeros: 00001, 00002, 00003, etc.
To specify the settings for the Counter field:
1. Drag the Counter field to the design canvas.
2. Move the cursor over the Counter field until the cursor changes to a pop-up triangle.
Working With Fields
61
Counter or Automatic Numbering Fields
3. Click to open the Counter Settings sheet.
4. Enter the counter start value.
5. Enter the increment value.
6. Enable “Show leading zeros” if you want the counter to always be the same number of digits.
7. Click OK to save the settings.
The following example shows the Counter field in use on a sheet of labels.
Total Field
The Total field displays the total number of labels, envelopes, or letterhead that are generated in preview mode.
For example, if 9 labels are generated, each of those labels will have its Total field populated with the number 9.
The Total field has formatting options similar to the Counter field and they can be accessed in a similar manner.
The following example shows the Total field on a sheet of labels.
Count of Total Field
The Count of Total field displays the current count along with a total and is useful for shipping labels where
Working With Fields
62
Data Syphon Via Tab Delimited Import Fields
multiple cartons comprise a single shipment, e.g. Carton 1 of 2, Carton 2 of 2. The Count of Total field has
formatting options similar to the Counter field and they can be accessed in a similar manner. The following example shows the Count of Total field on a sheet of labels.
Serial Number Field
The SerialNumber field is nearly identical to a normal Counter field except that it by default shows leading zeros
when displayed. Since Counter fields and Serial Number fields operate independently from one another, they
can be used simultaneously with different start and increment valued.
Data Syphon Via Tab Delimited Import Fields
Data can be syphoned from multiple sources and used in your design in SOHO Labels & Envelopes. In addition
to populating labels, envelopes, or letterhead with contact information from the Mac OS X Address Book, designs can also be populated with information from a tab delimited file. A tab delimited file is a text file that contains fields and records. Tab delimited files can be created from most applications including Microsoft Excel,
Personal Organizer, etc. For information on how to create tab delimited files in other applications, you’ll need
to consult their user manual or help system.
About Tab Delimited Files
In order to understand how the tab delimited import works in SOHO Labels & Envelopes, some terminology
needs to be explained. A tab delimited file, when viewed in a spreadsheet, is simply a collection of data organized
in rows and columns. The rows of the spreadsheet are called records. The columns of the spreadsheet are called
fields. Each record is comprised of fields. Within the tab delimited file itself, each row is separated by a return
character and each field is separated by a tab character. Hence the name: tab delimited file. SOHO Labels &
Envelopes supports an unlimited number of records with a total of twenty fields per record.
TABLE 6. “Sample Tab Delimited File” is a sample tab delimited file in a spreadsheet. This tab delimited file is
comprised of three records and each record contains five fields.
TABLE 6. Sample Tab Delimited File
John
Smith
333-4444
Las Vegas
Nevada
Susy
Goldberg
222-7777
Cheyenne
Wyoming
Tina
Jones
111-2222
Miami
Florida
Using a Tab Delimited File
There are two simple steps to using a tab delimited file. First, you must import the tab delimited file. Second,
you must place special import fields on your design to represent the imported data.
Working With Fields
63
Data Syphon Via Tab Delimited Import Fields
To import a tab delimited file:
The first thing to do when creating a label, envelope, or letterhead that will be populated with information from
a tab delimited file is to import the file into SOHO Labels & Envelopes.
1. Choose File > Import Tab Delimited File.
2. Select the tab delimited file from the Open dialog box.
3. Click OK to choose the tab delimited file.
4. Click Import to import the tab delimited file.
When a tab delimited file is imported into SOHO Labels & Envelopes, the information is stored in memory and
saved with the document. The information retrieved from the tab delimited file is not visible until the design is
displayed in preview mode.
To clear the tab delimited file from memory:
1. Choose File > Clear Import File
This will clear the tab delimited file from memory and another tab delimited file can be imported.
To populate a design with information from a tab delimited file:
Each record in a tab delimited file will create a new label, envelope, or letterhead in preview mode. In order to
see the data in each record, you’ll need to place special import fields on your design. There are a total of twenty
Tab Delimited Import fields: Import.1, Import.2, Import.3, etc. Each field will be populated with data from the
corresponding field in the tab delimited file. For example, the Import.1 field corresponds to the first field in the
tab delimited file. For information on adding fields to a design see Field Basics on page 46.
A Working Example
This working example will use the sample data from the tab delimited file shown in Table 6 on page 63. That
file has a total of three records with each record containing five fields. This example will generate a label for each
of the records and each label will have five fields: Import.1, Import.2, Import.3, Import.4, and Import.5. Although there are five fields in the tab delimited file, it’s not necessary to have 5 Import fields in the design. You
only need to add an import field for the fields you want to see on your design. This example will use all five fields.
This label design includes the labels First, Last, Phone, City, and State to demonstrate what each Import field
represents in preview mode.
Working With Fields
64
Miscellaneous Fields
Miscellaneous Fields
There are several Miscellaneous fields that don’t fall under any specific category including the powerful Dependency field. TABLE 7. “Miscellaneous Field Definitions” lists each Miscellaneous field and defines its purpose.
TABLE 7. Miscellaneous Field Definitions
Field Name
Field Definition
Long Date
The current date in the default long format as specified in the Mac OS X System Preferences > International. Example: Friday, January 20, 2004.
Short Date
The current date in the default short format as specified in the Mac OS X System Preferences > International. Example: 1/20/04.
Custom Date
The Custom Date lets you choose a custom date format using One-Click Formatting.
For more information on the Custom Date field and One-Click Formatting see OneClick Formatting on page 66.
Time
The current time in the default format.
Custom Time
The Custom Time lets you choose a custom time format using One-Click Formatting.
For more information on the Custom Time field and One-Click Formatting see OneClick Formatting on page 66.
[
Starts a text dependency. For more information on Text Dependencies see Dependency
Fields on page 65.
]
Ends a text dependency.
Dependency Fields
A contact in the Address Book may not contain data for a particular field on a design. In such cases, you may
want to hide other text related to that field. The Start and End text dependency fields allow you to not display
certain text or fields if the contact does not have data for a particular field.
Suppose there are two contacts: John Doe and Suzy and Suzy does not have a last name in her contact record.
Further suppose that a particular design includes first and last name fields with the text labels “First” and “Last
preceding those fields.
Figure 1 shows the design canvas for this example before the fields are filled in with a contact’s information. Figure 1.1 shows the design filled in with John Doe’s contact record. Figure 1.2 shows the design filled in with
Suzy’s contact record. Suzy does not have a last name in her contact record so the last name field is blank.
Figure 1
Figure 1.1
Figure 1.2
The dependency fields make it possible to omit the “Last” label and the last name field if a contact does not have
a last name entered in. Simply place a Start text dependency field before the “Last” label, and place an End text
Dependency field after the last name field as shown in Figure 2. The text dependency fields tell SOHO Labels
& Envelopes to not display any of the contents between the Start and End dependency fields if the last name
Working With Fields
65
One-Click Formatting
field does not contain information.
Figure 2
Figure 2.1
Figure 2.2
Figure 2.1 shows the design filled in with John Doe’s contact record. Figure 2.2 shows the design filled in with
Suzy’s contact record. Since Suzy does not have a last name entered in her contact record so neither the “Last”
label nor the last name field are displayed.
To add dependency fields to a design:
1. Click the Design button at the top of the SOHO Labels & Envelopes window (or choose View > Design
Mode).
2. Open the Contact Info drawer.
3. Insert a text box on the design canvas.
4. Drag the fields that you want to be dependant upon a value inside the text box.
5. Drag and place the Start text dependency field before the collection of text and text fields that you want to
make dependent.
6. Drag and place the End text dependency field after the collection of text and text fields that you want to
make dependent.
Note. There must be at least one field between the Start and End text dependency fields. If there is more than
one field between the Start and End text dependency fields, then the entire contents will be displayed if even one
field has data entered in for it.
One-Click Formatting
The One-Click Formatting features lets you change on-the-fly which value of a field is used without altering your
design. For example, the Phone field can be switched to use the Home or Work phone number on-the-fly. OneClick Formatting can be used on Phone Fields, Address/Delivery Blocks, Essentials Fields, and Custom Date
and Time Fields.
Phone Fields With One-Click Formatting
Phone formatting lets you specify how you’d like the digits in a phone number formatted independently of how
they’re entered in the contact record. For example, the telephone number “888-555-7777” can be formatted as
Working With Fields
66
One-Click Formatting
“888.555.7777”, “[888] 555-7777”, etc.
Quickly choose the phone
formatting for a phone field.
To apply formatting to a phone field:
1. Move the cursor over a phone field (the cursor will change to a pop-up menu triangle).
2. Click the mouse to open the pop-up menu.
3. Choose a phone number format.
Return & Delivery Address Blocks With One-Click Formatting
Each of the Return and Delivery Address Blocks smartly combines several Address Book fields and text into a
pre-formatted block that you can drag right onto your design. Once an address book block is on your design,
you can use the One-Click Formatting feature to quickly change the format of the block on-the-fly. SOHO Labels & Envelopes comes with many popular return and delivery address formats.
Quickly change the address
format in a Return or Delivery
Address Block.
Select an address format
from a list of popular formats.
The resulting address format
is instantly changed.
To change the address format in an existing Return/Delivery Address block:
1. Click tab at the top of the Return or Deliver Address Block to open the format pop-up menu.
2. Choose a new address format.
Essentials Fields With One-Click Formatting
The Essentials fields is a group of fields that one commonly uses on labels, envelopes, or letterhead. Each of the
Essentials fields either directly corresponds to an Address Book field or smartly combines more than one Address
Working With Fields
67
One-Click Formatting
Book field. Some of the Essentials fields including Address, Phone, Fax, Email, and Address (1-line) by default
use their primary value. For example, the Address field will be populated with the primary address of a contact.
The primary address is defined as the first address listed for a contact record in the Mac OS X Address Book.
Quickly select which phone number
to use for Phone field.
To select which value to use for the Address, Phone, Fax, Email or Address (1-line) field:
1. Move the cursor over the field (the cursor will change to a pop-up menu triangle).
2. Click the mouse to open the pop-up menu.
3. Choose a value.
Custom Date and Custom Time Fields With One-Click Formatting
The Custom Date and Time fields can have many formats applied to them. For example, the Custom Date field
can be formatted to show the day of the week or display the year first.
Quickly select which date format
to use for Custom Date field.
To select which format to use for the Custom Date and Time fields:
1. Move the cursor over the field (the cursor will change to a pop-up menu triangle).
2. Click the mouse to open the pop-up menu.
3. Choose a format.
Working With Fields
68
One-Click Formatting
Working With Fields
69
Active Positioning & Quantities
Chapter 7
Fluid Preview
The preview mode in SOHO Labels & Envelopes has a very powerful and fluid design in order to provide a more
natural working environment. Like the Mac’s built-in print preview, the preview in SOHO Labels & Envelopes
lets you preview your design to see exactly how it will be printed, but that’s where the similarity ends. The preview mode in SOHO Labels & Envelopes is active or fluid. This means you can naturally change aspects of the
preview on-the-fly and see the outcome in real-time. For example, you change where your design will print on a
page; change quantities; specify which contacts in the Address Book you want to populate your design with; automatically place design elements like a POSTNET barcode; and coolest of all you can edit any text on the page
including data that came from the Address Book or another source. All the while, you’ll see exactly how your
design will print on each page and how many pages will be printed.
To access preview mode:
1. Click Preview at the top of the main window (choose View > Preview Mode).
Active Positioning & Quantities
Each project type will have different options you can select in preview mode. These options include:
■
■
The number of copies of a label, envelope, or letterhead to print.
The start row and column for designs where multiple instances of the design can appear on the same sheet.
Quickly choose the number
of copies of a design to create.
Quickly print your design
from within the application.
Select the exact positioning
for your design when multiple
designs appear on the same sheet.
A change to any of these options will instantly be reflected in the Preview so you know exactly what will be printed. Note that the different options presented depend on the type of project being previewed.
On-The-Fly Mac OS X Address Book Integration
SOHO Labels & Envelopes integrates directly with the Mac OS X Address Book. This means any design that
contains a contact related field will be populated with contact information from the Address Book. The preview
mode therefore displays Group and Contact columns similar to those found in the Address Book so you can eas-
Fluid Preview
70
Live Editing
ily select the contact(s) you wish to use to populate your design.
Quickly search for a
contact.
Access the groups and
contacts in the
Mac OS X Address Book.
Select the contact(s) you
want to use in your design.
To select contact(s) in preview mode:
1. Choose View > Preview Mode.
2. Select the contact(s) from the Contact column.Hold down the shift key to select multiple contiguous contacts. Hold down the command key to select multiple contacts in a non-contiguous fashion. A label, envelope, or letterhead will be created for each selected contact.
Live Editing
It’s normally not possible to edit what you see in preview mode, but that doesn’t mean it’s not inconvenient. The
fluid nature of the preview mode in SOHO Labels & Envelopes means you can edit any text you see on a page.
When editing text in preview mode, there are two important modes to be familiar with:
■
■
Unlock mode. Unlock mode will allow you to edit any text box on any page.
Lock mode. Lock mode will not allow you to make any changes on any page and will show the original text
content.
Lock mode should not be confused with locking in your changes. Lock mode is a way to revert back to the original state of the labels, envelopes, or letterhead. Any changes made in unlock mode will be lost if you switch to
lock mode.
To switch to lock or unlock mode:
1. Click the Lock/Unlock button to switch between lock and unlock modes. The lock on the button will display which mode you’re in.
Unlock mode.
Lock mode.
To edit text in preview mode:
1. Switch to preview mode.
2. Click the Lock/Unlock button to unlock text editing.
Fluid Preview
71
Dynamic POSTNET Barcodes
3. Double-click the text on each label, envelope, or letterhead you wish to edit.
4. Edit the text.
Dynamic POSTNET Barcodes
If your design contains a Delivery Address Block, you may want to quickly add a POSTNET barcode to expedite
shipping with the U.S. Postal Service. Once again, the fluid nature of the preview mode in SOHO Labels &
Envelopes allow you to dynamically add a POSTNET barcode without altering your design.
There are three positions that conform to U.S.P.S. standards where the POSTNET barcode can be placed: above
the address, below the address, or in the lower-right position on envelopes only.
To dimensionally add a POSTNET barcode to your design:
1. Switch to preview mode.
2. Click the Place POSTNET Barcode button to select where the POSTNET barcode should be placed.
Quickly choose to place a
POSTNET barcode on the
label, envelope, or letterhead.
The POSTNET barcode will automatically be generated for each selected contact’s zip/postal code. For more
information on POSTNET barcodes see Barcode Fields in Chapter Working With Fields on page 58.
Fluid Preview
72
Printing Labels, Envelopes, and Letterhead
Chapter 8
Printing
The purpose of this chapter is to discuss the different options you have for printing labels, envelopes, or letterhead and the tools you’ll need to achieve the results you desire.
Printing Labels, Envelopes, and Letterhead
SOHO Labels & Envelopes supports two options for printing your labels, envelopes, or letterhead.
■
■
Use your own printer.
Use a commercial print shop.
Using Your Own Printer
When you use your own printer to print labels, envelopes, or letterhead, there are a few things you should keep
in mind:
■
■
Use paper stock that your printer supports. Most, if not all consumer printers, do not support especially
thick paper stock. Consult your manual or manufacturer for information on the types of paper stock your
printer supports. For especially thick paper stock you should consider using a commercial print shop.
Use paper stock that is specific to your type of printer for best results. When choosing paper stock, the paper
stock manufacturer usually specifies if the paper stock was designed for ink jet, monochrome laser or color
laser printers.
There are three basic steps involved in printing your design.
■
■
■
Specify the number of labels, envelopes, or letterhead to print.
Select which contact(s) to use
Setup your printer.
To specify the number of labels, envelopes, or letterhead to print:
1. Type a number into the “# Copies” field in preview mode. If your design contains contact fields, the value
specified here refers to the number of copies of the design to print for each contact.
To select which contact(s) to populate the design with:
Designs that have contact fields on them will require that you first select the contacts you wish to produce your
design for. If your design does not have contact fields skip this step.
1. Select the contact(s) from the Contact column.Hold down the shift key to select multiple contiguous contacts. Hold down the command key to select multiple contacts in a non-contiguous fashion. A label, envelope, or letterhead will be created for each selected contact.
To change the preferred printer:
Mac OS X lets you specify a default printer. However, the occasion frequently rises when printing labels, envelopes, or letterhead that you want to use a printer other than the system default. SOHO Labels & Envelopes lets
you specify a preferred printer that may be different than the system default printer for convenience sake. For
example, you may want to make your dedicated label printer your preferred printer even though your laser printer is your default printer.
1. Choose File > Preferred Printer and select your preferred printer. The preferred printer menu will list the
printers that have been setup on your computer.
Printing
73
Printer Calibration
Note: If you’re printing on a DYMO stock, the software will automatically select your DYMO printer.
To setup the printer for labels and letterhead:
1. Choose File > Page Setup.
2. Verify that each of the settings are correct for your printer.
To setup the printer for envelopes:
1. Click “Envelope Printing”.
2. Verify that each of the settings are correct for your printer. For more information on printing envelopes see
Envelope Printing on page 75.
To print the labels, envelopes, or letterhead:
1. Choose File > Print.
2. Verify each of the settings are correct for your printer. Settings will vary from printer to printer so it’s important that you’re familiar with your printer’s settings.
3. Click Print.
When you print out your design, if the labels, envelopes, or letterhead do not line up correctly on the paper stock
see Printer Calibration on page 74.
Using a Commercial Print Shop
SOHO Labels & Envelopes has support for various online commercial print shops. You can also take your labels,
envelopes, or letterhead to any local print shop of your choice. There are a few things to keep in mind when using
a commercial print shop:
■
■
■
■
Print Quality should be set at 300 dpi or higher. Consult with the print shop first to see if they have any
requirements for the dpi setting for graphics and other types of objects. For more information on Print Quality see Printer Tools on page 77.
Crop marks should be turned on. Crop marks provide a way for the print shops to know where to make the
cuts on the paper stock. For more information on crop marks see Printer Tools on page 77.
Full bleed may need to be turned on. For more information on full bleeds see Printer Tools on page 77.
Most if not all print shops require designs to be submitted in PDF format. SOHO Labels & Envelopes
makes it easy to save your design in PDF format as you’ll see below.
To have a commercial print shop print your design:
1. Switch to preview mode to verify everything is correct on your design.
2. Enter the number of copies you would like to print.
3. Choose File > Print Online.
4. Follow the on-screen instructions.
Printer Calibration
When you print out your label(s), the label(s) may not line up correctly on the paper stock. There are several
reasons this sometimes happens:
■
■
■
The paper stock is thick enough that it causes your printer to not pull it through perfectly.
The printer alignment guides are off slightly.
Glossy type stock may slip when it’s being fed into the printer.
SOHO Labels & Envelopes attempts to solve these common problems through printer calibration. Printer calibration may not solve all problems, but it will improve the alignment issues as best it can. Printer calibration
Printing
74
Envelope Printing
attempts to resolve these issues by adjusting for the difference of what you see on the screen versus what is printed.
Setup printer calibration
for all the printers you
use.
To setup printer calibration:
1. Choose File > Printer Calibration.
2. Choose a printer from the pop-up menu.
3. Insert a sheet of label stock into your printer.
4. Click Print. The following marks will print on the stock.
5. Enter the value of the tick mark closest to the RIGHT side and BOTTOM side of the top left label on the
stock into the Horizontal and Vertical text boxes.
6. Click OK when finished.
You can setup calibrations for each printer that you use. This can be accomplished by going through each of the
steps in the Printer Calibration dialog for each printer. Printer calibration is not necessary for envelopes, letterhead, or DYMO® LabelWriters.
Envelope Printing
Envelope printing in the past has usually been a chore until now. Envelope printing difficulties stem from the
fact that many printer manufacturers choose different ways to feed envelopes into their printers. This requires
Printing
75
Envelope Printing
that you, the user, figure out how to make the necessary adjustments in the software you’re using to print correctly. SOHO Labels & Envelopes solves this problem by providing easy-to-use visual tools to get setup for your
printer. Before you proceed, you should consult your printer owner’s manual or look at your printer to find out
how your printer handles envelopes.
To access the envelope printing settings.:
1. Switch to preview mode.
2. Click the Envelope Printing button to access the envelope printing settings.
Use the envelope printing settings
to specify how envelopes are
fed into your printer.
As you make changes to the envelope printer settings, the picture will change to provide visual feedback on how
the settings will be applied. This will greatly reduce any chance of the envelope printing incorrectly. Each of the
envelope settings will be discussed in TABLE 8. “Envelope Printer Settings”.
TABLE 8. Envelope Printer Settings
Envelope Setting
Alignment
The Alignment setting determines whether your printer or SOHO Labels & Envelopes
makes the necessary adjustments for envelope printing. Many modern printers handle
envelope printing automatically in which case you don’t want the software to take over.
Automatic
The printer will automatically adjust its settings for the envelope that is being printed.
This is the default selection when printing envelopes.
Manual
SOHO Labels & Envelopes will make the necessary adjustments based on what is
selected for Envelope Feed, Orientation, and Position settings.
Envelope Feed
The Envelope Feed setting determines where on the printer to feed the envelope.
Front loading
The envelope is fed from the front of the printer. Most laser printers feed the envelopes
from the front.
Top loading
The envelope is fed from the top of the printer. Most inkjet printers feed the envelopes
from the top.
Printing
76
Printer Tools
TABLE 8. Envelope Printer Settings
Envelope Setting
Orientation
The Orientation setting determines if the envelope is fed face up or face down. The
face of the envelope contains the return/delivery address and stamp.
Face up
The envelope is fed into the printer face up.
Face down
The envelope is fed into the printer face down.
Position
The Position setting determines the location of the envelope when it’s fed into the
printer.
Left
The envelope is fed from the left-hand side of the printer.
Center
The envelope is fed from the center of the printer.
Right
The envelope is fed from the right-hand side of the printer.
To manually specify how envelopes are fed into a printer:
1. Switch to preview mode.
2. Click the Envelope Printing button to access the envelope printing settings.
3. Select Manual to manually select how envelopes are fed into the printer.
4. Select the Envelope Feed, Orientation, and Position settings for your printer.
5. Click OK to save the settings.
Printer Tools
SOHO Labels & Envelopes comes with precision tools to ensure that you get professional-looking labels, envelopes, or letterhead from your own printer or a commercial print shop. These tools include crop marks, print
quality and bleed controls.
To access the printer tools:
1. Choose SOHO Labels & Envelopes > Preferences.
Printing
77
Printer Tools
2. Click Printing to open the printer preferences.
Choose the print quality
of certain special effects
Choose from various
bleed sizes.
Print crop marks.
Print Quality
The print quality setting allows you to set the dpi (dots per inch) for objects that are transparent, shadowed, tinted or masked. Objects that have these attributes assigned to them will require a high dpi setting to look good
when printed. Anything above 300 dpi will be sufficient for most jobs.
If you are having your design printed at a commercial print shop, they may offer suggestions for the Print Quality
setting.
Bleed Size
SOHO Labels & Envelopes supports full bleeds. Full bleed is the printing of objects past the edge of the design
canvas to ensure that printing goes all the way to the edge of the design after the design is cut or removed. This
is useful when you want an object to print to the very edge of the label, envelope, or letterhead without any
chance of unwanted white space. When you design your labels, envelopes, or letterhead you will need to place
and size objects past the edge of the design in order for full bleed to work. There are four bleed options: No bleed,
Small, Medium and Large. Here are samples of the different bleed options:
No bleed size selected. Notice how
the red box goes to the edge of
the design and stops.
Medium bleed size selected. Notice
how the red box extends past the
design boundaries.
Large bleed size selected.
Notice how the red box
extends farther past the
design boundaries
Printing
78
Printer Tools
Crop Marks
Crop marks, also known as cut marks, are marks that are printed on the label, envelope, or letterhead indicating
where the cuts need to be made. You should enable this option if you are sending your design to a commercial
print shop.
These light gray lines
are crop marks.
Printing
79