1
htV-m Download Software
Install Guide & User Manual
www.ppmtechnology.com
PPM Technology Ltd. – Cibyn Ind. Estate – Caernarfon – Gwynedd – LL55 2BD – Wales – UK
Telephone: 44 (0) 1286 676999 Fax: 44 (0) 1286 671881 E-mail: info@ppmtechnology.com
Registered in Wales: 3743347 VAT Number: GB 713 750 842 ISO 9001 2000 Registered Firm
Amended: 05/Dec/2012 Issue: 1.5
©2009, 2010, 2011 PPM Technology Ltd.
htV-m Download Software
TABLE OF CONTENTS.
INTRODUCTION...................................................3
HARDWARE INSTALLATION..................................... 4
SOFTWARE INSTALLATION......................................5
FIRST STEPS: CONNECTING.................................. 6
FIRST STEPS: DOWNLOADING DATA.........................8
FIRST STEPS: SAVING DATA.................................. 10
FIRST STEPS: SCHEDULES.................................... 15
FIRST STEPS: SETTINGS.......................................18
DATA DOWNLOAD
AND
SAVING...............................19
SCHEDULE CONTROL........................................... 22
OTHER INSTRUMENT SETTINGS.............................. 24
ADVANCED TOPICS.............................................. 29
2
INTRODUCTION.
htV-m Download Software
The newer htV-m instrument contains many advanced
features in addition to an extended memory range. In
order to access these features a PC is required which
connects to the instrument via the built-in USB
connection. This software allows:
• Data to be transferred from the instrument.
• Schedule and time settings to the defined.
• Detailed information on the instrument set-up to
be viewed.
• Automated calibration, diagnostic and restore
operations.
Throughout this manual you will see these two
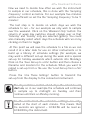
symbols used:
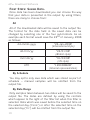
This symbol is used to warn you or highlight
important information.
This symbol is used to suggest useful tips and
suggestions to make using the instrument simpler.
3
htV-m Download Software
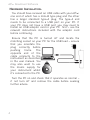
HARDWARE INSTALLATION.
You should have received an USB cable with your htV–m:
one end of which has a mini–B type plug and the other
has a larger standard type–A plug. The type–A end
needs to be connected to a USB port on your PC. If
your PC does not have a USB port you may need to
install an USB adaptor card in your PC first – see the
relevant instructions included with the adaptor card
before continuing.
Ensure that the PC is turned off and locate the
matching socket on your PC for the USB lead – ensure
that you orientate the
plug correctly before
pushing
home.
The
opposite end of the
cable connects to the
instrument as described
in the user manual. You
may also want to use
the mains supply for
your instrument whilst
it's connected to the PC.
Turn the PC on and check that it operates as normal –
if not turn off and remove the cable before seeking
further advice.
4
SOFTWARE INSTALLATION.
htV-m Download Software
The software is provided on a CD – insert it into your
PC. If auto-run is enabled on your PC then the
installation routine ought to begin. If auto-run is not
enabled then proceed as follows:
• Press down the 'Windows' key and the 'R' key at the
same time to open the 'Run...' box.
• In the 'Run...' box enter your CD drive letter (D:\
for example) followed by “autorun.exe”.
• Press the 'OK' button to start the installation.
On-screen prompts will guide you through the
remainder of the install process. Once complete you
can access the software in your 'Start' menu, under
'Programs > PPM Technology > htVm Download Software'.
Starting with v1.0r24 of the software a password can
be set and is required to carry out some tasks. When
running the software, if no password has been set
before, you will be asked to enter one or opt–out from
it's use. It's important that you remember this
password as it can't be recovered at a later date. It's
also important that you keep your password secure to
prevent other users who might have access to the
software from altering your settings.
5
htV-m Download Software
FIRST STEPS: CONNECTING.
When the software first starts we are presented with
the main screen and most of the functions are disabled
– this is because we have not connected the PC to our
instrument yet. To do this we need to tell the PC where
the instrument is connected.
If you are not sure which port the instrument is
connected to then you can simply click on the 'Auto'
button and the software will attempt to connect on each
port in turn until an instrument is found.
If no instrument is found then an error box is shown –
otherwise details of the instrument will be shown in the
window status bar and the info strip near the bottom of
the window. Also, the window icon will change to an
animated icon to show that the instrument connection
is OK.
Full access is now available to the software by clicking
on the tabs along the top of the window. When you are
done return to this screen and click 'Disconnect' to
safely disconnect the instrument.
Other equipment connected to other serial ports may
be affected by this automatic scan, if you have such
equipment connected then use the feature with
caution. See the advanced topics for instructions on
how to connect manually.
6
If you have more than one instrument connected then
only the first will be found when using the 'Auto'
feature – you will need to manually select the correct
ports in this case.
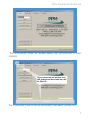
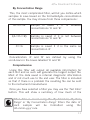
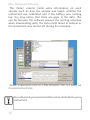
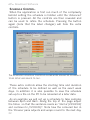
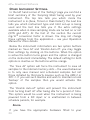
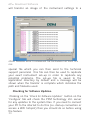
htV-m Download Software
THE CONFIGURE PAGE
STARTED.
AS SHOWN WHEN THE APPLICATION IS FIRST
THE CONFIGURE PAGE AFTER AN INSTRUMENT HAS BEEN CONNECTED.
7
htV-m Download Software
FIRST STEPS: DOWNLOADING DATA.
On the 'Download' tab there are initially two sections –
'Memory Usage' that summarises the memory used on the
instrument and 'Download Memory' that lets you download
and erase the whole of the instrument memory or just
portions of memory.
Usage:
Along with the maximum capacity the number of used
and free slots are shown – each slot records a single
sample. The 'Refresh' button will update these figures,
useful if a schedule is running or you have recently taken
some manual samples whilst the instrument is connected.
If the communication link to the instrument is idle then the
application will periodically update the memory usage for
you.
The coloured surround on the 'Refresh' button gives a
quick indication of the free capacity as it's colour changes
from green to red as the amount of free memory drops.
The percentage of memory used is also shown in the
status bar at the bottom of the window.
Download:
There are four buttons in this section: The top two buttons
will download all the memory or erase all of the memory.
The remaining two buttons will perform the same functions
but only on a selected portion of the memory – the portion
is defined by using the sliding control between the two sets
of buttons. The portion related controls are only shown
when there are enough slots to download. In addition, it is
only possible to erase portions of memory when the
selection starts from the first slot.
In order to save any data it must first be downloaded from
8
htV-m Download Software
After downloading, the data is stored in the PC
memory only and will be lost if you disconnect from
the instrument; the application is closed or the PC is
switched off.
When you download data it is only copied from the
instrument memory – it is not removed until you
choose to erase it from the instrument memory.
the instrument into the PC memory using either the
'Download All' or 'Download Portion' buttons. For now we will
download the whole of memory (assuming that you have
taken some samples which are ready to be downloaded).
Clicking on the 'Download All' button will start the process,
the progress bar and the status bar will show details of the
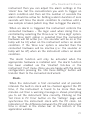
download. We are now ready to save the data.
THE DOWNLOAD PAGE WHILST A DOWNLOAD IS IN PROGRESS THE STATUS
BAR INDICATES THAT 45% OF THE DOWNLOAD IS COMPLETE.
9
htV-m Download Software
FIRST STEPS: SAVING DATA.
Once data has been downloaded you can choose the way
that your data is presented in the output by using filters,
there are many to choose from:
All
All of the downloaded data will be saved to the output file.
The format for the date field in the saved data can be
changed by selecting one of the four sub-formats. As an
example each format would save the 23rd of January, 2008
as follows:
dd–mmm–yyyy
dd/mm/yy
mm/dd/yy
UTC
By Schedule
"23–Jan–2008"
(International style)
"23/01/08"
(British style)
"01/23/08"
(US style)
"1201089600"
(Internal representation)
You may opt to only save data which was stored as part of
schedule – manual samples will be omitted from the
output file.
By Date Range
Only samples taken between two dates will be saved to the
output file. The dates are defined by using the controls
which appear to the right of the filter list when this filter is
selected. Data which was saved before the selected time on
the selected day ('From:') or after the selected time on the
selected day ('To:') will be omitted from the output file.
10
By Concentration Range
htV-m Download Software
This, the most complicated filter, will let you define which
samples to save based on the formaldehyde concentration
of the sample. You may choose from three comparisons:
A<=C<=B
Sample is saved if it
concentrations 'A' and 'B'
is
between
!(A<=C<=B)
Sample is saved if it is not between
concentrations 'A' and 'B'
C==A
Sample is saved if it is the same as
concentration 'A'
Concentration 'A' and 'B' are defined by using the
scroll–bars in the boxes labelled 'A' and 'B'.
Comprehensive
Using this filter will output all available information for
each slot and as such will generate the largest output file.
Most of the data saved is internal diagnostic information
and of not much use to the end user. The filter is included
so that if there is a problem the resulting file can be sent
to the instrument manufacturer.
Once you have selected a filter you may use the 'Test Filter'
button. This will show a summary of how much of the
When data is saved using the 'By Schedule', 'By Date
Range' or 'By Concentration Range' filters the date of
each
sample
will
be
formatted
using
the
'dd–mmm–yyyy' rule.
11
htV-m Download Software
downloaded data will be saved using the selected filter.
When you are ready to save your data you may also select
the type for your output file - this is done by selecting the
appropriate type from the 'Save as type' list after pressing
the 'Save Data' button. There are four types available:
CSV (Comma)
Each field is separated by a ","
CSV (Semicolon)
Each field is separated by a ";"
Use this if the decimal point for
your locale is a comma to
prevent confusion.
Text (Tab)
Text (Space)
Each field is separated by the
tab character.
Each field is separated by a
single space.
In general the default type should be OK for most uses –
CSV files are ultra-portable and can be opened by most
types of data manipulation applications. If you have
problems opening the output file then try one of the other
file types or study the documentation for the application
you are trying to use to open your data.
For now we'll use the default 'All (DD — MMM — YY)' filter
and save the data as 'CSV (Comma)', clicking on the 'Save
Data' will open a new window where you can specify a
filename and location for your data.
12
htV-m Download Software
The application will suggest a filename for you based
on 'HTV_' followed by the date and time but you can
change this to be something more meaningful. There
is no need to add the 'CSV' or 'TXT' extension to the
filename as the application will do this for you.
Using Windows Explorer navigate to where you saved your
file and open it using a text editor such as Notepad. You
should see your data, separated by commas, as follows:
Date,Time,Reading/ppm,Temperature/oC,Humidity/%rh,Reading/mg.m^3,Notes
04Jun2008,02:59:25,0.168,23.9,61.3,0.2068,Scheduled
06Aug2008,10:01:03,0.253,22.84,67.2,0.3126,Manual
06Aug2008,10:05:17,2.05,23.01,65,2.5315,Manual
06Aug2008,10:21:14,0.139,22.97,67.2,0.1717,Scheduled
06Aug2008,10:22:19,0.108,22.6,66.8,0.1336,Scheduled
Opening the same file with an application which
understands CSV files will result in your data being
tabulated as follows:
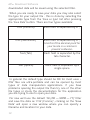
Date
Time
Reading
/ppm
Temperature
/oC
Humidity
/%rh
Reading
/mg.m^-3
04-Jun-2008
02:59:25
0.2068
Scheduled
06-Aug-2008
10:01:03
0.253
22.84
67.2
0.3126
Manual
06-Aug-2008
10:05:17
2.05
23.01
65
2.5315
Manual
06-Aug-2008
10:21:14
0.139
22.97
67.2
0.1717
Scheduled
06-Aug-2008
10:22:19
0.108
22.6
66.8
0.1336
Scheduled
0.168
23.9
61.3
Notes
13
htV-m Download Software
The 'Notes' column holds extra information on each
sample such as how the sample was taken; whether the
instrument was calibrated and if the battery was running
low. You may notice that there are gaps in the data, this
can be because the software pauses the running schedule
when downloading data; the instrument failed to sample or
the instrument was turned off during the schedule.
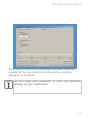
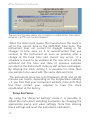
SAVING DOWNLOADED DATA
CONCENTRATION FILTER.
AS A
TAB
SEPARATED TEXT FILE USING THE
You will need your password to erase data from your
instrument.
14
FIRST STEPS: SCHEDULES.
htV-m Download Software
Schedules allow the instrument to use it's internal clock to
automatically take samples over a defined period of time.
The instrument can also be instructed to only sample on
certain days and to only fill — not overwrite — it's memory
bank whilst in a schedule.
The 'Schedule' tab is where most of these settings for the
instrument schedule can be viewed and changed: by
default only the basic controls are shown, the more
advanced controls will be covered in later sections. Along
the bottom are buttons that will let you:
• Save and load the current schedule settings to the
instrument.
• Control the schedule that has been loaded on to the
instrument.
The other visible controls adjust the sampling frequency
within the schedule; the schedule ending conditions and a
graphical representation of the schedule settings.
The 'Sampling Frequency' control can be adjusted from 1
minute up to 1 hour. The instrument will then take samples
at this rate, assuming that the sensor is sufficiently clear.
If the sensor is not clear when a sample is due then the
sample will be taken as soon as the sensor is able to as
long as it's within the bounds of the schedule. When the
sampling frequency is set to 'Continuous' the instrument
will take samples as often as possible by only waiting for
the previous sample to clear from the sensor. Changing the
sample frequency whilst in the default 'Simple' mode will
adjust the hidden schedule settings to be “all day, every
day”.
The schedule, once started, will continue until either it is
15
htV-m Download Software
turned off or one of the stop conditions selected in the
'Settings' box are met. These are:
• Run Once — The schedule will only run through once
and then stop. With the default “all day, every day” this
means that sampling will continue for a single week
and then stop.
• Repeat (Until Full) — The schedule will continue until
there are no more free slots in the memory or it is
stopped.
• Repeat (Overwrite) — The schedule will continue until
it is stopped. When the memory becomes full then the
oldest data slot is erased and overwritten with new
data.
The remaining section in 'Simple' mode shows a simple
'Preview' of the schedule indicating the start time and
duration of the sampling period with a yellow strip. Once
you have changed the settings to your requirements using
the 'Use These Settings' button will transmit them to the
instrument. If you wish to reload the settings from the
The 'Stop on Full' item on the instrument 'Conf' menu
takes precedence over the stop conditions so if it is
set then no memory slots will be overwritten — see
the instrument Operation Manual for more details.
instrument, undoing any changes you may have made, then
use the 'Reload from Instrument' button. Changing the
schedule settings whilst one is running will disrupt the
sampling so it may be better to stop the running schedule
first: do this by clicking on the 'Start/Stop Schedule' button
which will toggle the schedule state.
16
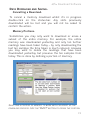
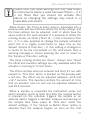
htV-m Download Software
THE SCHEDULE PAGE AFTER AN INSTRUMENT HAS BEEN CONNECTED
SHOWING THE "ALL DAY, EVERY DAY" SCHEDULE WITH A SAMPLING
FREQUENCY OF 2 MINUTES.
You will need your password to alter the Schedule
settings on your instrument.
17
htV-m Download Software
FIRST STEPS: SETTINGS.
Miscellaneous instrument settings and information are
placed on the 'Settings' tab. From here the instrument
sampling mode and settings can be seen; the audible
alarm settings can be changed (if the appropriate
hardware is fitted) and the instrument clock can set. More
advanced features are hidden at first as they should only
be adjusted in conjunction with detailed instructions or
when instructed by the manufacturer or their local agent.
THE SETTINGS PAGE SHOWING THE INSTRUMENT SETUP.
You will need your password to alter some of the
settings on your instrument.
18
DATA DOWNLOAD
AND
SAVING.
htV-m Download Software
Cancelling a Download.
To cancel a memory download whilst it's in progress
double-click on the status-bar. Any slots previously
downloaded will be lost and you will not be asked to
confirm the action.
Memory Portions.
Sometimes you may only want to download or erase a
subset of the entire memory. For example, the entire
memory was downloaded yesterday and only ten further
readings have been taken today – by only downloading the
last ten samples the time taken is much reduced. Likewise
you may want to delete the readings that have been
downloaded yesterday but preserve the ten samples from
today. This is done by defining a portion of memory.
SELECTING A PORTION OF MEMORY TO WORK WITH CAN SPEED UP THE
DOWNLOAD PROCESS. USE THE 'SHIFT' BUTTON TO DEFINE THE PORTION.
19
htV-m Download Software
To select a portion first drag the slider on the 'Download'
page to the first or last slot in your portion – the portion
number will be shown in the box above the slider. Now hold
down the SHIFT button on the keyboard whilst you drag the
slider again to the other end of your portion – the mouse
pointer will change from being the normal cross-hair to
being a double-ended arrow whilst you drag the slider.
Release the slider to complete the selection process.
The 'Download Portion' and 'Erase Portion' buttons will now
change to indicate the portion you have defined and the
slider bar will be highlighted over the range of the portion.
To cancel the selected portion simply click on the slider.
The slider is not shown if there are less than three
samples in the instrument memory. Erasing saved samples
can only be performed on portions that start from the first
slot – the 'Erase Portion' button will remain disabled is the
portion does not contain slot one.
Saving Your Data when “0.1” is shown as “0,1”.
After you have downloaded your data and saved to a CSV
file as recommended you may find that when you open the
saved file in another application that extra columns have
been inserted into your data or that the values in the file
do not match what you saw on the instrument. This is a
common problem with CSV files in countries in which the
practise is to use the ',' character to denote the decimal
point in numbers.
The problem come about because 'pure' CSV files use the
',' character to separate the data columns so when the data
“1” “2.3” and “4.5” is saved it is written as “1, 2.3, 4.5”
but the local settings makes the output file become “1,
2,3, 4,5” which is then incorrectly read back as being “1”
“2” “3” “4” and “5”.
20
htV-m Download Software
The solution in these areas is to use the 'alternative' CSV
format which uses ';' to separate the data columns and
therefore avoids the confusion. The problem can also be
avoided by using one of the two text formats that use
white–space characters to separate the data. You may need
to specify the data separation character used when you
import the data into the third-party application.
In most cases the application will detect which is the best
format to save data in and will select either the comma or
semi-colon CSV format for you. If you find that this
detection does not work correctly for your region please
contact the developer to report the problem.
21
htV-m Download Software
SCHEDULE CONTROL.
When the application is first run much of the complexity
behind setting the schedule is hidden until the 'Advanced'
button is pressed. All the controls are then revealed and
can be used to refine the schedule. Pressing the button
again (note that the label changes) will hide the extra
controls.
THE ADVANCED SCHEDULE CONTROLS ALLOW MORE ADVANCED SCHEDULES
TO BE SETUP AND SAVED TO FILE.
These extra controls allow the starting time and duration
of the schedule to be defined as well as the exact week
days. In addition it is also possible to save the schedule
set–up to a file on the PC to be reloaded at a later date.
As an example we will set up a schedule to take samples
between 8pm and 8am. Along the top of the page adjust
the times so that the sentence reads as ‘Start at [20:00:00]
and continue for [12:00:00]’. Note how the coloured bar in
the 'Preview' pane adjusts and wraps round to the next day.
22
htV-m Download Software
Now we need to decide how often we wish the instrument
to sample in our schedule, this is done with the 'Sampling
Frequency' control as before. For our example five minutes
will be sufficient so set the the 'Sampling Frequency' to be '5
minutes'.
The last step is to decide on which days we wish the
schedule to run – for our example we only wish to sample
over the weekend. Click on the 'Weekend Only' button: the
column of week day switches should change over so that
'Saturday' and 'Sunday' only are selected (green). You could
also manually select which days the schedule will run on by
clicking on them to toggle.
At this point we will save the schedule to a file so we can
recall it at a later date for use on other instruments or to
build up a library of schedule settings (for example, we
may want a different set–up during the week and a special
set–up for holiday weekends which extends into Monday).
Click on the 'Save Set–up to a File' button and then choose a
filename and location for the schedule. When you want to
reload a set–up from a file use the 'Load Set–up from a File'
button.
Press the 'Use These Settings' button to transmit the
set–up from the display to the connected instrument.
The day switches control which days the schedule will
start on, so in our example the schedule will continue
to sample up to midnight on Sunday and then
continue until 8am on Monday morning.
On the instrument the schedule settings are only
tested at the start of each minute. This means that
the seconds are ignored – 12:34:56 will be read as
12:34:00 by the instrument.
23
htV-m Download Software
OTHER INSTRUMENT SETTINGS.
In the left hand corner of the 'Settings' page you can find a
brief summary of the 'Sampling Mode' being used by your
instrument. The top line tells you which mode the
instrument is in (Area, Timed or Peak Detect); the next line
tells you which instrument type and limit set–up is being
used and the last line tells you if the extra settings
available when in Area sampling mode are turned on or not
(GTN and A2T). At the foot of the section the current
mg/m3 conversion factor is shown. You may not change
these settings from the application – see your Operation
Manual for more details.
Below the instrument information are two option buttons
marked as 'Save All' and 'Disable Autooff': you may toggle
their settings by clicking on the buttons. When the option
is active the button turns green and the option is changed
on the instrument immediately. The default setting for both
options is inactive so the buttons will be orange.
The 'Save All' option will force the instrument to save all
samples to the internal memory slots – the usual behaviour
is to only save manual and scheduled samples but not
those initiated by third-party devices such as the AMS2 or
SPC1. If you use such devices and wish to maintain a local
'backup' of the samples then you would activate this
option.
The 'Disable Autooff' option will prevent the instrument
from turning itself off after being idle for a period of time.
This option would be used when the instrument is being
powered from a DC input or is unattended in between
schedule periods, for example.
Alarm.
If you have the appropriate hardware fitted to your
24
htV-m Download Software
instrument then you can adjust the alarm settings in the
'Alarm' box. Set the concentration you wish to trigger an
alarm condition and then set the number of seconds the
alarm should be active for. Setting a alarm duration of zero
seconds will force the alarm condition to continue until a
new sample is taken (which may then re-trigger the alarm).
When an alarm is triggered the instrument controls the
connected hardware – the logic used when doing this is
controlled by selecting the 'Drive Low' or 'Drive High' option.
If the 'Drive High' option is selected then the connected
hardware will be active (i.e.: the sounder will be on or the
lamp will be lit) when an the instrument enters an alarm
condition. If the 'Drive Low' option is selected then the
connected hardware will be inactive (i.e.: the sounder or
lamp will be off) when an the instrument enters an alarm
condition.
The alarm function will only be activated when the
appropriate hardware is installed and the alarm function
has been enabled via the 'Enabled' tick-box or the
instrument 'Conf' menu. Once you are happy with the alarm
configuration pressing the 'Use these Settings' button will
transfer them to the connected instrument.
Clock.
When the instrument is first connected and at periodic
intervals the built-in clock will be checked against the PC
time, if the instrument is found to be more than two
minutes out then a warning message is shown prompting
you to set the instrument time correctly. Clicking on the
'Set Clock to PC Time' button on the 'Settings' page will
synchronise the instrument clock with the PC clock. An
indication of the difference between the PC and instrument
time is shown in the status bar at the bottom of the
application window.
25
htV-m Download Software
THE APPLICATION WILL WARN YOU IF THERE IS A SUBSTANTIAL TIME ERROR
BETWEEN THE PC AND THE INSTRUMENT.
When the instrument leaves the manufacturer the clock is
set to the correct time in the GMT/BST time zone. The
instrument does not correct for daylight saving or for
changes in time zone so it is recommended that you
connect to the instrument as soon as possible after a
change in the local time and correct any errors. If a
schedule is found to be enabled at the new time it will be
activated but the time and date of previous samples
recorded in the instrument memory will remain unchanged.
By altering the clock setting it is possible for more than
one sample to be saved with the same date and time.
The instrument clock has a drift between ±5.91 and ±0.09
minutes per month, depending on the temperature stability
– if you find that your instrument exhibits more drift than
this then contact your supplier to have the clock
recalibrated at the factory.
Pump And Valve.
By using the 'Advanced Settings' mode it is possible to
adjust the instrument sampling mechanics by changing the
appropriate pump and valve settings. Note that altering
these settings will reset the instrument calibration.
26
htV-m Download Software
Please note that valve settings will only take effect
on instruments where a valve has been fitted — if it
is not fitted then you should not activate this
feature as changing the settings may result in a
inoperable instrument.
When shown, the 'Pump & Valve' pane is separated into a
preview area and two sections where the Pump settings and
the Valve settings can be adjusted both of which have the
same controls. For each actuator it is possible to define the
running mode, an offset (‘Start at...’) and a duration (‘Run
for...’). It is also possible to change the sample activation
point but it is highly recommend to leave this as the
default 'Sample at Time Zero' – if this setting is changed or
is found to be the non-default on the instrument then a
warning message is shown advising the user to revert to
the 'Sample at Time Zero' setting.
The three running modes are 'Never', 'Always' and 'Timed'
the offset and duration settings are only available when the
actuator is running in 'Timed' mode.
The offset controls when an actuator will start it's run with
respect to 'Time Zero' which is marked on the preview with
a red line. The offset can be adjusted between –12.8 and
+12.7 seconds. The duration controls the amount of time
that an actuator runs for and can be adjusted between 0
and 25.5 seconds.
When a sample is requested the instrument works out
which actuator needs to start first after the sample button
is pressed (or the schedule triggers the sample or an
external device triggers a sample). Analysis and zeroing of
the sample then takes place at 'Time Zero' under the
default settings. If the 'Sample on Button Press' option is
selected then the analysis begins as soon as the first
27
htV-m Download Software
actuator starts (the black bar on the preview). The pump
settings are shown by the green line on the preview and the
valve settings are shown by the blue line. If either are set to
'Always' then a light grey line is shown instead.
Pressing on the 'Use these Settings' button will transmit
the settings to the instrument while 'ReLoad Settings' will
populate the application with the current instrument
set–up.
Restore Original & Default Settings.
If you have lost track of changes to the instrument setting
and caused a malfunction then it is possible to use the
application to revert the instrument to either a known
factory default or the settings in use when the instrument
was first connected to the software. This is done by clicking
on the 'Restore Default Settings' or 'Restore Original Settings'
buttons — this will revert most settings to a default state
by transmitting a series of commands to the instrument.
The function will not delete any saved samples but will
reset the instrument calibration as the Pump and Valve
settings are restored.
The factory defaults are supplied from a separate settings
file provided with the application but updates to this file
may be available from the manufacturer — if you find that
your problem is not fixed by using this feature then it may
be worth obtaining a more recent settings file by
contacting the manufacturer directly and requesting an
update.
The original settings for the instrument are saved when
the instrument is connected for the first time — if the
instrument settings had alredy been altered at this time
then restoring to these settings may not correct your
problem.
28
ADVANCED TOPICS.
htV-m Download Software
Some of the features not covered previously are described
here but the user should be aware that misuse of the more
advanced settings could lead to unexpected results and
others should only be used when instructed to do so by the
manufacturer or agents. Take care and think before you
transmit your settings to the instrument.
Manual COM Port Selection.
If you have problems with the 'Auto' function not finding
your instrument or connecting to the incorrect instrument
then you will need to manually select the correct COM Port.
This is done by using the drop down list on the 'Configure'
page to select the correct port and then pressing on the
'Select' button.
If the port you wish to use is not shown in the list (maybe
it's a USB adaptor which you connected after starting the
application) then pressing the 'Rescan PC for new ports'
button will re-populate the list. If you still can't find the
correct port then please check that the port has
enumerated correctly in the Windows Device Manager —
you can find this in the Control Panel under System
Properties or by using the 'Windows' Key and the
'Break/Pause' Key together.
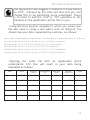
The Data Dump Format.
If you have placed the instrument into the 'Data Dump'
mode you can download the whole of memory to a serial
terminal or printer. The data is transferred in CSV format
(for a description of the CSV file see the chapter on 'FIRST
STEPS: SAVING DATA.' ) with each line being terminated
with the “<CR><LF>” pair. The file layout is shown in the
table.
29
htV-m Download Software
Column
1
2
Title
Description
Time
hh:mm:ss
Date
yyymmdd
Limit
instrument type 1 to 4
5
Time Result
in ppm
7
Time-to-Peak
in seconds
9
Humidity
as %age R.H.
3
4
6
8
10
Area Result
Peak Result
Temperature
Flags
in ppm
in ppm
in °C
see below
The 'Flags' column contains information about each
sample encoded as a series of eight zeroes or ones the
positions of which indicate a certain property being true or
not. The flag positions are explained in the table.
30
htV-m Download Software
Position
Meaning
1st : x 1 if instrument was calibrated.
2nd : x 1 if the reading was offset.
3rd : x 1 if the sample triggered a gate setting.
4th : x 1 if the sample was part of a schedule.
5th : x 1 if the sample was taken remotely¹.
6th : x 1 if instrument battery voltage was low.
7th : x 1 if sample temperature was offset².
8th : x internal flag — ignore sample if '1'.
¹ See description of 'Save All' in 'Other Instrument Settings' for more details
about this flag.
² If this flag becomes '1' then your instrument may have developed faulty
settings, see the procedure to 'Restore Default Settings' in 'Other Instrument
Settings'.
Generating a Log File of your Session.
If you run into problems and require technical support
you may be asked to provide a log file of the problem you
are encountering this is a simple text file which contains a
list of actions performed by the application. The log file
will help the support personnel to pinpoint where the
application is going wrong and to provide a solution.
By default no log file is created but if the application is
launched with the correct command line switch then a file
will be generated. To do this open the Windows 'Run...' box
31
htV-m Download Software
by pressing the 'Windows' Key and the 'R' key at the same
time or select 'Run...' from the 'Start' menu.
Use browse button to locate the application executable,
this will depend on your installation selection and your
operating
system
but
is
typically
“C:\Program Files\PPM Technology Ltd\htVm Download
Software\htvM_if.exe”. To create a fresh log file add the
switch “/lc” to the end. If you would prefer to append each
session to the existing file then only use the “/l” switch at
the end instead.
The log file will be saved to “debuglog.txt” in the same
folder as the application executable — please make sure
that this location is accessible by the application
beforehand. When you close the application a message will
be shown to confirm the creation of the log file.
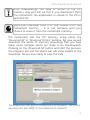
RUNNING THE APPLICATION FROM THE RUN BOX.
32
htV-m Download Software
You can also click on the 'Generate Technical Report' button
on the 'Configure' page: this will not only collect the current
session log but also the current instrument settings and
data along with information about your system into a
special file which you can then send to the support
personnel. This 'Technical Report' will be saved to your My
Documents folder and will be called “TechnicalFile.htv”.
Activating Terminal Mode.
As part of an attempt to resolve any problems you may
have you may be asked by the technical support personnel
to enter what is known as 'Terminal Mode' which bypasses
the normal application user interface and allows direct
communication with the instrument. This mode is activated
by using the “/d” command line switch when launching the
application. See the previous section on how to add
command line switches when launching the application.
When 'Terminal Mode' is activated you will see an extra
window along with the usual application window and the
main window title will also include the message [DEBUG
MODE]. Using the normal procedure, connect to your
instrument. Now you may type raw instrument commands
into the top line of the Terminal window and press the
button marked with '>>>' to transmit them. A log of the
'conversation' will be shown in the larger box on the
Terminal window, this log can copied to your clipboard by
using Ctrl+A to 'Select All' followed by Ctrl+C to 'Copy' it.
When you are done disconnect from the instrument as
normal from the main application window before closing
the application. You may also generate a log file of the
session by using the “/l” or “/lc” switches in addition to
“/d”.
The 'Save EE' button at the foot of the Terminal window
33
htV-m Download Software
will transfer an image of the instrument settings to a
USING TERMINAL MODE TO DOWNLOAD THE INSTRUMENT SETTINGS TO A
FILE.
special file which you can then send to the technical
support personnel this file can then be used to replicate
your exact instrument set–up in order to replicate any
potential problems. The set–up file is saved to the
application directory by default and a message will be
shown when the transfer is complete which indicates the
path and filename used.
Checking for Software Updates.
Clicking on the 'Check for Software Updates' button on the
'Configure' tab will check the PPM technology Ltd. server
for any updates to the system files. If you need to connect
your PC to the internet to do this (i.e. dial-up connection or
access a WiFi hotspot) then you should do so before using
the feature.
34
htV-m Download Software
New configuration files and docuemntation required by
the application will be downloaded and any new
distributions will be presented to the user for download.
It's recommended that you save these to your PC and close
the application before installing them. The system could
also show you important documentation and notices which
you should read carefully.
Changing the Password.
If you wish to change the password used to access the
secured functions in the application then use the “/n”
command line switch when launching the application. See
the previous sections on how to add command line
switches when launching the application.
When you use this switch you will be asked for your
current password and to enter your new password. You
must enter your new password twice to confirm that you
entered it correctly. The new password will take affect
immediately.
The System Tray Icon.
The application makes use of the System Tray to display
information, errors and messages to the user, the
application will also minimise to the System Tray rather
than the Task Bar.
You can right-click the System Tray icon to bring up a
menu where you can Auto Connect to an instrument;
Download & Save the data from the instrument; turn the
Schedule on or off on the instrument and Disconenct from
the instruemnt. Double-clicking on the icon will show or
hide the window and a sinlge click will show the last
message bubble.
You can start the application minimised to the System
35
htV-m Download Software
Tray by using the “/m” command line switch. See the
previous sections on how to add command line switches
when launching the application.
36