1
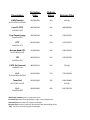
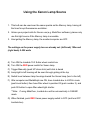
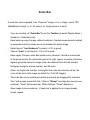
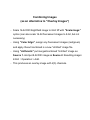
Zeiss Axioplan2 and MetaMorph Imaging Software Microscope’s User Manual Managed by For detail information about this instrument, please contact Dr. A. Budi Utama @ ext. 8232 or e-mail [email protected] AXIOPLAN2 MICROSCOPE SYSTEM START-UP 1. DO NOT start up the system if the fluorescent lamp has not adequately cooled down after the previous user finished. It will need 20-30 minutes to cool down. To be sure, check the log book to see the actual time the machine was turned off. 2. MAKE SURE ALL COMPONENTS ARE OFF!!!! When the lamp is first turned on it sends off a magnetic pulse that can damage computers and electronic components. This is why all other components must be off when the lamp is turned on. (This includes the computer monitor, which has its own on/off switch on the bottom right of the monitor face.) IT IS YOUR RESPONSIBILITY as a user to ensure that it is safe to turn the lamp on; only then, turn on arc lamp light source. (White power source "ebq 100" with on/off switch on upper left, label no. 1) NOTE YOUR LAMP START TIME IN THE LOG BOOK! Allow the lamp about 5 minutes to stabilize before collecting imaging data. 3. Turn on AxiopIan2 microscope (green switch on right back-side of microscope, label no. 2). 4. Turn on computer drive/monitor (label no. 3) 5. Turn on camera(s). The power source for the B/W-black and white camera “Cool Snap HQ” mounted on the top of the microscope is located on top of the computer tower (black box labeled "Cool Snap HQ" label no. 4). DO NOT alter the camera without permission. The color camera "Cool Snap CF" is mounted on the back of the microscope. Its power switch is located on the back left side of the camera, and is the only part of the camera that should be touched. Green LED indicates the camera is ON. 6. Click Axioplan2 Icon and select the "MetaMorph" software program. Logging in using the correct lab access and password. The system is now ready to begin image acquisition. 7. Verify during initial use that the imaging system is operational and was left in proper working condition: Left in a shut-down mode (see #4 of posted "System Shut-down" procedure below) Objectives you use are clean and undamaged No other visible alterations or damage are noticed on various system components Please check "yes" or "no" in the log book to verify whether you began with the system in proper condition. Make proper notes/comments if there is a problem so that it can be addressed as soon as possible. SYSTEM SHUT-DOWN 1. Close software program only (but do not shutdown computer yet). 2. Turn off camera(s). 3. Shut down computer. Be sure to turn off monitor. 4. Microscope MUST BE returned to shut-down mode before turning off the microscope: Any objective used for oil immersion MUST BE cleaned using lens paper (DO NOT use Kimwipes!!) Stage should be left at lowest position Objective turret placed with 10X objective in viewing position Turn off microscope Dust cover placed over microscope (if at end of day) but do not cover the hot halogen light source box Note "yes" for shut-down mode in log book 5. NOTE STOP TIME IN LOG BOOK - Clearly indicate total lamp usage in log book! MERCURY OR XENON LAMP USAGE MUST BE RECORDED. 6. Turn off Mercury lamp ("ebq 100" light source). ! !ATTENTION!! IF THE METAMORPH PROGRAM SHUTS-DOWN OR FREEZES DURING USE, PLEASE DO THE FOLLOWING: **CAPTURE THE ACTIVE WINDOW(S) WHICH CONTAINS AND DESCRIBES THE ERROR (ERROR REPORT) USING ---ALT PRT SCRN--- COMMAND This function copies the window, then open Word and paste the message into a new page. The file can be named and placed in the ‘reports’ folder on the desktop. **CAPTURING THE ENTIRE SCREEN CAN BE DONE USING ---CTRL PRT SCRN--- (however, this may not be necessary) Exiting the program and completely turning the computer OFF. Wait a few moments then back it ON again then logging back onto MetaMorph. This can usually allow you to continue working. COLOR CAMERA HOW TO ACQUIRE 24-BIT COLOR IMAGES 1. Turn on microscope, camera box, monitor, and computer. Turn ON color camera (CF) with switch on left-side back — green LED light should go on next to switch position. 2. On microscope upper-right front panel, BP (back port) should be on/selected for color camera site. 3. Log onto/open MetaMorph (with color camera ON, for initialization) **Note: ‘Acquire color’ dialog box for cool snap cf color camera use is different than the 'Acquire' box for cool snap HQ B&W camera use. To select the ‘Acquire Color’ dialog box (for exposure settings, capturing images etc.), go to the main menu under 'Acquire' and choose 'Set Acquisition Channel'; there will be 2 lines, 1 for Cool Snap HQ Monochrome 12-bit (B&W camera) and 1 for Cool Snap CF Monochrome Mosaic 12-bit (color camera). Select Cool Snap CF to access the Acquire Color dialog box in the Acquire main menu. 4. For bright-field color images, choose 'Color Balancing' menu, and for Image type >> select 'brightfield' and choose 'Acquire' menu. For Illumination >> DIC. While for Image type & Exposure >>> 'color image'. Finally, set time (in ms) 30-200ms. 5. Halogen light source levels can be 3-4 "green dots". Neutral density filters can be determined "empirically" (e.g., 100/1.5 or 100/25 are functional settings) i.e., looking in ocular, attain appropriate color/hue, and this should be matched digitally on computer monitor. DIC objective polarizer can be either removed or remains inserted. 6. Condenser diaphragm setting same as for DIC (e.g., II for 10x, 20x), or brightfield (I/H), or 1, 2, 3 for respective objectives. Alternatively, 3200 K or level 9 can be used with appropriate filters; subsequent white balancing and image acquisition might give a more true color. 7. To obtain an 'active image window' >>> click on ‘start focusing’ box at bottom left. If full field of view is not necessary, define region of interest/active region by selecting ‘region’ and set box to desired areal dimensions. This might work best for a specific area during white balancing. 8. White balancing on background/area without specimen, will set color scale for digital image acquisition to match extremely closely what is seen through ocular -- Choose ‘Color Balancing’ menu, and click on ‘measure white ref’ box. It might have to be done several times to set a true color tone for background. 9. There are controls for adjusting brightness and color RGB scale, if desired (‘Color Balancing’ then ‘Brightness and Adjustment’). However, if microscope neutral density filters and camera white balance are "well set," this should not be necessary. 10. Images saved in default .tiff format are 24-bit RGB (8+8+8-bit). These are compatible with, for example, Windows image software. If .jpg, for example, is chosen it will be 8-bit, and image will lose information such as annotations. Objectives for Zeiss Axioplan 2 Plan - APOCHROMAT 10X, NA 0.45 (air; n = 1) Brightfield DIC-contrast (II) Plan - APOCHRON1AT 20X, NA 0.75 (air; n = 1) Brighttield DIC-contrast (II) Plan - APOCHROMAT (Korr) 40X, NA 0.95 (air; n = 1) Brightfield DIC-contrast (III) Plan - APOCHROMAT 63X, NA 1.4 (oil; n = 1.518) DIC objective DIC-contrast (III) Plan - NEOFLUAR 100X, NA 1.3 oil; n = 1.518) Brightfield DIC-contrast (III) ACHROPLAN 10X, NA 0.3 W (Ph 1) (water; n = 1.33) Phase contrast DIC-contrast (II) ACHROPLAN 40X, NA 0.8 W (Ph 2) (water; n = 1.33) Phase contrast DIC-contrast (III) ** (NA = numerical aperture; n = refractive index) Fluorophore Excitation Filter Dichroic Mirror Emission Filter DAPI/Hoechst 340(360)380 400 420 (lp) 426(436)446 455 460(480)500 426(436)446 455 520(535)550 450(470)490 500 515(535)555 470(480)490 495 500(510)520 490(500)510 515 520(535)550 490(500)510 515 520 (lp) 530(545)560 570 572(610)648 540(560)580 595 600(630)660 610 (lp) 590(620)650 660 662(700)738 Ex:352, 359 Em:455,461 Cyan FP (CFP) Ex:430 Em:476 Cyan Topaz Energy Transfer (FRET) FITC Ex:493 Em:517 Narrow Band GFP Ex:397,480 Em:515 YFP Ex:520 Em:532 Y-GFP (lp) (mutant) Ex:498 Em:516 Cy-3 Ex:514,554 Em:566,615 Texas Red Ex:555,595 Em:615 Cy-5 Ex:649 Em:666 Wavelength numbers given in nanometers (nm) Excitation filter determines wavelength range – low(mid)high limits Dichroic mirror transmits 50% of given wavelength Emission filter transmits maximum fluorescence with low(mid)high limits "(lp)" transmits at and above given wavelength Using the Xenon Lamp Source 1. This bulb can be used over the same spectra as the Mercury lamp, having all the lines for epi-fluorescence excitation. 2. Unless your project calls for Xenon use (e.g. MetaFluor software), please only use this light source if the Mercury lamp is unusable. 3. Like igniting the Mercury lamp, the monitor/computer are OFF. The settings on the power supply box are already set: (left knob) 150w and (right knob) 0-250 watts A) Turn ON the Lambda 10-3 Sutter wheel control box B) Turn ON the RED power switch for Xenon lamp C) Trigger Manually (push UP silver stick) until click is heard D) Lamp light in left housing will be seen through grating at the top E) Switch lever between lamp housings toward the Xenon lamp (turn to the left) F) After computer and MetaMorph are ON, have Lambda box in LOCAL mode (push local button) then have filter wheel in position #3 (push number 3), and push S2 button to open filter wheel light shutter. **Note: If using MetaFluor, Lambda box will be automatically in ONLINE mode. G) When finished, push RED Xenon power supply switch to OFF (and turn OFF Lambda box). Scale Bar A scale bar can be applied to an "Acquired" image; or to a “single, saved TIFF (MetaMorph) image”, or to “all planes” or “single plane in a stack”. - You can use/click on "Scale Bar" box in the Taskbar (or select Display Menu > Graphics > Calibration bar). - Have back-up copy of image, without scale bar, if certain measurements related to grayscale intensity values are to be obtained for entire image. - Select/type-in "bar thickness" in pixels (~5-15 is good). - Choose ‘fonts’ in font section / 24 or 26 is good. - Have upper 2 boxes (under Bar border color) checked - third box unchecked. - In the boxes next to the checked boxes to the right, type in a number just below highest grayscale value for image (# can be obtained from the left side bar histogram using the mouse pointer), and hit enter. (Note: the higher the number, the brighter the scale bar intensity will be; the color will be that of the image by default for 16-bit tiff images) - The scale bar can be positioned quickly and easily by dragging the scale bar "box" with mouse cursor/left click. Click on "Stamp" and drag box away to see scale bar. "Undo" will remove bar. When finished, "Close" dialog box. - Save image to save scale bar - if scale bar is applied to an image already saved, resave. Combining Images (as an alternative to “Overlay Images”) - Scale 16-bit DIC/brightfield image to 8-bit tiff with “Scale Image” option (can also scale 16-bit fluorescent images to 8-bit, but not necessary). - Using “Color Align”, assign any fluorescent images (red/green) and apply. Result combined is a new “Untitled” image file. - Using “Arithmetic” put merged/combined “Untitled” image as Source 1. And put 8-bit DIC image as Source 2. Resulting image> 24-bit :: Operation > Add. - This produces an overlay image with 2(3) channels. Converting 16-bit Tiff image files in MetaMorph to 8-bit color tif For example, one can convert multiple images of planes in a stack file (.stk file) to separate 16-bit tiff format files (using FILE menu under ‘convert stack to TIFFs’). After creating individual 16-bit tiff files, put files into a director/folder, e.g, (...\images\new folder_1 \6to8-bit). Then, select DISPLAY >>Scale Image (supply necessary information). This allows one to convert a 16-bit file to an 8-bit color tif (0-256 grayscale range). You can also process or convert the 16-bit file extension automatically in a batch fashion using the Journal file: Select JOURNAL menu, go to LOOP, and then ‘...all images in directory’. Select the particular Journal written, i.e. (Copy to 8-Bit Batch.JNL). Select particular path ‘directory site’ - (where the files are) Click on 'open' Have checked, all images and autosave. Click on ‘run’ starts operation Dialog box will ask where to >> save in: And also >> file name: (8 hit copy of...file name#.tif) Go through saving process manually by clicking on 'save' box one can visualize the appearance of the new convened files (8-bit color tif) in the folder box. ** Note: If the Journal “8bit copy and save to same location.JNL” is selected instead, then after clicking on 'run' all files will be processed automatically.