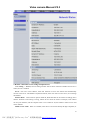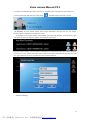
1
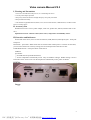
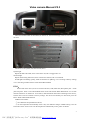
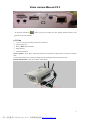
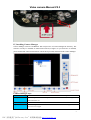
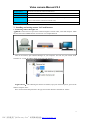
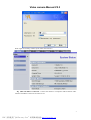
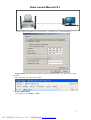
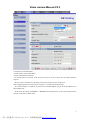
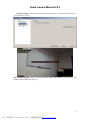
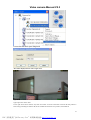
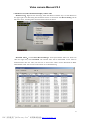
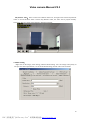
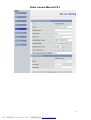
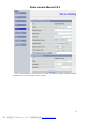
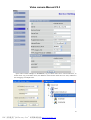
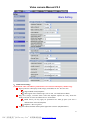
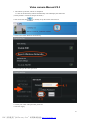
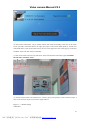
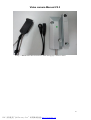
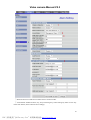
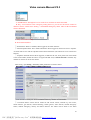
Video camera Manual V2.3 CONTENTS I, Warning and Precautions…………………………………………………………2 II, Accessory List…………………………..…………………………………………2 III, Interface and Indicators…………………………………………………………2 IV, Installing Camera Manager…………….……………………………………… 5 V, Installing and setting camera LAN and Internet…….………………………6 1. Connecting camera through LAN………………………....………...………..6 2. WIFI settings………………………..…………………………………………….8 3. Remote connection service settings and parameters………………..………….10 4. 3G settings and parameters…………………………………………..………….12 5. Ethernet settings…….……………………...……………………………………14 VI, Camera Manager Operation……………………………………………………14 1. Log in………………………...…………………………………....……………14 2. System configure……………………………..…………………………………15 3. Manual recording…………………………….…………………………………19 4. Media setting…………………………………………………………………20 5. Auto record……………………………………...………………………………21 6. Alarm equipment setting…………………..……………………………………22 7. Modify the initial start location………………………………………………23 8. Add remote account…………………………………..………………………23 VII, Advanced Settings……………………………..………………………………24 1. Water ripples ………………………...…………………………………………24 2. Multi-camera grouping………………............…………………………………25 3. Mobile video source settings……………………...……………………………30 4. Wireless AP/STA Switch……………………………………….…………………30 5. The alarm mail settings……………………………………….…………………32 6. Cloud Alarm settings……………………………………….…………………33 VIII, Other equipments…………………………….………………………………37 1. Android terminal software……...………………………………………………37 2. Temperature and humidity sensor………………………………………………46 3. Add a wireless alarm equipment and alarm settings……………………………46 1 PDF 文件使用 "pdfFactory Pro" 试用版本创建 www.fineprint.cn Video camera Manual V2.3 I, Warning and Precautions 1. Don’t move the SIM card with power on, or it will damage the device. 2. Use the power adaptor provided. 3. Keep away from heat and direct sunlight. Keep dry. Keep away from fluid. 4. Keep installed and steady. 5. This manual is applicable B2X720, DH26, CL26, GUN720 other models, if WIFI machine, No SIM card slot and no 3G settings menu II, Accessory List Standard accessories: 12V/1A power adaptor, LAN wire, product box, manual, software disk or SD card Optional accessories : Remote control, door sensor, temperature and humidity sensor. III, Interface and Indicators On the back of the device, there are slots for Ethernet, USB, SIM card, Microphone jack,Audio jack and power. Reset/WPS – press Reset / WPS switch with 30 seconds when camera power is switch on at same time, you can restore the device to factory settings, the successful operation of the device state. Enable WPS function - short press Reset / WPS switch USB Slot: Two modes: ① for USB sticks and portable hard drives; ② for the temperature and humidity sensor. They use different voltages. Default setting is for the first mode. If user wants to use it for the temperature and humidity sensor, please set ahead. B2X720: Doggy: 2 PDF 文件使用 "pdfFactory Pro" 试用版本创建 www.fineprint.cn Video camera Manual V2.3 There is a AP/STA button at the bottom (for details see Advanced Settings). There is also a Micro SD card slot. Indicators are for system (red) and network (blue). System light Rapid: hardware abnormal; slow: connected to 3G; off: not logged into 3G. Network light Rapid: camera being monitored; slow: connected to Internet; off: not connected. If both lights are flashing quickly, either the firmware is updating, or it is restoring to factory settings, or it is switching to WIFI. DON’T TURN OFF THE POWER. IVD2: On the back of the device, there are slots for Ethernet, USB, SIM card, Microphone jack,Audio jack and power. There is also a Reset/WPS button. Push and hold the Reset/WPS button in 5 seconds when3G Camera is on. Hold it for 15 seconds (or hold the button down while switching on the device), and the device will be restored to factory settings. The device successfully run state short press the Reset / WPS enabled WPS function USB Slot Two modes: ① for USB sticks and portable hard drives; ② for the temperature and humidity sensor. They use different voltages. Default setting is for the first mode. If user wants to use it for the temperature and humidity sensor, please set ahead. 3 PDF 文件使用 "pdfFactory Pro" 试用版本创建 www.fineprint.cn Video camera Manual V2.3 Front panel doorbell key : When you press the button, the user mobile terminal software will generate a tone and vibration GUN720: ① Camera LAN port provides an Ethernet connection, ② power input port, ③ Reset / WPS button interface ④ SIM card slot, ⑤ Micro SD card slot Factory default – press Reset / WPS switch with 30 seconds when camera power is switch on at same time, you can restore the device to factory settings, the successful operation of the device state, Enable WPS function - short press Reset / WPS switch 4 PDF 文件使用 "pdfFactory Pro" 试用版本创建 www.fineprint.cn Video camera Manual V2.3 IV, Installing Camera Manager Camera Manager software CD-ROM or SD card presence of Camera Manger-PC directory. The software can only be installed in .NET Framework2.0 (or higher). If you don't have it installed, please installed the .NET Framework2.0 with the disk provided, and then install Camera Manager. Camera Manager keys: Camera: Open Camera List. It shows current camera. Double click a camera to get access. Setting: Open Setting. Set screen shot saving location, video download location, recording time, alarm information, etc. MIC: Turn on/off MIC. When it's on, sounds will be recorded when turn on the camera. Page Switch: Camera Manager can control 36 cameras. In 4 screen view there will be 9 pages available In 9 screen view 4 pages. 5 PDF 文件使用 "pdfFactory Pro" 试用版本创建 www.fineprint.cn Video camera Manual V2.3 Pan/Tilt Control: The arrows can move the camera in all directions Screen Display: Click on button 1 to 4 to get the desired view. Zooming: Zoom in and out. Rotate camera: Click the PTZ will automatically horizontally uninterrupted cruising, 60s automatically stops (no such function at model GUN720 & CL26) Login new camera: To add a new remote camera. V, Installing and setting camera LAN and Internet 1. Connecting camera through LAN A:DHCP:Connect the LAN port of the camera through the network cable, router and computer. Make sure that the router's DHCP function is turned on. For example B2X720 Turn on the camera, open Camera Manager on your computer. You will see your camera under Camera List →Local. IP address shown on the list is the camera’s. Login Camera:After obtaining the camera’s IP address, open your Internet Explorer, put in the IP address and push ‘Enter’. Put in account name and password in the pop-out window. Both are set default as ‘admin’. 6 PDF 文件使用 "pdfFactory Pro" 试用版本创建 www.fineprint.cn Video camera Manual V2.3 When login successfully, camera system status will be shown. B: Static IP address connection:Connect the camera to a computer with an Internet cable. Camera’s IP address is fixed as 192.168.139.139. 7 PDF 文件使用 "pdfFactory Pro" 试用版本创建 www.fineprint.cn Video camera Manual V2.3 Set the computer’s IP address as 192.168.139.251 (192.168.139.X Network Segment). Login camera:After setting the IP address, open Internet Explorer. Put in 192.168.139.139 to login computer. The remaining steps are the same as DHCP. 2. Camera WIFI Setting After logging in, click Setting → WIFI 8 PDF 文件使用 "pdfFactory Pro" 试用版本创建 www.fineprint.cn Video camera Manual V2.3 ⑴Tick the box of Enable WIFI ⑵Click Change, Save Enable WIFI ⑶Click View Wireless Networks ⑷It will take about 10 seconds. Click the arrow of Active AP List, choose the one needed from the drop list. ⑸If your wireless AP requires a password, please put in the password in the Key box. After completing the above steps, the hits "Change " to complete the WIFI settings If a fixed IP address is required, un-tick the box of Enable DHCP, and put in the IP address in the DNS Address box. When finish the setting, click Status → Network to check WIFI status. As the picture shown below, Wireless LAN status is WIFI status. 9 PDF 文件使用 "pdfFactory Pro" 试用版本创建 www.fineprint.cn Video camera Manual V2.3 3. Remote connection service settings and parameters Click Setting → Service, Service Setting window will be shown. When the Enable Service box is ticked, service is enabled. Server:Fill in the server address, when this function to access the Internet will automatically connect to the server. The default is myfuncam.com.hk, if the user does not own server, do not change this address Internet Route: There are three options: Ethernet, WIFI and 3G.It can be chosen accordingly to the camera. Attention: if the setting is wrong, remote service cannot be used. For example, if the camera can only use Ethernet, and the computer route is set as WIFI or 3G, the camera’s remote service will not be enabled. Media Service UPnP:When it’s enabled, if the device is accessed remotely through computers (or 10 PDF 文件使用 "pdfFactory Pro" 试用版本创建 www.fineprint.cn Video camera Manual V2.3 other devices), connection speed will be tested. If direct connection is faster than connection through server, user will be given a choice whether to use direct connection. If the service is not enabled, it will always be connected through server. We suggest user to Enable the service. In about 10 minutes, remote service will be connected. The time required will change according to Internet status. User can check connection status in Status → Service. 11 PDF 文件使用 "pdfFactory Pro" 试用版本创建 www.fineprint.cn Video camera Manual V2.3 4. 3G Setting and Parameters After successful logged into the camera with Internet Explorer, click Setting → 3G. 3G Setting Application Modes: Video Call, Dial-up Internet and Call First. -Video Call: Internet cannot be accessed with 3G, but 3G is required for this mode. -Dial-up Internet: Internet will be available. Internet can be accessed with 3G, but Video Call cannot be used. -Call First:Video Call and Internet will be available. Internet will be off during Video Calls. Connection will be back on after the calls. Network mode : 3G only / GSM only / 3G first -GSM only : Video Call will not be available. -3G only : 3G signal only. GSM signal will not work. -3G first: If there is no 3G signal, GSM signal will work. Dial –up internet Network type: WCDMA / CDMA2000 / TD-SCDMA PPP Auto Configure: Enable / Disable (Enabled by default) Enable: System will automatically configure the APN and SIM dialing information Disable: System only reads user configuration information Access Point (APN) and Dial Number : For details of Dial-up Internet, please contact ( SIM ) mobile network operator to get the Access Point Name (APN) and dial number 12 PDF 文件使用 "pdfFactory Pro" 试用版本创建 www.fineprint.cn Video camera Manual V2.3 When 3G setting is finished, user can go to Status → 3G to check 3G status, shown as below. 13 PDF 文件使用 "pdfFactory Pro" 试用版本创建 www.fineprint.cn Video camera Manual V2.3 5. Ethernet Setting Click Setting→ Ethernet. Open the camera’s Ethernet setting. Change the address accordingly. VI, Camera Manager Software 1. Login camera in Camera Manager Local Login:Open Camera Manager, connected camera will be shown under Camera List→ Local. Double click camera, a login window will pop out. Enter camera administrator password. Default password is ‘admin’. Click ‘OK’. Remote Login:Click ‘Remote Login’, a window will pop out. Put in server address, camera SN, 14 PDF 文件使用 "pdfFactory Pro" 试用版本创建 www.fineprint.cn Video camera Manual V2.3 username and password. Click ‘Login’. If login is successful, a camera will be shown under the Camera List, with server address and camera SN. After logging in successfully, a video setting window will pop out. Change video setting according to user requirements and Internet status. Click Modify Setting, settings will be saved as modified. Click Reserve Setting, setting will be restored to the last modification. Attention: if Internet connection and computer setting are not ideal, don’t set the numbers too high, or the quality of the video will be poor. If connected, image can be seen immediately. Move mouse to the upper right corner of the image, there will be 3 tags: (from left to right) snapshot, recording and 3G signal. 2. System Configure Snapshot Setting:Click ‘Setting’, ‘System Configure’ window will pop out. User can change snapshot directory. When user clicks snapshot at the upper right corner of the image, snapshot will be saved in the set location. 15 PDF 文件使用 "pdfFactory Pro" 试用版本创建 www.fineprint.cn Video camera Manual V2.3 Record Setting: User can change record period and format. Attention: recorded video is not saved in the directory. The camera will download the video and save it in the set location. 16 PDF 文件使用 "pdfFactory Pro" 试用版本创建 www.fineprint.cn Video camera Manual V2.3 Warning Setting:Click the Real time Warning Notification box. Notifications will be shown in the middle of the screen. Video Window Display: Aliases can set the camera displays the camera location, easy to view cameras need to modify the alias give 17 PDF 文件使用 "pdfFactory Pro" 试用版本创建 www.fineprint.cn Video camera Manual V2.3 Camera local information point configuration Alias will be displayed in the camera right corner Upper left corner shows the camera media bit rate Upper right corner shows Alias Lower right corner shows location, only when the camera via remote connection will show that this position is achieved by positioning the camera's IP, the use of different network service providers, show different 18 PDF 文件使用 "pdfFactory Pro" 试用版本创建 www.fineprint.cn Video camera Manual V2.3 3. Manual record, video download and play remote video Manual record:Right click on the image, select Start Record. Another way is to click Record on the upper right corner. Recording time and format will be in consistence with Record Setting. On the left lower corner, recording status and record time left will be shown. Download Videos:Click Camera Record Manager. It will open Remote Video List. Select one video and right click, select Download. The selected video will be downloaded. If user wants to download more than one video, tick the box in front of the videos. Choose Download In Bulk. Downloaded videos will be saved in the location set in Record Setting. 19 PDF 文件使用 "pdfFactory Pro" 试用版本创建 www.fineprint.cn Video camera Manual V2.3 Play Remote Video:Select a video in the Remote Video List, and right click. Choose Play Remote Video or Preview Remote Video. Choose Play Remote Video, the video will be played normally. Choose the other, the video will be played in fast-forward mode. 4. Media Setting Right click on the image, select Setting, and then Media Setting. User can change video quality. If user puts the camera upside down, he can choose Rotate Image, and the video will be normal. 20 PDF 文件使用 "pdfFactory Pro" 试用版本创建 www.fineprint.cn Video camera Manual V2.3 5. Auto Record Click Record Configure. User can change record setting. Videos can only be saved in SD cards. If user wants to record automatically, enable Auto Record, and click New. Select a time needed, click OK. Total recording time of a random distribution of 8G SD card, for example, capacity conversion discussed here do not do, in order to show the capacity of the system prevail, video quality is 448M / H, you can continuously record 17 hours or so (7648M/448M) 21 PDF 文件使用 "pdfFactory Pro" 试用版本创建 www.fineprint.cn Video camera Manual V2.3 Users under the circumstances, whether to enable automatic deletion (not enabled by default) 6. Alarm Configure Setting Click Alarm Configure. User can set Alarm Source. If user needs external alarm, enable Wireless Detective. The camera supports remote control and door sensor. If Motion Detect is enabled, user can set the sensitivity. The sensitivity of motion detection based on the use of the environment of the camera settings may appear incomplete or inaccurate in a complex environment. If a SIM card is inserted, user can choose Replay Video and SMS Alarm. If the alarm firewall is enabled, call number not listed will not be able to reach the camera. 22 PDF 文件使用 "pdfFactory Pro" 试用版本创建 www.fineprint.cn Video camera Manual V2.3 7. Modify Default Location Click PTZ Setting. Choose Current Location (default: system default) in the Select Default Loc drop box. Choose Yes (default: No) for Change Selection. Click OK. When user starts the camera, PTZ default location will always be current location .This setting guarantees after the camera is restarted, monitoring location will be the set location. 8. Add Remote Service Account There is only one default admin user for every camera. When logging in remote service, the same account cannot be logged in at difference places at the same time. If user wants to log in remote service at the same time, he has to register a new account. The new account can only check current video and snapshot. It cannot get access to video, nor can it change settings. Give the new account to users who only wants to have look, so they cannot change settings. User can add a new account in MyFunCam or Camera Manager. User has to log in the remote service with the admin account first. Log in remote service, with the admin account, in Camera Manager (for detail instructions, please see above). Right click the address of the remote camera, choose User Manage. A User Manage window will pop out. 23 PDF 文件使用 "pdfFactory Pro" 试用版本创建 www.fineprint.cn Video camera Manual V2.3 Click New User. Put in new username and password. Click OK. If want to delete user, right click existed username, select Delete. VII, Advanced Setting (don’t change unless necessary) 1. Water Ripples Click Camera Audio and Video Setting. Change power frequency between 50Hz and 60Hz.When checking images, if there are severe water ripples, open Camera → Audio and Video. Change power frequency accordingly between 50Hz and 60Hz. 24 PDF 文件使用 "pdfFactory Pro" 试用版本创建 www.fineprint.cn Video camera Manual V2.3 2. Multi-camera grouping In service →associated with master device, user can bundle Video cameras into groups. One of them will be the main device, others will be affiliates. One of the cameras is the main device, others affiliates. After putting cameras in to groups, user only needs to login the main device to get access to all other devices. Attention: 1. if the main device cannot be connected to a remote server, other devices cannot be connected ether; 2. user cannot get access to affiliates’ remote servers by logging in an affiliate. User has to log in the main device. Seen as below, there are two Video cameras in LAN. Their SN are CN22110929674011 and CN22110929554239. 25 PDF 文件使用 "pdfFactory Pro" 试用版本创建 www.fineprint.cn Video camera Manual V2.3 The default associated main device of each Video camera is itself. 26 PDF 文件使用 "pdfFactory Pro" 试用版本创建 www.fineprint.cn Video camera Manual V2.3 27 PDF 文件使用 "pdfFactory Pro" 试用版本创建 www.fineprint.cn Video camera Manual V2.3 Now, CN22110929674011 is the main device, the other is the affiliate. Change the affiliates Related Main Device as: CN22110929674011. Shown as below 28 PDF 文件使用 "pdfFactory Pro" 试用版本创建 www.fineprint.cn Video camera Manual V2.3 Open Video Camera Manager in WINDOWS, log in remote NVS server CN22110929674011, as shown below. Log in the main device, the affiliates will be shown under the list as well, without the fuss of logging in multiple times. 29 PDF 文件使用 "pdfFactory Pro" 试用版本创建 www.fineprint.cn Video camera Manual V2.3 3. Mobile Video Source Setting In a 3G Camera with SIM card, click Setting→ Mobile Video Setting. Set it as Auto Search. The device will search cameras in the same Mobile Video Source, set it as automatic. The mobile will search cameras in the LAN, and group them. Video call 3G camera with a SIM card. It can be done to multiple cameras at the same time. Use 7 to switch to the previous camera, and 9 to the next. The advantage of this function is that using only one SIM card, can the user video call and manage all the 3G cameras in the LAN. If there is only one camera set, video call can only access mobiles with a SIM card. 4. Wireless AP/STA Switch If user wants to use wireless gate point, he has to enable Personal Hotpoint in Setting → Service. Put in SSID (if not, default setting will be 3gcam_110929XXXX. X is the last 4 numbers of the camera SN). Choose WAN point (Internet route, either Ethernet or 3G). Put in password (the same password for other devices through the camera). 30 PDF 文件使用 "pdfFactory Pro" 试用版本创建 www.fineprint.cn Video camera Manual V2.3 After the setting, if the device is switched to AP and it is using WIFI, the camera will serve as a wireless modem. Other devices can search the camera’s SSID, put in the password, and they will be connected to the Internet (the camera has to be set as using Ethernet or 3G). Or a small wireless LAN will be built through the camera. If the device is switched to STA,the camera will be an ordinary wireless user. It can be connect to other wireless gate point (for details, see Camera WIFI Setting). The picture below shows the network status when the camera is wirelessly connected. 31 PDF 文件使用 "pdfFactory Pro" 试用版本创建 www.fineprint.cn Video camera Manual V2.3 5、The alarm mail settings Open the alarm parameters page column as shown in the template configuration, click to change the settings saved and test the alarm mail can press the button, the camera will capture a picture and sent to the recipient's mailbox is in alarm capture messages, User can go to check mailbox whether the message was received that is represented the configuration successful, our camera are support mail server on : pop Server , 163.com, gmail.com, and yahoo.com. Hotmai.com does not support. 32 PDF 文件使用 "pdfFactory Pro" 试用版本创建 www.fineprint.cn Video camera Manual V2.3 6、Cloud Alarm settings Cloud alarm: video surveillance push alarm service based on third-party cloud storage Sign up and use a third party cloud storage (cloud disk) for free. No extra fees Support Baidu cloud, DropBox Will support more cloud storage, such as 360 , ali cloud, huawei dbank Huge free storage, real-time alarm video and snapshot upload. No worry about the damage and lost of video surveillance device or hard disk Baidu cloud: you may apply for permanent free 2048 gb space (can store 2 million alarm video and snapshot) DropBox:Max 25 gb free Support Android and iOS mobile phone application software (MyfuncamLite) 33 PDF 文件使用 "pdfFactory Pro" 试用版本创建 www.fineprint.cn Video camera Manual V2.3 Register / Unregister the camera push alarm service at any time. Arm / Disarm at any time Receive real-time alarm with sound and vibration. Display the alarm information and alarm list Download and playback the alarm video and snapshot in cloud storage. The alarm video capturing starts at 5 seconds before the alarm triggered and ends at 10 seconds after the alarm triggered. One-click real-time surveillance,Real-time video shows immediately Share alarm message by SMS, Email, etc. Convenient to share and handle alarm Register the Cloud Storage on Camera Œ login camera Web management page, select the cloud storage configuration, select the cloud storage types for Dropbox (for example) Authorize the application “LiveCloudStorage” to use Cloud storage • Automatically open Dropbox login page. Login using existing account or Register a new account Ž Authorize application “LiveCloudStorage” to use the user's Dropbox storage 34 PDF 文件使用 "pdfFactory Pro" 试用版本创建 www.fineprint.cn Video camera Manual V2.3 Display the camera cloud storage information • When Authorization is completed, open the cloud storage information page. If user wants to stop the cloud storage or change the cloud storage account, click the “cancel” button. The video and snapshot data in the cloud storage will not be deleted. 35 PDF 文件使用 "pdfFactory Pro" 试用版本创建 www.fineprint.cn Video camera Manual V2.3 36 PDF 文件使用 "pdfFactory Pro" 试用版本创建 www.fineprint.cn Video camera Manual V2.3 Login Dropbox storage. Access the uploaded videos and snapshots in the “Files” > “应用” > “LiveCloudStorage” folder Local configuration, It is not recommended to modify, otherwise it will lead to cloud storage exception. VIII, Other Devices 1. Android Terminal Software ⑴ Cloud AlarmCam software stored in the TF card Cloud AlarmCam-Android directory, TF card stored in the camera's manual and software, users need to first remove the camera TF card with computer to TF card, copy the data to phone. ⑵ After the copy is completed TF card back in the camera, because the camera is not inserted TF card will not be able to use the video feature. to install Cloud AlarmCam-Android directory run “Cloud AlarmCam.apk ” IOS mobile phone users in ‘App Store’ search "myfuncam" download the latest version installed Click on Cloud AlarmCam app, the main menu and interface function key as shown 37 PDF 文件使用 "pdfFactory Pro" 试用版本创建 www.fineprint.cn Video camera Manual V2.3 1. The camera is powered, self-test is completed 1.1 click on the Search key and will automatically scan and display the camera list ( Factory default - camera has hotspot AP mode ) 2.click on the wifi key to initially set up the camera wifi network 3.Click on the Search Wireless Networks key 4. select and input the router password 4.1 select your router and input router password 4.2 click on Apply 38 PDF 文件使用 "pdfFactory Pro" 试用版本创建 www.fineprint.cn Video camera Manual V2.3 4.3 camera will automatically restart, when user is completely select and input the router password 5. back to main menu and click on the search key , the camera wifi connection is shown: (3) Favorites: save the camera remote service login information next time the user can directly favorites registry. Eliminates the trouble of re-enter At the login screen remote camera's serial number, user name and password, add to favorites, login once, Favorites page just login the camera will record the information In the pop favorites interface, enter the camera's serial number, user name and password, camera name can be free to enter, just as a logo, and then click OK to add a collection. Each camera information favorites right two icons were logged camera remote service and delete the current camera information. ⑷ Advanced Settings 39 PDF 文件使用 "pdfFactory Pro" 试用版本创建 www.fineprint.cn Video camera Manual V2.3 System Settings - set the parameters do not recommend users to modify Snapshot: Set the camera interception image formats, PNG and JPEG Record Video: Set video camera recording time, the number of simultaneous downloads and video formats Alarm Configurations: Default tick, the camera triggers an alarm, the phone will receive a notification, the premise phone will need to connect the camera Server IP: connect to the server to provide remote camera Wizard Setting: Opening Camera AP / STA Setup Wizard, as detailed in the wireless AP / STA switch Description Other: 3G signal and media bit rate, the default check in the upper right corner shows the camera picture card Local Video Management: mention download video information to your phone Local Snapshot Management: Saving snapshots taken by mobile phone pictures Local Alarm Management: Check remote alarm recording, exit when prompted to save to a local, saved, to keep a phone for easy viewing Version update: Check for the latest version, when the latest version, log management interface, the system will automatically prompt whether to update the Dimensional code scanning capabilities: 40 PDF 文件使用 "pdfFactory Pro" 试用版本创建 www.fineprint.cn Video camera Manual V2.3 Open the two-dimensional code scanning capabilities, the camera scans the two-dimensional code is placed in a central, regulate the distance, scanning successful will directly enter the serial number of the camera serial number column, so that eliminates the need for users to enter the wrong serial number trouble, but also strengthened the confidentiality. (5) After entering the camera login interface, you can set the phone alarm service, select the alarm transmission, suggesting that the phone registered, so that when this camera triggers an alarm, even if the phone is not logged on to the camera, the phone will also receive a bound alarm 41 PDF 文件使用 "pdfFactory Pro" 试用版本创建 www.fineprint.cn Video camera Manual V2.3 (6) PTZ control instructions: Log in remote camera after slide horizontally to the left on the touch screen (pan left), horizontal slide to the right (pan right), vertical slide (head upward), vertical next slide (head down). Click on the touch screen, the icon in the upper left corner of the pop-up, click Start automatic cruise PTZ auto cruise horizontally (7) click on the touch screen, the top left corner of the icon functions from left to right: screenshots, Record Video, automatic cruise (8), Click the Advanced button to Android devices, software, pop-up menu operation, remote connection (Figure 1) with a LAN connection (Figure 2), the menu is slightly different: Figure 1 ---- Remote Login connection 42 PDF 文件使用 "pdfFactory Pro" 试用版本创建 www.fineprint.cn Video camera Manual V2.3 Figure 2 ---- scanning local connection Open MIC: Turn on / off Android devices MIC, the status is open sound can be transmitted to the camera Camera List: LAN all available cameras Close Speaker: Turn on / off the camera sound output device, the status is open sound can be transferred to Android devices Disarm/Arm:Control the camera alarm status, when the top right corner displays Represents the current state of Arm; Represents the current state of Disarm Alarm Record: network camera alarm records to view, If the alarm time, the alarm class 43 PDF 文件使用 "pdfFactory Pro" 试用版本创建 www.fineprint.cn Video camera Manual V2.3 Settings: Open the Settings item, you can view 3G Configurations, Video Configuration, Alarm Settings, WIFI settings,Time Settings, etc. Video Configuration: Remote Service Connection recommended bit rate 128, frame rate 10. If LAN 512 recommended rate, frame 8. Video effects you can choose if the LAN connection is HD, if it is a remote service connection Select Normal or standard definition, the default connection is normal, the user can according to the current network environment, appropriate adjustments If it is set too high, the picture card can not be displayed Other investigations related configuration actions can refer Camera Manager software operation, description will not be repeated. More: Video downloads, alarm service and user management Video Download: Opens video download page, you can download video or remote play video Alarm service: whether bound phone alarm, an alarm is triggered after the opening, the phone will receive the warning message User Management: add, and delete remote service account, to the different locations, while logged camcorder, you need to add a remote account Open the user management interface, click on the red box to add users, add the pop-up user interface, enter the user name and password then click OK. To delete a new user, just click on the icon to the right of the user name. 44 PDF 文件使用 "pdfFactory Pro" 试用版本创建 www.fineprint.cn Video camera Manual V2.3 (9) click video downloading, open the video download page, each video information from left to right behind the four key features are: Remote playback, download video, pause a download, delete videos. You can download the video to android devices, remote playback function can also be used to view the video, remote playback operation with Camera Manager operation of the software, as described will not be repeated. (10) Alarm information After binding the phone, an alarm is triggered when the phone will receive alarm information 45 PDF 文件使用 "pdfFactory Pro" 试用版本创建 www.fineprint.cn Video camera Manual V2.3 In the phone status bar For remote alarm notification service, this state indicates that the connection is normal, if it is gray connection failed, unable to send alarm information will lead to the phone Alarm information, click on to view alarm 2. Temperature and humidity sensor Use the USB slot to connect to the temperature and humidity sensor. Attention: Do not touch if the camera is hot. When installed, temperature and humidity status is accessible in Camera Manager or Cloud AlarmCam. 3. Add a wireless alarm equipment(Optional feature) and alarm settings 3.1、Below is an example 433 the door 46 PDF 文件使用 "pdfFactory Pro" 试用版本创建 www.fineprint.cn Video camera Manual V2.3 Setting → Alarm. Enable Wireless Detector. Alarm Setting page is shown as below 47 PDF 文件使用 "pdfFactory Pro" 试用版本创建 www.fineprint.cn Video camera Manual V2.3 ① Wireless Detector: Enable and un-enable the 433 wireless model. ② Armed Mode: Enable all alarm; stay, away and emergency; enable emergency alarm. If user only needs some alarms, choose alarm level accordingly. 48 PDF 文件使用 "pdfFactory Pro" 试用版本创建 www.fineprint.cn Video camera Manual V2.3 A: EMERGENCY: The highest level to set the level of alarm can not be disarmed. B: Stay : Level inferior to the emergency setting the level, you can use the remote control to disarm or alarm --alarm source Setting -- alarm Mode:Emergency alarm. Then set the left-behind alarm is disarmed C: Away: Level inferior Stay D: NOT USE: Disabled ③ Sound Alarm: When it’s enabled, When triggered, the alarm will buzz. ④ Alarm Snapshot Email: Put in Email information. When triggered, camera will have a snapshot. An Email will be sent with the snapshot and the alarm information (the camera has to be connected to Internet). ⑤ Telephone and SMS Alarm: When triggered, an SMS will be sent, and a phone call will be made to the saved number (mobile must have 3G signal and SIM card). If Alarm Firewall is enabled, only numbers on the list can access the camera. After setting, open Setting→ Accessory Main parameters are listed as below. ①New wireless accessory list: devices’ address detected by the 433 wireless model. ② Association Name: choose devices needed to add: remote control, infrared ray, door sensor, smoke detector, gas detector, infrared beaming, broken glasses, water detector, manual emergency button, medical emergency, robbery and motion detector. The names will be shown in the alarm 49 PDF 文件使用 "pdfFactory Pro" 试用版本创建 www.fineprint.cn Video camera Manual V2.3 information. User should choose according the device. ③ Zone: between 0 and 100. The number will be shown in the alarm information. Numbers are used to distinguish alarms with the same associated name. If use has more than one door sensors, he can number them according to zones, to separate them from each other. ④ Detector Attribute: Not use, stay, away and emergency. Set according to Alarm Level, user can switch on and off signed alarms. For example, if motion detector is set as Stay, and Alarm Level is set as enable, away or emergency, Motion Detector will not function. ⑤ Action: If the alarm is triggered, the camera will act accordingly. Press and hold Ctrl and multi choose (except RCAwayMode, RCDisarmMode and RCStayMode. User can only choose on of them). If Action is not enabled, the camera will not react. Record:When alarm is triggered, the camera will record automatically. SMS:A message will be sent to the set number, which can be set in Alarm Setting. ToAlarmCenter:Not available. VideoCall:Video call to the set number, which can be set in Alarm Setting. AlarmSound:The alarm will buzz until the camera is restarted. This function should be set in Alarm Setting. Alarm Email:A screen shot will be sent to the set Email, which can be set in Alarm Setting. PTZ Trace:When the alarm is triggered, the camera will rotate automatically to the set position to monitor. RCAwayMode:Set Alarm Mode as Enable all Alarm. It will be set as emergency. Cannot be multi-choose. RCDisarmMode:Set Alarm Mode as Enable Emergency Alarm. It will be set as emergency. Cannot be multi-choose. RCStayMode:Set Alarm Mode as Enable Stay and Emergency Alarm. It will be set as emergency. Cannot be multi-choose. ⑥ PTZ Tracking Angles: These two will only function if PTZ Trace is chosen in Action. If use doesn’t know the number, turn the PTZ the angle needed, the numbers will change automatically to current position 3.2、Here's how to add wireless accessories ---Description of the code(Optional feature) Method One: 1.Camera device front panel buttons on the code, the code key position as shown below. 50 PDF 文件使用 "pdfFactory Pro" 试用版本创建 www.fineprint.cn Video camera Manual V2.3 2. The first power-up the camera, press the camera after a successful start on the code key, to be heard from the camera after the buzzer short beeps, indicating the camera is turned on automatic code, release the code key. (Press the code key 30 seconds after the effective) 3. Then press the door of the code key (door of the black button) until you hear the camera buzzer sound indicates success of the code length, loosen the door of the code key. 4. At this point of the code is complete, then open the camera's web page, in the Settings → Wireless Accessories a bar code can view the already successful device, as shown below. Method Two:Manually add Use For GUN720 and accessories can not be automatically added Login camera, enter the management interface,Click Setting → Accessory 51 PDF 文件使用 "pdfFactory Pro" 试用版本创建 www.fineprint.cn Video camera Manual V2.3 For example the remote control (1) Click “Begin Learning”(Valid within 30 seconds) (2) Press the button on the door sensor code 5 seconds (3) When you hear the camera issued a "drop", said the success of the code, and then click the "Refresh List" In the "new wireless accessories list" display Magnetic unsuccessfully to add, at this time need to manually set the association name to "Magnetic", The "Detector Attribute" set up Away, "Action" hold 52 PDF 文件使用 "pdfFactory Pro" 试用版本创建 www.fineprint.cn Video camera Manual V2.3 down the Ctrl key to make multiple selections (4) After setting, click the "Add New Setting" 3.3、door sensor operation 1.Remote control and door sensor code key code only, equipment yard completion code key has no effect, can not trigger the alarm function。 2. When the camera is open all alarm status, in addition to all other alarm level is off the alarm effect when the camera is turned on emergency alarm status, in addition to the rating of the emergency alarm failure。 53 PDF 文件使用 "pdfFactory Pro" 试用版本创建 www.fineprint.cn Video camera Manual V2.3 3. Door sensor were placed on both sides of the door, when the door is open, the door will sound the alarm 54 PDF 文件使用 "pdfFactory Pro" 试用版本创建 www.fineprint.cn Video camera Manual V2.3 4. When the alarm device can not trigger an alarm, check the alarm level is set correctly。 3.4、Alarm plan To program the alarm time, the alarm program is set to be first enabled, if you want to set up day for the period of time instead of one day, you must first delete the number of days, for example, plans Tuesday 8:00 to 12:00 and 14:00 to 17:00 for the alarm time, they have to first delete all day Tuesday Before Tuesday's scheduled time to add, or will be unable to set the time period 55 PDF 文件使用 "pdfFactory Pro" 试用版本创建 www.fineprint.cn Video camera Manual V2.3 After setting Note: 1、The Ting Chi wireless fortification Effective Time 30 seconds means that when arming beep sounds when the alarm is armed after 30 seconds before commencement 2、If you set the CL26 camera to the factory system, the doorbell button will fail, this function key to be re-added to the alarm in order to use wireless accessories, as follows: 56 PDF 文件使用 "pdfFactory Pro" 试用版本创建 www.fineprint.cn Video camera Manual V2.3 Click on Then press , Then select the doorbell and health for about 5 seconds or so, you will hear the device, transient peaks song, click on Refresh List, the new options will appear at 000,001 parts, as shown below based system set up after a good point to Add New Setting So this function key to activate it 57 PDF 文件使用 "pdfFactory Pro" 试用版本创建 www.fineprint.cn Video camera Manual V2.3 58 PDF 文件使用 "pdfFactory Pro" 试用版本创建 www.fineprint.cn