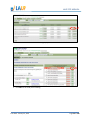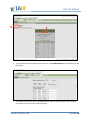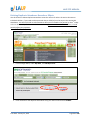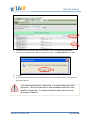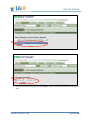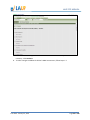
1
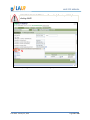
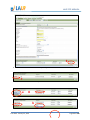
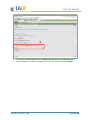
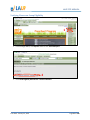
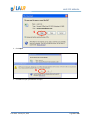
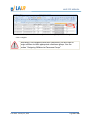
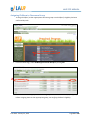
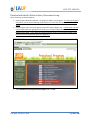
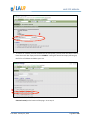
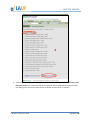
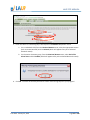
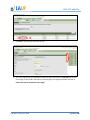
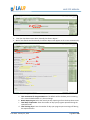
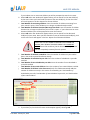
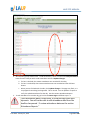
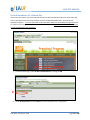
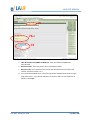
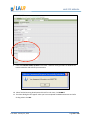
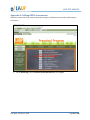
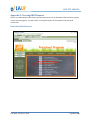
Efforts to Outcomes (ETO) User Manual (This page is intentionally left blank) LAUP ETO MANUAL Contents Logging into Your ETO Site ........................................................................................................................... 5 Navigating the ETO Home Page .................................................................................................................... 5 Enroll a New Family/Child (Entering Family/Child Information) .................................................................. 6 LAUP Proposed Enrollment Group ............................................................................................................. 14 Assigning Children to the Proposed Enrollment Group ................................................................. 15 Verifying Children’s Eligibility ..................................................................................................................... 18 Verifying Individual Child’s Eligibility ............................................................................................. 18 Verifying Classroom Group Eligibility ............................................................................................ 21 Assigning Children to Classroom Group ........................................................................................ 25 Verifying Children Are Assigned to Correct Group ........................................................................ 28 Moving Children from one Classroom Group to another Classroom Group .............................................. 30 Editing Start Date .......................................................................................................................... 33 Verifying ETO Data for Classroom Group-‐ETO Check Report ..................................................................... 36 Dismiss Individual Child or Entire Classroom Group .................................................................................. 40 Editing Child/Family Information ............................................................................................................... 44 Monthly Enrollment Reports ...................................................................................................................... 46 Submitting Monthly Enrollment Reports in ETO ........................................................................... 46 Viewing, Editing, and Printing Monthly Enrollment Reports ......................................................... 53 Attendance ................................................................................................................................................. 57 Recording Attendance in ETO ........................................................................................................ 57 Attendance Reports ...................................................................................................................... 64 Alternative Attendance Report ..................................................................................................... 69 Deleting Duplicate Attendance Records or Efforts ........................................................................ 71 Edit Attendance ............................................................................................................................. 73 Record Attendance for a Missed Day ............................................................................................ 76 Adding Child after Attendance Recorded for Classroom Group .................................................... 80 Appendix 1: ETO Standard Reports ........................................................................................................... 83 Appendix 2: Changing your Classroom Group name ................................................................................. 84 Appendix 3: Recording DRDP Assessments ................................................................................................ 86 Appendix 4: Editing DRDP Assessments ..................................................................................................... 92 _____________________________________________________________________________________ Print Date: January 23, 2014 Page 3 of 108 LAUP ETO MANUAL Appendix 5: Viewing DRDP Reports ........................................................................................................... 97 Individual Child Reports ................................................................................................................ 97 DRDP Assessment Report for Entire Program ............................................................................. 100 DRDP Assessment Report for Classroom/Group ......................................................................... 103 Appendix 6: Installing Crystal Viewer Reports ......................................................................................... 107 _____________________________________________________________________________________ Print Date: January 23, 2014 Page 4 of 108 LAUP ETO MANUAL Logging into Your ETO Site ETO Client Login Page: 1. Open Internet Explorer. 2. Go to the following web site: http://laup.etosoftware.com. 3. Enter your Username and Password. a. If you do not know/remember your username and password contact the ETO Hotline, 213-‐416-‐1217 or 213-‐416-‐1836. 4. Select Your Site from the list on the screen. a. After the first login your site will become the default selection in this field and you will not have to select it again. 5. Click on Login. Before accessing the ETO system, you will need to have internet access and be connected to the internet. The ETO system is ONLY compatible with Microsoft Internet Explorer. The ETO system will not run effectively with other Internet browsers, including MAC. Navigating the ETO Home Page This is the ETO home page where you will navigate through the ETO system. _____________________________________________________________________________________ Print Date: January 23, 2014 Page 5 of 108 LAUP ETO MANUAL 3 2 1 Section 1: The Center Menu is the area with the primary functions you will most often use within the ETO system. Use the Center Menu when directed to do so in the ETO manual. Section 2: The Right Menu lists the all of the functions in ETO. Only use this menu when directed to do so in the ETO manual. The narrow black bar to the left of the menu expands and hides the menu. Section 3: The Upper Right Menu appears on every ETO screen and has links that will get you back to the Home Page, Log Out or view your account information. It is very important to follow the steps outlined in this manual. If you do not complete the steps correctly your ETO data will be inaccurate and could possibly affect your payments. If you need assistance, contact the ETO Hotline, 213-‐416-‐1217 or 213-‐416-‐1836. Enroll a New Family/Child (Entering Family/Child Information) Before you are able to do anything using ETO, you must enter each child and their family information into the system and assign the child to a classroom/group. Use the LAUP Pre-‐Enrollment Form to begin _____________________________________________________________________________________ Print Date: January 23, 2014 Page 6 of 108 LAUP ETO MANUAL entering the Family/Child information into ETO. This is referred to as enrolling the Family/Child into the ETO system. 1 1. From the Home Page, select #1-‐ Enroll a New Family/Child by clicking GO. Use the information from the LAUP Pre-‐Enrollment Form to populate the Child and Family Members data in the following steps. If any information on the LAUP Pre-‐Enrollment Form is blank, please verify information with the family. _____________________________________________________________________________________ Print Date: January 23, 2014 Page 7 of 108 LAUP ETO MANUAL 2 2. Enter the child’s last name in Household/Family Name. All family members for this child will be linked to this name, regardless if other family members have a different last name. For the Start Date: Use the default, which is today’s date. This date reflects the date the child is entered into the ETO system. There may be instances where the Household/Family Name may be the same as another family at your site. You will need to differentiate between the two in ETO. For example: Household/Family Name: Smith Family 1, Household/Family Name: Smith Family 2 3 3. Click on the arrow for the Click to Add Household/Family Member by Family Relationship drop down menu, then click on Child and the Participant Demographic Information page will appear. _____________________________________________________________________________________ Print Date: January 23, 2014 Page 8 of 108 LAUP ETO MANUAL 4b 4c 4. Enter the Child and Family information here on the Participant Demographic Information page. You will enter the child’s information first and then family members: a. Fields with an asterisk (*) or highlighted in yellow are required fields. b. Is this Child a recipient of a subsidy? If the child is receiving any type of subsidy (your program receives funding from another source for the child) check the appropriate box. If you are unsure, check “None”. c. Is this Child a part of the LAUP program? Select “Yes” if the child is part of the LAUP program Please note: it is imperative that you remove a child from ETO if the parent does not complete the enrollment process. Otherwise, the child cannot enroll at another LAUP program if the parent elects to do so in the future. d. Any fields left blank without an asterisk* can be left blank and will not impact the ability to save data. e. Follow steps 5-‐8 to enter the parent/guardian information. At least one parent/guardian should be entered. _____________________________________________________________________________________ Print Date: January 23, 2014 Page 9 of 108 LAUP ETO MANUAL DO NOT CLICK SAVE YET!! You will need to follow steps 5-‐8 before clicking SAVE! 5 5. Enter the parent/guardian’s information in the emergency contact section. _____________________________________________________________________________________ Print Date: January 23, 2014 Page 10 of 108 LAUP ETO MANUAL 6 6. Delete the first row of the *Household/ Family Member section 7 7. Click Add Enrollment once so that you see 1 row. a 8 b _____________________________________________________________________________________ Print Date: January 23, 2014 Page 11 of 108 LAUP ETO MANUAL c d 8. Each family member MUST be assigned to the appropriate Program. Children are assigned to the Preschool Program and the parents/guardians are assigned to the Parents Program. The names on the drop down menus will be listed in the order they were inputted. a. To assign the child to the Preschool Program, select the child from the Household/Family Member drop down menu and select Preschool Program from the Program drop down. b. To assign the parents/primary caregiver to the Parents Program, select the parent/primary caregiver from the Household/Family Member drop down menu and select Parents Program from the Program drop down menu. Complete this step for each parent/guardian entered into the system. c. For the Start Date: Use the default, which is today’s date. This date reflects the date the child is entered into the system. d. When you have finished assigning each family member to the appropriate program, click Save. You have now entered the Household/Family information! DO NOT click SAVE in Step 8 until you have verified the child and parent/guardian are assigned to the correct program! 9 a b 9. This screen appears if the ETO system detects a Duplicate Entry. a. If this is not a duplicate entry, select Add as New to enroll the child into ETO and click Save. _____________________________________________________________________________________ Print Date: January 23, 2014 Page 12 of 108 LAUP ETO MANUAL b. If this is a duplicate entry, click Cancel. The system will automatically take you back to the Add Household screen (step 4) and you can edit the information. b 10 a 10. To enroll additional children: a. Click Add Another Household and follow steps 2-‐8. b. When you are finished entering all of the children enrolled in your program, click Home Page. _____________________________________________________________________________________ Print Date: January 23, 2014 Page 13 of 108 LAUP ETO MANUAL LAUP Proposed Enrollment Group Once enrolled in the ETO system, you will need to assign ALL LAUP children to the LAUP Proposed Enrollment Group for LAUP to confirm eligibility. From April 1 through August 20 of the program year, LAUP will verify each child’s eligibility within 14 days of being enrolled into the system. LAUP will notify parents through standard mail of their child’s eligibly within 14 days enrollment of the child and parent/guardian into the system. From August 21 through June 30 After, LAUP will verify each child’s eligibility within 48 hours being enrolled into the system. LAUP will notify parents through standard mail of their child’s eligibly within 7 days enrollment into the system. o You will need to check eligibility confirmations in ETO by following the steps in the Verifying Children’s Eligibility section. Once children’s eligibility has been verified, please remove children from the LAUP Proposed Enrollment Group. You will then need to assign child(ren) to their appropriate classroom group and edit their start date. To do this, see the sections Assigning Children to Classroom Group and Editing Start Date. o At the end of each school year, you will need to dismiss children from your classroom group before assigning the new children to the group. To do this, see the section Dismiss Entire Classroom Group from Program section. Child Enrollment Forms and LAUP Parent Consent Forms are to be completed after eligibility has been verified by LAUP. DO NOT enter children into the LAUP Classroom Groups before entering children into the Proposed Enrollment Group and allowing time for LAUP staff to confirm eligibility. _____________________________________________________________________________________ Print Date: January 23, 2014 Page 14 of 108 LAUP ETO MANUAL Assigning Children to the Proposed Enrollment Group 1 1. From the Home Page, select #5-‐Manage Classroom Groups by clicking GO. 2 2. Click Members for the LAUP Proposed Enrollment Group _____________________________________________________________________________________ Print Date: January 23, 2014 Page 15 of 108 LAUP ETO MANUAL 3 3. To search for children you have enrolled into the ETO system; a. Leave the search box empty, click GO and all children enrolled in the system will appear. 4. 4 You will need to add each child individually to the classroom group. Click on ADD next to the the classroom group. child’s name to add them to Existing Groups: This indicates that the child has already been assigned to a classroom group and should not be assigned to another classroom group. _____________________________________________________________________________________ Print Date: January 23, 2014 Page 16 of 108 LAUP ETO MANUAL 5 5. The child added will appear in Current Participants Assigned for Classroom Group for (name of Classroom Group) list. Follow step 4 for each child to be added to the classroom group. _____________________________________________________________________________________ Print Date: January 23, 2014 Page 17 of 108 LAUP ETO MANUAL Verifying Children’s Eligibility There are 2 ways you can verify children’s eligibility for the LAUP program 1. Per individual child 2. Per classroom group Verifying Individual Child’s Eligibility 1 1. From the Right Menu, under Participant History, click Participant Assessment. 2 2. Enter the child’s last name (or you may leave the box blank to view all children’s names) in the search box and click GO. _____________________________________________________________________________________ Print Date: January 23, 2014 Page 18 of 108 LAUP ETO MANUAL 3 3. Select the child by clicking GO next to the child’s name and the following screen will appear. 4 4. From the Take Action drop down menu select Review and the following screen will appear. _____________________________________________________________________________________ Print Date: January 23, 2014 Page 19 of 108 LAUP ETO MANUAL 5 5. See A-‐6. Does this child meet all of the Eligibility Requirements for the LAUP Program to confirm eligibility. If a child is not eligible, the reasons why will be stated in A-‐7. Notes. _____________________________________________________________________________________ Print Date: January 23, 2014 Page 20 of 108 LAUP ETO MANUAL Verifying Classroom Group Eligibility 1 1. From the Right Menu, click Reports and then click Custom Reports. 2 2. Click LAUP Eligibility Assessment – Assessed Children _____________________________________________________________________________________ Print Date: January 23, 2014 Page 21 of 108 LAUP ETO MANUAL 3 3. Scroll down and/or click Page numbers to see your entire classroom group list. The last Colum, Assessment Choice Response confirms eligibility: YES-‐child is eligible or NO-‐child is ineligible. 4 a b 4. To save the information to an Excel spreadsheet complete the following steps: a. Select Excel from the drop down menu b. Click the Save button _____________________________________________________________________________________ Print Date: January 23, 2014 Page 22 of 108 LAUP ETO MANUAL 5 5. Click Open. 6 6. Click Yes and your spreadsheet will open _____________________________________________________________________________________ Print Date: January 23, 2014 Page 23 of 108 LAUP ETO MANUAL 6 7. The last column, Assessment Choice Response confirms eligibility: YES-‐child is eligible or NO-‐ child is ineligible. REMINDER: Once eligibility has been confirmed, you will need to assign children to their appropriate classroom group. See the section “Assigning Children to Classroom Group” _____________________________________________________________________________________ Print Date: January 23, 2014 Page 24 of 108 LAUP ETO MANUAL Assigning Children to Classroom Group To assign child(ren) to their appropriate classroom group once child(ren)’s eligibility has been confirmed by LAUP: 1 1. From the Home Page, select #5-‐Manage Classroom Groups by clicking GO. 2 2. Click Members for the appropriate classroom group. Be sure to confirm child(ren)’s eligibility before assigning them to their appropriate group, see Verifying Children’s Eligibility. _____________________________________________________________________________________ Print Date: January 23, 2014 Page 25 of 108 LAUP ETO MANUAL 3 3. To search for children you have enrolled into the ETO system; a. Leave the search box empty, click GO and all children enrolled in the system will appear. 4 4. You will need to add each child individually to the classroom group. Click on ADD next to the child’s name to add them to the classroom group. Existing Groups: This indicates that the child has already been assigned to a classroom group and should not be assigned to another classroom group. Note: if the Existing Group is the Proposed Enrollment Group, you must remove the child from the Proposed Enrollment Group before adding him/her to a classroom group! _____________________________________________________________________________________ Print Date: January 23, 2014 Page 26 of 108 LAUP ETO MANUAL 5 The child added will appear in Current Participants Assigned for Classroom Group for (name of Classroom Group) list. Follow step 4 for each child to be added to the classroom group. The children listed in the ETO classroom group list MUST match with the children for which you have submitted Parent Consent Forms. If this information does not match, your ETO data will be inaccurate and could possibly affect your payments. If a child was added to the wrong classroom group, see section “Moving Children from one Classroom Group to another Classroom Group”. _____________________________________________________________________________________ Print Date: January 23, 2014 Page 27 of 108 LAUP ETO MANUAL Verifying Children Are Assigned to Correct Group 1 1. From the Home Page, select #5-‐Manage Classroom Groups by clicking GO. 2 2. Each of your LAUP classroom group(s) will be listed. Click the Members button to select the appropriate group. _____________________________________________________________________________________ Print Date: January 23, 2014 Page 28 of 108 LAUP ETO MANUAL 3. You will now see the list of children assigned to the selected classroom group. If you need to reassign children to a different classroom group, see the section Moving Children from one Classroom Group to another Classroom Group. _____________________________________________________________________________________ Print Date: January 23, 2014 Page 29 of 108 LAUP ETO MANUAL Moving Children from one Classroom Group to another Classroom Group Use this feature to move a child from the LAUP ID: Proposed Enrollment Group to an AM and/or PM session or to move a child between classroom groups. If a child is no longer enrolled in your program DO NOT use this process. See the section “Dismiss Individual Child or Entire Classroom Group.” 1 1. From the Home Page, select #5-‐Manage Classroom Groups by clicking GO. 2 2. Click the Members button for classroom group you are moving child(ren) out of. Reminder: Please remove eligible children from the LAUP Proposed Enrollment Group. _____________________________________________________________________________________ Print Date: January 23, 2014 Page 30 of 108 LAUP ETO MANUAL 3 3. Click Remove for the child you wish to dismiss from the group. 4 4. Enter the child’s last day in the Termination Date boxes and select Changed Classroom or Group from the drop down menu. _____________________________________________________________________________________ Print Date: January 23, 2014 Page 31 of 108 LAUP ETO MANUAL 5 5. Click Submit. The Group Member Information for (name of Classroom Group) screen will appear and the child will no longer be listed in the classroom group list. 6. Refer to page 24 and follow the steps under the section “Assigning Children to Classroom Group” The children listed in the ETO classroom group list MUST match with the children for which you have submitted Parent Consent Forms. If this information does not match, your ETO data will be inaccurate and could possibly affect your payments. _____________________________________________________________________________________ Print Date: January 23, 2014 Page 32 of 108 LAUP ETO MANUAL Editing Start Date To reflect a child’s actual start date in a classroom, their start date must be edited in the system. For September, enter your first operational day of the month. This date may either be before or after you submit your Monthly Enrollment Form. For example, the Monthly Enrollment Report is due Sept. 7th and your program’s start date is Sept. 10th. You would enter 09/10/2012 as the start date for all children who start on your first operational day. For children starting after your first operational day of the month, enter the date that the child started receiving program services. For example, if a child’s first day of school is 1/15/20##, this is the date you would enter. In order for the attendance data to be accurate the start date must be correct 1 1. From the Home Page, select #5-‐Manage Classroom Groups by clicking GO. _____________________________________________________________________________________ Print Date: January 23, 2014 Page 33 of 108 LAUP ETO MANUAL 2 2. Click the Members button for classroom group you need to edit. 3 3. Click Edit for the child you are editing. _____________________________________________________________________________________ Print Date: January 23, 2014 Page 34 of 108 LAUP ETO MANUAL 4 4. Enter the appropriate Start Date using the drop down menus and click Submit. a. Reminder: See description at the beginning of this section for what date to enter. b. It is imperative that all LAUP students have the correct start date. 5 5. The updated date will now be reflected in the list. Repeat this process for each child. The children listed in the ETO classroom group list MUST match with the children for which you have submitted Parent Consent Forms. If this information does not match, your ETO data will be inaccurate and could possibly affect your payments. _____________________________________________________________________________________ Print Date: January 23, 2014 Page 35 of 108 LAUP ETO MANUAL Verifying ETO Data for Classroom Group-ETO Check Report It is imperative before you begin to record attendance you should check your classrooms group(s) list to ensure that your ETO data is correct and that it matches with your Parent Consent Forms. On the ETO Check Report you will be able to check multiple pieces of ETO data, such as Start Data and Is Child part of LAUP Program? If your ETO data is inaccurate it could possibly affect your payments. 1 1. From the Right Menu, click Reports and then click Custom Reports. 2 2. Click ETO Check. _____________________________________________________________________________________ Print Date: January 23, 2014 Page 36 of 108 LAUP ETO MANUAL 3 3. Select the appropriate classroom group (i.e. LAUP ID: 1111111121 Classroom 1 PM) and click Continue. b 4 a 4. To easily view the information, complete the 2 following steps for this screen. a. Select Excel from the 2nd drop down menu b. Click the Save button _____________________________________________________________________________________ Print Date: January 23, 2014 Page 37 of 108 LAUP ETO MANUAL 5 5. Click Open. 6 6. Click Yes and your spreadsheet will open. _____________________________________________________________________________________ Print Date: January 23, 2014 Page 38 of 108 7 a LAUP ETO MANUAL b d c 7. An Excel spreadsheet will open. Check the following items. a. Participant First & Last Names: Ensure the children listed match your Parent Consent Forms. b. “Is this child part of the LAUP program?”: Ensure that all children are marked “Yes”. See the section Indicating Child part of LAUP program if it is blank or children are marked “NO.” c. Group Start Date: Ensure that children’s start date is correct. See the section Editing Start Date if the start date is incorrect. d. Term Date for Active: Ensure the date of any dismissed children is correct. Active/currently enrolled children will show today’s day in this column. The children listed in the ETO classroom group list MUST match with the children for which you have submitted Parent Consent Forms. If this information does not match, your ETO data will be inaccurate and could possibly affect your payments. _____________________________________________________________________________________ Print Date: January 23, 2014 Page 39 of 108 LAUP ETO MANUAL Dismiss Individual Child or Entire Classroom Group There are 2 ways to dismiss children: 1. Dismissing an individual child who is no longer enrolled in your program. If a child has changed classrooms, see the section Moving Children from one Classroom Group to another Classroom Group. 2. Dismissing the entire classroom group at the end of each program year. PLEASE NOTE: You will use the same classroom group(s) each school year. DO NOT CREATE NEW LAUP CLASSROOM GROUPS EACH YEAR. If you create new LAUP classroom groups, your attendance data will be inaccurate and could possibly affect your payments. 1 1. Select #10-‐Dismss Family/Child from Program and click GO. _____________________________________________________________________________________ Print Date: January 23, 2014 Page 40 of 108 LAUP ETO MANUAL 2 2. To search for children you have entered into the ETO system, you can enter the child’s name or leave the search box empty and click on SEARCH. Leaving the search box empty will bring up the full list of children enrolled at your site. 3 3. To dismiss an individual child, check the box next to the child’s name and click Dismiss (same date and reason) at the bottom of the page. Go to step 5. _____________________________________________________________________________________ Print Date: January 23, 2014 Page 41 of 108 LAUP ETO MANUAL 4 4. To dismiss the entire classroom group, check box Select All Participants and click Dismiss (same date and reason). All children enrolled in your program will be listed and will not be sorted by classroom group. Be sure to review the list of children to make sure it is accurate. _____________________________________________________________________________________ Print Date: January 23, 2014 Page 42 of 108 LAUP ETO MANUAL 5 b a 5. Enter the child’s or classroom group’s last day from the End Date drop down menus. a. For an individual child, from the Dismissal Reason menu, select the appropriate reason (such as Parent Removal) and click Submit (which will appear after you’ve selected dismissal reason). b. For the entire classroom group, from the Dismissal Reason menu, select End of the School Year and click Submit (which will appear after you’ve selected dismissal reason). 6 6. Click OK. You have successfully dismissed a child or classroom group from your program! _____________________________________________________________________________________ Print Date: January 23, 2014 Page 43 of 108 LAUP ETO MANUAL Editing Child/Family Information You can edit the child/family information at any time after you have entered the information into the ETO system. 1 1. From the Home Page, select #2-‐ View Edit Family/Child Information by clicking GO. 2 2. To search for children you have entered into the ETO system, you can enter the child’s name or leave the search box empty and click on SEARCH. Leaving the search box empty will bring up the full list of children enrolled at your site. _____________________________________________________________________________________ Print Date: January 23, 2014 Page 44 of 108 LAUP ETO MANUAL 3 3. Click GO for the child you would like to edit. 4. This is the page where you can edit the child and family information. Scroll down to see the entire page. To edit child’s information, make changes in the appropriate field and click on Submit (located at the bottom of the page). _____________________________________________________________________________________ Print Date: January 23, 2014 Page 45 of 108 LAUP ETO MANUAL Monthly Enrollment Reports Monthly Enrollment Reports will be completed once a month for each classroom group. The deadline to submit monthly enrollment data is by the 1st Friday or the 3rd business day of the month, whichever is later. If your monthly data is inaccurate, it could possibly affect your payments. Submitting Monthly Enrollment Reports in ETO 1 2 1. To submit a Monthly Enrollment Report, from the Right Menu click Record Efforts. A drop down menu should appear, click General Assessments. If the right menu is not appearing on your screen, click on the narrow black bar with an arrow in the middle and the menu should appear. _____________________________________________________________________________________ Print Date: January 23, 2014 Page 46 of 108 LAUP ETO MANUAL 2 2. Select Take New Assessment. 3. From the drop-‐down menu select “Monthly Enrollment Report.” 4. Wait a few seconds and the Monthly Enrollment Report will appear on the screen automatically. 4a 4b 4c 4d 5. Enter the following fields to record monthly enrollment data: a. Take assessment for Program Name on: The default will be the date you are entering info. Leave the default date as is; do not change. b. Month Reporting on: Select the month you are reporting on from the drop down menu. c. Total Days of Operation: Enter the number of days your program operated during the reported month. d. Total Training days: Enter the number of days your program spent training staff during the reported month. _____________________________________________________________________________________ Print Date: January 23, 2014 Page 47 of 108 LAUP ETO MANUAL 6 7 6. Write the name of your site/preschool in the section Site Name 7. Select the Classroom Name you will be reporting. Each of your LAUP classroom group(s) will be listed. For example, if you have 2 LAUP classrooms each with AM and PM sessions, you should see: 1. LAUP ID: 11111111111 Classroom 1 AM 2. LAUP ID: 11111111121 Classroom 1 PM 3. LAUP ID: 11111111221 Classroom 2 AM 4. LAUP ID: 11111111222 Classroom 2 PM The data you enter for the Monthly Enrollment Report MUST match with the information from the Parent Consent Forms you have submitted. If this information does not match, your ETO data will be inaccurate and could possibly affect your payments. _____________________________________________________________________________________ Print Date: January 23, 2014 Page 48 of 108 LAUP ETO MANUAL 8a 8b 8c 8d 8. Enter the following fields: a. Site Supervisor: Enter the name of your program’s site supervisor. b. Lead Teacher: Enter the name of your classroom’s lead teacher. c. Other Teaching Staff: Enter the names of all other teaching staff in the classroom. d. Total number of Teaching Staff in the LAUP Classroom: Enter total number of teaching staff in the LAUP Classroom (numerical text only). This number is used to determine adult/child ratio. 9a 9b 9c 9d 9e 9f 9g 9h 9i 9j 9. Enter the following fields: a. Total Number of Newly Enrolled Children: Enter the number of children enrolled on or before the first business day of the current reporting month. _____________________________________________________________________________________ Print Date: January 23, 2014 Page 49 of 108 b. c. d. e. LAUP ETO MANUAL If you indicate one or more new children you will be prompted to enter their names. Select Add and a new window will appear where you can search for the new child(ren) by last name. Once you have found the name of the new child(ren), click on the name and it will appear in the box. Repeat for all new children. Total Number of Continuing Children: Enter the number of children continuing from prior month’s report. These children are no longer considered newly enrolled. Total Number of Children Dismissed/No Longer Enrolled: Enter the number of children dismissed or no longer enrolled from prior month’s report. If you indicate one or more dismissed children you will be prompted to enter their names. Select Add and a new window will appear where you can search for the dismissed child(ren) by last name. Once you have found the name of the dismissed child(ren), click on the name and it will appear in the box. Repeat for all dismissed children. Please Note: DO NOT REMOVE DISMISSED CHILD FROM THE SYSTEM, ONLY REMOVE CHILDREN FROM THE CLASSROOM GROUP! You will be unable to find the dismissed child if the child has been completely removed from the system! f. Total Number of Children on Waitlist: Enter the number of children on your waitlist. (Not in the LAUP Proposed Enrollment Group) g. Total Number of Subsidized 4-‐year olds: Enter the number of subsidized 4-‐year olds enrolled. h. Total Number of Non-‐Subsidized 4-‐year olds: Enter the number of non-‐subsidized 4-‐ year olds enrolled. i. Total Number of Non-‐LAUP Children: Enter the number of non-‐LAUP children enrolled. j. Total Number of Children in the Classroom (Auto): This field automatically adds the number of children currently in this session as entered by you. Total Number of Subsidized 4-‐year olds, Total Number of Non-‐Subsidized 4-‐year olds, and Total Number of Non-‐LAUP Children. 10 10a 10. Indicate whether any LAUP Children in the classroom have an exemption by selecting Yes or No. a. If you select yes, list the child’s name and exemption type by selecting Add. _____________________________________________________________________________________ Print Date: January 23, 2014 Page 50 of 108 LAUP ETO MANUAL 11 12 11. A window prompting you to enter the child’s last name will automatically populate. 12. Enter the child’s last name and click Go. _____________________________________________________________________________________ Print Date: January 23, 2014 Page 51 of 108 LAUP ETO MANUAL 13 13. Select the child’s exemption type from the drop-‐box menu. 14. Repeat steps 9-‐12 to list additional children. _____________________________________________________________________________________ Print Date: January 23, 2014 Page 52 of 108 LAUP ETO MANUAL Viewing, Editing, and Printing Monthly Enrollment Reports 1 1. To view a Monthly Enrollment Report, from the Right Menu click Record Efforts. A drop down menu should appear, click General Assessments. 2 2. To view a Monthly Enrollment Report, select Read-‐Only from the Take Action drop down menu and the report will appear on the screen. _____________________________________________________________________________________ Print Date: January 23, 2014 Page 53 of 108 LAUP ETO MANUAL 3 3. To edit a Monthly Enrollment Report, select Update from the Take Action drop down menu and the report will appear. (If the report does not appear, be sure to turn your Pop Up blocker off). Make the applicable changes and select “Submit” 3 4. To print a Monthly Enrollment Report, select Print from the Take Action drop down menu and the report the following screen will appear. (If the report does not appear, be sure to turn your Pop Up blocker off). _____________________________________________________________________________________ Print Date: January 23, 2014 Page 54 of 108 LAUP ETO MANUAL 4 5 5. Click the Printer icon located in the top right of the screen. Be sure PDF Export is selected 6. A dialog box will appear, click Export. 6 7. Click Open and a PDF version of the report will appear. _____________________________________________________________________________________ Print Date: January 23, 2014 Page 55 of 108 LAUP ETO MANUAL 7 8. Click the Printer icon located in the top right of the screen and a dialog box should appear for you to select your printer. _____________________________________________________________________________________ Print Date: January 23, 2014 Page 56 of 108 LAUP ETO MANUAL Attendance The deadline to record attendance is by the 1st Friday or the 3rd business day of the month whichever is later. LAUP strongly encourages you to record attendance in ETO on a daily basis to help ensure your attendance data is accurate. If your attendance data is inaccurate, it could possibly affect your payments. You will not be able to edit attendance data once the deadline has passed. To review attendance data see the section Attendance Reports. Recording Attendance in ETO In order to record attendance, all children need to be enrolled in the ETO system and assigned to the appropriate classroom group. Check your classroom group list ( see section Verifying Children in Classroom Group) and enroll any new children (see section Enroll a New Family/Child) before recording attendance. 1 1. From the Home Page, select #6. Record Attendance by clicking the GO. 2 2. Select Group/Family and click Submit to record attendance for a class/group. _____________________________________________________________________________________ Print Date: January 23, 2014 Page 57 of 108 LAUP ETO MANUAL 3 3. Under Select Group, click the appropriate class/group you are recording attendance for. Attendance must be recorded at the Group/Family Level. If attendance is recorded at the Participant Level your attendance data will be inaccurate which could possibly affect payments. _____________________________________________________________________________________ Print Date: January 23, 2014 Page 58 of 108 LAUP ETO MANUAL 4 a b c d e f g 4. Populate the following fields to record attendance: a. Contact Location/Method-‐select Classroom. b. Date of Contact-‐The default will be the date you are entering info. Enter the actual date of attendance you are recording. For example, you may be recording attendance on Friday for the past Monday. c. Date of Next Contact-‐Click on the +1 symbol. Do not worry about what information is populated into this field. It is part of the ETO system and will not affect your data in any way. d. Time spent on Contact-‐This is the length of time for the LAUP program and the default is for a 3.5 hour program or 210 minutes. If you have a 3 hour program you will need change this to 180 minutes. e. New Value-‐This is the actual attendance. Click the Select All box to select all of the children in the group. Deselect any child that is absent. f. Record Effort-‐If you are recording attendance for one day, Click Record Effort. This saves the attendance. g. Save & Record Similar Effort-‐ If you are recording attendance for multiple days at once, Click Save & Record Similar Effort. This saves the attendance and brings up a new page for you record attendance for another day. _____________________________________________________________________________________ Print Date: January 23, 2014 Page 59 of 108 LAUP ETO MANUAL 5. The following screen will appear if attendance has already been recorded for the day you are attempting to enter. 5 a. DO NOT click . If you click Continue, you will be recording duplicate attendance records and your attendance data will be inaccurate. b. Click on GO Back and follow steps 6-‐9 below to re-‐enter the correct attendance data. If the attendance data does not match the daily sign-‐in sheets kept at your site, it could possibly affect your payment(s). You will not be able to edit attendance data once the deadline has passed. To review attendance data see the section “Attendance Reports.” 6 6. Select Group/Family and click Submit to record attendance for a class/group. _____________________________________________________________________________________ Print Date: January 23, 2014 Page 60 of 108 LAUP ETO MANUAL 7 7. Under Select Group, click the appropriate class/group you are recording attendance for. Attendance must be recorded at the Group/Family Level. If attendance is recorded at the Participant Level your attendance data will be inaccurate which could possibly affect payments. _____________________________________________________________________________________ Print Date: January 23, 2014 Page 61 of 108 LAUP ETO MANUAL a b c d e 8 f g 8. Populate the following fields to record attendance: a. Contact Location/Method-‐select Classroom. b. Date of Contact-‐ The default will be the date you are entering info. Enter the actual date of attendance you are recording. For example, you may be recording attendance on Friday for the past Monday. c. Date of Next Contact-‐Click on the +1 symbol. Do not worry about what information is populated into this field. It is part of the ETO system and will not affect your data in any way. d. Time spent on Contact-‐This is the length of time for the LAUP program and the default is for a 3.5 hour program or 210 minutes. If you have a 3 hour program you will need change this to 180 minutes. e. New Value-‐This is the actual attendance. Click the Select All box to select all of the children in the group. Deselect any child that is absent. f. Record Effort-‐If you are recording attendance for one day, Click Record Effort. This saves the attendance. g. Save & Record Similar Effort-‐ If you are recording attendance for multiple days at once, Click Save & Record Similar Effort. This saves the attendance and brings up a new page for you record attendance for another day. _____________________________________________________________________________________ Print Date: January 23, 2014 Page 62 of 108 LAUP ETO MANUAL 9 9. Click OK. Congratulations! You have successfully manually recorded attendance in ETO!! If your attendance data is inaccurate, it could possibly affect your payments. You will not be able to edit attendance data once the deadline has passed. To review attendance data see the section Attendance Reports. _____________________________________________________________________________________ Print Date: January 23, 2014 Page 63 of 108 LAUP ETO MANUAL Attendance Reports Please note: in order to view the following attendance reports, your computer must meet certain system requirements. If, after completing the following process, you are unable to view attendance reports, please see the Appendix 7: Installing Crystal Viewer Reports, contact your IT department, or call your assigned Tech Analyst. You should run attendance reports on a regular basis and before the deadline, by the 1st Friday or the 3rd business day of the month whichever is later, to ensure that your attendance data is accurate. If your attendance data is inaccurate, it could possibly affect your payments. You will not be able to edit attendance data once the deadline has passed. 1 1. To run an attendance report, from the Right Menu click ETO Reports. A drop down menu should appear, click Participant ETO. If the right menu is not appearing on your screen, click on the narrow black bar with an arrow in the middle and the menu should appear. If you have a Pop Up Blocker enabled, be sure to disable before running reports!! _____________________________________________________________________________________ Print Date: January 23, 2014 Page 64 of 108 LAUP ETO MANUAL 2 2. Select Daily Attendance from the drop down menu and click Submit. 3 3. Click Yes on the dialog box that appears. _____________________________________________________________________________________ Print Date: January 23, 2014 Page 65 of 108 LAUP ETO MANUAL 4 4. Click on the group name whose report you’d like to run. 5 6 5. Select the dates you would like to run the attendance report for. You can either manually select dates from the Drop Down menus, or you can select This/Previous Month or Quarter, or Year to Date. 6. Click Submit. _____________________________________________________________________________________ Print Date: January 23, 2014 Page 66 of 108 LAUP ETO MANUAL 6b 6c 6a 7. There are 3 things you should review and check when running attendance reports. a. # of events: The number of events are the number of days you have recorded attendance. This number should match the number of Days of Operations you report on your Monthly Enrollment Report. i. For example, if you have 19 days of service than the # of events should be 19. ii. The above is an example of an inaccurate report and the data would need to be edited before the submission deadline. b. Duplicate attendance records: To check for duplicate attendance records, select page 2 of the report by clicking on the black arrows at top of dialog box. This will show the per child/per day attendance data. See step 7 for more information. c. Duplicate efforts: An effort is defined as any type of data that is entered/recorded into ETO and will impact your # of events (days you have recorded attendance for). Click Show Details to see a report to identify duplicate efforts and see step 8 for more information. If the report does not appear, you may need to install Crystal Report Viewer to view the report, see Appendix 2: Alternative Attendance Report or Appendix 4: Installing Crystal Viewer or. If you are having difficulties contact your IT department or your assigned Tech Support Analyst. _____________________________________________________________________________________ Print Date: January 23, 2014 Page 67 of 108 LAUP ETO MANUAL 7 a d b c e 8. Only the days that attendance was recorded will appear on this report. Any day that attendance is not recorded, such as weekends or holidays, will not appear on the report. a. “0” indicates a child was absent on a particular day. b. “1” indicates a child was present on a particular day. c. “2” indicates a duplicate entry and you will need to go back and delete the duplicate attendance record for that date. To do this, go to Deleting Duplicate Attendance Records or Efforts section. d. The totals along the right side are the total number of days the child attended. e. The totals along the bottom are the total number of children in attendance in the classroom group for that day. Duplicate entries will cause your attendance data to be inaccurate and could possibly affect your payments. If you have any entries of “2” you will need to go back and delete duplicates. See the section “Deleting Duplicate Attendance Records or Efforts.” _____________________________________________________________________________________ Print Date: January 23, 2014 Page 68 of 108 LAUP ETO MANUAL Alternative Attendance Report 1 1. From the Right Side Menu, click ETO Reports and then click ETO: Participant. 2 2 a & b 2. Select the date for the attendance report you want to run. From the Point of Service Element drop down menu select Daily Attendance. a. To run an attendance report for all children in your program select All Participants b. To run an attendance for a specific classroom/group select Limit the report to member of one or more groups and then select the classroom/group. c. Click SUBMIT. _____________________________________________________________________________________ Print Date: January 23, 2014 Page 69 of 108 4 LAUP ETO MANUAL 3 3. You will see the ETO Summary for the selected dates. 4. To see the details for attendance report summary, click SHOW DETAILS and the following screen will appear. 5. This details summary lists each child alphabetically and each date attendance was recorded. Scroll down to seen the entire classroom/group. _____________________________________________________________________________________ Print Date: January 23, 2014 Page 70 of 108 LAUP ETO MANUAL Deleting Duplicate Attendance Records or Efforts Use this feature to delete duplicate attendance records or efforts for either the entire classroom or individual children. If you need to edit a particular day or child(ren) see the steps in the section Edit Attendance. You will not be able to edit attendance data once the deadline has passed, by the 1st Friday or the 3rd business day of the month whichever is later. If your attendance data is inaccurate, it could possibly affect your payments. 1 1. From the Right Menu, under My Work, click Edit My Efforts. 2 2. Enter the date for the duplicate attendance entry you need to edit and click SUBMIT. _____________________________________________________________________________________ Print Date: January 23, 2014 Page 71 of 108 LAUP ETO MANUAL 3 3. To delete an entire classroom duplicate attendance record, click Delete Group Effort. 4. To delete an individual child duplicate attendance record, click Delete Record for the child. 4 5 5. Click OK. 6. To verify that the duplicate entry has been deleted run an attendance report, see the section Attendance Reports. If your attendance data is inaccurate, it could possibly affect your payments. You will not be able to edit attendance data once the deadline has passed. To review attendance data see the section “Attendance Reports”. _____________________________________________________________________________________ Print Date: January 23, 2014 Page 72 of 108 LAUP ETO MANUAL Edit Attendance Use this feature if you need to make a change to an attendance record for a particular day or particular child(ren). For example, a child was absent but recorded as attending. You will need to make this change BEFORE the deadline, by the 1st Friday or the 3rd business day of the month whichever is later. This is feature does not delete duplicate attendance records, see the section Deleting Duplicate Attendance. If your attendance data is inaccurate, it could possibly affect your payments. 1 1. From the Home Page, select #11-‐Edit Attendance by clicking GO. _____________________________________________________________________________________ Print Date: January 23, 2014 Page 73 of 108 2 3 2. From the drop down menu, select Daily Attendance and click Submit. LAUP ETO MANUAL 3. Select the date you wish to edit and click Submit. You can only edit attendance for one day at a time. _____________________________________________________________________________________ Print Date: January 23, 2014 Page 74 of 108 LAUP ETO MANUAL 4 4. All classroom groups will be listed. To edit attendance, check or uncheck the Daily Attendance boxes for each child you wish to edit attendance and click Update Changes. a. If a box is checked, that means attendance was recorded for that day. b. If a box is unchecked, that means attendance was not recorded and the child was absent. c. When you are finished with the edits, click Update Changes. The page may flash, or it may appear that nothing has happened. This is normal. You can produce a report to verify the edited attendance for that day. See the section Attendance Reports. 5. To edit attendance for another day, go back to the Home Page and follow steps 1-‐4. If your attendance data is inaccurate, it could possibly affect your payments. You will not be able to edit attendance data once the deadline has passed. To review attendance data see the section “Attendance Reports.” _____________________________________________________________________________________ Print Date: January 23, 2014 Page 75 of 108 LAUP ETO MANUAL Record Attendance for a Missed Day You will use this feature if you have noticed that you missed recording attendance for a particular day. Run an attendance report to verify the days you have recorded attendance for. See the section Attendance Reports. You will not be able to edit attendance data once the deadline has passed, by the 1st Friday or the 3rd business day of the month whichever is later. If your attendance data is inaccurate, it could possibly affect your payments. 1 1. From the Home Page, select #6. Record Attendance by clicking the GO. 2 2. Select Group/Family and click Submit to record attendance for a class/group. _____________________________________________________________________________________ Print Date: January 23, 2014 Page 76 of 108 LAUP ETO MANUAL 3 3. Under Select Group, click the appropriate class/group you are recording attendance for. _____________________________________________________________________________________ Print Date: January 23, 2014 Page 77 of 108 LAUP ETO MANUAL 4 a b c d e f 4. Populate the following fields to record attendance: a. Contact Location/Method-‐select Classroom. b. Date of Contact-‐This is the actual date of attendance you are recording. The default will be the date you are entering info. Enter the actual date you are recording attendance for. c. Date of Next Contact-‐Click on the +1 symbol. Do not worry about what information is populated into this field. It is part of the ETO system and will not affect your data in any way. d. Time spent on Contact-‐This is the length of time for the LAUP program and the default is for a 3.5 hour program or 210 minutes. If you have a 3 hour program you will need change this to 180 minutes. e. New Value-‐This is the actual attendance. Click the Select All box to select all of the children in the group. Deselect any child that is absent. f. Record Effort-‐Click Record Effort. This saves the attendance. _____________________________________________________________________________________ Print Date: January 23, 2014 Page 78 of 108 LAUP ETO MANUAL 5 5. Click OK. Congratulations! You have successfully manually recorded attendance in ETO!! _____________________________________________________________________________________ Print Date: January 23, 2014 Page 79 of 108 LAUP ETO MANUAL Adding Child after Attendance Recorded for Classroom Group Use this process if you have recorded attended for the classroom group but did not enroll a new child into the ETO system. You will not be able to edit attendance data once the deadline has passed, by the 1st Friday or the 3rd business day of the month whichever is later. If your attendance data is inaccurate, it could possibly affect your payments. 1. Complete the steps in the sections Enroll a New Family/Child and Assigning Children to a Classroom/Group. 2 2. From the Right Menu, under My Work, click Edit Attendance. 3 3. Select Daily Attendance from the drop down menu and click SUBMIT. _____________________________________________________________________________________ Print Date: January 23, 2014 Page 80 of 108 LAUP ETO MANUAL 4 4. Enter the date you want to take attendance for and click SUBMIT. 5 5. Scroll down to find the classroom/group you want to add the new child to and click Add New Participant to this Grouping. _____________________________________________________________________________________ Print Date: January 23, 2014 Page 81 of 108 LAUP ETO MANUAL 6 7 6. Type the name of the Last Name of the new child and click Search. a. Please note: You will be unable to add a child if that child’s ETO start date takes place after the date for which you are attempting to record his/her attendance 7. Click GO next to the child’s name. The child will appear on the classroom/group list. Repeat steps 4-‐6 if you have more than one newly enrolled child. 8 1. Check the Daily Attendance box for the new child(ren) and then click Update Changes. You will leave all of the other boxes checked. You will need to complete steps 1-‐7 for each day you need to record attendance for the newly enrolled child(ren). _____________________________________________________________________________________ Print Date: January 23, 2014 Page 82 of 108 LAUP ETO MANUAL Appendix 1: ETO Standard Reports ETO has a variety of standard reports available, such as birthday lists, labels for mailing. 1 1. From the Right Menu, click Reports then click Standard Reports. 2. There are a variety of different types of reports included under Standard Reports. Mouse over (using your mouse, hold the cursor over) any report title for a description of the report. Scroll down to see the entire list of reports. a. Some useful reports are Birthday List, Avery 8160 Mailing Label for Participants and Participant List for (Program Name). _____________________________________________________________________________________ Print Date: January 23, 2014 Page 83 of 108 LAUP ETO MANUAL Appendix 2: Changing your Classroom Group name LAUP created classroom groups for each of your LAUP sessions you general classroom names. You can change the group name to reflect your actual classroom group name. ONLY CHANGE THE CLASSROOM NAME. DO NOT CHANGE ANY OTHER INFORMATION!! 1 1. From the Home Page, select #5-‐Manage Classroom Groups by clicking GO. 2 2. Click Edit for the group name you would like to change. _____________________________________________________________________________________ Print Date: January 23, 2014 Page 84 of 108 LAUP ETO MANUAL 3 4 3. Leave the LAUP ID number as it is and change ONLY the classroom name located in Group Name. DO NOT CHANGE THE GROUP DESCRIPTION or any other information on the page!! a. For example, changing Classroom 1 PM to Red Class AM. 4. Click Submit. 5. To see the changes, follow step 1 (from the Home Page, click GO #5-‐Manage Classroom Groups). DO NOT DELETE OR CHANGE YOUR LAUP ID NUMBER!! Making any type of changes other than your changing your classroom group name will cause your ETO data to be inaccurate and could possibly affect your payments. _____________________________________________________________________________________ Print Date: January 23, 2014 Page 85 of 108 LAUP ETO MANUAL Appendix 3: Recording DRDP Assessments The DRDP assessments will be completed twice a year for each child. Teachers will complete the “Baseline” assessment within 60 calendar days of the child’s enrollment in the LAUP program and the “Follow-‐Up” assessment will be completed six months later. LAUP will notify providers of deadlines to submit DRDP Assessments to LAUP. 1 1. On the Home Page, select #4-‐Record A Child Assessment by clicking GO. _____________________________________________________________________________________ Print Date: January 23, 2014 Page 86 of 108 LAUP ETO MANUAL 2 2. To search for children you have entered into the ETO system, you can enter the child’s name or leave the search box empty and click on SEARCH. Leaving the search box empty will list all children enrolled in the program and does not sort by classroom group. 3 3. To select a child, click GO before the child’s name. _____________________________________________________________________________________ Print Date: January 23, 2014 Page 87 of 108 LAUP ETO MANUAL 4 5 4. From the drop down menu select the appropriate Desired Results Developmental Profile (DRDP). a. For the Baseline assessment, select Desired Results Developmental Profile (DRDP)-‐ Baseline b. For the Follow-‐Up assessment, select Desired Results Developmental Profile (DRDP)-‐ Follow-‐Up 5. Click Continue 6. The assessment you select from the drop down menu will automatically populate the first time an assessment is completed for a child. 7. If an assessment has already been completed for a child, the above screen will appear. a. Click Take New Assessment and follow steps 4 and 5 from above. _____________________________________________________________________________________ Print Date: January 23, 2014 Page 88 of 108 LAUP ETO MANUAL 7a 7b-‐c 7d 8. Begin recording the assessment. Yellow fields are required. a. Take Assessment for (NAME of CHILD) on: Enter actual date the DRDP was administered. b. Observer Name: This is the person who completed the DRDP. c. Observer Title: This is the title of the person and should be classroom staff (Lead Teacher, Assistant Teacher, etc.). d. For each of the 43 DRDP items, select the appropriate developmental level from the drop down menu. If you did not administer a section or did not record data for an element, select N/A. _____________________________________________________________________________________ Print Date: January 23, 2014 Page 89 of 108 LAUP ETO MANUAL 9. Leave the Schedule Follow-‐up Alert items blank. LAUP will notify providers of deadlines for both the Baseline and Follow-‐Up assessments. 10. When finished entering developmental levels for each item, click SUBMIT. 11. The above dialog box will appear when you have completed the DRDP assessment and after clicking submit click OK. _____________________________________________________________________________________ Print Date: January 23, 2014 Page 90 of 108 LAUP ETO MANUAL 12. The above screen will appear when an assessment is submitted. Review your work and edit as necessary. Click Continue. 13. Repeat steps 1-‐12 for each child in your program. _____________________________________________________________________________________ Print Date: January 23, 2014 Page 91 of 108 LAUP ETO MANUAL Appendix 4: Editing DRDP Assessments Follow the steps below if you need to edit/make changes to a DRDP assessment after submitting the information. 1 1. On the Home Page, select #4-‐Record A Child Assessment by clicking GO. _____________________________________________________________________________________ Print Date: January 23, 2014 Page 92 of 108 LAUP ETO MANUAL 2 2. To search for children you have entered into the ETO system, you can enter the child’s name or leave the search box empty and click on SEARCH. Leaving the search box empty will bring up the full list of children enrolled at your site. 3 3. To select a child, click GO before the child’s name. a. This list includes all children enrolled in the program and does not sort by classroom group. _____________________________________________________________________________________ Print Date: January 23, 2014 Page 93 of 108 LAUP ETO MANUAL 4 4. Select Update from the Take Action drop down menu. _____________________________________________________________________________________ Print Date: January 23, 2014 Page 94 of 108 LAUP ETO MANUAL 5. To make edits, go to item to be changed and select the new developmental level from the drop down menu. When finished making all changes, click SUBMIT to save your edits and the following dialog box will appear. 6 6. Click OK. _____________________________________________________________________________________ Print Date: January 23, 2014 Page 95 of 108 LAUP ETO MANUAL 7. The above screen will appear when an assessment is submitted. Review your work and edit as necessary. Click Continue. 8. To make changes to additional children’s DRDP assessments, follow Steps 1-‐7. _____________________________________________________________________________________ Print Date: January 23, 2014 Page 96 of 108 LAUP ETO MANUAL Appendix 5: Viewing DRDP Reports You can run DRDP Baseline and Follow-‐Up assessment reports for an individual child, the entire program or each classroom/group. You will need to run separate reports for the Baseline and Follow-‐Up assessments. Individual Child Reports 1 1. On the Home Page, select #4-‐Record A Child Assessment by clicking GO. _____________________________________________________________________________________ Print Date: January 23, 2014 Page 97 of 108 LAUP ETO MANUAL 2 2. To search for children you have entered into the ETO system, you can enter the child’s name or leave the search box empty and click on SEARCH. Leaving the search box empty will bring up the full list of children enrolled at your site. 3 3. To select a child, click GO before the child’s name. a. This list includes all children enrolled in the program and does not sort by classroom group. _____________________________________________________________________________________ Print Date: January 23, 2014 Page 98 of 108 LAUP ETO MANUAL 4 4. From the drop down menu, select the report you would like to run. The most used reports are listed below. New windows appear for reports b-‐d. a. Review: shows the DRDP questions with responses on comments within the ETO window. b. Response Report: shows only questions with responses and notes with headers on each page. c. Full Report: shows all questions, with and without responses, and notes with headers on each page (this is the longest report). d. Condensed Report: similar to response report but eliminates the large header except on page 1 (this is the shortest report). If you have a Pop Up Blocker enabled, be sure to disable before running reports!! _____________________________________________________________________________________ Print Date: January 23, 2014 Page 99 of 108 LAUP ETO MANUAL DRDP Assessment Report for Entire Program The report below requires Crystal Viewer Reports. To install the appropriate software, see Appendix 6. Please be aware that even with Crystal Viewer Reports, the report below may take a substantial amount of time to generate. 1 2 1. To view a report for your entire program, from the Right Menu, click Reports and then click Assessment Reports (first option). 2. Click Aggregate Assessment Reports, under View Aggregate Assessment Reports. 3 3. Select the appropriate DRDP assessment (Baseline or Follow-‐Up) from the drop down menu and click CONTINUE and a new dialog box will appear. _____________________________________________________________________________________ Print Date: January 23, 2014 Page 100 of 108 LAUP ETO MANUAL 4 4. This is the Aggregate Assessment Report, a Summary of Responses for DRDP, and includes responses for all children in the program. a. On the left side of the screen, the Preview menu lists each of the 43 DRDP items. To see the summary responses for an individual item (i.e. Comprehension of meaning…), click on that item and a pie chart will appear. b. You can print the report by clicking on the print icon located in the upper left corner of the dialog box (directly above the Preview tab). If the report does not appear, you may need to install Crystal Report Viewer to view the report, see Appendix 7: Installing Crystal Viewer or. If you are having difficulties contact the ETO Hotline at 213-‐416-‐ 1301 for support. _____________________________________________________________________________________ Print Date: January 23, 2014 Page 101 of 108 LAUP ETO MANUAL 5 5. To view the development level of children for each DRDP item, place the cursor on the item title (i.e. Socio-‐dramatic play…) above the pie chart (a red box will appear around the text) and double click. You should now see a list of children and their developmental level, see next image. 6 6. To get back to the Summary of Responses for DRDP, click either the Preview tab or the X directly above the Preview tab. a. You can print the report by clicking on the print icon located in the upper left corner of the dialog box (directly above the Preview tab). _____________________________________________________________________________________ Print Date: January 23, 2014 Page 102 of 108 LAUP ETO MANUAL DRDP Assessment Report for Classroom/Group 1 2 1. To view a report for your entire program, from the Right Menu, click Reports and then click Assessment Reports (first option). 2. Click Aggregate Assessment Reports in Date Range by Participant Group, under View Aggregate Assessment Reports 3 3. From the Select Group drop down menu, select the appropriate classroom group and click CONTINUE. _____________________________________________________________________________________ Print Date: January 23, 2014 Page 103 of 108 LAUP ETO MANUAL 4 4. From the Select Assessment drop down menu, select the appropriate DRDP assessment (Baseline or Follow-‐Up) and click CONTINUE. 5 5. Enter the date range of when the DRDP assessment was completed and click SUBMIT. _____________________________________________________________________________________ Print Date: January 23, 2014 Page 104 of 108 LAUP ETO MANUAL 6 6. This is the Aggregate Assessment Report in Date Range by Participant Group, a Summary of Responses for DRDP, and includes responses for all children in the program. a. On the left side of the screen, the Preview menu lists each of the 43 DRDP items. To see the summary responses for an individual item (i.e. Identity of Self…), click on that item and a pie chart will appear. _____________________________________________________________________________________ Print Date: January 23, 2014 Page 105 of 108 LAUP ETO MANUAL 7 7. To view the developmental level of children for each DRDP item, place the cursor on the item title (i.e. Comprehension of meaning…) above the pie chart (a red box will appear around the text) and double click. You should now see a list of children and their development level, see next image. 8 8. To get back to the Summary of Responses for DRDP, click either the Preview tab or the X directly above the Preview tab. a. You can print the report by clicking on the print icon located in the upper left corner of the dialog box. _____________________________________________________________________________________ Print Date: January 23, 2014 Page 106 of 108 LAUP ETO MANUAL Appendix 6: Installing Crystal Viewer Reports How do I install Crystal Reports viewer on my computer? Go to: http://www.etoreports.com/npviewer.exe and follow the steps to install the viewer. IMPORTANT!!!!!! If you are part of a computer network (such as a school district) you should contact your IT department and/or network administrator before attempting to install the Crystal Report Viewer as you may not be able to install on your own. When I click on a link to open a Crystal Report, nothing happens. Why? The most likely explanation is that pop-‐up blockers are getting in the way. What are Pop-‐Up blockers? A Pop-‐Up blocker is software that prevents new web browser windows from launching and can be useful for stopping unwanted advertisements from popping up unexpectedly. The problem is Crystal Reports always launches in a new window, so we'll need to disable your computer's pop-‐up blocking software in order to make Crystal Reports work properly. How do I find out if I have Pop-‐Up blocking software on my computer, and how do I disable it? There are so many different brands and types of Pop-‐Up blocking software products out there that it is unfortunately not possible to document them all here. However, here are the three most common sources of pop-‐up blocking on our customers' computers along with tips for disabling them. 1. Internet Explorer 6.0 itself now has built-‐in Pop-‐Up blocking functionality. To disable it, go to the Tools menu, then choose Pop-‐Up Blocker, and from the menu that appears to the right, select "Turn off Pop-‐Up Blocker". 2. Google Toolbar blocks Pop-‐Ups, including Crystal Reports. To disable Google Toolbar's Pop-‐Up blocking functions altogether, follow these steps (from http://www.google.com/support/toolbar/bin/answer.py?answer=9160&topic=116) Click the "Settings" button on your Toolbar and choose "Options. "Select the "More" tab. Un-‐check the box next to "Popup Blocker." Click "OK." 3. Yahoo Toolbar is another common source of Pop-‐Up blocking. According to a Yahoo! Help document (published here: http://help.yahoo.com/help/us/toolbar/pub/pub-‐13.html), you can turn the Yahoo! Pop-‐Up Blocker on or off by following these steps: Click the Pop-‐Up Blocker menu Select "Enable Pop-‐Up Blocker" If the checkmark was present, Pop-‐Up Blocker is now off. If the checkmark was not present, Pop-‐Up blocker is now enabled. For more comprehensive instructions on disabling and managing the Yahoo! Toolbar and its Pop-‐Up blocking functionality, please consult Yahoo!'s help documentation, starting here: http://help.yahoo.com/help/us/toolbar/pub/pub-‐13.html _____________________________________________________________________________________ Print Date: January 23, 2014 Page 107 of 108 LAUP ETO MANUAL 4. For additional help with disabling these or other Pop-‐Up blockers, you may want to check out an excellent Internet-‐accessible document published by the National Association of College and University Business Officers, available here: http://www.nacubo.org/documents/prof_dev/PopUpBlockers.pdf When I click on a link for a Crystal Report, a new window does launch, but the problem is that it contains nothing but a little red 'X.' So where's my report? In this case, the problem is not Pop-‐Up blocking software. (We can be sure of that because the new window did in fact pop up; it just doesn't contain the Crystal Report we were expecting). If all you're seeing in that new window is a red 'X' inside of a white rectangle, then you will need to install the Crystal Reports Viewer software. It is available here: http://www.etoreports.com/npviewer.exe. This process will only take a few minutes. Simply click on the link above, and when the new window appears click 'Run' to install the file. As is the case with many .exe files (or "executable" files), you may encounter warning messages or confirmation messages along the way which ask you whether you are sure you want to install this software. Please answer in the affirmative to all such questions, as this application is harmless and necessary for the viewing of Crystal Reports. I tried to install the Crystal Reports viewer (http://www.etoreports.com/npviewer.exe) but I am still seeing the red 'X' and no Reports. What should I do now? First, please try restarting your computer. That is sometimes all it takes to get the Crystal Reports viewer working. If rebooting does not help, please contact your network administrator for help with installing the Crystal Reports viewer. You might not have administrative access to the computer on which you are trying to install the Crystal Reports viewer. (If you got a message during the install process that InstallShield was in use, you probably do not have administrative access to this computer). In that case, only your network administrator will be able to assist you. If your organization does not have a network administrator (or an IT department), please consult whomever in your office is responsible for installing new software applications on your computers. Other troubleshooting tips: Please make sure you are using a 32-‐bit Operating System. You can check your System Type by going to your computer Start Menu, right-‐clicking on Computer, and clicking Properties. A 64-‐bit Operating System is incompatible with viewing Crystal reports. Additionally, if you are having trouble exporting a Crystal report. You might need to add a few trusted sites to your browser. To fix this issue please go to Internet Explorer > Tools > Internet Options, from here go to the Security Tab and click on Trusted Sites > Sites and make sure these site are added: https://etoreports.com, https://etoreports2.com and https://reports.etosoftware.com. Also, make sure IE8 is running in compatibility mode. Then click close and ok to close the Internet Options. Close all browsers and reopen ETO Software. If you are still unable to export and save a report please contact Customer Support for further assistance. _____________________________________________________________________________________ Print Date: January 23, 2014 Page 108 of 108