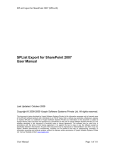
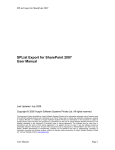
1
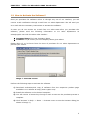
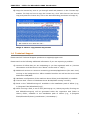
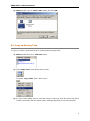
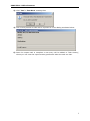
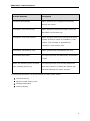
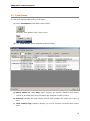
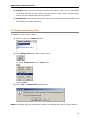
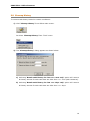
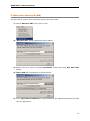
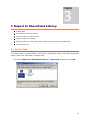
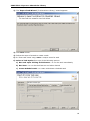
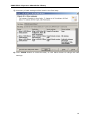
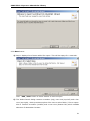
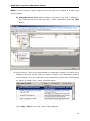
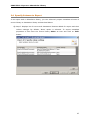
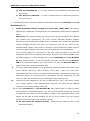
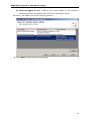
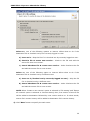
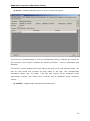
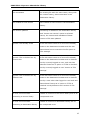
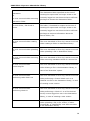
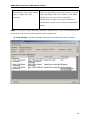
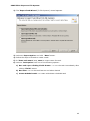
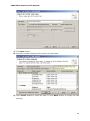
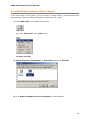
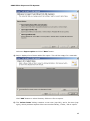
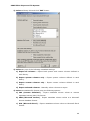
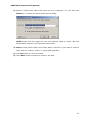
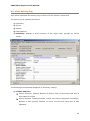
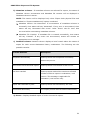
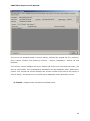
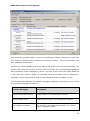
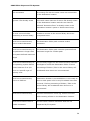
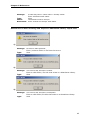
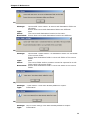
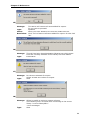
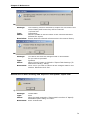
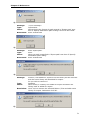
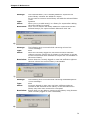
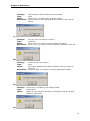
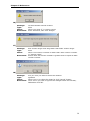
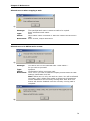
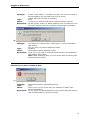
User Manual --------------------------------------------------------------------------- XPlica for SharePoint 2003 Table of Contents 1 2 XPlica Introduction ______________________________________________________ 1 1.1 About XPlica ______________________________________________________________ 1 1.2 System requirements_______________________________________________________ 1 1.3 How to Activate the Software? _______________________________________________ 2 1.4 Technical Support _________________________________________________________ 3 XPlica Features__________________________________________________________ 4 2.1 Create Task _______________________________________________________________ 4 2.2 Copy an Existing Task _______________________________________________________ 5 2.3 Run a Task _______________________________________________________________ 6 2.4 Task History ______________________________________________________________ 8 2.5 View Activity Log _________________________________________________________ 10 2.6 Remove a Task History Item ________________________________________________ 11 2.7 Task Status ______________________________________________________________ 12 2.8 Delete an Existing Task ____________________________________________________ 13 2.9 Cleanup History __________________________________________________________ 14 2.10 3 4 Get User Security ID (SID) ________________________________________________ 15 Export to SharePoint Library ______________________________________________ 17 3.1 Create Task ______________________________________________________________ 17 3.2 Add Folders or Files to Export _______________________________________________ 20 3.3 Version History of Source Files ______________________________________________ 25 3.4 Specify Columns to Export __________________________________________________ 27 3.5 Specify options for files with same name as source exists in destination_____________ 31 3.6 View Activity Log _________________________________________________________ 33 Export to File System ____________________________________________________ 41 4.1 Create Task ______________________________________________________________ 41 ii Table of Contents 5 6 4.2 Add Libraries, Folders or Files to Export _______________________________________ 44 4.3 Version History of Source Files ______________________________________________ 47 4.4 Specify Columns to Export __________________________________________________ 48 4.5 Specify Destination Path ___________________________________________________ 50 4.6 View Activity Log _________________________________________________________ 52 References ____________________________________________________________ 59 5.1 Why do I get these Alerts? _________________________________________________ 59 5.2 Troubleshooting __________________________________________________________ 79 Index _________________________________________________________________ 80 iii Chapter 1 XPlica Introduction 1 1.1 About XPlica XPlica for SharePoint 2003 is a powerful tool to export document / picture library with its contents to another document / picture library or file system. XPlica exports SharePoint libraries, folders, documents, version histories and metadata to the desired destination. XPlica supports both, SharePoint Portal Server 2003 and Windows SharePoint Services v2.0 environment. The major advantages of using XPlica as against manual export of documents: Export SharePoint files for online / offline viewing or backup / restore purposes Selectively export folders, documents, versions and metadata Sync documents between document / picture libraries without the need to backup and restore items Preserves the source folder structure Exports each version of the document into a manageable folder structure in the file system Exports metadata into Comma Separated Values (CSV), MS-Excel (XLS), MSAccess (MDB) format for easy viewing, re-import to another DMS or in-depth analysis 1.2 System requirements Hardware: Intel Pentium III or higher processor, 512 MB of RAM, 4 MB disk space to install XPlica Operating System: Windows Server 2003 Software: Microsoft SharePoint Portal Server 2003 (or) Windows SharePoint Services with the latest service pack must be installed. NOTE: XPlica must be installed in the Front-end Web Server in a SharePoint Server farm. 1 CHAPTER 1 – XPlica for SharePoint 2003 Introduction 1.3 How to Activate the Software? Once you purchase the software online or through any one of our resellers, you will receive a sale notification through e-mail from our sales department. We will send you an e-mail with the necessary instructions to activate the software. In case you do not receive an e-mail from our sales team after you purchase the software, please send the following information to our sales department at [email protected] with the sales order number: Company Name: End-user Company Name Location: City & Country for the Company Name given above Please allow 12 to 24 hours from the time of purchase for our sales department to process your orders. Image 1 - Activate screen Perform the following steps to activate the software 1) Download evaluation/trial copy of software from the respective product page available in our website at http://www.vyapin.com/ 2) Install the software on the desired computer. 3) You will receive a license key through e-mail as soon as the purchase process is complete. 4) Click 'Activate' in Help -> About -> Activate menu to see the Activate dialog (as shown in Image 1). 2 CHAPTER 1 – XPlica for SharePoint 2003 Introduction 5) Copy the license key sent to you through email and pastes it in the 'License Key' textbox. For help on how to copy the license key, click 'Click here to see how to copy and paste the license key' link in the Activate dialog (as shown in Image 2). Image 2 - How to copy license key screen 1.4 Technical Support Please send all Technical Support questions to [email protected]. Please send us the following additional information if you are reporting a problem: 1) Version of XPlica that you are evaluating or you has registered with us. (Version information could be found in the "About" Screen and in "Help"). 2) Additional services or resource consuming processes/applications (like anti-virus) running in the background on XPlica installed machine as well as the source and destination SPS/WSS 3) Hardware configuration of the machine where XPlica (and SPS/WSS) is installed. 4) 'Service Pack' version of Windows Server & SPS/WSS running currently. 5) Send us the "XPlicaErrorLog.txt" available in the installation path of XPlica (e.g., C:\Program Files\XPlica2003\Log\). 6) While running a task, a set of files (ActivityLog.csv, ActivityLog.mdb, Errorlog.csv and XPlicaErrorLog.txt) will be generated under the respective task folder in History folder, available in the installation path of XPlica (e.g., C:\Program Files\XPlica2003\History\<taskname>\<timestamp>). 3 Chapter 2 XPlica Features Create task Copy an existing task Run a task Task History Delete an existing task Export to SharePoint Library Export to File System 2 2.1 Create Task You can create a task to export folders / files from a SharePoint Library to another SharePoint Library or to location in file system / network share. 1) Click 'New Task’ from XPlica main screen. Or Select 'New Task' from 'Task' menu Or Press 'Ctrl + N' 4 CHAPTER-2–XPlica Features 2) Select a task type in 'New Task' dialog and click OK. 2.2 Copy an Existing Task To copy or create a new task from an existing XPlica export task: 1) Select a task from the 'Task List' pane. 2) Click 'Copy Task’ from XPlica main screen. Or Select 'Copy Task' from 'Task' menu 3) In 'Copy Task' dialog enter a new task name in 'Save As' text-box and Click OK to create a new task with the same export settings specified in the selected task. 5 CHAPTER-2–XPlica Features 2.3 Run a Task To run a task and export folders / files added for export: 1) Select a task from 'Task List' pane. 2) Click 'Run Now’ from XPlica main screen. Or Select 'Run Now' from 'Task' menu Or Press 'Ctrl + R' 6 CHAPTER-2–XPlica Features 3) Click 'Yes' in 'Run Now' message box 4) The current process of task will be reported in a new dialog as shown below: 5) Once the export task is complete a new entry will be added in 'Task History', where you can view the export activity performed when the task ran last. 7 CHAPTER-2–XPlica Features 2.4 Task History When an export task is run in XPlica, an entry is added to XPlica task database related to the task. History of a task can be seen at right-bottom of XPlica application's main window. To view task history of a particular task: 1) Select a task from 'Task List' pane. 2) The history of task will be displayed at right-bottom of XPlica main window as shown below: Where Start Time -> Date and Time a task was initiated. End Time -> Date and Time a task completed its export process Elapsed Time -> Total time (hh:mm:ss) a task has taken to complete its export process. Remarks -> Brief remark about the status of export. 8 CHAPTER-2–XPlica Features Possible Remarks Description Completed Successfully Export process was completed successfully without any errors Incomplete: refer activity log Export process encountered certain errors as described in the activity log Incomplete: eval limit reached Export process reached the maximum allowed number of files to export in evaluation / trial version. This message is applicable for evaluation / trial version only. Terminated: cancelled by user Export process was cancelled by the user. Terminated abnormally The export process was abnormally terminated / killed. Failed: the following error occurred The export process could not be initiated as while creating activity log there were issues in creating the activity log files and initiating the export process. The following operations can be performed on Task history items: View activity log. Remove a task history item. Manage task status. Cleanup history. 9 CHAPTER-2–XPlica Features 2.5 View Activity Log To view activity log associated with a task history item: 1) Select an item from 'Task History' pane. 2) Click 'View Activity Log’ from XPlica main screen. Or Select 'View Activity Log' from 'Tools' menu 3) The activity log of a task is displayed as four categories a) Summary A brief Summary of Export is displayed. b) Errors Displays detailed report of errors occurred in export. c) Details Displays log of both success and failures occurred in export. d) Task settings Displays settings specified for the task at the time of export. NOTE: For all errors refer 'Error log' section of 'Activity Log' to get description of actual error that occurred in export. When XPlica reports errors, kindly send us the following files that could be found in History folder of corresponding task (example: C:\Program Files\XPlica2003\History\XPlicaTask\05_22_2006_18_39_19) 10 CHAPTER-2–XPlica Features 1) The log files ActivityErrors.csv and XPlicaErrorLog.txt 2) The task settings file ActivityLog.MDB 3) The activity log DetailedActivityLog.csv (omit if too large) 4) The metadata log MetadataActivityLog.csv (for 'Export to File System' task type only) (Zip the files if they are large) 2.6 Remove a Task History Item To remove a task history item: 1) Select item from 'Task History' pane. 2) Click 'Remove' from XPlica main screen. Or Select 'Remove Activity Log' from 'Tools' menu This will remove the currently selected activity log entry and log folder and files associated with it. To remove all task history items see Cleanup task and Task status. 11 CHAPTER-2–XPlica Features 2.7 Task Status To view and manage task history of all tasks: 1) Click 'Task Status’ from XPlica main screen. Or select ‘Task Status’ from ‘Tools’ menu. 2) The 'Task Status' dialog appears as shown below: a) Show status for <n> days: Upon clicking 'Go' button, displays task history entries of all tasks that were run within the specified number of days. b) Refresh: Reloads the task history entries and updates the newly run tasks (if any). c) View activity log: Displays activity log of the currently selected task history item. 12 CHAPTER-2–XPlica Features d) Remove: Removes the currently selected task history entry and its associated log folders and files. If the currently selected row is a 'Task name', all task history entries for the selected task will be removed. e) Remove all: Removes all task history entries and their associated log folders and files that are currently displayed. 2.8 Delete an Existing Task To delete an export task in XPlica: 1) Select a task from 'Task List' pane. 2) Click 'Delete Task’ from XPlica main screen. Or Select 'Delete Task' from 'Task' menu Or Press ‘Del’ 3) Click 'Yes' in 'Delete Task' message-box NOTE: Deleting a task will permanently delete the selected task and its version history. 13 CHAPTER-2–XPlica Features 2.9 Cleanup History To remove task history based on certain conditions: 1) Click 'Cleanup History’ from XPlica main screen. Or Select 'Cleanup History' from 'Tools' menu 2) The 'Cleanup History' dialog appears as shown below: a) Selecting 'Retain task history for last <n> runs only' option will remove all history entries for each task that are older than <n> runs (task instances). b) Selecting 'Retain task history for last <n> days only' option will remove all history entries for each task that are older than <n> days. 14 CHAPTER-2–XPlica Features 2.10 Get User Security ID (SID) Use this tool to enter a user name and retrieve the user's SID. 1) Select 'Get User SID' from 'Tools' menu 2) 'Get User SID' dialog appears as shown below: 3) Specify the user name in Domain\UserName format and Click 'Get User SID' button. 4) User's SID will be displayed as shown below: 5) Click 'Copy SID to clipboard' to copy the SID to the clipboard and paste the SID into any application. 15 Chapter 3 Export to SharePoint Library 3 Create task Add folders or files to export Version history of source files Specify columns to export Specify options for files with same name as source exists in destination View activity log 3.1 Create Task To create a task to export folders / files from a SharePoint library to another SharePoint Library within the same Site or another Site: 1) Select 'Export to a SharePoint Library' in 'New Task' dialog and click OK. 17 CHAPTER-3–Export to SharePoint Library 2) The 'Export Task Wizard (To SharePoint Library)' wizard appears. 3) Click Next button. 4) Follow the steps of wizard to create a task. 5) In 'Enter task name' step, enter a unique name for task 6) Select a Task Option from one of the following options: a) Run task upon clicking Finish button - to run the task immediately b) Run later - to run the task later as and when desired c) Create Schedule task - to create a Windows scheduled task 18 CHAPTER-3–Export to SharePoint Library 7) Summary of task settings will be listed in the final step. 8) Click 'Finish' button to create the task, or click 'Back' button to change the task settings. 19 CHAPTER-3–Export to SharePoint Library 3.2 Add Folders or Files to Export In an export task to SharePoint, you can export selected folders and/or files. Follow the steps given below to add items for export: 1) Click 'New Task’ from XPlica main screen. Or Select 'New Task' from 'Task' menu Or Press 'Ctrl+N' 2) Select 'Export to a SharePoint Library' in 'New Task' dialog and click OK. 3) The 'Export Task Wizard (To SharePoint Library)' wizard appears. 20 CHAPTER-3–Export to SharePoint Library Click Next button. 4) Step 1 displays list of items added for export. This will be empty for a new task. Click 'Add / Edit' button to select folders or files to export. 5) The 'Select Items' dialog contains a textbox (top), tree-view (top-left) and a listview (top-right), which provides explorer like view to select folder / file to export. Also it contains a textbox (middle) and a tree-view (bottom-left) which enables selection of destination location. 21 CHAPTER-3–Export to SharePoint Library 6) Select source folder(s) / file(s) to export and Click 'Add' button. You can source folder(s) / file(s) to export using one of the following methods: a) Using the source textbox: Type the full URL of a file or a folder in the source textbox, select a destination and Click 'Add' button near the destination textbox. 22 CHAPTER-3–Export to SharePoint Library NOTE: Current version of XPlica supports only one item to be added at a time using source textbox. b) Using the source tree: Select a folder in the source tree-view or folder(s) / file(s) from the list view (top-right pane) , select a destination and Click 'Add' button. 7) Once folder(s) / file(s) have been added to a destination location, the same set of folder(s) and file(s) can be copied to another location or the destination location can be altered. To do so, select the source-destination location from 'Items added for export' to enable 'Copy / Move' as shown below. Click 'Copy / Move', the 'Copy / Move' dialog appears. 23 CHAPTER-3–Export to SharePoint Library Copy action will allow you to copy the selection (folders and files from source) to a new destination location and Move action will allows you to move the selection (folders and files from source) to a new destination location. Select the appropriate option to perform and enter / select the new destination location and Click OK. 8) Click OK button, when complete. 24 CHAPTER-3–Export to SharePoint Library NOTE: To export the entire library contents, select the library in source tree-view, select all items from the list-view by clicking 'Ctrl+A', select a destination and Click 'Add' button near the destination textbox. 9) Click 'Next' button to specify version settings. 3.3 Version History of Source Files In an export task to a SharePoint Library, you can optionally export version history of source files to the destination location: 1) Step 2 displays list of libraries in export and version settings. By default, 'Export latest version only' option is selected. To export version history of files from the source library Select an item and Click on 'Edit' button. 2) Select version settings in 'Version Settings' dialog. 3) Select any one of the following version settings. 25 CHAPTER-3–Export to SharePoint Library a) Export latest version only - Export the latest version of file from the source. b) Export all versions - Export all versions of files as in source. NOTE: When selecting 'Export all versions', version history of source files will be exported only if versioning is enabled in both source and destination library. 4) Step 2 will display the version settings as shown below: 5) Click Next button to specify Copy settings. 26 CHAPTER-3–Export to SharePoint Library 3.4 Specify Columns to Export In an export task to SharePoint library, you can selectively export metadata columns of source library to destination library as described below: 1) Step 3 displays list of source and destination libraries added for export and their column settings. By default, 'None' option is selected. To export metadata properties of files from the source library Select an item and Click on 'Edit' button. 27 CHAPTER-3–Export to SharePoint Library 2) Select column settings in 'Column Settings' dialog. 3) Select any one of the following column settings: a) Do not export columns - XPlica will not export the metadata column values of source files. b) Export all custom columns - XPlica will export all CUSTOM metadata column values of source files. c) Export selected custom columns - Specify list of CUSTOM metadata columns from source library to export to files in destination library. When selecting this option, 'Apply to' will display only the destination libraries where the currently selected source library items were added for export. NOTE: XPlica will only update those columns that already exist and the data types match in the destination library. Other columns will not be updated. 4) Select Special Column Settings. The options given below to carry forward special columns in a SharePoint Library. a) File created date - To carry forward Created Date field from the source files. b) File last modified date - To carry forward Last Modified Date field from the source files. c) File created by * - To carry forward Created By field from the source files. 28 CHAPTER-3–Export to SharePoint Library d) File last modified by * - To carry forward Last Modified By field from the source files. e) File check-in comments - To carry forward Check-in Comments field from the source files. (*) The following section contains important information about the Created By and Last Modified By fields: i. If the destination library resides in a Portal Area (SPS) ONLY, the options Original file Created By and Original file Last Modified By fields require additional steps. Important: The following steps are provided as a general guideline only. Before you perform this workaround, you must contact Microsoft Product Support Services for more information about how to complete the workaround. Microsoft Product Support Services will help you determine and set the value of the FullControlSID registry entry that is required in this workaround. Please refer to the article http://support.microsoft.com/?id=915489 for more information. The currently logged on user's SID or the user name provided in the Run As parameter SID for the scheduled task should be set as the FullControlSID in the Windows Registry in order to assign the original Created By and Last Modified By field values correctly. To get the specific User SID, you can use the Get User SID tool in XPlica provided for your convenience. To open the Get User SID tool, Select Tools menu and click Get User SID. ii. The user names that appear in the Created By and Last Modified By fields in the source library should be either member of the Site / Area (or) must have participated the Site / Area as an authenticated member of a domain group in the destination library for the field values to be applied correctly. Otherwise, you will notice a 'User cannot be found' error message in XPlica Activity Log. iii. 'Original file last modified by' will not be reflected for a file, if you select 'Create new version' option in File Settings step. However, this field will be updated correctly in the version history of the file. 5) If either Created By or Last Modified By field values does not exist in either source library or destination library, any one of the following options can be used to substitute user values to these respective fields in the destination library. This option can be used to avoid skipping the file (or a file version) from the export process. Select any one of the following options: a) Do not export file (default option) - XPlica will not export the file to the destination library 29 CHAPTER-3–Export to SharePoint Library b) Currently logged on user - Assigns the currently logged on user context to Created By and/or Last Modified By fields in the destination library 6) Step 3 will display the column settings as below: 7) Click 'Next' button to specify file settings. 30 CHAPTER-3–Export to SharePoint Library 3.5 Specify options for files with same name as source exists in destination In a export task to SharePoint library, you can specify options to handle files in the destination location: 1) Step 4 displays file settings. If a file with same name as in source, already exists in a destination library, then XPlica can either, skip the file, overwrite the file or add the file as a new version. 2) Select any one of the following options: a) Don't overwrite - Skips the file without overwriting. b) Overwrite file - Delete the file from the destination location (along with its version history) and exports the source file. c) Create new version - Ads the source file as new version at the destination location. 31 CHAPTER-3–Export to SharePoint Library Select any one of the following options to instruct XPlica what to do if the destination file is checked-out by the currently logged on user: a) Leave as is - Skip the file if it is checked-out by currently logged on user. b) Check-in file & create new version - Check-in the file and add the source file as a new version. c) Cancel Checkout file & create new version - Undo Checkout the file and add the source file as new version. Select any one of the following option to instruct XPlica what to do if the destination file is checked-out by a different user: a) Leave as is (checked-out by currently logged on user) - Skip the file if it is checked-out by a different user. b) Cancel Checkout file & create new version - Undo Checkout the file and add the source file as new version. NOTE: When 'Create a new version' option is selected in 'File setting' and 'Export all versions' option is selected in 'Version setting' then, first version of source file will be added to destination followed by next version and so on. In other words, source file's version history will be added to destination file's version history. 4) Click 'Next' button to specify the task name. 32 CHAPTER-3–Export to SharePoint Library 3.6 View Activity Log This section describes the Activity Log of 'Export To SharePoint Library' export task. The activity log is classified as follows: 1) Summary 2) Errors 3) Details 4) Task Settings 1) Summary: Displays a brief summary of the export task, grouped by source and destination library. The following are the details displayed in 'Summary' section: a) Status of source and destination library If the currently logged on user is able to connect to a library, then version setting (Versioning is ENABLED / DISABLED) will be displayed. If the currently logged on user is unable to connect to library or the library does not exist, then an error message will be displayed. b) Folders and Files Source statistics: Displays Number of folders, files, versions and total size of files added for export 33 CHAPTER-3–Export to SharePoint Library Export statistics: Displays Number of files and versions exported successfully, Number of files ignored, Number of errors occurred and Total Size of files uploaded. c) Metadata Columns: If metadata columns are selected for export, the Column name, Data type of the column in source library and Remarks about the metadata column will be displayed in 'Metadata columns' section. If a metadata column, with same data type, exists in both source and destination libraries, then 'Remarks' column will say 'Available in destination'. If a metadata column exists in both source and destination libraries, but differs in data type, then 'Remarks' column will say 'Data type of source does not match with destination library (<data_type_in_destination>)'. If a metadata column is not found in destination library, then 'Remarks' columns will say 'No matching column found in destination'. If a metadata column is not found in source library, then 'Remarks' column will contain an appropriate error message. d) Remarks Column Remarks column displays a brief remark about the status of export for each source-destination library combination. The following are the possible remarks. Possible Remarks Description Completed Successfully Export process was completed successfully without any errors. Some errors occurred while Export process encountered certain errors. export Eval limit reached Export process reached the maximum allowed number of files to export in evaluation / trial version. This message is applicable for evaluation / trial version only. Export was cancelled by user Export process was cancelled by the user. Terminated abnormally The export process was terminated abnormally. 34 CHAPTER-3–Export to SharePoint Library 2) Errors - Displays detailed report of errors occurred in export. The errors are grouped based on source and destination library, followed by original file (for versions). Error section contains the following columns - Source, Destination and Remarks. The 'Source' column displays the source library URL at the root node and the folder / file URL as child nodes and versions as child nodes to file URL. The corresponding destination library URL, the folder / file URL and version will be displayed under 'Destination' column. The actual error occurred will be displayed under 'Remarks' column. 3) Details - Displays both successful and failed items. 35 CHAPTER-3–Export to SharePoint Library The entries are grouped based on source and destination library, followed by original file (for versions). Details section contains the following columns - Source, Destination, Size and Remarks. The 'Source' column displays the source library URL at the root node and the folder / file URL as child nodes and versions as child nodes of file URL. The corresponding destination library URL, the folder / file URL and version will be displayed under 'Destination' column. The size of the source file will be displayed in the 'Size' column and status of export will be displayed under 'Remarks' column. The following table displays the possible messages displayed in Remarks column and its corresponding message description: Possible Messages Description Folder Created Successfully Folder Created in the Destination Library Folder Already Exists Folder Already Exists in the Destination Library File Created Successfully File created in the destination location. For version status, expand file node. 36 CHAPTER-3–Export to SharePoint Library File overwritten An existing file with the same name, along with its version history, was overwritten in the destination library. File created as new version File created as new version in the destination library. File version updated Versioning is disabled in the destination library and 'Create new version' option is selected. Hence, the content and metadata of latest version of file was updated. Ignored: File already exists A file with same name as of source file already exists in the destination location and the user has selected not to overwrite the file option in 'File settings'. Ignored: File is checked out by A file with same name as of source file already current user exists in the destination location and is checkedout by currently logged on user, and user has selected 'Leave as is' option in 'If file is checkedout by currently logged on user' section of 'File settings'. Ignored: File is checked out by A file with same name as of source file already different user exists in the destination location and is checkedout by a user other than logged on user and user has selected 'Leave as is' option in 'If file is checked-out by different user' section of 'File settings'. An error occurred while Unable to connect to the source library due to an connecting to source library unexpected error. An error occurred while Unable to connect to destination library due to connecting to destination library an unexpected error. 37 CHAPTER-3–Export to SharePoint Library No such folder found in destination Or An error occurred while retrieving destination folder No such folder / file found in source The destination folder specified at the time of creating the export task no longer exists or the currently logged on user does not have sufficient privileges to access the destination folder. The folder / file added for export at the time of creating the export task no longer exists or the currently logged on user does not have sufficient privileges to retrieve information about the source folder / file. An error occurred while creating folder The error described in 'Error log' section occurred An error occurred while uploading file The error described in 'Error log' section occurred An error occurred while retrieving metadata The error described in 'Error log' section occurred An error occurred while overwriting file The error described in 'Error log' section occurred while creating a folder in destination library. while uploading a file in destination library. while retrieving metadata values of a source file. while deleting a file in the destination library, in case of an 'Overwrite' option. An error occurred while performing undo check-out The error described in 'Error log' section occurred while performing a 'Cancel Check-out' on a checked-out file in the destination library, in case of creating a new version. An error occurred while performing Check-in The error described in 'Error log' section occurred while performing a 'check-in' on a file checkedout by current logged on user in the destination library, in case of creating a new version. User cannot be found The error described in 'Error log' section occurred while uploading a file or file version, if either 'Created By' or 'Modified By' user does not exist in the destination library. 38 CHAPTER-3–Export to SharePoint Library The parameter login name can be The error described in 'Error log' section occurred empty or bigger than 255 while uploading a file or file version, if the USER characters VALUE from any one of the 'Created By', 'Modified By' or Other user name specified, is unavailable in either source library or destination library NOTE: For all errors refer 'Error log' section of 'Activity Log' to view a description of the actual error that occurred while performing the export task. 4) Task settings - Displays settings specified for the task at the time of export. 39 Chapter 4 Export to File System Create task Add libraries, folders or files to export Version history of source files Specify columns to export Specify destination path View activity log 4 4.1 Create Task To create a task to export folders / files from a SharePoint library to a location in File system or Network Share: 1) Select 'Export to File System' in 'New Task' dialog and click OK. 41 CHAPTER-4-Export to File System 2) The 'Export Task Wizard (To File System)' wizard appears. 3) Select an Export Option. and click 'Next' button. 4) Follow the steps of wizard to create a task. 5) In 'Enter task name' step, enter a unique name for task. 6) Select a Task Option from one of the following options: a) Run task upon clicking Finish button - to run the task immediately after clicking 'Finish' button. b) Run later - to run the task later as and when desired c) Create Schedule task - to create a Windows scheduled task 42 CHAPTER-4-Export to File System 7) Click Next button. 8) Summary of task settings will be listed in the final step. 9) Click 'Finish' button to create the task, or click 'Back' button to change the task settings. 43 CHAPTER-4-Export to File System 4.2 Add Libraries, Folders or Files to Export In an export task to file system, you can export an entire library, selected folders and selected files. Follow the steps given below to add items for export: 1) Click 'New Task' from XPlica main screen. Or Select 'New Task' from 'Task' menu Or Press 'Ctrl+N' 2) Select 'Export to File System' in 'New Task' dialog and click OK. 3) The 'Export Task Wizard (To File System)' wizard appears. 44 CHAPTER-4-Export to File System Select an Export option and Click ‘Next’ button. 4) Step 1 displays list of items added for export. This will be empty for a new task. Click ‘Add’ button to select libraries, folders or files to export. 5) The 'Select items' dialog contains a tree-view (top-left), and a list-view (topright), which provides explorer like view to select library / folder / file to export. 45 CHAPTER-4-Export to File System 6) Select source library / folder(s) / file(s) to export and Click 'Add' button. Click OK button when complete. 7) Click 'Next' button to specify version settings. 46 CHAPTER-4-Export to File System 4.3 Version History of Source Files In an export task to File System, you can selectively export version history of source files to the destination location: 1) Step 2 displays list of items added for export and version settings. By default, 'Latest version only' option is selected. Version settings can be applied for each of the items added for export or for all items in a library. To apply version settings for an individual item, Select an item and Click on 'Edit' button. To apply version settings for all items in a library, Select the library URL and click on 'Edit' button. 2) Select version settings in 'Select file versions' dialog. 3) Select any one of the following version settings. 47 CHAPTER-4-Export to File System a) Export all versions - Export all versions of files as in source. b) Export version range - Export only versions specified in the range of files from source e.g., versions 2 to 5 c) Export latest version only - Export the latest version of file from the source. NOTE: When selecting 'Export all versions' or 'Export version range' option, a version folder name must be provided in 'Version Folder Name' text-box. When exporting version history of source files, a new folder with the name <version_folder_name><version_number> will be created as a sub-folder in the folder hierarchy and the respective versions will be exported to the corresponding version folder. 4) Click Next to Proceed to the next step. 4.4 Specify Columns to Export In a export task to File System, you can selectively export metadata columns of source files to CSV, MDB or XLS formats or update the date fields - Created Date and Last Modified Date, in the file system as described below: 1) Step 3 displays list of library URLs added for export, list of columns selected, and export file format for metadata (document properties). 48 CHAPTER-4-Export to File System 2) Select a library URL and click 'Edit' button 3) Select any one of the following metadata settings: a) Export all columns - Export both system and custom columns defined in each library. b) Export system columns only - Export system columns defined in each library. c) Export custom columns only - Export custom columns defined in each library. d) Export selected columns - Manually select columns to export. 4) Select a metadata file format using the following options: a) CSV (Comma delimited) - Export metadata column values to comma separated values (CSV) file format. b) MDB (Microsoft Access) - Export metadata column values to a Microsoft Access database format. c) XLS (Microsoft Excel) - Export metadata column values to Microsoft Excel format. 49 CHAPTER-4-Export to File System 5) Select File System Date Settings. The date options given below will assign the respective data field values in the file system as in the original SharePoint library. a) Retain original file created date - To carry forward Created Date field from the source files. b) Retain original file last modified date - To carry forward Last Modified Date field from the source files. 6) Click 'Next' button to specify the destination path. 4.5 Specify Destination Path To specify the destination path (location) where the selected items and / or metadata are to be exported: 1) Step 4 displays list of library URL's added for export and the destination path where items and their metadata will be exported. 2) Select a library URL and click 'Edit' button. 50 CHAPTER-4-Export to File System 3) Specify a folder path where the items are to be exported. You can also click browse ('...') button to launch folder browse dialog. NOTE: Ensure that the logged on user has sufficient rights to create, edit and delete folders and files in the specified export path. 4) Select 'Create parent folder with Library Name' check box if you want to create a folder with the <library_name> in export path specified. 5) Click OK button to return to wizard. 6) Click 'Next' button to specify a name for the task. 51 CHAPTER-4-Export to File System 4.6 View Activity Log This section describes the Activity Log of 'Export To File System' export task. The activity log is classified as follows: 1) Summary 2) Errors 3) Details 4) Task Settings 1) Summary: Displays a brief summary of the export task, grouped by source library. The following are the details displayed in 'Summary' section: a) Folders and Files Source statistics: Displays Number of folders, files, versions and total size of files added for export Export statistics: Displays Number of files and versions exported successfully, Number of files ignored, Number of errors occurred and Total Size of files uploaded. 52 CHAPTER-4-Export to File System b) Metadata columns - If metadata columns are selected for export, the status of Metadata column enumeration and Metadata file creation will be displayed in 'Metadata columns' section. NOTE: This section will be displayed only when 'Export both physical files and metadata' or 'Export metadata only' option is selected. Metadata Column List Generation: If enumeration of metadata columns is successful, then status will say 'Generated'. If any error is encountered, then status will say 'Generated with errors'. Refer 'Errors' tab for error that occurred while enumerating metadata columns. Metadata File Creation: If metadata file is created successfully, then status will say 'Created'. If any errors are encountered, status will contain an appropriate error message. c) Remarks column: Remarks column displays a brief remark about the status of export for each source-destination library combination. The following are the possible remarks: Possible Remarks Description Completed Successfully Export process was completed successfully without any errors. Some errors occurred while export Export process encountered certain errors. Eval limit reached Export process reached the maximum allowed number of files to export in evaluation / trial version. This message is applicable for evaluation / trial version only. Export was cancelled by user Export process was cancelled by the user. Terminated abnormally The export process was terminated abnormally. 2) Errors - Displays detailed report of errors occurred in export. 53 CHAPTER-4-Export to File System The errors are grouped based on source library, followed by original file (for versions). Error section contains the following columns - Source, Destination, Version ID and Remarks. The 'Source' column displays the source library URL at the root node and the folder / file URL as child nodes. The corresponding destination will be displayed under 'Destination' column. The 'Version ID' column displays the version number of the source file (empty in case of folder). The actual error occurred will be displayed under 'Remarks' column. 3) Details - Displays both successful and failed items. 54 CHAPTER-4-Export to File System The entries are grouped based on source and destination library, followed by original file (for versions). Details section contains the following columns - Source, Destination, File Size, Metadata and Remarks. The 'Source' column displays the source library URL at the root node and the folder / file URL as child nodes and versions as child nodes of file URL. The corresponding destination will be displayed under 'Destination' column. The size of the source file will be displayed in the 'File Size' column. Status of metadata value enumeration will be displayed in 'Metadata' column and status of export will be displayed under 'Remarks' column. The following table displays the possible messages displayed in Remarks column and its corresponding message description: Possible Messages Description Folder Created Successfully Folder created in the destination location. Folder already exists Folder already exists in the destination location. File created successfully File created in the destination location. For version status, expand file node. 55 CHAPTER-4-Export to File System File overwritten An existing file with the same name was overwritten in the destination location. Ignored: File already exists A file with same name as of source file already exists in the destination location and the user has not selected 'Overwrite files if it already exists in the destination location' option in 'Select items' step. An error occurred while Unable to connect to the source library due to an connecting to source library unexpected error. Could not create directory The destination folder path contains invalid due to invalid characters characters. Could not create directory as The destination folder path exceeds system defined the pathname is longer than maximum length for a folder path. the system-defined maximum length Could not create directory as The currently logged on user does not have sufficient the operating system denies privileges to access the destination folder. Further access because of an I/O processing of folders / files in the source library will error or a specific type of be aborted when this error is encountered. security error Could not create directory Destination location is not available or is not ready to due to an IO Error write or disk space is full or any IO related issue has occurred. Further processing of folders / files in the source library will be aborted when this error is encountered. Could not create directory The error described in 'Error log' section occurred while creating a folder in the destination location. Could not create file due to The file name contains characters that are not invalid characters supported by file system. 56 CHAPTER-4-Export to File System Could not create file as the The destination file path exceeds system defined pathname is longer than the maximum length for a file path. system-defined maximum length Could not create file as the The currently logged on user does not have sufficient operating system denies privileges to access the destination file. Further access because of an I/O processing of folders / files in the source library will error or a specific type of be aborted when this error is encountered. security error Could not create file as The file name exceeds system defined maximum filename is longer than the length for a file path. system-defined maximum length Could not allocate memory Sufficient memory is not available at the time of (Out of memory) operation. Could not create file The error described in 'Error log' section occurred while uploading a file in destination library. NOTE: For all errors refer 'Error log' section of 'Activity Log' to view a description of the actual error that occurred while performing the export task. 4) Task settings - Displays settings specified for the task at the time of export. 57 CHAPTER-4-Export to File System 58 Chapter 5 References 5 5.1 Why do I get these Alerts? Alert & Error Messages The following are the list of alerts / error messages / questions displayed in XPlica. Alerts & errors when launching XPlica application: 1) Message: Type: Cause: Resolution: Application is already running. Error. When you launch multiple instances of XPlica application. Do not run multiple instances of XPlica application. Message: XPlica is unable to proceed. The following error occurred while creating error log file: <Error message> Error. Currently logged on user does not have sufficient rights to Create files in application folder or its sub-folder. Ensure that the currently logged on user has full access rights in Application folder or its sub-folder. 2) Type: Cause: Resolution: 59 Chapter-5-References 3) Message: Type: Cause: Resolution: XPlica is unable to proceed. The following error occurred while creating error log file: <Error message> Error. Currently logged on user does not have sufficient rights to Open files in application folder or its sub-folder. Ensure that the currently logged on user has full access rights in Application folder or its sub-folder. 4) Message Type: Cause: Resolution: XPlica is unable to Proceed. The following error occurred while retrieving log file header information: <error message> Error. Currently logged on user does not have sufficient rights to read contents of files in application folder or its sub-folder. Ensure that the currently logged on user has full access rights in application folder or its sub-folder 5) 60 Chapter-5-References Message: Type: Cause: Resolution: XPlica is unable to proceed. The following files are not found: <file list> Error. XPlica is unable to find certain application files. Run XPlica setup again to repair the application 6) Message: Type: Cause: Resolution: XPlica is unable to proceed. The following Components are not found: <component list> Error. The listed components may have been unregistered or deleted. Run XPlica setup again to repair the application 7) Message: Type: Cause: Resolution: XPlica is unable to proceed. Ensure the following services are running: - IIS Admin Service - World Wide Web Publishing Service Error. When all or any one of the above mentioned services are not in running state. Ensure that all the above mentioned services are in running state. 8) 61 Chapter-5-References Message: Type: Cause: Resolution: XPlica is unable to proceed. The following error occurred while retrieving virtual server list: <error message> Error. Currently logged on user may not have sufficient rights to retrieve virtual server list. Ensure that the currently logged on user is a member of local 'Administrators' group in both front-end SharePoint server and back-end database server (SQL server). 9) Message: Type: Cause: Resolution: XPlica is unable to proceed. Ensure at least one site is extended and in ready state. Error. XPlica is unable to find any virtual server in extended (ready) state. Go to SharePoint Central Administration Site and Extend at least one virtual server or create a portal site. 10) Message: This is a <days>-day evaluation version of XPlica. You can export 25 items only to a SharePoint library and File System respectively during the evaluation period. Type: Cause: Resolution: Information You are running an evaluation version of XPlica. Purchase the product to unlock the feature restrictions in the evaluation version of XPlica. 62 Chapter-5-References Alerts & errors when registering XPlica or in Help section: 1) Message: Type: Cause: Resolution: Unable to show license agreement as license file '<file name>' is not found in the specified location. Alert XPlica is unable to load the license file. Run XPlica setup again to repair. 2) Message: Type: Cause: Resolution: Unable to show license agreement file '<file name>'. The following error occurred while loading license file: <error description> Alert XPlica is unable to read the contents of license file. Ensure that currently logged on user has full access rights to the application folder or its sub-folder. Alerts & errors when specifying a task name while copying or creating a task: 1) Message: Type: Cause: Resolution: Enter a Valid Task Name Alert No Task Name is Specified Enter a Valid and Unique Task Name 63 Chapter-5-References 2) Message: Type: Cause: Resolution: The task name cannot contain any of the following characters: \/:*?"<>| Alert Characters \ / : * ? " < > | are invalid in a task name. As XPlica creates folders with the task name in History folder in application path, avoid using these characters in the task name 3) Message: Type: Cause: Resolution: Task name cannot be '.' or '..' Enter a valid task name. Alert This message appears name of the task is specified as '.' or '..'. As XPlica creates folders with the task name in History folder in application path, avoid using creating task with name '.' and '..'. 4) Message: Type: Cause: Resolution: Task name cannot exceed 100 characters. Alert When more than 100 characters are entered in Task Name. Enter Less than 100 characters in Task Name. 5) 64 Chapter-5-References Message: Type: Cause: Resolution: A task with name '<task name>' already exists. Enter a different task name. Alert Task Name must be Unique. Enter a Valid and Unique Task Name Alerts & errors when working with 'Export To SharePoint Library' export task: 1) Message: Type: No Source URL Specified. Enter / select a folder or file form the source. Alert 2) Message: Type: The source URL entered is invalid. Enter a valid folder / file URL that exists in a SharePoint Library. Alert 3) Message: Type: The source URL entered is incomplete. Enter a valid folder/ file URL that exists in a SharePoint Library. Alert 65 Chapter-5-References 4) Message: Type: No folder / file with the URL '<source location>' exist in '<source libraryURL>'. Enter a valid folder / file URL that exists in a SharePoint Library. Alert 5) Message: Type: Cause: Resolution: XPlica doesn't support export of an entire library. Select a folder to export. Alert When a library is selected in the tree-view for export. Current version of XPlica does not directly support export of an entire library. To export the contents of a entire library, select a library in the Source tree-view, select all items in the Source list-view (using Ctrl+A) and add them for export. 6) Message: Type: No valid destination location specified. Enter / select a valid SharePoint library or folder URL. Alert 7) 66 Chapter-5-References Message: Type: Cause: Resolution: Items cannot be added to this level. Enter / select a valid SharePoint library or folder. Alert XPlica supports export of folders and files into a SharePoint Library or a folder in SharePoint Library. If the selected destination location is neither library nor folder, then the above alert will be displayed. Enter or select a valid SharePoint Library of folder from the destination tree-view. 8) Message: Type: The destination URL is invalid. Enter a valid library / folder URL that exists in SharePoint. Alert 9) Message: Type: Cause: Resolution: Cannot add items to it. Ensure that source and destination locations are different. Alert The source and destination location is same. Select a different source and/or destination location and add folders / files for export. 10) Message: Type: Cause: Resolution: Cannot add '<item name>' to itself. Ensure that source and destination items are different. Alert The source and destination items are the same. Select a different source and/or destination location and add folders / files for export. 67 Chapter-5-References 11) Message: Type: Cause: Resolution: Cannot add <item name> as source and destination folder are the same. Ensure that source and destination folders are different. Alert The source and destination location is the same. Ensure that source and destination location are different. 12) Message: Type: Cause: Resolution: Cannot add '<folder name>' as destination folder is a sub-folder of the source folder. Ensure that destination folder is not a sub-folder of the source folder. Alert The source folder and its contents cannot be exported to a subfolder within the source folder. Ensure that destination folder is not a sub-folder of the source folder. 13) Message: Type: '<item name>' have been already added for export. Information Message: Type: One or more item(s) have been already added for export. Information 14) 68 Chapter-5-References 15) Message: Type: Cause: Resolution: This action will remove all items added for export. Do you wish to proceed? Question When you Click ‘Remove All’ from the middle tool bar. Click ‘Yes’ to Remove all items added for export. Or else click ‘No’. 16) Message: Type: This will load only those destination libraries into which items from the currently selected source library has been added. Information 17) Message: Type: No columns selected for export. Select at least one column to export. Alert 18) Message: Type: XPlica is unable to retrieve custom columns. The following error occurred while connecting to the source library '<source libraryURL>'. <error message> Alert 69 Chapter-5-References 19) Message: Type: Cause: Resolution: The following columns selected for export are not found in the source library and hence they will be removed. <column list> Information XPlica is unable to retrieve some of the columns that were selected for export. Ensure that the selected columns exist in the source library. 20) Message: Type: Cause: Resolution: This action will clear all changes made in this session. Do you wish to proceed? Question When 'Cancel' button is clicked in 'Export Task Settings (To SharePoint Library)' dialog. Click 'Yes' if you wish to cancel all the changes made in the session. Otherwise click 'No'. Alerts & errors when working with 'Export To File System' export task: 1) Message: Type: Cause: Resolution: Invalid Path Alert When the path entered in 'Export path' text-box of 'Specify destination path' dialog is invalid. Enter a Valid Path 70 Chapter-5-References 2) Message: Type: Cause: Resolution: <error message> Information XPlica checks the format of path entered in 'Export path' textbox of 'Specify destination path' dialog is found to be invalid. Enter a Valid Path 3) Message: Type: Cause: Resolution: Enter export path. Alert. When no path is specified in 'Export path' text-box of 'Specify destination path' dialog. Enter a Valid Path 4) Message: Type: Cause: Resolution: Folders / files added for export from this library will be removed and the entire library will be added for export. Do you wish to continue? Question When items in a library are added for export and when the library itself is added for export. Click 'Yes' to remove the selected folders / files and add entire library for export. Otherwise click 'No'. 5) 71 Chapter-5-References Message: Type: Cause: Resolution: The selected folder / file is already added for export as the entire library contents are added for export. Do you wish to remove entire library and add the selected folder / file? Question When you try to add item(s) in a library for export after adding the entire library for export. Click 'Yes' to remove the library added for export and add the selected item(s) for export instead. Otherwise click 'No'. 6) Message: Type: Cause: Resolution: The following error occurred while retrieving column list: <error message> Alert When the currently logged on user does not have sufficient rights to retrieve column list of a library or the library is corrupt or the columns that were selected for export are not available in the source library. Ensure that the currently logged on user has sufficient rights to retrieve column list and the library is accessible. 7) Message: Type: Cause: Resolution: The following error occurred while retrieving metadata options: <error message> Alert Currently logged on user may not have sufficient rights to connect to the selected source library or the selected source library may have been removed or corrupted. Ensure that you are able to connect to the library using browser (with currently logged on user credentials). 8) 72 Chapter-5-References Message: Type: Cause: Resolution: Only libraries, folders and files can be added. Alert When you try to add a site / area for export. Ensure that you are adding libraries, folders or files only for export. Message: Type: Cause: Resolution: Are you sure you want to remove? Question When you try to remove an item added for export. Click 'Yes' if you wish to remove the item. Otherwise click 'No'. Message: Type: Cause: Select at least one column. Alert No column selected and 'Export selected columns' option is selected. Select at least one column or choose appropriate option. 9) 10) Resolution: 11) Message: Type: Cause: Some file(s) or folder(s) are already added. Information When you are trying to add file(s) or folder(s) that are already added to export list. 12) 73 Chapter-5-References Message: Type: Cause: '<source url>' is already added. Alert When you add a file or folder that is already added to export list. 13) Message: Type: Cause: Resolution: Specify valid version number. Alert When an invalid number is entered in the version range. Ensure that a valid number is entered in the version range. Message: Type: Cause: Version folder name cannot exceed 50 characters. Alert When more than 50 characters are entered in Version folder name. Enter less than 50 characters in Version folder name. 14) Resolution: 15) Message: Type: Cause: Resolution: The version folder name cannot contain any of the following characters: \/:*?"<>| Information Characters \ / : * ? " < > | are invalid in a Windows folder name. Remove these characters in the folder name. 74 Chapter-5-References 16) Message: Type: Cause: Resolution: Version Number cannot be Zero Alert When you enter ‘0’ in version range. Enter a Positive, Non-zero Integer. Message: Type: Cause: End version range must be greater than Start version range. Alert When 'end version' number is lesser than 'start version' number in 'Version range'. Ensure that end version number is greater than or equal to start version number. 17) Resolution: 18) Message: Type: Cause: Resolution: Are you sure you want to close this wizard? Question When you try to close the wizard or click 'Cancel' button. Click 'Yes' if you wish to ignore the changes made for the task, Otherwise click 'No'. 75 Chapter-5-References Alerts & errors when copying a task: 1) Message: Type: Cause: Resolution: The specified task name is same as task to be copied. Enter a different task name. Alert When same name is entered in 'Save as' textbox as the source task. Enter a valid, unique task name. Alerts & errors in XPlica main screen: 1) Message: Type: Cause: Resolution: This action will run the selected task '<task name>'. Do you wish to proceed? Question Confirmation before running a task. Click 'Yes' if you wish to start the export process based on task settings. Otherwise click 'No'. Note: XPlica can run only one task at a time. You will be allowed to create / edit / delete other tasks in XPlica but all operations will be disabled for the currently running task. Also 'Run now' button will also be disabled until the currently running task is complete. 2) 76 Chapter-5-References Message: Type: Cause: Resolution: A task '<task name>' is already running. The current version of XPlica supports only one task to be run at a time. Please wait until the task is complete. Alert Trying to run another task when a task is already running. As the current version of XPlica supports only one task to be run at a time, please wait until currently running task is complete. 3) Message: Type: Cause: Resolution: This action will remove task '<task name>' and its associated task history. Are you sure you want to delete the task? Question Confirmation before Deleting a Task Click 'Yes' if you wish to remove the task and its corresponding task history from XPlica. Note: After deleting a task, you will not be able to retrieve task settings and its history. Alerts & errors when running a task: 1) Message: Type: Cause: Resolution: XPlica Task Runner is Already Running. Error When you try to run more than one instance of XPlica Task Runner application. Do not try to run XPlicaTaskRunner.exe directly and also ensure that no XPlica task is currently running. 77 Chapter-5-References 2) Message: Type: Cause: Resolution: XPlica is unable to run the task. Evaluation period has expired. Please purchase the product online and activate the software for unrestricted use. Error When you try to run a task after the evaluation period has expired. Contact our Technical Support or Sales Team as required. 3) Message: Type: Cause: Resolution: This is a <days>-day evaluation version of XPlica. You can export 25 items only for each task type (SharePoint Library and File System) during the evaluation period. You have already reached the evaluation limit for '<task type>' task. Please purchase the product and activate the software for unrestricted use. Error When you try to run a task after reaching evaluation limit (number of files that can be exported). Contact our Technical Support or Sales Team as required. 4) Message: Type: Cause: Resolution: This action will terminate the export process. Are you sure to proceed? Question Confirmation to end a currently running task. Click 'Yes' to end the currently running task. Click 'No' if 'End task' button is clicked accidentally. 78 Chapter-5-References 5.2 Troubleshooting If and when a problem arises, please forward the following files to [email protected] to get back to you with a solution. These files will be available where XPlica is installed. 1) Error log file - e.g., C:\Program Files\XPlica2003\Log\XPlicaErrorLog.txt 2) For issues while running a task, the Activity Log and Error Log files will be generated in a date and time-stamp folder within the task folder name under History folder. a) Activitylogfile-e.g.,C:\Program Files\XPlica2003\History\XPlicaTask20\05_22_2006_18_39_19\ActivityLogDet ailedActivityLog.csv b) Tasksettingsfile-e.g.,C:\Program Files\XPlica2003\History\XPlicaTask20\05_22_2006_18_39_19\ActivityLog.md b c) Errorlogfile-e.g.,C:\Program Files\XPlica2003\History\XPlicaTask20\05_22_2006_18_39_19\ErrorLogActivit yErrors.csv d) Metadatalogfile-e.g.,C:\Program Files\XPlica2003\History\XPlicaTask20\05_22_2006_18_39_19\MetadataActivi tyLog.csv e) XPlicaerrorlogfile-e.g.,C:\Program Files\XPlica2003\History\XPlicaTask20\05_22_2006_18_39_19\XPlicaErrorLog .txt 79 Chapter 6 6 Index About XPlica, 1 Run a Task, 6 Add Folders or Files to Export, 20 SharePoint, 1 Add Libraries, Folders or Files to Export, Specify Columns to Export, 27, 48 44 Alert & Error Messages, 59 Cleanup History, 14 Specify Destination Path, 50 Specify options for files with same name as source exists in destination, 31 Copy an Existing Task, 5 System requirements, 1 Create Task, 4, 17, 41 Task History, 8 Delete an Existing Task, 13 Task Status, 12 Export to File System, 41 Technical Support, 3 Export to SharePoint Library, 17 Troubleshooting, 79 Get User Security ID (SID), 15 Version History of Source Files, 25, 47 How to Activate the Software?, 2 View Activity Log, 10, 33, 52 References, 59 Why do I get these Alerts?, 59 Remove a Task History Item, 11 XPlica Features, 4 80