1
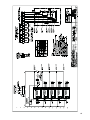
/ LLC Water Level Control System /
User Manual 09-1366
1
Contents
Note
This manual contains vital information for the proper installation and
operation of your cooling tower. Carefully read the manual before
installation or operation of the tower and follow all instructions.
Save this manual for future reference.
Quick Start Guide .......................................................................................................4
Description ...................................................................................................................5
Operation ......................................................................................................................5
Water Makeup Function ............................................................................................7
HAND-OFF-AUTO Switch ........................................................................................7
Internal Components ..................................................................................................8
Electrode Probe Assembly .......................................................................................9
Operation Sequence Illustrations............................................................................9
Water Makeup Control Sequence .......................................................................10
High-Level Alarm Sequence ..................................................................................11
High-Level Cutoff Sequence .................................................................................11
Low-Level Alarm Sequence ...................................................................................12
Low-Level Cutoff Sequence ..................................................................................12
Makeup and High Circuit Card Checking ..........................................................13
Low Circuit Card Checking ...................................................................................14
Electrode Probe Part Numbers ............................................................................15
Relay Circuit Card Part Numbers.........................................................................16
Part Numbers ............................................................................................................16
Wiring Diagrams....................................................................................................... 17
The following defined terms are used throughout this manual to
bring attention to the presence of hazards of various risk levels, or
to important information concerning the life of the product.
Warning
Indicates presence of a hazard which can cause severe personal
injury, death or substantial property damage if ignored.
Caution
Indicates presence of a hazard which will or can cause personal
injury or property damage if ignored.
Note
2
Indicates special instructions on installation, operation or maintenance which are important but not related to personal injury
hazards.
Introduction
These instructions are intended to assure that field connections are completed
properly and the control system operates for the maximum time possible. Since
product warranty may depend on your actions, please read these instructions
thoroughly prior to operation.
If you have questions about the operation and/or maintenance of this control
system and you do not find the answers in this manual, please contact your
Marley sales representative.
Warning
Hazard of electrical shock or burn. Be sure to turn off power to the
panel before servicing. If working on equipment out of site of panel
disconnect, lockout using standard lockout procedure.
Safety First
The Marley control system uses UL listed components installed in accordance
with the National Electric Code. The location of the cooling tower and field
installation of the control system can affect the safety of those responsible
for installing, operating or maintaining the tower and controls. However,
since SPX Cooling Technologies does not control the tower location, or field
installation, we cannot be responsible for addressing safety issues that are
affected by these items.
Warning
The following safety issues should be addressed by those responsible
for installation, maintenance or repair of the tower and controls:
t"DDFTTUPBOEGSPNUIFDPOUSPMQBOFMJODMVEJOHUIFDVTUPNFS
supplied main disconnect/branch circuit protection.)
t1SPQFSHSPVOEJOHPGFMFDUSJDBMDPOUSPMDJSDVJUT
t4J[JOH BOE QSPUFDUJPO PG CSBODI DJSDVJUT GFFEJOH UIF DPOUSPM
panel.
t2VBMJGJDBUJPOPGQFSTPOTXIPXJMMJOTUBMMNBJOUBJOBOETFSWJDF
the electrical equipment.
These are only some of the safety issues that may arise in the design and
installation process. Marley strongly recommends that you consult a safety
engineer to be sure that all safety considerations have been addressed.
Other safety issues are addressed in literature supplied with your tower. You
should closely review the literature prior to installing, maintaining or repairing
your tower.
3
Quick Start Guide
Connect incoming power here.
Panel requires 120VAC 1 phase,
6 amp power with ground.
If a makeup solenoid circuit is
provided, connect the solenoid
wires here at points 4A and 2A.
This circuit provides 120 VAC
power for the solenoid.
Connect alarm and/or cutoff
control wiring to the grey terminal
points.
Connect water level probe wiring
to the blue terminals. The probes
are generally located in the
cold water basin of the cooling
tower.
To avoid water getting into the
control panel, all conduit entries
should be into the bottom of the
enclosure.
Note
If the control panel is furnished with a water makeup selector switch located on
the right-hand side of the enclosure:
HAND: position: Solenoid will energize.
OFF: position: Solenoid is de-energized
AUTO: Solenoid will operate depending on water level in relation to water probe
height.
4
Operation
Description
The Liquid Level Control systems are used to accomplish five different functions:
t8BUFS.BLFVQ
t)JHI8BUFS"MBSN
t-PX8BUFS"MBSN
t)JHI8BUFS$VUPGG
t-PX8BUFS$VUPGG
The most common application of a water level control system is water makeup.
The system regulates the amount of water in the tower basin and keeps it within
normal operating levels. This makeup system is used to control a remotely
installed water solenoid valve. When the water level drops below a prescribed,
preset level, the solenoid valve is energized by the control system to fill the
basin to its proper level.
High and low water alarms can be utilized to give warnings associated with
abnormal operating water levels. To provide indication of these types of alerts,
the control system provides dry contacts to interface with various digital control
systems or can be connected to user supplied alarm indicators to signal when
corrective action is required.
Low-water cutoffs are commonly used to protect pumps from operating without sufficient water. When used in unattended operating environments, the
low-water cutoff is configured to shut the pump off, thus preventing costly
repairs. Dry contacts can be wired directly in series with pilot duty controls
or to digital control systems to initiate the shutdown of protected equipment
during low-water situations.
Operation
The LLC water level control system consists of special purpose liquid sensing
relays on one or more individual circuit cards connected to a probe assembly
located in the cold-water basin. Each circuit card contains one relay and external
signaling is provided by each of these special purpose cards. The individual
relay provides a “Form C” normally open and normally closed dry contact. The
circuit card activates the relay using “through the water” continuity by way of
the senor probes located in the cold-water basin of the cooling tower.
5
Operation
Utilizing water’s ability to conduct electricity, a circuit path can be established
between one probe tip and the other. Current conducts through the water
across probes of dissimilar length. One common or reference probe is present
in all systems and is shared by all functions of the system. This probe can be
identified by its length. It is the longest probe in the system and extends the
deepest into the basin. The current path is routed between all other probe tips
and this one “common”. When the water level reaches the shorter probe, the
circuit is completed and the relay responds, opening or closing relay contacts
corresponding to a fixed level. For low-level control, the ground reference probe
and a slightly shorter probe provide the circuit. When the water level drops
below this tip, the continuity between this probe and the reference probe is
interrupted and the relay contacts transfer. The distance from the tip of the
low probe to the floor of the basin determines the minimum water level that is
allowed before an alarm is produced or pump operation is interrupted.
The number of additional probes is determined by the individual application.
As an example, in a “water makeup” system there are three probes. One
reference and two standard or short-tipped probes. The tip of the reference
probe is normally positioned slightly above the basin floor with the additional
probe tips positioned at different heights dictated by their specific function.
The Makeup system would have one probe at a height to begin or start filling
the basin and another positioned higher to complete or stop filling. A probe
for a High Alarm or High Cutoff would be positioned at a level to activate
when the basin water exceeds its normal operating level and logically a Low
Alarm or Low Cutoff would be positioned to detect a low water level nearer
the bottom of the basin. Again, signaling is achieved in two ways. High Level
and Makeup cards react when the water provides a completed circuit or
continuity between its sensor and the reference probe. The second type of
signal is for Low Level detection. The Low Level cards react when the water
is not present and opens the circuit or disrupts the current flow between its
probe and the reference.
A water level control system can be configured to meet various combination
requirements. Since one individual circuit card is responsible for each function, the size and circuitry varies in proportion to the number of operations
desired. For example, a water level makeup control will require a control panel
with one circuit relay card and three probes. A system configured for water
makeup that includes a high alarm and a low alarm, will require three circuit
cards and five probes—one circuit card for the water makeup option, one for
high operation and one for low.
6
Operation
Water Makeup Function
A system is designed for alarms and/or cutoff indication only would not be
equipped with the water makeup function.
The circuitry for water makeup in the LLC control panel provides an independent circuit breaker for direct connection to a 110-120VAC water solenoid
valve. This added feature allows customer installation without having to
provide an additional power circuit to energize the solenoid. The solenoid is
connected to terminals 2A and 4A as represented on the control’s specific
wiring diagram.
Purpose and Function of the HAND-OFF-AUTO Switch
Located on the right side of the control’s enclosure is a HAND-OFF-AUTO
switch. This switch is used primarily at cooling tower startup and in maintenance
procedures where the tower basin is empty or has been drained. When the
tower’s basin needs to be manually filled, the switch is placed in the HAND
position. This selection bypasses the probe assembly’s feedback and directly
energizes the solenoid valve connected to the water supply. Once the cooling
tower basin is filled, the switch is placed in the AUTO position to allow the
adjusted probe assembly to monitor and sustain the proper operating level.
Placing the switch in the OFF position completely interrupts any monitoring or
fill action normally provided by the LLC control panel. Normal tower operation
depends upon the HAND-OFF-AUTO switch being positioned in the AUTO
mode at all times.
7
Operation
Inside view of a LLC Control Panel with Makeup, High Alarm, and Low Alarm.
Internal Components of the LLC Control Panel
LLC control panels are built to UL and CUL standards and are designed to
provide the numerous configurations needed for cooling tower applications.
All LLC control panels include a main circuit breaker with an additional circuit
breaker and a HAND-OFF-AUTO switch provided when the system includes
a water makeup circuit. The additional circuit breaker provides an exclusive
control circuit for a 120VAC water solenoid valve. High and low circuit relay
cards and the appropriate terminal connections comprise the rest of the
components necessary for the specific configuration. The raised terminal strip
provides easier access to make the necessary connections of the water probe
assembly and customer interface.
8
Operation
Stainless Steel Electrode Probe Assembly
The electrode probe tips are stainless steel suspended from a noncorrosive
PVC enclosure box with 20 feet of wire for each probe. A galvanized or stainless steel stilling chamber is installed over the probes to calm the water for
accurate readings.
Illustrations Describing Operation Sequence
The next three pages are simplified illustrations representing the sequence of
operation for each type of circuit card.
t1BHFo.BLFVQ
t1BHFo)JHI"MBSN
t'JHVSFo-PX"MBSN
t'JHVSFo)JHI$VUPGG
t'JHVSFo-PX$VUPGG
Note
Reference is the one common probe to the total system configuration.
9
Operation
Water Makeup Control – Sequence of Operation
1.
Relay
Contact
Open
DE-ENERIZED
CONTROL PANEL
Power OFF
CIRCUIT CARD
with RELAY
2.
Valve
Closed
2
120VAC 4A
Relay
Contact
Closed
ENERIZED
CONTROL PANEL
Power ON
CIRCUIT CARD
with RELAY
120VAC 4A
13 14 15
Relay
Contact
Open
Water
Level
Rising
ENERIZED
CONTROL PANEL
Power ON
5.
Valve
Closed
2
120VAC 4A
Relay
Contact
Open
Water
Level
Rising
ENERIZED
CONTROL PANEL
Power ON
CIRCUIT CARD
with RELAY
6.
Valve
Closed
Relay
Contact
Closed
REFERENCE
PROBE
REFERENCE
PROBE
ENERIZED
CONTROL PANEL
Power ON
CIRCUIT CARD
with RELAY
Valve
Open
2
SOLENOID
VALVE
120VAC 4A
13 14 15
MAKE-UP
OFF
PROBE
MAKE-UP
ON
PROBE
Water Level
Dropping
SOLENOID
VALVE
MAKE-UP
ON
PROBE
13 14 15
MAKE-UP
ON
PROBE
10
120VAC 4A
MAKE-UP
OFF
PROBE
REFERENCE
PROBE
120VAC 4A
MAKE-UP
OFF
PROBE
Valve
Open
13 14 15
2
SOLENOID
VALVE
13 14 15
Water Level
Rises
To MAKEUP
OFF Probe
CIRCUIT CARD
with RELAY
2
SOLENOID
VALVE
MAKE-UP
ON
PROBE
REFERENCE
PROBE
CIRCUIT CARD
with RELAY
ENERIZED
CONTROL PANEL
Power ON
MAKE-UP
OFF
PROBE
MAKE-UP
ON
PROBE
4.
Relay
Contact
Closed
13 14 15
MAKE-UP
OFF
PROBE
Water
Level
Valve
Open
2
SOLENOID
VALVE
3.
REFERENCE
PROBE
MAKE-UP
OFF
PROBE
MAKE-UP
ON
PROBE
Water Level
Drops Below
MAKEUP
ON Probe
REFERENCE
PROBE
SOLENOID
VALVE
Operation
High Level Alarm – Sequence of Operation
1.
Relay
Contact
Closed
DE-ENERIZED
CONTROL PANEL
Power OFF
2.
Relay
Contact
Open
CIRCUIT CARD
with RELAY
5
6
ENERIZED
CONTROL PANEL
Power ON
Relay
Contact
Closed
CIRCUIT CARD
with RELAY
5
CUSTOMER
CONNECTION
6
5A
ENERIZED
CONTROL PANEL
Power ON
CIRCUIT CARD
with RELAY
5
CUSTOMER
CONNECTION
6
5A
13 16
13 16
HIGH
ALARM
PROBE
Water
Level
Rising
REFERENCE
PROBE
CUSTOMER
CONNECTION
5A
13 16
HIGH
ALARM
PROBE
Water
Level
3.
HIGH
ALARM
PROBE
High
Alarm
Condition
REFERENCE
PROBE
REFERENCE
PROBE
High Level Cutoff – Sequence of Operation
1.
Relay
Contact
Open
DE-ENERIZED
CONTROL PANEL
Power OFF
2.
Relay
Contact
Closed
CIRCUIT CARD
with RELAY
ENERIZED
CONTROL PANEL
Power ON
8
7
CIRCUIT CARD
with RELAY
8
8A
7
CUSTOMER
CONNECTION
8
13 17
HIGH
CUTOFF
PROBE
REFERENCE
PROBE
ENERIZED
CONTROL PANEL
Power ON
8A
CUSTOMER
CONNECTION
13 17
Water
Level
Relay
Contact
Open
CIRCUIT CARD
with RELAY
8A
7
3.
13 17
HIGH
CUTOFF
PROBE
Water
Level
Rising
CUSTOMER
CONNECTION
REFERENCE
PROBE
HIGH
CUTOFF
PROBE
High
Cutoff
Condition
REFERENCE
PROBE
11
Operation
Low Level Alarm – Sequence of Operation
1.
Relay
Contact
Closed
DE-ENERIZED
CONTROL PANEL
Power OFF
2.
Relay
Contact
Open
CIRCUIT CARD
with RELAY
9
10
ENERIZED
CONTROL PANEL
Power ON
Relay
Contact
Closed
CIRCUIT CARD
with RELAY
9
CUSTOMER
CONNECTION
10
9A
ENERIZED
CONTROL PANEL
Power ON
CIRCUIT CARD
with RELAY
9
CUSTOMER
CONNECTION
10
9A
13 18
Water
Level
3.
9A
13 18
LOW
ALARM
PROBE
REFERENCE
PROBE
13 18
LOW
ALARM
PROBE
Water
Level
Dropping
CUSTOMER
CONNECTION
Low
Alarm
Condition
REFERENCE
PROBE
LOW
ALARM
PROBE
REFERENCE
PROBE
Low Level Cutoff – Sequence of Operation
1.
Relay
Contact
Open
DE-ENERIZED
CONTROL PANEL
Power OFF
2.
Relay
Contact
Closed
CIRCUIT CARD
with RELAY
9
10
ENERIZED
CONTROL PANEL
Power ON
9
10
9A
LOW
ALARM
PROBE
ENERIZED
CONTROL PANEL
Power ON
CIRCUIT CARD
with RELAY
9
CUSTOMER
CONNECTION
10
9A
9A
13 19
REFERENCE
PROBE
12
Relay
Contact
Open
CIRCUIT CARD
with RELAY
CUSTOMER
CONNECTION
13 19
Water
Level
3.
Water
Level
Dropping
13 19
LOW
ALARM
PROBE
REFERENCE
PROBE
Low
Cutoff
Condition
LOW
ALARM
PROBE
REFERENCE
PROBE
CUSTOMER
CONNECTION
Checkout Procedure
Water Makeup, High Alarm and High Cutoff – Circuit Card LLC24B2F50N
If an individual circuit relay card is suspected of causing
a problem, use one of the next two checkout procedures
to verify its’ condition. The first procedure is used when
checking the Makeup, High Alarm or High Cutoff cards.
0
0
H
Load
Contacts
NC
L
NO
C
COM
115 VAC
The second procedure, on the next page, is used to check
a Low Alarm or Low Cutoff card. Perform each step as
directed.
H
Load
Contacts
Probes
NC
L
NO
C
COM
115 VAC
AC Line
Probes
AC Line
Step1
Step 2
1—Disconnect all wires from relay card. Connect power
to the relay.
1. Attach a jumper to C and L (probe terminals). Meter
should still read 0 ohms.
2—Connect ohmmeter across contacts COM and NO.
Meter should read 0 ohms (closed contact).
0
H
infinity
Load
Contacts
NC
L
NO
C
COM
115 VAC
H
Load
Contacts
Probes
NC
L
NO
C
COM
115 VAC
AC Line
Probes
AC Line
Step 3
Step 4
1. Touch a jumper to the H and C terminals. Meter should
read “infinity” (open contact).
1. Remove the jumper from L to C. Meter should read 0
ohms, indicating contacts have closed.
2. Remove the jumper from H to C, leaving the jumper from
L to C in place. Contacts should remain open.
Note—Check out procedure for card LCC24BF50N
(Makeup, High Alarm and High cutoff) Uses N.O. (normally open) contacts verses N.C for card LCC24Af50N.
See next Page.
13
Checkout Procedure
Low Alarm and Low Cutoff – Circuit Card LLC24A2F50N
0
0
H
Load
Contacts
NC
L
NO
C
COM
115 VAC
H
Load
Contacts
Probes
NC
L
NO
C
COM
115 VAC
AC Line
Probes
AC Line
Step1
Step 2
1—Disconnect all wires from relay card. Connect power
to the relay.
1. Attach a jumper to C and L (probe terminals). Meter
should still read 0 ohms.
2—Connect ohmmeter across contacts COM and NC.
Meter should read 0 ohms (closed contact).
infinity
Load
Contacts
NC
L
NO
C
COM
115 VAC
0
H
H
Load
Contacts
Probes
NC
L
NO
C
COM
115 VAC
AC Line
Probes
AC Line
Step 3
Step 4
1. Touch a jumper to the H and C terminals. Meter should
read “infinity” (open contact).
1. Remove the jumper from L to C. Meter should read 0
ohms, indicating contacts have closed.
2. Remove the jumper from H to C. Contacts should
remain open.
Note—Check out procedure for card LCC24AF50N
(Low Alarm and Low Cutoff) uses N.C. (normally closed)
contacts verses N.O. for card LCC24BF50N. See previous page.
14
Parts List
Threaded Probe Tip
Standard Item D20643
Includes red cap and
small hat-shaped copper
crimp-on connector
Probe,
Reference/GND
“Tip Only”
Item D20718
Electrode Probe Assembly
Additional part numbers can be found on the next page
15
Parts List
Relay Circuit Card
Item number % – Used for Makeup, High Alarm and High Cutoff (LLC24B2F50N)
Item number % – Used for Low Alarm and Low Cutoff (LLC24A2F50N)
16
.BSMFZ*UFN
%FTDSJQUJPO
H-O-A Switch
%
Makeup Relay Card
%
High Alarm Relay Card
%
High Cutoff Relay Card
%
Low Alarm Relay Card
%
Low Cutoff Relay Card
$
Standard Probe Sensor (Complete with tip and 20 ft wire)
%
Standard Probe Sensor (Complete with tip and 50 ft wire)
%
Reference / GND Probe Sensor (Complete with tip and 20 ft wire)
%
Reference / GND Probe Sensor (Complete with tip and 50 ft wire)
%
Standard Probe Sensor Stainless Steel Tip
%
Reference / GND Probe Sensor Stainless Steel Tip
Terminal Blocks Kit (2 Gray, 2 Blue and 1 End)
D81756
EMI Filter
17
18
19
20
21
22
23
24
25
26
27
28
29
30
31
32
33
34
35
36
37
38
39
40
41
42
43
44
45
46
47
7401 WEST 129 STREET | OVERLAND PARK, KANSAS 66213 UNITED STATES | 913 664 7400 | [email protected] | spxcooling.com
In the interest of technological progress, all products are subject to design and/or material change without notice.
©2009 SPX Cooling Technologies, Inc. | Printed in USA
Manual 09-1366