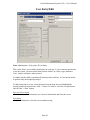
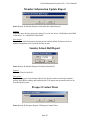
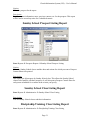
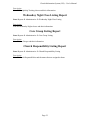
1
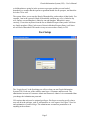
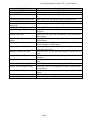
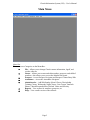
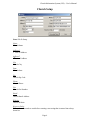
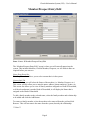
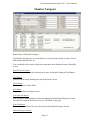
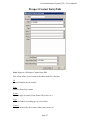
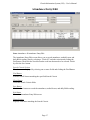
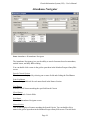
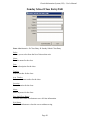
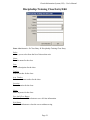
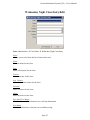
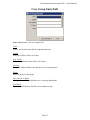
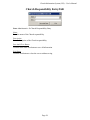
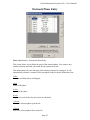
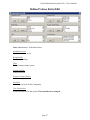
Church Information System
User’s Manual
Designed and By Computing Technologies
8/31/06
Table of Contents
Section
Members vs. Prospects vs. Child of Member
Page
1
Outreach Phase
1
Family Connection
1
User Setup
2
Permissions
3
Let’s Get Started!
4
Main Menu
5
Church Setup
6
Member/Prospect Entry/Edit
8
Member Navigator
11
Prospect Navigator
12
Prospect Contact Entry/Edit
15
Attendance Entry/Edit
17
Attendance Navigator
18
Administrative
Sunday School Class Entry/Edit
Discipleship Training Class Entry/Edit
Wednesday Night Class Entry/Edit
Care Group Entry/Edit
Church Responsibility Entry/Edit
Outreach Phase Entry/Edit
Defined Values Entry/Edit
User Entry/Edit
About Screen
20
21
22
23
24
25
27
28
29
Reports
Member Information Update Report
Sunday School Roll Report
Prospect Contact Sheet
Sunday School Prospect Listing Report
Sunday School Class Listing Report
Discipleship Training Class Listing Report
Wednesday Night Class Listing Report
Care Group Listing Report
Church Responsibility Listing Report
30
30
30
31
31
31
32
32
32
Church Information System (CIS) – User’s Manual
Members vs. Prospects vs. Child of Member
CIS is setup so that a Church and group of users can be up and going as quick as possible
with as little headache as possible.
In CIS, Members, Child of Members, and Prospects are all entered thru the same screen,
this keeps the user from having to learn multiple operations to enter each. Member, Child
of Member, or Prospect is specified on the “Contact Info” tab of the “Member/Prospect
Entry/Edit” screen.
Each Name in CIS must be specified as Member, Child of Member, or Prospect. Each
also must have specified an “Active/InActive” Status on the “Church Info” tab and an
“Active/InActive” Status on the “Prospect Info” tab.
This means, that you can have a “Member” that is “Active” in Church and “InActive” as
a “Prospect”. But you can also have a “Member” that is “InActive” in Church, but
“Active” as a “Prospect”. And you could also have a “Prospect” that is “Active” in
Church and “Active” as “Prospect”. And you could…well, I think you get the point.
Outreach Phase
CIS was developed primarily to handle outreach, but was expanded to include many other
functions. CIS allows any “name”, whether it be a member or prospect in the system, to
be in the outreach program. Anyone in the system that has a status of “Active” on the
“Prospect Info” tab of “Member/Prospect Entry/Edit” is considered to be in the outreach
program.
CIS can do a lot of the work for your outreach program for you. The outreach phases
must be setup in the “Outreach Phase Entry” screen. In this screen, you get each phase a
name (i.e. Phase 1, Phase 2, etc), a phase action (i.e. GROW Visit, Sunday School Letter,
Pastor Visit, etc) and a number of weeks until the next phase begins.
So, each prospect can have a “Next Action” and “Next Action Date” assigned to them.
Once that action happens, they will be automatically moved to the next outreach phase.
The system does allow you to change this manually or take them out of the outreach
phase completely.
By having each prospect assigned a “Next Action” and “Next Action Date”, it is very
easy to query a list of prospects to visit, call, write, etc for a certain night, week, month
etc thru the Prospect Navigator.
Family Connection
CIS handles family connections in a clean and easy way, once you understand it. CIS
assumes that each name entered in the system is either head of household or their head of
household is in the system. Now, I know you are probably saying, but I have some youth
Page 1
Church Information System (CIS) – User’s Manual
or children that are going be in the system as a prospect and they are not head of
household, we assume that their parent or guardian should also be prospect, and therefore
be in the CIS as well.
The system allows you to map the Head of Household to each member of that family. For
example, I am in the system as Head of Household, and Kim, my wife, is linked as my
wife, and my son and daughter is linked as son and daughter. When this is setup
correctly, I can select my name from the list on Member/Prospect Entry and it will show
my family members. When I select one of them in Member/Prospect Entry it will show
me as Head of Household. This makes it easy to traverse thru a family in CIS.
User Setup
The “Login Screen” is the first thing you will see when you run Church Information
System (CIS). Each user of the software must have a Username and Password. The
administrator account is Username: Admin and Password: Admin. It is recommended that
you change the Administrator password.
CIS requires that each user be assigned privileges. Privileges are used to specify what a
user can do in the software, such as, add members or view reports. See Figure 2 for a list
and explanation of each Privilege. The administrator account has permission to do
anything in the software.
Page 2
Church Information System (CIS) – User’s Manual
Permission Name
Attendance Entry/Edit
Care Group Entry/Edit
Church Info
Church Responsibility Entry/Edit
Defined Values
Discipleship Training Class
Entry/Edit
Mailing Labels Report
Member Navigator Report
Description
Allows the User to add and edit attendance data
Allows the User to add and edit Care Groups
Allows the User to change the Church Name, Address, Phone,
etc.
Allows the User to add and edit Church Responsibilities
Allows the User to edit “Defined Values” for the system
Allows the User to add and edit Discipleship Training Classes
Allows the User to view and print Mailing Labels
Allows the User to view and print reports from the Member
Navigator
Member Entry/Edit
Allows the User to add and edit Members, Child of Members,
and Prospects
Member Information Update
Allows the User to view and print a Member Information
Report
Update Report
Member View
Allows the User to only view and not add or edit Members,
Child of Members, and Prospects
Outreach Phase Entry/Edit
Allows the User to add and edit the Outreach Phases and the
order and span of each
Prospect Contact Entry/Edit
Allows the User to add and edit Prospect Contacts that are
made
Prospect Navigator Report
Allows the User to view and print reports from the Prospect
Navigator
Prospect Visitation Sheet Report
Allows the User to view and print the Prospect Visitation
Sheet
Sunday School Class Entry/Edit
Allows the User to add and edit Sunday School Classes
Sunday School Prospect Listing
Allows the User to view and print the Sunday School Prospect
Listing Report
Sunday School Roll Report
Allows the User to view and print the Sunday School Roll
Report
User Permissions
Allows the User to setup permissions for all users.
Wednesday Night Class Entry/Edit Allows the User to add and edit Wednesday Night Classes
Page 3
Church Information System (CIS) – User’s Manual
Let’s Get Started!
Now that you have a basic understanding of how the software is laid out, let’s get started
entering some data. The following is a list of steps I recommend following to begin using
the system. Many of these steps will tell you to do something, but not explain how to do
it in detail. That is explained later in this manual:
1. I know most people will ignore this step, but it will save you much, much
headache down the road if you will READ THIS ENTIRE DOCUMENT
BEFORE EVER LOGGING INTO THE SOFTWARE. For those of you who are
computer savvy, I know you are going to ignore this step, you probably didn’t
even make it this for, but at least I can say “I told you so!”
2. Log in as the Administrator account and add each person to the system that will
being doing initial data entry. See Member/Prospect Entry/Edit.
3. Create a User Name and Password for each and give them the appropriate
privileges. See User Entry.
4. Enter all the Sunday School Classes. See Sunday School Class Entry.
5. Enter all the Discipleship Training Classes. See Discipleship Training Class
Entry.
6. Enter all the Wednesday Night Classes. See Wednesday Night Class Entry.
7. Enter all the Care Groups. See Care Group Entry.
8. Enter all the Church Responsibilities. See Church Responsibility Entry.
9. Enter or edit the Defined Values. See Defined Values.
10. Setup the Outreach phases. See Outreach Phase Entry.
11. Enter all the Deacons and assign them the responsibility of “Deacon.” This will
allow you to select a Deacon for members that you will be entering in the next
step. See Member/Prospect Entry Edit.
12. Enter all members and children of the church. As you enter them, I recommend
keying all information possible into CIS (i.e. Sunday School Class, Discipleship
Training Class, Wednesday Night Class, Deacon, Care Group, Family Relations,
etc.) See Member/Prospect Entry Edit.
13. Print out the “Member Info Update Report” for all Members and children and
distribute those to be check and updated by each person. Once you get them back,
update them in CIS. See Member Info Update Report.
14. Enter all prospects into the system. See Member/Prospect Entry Edit.
15. Now you are ready to go.
Page 4
Church Information System (CIS) – User’s Manual
Main Menu
Menu Bar
There are seven Categories on the Menu Bar:
•
File – Allows you to change Church contact information, logoff, and
exit the software.
•
Names – Allows you to enter and edit members, prospects, and child of
members. Also allows you to access the Member Navigator.
•
Prospect – Access Prospect Navigator and Prospect Contact Entry/Edit.
•
Attendance – Access the Attendance Navigator.
•
Administrative – Add/Edit Sunday School Classes, Discipleship
Training Classes, Wednesday Night Classes, Care Groups, Outreach
Phases, Church Responsibilities, Defined Values and Security.
•
Reports – View reports for members, prospects, etc.
•
Help – View current version of the software
Page 5
Church Information System (CIS) – User’s Manual
Church Setup
Item: File Æ Setup
Name
Church Name
Address1
1st Line of Address
Address2
2nd Line of Address
City
Church City
State
Church State
Zip
Church Zip Code
Phone
Church Phone
Fax
Church Fax Number
Email
Church Email Address
Website
Church Website
Keypress Delay
The number of seconds to wait before resetting a text string that is entered into a drop
down list.
Page 6
Church Information System (CIS) – User’s Manual
Save & Close Button
Click the Save & Close button to save the church information and close the screen.
Exit Button
Click the Exit button to close the screen without saving.
Page 7
Church Information System (CIS) – User’s Manual
Member/Prospect Entry/Edit
Item: Names Æ Member/Prospect Entry/Edit
The “Member/Prospect Entry/Edit” screen is where you will enter all names into the
system. This includes Members, Child of Member, Prospects, etc. All fields in blue are
required before you can save.
Name Drop Down Box
This Drop Down box allows you to select a name that is in the system.
Contact Info Tab
This tab is where you will select the Status of the member (i.e. Member, Prospect, etc.).
This screen will also allow you to enter the name, address, phone number(s), picture, etc.
This screen also allows you to view all family members assigned to a Head of Household,
or if the selected name is not the Head of Household, it will display the Name that is
assigned as the Head of Household.
To add a family member to the selected name, select the family member and relation ship
to be added and click the Add Button.
To remove a family member, select the member to be removed from the grid and click
Remove. This will not remove the name from the system, but only the relationship.
** Note **
Page 8
Church Information System (CIS) – User’s Manual
Only Non-Head of Households will show up in the drop down box to be added as family
members.
Demographic Info Tab
This tab is where you will enter items such as Place of Work, Occupation, Date of Birth,
Head of Household, etc.
Notes Tab
This tab will give you plenty of space to record notes for that particular person. This tab
also shows you added the name to the system and when and the last edit to that name.
Church Info Tab
This tab will hold all the church related info for that name. This tab is used primarily for
Members and Child of Members. You must select a Church Status (Active or InActive).
There are many dates you can record here, as well as, Class Assignments. This tab also
allows you to define Church Responsibilities for that person (i.e. Deacon, Sunday School
Class Teacher, etc.)
To add a responsibility to the selected name, select the responsibility and begin and end
dates and click the Add Button.
To remove a responsibility from the selected name, select the responsibility from the grid
and click the Remove Button.
Prospect Info Tab
This tab will hold all the prospect related info for that name. This tab is used primarily for
Prospects and InActive Church Members. You must select a Prospect Status (Active,
InActive, or Guest). This tab allows you to specify the source, Sunday School Class
assigned, and notes. This tab also shows previous contacts that have been recorded for
that name and shows you the current Outreach Phase, Next Outreach Action, and Date.
You can double click a contact on the grid to open up in the Prospect Contact Entry/Edit
screen.
Attendance Info Tab
This tab will show attendance, daily Bible reading, and studied lesson history for the
selected name. Each day highlighted in yellow represents an attendance, daily Bible
reading, or studied lesson for the selected name.
Use the “<<” and “>>” Buttons to move month to month.
New Button
Click this button to add a new name to the system.
Save and New Button
Click this button to save the current information and add a new name to the system.
Save and Close Button
Click this button to save the current information and close the Member/Prospect
Entry/Edit Screen.
Page 9
Church Information System (CIS) – User’s Manual
Exit Button
Click this button to close the Member/Prospect Entry/Edit Screen without saving any
changes.
Page 10
Church Information System (CIS) – User’s Manual
Member Navigator
Item: Names Æ Member Navigator
The Member Navigator gives you the ability to search for names based on status, date of
birth, Sunday School class, etc.
You can double click a name in the grid to open them in the Member/Prospect Entry/Edit
screen.
Search Criteria Section
Filter the names displayed by selecting one or more fields and clicking the Find Button.
Find Button
Searches for all Names matching the specified Search Criteria
Clear Button
Clears the Search Criteria fields.
Exit Button
Closes the Member Navigator screen
Print Mail Lbl Button
This will print a mailing label for each name displayed in the Member/Prospect Section.
The labels will print in the format of Avery 5160 labels 30 per page.
Print List Button
Prints a listing with detail for each name listed in the Member/Prospect Section.
Member/Prospect Section
Page 11
Church Information System (CIS) – User’s Manual
This section displays all names matching the Search Criteria. You can double click a
name in the grid to open them in the Member/Prospect Entry/Edit screen. The title block
for the section also displays a count for the number of names matching the Search
Criteria.
Page 12
Church Information System (CIS) – User’s Manual
Prospect Navigator
Item: Prospects Æ Prospect Navigator
The Prospect Navigator gives you the ability to search for names based on status, next
and previous actions, date of birth, Sunday School class, etc.
You can double click a name in the grid to open them in the Member/Prospect Entry/Edit
screen.
Search Criteria Section
Filter the names displayed by selecting one or more fields and clicking the Find Button.
Print List Button
Prints a listing with detail for each name listed in the Prospect Section.
Print Mail Lbl Button
This will print a mailing label for each name displayed in the Prospect Section. The labels
will print in the format of Avery 5160 labels 30 per page.
Print PCS Button
Prints a “Prospect Contact Sheet” for each name listed in the Prospect Section.
Find Button
Searches for all Names matching the specified Search Criteria
Clear Button
Clears the Search Criteria fields.
Page 13
Church Information System (CIS) – User’s Manual
Exit Button
Closes the Prospect Navigator screen
Prospect Section
This section displays all names matching the Search Criteria. You can double click a
name in the grid to open them in the Member/Prospect Entry/Edit screen. The title block
for the section also displays a count for the number of names matching the Search
Criteria.
Contacts Section
This section displays a listing of all previous contacts made to the name selected in the
Prospect Section Grid. You can double click a contact to open it in the “Prospect Contact
Entry/Edit” screen.
Page 14
Church Information System (CIS) – User’s Manual
Prospect Contact Entry/Edit
Item: Prospects Æ Prospect Contact Entry/Edit
This screen allows you to record each contact made for a Prospect.
ID
Internal identifier for the contact.
Date
Enter the date of the contact.
Action
Enter the type of contact (Visit, Phone Call, Letter, etc)
Type
Addition field for recording type of visit or letter.
Visitor 1
Enter the name of the first visitor, caller, letter writer, etc.
Page 15
Church Information System (CIS) – User’s Manual
Visitor 2
Enter the name of the second visitor, caller, letter writer, etc.
Rating
Select a rating (Good, Poor, Not Reached, etc)
Notes
Enter any notes taken from the visit, call, letter, etc.
Next Phase
Select the next phase for the prospect.
Next Contact Date
Enter the next scheduled contact date for the prospect.
Next Contact Action
Enter the next scheduled contact action for the prospect.
Save and New
Click to save the current contact and add a new.
Exit Button
Click the Exit button to close the screen without saving.
Page 16
Church Information System (CIS) – User’s Manual
Attendance Entry/Edit
Item: Attendance Æ Attendance Entry/Edit
The Attendance Entry/Edit screen allows you to record attendance, studied lesson, and
daily Bible reading. Start by selecting a “Week Of” and other criteria and clicking the
Find button. Then click the check box under each item that needs to be selected. Finish
by click the Save button.
Search Criteria Section
Filter the names displayed by selecting one or more fields and clicking the Find Button.
Find Button
Searches for all Names matching the specified Search Criteria
Clear Button
Clears the Search Criteria fields.
Save Button
Click the Save button to record the attendance, studied lesson, and daily Bible reading.
Exit Button
Closes the Attendance Entry/Edit screen
Names Section
Displays each name matching the Search Criteria.
Page 17
Church Information System (CIS) – User’s Manual
Attendance Navigator
Item: Attendance Æ Attendance Navigator
The Attendance Navigator gives you the ability to search for names based on attendance,
studied lesson, and daily Bible reading.
You can double click a name in the grid to open them in the Member/Prospect Entry/Edit
screen.
Search Criteria Section
Filter the names displayed by selecting one or more fields and clicking the Find Button.
Print List Button
Prints a listing with detail for each name listed in the Names Section.
Find Button
Searches for all Names matching the specified Search Criteria
Clear Button
Clears the Search Criteria fields.
Exit Button
Closes the Attendance Navigator screen
Names Section
This section displays all names matching the Search Criteria. You can double click a
name in the grid to open them in the Member/Prospect Entry/Edit screen. The title block
Page 18
Church Information System (CIS) – User’s Manual
for the section also displays a count for the number of names matching the Search
Criteria.
Page 19
Church Information System (CIS) – User’s Manual
Sunday School Class Entry/Edit
Item: Administrative Æ Class Entry Æ Sunday School Class Entry
Select
Allows you to select from the list of classes that exist.
Name
Enter the name for the class.
Desc.
Enter a description for the class.
Teacher
Select a teacher for the class.
Asst. Teacher
Select an assistant teacher for the class.
Location
Enter a location for the class.
Notes.
Enter any notes for the class.
Save And Close Button
Click the Save and Close button to save all class information
Exit Button
Click the Exit button to close the screen without saving.
Page 20
Church Information System (CIS) – User’s Manual
Discipleship Training Class Entry/Edit
Item: Administrative Æ Class Entry Æ Discipleship Training Class Entry
Select
Allows you to select from the list of classes that exist.
Name
Enter the name for the class.
Desc.
Enter a description for the class.
Teacher
Select a teacher for the class.
Asst. Teacher
Select an assistant teacher for the class.
Location
Enter a location for the class.
Notes.
Enter any notes for the class.
Save And Close Button
Click the Save and Close button to save all class information
Exit Button
Click the Exit button to close the screen without saving.
Page 21
Church Information System (CIS) – User’s Manual
Wednesday Night Class Entry/Edit
Item: Administrative Æ Class Entry Æ Wednesday Night Class Entry
Select
Allows you to select from the list of classes that exist.
Name
Enter the name for the class.
Desc.
Enter a description for the class.
Teacher
Select a teacher for the class.
Asst. Teacher
Select an assistant teacher for the class.
Location
Enter a location for the class.
Notes.
Enter any notes for the class.
Save And Close Button
Click the Save and Close button to save all class information
Exit Button
Click the Exit button to close the screen without saving.
Page 22
Church Information System (CIS) – User’s Manual
Care Group Entry/Edit
Item: Administrative Æ Care Group Entry
Select
Allows you to select from the list of groups that exist.
Leader
Select the Leader of the Care Group.
Asst. Leader
Select the Assistant Leader of the Care Group.
SS Class
Select the Sunday School Class that the Care Group represents
Notes.
Enter any notes for the group.
Save And Close Button
Click the Save and Close button to save all group information
Exit Button
Click the Exit button to close the screen without saving.
Page 23
Church Information System (CIS) – User’s Manual
Church Responsibility Entry/Edit
Item: Administrative Æ Church Responsibility Entry
Name
Enter the name of the Church responsibility
Description
Enter a description of the Church responsibility
Save And Close Button
Click the Save and Close button to save all information
Exit Button
Click the Exit button to close the screen without saving.
Page 24
Church Information System (CIS) – User’s Manual
Outreach Phase Entry
Item: Administrative Æ Outreach Phase Entry
This screen allows you to define the steps of the outreach phase. You can have any
number of phases and each can extend for any amount of weeks.
This information will come into play when entering contacts for a prospect. It will
automatically schedule a contact for the next phase on the list in the defined time line.
Order
Order in which the phases will happen.
Name
Name of the phase
Action
Action for the phase
Weeks
Number of weeks before the next action is scheduled.
/\ Button
Moves the selected phase up in the list.
\/ Button
Moves the selected phase down in the list.
Page 25
Church Information System (CIS) – User’s Manual
Add Phase Button
Adds another phase to the list of actions.
Delete Phase Button
Deletes the selected phase from the list.
Save and Close Button
Click the Save and Close button to save all outreach phase information.
Exit Button
Click the Exit button to close the screen without saving any changes.
Page 26
Church Information System (CIS) – User’s Manual
Defined Values Entry/Edit
Item: Administrative Æ Defined Values
Attendance Levels
Church attendance levels.
Relationships
Family relationships
Titles
Titles for names in the system
Prospect Action
Outreach actions.
Prospect Contact Rating
Contact ratings.
Cut-Style
Select the Cut-Style for the Component
User Permissions
Permissions allowed in the system. These should not be changed.
Page 27
Church Information System (CIS) – User’s Manual
User Entry/Edit
Item: Administrative Æ Security Æ User Entry
This screen allows you to define permissions for each user. To give someone permission
to use the system, you must select them from the Name List, select a type (Admin or
User), assign a username, and password.
An Admin has the ability to perform all functions in the software. A User has the ability
to perform only the assigned privileges.
To add permissions to a user, select the name from the drop down and highlight the
desired permission and click the “Add >” button. To remove, select the user permission
and click the “< Rem” button.
Save and Close Button
Click the Save and Close button to save the user information and close the screen.
Exit Button
Click the Exit button to close the screen without saving.
Page 28
Church Information System (CIS) – User’s Manual
About Screen
Item: Help Æ About
OK Button
Closes the About Screen
System Info Button
Displays information pertaining to your current system
Page 29
Church Information System (CIS) – User’s Manual
Member Information Update Report
Item: Reports Æ Member Reports Æ Member Info Update Report
Options
Select the name for the report to be printed. You can also select “All Members and Child
of Members” or “Add Head of Household”.
Description
Shows all recorded information for that person with the ability for them to write in
updated information to be keyed back in the system.
Sunday School Roll Report
Item: Reports Æ Member Reports Æ Sunday School Roll
Options
Select the Date for the Roll.
Description
Displays a report for each Sunday School class for the teacher to mark each member
present, daily Bible reading, and studied lesson. This report can be turned back in to be
recorded in the system.
Prospect Contact Sheet
Item: Reports Æ Prospects Reports Æ Prospect Contact Sheet
Page 30
Church Information System (CIS) – User’s Manual
Options
Select the prospect for the report.
Description
Displays contact information, notes, previous contacts, etc. for the prospect. This report
will be used to record any notes for a scheduled contact.
Sunday School Prospect Listing Report
Item: Reports Æ Prospects Reports Æ Sunday School Prospect Listing
Options
Select the Sunday School classes and the dates and actions for which you want a Prospect
Contact Sheet to be printed.
Description
This report lists all prospects by Sunday School class. This allows the Sunday School
classes to be familiar with their prospects. It will also print a Prospect Contact Sheet for
each person scheduled for a contact in the criteria you specify.
Sunday School Class Listing Report
Item: Reports Æ Administrative Æ Sunday School Class Listing
Description
Lists all Sunday School classes and their information.
Discipleship Training Class Listing Report
Item: Reports Æ Administrative Æ Discipleship Training Class Listing
Page 31
Church Information System (CIS) – User’s Manual
Description
Lists all Discipleship Training classes and their information.
Wednesday Night Class Listing Report
Item: Reports Æ Administrative Æ Wednesday Night Class Listing
Description
Lists all Wednesday Night classes and their information.
Care Group Listing Report
Item: Reports Æ Administrative Æ Care Group Listing
Description
Lists all Care Groups and their information.
Church Responsibility Listing Report
Item: Reports Æ Administrative Æ Church Responsibility Listing
Description
Lists all Church Responsibilities and the names that are assigned to them.
Page 32