1
Building Highly Efficient Red Hat
Enterprise Virtualization 3.0 Cloud
Infrastructure with Mellanox
Interconnect
Reference Design
Rev 1.0
November 2012
www.mellanox.com
Mellanox Technologies
NOTE:
THIS HARDWARE, SOFTWARE OR TEST SUITE PRODUCT (“PRODUCT(S)”) AND ITS RELATED
DOCUMENTATION ARE PROVIDED BY MELLANOX TECHNOLOGIES “AS-IS” WITH ALL FAULTS OF ANY
KIND AND SOLELY FOR THE PURPOSE OF AIDING THE CUSTOMER IN TESTING APPLICATIONS THAT USE
THE PRODUCTS IN DESIGNATED SOLUTIONS. THE CUSTOMER'S MANUFACTURING TEST ENVIRONMENT
HAS NOT MET THE STANDARDS SET BY MELLANOX TECHNOLOGIES TO FULLY QUALIFY THE
PRODUCTO(S) AND/OR THE SYSTEM USING IT. THEREFORE, MELLANOX TECHNOLOGIES CANNOT AND
DOES NOT GUARANTEE OR WARRANT THAT THE PRODUCTS WILL OPERATE WITH THE HIGHEST
QUALITY. ANY EXPRESS OR IMPLIED WARRANTIES, INCLUDING, BUT NOT LIMITED TO, THE IMPLIED
WARRANTIES OF MERCHANTABILITY, FITNESS FOR A PARTICULAR PURPOSE AND NONINFRINGEMENT
ARE DISCLAIMED. IN NO EVENT SHALL MELLANOX BE LIABLE TO CUSTOMER OR ANY THIRD PARTIES
FOR ANY DIRECT, INDIRECT, SPECIAL, EXEMPLARY, OR CONSEQUENTIAL DAMAGES OF ANY KIND
(INCLUDING, BUT NOT LIMITED TO, PAYMENT FOR PROCUREMENT OF SUBSTITUTE GOODS OR SERVICES;
LOSS OF USE, DATA, OR PROFITS; OR BUSINESS INTERRUPTION) HOWEVER CAUSED AND ON ANY
THEORY OF LIABILITY, WHETHER IN CONTRACT, STRICT LIABILITY, OR TORT (INCLUDING NEGLIGENCE
OR OTHERWISE) ARISING IN ANY WAY FROM THE USE OF THE PRODUCT(S) AND RELATED
DOCUMENTATION EVEN IF ADVISED OF THE POSSIBILITY OF SUCH DAMAGE.
Mellanox Technologies
350 Oakmead Parkway Suite 100
Sunnyvale, CA 94085
U.S.A.
www.mellanox.com
Tel: (408) 970-3400
Fax: (408) 970-3403
Mellanox Technologies, Ltd.
Beit Mellanox
PO Box 586 Yokneam 20692
Israel
www.mellanox.com
Tel: +972 (0)74 723 7200
Fax: +972 (0)4 959 3245
© Copyright 2012. Mellanox Technologies. All Rights Reserved.
Mellanox®, Mellanox logo, BridgeX®, ConnectX®, CORE-Direct®, InfiniBridge®, InfiniHost®, InfiniScale®, PhyX®,
SwitchX®, Virtual Protocol Interconnect® and Voltaire® are registered trademarks of Mellanox Technologies, Ltd.
Connect-IB™, FabricIT™, MLNX-OS™, ScalableHPC™, Unbreakable-Link™, UFM™ and Unified Fabric Manager™ are
trademarks of Mellanox Technologies, Ltd. All other trademarks are property of their respective owners.
Some of the text and illustrations in this document have been incorporated and/or modified from
https://access.redhat.com/knowledge/docs/en-US/Red_Hat_Enterprise_Virtualization/3.0/pdf/Installation_Guide/Red_Hat_
Enterprise_Virtualization-3.0-Installation_Guide-en-US.pdf. which is licensed by Red Hat under a Creative Commons
Attribution–Share Alike 3.0 Unported license ("CC-BY-SA"). An explanation of CC-BY-SA is available at
http://creativecommons.org/licenses/by-sa/3.0/.
2
Document Number: 4008
Mellanox Technologies
Contents
Rev 1.0
Contents
1
Introduction ..................................................................................................................................... 7
2
Getting Started ................................................................................................................................ 8
3
4
5
2.1
Basic Test Bed Configuration ................................................................................................. 8
2.2
Required Hardware ................................................................................................................ 8
2.3
Required Software Packages ................................................................................................. 9
Software Installation and Basic Configuration .......................................................................... 10
3.1
RHEV-M Installation (Host2-1) ............................................................................................. 10
3.2
RHEV Host Installation (Host3) ............................................................................................ 14
3.3
Mellanox OFED Driver Installation (All Hosts) ...................................................................... 17
3.4
Mellanox VSA Installation (Host4) ........................................................................................ 18
3.5
Mellanox UFM Installation (Host1) ....................................................................................... 19
3.6
Mellanox Network Manager Plugin ....................................................................................... 20
3.6.1
Installing Mellanox Network Manager Server ......................................................... 20
3.6.2
Installing Mellanox Network Client .......................................................................... 20
RHEV Manager Configuration ...................................................................................................... 21
4.1
Add Data-Center ................................................................................................................... 21
4.2
Add Cluster ........................................................................................................................... 21
4.3
Add Host ............................................................................................................................... 22
4.4
Add Storage .......................................................................................................................... 24
4.5
Adding Virtual Machines to a Cluster ................................................................................... 26
4.6
Add a Network to the Cluster ................................................................................................ 31
4.7
Add an Interface to VM ......................................................................................................... 33
Using UFM to Automate Network Mangement ........................................................................... 36
5.1
Basic UFM Configuration Flow ............................................................................................. 37
6
Mellanox Network Manager Plugin.............................................................................................. 40
7
Troubleshooting ............................................................................................................................ 41
8
7.1
Host is Not Added to Logical Server in UFM ........................................................................ 41
7.2
Migration of VM Fails ............................................................................................................ 41
7.3
Connection Verification of Virtual Machines Using eIPoIB ................................................... 41
7.4
Low Latency Performance Tuning ........................................................................................ 41
Related Documentation ................................................................................................................ 42
3
Mellanox Technologies
Rev 1.0
Contents
List of Figures
Figure 1: Basic Test Bed Scenario - Example......................................................................................... 8
Figure 2: Red Hat Enterprise Linux Installation ..................................................................................... 10
Figure 3: Red Hat Enterprise Linux Installation ..................................................................................... 10
Figure 4: Red Hat Network – Register .................................................................................................. 11
Figure 5: RHEV-M Portal ....................................................................................................................... 14
Figure 6: Red Hat Enterprise Linux Installation ..................................................................................... 14
Figure 7: Red Hat Enterprise Linux Installation (4) ............................................................................... 15
Figure 8: Red Hat Network – Register .................................................................................................. 15
Figure 9: Using ConnectX-3 Adapter Results in Faster I/O Traffic Delivery rather than using Multiple
10GbE Ports from Competitors ............................................................................................................. 19
Figure 10: New Data Center .................................................................................................................. 21
Figure 11: New Cluster .......................................................................................................................... 21
Figure 12: Data Center .......................................................................................................................... 22
Figure 13: Adding a Host ....................................................................................................................... 22
Figure 14: Installation in Progress ......................................................................................................... 23
Figure 15: Installation Complete ............................................................................................................ 23
Figure 16: Host is UP ............................................................................................................................ 24
Figure 17: Discovering Targets ............................................................................................................. 24
Figure 18: Login to Target ..................................................................................................................... 25
Figure 19: Choosing an LUN ................................................................................................................. 25
Figure 20: After Adding a Storage Domain ........................................................................................... 26
Figure 21: Successfully Adding a Storage Domain ............................................................................... 26
Figure 22: Adding New Virtual Machine - General ................................................................................ 26
Figure 23: Adding a New Virtual Machine - Console ............................................................................ 27
Figure 24: Adding a New Virtual Machine - Host .................................................................................. 27
Figure 25: Adding a New Virtual Machine – Boot Options .................................................................... 28
Figure 26: Adding a New Virtual Machine – Configuration ................................................................... 28
Figure 27: Adding a New Virtual Machine – Adding a New Network Interface ..................................... 29
Figure 28: Adding a New Virtual Machine – Adding a New Virtual Disk ............................................... 29
Figure 29: Adding a New Virtual Machine – Finishing Configuratiin secon .......................................... 30
Figure 30: Adding a New Virtual Machine – VMs Screen ..................................................................... 30
Figure 31: Adding a New Virtual Machine – VNC Screen ..................................................................... 30
Figure 32: Logical Networks .................................................................................................................. 31
Figure 33: Adding a New Logical Network ............................................................................................ 31
Figure 34: Displaying the New Logical Network .................................................................................... 32
Figure 35: Adding a Network Interface to the Logical Network ............................................................. 32
Figure 36: Displaying the Network Interface of the Logical Network ..................................................... 33
Figure 37: Virtual Machine – Network Interfaces View ......................................................................... 33
Figure 38: Adding a New Network Interface.......................................................................................... 34
Figure 39: Displaying the New Network Interface ................................................................................. 34
Figure 40: Verifying the New HCA is Up ............................................................................................... 35
Figure 41: UFM Environment ................................................................................................................ 37
4
Mellanox Technologies
Contents
Rev 1.0
Figure 42: New Logical Server .............................................................................................................. 37
Figure 43: Add Hosts ............................................................................................................................. 38
Figure 44: Add Hosts ............................................................................................................................. 38
Figure 45: Connect the Logical Sever to the Network. .......................................................................... 39
Figure 46: UFM Network Connected to the UFM Logical Server .......................................................... 39
5
Mellanox Technologies
Rev 1.0
Contents
List of Tables
Table 1: Required Hardware ................................................................................................................... 8
Table 2: List of Related Documents ...................................................................................................... 42
6
Mellanox Technologies
Building Highly Efficient Red Hat Enterprise Virtualization 3.0 Cloud Infrastructure with Mellanox Interconnect
Reference Design
1
Rev 1.0
Introduction
This reference design describes how to integrate and use Red Hat Enterprise Virtualization
Manager (RHEV-M) to control a cloud based on:
Servers with Red Hat OS and KVM
Mellanox products for network connectivity and storage
Through significant customer engagements, building data centers, and working closely with
IaaS architects and administrators, Mellanox in collaboration with Red Hat formed a new
architecture which enables an integrated computing, network and storage technology cloud
solution. Through intelligent discovery, awareness and automation, the new joint solution
provides the highest levels of virtualization and application performance.
The new collaboration is designed to deliver a high-performance and efficient cloud
infrastructure. Performance, application service levels, security, and usability no longer need
to be compromised, and importantly, users will benefit from the most cost effective cloud
infrastructure.
The purpose of this document is to describe virtualization networking management with
RHEV-M as cloud orchestrator and Mellanox InfiniBand HCAs and switches as a fabric
interconnect.
This reference architecture demonstrates how to build a fully integrated InfiniBand FDR
interconnect cloud infrastructure with RHEV-M.
This reference architecture covers the installation and setup of the infrastructure, including:
Installation and configuration of the RHEV and Mellanox components: Adapters, switches,
storage accelerator and fabric manger
Datacenter configuration - various configuration flows needed to operate the network
Monitoring and troubleshooting
7
Mellanox Technologies
Rev 1.0
Getting Started
2
Getting Started
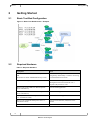
2.1
Basic Test Bed Configuration
Figure 1: Basic Test Bed Scenario - Example
2.2
Required Hardware
Table 1: Required Hardware
Equipment
Notes
Mellanox SX6036 InfiniBand/Gateway switch
Used for data/storage networks.
OR
Grid Director 4036E InfiniBand/Gateway switch
The gateway functionality is used for connecting
to external Ethernet networks.
Ethernet Switch (Optional)
1GE - Used for Management network.
Management network can be done over a
(separate) IB partition as well.
Server (refer to the UFM User Manual specific
server information)
Used for UFM application
Server (refer to the VSA User Manual specific
server information)
Used for VSA application
Server (refer to Red Hat Enterprise Virtualization
3.0 - Installation Guide)
Used for RHEV-M application
Server (refer to Red Hat Enterprise Linux 6.2 Installation Guide)
Used as virtual machine (VM) hosts in the
clusters
8
Mellanox Technologies
Building Highly Efficient Red Hat Enterprise Virtualization 3.0 Cloud Infrastructure with Mellanox Interconnect
Reference Design
2.3
Rev 1.0
Required Software Packages
1
1
1
1
Mellanox OFED Driver
Please contact [email protected] to obtain this package.
Unified Fabric Manager (UFM)
Mellanox Storage Accelerator (VSA) – version 2.1.1-1
Mellanox Network Manager (MNM) – version 1.0
Please contact [email protected] to obtain this package.
Red Hat Enterprise Linux (RHEL) 6.2 (or higher)
Red Hat Enterprise Virtualization 3.0 (RHEV, RHEV-M) or higher
1
Mellanox Technologies packages are supported by Mellanox and not included in the Red Hat distributions.
9
Mellanox Technologies
Rev 1.0
3
Software Installation and Basic Configuration
Software Installation and Basic Configuration
Integrated cloud solution contains several software applications and HW components. The
following chapter supplies basic software installations procedures for the cloud.
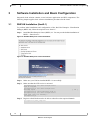
3.1
RHEV-M Installation (Host2-1)
To perform initial installation and configuration of the Red Hat Enterprise Virtualization
Manager (RHEV-M), follow the steps below on “host2-1”:
Step 1: Install Red Hat Enterprise Linux (RHEL) 6.2. You may use the default installation of
RHEL – “Basic Server”.
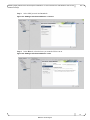
Figure 2: Red Hat Enterprise Linux Installation
Figure 3: Red Hat Enterprise Linux Installation
Step 2: Make sure your VM has installed RHEL 6.2 successfully.
Step 3: Make sure that the NTP service is activated.
[root@host2-1]# /etc/init.d/ntpd status
ntpd is stopped
[root@host2-1]# /etc/init.d/ntpd start
Starting ntpd:
[root@host2-1]# /sbin/chkconfig ntpd on
[root@host2-1]# /etc/init.d/ntpd status
ntpd (pid 5197) is running...
[root@host2-1]#
[
OK
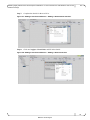
Step 4: Register to Red Hat Network to be able to subscribe to the required channels.
[root@host2-1]#rhn_register
…
10
Mellanox Technologies
]
Building Highly Efficient Red Hat Enterprise Virtualization 3.0 Cloud Infrastructure with Mellanox Interconnect
Reference Design
Rev 1.0
Figure 4: Red Hat Network – Register
Step 5: Subscribe to the required channels. Run:
[root@host2-1]#rhn-channel --add
--channel=rhel-x86_64-server-6-rhevm-3
Username: meldcs
Password:
[root@host2-1]#rhn-channel --add
-channel=jbappplatform-5-x86_64-server-6-rpm
Username: meldcs
Password:
[root@host2-1]#rhn-channel --add
--channel=rhel-x86_64-server-supplementary-6
Username: meldcs
Password:
[root@host2-1]#
Step 6: Confirm the list of channels to which the server is subscribed.
[root@host2-1]#rhn-channel –list
jbappplatform-5-x86_64-server-6-rpm
rhel-x86_64-server-6
rhel-x86_64-server-6-rhevm-3
[root@host2-1]#
Step 7: If installed, the classpathx-jaf package must be removed. It conflicts with some of
the components installed to support JBoss.
[root@host2-1]# yum remove classpathx-jaf
Loaded plugins: product-id, rhnplugin, security, subscription-manager
Updating certificate-based repositories.
Unable to read consumer identity
Setting up Remove Process
No Match for argument: classpathx-jaf
jbappplatform-5-x86_64-server-6-rpm
| 1.3 kB
00:00
jbappplatform-5-x86_64-server-6-rpm/primary
| 94 kB
00:00
jbappplatform-5-x86_64-server-6-rpm
401/401
rhel-x86_64-server-6-rhevm-3
| 1.6 kB
00:00
11
Mellanox Technologies
Rev 1.0
Software Installation and Basic Configuration
rhel-x86_64-server-6-rhevm-3/primary
| 23 kB
00:00
rhel-x86_64-server-6-rhevm-3
121/121
rhel-x86_64-server-supplementary-6
| 1.8 kB
00:00
rhel-x86_64-server-supplementary-6/primary
| 91 kB
00:00
rhel-x86_64-server-supplementary-6
249/249
Package(s) classpathx-jaf available, but not installed.
No Packages marked for removal
[root@host2-1]#
Step 8: Use yum to ensure that the most up to date versions of all installed packages are in
use.
[root@host2-1]#yum upgrade
…
Step 9: Use yum to initiate installation of the RHEV-M package and all dependencies.
[root@host2-1]#yum install rhevm
…
NOTE: You must run this command as the root user.
Step 10: Once package installation is complete the RHEV-MR must be configured. Use the
rhevm-setup script command:
[root@host2-1]#rhevm-setup
Welcome to RHEV Manager setup utility
HTTP Port [8080] :
HTTPS Port [8443] :
Host fully qualified domain name, note that this name should be fully
resolvable [host2-1.lab.mtl.com] :
Password for Administrator (admin@internal) :
Warning: Weak Password.
Confirm password :
Database password (required for secure authentication with the locally
created database) :
Warning: Weak Password.
Confirm password :
Organization Name for the Certificate: Mellanox
The default storage type you will be using ['NFS'| 'FC'| 'ISCSI']
[NFS] : ISCSI
Should the installer configure NFS share on this server to be used as
an ISO Domain? ['yes'| 'no'] [yes] : no
Firewall ports need to be opened.
You can let the installer configure iptables automatically overriding
the current configuration. The old configuration will be backed up.
Alternately you can configure the firewall later using an example
iptables file found under /usr/share/rhevm/conf/iptables.example
Configure iptables ? ['yes'| 'no']: yes
RHEV Manager will be installed using the following configuration:
=================================================================
http-port:
8080
https-port:
8443
12
Mellanox Technologies
Building Highly Efficient Red Hat Enterprise Virtualization 3.0 Cloud Infrastructure with Mellanox Interconnect
Reference Design
host-fqdn:
auth-pass:
db-pass:
org-name:
default-dc-type:
override-iptables:
Proceed with the configuration
Rev 1.0
host2-1.lab.mtl.com
********
********
Mellanox
ISCSI
yes
listed above? (yes|no): yes
Installing:
Creating JBoss Profile...
Creating CA...
Setting Database Security...
Creating Database...
Updating the Default Data Center Storage Type...
Editing JBoss Configuration...
Editing RHEV Manager Configuration...
Configuring Firewall (iptables)...
Starting JBoss Service...
[
[
[
[
[
[
[
[
[
DONE
DONE
DONE
DONE
DONE
DONE
DONE
DONE
DONE
]
]
]
]
]
]
]
]
]
**** Installation completed successfully ******
(Please allow RHEV Manager a few moments to start up.....)
Additional information:
* SSL Certificate fingerprint:
2E:EB:D8:9C:61:DD:99:0E:85:9C:76:02:26:B5:57:B5:3E:D6:1F:3A
* SSH Public key fingerprint:
ac:7e:ec:f2:47:91:c3:90:18:98:ae:5d:e0:88:b4:e2
* The firewall has been updated, the old iptables configuration file was
saved to /usr/share/rhevm/conf/iptables.backup.104857-07312012_5209
* The installation log file is available at:
/var/log/rhevm/rhevm-setup_2012_07_31_10_47_13.log
* Please use the user "admin" and password specified in order to login
into RHEV Manager
* To configure additional users, first configure authentication domains
using the 'rhevm-manage-domains' utility
* To access RHEV Manager please go to the following URL:
http://host2-1:8080
[root@host2-1]#
To ensure that the installation does not fail, make sure that the locale settings are as
follows:
(host)#locale
LANG=en_US.UTF-8
LC_CTYPE="en_US.UTF-8"
LC_NUMERIC="en_US.UTF-8"
LC_TIME="en_US.UTF-8"
LC_COLLATE="en_US.UTF-8"
LC_MONETARY="en_US.UTF-8"
LC_MESSAGES="en_US.UTF-8"
LC_PAPER="en_US.UTF-8"
LC_NAME="en_US.UTF-8"
LC_ADDRESS="en_US.UTF-8"
LC_TELEPHONE="en_US.UTF-8"
LC_MEASUREMENT="en_US.UTF-8"
LC_IDENTIFICATION="en_US.UTF-8"
LC_ALL=
NOTE: You can access the administration portal by pointing your Internet Explorer to
http://your_server:8080 (assuming you followed the defaults).
Use the administrator username and password you supplied in the configuration step. You
13
Mellanox Technologies
Rev 1.0
Software Installation and Basic Configuration
will be instructed to install .NET Framework.
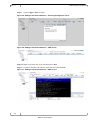
Step 11: You can access the administration portal by pointing your internet browser to
http://host2-1:8080 (assuming you followed the defaults).
Figure 5: RHEV-M Portal
For advance configuration of the RHEV-M refer to “Red Hat Enterprise Virtualization 3.0 Installation Guide”.
3.2
RHEV Host Installation (Host3)
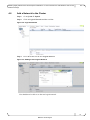
Follow these steps for RHEV installation:
Step 1: Install RHEL 6.2. You may use the default installation of RHEL – “Basic Server”.
Figure 6: Red Hat Enterprise Linux Installation
14
Mellanox Technologies
Building Highly Efficient Red Hat Enterprise Virtualization 3.0 Cloud Infrastructure with Mellanox Interconnect
Reference Design
Rev 1.0
Figure 7: Red Hat Enterprise Linux Installation (4)
Step 2: Make sure your VM has installed RHEL 6.2 successfully.
Step 3: Make sure that the NTP service is activated.
[root@host3]# /etc/init.d/ntpd status
ntpd is stopped
[root@host3]# /etc/init.d/ntpd start
Starting ntpd:
[root@host3]# /sbin/chkconfig ntpd on
[root@host3]# /etc/init.d/ntpd status
ntpd (pid 5197) is running...
[root@host3]#
[
OK
]
Step 4: Register to Red Hat Network to be able to subscribe to the required channels.
[root@host3]#rhn_register
…
Figure 8: Red Hat Network – Register
Step 5: Subscribe to the required channels. Run:
[root@host3]# rhn-channel --add --channel=rhel-x86_64-server
Username: meldcs
Password:
[root@host3]# rhn-channel --add
--channel=rhel-x86_64-rhev-mgmt-agent-6
15
Mellanox Technologies
Rev 1.0
Software Installation and Basic Configuration
Username: meldcs
Password:
[root@host3]#
Step 6: Confirm the list of channels to which the server is subscribed. Run:
[root@host3]#rhn-channel –list
rhel-x86_64-rhev-mgmt-agent-6
rhel-x86_64-server-6
[root@host3]#
Step 7: Add a manual host entry to the /etc/hosts file (on the Red Hat Enterprise Linux
host) for the RHEV-M server to enable vdsm and other services to connect properly
to the host.
10.0.0.1 server1.example.com rhev-manager.server1.example.com
For example:
172.30.40.147 host2-1.lab.mtl.com rhev-manager.host2-1.lab.mtl.com
Step 8: Open firewall ports.
The following commands will remove and existing firewall rules and add the ports
required by RHEV-M to the iptables rules that open the required ports for the agent
to function properly.
[root@host3]# iptables --flush
[root@host3]# iptables --append INPUT -m state --state
ESTABLISHED,RELATED -j ACCEPT
[root@host3]# iptables --append INPUT -p icmp -j ACCEPT
[root@host3]# iptables --append INPUT -i lo -j ACCEPT
[root@host3]# iptables --append INPUT -p tcp --dport 22 -j ACCEPT
[root@host3]# iptables --append INPUT -p tcp --dport 16514 -j ACCEPT
[root@host3]# iptables --append INPUT -p tcp --dport 54321 -j ACCEPT
[root@host3]# iptables --append INPUT -p tcp -m multiport --dports
5634:6166 -j ACCEPT
[root@host3]# iptables --append INPUT -p tcp -m multiport --dports
49152:49216 -j ACCEPT
[root@host3]# iptables --append INPUT -j REJECT --reject-with
icmp-host-prohibited
[root@host3]# iptables --append FORWARD -m physdev !
--physdev-is-bridged -j REJECT
--reject-with icmp-host-prohibited
[root@host3]# /etc/init.d/iptables save
[root@host3]# chkconfig iptables on
[root@host3]# service iptables restart
Step 9: The RHEV-M makes use of sudo to perform operations as root on the host. The
default configuration stored in /etc/sudoers contains values to allow this. To
configure sudo access. Add /etc/sudoers the following entry
root ALL=(ALL) ALL
Step 10: Enable SSH access for root user. Add /etc/ssh/sshd_config file has the entry.
PermitRootLogin yes
Step 11: Restart the SSH server, in case of a change in the /etc/ssh/sshd_config file.
[root@host3]# service sshd restart
For advanced configuration of the RHEV-M refer to “Red Hat Enterprise Virtualization 3.0 Installation Guide”.
16
Mellanox Technologies
Building Highly Efficient Red Hat Enterprise Virtualization 3.0 Cloud Infrastructure with Mellanox Interconnect
Reference Design
3.3
Rev 1.0
Mellanox OFED Driver Installation (All Hosts)
Any host in the fabric shall have Mellanox OFED installed.
Follow those steps for basic Mellanox OFED installation on all hosts.
Step 1: Make sure you download Mellanox OFED from www.mellanox.com and locate it in
your file system.
Step 2:
2
Install Mellanox OFED from the source.
# yum install libstdc++-devel flex bison gcc-c++ libstdc++-devel
zlib-devel libtool glibc-devel gcc kernel-devel rpm-build
iscsi-initiator-utils redhat-rpm-config tcl-devel
Step 3: Download the OFED iso. Run:
# mkdir /mnt/tmp
# mount –o loop MLNX_OFED_LINUX-1.5.3-3.0.0-rhel6.2-x86_64.iso
/mnt/tmp
# cd /mnt/tmp
# ./mlnxofedinstall
Step 4: Reboot the server (in case the firmware is updated).
Step 5: Verify Mellanox OFED installation. When running ibv_devinfo you should see
an output similar to this:
(host)# ibv_devinfo
hca_id: mlx4_0
transport:
fw_ver:
node_guid:
sys_image_guid:
vendor_id:
vendor_part_id:
hw_ver:
board_id:
phys_port_cnt:
port:
1
state:
max_mtu:
active_mtu:
sm_lid:
port_lid:
port_lmc:
link_layer:
port:
2
state:
max_mtu:
active_mtu:
sm_lid:
port_lid:
port_lmc:
link_layer:
InfiniBand (0)
2.9.1080
0002:c903:000d:1410
0002:c903:000d:1413
0x02c9
26428
0xB0
MT_0DD0110009
2
PORT_ACTIVE (4)
2048 (4)
2048 (4)
24
22
0x00
IB
PORT_ACTIVE (4)
2048 (4)
1024 (3)
0
0
0x00
Ethernet
Step 6: Set up your IP address for your “ib0” interface by editing the ifcfg-ib0 file and
running ifup as follows:
2
If your kernel version does not match with any of the offered pre-built RPMs, you can add your kernel version by using the
“mlnx_add_kernel_support.sh” script located under the docs/ directory. For further information, please refer to MlNX_OFED User Manual
Section Pre-installation Notes mlnx_add_kernel_support.sh tool.
17
Mellanox Technologies
Rev 1.0
Software Installation and Basic Configuration
# vi /etc/sysconfig/network-scripts/ifcfg-ib0
DEVICE=ib0
BOOTPROTO=none
ONBOOT="yes"
IPADDR=192.168.20.103
NETMASK=255.255.255.0
NM_CONTROLLED=yes
TYPE=Infiniband
# ifup ib0
Step 7: Add eIPoIB Interfaces. Make sure the host is connected to an InfiniBand network
and that you have the latest Mellanox OFED that supports eIPoIB.
Step 8: Locate the interface. Make sure that you have the following line in the file
/etc/infiniband/openib.conf:
E_IPOIB_LOAD=yes
If the E_IPOIB_LOAD = no , please change it and reload openibd process,
as follows:
#/etc/init.d/openibd restart
Step 9: Run the following command after OFED installation to see all the eIPoIB interfaces:
# cat /sys/class/net/eth_ipoib_interfaces
eth5 over IB port: ib0
Step 10: 3To find the right interface, run:
# ibdev2netdev
mlx4_0 port 2 ==> eth0 (Up)
mlx4_0 port 1 ==> eth5 (Down)
mlx4_0 port 1 ==> ib0 (Up)
Here we can see that our interface (eth5) is associated with the first port on the first
HCA.
Step 11: To further ensure that this interface is a PV-IPoIB interface, you may run:
#ethtool -i eth5
driver: eth_ipoib
version: 1.0.0
firmware-version: 1
For additional options and advance installation refer to Mellanox OFED User Manual.
3.4
Mellanox VSA Installation (Host4)
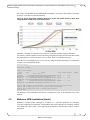
iSER- ConnectX’s RDMA capabilities can be used to accelerate hypervisor traffic such as
storage access, VM migration, data and VM replication. The use of RDMA moves the data
from node-to-node to the ConnectX hardware, producing much faster performance, lower
latency/access-time, and lower CPU overhead, which provides zero-copy message transfers
for SCSI packets. Thus, the RAID for a cluster may now be connected via InfiniBand and
result in saving additional storage connector such as Fibre Channel, thereby greatly reducing
the cost of the cluster. when using RDMA-based iSCSI (iSER) compared to traditional
TCP/IP based iSCSI, RDMA can provide 10X faster performance. This will also consolidate
3
If your kernel version does not match with any of the offered pre-built RPMs, you can add your kernel version by using the
“mlnx_add_kernel_support.sh” script located under the docs/ directory. For further information, please refer to MlNX_OFED User Manual
Section Pre-installation Notes mlnx_add_kernel_support.sh tool.
18
Mellanox Technologies
Building Highly Efficient Red Hat Enterprise Virtualization 3.0 Cloud Infrastructure with Mellanox Interconnect
Reference Design
Rev 1.0
the efforts of both Ethernet and InfiniBand communities, and reduce the number of Storage
protocols a user has to learn and maintain.
Figure 9: Using ConnectX-3 Adapter Results in Faster I/O Traffic Delivery rather than
using Multiple 10GbE Ports from Competitors
Mellanox’s Storage Accelerator (VSA) software is a highly scalable, high performance,
low-latency software solution for tier-one storage and gateways that provides ultra-fast remote
block storage access and accelerates access to SAN, DAS, or Flash based storage.
Once the VSA is installed on your server, run vscli and perform the following VSA commands
to enter VSA configuration mode::
(host)# vscli
VSA-root> config
VSA-/# show disks/
State
Idx
Name
Size Cache Vendor
Serial
Rev paths
running
1 3600605b0032a49601601f69931f3bb42 667GB
0
LSI
MR9265-8i 0042bbf33199f6011660492a03b00506 3.14
1
running
2 3600605b0032882501643ddec0204767e 890GB
0
LSI
MR9265-8i 007e760402ecdd431650822803b00506 3.14
1
running
3 3600605b0032867601643c9ecd0d3de2c 890GB
0
LSI
MR9265-8i 002cded3d0ecc9431660672803b00506 3.14
1
VSA-/#
VSA-/#
VSA-/#
VSA-/#
Model
add servers/ rhev-servers ips=192.168.20.101;192.168.20.103
add targets/iqn.iser.1 transport=iser,volumes=d1
set targets/iqn.iser.1 server=rhev-servers
save
For Mellanox VSA installation and advance configuration, refer to the Mellanox VSA User
Manual.
3.5
Mellanox UFM Installation (Host1)
Mellanox's Unified Fabric Manager™ (UFM™) is a powerful platform for managing
scale-out computing environments. UFM enables data center operators to efficiently monitor
and operate the entire fabric, boost application performance and maximize fabric resource
utilization.
19
Mellanox Technologies
Rev 1.0
Software Installation and Basic Configuration
For Mellanox UFM installation and basic configuration, refer to the Mellanox UFM User
Manual.
3.6
Mellanox Network Manager Plugin
3.6.1
Installing Mellanox Network Manager Server
Copy the file mellanox_nm_server.tar.gz to the server that is running UFM.
#
#
#
#
3.6.2
cd /tmp
tar zxvf mellanox_nm_server.tar.gz
cd mellanox_nm_server
./install.sh
Installing Mellanox Network Client
Copy the file mellanox_nm_client.tar.gz to each server in the fabric.
#
#
#
#
cd /tmp
tar zxvf mellanox_nm_client.tar.gz
cd mellanox_nm_client
./install.sh
20
Mellanox Technologies
Building Highly Efficient Red Hat Enterprise Virtualization 3.0 Cloud Infrastructure with Mellanox Interconnect
Reference Design
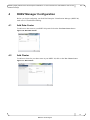
4
Rev 1.0
RHEV Manager Configuration
Before you begin configuring your Red Hat Enterprise Virtualization Manager (RHEV-M),
make sure it is installed and running.
4.1
Add Data-Center
To add a new data center in your RHEV-M portal click on the New Data Center button
Figure 10: New Data Center
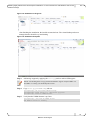
4.2
Add Cluster
To add new cluster for your data center in your RHEV-M, click on the New Cluster button:
Figure 11: New Cluster
21
Mellanox Technologies
Rev 1.0
RHEV Manager Configuration
Figure 12: Data Center
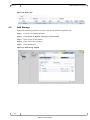
4.3
Add Host
Follow these steps in order to add a host:
Step 1: Go to Hosts tab and click on New.
Figure 13: Adding a Host
Step 2: Fill in the details as desired.
After filling in the required details the installation starts
NOTE: If you intend to use UFM or Mellanox Network Plugin, it is necessary that the
hostname you give the host you add is the same as the hostname in UFM.
22
Mellanox Technologies
Building Highly Efficient Red Hat Enterprise Virtualization 3.0 Cloud Infrastructure with Mellanox Interconnect
Reference Design
Rev 1.0
Figure 14: Installation in Progress
After finishing the installation, the installer restarts the host. The virtual desktop and server
manager daemon should be up and running.
Figure 15: Installation Complete
Step 3: Add storage support by applying the iscsi.py patch to enable iSER support.
NOTE: You should get the iscsi.py.patch from Mellanox support ready for RHEV 3.0.
For RHEV 3.1 and up you should skip this section.
Step 4: Copy iscsi.py.patch to /tmp, and run:
[root@host3]# cd /usr/share/vdsm/storage
[root@host3]# patch iscsi.py < /tmp/iscsi.py.patch
[root@host3]# service vdsmd restart
Step 5: Verify that the VDSM daemon is up. Run:
[root@host3]# /etc/init.d/vdsmd status
VDS daemon server is running
23
Mellanox Technologies
Rev 1.0
RHEV Manager Configuration
Figure 16: Host is UP
4.4
Add Storage
Perform the following operations in order to add storage domain using RHEV-M.
Step 1: Connect to the RHEV-M Portal.
Step 2: Click System Default Storage New Domain.
Step 3: Enter a name for the domain.
Step 4: Enter an IP of the VSA host.
Step 5: Click on Discover.
Figure 17: Discovering Targets
24
Mellanox Technologies
Building Highly Efficient Red Hat Enterprise Virtualization 3.0 Cloud Infrastructure with Mellanox Interconnect
Reference Design
Rev 1.0
Step 6: Click on Login locatedon the right of your chosen target.
Figure 18: Login to Target
Step 7: Choose the LUN you wish to add and click OK.
Figure 19: Choosing an LUN
25
Mellanox Technologies
Rev 1.0
RHEV Manager Configuration
Figure 20: After Adding a Storage Domain
Figure 21: Successfully Adding a Storage Domain
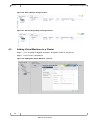
4.5
Adding Virtual Machines to a Cluster
Step 1: Click on System Default Clusters Default VMs New Server.
Step 2: Fill the details in General tab.
Figure 22: Adding New Virtual Machine - General
26
Mellanox Technologies
Building Highly Efficient Red Hat Enterprise Virtualization 3.0 Cloud Infrastructure with Mellanox Interconnect
Reference Design
Rev 1.0
Step 3: Select VNC protocol in Console tab.
Figure 23: Adding a New Virtual Machine - Console
Step 4: In the Host tab, select the host you want the VM to run on.
Figure 24: Adding a New Virtual Machine - Host
27
Mellanox Technologies
Rev 1.0
RHEV Manager Configuration
Step 5: Go to Boot Options tab and choose Hard Disk as the First Device and PXE as the
Second Device then click the OK button at the bottom.
Figure 25: Adding a New Virtual Machine – Boot Options
Step 6: A wizard will pop up. Choose Configure Network Interface.
Figure 26: Adding a New Virtual Machine – Configuration
28
Mellanox Technologies
Building Highly Efficient Red Hat Enterprise Virtualization 3.0 Cloud Infrastructure with Mellanox Interconnect
Reference Design
Rev 1.0
Step 7: Complete the details for the new HCA.
Figure 27: Adding a New Virtual Machine – Adding a New Network Interface
Step 8: Click on Configure Virtual Disks and fill in the details.
Figure 28: Adding a New Virtual Machine – Adding a New Virtual Disk
29
Mellanox Technologies
Rev 1.0
RHEV Manager Configuration
Step 9: Click Configure Later to finish.
Figure 29: Adding a New Virtual Machine – Finishing Configuratiin secon
Figure 30: Adding a New Virtual Machine – VMs Screen
Step 10: Right click on the line of the VM and choose Run.
Step 11: In order to start the VM console, right-click and select Console.
Figure 31: Adding a New Virtual Machine – VNC Screen
30
Mellanox Technologies
Building Highly Efficient Red Hat Enterprise Virtualization 3.0 Cloud Infrastructure with Mellanox Interconnect
Reference Design
4.6
Rev 1.0
Add a Network to the Cluster
Step 1: Go to System Default.
Step 2: Click on Logical Networks and then on New.
Figure 32: Logical Networks
Step 3: Fill in the details for the new Logical Network.
Figure 33: Adding a New Logical Network
You should now be able to see the new logical network.
31
Mellanox Technologies
Rev 1.0
RHEV Manager Configuration
Figure 34: Displaying the New Logical Network
Step 4: Go to each host you want to connect to the new logical network and click Edit on the
interface.
Step 5: Find which interface is eIPoIB. Run:
(config) # cat /sys/class/net/eth_ipoib_interfaces
eth5 over IB port: ib0
Step 6: Give it an IP address and save the configuration.
Figure 35: Adding a Network Interface to the Logical Network
You should now see the logical network name under the column Network Name for this
interface.
32
Mellanox Technologies
Building Highly Efficient Red Hat Enterprise Virtualization 3.0 Cloud Infrastructure with Mellanox Interconnect
Reference Design
Rev 1.0
Figure 36: Displaying the Network Interface of the Logical Network
4.7
Add an Interface to VM
Step 1: Go to the VMs pane.
Step 2: Click on Network Interface tab.
Step 3: Click on New button – a pop-up will open.
Figure 37: Virtual Machine – Network Interfaces View
33
Mellanox Technologies
Rev 1.0
RHEV Manager Configuration
Step 4: Fill in the details for the HCA.
Figure 38: Adding a New Network Interface
You should now see the new added network interface.
Figure 39: Displaying the New Network Interface
Step 5: Start the VM.
Step 6: Verify that the host has a new network interface for the VM. Run the command
ifconfig –a.
34
Mellanox Technologies
Building Highly Efficient Red Hat Enterprise Virtualization 3.0 Cloud Infrastructure with Mellanox Interconnect
Reference Design
Rev 1.0
Figure 40: Verifying the New HCA is Up
35
Mellanox Technologies
Rev 1.0
5
Using UFM to Automate Network Mangement
Using UFM to Automate Network Mangement
Mellanox's Unified Fabric Manager™ (UFM™) is a powerful platform for managing
scale-out computing environments. UFM enables data center operators to efficiently monitor
and operate the entire fabric, boost application performance and maximize fabric resource
utilization. UFM’s automated and application-centric approach bridges the gap between
servers, applications and fabric elements, thus enabling administrators to manage and optimize
from the smallest to the largest and most performance-demanding clusters.
UFM provides the ability to monitor, troubleshoot, configure and optimize all fabric aspects
available via only one interface. UFM’s central dashboard provides a one-view fabric-wide
status view.
UFM includes an advanced granular monitoring engine that provides real-time access to
switch and host data, enabling cluster-wide monitoring of fabric health and performance,
real-time identification of fabric-related errors and failures, quick problem resolution via
granular threshold-based alerts, and a fabric utilization dashboard.
Fabric congestion is difficult to detect when using traditional management tools resulting in
unnoticed congestion and fabric under-utilization. UFM’s unique traffic map quickly
identifies traffic trends, traffic bottlenecks, and congestion events spreading over the fabric
which enables the administrator to identify and resolve problems promptly and accurately.
Using UFM one can set specific service levels for different applications to ensure that critical
applications get the right priority according to the fabric. QoS management is performed using
a unique intelligent algorithm that determines the optimal configuration for each device
location in the topology and its QoS capabilities.
UFM uses a logical fabric model to manage the fabric as a set of business-related entities such
as time critical applications or services. The logical fabric model enables fabric monitoring
and performance optimization on the application level rather than just at the individual port or
device level. Managing the fabric using the logical fabric model provides improved visibility
into fabric performance and potential bottlenecks, improved performance due to
application-centric optimizations, quicker troubleshooting, and higher fabric utilization.
Refer to UFM User Manual for detailed installation and configuration options.
36
Mellanox Technologies
Building Highly Efficient Red Hat Enterprise Virtualization 3.0 Cloud Infrastructure with Mellanox Interconnect
Reference Design
5.1
Rev 1.0
Basic UFM Configuration Flow
Follow the next steps for basic UFM configuration. The following steps show how to create a
logical server and UFM Network, and finally connecting between them.
Step 1: Create an environment.
Figure 41: UFM Environment
Step 2: Add a logical server. UFM logical server is equivalent to datacenter cluster in the
RHEV-M architecture model.
Figure 42: New Logical Server
37
Mellanox Technologies
Rev 1.0
Using UFM to Automate Network Mangement
Step 3: Add all hosts in the RHEV-M cluster.
Figure 43: Add Hosts
Step 4: Create a new network. Add partition key (PKey)
Figure 44: Add Hosts
38
Mellanox Technologies
Building Highly Efficient Red Hat Enterprise Virtualization 3.0 Cloud Infrastructure with Mellanox Interconnect
Reference Design
Rev 1.0
Step 5: Connect the logical server (cluster) to the network. By doing this, all hosts located
under this logical server (cluster) will be connected.
Figure 45: Connect the Logical Sever to the Network.
Figure 46: UFM Network Connected to the UFM Logical Server
Refer to UFM User Manual for advanced configuration options.
39
Mellanox Technologies
Rev 1.0
6
Mellanox Network Manager Plugin
Mellanox Network Manager Plugin
Mellanox Network Manager Plugin performs seamless integration between Mellanox UFM
and the RHEV Manager. After installing the plugin, (see section 3.6 Mellanox Network
Manager Plugin), the interconnectivity between the hosts in the network over eIPoIB interface
is performed seamlessly.
For advanced configuration, please contact [email protected].
40
Mellanox Technologies
Building Highly Efficient Red Hat Enterprise Virtualization 3.0 Cloud Infrastructure with Mellanox Interconnect
Reference Design
7
Troubleshooting
7.1
Host is Not Added to Logical Server in UFM
Rev 1.0
Check that you see the server in UFM. If it does not appear there, run:
#cat /sys/class/infiniband/mlx4_0/node_desc
The output should be something other than localhost HCA-1.
You can change it by running, for example:
#echo “web1 HCA-1” > /sys/class/infiniband/mlx4_0/node_desc
7.2
Migration of VM Fails
Step 1: Check that libvirtd on the target is listening on TCP port.
# netstat -nap |grep libvirtd
tcp
0
0 0.0.0.0:16509
LISTEN
30771/libvirtd
0.0.0.0:*
Step 2: From the source, run:
#virsh -c qemu+tcp://target_host/system capabilities
Where target_host is the host name of the target.
The command should return without errors.
Step 3: Check that the file /etc/sysconfig/libvirtd has the following lines:
LIBVIRTD_ARGS=--listen
DAEMON_COREFILE_LIMIT=unlimited
Step 4: Check that the port libvirtd is not blocked by a firewall.
7.3
Connection Verification of Virtual Machines Using eIPoIB
Check that you can run the command virsh list without errors.
If you get a prompt for authentication edit the file /etc/libvirt/libvirt.conf by
changing this line:
auth_unix_rw=”sasl”
To:
auth_unix_rw=”none”
7.4
Low Latency Performance Tuning
The below links provides a tactical tuning overview of Red Hat Enterprise Linux 6 for latency
sensitive workloads and describes important tuning parameters and settings that can improve
performance for Mellanox adapters. Each setting, along with its potential effect, is described
to help in making an informed judgment concerning its relevance to the user's system, the
system workload, and the performance goals.
Performance Tuning Guidelines for Mellanox Network Adapters
Low Latency Performance Tuning Guide for Red Hat Enterprise Linux 6
41
Mellanox Technologies
Rev 1.0
8
Related Documentation
Related Documentation
For additional information, see the following documents:
Table 2: List of Related Documents
Document
Location
Red Hat Enterprise Virtualization 3.0 - Installation http://docs.redhat.com/docs/en-US/Red_Hat_Ente
Guide
rprise_Virtualization/3.0/pdf/Installation_Guide/
Red_Hat_Enterprise_Virtualization-3.0-Installati
on_Guide-en-US.pdf
Mellanox OFED User Manual
www.mellanox.com > Products > Adapter IB/VPI
SW > Linux SW/Drivers
http://www.mellanox.com/content/pages.php?pg=
products_dyn&product_family=26&menu_sectio
n=34
Mellanox UFM User Manual
http://license1.mellanox.com
Mellanox VSA User Manual
http://license1.mellanox.com
Mellanox Cloud Interface plugin
Please contact [email protected].
Red Hat - Low Latency Performance Tuning
https://access.redhat.com/knowledge/articles/221
153
Mellanox - Low Latency Performance Tuning
Performance Tuning Guidelines for Mellanox
Network Adapters
42
Mellanox Technologies