1
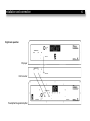
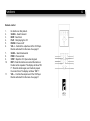
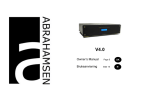
V1.0
Owner’s Manual
Page 5
UK
Bruksanvisning
Side 18
N
Warranty certificate
Register your product with
ABRAHAMSEN© and expand
your warranty from two(2) to
five(5) years. Use the included
registration form or register online at www.abrahamsenaudio.
com. For fastest processing,
we recommend online registration. When we receive your
registration, we will send you a
warranty card.
2
Registrer ditt produkt hos
ABRAHAMSEN© og utvid
garantien fra to(2) til fem(5)
år. Bruk det vedlagte registreringsskjema eller gå online på
www.abrahamsenaudio.com.
Raskeste måte vil være å gjøre
det online. Når vi har mottatt
din registrering, vill vi sende
deg et garantikort.
Owner_V1.0_v1.2 Copyright © ECS Holding AS, 2007
Use this information to register your product.
Bruk denne informasjonen til å registrere ditt produkt.
Quality inspection
3
Thank you for chosing this ABRAHAMSEN© product. You will enjoy years of listening pleasure and true High End musical performance from your
audio system. The signatures shown below certify that this product met or exceeded our strict standards.
Takk for at du har valgt et produkt fra ABRAHAMSEN©. Du kommer til å nyte mange år med lytteopplevelse og ekte “High End” musikkgjengivelse
fra ditt lydsystem. Underskriftene under viser at dette produktet møtte eller overgikk våre strenge standarer.
Electric performance:
_________________
Listening:
_________________
Final inspection:
_________________
We strongly believes that uncompromising quality is not an option--it’s an obligation.
Per Abrahamsen Designer
Maintenance interval
Adjustment:
Cleaning:
Idling
Connectors
DC
Adjustment:
PCB
Cleaning:
Idling
Connectors
DC
Adjustment:
PCB
Cleaning:
Idling
Connectors
DC
Adjustment:
PCB
Cleaning:
Idling
Connectors
DC
Adjustment:
PCB
Cleaning:
Idling
Connectors
DC
PCB
4
5000Hours
Date/Sign/Stamp
10000Hours
Date/Sign/Stamp
15000Hours
Date/Sign/Stamp
20000Hours
Date/Sign/Stamp
25000Hours
Date/Sign/Stamp
Adjustment:
Cleaning:
Idling
Connectors
DC
Adjustment:
PCB
Cleaning:
Idling
Connectors
DC
Adjustment:
PCB
Cleaning:
Idling
Connectors
DC
Adjustment:
PCB
Cleaning:
Idling
Connectors
DC
Adjustment:
PCB
Cleaning:
Idling
Connectors
DC
PCB
30000Hours
Date/Sign/Stamp
35000Hours
Date/Sign/Stamp
40000Hours
Date/Sign/Stamp
45000Hours
Date/Sign/Stamp
50000Hours
Date/Sign/Stamp
V1.0 CD PLAYER
User and Quality Inspection Manual
UK
Warning:
To avoid risk of fire or electric shock, do not expose this
appliance to rain or moisture. Verify line voltage before use.
Do not remove cover. No user serviceable parts inside. Refer servicing to qualified service
personnel.The warranty is void if the product is tampered with by non-authorised
personnel.Use only authorised ABRAHAMSEN© service center.
Introduction
This user manual contains important information on the placement, installation, and operation of your ABRAHAMSEN©
product. Please read this information thoroughly. A good
understanding of these details will help ensure satisfactory
operation and long life for your product.
The story behind the sound.
In 1972 Dr. Otala and Mr. Lohstro finished their work in
analysing transistor amplifiers to determine what actually
created the ”transistor sound” in general transistorized
designs. The results of their innovative design work were
incorporated in the legendary 25 watt amplifier.
This product was the first commercial transistor amplifier
to use this new design approach, and the amplifier was
immediately recognised as dramatically more musical and
dynamic sounding than any other transistor amplifier. The
same design philosophy has been constantly updated by
additional research and development. This philosophy forms
the basis of the new ABRAHAMSEN© design.
After the 25 watt amplifier had established a new standard
for transistor amplifiers, research was undertaken to find
ways to make the amplifier even better, and to extend its
highly musical sound quality to more powerful amplifier
design.
6
Unpacking the V1.0
Immediately upon receipt of the V1.0, inspect the carton
for possible damage during shipment. The carton and packaging have been designed to provide the safest possible
protection for the transport of your amplifier. Unpack the unit
carefully. Save all packaging materials for future shipment.
The contents of the carton
1 pcs ABRAHAMSEN© V1.0
1 pcs AC mains cord
1 pcs Owners manual
1 pcs Spare fuse
(located in the fuse drawer, mains inlet. See page 14)
If any of the items mentioned above are not included in the
carton, please contact your authorized ABRAHAMSEN©
dealer, distributor, or ECS Holding AS for assistance.
Setup procedure
Before connecting the V1.0 to the mains, check that the
mains voltage indicated on the rear panel corresponds to
the line voltage in the territory you intend to use the unit.
Before connection
How to avoid antenna problems
In some set-ups hum may occur when you connect the radio,
VCR or TV to your system. The problem is caused by DC
voltage coming from your antenna. Please contact your cable
network operator.
N
SE
HM
RA
How to avoid noise problems
The V1.0 contains delicate circuits that are sensitive to magnetic strayfields. The unit should not be placed near mains
transformers, TV sets etc. Care should be taken regarding
placement of the interconnect cables. Do not run interconnect
cables in parallel with mains cords or speaker cables. Keep
interconnect and speaker cables as short as possible.
How to remove and un secure transport necessitis
Remove the wing bolt located underneath the product.
AB
How to avoid damages
Do not under any circumstances connect or disconnect equipment when power is turned on. The design of the RCA plug
generates a huge transient when inserted. Connecting or disconnecting equipment with the power on can result in severe
damage to both speaker and amplifier.
7
REMOVE
!Important!
Keep the wing bolt in a safe place for future use. Always
tighten the wing bolt when moving the CD player. If not
securely fastened, the CD player will be severely damaged,
resulting in void of warranty. Do not over-tighten the wing
bolt.
Installation and connection
How to connect your CD-player
Please read these pages carefully.(page 8 to 10)
Do not under any circumstances connect or disconnect equipment when the power is turned on.
Balanced operation
CD-player
Preamplifier/Integrated Amplifier
8
Installation and connection
Singel-ended operation
CD-player
Preamplifier/Integrated Amplifier
9
Installation and connection
Digital out operation
CD-player
D/A Converter
Preamplifier/Integrated Amplifier
10
Functions
11
Rear panel
The on/off switch is located on the left hand side of the mains
inlet.
Front panel controls
The front panel have two multifunction knobs one on the left
and one on the right side.
Left side knob:
Right side knob:
Turn left = Search backwards
Turn right = Search forward
Push
= Stop/Disc
Turn left = Previous
Turn right = Next
Push
= Play/Pause
Level adjustment
Using the built in volume control, the CD player may be connected directly to a power amplifier. The volume control needs
to be activated before it can be used.
Push both the left and right multifunction knobs simultaneously
until “MENU” is shown in the display. To activate the menu the
CD-Player must by in stop mode. “CANCEL” or “VOLUME ON”
can be selected by turning the left switch.
Pushing the knob when “CANCEL” is selected, the product will
go back to normal use without selecting anything.
Pushing the knob when “VOLUME ON” is selected, the display
will show “VOL:00” and the volume may be adjusted with the
remote control.
Bypassing the volume control:
Bring up “MENU” again, and the display will show “VOLUME
OFF”. Pushing the left knob will override the volume control.
The level adjustment can only be operated from the remote
control. When the player is turned off, the level is saved, and
will be used when the player is turned on.
Functions
Remote control
1.
2.
3.
4.
5.
6.
7.
8.
9.
10.
11.
No function on this product.
SCAN + - Search forward
NEXT - Next track
PLAY - Start playing the CD
PAUSE - Pause on/off
VOL + - Controls the output level of the CD-Player.
Must be activated from the menu. See page 11
SCAN - - Search backwards
PREV - Previous track
STOP - Stops the CD. Open when stopped.
REP - Press this button once and all the tracks on
the disc will be repeated. The display will show “RE
P”. Press the button again, and it will only repeat
the current track. The display will show “REP 1”.
VOL - - Controls the output level of the CD-Player.
Must be activated from the menu. See page 11
12
Startup
How to power up your system
You should always power up your system the following way:
Signal sources (CD player, tuner etc.) first, then the preamplifier/power amplifier/integrated amplifier. When turning your
system off, you should start by switching off your power amplifier/integrated amplifier. Finally the signal source devices.
Loading a disc
1. Load the disc by open the CD drawer, press the disc button
on the front panel or on the remote control. «Open» is shown
on the display.
2. Place the disc on the drawer. Press the disc button on the
front panel or on the remote control. The CD player must first
read and load vital information from the disc. During this process, the display shows ”READING” and takes approximately
three seconds. Tracks and total time are displayed.
3. Press play and the first track starts to play.
Warning:
(The laser pick-up is located behind the spindle.)
NEVER look directly into the laserbeam!!!
Under normal circumstances the laser needs no
cleaning.
Do not use any kind of “cleaning CDs”!
13
Important notice
For optimal sonic performance, the V1.0 should be burned
in for a minimum time of 96 hours. The easiest way to burn
in your V1.0 is to put a disc in REPEAT mode with the rest
of your system turned off.
If the product has been switched off, allow two hours of
warm-up to optimise sonic performance.
Due to high class A operation in all ABRAHAMSEN©
designs, it is normal for the product to feel warm. Proper
ventilation is important. The product should NEVER be
completely covered.
A good rule of thumb is to allow at least 3-5 cm (1-2 inches)
of air sidewise, and 5-8 cm (2-3 inches) above the product.
Please refer to this manual for removal of the CD transport
screw. The transport screw must be removed for proper
operation. See page 7
When transporting the CD player, always re-insert the
transport screw to avoid severe damage to the unit!!!
Maintenance and Servicing
Maintenance interval
To maintain maximum performance and to protect your investment, it is essential that your product is serviced in accordance
to the correct maintenance interval.
Every 5000 hours we recommend you to have maintenance
on your product. This operation involves, among other things,
cleaning of connectors, adjustments of DC voltage and idling
current(class A area). See page 4.
Servicing
Refer all servicing to qualified personnel. To reduce the risk
of electric shock, do not perform any servicing other than
that contained in the user manual unless you are qualified
to do so. Servicing is required when the product has been
damaged in any way, such as the product has been exposed
to rain or moisture, does not operate normally or has been
dropped.
14
Cleaning
When the product needs a cleaning, you can blow off dust
from the amplifier with a blower or clean with a rag etc. Don’t
use solvents such as alcohol or other fluids with very strong
volatility and flammability for cleaning the apperatus body.
Fuse
To prevent a fire, make sure to use fuses with specified
standard(current, voltage, type). Do not use a different fuse
or short circuit the fuse holder. Before replacing the fuse, turn
OFF the product and disconnect the powercord.
SPARE FUSE
Do not remove any cover
There are areas with high voltages inside. To reduce the risk of
electric shock, do not remove any cover if the AC powercord is
connected. The cover should be removed by qualified personnel only. No user serviceable parts inside.
MAIN FUSE
If service is needed
If Service is needed
Your dealer will have all relevant information regarding the
service station in your area, and will ensure that your unit is
serviced with minimum delay. It is our general policy to have
your unit returned to you within five working days. This is an
average time, and can vary locally, depending on the workload
at that particular service station. If, for some reason, there are
no service facilities available in your country, please ship the
unit to the following address:
ECS Holding AS,
Box 108, N-1471 Lorenskog,
Norway
E-mail:
[email protected]
Service department: [email protected]
Web:
www.abrahamsenaudio.com
15
The end-user is responsible for all shipping charges, insurance,
re-importation and duty charges. When shipping a product to
the factory for service, always include the following:
1. A sales slip or other proof of purchase if repair is claimed
under warranty.
2. A proforma invoice with value of goods, stating that the
amplifier is returned to Norway for repair.
3. An accompanying letter describing faults, symptoms, or problems with the unit.
4.Always ship the unit in its original carton and packaging
material to prevent damage in transit.
ABRAHAMSEN© by ECS Holding will not cover damages
incurred in transit. If you require further information concerning the operation of the unit, or if you have any questions
related to service, please do not hesitate to contact your
dealer or national distributor.
When transporting the CD player, always re-insert the
transport screw to avoid severe damage to the unit!!!
Technical specification
The following technical data were measured on randomized test objects
and are typical data.
All measurements are made with main voltage
120/240 V 50Hz / 60Hz.
Clipping point of the product is set to a level where total harmonic distortion (THD) is 0.2%.
Output impedance (20-20kHz) ..............................<100R
THD (1kHz)............................................................<0.002%
Noise .....................................................................<130uV
Frequency response -3dB .....................................DC-100KHz
Slew rate ...............................................................100Vus
Channel separation (20Hz-20kHz) ........................>90dB
16
Dimensions
Width
432mm
Depth 320mm
Height 115mm
Weight 7.5kg
(17”)
(12.6”)
(4.5”)
(15lbs)
The manufacturer reserves the right to alter these specifications
without further notice
Warranty terms and conditions
1 ABRAHAMSEN© by ECS Holding warrants that this product will be free from any defects in matrials and/or workmanship for a period of to(2) years from the purchase date,
five(5) if you have completed the warranty registration.
2 The extended warranty service is only available to the
orginal consumer, who purchased this product directly from
the retail dealer, and it can not be transferred.
3 During the warranty service, ABRAHAMSEN© by ECS
Holding may repair or replace this product at its own option
at no charge to you for parts or labor in accordance with this
limited warranty.
4 This warranty does not apply to the damages that occurred under the following conditions:
4.1 Instead of operating in accordance with the user’s manual. Any abuse or misuse of this product.
4.2 Normal tear and wear.
4.3 The product has been altered or modified in any way.
4.4 Damage which may have been caused either directly or
indirectly by another product / force / etc.
17
4.5 Abnormal service or repairing by anyone other than a
qualified person or technician.
And in such cases, all the expenses will be charged to the
buyer.
5 In no event shall ABRAHAMSEN© by ECS Holding be
liable for any incidental or consequential damages. Some
countrys do not allow the exclusion or limitation of incidental
or consequential damages, so the above exclusion or limitation may not apply to you.
6 This warranty gives you the specific rights, and these rights
are compatible with this country laws, you may also have
other statutory rights that may vary from country to country.
V1.0 CD SPILLER
Bruksanvisning og Inspeksjons manual
N
Advarsel:
Apparatet må ikke utsettes for regn eller fuktighet. Dette kan føre til kortslutning.
Apparatet inneholder ingen deler som kan repareres eller skiftes ut av brukeren.
Garantien gjelder ikke ved inngrep utført av brukeren.
Garantien gjelder kun ved innlevering til et autorisert ABRAHAMSEN© service-verksted.
Introduksjon
Denne brukermanualen inneholder informasjon vedrørende
installasjon og generell bruk av ditt ABRAHAMSEN© produkt. Vennligst les den grundig. En riktig forståelse av disse
detaljene vil gi en bedre bruk av produktet.
Historien bak lyden.
I 1972 sluttførte Matti Otala og Jan Lohstro sine studier for å
finne hva som var opphavet til den typiske ”transistorlyden”
som fantes i alle transistorforsterkere på den tiden. Denne
”lyden” er fremdeles fremtredende i mange produkter. Resultatet fra deres forskning ble innført i en forsterker utviklet
av Per Abrahamsen, og ble senere kjent som den legendariske ”25 Watter’n”.
Denne forsterkeren var det første kommersielle produktet
som utnyttet denne teorien, og forsterkeren ble omtalt som
vesentlig mer dynamisk og musikalsk enn andre transistorforsterkere. Denne designfilosofien har blitt videreutviklet
gjennom mange år.
Bedre elektroniske komponenter har sammen med denne
utviklingen lagt grunnlaget for den nye ABRAHAMSEN©
produktserie.
19
Utpakking av V1.0
Etter å ha tatt ut og lest denne bruksanvisningen bør du inspisere ytterkartongen for eventuelle skader under transport. Hvis
den har synlige skader må det straks rettes krav mot transportør.
Pakk ut produktet forsiktig, og ta vare på emballasjen for
fremtidig transport. Innpakningen er designet for tryggest mulig
transport av produktet.
Kartongens innhold
1 stk ABRAHAMSEN© V1.0
1 stk Nettkabel
1 stk Bruksanvisning
1 stk Reservesikring
(Plassert i sikringsskuffen, nettintak Se side 26)
Hvis noen av de gjenstandene som er nevnt ovenfor ikke er
vedlagt, vennligst kontakt din forhandler, importør eller ECS
Holding AS for assistanse.
Oppkobling av V1.0
Før du kobler enheten til nettspenningen, sjekk at enheten du
har mottat er beregnet for samme spenning som det området
du befinner deg i. Dette er merket på baksiden av enheten.
Før tilkobling
N
SE
HM
RA
Hvordan unngå støyproblemer
V1.0 inneholder kretsløp som kan være følsomme for magnetfelt. Apparatet bør ikke plasseres i nærheten av transformatorer m.m. Du bør også ta hensyn til plasseringen av
signalkabler. Disse bør ikke ligge parallelt med nettledninger
eller høyttaler-ledninger. De bør være så korte som mulige.
Hvordan fjerne transportsikringen
Fjern vingebolten på undersiden av produktet.
AB
Hvordan unngå koblingsproblemer.
Slå alltid av apparatet før andre produkter tilkobles.
RCA (Phono) pluggen er konstruert slik at den genererer en
kraftig transient når den kobles til. Til- og frakobling av annet
utstyr kan ødelegge både høyttaler og forsterker.
20
FJERNES
Hvordan unngå antenneproblemer.
Feil på fellesantenneanlegg kan resultere i brum i høyttalerne
når radio, VCR, eller TV kobles til anlegget. Problemet er DCspenning som kommer fra antennen. Vennligst kontakt din
lokale kabelleverandør.
Viktig!
Ta vare på vingebolten, å monter altid transportsikringen før
CD-spilleren flyttes eller transporteres. Bruk ikke stor kraft
ved tilskruing.
Installasjon og tilkobling
Hvordan tilkoble ditt produkt
Les disse sidene nøye(page 21 til 23).
Ikke utfør tilkobling eller frakobling dersom produktet er slått på.
Balansert tilkobling
CD-spiller
Forforsterker/Integrert forsterker
21
Installasjon og tilkobling
Ubalansert tilkobling
CD-spiller
Forforsterker/Integrert forsterker
22
Installasjon og tilkobling
Digital tilkobling
CD-spiller
D/A Konverter
Forforsterker/Integrert forsterker
23
Funksjoner
24
Av/på-bryteren
Er lokalisert på bakplaten på venstre side av nettinntaket.
Front knapper
På fronten finner du to multifunksjonsknapper, en på venstre
og en på høyre side.
Venstre knapp:
Høyre knapp:
Vri mot venstre
Vri mot høyre
Trykk
= Spole bakover
= Spole fremover
= Stopp/Disc
Vri mot venstre
Vri mot høyre
Trykk
= Forrige spor
= Neste spor
= Play/Pause
Volumjustering.
Med den innebygde volumkontrollen kan CD-spilleren kobles
direkte til en sluttforsterker. Volumkontrollen må aktiveres før
den kan brukes.
Trykk inn venstre og høyre multifunksjonsknapper samtidig til
”MENU” vises i displayet. For å få tilgang til menyen må spilleren være i stopp modus. Ved å vri på venstre knapp velges
”CANCEL” eller ”VOLUME ON”. Et trykk mens ”CANCEL”
vises kanslerer valg, og produktet går tilbake til normal bruk
uten at noe er valgt. Et trykk mens ”VOLUME ON” vises vil
aktivere volumkontrollen og displayet viser ”VOL:00”. Volumet
kan økes / reduseres med fjernkontrollen.
Gjenta det samme for å sette volumet ut av funksjon. Displayet
vil da vise ”CANCEL eller ”VOLUME OFF”. Trykk venstre knapp
når ”VOLUME OFF” vises, og volumet er satt ut av funksjon.
Volumkontrollen kan kun styres fra fjernkontrollen.
Nivået som er valgt når CD-spilleren slås av, blir lagret og vil
bli brukt når spilleren slås på.
Funksjoner
Fjernkontroll
1.
Ikke i bruk på dette produktet.
2.
SCAN + - Spole fremover
3.
NEXT - Neste spor
4.
PLAY - Start
5.
PAUSE - Pause av/på
6.
VOLUM + - Kontrollerer utgangsnivået fra CD-spil
leren. Må aktiveres fra menyen se side 24.
7.
SCAN - - Spole bakover
8.
PREV - Forrige spor.
9.
STOP - Stopp. Åpne når stoppet.
10.
REP - Trykk en gang, og den repeterer hele
CD’en (REP vises i displayet). Trykk en gang
til, og det aktuelle sporet repeteres (REP 1
vises i displayet).
11.
VOLUM - - Kontrollerer utgangsnivået fra CD-spil
leren. Må aktiveres fra menyen se side 24.
25
Oppstart
Hvordan slå av/på systemet
Du bør alltid slå på systemet i denne rekkefølgen: Kilde (CD,
DVD, TUNER, etc.) først, så forforsterkeren/effektforsterker/integrertforsterker. Når du slår systemet av igjen bør du begynne
med effektforsterkeren/integrertforsterkeren.
Legg inn CD
1. Trykk DISC på frontpanelet eller fjernkontrollen. Displayet
viser OPEN.
2. Plasser CD i skuffen og trykk DISC på frontpanelet eller
fjernkontrollen. CD-spilleren leser inn informasjonen fra platen.
Displayet viser READING i ca 3 sekunder. Antall spor og total
tid vises.
3. Trykk PLAY og spor 1 starter.
Advarsel:
Laseren sitter på baksiden av spindelen. Se aldri direkte
inn i laseren! Laseroptikken må under normale omstendigheter ikke rengjøres. Bruk aldri en ”rense-CD”.
26
Viktig informasjon
For optimal lydgjengivelse bør V1.0 spilles inn i minst 96
timer. Vi anbefaler derfor at du setter en CD-plate på REPEATE med forsterkeren avslått.
Hvis produktet har vært avslått, må man beregne ca. 2
timers oppvarming for optimal lydgjengivelse.
På grunn av den høye klasse A driften i ABRAHAMSEN©’S
konstruksjon er det normalt at produktet blir varmt. Det er
viktig at produktet får god kjøling, og må derfor ikke tildekkes. En god regel er å tillate 3-5 cm luftrom på begge sider
og 5-8 cm over produktet.
Vi vil også henvise til bruksanvisningen vedr. transportsikringen som må løsnes før bruk. Se side 20
Husk transportsikringen når produktet transporteres.
Inspeksjon og service
Inspeksjonsintervaller
Over tid vil flere viktige parametere endre seg. Det er derfor
lydmessig viktig at produktet blir vedlikeholdt i henhold til de
vedlagte vedlikeholdsintervallene.
Vi anbefaler at produktet blir vedlikeholdt hver 5000 time. Dette
innebærer blant annet rensing av kontakter, justering av spenning og hvilestrøm (klasse A område).
Se side 4.
Service
Bruk kun kvalifisert serviceverksted. Hvis du ikke er kvalifisert, og for å unngå elektrisk støt, ikke utfør annen service
på apparatet enn det som er omtalt i denne manualen.
Service er nødvendig når produktet har blitt utsatt for fuktighet, regn, eller på annen måte ikke virker som normalt.
27
Rengjøring
Bruk ikke alkohol eller annen brennbar væske ved rengjøring av produktet. Blås støv av apparatet med en blåser eller
”trykkluft på boks”. Vær forsiktig med lufttrykket ved blåsing
gjennom luftespaltene.
Nettsikring
Bruk kun sikringer av samme type og styrke som spesifisert.
Før sikringen skiftes må produktet være avslått og nettkabelen
trekkes ut av stikkontakten.
RESERVESIKRING
Fjern ikke topplokket
Produktet inneholder områder med høy spenning. For å redusere risikoen for elektrisk støt, må ikke topplokket skrus av så
lenge nettkabelen er tilkoblet nettet. Topplokket skal fjernes av
kvalifisert personell. Det er ingen service deler innvendig, som
kan skiftes av bruker.
HOVEDSIKRING
Serviceprosedyrer
28
Hvis det er behov for service
Din forhandler har all informasjon du trenger vedrørende
serviceverksteder, og garanterer at din enhet får service uten
forsinkelse. Under normale forhold vil ditt produkt bli returnert
i løpet av fem arbeidsdager. Dette kan variere avhengig av
kapasiteten hos verkstedet du benytter.
Hvis det ikke finnes et autorisert verksted i nærheten av deg,
kan du sende produktet til adressen under:
Du er selv ansvarlig for alle transportutgifter og forsikring
når du sender et produkt til service. Husk alltid å legge ved
følgende:
ECS Holding AS,
Box 108, N-1471 Lørenskog,
Norway
3.Send alltid produktet i originalemballasje.
E-post:
Service avdeling:
Web:
[email protected]
[email protected]
www.abrahamsenaudio.com
1. Kvittering eller annet kjøpsbevis dersom produktet kreves
reparert under garanti.
2. Et kort notat om feilen, feilsymptomer og hvordan feilen
oppsto.
ABRAHAMSEN© ved ECS Holding kan ikke under noen
omstendigheter stilles ansvarlig for skader som har oppstått
under transport.
Husk transportsikringen når produktet transporteres.
Tekniske spesifikasjoner
Følgende tekniske data er målt på et tilfeldig V1.0 produkt og
er typiske data.
Alle målinger er gjort med 120/240 V 50Hz / 60Hz. nettspenning.
Max utgangsnivå er satt til THD = 0,2%
Utgangsimpedans (20-20kHz) ...............................<100R
THD (1kHz)............................................................<0.002%
Støy .......................................................................<130uV
Frekvensrespons -3dB ..........................................DC-100KHz
Slew rate ...............................................................100Vus
Kanalseparasjon (20Hz-20kHz) ............................>90dB
29
Dimensjoner
Width
432mm
Depth 320mm
Height 115mm
Weight 7.5kg
(17”)
(12.6”)
(4.5”)
(15lbs)
Produsenten forbeholder seg retten til forandringer uten forvarsel.
Garantivilkår
1 ABRAHAMSEN© ved ECS Holding garanterer at dette
produktet vil være fri for feil oppstått av komponent eller
monteringsfeil i 2 (to) år fra kjøpsdato, eventuelt 5 (fem) år
hvis du har registrert deg for utvidet garanti.
2 Den utvidete garantien er kun gyldig for førstegangskjøper som har kjøpt produktet direkte fra forhandler, og kan
ikke bli overført.
3 I garantitiden vil ABRAHAMSEN© ved ECS Holding reparere eller bytte ut dette produktet uten kostnad for deler og
arbeid i henhold til denne begrensede garanti.
4 Garantien gjelder ikke følgende forhold:
4.1 Misbruk av produktet eller ikke brukt i henhold til anbefalinger gitt i denne manual.
4.2 Normal slitasje.
4.3 Forandring eller ombygging av produktet.
4.4 Ødeleggelse påført av andre produkter eller bruk av
overdreven kraft.
30
4.5 Service eller reparasjoner utført av ukvalifiserte servicepersoner.
I de nevnte punkter vil alle kostnader vedrørende service bli
belastet kjøper.
5 Ikke under noen omstendigheter vil ABRAHAMSEN© ved
ECS Holding være ansvarlig for uhell og skader utover å
reparere produktet.
6 Denne garantien gir deg spesifikke rettigheter som er i
samsvar med dette landets lov. Du kan ha andre rettigheter
som kan variere fra land til land.