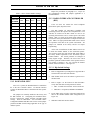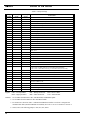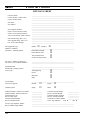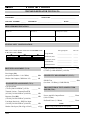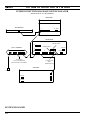
1
ERICSSONZM LBI-39074A Mobile Communications EDACS MASTR III Basic or Level 1 System Installation Manual LBI-39074 TABLE OF CONTENTS 1. GENERAL INFORMATION 1.1 IMPORTANT SAFETY INFORMATION .......................................................................... 9 1.2 GENERAL SPECIFICATIONS ........................................................................................... 10 1.3 INTRODUCTION ................................................................................................................ 11 1.4 REFERENCE MANUALS................................................................................................... 12 1.5 TOOLS AND TEST EQUIPMENT ..................................................................................... 12 2. SITE PREPARATION 2.1 INTRODUCTION ................................................................................................................ 15 2.2 ANTENNA SYSTEM .......................................................................................................... 15 2.2.1 ANTENNA MOUNTING ................................................................................... 15 2.2.2 TRANSMISSION LINES ................................................................................... 15 2.2.3 ANTENNA GROUNDING................................................................................. 16 2.3 SITE REQUIREMENTS ...................................................................................................... 16 2.3.1 2.3.2 2.3.3 2.3.4 FLOOR PLAN .................................................................................................... 16 OPERATING ENVIRONMENT ........................................................................ 16 ELECTRICAL POWER...................................................................................... 16 TELEPHONE LINES.......................................................................................... 17 2.4 QUALITY AUDIT ............................................................................................................... 17 2.4.1 ANTENNA SYSTEM......................................................................................... 17 This manual is published by Ericsson GE Mobile Communications Inc., without any warranty. Improvements and changes to this manual necessitated by typographical errors, inaccuracies of current information, or improvements to programs and/or equipment, may be made by Ericsson GE Mobile Communications Inc., at any time and without notice. Such changes will be incorportated into new editions of this manual. No part of this manual may be reproduced or transmitted in any form or by any means, electronic or mechanical, including photocopying and recording, for any purpose, without the express written permission of Ericsson GE Mobile Communications Inc. Copyright June 1994, Ericsson GE Mobile Communications Inc. 2 LBI-39074 3. EQUIPMENT INSTALLATION 3.1 INSTALLATION................................................................................................................. 19 3.2 UNPACKING EQUIPMENT .............................................................................................. 19 3.3 RF EQUIPMENT INSTALLATION ................................................................................... 19 3.3.1 SURGE PROTECTION EQUIPMENT.............................................................. 20 3.3.2 INSTALLING VENDOR SUPPLIED RF EQUIPMENT .................................. 20 3.4 TRUNKED EQUIPMENT INSTALLATION ..................................................................... 20 3.4.1 CABINET MOUNTING (TYPICAL) ................................................................ 20 3.4.2 CABLE DUCT ASSEMBLY.............................................................................. 21 3.4.3 PROTECTIVE GROUND CONNECTIONS ..................................................... 21 3.4.4 POWER CONNECTIONS.................................................................................. 22 3.5 QUALITY AUDIT............................................................................................................... 22 4. SYSTEM CABLING 4.1 INTERIOR RF CABLING................................................................................................... 25 4.1.1 INSTALLING RF CABLES ............................................................................... 25 4.2 EDACS INTERFACE CABLING ....................................................................................... 27 4.2.1 4.2.2 4.2.3 4.2.4 4.2.5 4.2.6 4.2.7 POWER SENSOR .............................................................................................. 27 STATION AUDIO.............................................................................................. 28 RIC AUDIO ........................................................................................................ 29 GETC DATA ...................................................................................................... 29 SERIAL MODULE............................................................................................. 30 PHONE LINE ..................................................................................................... 30 DOWNLINK DATA........................................................................................... 30 4.3 CUSTOMER INTERFACE CABLING............................................................................... 31 4.3.1 ALARM AND CONTROL UNIT (ACU)........................................................... 31 4.4 QUALITY AUDIT............................................................................................................... 33 5. STATION CONFIGURATION 5.1 INTRODUCTION................................................................................................................ 35 5.1.1 STATION GETC's.............................................................................................. 35 5.1.2 DOWNLINK GETC ........................................................................................... 37 5.1.3 RADIO INTERFACE CONTROLLER (RIC).................................................... 37 3 LBI-39074 5.1.4 CHANNEL TERMINATIONS ........................................................................... 39 5.1.5 POWER MONITOR UNIT................................................................................. 40 5.1.6 SITE CONTROLLER MODEM ......................................................................... 40 5.2 QUALITY AUDIT ............................................................................................................... 40 6. SYSTEM MANAGER INSTALLATION 6.1 SPECIFICATIONS .............................................................................................................. 43 6.2 INTRODUCTION ................................................................................................................ 43 6.3 INSTALLATION ................................................................................................................. 43 6.3.1 OPERATING ENVIRONMENT ........................................................................ 43 6.3.2 ELECTRICAL POWER...................................................................................... 44 6.3.3 TELEPHONE LINES.......................................................................................... 44 6.4 DATA MODEMS................................................................................................................. 44 6.4.1 INSTALLATION................................................................................................ 44 6.4.2 TEST EQUIPMENT REQUIRED ...................................................................... 44 6.4.3 CONFIGURATION ............................................................................................ 44 6.5 QUALITY AUDIT ............................................................................................................... 49 7. SYSTEM TEST AND ALIGNMENT PROCEDURES 7.1 INTRODUCTION ................................................................................................................ 51 7.2 TEST EQUIPMENT ............................................................................................................ 51 7.3 POWER UP .......................................................................................................................... 51 7.4 GETC PROGRAMMING .................................................................................................... 51 7.5 TRUNKED REPEATER TEST ........................................................................................... 51 7.5.1 7.5.2 7.5.3 7.5.4 SETUP ................................................................................................................ 52 RECEIVER POT ALIGNMENT ........................................................................ 53 TRANSMITTER POT ALIGNMENT:............................................................... 53 TRANSMITTER OUTPUT AND REFLECTED POWER (except MASTR III 800 MHz)............................................................................ 55 7.5.5 TRANSMITTER OUTPUT AND REFLECTED POWER (MASTR III 800 MHz only) ............................................................................... 55 7.6 RF SYSTEM CHECK .......................................................................................................... 56 7.6.1 TRANSMITTER COMBINER ........................................................................... 56 7.6.2 RECEIVER MULTICOUPLER TEST ............................................................... 56 7.6.3 TOWER TOP AMPLIFIER TEST...................................................................... 57 4 LBI-39074 7.7 RF POWER MONITOR TEST............................................................................................ 57 8. SYSTEM FUNCTIONAL CHECKOUT PROCEDURES 8.1 INTRODUCTION................................................................................................................ 59 8.2 PROGRAMMING THE EDACS TEST RADIOS.............................................................. 59 8.3 BASIC TEST SITE .............................................................................................................. 59 8.4 LEVEL 1 TRUNKING TEST .............................................................................................. 60 8.5 UNINTERRUPTABLE POWER SUPPLY TEST............................................................... 60 8.6 TELEPHONE INTERCONNECT TEST............................................................................. 60 APPENDIX A - INSTALLATION CHECKLISTS SITE DATA SHEET................................................................................................................... A-2 INSTALLER PROFILE DATA SHEET..................................................................................... A-4 ANTENNA SYSTEM INSTALLATION CHECKLIST ............................................................ A-5 EQUIPMENT INSTALLATION CHECKLIST ......................................................................... A-6 SYSTEM CABLING CHECKLIST............................................................................................ A-7 CONFIGURATION CHECKLIST ............................................................................................. A-8 DOWNLINK GETC CHECKLIST............................................................................................. A-9 SYSTEM MANAGER INSTALLATION CHECKLIST............................................................ A-10 GETC PROGRAMMING DATA SHEET.................................................................................. A-11 TRUNKED REPEATER TEST DATA ...................................................................................... A-12 RF SYSTEM TEST DATA......................................................................................................... A-13 APPENDIX B - EQUIPMENT ROOM LAYOUT DIAGRAMS STANDARD EQUIPMENT ROOM FLOOR PLANS ............................................................... B-2 STANDARD EQUIPMENT CABINET LAYOUT DIAGRAM ................................................ B-3 5 LBI-39074 APPENDIX C - EDACS INTERFACE PANEL INTERCONNECTION DIAGRAMS INSTALLATION WIRING GUIDE ........................................................................................... C-2 INSTALLATION WIRING GUIDE ........................................................................................... C-2 POWER SENSOR MODULES................................................................................................... C-3 STATION AUDIO MODULES .................................................................................................. C-4 RIC AUDIO MODULES............................................................................................................. C-5 GETC DATA MODULES........................................................................................................... C-6 SERIAL MODULES (BASIC EDACS)...................................................................................... C-7 SERIAL MODULES (LEVEL 1 SYSTEM) ............................................................................... C-8 PHONE LINE MODULE............................................................................................................ C-9 APPENDIX D - PUNCHBLOCK CONNECTION DIAGRAMS STATION AUDIO CH. 1-12 ...................................................................................................... D-2 STATION AUDIO CH. 13-20 .................................................................................................... D-3 MODEM DATA - CH. 1-12........................................................................................................ D-4 MODEM DATA - CH. 13-20...................................................................................................... D-5 PHONE LINE 1-16 ..................................................................................................................... D-6 PHONE LINE 17-20 ................................................................................................................... D-7 DOWNLINK DATA ................................................................................................................... D-8 APPENDIX E - SYSTEM MANAGER INTERCONNECTION DIAGRAMS INTERCONNECTION DIAGRAM SYSTEM MANAGER ...................................................... E-2 6 LBI-39074 FIGURES AND TABLES Figure 1 - Surge Protectors ........................................................................................... 23 Figure 2 - Typical Mounting of the Rx Surge Protectors .............................................. 23 Figure 3 - Antenna Power Sensor Interconnection........................................................ 28 Figure 4 - External Connections Directly to Other Equipment (Rear View)................. 31 Figure 5 - Typical Control Output Configurations ........................................................ 32 Figure 6 - Typical Alarm Input Configurations............................................................. 32 Figure 7 - Station GETC (19D904266) Jumper Locations............................................ 35 Figure 8 - Station GETC DIP Switch Settings .............................................................. 36 Figure 9 - RIC Board Switch Locations ........................................................................ 39 Figure 10 - SW4 DIP Switch Binary Weight Assignment............................................. 39 Figure 11 - Channel Termination Board ....................................................................... 39 Figure 12 - System Manager to Controller Using Direct Connection ........................... 44 Figure 13 - Test Mode Repeat....................................................................................... 52 Figure 14 - Test Mode - GETC Modem Line Output.................................................... 53 Figure 15 - Test Mode - Low Speed Data / Repeat ....................................................... 53 Figure 16 - Test Mode - Repeat .................................................................................... 54 Figure 17 - Test Mode 9600 BAUD Pseudo - Random Data........................................ 54 Figure 18 - GETC Shelf ................................................................................................ 54 Figure 19 - Power Amplifier Adjustment Locations ..................................................... 56 Figure 20 - Receiver Multicoupler Test Setup .............................................................. 57 Table 1 - Tools and Test Equipment ............................................................................. 13 Table 2 - RF Cables and Connectors Supplied (10 Channel System) ........................... 26 Table 3 - 25-Pair Interconnect Cables........................................................................... 28 Table 4 - 15-Conductor Interconnect Cables ................................................................ 30 Table 5 - Alarm Input Connections Pin Identification .................................................. 33 Table 6 - Control Output Connections Pin Identification.............................................. 33 Table 7 - GETC Channel Number Settings ................................................................... 37 Table 8 - Jumper Settings.............................................................................................. 38 Table 9 - PC Programming Packages............................................................................ 59 Table 10 - Station GETC Front Panel LED Indicators................................................. 59 7 LBI-39074 This page intentionally left blank 8 GENERAL INFORMATION 1.1 IMPORTANT SAFETY INFORMATION The following general safety precautions must be observed during all phases of operation, service, and repair of this product. Failure to comply with these precautions or with specific warnings elsewhere in this manual violates safety standards of design, manufacture, and intended use of the product. Ericsson GE Mobile Communications Inc. assumes no liability for the customer's failure to comply with these standards. LBI-39074 result in a risk of fire and electric shock. If an extension cord must be used, ensure: a. The pins on the plug of the extension cord are the same number, size, and shape as those of the plug on the power supply. b. The extension cord is properly wired, in good condition, and c. The wire size is large enough for the AC ampere rating of unit. 1. SAVE THIS MANUAL - It contains important safety and operating instructions. 11. DO NOT operate equipment with damaged power cords or plugs - replace them immediately. 2. Before using this equipment, please follow and adhere to all warnings, safety and operating instructions located on the product and in the manual. 12. DO NOT operate this product in an explosive atmosphere unless it has been specifically certified for such operation. 3. DO NOT expose equipment to rain, snow or other type of moisture. 13. To reduce risk of electric shock, unplug unit from outlet before attempting any maintenance or cleaning. 4. Care should be taken so objects do not fall or liquids do not spill into the equipment. 14. DO NOT operate this product with covers or panels removed. Refer all servicing to qualified service personnel. 5. DO NOT expose equipment to extreme temperatures. 6. DO NOT use auxiliary equipment not recommended or sold by Ericsson GE. To do so may result in a risk of fire, electric shock or injury to persons. 7 GROUND THE EQUIPMENT-To minimize shock hazard, the station equipment cabinet must be connected to an electrical ground. The equipment supplied is equipped with threeconductor AC power cords. These power cords must be plugged into approved three-contact electrical outlets with the grounding wires firmly connected to an electrical ground (safety ground) at the power outlet. The power cords must also meet International Energy Commission (IEC) safety standards. 8. To reduce risk of damage to electrical cords, pull by plug rather than cord when disconnecting a unit. 9. Make sure all power cords are located so they will not be stepped on, tripped over or otherwise subjected to damage or stress. 15. Use only fuses of the correct type, voltage rating and current rating as specified in the parts list. Failure to do so can result in fire hazard. 16. GROUNDING AND AC POWER CORD CONNECTION - To reduce risk of electrical shock use only a properly grounded outlet. The system components are equipped with electric cords having an equipment grounding conductor and a grounding plug. Be sure all outlets are properly installed and grounded in accordance with all local codes and ordinances. 17. DANGER - Never alter the AC cord or plug. Plug into an outlet properly wired by a qualified electrician. Improper connection or loss of ground connection can result in risk of an electrical shock. 18 ELECTROSTATIC DISCHARGE SENSITIVE COMPONENTS - This station contains CMOS and other circuit components which may be damaged by electrostatic discharge. Proper precaution must be taken when handling circuit modules. As a minimum, grounded wrist straps should be used at all times when handling circuit modules. 10. An extension cord should not be used unless absolutely necessary. Use of an improper extension cord could 9 LBI-39074 GENERAL INFORMATION 1.2 GENERAL SPECIFICATIONS Repeater Cabinet Type: Indoor Cabinet (Floor Mount) Size Height: Width: Depth: Number of Rack Units Weight (min.) Continuous Duty: Packed for Domestic Shipping: 175 cm (69-1/2 in.) 59 cm (23-3/16 in.) 53.3 cm (21 in.) 33 136 kg (300 lb.)(w/2 repeaters per cabinet) 147 kg (317 lb.)(w/ 2 repeaters per cabinet Ambient Temperature: (for full spec. performance per EIA) -30°C to +60°C (-22°F to +140°F) Humidity (EIA) 90% at 50°C (122°F) non-condensing 205 kg (450 lb.) (w/3 repeaters per cabinet) 212 kg (467 lb.) (w/3 repeaters per cabinet) Altitude Operable: Shippable: Up to 4,570 m (15,000 ft.) To 15,250 m (50,000 ft.) Input Power Source: 120 Vac (±20%), 60 Hz, 9 Amps per channel (max.) 230 Vac (±15%), 50 Hz Source Power Drain @ 121 Vac (per 800 MHz channel) 1100 Watts per channel (max.) Receiver: Standby: Rated Audio: Transmitter: 10 139 Watts 145 Watts 600 Watts GENERAL INFORMATION LBI-39074 Site Controller Cabinet Type: Indoor Cabinet (Floor Mount) Size Height: Width: Depth: Number of Rack Units Weight (min.) Standard (basic no options): With options: 175 cm (69-1/2 in.) 59 cm (23-3/16 in.) 53.3 cm (21 in.) 33 Ambient Temperature: 5°C to 50°C (41°F to 122°F) Humidity (EIA) 10% to 90% non-condensing 73 kg (160 lb.) 91 kg (200 lb.) Altitude Operable: Up to 4,570 m (15,000 ft.) Input Power Source: 120 Vac (±20%), 60 Hz 230 Vac (±15%), 50 Hz (±2%) Source Power Drain @ 121 Vac 750 Watts 1.3 INTRODUCTION An Enhanced Digital Access Communications System (EDACS) Basic or Level 1 System consists of individual EDACS radios and a single EDACS Basic or Level 1 trunked repeater site. The EDACS Level 1 system may also include an optional System Manager computer for access to user management features. This manual covers the installation and testing of the trunked repeater site and the System Manager. Before attempting to install or checkout the equipment, you must become familiar with the contents of this manual. The manual is divided into the following sections: • • General Information - This includes information on safety, systems specifications, a listing of related documentation, and a list of test equipment required for testing, aligning , and maintaining the radio equipment. Site Preparation - This section identifies site requirements and installation practices for the antenna tower, transmissions lines, and the equipment shelter. • Equipment Installation - This section provides instructions for unpacking and physically installing the electronic equipment cabinets. • System Cabling - This section provides detailed instructions for installing interior transmission lines and inter-cabinet cabling. • Station Configuration - This section provides detailed instructions for setting up the equipment prior to applying power. • System Manager Installation - This section provides site requirements, installation and configuration instructions for the optional System Manager. • System Test And Alignment Procedures - These procedures provide detailed instructions for testing and aligning each of the individual system components. • System Functional Checkout Procedures - This section provides detailed instructions for verifying the overall operation of the equipment as a system. • Appendices - The Appendices include support features such as; Installation and operation, 11 LBI-39074 GENERAL INFORMATION Checklists, Typical Floor Plans, and Cabinet Interconnection Diagrams. 1.4 REFERENCE MANUALS It may be necessary to consult one or more of the following manuals. These manuals will also provide additional guidance if you encounter technical difficulties during the installation or testing processes. LBI-38550 - Base Station Power Supply Maintenance Manual LBI-38636 - MASTR III Base Station Installation Manual LBI-38703 - System Manager Installation, Setup, and Troubleshooting LBI-38737 - Electrostatic Discharge Protection LBI-38775 - MASTR III Base Station System Combination Maintenance Manual LBI-38812 - EDACS Interface Panel Maintenance Manual LBI-38822 - Turbo Board (GETC-1e) Maintenance Manual LBI-38875 - EDACS Cable Duct System Maintenance Manual LBI-38894 - GETC Trunking Card Maintenance Manual LBI-38983 - Antenna Systems Assembly Manual LBI-38984 - System Manager User's Guide LBI-38985 - EDACS Site Controller Maintenance Manual LBI-38988 - EDACS Station GETC Configuration Manual LBI-39025 - MASTR III RF Package, 800 MHz LBI-39067 - Standard For Site Grounding And Protection SRN-1010 - Software Release Notes for GETC Turbo Board Software 12 SRN-1060 - Software Release Notes for GETC-1e Software SRN-1062 - Software Release Notes for Turbo Board Software TQ-3353 - MIIe and MIII Programming Guide TQ-3357 - GETC Shelf Programming Guide The following vendor manuals should also be available when installing equipment into the RF Equipment cabinet: • DECIBEL PRODUCTS, Inc. User's Manual for the DB8843 Remote Site Monitor. • DECIBEL PRODUCTS, Inc. maintenance manual for the DB8900 Tower Top Amplifier Family. • DECIBEL PRODUCTS, Inc. maintenance manual for the DB8000 Receiver (RX) Multicoupler Family. • DECIBEL PRODUCTS, Inc. Installation & Operations Manual for the DB8061H/8062H Transmitter ( Tx) Combiners. 1.5 TOOLS AND TEST EQUIPMENT The items listed in Table 1 are the tools and test equipment for use during alignment, testing, and maintenance of the RF and digital radio equipment. Test equipment other than that recommended may be substituted, providing it is electrically equivalent in accuracy and operating range, and capable of maintaining the tolerances specified for the recommended test equipment. LBI-39074 Table 1 - Tools and Test Equipment ITEM QTY DESCRIPTION VENDOR 1 1 Deluxe Tool Kit 2 1 Crowbar Required to open shipping crates. 3 1 Hammer drill and 3/4 inch concrete bit Drill holes for mounting cabinets. 4 1 RF Communications Test Set (Including test probe, (2) 10 ft. BNC-to-BNC cables, and (2) BNC-to-N type adapters 5 1 Ladder or step stool 6 1 Wire Inserter Amphenol EGE HP MODEL No. TXCTC3 8920 WHERE USED (DETAILED) EGE’s deluxe tool kit combines the workmanship of a Platt case with quality professional hand tools. This carefully selected tool assortment has been chosen primarily for the two-way radio, paging, and cellular industries and includes just about every tool a technician should ever need to do installation and repair. This kit contains the most commonly requested tools in the land mobile industry and is available with or without an auto glass tester, capacitance meter, Multimeter, and cordless screwdriver. Test and Alignment. System cabling. 25 pair cable to punch block (CHAMP) connectors. 7 1 1/4 / 1/2 inch Heliax Stripper Andrew 207865 Preparing RF Cables. 8 1 Replacement blade - 5 pack Andrew 209874 Preparing RF Cables. 9 1 PC Programming Adapter EGE TQ3370 10 1 PC Programming Software EGE TQ3353 TQ3357 TQ3364 MASTR III. GETC Programming. EDACS PC Product Program. 11 1 Programming Cables EGE TQ3311 TQ3336 TQ3368 TQ3360 TQ3356 TQ3313 Cable for MPA/MPD radios. Cable for PCS radio. Cable for MRK radio. Cable for GETC. Cable for MASTR III T/R Shelf. Cable for RANGR radio. 12 1 Laptop or portable computer 386 or 486 Running PC Programming Software. 13 3 Portable radios EGE MRK, MPA, PCS Talk Tests. 14 1 RS-232 Adapter Cable DB9(F) to DB25(M) NEWARK 50F6410 Interconnection between Laptop computer and Interface modules 15 1 Transmission Impairment Measuring Set (TIMMS) (w/(2) 10 ft. cables terminated with alligator clips HP 4934A Test and alignment. 16 1 Punch Block EGE 19B851899P2 Test and alignment. 17 1 Adapter, Punch block Amphenol 284-1 Test and alignment. 18 2 RF Directional Wattmeter Bird Model 43 Plug-in Elements, 400 - 1000 Mhz 50 Watt 100 Watt 250 Watt Bird TBR 43N Test output power. TBR50E TBR100E TBR250E 19 1 Extender board (optional) EGE 188D5338G1 188D5338G2 Use with System and Power modules. Use with RF modules. 20 1 Test and Troubleshooting Fixture EGE TQ0650 Test, align, and troubleshoot MASTR III Station. 21 1 RF Coaxial Load Resistor Bird 8135 Test and alignment. 13 LBI-39074 SITE PREPARATION Table 2 - Tools and Test Equipment (con’t) ITEM QTY 22 1 Attenuator. 10 dB, 100 W Bird 8343-100 Test and alignment. 23 1 Punch Down Tool Newark 50F6281 Terminate and cut wires to Type 66 terminal blocks. 14 DESCRIPTION VENDOR MODEL No. WHERE USED (DETAILED) LBI-39074 2. SITE PREPARATION 2.1 INTRODUCTION 2.2.2 TRANSMISSION LINES This section provides instructions for preparing the site and other considerations which must be completed prior to installing an EDACS Basic or Level 1 system equipment. The areas covered include the following: When installing the transmissions lines, refer to the block diagram for UHF/800 MHz Antenna Systems contained in LBI- 38983. • 2.2.2.1 Length Antenna System - This includes installation of the antenna tower, receive and transmit antennas, and the installation of the transmission lines from the antenna to the equipment shelter. • Site Requirements - Information is provided concerning various factors which may affect the physical location of the equipment facility. • Facility Preparation - This section provides information for preparing the facility prior to installing the equipment. This information includes proposed equipment layout, environment; electrical power; and telephone line installation. The length of the main coaxial cable for each antenna is planned as a continuous run with no connectors or splices between the antenna and the equipment room. Each cable includes a 50-foot allowance for the distance from the bottom of the tower to the equipment room. Smaller diameter, more flexible coaxial cables are used at both ends of the main coaxial cable to facilitate installation. 2.2.2.2 Minimum Bending Radius Always adhere to the minimum bending requirements provided by the manufacturer. For Andrew Products, the values are: CABLE SIZE 2.2 ANTENNA SYSTEM 1/4-inch 1/2-inch 7/8-inch 1 5/8-inch This section covers installing the antenna system, including RF cables from the antennas to the equipment room wall feedthrough connector. Antenna systems are generally installed by crews trained and equipped for working on antenna towers. As a result, this manual assumes the Antenna Systems are installed by crews with the specialized equipment and skills required for working on towers and installing the antenna cables. However, it may be necessary for the system installer to provide information and directions to the crew installing the antenna system and to verify proper installation. BENDING RADIUS 1-inch 1.25-inch 10-inches 20-inches (25 mm) (32 mm) (250 mm) (510 mm) 2.2.2.3 Hoisting Grips Hoisting grips provide the means to attach a lifting mechanism to the coaxial cable without damaging the cable. Each hoisting grip is capable of safely lifting 200 feet of cable without causing damage. Therefore, one hoisting grip is required for every 200-foot section of cable. The grips may be left attached to the cable after the cable installation is completed. 2.2.1 ANTENNA MOUNTING Some situations may require more hoisting grips, such as: The antenna tower must allow antenna mounting that provides isolation of at least 25 dB between the Tx and Rx antennas. This is necessary to avoid interference in the trunked receivers caused by the trunked transmitters. An isolation of greater than 25 dB is easily obtained by placing one antenna directly above the other on the tower (minimum 10-foot separation). • An installation to a tower which is on top of another structure. • Any installation where the length of cable that must be lifted is greater than the height of the tower. In these situations, additional hoisting grips should be ordered. 15 LBI-39074 SITE PREPARATION 2.2.2.4 Hangers And Adapters Coaxial cables on the tower should be secured at intervals of 3 feet (maximum). Securing 7/8 inch and 1 5/8 inch diameter coaxial cables is accomplished by using either hangers or hangeradapter combinations. The hangers secure the cables to the tower structure by using prepunched holes or attachment adapters. • When the tower structure is prepunched with 3/4inch holes, snap-in hangers are used (preferred method). • When the tower is prepunched with 3/8 inch holes, the hanger is secured by a 3/8 inch bolt. For towers without prepunched holes, the hangers are attached with adapters. The type of adapter depends on the type of tower structure. Adapters are available for either angle tower members or round tower members. Adapters for each antenna system are selected when ordering the system. If the coaxial cable must be attached to a structure that is not compatible with any of the above hangers or adapters, then additional materials or other special considerations may be required To secure 1/4-inch or 1/2-inch vertical or horizontal coaxial cables of any size, use nylon cable ties. 2.2.2.5 Weatherproofing A kit of weatherproof tape is provided to protect coaxial connectors from the outside elements. One roll of tape is sufficient to weatherproof four exposed outside connector joints. 2.2.3 ANTENNA GROUNDING Grounding kits are installed to prevent the radio system from being damaged by lightning. A grounding kit should be installed at the top end of each coaxial cable run on the tower. A second kit should be installed on each cable at the bottom of the tower and a third kit on the cable at the point where the cable enters the building, if the tower-to-building length is greater than 20 feet. For cable runs on the tower greater than 200 feet, additional kits should be installed at each 200-foot interval. 2.3 SITE REQUIREMENTS 16 This section provides information for preparing the facility prior to installing the equipment. This information includes proposed equipment layout, environment, electrical power and telephone line installation 2.3.1 FLOOR PLAN Direct access (for antenna cables and personnel) between the tower and the equipment room is necessary. Standard floor plans for the equipment cabinets are shown in the Appendix B. The lengths of interconnect cables supplied are based on these standard floor plans. If a floor plan other than a standard floor plan is used, longer interconnect cables may be required. 2.3.2 OPERATING ENVIRONMENT The equipment room where the RF Equipment, Repeater and Site Controller equipment is installed must meet the environmental conditions listed in the Station Specifications section of this manual: Although the temperature requirements for individual pieces of trunked equipment may be broader, when several units are assembled together in a cabinet more heat is generated. Because of this condition, the ambient room temperature outside the cabinet must be lowered to ensure the temperature inside the cabinet does not exceed the limits for the equipment. 2.3.3 ELECTRICAL POWER Each EDACS cabinet is equipped with its own AC power cord. Each of these power cords should be connected to a separate circuit breaker. The following circuit breakers are recommended. • 115 Vac (60 Hz) - a 20-amp circuit breaker for each power cord. • 230 Vac (50 Hz) - a 15-amp circuit breaker for each power cord. Receptacles must be installed within reach of the power cords. This can be on the wall behind the cabinets, in the floor under the cabinets, or in the cabinet top cable ducts. The Site Controller power cord is about 4.5 meters (15 feet) long, starting from a point within the rear of the cabinet about one foot above the floor. Each repeater power supply power cord is about 3 meters (9.7 feet) long, starting at the back of each power supply (two or three different heights) within the rear of each repeater cabinet. Each cord plugs into an AC Outlet which has a cord length of about 3 meters (9.7 feet) long. SITE PREPARATION When required, the power supplies may be omitted from the repeater cabinet. In this case, power must be supplied to the repeaters from an external 13.8 Vdc power source through a separate 30-amp circuit breaker for each repeater. Additional equipment may be required if other types of power sources are used, or if the power source is not within reach of the individual AC power cords. 2.3.4 TELEPHONE LINES If the distance between the System Manager and the Equipment Room is less than about 50 feet, a standard RS-232 data cable may be used to connect the System Manager computer to the Site Controller computer. However, if the distance between the System Manager and the Equipment Room exceeds about 50 feet, a 2-wire Dial-up or 4-Wire Leased 3002 Data-Grade Telephone Line (or equivalent) with a data modem at each end is required to connect the System Manager computer to the Site Controller computer. To ensure the proper data-grade circuit is obtained when leasing a telephone line, request a 4-Wire 3002 DataGrade line from the local or regional telephone carrier. If using an equivalent line, it must meet the following specifications: • Frequency response: 1000 Hz 500 - 2400 Hz 300 - 2700 Hz Reference -1 to +3 dB -2 to +6 dB • Maximum Frequency Error = ±5 Hz • Maximum Net Loss = 16 dB LBI-39074 2.4 QUALITY AUDIT 2.4.1 ANTENNA SYSTEM After the Antenna System is installed it should be inspected before the installers leave. A checklist of tasks performed on the antenna system is provided in Appendix A. Be sure to complete this visual inspection before the installers leave, so any obvious errors can be corrected. Using field glasses (if necessary) view the Antenna System from various positions on the ground. Using copies of the Antenna System Installation Checklist found in Appendix A, fill out a checklist for each antenna as you go through the following inspection procedure. This will provide a record of the inspection, and of some antenna information for future reference. Record the make of antenna. Record the type of antenna (omni or directional). Record the design gain of the antenna. If the antenna is directional, record the bearing of the main lobe. If it is omni, write "Omni" in the data entry line. Record the height of the antenna above ground. Confirm that cable hoisting grips were installed as required to prevent damage to the coaxial cable. Hoisting grips should have been installed at the antenna end of the cable plus one for each 200 feet of cable length. Confirm the cable is secured to the tower at intervals which do not exceed 3 feet. Confirm the cable is grounded at the top of the tower. • Maximum Group Delay (800-2400 Hz) = 2000 µS • Minimum S/N Ratio = 24 dB Confirm the cable is grounded at the point where it leaves the tower. Confirm the cable is grounded at the point where it enters the building. Confirm the coaxial cable run looks OK. The cable must be tight (nothing to flap in the breeze), have no dings or kinks, be one continuous run (no connectors or splices), and not exceed the minimum bending radius on any bend. Confirm the cable feedthrough is properly installed where the cable enters the building. 17 LBI-39074 SITE PREPARATION Confirm the coaxial connectors have been properly weather sealed with tape. 18 Confirm the cable entrance to the building has been properly weather sealed. LBI-39074 3. EQUIPMENT INSTALLATION 3.1 INSTALLATION will vary accordingly. If size and weight limits are required, contact the factory for special packing instructions. NOTE AC power adequate to meet system requirements, environmental control, and digital or voice grade phone lines must be available at the site prior to installation. Cabinets packed on mini pallets can be moved with a hand-truck, crates may need a fork lift or pallet jack, depending on the size. Wrenches will be needed to unbolt the cabinets from the mini pallets, and a crowbar and hammer will be useful in opening the crates. Do not leave packed or unpacked equipment where they can be rained on. This section is divided into the following sub-sections: • Antenna System • Trunked Equipment Installation • RF Equipment Installation and Cabling • EDACS Interface Cabling • Customer Interface Cabling • System Manager Upon receipt of the EDACS station equipment, carefully examine each carton. If any damage is detected, note the damage on the Bill of Lading. Move the cartons as close as possible to their mounting location. Unpack the equipment and carefully examine each item. If there is any damage to the equipment, contact the carrier immediately and have their representative verify the damage. If you fail to report the shipping damage immediately, you may forfeit any claim against the carrier. The sub-section on Trunked Equipment includes the installation of the Failsoft Repeater, Site Controller, RF Equipment cabinet, and Test Unit antenna. When unpacking the equipment, check the contents against the packing list. Contact your Ericsson GE representative and the carrier if any discrepancies are noted. 3.2 UNPACKING EQUIPMENT 3.3 RF EQUIPMENT INSTALLATION EDACS equipment is generally packed in one of the following two ways: NOTE • • Bolted vertically to a mini pallet approximately 36” deep x 32” wide, with a corrugated cardboard cover held down with two plastic straps. This technique is generally used for domestic shipments of 69-inch and 83-inch cabinets. The mini pallet adds approximately three inches to the overall cabinet height. The weight varies according to the content, but generally runs from 300 pounds to 600 pounds. Crated vertically or horizontally. This technique is generally used for open-racked equipment and overseas shipments of 69-inch and 83-inch cabinets. Crates may contain one or several cabinets or racks, and the dimensions and weight These procedures are for Ericsson GE standard installation. If the system is non-standard, installation procedures may differ. In this event, installers should consult with Ericsson GE System Engineering. Refer to the Trunked Equipment sub-section, RF Equipment cabinet(s) for detailed information for fabricating and installing RF cables within the equipment room. This section provides instructions for installing the RF Equipment and for running the necessary RF cables to the equipment room wall Tx and Rx feedthrough connectors. 19 LBI-39074 EQUIPMENT INSTALLATION The RF Equipment Cabinet consists of the following components: • Vertical Cabinet/Rack • Top Cover 69 inch cabinet/cabinet only • Tower Top Amplifier or Receiver Filter • Receiver Multicoupler • Transmitter Combiner have already been installed by other installers (Refer to Surge Protector Diagrams in Figures 1 and 2). 4. Install the Antenna Power Sensor by connecting it directly to the output of the Tx Combiner. The Antenna Power Sensor allows the Site Controller to monitor forward and reflected power to the transmit antenna. (The Antenna Power Sensor is shipped in the bottom of the Site Controller cabinet.) 5. Mount the transmit surge protector (IS-CT50LNZ-MA) to the grounded bulkhead panel, located at the wall feedthru where the antenna system enters the building. This panel should have already been installed by other installers. (Refer to Surge Protector Diagrams in Figures 1 and 2.) 6. Install Top Cover (if cabinet). 3.3.1 SURGE PROTECTION EQUIPMENT • Tx Coax Surge Protector, IS-DC50LNZ-MA (400960 MHz) • Rx Coax Surge Protector, IS-CT50HN-MA (800-900 MHz) 3.3.2 INSTALLING VENDOR SUPPLIED RF EQUIPMENT RF Equipment used for interfacing the Antenna System to the Repeaters may be pre-racked by Ericsson GE or dropped shipped from the individual vendors directly to the customer. If the RF equipment is supplied directly from the vendor, it will be necessary to install the equipment into the RF Equipment Cabinet. NOTE The system is designed to use either a Tower Top Amplifier or a Receiver Filter. When a Tower Top Amplifier is used, the Receiver Filter is not required. 1. 2. 3. 20 Install the vendor supplied RF equipment into the RF Equipment cabinet. The Cabinet Layout Diagram in Appendix B shows a typical equipment rack-up of the RF Equipment cabinet. (For specially engineered systems, refer to the "As-Built" Site Floor Plan and Equipment Rack Elevation Diagrams for the particular site as supplied by Special Engineering.) Secure each component to the cabinet using standard mounting screws and clips that come as part of the cabinet hardware kit. Mount the Receive Surge Protector (IS-DC50LNZMA), if not previously installed, to the grounded bulk head panel, located at the wall feedthru where the antenna system enters the building. This panel should 3.4 TRUNKED EQUIPMENT INSTALLATION This section provides general instructions for the physical installation of the following standard cabinets in the equipment room: • Site Controller cabinet/Racks (if supplied) • Failsoft Repeater cabinet(s)/Racks • RF Equipment cabinet(s)/Racks An Equipment Room Installation Checklist, see Appendix A, is provided which suggests the installation task sequence and provides a method for tracking task completion. 3.4.1 CABINET MOUNTING (TYPICAL) The following tools and materials are typically needed to fasten the cabinets to concrete floor (if installing on wood flooring - do not use lead anchors): • 1/2” x 2” Lag screws (4 per rack). • 1/2” Flat washers (4 per cabinet/rack). • Lead anchor for 1/2” lag screws (4 per rack). • Measuring tape. • Heavy duty marker (suitable for marking coarse concrete). • Eye protection. EQUIPMENT INSTALLATION • Ear protection. • Drill with masonry bit (see size marked on anchor). • 1/4” x 24” Flexible plastic tubing (blow debris out of hole). • Hammer (seat anchor in hole). • Wrench (screw lag screw into anchor). The lag screws, washers, and anchors are supplied with each cabinet. The tools must be supplied by the installer. The following additional materials are supplied with each optional open-type equipment rack to fasten adjacent side rails together at the top and bottom: • 3/8” x 1 1/2” Hex machine screws (2 per openrack). • 3/8” Hex nut (2 per open-rack). • 3/8” Flat washers (4 per open-rack). • 3/8” Lock washer (2 per open-rack). Refer to the floor plans in the Appendix B. These floor plans cover standard cabinet placement for sites having up to 20 MASTR III trunked repeaters (channels), in 69-inch or 83-inch cabinets. If other than a standard configuration is used, special interconnect cables may be required. When the number of repeaters (mounted three per cabinet) is 12 or less, the standard placement of the Site Controller, Failsoft Repeater, and RF Coupling cabinets is in a single row. When the number of repeaters (mounted three per cabinet) is 13 to 20, the standard placement of the Site Controller, Failsoft Repeater, and RF Coupling cabinets is in two rows (cabinet backs of one row facing cabinet fronts of the other row) with a three-foot isle between. The RF Equipment cabinet(s) may be installed at either end of a row. For optimum performance, this cabinet should be located on the end nearest the point where the antenna cables enter the building. This allows the antenna cable lengths to be minimized. Position all the cabinets on the floor exactly where they are to be mounted. Allow one (1) meter (3 feet) of free space in front of and behind each cabinet, to allow the cabinet doors to swing completely open. Also allow one (1) meter (3 feet) of free space around at least one end of each row of cabinets, to get to the back of the cabinets. Mark the position of the mounting bolt holes on the floor using the four holes in the bottom of each cabinet as a template. Then move the cabinets out of the way, drill the LBI-39074 holes in the floor for the screw anchors, seat the anchors in the holes, reposition the cabinets, and fasten the cabinets down with lag screws (use a flat washer under each lag screw head, to keep from chewing up the cabinet around the hole). 3.4.2 CABLE DUCT ASSEMBLY If cabinet-top cable ducts are supplied, install per LBI38875 using the hardware provided. However, leave the duct covers off until the site wiring is complete. These cable ducts are not for optional open-type equipment racks. 3.4.3 PROTECTIVE GROUND CONNECTIONS Protective grounding outside the equipment room is beyond the scope of this manual. This manual provides information for internal grounding only. However, a general rule of thumb for the external grounding system is the resistance to ground should be five (5) ohms or less, as measured with a Biddle DET2/2 Megger or equivalent, per IEEE STD 81-1983. All metal (electrically conductive) objects within the equipment room must be grounded. These objects are divided into the following three (3) groups. • Room Fixtures • AC Power • EDACS and connecting equipment All metallic fixtures and room parts, such as door frames, sheet metal, ventilation louvers, air conditioning units, light fixtures, etc., should be connected to an internal halo ground of No. 2 AWG copper wire six (6) inches below the ceiling. This interior halo ground must be connected to the external ground system at each corner, using separate No. 2 AWG copper wires. In addition to all other AC power protection, the AC power must be equipped with a Josilyn AC protector, or equivalent, placed immediately after the main disconnect switch. This protector must be connected to the external ground system using a separate No. 2 AWG copper wire. All EDACS cabinets, cable trays, and protectors for cables connecting to this equipment, must be connected to a single grounding plate or bulkhead panel mounted on the wall where the antenna cables enter the equipment room. This grounding plate must be connected to the external ground system using two (2), two-inch wide copper 21 LBI-39074 EQUIPMENT INSTALLATION strapping, or equivalent. A separate No. 2 AWG copper wire must be used for each EDACS cabinet, each cable tray, and each group of cable protectors. A few general rules of thumb are as follows: • Make ground wires as short as possible and direct as possible - avoid bends if possible - absolutely no bends with a radius of less than eight (8) inches. • Surface area of ground wires is more important than cross sectional area. • All connections must be clean, free of nonconductive coatings, and be coated with an antioxidant such as NO-OX. 3.5 QUALITY AUDIT The repeater site equipment room should be inspected before the installers leave. Use an ohm meter, if necessary, to check for continuity or shorts. Using copies of the Equipment Room Installation Checklists (#1 and #2) found in Appendix A, complete a checklist for each equipment cabinet as you go through the following inspection procedure. Verify the following mechanical connections: 1. Verify each cabinet/rack is correctly fastened to the floor in all four (4) corners. 2. For cabinets, verify the optional cable ducts have been correctly installed. 3. For racks, verify all racks are bolted to adjacent rack at the top and bottom. 4. For cabinets, verify the top plate is correctly installed on the RF cabinet. 5. Verify the RF equipment is correctly installed. 6. Ensure all special installation requirements, provided by System Engineering, have been completed correctly. 3.4.4 POWER CONNECTIONS CAUTION To prevent damage to equipment, ensure power is not accidentally applied at this time. Make sure all equipment circuit breakers are in the OFF position. DO NOT apply power at this time! Each EDACS cabinet must be wired to a separate circuit breaker (20-amp for 115 Vac operation, 15-amp for 230 Vac). If plugs are used to connect the cabinets to the circuit breakers, do not plug in until the equipment installation, system cabling, and station configuration sections of this manual are complete and you are ready to turn on the equipment. 22 EQUIPMENT INSTALLATION RX SURGE PROTECTOR IS-DC50LNZ-MA Suffix: -MA for male connector bulkhead port (not threaded like female shown) LBI-39074 Tx SURGE PROTECTOR IS-CT50HN-MA Suffix: -MA for male antenna port (not threaded like female shown) Figure 1 - Surge Protectors GROUNDED BULKHEAD PANEL WALL FEEDTHRU RF CABLE RF CABLE 1/2" SUPERFLEX JUMPER TO ANTENNA FROM EQUIPMENT CABINET WALL SURGE PROTECTOR IS-DC50LNZ Figure 2 - Typical Mounting of the Rx Surge Protectors 23 LBI-39074 EQUIPMENT INSTALLATION This page intentionally left blank 24 LBI-39074 4. SYSTEM CABLING 4.1 INTERIOR RF CABLING 4.1.1.1 Receive Section Some RF coaxial cables may be pre-made and included with the system. However, most cables, must be custom made, on site, to the required length. Table 3 lists the cables, and associated connectors, which will typically be fabricated in the field. Use the following procedures to install the RF cables for the receive section of the system. 1. The coaxial cable and connectors are supplied in bulk. To cut the cable properly for easy connector attachment, use an Andrew's "EASIAX" cutting tool (or equivalent). NOTE These cables may be connected inside the repeater cabinets at the factory. If they are already connected to the repeaters, they only need to be routed to the RX Multicoupler. Pay close attention to cable labeling and connect to the correct port on the Multicoupler. When installing the RF cables, refer to the Antenna System Block Diagrams in LBI- 38983 to locate and identify the specific cable called for in these installation instructions. 4.1.1 INSTALLING RF CABLES Assemble and install the RF coaxial cables. Be careful not to exceed minimum bend radius (refer to paragraph 2.2.2.2. Refer to the Antenna Systems Assemble Manual LBI38983, MASTR III Base Station Installation Manual LBI38636, and applicable vendor manuals for Tx and Rx connection points. (For specially engineered systems, refer to the "As-Built" Antenna System Diagrams for the particular site.) Use cable ties to secure the coaxial cables to the back rails of the cabinets. Ensure cables do not impede access to the internal equipment and the installation appears neat and orderly. Route cables away from the sharp ends of mounting screws (on the back side of the equipment rails), and allow room for equipment mounting screws to be removed and re-installed without damaging the cables. 2. Make sure that any unused ports on the Rx Multicoupler are terminated with 50 ohm loads (Refer to the vendor Maintenance Manual). 3. from the Connect a 1/2-inch Superflex RF cable output of the Rx Multicoupler to the input of the Tower Top Amplifier Power Supply (or RX Filter if installed). 4. Connect a 1/2-inch Superflex RF jumper ➅ from the surge protector to a wall feedthru (Refer to the Antenna System Block Diagram in Appendix F) 5. from the Connect a 1/2-inch Superflex RF cable output of the Tower Top Amplifier Power Supply (or Rx Filter) to the receive surge protector. 6. Plug the AC power cords for the Tower Top Amplifier Power Supply and the RX Multicoupler into a into a 120 Vac power strip. (Ensure AC circuit breaker is OFF prior to plugging cord into AC power strip.) NOTE If overhead cable trays are used, ensure the RF cable lengths are sufficient to run from point A to point B via the cable tray. Do not drape cables on top of cable trays or racks. Begin the cable installation by installing receiver cables first. Then complete the installation by installing the transmitter cables. from the RX Multicoupler Route receiver RF cables to the receiver RF input connectors. One cable is required for each receive channel as labeled (RX CH 1, RX CH 2, RX CH 3, etc.). 4.1.1.2 Transmit Section 1. Route the Tx RF (1/2-inch Superflex) cables from the power output connector of each transmitter to the RF Equipment Cabinet/rack. 25 LBI-39074 SYSTEM CABLING Table 3 - RF Cables and Connectors Supplied (10 Channel System) Cable Ref. Number* 1. Cable Description Cable Type Connectors QTY Rx RF coax cables. (Connects between the Rx Multicoupler and Receiver RF inputs.) [V] 1/4-inch Superflex RF coaxial cable (FSJ1-50A). 2. Rx RF coax cable. (Connects between the Rx Multicoupler and the Tower Top Amplifier Power Supply/Rx Filter.) [M] 1/2-inch Superflex [L] Type N (M) - 44ASW 1/2- As Required RF coaxial cable inch Superflex connectors (qty. (FSJ4 -50B). 2). 1 3. Tx RF coax cables. (These cables connect between the transmitter outputs and the Tx Combiner.) [M] 1/2-inch Superflex [L] Type N(M) - 44ASW As Required RF coaxial cable (FSJ4 Superflex connector. -50B) [Y] Type N(M) - 49600-1, 1/2inch Superflex right angle connector. 10 4. RF coax cables. [M] 1/2-inch Superflex [L] Type N(M) - 44ASW 1/2- As Required (Connects between the Rx RF coaxial cable (FSJ4 inch Superflex connectors (qty. Tower Top Amplifier Power -50B) 2). Supply and the Rx surge protector.) 1 5. RF coax cables. (Connects between the Antenna Power Sensor and the Tx surge protector.) 1 6. RF coax cables. [M] 1/2-inch Superflex [L] Type N(M) - 44ASW 1/2(Connects between the RF coaxial cable (FSJ4 inch Superflex connectors. Surge Protector and the wall -50B) feedthru connector.) [N] Type N(F) - 44ASN 1/2inch Superflex connectors. [U] Type BNC (M) - 41ASWB As Required 1/4-inch Superflex connector. 10 [W] Type N (M) - 41ASW 1/4inch Superflex connector. [M] 1/2-inch Superflex [L] Type N(M) - 44ASW 1/2- As Required RF coaxial cable (FSJ4 inch Superflex connectors (qty. -50B) 2). * - Reference numbers used in Table 3 correspond to reference numbers used in the text. [ ] - Refer to material callouts referenced in LBI-38983, 19D904223 sheet 1. 26 Cable Length (ft.) As Required 2 SYSTEM CABLING 2. Connect each Tx RF cable to the Tx Combiner input corresponding to the channel number as labeled (Tx CH1, Tx CH2, Tx CH3, etc.). 3. To make any other required connections to the Tx Combiner, refer to Installation & Operation Manual supplied by vendor. 4. Connect the Tx Combiner channels as instructed in the vendor manual. 5. Connect a 1/2-inch Superflex RF jumper ➅ from the surge protector to a wall feedthru. (Refer to the Antenna System Block Diagram in Appendix F.) 6. from the Tx Connect a 1/2-inch Superflex RF cable Combiner - RF Power Sensor (if supplied) output to the Tx surge protector. LBI-39074 together using 25-Pair cables. The specific cabling scheme depends on the number of repeater racks (rows) as shown in the applicable Power Sensor Module interconnect diagram in the Appendix C. Additionally, a cable is routed from the Antenna Power Sensor to the PMU via the Site Controller Interface module. Refer to LBI-38812. NOTE 4.2 EDACS INTERFACE CABLING Most non-RF cabling between cabinets connects from the EDACS Interface Panel in the top of one cabinet, to the panel in the top of the next , to the top of the next, etc. In this way, the cabinets are daisy-chained, by row, to the Site Controller cabinet. Each EDACS Interface Panel is made up of one or more modules with labels such as POWER SENSOR, STATION AUDIO, RIC AUDIO, MODEM DATA, etc. The panels for your site may contain modules for options you don’t have. However, not enough cables are supplied to daisychain these unused modules, so daisy-chain only those modules you need. Refer to the Installation Wiring Guide in Appendix C to determine which interface cables are required. Install the cables between the interface panels using the following instructions and by referring to the Interconnection Diagrams in Appendix C. The Site Controller cabinet may come with Channel Termination boards (jumper boards) 19D852379G1 installed in Power Sensor module connectors J1 and J2. Temporarily remove these jumpers. They will be reinstalled later. 4.2.1.1 Systems With 1 To 12 Channels 1. Install the 5-foot 25-Pair cables 19D903880P120 between the Power Sensor modules as shown in Appendix C (EDACS Interface Cabling Diagrams). 2. Install a 5-foot 25-Pair cable 19D903880P120 between the Power Sensor module J1 in the Site Controller and the Power Sensor module in the adjacent Repeater cabinet, i.e. Site Controller J1 to Repeater CH. 1-3 (J14). 4.2.1.2 Systems With 13 To 20 Channels 1. Install the 5-foot 25-Pair cables 19D903880P120 between the Power Sensor modules as shown in Appendix C (EDACS Interface Cabling Diagrams) for channels 1 thru 12. 2. Install the 5-foot 25-Pair cables 19D903880P120 between the Power Sensor modules as shown in Appendix C (EDACS Interface Cabling Diagrams) for channels 13 thru 20. 3. Install a 15-foot 25-Pair cable 19D903880P121 cable between the Site Controller Power Sensor module J1 and J14 on the Power Sensor module in the end Repeater cabinet in the second row. 4. Install a 15-foot 25-Pair cables 19D903880P121 between the Site Controller Sensor module J2 and J14 on the Power Sensor module in the end repeater cabinet of the first row. 4.2.1 POWER SENSOR If the site does not contain the Power Monitor Unit (PMU) option, skip this Power Sensor section and proceed to the STATION AUDIO section. The Station Interface modules 19C852204G1 (labeled POWER SENSOR) collect and route relative Tx output power data to the Power Monitor Unit (PMU) via the Site Controller Interface module 19C852213G1 (labeled POWER SENSOR). These modules are daisy-chained If a non-standard floor plan is used, longer cables may be required. The cables listed in Table 4 are the same as those specified above except for their length: 27 LBI-39074 SYSTEM CABLING Table 4 - 25-Pair Interconnect Cables 19D903880Pxxx LENGTH IN FEET P122 7 P123 10 P124 20 P125 25 P126 30 P127 35 P128 40 P129 50 Site Controller Power Sensor Interface Panel 19C852213G1 J6 P6 Power Monitor Unit (P4) J7 P7 Antenna OPR OPF Combiner Bidirectional Antenna Power Sensor Transmitters P7 OPF ---- 30-feet ---Red Blk 4.2.1.3 Antenna Power Sensor Cable Red Blk Install the Antenna Power Sensor cable between the Antenna Sensor and the Site Controller Interface module (POWER SENSOR) using the following procedure: NOTE If the Antenna Power Sensor cable is not supplied, it will need to be fabricated on site. Refer to Figure 3, Appendix C, and the vendor's PMU manual for details. 1. Connect the DB-9 end (P6) of the cable to the Site Controller Interface module (POWER SENSOR) connector J6. 2 Route to the RF Equipment Cabinet. 3. Connect the lead labeled OPF for "forward power" to the output voltage phono jack on the Transmitter/Combiner end of the Antenna Power Sensor. 4. Connect the lead labeled OPR for "reverse" or "reflected power" to the antenna end of the sensor. OPR Red 1 Blk 6 Red 2 Blk 7 OPF OPF GND OPR OPR GND Figure 3 - Antenna Power Sensor Interconnection 4.2.2 STATION AUDIO The Interface modules 19C852204G1 labeled STATION AUDIO collects Tx and Rx audio at each repeater for distribution at the punchblock. 4.2.2.1 Systems With 1 To 12 Channels 1. Install the 5-foot 25-Pair cables 19D903880P120 between the Station Audio modules as shown in Appendix C (EDACS Interface Cabling Diagrams) for channels 1 thru 12. 2. Install a 25-Pair cable between J14 on the Station Audio module in repeater cabinet #1 and the punchblock. 4.2.2.2 Systems With 13 To 20 Channels 28 1. Install the 5-foot 25-Pair cables 19D903880P120 between the Station Audio modules as shown in Appendix C (EDACS Interface Cabling Diagrams) for channels 1 thru 12. 2. Install a 25-Pair cable between J14 on the Station Audio module in repeater cabinet #1 and the punchblock. SYSTEM CABLING The cable must be cut to length and the Amphenol connector reattached. 3. 4. Install the 5-foot 25-Pair cables 19D903880P120 between the Power Sensor modules as shown in Appendix C (EDACS Interface Cabling Diagrams) for channels 13 thru 20. Install a 25-Pair cable between J14 on the Station Audio module in repeater cabinet #5 and the punchblock. If a non-standard floor plan is used, longer cables may be required. The cables listed in Table 4 are the same as those specified above except for their length: 4.2.3 RIC AUDIO If the site does not contain the Local Telephone Interconnect option, skip this section and move on to the GETC DATA module section. 3. LBI-39074 Install a 15-foot 25-Pair cable 19D903880P121 between J14 on the Site Controller RIC Audio module for channels 13-20 and J14 on the RIC Audio module for Repeater Channels 13-15. If a non-standard floor plan is used, longer cables may be required. Refer to Table 4 for longer cables. 4.2.4 GETC DATA If the site is a Basic system (i.e. no Site Controller), skip this section and move on to the SERIAL MODULE section. The Interface modules 19C852204G1 labeled GETC DATA collect GETC data from each repeater. The GETC DATA modules are daisy-chained together using 25-pair cables, as shown in the applicable GETC Data Module Interconnect Diagram in Appendix C. 4.2.4.1 Systems With 1 To 12 Channels The Interface modules 19C852204G1 labeled RIC AUDIO collect telephone interconnect audio data from each repeater. The RIC Audio modules are daisy-chained together using 25-pair cables, as shown in the applicable RIC Audio Module Interconnect Diagram in Appendix C. 1. Install 5-foot 25-Pair cables 19D903880P120 between the GETC Data modules as shown in Appendix C (EDACS Interface Cabling Diagrams). 2. Install a 5-foot 25-Pair cable 19D903880P120 between the GETC Data module (channels 1-12) J14 in the Site Controller cabinet and GETC Data module J14 in the adjacent Repeater cabinet. 4.2.3.1 Systems With 1 To 12 Channels 1. 2. Install 5-foot 25-Pair cables 19D903880P120 between the RIC Audio modules as shown in Appendix C (EDACS Interface Cabling Diagrams). Install a 5-foot 25-Pair cable 19D903880P120 between the Site Controller RIC Audio module J14 and J14 on the RIC Audio module for Repeater Channels 1-3. 4.2.3.2 Systems With 13 To 20 Channels 1. Install 5-foot 25-Pair cables 19D903880P120 between the repeater RIC Audio modules as shown in Appendix C (EDACS Interface Cabling Diagrams). 2. Install a 15-foot 25-Pair cable 19D903880P121 between J14 on the Site Controller RIC Audio module for channels 1-12 and J14 on the RIC Audio module for Repeater Channels 1-3. 4.2.4.2 Systems With 13 To 20 Channels 1. Install 5-foot 25-Pair cables 19D903880P120 between the GETC Data modules as shown in Appendix C (EDACS Interface Cabling Diagrams). 2. Install a 5-foot 25-Pair cable 19D903880P120 between the GETC Data module (channels 13-20) J14 in the Site Controller cabinet and GETC Data module J14 in the adjacent Repeater cabinet. 2. Install a 15-foot 25-Pair cable 19D903880P121 between the GETC Data module (channels 1-12) J14 in the Site Controller cabinet and the GETC Data module J14, in the end Repeater cabinet in the first row. If a non-standard floor plan is used, longer cables may be required. Refer to Table 4 for longer cables. 29 LBI-39074 SYSTEM CABLING 4.2.5 SERIAL MODULE Table 5 - 15-Conductor Interconnect Cables The Serial Interface modules 19C852447G1 labeled SERIAL MODULE collect and route serial data throughout the EDACS. The SERIAL MODULE modules are daisychained together using 15-conductor cables, as shown in the applicable SERIAL MODULE Modules Interconnect Diagram in Appendix C. 4.2.5.1 Systems With 1 To 12 Channels 1. 2. Install the 5-foot 15-conductor cables 19D903880P130 between Serial modules in adjacent Repeater cabinets as shown in Appendix C (EDACS Interface Cable Diagrams). If the system includes a Site Controller, install a 5-foot 15-conductor cable 19D903880P130 between the Serial module J1 in the Site Controller and the Serial module J1 in the adjacent Repeater cabinet. 4.2.5.2 Systems With 13 To 20 Channels 1. Install the 5-foot 15-conductor cables 19D903880P130 between Serial modules in adjacent Repeater cabinets as shown in Appendix C (EDACS Interface Cable Diagrams). NOTE Perform steps 2 and 3 if the system includes a Site Controller. 19D903880Pxxx LENGTH IN FEET P132 20 P133 25 P134 30 P135 35 P136 40 P137 45 P138 50 4.2.6 PHONE LINE If the site does not contain the Local Telephone Interconnect option, skip this section and move on to the Customer Interface Cabling section. The Interface modules 19C852204G1, labeled PHONE LINE 1-16 and PHONE LINE 17-20, provide Local Telephone Interconnect telephone line connections. The PHONE LINE modules are located in the Site Controller cabinet. 2. Install a 5-foot 15-conductor cable 19D903880P130 between Serial module J2 in the Site Controller and Serial module J1 in the adjacent Repeater cabinet. 1. Install a 25-pair cable from the PHONE LINE module J14 in the Site Controller cabinet to the punchblock as shown in Appendix C (EDACS Interface Cable Diagrams). Refer to Appendix D for Phone Line Punchblock Diagrams 3. install a 15-foot 15-conductor cable 19D903880P131 between the Serial module J1 in the Site Controller and the Serial module J1 in Repeater cabinet of the first row. This cable must be cut to length and the Amphenol connector reattached. 4.2.7 DOWNLINK DATA If a non-standard floor plan is used, longer cables may be required. The cables listed in Table 5 are the same as those specified above, except for their length: The Interface module 19C852204G1 labeled DWNLINK DATA module is supplied either in cabinet #1 for a multisited Basic Site or in the Site Controller cabinet. The Downlink GETC is connected to J1 of the DWNLINK DATA module. 1. 30 Install a 25-pair cable from the DWNLINK DATA module J14 to the punchblock. Refer to Appendix D for punchblock connections. SYSTEM CABLING LBI-39074 4.3 CUSTOMER INTERFACE CABLING user-supplied control devices. Typical control output configurations are shown in Figure 5. Control output connections are shown in Table 7. Not all cables connecting to a cabinet are connected to the EDACS Interface Panel. Some connections to usersupplied devices bypass the EDACS Interface Panels and connect directly to a specific piece of equipment within the EDACS Site Controller cabinet. The following direct connections to user-supplied devices may be required: If a modem is supplied, connect the RJ11 telco cable between the rear of the modem (see Figure 4) and J3 on the Downlink module. • 32 alarm inputs and 8 control outputs connecting to the ACU (Alarm and Control Unit) option. CAUTION These alarm inputs and control outputs must come through protected punch blocks or equivalent protection before being connected to the ACU. The locations of these direct connections to usersupplied devices are shown in Figure 4. NOTE Special care must be taken to ensure that all outside wiring comes through protected punchblocks, or equivalent protection, before being connected to the Site Controller cabinet. EDACS Interface Panel #1 EDACS Interface Panel #2 Use cable ties to secure the cables to the side rails of the EDACS Site Controller cabinet so that access is allowed to the internal equipment without moving the cables, and so that the appearance is neat and orderly. CAUTION Avoid routing any cables near the sharp end of mounting screws, and route the cables so that mounting screws can be removed and re-installed without damaging the cables. Alarm Inputs A1 - A16 to External Alarm-Sensing Devices Alarm and Control Unit J1 J3 J4 Test Unit Alarm Inputs A17-A32 to External Alarm-Sensing Devices J5 Control Outputs C1-C8 to External Control Devices 4.3.1 ALARM AND CONTROL UNIT (ACU) CAUTION Never make a direct connection between a power circuit or ground in the external equipment, and a power circuit or ground in the ACU. The Alarm and Control Unit provides two 50-pin connectors for up to 32 alarm inputs (A1 through A32) to user-supplied, alarm-sensing devices. Typical alarm input configurations are shown in Figure 6. Alarm input connections are shown in Table 6. Data Link to System Manager Figure 4 - External Connections Directly to Other Equipment (Rear View) The Alarm and Control Unit also provides one 50-pin connector for up to 8 control outputs (C1 through C8) to 31 LBI-39074 SYSTEM CABLING TAU RELAY SWITCHES USER'S LOAD User-Supplied Equipment TAU Alarm Input User-Supplied Equipment TAU Control Output 1 +V RELAY CONTACT CLOSURE Closure=Logic 0=Active LED 2 3 N.O. +V COM C C C C N.C. TAU Output Relay Contacts + C User's Load to be Controlled Optoelectronic Coupler G . . +13.8 VDC +13.8 VDC TAU RELAY SWITCHES USER'S RELAY 1 +V OPEN COLLECTOR DRIVE Xstr On=Logic 0=Active LED 2 3 N.O. +V COM N.C. TAU Output Relay PWR GND Contacts C C C C + User's Load to be Controlled Optoelectronic Coupler G . . +5 to +16 VDC C +5 to +16 VDC Return . 1 +V OPEN COLLECTOR DRIVE Xstr On=Logic 0=Active LED 2 Figure 5 - Typical Control Output Configurations 3 4.3.1.1 Test Unit Antenna Install the test unit antenna using the following instructions. 1. 2. Connect antenna cable to the test unit radio antenna output connector. Mount antenna in a location with the least amount of interference. This is normally in the RF combiner cabinet, however, the System Engineer can determine the best location for your particular installation. + +15 to +48 VDC C Optoelectronic Coupler G . +15 to +48 VDC Return 1 +V OP AMP Driver +Output=Logic 0=Active LED 2 3 +15 VDC + C Optoelectronic Coupler -15 VDC G . . Figure 6 - Typical Alarm Input Configurations 32 SYSTEM CABLING Table 6 - Alarm Input Connections Pin Identification Function + C G + C G + C G + C G + C G + C G + C G + C G + C G + C G + C G + C G + C G + C G + C G + C G Connector J4 Pin# Alarm # 26 1 A1 27 2 28 A2 3 29 4 A3 30 5 31 A4 6 32 7 A5 33 8 34 A6 9 35 10 A7 36 11 37 A8 12 38 13 A9 39 14 40 A10 15 41 16 A11 42 17 43 A12 18 44 19 A13 45 20 46 A14 21 47 22 A15 48 23 49 A16 24 Connector J5 Pin # Alarm # 26 1 A17 27 2 28 A18 3 29 4 A19 30 5 31 A20 6 32 7 A21 33 8 34 A22 9 35 10 A23 36 11 37 A24 12 38 13 A25 39 14 40 A26 15 41 16 A27 42 17 43 A28 18 44 19 A29 45 20 46 A30 21 47 22 A31 48 23 49 A32 24 +13.8 VDC* 25 --- 25 --- PWR GND 50 --- 50 --- * Requires jumper on the Alarm/Control Interface Board: jumper J40 for connector J4, jumper J41 for connector J5. See cautions about power circuits in text. LBI-39074 Table 7 - Control Output Connections Pin Identification Function N.O. COM N.C. N.O. COM N.C. N.O. COM N.C. N.O. COM N.C. +5 VDC +5 VDC LOG GND LOG GND +13.8 VDC +13.8 VDC PWR GND PWR GND Pin# 26 1 27 2 28 3 29 4 30 5 31 6 13 38 14 39 15 40 16 41 Connector J3 Control # Pin # Control # 32 7 A5 A1 33 8 34 A6 A2 9 35 10 A7 A3 36 11 37 A8 A4 12 +5 VDC requires jumper P38 on the Alarm/Control Interface Board. +13.8 VDC requires jumper P39 on the Alarm/Control Interface Board. See cautions about power circuits in text. 4.4 QUALITY AUDIT The purpose of this section is to double check the cable installation by visually confirming critical points. These checks are to be made before any power is applied to the equipment, and are best made by someone other than the installer. Verify EDACS Interface Panel and RF cable connections (see the appropriate interconnection diagram in the Appendix C). Use an ohm meter, if necessary, to check for continuity or shorts. Using copies of the System Cabling Checklists (#1 and #2) found in Appendix A, complete a checklist for each equipment cabinet as you go through the following inspection procedure. 1. Verify the RF coaxial cable connections to the cabinet are correctly installed. (See RF Equipment Installation and Cabling Section.) 2. Verify the daisy-chain connection(s) to the POWER SENSOR module are correct. 3. Verify the bi-directional power sensor in the RF cabinet is connected correctly to the POWER SENSOR module in the Site Controller cabinet. (Does not apply to repeater cabinets.) 33 LBI-39074 SYSTEM CABLING 4. Verify the daisy-chain connection(s) to the STATION AUDIO module is correct. (Applies only to repeater cabinets.) Verify the following special electrical connections in the Site Controller cabinet. (see the appropriate interconnection diagram in the Appendix C): 5. Verify the connection between the STATION AUDIO module and the STATION AUDIO Punchblock is correct. (Applies only to the first repeater cabinet in each row.) 11. Verify the connections between the PHONE LINE modules and the PHONE LINE punchblocks are correct. (Applies only to the Site Controller cabinet.) 6. Verify the daisy-chain connection(s) to the RIC AUDIO module is correct. (Does not apply to RF cabinet.)(The Site Controller cabinet has two modules - one for each row of cabinets.) 7. 8. 9. 34 Verify the daisy-chain connection(s) to the GETC DATA module is correct. (Does not apply to RF cabinet.)(Site Controller cabinet has two modules - one for each row of cabinets.) Verify the daisy-chain connection(s) to the SERIAL MODULE is correct. (Does not apply to RF cabinet.) Verify the connection between the DOWNLINK module (on a Basic site) and the DOWNLINK Punchblock is correct. 12. Verify the connection between the DWNLINK DATA module and the Punchblock is correct. (Applies only to the Site Controller cabinet.) 13. Verify the connection between the Data Modem and the line to the System Manager is Correct. (Applies only to the Site Controller cabinet.) 14. Verify that alarm inputs A1 through A16 are connected to J4 on the back of the Alarm and Control Unit. (Applies only to the Site Controller cabinet.) 15. Verify that alarm inputs A17 through A32 are connected to J5 on the back of the Alarm and Control Unit. (Applies only to the Site Controller cabinet.) 16. Verify that control outputs C1 through C8 are connected to J3 on the back of the Alarm and Control Unit. (Applies only to the Site Controller cabinet.) LBI-39074 5. STATION CONFIGURATION 5.1 INTRODUCTION 5.1.1 STATION GETC's Prior to placing the equipment into operation, the position of jumpers and the setting of DIP switches on the GETC (Ericsson GE Trunking Card) and RIC (Repeater Interconnect Controller) boards must be verified. The station GETC's are located in the repeater cabinets One GETC is required for each channel. The position of the jumpers on the GETC board control the data processing functions performed by the GETC and whether it operates as a working channel or control channel. The position of the DIP switches is determined by the system type, i.e. trunked failsoft, conventional, or voted and whether or not it is connected to a Site Controller. The jumpers are normally installed at the factory and the DIP switches set. Configuring the GETC involves verifying the jumper positions and DIP switch settings. Refer to LBI-38988 Station GETC Configuration Manual and SRN-1002 or 1060 for the current jumper positions and switch settings. Hardware and software revisions and part numbers will be recorded during station configuration and setup. Appendix B shows a typical 12-Channel Level 1 EDACS system and identifies the shelves and channel numbers. J10 J27 J29 J8 J6 J7 1 J14 J15 1 J49 J9 1 J47 1 T1 1 J20 J52 1 J19 T2 J67 J18 R2 J26 1 R1 1 J69 1 1 J62 1 1 1 1 J21 J50 U18 J74 U2 U3 1 J53 1 1 J51 1 J44 U1 1 1 J71 U19 TP107 J17 J3 1 1 J11 J68 1 J60 1 1 1 J13 1 J46 J73 1 1 1 1 1 1 J61 1 J28 J48 1 J12 J54 1 J72 U4 1 S1 S2 J16 J63 J64 S3 1 J65 J66 R141 1 1 R31 1 J24 1 19D904266 LED Indicators U35 Dip Switches S4 Reset Switch J25 1 1 J55 1 L1 L2 L3 L4 L5 L6 L7 Figure 7 - Station GETC (19D904266) Jumper Locations 35 LBI-39074 STATION CONFIGURATION 5.1.1.1 Jumper Position Verification 1. Refer to the Station GETC Configuration Manual LBI38988 and, if possible, make a full size transparency of the station GETC Jumper Location Diagrams. If the LBI is unavailable, refer to Figure 7 and Table 8. 2. Slide the GETC shelf for repeater No. 1 into the service position, to gain access to the GETC board. 3. Overlay the transparency on the GETC board and verify that all jumpers are in the correct position. S1 4. Remove transparency. 5. While the GETC is in the service position, proceed with checking the DIP switch settings, next paragraph. 6. Record the GETC DIP Switch settings on the Trunked Repeater Test Data Sheet (Appendix A) for the channel being configured. 7. 8. 3 4 5 6 7 8 1 2 3 4 5 6 7 8 C C C C C C C C C C C C C C C C Front of GETC 3 4 5 6 7 8 C C C C C C C OPEN Legend: C = Closed OPEN O = Open NOTE Be sure the DIP switch settings correspond to the Personality data programmed into the repeater and Site Controller or System Manager if part of the system. 1. Set S1-1 thru S1-7 and S2-1 thru S2-4 to the CLOSED position (not used). NOTE In MASTR III repeaters the operating frequency is programmed directly into the MASTR III's personality. Set S1-1 thru S1-7 and S2-1 thru S2-4 to the Closed position. 2. Set S1-8 to the Closed position (not used). 3. Set S2-5 to enable or disable Conventional Failsoft. • OPEN • CLOSED = Enabled. = Disabled. 4. Set S3-1 thru S3-5 to the repeater’s channel number. Use the chart in Table 8 to determine the proper settings for the channel desired. (In example, For Channel 1 set S3-1 to Open and S3-2 thru S3-5 to the Closed position.) 5. Set S3-6 and S3-7 to the Closed position (normal operation, i.e. not test or simulcast). 6. Set S3-8 for Trunked Failsoft or Site Controller communications. Set the GETC DIP switches using the following procedures (refer to example in Figure 8): 36 2 Figure 8 - Station GETC DIP Switch Settings (Ch. 1) 5.1.1.2 Dip Switch Position Verification Three DIP switches on the GETC Logic Board must be set for proper repeater operation. These switches are located on the GETC Logic Board as shown in Figure 7. In the MASTR III repeater, S1-1 through S1-7 and S2-1 thru S2-4 are not used. S3-1 through S3-5 select the channel number. The remaining switch positions depend on the function of the overall system (i.e. with or without Site Controller or conventional Failsoft system). 1 O OPEN Record the part number and revision number for the GETC Logic board and the Turbo board. Record the GETC firmware Group number. S3 2 NOTE If the jumper transparency is not available, use the GETC Jumper Positions table in LBI-38988 or SRN's to verify the correct jumper positions for each Station (Working Channel and Control Channel) GETC. S2 1 • OPEN • CLOSED = GETC connected to Site Controller. = Always operates in Trunked Failsoft. 7. Slide GETC shelf back into the rack. 8. Repeat the jumper and DIP switch verification process for all GETC's in the repeater racks. STATION CONFIGURATION LBI-39074 Repeat the procedures in paragraph 5.1.1, except use the configuration settings and jumpers applicable to a Downlink GETC. Table 8. GETC Channel Number Settings SWITCH SETTINGS 5.1.3 RADIO INTERFACE CONTROLLER (RIC) CHANNEL NUMBER S3-1 S3-2 S3-3 S3-4 S3-5 1 O C C C C 2 C O C C C 3 O O C C C 4 C C O C C 5 O C O C C 6 C O O C C 7 O O O C C 8 C C C O C 9 O C C O C 10 C O C O C 11 O O C O C 12 C C O O C 13 O C O O C 14 C O O O C 15 O O O O C 16 C C C C O 17 O C C C O 5.1.3.1 Dip Switch Settings 18 C O C C O 1. 19 O O C C O Refer to Equipment Layout Diagrams in Appendix B to locate the RIC associated with channel 1. 20 C C O C O 2. Slide the RIC shelf out of the cabinet to gain access to the RIC board. 3. Refer to Figure 9 or the location of SW1 thru SW3. Verify SW1 thru SW3 switch positions as follows: 5.1.2 DOWNLINK GETC If the site does not contain the Local Telephone Interconnect option, skip this section. The RIC handles all interconnect signalling and interfacing between the repeater and a telephone line. Four switches are located on the RIC which are used to set operating characteristics and to control power and audio routing. SW1 is a power on/off switch, SW2 and SW3 are preset at the factory and should not be tampered with in the field. SW4 is an eight position DIP switch used to control the operation of the RIC in the system environment. All jumpers are installed at the factory and do not require repositioning. At the time of installation, the RIC address must be set to match the channel number of the associated repeater. This involves setting the eight section DIP switch SW4 to the binary number equivalent of the associated repeater channel number. The switch positions are arranged in binary digital weight. Therefore, the sum of the switch positions equals the channel number of the repeater selected. For example, if switches 1 & 3 were selected, the channel number selected would be 5. See Figure 10. For Level 1 systems, the Downlink GETC is installed in the in the Site Controller cabinet. For BASIC EDACS systems, the Downlink GETC is installed in the first repeater cabinet. The jumpers are normally installed at the factory and the DIP switches set. Configuring the Downlink GETC involves verifying the jumper positions and DIP switch settings. Refer to LBI-38896 - Site Downlink GETC Configuration Manual and SRN-1061 for the current jumper positions and DIP switch settings applicable to the type of multisite system. • SW1 - Towards front of board - Power switch ON. • SW2/SW3 - left position, DISABLE and RESET 4. Locate SW4 on the left edge of the RIC board and set SW4 to the channel number under configuration (see Figure 10). 5. Slide RIC board back into the cabinet. 37 LBI-39074 STATION CONFIGURATION Table 9 - Jumper Settings Jumper Position Wideband 1 GETC Narrow Band 2 GETC P11 1&2 3 1&2 3 P12 1&2 3 1&2 3 P13 1&2 1&2 BSL Tx output to BSL Rx input. P14 1&2 1&2 Master site controller path selection enable. P15 1&2 1&2 Backup site controller path selection enable. P16 1&2 1&2 BSL selection enable. P17 1&2 1&2 LSD encode path enable. P18 1&2 1&2 LSD decode path enable. P21 1&2 1&2 Enable high-speed data acquisition rate control, HSACQ. FUNCTION Enables Receive Data from 9600 baud modem board. Enables Clear-To-Send (CTS) from 9600 baud modem board. P24 1&2 1&2 P25 1&2 1&2 BSL selection (Failsoft) enable. LSD encode path enable. P26 1&2 1&2 Lock-detect path enable. P28 1&2 1&2 Sync line input path enable. P29 1&2 1&2 Enable site controller RxD, J8-4. P44 1&2 1&2 Use for 256K or 512K EPROM. P46 1&2 1&2 Used for normal communications. P47 1&2 1&2 BSL select. P48 1&2 1&2 BSL select. P50 1&2 1&2 Enable tone control for voted system P52 2&3 2&3 TxD polarity invert. P53 1&2 1&2 RxD polarity normal. P54 1&2 1&2 Enable MODCNTL local control. P60 1&2 1&2 Enables HSD path. P61 2&3 2&3 Use for 512K EPROM. P62 1&2 2&3 1 & 2 selects 11 MHz clock Freq. for 9600 baud data (Wideband). 2 & 3 selects 5.5296 MHz clock freq. for 4800 baud data (Narrow band). P63 OMIT 1&2 1 & 2 for 4800 baud (900 MHz Narrow band) P64 OMIT 1&2 1 & 2 for 4800 baud (900 MHz Narrow band) P65 OMIT 1&2 1 & 2 for 4800 baud (900 MHz Narrow band) P66 OMIT 1&2 1 & 2 for 4800 baud (900 MHz Narrow band) P68 1&2 1&2 Selects Local (on)/Remote (off) control of station PTT. P69 1&2 1&2 Enables COMB PTT IN. P71 1&2 1&2 Enables phone modem RTS control. P72 1&2 1&2 Selects internal oscillator. P73 2&3 2&3 Enables NOR gate U22B for EDACS applications. P74 2&3 2&3 CAS polarity normal. Legend: LSD = Low Speed Data HSD = High Speed Data BSL = Backup Serial Link MSL = Main Serial Link RxD = Receive Data TxD = Transmit Data NOTES:1. Use for EDACS Wideband CC/WC, WB Downlink, and WB/NB Uplink. 2. Use for EDACS Narrow Band CC/WC and NB Downlink. 3. P11 and P12 are shown for GETC’s with Rockwell Modems installed. For GETC’s using RS-232 communication links (Rockwell Modem not installed), move P11 to J11-2 & 3 and P12 to J12-2 & 3. 4. Omit (remove) the following jumpers: P20, P51, P55, & P67. 38 STATION CONFIGURATION LBI-39074 NOTE As shipped, the termination board is plugged into J1 of the POWER SENSOR module in the Site Controller Cabinet. All jumpers are shipped in place. Do not move the termination board unless the Site Controller is equipped with a PMU. SW 1 ON (Shaded represents ON) 5.1.4.1 Systems With 1 To 12 Channels SW 2 1. Locate the termination board in the last repeater cabinet in row 1 (end of 25-Pair cable). The termination board is plugged into J15 of POWER SENSOR module. 2. Refer to Figure 11 and remove all jumpers corresponding to active channels (CH. 1 - J1/P1, CH. 2 - J2/P2,...CH. 12 - J12/P12). Verify that jumpers are installed on all unused channels. 3. Locate the termination board in the Site Controller cabinet and remove the jumpers for all active channels. NOTE: The jumper configuration should be the same as in step 2. SW 3 Figure 9 - RIC Board Switch Locations 6. Repeat the above procedure for all remaining channels. 8 4 1 ON * 1 2 4 8 16 * ON = Single Mode * Not used BINARY WEIGHT Figure 10 - SW4 DIP Switch Binary Weight Assignment 5.1.4 CHANNEL TERMINATIONS J1/P1 J2/P2 J3/P3 J4/P4 If the site does not contain the Power Monitor Unit (PMU) option, skip this section. The Channel Termination board (19C852379G1) grounds the power sensor inputs (for unused channels) to the Power Monitor Unit. Two termination boards, each providing terminations for up to 12 channels, are provided. The Channel Termination boards plug into the POWER SENSOR module on the back of the EDACS Interface Panel. One board terminates the daisy chain at the last repeater cabinet in the first row for channels 1 to 12. The second terminates the daisy chain at the Site controller cabinet (single row configurations) or at the last repeater cabinet in the second row (double row configurations) for channels 11 - 20. The exact location of these boards is determined by the system configuration. Refer to the Power Sensor Module Interconnection Diagram in Appendix C. J5/P5 J6/P6 J7/P7 J8/P8 J9/P9 J10/P10 J11/P11 J12/P12 Figure 11 - Channel Termination Board 39 LBI-39074 STATION CONFIGURATION NOTE Channels 11 and 12 overlap; if channel 11 or 12 is used, the corresponding jumpers must be removed from both termination boards. The Power Monitor Unit contains eight OPTION SELECT DIP switches on the back (just to the left of the LOCAL ALARM INPUTS). 1. 4. Verify that the termination board is plugged into J2 of the POWER SENSOR module in the Site Controller cabinet. Switch 1 (farthest to the left) and switch 4 should SET TO the ON (up) position. All other switches should be in the OFF (down) position. 4 1 8 UP 5.1.4.2 Systems with 13 to 20 Channels DN 1. 2. 3. Locate the termination board in the last repeater cabinet in row 1 (end of 25-Pair cable). The termination board is plugged into J15 of POWER SENSOR module. Refer to Figure 11 and remove all jumpers corresponding to active channels (CH. 1 - J1/P1, CH. 2 - J2/P2,...CH. 12 - J12/P12). Verify that jumpers are installed on all unused channels. Locate the termination board in the Site Controller cabinet and remove the jumpers for all active channels. NOTE: The jumper configuration should be the same as in step 2. Indicates switch position OPTION SELECT Switch There are no configurable jumpers in the Power Monitor Unit. (Applies only to the Site Controller cabinet.) 5.1.6 SITE CONTROLLER MODEM The Site Controller modem, if supplied, requires setting up the DIP Switches based on the type of communications link (dial-up or dedicated line) to the System Manager. Follow the appropriate procedure in Section 6.4. NOTE Channels 11 and 12 overlap; if channel 11 or 12 is used, the corresponding jumpers must be removed from both termination boards. 4. Verify that the termination board is plugged into J2 of the POWER SENSOR module in the Site Controller cabinet. 5. 6. 7. Locate the termination board for the second row of cabinets. It will be in the Site Controller cabinet or the last repeater cabinet in the second row. Remove all jumpers corresponding to the active channels 11 to 20 (CH. 11 - J1/P1, CH. 12 - J2/P2, CH. 13 - J3/P3, CH. 20 - J10/P10). Verify that the termination board is plugged into J15 of the POWER SENSOR module in the last repeater cabinet (highest number channel) in the second row. (end of 25-Pair cable). 5.1.5 POWER MONITOR UNIT If the site does not contain the Power Monitor Unit (PMU) option, skip this section. 40 5.2 QUALITY AUDIT The purpose of this section is to double check the switch settings, and jumper positions. These checks are to be made before any power is applied to the equipment, and are best made by someone other than the installer. Using a copy of the Configuration Checklist, found in Appendix A, record and verify the following switch settings and jumper positions in the following equipment: 1. Verify the switch settings and jumper positions are correct (refer to the Configuration section of this manual). (Applies to repeater cabinets only.) 2. Verify the DIP switches are set correctly (refer to the Configuration section of this manual.) (Applies only to repeater cabinets.) 3. Each Channel Termination board 19C852379G1 (qty. 2), for grounding the unused power sensor inputs, should be plugged into a Power Sensor module in separate EDACS interface panels. Each board has 12 grounding jumpers. See the Channel Termination Boards section for details. (Applies to the repeater cabinets only) STATION CONFIGURATION 4. The Power Monitor Unit contains an 8-section DIP switch on the back of the unit (labeled OPTION SELECT). Section 1 (farthest to the left) and section 4 should be in the ON (up) position. All other switches should be in the OFF (down) position. See the Power Monitor Unit section for details. (Applies only to the Site Controller cabinet.) 5. LBI-39074 The Data Modem contains a DIP switch located in the well on the bottom of the modem. See System Manager - Data Modem Configuration section for details. (Applies to the Site Controller cabinet only.) 41 LBI-39074 STATION CONFIGURATION This page intentionally left blank 42 LBI-39074 6. SYSTEM MANAGER INSTALLATION 6.1 SPECIFICATIONS System Manager Physical Characteristics: Size Height: Width: Depth: Weight (min.) 17.0 cm (6.7 in.) 61.5 cm (24.2 in.) 31.0 cm (12.2 in.) 10.5 kg (31.5 lb.) Ambient Temperature: 10°C to 32°C (50°F to 90°F) Humidity (EIA) 10% to 80% non-condensing Altitude Up to 2,400 m (8,000 ft.) Power Requirements: 120 Vac (±20%), 50/60 Hz, 1ph, 3.6 Amps 240 Vac (±15%), 50/60 Hz 1ph, 1.9 Amps 6.2 INTRODUCTION 6.3 INSTALLATION The System Manager is an optional part of an EDACS Level 1 system. The System Manager is usually placed in a separate location from the Trunked Repeater site equipment. The System Manager consists the following equipment: The equipment is usually arranged on a table or desk, and is connected together as shown in the Interconnection Diagram for the System Manager in the Appendix E. The Data Modem is also connected to the data circuit going to the Site Controller. • Data Modem • Computer • Keyboard • Video Terminal • Dot Matrix Printer 6.3.1 OPERATING ENVIRONMENT The room where the System Manager is installed must not exceed 2400 meters (8000 feet) above sea level and must be environmentally controlled. When the System Manager is operating, the temperature and humidity must be maintained within the following limits: • Temperature range - 10 to 32 degrees C (50 to 90 degrees F) • Relative humidity - 10 to 80 % non-condensing 43 LBI-39074 SYSTEM MANAGER INSTALLATION NOTE 6.3.2 ELECTRICAL POWER The System Manager equipment requires four outlets capable of providing approximately 3.6 amps at 120 Vac (50/60 Hz) or 1.9 amps at 240 Vac (50/60 Hz). 6.3.3 TELEPHONE LINES 6.4.1 INSTALLATION If the distance between the System Manager and the Equipment Room is less than about 50 feet, a standard RS-232 data cable may be used to connect the System Manager computer to the Site Controller computer. However, if the distance between the System Manager and the Equipment Room exceeds about 50 feet, a 2-Wire Dial-up or 4-Wire Leased 3002 Data-Grade Telephone Line (or equivalent) with a data modem at each end is required to connect the System Manager computer to the Site Controller computer. To ensure the proper data-grade circuit is obtained when leasing a telephone line, request a 4-wire, 3002 datagrade telephone line from the local or regional telephone carrier. If using an equivalent line, it must meet the following specifications: • Frequency response: 1000 Hz 500-2400 Hz 300-2700 Hz If the distance between the Site Manager and the Site Controller is less than 50 feet, modems are not required; instead, a direct RS-232 serial connection is made. If modems are not used, skip this section. If the System Manager Modem is used, connect the telephone-line data link from the System Manager to the right-hand, 4-pin modular phone jack on the rear of the System Manager Modem. See Figure 4 and Appendix E. If the System Manager Modem is not used, connect the System Manager to Port 0 (SM) on the back of the Controller using the connection shown in Figure 12. Controller Shield Rx Data Tx Data Signal GND Reference -1 to +3 dB -2 to +6 dB System Manager 1 3 2 7 1 2 3 7 DB-25 (F) DB-25 (F) Shield Tx Data Rx Data Signal GND Figure 12- System Manager to Controller Using Direct Connection • Maximum Frequency Error = ±5 Hz • Maximum Net Loss = 16 dB • Maximum Group Delay (800-2400 Hz) = 2000 µS • Computer Terminal or PC and related manual • Minimum S/N Ratio = 24 dB • Modem Cable - full blue ribbon or DEC BC22E 6.4.2 TEST EQUIPMENT REQUIRED 6.4.3 CONFIGURATION 6.4 DATA MODEMS The Site Controller and System Manager modems must be setup to allow data transfer between them using a dedicated line or dialup line (subscriber line).You must first determine the type of line used at your location and then setup the modem accordingly. 44 The following procedures configure the System Manager and Site Controller modems for your system when using US Robotics data modems. Refer to the vendor's manual for switch location and identification. The following applications are covered. • Dialup System Manager To Site Controller • Dedicated Line, System Manager To Site Controller SYSTEM MANAGER INSTALLATION • Dialup Remote System Manager Terminal • Dedicated Line, Remote System Manager Terminal LBI-39074 6.4.3.1.1 For VAX System Manager Application 1 5 10 DUAL UP 6.4.3.1 Dialup System Manager To Site Controller DN Indicates switch position Modem Switch NOTE In this application, both modems are configured the same. 1. 6.4.3.1.2 For PDP System Manager, PDP Site Controller, and VAX Site Controller Applications Set the DIP switches (located on the bottom of the modem) as shown below: 1 5 10 DUAL UP 1 10 DUAL DN UP Indicates switch position DN Indicates switch position 2. 3. Modem Switch Connect the PC or Computer Terminal to the modem using a straight-through modem cable (a full ribbon cable is OK). Set the terminal to 9600 baud, 8-bit, no parity ONLY. Refer to Robotics Maintenance Manual for additional information. 6.4.3.2 Dedicated Line, System Manager To Site Controller 6.4.3.2.1 Site Controller Modem 1. Set the DIP switches (located on the bottom of modem) as shown below: 1 4. Modem Switch 5 10 DUAL Connect AC power to modem and turn it ON. UP 5. Type "AT" <ENTER>. Terminal should respond "OK". (If not, check cable and verify steps 1-4 above). 6. Type the following commands in the order given, following each with a carriage return: ATS15=32 ATS13=1 AT&MO AT&K0 AT&B1 AT&N6 AT&S4 ATT ATX6 AT&Q0 AT&W DN Indicates switch position 7. Turn modem OFF and reset DIP switches as shown below: Modem Switch 2. Connect the PC or Computer Terminal to the modem using a straight-through modem cable (a full ribbon cable is OK). 3. Set the terminal to 9600 baud, 8-bit, no parity ONLY. Refer to Robotics Maintenance Manual for additional information. 4. Connect AC power to modem and turn it ON. 5. Type "AT" <ENTER>. Terminal should respond "OK". (If not, check cable and verify steps 1-4 above). 45 LBI-39074 SYSTEM MANAGER INSTALLATION 6. Type the following commands in the order given, following each with a carriage return: ATS15=32 ATS7=255 AT&M0 AT&K0 AT&B1 AT&N6 AT&L1 AT&S2 AT&W 7. Turn modem OFF and reset DIP switches as shown below: ATS15=32 ATS7=255 ATS13=1 AT&M0 AT&K0 AT&B1 AT&N6 AT&L1 AT&S2 AT&W 7. Turn modem OFF and reset DIP switches as shown below: 1 1 5 10 5 10 DUAL DUAL UP UP DN DN Indicates switch position Indicates switch position 6.4.3.3 Dialup Remote System Manager Terminal, 6.4.3.2.2 System Manager Modem 1. Set the DIP switches (located on the bottom of the modem) as shown below: 1 5 10 6.4.3.3.1 System Manager Modem 1. Set the DIP switches (located on the bottom of the of modem) as shown below: 2. Connect the PC or Computer Terminal to the modem using a straight-through modem cable (a full ribbon cable is OK). 3. Set the terminal to 9600 baud, 8-bit, no parity ONLY. Refer to Robotics Maintenance Manual for additional information. 4. Connect AC power to modem and turn it ON. 5. Type "AT" <ENTER>. Terminal should respond "OK". (If not, check cable and verify steps 1-4 above). 6. Type the following commands in the order given, following each with a carriage return: ATS15=32 ATS13=1 AT&H2 AT&B1 ATT AT&X6 AT&W AT&S2 AT&W DUAL UP DN Indicates switch position 2. 3. Modem Switch Connect the PC or Computer Terminal to the modem using a straight-through modem cable (a full ribbon cable is OK). Set the terminal to 9600 baud, 8-bit, no parity ONLY. Refer to Robotics Maintenance Manual for additional information. 4. Connect AC power to modem and turn it ON. 5. Type "AT" <ENTER>. Terminal should respond "OK". (If not, check cable and verify steps 1-4 above). 6. Type the following commands in the order given, following each with a carriage return: 46 Modem Switch Modem Switch SYSTEM MANAGER INSTALLATION 7. 1 Turn modem OFF and reset DIP switches as shown below: LBI-39074 5 10 DUAL UP 1 5 10 DUAL DN UP Indicates switch sposition DN Indicates switch position NOTE Modem Switch Terminal should be set for 9600 baud, data leads only (no modem control), XON/XOFF recognition (default for all DEC VT1xx/VT2xx/VT3xx terminals). NOTE The modem port should be set for 9600 baud, remote, and no autobaud. 6.4.3.4 Dedicated Line, Remote System Manager Terminal 6.4.3.3.2 Remote Terminal Modem 1. Set the DIP switches (located on the bottom of the of modem) as shown below: 1 Modem Switch 5 10 DUAL 6.4.3.4.1 Remote Terminal Modem 1. Set the DIP switches (located on the bottom of modem) as shown below: UP 1 5 10 DUAL DN UP Indicates switch position Modem Switch DN 2. Connect the PC or Computer Terminal to the modem using a straight-through modem cable (a full ribbon cable is OK). Indicates switch position Modem Switch 3. Set the terminal to 9600 baud, 8-bit, no parity ONLY. Refer to Robotics Maintenance Manual for additional information. 2. Connect the PC or Computer Terminal to the modem using a straight-through modem cable (a full ribbon cable is OK). 4. Connect AC power to modem and turn it ON. 3. 5. Type "AT" <ENTER>. Terminal should respond "OK". (If not, check cable and verify steps 1-4 above). Set the terminal to 9600 baud, 8-bit, no parity ONLY. Refer to Robotics Maintenance Manual for additional information. 4. Connect AC power to modem and turn it ON. 6. Type the following commands in the order given, following each with a carriage return: ATS15=32 AT&H2 AT&B1 ATT AT&X6 AT&W 5. Type "AT" <ENTER>. Terminal should respond "OK". (If not, check cable and verify steps 1-4 above). 6. Type the following commands in the order given, following each with a carriage return: ATS15=32 ATS7=255 AT&N6 AT&L1 AT&S2 AT&W 7. Turn modem OFF and reset DIP switches as shown below: 47 LBI-39074 7. SYSTEM MANAGER INSTALLATION 1 Turn modem OFF and reset DIP switches as shown below: 5 10 DUAL UP 1 5 10 DUAL DN UP Indicates switch position Modem Switch DN Indicates switch position NOTE Modem Switch The modem port should be set for 9600 baud, remote, and no auto-baud. 6.4.3.4.2 System Manager Modem 1. Set the DIP switches (located on the bottom of the modem) as shown below: 1 5 10 DUAL 6.4.3.4.3 Remote Terminal Modem 1. Set the DIP switches (located on the bottom of the of modem) as shown below: UP 1 5 10 DUAL DN UP Indicates switch position 2. Modem Switch 3. Set the terminal to 9600 baud, 8-bit, no parity ONLY. Refer to Robotics Maintenance Manual for additional information. 4. Connect AC power to modem and turn it ON. 5. Type "AT" <ENTER>. Terminal should respond "OK". (If not, check cable and verify steps 1-4 above). 6. 7. 48 DN Connect the PC or Computer Terminal to the modem using a straight-through modem cable (a full ribbon cable is OK). Type the following commands in the order given, following each with a carriage return: ATS15=32 ATS7=255 ATS13=1 AT&N6 AT&L1 AT&S2 AT&W Indicates switch position Modem Switch 2. Connect the PC or Computer Terminal to the modem using a straight-through modem cable (a full ribbon cable is OK). 3. Set the terminal to 9600 baud, 8-bit, no parity ONLY. Refer to Robotics Maintenance Manual for additional information. 4. Connect AC power to modem and turn it ON. 5. Type "AT" <ENTER>. Terminal should respond "OK". (If not, check cable and verify steps 1-4 above). 6. Type the following commands in the order given, following each with a carriage return: ATS15=32 AT&H2 AT&B1 ATT AT&X6 AT&W 7. Turn modem OFF and reset DIP switches as shown below: Turn modem OFF and reset DIP switches as shown below: SYSTEM MANAGER INSTALLATION 1 5 10 DUAL LBI-39074 6.5 QUALITY AUDIT UP Using a copy of the System Manager Installation Checklist found in the Appendix A, fill out the checklist as you go through the following inspection procedure. DN Indicates switch sposition Modem Switch 1. Verify the System Manager equipment is connected as shown in the interconnection diagram for the System Manager in the Appendix C. 2. Verify the Data Modem is correctly connected to the line to the repeater site. 3. Verify the Data Modem is correctly configured (refer to the Data Modem part of the Installation Section). 4. The Data Modem contains a DIP switch located in the well on the bottom of the modem. See Data Modem Configuration section for details. NOTE Terminal should be set for 9600 baud, data leads only (no modem control), XON/XOFF recognition (default for all DEC VT1xx/VT2xx/VT3xx terminals). 49 LBI-39074 SYSTEM MANAGER INSTALLATION This page intentionally left blank 50 LBI-39074 7. SYSTEM TEST AND ALIGNMENT PROCEDURES 7.1 INTRODUCTION 7.4 GETC PROGRAMMING The System Test and Alignment Procedures are to be completed on the site equipment prior to performing the Functional Checkout of the system or placing the system into service. These procedures should only be performed by qualified field service technicians. Each test has step by step procedures, along with visual aids when necessary, to check the performance or make alignment adjustments if needed to the individual system elements. Prior to operating the system, ensure the GETC personalities are properly programmed to the particular customer configuration. Data sheets are provided (see Appendix A) for each test. These sheets should be completed while performing each test and should be retained for future reference. This sheets will sometimes require numerical data be recorded or a simple check mark be entered to indicate the equipment performed properly. In cases where a particular test is not applicable at the repeater site under test, N/A must be entered to indicate the test was considered but was not applicable. Each data sheet contains a section number and title as identification. All data sheets are located in Appendix A. It may be helpful to make copies of the applicable data sheets for use during the tests. Prior to beginning the tests ensure that enough copies of each data sheet are available for all the repeaters, transmitter combiners, etc., in the system. 7.2 TEST EQUIPMENT A test equipment list (Table 1) is located in the front of this manual. The alignment procedures provided in this manual were written for the test equipment listed in Table 1. Item numbers in parenthesis ( ) are provided for quick reference to the equipment list. 7.3 POWER UP Apply power to all station equipment. Check equipment for any abnormal indications. 1. Using the PC Programmer, TQ-3357 and Programming cable, TQ-3360, program the each GETCs’ personality. Refer to the GETC Programming Data Sheet in Appendix A. If specific customer information is unavailable, use the default settings. 2. Record the Software revision number of the Turbo board on the Trunked Repeater Data Sheet. 2. Repeat the programming procedure for each Station GETC and the Downlink GETC (if applicable). The Downlink GETC uses the same personality. NOTE FCC regulations require each site have a valid Call Sign prior to going on the air. 7.5 TRUNKED REPEATER TEST Each Trunked Repeater and GETC are tested together as a unit. These test procedures provide for the testing and recording of the performance parameters associated with these two units. Unless otherwise stated, all adjustments and alignments in this section are to be made using the MASTR III PC Programming Utility Software (TQ-0619) or the Utility Handset (SPK9024). Refer to the Utility PC Programmer Manual (LBI-38540) or the Utility Handset Manual (LBI-38599) whenever necessary. Make copies of the Trunked Repeater Test Data form (one copy for each repeater) and enter the following pertinent data: 1. Record the customer's name, site name, station number, channel number, test operator name, and date on the data sheet. 2. Record the GETC dip switch settings (S1 - S3) for the station under test on the data sheet. 51 LBI-39074 SYSTEM TEST AND ALIGNMENT PROCEDURES 3. Record the Model Number and Serial Number from the equipment identification plate. 4. Record the TX and RX FCC identification number from the equipment identification plate. audio to the transmitter when a signal is present on the receiver. S1 S2 S3 1 2 3 4 5 6 7 8 1 2 3 4 5 6 7 C C C C C C C C C C C C C C C 8 1 2 3 4 5 6 7 8 C C C C C C C C O OPEN 5. Record the transmitter and receiver frequencies. Front of GETC 7.5.1 SETUP 1. AUDIO Rx OPEN O = Open 5. To load the test, the reset button (S4) in the GETC shelf must be pressed after the DIP switches have been set. The transmitter should be unkeyed by toggling the TX Disable switch on the System Module to ON (LED on). 7.5.1.1 Test Equipment Setup Line Out Channel 1 27 2. C = Closed The HP 8920 RF Communications Test Set (item 4) and the HP 4934A TIMMS (item 15)should be setup as follows before starting the test and alignment procedures. Punchblock Connector 26 2 Legend: Figure 13 - Test Mode Repeat The following Line Input and Line Output measurements and adjustments should be made from the Station Audio Type 66 Punchblock. To aid in testing, connect the TIMMS (HP 4934A) (item 15) to the Station Audio Punchblock using the test cable to punchblock adapter, 284-4 (item 17). Refer to Appendix D and the following example. 1 OPEN AUDIO Tx Line In HP 8920 - RF COMMUNICATIONS TS SETUP SCREEN CONTROL............... DUPLEX TUNE MODE .......................... MANUAL Terminate the output of the transmitter with an RF Coaxial Load Resistor (item 21). TUNE FREQ............................ SET TO TX FREQ. Plug the Utility Handset cable into the MIC jack or the Utility PC Programmer into the DATA connector, both located on the front of the T/R Shelf. IF FILTER................................ 15K I/P PORT.................................. ANT EXT TX KEY .......................... OFF RF GEN FREQ ........................ SET TO RX FREQ. AMPLITUDE........................... 1.0 mV NOTE The Utility Handset and the Utility Programmer cannot be connected to the T/R Shelf at the same time. ATTEN HOLD......................... OFF O/P PORT ................................ DUPLEX AF GEN 1 FREQ ..................... 1.0 kHz 3. 4. 52 Using the Utility Programmer or the Utility Handset, set the following pots to the value indicated: AF GEN 2 FREQ ..................... 3.0 kHz • Repeater Gain (RG) 1023 AUDIO OUT............................ AC • Compressor Threshold (CT) 32767 • Compressor Gain (CP) 1023 FILTER 2 ................................. 3 kHz LPF • DSP Line Input (DLI) 100 DE EMPHASIS........................ OFF FM COUPLING....................... AC AF ANALYZER I/P................. FM DEMOD FILTER 1 ................................. <20 Hz HPF Configure the GETC DIP switches as shown in Figure 15. This places the GETC in the test mode continuously keying the transmitter and routing receiver DETECTOR............................. PK+ −/2 SYSTEM TEST AND ALIGNMENT PROCEDURES HP 4934A - TIMMS SETUP LBI-39074 7.5.3 TRANSMITTER POT ALIGNMENT: POWER ................................... ON 7.5.3.1 Low Speed Data DISPLAY ................................ TRMT 1. LEVEL .................................... -60 dBm Configure the DIP switches as shown in Figure 15. This invokes a test mode on the GETC which keys the transmitter with receiver audio and low speed data from the GETC routed to the transmitter. FREQ....................................... 1004 Hz TRMT IMP.............................. 600 Ohm RCV IMP................................. 600 Ohm S1 MEAS...................................... LEVEL FREQ S2 S3 1 2 3 4 5 6 7 8 1 2 3 4 5 6 7 C C C C C C C C C C C C C C C 8 O OPEN 7.5.2 RECEIVER POT ALIGNMENT Front of GETC 1 2 3 4 5 6 7 8 C C C C C C C O OPEN Legend: C = Closed OPEN O = Open Figure 15 - Test Mode - Low Speed Data / Repeat 7.5.2.1 Line Output (LO): 1. Using the HP 8920 as an RF signal generator, apply an "on channel" RF signal to the Receiver Front End module jack J2 (RF IN), at a steady signal level of -47 dBm or 1mV, with a 1 kHz tone at 3.0 kHz (2.4 kHz NPSPAC) of deviation. 2. Place HP 4934A (TIMMS) into the Receive Mode. 3. Connect the TIMMS to the Receive Audio on the punchblock (bridging clips removed). 4. Using the TIMMS, adjust the Line Output level to the maximum level specified by the System Engineer. If not specified, set to 0 dBm. 2. To load the test, the reset button (S4) in the GETC shelf must be pressed after the DIP switches have been set. Be sure that the receiver is squelched (may be adjusted using the SQUELCH control on the T/R Shelf) during this alignment because the receive audio (if any) is still routed to the transmitter. 3. Connect the HP 8920 ANT IN to the repeater TX Synthesizer RF OUT. Measure the deviation out of the transmitter and adjust the CG Pot for 750 Hz (600 Hz NPSPAC) +25 Hz of deviation. NOTE 7.5.2.2 GETC Modem Line Output 1. Leave the low speed data on for the next step (setting the Transmit Limiter), because the two deviations are independent of each other and are summed together for total output deviation. Set the GETC DIP Switches to the Test Mode setting as shown in Figure 14. S1 S2 1 2 3 4 5 6 7 C C C C C C C 8 S3 1 2 3 4 5 6 7 8 C C C C C C C C O 2 O OPEN Legend: C = Closed 3 4 5 O O C O OPEN Front of GETC 1 6 7 8 C C C OPEN 4. O = Open Disconnect the signal from the repeater TX Synthesizer RF OUT. Figure 14 - Test Mode-GETC Modem Line Output 7.5.3.2 Transmit Limiter - Transmit Pot (TX): 1. Using the TIMMS, adjust R2 on the GETC Logic board for a level 5 dB below the Line Output level set in 7.5.2.1. 1. 2. Return the GETC DIP Switches to their original positions. The Transmit (TX) Pot adjusts the limit of the level of deviation for all audio into the transmitter except Low Speed Data. Leave the DIP switches set for low speed data. Using a balanced 600 ohm source, apply a 1004 Hz tone at 0 dBm to the Line Input of the station under test at the Punchblock. 3. Remove Line Input signal. 2. Adjust the transmit deviation limit (TX) Pot for desired system deviation maximum of 4.5 kHz (3.6 kHz NPSPAC) +100 Hz at the transmitter. 53 LBI-39074 3. SYSTEM TEST AND ALIGNMENT PROCEDURES Disconnect the Line Input signal source. 7.5.3.6 High Speed Data Deviation (R31) 7.5.3.3 Repeater Gain (RG): 1. Configure the DIP switches as shown in Figure 17. Reset the GETC (S4). Configure the DIP switches as shown in Figure 16. Reset the GETC (S4). S1 S2 S1 1 2 3 4 5 6 7 8 1 2 3 4 5 6 7 C C C C C C C C C C C C C C 3 4 5 6 7 8 1 2 3 4 5 6 7 C C C C C C C C C C C C C C C 8 1 2 3 4 5 6 7 8 C C C C C C C C OPEN Front of GETC O Front of GETC OPEN Legend: S3 2 S3 C OPEN S2 1 C = Closed 8 1 2 O O O OPEN Legend: C = Closed 3 4 5 6 7 8 C C C C C C OPEN O = Open OPEN O = Open Figure 16 - Test Mode - Repeat 2. The Repeater Gain Pot sets the gain from the receiver audio to the modulation input to the transmitter. Using the HP 8920, apply an "on channel" RF signal to the Receiver Front End Module jack J2 (RF IN) at a steady signal level of -47 dBm or 1mV, with a 1 kHz tone at 3.0 kHz (2.4 kHz NPSPAC) of deviation. 3. Verify the transmitted tone is 1004 Hz and adjust the Repeater Gain (RG) Pot for 3.0 kHz (2.4 kHz NPSPAC) +100 Hz deviation. 4. Disconnect the HP 8920 from the (RF IN) J2. Figure 17 - Test Mode 9600 BAUD Pseudo - Random Data 1. The High Speed Data Deviation is set using R31 on the GETC Logic Board (see Figure 18). When the GETC is in this test mode, audio is routed from the High Speed Data input to the station. No other signals (receiver, line in) will be transmitted. The signal from the GETC to the transmitter is 9600 BAUD Pseudo - Random Data. Measure the transmitter deviation and adjust R31 on the GETC Board for 3.0 kHz (2.4 kHz NPSPAC) +100 Hz deviation. 7.5.3.4 Line Input Sensitivity - DSP Line Input (DI): The DSP Line Input (DI) Pot adjusts the transmitter deviation sensitivity to audio on the line input . 1. Using the TIMMS, apply a 1004 Hz tone to the Line Input on the punchblock. Set the signal level to the maximum Line Input specified by the System Engineer. If not specified, set to -16 dBm. 2. Adjust the DSP Line Input (DI) Pot for 3.0 kHz (2.4 kHz NPSPAC) +100 Hz transmitter deviation. Figure 18 - GETC Shelf 2. 7.5.3.5 Modem Line Input 1. Set the TIMMS for an output level 5 dBm below the level set in 7.5.3.4. 2. Connect the HP 8920 oscilloscope between U18 pin 1 and ground on the GETC Logic Board. 3. Adjust R1 on the GETC Logic Board for an output of 300 mVpp ±30 mV. 4. 54 Disconnect the TIMMS from the Line Input. Return the GETC DIP switch settings to their original positions and reset the GETC (pressing S4). 7.5.3.7 SINAD Test 1. Connect the HP 8920 to the RF IN (J2) on the Receiver Front End module. 2. Connect the Audio Input of the HP 8920 to the Line Output at the punchblock. Open the squelch. 3. Set the HP 8920 to measure SINAD and adjust the RF level until an average 12 dB SINAD is attained. If the SYSTEM TEST AND ALIGNMENT PROCEDURES SINAD is greater than -115 dBm, service the receiver. Record the 12 dB SINAD value on the data sheet in Appendix A. 7.5.5 TRANSMITTER OUTPUT AND REFLECTED POWER (MASTR III 800 MHz only) 7.5.3.8 Squelch Adjustment 1. Adjust the RF level for an average 10 dB SINAD reading. 2. Adjust the squelch until it just closes. 3. Remove the HP 8920 from the station. 4. Remove the TIMMS from the punchblock and reinstall the bridging clips. 7.5.4 TRANSMITTER OUTPUT AND REFLECTED POWER (except MASTR III 800 MHz) LBI-39074 NOTE Leave the power for all repeaters OFF except the repeater under test. 1. On the System Module of the Repeater under test, toggle the Tx DISABLE Switch to disable transmission (TX disable LED should be on). 2. Connect a RF Directional Wattmeter (item 18) between the PA output and the TX Combiner. Put the Wattmeter into FORWARD mode. Attach a 150 watt RF load (item 21) onto the output of the TX Combiner. 3. Turn off all other Repeater Stations connected to the combiner to prevent overloading the RF load. 4. Toggle the Tx DISABLE switch to enable transmission (TX disable LED should be off). Toggle the REM PTT switch on the front of the System Module (Transmit LED should be on). 5. Remove the top two screws securing the PA Assembly to the rack. This will allow the top of the PA Assembly to swing down and permit access to the PA adjustment. 6. Using a non-inductive tuning tool, adjust R11 on the PA Assembly for 100 ±5 watts output power (see Figure 19). Record the final output power. NOTE Leave the power for all repeaters OFF except the repeater under test. 1. Connect the Bird 8343-1 RF Directional Wattmeter to the Transmitter Output port. 2. Key the station. 3. Measure the Transmitter Output Power and adjust the Transmitter Power Pot (PA) for 100 ±5 watts. 4. Toggle the Tx DISABLE switch and disable transmission (Tx Disable LED on. Set the sensing direction to REVERSE. 5. 6. Toggle the Tx DISABLE again to enable transmission (Tx Disable LED off). Read the reflected power and record this value on the RF System data sheet. If this value is greater than 4 watts, service is required to reduce the reflected power. Toggle Tx DISABLE to disable transmission. WARNING Final adjustment of the PA Assembly for output power should be made with potentiometer R11 only. DO NOT adjust any other pots on the PA assembly. The remaining pots are set at the factory and do not require adjustment. 8. Toggle the Tx DISABLE switch and disable transmission (Tx Disable LED on. Set the sensing direction to REVERSE. 9. Toggle the Tx DISABLE again to enable transmission (Tx Disable LED off). Read the reflected power and record this value on the RF System data sheet. If this value is greater than 4 watts, service is required to reduce the reflected power. Toggle Tx DISABLE to disable transmission. Remove Wattmeter and reconnect cable to RF Combiner. 55 LBI-39074 SYSTEM TEST AND ALIGNMENT PROCEDURES The difference between the channel with the highest output and the channel with the lowest output should not exceed 1 dBm. R2 R10 PL3 (R2) R5 PL2 (R5) R8 PL1 (R8) R11 5. If the output power does not meet the minimum requirement, the transmitter combiner cavity requires retuning. 6. Toggle Tx DISABLE to disable transmission. 7. Repeat steps 3-6 for the remaining Station Repeaters. 8. Toggle the Tx DISABLE switch and disable transmission (Tx Disable LED on). Remove the RF load from the output of the combiner. 9. Replace the 250 watt element with a 10 watt element between the output of the transmitter combiner and the antenna system. Select the REVERSE direction. PO MAX (R10) PL0 (R11) P/O 19D901841G3 Figure 19 - Power Amplifier Adjustment Locations 10. Remove Wattmeter Combiner. and reconnect cable to RF 7.6 RF SYSTEM CHECK 7.6.1 TRANSMITTER COMBINER The transmitter combiners must be tested to insure the cavities have been tuned to the proper frequencies and do not have losses that exceed specifications. 1. 2. 3. 4. On the RF System Test Data sheet, record the cabinet number of the cabinet which contains the transmitter combiner. Connect a second Wattmeter terminated into a 50 ohm load at the output of the transmitter combiner. Toggle the Tx DISABLE again to enable transmission (Tx Disable LED off). Measure the output power of the transmitter combiner. Record this value on the data sheet. The input power to the Combiner (from the Repeater PA) should be 100 ±5 watts as adjusted in the previous section. With 100 watts input power to the Combiner, the maximum Combiner loss for any one channel should not exceed the following limits: 5 channel Combiner -2.2 dB or approximately 40 watts maximum. 10 channel Combiner -3.2 dB or approximately 50 watts maximum. 10. Toggle the Tx DISABLE again to enable transmission (Tx Disable LED off). Record the reflected power from the antenna system. Toggle the Tx DISABLE switch and disable transmission again (Tx Disable LED on). 11. Remove the Thru-line Wattmeter and power down all repeaters. 7.6.2 RECEIVER MULTICOUPLER TEST The receiver multicoupler must be tested as described in the following procedure. 1. Record the number of the cabinet in which the multicoupler is located. 2. All output ports except the one being tested must be terminated with a receiver or a 50 ohm load. 3. Connect an RF signal generator to the input of the receiver multicoupler. Set the frequency of the generator to the center frequency of the repeaters. Set the generator output level to -90 dBm. 4. Use a 50 ohm RF voltmeter to measure the signal level present at each output port on the multicoupler and record these levels on RF System data sheet. There must be no more than 1.0 dB variation in the output levels at the different ports. NOTE The dB loss can be calculated by the following formula: dB loss = 10 log ((input power)/(output power)) 56 The net gain through a 5 or 10 channel receiver multicoupler is typically 6.0 dB. SYSTEM TEST AND ALIGNMENT PROCEDURES 9. RF Signal INPUTS Meter 2 LBI-39074 Connect the receiver multicoupler port to the antenna input port on the HP 8920. 10. Set the HP 8920 to Spectrum Analyzer mode. Receiver Multicoupler 3 RF IN Signal Generator HP 8920 4 11. A signal spike should be present at the RF generator frequency. 12. Record the amplitude of the spike with the TTA ON in Appendix A-14. 5 13. Put the TTA in bypass mode by turning the DC Injector Voltage OFF. Figure 20 - Receiver Multicoupler Test Setup 14. Record the amplitude of this spike. 7.6.3 TOWER TOP AMPLIFIER TEST The Tower Top Amplifier (TTA) must be tested as described in the following procedure. A power supply mounted in the Transmitter combiner cabinet provides DC power to the tower mounted amplifier via the receiver coaxial cable. 1. Record the number of the cabinet in which the TTA power supply is located. 2. Remove the antenna connection from the multicoupler/injector unit located with the repeater equipment. 3. With the injector turned on, use a DC Multimeter to measure the voltage present at the N connector on the multicoupler/injector output. Record the voltage level on the RF Systems Test Data Sheet. WARNING Do not inadvertently short out the center pin of the N-connector to the ground as this will result in a blown fuse in the injector. 4. Reconnect the antenna. 5. Disable the transmitter on all repeaters with the TX Disable switch. 6. Disconnect the transmitter antenna from the transmitter combiner and connect the RF Output of the HP 8920. 7. Set the HP 8920 to the receive band center frequency and maximum output level. 8. Disconnect one output from the receiver multicoupler port. 15. Record the difference between the values recorded in steps 12 and 14. 7.7 RF POWER MONITOR TEST The RF Power Monitor unit monitors the RF power from each transmitter as well as the input and reflected power for the transmit antenna coax line. An alarm is fed from the RF Power Monitor via an RS 232-C connection to the Site Controller if any parameter is outside its specified limit. Appendix C provides the interconnections between the Power Monitor and the Site Controller. Whenever DC power is removed from the RF Power Monitor, the unit must be reprogrammed; therefore, at the initial installation of a repeater site the RF Power Monitor must be reprogrammed. If the site is equipped with an RF Power Monitor, the Power Monitor unit will need to be set up and programmed as follows: 1. On the back panel option switch, set switch 1, 4, 8 on (up) and all other switches off (down). 2. The Power Monitor unit will be powered from the site +12 Vdc supply; and the front panel 110 VAC-OFF-12 Vdc switch must be in the 12 Vdc position. 57 LBI-39074 3. SYSTEM TEST AND ALIGNMENT PROCEDURES In order to clear the memory, press the following keys in order: (1) (3) (5) (7) (CLEAR) This will cause all RAM locations in memory to be set to zero. 4. Clear all alarm memory by pressing the following keys in order: Set the clock to the proper current time. As an example, to set the time to 2:39 PM, press the following keys: (SET) (TIME) (1) (4) (3) (9) (ENTR) NOTE: The clock operates on 24-hour time. 6. Set the date to the current date. As an example, to set the date to May 26, depress the following keys: (SET) (DATE) (0) (5) (2) (6) (ENTR) 7. Assign the repeater stations to the proper antenna for the Power Monitor. Designate radio station #1 as Channel 1 and assign it to the transmit antenna (Antenna #1) by depressing the following keys: (0) (1) (0) (1) (CHNL/DES) (ENTR) (channel 1) (0) (1) (0) (2) (CHNL/DES) (ENTR) (channel 2) NOTE: The first two digits always defines the antenna, while digits 3 and 4 define the channel number. 8. Repeat step 7 for the remaining channels at the site. 9. This step will adjust the sensors at the transmitter power output and the transmitter combiner output so they will monitor the power output correctly. 58 11. Toggle the Tx DISABLE again to enable transmission (Tx Disable LED off) 12. Depress the following keys on the power monitor: (0) (1) (0) (1) (IPF) (DUAL) (OPF) (ENTR) (9) (9) (9) (9) (CLEAR) 5. 10. Connect an in-line watt meter between a station PA output and the input to the transmitter combiner (locate at the output of the PA). Connect a second watt meter terminated in a 50 ohm load at the output of the transmitter combiner. This will display the transmitter output power and combiner in real time. 13. Adjust the transmitter power sensor to obtain the same reading on the display of the RF Power Monitor as the watt meter on the output of the transmitter. 14. Adjust the antenna power sensor (lower screw) to obtain the same reading on the display of the RF Power Monitor as the watt meter on the output of the transmitter combiner. 15. Repeat 9a through 10a for each channel, using the correct antenna/channel keystrokes for the transmitter under test. 12. Connect two 50 ohm dummy loads together using a tee and terminate the watt meter on the output of the transmitter combiner with them. On the power monitor enter the keystrokes: (0) (1) (0) (1) (OPF) (DUAL) (OPR) (ENTR) Substitute the correct antenna/channel combination for the station under test. Adjust the reverse antenna power sensor (upper screw) to match the reflected power reading. LBI-39074 8. SYSTEM FUNCTIONAL CHECKOUT PROCEDURES 8.1 INTRODUCTION 8.3 BASIC TEST SITE This chapter describes the recommended System Power-Up and Test Procedures for EDACS Basic and Level 1 equipment. The procedures should be performed in the order presented. Upon successful completion of this section, the EDACS site equipment is considered to be fully operational and ready for service. This section verifies basic failsoft operations for the EDACS Basic and Level 1 sites in the Failsoft mode. Test radios programmed with the generic personality described in the previous section should be used; however, names and specific ID numbers may be substituted to reflect customerspecific programming. NOTE NOTE Before proceeding, verify all equipment has been mechanically installed, electrically interconnected and configured in accordance with this installation manual. Ensure the Site Controller (if supplied) power is OFF. 1. 8.2 PROGRAMMING THE EDACS TEST RADIOS Table 10 - Station GETC Front Panel LED Indicators The following system functional test requires two (2) portable radios. One of the radios must be equipped with a keypad. Each radio should be programmed with the site frequencies and test talk group. Table 9 lists the PC Programming packages for various types of EDACS radios. Refer to the manual included with the applicable programming package for radio programming details. Program each radio as necessary. Table 9− PC Programming Packages EDACS RADIO TYPE M-PA portable MRK-II portable Dual Format PCS portable Dual Format MDR mobile Dual Format MDX mobile Orion mobile Verify Channel 1 is operating as a Control Channel (CC) and all the other station GETC’s are idle or Working Channels (WC). See Table 10. PC PROGRAMMING PACKAGE NUMBER TQ-3340 TQ-3374 TQ-3373 TQ-3373 TQ-3373 TQ-3374 < < < < < < MODE L1 L2 L3 L4 L5 L6 L7 (H7) (H6) (H5) (H4) (H3) (H2) (H1) Failsoft Trunking: Control Channel Idle Working Channel Assigned Clear Voice Call Assigned Digital Voice Call l l l l m m m m m m m m m m m m m m m m l m l l l l m l Trunking: Control Channel Idle Working Channel Assigned Clear Voice Call Assigned Digital Voice Call m m m m m m m m m m m m m m m m m m m m l m l l l l m l Legends: 2. m =Off l = On Verify each idle Working Channel can be assigned to call by performing a PTT on the portable radio. NOTE For sites not programmed for automatic channel rotation, each Working Channel must be selected manually by turning all the other Working Channels OFF. 59 LBI-43009 SYSTEM FUNCTIONAL CHECKOUT PROCEDURES 3. Reset the Control Channel GETC and verify that the Control Channel rotates to the next allowable Control Channel position. 8.5 UNINTERRUPTABLE POWER SUPPLY TEST 4. Repeat steps 2 and 3 and verify each GETC will operate as the Control Channel. 1. Remove AC power from the Site Controller cabinet. 2. Verify the UPS automatically switches in and supplies power to the Site Controller. The power "glitch" should not force the site into failsoft trunked mode. 3. Allow the UPS to power the Site Controller for at least five (5) continuous minutes. 8.4 LEVEL 1 TRUNKING TEST This section tests Site Controller operation and trunked operations of the EDACS Level 1 site. These tests should only be performed after the basic failsoft tests described in the previous section have been completed. 1. Apply power to the Site Controller computer. 8.6 TELEPHONE INTERCONNECT TEST 2. Verify the front panel "LTC" and "RUN" indicators are ON. The following tests verify Telephone Interconnect operation. 3. Verify the two Fail LED’s on the rear of the Site Controller are OFF. NOTE 4. Reset the Control Channel GETC. Verify the site goes into full Trunking mode (L1 turns OFF). 5. Verify that each idle Working Channel can be assigned to call by performing a PTT on the portable radio. NOTE For sites not programmed for automatic channel rotation, each Working Channel must be selected manually by turning all the other Working Channels OFF. 6. Reset the Control Channel GETC and verify that the Control Channel rotates to the next allowable Control Channel position. 7. Repeat steps 5 and 6 and verify each GETC will operate as the Control Channel. This test requires a live telephone line and a punchblock with the bridging clips installed. 1. Using a portable radio, perform an outbound telephone call. 2. Repeat step 1 for all available telephone lines. 3. Make an inbound telephone call to the site and at the second dial tone, overdial the 5-digit LID of the test portable. 4. Verify the portable rings and when answered, the call is processed. Ericsson GE Mobile Communications Inc. Mountain View Road • Lynchburg Virginia 24502 Printed in U.S.A. 60 LBI-39074 APPENDIX A INSTALLATION CHECKLISTS A-1 LBI-39074 INSTALLATION CHECKLISTS SITE DATA SHEET Customer Name: Local Customer Contact Name: Local Customer Phone: _________________________________________________________ _________________________________________________________ _________________________________________________________ Site Name: Site Address: _________________________________________________________ _________________________________________________________ _________________________________________________________ _________________________________________________________ _________________________________________________________ _________________________________________________________ _________________________________________________________ _________________________________________________________ _________________________________________________________ _________________________________________________________ _________________________________________________________ _________________________________________________________ Site Telephone Number: If Site is Leased, Owner's Name: If Site is Leased, Owner's Phone: Access Controlled by (Name, Phone): Site Latitude (Deg., Min., Sec.): Site Longitude (Deg., Min., Sec.): FCC License ID/Call Sign: Site Equipment Type: Number of Channels: If LEVEL 1, Installed Options: BASIC o LEVEL 1 o _________________________________________________________ ¨ Redundant Downlink Power Monitor Unit Test and Alarm Unit Local Telco Interconnect ¨ ¨ ¨ If Local I/C, Number of PSTN Cct: If Local I/C, List Channels with RICs: _________________________________________________________ _________________________________________________________ Installation Date: Installed By (Company Name): Tower Type: _________________________________________________________ _________________________________________________________ ¨ Self Supporting ¨ ¨ ¨ Guyed Monopole Other Tower Height: Tower FAA Options: _________________________________________________________ ¨ ¨ Lights Painted Antenna System: Single If Multi-Antennas, Number of Transmit: If Multi-Antenna, Number of Receive: Transmit Helix Type: Receive Helix Type: Transmit Antenna Model Receive Antenna Model: ______________ ______________ ______________ ______________ ______________ ______________ If Tower Top Amplifier, Model: Receiver Multicoupler Model: _________________________________________________________ _________________________________________________________ A-2 ¨ Multi ¨ Transmit Antenna Height: Receive Antenna Height: Transmit Antenna Azimuth: Receive Antenna Azimuth: Transmitter Combiner Model: Tower Top Amplifier: YES _______________ _______________ _______________ _______________ _______________ NO ¨ ¨ INSTALLATION CHECKLISTS LBI-39074 SITE DATA SHEET (Continued) Design† Telco Line Output Level: ______________________________________ Design† Telco Line Input Level: ______________________________________ † These line levels are obtained from the customer after consultation with EGE Systems Engineering and represent the maximum levels as referenced in the main procedures. A-3 LBI-39074 INSTALLATION CHECKLISTS INSTALLER PROFILE DATA SHEET INSTALLER PROFILE Installer’s Company Name: ______________________________________ Installer’s Telephone Number: ______________________________________ Installer’s Name (s): ______________________________________ ______________________________________ Technician’s Name (s): ______________________________________ ______________________________________ Date of Testing Complete: ______________________________________ Test Equipment Used, if other than specified: ______________________________________ ______________________________________ ______________________________________ ______________________________________ ______________________________________ ______________________________________ ______________________________________ A-4 INSTALLATION CHECKLISTS LBI-39074 ANTENNA SYSTEM INSTALLATION CHECKLIST SITE ______________ ANTENNA ______________ INSPECTED BY ______________ DATE ______________ CHECKLIST: 1. What is make of antenna? ______________ 2. What is type of antenna? ______________ 3. What is design gain of antenna? ______________ 4. What is bearing of antenna? ______________ 5. What is height of antenna above ground? ______________ 6. Are hoisting grips installed as specified? ______________ 7. Is cable secured to tower at specified intervals? ______________ 8. Is cable grounded at top of tower? ______________ 9. Is cable grounded at bottom of tower? ______________ 10. Is cable grounded at point where it enters building? ______________ 11. Is cable feed-through properly installed? ______________ 12. Are coaxial connectors weather-sealed? ______________ 13. Is cable entrance weather-sealed? ______________ dB ft A-5 LBI-39074 INSTALLATION CHECKLISTS EQUIPMENT INSTALLATION CHECKLIST SITE ______________ CABINET ______________ INSPECTED BY ______________ DATE ______________ CHECKLIST #1: A-6 1. Verify each cabinet/rack is correctly fastened to the floor in all four (4) corners. ______________ 2. For cabinets, verify the optional cable ducts have been correctly installed. ______________ 3. For racks, verify all racks are bolted to adjacent rack at the top and bottom. ______________ 4. For cabinets, verify the top plate is correctly installed on the RF cabinet. ______________ 5. Verify the RF equipment is correctly installed. ______________ 6. Ensure all special installation requirements, provided by System Engineering, have been completed correctly. ______________ INSTALLATION CHECKLISTS LBI-39074 SYSTEM CABLING CHECKLIST SITE ______________ CABINET ______________ INSPECTED BY ______________ DATE ______________ CHECKLIST: 1. Are RF coaxial connections correctly installed? (Does not apply to Site Controller cabinet.) ______________ 2. Is the daisy-chain correctly connected to the EDACS Interface Panel's POWER SENSOR module? (Does not apply to RF cabinet.) ______________ 3. Is the bi-directional power sensor in the RF cabinet connected correctly to the EDACS Interface Panel's POWER SENSOR module in the Site Controller cabinet? (Does not apply to the Failsoft Repeater cabinets.) ______________ 4. Is the daisy-chain correctly connected to the EDACS Interface Panel's STATION AUDIO module? (Applies only to Failsoft Repeater cabinets.) ______________ 5. Is the STATION AUDIO module in the first Failsoft Repeater cabinet in each row correctly connected to a Punchblock? ______________ 6. Is the daisy-chain correctly connected to the EDACS Interface Panel's RIC AUDIO module(s)? (Does not apply to RF cabinet.) (Site Controller cabinet has two modules - one for each row of cabinets.) ______________ 7. Is the DOWNLINK DATA module correctly connected to a Punchblock? (Applies only to the first Failsoft Repeater cabinet in the first row.) ______________ 8. Is the daisy-chain correctly connected to the EDACS Interface Panel's GETC DATA module? (Does not apply to RF cabinet.) (Site Controller cabinet has two modules - one for each row of cabinets.) ______________ 9. Is the daisy-chain correctly connected to the EDACS Interface Panel's SERIAL MODULE? (Does not apply to RF cabinet.) ______________ 10. Are the two PHONE LINE modules correctly connected to the punchblocks? (Applies only to Site Controller cabinet.) ______________ 11. Is the DWNLINK DATA module correctly connected to the Punchblock? (Applies only to Site Controller cabinet.) ______________ 12. Is the Data Modem correctly connected to the DOWNLINK module? (Applies only to Site Controller cabinet.) ______________ 13. Are alarm inputs A1-A16 correctly connected to J4 on the back of the Alarm and Control Unit? (Applies only to Site Controller cabinet.) ______________ 14. Are alarm inputs A17-A32 correctly connected to J5 on the back of the Alarm and Control Unit? (Applies only to Site Controller cabinet.) ______________ 15. Are control outputs C1-C8 correctly connected to J3 on the back of the Alarm and Control Unit? (Applies only to Site Controller cabinet.) ______________ A-7 LBI-39074 INSTALLATION CHECKLISTS CONFIGURATION CHECKLIST SITE ______________ CABINET ______________ INSPECTED BY ______________ DATE ______________ CHECKLIST: A-8 1. Are the DIP switches and jumpers in the Station GETC set correctly? (Applies only to the Repeater cabinets.) ______________ 2. Are the DIP switches and jumpers in the Downlink GETC set correctly? (Applies to the Site Controller only.) ______________ 3. Are the switches and jumpers in the RIC(s) set correctly? (Applies only to the Repeater cabinets.) ______________ 4. Are the jumpers on the Channel Termination Boards (19C852379G1) correct? (Applies to the Site Controller and repeater cabinets.) ______________ 5. Is the DIP switch on the Power Monitor Unit set correctly? (Applies to the Site Controller cabinet only.) ______________ 6. Is the DIP switch on the Data Modem set correctly? (Applies to the Site Controller only.) ______________ INSTALLATION CHECKLISTS LBI-39074 DOWNLINK GETC CHECKLIST SITE ______________ CABINET ______________ INSPECTED BY ______________ DATE ______________ DOWNLINK GETC CONFIGURATION: Mark a C in a switch position if that switch is CLOSED. Mark an O if that switch is OPEN. S1 S2 1 2 3 4 5 6 7 C C C C C C C 8 1 2 3 4 C C C C 5 S3 6 7 8 C C C 1 2 3 4 5 6 7 8 Part (group) No. Rev. No. Logic Board: ___________________ ______ Firmware (U2): ___________________ ______ Firmware (U35): ___________________ ______ Turbo Board: ___________________ ______ Turbo Software: ___________________ ______ O OPEN OPEN OPEN A-9 LBI-39074 INSTALLATION CHECKLISTS SYSTEM MANAGER INSTALLATION CHECKLIST INSPECTED BY ______________ DATE ______________ CHECKLIST: 1. Is the System Manager equipment connected correctly? ______________ 2. Is the Data Modem correctly connected to the line to the repeater site? ______________ 3. Is the DIP switch on the Data Modem set correctly? ______________ A-10 INSTALLATION CHECKLISTS LBI-39074 GETC PROGRAMMING DATA SHEET CUSTOMER: ________________________________ CHANNEL NUMBER: _______ SITE NAME: _________________________________ PROGRAMMED BY: ___________________________ DATE: ____________ CHANNEL ALLOCATION (Screen L1-A): Channel Number 1 2 3 1 2 3 4 5 6 7 8 9 0 1 2 3 4 5 6 7 8 9 0 1 2 3 4 5 6 7 8 9 0 1 2 Control Channel Clear Voice Digital Voice Data Pager Interconnect _ _ _ _ _ _ _ _ _ _ _ _ _ _ _ _ _ _ _ _ _ _ _ _ _ _ _ _ _ _ _ _ _ _ _ _ _ _ _ _ _ _ _ _ _ _ _ _ _ _ _ _ _ _ _ _ _ _ _ _ _ _ _ _ _ _ _ _ _ _ _ _ _ _ _ _ _ _ _ _ _ _ _ _ _ _ _ _ _ _ _ _ _ _ _ _ _ _ _ _ _ _ _ _ _ _ _ _ _ _ _ _ _ _ _ _ _ _ _ _ _ _ _ _ _ _ _ _ _ _ _ _ _ _ _ _ _ _ _ _ _ _ _ _ _ _ _ _ _ _ _ _ _ _ _ _ _ _ _ _ _ _ _ _ _ _ _ _ _ _ _ _ _ _ _ _ _ _ _ _ _ _ _ _ _ _ _ _ _ _ _ _ Downlink _ _ _ _ _ _ _ _ _ _ _ _ _ _ _ _ _ _ _ _ _ _ _ _ _ _ _ _ _ _ _ _ Multisite Downlink _ _ _ _ _ _ _ _ _ _ _ _ _ _ _ _ _ _ _ _ _ _ _ _ _ _ Y _ _ _ _ _ External CUI _ _ _ _ _ _ _ _ _ _ _ _ _ _ _ _ _ _ _ _ _ _ _ _ _ _ _ _ _ _ _ _ SITE OPTION (Screen L3-D): Default settings in ( ) SITE NAME: _________________________________ SITE ID: _________________________________ DATE: _________________________________ MORSE ID*: _________________________________ Channel Assignment: __________ (Descending) SCAT: __________ (N) Rotating Assignment: __________ (Y) Multisite System: __________ (Y) Site Ch/Frq Notification: __________ (N) Simulcast System: __________ (N) Individual Call Updates: __________ (One Shot) Voter System: __________ (N) Logical ID above 8191: __________ (Y) CTIS: __________ (N) * Required by FCC prior to putting site on air. SITE OPTION (Screen L3-D): Default settings in ( ) Individual Call Hang: __________ (∅) Transmission Trunked Timer: __________ (300) Group Call Hang: __________ (∅) Message Trunked Timer: __________ (300) Special Call Hang: __________ (5) Morse Interval Timer: __________ (30) Voice Guard Hang: __________ (∅) Test Call Interval Timer: __________ (∅) Emergency Call Hang: __________ (2) Maximum Interconnect Calls: __________ (1) System All Call Hang: __________ (∅) A-11 LBI-39074 INSTALLATION CHECKLISTS TRUNKED REPEATER TEST DATA CUSTOMER: ________________________________ CHANNEL NUMBER: _______ SITE NAME: _________________________________ TESTED BY: ________________________________ DATE: ____________ REPEATER IDENTIFICATION: MODEL NO.: RX FCC ID #: RX FREQUENCY (MHz): SERIAL NO.: TX FCC ID # TX FREQUENCY (MHz): STATION GETC CONFIGURATION: Mark a C in a switch position if that switch is CLOSED. Mark an O if that switch is OPEN. S1 S2 1 2 3 4 5 6 7 C C C C C C C 8 1 2 3 4 C C C C 5 S3 6 7 8 C C C 1 2 3 4 5 6 7 8 Part (group) No. Rev. No. Logic Board: ___________________ ______ Firmware (U2): ___________________ ______ Firmware (U35): ___________________ ______ Turbo Board: ___________________ ______ Turbo Software: ___________________ ______ O OPEN OPEN OPEN High Speed Data Deviation _______ kHz (3.0 kHz [2.4 kHz NPSPAC] ±100 Hz) RECEIVER ALIGNMENT (7.5.2): Line Output (LO) (as specified, default = 0 ±0.5 dBm) _______ dBm SENSITIVITY MEASUREMENT (7.5.3.7): Modem Line Output (5 dB below LO) ______ dB TRANSMITTER ALIGNMENT (7.5.3): Low Speed Data (750 Hz [600 Hz NPSPAC] ±25 Hz _______ Hz Transmit Limiter - Transmit Pot (TX) (4.5 kHz [3.6 kHz NPSPAC] ±100 Hz) _______ kHz _______ kHz Repeater Gain (RG) (3.0 kHz [2.4 kHz NPSPAC] ±100 Hz) Line Input Sensitivity - DSP Line Input (3.0 kHz [2.4 kHz NPSPAC] ±100 Hz) _______ kHz Modem Line Input (300 mVpp ±30 mV)______ mVpp A-12 SINAD Test _______ dBm (less than -115 dBm @ 12 dB SINAD) TRANSMITTER OUTPUT & REFLECTED POWER (7.5.4): Power Amplifier Output Power (100 ±5 Watts) _______ Watts Reflected Power (≤4 Watts) _______ Watts NOTE Make a copy of this form for each repeater. INSTALLATION CHECKLISTS LBI-39074 RF SYSTEM TEST DATA CUSTOMER: ________________________________ SITE NAME ______________ 7.6.1. TRANSMITTER COMBINER TEST CHANNEL NUMBER PA OUTPUT POWER (Watts) (REF, 7.5.4 or 7.5.5) REFLECTED POWER (Watts) COMBINER OUTPUT POWER (Watts) COMBINER LOSS (dB) ANTENNA REFLECTED POWER (Watts) 1 2 3 4 5 6 7 8 9 10 11 12 13 14 15 16 17 18 19 20 A-13 LBI-39074 INSTALLATION CHECKLISTS 7.4 RF SYSTEM TEST DATA (Continued) CUSTOMER: ________________________________ SITE NAME ______________ 7.6.2. RECEIVER MULTICOUPLER TEST 7.6.3. TOWER TOP AMPLIFIER TEST Pad Installed: _____________ dB Multicoupler Output: _____________ dBm Tower Top Amplifier (gain): _____________ dB Tower Top Injector _____________ volts CHANNEL NUMBER A-14 OUTPUT MULTICOUPLER (dBm) SIGNAL TTA ON (dBm) SIGNAL TTA Bypassed (dBm) CHANNEL NUMBER 1 11 2 12 3 13 4 14 5 15 6 16 7 17 8 18 9 19 10 20 OUTPUT MULTICOUPLER (dBm) SIGNAL TTA ON (dBm) SIGNAL TTA Bypassed (dBm) LBI-39074 APPENDIX B EQUIPMENT ROOM LAYOUT DIAGRAMS B-1 LBI-39074 EQUIPMENT ROOM LAYOUT DIAGRAMS STANDARD 12-CHANNEL AND 20-CHANNEL FLOOR PLANS FOR 69" CABINETS CABLE DUCT 69 in. FRONT ROW 1 EQ. SITE CHAN. CHAN. CHAN. CHAN. RF CONT. 1-3 4-6 7-9 10-12 EQ. CAB. CAB. CAB. CAB. CAB. CAB. A TOP VIEW VIEW A CABLE DUCT ROW 2 BACK CAB. CABLE DUCT CABLE DUCT BRIDGE CHAN. CHAN. CHAN. 13-15 16-18 19&20 EQ. CAB. CAB. CAB. CAB. RF 69 in. SITE B CONT. EQ. 69 in. 7 ft CAB. CAB. EQ. CAB. CABLE DUCT ROW 1 CHAN. CHAN. CHAN. CHAN. RF 1-3 4-6 7-9 10-12 EQ. CAB. CAB. CAB. CAB. CAB. ROW 1 TOP VIEW ROW 2 VIEW B STANDARD 12-CHANNEL AND 20-CHANNEL FLOOR PLANS FOR 83" CABINETS CABLE DUCT 83 in. FRONT ROW 1 EQ. SITE CHAN. CHAN. CHAN. CHAN. RF CONT. 1-3 4-6 7-9 10-12 EQ. CAB. CAB. CAB. CAB. CAB. CAB. A TOP VIEW VIEW A CABLE DUCT ROW 2 BACK CAB. CABLE DUCT CABLE DUCT BRIDGE CHAN. CHAN. CHAN. RF 13-15 16-18 19&20 EQ. CAB. CAB. CAB. CAB. 83 in. SITE B CONT. EQ. 83 in. 7.25 ft CAB. CAB. EQ. CAB. CABLE DUCT ROW 1 CHAN. CHAN. 1-3 4-6 7-9 10-12 EQ. CAB. CAB. CAB. CAB. CAB. CHAN. CHAN. RF ROW 1 TOP VIEW STANDARD EQUIPMENT ROOM FLOOR PLANS B-2 ROW 2 VIEW B EQUIPMENT ROOM LAYOUT DIAGRAMS EDACS INTERFACE PANEL EDACS INTERFACE PANEL EDACS INTERFACE PANEL RIC GETC RIC GETC POWER MONITOR UNIT LOCAL TELEPHONE INTERCONNECT DOWNLINK GETC* DOWNLINK GETC* BLANK PANEL COMPUTER CONTROLLER BLANK PANEL ALARM AND CONTROL UNIT TEST UNIT BLANK PANEL POWER SUPPLY BLANK PANEL BLANK PANEL UNINTERRUPTIBLE POWER SUPPLY SITE CONTROLLER EDACS INTERFACE PANEL LBI-39074 EDACS INTERFACE PANEL RIC GETC 10 CHANNEL REPEATER NO. 3 REPEATER NO. 6 REPEATER NO. 9 POWER SUPPLY RIC GETC POWER SUPPLY RIC GETC POWER SUPPLY RIC GETC REPEATER NO. 2 REPEATER NO. 5 REPEATER NO. 8 POWER SUPPLY RIC GETC POWER SUPPLY RIC GETC POWER SUPPLY RIC GETC REPEATER NO. 1 REPEATER NO. 4 REPEATER NO. 7 REPEATER NO. 10 POWER SUPPLY POWER SUPPLY POWER SUPPLY POWER SUPPLY REPEATER CABINET REPEATER CABINET REPEATER CABINET COMBINER SPACE TOWER TOP AMPL POWER SUPPLY OR RX FILTER RX MULTICOUPLER SPACE RIC GETC REPEATER CABINET RF CABINET * Not used in EDACS Level 1 Systems STANDARD EQUIPMENT CABINET LAYOUT DIAGRAM B-3 LBI-39074 This page intentionally left blank B-4 LBI-39074 APPENDIX C EDACS INTERFACE PANEL INTERCONNECTION DIAGRAMS C-1 LBI-39074 EDACS INTERFACE PANEL INTERCONNECTION DIAGRAMS INSTALLATION WIRING GUIDE The following table lists the EDACS Interface Panel modules that are supplied for various standard and optional site configurations. A YES means that the modules need to be daisy-chained to the Site Controller cabinet. A NO means that the module is supplied, but should not be daisy chained. An OPT means that an optional cable to an optional pre-wired punchblock can be connected (cable and punchblock do not come with the Local Telephone Interconnect option). SITE CONFIGURATION CABINET-TO-CABINET OR CABINET-TO-PUNCHBLOCK CONNECTIONS ARE REQUIRED TO THE FOLLOWING EDACS INTERFACE PANEL MODULES POWER SENSOR STATION AUDIO RIC AUDIO MODEM DATA GETC DATA BASIC EDACS: STANDARD PACKAGE LEVEL 1 EDACS: STANDARD PACKAGE OPTIONS: POWER MONITOR LOCAL TELEPHONE INTERCONNECT: 1-16 SUBSCRIBER LINES 17-32 SUBSCRIBER LINES SERIAL MODULE PHONE LINE 1-16 PHONE LINE 17-20 DWNLINK DATA YES NO NO YES YES NO YES YES YES OPT OPT OPT When a non-standard cabinet layout is used, a longer cable will need to be substituted for a cable that is too short. The following tables give alternate cable part numbers and lengths for the two types of cables used in the daisy-chains. CABINET-TO-CABINET / CABINET-TO-PUNCHBLOCK 25-PAIR SHIELDED INTERCONNECT CABLES WITH 50-PIN MALE TELCO RIGHT-ANGLE CONNECTOR AT EACH END ERICSSON GE PART NUMBER CABLE LENGTH ERICSSON GE PART NUMBER 19D903880P120 5 FEET 19D903880P130 5 FEET 19D903880P121 15 FEET 19D903880P131 15 FEET 19D903880P122 7 FEET 19D903880P132 20 FEET 19D903880P123 10 FEET 19D903880P133 25 FEET 19D903880P124 20 FEET 19D903880P134 30 FEET 19D903880P125 25 FEET 19D903880P135 35 FEET 19D903880P126 30 FEET 19D903880P136 40 FEET 19D903880P127 35 FEET 19D903880P137 45 FEET 19D903880P128 40 FEET 19D903880P138 50 FEET 19D903880P129 50 FEET EDACS Interface Panel Interconnections INSTALLATION WIRING GUIDE C-2 CABINET-TO-CABINET (SERIAL MODULE) 15-CONDUCTOR SHIELDED INTERCONNECT CABLES WITH DB-15 MALE CONNECTOR AT EACH END CABLE LENGTH EDACS INTERFACE PANEL INTERCONNECTION DIAGRAMS LBI-39074 STANDARD ARRANGEMENT FOR UP TO 12 CHANNELS: Channel Termination Board (19C852379G1) Antenna Sensor Cable Channel Termination Board (19C852379G1) 19D903880P120 5-ft., 25-Pair Cables J2 J7 J1 POWER SENSOR Module 19C852213G1 Site Controller Cabinet J14 J15 POWER SENSOR Module 19C852204G1 Channel 1-3 Rptr. Cabinet J14 J15 POWER SENSOR Module 19C852204G1 Channel 4-6 Rptr. Cabinet J14 J15 POWER SENSOR Module 19C852204G1 Channel 7-9 Rptr. Cabinet J14 J15 POWER SENSOR Module 19C852204G1 Channel 10-12 Rptr. Cabinet F Power Sensor R RF Cabinet Single Row - Channels 1-12 STANDARD ARRANGEMENT FOR 13 TO 20 CHANNELS: Antenna Sensor Cable Channel Termination Board (19C852379G1) 19D903880P120 5-ft., 25-Pair Cables J1 J7 J2 POWER SENSOR Module 19C852213G1 Site Controller Cabinet J14 J15 POWER SENSOR Module 19C852204G1 Channel 13-15 Rptr. Cabinet J14 J15 POWER SENSOR Module 19C852204G1 Channel 16-18 Rptr. Cabinet J14 J15 POWER SENSOR Module 19C852204G1 Channel 19&20 Rptr. Cabinet F Power Sensor R RF Cabinet Second Row - Channels 13-20 19D903880P121 15-ft., 25-Pair Cable Channel Termination Board (19C852379G1) Antenna Sensor Cable 19D903880P120 5-ft., 25-Pair Cables J14 J15 POWER SENSOR Module 19C852204G1 Channel 1-3 Rptr. Cabinet J14 J15 POWER SENSOR Module 19C852204G1 Channel 4-6 Rptr. Cabinet J14 J15 POWER SENSOR Module 19C852204G1 Chanel 7-9 Rptr. Cabinet J14 J15 POWER SENSOR Module 19C852204G1 Channel 10-12 Rptr. Cabinet F Power Sensor R RF Cabinet First Row - Channels 1-12 EDACS Interface Panel Interconnections POWER SENSOR MODULES (Made from 19D904207, Sh. 2, Rev. 0) C-3 LBI-39074 EDACS INTERFACE PANEL INTERCONNECTION DIAGRAMS STANDARD ARRANGEMENT FOR UP TO 12 CHANNELS: 19D903880P121 15-ft., 25-Pair Cable 19D903880P120 5-ft., 25-Pair Cables J4 J1 Pre-Wired Type 66 Punchblock 19C851899P2 Site Controller Cabinet J14 J15 STATION AUDIO Module 19C852204G1 Channel 1-3 Rptr. Cabinet J14 J15 STATION AUDIO Module 19C852204G1 Channel 4-6 Rptr. Cabinet J14 J15 STATION AUDIO Module 19C852204G1 Channel 7-9 Rptr. Cabinet J14 J15 STATION AUDIO Module 19C852204G1 Channel 10-12 Rptr. Cabinet RF Cabinet Single Row - Channels 1-12 STANDARD ARRANGEMENT FOR 13 TO 20 CHANNELS: 19D903880P121 15-ft., 25-Pair Cable 19D903880P120 5-ft., 25-Pair Cables J4 J1 Pre-Wired Type 66 Punchblock 19C851899P2 Site Controller Cabinet J14 J15 STATION AUDIO Module 19C852204G1 Channel 13-15 Rptr. Cabinet J14 J15 STATION AUDIO Module 19C852204G1 Channel 16-18 Rptr. Cabinet J14 J15 STATION AUDIO Module 19C852204G1 Channel 19&20 Rptr. Cabinet RF Cabinet Second Row - Channels 13-20 19D903880P121 15-ft., 25-Pair Cable 19D903880P120 5-ft., 25-Pair Cables J4 J1 Pre-Wired Type 66 Punchblock 19C851899P2 J14 J15 STATION AUDIO Module 19C852204G1 Channel 1-3 Rptr. Cabinet J14 J15 STATION AUDIO Module 19C852204G1 Channel 4-6 Rptr. Cabinet J14 J15 STATION AUDIO Module 19C852204G1 Channel 7-9 Rptr. Cabinet J14 J15 STATION AUDIO Module 19C852204G1 Channel 10-12 Rptr. Cabinet RF Cabinet First Row - Channels 1-12 EDACS Interface Panel Interconnections STATION AUDIO MODULES (Made from 19D904213, Sh. 2, Rev. 0) C-4 EDACS INTERFACE PANEL INTERCONNECTION DIAGRAMS LBI-39074 STANDARD ARRANGEMENT FOR UP TO 12 CHANNELS: 19D903880P120 5-ft., 25-Pair Cables J14 J14 J15 J15 RIC AUDIO RIC AUDIO 1-12 13-20 Module Module 19C852204G1 19C852204G1 Site Controller Cabinet J14 J15 RIC AUDIO Module 19C852204G1 J14 J15 RIC AUDIO Module 19C852204G1 J14 J15 RIC AUDIO Module 19C852204G1 J14 J15 RIC AUDIO Module 19C852204G1 Channel 1-3 Rptr. Cabinet Channel 4-6 Rptr. Cabinet Channel 7-9 Rptr. Cabinet Channel 10-12 Rptr. Cabinet RF Cabinet Single Row - Channels 1-12 STANDARD ARRANGEMENT FOR 13 TO 20 CHANNELS: 19D903880P121 15-ft., 25-Pair Cable 19D903880P120 5-ft., 25-Pair Cables J14 J15 J15 J14 RIC AUDIO RIC AUDIO 1-12 13-20 Module Module 19C852204G1 19C852204G1 Site Controller Cabinet J14 J15 RIC AUDIO Module 19C852204G1 J14 J15 RIC AUDIO Module 19C852204G1 J14 J15 RIC AUDIO Module 19C852204G1 Channel 13-15 Rptr. Cabinet Channel 16-18 Rptr. Cabinet Channel 19&20 Rptr. Cabinet RF Cabinet Second Row - Channels 13-20 19D903880P120 5-ft., 25-Pair Cables J14 J15 RIC AUDIO Module 19C852204G1 J14 J15 RIC AUDIO Module 19C852204G1 J14 J15 RIC AUDIO Module 19C852204G1 J14 J15 RIC AUDIO Module 19C852204G1 Channel 1-3 Rptr. Cabinet Channel 4-6 Rptr. Cabinet Channel 7-9 Rptr. Cabinet Channel 10-12 Rptr. Cabinet RF Cabinet First Row - Channels 1-12 EDACS Interface Panel Interconnections RIC AUDIO MODULES (Made from 19D904209, Sh. 2, Rev. 0) C-5 LBI-39074 EDACS INTERFACE PANEL INTERCONNECTION DIAGRAMS STANDARD ARRANGEMENT FOR UP TO 12 CHANNELS: 19D903880P120 5-ft., 25 Pair Cables J14 J14 GETC DATA GETC DATA (Left) (Right) Module Module 19C852313G1 19C852313G1 Site Controller Cabinet J14 J15 GETC DATA Module 19C852204G1 J14 J15 GETC DATA Module 19C852204G1 J14 J15 GETC DATA Module 19C852204G1 J14 J15 GETC DATA Module 19C852204G1 Channel 1-3 Rptr. Cabinet Channel 4-6 Rptr. Cabinet Channel 7-9 Rptr. Cabinet Channel 10-12 Rptr. Cabinet RF Cabinet Single Row - Channels 1-12 STANDARD ARRANGEMENT FOR 13 TO 20 CHANNELS: 19D903880P121 15-ft., 25-Pair Cable 19D903880P120 5-ft., 25 Pair Cables J14 J14 GETC DATA GETC DATA (Left) (Right) Module Module 19C852313G1 19C852313G1 Site Controller Cabinet J14 J15 GETC DATA Module 19C852204G1 J14 J15 GETC DATA Module 19C852204G1 J14 J15 GETC DATA Module 19C852204G1 Channel 13-15 Rptr. Cabinet Channel 16-18 Rptr. Cabinet Channel 19&20 Rptr. Cabinet RF Cabinet Second Row - Channels 13-20 19D903880P120 5-ft., 25 Pair Cables J14 J15 GETC DATA Module 19C852204G1 J14 J15 GETC DATA Module 19C852204G1 J14 J15 GETC DATA Module 19C852204G1 J14 J15 GETC DATA Module 19C852204G1 Channel 1-3 Rptr. Cabinet Channel 4-6 Rptr. Cabinet Channel 7-9 Rptr. Cabinet Channel 10-12 Rptr. Cabinet RF Cabinet First Row - Channels 1-12 EDACS Interface Panel Interconnections GETC DATA MODULES (Made from 19D904208, Sh. 2, Rev. 0) C-6 EDACS INTERFACE PANEL INTERCONNECTION DIAGRAMS LBI-39074 STANDARD ARRANGEMENT FOR UP TO 12 CHANNELS: 19D903880P130 5-ft., 15-Conductor Cables J1 J2 SERIAL MODULE 19C852447G1 J1 J2 SERIAL MODULE 19C852447G1 J1 J2 SERIAL MODULE 19C852447G1 J1 J2 SERIAL MODULE 19C852447G1 Channel 1-3 Rptr. Cabinet Channel 4-6 Rptr. Cabinet Channel 7-9 Rptr. Cabinet Channel 10-12 Rptr. Cabinet RF Cabinet Single Row - Channels 1-12 STANDARD ARRANGEMENT FOR 13 TO 20 CHANNELS: 19D903880P130 5-ft., 15-Conductor Cables J1 J2 SERIAL MODULE 19C852447G1 J1 J2 SERIAL MODULE 19C852447G1 J1 J2 SERIAL MODULE 19C852447G1 Channel 13-15 Rptr. Cabinet Channel 16-18 Rptr. Cabinet Channel 19&20 Rptr. Cabinet RF Cabinet Second Row - Channels 13-20 19D903880P131 15-ft., 15-Conductor Cable 19D903880P130 5-ft., 15-Conductor Cables J1 J2 SERIAL MODULE 19C852447G1 J1 J2 SERIAL MODULE 19C852447G1 J1 J2 SERIAL MODULE 19C852447G1 J1 J2 SERIAL MODULE 19C852447G1 Channel 1-3 Rptr. Cabinet Channel 4-6 Rptr. Cabinet Channel 7-9 Rptr. Cabinet Channel 10-12 Rptr. Cabinet RF Cabinet First Row - Channels 1-12 EDACS Interface Panel Interconnections SERIAL MODULES (BASIC EDACS) (Made from 19D904206, Sh. 2, Rev. 0) C-7 LBI-39074 EDACS INTERFACE PANEL INTERCONNECTION DIAGRAMS STANDARD ARRANGEMENT FOR UP TO 12 CHANNELS: 19D903880P130 5-ft., 15-Conductor Cables J1 J2 SERIAL MODULE 19C852447G1 J1 J2 SERIAL MODULE 19C852447G1 J1 J2 SERIAL MODULE 19C852447G1 J1 J2 SERIAL MODULE 19C852447G1 J1 J2 SERIAL MODULE 19C852447G1 Site Controller Cabinet Channel 1-3 Rptr. Cabinet Channel 4-6 Rptr. Cabinet Channel 7-9 Rptr. Cabinet Channel 10-12 Rptr. Cabinet RF Cabinet Single Row - Channels 1-12 STANDARD ARRANGEMENT FOR 13 TO 20 CHANNELS: 19D903880P130 5-ft., 15-Conductor Cables J1 J2 SERIAL MODULE 19C852447G1 J1 J2 SERIAL MODULE 19C852447G1 J1 J2 SERIAL MODULE 19C852447G1 J1 J2 SERIAL MODULE 19C852447G1 Site Controller Cabinet Channel 13-15 Rptr. Cabinet Channel 16-18 Rptr. Cabinet Channel 19&20 Rptr. Cabinet RF Cabinet Second Row - Channels 13-20 19D903880P131 15-ft., 15-Conductor Cable 19D903880P130 5-ft., 15-Conductor Cables J1 J2 SERIAL MODULE 19C852447G1 J1 J2 SERIAL MODULE 19C852447G1 J1 J2 SERIAL MODULE 19C852447G1 J1 J2 SERIAL MODULE 19C852447G1 Channel 1-3 Rptr. Cabinet Channel 4-6 Rptr. Cabinet Channel 7-9 Rptr. Cabinet Channel 10-12 Rptr. Cabinet RF Cabinet First Row - Channels 1-12 EDACS Interface Panel Interconnections SERIAL MODULES (LEVEL 1 SYSTEM) (Made from 19D904211, Sh. 2, Rev. 0) C-8 EDACS INTERFACE PANEL INTERCONNECTION DIAGRAMS LBI-39074 STANDARD ARRANGEMENT FOR UP TO 12 CHANNELS: Optional 19D903880P121 15-ft., 25-Pair Cable J4 J1 Optional Pre-Wired Type 66 Punchblock 19C851899P2 J14 J15 PHONE LINE 1-16 Module 19C852204G1 Site Controller Cabinet Channel 1-3 Rptr. Cabinet Channel 4-6 Rptr. Cabinet Channel 7-9 Rptr. Cabinet Channel 10-12 Rptr. Cabinet RF Cabinet Single Row - Channels 1-12 STANDARD ARRANGEMENT FOR 13 TO 20 CHANNELS: Optional 19D903880P121 15-ft., 25-Pair Cables J4 J1 Optional Pre-Wired Type 66 Punchblock 19C851899P2 J14 J15 J14 J15 PHONE LINE PHONE LINE 1-16 17-20 Module Module 19C852204G1 19C852204G1 Site Controller Cabinet Channel 13-15 Rptr. Cabinet Channel 16-18 Rptr. Cabinet Channel 19&20 Rptr. Cabinet RF Cabinet Second Row - Channels 13-20 J4 J1 Optional Pre-Wired Type 66 Punchblock 19C851899P2 Channel 1-3 Rptr. Cabinet Channel 4-6 Rptr. Cabinet Channel 7-9 Rptr. Cabinet Channel 10-12 Rptr. Cabinet RF Cabinet First Row - Channels 1-12 EDACS Interface Panel Interconnections PHONE LINE MODULE C-9 LBI-39074 This page intentionally left blank C-2 LBI-39074 APPENDIX D PUNCHBLOCK CONNECTION DIAGRAMS D-1 LBI-39074 PUNCHBLOCK CONNECTION DIAGRAM PRE-WIRED TYPE 66 PUNCHBLOCK A B C D 25-PAIR CONN #1 26 27 28 29 30 31 32 33 34 35 36 37 38 39 40 41 42 43 44 45 46 47 48 49 50 TYPE 66 PUNCHBLOCK CONN #1 1 26 1 2 27 3 2 4 5 28 6 3 7 29 8 4 9 30 10 5 11 31 12 6 13 32 14 7 15 33 16 8 17 34 18 9 19 35 20 10 21 36 22 11 23 37 24 12 25 38 13 39 14 40 15 41 16 42 17 43 18 44 19 45 20 46 21 25-PAIR 47 CONN 22 #4 48 23 49 24 50 25 STATION AUDIO CH. 1-12 D-2 A B C D 1 2 3 4 5 6 7 8 9 10 11 12 13 14 15 16 17 18 19 20 21 22 23 24 25 26 27 28 29 30 31 32 33 34 35 36 37 38 39 40 41 42 43 44 45 46 47 48 49 50 CONN #4 26 1 27 2 28 3 29 4 30 5 31 6 32 7 33 8 34 9 35 10 36 11 37 12 38 13 39 14 40 15 41 16 42 17 43 18 44 19 45 20 46 21 47 22 48 23 49 24 50 25 Audio Rx Chan 1 Audio Tx Audio Rx Chan 2 Audio Tx Audio Rx Chan 3 Audio Tx Audio Rx Chan 4 Audio Tx Audio Rx Chan 5 Audio Tx Audio Rx Chan 6 Audio Tx Audio Rx Chan 7 Audio Tx Audio Rx Chan 8 Audio Tx Audio Rx Chan 9 Audio Tx Audio Rx Chan 10 Audio Tx Audio Rx Chan 11 Audio Tx Audio Rx Chan 12 Audio Tx PUNCHBLOCK CONNECTION DIAGRAM PRE-WIRED TYPE 66 PUNCHBLOCK A B C D 25-PAIR CONN #1 26 27 28 29 30 31 32 33 34 35 36 37 38 39 40 41 42 43 44 45 46 47 48 49 50 LBI-39074 TYPE 66 PUNCHBLOCK CONN #1 1 26 1 2 27 3 2 4 5 28 6 3 7 29 8 4 9 30 10 5 11 31 12 6 13 32 14 7 15 33 16 8 17 34 18 9 19 35 20 10 21 36 22 11 23 37 24 12 25 38 13 39 14 40 15 41 16 42 17 43 18 44 19 45 20 46 21 25-PAIR 47 CONN 22 #4 48 23 49 24 50 25 A B C D 1 2 3 4 5 6 7 8 9 10 11 12 13 14 15 16 17 18 19 20 21 22 23 24 25 26 27 28 29 30 31 32 33 34 35 36 37 38 39 40 41 42 43 44 45 46 47 48 49 50 CONN #4 26 1 27 2 28 3 29 4 30 5 31 6 32 7 33 8 34 9 35 10 36 11 37 12 38 13 39 14 40 15 41 16 42 17 43 18 44 19 45 20 46 21 47 22 48 23 49 24 50 25 Audio Rx Chan 13 Audio Tx Audio Rx Chan 14 Audio Tx Audio Rx Chan 15 Audio Tx Audio Rx Chan 16 Audio Tx Audio Rx Chan 17 Audio Tx Audio Rx Chan 18 Audio Tx Audio Rx Chan 19 Audio Tx Audio Rx Chan 20 Audio Tx STATION AUDIO CH. 13-20 D-3 LBI-39074 PUNCHBLOCK CONNECTION DIAGRAM PRE-WIRED TYPE 66 PUNCHBLOCK A B C D 25-PAIR CONN #1 26 27 28 29 30 31 32 33 34 35 36 37 38 39 40 41 42 43 44 45 46 47 48 49 50 MODEM DATA - CH. 1-12 D-4 TYPE 66 PUNCHBLOCK CONN #1 1 26 1 2 27 3 2 4 5 28 6 3 7 29 8 4 9 30 10 5 11 31 12 6 13 32 14 7 15 33 16 8 17 34 18 9 19 35 20 10 21 36 22 11 23 37 24 12 25 38 13 39 14 40 15 41 16 42 17 43 18 44 19 45 20 46 21 25-PAIR 47 CONN 22 #4 48 23 49 24 50 25 A B C D 1 2 3 4 5 6 7 8 9 10 11 12 13 14 15 16 17 18 19 20 21 22 23 24 25 26 27 28 29 30 31 32 33 34 35 36 37 38 39 40 41 42 43 44 45 46 47 48 49 50 CONN #4 26 1 27 2 28 3 29 4 30 5 31 6 32 7 33 8 34 9 35 10 36 11 37 12 38 13 39 14 40 15 41 16 42 17 43 18 44 19 45 20 46 21 47 22 48 23 49 24 50 25 Tx Data Chan 1 Rx Data Tx Data Chan 2 Rx Data Tx Data Chan 3 Rx Data Tx Data Chan 4 Rx Data Tx Data Chan 5 Rx Data Tx Data Chan 6 Rx Data Tx Data Chan 7 Rx Data Tx Data Chan 8 Rx Data Tx Data Chan 9 Rx Data Tx Data Chan 10 Rx Data Tx Data Chan 11 Rx Data Tx Data Chan 12 Rx Data PUNCHBLOCK CONNECTION DIAGRAM PRE-WIRED TYPE 66 PUNCHBLOCK A B C D 25-PAIR CONN #1 26 27 28 29 30 31 32 33 34 35 36 37 38 39 40 41 42 43 44 45 46 47 48 49 50 LBI-39074 TYPE 66 PUNCHBLOCK CONN #1 1 26 1 2 27 3 2 4 5 28 6 3 7 29 8 4 9 30 10 5 11 31 12 6 13 32 14 7 15 33 16 8 17 34 18 9 19 35 20 10 21 36 22 11 23 37 24 12 25 38 13 39 14 40 15 41 16 42 17 43 18 44 19 45 20 46 21 25-PAIR 47 CONN 22 #4 48 23 49 24 50 25 A B C D 1 2 3 4 5 6 7 8 9 10 11 12 13 14 15 16 17 18 19 20 21 22 23 24 25 26 27 28 29 30 31 32 33 34 35 36 37 38 39 40 41 42 43 44 45 46 47 48 49 50 CONN #4 26 1 27 2 28 3 29 4 30 5 31 6 32 7 33 8 34 9 35 10 36 11 37 12 38 13 39 14 40 15 41 16 42 17 43 18 44 19 45 20 46 21 47 22 48 23 49 24 50 25 Tx Data Chan 13 Rx Data Tx Data Chan 14 Rx Data Tx Data Chan 15 Rx Data Tx Data Chan 16 Rx Data Tx Data Chan 17 Rx Data Tx Data Chan 18 Rx Data Tx Data Chan 19 Rx Data Tx Data Chan 20 Rx Data MODEM DATA - CH. 13-20 D-5 LBI-39074 PUNCHBLOCK CONNECTION DIAGRAM PRE-WIRED TYPE 66 PUNCHBLOCK A B C D 25-PAIR CONN #1 26 27 28 29 30 31 32 33 34 35 36 37 38 39 40 41 42 43 44 45 46 47 48 49 50 PHONE LINE 1-16 D-6 TYPE 66 PUNCHBLOCK CONN #1 1 26 1 2 27 3 2 4 5 28 6 3 7 29 8 4 9 30 10 5 11 31 12 6 13 32 14 7 15 33 16 8 17 34 18 9 19 35 20 10 21 36 22 11 23 37 24 12 25 38 13 39 14 40 15 41 16 42 17 43 18 44 19 45 20 46 21 25-PAIR 47 CONN 22 #4 48 23 49 24 50 25 A B C D 1 2 3 4 5 6 7 8 9 10 11 12 13 14 15 16 17 18 19 20 21 22 23 24 25 26 27 28 29 30 31 32 33 34 35 36 37 38 39 40 41 42 43 44 45 46 47 48 49 50 CONN #4 26 Tip 1 Ring 27 Tip 2 Ring 28 Tip 3 Ring 29 Tip 4 Ring 30 Tip 5 Ring 31 Tip 6 Ring 32 Tip 7 Ring 33 Tip 8 Ring 34 Tip 9 Ring 35 Tip 10 Ring 36 Tip 11 Ring 37 Tip 12 Ring 38 Tip 13 Ring 39 Tip 14 Ring 40 Tip 15 Ring 41 Tip 16 Ring 42 17 43 18 44 19 45 20 46 21 47 22 48 23 49 24 50 25 Line 1 Line 2 Line 3 Line 4 Line 5 Line 6 Line 7 Line 8 Line 9 Line 10 Line 11 Line 12 Line 13 Line 14 Line 15 Line 16 PUNCHBLOCK CONNECTION DIAGRAM PRE-WIRED TYPE 66 PUNCHBLOCK A B C D 25-PAIR CONN #1 26 27 28 29 30 31 32 33 34 35 36 37 38 39 40 41 42 43 44 45 46 47 48 49 50 LBI-39074 TYPE 66 PUNCHBLOCK CONN #1 1 26 1 2 27 3 2 4 5 28 6 3 7 29 8 4 9 30 10 5 11 31 12 6 13 32 14 7 15 33 16 8 17 34 18 9 19 35 20 10 21 36 22 11 23 37 24 12 25 38 13 39 14 40 15 41 16 42 17 43 18 44 19 45 20 46 21 25-PAIR 47 CONN 22 #4 48 23 49 24 50 25 A B C D 1 2 3 4 5 6 7 8 9 10 11 12 13 14 15 16 17 18 19 20 21 22 23 24 25 26 27 28 29 30 31 32 33 34 35 36 37 38 39 40 41 42 43 44 45 46 47 48 49 50 CONN #4 26 Tip 1 Ring 27 Tip 2 Ring 28 Tip 3 Ring 29 Tip 4 Ring 30 Tip 5 Ring 31 Tip 6 Ring 32 Tip 7 Ring 33 Tip 8 Ring 34 Tip 9 Ring 35 Tip 10 Ring 36 Tip 11 Ring 37 Tip 12 Ring 38 Tip 13 Ring 39 Tip 14 Ring 40 Tip 15 Ring 41 Tip 16 Ring 42 17 43 18 44 19 45 20 46 21 47 22 48 23 49 24 50 25 Line 17 Line 18 Line 19 Line 20 Line 21 Line 22 Line 23 Line 24 Line 25 Line 26 Line 27 Line 28 Line 29 Line 30 Line 31 Line 32 PHONE LINE 17-20 D-7 LBI-39074 PUNCHBLOCK CONNECTION DIAGRAM PRE-WIRED TYPE 66 PUNCHBLOCK A B C D 25-PAIR CONN #1 26 27 28 29 30 31 32 33 34 35 36 37 38 39 40 41 42 43 44 45 46 47 48 49 50 DOWNLINK DATA D-8 TYPE 66 PUNCHBLOCK CONN #1 1 26 1 2 27 3 2 4 5 28 6 3 7 29 8 4 9 30 10 5 11 31 12 6 13 32 14 7 15 33 16 8 17 34 18 9 19 35 20 10 21 36 22 11 23 37 24 12 25 38 13 39 14 40 15 41 16 42 17 43 18 44 19 45 20 46 21 25-PAIR 47 CONN 22 #4 48 23 49 24 50 25 A B C D 1 2 3 4 5 6 7 8 9 10 11 12 13 14 15 16 17 18 19 20 21 22 23 24 25 26 27 28 29 30 31 32 33 34 35 36 37 38 39 40 41 42 43 44 45 46 47 48 49 50 CONN #4 26 1 27 2 28 3 29 4 30 5 31 6 32 7 33 8 34 9 35 10 36 11 37 12 38 13 39 14 40 15 41 16 42 17 43 18 44 19 45 20 46 21 47 22 48 23 49 24 50 25 Tx+ TxRxRx+ Tx+ TxRxRx+ Downlink GETC Redundant Downlink GETC LBI-39074 APPENDIX E SYSTEM MANAGER INTERCONNECTION DIAGRAMS E-1 LBI-39074 SYSTEM MANAGER INTERCONNECTION DIAGRAMS INTERCONNECTION DIAGRAM SYSTEM MANAGER (REAR VIEW OF ALL EQUIPMENT) MONITOR KEYBOARD 2 1 AC PWR COMPUTER TERMINATION B DATA MODEM TERMINATION A 0 1 3 OFF/ON DATA LINK TO DATA MODEM IN SITE CONTROLLER CABINET AC PWR OFF/ON AC PWR SYSTEM MANAGER E-2 AC PWR 2 T-CONNECTOR WITH TERMINATIONS PRINTER OFF/ON