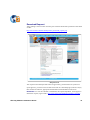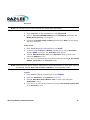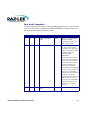
1
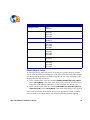
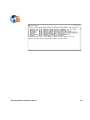
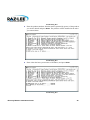
Installation Guide Updated: March 30, 2015 iSecurity Modules Installation Guide ii Table of Contents Copyright Notice .......................................................................................... 2 About This Manual ....................................................................................... 4 Who Should Read This Manual ...................................................................4 Terminology ................................................................................................. 4 Documentation Overview ............................................................................. 4 Printed Materials ......................................................................................................4 Typography Conventions ............................................................................. 4 iSecurity Product Suite .................................................................................5 iSecurity Products Installation/Upgrade ....................................................... 10 Overview ......................................................................................................10 Preparation .................................................................................................. 11 Prerequisites .............................................................................................................11 Create a New User ....................................................................................................13 Download Request ....................................................................................................14 Upgrade or Install ....................................................................................................15 Verify Link .................................................................................................................15 De-activation ............................................................................................................15 Data Area Preparation .............................................................................................19 Upgrade Considerations ...........................................................................................21 Backup ......................................................................................................................21 Check Object Locks ..................................................................................................22 Installing/Upgrading ..................................................................................... 23 Installation/Upgrade Process ...................................................................................23 Post Processing ........................................................................................... 30 Start and Verify .........................................................................................................31 Activation ..................................................................................................................32 Product Specific Actions .............................................................................. 36 Audit ..........................................................................................................................36 Screen ........................................................................................................................36 Password Reset .........................................................................................................37 Libraries and Special Users ......................................................................... 39 Comments .................................................................................................... 41 Copyright Notice © Copyright Raz-Lee Security Ltd. All rights reserved. This document is provided by Raz-Lee Security for information purposes only. Raz-Lee Security© is a registered trademark of Raz-Lee Security Inc. Assessment, FileScope, Firewall, Audit, Action, System Control, User Management, Capture, View, Anti-Virus, AP-Journal, Visualizer © are trademarks of Raz-Lee Security Inc. Other brand and product names are trademarks or registered trademarks of the respective holders. Microsoft Windows© is a registered trademark of the Microsoft Corporation. Adobe Acrobat© is a registered trademark of Adobe Systems Incorporated. Information in this document is subject to change without any prior notice. The software described in this document is provided under Raz-Lee’s license agreement. This document may be used only in accordance with the terms of the license agreement. The software may be used only with accordance with the license agreement purchased by the user. No part of this document may be reproduced or retransmitted in any form or by any means, whether electronically or mechanically, including, but not limited to: photocopying, recording, or information recording and retrieval systems, without written permission given by Raz-Lee Security Inc. Visit our web site at www.razlee.com. iSecurity Modules Installation Guide 2 Chapter 1: iSecurity Modules Installation Guide 3 About This Manual Who Should Read This Manual This manual is intended for system administrators and security administrators responsible for the implementation and management of security on System i systems. Terminology This manual attempts to adhere to standard IBM System i (AS/400) terminology and conventions whenever possible. However, deviations from IBM standards are employed in certain circumstances in order to enhance clarity or when standard IBM terminology conflicts with generally accepted industry conventions. Documentation Overview Raz-Lee Security takes customer satisfaction seriously. Therefore, our products are designed for ease of use. The documentation package includes a variety of materials to get you up to speed with this software quickly and effectively. We hope you find this user manual informative; your feedback is important to us. Please send your comments about this user manual to [email protected]. Printed Materials This user guide is the only printed documentation necessary for understanding this product. It is available in user-friendly PDF format and may be displayed or printed using Adobe Acrobat Reader version 6.0 or higher. If you do not have Acrobat Reader, you can download it from the Adobe website: http://www.adobe.com This manual contains concise explanations of the various product features as well as step-by-step instructions for using and configuring the product. Typography Conventions This document is intended to be printed by the end user and viewed on-line using a variety of different PC platforms. Accordingly, it was written using standard Windows TrueType fonts that are installed on virtually all systems. You do not need to install any special fonts in order to view or print this document. Body text appears in 11-point Times New Roman. Menu options, field names, and function key names appear in Arial Bold. iSecurity Modules Installation Guide 4 Chapter 1: IBM i (OS/400) commands, system values, data strings, and so on appear in Bold Italic. Key combinations are separated by a dash, for example: Shift-Tab. Referrals to chapters or procedures appear in Times New Roman Italic. iSecurity Product Suite Raz-Lee’s iSecurity is an integrated, state-of-the-art security solution for all System i servers, providing cutting-edge tools for managing all aspects of network access, data, and audit security. Its individual components work together transparently, providing comprehensive out-of-the-box security. The iSecurity Product Suite includes: Product Description Action Action intercepts security breaches and other events in real-time and immediately takes appropriate corrective action. Actions may include sending alert messages to key personnel and/or running command scripts or programs that take corrective steps. No effective security policy is complete without Action Anti-Virus Anti-Virus is a dedicated IBM System i (AS/ 400)-specific product engineered to provide full protection to the server, its file contents, and resident IBM System i (AS/400) or System i dedicated software. iSecurity Modules Installation Guide 5 Product Description AP-Journal AP-Journal automatically manages database changes by documenting and reporting exceptions made to the database journal. Assessment Assessment checks your ports, sign-on attributes, user privileges, passwords, terminals, and more. Results are instantly provided, with a score of your current network security status with its present policy compared to the network if iSecurity were in place. Audit Audit is a security auditing solution that monitors System i events in real-time. It includes a powerful query generator plus a large number of predefined reports. Audit can also trigger customized responses to security threats by means of the integrated script processor contained in Action. Authority On Demand Authority on Demand provides an advanced solution for emergency access to critical application data and processes, which is one of the most common security slips in System i (IBM i) audits. Current manual approaches to such situations are not only error-prone, but do not comply with regulations and often-stringent auditor security requirements. iSecurity Modules Installation Guide 6 Chapter 1: Product Description Capture Capture silently captures and documents user screens for tracking and monitoring, without any effects on system performance. It also preserves job logs for subsequent review. Capture can run in playback mode and can be used to search within texts. Change Tracker Change Tracker automatically tracks modifications in the software and file structure within production libraries. Changes are tracked at both the object and source levels. It does not require any special actions by programmers. COMMAND COMMAND monitors and filters commands and its parameters before they are run, enabling you to control each parameter, qualifier or element, in conjunction with the context in which it is about to run. Options include Allow, Allow with Changes and Reject. It includes a comprehensive log, proactive alerting and easily integrates with SIEM. DB-Gate Direct IBM i Client-only Access to Non-DB2 Databases DB-Gate empowers IBM i customers with exciting data access capabilities, based on Open Database Connectivity (ODBC), employing standard OS/400 facilities to enable fully database-transparent access to remote systems. iSecurity Modules Installation Guide 7 Product Description Firewall Firewall protects and secures all types of access, to and from the System i, within or outside the organization, under all types of communication protocols. Firewall manages user profile status, secures entry via predefined entry points, and profiles activity by time. Its Best Fit algorithm determines the validity of any security-related action, hence significantly decreasing system burden while not compromising security. Password Password provides a first-tier wall of defense for users by ensuring that user passwords cannot be easily cracked. Screen Screen protects unattended terminals and PC workstations from unauthorized use. It provides adjustable, terminal- and user-specific timeout capabilities. iSecurity Modules Installation Guide 8 Chapter 1: Product Description View View is a unique, patent-pending, field-level solution that hides sensitive fields and records from restricted users. This innovative solution hides credit card numbers, customer names, etc. Restricted users see asterisks or zeros instead of real values. View requires no change in existing applications. It works for both SQL and traditional I/O. Visualizer Visualizer is an advanced DWH statistical tool with state-of-the-art technology. This solution provides security-related data analysis in GUI and operates on summarized files; hence, it gives immediate answers regardless of the amount of security data being accumulated. iSecurity Modules Installation Guide 9 iSecurity Products Installation/Upgrade Overview All iSecurity products are available for downloading directly from the Raz-Lee website at www.razlee.com. These instructions are applicable for one or any combination of iSecurity products, and are relevant for the following versions: iSecurity Part/Version Products Included iSecurity Part 1 Version 17.00 and later Firewall, Command, Password, Screen iSecurity Part 2 Version 12.00 and later Action, Audit, Central Admin iSecurity Part 4 Version 8.00 and later AP-Journal NOTE: The AP-Journal product can be installed only if your operating system is V5R2 or later. iSecurity Part 5 Version 6.00 and later Anti-Virus NOTE: The Anti-Virus product can be installed only if your operating system is V5R4 or later. In addition, only a security administrator with auditing privileges should work with Anti-Virus. iSecurity Part 6 Version 17.00 and later FileScope iSecurity Part 7 Version 3.00 and later Capture iSecurity Part 8 Version 4.00 and later Authority on Demand The installation/upgrade consists of the following stages: Preparation: Installing/Upgrading: Post Processing: Within each section, you will find a distinction made between actions for every installation, actions for the first time installation only, and actions for upgrade installations only. iSecurity Modules Installation Guide 10 Chapter 1: Preparation Before you can install/upgrade your products, you must prepare both the computer and the environment for the process. Prerequisites Time Required You must ensure that you schedule sufficient time to perform the installation/ upgrade. While the process is running, the specific iSecurity product you are working with is unavailable. A first time installation will take up to 15 minutes for each product you install. An upgrade installation will take up to 60 minutes for each product you upgrade. Special Considerations Before you start the install/upgrade of Firewall, you should take into consideration that the recommended method is to perform an IPL after the activation of the servers. If you only perform IPL on a planned basis, you may want to consider delaying the installation/upgrade until immediately before the planned IPL. In very extreme circumstances, there may be a need to perform an unscheduled IPL after installing/upgrading Anti-Virus or Firewall. System Requirements The system requirements for each product are detailed in the table below. Product Operating System Disk Requirements Action V5R2 and later Included in the Audit library Anti-Virus V5R4 and later 220 MB AP-Journal V5R2 and later 60 MB Audit V5R2 and later 180 MB Authority On Demand V5R2 and later 50 MB Capture V5R2 and later 50 MB Change Tracker V5R2 and later 42 MB Command V5R2 and later Included in the Firewall library iSecurity Modules Installation Guide 11 Product Operating System Disk Requirements DB-Gate V5R2 and later 110 MB Firewall V5R2 and later 80 MB Password V5R2 and later Included in the Firewall library Screen V5R2 and later Included in the Firewall library Product Interdependencies The table below shows which additional products are mandatory for each product. If you have not purchased these products, they will be provided for you at no cost and without a need for licensing, but you will be unable to access them. You must ensure that additional products are all at the latest version. For example, if you upgrade Action, you must also upgrade Audit. Product Required Products Action Audit Anti-Virus No interdependencies AP-Journal No interdependencies Audit No interdependencies Authority on Demand Audit - if you will be working with SYSLOG. Audit, AP-Journal and Capture - if you will be working with extended logging. Capture No interdependencies Change Tracker Audit Command Audit, Firewall DB-Gate No interdependencies Firewall Audit Password Audit Password Reset Audit, Authority on Demand Screen Audit iSecurity Modules Installation Guide 12 Chapter 1: Create a New User New customers should fill in the New User form in URL: http://www.razlee.com/downloads/create_new_user.php NOTE: New customers should be instructed to type a Referral's Name field so the request can be assigned to you. NOTE: To receive a Referral Name, please contact [email protected] iSecurity Modules Installation Guide 13 Download Request After creating a new user when necessary, the customer should select products to download at URL: http://www.razlee.com/downloads/product_download_request.php Request Form Your request to download products must be approved by your distributor or by Raz-Lee. Upon approval, you will receive an email with a link to a download page (valid for 7 days) that contains the software, appropriate documentation and installation instructions. Distributor: To view the customer’s information, the requested products, and to approve/ decline the request, login at URL: http://www.razlee.com/distributors/partners_login.php iSecurity Modules Installation Guide 14 Chapter 1: Upgrade or Install If you are performing a first time installation, you should verify that it is indeed a first time installation and not an upgrade. To verify a first time installation: 1. Enter the following command: wrklib lib(smz*) 2. Check for the existence of the libraries shown for the product you are installing in the table in Backup on page 21. If the libraries exist, you will be performing an upgrade. Verify Link Before you continue with the rest of the process, verify the link you received from Raz-Lee. De-activation You must de-activate each product you wish to upgrade. Before starting the deactivation, ensure that no jobs that could be adversely affected are running. Firewall Enter STRFW into the command line to start Firewall. 2. Select 81. System Configuration in the main Firewall menu. The iSecurity (part I) Global Parameters menu appears. 3. Select 1. General definitions in the iSecurity (part I) Global Parameters menu. The Firewall General Definitions screen appears. 4. Check the Enable Super Speed Processing flag. If Enable Super Speed Processing = ‘Y’, set the flag to ‘N’, perform an IPL and continue with this procedure. 1. iSecurity Modules Installation Guide 15 If Enable Super Speed Processing = ‘N’, continue with this procedure. 5. 6. 7. 8. 9. Press F3 to return to the main menu. Select 1. Activation and Server Setting in the main Firewall menu. The Activation and Server Setting menu appears. Select 21. Suspend Activity (before upgrade) in the Activation and Server Setting menu. The Set Firewall Security screen appears. Set the Restart servers in *INT job to *NO. If you intend to send this command as a batch job, then you should set the Restart servers in *BCH job to *NO. After pressing Enter, the system will work for a couple of minutes, and will display a message similar to this “Firewall suspended at 01.01.01 10:10:10. Use *RESUME to re-activate”. Select 1. Work with Servers. The secure level of all the servers should be set to NO. Press Enter. A message will appear telling you that “Subsytem ZFIREWALL is Not Active”. Firewall is now de-activated; access to the computer is not being controlled. Screen Enter STRSCN from the command line to start Screen. 2. Select 41. Activation in the Screen main menu. The Activation menu appears. 3. Select 5. Work With Active Monitor Jobs to check if the subsystem ZGUARD is active. 4. If it is active, press F3 and then de-activate product by selecting 2. De-activate Screen Now in the Activation menu. 1. iSecurity Modules Installation Guide 16 Chapter 1: Password NOTE: You can skip this procedure if Firewall has already been deactivated. Enter STRPWD from the command line to start Password. 2. Select 1. Activate CHGPWD Validation in the Password main menu. The Modify Server Security screen appears. 3. Type 2 in the Enable validity checking field and press Enter. Do not change any other parameters. 1. Audit/Action Enter STRAUD from the command line to start Audit. 2. To deactivate both Audit and Action simultaneously, select 2. Activation from the Audit main menu. The Activation menu appears. 3. Select 5. Work With Active Jobs in the Activation menu to check if the subsystem ZAUDIT is active 4. If it is active, press F3 and then de-activate product by selecting 2. De-activate ZAUDIT subsystem in the Activation menu. 1. NOTE: All functions that use the ZAUDIT subsystem will also be deactivated. To check which functions are affected, select 5. Auto start activities in ZAUDIT in the Configuration menu. Capture Enter STRCPT from the command line to start Capture. 2. Select 11. Activation in the Capture main screen. 3. Select 5. Work With Active Monitor Jobs to check if the subsystem ZCAPTURE is active. 4. If it is active, de-activate the product by selecting 2. De-activate Capture Now in the Activation screen. 1. iSecurity Modules Installation Guide 17 Anti-Virus 1. Enter STRAV from the command line to start Anti-Virus. 2. Select 11. IFS Viruses, Worms and Trojans in the Anti-Virus main menu The menu IFS Viruses, Worms and Trojans appears. 3. Select 1. Activation in the IFS Viruses, Worms and Trojans menu. The Activation menu appears. 4. Select 5. Work with Active Jobs from the Activation menu to check if the subsystem ZANTIVIRUS is active. 5. If it is active, de-activate the product by selecting 2. De-activate Real-Time Detection in the Activation menu. AP-Journal 1. 2. 3. 4. 5. Enter STRJR from the command line to start AP-Journal. Select 11. Applications, BizAlerts from the AP-Journal main menu. The Applications, BizAlerts - Definitions menu appear. Select 11. Activation from the Applications, BizAlerts - Definitions menu. The Collection to Containers menu appears. Select 5. Work with Active Jobs from the Collection to Containers menu to check if the subsystem ZJOURNAL is active. If it is active, press F3 and then de-activate the product by selecting 2. De-activate Real-Time Journal Collection (all applications) from the Collection to Containers menu. Authority on Demand Enter STRAOD from the command line to start Authority on Demand. 2. Select 11. Activation from the Authority on Demand main screen. The Activation menu appears. 3. Select 5. Work with Active Jobs from the Activation menu to check if the subsystem ZAUTH is active. 4. If it is active, press F3 and then de-activate the product by selecting 2. De-activate Authority on Demand Now from the Activation screen. 1. FileScope Change the names of the CHGFC and SHWFC commands in QGPL to ensure that nobody works with FileScope during the upgrade. iSecurity Modules Installation Guide 18 Chapter 1: Data Area Preparation To better control various aspects of the installation/upgrade process, you can create a data area of 256 bytes in length called ISECCMDLIB in the QGPL library. The data area should contain the following fields: From To Bytes Field Text Default Description 1 10 10 QGPL Alternative Name QGPL Where to copy the STR*, RUN* and *INIT commands, so that every user will find them 11 12 2 ASP 01 •Products being installed for the first time will be installed to this ASP. This refers to the product library and data library (for example, SMZ4, SMZ4DTA) •In some products such as AP-Journal, other libraries are created. For example, in the AP-Journal a library is created per application. When created you are prompted with the CRTLIB (Create Library) so that you can set the ASP number. •Change the current ASP of the library. All future upgrades will use this ASP. •All products will try to preserve the current ASP at upgrade time. Due to its sensitivity, you should check it. 13 13 1 Expire Message FRQ* Not Used iSecurity Modules Installation Guide 19 From To Bytes Field Text Default Description 14 14 1 Wait For STROBJCVN Y If you are installed the product on an OS400 version which is not the one that it was created for, objects require conversion and this is normally done in a batch job sent to work parallel to the installation. If you want the conversion to run inline, (wait until it ends), this field should be set to Y. 15 20 6 Filler 21 30 10 Subsytem name for Start at IPL 31 40 10 Subsystem library for *LIBL Start at IPL 41 45 5 UDP source port for Audit/Firewall QSYSWR K The port number should be a valid integer, be greater than 1024 and less than 65535. NOTE: It is the Customer’s responsibility to populate the Data Area. You can also update the Data Area directly from Audit: Enter STRAUD from the command line to start Audit. 2. Select 82. Maintenance Menu in the Audit main menu. 3. Select 91. Global Installation Defaults from the Maintenance Menu. 1. For more details, see the appropriate section in the Audit manual. iSecurity Modules Installation Guide 20 Chapter 1: Upgrade Considerations If you are upgrading from a very old version, you may not be able to upgrade directly to the latest version. You will have to upgrade to a later version (the prerequisite version) than your version and then immediately perform a second upgrade to the latest version. You should also make sure that you allocate enough time to do this double upgrade, including a full backup before each upgrade. See the table below for details of products and versions. To obtain the prerequisite version, contact Raz-Lee support staff at [email protected]. Product Installed version Prerequisite Version Audit 11.xx and earlier 12.32 Firewall 15.xx and earlier 16.32 Backup If you are upgrading your iSecurity products, you should backup your iSecurity libraries before starting the upgrade process. Backup each product separately, as shown in the following table: Product Libraries Action SMZ4 SMZ4DTA Anti-Virus SMZV SMZVDTA AP-Journal SMZJ SMZJDTA SMZJcmbol SMZJYYMMDD SMZJxxxxx Audit SMZ4 SMZ4DTA ISECURITY Authority on Demand SMZO SMZODTA Capture SMZC SMZCDTA iSecurity Modules Installation Guide 21 Product Libraries Change Tracker SMZT SMZTDTA Command SMZ8 SMZTMPA SMZTMPB SMZTMPC DB-Gate SMZB SMZBDTA Firewall SMZ8 SMZTMPA SMZTMPB SMZTMPC Password SMZ8 SMZTMPA SMZTMPB SMZTMPC Password Reset SMZO SMZODTA Screen SMZ8 SMZTMPA SMZTMPB SMZTMPC Check Object Locks As stated previously, while the process is running, the specific iSecurity product you are working with is unavailable. To avoid object locks and ensure that nobody is working with the products you want to upgrade, do one of the following for the libraries shown in the table above: In the command line, enter the command SMZ4/CHKSECLCK LibraryName, where LibraryName is the name of the library to be checked. You do not need to check the data libraries SMZxDTA, as the command does this for you. 2. In the command line, enter the command WRKOBJLCK OBJ(LibraryName), OBJTYPE(*LIB), where LibraryName is the name of the library to be checked. 1. If the return results that show that the library to be upgraded is locked, you must ensure that all work with the library stops before continuing with the upgrade. iSecurity Modules Installation Guide 22 Chapter 1: Installing/Upgrading Installation/Upgrade Process Before you start the process, ensure that you have carried out all the necessary preparation as described in Preparation on page 11. Important notes: Although you can install/upgrade the products in any order you choose, you must install/upgrade Audit first. The link in the email is VALID ONLY for SEVEN days; afterwards you will not be able to download the software using the link. To use extended logging capability in Authority On Demand, you may need installation and licensing for other iSecurity products such as Capture, Audit, and AP-Journal. iSecurity Modules Installation Guide 23 Installing each product separately Create a temporary directory on your local computer. 2. Click the link in the email you received from Raz-Lee. The Products Download Page appears. Do not close it until you have finished installing all products. 1. iSecurity Modules Installation Guide 24 Chapter 1: Products Download Page 1. Click on the product to install, the File Download dialog box appears. File Download Dialog NOTE: This dialog box will differ in appearance according to your operating system and browser. Save the zip file to the directory you created in step 1 on page 24 and extract it. 3. Open the extracted directory and run SETUP. The Raz-Lee Installation dialog box appears. 2. iSecurity Modules Installation Guide 25 Install Dialog Box 4. Enter either the host system name or IP address, a user name with Security Officer (*SECOFR) authority, a password for this user, and press Enter. The installation process runs. NOTE: A first time installation will take up to 15 minutes for each product you install. An upgrade installation will take up to 60 minutes for each product you upgrade. Upon completion of the installation routine, close the The Raz-Lee Installation dialog box. 6. To install additional products, delete the contents of the temporary directory, and return to step 1 on page 25. 7. When you have finished installing/upgrading all products, continue with Post Processing on page 30. 5. iSecurity Modules Installation Guide 26 Chapter 1: Installing all products together Request a single install link from Raz-Lee support staff. 2. Click the link in the email you received from Raz-Lee, the File Download dialog box appears. 1. File Download NOTE: This dialog box will differ in appearance according to your operating system and browser. Select Open. The file will self extract and its folder will open. The file is large, so this process may take some time. 4. Double click on the exe file. The Raz-Lee Installation dialog box appears. 3. iSecurity Modules Installation Guide 27 iSecurity Modules Installation Guide 28 Chapter 1: Install Dialog Box 5. Enter the product numbers from the menu (separated by spaces) of the products you wish to install and press Enter. The products will be installed in the order you entered them. Install Dialog Box 6. Enter either the host system name or IP address, and press Enter. Install Dialog Box iSecurity Modules Installation Guide 29 7. Enter a user name with Security Officer (*SECOFR) authority, a password for this user, and press Enter. The installation process runs, installing all products in the sequence you selected. NOTE: A first time installation will take up to 15 minutes for each product you install. An upgrade installation will take up to 60 minutes for each product you upgrade. NOTE: If a specific product fails to install, the process continues with the next selected product and a log appears. 8. Upon completion of the installation process, close the The Raz-Lee Installation dialog box and continue with Post Processing on page 30. Post Processing After your installation/upgrade process has completed, perform the following steps to verify that the process was successful, and to setup your new software for working. iSecurity Modules Installation Guide 30 Chapter 1: Start and Verify To verify that your software was correctly installed and to start working, do the following: 1. At the command line, type the appropriate product start command and press Enter. 2. 3. 4. 5. 6. Product Product Code Action STRACT Anti-Virus STRAV AP-Journal STRJR Audit STRAUD Authority on Demand STRAOD Capture STRCPT Change Tracker STRCT Command STRCMD DB-Gate STRDB FileScope STRFS Firewall STRFW Password STRPWD Screen STRSCN Select 81. System Configuration. The appropriate System Configuration menu appears. Verify that the version number of the product was updated. Press F22. The Authorization Code field opens. Enter the Authorization Code for the product and press Enter. To ensure the code was inserted correctly, enter the product’s log with the appropriate command (shown in the table below) and select 2. By Entry Type. An error message will be prompted if the code was entered incorrectly. iSecurity Modules Installation Guide Product Display Log Command Action DSPACLOG Anti-Virus DSPAVLOG 31 Product Display Log Command AP-Journal DSPJRLOG Audit DSPAUDLOG Authority on Demand DSPAODLOG Capture DSPCPTLOG Change Tracker Command DB-Gate DSPDBLOG FileScope DSPFSLOG Firewall DSPFWLOG Password DSPPWDLOG Screen DSPSCNLOG Activation Each product that was de-activated before starting the upgrade process should now be activated. iSecurity Modules Installation Guide 32 Chapter 1: Firewall Before you start the activation of Firewall, you should decide if you will be performing an IPL during the procedure. Enter STRFW into the command line to start Firewall. 2. Select 1. Activation and Server Setting in the main Firewall menu. The Activation and Server Setting menu appears. 3. Select 22. Resume Activity (after upgrade) in the Activation and Server Setting menu. The Set Firewall Security screen appears. 4. If you will be performing an IPL, do the following: a. Set the Restart servers in *INT job to *NO. After pressing Enter, the system will work for a couple of minutes, and will display a message similar to this: “Firewall operation resumed based on setting of 15/01/15 16:20:15.” 1. b. Select 1. Work with Servers. The Secure column of all the servers that were suspended should be set to YES and press Enter. c. Perform an IPL after ensuring that all users have signed off and all critical jobs have finished. NOTE: Until you perform the IPL, unexpected errors may occur on the servers marked with an asterisk in the Work with Servers screen 5. If you will not be performing an IPL, do the following: a. Set the Restart servers in *INT job to *YES. b. If you intend to send this command as a batch job, then you should set the Restart servers in *BCH job to *YES. After pressing Enter, the system will work for a couple of minutes, and will display a message similar to this: “Firewall operation resumed based on setting of 15/01/15 16:20:15.” c. Select 1. Work with Servers. The Secure column of all the servers that were suspended should be set to YES and press Enter. iSecurity Modules Installation Guide 33 Screen Enter STRSCN from the command line to start Screen. 2. Select 41. Activation in the Screen main menu. The Activation menu appears. 3. Selecting 1. Activate Screen Now in the Activation menu. 1. Password NOTE: You can skip this procedure if Firewall has already been deactivated. Enter STRPWD from the command line to start Password. 2. Select 1. Activate CHGPWD Validation in the Password main menu. The Modify Server Security screen appears. 3. Type 1 in the Enable validity checking field and press Enter. Do not change any other parameters. 1. Audit/Action Enter STRAUD from the command line to start Audit. 2. To activate both Audit and Action simultaneously, select 2. Activation from the Audit main menu. The Activation menu appears. 3. Select 1. Activate ZAUDIT subsystem in the Activation menu. 1. NOTE: All functions that use the ZAUDIT subsystem will also be activated. To check which functions are affected, select 5. Auto start activities in ZAUDIT in the Configuration menu. NOTE: When reactivating Audit after an upgrade, take into consideration that all activity that took place during the upgrade will be written immediately to the Audit log files. This could have an adverse affect on performance. You might want to wait until a time of low system activity to perform the reactivation. iSecurity Modules Installation Guide 34 Chapter 1: Capture Enter STRCPT from the command line to start Capture. 2. Select 11. Activation in the Capture main screen. 3. Select 1. Activate Capture Now in the Activation screen. 1. Anti-Virus Enter STRAV from the command line to start Anti-Virus. 2. Select 11. IFS Viruses, Worms and Trojans in the Anti-Virus main menu The menu IFS Viruses, Worms and Trojans appears. 3. Select 1. Activation in the IFS Viruses, Worms and Trojans menu. The Activation menu appears. 4. Select 1. Activate Real-Time Detection in the Activation menu. 1. AP-Journal Enter STRJR from the command line to start AP-Journal. 2. Select 11. Applications, BizAlerts from the AP-Journal main menu. The Applications, BizAlerts - Definitions menu appear. 3. Select 11. Activation from the Applications, BizAlerts - Definitions menu. The Collection to Containers menu appears. 4. Select 1. Activate Real-Time Journal Collection from the Collection to Containers menu. 1. Authority on Demand Enter STRAOD from the command line to start Authority on Demand. 2. Select 11. Activation from the Authority on Demand main screen. The Activation menu appears. 3. Select 1. Activate ZAUTH subsystem. 1. iSecurity Modules Installation Guide 35 Product Specific Actions Where relevant, perform the following product specific actions. Audit If you installed Audit as a pre-requisite for other modules (that is, you will not be working with Audit and you do not have an authorization code for Audit), do the following: Enter STRAUD from the command line to start Audit. 2. Select 81. System Configuration from the Audit main menu. The iSecurity/ Base System Configuration menu appears. 3. Press Enter. The Audit main menu appears. 4. Press F3 to exit from Audit. 1. Screen If you will be working with Screen in stand alone mode, you should run the following command to remove the Firewall auto start job entry: RMVAJE SBSD(QSYS/QSYSWRK) JOB(GS#FIREWAL) iSecurity Modules Installation Guide 36 Chapter 1: Password Reset Password Reset has an option for users to reset their IBM i passwords on a web browser. They do this by accessing a web application. To install the web application, perform the following: In the extracted installation directory, locate the pr.war file. 2. Deploy the pr.war file to any Java Application Server (such as Tomcat, WebSphere, and so on) on your network. The Server must run JVM version 6 or higher. 3. In any text editor, open the web.xml file in the WEB-INF directory and do the following: a. In the JDBC URL parameter of the file, enter the host name and IP address of the IBM i where Password Reset is installed, and the ID and Password of the owner of Password Reset. For example: <init-param> 1. <description>JDBC URL</description> <param-name>jdbcUrl</param-name> <paramvalue>jdbc:host:IPaddress;naming=system;prompt=false;errors=full;date format=iso;translate binary=true;user=user;password=password</paramvalue> </init-param> iSecurity Modules Installation Guide 37 b. In the Questions Plugin Config, Crypt Plugin Config, IInitialQuestionsPlugin Config, and IInitialAnswersCheckerPlugin Config sections of the file, enter the IP address of the IBM i where Password Reset is installed, and the ID and Password of the owner of Password Reset For example: <init-param> <description>Questions Plugin Config</description> <param-name>questionsPluginConfig</param-name> <param-value>IPaddress,User,Password</param-value> </init-param> c. Save and close the file. 4. Ensure that all users know the URL to access this option. The URL will be in the format http://<serverName>:<portNumber>/pr (for example, http:// localhost:8080/pr). Instructions for using the web application can be found in the Password Reset User Guide. iSecurity Modules Installation Guide 38 Chapter 1: Libraries and Special Users For each product that you install, specific product libraries are installed and special user profiles, authorization lists, and Job Schedule Entries are created. Special Users Authorization Job Schedule Lists Entries SMZ4 SMZ4DTA /iSecurity /Smz4 /snmp SECURITY2P SECURITY1P AU#MNT AU@DAILY AU@DAILYGU AU@DAILYHT Anti-Virus SMZV SMZVDTA /smzvdta /snmp SECURITY5P SECURITY5P AV$UPDDFN AV#MNT AV@NTV AP-Journal SECURITY4P SMZJ SMZJDTA SMZJcmbol SMZJyymmdd, where yymmdd is the date the library was created for reports. SECURITY4P JR#MNT JR@DAILY Audit SMZ4 SMZ4DTA /iSecurity /Smz4 /snmp SECURITY2P SECURITY1P AU#MNT AU@DAILY AU@DAILYGU AU@DAILYHT Authority on SMZO Demand SMZODTA SECURITY8P FORGOT SECURITY8P OD#MNT OD@RMVEM Capture SECURITY7P SECURITY7P CP#MNT Product Libraries Action iSecurity Modules Installation Guide SMZC SMZCDTA 39 Special Users Authorization Job Schedule Lists Entries Product Libraries Change Tracker SECURITYTP SECURITYTP SMZT SMZTDTA SMZTyymmdd, where yymmdd is the date the library was created for reports. Command SMZ8 SMZTMPA SMZTMPB SMZTMPC SECURITY1P DB-Gate SMZB SMZBDTA SECURITYBP Firewall SMZ8 SMZ8SYS SMZTMPA SMZTMPB SMZTMPC /smz8 /snmp SECURITY1P SECURITY1P GS#MNT GS@DAILY GS@DAILYGU GS@DAILYHT Password SMZ8 SMZTMPA SMZTMPB SMZTMPC SECURITY1P SECURITY1P GS#MNT GS@DAILY GS@DAILYGU GS@DAILYHT Password Reset SMZO SMZODTA SECURITY8P FORGOT SECURITY8P OD#MNT OD@RMVEM Screen SMZ8 SMZTMPA SMZTMPB SMZTMPC SECURITY1P SECURITY1P GS#MNT GS@DAILY GS@DAILYGU GS@DAILYHT SECURITY1P CT#MNT GS#MNT GS@DAILY GS@DAILYGU GS@DAILYHT DB#MNT When you run xxQRY, where xx is the product name, library SMZRyymmdd is created, where yymmdd is the date the library was created for reports. iSecurity Modules Installation Guide 40 Chapter 1: Comments We hope you found this guide informative; your comments are important to us. Raz-Lee Security wants its user manuals to be as helpful as possible; please send your comments about this user manual to [email protected]. iSecurity Modules Installation Guide 41