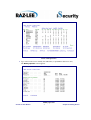
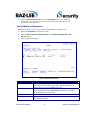
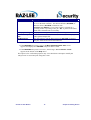
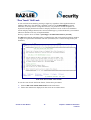
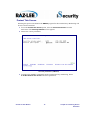
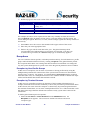
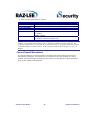
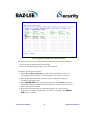
1
Screen TM The Terminal Screen Protection Component of iSecurity User Manual Version 14 Screen 14 User Manual Copyright Notice © Copyright Raz-Lee Security Inc. All rights reserved. This document is provided by Raz-Lee Security for information purposes only. Raz-Lee Security© is a registered trademark of Raz-Lee Security Inc. Action, System Control, User Management, Assessment, Firewall, Screen, Password, Audit, Capture, View, Visualizer, FileScope, Anti-Virus, AP-Journal © are trademarks of Raz-Lee Security Inc. Other brand and product names are trademarks or registered trademarks of the respective holders. Microsoft Windows© is a registered trademark of the Microsoft Corporation. Adobe Acrobat© is a registered trademark of Adobe Systems Incorporated. Information in this document is subject to change without any prior notice. The software described in this document is provided under Raz-Lee’s license agreement. This document may be used only in accordance with the terms of the license agreement. The software may be used only with accordance with the license agreement purchased by the user. No part of this document may be reproduced or retransmitted in any form or by any means, whether electronically or mechanically, including, but not limited to: photocopying, recording, or information recording and retrieval systems, without written permission given by Raz-Lee Security Inc. Visit our website at http://www.razlee.com . Record your Product Authorization Code Here: Computer Model: Serial Number: Authorization Code: Screen 14 User Manual 2 About This Manual About This Manual Who Should Read This Book This user guide is intended for system administrators and security administrators responsible for the implementation and management of security on System i systems. However, any user with a basic knowledge of System i operations will be able to make full use of this product after reading this book. Product Documentation Overview Raz-Lee takes customer satisfaction seriously. Our products are designed for ease of use by personnel at all skill levels, especially those with minimal System i experience. The documentation package includes a variety of materials to get you up to speed with this software quickly and effectively. Printed Materials This user guide is the only printed documentation necessary for understanding Screen. It is available in user-friendly PDF format and may be displayed or printed using Adobe Acrobat Reader version 4.0 or higher. Acrobat Reader is included on the product CD-ROM. Screen includes a single user guide that covers the following topics: Introduction Installation Start-up and Initial Configuration Using Screen This manual contains concise explanations of the various product features as well as step-bystep instructions for using and configuring the product. On-Line Help System i context sensitive help is available at any time by pressing the F1 key. A help window appears containing explanatory text that relates to the function or option currently in use. On-Line help will shortly be available in Windows help format for viewing on a PC with terminal emulation. Screen 14 User Manual About This Manual Typography Conventions Menu options, field names, and function key names are written in Sans-Serif Bold. References to chapters or sections are written in Italic. OS/400 commands and system messages are written in Bold Italic. Key combinations are separated by a dash, for example: Shift-Tab. Emphasis is written in Times New Roman bold. Screen 14 User Manual 4 About This Manual TOC Table of Contents ABOUT THIS MANUAL .............................................................................................................................3 WHO SHOULD READ THIS BOOK..................................................................................................................3 PRODUCT DOCUMENTATION OVERVIEW ......................................................................................................3 Printed Materials ....................................................................................................................................3 On-Line Help...........................................................................................................................................3 TYPOGRAPHY CONVENTIONS .......................................................................................................................4 CHAPTER 1: INTRODUCTION TO SCREEN ........................................................................................1 KEY FEATURES ............................................................................................................................................2 NATIVE OS/400 TEXT BASED USER INTERFACE ..........................................................................................2 MENUS .........................................................................................................................................................2 DATA ENTRY SCREENS ................................................................................................................................3 Function Keys..........................................................................................................................................3 WHAT’S NEW IN SCREEN 12.3 .....................................................................................................................3 CHAPTER 2: STARTING SCREEN ..........................................................................................................5 CHANGING THE PASSWORD ..........................................................................................................................5 MODIFYING OPERATORS’ AUTHORITIES ......................................................................................................6 ACTIVATION PROCEDURES ...........................................................................................................................8 DE-ACTIVATE MONITOR ..............................................................................................................................9 MANUAL ACTIVATION .................................................................................................................................9 AUTO ENABLE AFTER RUNNING A COMMAND .............................................................................................9 ENABLING PROTECTION FOR TERMINAL SCREENS .....................................................................................10 VERIFY MONITOR SUBSYSTEM ..................................................................................................................11 CHAPTER 3: ADDITIONAL ACTIVATION FEATURES ...................................................................13 SELF LOCK .................................................................................................................................................13 “ONE TOUCH” SELF LOCK .........................................................................................................................14 CHAPTER 4: CONTROLLING SCREEN ACTIVATION....................................................................15 ENABLING & DISABLING PROTECTION GLOBALLY ....................................................................................15 PROTECT THIS SCREEN ..............................................................................................................................16 CHAPTER 5: DEFINITIONS....................................................................................................................17 WORKING WITH TIMEOUT PERIODS ...........................................................................................................18 EXCEPTIONS ...............................................................................................................................................19 Exception by User/Profile Groups ........................................................................................................19 Exception by Terminal Screens .............................................................................................................19 FORCED SIGNOFF EXCEPTIONS...................................................................................................................20 PASSWORD .................................................................................................................................................22 Individual User......................................................................................................................................22 Groups of Users ....................................................................................................................................22 Password Subsystem..............................................................................................................................23 CHAPTER 6: WORKING WITH REPORTS/QUERIES.......................................................................24 CHAPTER 7: SYSTEM CONFIGURATION ..........................................................................................26 SCREEN GENERAL DEFINITIONS .................................................................................................................26 Screen 14 User Manual About This Manual TRANSLATION ............................................................................................................................................28 CHAPTER 8: IMPLEMENTATION ........................................................................................................30 ADDING THE GRINIT COMMAND IN THE INITIAL PROGRAM .....................................................................30 FORCING GRINIT TO RUN FOR ALL JOBS ..................................................................................................30 Screen 14 User Manual 6 About This Manual 1 Chapter 1: Introduction to Screen Screen is a terminal screen security product that protects unattended terminals, including PCs running terminal emulation software, from unauthorized use. Unattended terminals provide a tempting opportunity, even for honest employees, to “play” with programs and data that they are otherwise prevented from using. Such activity is often considered to be harmless, but in fact, can result in catastrophic damage to critical databases or theft of confidential information. Unauthorized terminal abuse is very difficult to detect or prevent because the actual transaction source cannot be readily identified. Screen protects unattended terminals by automatically locking them after a specified period of inactivity. Locked terminal screens are released when the user, his supervisor or the security officer enters a valid password. If a locked terminal is not released within a specified period that terminal session may be automatically ended. Time-out periods may be defined according to variable criteria such as date, time of day or user profile. Screen provides centralized control over the locking of unattended terminal screens, time-out definition for individual terminals and release passwords. Protection may be individually enabled or disabled for specific users and terminals. Time-out periods can also be individually specified for specific users and terminals. Screen enables a user to quickly lock his own screen in order to protect confidential data displays from prying eyes. NOTE: This product works for Interactive jobs (INT) Screen 14 User Manual Chapter 1: Introduction to Screen Key Features Easy-to-use for non-technical system administrators Centralized screen protection control Adjustable time-outs based on user profile, terminal and time of day Optional forced SIGNOFF if a terminal is not released within the designated time Definable exceptions to forced SIGNOFF based on active program Protects pass-through sessions – optional use of host or target system password Centralized control over screen release passwords Auto-Dim (screen saver) option for PCs running terminal emulation “Self-Lock” manual locking for quick screen blanking “One Touch” option locks terminal by pressing programmable hot key IBM Operations Navigator Plugin Native OS/400 Text Based User Interface Screen is designed from the ground up to be a user-friendly product for auditors, managers, security personnel and system administrators. The user interface follows standard System i CUA conventions. All product features are available via the menus, so you are never required to memorize arcane commands. Many features are also accessible via the command line, for the convenience of experienced users. Menus Product menus allow easy access to all features with a minimum of keystrokes. Menu option numbering and terminology is consistent throughout this product and with other Raz-Lee products. To select a menu option, simply type the option number and press Enter. The command line is available from nearly all product menus. If the command line does not appear (and your user profile allows use of the command line), press F10 to display it. Screen 14 User Manual 2 Chapter 1: Introduction to Screen Data Entry Screens Data entry screens include many convenient features such as: Pop-up selection windows Convenient option prompts Easy-to-read descriptions and explanatory text for all parameters and options Search and filtering with generic text support The following describes the various data entry screen options. To enter data in a field, type the desired text and then press Enter or Field Exit. To move from one field to another without changing the contents, press the Tab or Shift-Tab keys. To view options for a data field together with an explanation press F4. To accept the data displayed on the screen and continue, press Enter. Function Keys The following function keys may appear on data entry screens: Function Key F1 – Help F3 – Exit F4 – Prompt F6 – Add New F8 – Print F9 – Retrieve F12 – Cancel Description Display context sensitive help End the current task and return to the screen or menu from which the task was initiated Display a list of valid options for the current field or command For certain data items, a pop-up selection window appears Create a new record or data item Print the current report or data item Retrieve the previously entered command Return to the previous screen or menu without updating What’s New in Screen 12.3 There are new features in the Activation menu (Opt 41. Activation). These features are AutoEnable After Running a Command, options 21 and 22. The following new features are common to Firewall, Screen, and Password. The Uninstallation process has been modified, and can now be executed from outside the product only. Opt 82 > 91 provides a special notification screen with all the needed instructions. In addition, the following objects are now deleted during the Uninstallation process: Commands from QGPL The SMZ8SYS special library Screen 14 User Manual 3 Chapter 1: Introduction to Screen The SMZ8JRND special journaling library There is a new feature in 82. Maintenance Menu. These are options 71, 72, and 79, all related to Journal files. The 59. PRINT1-PRINT9 Setup feature in the Maintenance Menu has been modified. Screen 14 User Manual 4 Chapter 1: Introduction to Screen 2 Chapter 2: Starting Screen A system administrator with *SECADM special authority must logon in order to globally control terminal screens or to configure the product. Any user may start Screen in order to enable or disable protection for his own terminal screen or to change his screen release password. To start Screen, type STRSEC in the command line. The main menu appears as below. Screen Main Menu Changing the Password An additional, product specific password may be required to access certain features. The default password is QSECOFR. It is highly recommended that you change this password immediately after using the product for the first time. To change the product specific password: 1. Select 81. System Configuration from the main menu. 2. Select 92. Modify Password from Global Parameters menu. 3. Type the new password and confirmation in the spaces provided. Screen 14 User Manual Chapter 2: Starting Screen Modifying Operators’ Authorities The Operators’ authorities management is now maintained in one place for the entire iSecurity on all its modules. There are three default groups: *AUD#SECAD- All users with both *AUDIT and *SECADM special authorities. By default, this group has full access (Read and Write) to all iSecurity components. *AUDIT- All users with *AUDIT special authority. By default, this group has only Read authority to Audit. *SECADM- All users with *SECADM special authority- By default, this group has only Read authority to Firewall. By default, all three groups use the same password (QSECOFR). You may add more operators, delete them, and give them authorities and passwords according to your own judgment. You even have the option to make the new operators’ definitions apply to all your systems; therefore, upon import, they will work on every system. NOTE: When upgrading for the first time to iSecurity, certain user(s) might not have access according to the new authority method. Therefore, the first step you need to take after upgrading is to edit those authorities. To modify operators’ authorities, follow this procedure. 1. Select 82. Maintenance Menu from the main menu. The Maintenance Menu appears. 2. Select 11. Work with Operators from the Maintenance Menu. The Work with Operators screen appears. Screen 14 User Manual 6 Chapter 2: Starting Screen Work with Operators 3. Type 1 next to the user to modify his authorities (or press F6 to add a new user). The Modify Operator screen appears. Modify Operator Screen 14 User Manual 7 Chapter 2: Starting Screen Option Description Password Name = Password Same = Same as previous password when edited Blank = No password 1 = *USE Read authority only 9 = *FULL Read and Write authority 4. Set authorities and press Enter. Activation Procedures The Start Monitor loads the global parameters used to periodically scan the terminals and starts the monitoring process. Screen uses a subsystem called ZGUARD to continuously monitor terminal screens. When ZGUARD is active, all terminal screens are protected. When using Screen for the first time, perform the following steps in to activate Screen monitoring. 1. Select 41. Activation from the main screen. The Activation screen appears. Activation 2. Select 11. Enable Screen – All Screens from the Activation menu and specify the subsystem in which interactive jobs run. This is normally QINTER or QBASE. If more than one such subsystem is used, repeat this step for each interactive subsystem. Screen 14 User Manual 8 Chapter 2: Starting Screen 3. All terminal screens will be protected automatically immediately upon sign on. 4. Select 13. Activate at IPL from the Global Activation menu. This step automatically activates Screen after each IPL. 5. Define timetable parameters as described in this guide. 6. Select option 21 to add rules for auto-enable screen protection after running a command 7. Select 1. Activate Screen Now from the Activation menu. This final step ensures that every terminal screen that was already signed when Step 1 was performed is now protected. De-activate Monitor This option stops the ZGUARD Subsystem and ends the terminal monitoring by Screen. NOTE: It is recommended to restart the system once a week (Enable and Disable Screen). This action causes a temporary pause in the activity of the control system. By performing this action, the system is reactivated using the current settings of the System Global Parameters. This is essential if there have been changes made to the parameter file that determine the mode of operation of the control system. To stop Screen monitoring, perform the following steps. 1. Select 41. Activation from the main screen. The Activation screen appears. 2. Select 11. Disable Screen – All Screens from the Activation menu and specify the subsystem in which interactive jobs run. If more than one such subsystem is used, repeat this step for each interactive subsystem. 3. All terminal screens protection will be disabled. 4. Select 14. Do Not Activate at IPL from the Global Activation menu. 5. Select option 22 to remove rules for auto-enable screen protection after running a command 6. Select 2. De-activate Screen Now from the Activation menu. Manual Activation You may configure the monitor subsystem to start automatically on IPL, or you may manually start and stop it. To automatically start the monitor subsystem, select 13. Activate at IPL. To prevent the monitor subsystem from automatically starting, select 14. Do Not Activate at IPL. To manually start the monitor subsystem, select 1. Activate Screen Now. To manually stop the monitor subsystem, select 2. De-activate Screen Now. Auto Enable after Running a Command Screen 14 User Manual 9 Chapter 2: Starting Screen You may also configure the monitor subsystem to start automatically after a specific command was executed To start the monitor subsystem, select option 21. Add. Type a name and the command that will execute the screen protection. Add Command Extension To stop the monitor subsystem from automatically starting, select 22. Remove. Type the command name to remove from the automatic screen protection. To manually start the monitor subsystem, select 1. Activate Screen Now. To manually stop the monitor subsystem, select 2. De-activate Screen Now. Enabling Protection for Terminal Screens Each user may enable or disable protection for his own terminal Screen. This is normally done for test purposes only. To manually enable protection for one’s own terminal screen, select 1. Protect this Screen from the main menu. To disable protection for one’s own terminal screen, select 2. Do Not Protect this Screen. The system administrator can globally enable and disable protection for all terminal screens. To globally enable all terminal screens, perform the following procedures: 1. Select 41. Activation from the main menu. 2. Select 11. Enable Screen – All Screens from the Global Activation menu. Screen 14 User Manual 10 Chapter 2: Starting Screen 3. Select 1. Activate Screen Now from the Activation menu. This final step ensures that every terminal screen that was already signed when Step 1 was performed is now protected. Verify Monitor Subsystem This function allows you to verify whether the ZGUARD is currently active. 1. Select 41. Activation from the main menu. 2. Select 5. Work with Active Monitor Jobs. The Work with Subsystem Jobs Screen appears. 3. Enter your desired options. Work with Subsystem Jobs Options Description 2=Change Runs the Change Job (CHGJOB) command. If no value is specified on the Parameters input field, default parameters are shown when you press the F4 (prompt) key. Hold the job. The job's spooled files are not held unless the default for the Hold spooled files (SPLFILE) parameter is overridden using the Parameter's input field Runs the End Job (ENDJOB) command. 3=Hold 4=End 5=Work with Screen 14 User Manual Runs the Work with Job (WRKJOB) command, which displays the Work with Job Menu. 11 Chapter 2: Starting Screen Options Description 6=Release 7=Display message Runs the Release Job (RLSJOB) command, which releases the job if it is in the held condition. The Release Reader (RLSRDR) or Release Writer (RLSWTR) command (with OPTION(*CURRENT)) is run if this option is selected for a spooling reader or spooling writer job. 'Rls' is placed in the status field if the command runs successfully. Displays the message for which the job is waiting. 8=Work with spooled files Runs the Work with Job (WRKJOB) command, which displays the job's spooled output files. 13=Disconnect Use this option to run the Disconnect Job (DSCJOB) command. All jobs at the device will be disconnected. If the ZGUARD subsystem is active, the Work with Subsystem Jobs screen appears and displays the ZGUARD subsystem and its status. If the ZGUARD subsystem is not active, the message “Screen monitor closed” appears at the bottom of the Help menu. This option is for verification purposes only. You should never attempt to modify the subsystem or its associated jobs using this screen. Screen 14 User Manual 12 Chapter 2: Starting Screen 3 Chapter 3: Additional Activation Features Self Lock Very often a terminal user will need to leave the workstation for a short while, and it is inefficient and time-consuming to ask the user to sign off and on for each occasion. The Self Lock feature of Screen provides an easy yet comprehensive method for locking the user terminal. When locking the terminal, the user can specify the maximum duration he expects to be away from his machine. Should he be absent longer, the terminal’s job automatically ends. Screen - LOCK this screen (GRLOCK) To use the Self Lock feature, follow these procedures. 1. Select option 3. Self Lock from the main screen (alternately, type GRLOCK in the command line). The GRLOCK screen appears. 2. Enter the timeout period in minutes or keep the default setting of *NOMAX. 3. Press Enter to confirm you choice. Your terminal is now locked. To end the lock state, and restore the original display, enter the password you used to log onto the system. Screen 14 User Manual Chapter 3: Additional Activation Features “One Touch” Self Lock A user can lock his terminal by pressing a single key regardless of the application that is running at that time. This function is enabled via the use of the Record/Play keyboard functions, or hot-key macros. Using these macros, it is possible to record a sequence of keystrokes and play them back whenever the play function is used. As the exact method to record and play changes between the various terminal types, you should look in your terminal manual to find the exact way of implementation. The key sequence to be recorded is [SYS.REQ] 5 999 SMZTMPA/GRSLFL [ENTER] The 999 states that the maximum delay is unlimited, the 999 can be replaced with any number (3 digits) to represent the maximum wait time (in minutes) for a release attempt, before job terminates. Lock Your Screen with “One Touch” To use the “One Touch” Self Lock feature, follow these procedures. 1. Select 4. Set “One Touch” Self Lock from the main menu. 2. Follow the instructions displayed on the screen to record the macro. Screen 14 User Manual 14 Chapter 3: Additional Activation Features 4 Chapter 4: Controlling Screen Activation Enabling & Disabling Protection Globally The system administrator can globally enable and disable protection for all terminal screens. To globally enable all terminal screens, perform the following steps in order: 1. Select 41. Activation from the main menu. The Activation screen appears. 2. Select 11. Enable Screen – All Screens from the Global Activation menu. The Wide/Guard Initiation-Default (GRINITDFT)screen appears. Wide/Guard Initiation-Default (GRINITDFT) 3. Select 1. Activate Screen Now from the Activation menu. This second step ensures that every terminal screen that was already signed when Step 1 was performed is now protected. To globally disable protection for all terminal screens: 1. Select 12. Disable Screen – All Screens from the Activation menu. The Wide/Guard Initiation-Default (GRINITDFT) screen appears. 2. Select 1. De-activate Screen Now from the Activation menu. Screen 14 User Manual Chapter 4: Controlling Screen Activation Protect This Screen Selecting this option will initialize the GRINIT program for this terminal only. Monitoring will be active for this terminal. 1. To use the Protect this Screen option, select 1. Protect this Screen from the main menu. The iSecurity Initiation screen appears. 2. Choose the correct parameters. iSecurity Initiation (GRINIT) 3. To disable the GRINIT command from the terminal and stop monitoring, Select 2. Do Not Protect This Screen and select parameters. Screen 14 User Manual 16 Chapter 4: Controlling Screen Activation 5 Chapter 5: Definitions This section deals with defining your terminal security. The topics that are addressed are: Time Table Exceptions ENDJOB exceptions Password Screen protection is based on global timeout periods, which may then be customized for individual terminal screens, users and specific jobs running in a terminal session. Protection may be disabled for individual screens and users. To work with terminal screen protection parameters, select 21. Time-Out Definitions from the main menu. The Definitions menu appears. Definitions Screen 14 User Manual Chapter 5: Definitions Working with Timeout Periods Screen uses a calendar to assign global timeout periods for specific dates. These global timeout periods are for screen locking and password entry. Since the demands on the security system change according to the type of day (work day, weekend, half day, vacation day, etc) and according to the time of day (during working hours, after work hours, night hours), you may define different timeout periods based on these parameters. The system contains an annual diary in which the days can be characterized. Each type of day is defined by one character chosen by the user. This character needs to be entered in the appropriate position in the internal calendar (press F14 to update this) and in the timetable, by type of day and hour. The hour that is entered is the beginning of the period. Appropriate characteristics can be defined for each type of day and each time. The way the security system operates is defined by two main parameters: The maximum time a workstation can remain inactive before the security system starts protecting it. The maximum time the security system will wait for a password to be entered. After this time has elapsed the security system will terminate the activity of this workstation. A special value 999 will render this option inoperative. To define global timeout periods, follow these procedures. 1. Select 1. Define Timeout Periods from the Definitions menu. The Timeout Definitions screen appears. Screen Timeout Period Definitions Screen 14 User Manual 18 Chapter 5: Definitions 2. Define day types in the lower section of the screen as follows: Option Description Day type 1 character code representing the day type (weekday, weekend, holiday, etc) 24 hour clock at which these timeout periods take effect Idle time before screen is locked Time allowed to enter password before forced signoff Hour – Hour Lock Timeout Password Timeout For example, the above screen capture shows that every weekday at 16:00, the screen is locked (GRLOCK) after 45 minutes of non-activity. After ten minutes of being locked, the screen undergoes signoff. However, at 17:00, screens undergo signoff after twenty minutes of non-activity. 3. Press F14 to move the cursor to the calendar in the upper section of the screen. 4. Enter the year in the appropriate field. 5. Ender a day type code for each date in the year. The global timeout periods corresponding to the indicated day type will apply for each date. If no day type is entered for a given date, the *DEFAULT day type is automatically applied. Exceptions You can customize timeout periods, or disable protection entirely, for individual users, profile groups and individual terminal screens by creating exceptions to the global timeout periods. The exception tables allow one to change the times that have been defined or to change the way the system should operate in special cases where the general parameters are not suitable. Exception by User/Profile Groups At this level of exceptions, one can enter a User name or Group profile and by using the multiplication parameter the reaction time of the system can be increased or decreased for specific Users or Groups. For instance, it is natural that the QSECOFR should be protected more than other users, so a multiplication factor of 0.5 could be entered so that the time lapse will be half the default time before that terminal is locked. Exception by Terminal Screens At this level we can define exceptions by the name of the Terminal (Workstation). For example, terminals located in areas with many workers may need more protection than others. At the extreme, the room where the computer is situated may be protected against break-in. For terminals located there, we can enter a multiplication factor of 3.0. This means that it will take three times longer than the default time until the security system takes control of the workstation. To define global timeout period exceptions: 1. Select 11. For Users or 12. For Screens from the Definitions menu. An Exception screen appears. The screens are similar for both user and screen exception types. Screen 14 User Manual 19 Chapter 5: Definitions 2. Enter exception parameters as follows: Parameter User Profile Screen Lock Time Factor Pwd Time Factor Protect Active Auto Dim Description User profile or profile group (User exceptions only) OS/400 terminal name (Screen exceptions only) Screen locking timeout multiplier (See note below) Screen release timeout multiplier (See note below) Protection enabled for this screen or user Y = Enable Blank = Disable Enable screen saver Y = Enable – Screen exceptions only NOTE: Timeout factors are expressed as multipliers to the global timeout setting value. For example, if the global timeout setting value is 15 minutes and the exception value is 4, the exception timeout will occur after 60 (15 x 4) minutes. Likewise, if the global timeout setting is 15 minutes and the exception value is .5, the exception timeout will occur after 7½ (15 x .5) minutes. Forced Signoff Exceptions If a locked terminal is not released within a specified period, that terminal session will be automatically terminated. Exceptions may be created to prevent jobs running on a locked terminal from automatically terminating in this manner. Forced signoff exception definitions apply to jobs running on all terminals. Screen 14 User Manual 20 Chapter 5: Definitions Forced Signoff Exceptions for Active Programs An exception may cause one of the following actions to occur for the specified job: Place the job on HOLD without terminating it Run a user specified program prior to the forced signoff To define a forced signoff exception, 1. Select 21. For Active Programs from the Security Definitions menu. The Forced Signoff Exceptions for Active Programs screen appears (see above). 2. Enter the program name in the first field or enter *ALWAYS to apply the exception to all running jobs. 3. Enter *NEVER-END in the second field to place the job on HOLD or enter the name of the program to run before the job terminates. If the second field is left blank, the job will terminate. 4. Enter the name of the library in which the program to be run prior to job termination is located in the third field. This field is left blank if the *NEVEREND option is selected. Screen 14 User Manual 21 Chapter 5: Definitions Password The system administrator can define Screen passwords for individual users from any terminal. Each user is assigned a password for himself, and a second password may be assigned for use by the users’ supervisor. Either password is accepted to release a locked terminal screen. Individual User To set a password for an individual user, perform the following procedures: 1. Select 31.Individual User from the Definitions menu (this is the equivalent to running the command GRCHGPWD). The Change iSecurity Password screen appears. 2. Enter your information in the fields on the screen. Parameter or Option User password User profile name or * Manager Description Specify the internal password assigned to the terminal user. Specify a user profile or name that the password will be associated to. The default (*) is set as the current user. Specify the name of an existing user profile, which has permission to release a locked terminal of a user using the internal password of the product. *SAME – The group user profile does not change *NONE – Any user or group user profile is associated with this user profile. Groups of Users To set a password for multiple users, perform the following procedures: 1. Selecting option 32. Multiple Users from the Definitions menu. The Work with Multiple Passwords screen appears. 2. Enter the correct field in User. Screen 14 User Manual 22 Chapter 5: Definitions Option Name *generic *ALL: Description Specify a user name Display user by generic name. (For example, D* will display all users whose name starts with a ‘D’.) This option is allowed only for the QSECOFR or to member of his user group. Selecting *ALL (the default) will enable all the users of the system to be shown together with their description, their group user and the date of the last password change. The user’s password is not displayed. NOTE: If “Manager” is changed, the password must be reentered. To remove a manager, enter *NONE. Password Subsystem The password system contains a complete set of passwords. The user can update this set of passwords according to the security policy in his unit. The password can be equivalent (or different) to those in the operating system. The passwords are encrypted by a method that does not allow retrieval. Apart from the password one can also define for each user a name of another user that can release him from security system locks. As this is usually the head of the group we will refer to him as the “Manager”. Screen 14 User Manual 23 Chapter 5: Definitions 6 Chapter 6: Working with Reports/Queries The system collects activity information in a log file. The information includes all LOCKS, RELEASES, JOB-END/HELD AFTER LOCKS. For each entry, the time stamp and the results are attached. A reporting system enables the user to produce reports about Screen activity. The available report types can be run in batch or interactive mode. Interactive reports are under the ‘Display Log’ heading, whereas batch reports are under the ‘Print Log’ heading. The output is sent to SMZTMPA/WSPRINT. To work with reports and queries, select 31. Display Log from the main menu. The Display Screen Activity Log appears. Display Screen Activity Log Menu Option All Entries Locks Enforced by Monitor Description This report contains both Enforced Locks as well as JobEnds. This report contains only Enforced Locks. Select one of the following and the Display SCREEN Log (DSPSCLOG) screen appears: Screen 14 User Manual Chapter 6: Working with Reports/Queries Display Screen Log Parameter *LOCKS *EOJ *ALL Name Generic Screen 14 User Manual Description Screen locks made by the terminal End job after lock All reports, dates, or users (depending on where this parameter is placed) User/terminal name Display user/terminal by generic name. (For example, D* will display all users whose name starts with a ‘D’.) 25 Chapter 6: Working with Reports/Queries 7 Chapter 7: System Configuration This option enables you to determine the different modes that the system can operate in, i.e. the amount of time between successive checks, or the number of attempts a user is allowed to enter a password. To set configuration for all the iSecurity Suite products, select 81. System Configuration from the Screen main menu. iSecurity (part I) Global Parameters Screen General Definitions To configure Screen, select 11.General Definitions from the Global Parameters menu. The Screen General Definitions screen appears. Screen 14 User Manual Chapter 7: System Configuration Screen General Definitions Parameter or Option Automatic Dim Screen Number of minutes between checks Maximum Password retries Screen 14 User Manual Description Yes =Activate this feature No = Do not activate this feature If the same information is displayed on a screen for a long period of time, the characters become fixed on the screen and are visible even when the screen is not operated. The data will appear as a dark shadow even when something else is displayed on the screen. Therefore, the auto dimming option is important for workstations that do not have auto dim, such as PCs and older workstations. Workstations with auto dim, but do not use this option can also benefit from it. Setting this option will define how many minutes will pass between successive checks. The default value is 3. Enter the number of retires allowed before the terminal is locked. 0 = The number will be taken automatically from the system value (QMAXSIGN) that defines the number of trials for entering the operating system password. 99 =Unlimited number of trials (*NOMAX) 27 Chapter 7: System Configuration Check Pass-Through previous pwd. Pass-Through terminals (Home to Target) are protected by Screen; on the Target system. The following choices are available for this setting. Y=YES - The lock state can be ended if the entered password corresponds to the SIGNON Home System. N=NO - The lock state can be ended if the entered password corresponds to the SIGNON Target System B=BOTH SYSTEMS - The lock state can be ended if the entered password corresponds to either the SIGNON Target System or the SIGNON Home System. Inform about screens in which GRINIT has not been entered. End job M=Send informative message N=No Internal Password Validation pgm & Library Select the way you wish to extend the control of terminating a job. ENDJOB - End all active jobs (this is the default) VARY OFF - End all jobs then vary off terminal JLDJOB - Hold the active job. There are two passwords in Screen - entered by the user and entered from the product. If the user internal security program is enabled, it will replace the user password by its own password (10 characters) and the Screen password by a system password called GSPASSWORD. If the contents of GSPASSWORD are identical to the Screen password, the user internal security program is run; otherwise an error will occur before the end of the run. *NONE: No user internal security Name: The name of the security program *LIBL (Library): Enter the library name Translation All screen sections that the user sees can be translated. To translate a screen, select option 12. Customize Messages from the System Configuration menu. An example follows. Screen 14 User Manual 28 Chapter 7: System Configuration Screen Translation All visible “constants” and messages are displayed. Overwrite them with your text, clear the field and press ENTER. To translate the help text, follow these procedures on the following page. 1. Create a new member in the GRSOURCE file in library SMZ8. 2. Copy the original help text to it. 3. To translate as required without altering the control records identified by .PGM, .FMT, etc, select 12 from the System Configuration menu and enter the name of the new member at the bottom of the translation panel. Screen 14 User Manual 29 8 Chapter 8: Implementation In order for a terminal to be monitored by the product, the command GRINIT must be run from that terminal. Performing one of the following to do this: Add the GRINIT command to the initial program of the users that you want to protect. Force GRINIT to run for all jobs (no change in any program) Each time a terminal needs to be protected, and GRINIT has not been run, a message is sent to the QSYSOPR. If you want to separate these messages, create a message queue named SCREEN in library QGPL, and the messages will be directed to it automatically. Adding the GRINIT Command in the Initial Program In the initial program of the users that you want to monitor, add the following commands: GRINIT MONMSG CPF0000 These commands should be added so that they will be executed before any screen is displayed. Forcing GRINIT to Run for All Jobs When an interactive program terminal signs on, a specific “routing entry” is selected from an interactive sub-system to execute it. The routing entry specifies which program will have control. That program is almost always QCMD from QSYS. The following procedure will change the program name to another program that will initiate GRINIT and only then will it call QCMD from QSYS. To ensure the insertion of GRINIT for all users, without having to add the GRINIT in all initial programs, the following procedure (designed to prevent possible problems) should be followed, even if the product is no longer installed on the system. The source of program is included in file GRSOURCE, library SMZ8 member GR#44QCMD. The procedure is as follows. 1. Duplicate the GR#QCMD program into QGPL -CRTDUPOBJ GR#QCMD SMZ8 *PGM QGPL 2. Transfer your job to the controlling subsystem - TFRJOB QCTL 3. Ensure no user is using sub-system QINTER - DSPSBS QINTER 4. Terminate the sub-system - ENDSBS QINTER 5. Print the QINTER sub-system description - DSPSBSD QINTER OUTPUT(*PRINT) 6. Look at the note on “routing entries” in the ‘what is happening” section of the previous page. Screen 14 User Manual Chapter 8: Implementation 7. Repeat the following for each line that contains program QCMD library QSYS as the program to get control - QCMID library QSYS as the program to get control CHGRTGE SBSD(QINTER) SEQNBR(number) PGM(QGPL/GR#44QCMD) 8. Start sub-system QINTER - STRSBS QINTER 9. Repeat this procedure for all other interactive subsystems. Parameter or Option Description Opt 1 = Select this rule for modification 3 = Copy this rule for another user 4 = Delete this rule F6 F8 Add new rule Print rules Screen 14 User Manual 31 Chapter 8: Implementation